Lab Guide ISE 1 2 Profiling
39
Lab Overview ISE 1.2 Profiling Lab.docx – Version 1.0.1 Page 1 of 39 Cisco ISE 1.2 Profiling Lab Overview This lab is designed to help attendees understand how to deploy Cisco Identity Services Engine (ISE) focusing on new key profiling features in ISE 1.2. The ISE profiling lab covers how to write policies using logical profiles, how to enable ISE to receive automatic updates from the new feed services and the how to enable profiling probes for wired and wireless devices. The last section covers day-to-day operations, which allows the student to use the new tools such as the Search and Session trace that provide better visibility and troubleshooting. Lab participants should be able to complete the lab within the allotted time of 4 hours. Lab Exercises This lab guide includes the following exercises: • Lab Exercise 2-1: Enable ISE Probes, Verify Profiled Endpoints and Probe information • Lab Exercise 2-2: Enable Device Sensor and SNMP Query Profiles • Lab Exercise 2-3: Create Profiles and Authorization Policies using Logical Profiles • Lab Exercise 2-4: Profile Feed Service configuration with logging and reporting
-
Upload
juliushasan2 -
Category
Documents
-
view
233 -
download
1
Transcript of Lab Guide ISE 1 2 Profiling
8/10/2019 Lab Guide ISE 1 2 Profiling
http://slidepdf.com/reader/full/lab-guide-ise-1-2-profiling 1/39
Lab Overview
ISE 1.2 Profiling Lab.docx – Version 1.0.1 Page 1 of 39
CiscoISE 1.2 Profiling
Lab Overview This lab is designed to help attendees understand how to deploy Cisco Identity Services Engine (ISE)focusing on new key profiling features in ISE 1.2. The ISE profiling lab covers how to write policies usinglogical profiles, how to enable ISE to receive automatic updates from the new feed services and the howto enable profiling probes for wired and wireless devices. The last section covers day-to-day operations,which allows the student to use the new tools such as the Search and Session trace that provide bettervisibility and troubleshooting.
Lab participants should be able to complete the lab within the allotted time of 4 hours.
Lab Exercises This lab guide includes the following exercises:
• Lab Exercise 2-1: Enable ISE Probes, Verify Profiled Endpoints and Probe information• Lab Exercise 2-2: Enable Device Sensor and SNMP Query Profiles• Lab Exercise 2-3: Create Profiles and Authorization Policies using Logical Profiles• Lab Exercise 2-4: Profile Feed Service configuration with logging and reporting

8/10/2019 Lab Guide ISE 1 2 Profiling
http://slidepdf.com/reader/full/lab-guide-ise-1-2-profiling 2/39
Product Overview: ISE
ISE 1.2 Profiling Lab.docx – Version 1.0.1 Page 2 of 39
Product Overview: ISE The Cisco Identity Services Engine (ISE) is an identity and access control policy platform that enablesenterprises to enforce compliance, enhance infrastructure security and streamline their serviceoperations. Its unique architecture allows enterprises to gather real-time contextual information fromnetwork, users and devices to make proactive governance decisions by tying identity back into variousnetwork elements including access switches, wireless controllers, VPN gateways, and datacenterswitches. Cisco Identity Services Engine is a key component of the Cisco Secure Access™ Solution.Cisco ISE allows enterprise users (employees) who wish to adopt the capabilities of their personalfeature-rich smart devices to connect these devices onto an Enterprise network, self-provision and self-manage their devices in a BYOD environment.
Secure Access Lab Topology
8/10/2019 Lab Guide ISE 1 2 Profiling
http://slidepdf.com/reader/full/lab-guide-ise-1-2-profiling 3/39
Secure Access Lab IP Addresses and VLANs
ISE 1.2 Profiling Lab.docx – Version 1.0.1 Page 3 of 39
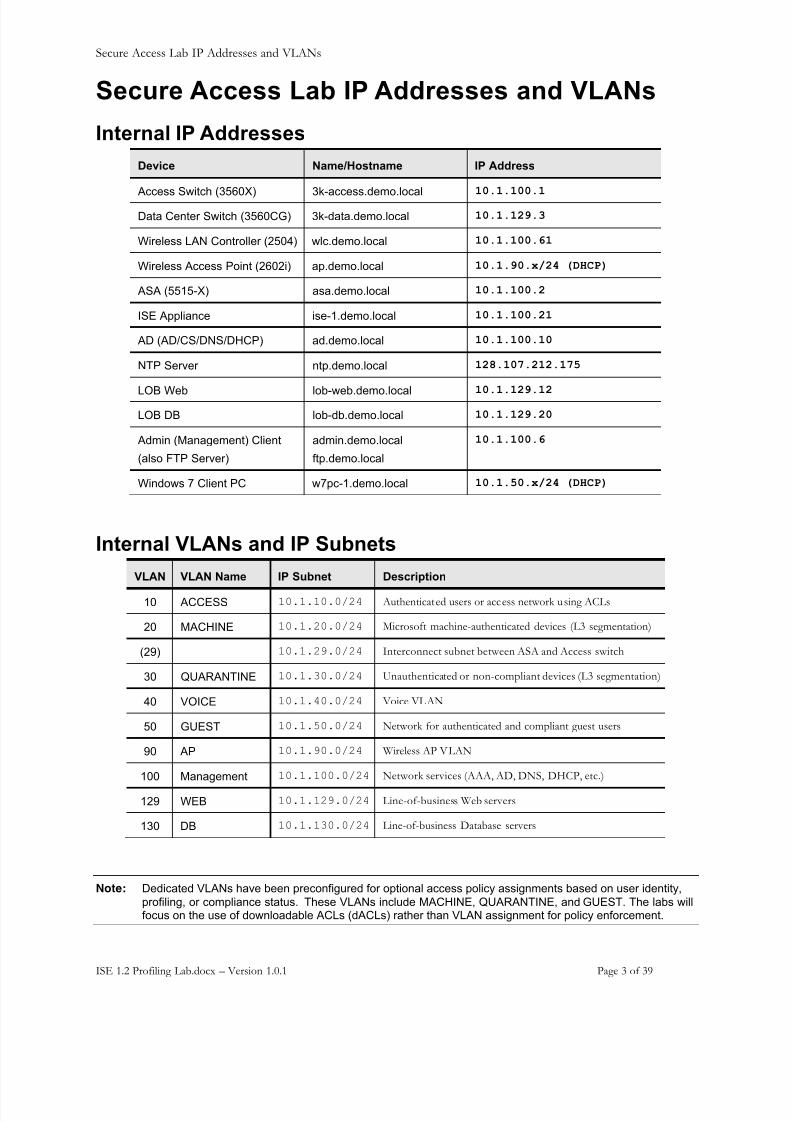
Secure Access Lab IP Addresses and VLANs Internal IP A ddresses
Internal VLANs and IP Subnets
Note: Dedicated VLANs have been preconfigured for optional access policy assignments based on user identity,profiling, or compliance status. These VLANs include MACHINE, QUARANTINE, and GUEST. The labs willfocus on the use of downloadable ACLs (dACLs) rather than VLAN assignment for policy enforcement.
Device Name/Hostname IP Address
Access Switch (3560X) 3k-access.demo.local 10.1.100.1Data Center Switch (3560CG) 3k-data.demo.local 10.1.129.3
Wireless LAN Controller (2504) wlc.demo.local 10.1.100.61
Wireless Access Point (2602i) ap.demo.local 10.1.90.x/24 (DHCP)
ASA (5515-X) asa.demo.local 10.1.100.2
ISE Appliance ise-1.demo.local 10.1.100.21
AD (AD/CS/DNS/DHCP) ad.demo.local 10.1.100.10
NTP Server ntp.demo.local 128.107.212.175
LOB Web lob-web.demo.local 10.1.129.12
LOB DB lob-db.demo.local 10.1.129.20
Admin (Management) Client
(also FTP Server)
admin.demo.local
ftp.demo.local
10.1.100.6
Windows 7 Client PC w7pc-1.demo.local 10.1.50.x/24 (DHCP)
VLAN VLAN Name IP Subnet Description
10 ACCESS 10.1.10.0/24 Authenticated users or access network using ACLs
20 MACHINE 10.1.20.0/24 Microsoft machine-authenticated devices (L3 segmentation)
(29) 10.1.29.0/24 Interconnect subnet between ASA and Access switch
30 QUARANTINE 10.1.30.0/24 Unauthenticated or non-compliant devices (L3 segmentation)
40 VOICE 10.1.40.0/24 Voice VLAN
50 GUEST 10.1.50.0/24 Network for authenticated and compliant guest users
90 AP 10.1.90.0/24 Wireless AP VLAN
100 Management 10.1.100.0/24 Network services (AAA, AD, DNS, DHCP, etc.)
129 WEB 10.1.129.0/24 Line-of-business Web servers
130 DB 10.1.130.0/24 Line-of-business Database servers
8/10/2019 Lab Guide ISE 1 2 Profiling
http://slidepdf.com/reader/full/lab-guide-ise-1-2-profiling 4/39
Secure Access Lab IP Addresses and VLANs
ISE 1.2 Profiling Lab.docx – Version 1.0.1 Page 4 of 39
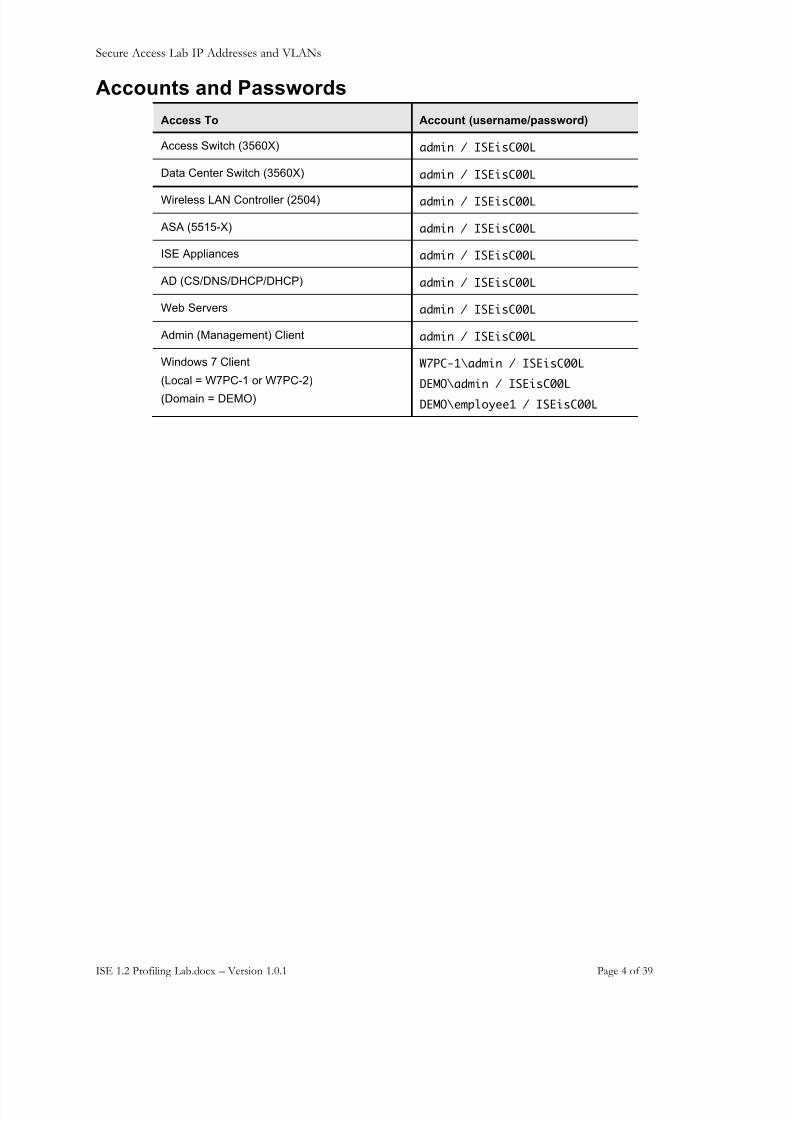
Accounts and Passwords
Access To Account (username/password)
Access Switch (3560X) admin / ISEisC00L
Data Center Switch (3560X) admin / ISEisC00L
Wireless LAN Controller (2504) admin / ISEisC00L
ASA (5515-X) admin / ISEisC00L
ISE Appliances admin / ISEisC00L
AD (CS/DNS/DHCP/DHCP) admin / ISEisC00L
Web Servers admin / ISEisC00L
Admin (Management) Client admin / ISEisC00L
Windows 7 Client
(Local = W7PC-1 or W7PC-2)
(Domain = DEMO)
W7PC-1\admin / ISEisC00L
DEMO\admin / ISEisC00L
DEMO\employee1 / ISEisC00L
8/10/2019 Lab Guide ISE 1 2 Profiling
http://slidepdf.com/reader/full/lab-guide-ise-1-2-profiling 5/39
Pre-Lab Setup Instructions
ISE 1.2 Profiling Lab.docx – Version 1.0.1 Page 5 of 39
Pre -Lab Setup Instructions
Note: To access the lab, you must first connect to the Admin PC. The Admin PC provides a launching point foraccess to all the other lab components.
Note: Admin PC access is through RDP, therefore you must have an RDP client installed on your computer.
Connect ing to Lab Devices Step 1 Launch the Remote Desktop application on your system.
a. Connect to your assigned pod’s Admin PC using Remote Desktop Protocol (RDP) withthe IP Address and password provided by your instructor.
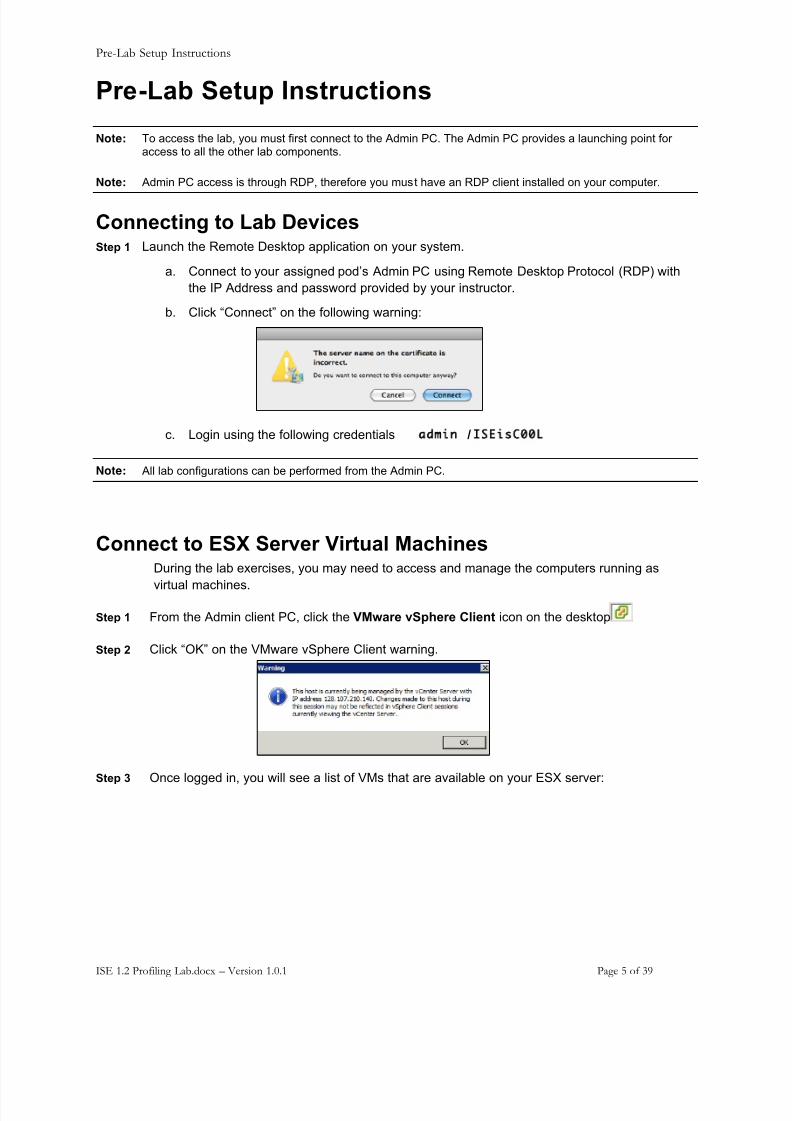
b. Click “Connect” on the following warning:
c. Login using the following credentials admin / ISEisC L
Note: All lab configurations can be performed from the Admin PC.
Connect to ESX Server Virtual Machines During the lab exercises, you may need to access and manage the computers running as
virtual machines.
Step 1 From the Admin client PC, click the VMware vSphere Client icon on the desktop
Step 2 Click “OK” on the VMware vSphere Client warning.
Step 3 Once logged in, you will see a list of VMs that are available on your ESX server:
8/10/2019 Lab Guide ISE 1 2 Profiling
http://slidepdf.com/reader/full/lab-guide-ise-1-2-profiling 6/39
Pre-Lab Setup Instructions
ISE 1.2 Profiling Lab.docx – Version 1.0.1 Page 6 of 39
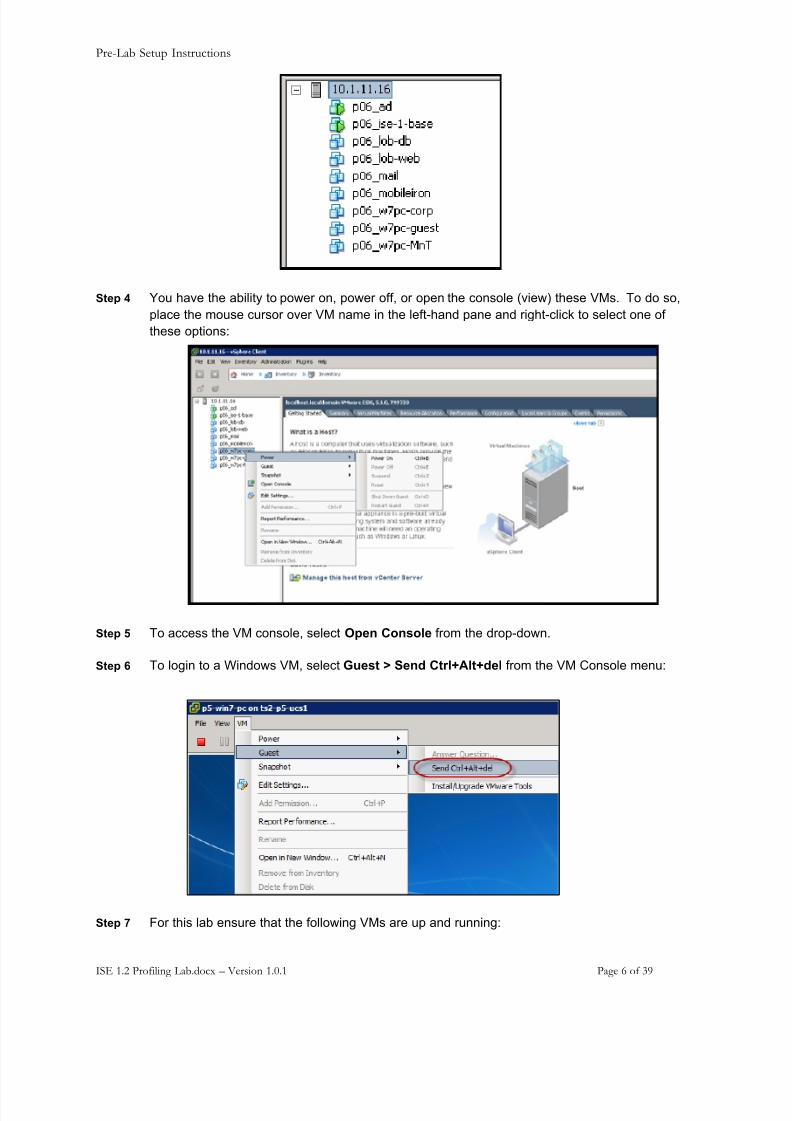
Step 4 You have the ability to power on, power off, or open the console (view) these VMs. To do so,place the mouse cursor over VM name in the left-hand pane and right-click to select one ofthese options:
Step 5 To access the VM console, select Open Console from the drop-down.
Step 6 To login to a Windows VM, select Guest > Send Ctrl+Alt+del from the VM Console menu:
Step 7 For this lab ensure that the following VMs are up and running:
8/10/2019 Lab Guide ISE 1 2 Profiling
http://slidepdf.com/reader/full/lab-guide-ise-1-2-profiling 7/39
Pre-Lab Setup Instructions
ISE 1.2 Profiling Lab.docx – Version 1.0.1 Page 7 of 39
p##_adp##_ise-1-basep##_lob-dbp##_lob-webp##_mailp##_w7pc-corpp##_w7pc-guest
## refers to the pod number that you are assigned by your instructor. For example, POD 2,p##_ad would be p02_ad. Additional VmWare images will be powered up if needed through outthe lab exercises.
Connect to Lab Device ConsolesStep 1 To access the lab switches and ISE servers using SSH:
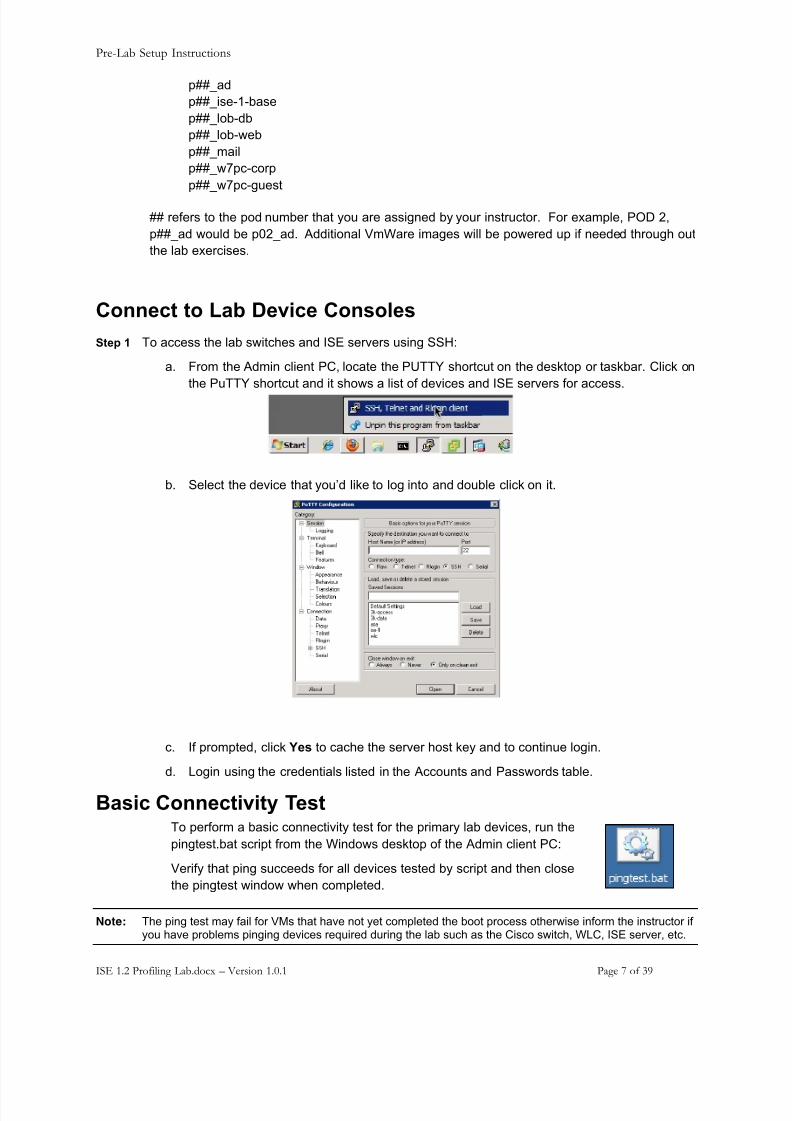
a. From the Admin client PC, locate the PUTTY shortcut on the desktop or taskbar. Click onthe PuTTY shortcut and it shows a list of devices and ISE servers for access.
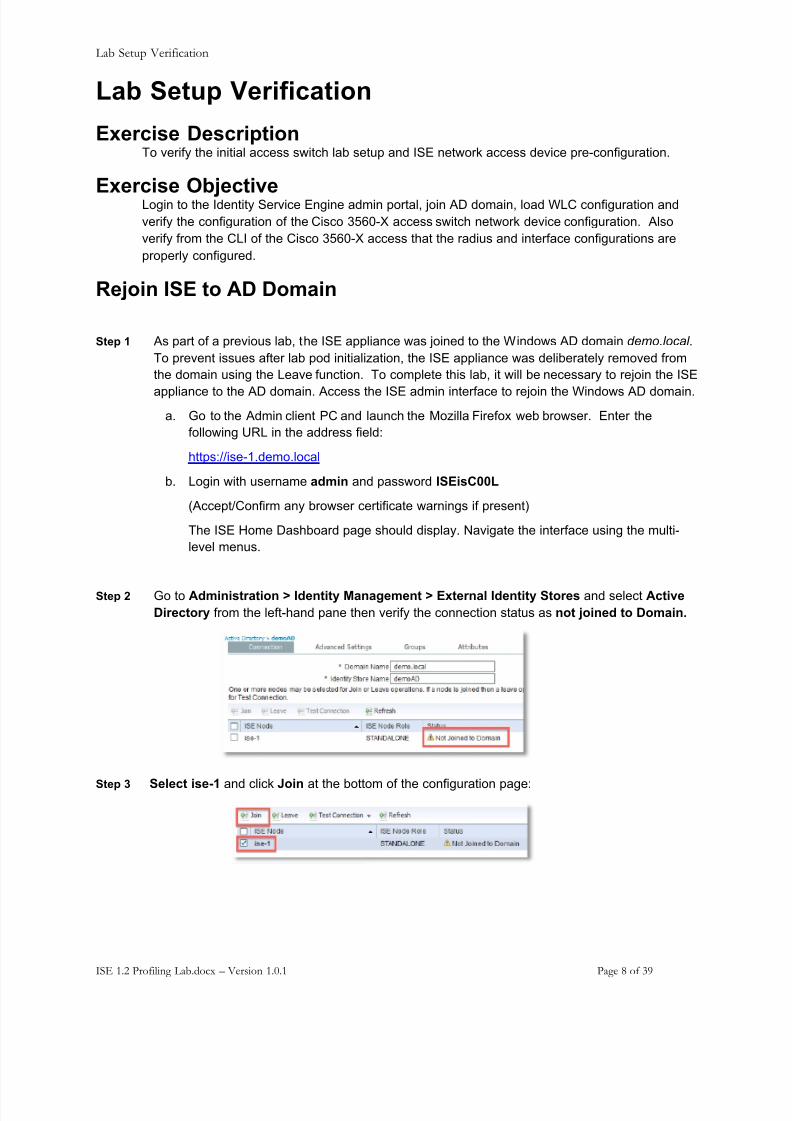
b. Select the device that you’d like to log into and double click on it.
c. If prompted, click Yes to cache the server host key and to continue login.
d. Login using the credentials listed in the Accounts and Passwords table.
Basic Connectivity Test To perform a basic connectivity test for the primary lab devices, run thepingtest.bat script from the Windows desktop of the Admin client PC:
Verify that ping succeeds for all devices tested by script and then closethe pingtest window when completed.
Note: The ping test may fail for VMs that have not yet completed the boot process otherwise inform the instructor ifyou have problems pinging devices required during the lab such as the Cisco switch, WLC, ISE server, etc.
8/10/2019 Lab Guide ISE 1 2 Profiling
http://slidepdf.com/reader/full/lab-guide-ise-1-2-profiling 8/39
Lab Setup Verification
ISE 1.2 Profiling Lab.docx – Version 1.0.1 Page 8 of 39
Lab Setup Verification
Exercise Description To verify the initial access switch lab setup and ISE network access device pre-configuration.
Exercise Objective Login to the Identity Service Engine admin portal, join AD domain, load WLC configuration andverify the configuration of the Cisco 3560-X access switch network device configuration. Alsoverify from the CLI of the Cisco 3560-X access that the radius and interface configurations areproperly configured.
Rejoin ISE to AD Domain
Step 1 As part of a previous lab, the ISE appliance was joined to the Windows AD domain demo.local .To prevent issues after lab pod initialization, the ISE appliance was deliberately removed fromthe domain using the Leave function. To complete this lab, it will be necessary to rejoin the ISE
appliance to the AD domain. Access the ISE admin interface to rejoin the Windows AD domain.a. Go to the Admin client PC and launch the Mozilla Firefox web browser. Enter the
following URL in the address field:
https://ise-1.demo.local
b. Login with username admin and password ISEisC00L
(Accept/Confirm any browser certificate warnings if present)
The ISE Home Dashboard page should display. Navigate the interface using the multi-level menus.
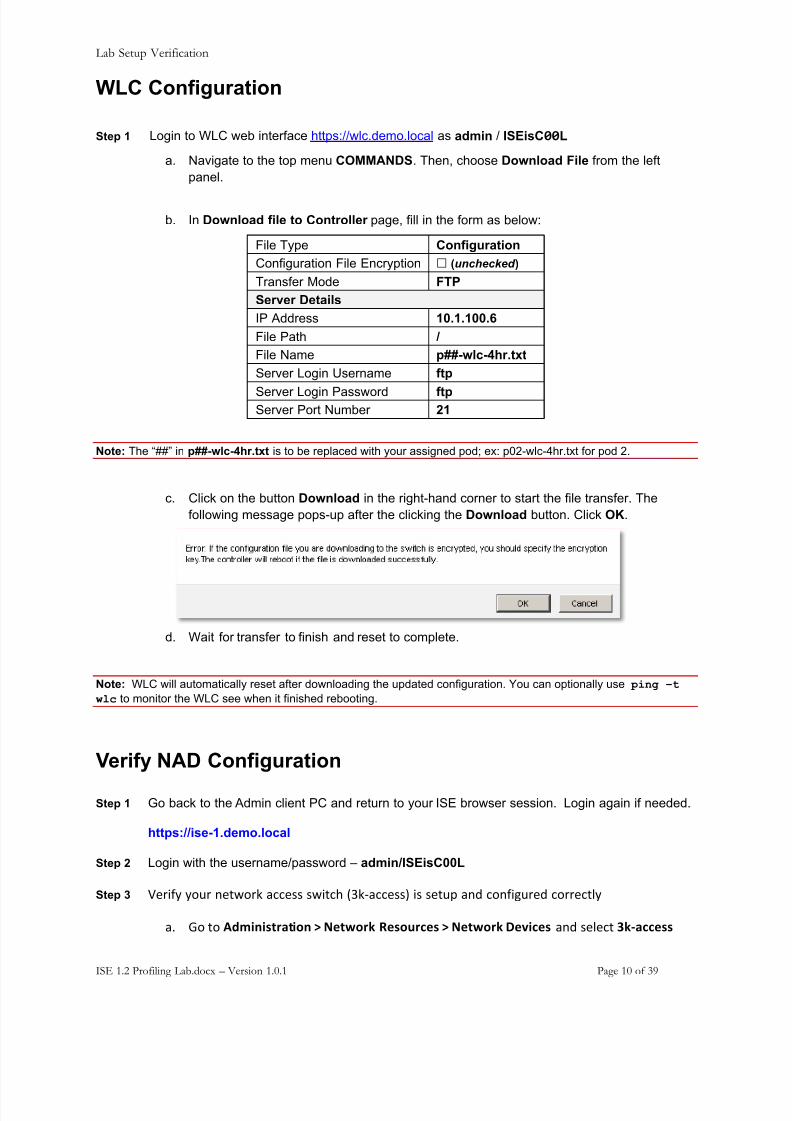
Step 2 Go to Administration > Identity Management > External Identity Stores and select ActiveDirectory from the left-hand pane then verify the connection status as not joined to Domain.
Step 3 Select ise-1 and click Join at the bottom of the configuration page:
8/10/2019 Lab Guide ISE 1 2 Profiling
http://slidepdf.com/reader/full/lab-guide-ise-1-2-profiling 9/39
8/10/2019 Lab Guide ISE 1 2 Profiling
http://slidepdf.com/reader/full/lab-guide-ise-1-2-profiling 10/39
Lab Setup Verification
ISE 1.2 Profiling Lab.docx – Version 1.0.1 Page 10 of 39
WLC Configuration
Step 1 Login to WLC web interface https://wlc.demo.local as admin / ISEisC !! L
a. Navigate to the top menu COMMANDS . Then, choose Download File from the leftpanel.
b. In Download file to Controller page, fill in the form as below:
Note: The “##” in p##-wlc-4hr.txt is to be replaced with your assigned pod; ex: p02-wlc-4hr.txt for pod 2.
c. Click on the button Download in the right-hand corner to start the file transfer. Thefollowing message pops-up after the clicking the Download button. Click OK .
d. Wait for transfer to finish and reset to complete.
Note: WLC will automatically reset after downloading the updated configuration. You can optionally use ping –t wlc to monitor the WLC see when it finished rebooting.
Verify NAD Configuration
Step 1 Go back to the Admin client PC and return to your ISE browser session. Login again if needed.
https://ise-1.demo.local
Step 2 Login with the username/password – admin/ISEisC00L
Step 3 "#$%&' '()$ *#+,($- .//#00 0,%+/1 23-4.//#005 %0 0#+)6 .*7 /(*&%8)$#7 /($$#/+9'
.: ;( +( !"#$%$&'()'$*% , -.'/*(0 1.&*2(3.& , -.'/*(0 4.5$3.& .*7 0#9#/+ 607)33.&&
File Type ConfigurationConfiguration File Encryption ! (unchecked ) Transfer Mode FTPServer DetailsIP Address 10.1.100.6File Path /File Name p##-wlc-4hr.txtServer Login Username ftp
Server Login Password ftpServer Port Number 21
8/10/2019 Lab Guide ISE 1 2 Profiling
http://slidepdf.com/reader/full/lab-guide-ise-1-2-profiling 11/39
Lab Setup Verification
ISE 1.2 Profiling Lab.docx – Version 1.0.1 Page 11 of 39
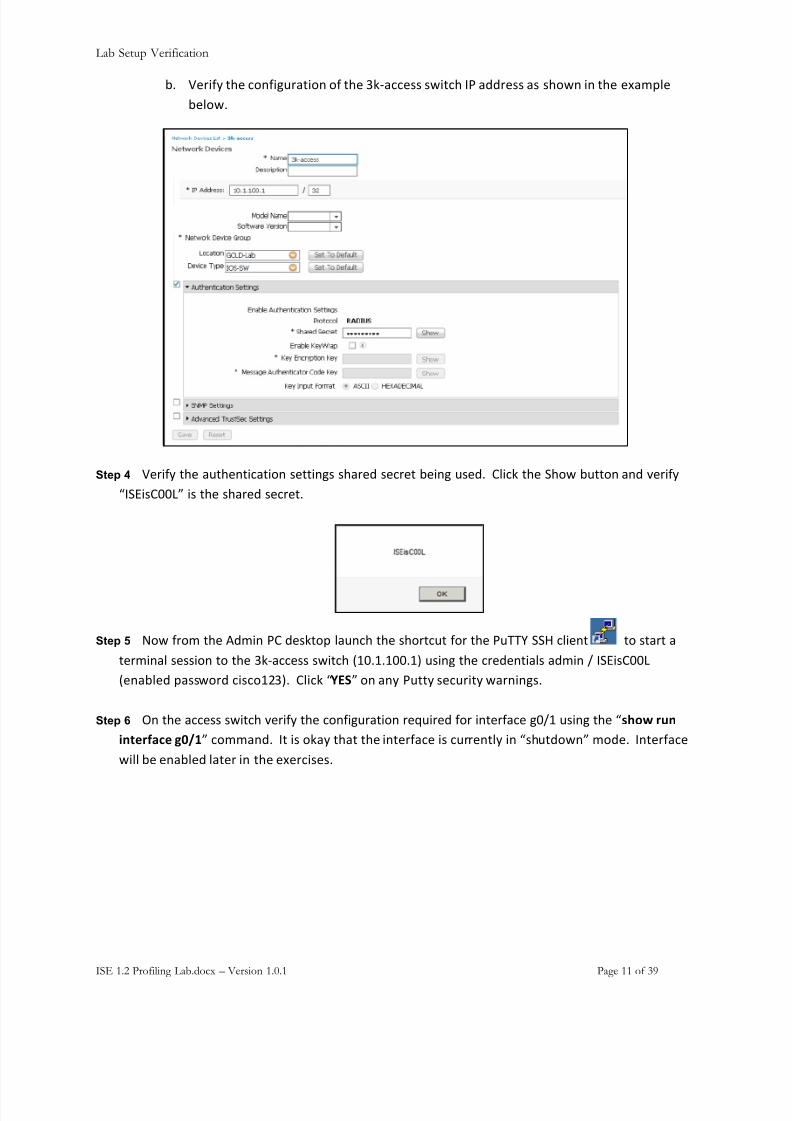
<: "#$%&' +1# /(*&%8)$.+%(* (& +1# 3-4.//#00 0,%+/1 => .77$#00 .0 01(,* %* +1# #?.@69#<#9(,:
Step 4 "#$%&' +1# .)+1#*+%/.+%(* 0#++%*80 01.$#7 0#/$#+ <#%*8 )0#7: A9%/- +1# B1(, <)++(* .*7 C#$%&'D=BE%0AFFGH %0 +1# 01.$#7 0#/$#+:
Step 5 I(, &$(@ +1# J7@%* >A 7#0-+(6 9.)*/1 +1# 01($+/)+ &($ +1# >)KKL BBM /9%#*+ +( 0+.$+ .+#$@%*.9 0#00%(* +( +1# 3-4.//#00 0,%+/1 2NF:N:NFF:N5 )0%*8 +1# /$#7#*+%.90 .7@%* O =BE%0AFFG2#*.<9#7 6.00,($7 /%0/(NP35: A9%/- D89: H (* .*' >)++' 0#/)$%+' ,.$*%*80:
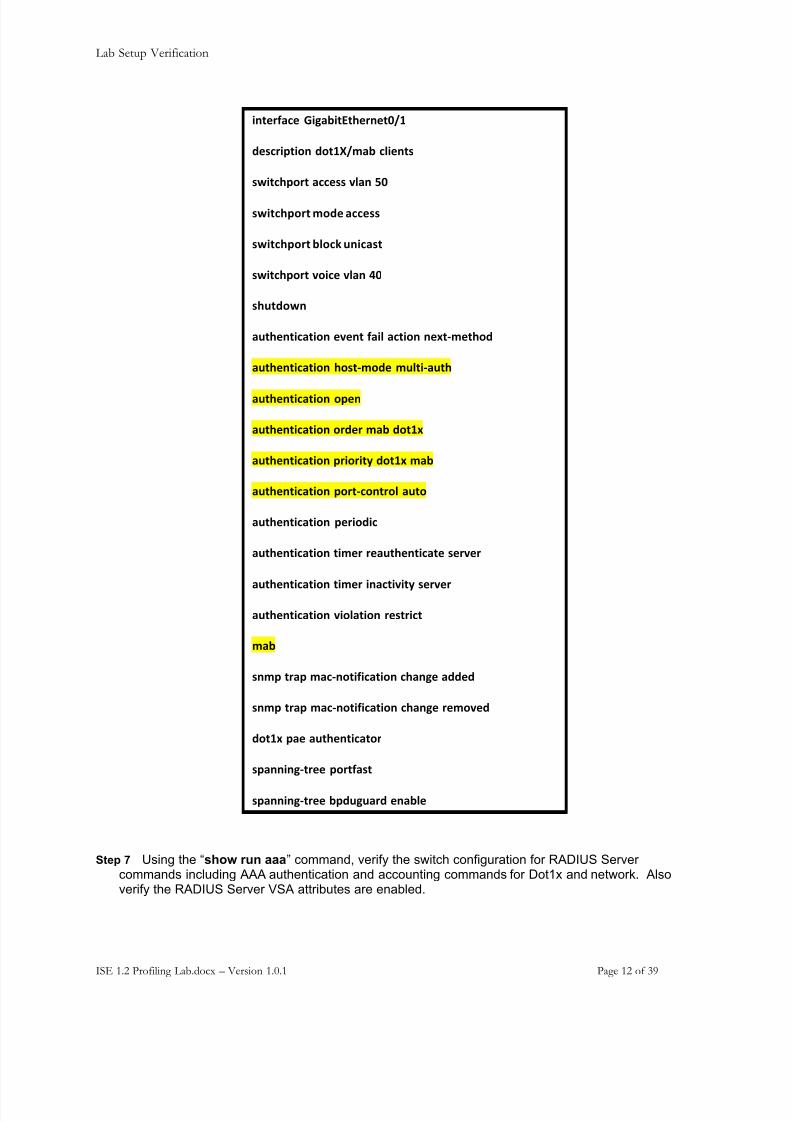
Step 6 Q* +1# .//#00 0,%+/1 C#$%&' +1# /(*&%8)$.+%(* $#R)%$#7 &($ %*+#$&./# 8FON )0%*8 +1# D&;*/ (2%$%'.(<)3. =>?@H /(@@.*7: =+ %0 (-.' +1.+ +1# %*+#$&./# %0 /)$$#*+9' %* D01)+7(,*H @(7#: =*+#$&./#,%99 <# #*.<9#7 9.+#$ %* +1# #?#$/%0#0:
8/10/2019 Lab Guide ISE 1 2 Profiling
http://slidepdf.com/reader/full/lab-guide-ise-1-2-profiling 12/39
Lab Setup Verification
ISE 1.2 Profiling Lab.docx – Version 1.0.1 Page 12 of 39
$%'.(<)3. A$=)B$'9';.(%.'>?@
".&3($C'$*% "*'@D?#)B 3E$.%'&
&/$'3;C*(' )33.&& 5E)% F>
&/$'3;C*(' #*". )33.&&
&/$'3;C*(' BE*30 2%$3)&'
&/$'3;C*(' 5*$3. 5E)% G>
&;2'"*/%
)2';.%'$3)'$*% .5.%' <)$E )3'$*% %.H'7#.';*"
)2';.%'$3)'$*% ;*&'7#*". #2E'$7)2';
)2';.%'$3)'$*% *C.%
)2';.%'$3)'$*% *(".( #)B "*'@H
)2';.%'$3)'$*% C($*($'I "*'@H #)B
)2';.%'$3)'$*% C*('73*%'(*E )2'*
)2';.%'$3)'$*% C.($*"$3
)2';.%'$3)'$*% '$#.( (.)2';.%'$3)'. &.(5.(
)2';.%'$3)'$*% '$#.( $%)3'$5$'I &.(5.(
)2';.%'$3)'$*% 5$*E)'$*% (.&'($3'
#)B
&%#C '()C #)37%*'$<$3)'$*% 3;)%=. )""."
&%#C '()C #)37%*'$<$3)'$*% 3;)%=. (.#*5."
"*'@H C). )2';.%'$3)'*(
&C)%%$%=7'(.. C*('<)&'
&C)%%$%=7'(.. BC"2=2)(" .%)BE.
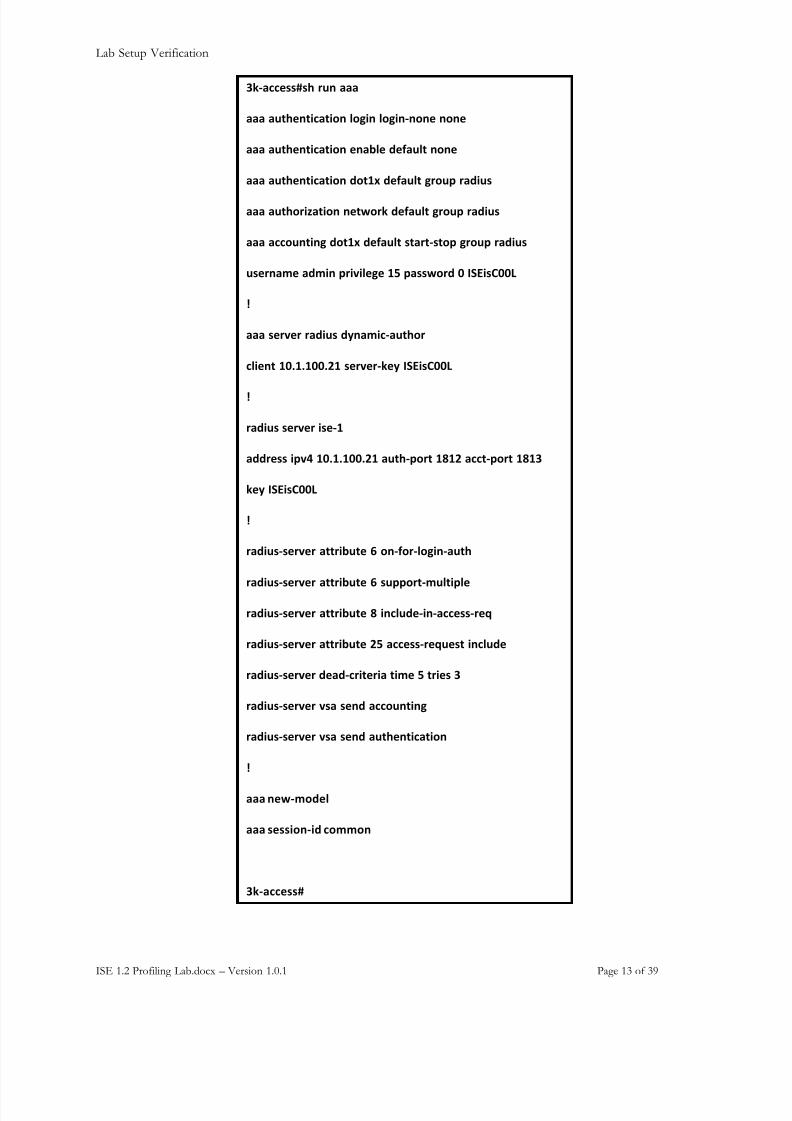
Step 7 Using the “ show run aaa ” command, verify the switch configuration for RADIUS Servercommands including AAA authentication and accounting commands for Dot1x and network. Alsoverify the RADIUS Server VSA attributes are enabled.
8/10/2019 Lab Guide ISE 1 2 Profiling
http://slidepdf.com/reader/full/lab-guide-ise-1-2-profiling 13/39
Lab Setup Verification
ISE 1.2 Profiling Lab.docx – Version 1.0.1 Page 13 of 39
607)33.&&J&; (2% )))
))) )2';.%'$3)'$*% E*=$% E*=$%7%*%. %*%.
))) )2';.%'$3)'$*% .%)BE. ".<)2E' %*%.
))) )2';.%'$3)'$*% "*'@H ".<)2E' =(*2C ()"$2&
))) )2';*($K)'$*% %.'/*(0 ".<)2E' =(*2C ()"$2&
))) )33*2%'$%= "*'@H ".<)2E' &')('7&'*C =(*2C ()"$2&
2&.(%)#. )"#$% C($5$E.=. @F C)&&/*(" > L:9$&M>>N
O
))) &.(5.( ()"$2& "I%)#$37)2';*(
3E$.%' @>P@P@>>PQ@ &.(5.(70.I L:9$&M>>N
O
()"$2& &.(5.( $&.7@
)""(.&& $C5G @>P@P@>>PQ@ )2';7C*(' @R@Q )33'7C*(' @R@6
0.I L:9$&M>>N
O
()"$2&7&.(5.( )''($B2'. S *%7<*(7E*=$%7)2';
()"$2&7&.(5.( )''($B2'. S &2CC*('7#2E'$CE.
()"$2&7&.(5.( )''($B2'. R $%3E2".7$%7)33.&&7(.T
()"$2&7&.(5.( )''($B2'. QF )33.&&7(.T2.&' $%3E2".
()"$2&7&.(5.( ".)"73($'.($) '$#. F '($.& 6
()"$2&7&.(5.( 5&) &.%" )33*2%'$%=
()"$2&7&.(5.( 5&) &.%" )2';.%'$3)'$*%
O
))) %./7#*".E
))) &.&&$*%7$" 3*##*%
607)33.&&J
8/10/2019 Lab Guide ISE 1 2 Profiling
http://slidepdf.com/reader/full/lab-guide-ise-1-2-profiling 14/39
Lab Exercise 2-1: Enable ISE, Probes, and Network Device for Profiling
ISE 1.2 Profiling Lab.docx – Version 1.0.1 Page 14 of 39
Lab Exercise 2 -1: Enable ISE, Probes, andNetwork Device for Profiling
Exercise Description This exercise will enable ISE profiling probes and NAD communications on the ISE Policy Servicenode.
Exercise Objective At the end of this exercise you will learn how to enable ISE probes including DHCP, HTTP,Radius, SNMP Query and Device Sensor on the ISE Policy Service Node (PSN).
Lab Exercise Steps Step 1 Log into your ISE device via the admin GUI.
Step 2 Go to Administration > System > Deployment .
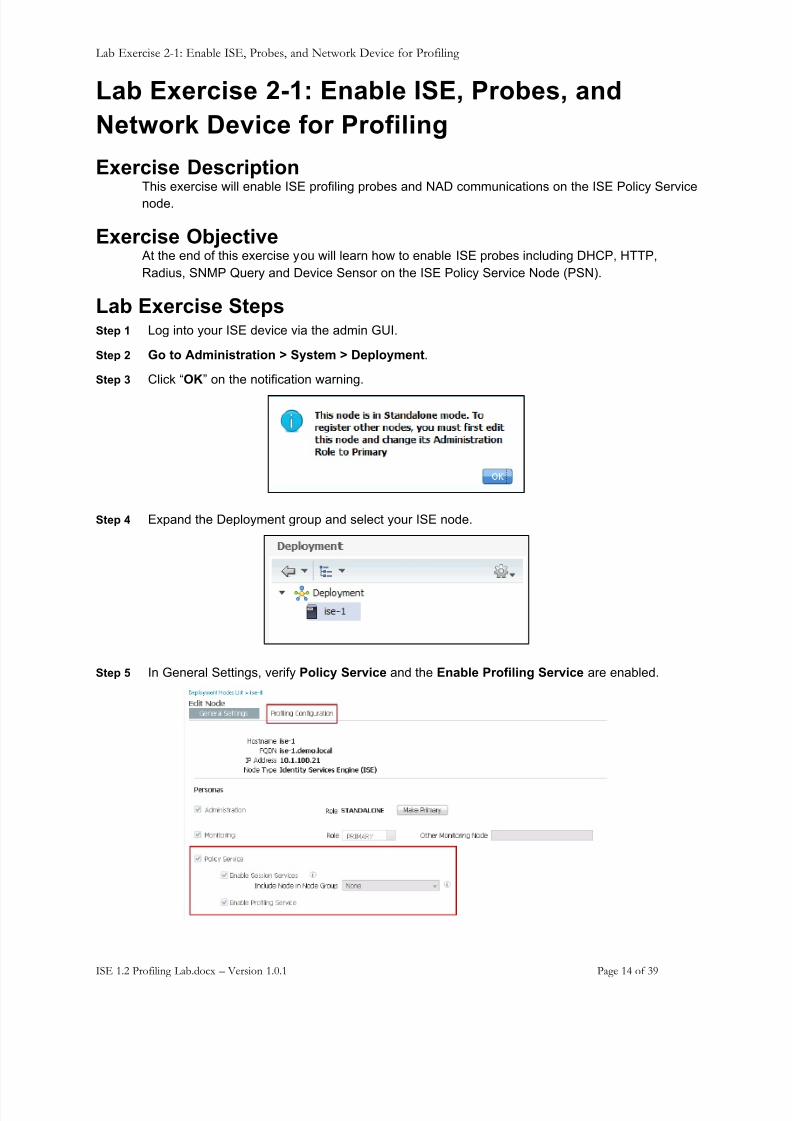
Step 3 Click “OK ” on the notification warning.
Step 4 Expand the Deployment group and select your ISE node.
Step 5 In General Settings, verify Policy Service and the Enable Profiling Service are enabled.
8/10/2019 Lab Guide ISE 1 2 Profiling
http://slidepdf.com/reader/full/lab-guide-ise-1-2-profiling 15/39
Lab Exercise 2-1: Enable ISE, Probes, and Network Device for Profiling
ISE 1.2 Profiling Lab.docx – Version 1.0.1 Page 15 of 39
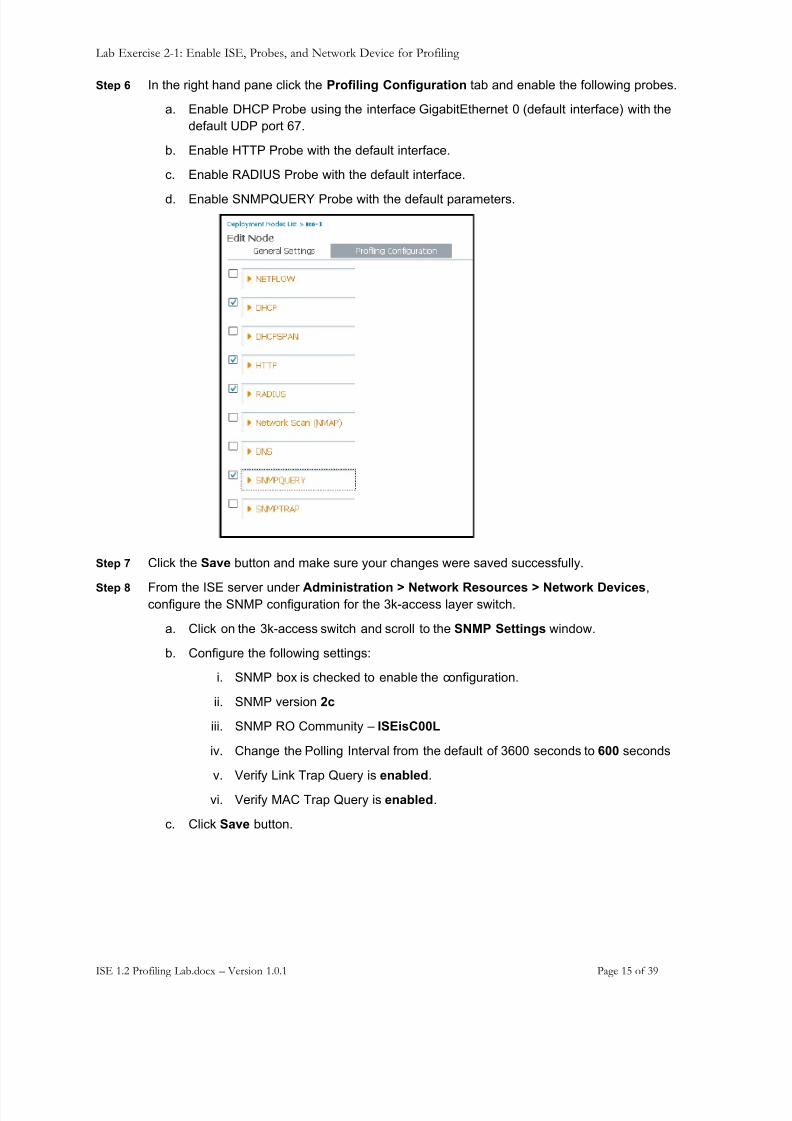
Step 6 In the right hand pane click the Profiling Configuration tab and enable the following probes.
a. Enable DHCP Probe using the interface GigabitEthernet 0 (default interface) with thedefault UDP port 67.
b. Enable HTTP Probe with the default interface.
c. Enable RADIUS Probe with the default interface.
d. Enable SNMPQUERY Probe with the default parameters.
Step 7 Click the Save button and make sure your changes were saved successfully.
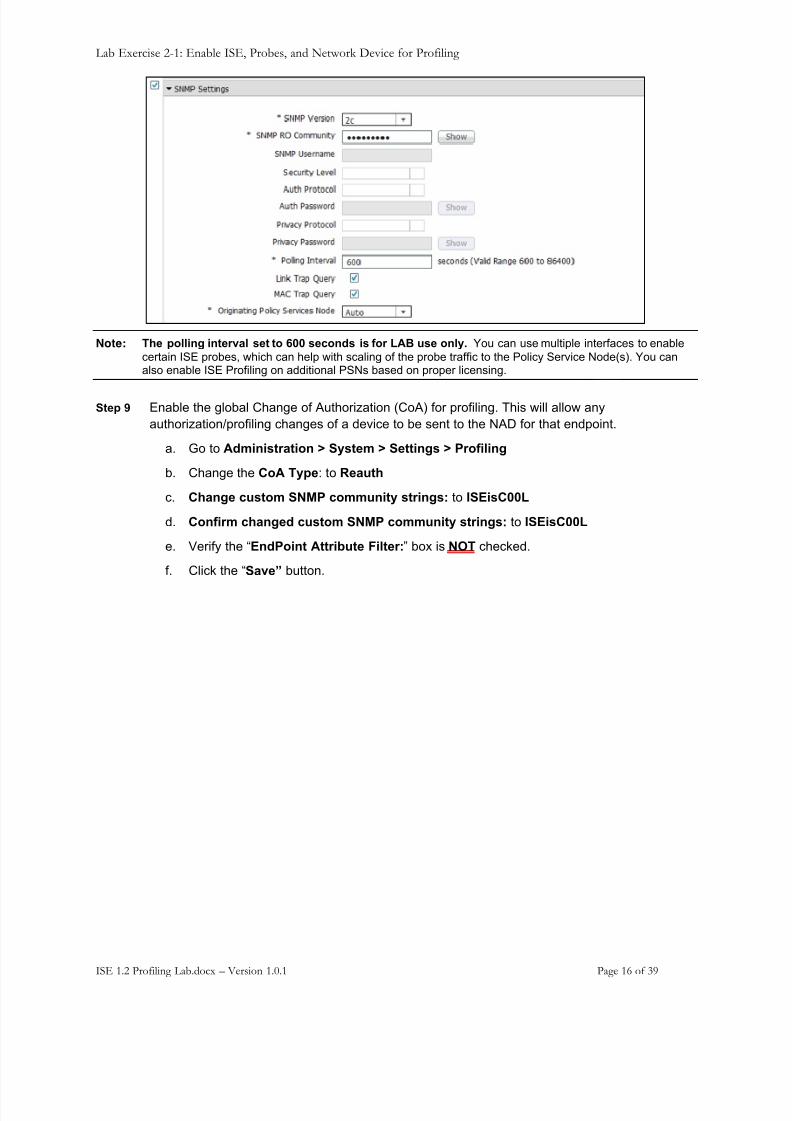
Step 8 From the ISE server under Administration > Network Resources > Network Devices ,configure the SNMP configuration for the 3k-access layer switch.
a. Click on the 3k-access switch and scroll to the SNMP Settings window.
b. Configure the following settings:
i. SNMP box is checked to enable the configuration.
ii. SNMP version 2c
iii. SNMP RO Community – ISEisC00L
iv. Change the Polling Interval from the default of 3600 seconds to 600 seconds
v. Verify Link Trap Query is enabled .
vi. Verify MAC Trap Query is enabled .
c. Click Save button.
8/10/2019 Lab Guide ISE 1 2 Profiling
http://slidepdf.com/reader/full/lab-guide-ise-1-2-profiling 16/39
Lab Exercise 2-1: Enable ISE, Probes, and Network Device for Profiling
ISE 1.2 Profiling Lab.docx – Version 1.0.1 Page 16 of 39
Note: The polling interval set to 600 seconds is for LAB use only. You can use multiple interfaces to enablecertain ISE probes, which can help with scaling of the probe traffic to the Policy Service Node(s). You canalso enable ISE Profiling on additional PSNs based on proper licensing.
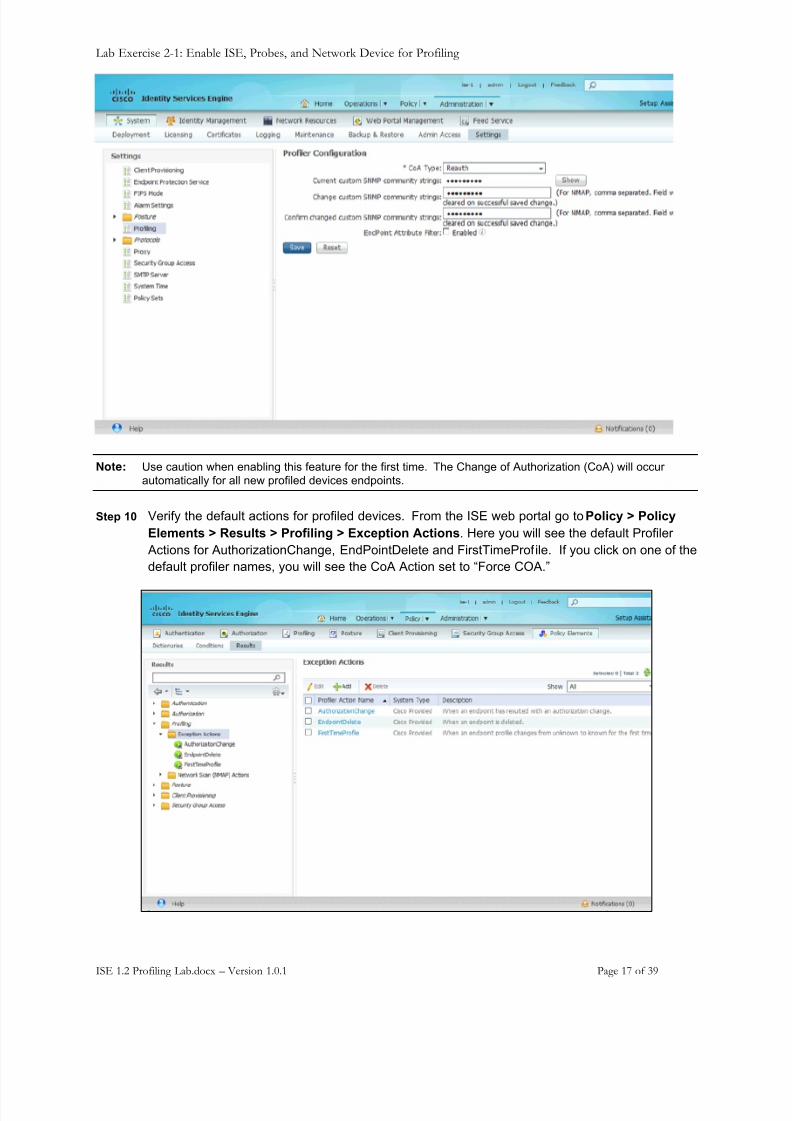
Step 9 Enable the global Change of Authorization (CoA) for profiling. This will allow anyauthorization/profiling changes of a device to be sent to the NAD for that endpoint.
a. Go to Administration > System > Settings > Profiling
b. Change the CoA Type : to Reauth
c. Change custom SNMP community strings: to ISEisC00L
d. Confirm changed custom SNMP community strings: to ISEisC00L
e. Verify the “ EndPoint Attribute Filter: ” box is NOT checked.
f. Click the “ Save” button.
8/10/2019 Lab Guide ISE 1 2 Profiling
http://slidepdf.com/reader/full/lab-guide-ise-1-2-profiling 17/39
Lab Exercise 2-1: Enable ISE, Probes, and Network Device for Profiling
ISE 1.2 Profiling Lab.docx – Version 1.0.1 Page 17 of 39
Note: Use caution when enabling this feature for the first time. The Change of Authorization (CoA) will occurautomatically for all new profiled devices endpoints.
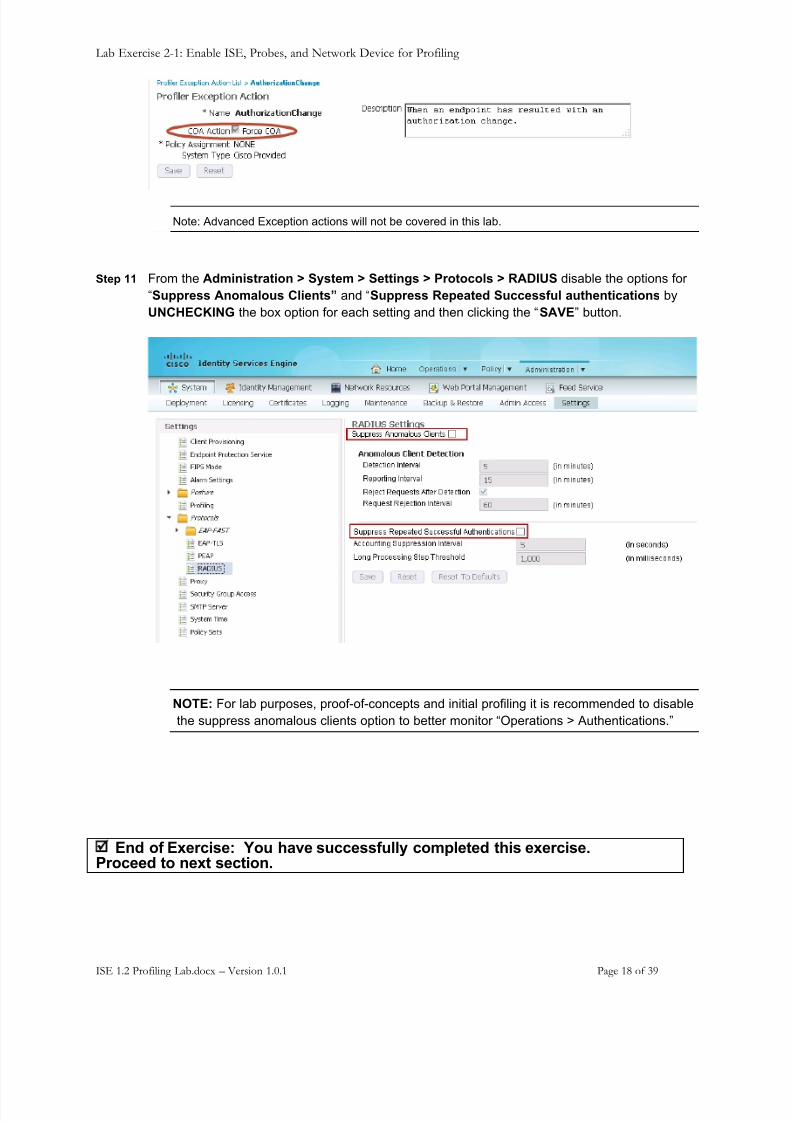
Step 10 Verify the default actions for profiled devices. From the ISE web portal go to Policy > PolicyElements > Results > Profiling > Exception Actions . Here you will see the default Profiler
Actions for AuthorizationChange, EndPointDelete and FirstTimeProfile. If you click on one of thedefault profiler names, you will see the CoA Action set to “Force COA.”
8/10/2019 Lab Guide ISE 1 2 Profiling
http://slidepdf.com/reader/full/lab-guide-ise-1-2-profiling 18/39
Lab Exercise 2-1: Enable ISE, Probes, and Network Device for Profiling
ISE 1.2 Profiling Lab.docx – Version 1.0.1 Page 18 of 39
Note: Advanced Exception actions will not be covered in this lab.
Step 11 From the Administration > System > Settings > Protocols > RADIUS disable the options for“Suppress Anomalous Clients” and “ Suppress Repeated Successful authentications byUNCHECKING the box option for each setting and then clicking the “ SAVE ” button.
NOTE: For lab purposes, proof-of-concepts and initial profiling it is recommended to disablethe suppress anomalous clients option to better monitor “Operations > Authentications.”
End of Exercise: You have successfully completed this exercise.Proceed to next section.

8/10/2019 Lab Guide ISE 1 2 Profiling
http://slidepdf.com/reader/full/lab-guide-ise-1-2-profiling 19/39
Lab Exercise 2-2: Enabling SNMP Query, DHCP and Device Sensor Probes
ISE 1.2 Profiling Lab.docx – Version 1.0.1 Page 19 of 39
Lab Exercise 2 -2 : Enabling SNMP Query , DHCP and Device Sens or Probes
Exercise Description
Configure and verify the SNMP Query and DHCP probes are properly configured on the accessswitch. Configure and verify the Device Sensor on the Wired Switch and Wireless LANController (WLC). Verify Profiled Endpoints.
Exercise Objective In this exercise you will verify the configure for the SNMP query and DHCP probes and devicesensor feature on the Cisco Wired Switch and Wireless LAN Controller and then verify that DHCPand CDP and being sent from the wired switch and that DHCP and HTTP data is being sent fromthe WLC to the ISE PSN node via Radius Accounting packets.
SNMP and DHCP Probe Configuration Step 1 From Putty, SSH into the 3k-access switch with the admin/ISEisC00L credentials.Step 2 Verify the SNMP server configuration on the access switch using the “ show run | include
snmp-server ” command.
Step 3 For the DCHP probe configuration, we need to verify that the access layer switch has theadditional IP helper address for the ISE appliance (10.1.100.21) on interface Vlan 50 for DHCPpacket information to be sent to the ISE DHCP probe.
Step 4 From the Vsphere Client, open a console session to the p##_w7pc-guest VmWare image.Login with the credentials admin/ISEisCooL then start the Control Panel application and select“View network status and tasks ” under the Network and Internet section. Next click “ Changeadapter settings ” and then right click the w7pc-guest-wired interface and enable .
3-4.//#00S 01 $)* %*+#$&./# C9.*TF
%*+#$&./# "9.*TF
7#0/$%6+%(* ;UEBK
%6 .77$#00 NF:N:TF:N PTT:PTT:PTT:F
%6 1#96#$4.77$#00 NF:N:NFF:NF
%6 1#96#$4.77$#00 NF:N:NFF:PN
8/10/2019 Lab Guide ISE 1 2 Profiling
http://slidepdf.com/reader/full/lab-guide-ise-1-2-profiling 20/39
Lab Exercise 2-2: Enabling SNMP Query, DHCP and Device Sensor Probes
ISE 1.2 Profiling Lab.docx – Version 1.0.1 Page 20 of 39
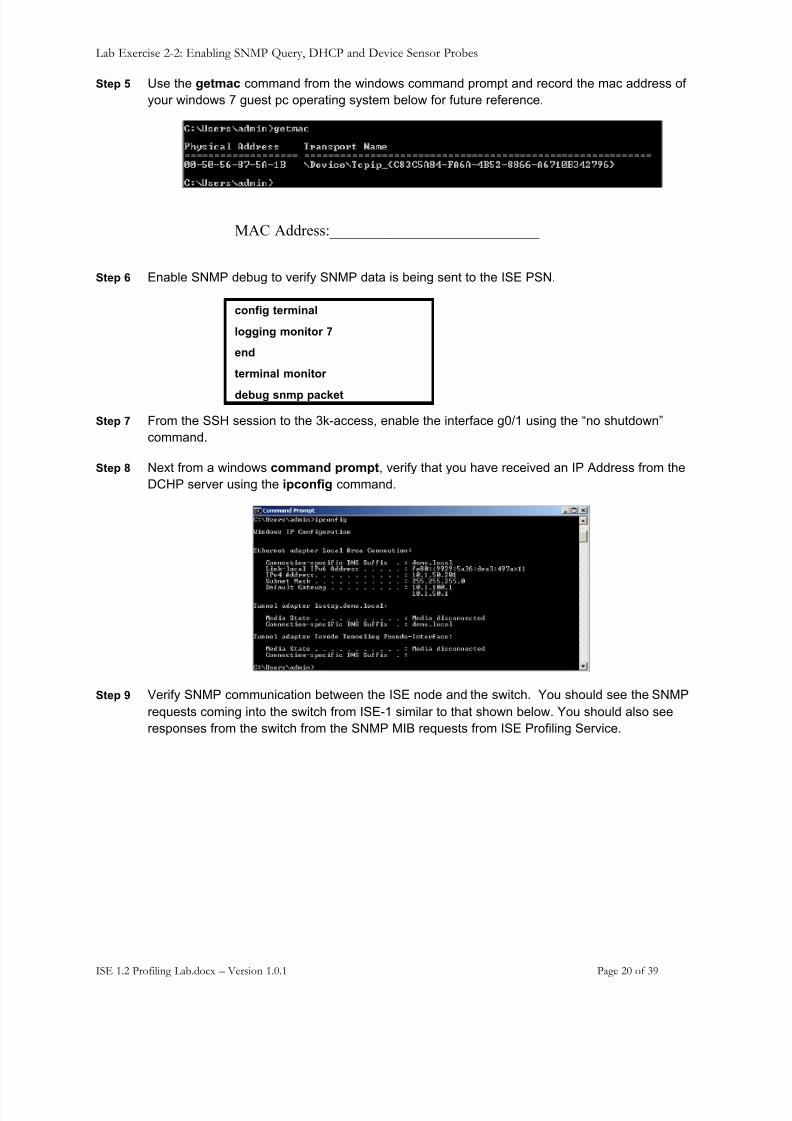
Step 5 Use the getmac command from the windows command prompt and record the mac address ofyour windows 7 guest pc operating system below for future reference.
MAC Address:___________________________
Step 6 Enable SNMP debug to verify SNMP data is being sent to the ISE PSN.
config terminal
logging monitor 7
end
terminal monitor
debug snmp packet
Step 7 From the SSH session to the 3k-access, enable the interface g0/1 using the “no shutdown”command.
Step 8 Next from a windows command prompt , verify that you have received an IP Address from theDCHP server using the ipconfig command.
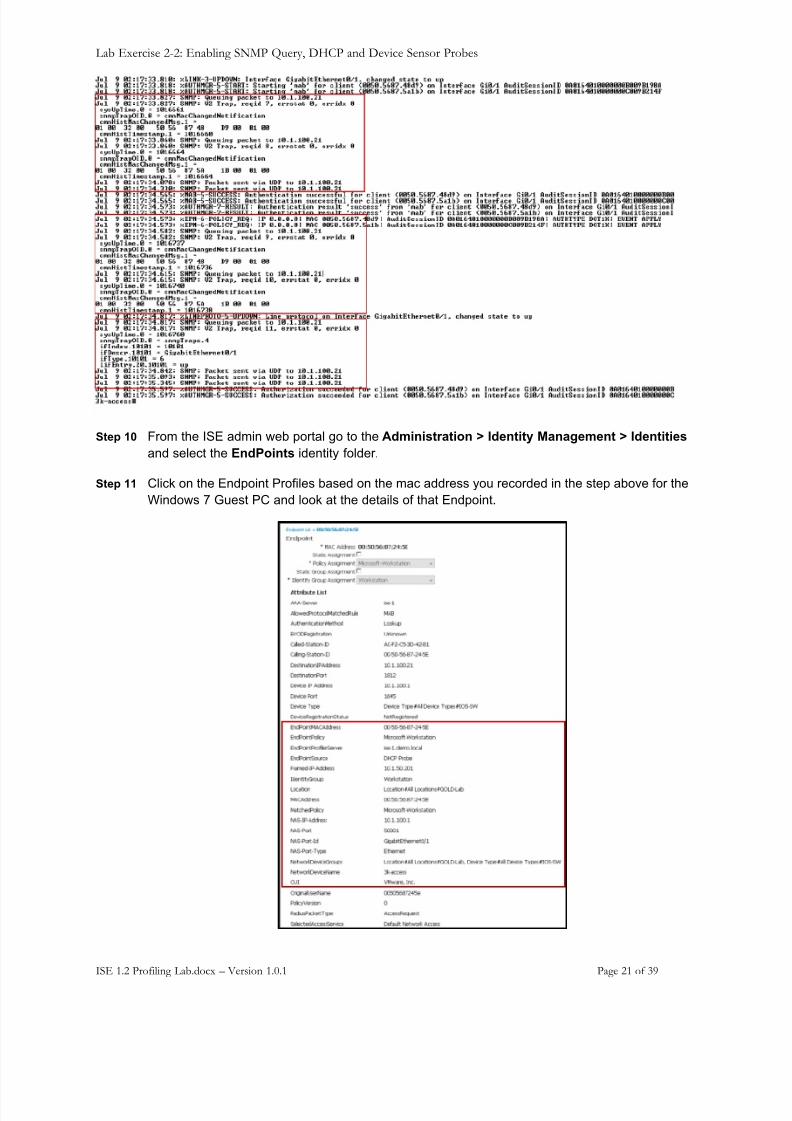
Step 9 Verify SNMP communication between the ISE node and the switch. You should see the SNMPrequests coming into the switch from ISE-1 similar to that shown below. You should also seeresponses from the switch from the SNMP MIB requests from ISE Profiling Service.
8/10/2019 Lab Guide ISE 1 2 Profiling
http://slidepdf.com/reader/full/lab-guide-ise-1-2-profiling 21/39
Lab Exercise 2-2: Enabling SNMP Query, DHCP and Device Sensor Probes
ISE 1.2 Profiling Lab.docx – Version 1.0.1 Page 21 of 39
Step 10 From the ISE admin web portal go to the Administration > Identity Management > Identitiesand select the EndPoints identity folder.
Step 11 Click on the Endpoint Profiles based on the mac address you recorded in the step above for theWindows 7 Guest PC and look at the details of that Endpoint.
8/10/2019 Lab Guide ISE 1 2 Profiling
http://slidepdf.com/reader/full/lab-guide-ise-1-2-profiling 22/39
Lab Exercise 2-2: Enabling SNMP Query, DHCP and Device Sensor Probes
ISE 1.2 Profiling Lab.docx – Version 1.0.1 Page 22 of 39
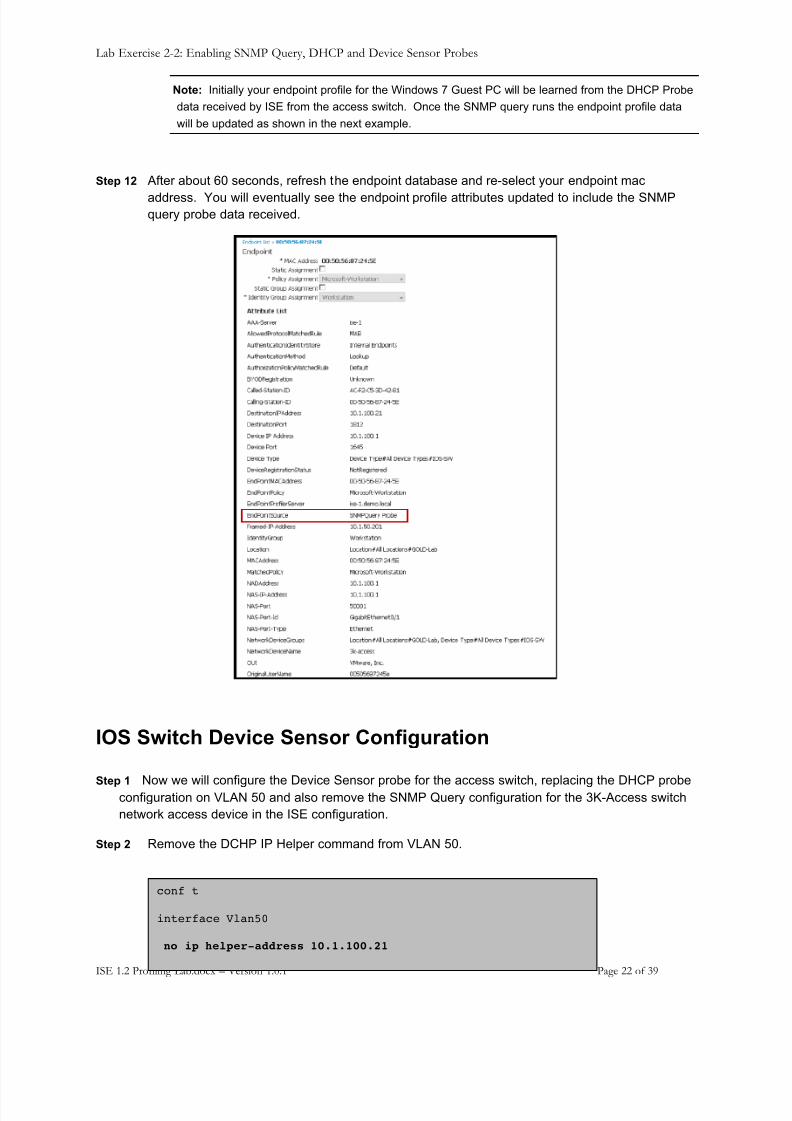
Note: Initially your endpoint profile for the Windows 7 Guest PC will be learned from the DHCP Probedata received by ISE from the access switch. Once the SNMP query runs the endpoint profile datawill be updated as shown in the next example.
Step 12 After about 60 seconds, refresh the endpoint database and re-select your endpoint mac
address. You will eventually see the endpoint profile attributes updated to include the SNMPquery probe data received.
IOS Switch Device Sensor Configuration
Step 1 Now we will configure the Device Sensor probe for the access switch, replacing the DHCP probeconfiguration on VLAN 50 and also remove the SNMP Query configuration for the 3K-Access switchnetwork access device in the ISE configuration.
Step 2 Remove the DCHP IP Helper command from VLAN 50.
conf t
interface Vlan50
no ip helper-address 10.1.100.21

8/10/2019 Lab Guide ISE 1 2 Profiling
http://slidepdf.com/reader/full/lab-guide-ise-1-2-profiling 23/39
Lab Exercise 2-2: Enabling SNMP Query, DHCP and Device Sensor Probes
ISE 1.2 Profiling Lab.docx – Version 1.0.1 Page 23 of 39
Step 3 From Administration > Network Resources > Network Device and edit the 3k-access switchconfiguration.
Step 4UNCHECK the box for the SNMP Settings configuration and then click the SAVE button.
NOTE: We are disabling the DHCP IP Helper address and the SNMP Query as per best practice whenusing Device Sensor feature to keep from getting the same profiling data multiple times. This will alsoeliminated extra replication processes for the ISE databases.
Step 5 From the Access switch SSH session, add the following commands to enable the device-sensorconfiguration.
device-sensor filter-list cdp list ISEtlv name device-nametlv name address-typetlv name capabilities-typetlv name platform-type
!device-sensor filter-spec cdp include list ISE!device-sensor filter-list dhcp list DHCPoption name host-nameoption name class-identifieroption name client-identifier
!device-sensor filter-spec dhcp include list DHCP!device-sensor accountingdevice-sensor notify all-changes
epm logging
Step 6 From Administration > Identity Management > Identities select the Endpoints folder and thenremove the existing endpoint for the Windows 7 Guest PC VmWare again.
Step 7 Next perform a shutdown/no shutdown on interface g0/1 from the access switch that will thenhave radius accounting packets sent to ISE, which will recreate the endpoint profile.
Step 8 "#$%&' +1# #*76(%*+ 7.+. ,.0 8#*#$.+#7 &$(@ +1# V#C%/# B#*0($ 2W.7%)0 J//()*+%*8 6./-#+05 .06#$ +1# #?.@69# <#9(,:
8/10/2019 Lab Guide ISE 1 2 Profiling
http://slidepdf.com/reader/full/lab-guide-ise-1-2-profiling 24/39
Lab Exercise 2-2: Enabling SNMP Query, DHCP and Device Sensor Probes
ISE 1.2 Profiling Lab.docx – Version 1.0.1 Page 24 of 39
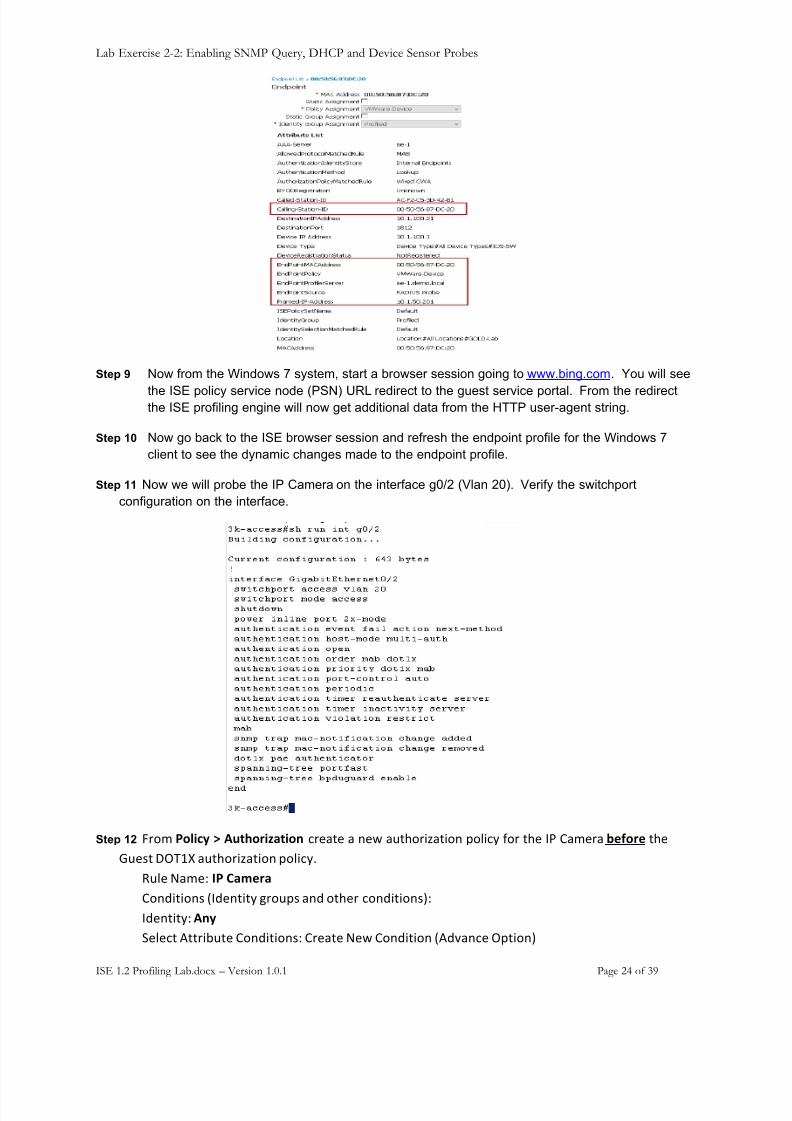
Step 9 Now from the Windows 7 system, start a browser session going to www.bing.com . You will see
the ISE policy service node (PSN) URL redirect to the guest service portal. From the redirectthe ISE profiling engine will now get additional data from the HTTP user-agent string.
Step 10 Now go back to the ISE browser session and refresh the endpoint profile for the Windows 7client to see the dynamic changes made to the endpoint profile.
Step 11 Now we will probe the IP Camera on the interface g0/2 (Vlan 20). Verify the switchportconfiguration on the interface.
Step 12 X$(@ U*E$3I , !2';*($K)'$*% /$#.+# . *#, .)+1($%Y.+%(* 6(9%/' &($ +1# => A.@#$. B.<*(. +1#;)#0+ VQKNZ .)+1($%Y.+%(* 6(9%/':
W)9# I.@#[ LU M)#.() A(*7%+%(*0 2=7#*+%+' 8$()60 .*7 (+1#$ /(*7%+%(*05[=7#*+%+'[!%I B#9#/+ J++$%<)+# A(*7%+%(*0[ A$#.+# I#, A(*7%+%(* 2J7C.*/# Q6+%(*5
8/10/2019 Lab Guide ISE 1 2 Profiling
http://slidepdf.com/reader/full/lab-guide-ise-1-2-profiling 25/39
Lab Exercise 2-2: Enabling SNMP Query, DHCP and Device Sensor Probes
ISE 1.2 Profiling Lab.docx – Version 1.0.1 Page 25 of 39
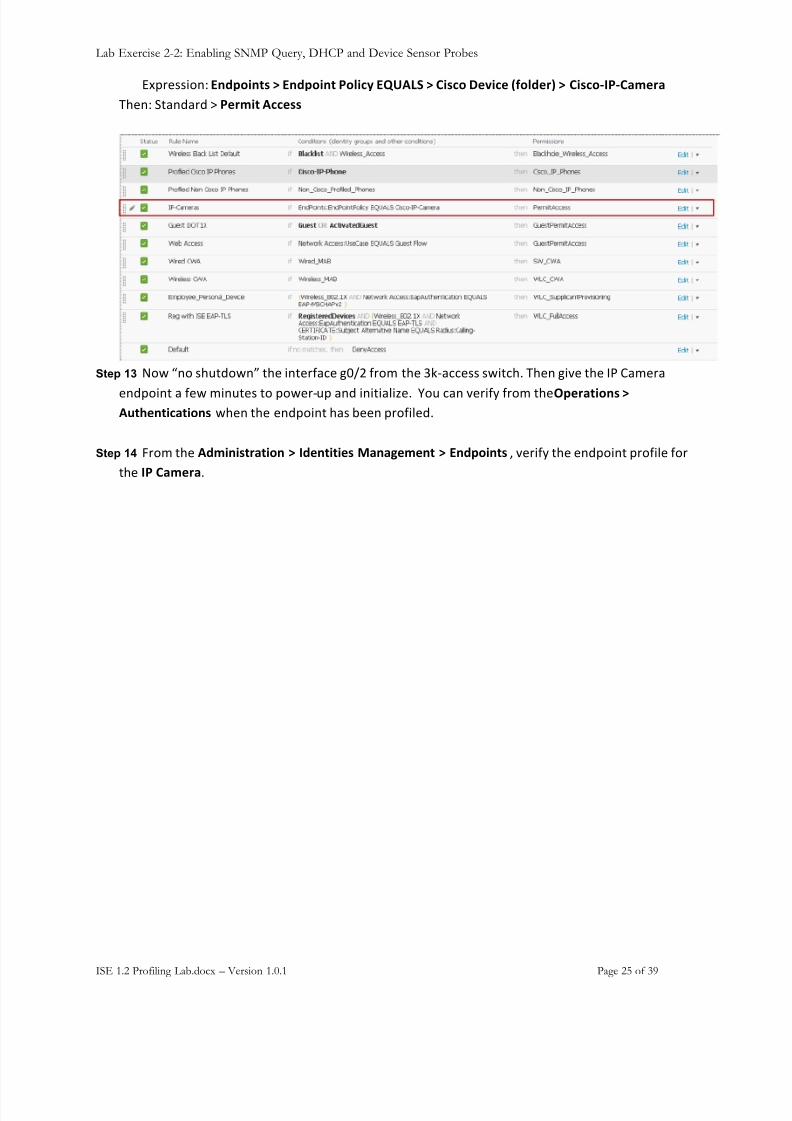
E?6$#00%(*[9%"C*$%'& , 9%"C*$%' U*E$3I 9VW!N: , M$&3* 4.5$3. X<*E".(Y , M$&3*7LU7M)#.() K1#*[ B+.*7.$7 \ U.(#$' !33.&&
Step 13 I(, D*( 01)+7(,*H +1# %*+#$&./# 8FOP &$(@ +1# 3-4.//#00 0,%+/1: K1#* 8%C# +1# => A.@#$.
#*76(%*+ . &#, @%*)+#0 +( 6(,#$4)6 .*7 %*%+%.9%Y#: L() /.* C#$%&' &$(@ +1#ZC.()'$*%& ,!2';.%'$3)'$*%& ,1#* +1# #*76(%*+ 1.0 <##* 6$(&%9#7:
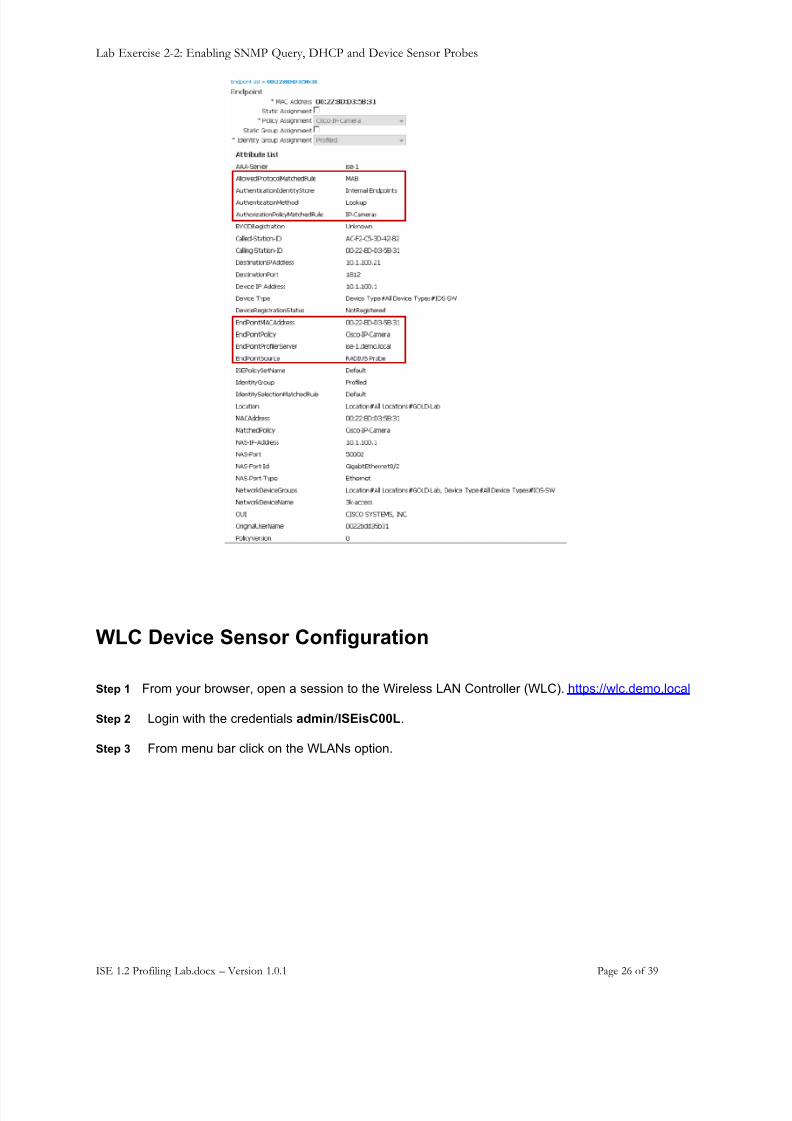
Step 14 X$(@ +1#!"#$%$&'()'$*% , L".%'$'$.& [)%)=.#.%' , 9%"C*$%'& ] C#$%&' +1# #*76(%*+ 6$(&%9# &($+1# LU M)#.() :
8/10/2019 Lab Guide ISE 1 2 Profiling
http://slidepdf.com/reader/full/lab-guide-ise-1-2-profiling 26/39
Lab Exercise 2-2: Enabling SNMP Query, DHCP and Device Sensor Probes
ISE 1.2 Profiling Lab.docx – Version 1.0.1 Page 26 of 39
WLC Device Sensor Configuration
Step 1 From your browser, open a session to the Wireless LAN Controller (WLC). https://wlc.demo.local
Step 2 Login with the credentials admin /ISEisC00L .
Step 3 From menu bar click on the WLANs option.

8/10/2019 Lab Guide ISE 1 2 Profiling
http://slidepdf.com/reader/full/lab-guide-ise-1-2-profiling 27/39
Lab Exercise 2-2: Enabling SNMP Query, DHCP and Device Sensor Probes
ISE 1.2 Profiling Lab.docx – Version 1.0.1 Page 27 of 39
Step 4 I#?+ /9%/- (* +1# ^GJI =V DNNH +( <# .<9# +( @(7%&' +1# ^GJI .++$%<)+#0:
Step 5 Next click on the Advanced tab for the n-p##-TS-WPA2 WLAN where ## is your pod number.
8/10/2019 Lab Guide ISE 1 2 Profiling
http://slidepdf.com/reader/full/lab-guide-ise-1-2-profiling 28/39
Lab Exercise 2-2: Enabling SNMP Query, DHCP and Device Sensor Probes
ISE 1.2 Profiling Lab.docx – Version 1.0.1 Page 28 of 39
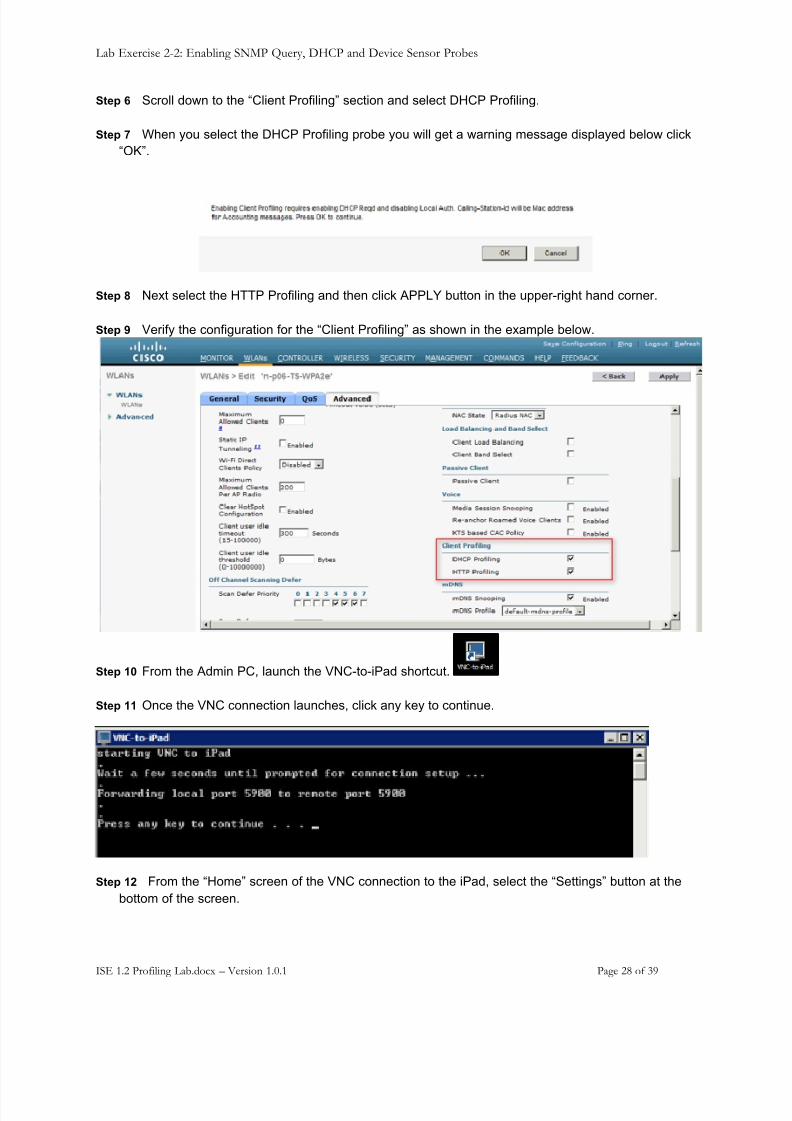
Step 6 Scroll down to the “Client Profiling” section and select DHCP Profiling.
Step 7 When you select the DHCP Profiling probe you will get a warning message displayed below click“OK”.
Step 8 Next select the HTTP Profiling and then click APPLY button in the upper-right hand corner.
Step 9 Verify the configuration for the “Client Profiling” as shown in the example below.
Step 10 From the Admin PC, launch the VNC-to-iPad shortcut.
Step 11 Once the VNC connection launches, click any key to continue.
Step 12 From the “Home” screen of the VNC connection to the iPad, select the “Settings” button at thebottom of the screen.
8/10/2019 Lab Guide ISE 1 2 Profiling
http://slidepdf.com/reader/full/lab-guide-ise-1-2-profiling 29/39
Lab Exercise 2-2: Enabling SNMP Query, DHCP and Device Sensor Probes
ISE 1.2 Profiling Lab.docx – Version 1.0.1 Page 29 of 39
Controlling iPAD via VNC Client Below are some tips for controlling the iPad UI via VNC client that will be useful for the entire lab:
• Home: (On PC/Mac with 2/3-button mouse) Right click once with a mouse. (On Mac with trackpad) Touch with two fingers on the Track Pad If Secondary Click is configured.
• Mouse: Mouse pointer mimics touching the iPad screen with one finger.
• Scrolling or dragging: Press and hold Left mouse button and move the mouse pointer to scroll
• Keyboard: Move the pointer over any text box on the iPad, click once, and then begin using yourlocal keyboard for input.
Notes: The tab key is not available on the iPad’s virtual keyboard so you will have to move the pointer to the text field you want toinput text, and click on it.
When interacting with the iPad VNC session, US keyboard is preferred. If you have a mouse attached to your computer you will findit easier to navigate the iPad session also.
US keyboard is needed for the RDP session too unless you have additional language packs installed to provide keyboard mappings.This is only for the RDP sessions
Note : The next steps are to ensure that the iPad device is starting clean for the next part of the lab.
Step 1 Verify that the iPad’s WiF is disabled.a. Settings > Wi-Fi > OFF .
Step 2 Remove all existing profiles.a. Settings > General > Profiles b. Click any existing profile one at a time and click on the Remove button.
Step 3 Next we will clear out any cached history, cookies and data stored with Safari.
a. Settings > Safari b. Click Clear History c. Click Clear Cookies and Data
Step 4 Now that your Apple iPad is cleanup we can proceed with the rest of the lab. Select the Wi-Fimenu option and turn on the Wi-Fi.
Step 5 From the “Choose a Network” select n-pXX-TS-WPA2e (where XX is your pod number) SSID.
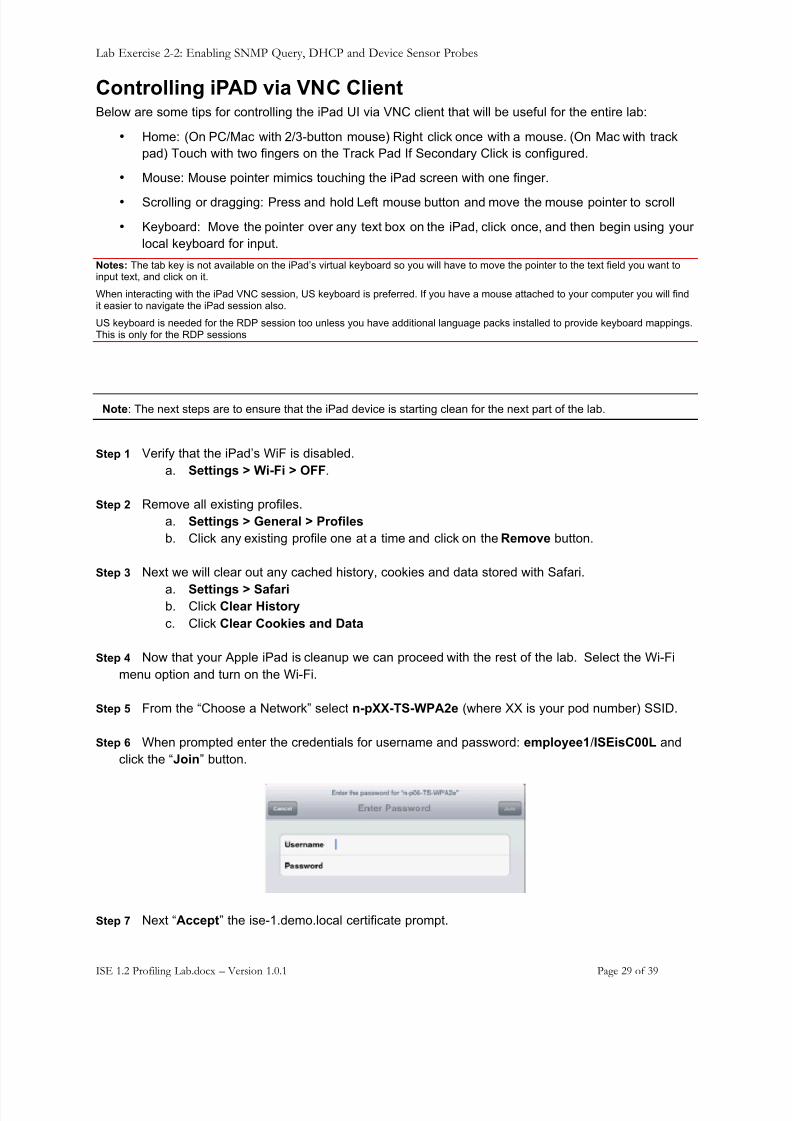
Step 6 When prompted enter the credentials for username and password: employee1 /ISEisC00L andclick the “ Join ” button.
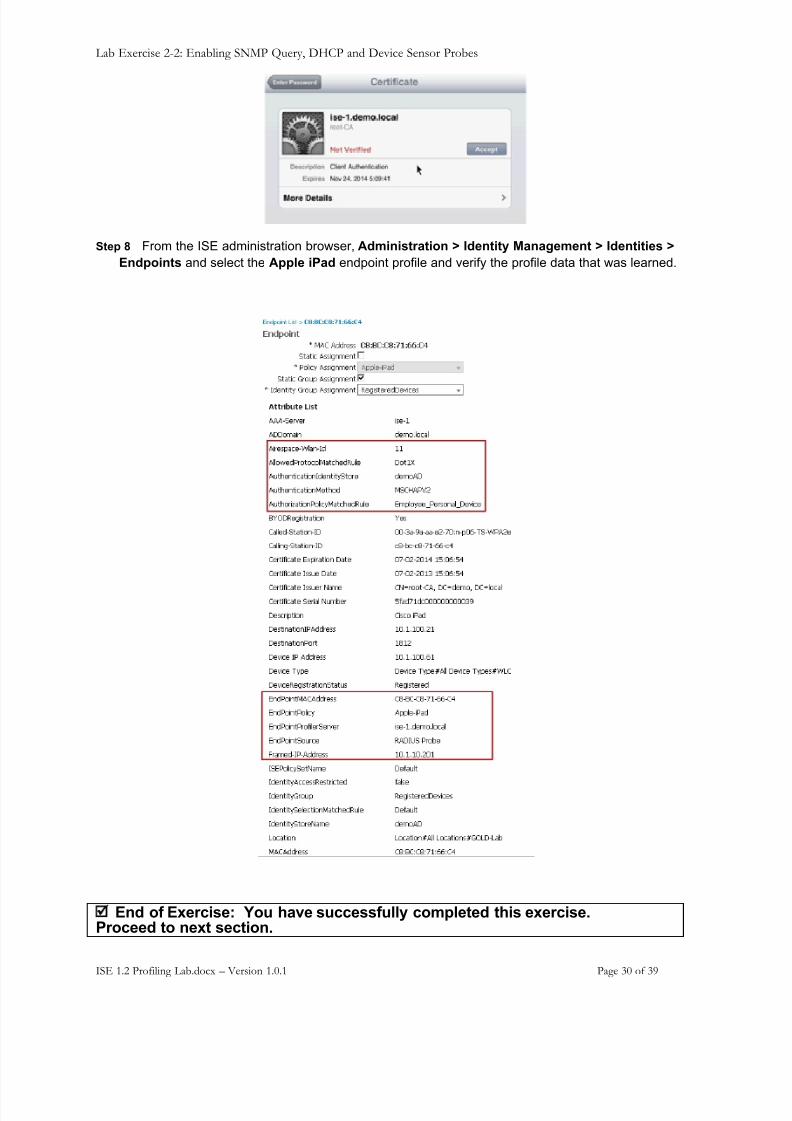
Step 7 Next “ Accept ” the ise-1.demo.local certificate prompt.
8/10/2019 Lab Guide ISE 1 2 Profiling
http://slidepdf.com/reader/full/lab-guide-ise-1-2-profiling 30/39
Lab Exercise 2-2: Enabling SNMP Query, DHCP and Device Sensor Probes
ISE 1.2 Profiling Lab.docx – Version 1.0.1 Page 30 of 39
Step 8 From the ISE administration browser, Administration > Identity Management > Identities >Endpoints and select the Apple iPad endpoint profile and verify the profile data that was learned.
End of Exercise: You have successfully completed this exercise.Proceed to next section.
8/10/2019 Lab Guide ISE 1 2 Profiling
http://slidepdf.com/reader/full/lab-guide-ise-1-2-profiling 31/39
Lab Exercise 2-3: Create Profiles and Authorization Policies using Logical Profiles
ISE 1.2 Profiling Lab.docx – Version 1.0.1 Page 31 of 39
Lab Exercise 2 -3 : Create Profiles and
Authorization Policies using Logical Profiles
Exercise Description In ISE 1.2 configuration we now have the capability to create “Logical Profiles” instead of usingIdentity groups when creating Authorization Policies. Use Logical Profiles will lighten theadministration process of matching profiling policies and reduce the complexity of using
Authorization Policies.
Exercise Objective In this exercise you will configure a new “Logical Profile for the company’s smart devicesincluding Android, Apple-iDevices, Apple-iPads, Apple-iPhones. One the new logical profile isconfigured you will then create a new authorization policy using the logical profile created.
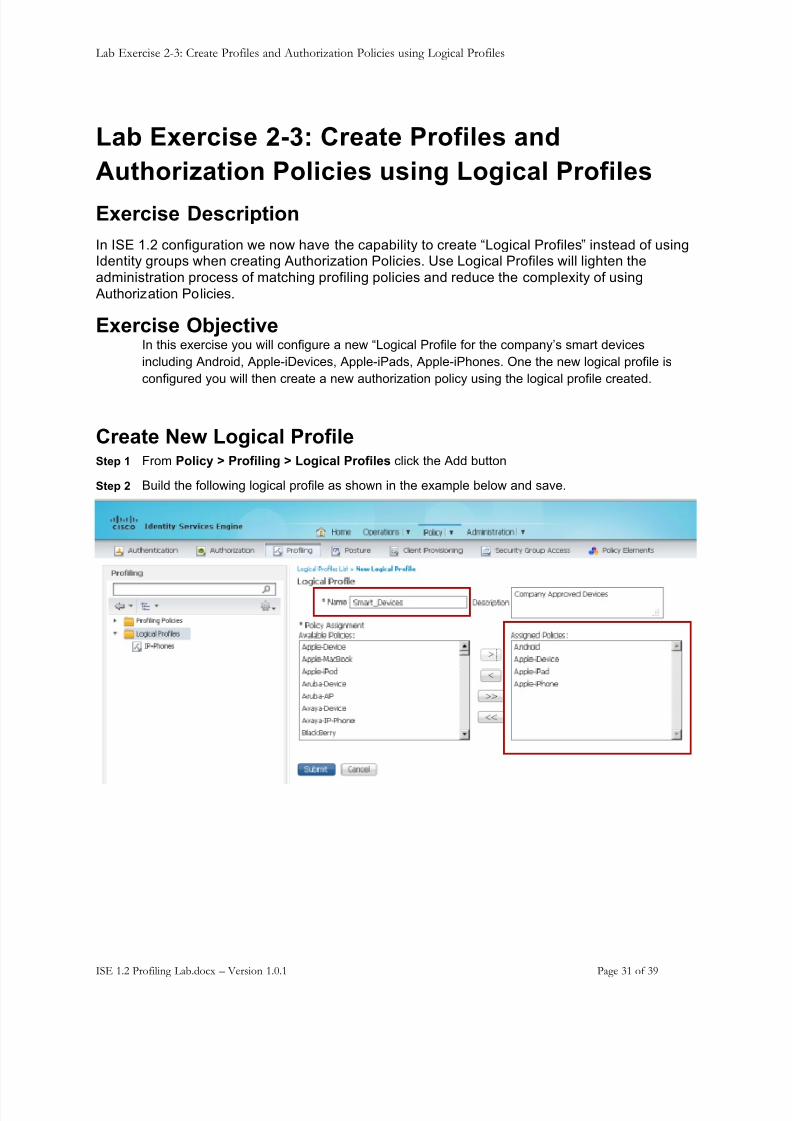
Create New Logical Profile Step 1 From Policy > Profiling > Logical Profiles click the Add button
Step 2 Build the following logical profile as shown in the example below and save.
8/10/2019 Lab Guide ISE 1 2 Profiling
http://slidepdf.com/reader/full/lab-guide-ise-1-2-profiling 32/39
Lab Exercise 2-3: Create Profiles and Authorization Policies using Logical Profiles
ISE 1.2 Profiling Lab.docx – Version 1.0.1 Page 32 of 39
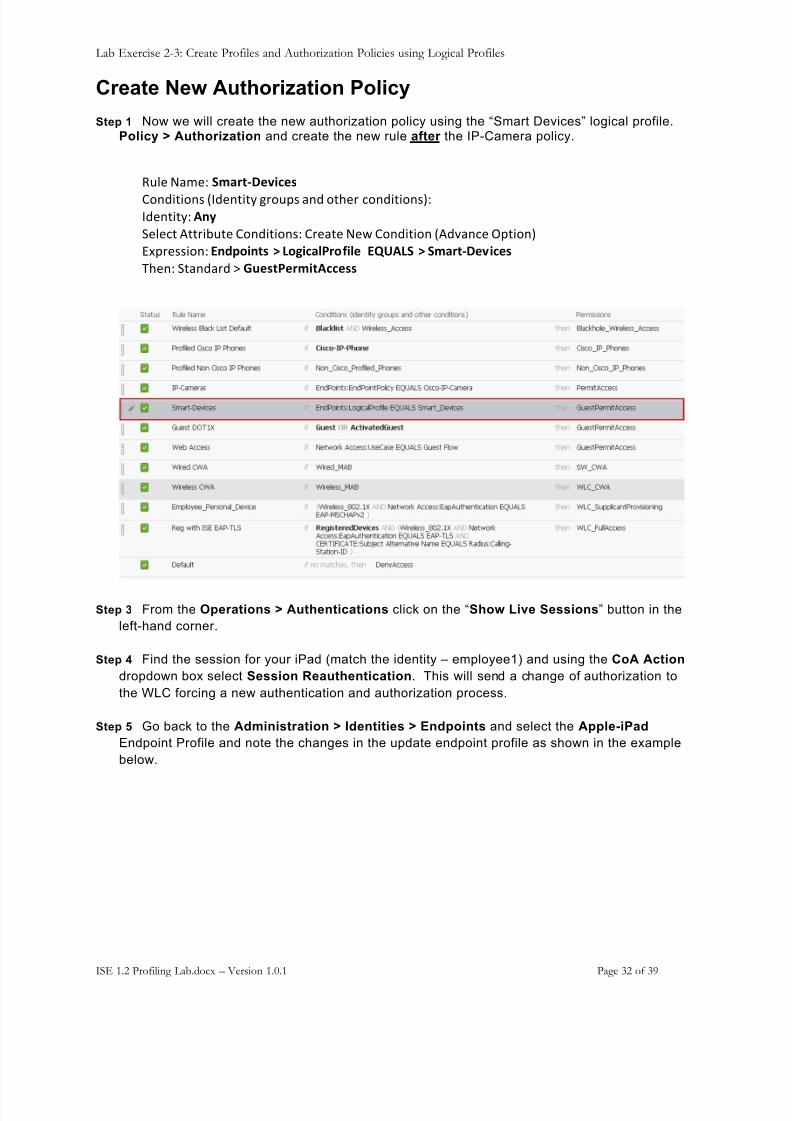
Create New Authorization Policy Step 1 Now we will create the new authorization policy using the “Smart Devices” logical profile.
Policy > Authorization and create the new rule after the IP-Camera policy.
W)9# I.@#[ :#)('74.5$3.& A(*7%+%(*0 2=7#*+%+' 8$()60 .*7 (+1#$ /(*7%+%(*05[=7#*+%+'[!%I B#9#/+ J++$%<)+# A(*7%+%(*0[ A$#.+# I#, A(*7%+%(* 2J7C.*/# Q6+%(*5E?6$#00%(*[9%"C*$%'& , N*=$3)EU(*<$E. 9VW!N: , :#)('74.5$3.& K1#*[ B+.*7.$7 \ A2.&'U.(#$'!33.&&
Step 3 From the Operations > Authentications click on the “ Show Live Sessions ” button in theleft-hand corner.
Step 4 Find the session for your iPad (match the identity – employee1) and using the CoA Action dropdown box select Session Reauthentication . This will send a change of authorization tothe WLC forcing a new authentication and authorization process.
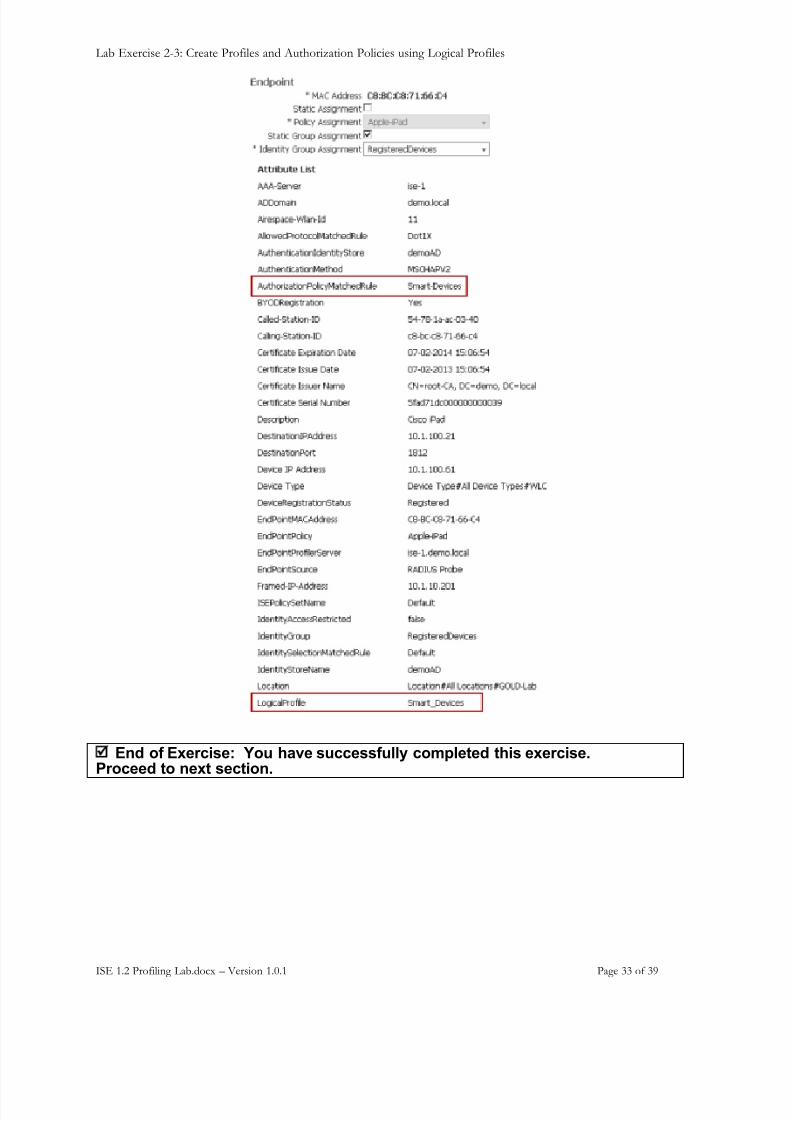
Step 5 Go back to the Administration > Identities > Endpoints and select the Apple-iPadEndpoint Profile and note the changes in the update endpoint profile as shown in the examplebelow.
8/10/2019 Lab Guide ISE 1 2 Profiling
http://slidepdf.com/reader/full/lab-guide-ise-1-2-profiling 33/39
Lab Exercise 2-3: Create Profiles and Authorization Policies using Logical Profiles
ISE 1.2 Profiling Lab.docx – Version 1.0.1 Page 33 of 39
End of Exercise: You have successfully completed this exercise.Proceed to next section.
8/10/2019 Lab Guide ISE 1 2 Profiling
http://slidepdf.com/reader/full/lab-guide-ise-1-2-profiling 34/39
Lab Exercise 2-4: Profile Feed Service
ISE 1.2 Profiling Lab.docx – Version 1.0.1 Page 34 of 39
Lab Exercise 2 -4 : Profile Feed Service
Exercise Description In ISE 1.2 we have the capability to receive a feed service from Cisco Systems that willdynamically change and/or add new profiling policies and OUI updates to the ISE system
without the need to perform upgrades or patches like you had to do in ISE 1.x versions.
Exercise Objective In this exercise, you will configure the Profiler Feed Service option. You will then run the profileupdate feature and see the resulting profile and OUI updates. Next you will run one of the reportsfor Profile Feed Service.
Profiler Feed Service Configuration Step 1 From the vSphere client power on the p##_ISE-FeedService and p##_Mail images.
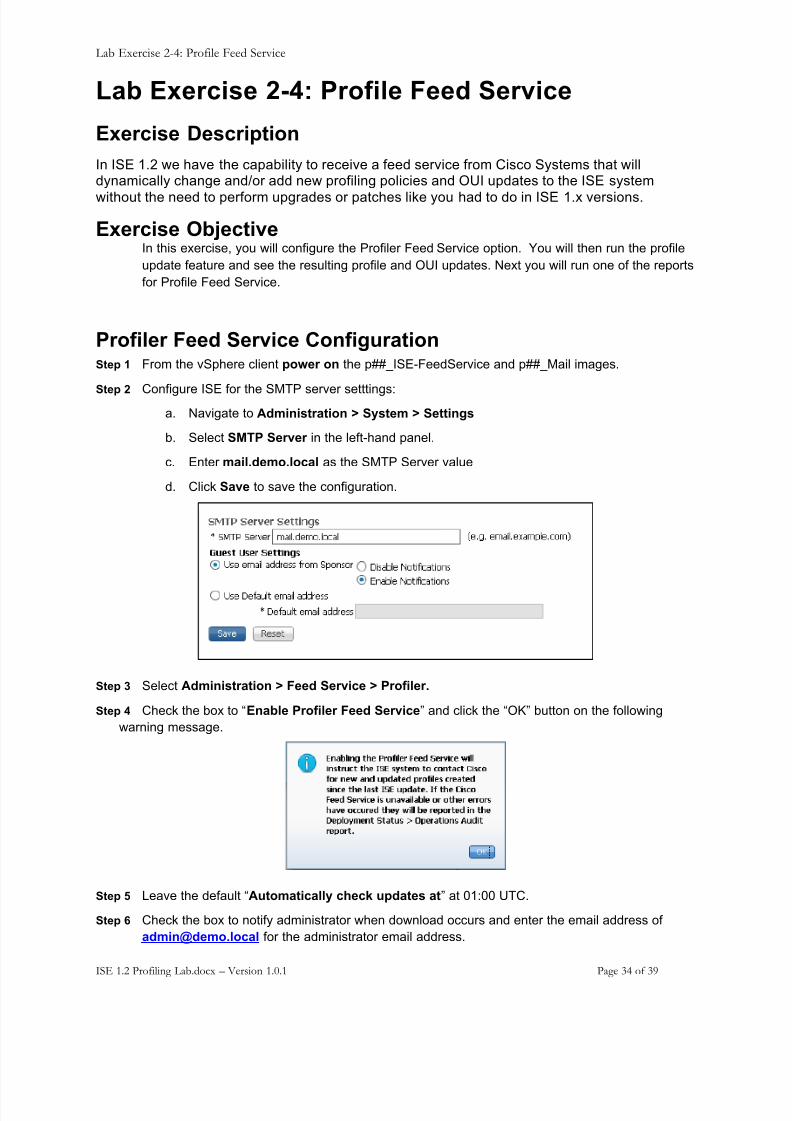
Step 2 Configure ISE for the SMTP server setttings:a. Navigate to Administration > System > Settings
b. Select SMTP Server in the left-hand panel.
c. Enter mail.demo.local as the SMTP Server value
d. Click Save to save the configuration.
Step 3 Select Administration > Feed Service > Profiler.
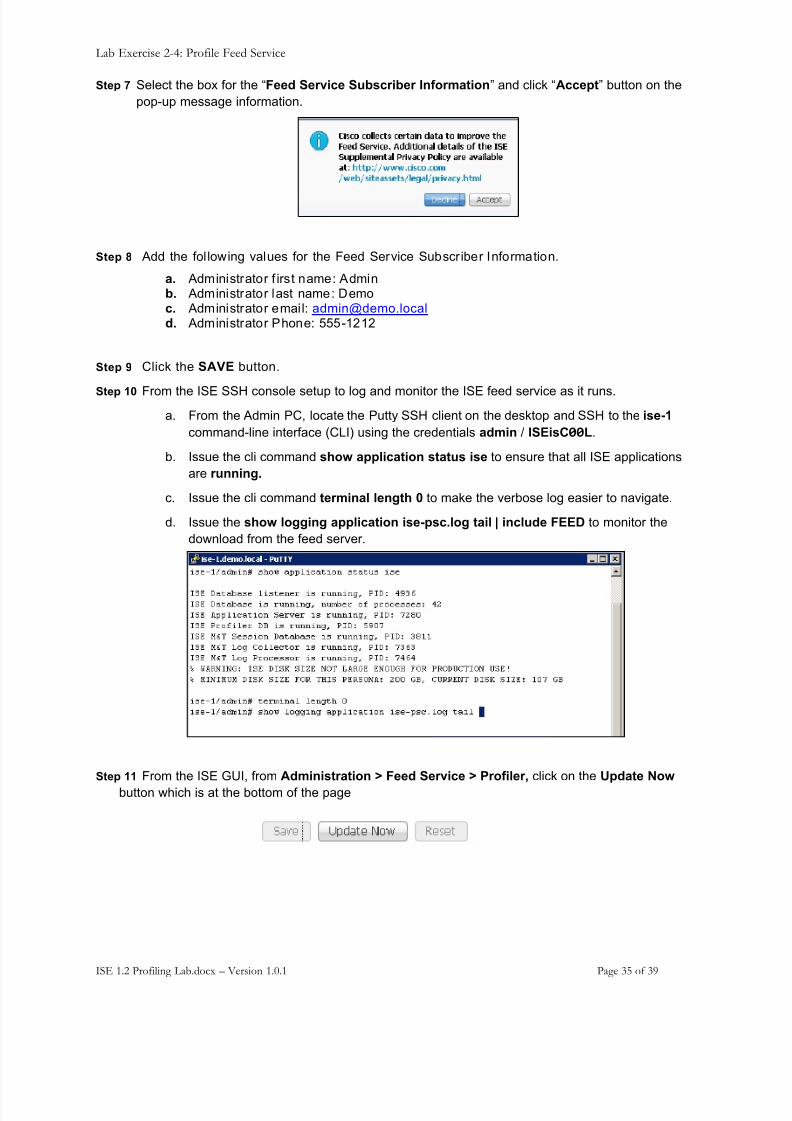
Step 4 Check the box to “ Enable Profiler Feed Service ” and click the “OK” button on the followingwarning message.
Step 5 Leave the default “ Automatically check updates at ” at 01:00 UTC.
Step 6 Check the box to notify administrator when download occurs and enter the email address [email protected] for the administrator email address.
8/10/2019 Lab Guide ISE 1 2 Profiling
http://slidepdf.com/reader/full/lab-guide-ise-1-2-profiling 35/39
8/10/2019 Lab Guide ISE 1 2 Profiling
http://slidepdf.com/reader/full/lab-guide-ise-1-2-profiling 36/39
Lab Exercise 2-4: Profile Feed Service
ISE 1.2 Profiling Lab.docx – Version 1.0.1 Page 36 of 39
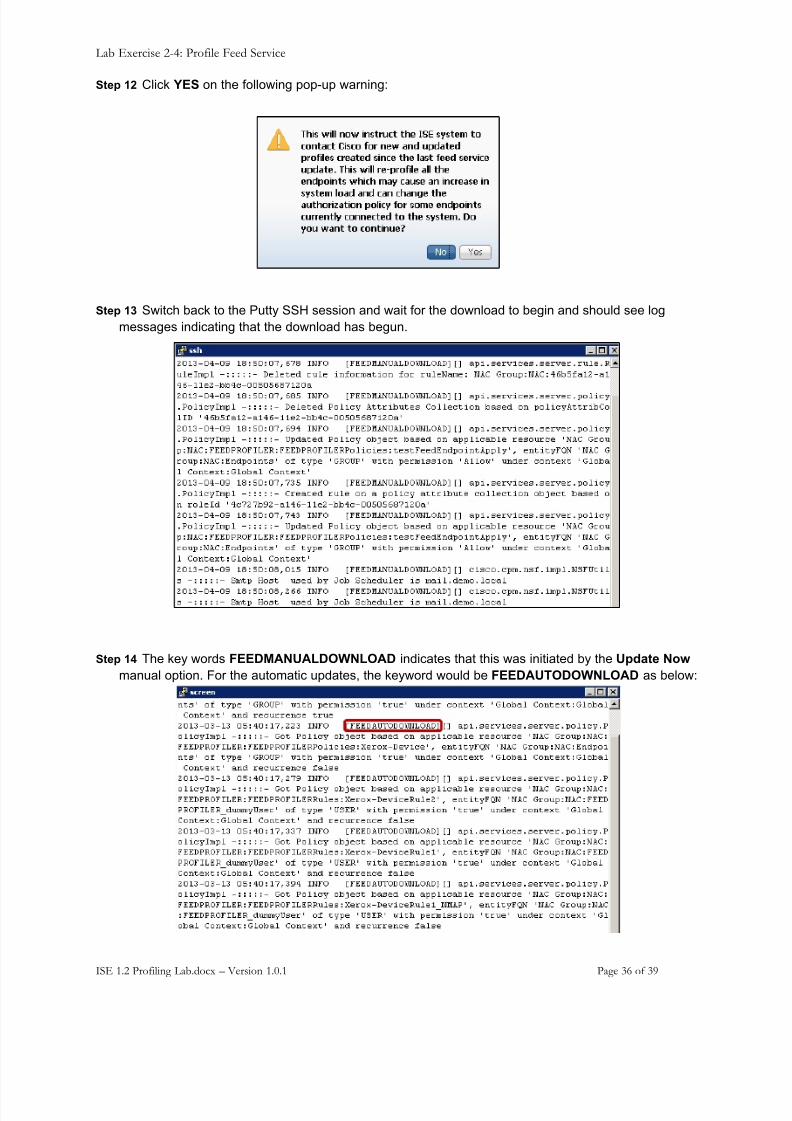
Step 12 Click YES on the following pop-up warning:
Step 13 Switch back to the Putty SSH session and wait for the download to begin and should see logmessages indicating that the download has begun.
Step 14 The key words FEEDMANUALDOWNLOAD indicates that this was initiated by the Update Now manual option. For the automatic updates, the keyword would be FEEDAUTODOWNLOAD as below:
8/10/2019 Lab Guide ISE 1 2 Profiling
http://slidepdf.com/reader/full/lab-guide-ise-1-2-profiling 37/39
Lab Exercise 2-4: Profile Feed Service
ISE 1.2 Profiling Lab.docx – Version 1.0.1 Page 37 of 39
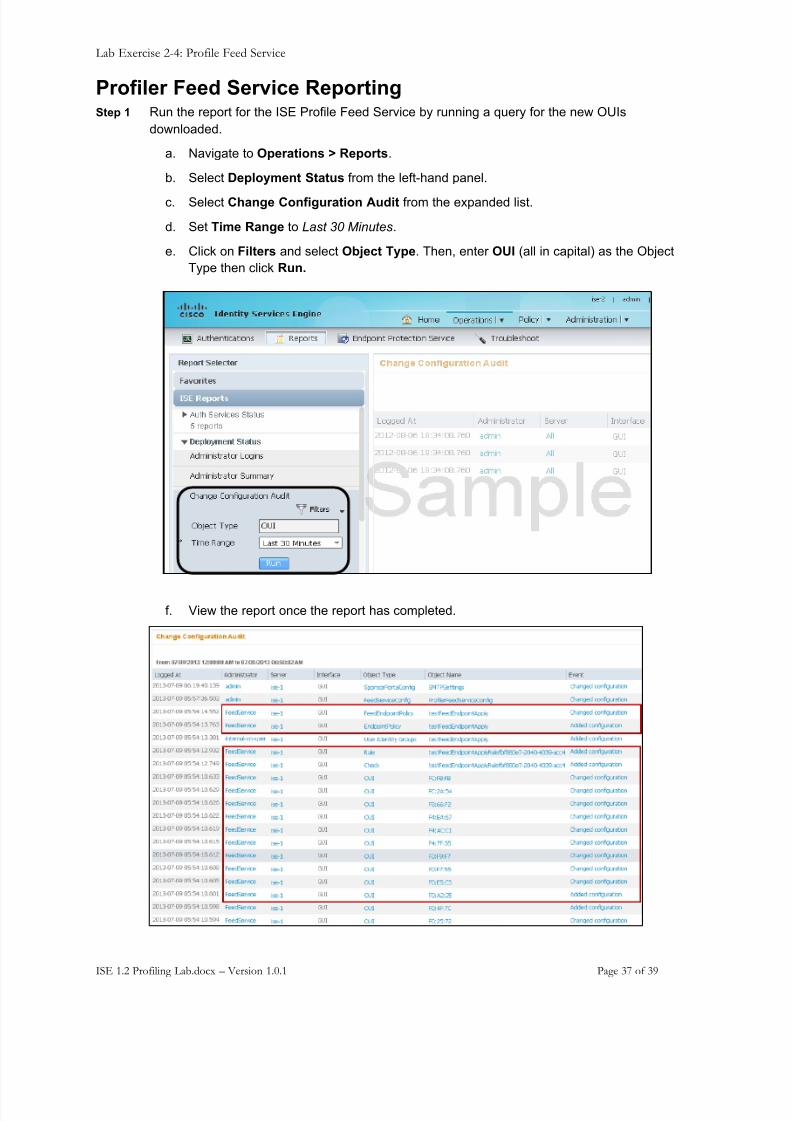
Profiler Feed Service ReportingStep 1 Run the report for the ISE Profile Feed Service by running a query for the new OUIs
downloaded.
a. Navigate to Operations > Reports .
b. Select Deployment Status from the left-hand panel.
c. Select Change Configuration Audit from the expanded list.
d. Set Time Range to Last 30 Minutes .
e. Click on Filters and select Object Type . Then, enter OUI (all in capital) as the ObjectType then click Run.
f. View the report once the report has completed.
8/10/2019 Lab Guide ISE 1 2 Profiling
http://slidepdf.com/reader/full/lab-guide-ise-1-2-profiling 38/39
Lab Exercise 2-4: Profile Feed Service
ISE 1.2 Profiling Lab.docx – Version 1.0.1 Page 38 of 39
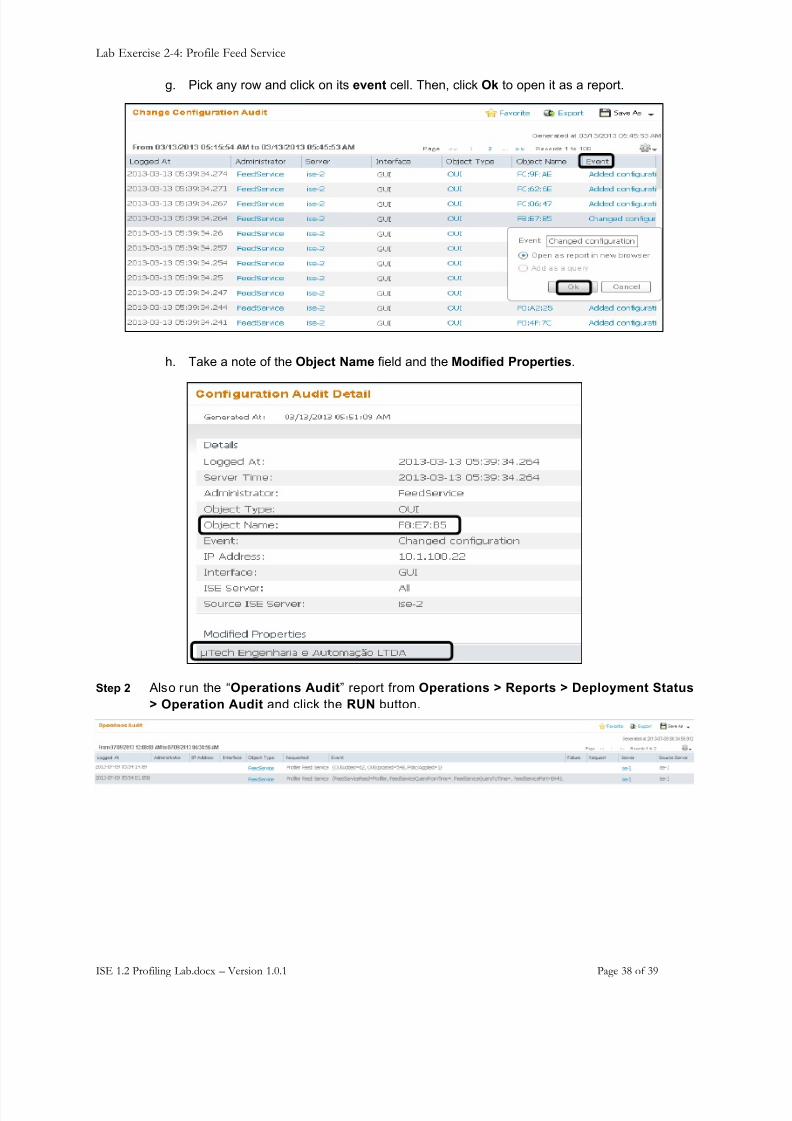
g. Pick any row and click on its event cell. Then, click Ok to open it as a report.
h. Take a note of the Object Name field and the Modified Properties .
Step 2 Also run the “ Operations Audit ” report from Operations > Reports > Deployment Status> Operation Audit and click the RUN button.
8/10/2019 Lab Guide ISE 1 2 Profiling
http://slidepdf.com/reader/full/lab-guide-ise-1-2-profiling 39/39
Lab Exercise 2-4: Profile Feed Service
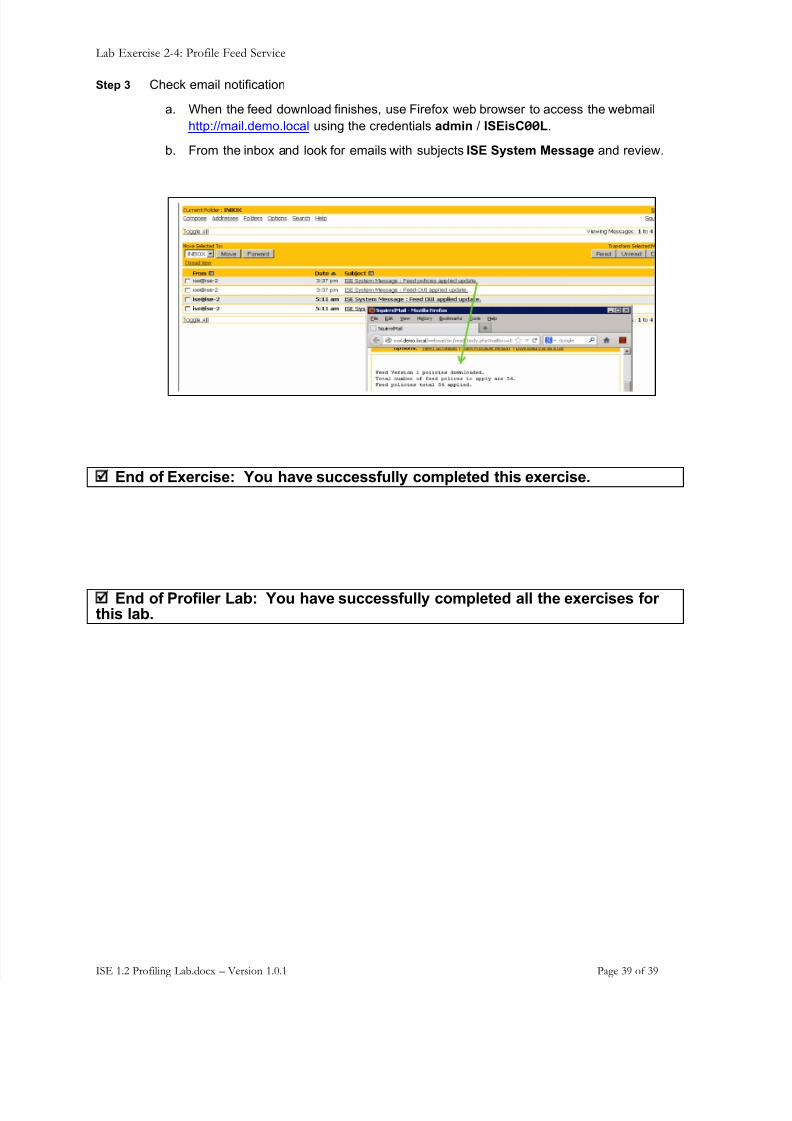
Step 3 Check email notification
a. When the feed download finishes, use Firefox web browser to access the webmailhttp://mail.demo.local using the credentials admin / ISEisC !! L.
b. From the inbox and look for emails with subjects ISE System Message and review.
End of Exercise: You have successfully completed this exercise.
End of Profiler Lab: You have successfully completed all the exercises forthis lab.