GX200 - bruehwiler.com
60
BEDIENUNGSANLEITUNG OPERATOR MANUAL MODE D‘EMPLOI ISTRUZIONI PER L’USO GEBRUIKSHANDLEIDING DE GB FR IT NL GX200
Transcript of GX200 - bruehwiler.com
1
BEDIENUNGSANLEITUNGOPERATOR MANUAL
MODE D‘EMPLOIISTRUZIONI PER L’USO
GEBRUIKSHANDLEIDING
DEGBFRITNL
GX200
2
2.
3.
9.
4.
8.
1. 5.
6.
7.
10.
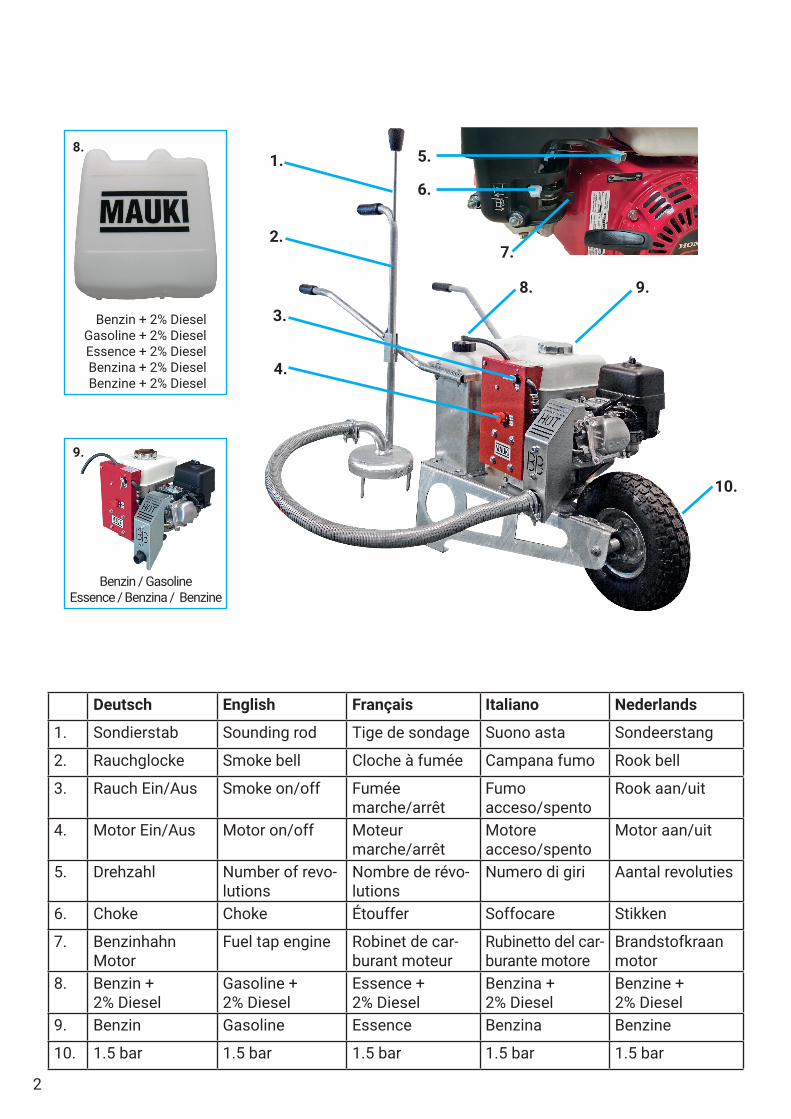
Deutsch English Français Italiano Nederlands
1. Sondierstab Sounding rod Tige de sondage Suono asta Sondeerstang
2. Rauchglocke Smoke bell Cloche à fumée Campana fumo Rook bell
3. Rauch Ein/Aus Smoke on/off Fumée marche/arrêt
Fumoacceso/spento
Rook aan/uit
4. Motor Ein/Aus Motor on/off Moteur marche/arrêt
Motore acceso/spento
Motor aan/uit
5. Drehzahl Number of revo-lutions
Nombre de révo-lutions
Numero di giri Aantal revoluties
6. Choke Choke Étouffer Soffocare Stikken
7. Benzinhahn Motor
Fuel tap engine Robinet de car-burant moteur
Rubinetto del car-burante motore
Brandstofkraan motor
8. Benzin + 2% Diesel
Gasoline +2% Diesel
Essence +2% Diesel
Benzina + 2% Diesel
Benzine +2% Diesel
9. Benzin Gasoline Essence Benzina Benzine
10. 1.5 bar 1.5 bar 1.5 bar 1.5 bar 1.5 bar
Benzin / GasolineEssence / Benzina / Benzine
9.
8.
Benzin + 2% DieselGasoline + 2% DieselEssence + 2% DieselBenzina + 2% DieselBenzine + 2% Diesel
3
2.
3. 3.
1.
4.
5. 6.
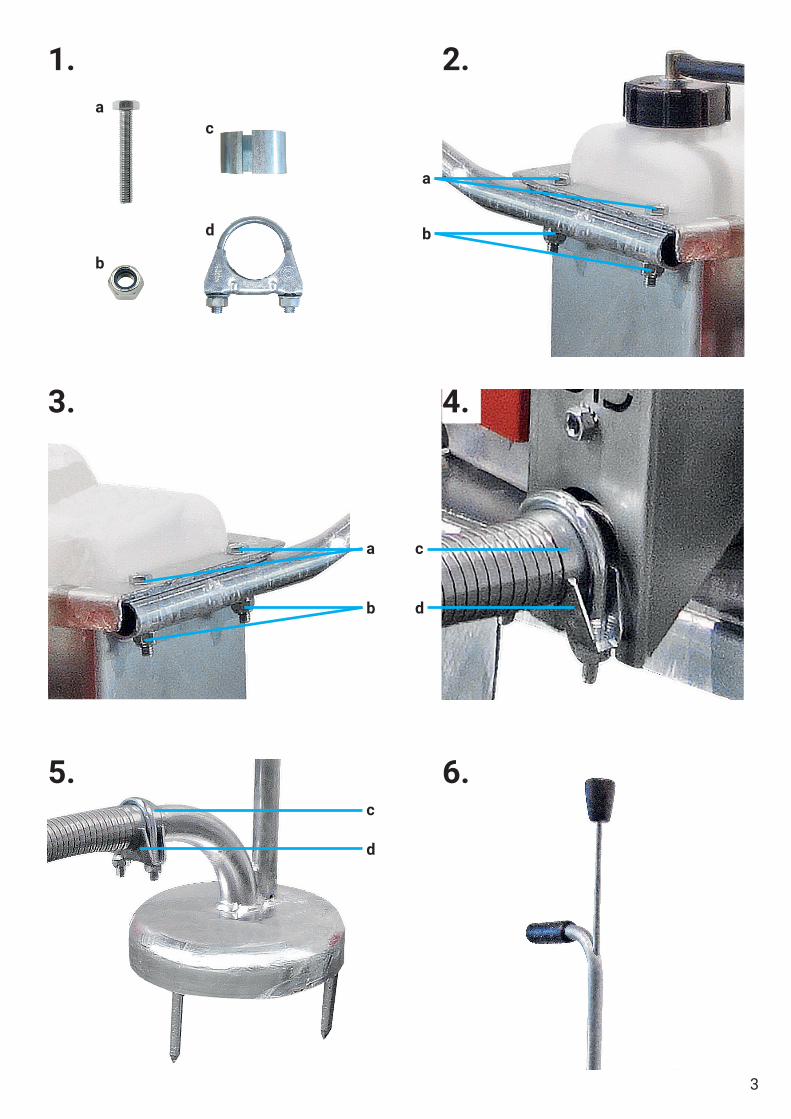
a
b
a
b
c
d
c
d
a
b
c
d
4
Sprachen/Languages/Langues/Lingue/TalenDE. . . . . . . . . . . . . . . . . . . . . . . . . . . . . . . . . . . . . . . . . . . . . . . . . . . . . . . . . . . . . . . . . . . . . . . . . . . . . . . . . .5GB . . . . . . . . . . . . . . . . . . . . . . . . . . . . . . . . . . . . . . . . . . . . . . . . . . . . . . . . . . . . . . . . . . . . . . . . . . . . . . . .16FR. . . . . . . . . . . . . . . . . . . . . . . . . . . . . . . . . . . . . . . . . . . . . . . . . . . . . . . . . . . . . . . . . . . . . . . . . . . . . . . . .27IT . . . . . . . . . . . . . . . . . . . . . . . . . . . . . . . . . . . . . . . . . . . . . . . . . . . . . . . . . . . . . . . . . . . . . . . . . . . . . . . . .38NL. . . . . . . . . . . . . . . . . . . . . . . . . . . . . . . . . . . . . . . . . . . . . . . . . . . . . . . . . . . . . . . . . . . . . . . . . . . . . . . . .49
Wichtig: Diese Anleitung muss sorgfältig durchgelesen werden, bevor Sie den Mäusevernichter zum ersten Mal einsetzen. Sie enthält Informationen zu Ihrer eigenen Sicherheit und zur Sicherheit anderer.
Important: Please read these instructions through carefully before using the Rodent Destroyer for the first time. They contain information which is critical for your own safety and the safety of others.
Important: Ce mode d‘emploi doit être soigneusement lu avant d‘utiliser le destructeur de mulots pour la première fois. Il contient des informations pour votre propre sécurité et celle des autres.
Importante: Preghiamo di leggere attentamente questo libretto di utilizzo, in modo da usare corret-tamente il nostro apparecchio e svolgere una giusta manutenzione. Le istruzioni inoltre vi aiuteran-no ad evitare danni e pericoli a cose e persone.
Belangrijk: Voor u deze Muizenverdelger gebruikt, is het van belang dat u deze handleiding goed doorleest. Hierin staat informatie voor uw eigen veiligheid, maar ook voor die van anderen.

5
INHALTSVERZEICHNIS MAUKI Mäusevernichter - GX 200
1. Einleitung . . . . . . . . . . . . . . . . . . . . . . . . . . . . . . . . . . . . . . . . . . . . . . . . . . . . . . . . . . . . . . . . . . . . . . . . . 61.1 Funktionsweise . . . . . . . . . . . . . . . . . . . . . . . . . . . . . . . . . . . . . . . . . . . . . . . . . . . . . . . . . . . . . . . . 61.2 Konstruktion . . . . . . . . . . . . . . . . . . . . . . . . . . . . . . . . . . . . . . . . . . . . . . . . . . . . . . . . . . . . . . . . . . . 61.3 Verwendungsbereich . . . . . . . . . . . . . . . . . . . . . . . . . . . . . . . . . . . . . . . . . . . . . . . . . . . . . . . . . . . . 6
2. Sicherheit . . . . . . . . . . . . . . . . . . . . . . . . . . . . . . . . . . . . . . . . . . . . . . . . . . . . . . . . . . . . . . . . . . . . . . . . . 72.1 Abgase . . . . . . . . . . . . . . . . . . . . . . . . . . . . . . . . . . . . . . . . . . . . . . . . . . . . . . . . . . . . . . . . . . . . . . . 72.2 Verbrennungsgefahr . . . . . . . . . . . . . . . . . . . . . . . . . . . . . . . . . . . . . . . . . . . . . . . . . . . . . . . . . . . . 72.3 Geräuschemissionen. . . . . . . . . . . . . . . . . . . . . . . . . . . . . . . . . . . . . . . . . . . . . . . . . . . . . . . . . . . . 72.4 Kraftstoff. . . . . . . . . . . . . . . . . . . . . . . . . . . . . . . . . . . . . . . . . . . . . . . . . . . . . . . . . . . . . . . . . . . . . . 72.5 Allgemeines . . . . . . . . . . . . . . . . . . . . . . . . . . . . . . . . . . . . . . . . . . . . . . . . . . . . . . . . . . . . . . . . . . . 7
3. Technische Daten . . . . . . . . . . . . . . . . . . . . . . . . . . . . . . . . . . . . . . . . . . . . . . . . . . . . . . . . . . . . . . . . . . 84. Inbetriebnahme . . . . . . . . . . . . . . . . . . . . . . . . . . . . . . . . . . . . . . . . . . . . . . . . . . . . . . . . . . . . . . . . . . . . 8
4.1 Vorbereitung . . . . . . . . . . . . . . . . . . . . . . . . . . . . . . . . . . . . . . . . . . . . . . . . . . . . . . . . . . . . . . . . . . . 84.2 Motor starten (siehe auch Bedienungsanleitung Motor) . . . . . . . . . . . . . . . . . . . . . . . . . . . . . . 84.3 Motor abstellen . . . . . . . . . . . . . . . . . . . . . . . . . . . . . . . . . . . . . . . . . . . . . . . . . . . . . . . . . . . . . . . . 9
5. Wartung . . . . . . . . . . . . . . . . . . . . . . . . . . . . . . . . . . . . . . . . . . . . . . . . . . . . . . . . . . . . . . . . . . . . . . . . . . 96. Lagerung. . . . . . . . . . . . . . . . . . . . . . . . . . . . . . . . . . . . . . . . . . . . . . . . . . . . . . . . . . . . . . . . . . . . . . . . . . 97. Mäusebekämpfung mit MAUKI . . . . . . . . . . . . . . . . . . . . . . . . . . . . . . . . . . . . . . . . . . . . . . . . . . . . . .10
7.1 Mäusebau sondieren . . . . . . . . . . . . . . . . . . . . . . . . . . . . . . . . . . . . . . . . . . . . . . . . . . . . . . . . . . .107.2 Maschinen-Einsatz. . . . . . . . . . . . . . . . . . . . . . . . . . . . . . . . . . . . . . . . . . . . . . . . . . . . . . . . . . . . .107.3 Kontrolle über die Rauchverteilung . . . . . . . . . . . . . . . . . . . . . . . . . . . . . . . . . . . . . . . . . . . . . . .107.4 Vorbereiten des nächsten Mäusebaues . . . . . . . . . . . . . . . . . . . . . . . . . . . . . . . . . . . . . . . . . . .107.5 Standortwechsel . . . . . . . . . . . . . . . . . . . . . . . . . . . . . . . . . . . . . . . . . . . . . . . . . . . . . . . . . . . . . .107.6 Bautenvernichtung. . . . . . . . . . . . . . . . . . . . . . . . . . . . . . . . . . . . . . . . . . . . . . . . . . . . . . . . . . . . .107.7 Einteilung und Vorgang . . . . . . . . . . . . . . . . . . . . . . . . . . . . . . . . . . . . . . . . . . . . . . . . . . . . . . . . .107.8 Nachkontrolle . . . . . . . . . . . . . . . . . . . . . . . . . . . . . . . . . . . . . . . . . . . . . . . . . . . . . . . . . . . . . . . . .117.9 Zeitpunkt der Bekämpfung . . . . . . . . . . . . . . . . . . . . . . . . . . . . . . . . . . . . . . . . . . . . . . . . . . . . . .117.10 Hinweis . . . . . . . . . . . . . . . . . . . . . . . . . . . . . . . . . . . . . . . . . . . . . . . . . . . . . . . . . . . . . . . . . . . . .11
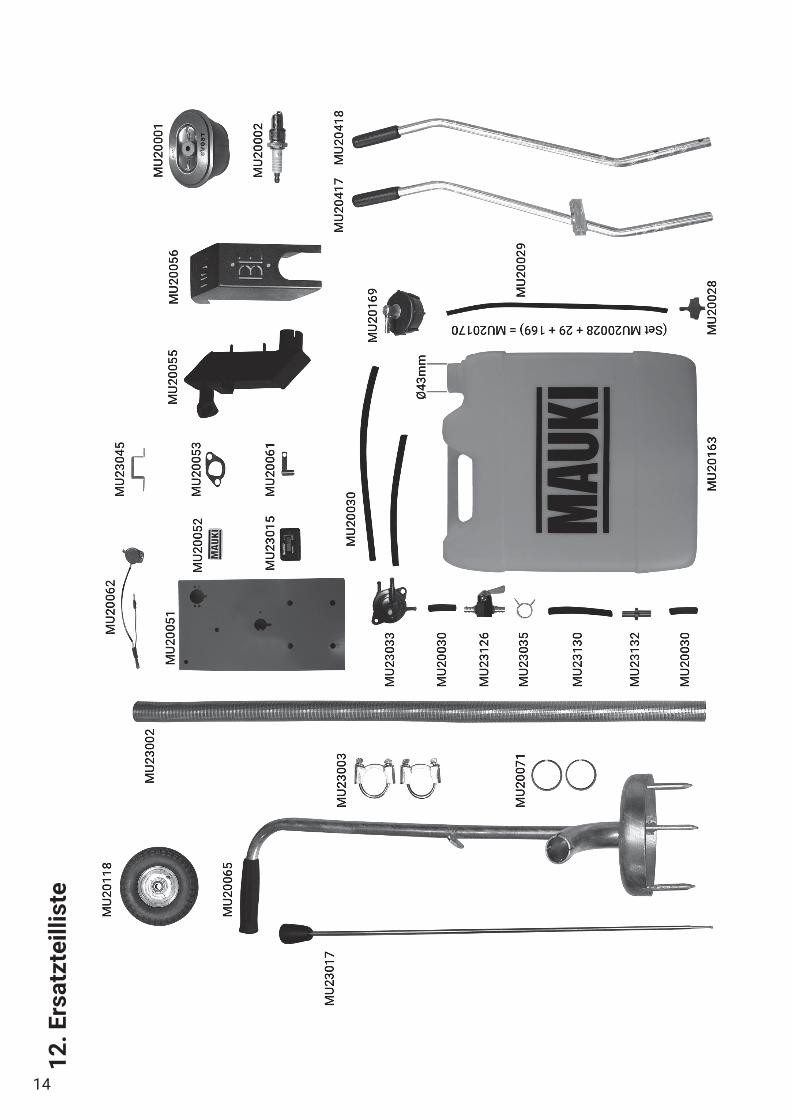
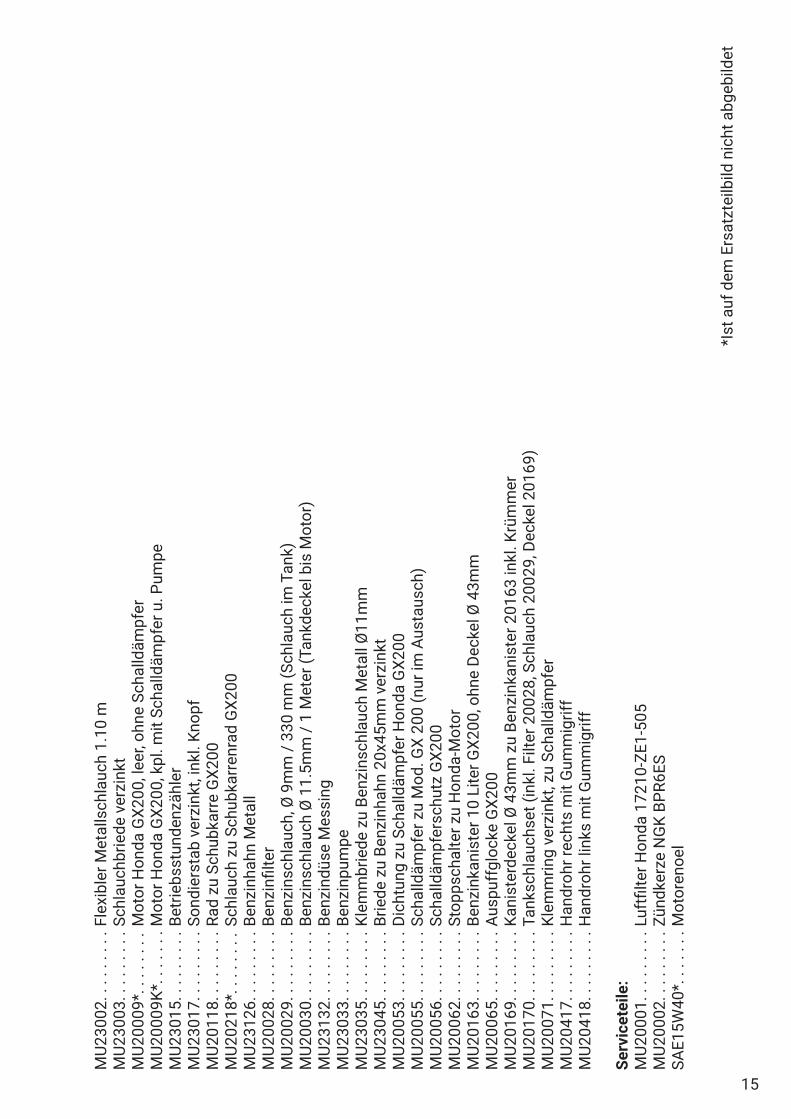
8. Betriebsstörungen. . . . . . . . . . . . . . . . . . . . . . . . . . . . . . . . . . . . . . . . . . . . . . . . . . . . . . . . . . . . . . . . .119. Service - Stelle . . . . . . . . . . . . . . . . . . . . . . . . . . . . . . . . . . . . . . . . . . . . . . . . . . . . . . . . . . . . . . . . . . .1210. Garantiebedingungen . . . . . . . . . . . . . . . . . . . . . . . . . . . . . . . . . . . . . . . . . . . . . . . . . . . . . . . . . . . . .1211. EG - Konformitätserklärung. . . . . . . . . . . . . . . . . . . . . . . . . . . . . . . . . . . . . . . . . . . . . . . . . . . . . . . .1312. Ersatzteilliste. . . . . . . . . . . . . . . . . . . . . . . . . . . . . . . . . . . . . . . . . . . . . . . . . . . . . . . . . . . . . . . . . . . .14
DEDiese Bedienungsanleitung ist urheberrechtlich geschützt. Alle Rechte bleiben vorbehalten, beson-ders das Recht der Vervielfältigung, Übersetzung und der Verarbeitung mit elektronischen Systemen.

6
1. EinleitungVielen Dank, dass Sie sich für einen MAUKI Mäusevernichter entschieden haben. Wir als Hersteller möchten, dass Sie mit Ihrem neuen Produkt vollständig zufrieden sind.
WICHTIG: Lesen Sie diese Anleitung sorgfältig durch, damit Sie Ihr Gerät korrekt bedienen und warten können. Die Anleitung hilft bei der Vermeidung von Verletzungen und Schäden.
1.1 FunktionsweiseMit einer Benzinpumpe wird ein Benzin-Diesel-Gemisch angesaugt, genau dosiert in den Spezial-Schalldämpfer eingespritzt und dort verdampft. Dieser Rauch wird über einen flexiblen Metall-schlauch und einer Glocke in das Gangsystem geleitet. Der hohe Druck des Industriemotors bewirkt eine schnelle Rauchverteilung und der vorhandene Sauerstoff wird aus dem Gangsystem gepresst. Die Schädlinge haben keine Chance zu entrinnen. Innert Sekunden werden die Atemwege gelähmt. Dies führt zu einem raschen und schmerzlosen Tod. Falls die betäubte oder tote Maus von einer Katze oder einem Greifvogel gefressen wird, besteht keine Gefahr einer Sekundärvergiftung.
1.2 KonstruktionDie robuste und handliche Schubkarre ist feuerverzinkt und mit einer Rauchglocke sowie einem Sondierstab ausgerüstet. Der leistungsstarke 5.5 PS Honda-Motor entspricht der neuesten Techno-logie, ist langlebig und servicefreundlich. Zur Sicherheit des Bedieners kann beim Standortwechsel die Rauchentwicklung abgestellt werden.
1.3 VerwendungsbereichDer MAUKI - Mäusevernichter dient ausschliesslich dem Zweck, Wühlmäuse gezielt in ihren Bauten zu bekämpfen. Bitte beachten Sie folgende Einsatz-Beschränkungen:
1. Das Gerät darf nur im Freien eingesetzt werden! In geschlossenen Räumen besteht akute Vergif-tungsgefahr durch Kohlenmonoxid!
2. Der Maulwurf ist geschützt und darf nur mit einer Ausnahmegenehmigung der zuständigen Be-hörde (Landratsamt) bekämpft werden.
3. Gemäss Tierschutzgesetz ist für die gewerbsmässige Bekämpfung von Wirbeltieren als Schäd-linge eine Bewilligung notwendig. Die Bekämpfung von Wirbeltieren als Schädlinge durch Privatper-sonen ist jedoch nicht erlaubnispflichtig.
4. Der Einsatz in Wasserschutzgebieten und Trinkwasserschutzzonen I und II, sowie auf Flächen mit Trinkwasserleitungen aus Kunststoff im Umkreis von 100m ist nicht erlaubt.
5. Die Verwendung des Gerätes zum Zweck des Pflanzenschutzes in Anbaubereichen (Äcker, Ge-wächshäuser, Wälder, usw.) ist nicht zulässig.
6. Der Benutzer ist allein verantwortlich für die ordnungsgemässe Verwendung der Ausrüstung und die Einhaltung der Nutzungsbeschränkungen.
7. Verlangen Sie vor dem Kauf oder dem ersten Einsatz bei Ihrer zuständigen Behörde (Landrats-amt) nach einer Einsatzbewilligung.
7
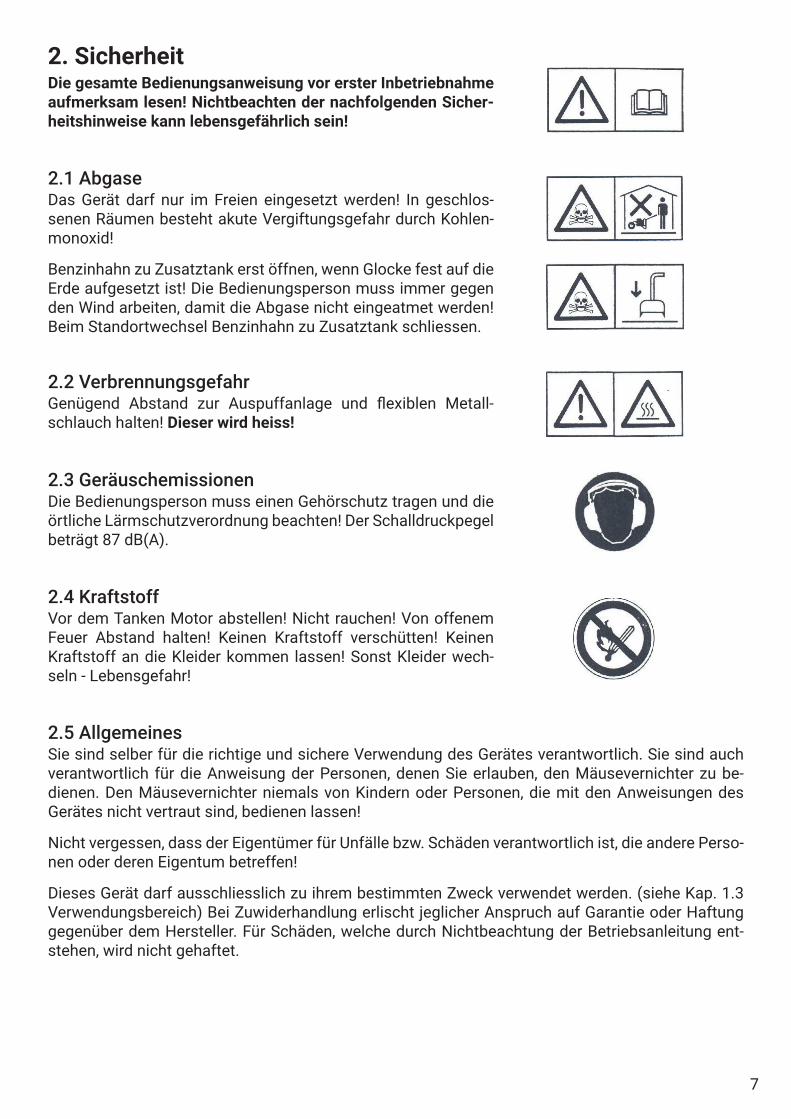
2. SicherheitDie gesamte Bedienungsanweisung vor erster Inbetriebnahme aufmerksam lesen! Nichtbeachten der nachfolgenden Sicher-heitshinweise kann lebensgefährlich sein!
2.1 AbgaseDas Gerät darf nur im Freien eingesetzt werden! In geschlos-senen Räumen besteht akute Vergiftungsgefahr durch Kohlen-monoxid!
Benzinhahn zu Zusatztank erst öffnen, wenn Glocke fest auf die Erde aufgesetzt ist! Die Bedienungsperson muss immer gegen den Wind arbeiten, damit die Abgase nicht eingeatmet werden! Beim Standortwechsel Benzinhahn zu Zusatztank schliessen.
2.2 VerbrennungsgefahrGenügend Abstand zur Auspuffanlage und flexiblen Metall-schlauch halten! Dieser wird heiss!
2.3 GeräuschemissionenDie Bedienungsperson muss einen Gehörschutz tragen und die örtliche Lärmschutzverordnung beachten! Der Schalldruckpegel beträgt 87 dB(A).
2.4 KraftstoffVor dem Tanken Motor abstellen! Nicht rauchen! Von offenem Feuer Abstand halten! Keinen Kraftstoff verschütten! Keinen Kraftstoff an die Kleider kommen lassen! Sonst Kleider wech-seln - Lebensgefahr!
2.5 AllgemeinesSie sind selber für die richtige und sichere Verwendung des Gerätes verantwortlich. Sie sind auch verantwortlich für die Anweisung der Personen, denen Sie erlauben, den Mäusevernichter zu be-dienen. Den Mäusevernichter niemals von Kindern oder Personen, die mit den Anweisungen des Gerätes nicht vertraut sind, bedienen lassen!
Nicht vergessen, dass der Eigentümer für Unfälle bzw. Schäden verantwortlich ist, die andere Perso-nen oder deren Eigentum betreffen!
Dieses Gerät darf ausschliesslich zu ihrem bestimmten Zweck verwendet werden. (siehe Kap. 1.3 Verwendungsbereich) Bei Zuwiderhandlung erlischt jeglicher Anspruch auf Garantie oder Haftung gegenüber dem Hersteller. Für Schäden, welche durch Nichtbeachtung der Betriebsanleitung ent-stehen, wird nicht gehaftet.

8
3. Technische DatenHersteller: Brühwiler Maschinen AG, Hauptstrasse 1, CH-8362 Balterswil Tel.: 071 973 80 40 (0041 71 973 80 40) Fax.: 071 973 80 49 (0041 71 973 80 49) E-Mail: [email protected] Web: www.mauki.chBezeichnung: MAUKI Mäusevernichter GX 200Abmessungen: Höhe 64 cm, Breite 59 cm, Länge 126 cmGewicht: ca. 37 kg (ohne Betriebsstoff)Motor: Honda GX 200T Hubraum 196 cm3
Netto Leistung 4.1 kW / 5.5 PSSchallpegel: 3400 U/min: 87dB(A) 2200 U/min: 78dB(A)Betriebsstoff: Motor: Bleifreibenzin (kein Oel) Zusatztank: Bleifreibenzin mit 2% Diesel (2dl Diesel pro 10l Benzin)Fahrgestell: feuerverzinkte Schubkarre mit PneuräderZusatzbehälter: 10 Liter für Benzin-Dieselgemisch (2dl Diesel pro 10l Benzin)Zubehör: inkl. Sondierstab, BetriebsanleitungGarantie: 2 Jahre
4. Inbetriebnahme4.1 VorbereitungAuftanken. Achtung! Benzin ist leicht entflammbar und hochexplosiv! Feuer und Explosionen kön-nen Verbrennungen oder Sachschäden verursachen. Kraftstoff nur in Behältern aufbewahren, die speziell für diesen Zweck konstruiert wurden. Für Kinder unzugänglich aufbewahren. Das Gerät nur im Freien auftanken und beim Tanken nicht rauchen. Zum Auffüllen einen Trichter verwenden. Vor dem Motorstart Kraftstoff nachfüllen. Niemals den Tankdeckel entfernen oder Benzin einfüllen, während der Motor läuft oder wenn der Motor heiss ist. Den Kraftstofftank nicht ganz auffüllen. Nur soviel Benzin in den Tank füllen, bis der Flüssigkeitsstand 10 mm unter der Unterseite des Einfüll-stutzens liegt. Dieser Freiraum im Tank ermöglicht dem Kraftstoff, sich auszudehnen. Wenn Benzin verschüttet wurde, nicht versuchen, den Motor zu starten, sondern das Gerät vom verschütteten Kraftstoff wegschieben und offene Flammen vermeiden, bis die Kraftstoffdämpfe verdunstet sind.
Betriebsstoff: Motor Bleifreibenzin (kein Oel) Zusatztank max. 10 Liter Benzin - Dieselgemisch Mischverhältnis: 2% Diesel (2dl Diesel pro 10l Benzin) Hinweis Der Diesel hat keinen Einfluss auf die Wirkung des Gerätes, es dient nur zur Markierung der Abgase
4.2 Motor starten (siehe auch Bedienungsanleitung Motor)Achtung! Den Motor nicht in begrenzten Räumen laufen lassen, wo sich gefährliche Kohlenmono-xiddämpfe ansammeln können.
9
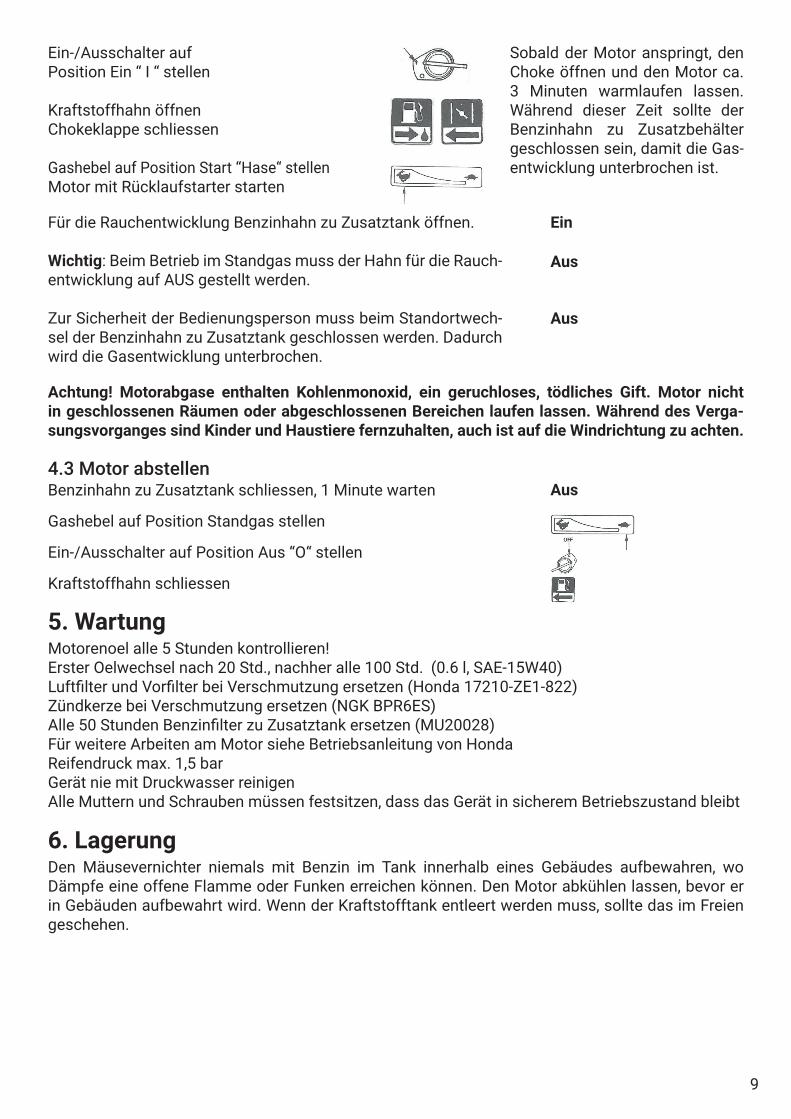
Ein-/Ausschalter auf Position Ein “ I “ stellen
Kraftstoffhahn öffnenChokeklappe schliessen
Gashebel auf Position Start “Hase“ stellenMotor mit Rücklaufstarter starten
Sobald der Motor anspringt, den Choke öffnen und den Motor ca. 3 Minuten warmlaufen lassen. Während dieser Zeit sollte der Benzinhahn zu Zusatzbehälter geschlossen sein, damit die Gas-entwicklung unterbrochen ist.
Für die Rauchentwicklung Benzinhahn zu Zusatztank öffnen.
Wichtig: Beim Betrieb im Standgas muss der Hahn für die Rauch-entwicklung auf AUS gestellt werden.
Zur Sicherheit der Bedienungsperson muss beim Standortwech-sel der Benzinhahn zu Zusatztank geschlossen werden. Dadurch wird die Gasentwicklung unterbrochen.
Ein
Aus
Aus
Achtung! Motorabgase enthalten Kohlenmonoxid, ein geruchloses, tödliches Gift. Motor nicht in geschlossenen Räumen oder abgeschlossenen Bereichen laufen lassen. Während des Verga-sungsvorganges sind Kinder und Haustiere fernzuhalten, auch ist auf die Windrichtung zu achten.
4.3 Motor abstellenBenzinhahn zu Zusatztank schliessen, 1 Minute warten
Gashebel auf Position Standgas stellen
Ein-/Ausschalter auf Position Aus “O“ stellen
Kraftstoffhahn schliessen
Aus
5. WartungMotorenoel alle 5 Stunden kontrollieren!Erster Oelwechsel nach 20 Std., nachher alle 100 Std. (0.6 l, SAE-15W40)Luftfilter und Vorfilter bei Verschmutzung ersetzen (Honda 17210-ZE1-822)Zündkerze bei Verschmutzung ersetzen (NGK BPR6ES)Alle 50 Stunden Benzinfilter zu Zusatztank ersetzen (MU20028)Für weitere Arbeiten am Motor siehe Betriebsanleitung von HondaReifendruck max. 1,5 barGerät nie mit Druckwasser reinigenAlle Muttern und Schrauben müssen festsitzen, dass das Gerät in sicherem Betriebszustand bleibt
6. LagerungDen Mäusevernichter niemals mit Benzin im Tank innerhalb eines Gebäudes aufbewahren, wo Dämpfe eine offene Flamme oder Funken erreichen können. Den Motor abkühlen lassen, bevor er in Gebäuden aufbewahrt wird. Wenn der Kraftstofftank entleert werden muss, sollte das im Freien geschehen.

10
7. Mäusebekämpfung mit MAUKI10 entscheidende Grundregeln bilden das Geheimnis des Erfolges.
7.1 Mäusebau sondierenMit dem Sondierstab den Mäusegang suchen und ein Loch von ca. 5 cm Durchmesser öffnen. ACHTUNG! Das Gerät darf nur im Freien eingesetzt werden! In geschlossenen Räumen besteht akute Vergiftungsgefahr durch Kohlenmonoxid!
7.2 Maschinen-EinsatzGlocke aufsetzen und gut andrücken. Motor ca. 5 Minuten auf Vollgas drehen lassen. ACHTUNG! Benzinhan zu Zusatztank erst öffnen, wenn Glocke fest auf die Erde gedrückt ist!
7.3 Kontrolle über die RauchverteilungGenau kontrollieren, ob bei einem zusammenhängenden Bau alle Gänge mit Rauch gefüllt sind. (siehe aufsteigender Rauch, ev. mit Sondierstab kontrollieren) Das System verlangt zur Markierung des Rauches den Zusatz von 2 % Diesel. Der Zusatz von Diesel oder Oel hat keinen Einfluss auf die Wirkung des Gerätes! Dieses dient nur zur Markierung der Mäusegänge. ACHTUNG! Die Bedienungsperson muss immer gegen den Wind zur Glocke stehen! Es dürfen sich keine weiteren Personen, insbesondere Kinder oder Haustiere, in der Nähe aufhalten!
7.4 Vorbereiten des nächsten MäusebauesWährend den 5 Minuten Laufzeit können Sie den nächsten Bau suchen und vorbereiten. Loch mit Sondierstab markieren. Bei sehr grossen Bauten (oft bis 50 Meter lang) empfehlen wir, die Glocke an 2 - 3 Orten anzusetzen.
7.5 StandortwechselZur Sicherheit der Bedienungsperson muss beim Standortwechsel der Benzinhahn zu Zusatztank geschlossen werden. Dadurch wird die Rauchentwicklung unterbrochen. Die Glocke abheben, diese an die Maschine hängen und sofort das Loch mit dem Fuss zudrücken, damit der Rauch nicht ent-weichen kann. Die Maschine an den neuen Standort verschieben und Glocke auf das vorher vorbe-reitete Loch ansetzen und Zusatzhahn öffnen.
7.6 BautenvernichtungGehen Sie an den vorgängig ausgeräucherten Bau zurück und treten Sie alle Mäusehaufen und Gän-ge zu. Damit verhindern Sie, dass zuwandernde Mäuse keine offenen Gänge finden und diese be-nützen können. Wenn sich eine Maus trotzdem einnistet, muss diese die Gänge frisch aufstossen. Diese sind dann gut erkennbar und bei einem 2. Durchgang neu auszuräuchern.
7.7 Einteilung und VorgangImmer grossflächig ausräuchern. Wenn möglich Ihren Nachbarn zum Mitmachen motivieren. Bei Hanglagen immer oben mit dem Ausräuchern beginnen. (Gase sind schwerer als Luft) Falls Wald-ränder oder Bachborde angrenzen, müssen Sie dort beginnen und Richtung offene Wiese arbeiten, denn die Mäuse halten dort oft einen Fluchtweg offen.
11
7.8 NachkontrolleNach jedem Grasschnitt oder jeder Ernte auf Wiesen und Felder auf neue Mäusebauten achten. Be-sonders Obst-, Reb- und Gemüse-Anlagen sind wegen Wurzelverbiss gefährdet.
7.9 Zeitpunkt der BekämpfungGrundsätzlich muss das ganze Jahr über bekämpft werden. Im Winterhalbjahr, soweit es die Schnee-decke zulässt, haben Sie den besten Erfolg. Die Tiere sind dann geschwächt und Ihre Vermehrungs-rate geringer. Damit man nicht plötzlich von einer hohen Mäusepopulation überrascht wird, ist eine dauernde Überwachung der Wiesen, Felder, Obst- und Rebanlagen nötig. Achtung: Die Zuwande-rung der Mäuse im Sommerhalbjahr ist gross.
7.10 HinweisDiese Mäusebekämpfung ist eine einfache und sichere Bekämpfungsmethode. Sie ist gefahrlos für Pflanzen, Greifvögel, Katzen, Hunde, Füchse und andere Nützlinge. Durch den Sauerstoffmangel hö-ren die Schädlinge auf zu atmen. Es ergibt sich dadurch keine Sekundärvergiftung. Trotz wirksamer Bekämpfung mit MAUKI ist es ratsam, auch die natürlichen Feinde der Mäuse zu schützen. Ver-zichten Sie auf den Einsatz von Gift! Die Natur und die Vogelwelt sind Ihnen dankbar. Wir wünschen Ihnen viel Erfolg und würden uns freuen, wenn sie unseren MAUKI weiterempfehlen würden.
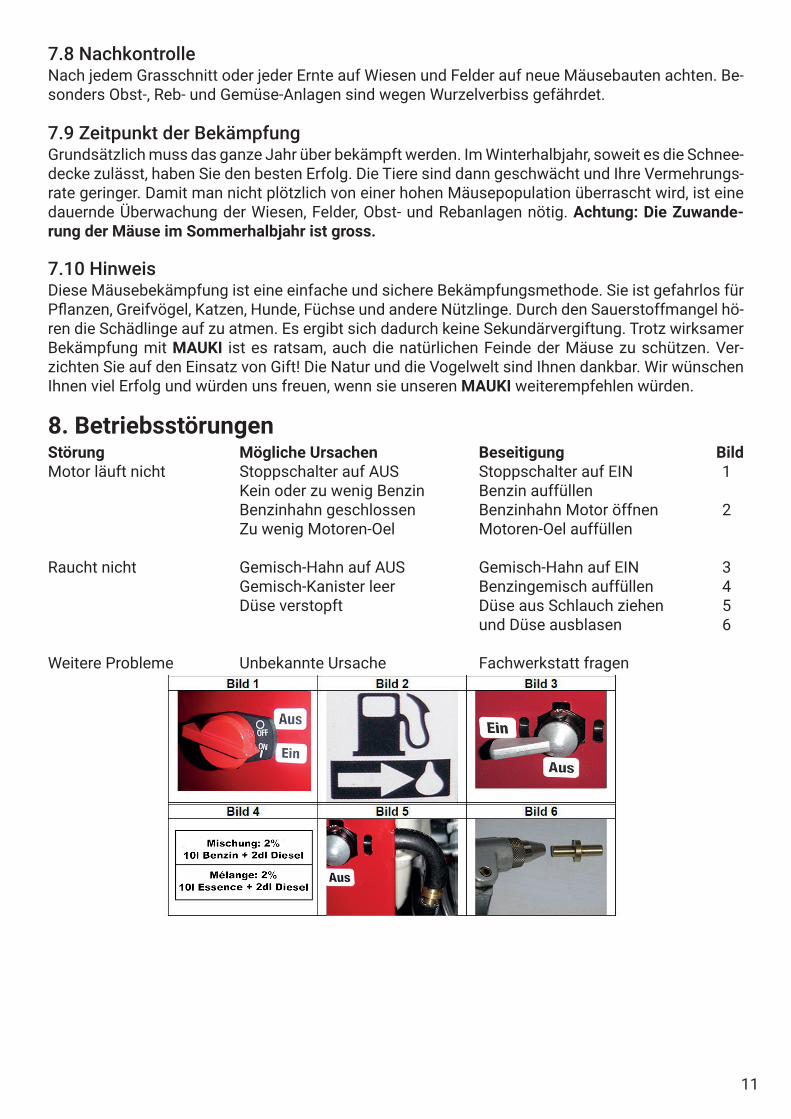
8. BetriebsstörungenStörung Mögliche Ursachen Beseitigung BildMotor läuft nicht Stoppschalter auf AUS Stoppschalter auf EIN 1 Kein oder zu wenig Benzin Benzin auffüllen Benzinhahn geschlossen Benzinhahn Motor öffnen 2 Zu wenig Motoren-Oel Motoren-Oel auffüllen
Raucht nicht Gemisch-Hahn auf AUS Gemisch-Hahn auf EIN 3 Gemisch-Kanister leer Benzingemisch auffüllen 4 Düse verstopft Düse aus Schlauch ziehen 5 und Düse ausblasen 6
Weitere Probleme Unbekannte Ursache Fachwerkstatt fragen

12
9. Service - StelleFür die Wartung, Ersatzteile oder andere Informationen wenden Sie sich bitte an Ihren MAUKI-Fach-händler oder an den Hersteller. Wenn Sie sich an Ihre Servicestelle oder ans Werk wenden, sollten Sie immer das Modell, die Serie-Nummer des Gerätes und die Motoren-Serie-Nummer angeben. Diese Nummern helfen dem Händler oder dem Herstellerwerk die entsprechenden Informationen für Ihr Produkt zu beschaffen.
MAUKI Mäusevernichter, Modell GX200
Serie-Nr: ____________________________________ Kaufdatum:_____________________________________
Servicestelle:
Hersteller: Brühwiler Maschinen AG, Hauptstrasse 1, CH-8362 Balterswil Tel.: 071 973 80 40 (0041 71 973 80 40) Fax.: 071 973 80 49 (0041 71 973 80 49) E-Mail: [email protected] Web: www.mauki.ch
10. GarantiebedingungenDie Garantie ist unter Ausschluss aller weiteren Ansprüche auf kostenlosen Ersatz der Teile be-schränkt, welche innerhalb der Garantiezeit von 24 Monaten nachweislich infolge eines Material- und Bearbeitungsfehlers unbrauchbar geworden sind. Die Lieferung der Ersatzteile erfolgt so rasch wie möglich. Eine Verzögerung der Lieferung dieser Teile begründet weder Schadenersatzforderun-gen des Käufers noch eine Verlängerung der Garantiezeit. Die Montage- und Frachtkosten werden nicht vergütet. Von der Garantie ausgenommen sind Teile, die infolge unsachgemässer Reparatur- arbeiten oder natürlicher Abnutzung unbrauchbar geworden sind. Die Garantie erlischt, wenn das Gerät ausserhalb einer autorisierten Werkstätte repariert wird, keine Original-Ersatzteile verwendet werden oder die ausgehändigte Bedienungsanleitung nicht beachtet wurde. Im Übrigen gelten die Verkaufs- und Lieferbedingungen der Verkaufsstelle.
13
11. EG - KonformitätserklärungEG - Konformitätserklärung (2006/42/EG, 2004/108/EG) Der Hersteller: Brühwiler Maschinen AG
Hauptstrasse 1 CH-8362 Balterswil
erklärt, dass die nachfolgende Maschine:
Bauart: Mäusevernichter Marke: MAUKI Modell: GX200
mit den Bestimmungen der Maschinenrichtlinie 2006/42/EG, inklusiv deren Änderungen, übereinstimmen. Das Erzeugnis ist in Übereinstimmung mit den folgenden Normen entwickelt und gefertigt worden: EN ISO 12100:2011-03 Sicherheit von Maschinen - Grundbegriffe,
allgemeine Gestaltungsleitsätze - Teil 1: Grundsätzliche Terminologie, Methodologie (ISO 12100-1:2003); Deutsche Fassung EN ISO 12100-1:2003
DIN EN ISO 13732-1:2008 Ergonomie der thermischen Umgebung -
Bewertungsverfahren für menschliche Reaktionen bei Kontakt mit Oberflächen - Teil 1: Heiße Oberflächen (ISO 13732-1:2006); Deutsche Fassung EN ISO 13732-1:2008
DIN EN ISO 14982:2009 Land- und forstwirtschaftliche Maschinen –
Elektromagnetische Verträglichkeit - Prüfverfahren und Bewertungskriterien
Bevollmächtigt die technischen Unterlagen zusammenzustellen ist: Herr Beat Brühwiler, Anschrift siehe Hersteller Ausgefertigt in: Balterswil Am: 01.03.2021 Unterzeichner: Beat Brühwiler, Bereichsleiter Unterschrift:
14
12. E
rsat
ztei
llist
e
15
MU2
3002
. . .
. . .
. . .
Flex
ible
r Met
alls
chla
uch
1.10
mM
U230
03. .
. . .
. . .
. Sc
hlau
chbr
iede
ver
zink
tM
U200
09*.
. . .
. . .
. M
otor
Hon
da G
X200
, lee
r, oh
ne S
chal
ldäm
pfer
MU2
0009
K*. .
. . .
. . M
otor
Hon
da G
X200
, kpl
. mit
Scha
lldäm
pfer
u. P
umpe
MU2
3015
. . .
. . .
. . .
Bet
riebs
stun
denz
ähle
rM
U230
17. .
. . .
. . .
. So
ndie
rsta
b ve
rzin
kt, i
nkl.
Knop
fM
U201
18. .
. . .
. . .
. R
ad z
u Sc
hubk
arre
GX2
00M
U202
18*.
. . .
. . .
. S
chla
uch
zu S
chub
karr
enra
d G
X200
MU2
3126
. . .
. . .
. . .
Ben
zinh
ahn
Met
all
MU2
0028
. . .
. . .
. . .
Ben
zinfi
lter
MU2
0029
. . .
. . .
. . .
Ben
zins
chla
uch,
Ø 9
mm
/ 33
0 m
m (S
chla
uch
im T
ank)
MU2
0030
. . .
. . .
. . .
Ben
zins
chla
uch
Ø 1
1.5m
m /
1 M
eter
(Tan
kdec
kel b
is M
otor
)M
U231
32. .
. . .
. . .
. B
enzi
ndüs
e M
essi
ngM
U230
33. .
. . .
. . .
. B
enzi
npum
peM
U230
35. .
. . .
. . .
. K
lem
mbr
iede
zu
Benz
insc
hlau
ch M
etal
l Ø11
mm
MU2
3045
. . .
. . .
. . .
Brie
de z
u Be
nzin
hahn
20x
45m
m v
erzi
nkt
MU2
0053
. . .
. . .
. . .
Dic
htun
g zu
Sch
alld
ämpf
er H
onda
GX2
00M
U200
55. .
. . .
. . .
. Sc
halld
ämpf
er z
u M
od. G
X 20
0 (n
ur im
Aus
taus
ch)
MU2
0056
. . .
. . .
. . .
Scha
lldäm
pfer
schu
tz G
X200
MU2
0062
. . .
. . .
. . .
Stop
psch
alte
r zu
Hon
da-M
otor
MU2
0163
. . .
. . .
. . .
Ben
zink
anis
ter 1
0 Li
ter G
X200
, ohn
e De
ckel
Ø 4
3mm
MU2
0065
. . .
. . .
. . .
Aus
puff
gloc
ke G
X200
MU2
0169
. . .
. . .
. . .
Kan
iste
rdec
kel Ø
43m
m z
u Be
nzin
kani
ster
201
63 in
kl. K
rüm
mer
M
U201
70. .
. . .
. . .
. Ta
nksc
hlau
chse
t (in
kl. F
ilter
200
28, S
chla
uch
2002
9, D
ecke
l 201
69)
MU2
0071
. . .
. . .
. . .
Kle
mm
ring
verz
inkt
, zu
Scha
lldäm
pfer
MU2
0417
. . .
. . .
. . .
Han
droh
r rec
hts
mit
Gum
mig
riff
MU2
0418
. . .
. . .
. . .
Han
droh
r lin
ks m
it G
umm
igrif
f
Serv
icet
eile
:M
U200
01. .
. . .
. . .
. Lu
ftfil
ter H
onda
172
10-Z
E1-5
05M
U200
02. .
. . .
. . .
. Zü
ndke
rze
NG
K BP
R6ES
SAE1
5W40
*. .
. . .
. . M
otor
enoe
l
*Ist
auf
dem
Ers
atzt
eilb
ild n
icht
abg
ebild
et

16
GBThis manual is protected by copyright. All rights are reserved, especially the right of reproduction, translation and processing with electronic systems.
INDEX OF CONTENTS MAUKI Rodent Destroyer - GX 200
1. Introduction . . . . . . . . . . . . . . . . . . . . . . . . . . . . . . . . . . . . . . . . . . . . . . . . . . . . . . . . . . . . . . . . . . . . . .171.1 Operation. . . . . . . . . . . . . . . . . . . . . . . . . . . . . . . . . . . . . . . . . . . . . . . . . . . . . . . . . . . . . . . . . . . . .171.2 Construction . . . . . . . . . . . . . . . . . . . . . . . . . . . . . . . . . . . . . . . . . . . . . . . . . . . . . . . . . . . . . . . . . .171.3 Field of Application . . . . . . . . . . . . . . . . . . . . . . . . . . . . . . . . . . . . . . . . . . . . . . . . . . . . . . . . . . . .17
2. Safety . . . . . . . . . . . . . . . . . . . . . . . . . . . . . . . . . . . . . . . . . . . . . . . . . . . . . . . . . . . . . . . . . . . . . . . . . . .182.1 Exhaust Gases . . . . . . . . . . . . . . . . . . . . . . . . . . . . . . . . . . . . . . . . . . . . . . . . . . . . . . . . . . . . . . . .182.2 Burns Hazard . . . . . . . . . . . . . . . . . . . . . . . . . . . . . . . . . . . . . . . . . . . . . . . . . . . . . . . . . . . . . . . . .182.3 Noise Emissions. . . . . . . . . . . . . . . . . . . . . . . . . . . . . . . . . . . . . . . . . . . . . . . . . . . . . . . . . . . . . . .182.4 Fuel . . . . . . . . . . . . . . . . . . . . . . . . . . . . . . . . . . . . . . . . . . . . . . . . . . . . . . . . . . . . . . . . . . . . . . . . .182.5 General . . . . . . . . . . . . . . . . . . . . . . . . . . . . . . . . . . . . . . . . . . . . . . . . . . . . . . . . . . . . . . . . . . . . . .18
3. Technical Data . . . . . . . . . . . . . . . . . . . . . . . . . . . . . . . . . . . . . . . . . . . . . . . . . . . . . . . . . . . . . . . . . . . .194. Starting Up . . . . . . . . . . . . . . . . . . . . . . . . . . . . . . . . . . . . . . . . . . . . . . . . . . . . . . . . . . . . . . . . . . . . . . .19
4.1 Preparation . . . . . . . . . . . . . . . . . . . . . . . . . . . . . . . . . . . . . . . . . . . . . . . . . . . . . . . . . . . . . . . . . . .194.2 Starting the engine (see also operator manual engine) . . . . . . . . . . . . . . . . . . . . . . . . . . . . . .194.3 Switching off engine . . . . . . . . . . . . . . . . . . . . . . . . . . . . . . . . . . . . . . . . . . . . . . . . . . . . . . . . . . .20
5. Maintenance . . . . . . . . . . . . . . . . . . . . . . . . . . . . . . . . . . . . . . . . . . . . . . . . . . . . . . . . . . . . . . . . . . . . .206. Storage . . . . . . . . . . . . . . . . . . . . . . . . . . . . . . . . . . . . . . . . . . . . . . . . . . . . . . . . . . . . . . . . . . . . . . . . . .207. Rodent Control with MAUKI . . . . . . . . . . . . . . . . . . . . . . . . . . . . . . . . . . . . . . . . . . . . . . . . . . . . . . . . .21
7.1 Searching Out the Rodent Run . . . . . . . . . . . . . . . . . . . . . . . . . . . . . . . . . . . . . . . . . . . . . . . . . . .217.2 Using the Machine . . . . . . . . . . . . . . . . . . . . . . . . . . . . . . . . . . . . . . . . . . . . . . . . . . . . . . . . . . . . .217.3 Monitoring Gas Distribution . . . . . . . . . . . . . . . . . . . . . . . . . . . . . . . . . . . . . . . . . . . . . . . . . . . . .217.4 Preparing the next Rodent Run. . . . . . . . . . . . . . . . . . . . . . . . . . . . . . . . . . . . . . . . . . . . . . . . . . .217.5 Change of Location . . . . . . . . . . . . . . . . . . . . . . . . . . . . . . . . . . . . . . . . . . . . . . . . . . . . . . . . . . . .217.6 Destroying the Runs. . . . . . . . . . . . . . . . . . . . . . . . . . . . . . . . . . . . . . . . . . . . . . . . . . . . . . . . . . . .217.7 Classification and Procedure . . . . . . . . . . . . . . . . . . . . . . . . . . . . . . . . . . . . . . . . . . . . . . . . . . . .217.8 Follow-Up Checks. . . . . . . . . . . . . . . . . . . . . . . . . . . . . . . . . . . . . . . . . . . . . . . . . . . . . . . . . . . . . .227.9 Time to Apply Controls . . . . . . . . . . . . . . . . . . . . . . . . . . . . . . . . . . . . . . . . . . . . . . . . . . . . . . . . .227.10 Note. . . . . . . . . . . . . . . . . . . . . . . . . . . . . . . . . . . . . . . . . . . . . . . . . . . . . . . . . . . . . . . . . . . . . . . .22
8. Troubleshooting . . . . . . . . . . . . . . . . . . . . . . . . . . . . . . . . . . . . . . . . . . . . . . . . . . . . . . . . . . . . . . . . . .229. Service Point . . . . . . . . . . . . . . . . . . . . . . . . . . . . . . . . . . . . . . . . . . . . . . . . . . . . . . . . . . . . . . . . . . . . .2310. Warranty Conditions . . . . . . . . . . . . . . . . . . . . . . . . . . . . . . . . . . . . . . . . . . . . . . . . . . . . . . . . . . . . . .2311. Spare parts. . . . . . . . . . . . . . . . . . . . . . . . . . . . . . . . . . . . . . . . . . . . . . . . . . . . . . . . . . . . . . . . . . . . . .2412. EC - Declaration of Conformity . . . . . . . . . . . . . . . . . . . . . . . . . . . . . . . . . . . . . . . . . . . . . . . . . . . . .26
17
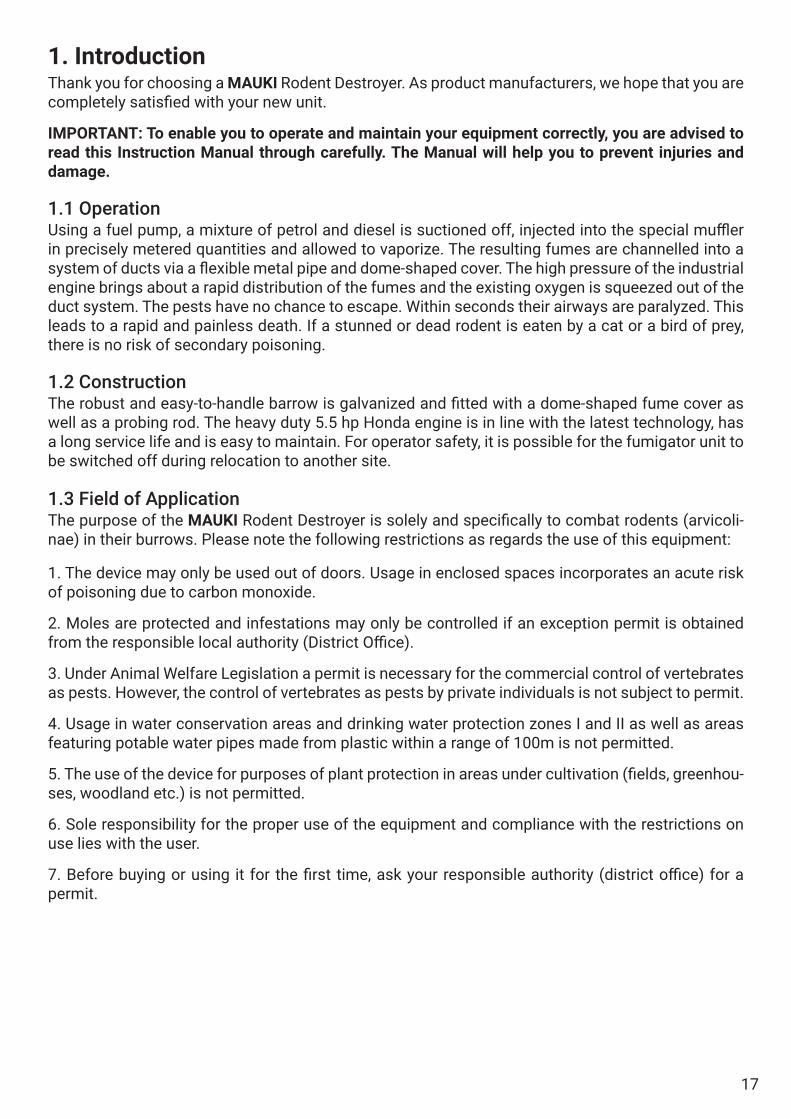
1. IntroductionThank you for choosing a MAUKI Rodent Destroyer. As product manufacturers, we hope that you are completely satisfied with your new unit.
IMPORTANT: To enable you to operate and maintain your equipment correctly, you are advised to read this Instruction Manual through carefully. The Manual will help you to prevent injuries and damage.
1.1 OperationUsing a fuel pump, a mixture of petrol and diesel is suctioned off, injected into the special muffler in precisely metered quantities and allowed to vaporize. The resulting fumes are channelled into a system of ducts via a flexible metal pipe and dome-shaped cover. The high pressure of the industrial engine brings about a rapid distribution of the fumes and the existing oxygen is squeezed out of the duct system. The pests have no chance to escape. Within seconds their airways are paralyzed. This leads to a rapid and painless death. If a stunned or dead rodent is eaten by a cat or a bird of prey, there is no risk of secondary poisoning.
1.2 ConstructionThe robust and easy-to-handle barrow is galvanized and fitted with a dome-shaped fume cover as well as a probing rod. The heavy duty 5.5 hp Honda engine is in line with the latest technology, has a long service life and is easy to maintain. For operator safety, it is possible for the fumigator unit to be switched off during relocation to another site.
1.3 Field of ApplicationThe purpose of the MAUKI Rodent Destroyer is solely and specifically to combat rodents (arvicoli-nae) in their burrows. Please note the following restrictions as regards the use of this equipment:
1. The device may only be used out of doors. Usage in enclosed spaces incorporates an acute risk of poisoning due to carbon monoxide.
2. Moles are protected and infestations may only be controlled if an exception permit is obtained from the responsible local authority (District Office).
3. Under Animal Welfare Legislation a permit is necessary for the commercial control of vertebrates as pests. However, the control of vertebrates as pests by private individuals is not subject to permit.
4. Usage in water conservation areas and drinking water protection zones I and II as well as areas featuring potable water pipes made from plastic within a range of 100m is not permitted.
5. The use of the device for purposes of plant protection in areas under cultivation (fields, greenhou-ses, woodland etc.) is not permitted.
6. Sole responsibility for the proper use of the equipment and compliance with the restrictions on use lies with the user.
7. Before buying or using it for the first time, ask your responsible authority (district office) for a permit.
18
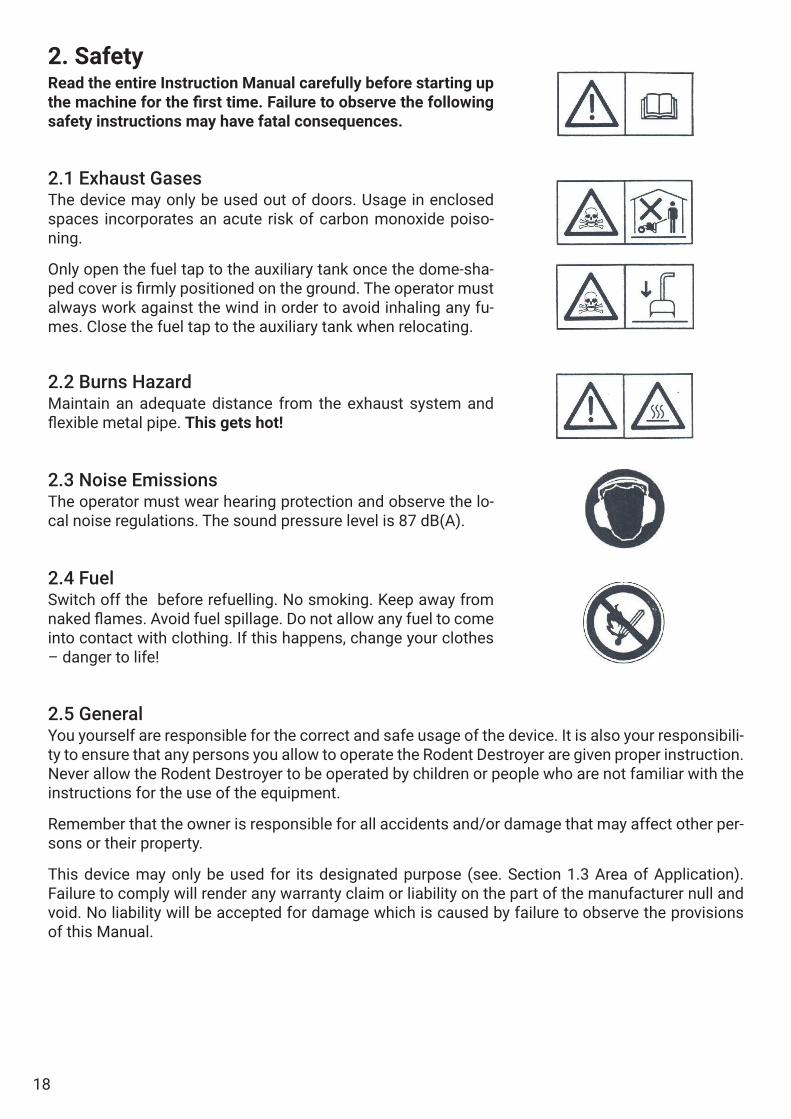
2. SafetyRead the entire Instruction Manual carefully before starting up the machine for the first time. Failure to observe the following safety instructions may have fatal consequences.
2.1 Exhaust GasesThe device may only be used out of doors. Usage in enclosed spaces incorporates an acute risk of carbon monoxide poiso-ning.
Only open the fuel tap to the auxiliary tank once the dome-sha-ped cover is firmly positioned on the ground. The operator must always work against the wind in order to avoid inhaling any fu-mes. Close the fuel tap to the auxiliary tank when relocating.
2.2 Burns HazardMaintain an adequate distance from the exhaust system and flexible metal pipe. This gets hot!
2.3 Noise EmissionsThe operator must wear hearing protection and observe the lo-cal noise regulations. The sound pressure level is 87 dB(A).
2.4 FuelSwitch off the before refuelling. No smoking. Keep away from naked flames. Avoid fuel spillage. Do not allow any fuel to come into contact with clothing. If this happens, change your clothes – danger to life!
2.5 GeneralYou yourself are responsible for the correct and safe usage of the device. It is also your responsibili-ty to ensure that any persons you allow to operate the Rodent Destroyer are given proper instruction. Never allow the Rodent Destroyer to be operated by children or people who are not familiar with the instructions for the use of the equipment.
Remember that the owner is responsible for all accidents and/or damage that may affect other per-sons or their property.
This device may only be used for its designated purpose (see. Section 1.3 Area of Application). Failure to comply will render any warranty claim or liability on the part of the manufacturer null and void. No liability will be accepted for damage which is caused by failure to observe the provisions of this Manual.
19
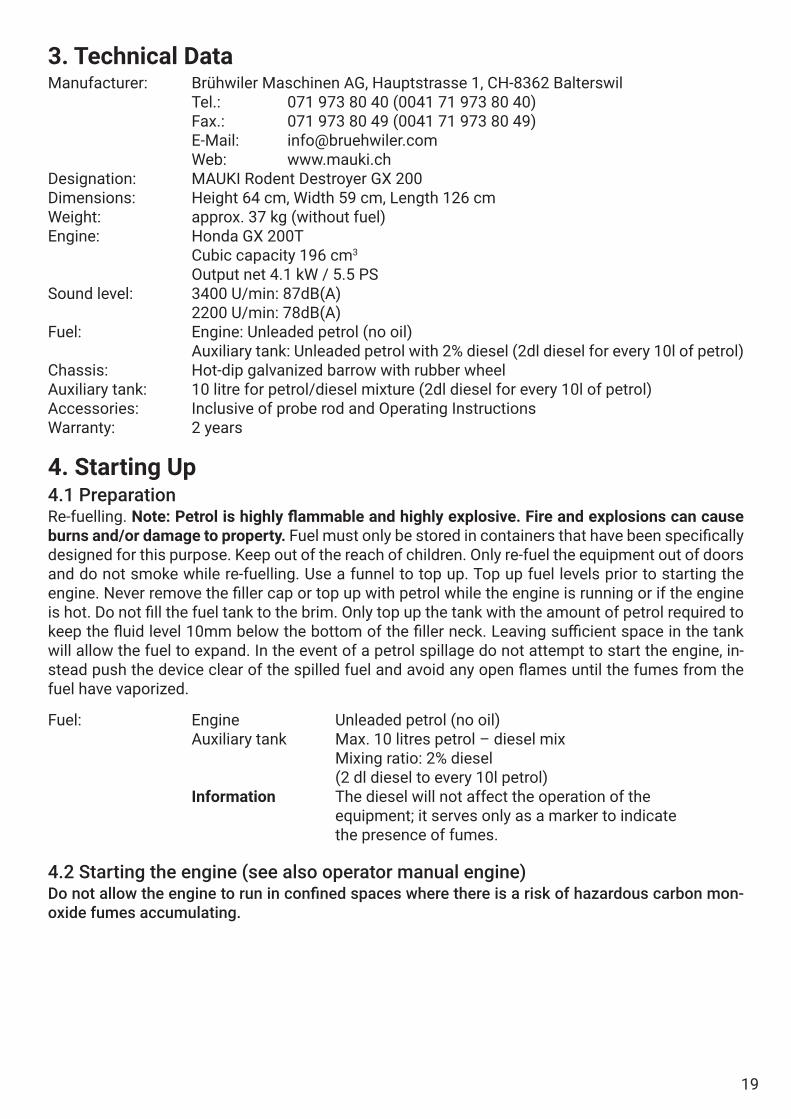
3. Technical DataManufacturer: Brühwiler Maschinen AG, Hauptstrasse 1, CH-8362 Balterswil Tel.: 071 973 80 40 (0041 71 973 80 40) Fax.: 071 973 80 49 (0041 71 973 80 49) E-Mail: [email protected] Web: www.mauki.chDesignation: MAUKI Rodent Destroyer GX 200Dimensions: Height 64 cm, Width 59 cm, Length 126 cmWeight: approx. 37 kg (without fuel)Engine: Honda GX 200T Cubic capacity 196 cm3
Output net 4.1 kW / 5.5 PSSound level: 3400 U/min: 87dB(A) 2200 U/min: 78dB(A)Fuel: Engine: Unleaded petrol (no oil) Auxiliary tank: Unleaded petrol with 2% diesel (2dl diesel for every 10l of petrol)Chassis: Hot-dip galvanized barrow with rubber wheelAuxiliary tank: 10 litre for petrol/diesel mixture (2dl diesel for every 10l of petrol)Accessories: Inclusive of probe rod and Operating InstructionsWarranty: 2 years
4. Starting Up4.1 PreparationRe-fuelling. Note: Petrol is highly flammable and highly explosive. Fire and explosions can cause burns and/or damage to property. Fuel must only be stored in containers that have been specifically designed for this purpose. Keep out of the reach of children. Only re-fuel the equipment out of doors and do not smoke while re-fuelling. Use a funnel to top up. Top up fuel levels prior to starting the engine. Never remove the filler cap or top up with petrol while the engine is running or if the engine is hot. Do not fill the fuel tank to the brim. Only top up the tank with the amount of petrol required to keep the fluid level 10mm below the bottom of the filler neck. Leaving sufficient space in the tank will allow the fuel to expand. In the event of a petrol spillage do not attempt to start the engine, in-stead push the device clear of the spilled fuel and avoid any open flames until the fumes from the fuel have vaporized.
Fuel: Engine Unleaded petrol (no oil) Auxiliary tank Max. 10 litres petrol – diesel mix Mixing ratio: 2% diesel (2 dl diesel to every 10l petrol) Information The diesel will not affect the operation of the equipment; it serves only as a marker to indicate the presence of fumes.
4.2 Starting the engine (see also operator manual engine)Do not allow the engine to run in confined spaces where there is a risk of hazardous carbon mon-oxide fumes accumulating.
20
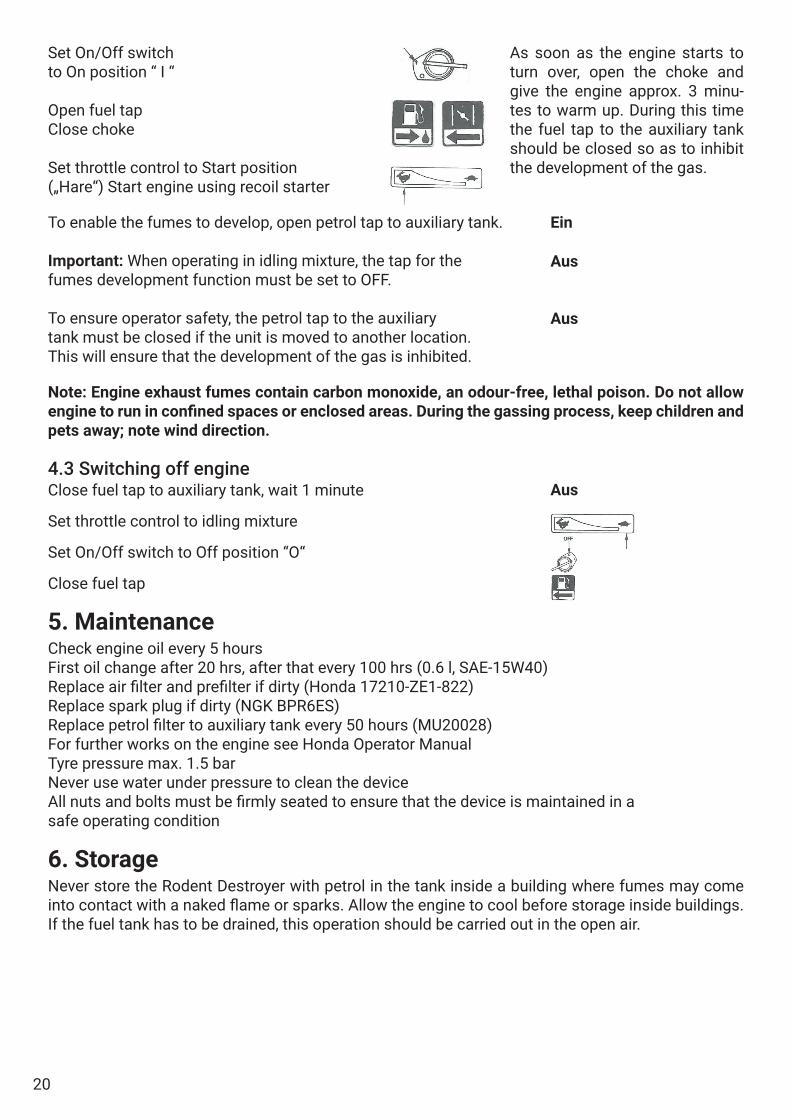
Set On/Off switchto On position “ I “
Open fuel tapClose choke
Set throttle control to Start position („Hare“) Start engine using recoil starter
As soon as the engine starts to turn over, open the choke and give the engine approx. 3 minu-tes to warm up. During this time the fuel tap to the auxiliary tank should be closed so as to inhibit the development of the gas.
To enable the fumes to develop, open petrol tap to auxiliary tank.
Important: When operating in idling mixture, the tap for thefumes development function must be set to OFF.
To ensure operator safety, the petrol tap to the auxiliarytank must be closed if the unit is moved to another location.This will ensure that the development of the gas is inhibited.
Ein
Aus
Aus
Note: Engine exhaust fumes contain carbon monoxide, an odour-free, lethal poison. Do not allow engine to run in confined spaces or enclosed areas. During the gassing process, keep children and pets away; note wind direction.
4.3 Switching off engineClose fuel tap to auxiliary tank, wait 1 minute
Set throttle control to idling mixture
Set On/Off switch to Off position “O“
Close fuel tap
Aus
5. MaintenanceCheck engine oil every 5 hoursFirst oil change after 20 hrs, after that every 100 hrs (0.6 l, SAE-15W40)Replace air filter and prefilter if dirty (Honda 17210-ZE1-822)Replace spark plug if dirty (NGK BPR6ES)Replace petrol filter to auxiliary tank every 50 hours (MU20028)For further works on the engine see Honda Operator ManualTyre pressure max. 1.5 barNever use water under pressure to clean the deviceAll nuts and bolts must be firmly seated to ensure that the device is maintained in asafe operating condition
6. StorageNever store the Rodent Destroyer with petrol in the tank inside a building where fumes may come into contact with a naked flame or sparks. Allow the engine to cool before storage inside buildings. If the fuel tank has to be drained, this operation should be carried out in the open air.

21
7. Rodent Control with MAUKIThere are 10 key principles that constitute the secret to success.
7.1 Searching Out the Rodent RunSearch out the rodent run with the probe and open up a hole approx. 5cm in diameter. NOTE: The device may only be used in the open air. Using it in enclosed spaces incorporates an acute risk of carbon monoxide poisoning.
7.2 Using the MachineAttach the dome-shaped cover and press down securely. Allow the engine to run at full throttle for approx. 5 minutes. NOTE: Only open the petrol tap once the dome-shaped cover is firmly pressed down on to the ground.
7.3 Monitoring Gas DistributionIf there is an adjacent run, carry out a precise check on whether all the passageways are filled with fumes (check for rising fumes, it may be necessary to check with the probe). For purposes of iden-tifying exactly where the fumes are, the system requires the addition of 2% diesel. The addition of diesel or oil has no effect on the action of the device. This serves only to mark out the rodent runs. NOTE: The operator must always stand upwind of the dome-shaped cover. There must be no other persons – especially children or pets – in the vicinity.
7.4 Preparing the next Rodent RunDuring the 5 minute running time you can search out the next run and make the necessary preparations. Use the probe rod to mark the hole. If very large runs are involved (often up to 50 metres in length) we recommend placing the dome-shaped cover at 2 – 3 locations.
7.5 Change of LocationIn the interests of operator safety, it is essential that, in the event of a change of location,that the petrol tap to the auxiliary tank is closed. This will ensure that fume development is impeded. Lift the dome-shaped cover, hang it on the machine and close the hole immediately with the foot so that the fumes cannot escape. Move the machine to the new location and place the dome-shaped cover over the previously prepared hole and open auxiliary tap.
7.6 Destroying the RunsGo back to the previously fumigated run and tread on all mounds and passageways constructed by the rodents to close. By so doing you will ensure that any migrating rodents are unable to find any open passageways that they can use. If a rodent happens to become entrenched despite this, it will need to push up fresh earth to create new passageways. In the event, these will be readily identifia-ble and a second attempt made at refumigation.
7.7 Classification and ProcedureAlways fumigate over a wide area. If possible, encourage your neighbours to join in. On hillside loca-tions always commence fumigation from the top (gases are heavier than air). Where there are stret-ches of woodland or banks of streams adjacent, then you should start here and work in the direction of open meadow land because this is where the rodents will often keep an escape route open.
22
7.8 Follow-Up ChecksBe alert to the possibility of new runs being constructed on meadow-land and fields after each grass cutting operation or harvest. Orchards, vineyards and vegetable plots are particularly at risk from browsing or nibbling at the roots.
7.9 Time to Apply ControlsAs a matter of principle, controls should be applied all year round. It is in the winter months, snow covering permitting, that you will find you obtain the best results. The animals are then weakened and their rate of reproduction is lower. In order to avoid being suddenly swamped by a high rodent population, it is essential to ensure that the meadows, fields, orchards and vineyards are constantly monitored. Note: Remember that large numbers of rodents tend to migrate during the summer months.
7.10 NoteRodent control is a straightforward and reliable method of control. It is safe for plants, birds of prey, cats, dogs, foxes and other beneficial organisms. The pests cease breathing due to the lack of oxy-gen. No secondary poisoning can occur. Even though you may be operating effective controls with MAUKI it is advisable to take care at the same time to protect the natural enemies of the rodents. Not using poisons will earn you the gratitude of the birds as well as the birds. We wish you every success and would appreciate your recommending MAUKI to your friends.
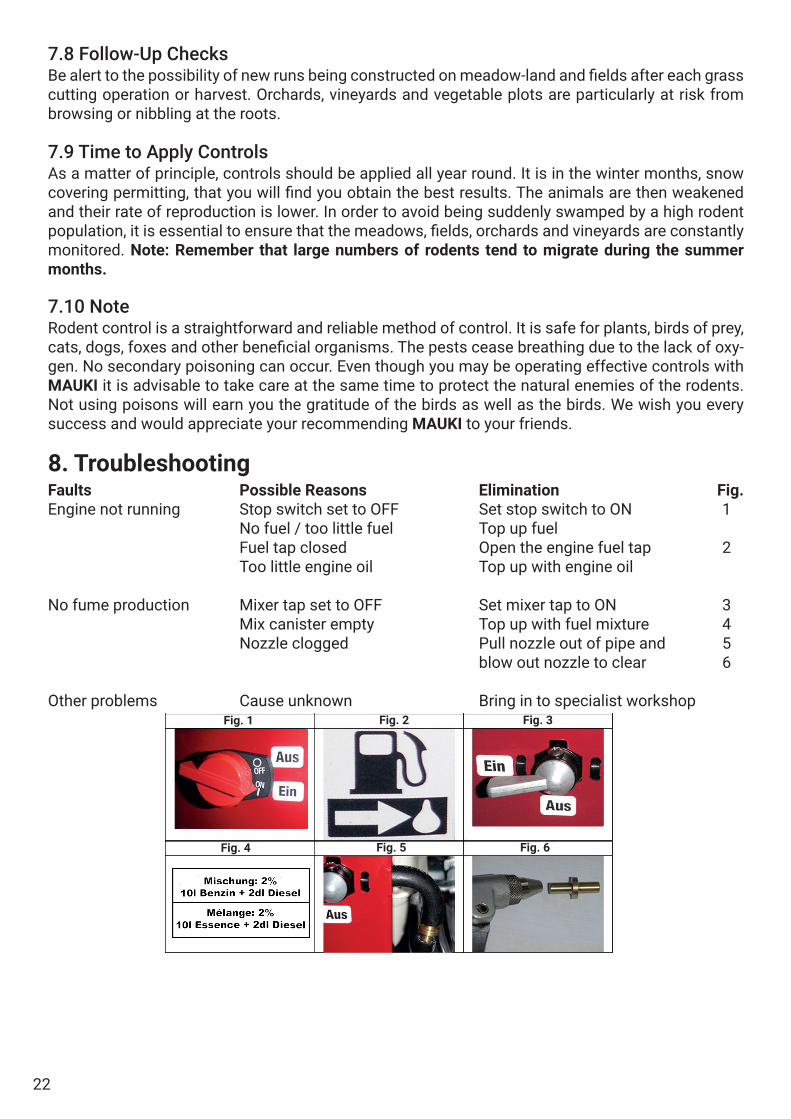
8. TroubleshootingFaults Possible Reasons Elimination Fig.Engine not running Stop switch set to OFF Set stop switch to ON 1 No fuel / too little fuel Top up fuel Fuel tap closed Open the engine fuel tap 2 Too little engine oil Top up with engine oil
No fume production Mixer tap set to OFF Set mixer tap to ON 3 Mix canister empty Top up with fuel mixture 4 Nozzle clogged Pull nozzle out of pipe and 5 blow out nozzle to clear 6
Other problems Cause unknown Bring in to specialist workshopFig. 1 Fig. 2 Fig. 3
Fig. 4 Fig. 5 Fig. 6

23
9. Service PointFor maintenance and service, spares or other information please contact your specialist MAUKI dealer or the manufacturer. If you contact your service point or the factory itself, you should always quote the model, the serial number of the item of equipment and the engine serial number. These numbers will help the dealer or the manufacturer to obtain the corresponding information for your product.
MAUKI Rodent Destroyer, Modell GX200
Serial No: ________________________________ Purchase date:____________________________________
Service Point:
Manufacturer: Brühwiler Maschinen AG, Hauptstrasse 1, CH-8362 Balterswil Tel.: 071 973 80 40 (0041 71 973 80 40) Fax.: 071 973 80 49 (0041 71 973 80 49) E-Mail: [email protected] Web: www.mauki.ch
10. Warranty ConditionsThe warranty is limited, to the exclusion of all other claims, to free-of-charge replacement of any parts which have become unusable within the warranty period of 24 months as a result of a mate-rial and/or machining fault. The spare parts will be supplied as quickly as possible. Any delay in the delivery of these parts shall not entitle the purchaser to any compensation for damages or to any ex-tension of the warranty period. Installation and freight costs will not be reimbursed. Excluded from the warranty are any parts which have become unserviceable as a result of incorrect repair works or natural wear and tear. The warranty shall be void if the device is repaired outside an authorised work-shop, in the event of failure to use original spares or to comply with the Instruction Manual issued. In all other respects the Sales and Delivery Conditions of the retail outlet shall apply.

24
11. S
pare
par
ts
25
MU2
3002
. . .
. . .
. . .
Flex
ible
met
al h
ose
1.10
mM
U230
03. .
. . .
. . .
. H
ose
clam
p, g
alva
nize
dM
U200
09*.
. . .
. . .
. En
gine
Hon
da G
X200
, bas
ic u
nit,
excl
. muffl
erM
U200
09K*
. . .
. . .
. Eng
ine
Hon
da G
X200
, com
plet
e w
ith m
uffler
and
pum
pM
U230
15. .
. . .
. . .
. O
pera
ting
hour
s m
eter
MU2
3017
. . .
. . .
. . .
Pro
be ro
d, g
alva
nize
d, in
cl. k
nob
MU2
0118
. . .
. . .
. . .
Whe
el fo
r bar
row
GX2
00M
U202
18*.
. . .
. . .
. H
ose
for b
arro
w G
X200
MU2
3126
. . .
. . .
. . .
Fuel
tap,
met
alM
U200
28. .
. . .
. . .
. Fu
el fi
lter
MU2
0029
. . .
. . .
. . .
Fuel
pip
e, d
ia. 9
mm
/ 33
0 m
m (p
ipe
in ta
nk)
MU2
0030
. . .
. . .
. . .
Fuel
pip
e, d
ia.1
1.5m
m /
1 m
etre
(tan
k co
ver a
s fa
r as
engi
ne)
MU2
3132
. . .
. . .
. . .
Fuel
noz
zle,
bra
ssM
U230
33. .
. . .
. . .
. Fu
el p
ump
MU2
3035
. . .
. . .
. . .
Clam
p fo
r gas
olin
e ho
se m
etal
Ø11
mm
MU2
3045
. . .
. . .
. . .
Clam
p fo
r fue
l tap
20x
45m
m g
alva
nize
d M
U200
53. .
. . .
. . .
. Se
al fo
r muffl
er H
onda
GX2
00M
U200
55. .
. . .
. . .
. M
uffler
for m
odel
GX
200
(rep
lace
men
t onl
y)M
U200
56. .
. . .
. . .
. M
uffler
cov
er G
X200
MU2
0062
. . .
. . .
. . .
Stop
sw
itch
to H
onda
eng
ine
MU2
0163
. . .
. . .
. . .
Petro
l can
10
litre
GX2
00, e
xcl.
lid d
ia. 4
3mm
MU2
0065
. . .
. . .
. . .
Dom
e-sh
aped
fum
igat
or c
over
GX2
00M
U201
69. .
. . .
. . .
. Ca
n lid
, dia
. 43m
m, f
or p
etro
l can
201
63 in
cl. e
lbow
MU2
0170
. . .
. . .
. . .
Set o
f hos
es fo
r tan
k (in
cl. fi
lter 2
0028
, hos
e 20
029,
lid
2016
9)M
U200
71. .
. . .
. . .
. Cl
ampi
ng ri
ng, g
alva
nize
d, to
muffl
erM
U204
17. .
. . .
. . .
. Ri
ght h
and
tube
with
rubb
er g
ripM
U204
18. .
. . .
. . .
. Le
ft h
and
tube
with
rubb
er g
rip
Serv
ice
part
s:M
U200
01. .
. . .
. . .
. Ai
r filte
r Hon
da 1
7210
-ZE1
-505
MU2
0002
. . .
. . .
. . .
Spar
k pl
ug N
GK
BPR6
ESSA
E15W
40*.
. . .
. . .
Eng
ine
oil
*not
sho
wn
on s
pare
par
ts p
ictu
re
26
12. EC - Declaration of Conformity
The Manufacturer: Brühwiler Maschinen AG Hauptstrasse 1 CH-8362 Balterswil
hereby declares that the following machine
Design: Rodent Destroyer Brand name: MAUKI Model: GX200
complies with the provisions of the Machinery Directive 2006/42/EC, including any amendments thereto. The product has been developed and manufactured in compliance with the following standards:
EN ISO 12100:2011 Safety of Machinery – Basic Concepts, General
DIN EN ISO 13732-1:2008
DIN EN ISO 14982:2009
Principles for Design: Basic Terminology, Methodology (ISO 12100-1:2003); German version EN ISO 12100-1:2003
Ergonomics of the Thermal Environment – Methods for the assessment of human responses to contact with surfaces - Part 1: Hot surfaces (ISO 13732-1:2006); German version EN ISO 13732-1:2008
Agricultural and Forestry Machinery – Electromagnetic compatibility – Test methods and assessment criteria
Person authorized to compile the technical documentation: Mr. Beat Brühwiler, for address see manufacturer
Issued in: on: Signatory:
Balterswil 01.03.2021 Beat Brühwiler, Divisional Director
signed:
EC Declaration of Conformity (2006/42/EC, 2004/108/EC)

27
TABLE DES MATIÈRES MAUKI Destructeur de mulots - GX 200
1. Introduction . . . . . . . . . . . . . . . . . . . . . . . . . . . . . . . . . . . . . . . . . . . . . . . . . . . . . . . . . . . . . . . . . . . . . .281.1 Mode de fonctionnement . . . . . . . . . . . . . . . . . . . . . . . . . . . . . . . . . . . . . . . . . . . . . . . . . . . . . . .281.2 Conception constructive . . . . . . . . . . . . . . . . . . . . . . . . . . . . . . . . . . . . . . . . . . . . . . . . . . . . . . . .281.3 Utilisation de la gamme. . . . . . . . . . . . . . . . . . . . . . . . . . . . . . . . . . . . . . . . . . . . . . . . . . . . . . . . .28
2. Sécurité . . . . . . . . . . . . . . . . . . . . . . . . . . . . . . . . . . . . . . . . . . . . . . . . . . . . . . . . . . . . . . . . . . . . . . . . .292.1 Gaz d‘échappement . . . . . . . . . . . . . . . . . . . . . . . . . . . . . . . . . . . . . . . . . . . . . . . . . . . . . . . . . . . .292.2 Risque de brûles. . . . . . . . . . . . . . . . . . . . . . . . . . . . . . . . . . . . . . . . . . . . . . . . . . . . . . . . . . . . . . .292.3 Emissions de bruit . . . . . . . . . . . . . . . . . . . . . . . . . . . . . . . . . . . . . . . . . . . . . . . . . . . . . . . . . . . . .292.4 Carburant . . . . . . . . . . . . . . . . . . . . . . . . . . . . . . . . . . . . . . . . . . . . . . . . . . . . . . . . . . . . . . . . . . . .292.5 Généralités . . . . . . . . . . . . . . . . . . . . . . . . . . . . . . . . . . . . . . . . . . . . . . . . . . . . . . . . . . . . . . . . . . .29
3. Caractéristiques techniques . . . . . . . . . . . . . . . . . . . . . . . . . . . . . . . . . . . . . . . . . . . . . . . . . . . . . . . .304. Mise en service . . . . . . . . . . . . . . . . . . . . . . . . . . . . . . . . . . . . . . . . . . . . . . . . . . . . . . . . . . . . . . . . . . .30
4.1 Préparation . . . . . . . . . . . . . . . . . . . . . . . . . . . . . . . . . . . . . . . . . . . . . . . . . . . . . . . . . . . . . . . . . . .304.2 Démarrage du moteur (Voir également mode d‘emploi du moteur) . . . . . . . . . . . . . . . . . . . .304.3 Arrêt du moteur . . . . . . . . . . . . . . . . . . . . . . . . . . . . . . . . . . . . . . . . . . . . . . . . . . . . . . . . . . . . . . .31
5. Entretien . . . . . . . . . . . . . . . . . . . . . . . . . . . . . . . . . . . . . . . . . . . . . . . . . . . . . . . . . . . . . . . . . . . . . . . . .316. Entreposage . . . . . . . . . . . . . . . . . . . . . . . . . . . . . . . . . . . . . . . . . . . . . . . . . . . . . . . . . . . . . . . . . . . . . .317. Lutte contre les mulots avec MAUKI . . . . . . . . . . . . . . . . . . . . . . . . . . . . . . . . . . . . . . . . . . . . . . . . .32
7.1 Sonder les galeries des mulots . . . . . . . . . . . . . . . . . . . . . . . . . . . . . . . . . . . . . . . . . . . . . . . . . .327.2 Utilisation de la machine. . . . . . . . . . . . . . . . . . . . . . . . . . . . . . . . . . . . . . . . . . . . . . . . . . . . . . . .327.3 Contrôle par la distribution de fumée . . . . . . . . . . . . . . . . . . . . . . . . . . . . . . . . . . . . . . . . . . . . .327.4 Préparation de la prochaine galerie de mulots. . . . . . . . . . . . . . . . . . . . . . . . . . . . . . . . . . . . . .327.5 Changement de lieu . . . . . . . . . . . . . . . . . . . . . . . . . . . . . . . . . . . . . . . . . . . . . . . . . . . . . . . . . . . .327.6 Destruction des galeries . . . . . . . . . . . . . . . . . . . . . . . . . . . . . . . . . . . . . . . . . . . . . . . . . . . . . . . .327.7 Classification et procédure . . . . . . . . . . . . . . . . . . . . . . . . . . . . . . . . . . . . . . . . . . . . . . . . . . . . . .327.8 Contrôle ultérieur . . . . . . . . . . . . . . . . . . . . . . . . . . . . . . . . . . . . . . . . . . . . . . . . . . . . . . . . . . . . . .337.9 Moment de la lutte. . . . . . . . . . . . . . . . . . . . . . . . . . . . . . . . . . . . . . . . . . . . . . . . . . . . . . . . . . . . .337.10 Avis . . . . . . . . . . . . . . . . . . . . . . . . . . . . . . . . . . . . . . . . . . . . . . . . . . . . . . . . . . . . . . . . . . . . . . . .33
8. Dysfonctionnement. . . . . . . . . . . . . . . . . . . . . . . . . . . . . . . . . . . . . . . . . . . . . . . . . . . . . . . . . . . . . . . .339. Pièces de rechange. . . . . . . . . . . . . . . . . . . . . . . . . . . . . . . . . . . . . . . . . . . . . . . . . . . . . . . . . . . . . . . .3410. Conditions de garantie . . . . . . . . . . . . . . . . . . . . . . . . . . . . . . . . . . . . . . . . . . . . . . . . . . . . . . . . . . . .3411. EG - Déclaration de conformité . . . . . . . . . . . . . . . . . . . . . . . . . . . . . . . . . . . . . . . . . . . . . . . . . . . . .3512. Liste des pièces rechanger . . . . . . . . . . . . . . . . . . . . . . . . . . . . . . . . . . . . . . . . . . . . . . . . . . . . . . . .36
FRLa présente mode d‘emploi est protégée par des droits d‘auteur. Tous droits réservés, en particulier tout droit de copie, de traduction et de traitement avec des systèmes électroniques quelconques.
28
1. IntroductionNous vous félicitons et vous remercions d‘avoir décidé d‘acquérir un destructeur de mulots MAUKI. En tant que fabricant, nous souhaiterions que vous soyez en tous points satisfait de votre nouveau produit. IMPORTANT: Veuillez lire attentivement ce mode d‘emploi, de manière à pouvoir correc-tement utiliser et entretenir votre appareil. Les instructions vous aident à éviter des blessures et dommages.
1.1 Mode de fonctionnementUn mélange essence et diesel venant d’un 2e réservoir est aspiré, dosé avec précision et injecté dans le pot d’échappement spécial d’un moteur à essence, où la température élevée le vaporise. Cette fumée est dirigée, via un tuyau métallique flexible et un embout en forme de cloche, dans le système de galeries des mulots. La haute pression que génèrent les gaz d’échappement du moteur industriel y assure une diffusion rapide de la fumée, ainsi que l’expulsion de l’oxygène qui les emplit normalement. Ces animaux nuisibles n’ont aucune chance d’en réchapper. Leurs voies respiratoires sont paralysées en l’espace de quelques secondes seulement, ce qui conduit à une mort rapide et sans douleur. S’il arrivait qu’un chat ou un rapace mange un mulot mort ou déjà intoxiqué, il n’y a aucun danger d’intoxication secondaire.
1.2 Conception constructiveRobuste et aisément maniable, la brouette en métal galvanisé est équipée d’une cloche canalisant la fumée et d’une barre de sondage. Le puissant moteur Honda de 5.5 ch est conçu selon la techno-logie la plus récente, il est durable et d’accès facile pour ’entretien. Pour la sécurité de l’opérateur, la diffusion de gaz peut être coupée pendant qu’il change l‘entretien d’emplacement.
1.3 Utilisation de la gammeLe MAUKI - destructeur de campgnols est utilisée aux seules fins de la lutte contre les campagnols en particulier dans leurs habitats. Veuillez noter les restrictions d‘utilisation suivantes:
1. L‘appareil ne doit être utilisé qu‘à l‘extérieur! Dans les pièces fermées, il existe un risque aigu d‘in-toxication par le monoxyde de carbone!
2. La taupe est protégée et ne peut être combattue qu‘avec un permis spécial de l‘autorité compé-tente (bureau de district).
3. Selon la loi sur le bien-être des animaux, un permis est requis pour le contrôle commercial des animaux vertébrés en tant que ravageurs. Cependant, la lutte contre les vertébrés en tant que rava-geurs par des particuliers ne nécessite pas de permis.
4. L‘utilisation dans les zones de protection de l‘eau et les zones de protection de l‘eau potable I et II, ainsi que dans les zones avec des conduites d‘eau potable en plastique dans un rayon de 100 m n‘est pas autorisée.
5. L‘utilisation de l‘appareil à des fins de protection des végétaux dans les zones de culture (champs, serres, forêts, etc.) n‘est pas autorisée.
6. L‘utilisateur est seul responsable de la bonne utilisation de l‘équipement et du respect des restric-tions d‘utilisation.
7. Avant d‘acheter ou d‘utiliser le véhicule pour la première fois, demandez un permis à votre autorité compétente (bureau de district).

29
2. SécuritéLire attentivement l‘ensemble du mode d‘emploi avant la pre-mière mise en service! La non-observation des avis de sécurité qui suivent peut être mortelle!
2.1 Gaz d‘échappementL‘appareil ne doit être utilisé qu‘à l‘extérieur! Un risque d‘intoxica-tion grave par le monooxyde de carbone existe dans les locaux fermés!
Ouvrir tout d‘abord le robinet d‘essence du réservoir supplémen-taire lorsque la cloche est bien appuyée au sol! L‘opérateur doit toujours travailler contre le vent, de manière à ne pas inhaler de gaz d‘échappement! Le robinet d‘essence du réservoir supplé-mentaire doit être fermé lors du changement de lieu.
2.2 Risque de brûlesObserver une distance suffisante par rapport à l‘installation d‘échappement et au tuyau métallique flexible!
2.3 Emissions de bruitL‘opérateur doit porter une protection auditive et l‘ordonnance locale sur les protections de bruit doit être observée! Le niveau de pression acoustique s‘élève à 87 dB(A).
2.4 CarburantArrêter le moteur avant de faire le plein! Ne pas fumer!S‘écarter de toute flamme nue! Ne pas secouer le carburant! Ne pas déverser de carburant sur les vêtements! Sinon en changer - Danger de mort!
2.5 GénéralitésVous êtes vous-même responsable de la bonne utilisation sûre de l‘appareil. Vous êtes également responsable de l‘instruction des personnes que vous autorisez à utiliser le destructeur de mulots. Le destructeur de mulots ne doit jamais être utilisé par des enfants ou des personnes qui ne sont pas familiarisées avec les instructions de l‘appareil.
Ne pas oublier que le propriétaire est responsable des accidents et dommages qui concernent les autres personnes ou leurs biens!
Cet appareil doit être exclusivement utilisé conformément à sa destination (voir ch. 1.3 utilisation de la gamme). En cas de violation, le fabricant décline toute prétention de garantie ou de responsa-bilité. Aucune responsabilité n‘est reconnue pour les dommages résultant de la non-observation du mode d‘emploi.
30
3. Caractéristiques techniquesFabricant: Brühwiler Maschinen AG, Hauptstrasse 1, CH-8362 Balterswil Tel.: 071 973 80 40 (0041 71 973 80 40) Fax.: 071 973 80 49 (0041 71 973 80 49) E-Mail: [email protected] Web: www.mauki.chDésignation: MAUKI Destructeur de mulots GX 200Dimensions: hauteur 64 cm, largeur 59 cm, longueur 126 cmPoids: env. 37 kg (sans carburant)Moteur: Honda modèle GX 200T QX4 Cylindrée 196 cm3
Puissance 4,1 kW/5,5 CV netNiveau de bruit: 3400 U/min: 87dB(A) 2200 U/min: 78dB(A)Carburant: Moteur: essence sans plomb (pas d‘huile) Réservoir: essence sans plomb avec 2% de diesel (2dl de diesel pour 10l d‘essence)Châssis: brouette galvanisée à chaud avec roues à pneusRéservoir: 10 litres de mélange de diesel-essence (2dl de diesel pour 10l d‘essence)Accessoires: y compris barre de sondage, outil, mode d‘emploiGarantie: 2 ans
4. Mise en service4.1 PréparationPlein. Attention! L‘essence est aisément inflammable et hautement explosive! Le feu et les explo-sions peuvent provoquer des brûlures ou des dommages aux biens. Ne conserver le carburant que dans des récipients spécialement construits dans ce but. A conserver à l‘abri des enfants. Le plein de l‘appareil ne doit être effectué qu‘à l‘extérieur et il est interdit de fumer lorsque l‘on fait le plein. Un entonnoir doit être utilisé à cet effet. Compléter le plein de carburant avant de mettre le moteur en marche. Ne jamais ouvrir le couvercle du réservoir ou verser de l‘essence pendant que le moteur tourne ou est chaud. Ne pas remplir complètement le réservoir de carburant. Ne verser d‘essence dans le réservoir que jusqu‘à ce que le niveau de liquide vienne 10 mm en dessous du bord inférieur de la tubulure de remplissage. Cet espace libre dans le réservoir permet au carburant de se dilater. Si de l‘essence est déversée, ne pas tenter de démarrer le moteur, mais éliminer le carburant déversé de l‘appareil et éviter toute flamme nue jusqu‘à ce que les vapeurs de carburant se soient évaporées.
Carburant: Moteur Essence sans plomb (pas d‘huile) Réservoir max. 10 litres de mélange essence- diesel Proportions de mélange: 2% de diesel (2dl de diesel pour 10l d‘essence) Remarque Le diesel n‘a pas d‘influence sur la effet, il ne sert qu‘à marquer les gaz d‘échappement.
4.2 Démarrage du moteur (Voir également mode d‘emploi du moteur)Attention! Ne pas faire tourner le moteur dans des locaux fermés où les vapeurs de monooxyde de carbone dangereuses peuvent s‘accumuler.

31
Mettre l’interrupteur du moteur sur la position marche “ I “
Ouvrir le robinet d’essenceMettre la tirette de starter sur position ferme-ture
Déplacer le levier vers la gaucheLancer le moteur avec le démarreur à enrouleur
Dès que le moteur a démarré, ouvrir le volet du starter et laisser le moteur chauffer pendant env. 3 minutes. Le robinet d‘essence du réservoir supplémentaire devrait être fermé pendant cette opéra-tion, de manière que le dégage-ment de gaz soit interrompu.
Pour l’évolution de la fumée ouvrier le robinet d’éssence du réser-voir complémentaire.
Important: Quand le moteur est en marche, le robinet pourl’évolution de la fumée doit être positionné sur “OFF“.
Pour la sécurité de l‘opérateur, le robinet d‘essence du réservoir supplémentaire doit être fermé pendant les changements de lieu. Le dégagement de gaz est de ce fait interrompu.
Ein
Aus
Aus
Attention! Les gaz d‘échappement du moteur contiennent du mono-oxyde de carbone, un gaz sans odeur, mortel. Ne pas faire tourner le moteur dans des locaux fermés ou des zones confinées. Tenir les enfants et les animaux domestiques à distance pendant l‘opération de gazage et veiller également à la direction du vent.
4.3 Arrêt du moteurFermer le robinet d’essence du réservoir et attendre 1 minute
Mettre le levier des gaz complètement à droite
Tourner l‘interrupteur du moteur à la position “OFF“
Fermer le robinet d’essence
Aus
5. EntretienVérifiez l‘huile moteur toutes les 5 heures!Première vidange d‘huile après 20 heures, puis toutes les 100 heures (0.6 l, SAE-15W40)Remplacer le filtre à air et le pré-filtre s‘ils sont sales (Honda 17210-ZE1-822)Remplacez la bougie d‘allumage si elle est sale (NGK BPR6ES)Remplacer le filtre à carburant du réservoir auxiliaire toutes les 50 heures (MU20028)Pour de plus amples informations sur le moteur, voir le mode d‘emploi de HondaPression des pneus max. 1,5 barNe jamais nettoyer l‘appareil avec de l‘eau sous pressionTous les boulons et écrous doivent être serrés de manière à ce que l‘appareil reste en bon état de fonctionnement
6. EntreposageNe jamais conserver le destructeur de mulots avec de l‘essence dans le réservoir à l‘intérieur d‘un bâtiment où les vapeurs pourraient atteindre une flamme nue ou des étincelles. Laisser le moteur refroidir avant de le rentrer dans des bâtiments. Si le réservoir de carburant doit être vidangé, cette opération devrait être effectuée à l‘extérieur.
32
7. Lutte contre les mulots avec MAUKI10 règles de base déterminantes constituent le secret de la réussite.
7.1 Sonder les galeries des mulotsRechercher la galerie des mulots avec la barre de sondage et ouvrir un trou d‘un diamètre d‘env. 5 cm. ATTENTION: L‘appareil ne doit être utilisé qu‘à l‘extérieur! Un risque d‘intoxication aigu par le monooxyde de carbone existe dans les locaux fermés!
7.2 Utilisation de la machinePlacer la cloche et bien la presser. Laisser tourner le moteur à pleins gaz pendant env. 3 minutes. ATTENTION! N‘ouvrir le robinet d‘essence du réservoir supplémentaire que lorsque la cloche est fermement pressée contre le sol!
7.3 Contrôle par la distribution de fuméeContrôler avec précision si, dans le cas d‘une culture contigue, toutes les galeries sont remplies de gaz (observer la fumée qui monte, évent. contrôler avec la barre de sondage). Le système exige l‘ad-dition 2% de diesel pour rendre le fumée incolore visible. L‘addition de diesel n‘a pas d‘influence sur la effet de la MAUKI! Ceci sert uniquement au repérage des galeries de mulots. ATTENTION! L‘opérateur doit toujours se placer contre le vent par rapport à la cloche! Aucune au-tre personne, en particulier les enfants ou les animaux domestiques, ne doit séjourner à proximité!
7.4 Préparation de la prochaine galerie de mulotsPendant la durée de fonctionnement de 3 minutes, vous pouvez rechercher la galerie suivante et préparer le travail. Repérer le trou avec la barre de sondage. Dans le cas de galeries très importantes (souvent jusqu‘à 50 mètres de long), nous recommandons de disposer la cloche à 2-3 endroits.
7.5 Changement de lieuLe robinet d‘essence du réservoir supplémentaire doit être fermé pour la sécurité de l‘opérateur lors du changement de lieu. Le dégagement de gaz est de ce fait interrompu. Relever la cloche, l‘accro-cher à la machine et, du pied, refermer immédiatement le trou pour que le gaz ne puisse s‘échapper. Déplacer la machine sur le nouveau lieu, placer la cloche sur le trou préalablement préparé et ouvrir le robinet du réservoir supplémentaire.
7.6 Destruction des galeriesRevenez sur les galeries préalablement traitées au gaz et fermez toutes les galeries et entrées de mulots. Vous évitez ainsi que des mulots qui circulent ne trouvent des galeries ouvertes et puissent les utiliser. Si néanmoins un mulot s‘installe, il doit réouvrir les galeries. Celles-ci sont alors bien identifiables et doivent être regazées lors d‘un second passage.
7.7 Classification et procédureIl faut toujours effectuer un gazage sur de grandes surfaces. En cas de situations en pente, com-mencer toujours le gazage par le haut (les gaz sont plus lourds que l‘air). A proximité de lisières de forêts ou de bordures de ruisseaux, commencer à cet endroit et travailler en direction du pré dégagé, car les mulots y occupent souvent une issue de secours.
33
7.8 Contrôle ultérieurAprès chaque coupe d‘herbe ou chaque récolte dans les prés et champs, observer les nouvelles constructions effectuées par les mulots. Les cultures d‘arbres, de vignes et de légumes sont parti-culièrement mises en danger par la destruction de leurs racines.
7.9 Moment de la lutteEn principe, on doit lutter pendant toute l‘année. C‘est les mois d‘hiver que vous obtiendrez les meil-leurs succès, dans la mesure où la couverture neigeuse l‘autorise. Les animaux sont affaiblis et leur taux de multiplication plus faible. De manière à ne pas être surpris par une pullutation élevée, une surveillance continue des prés et champs, de cultures, d‘arbres et de vignes est nécessaire. Attention: la migration des mulots est importante en été.
7.10 AvisCette méthode de lutte contre les mulots est simple et sûre. Elle est sans danger pour les plantes, les oiseaux de proie, les chats, chiens, renards et autres animaux utiles. Malgré une lutte efficace avec MAUKI, il est conseillé de protéger également les ennemis naturels du mulot. Renoncez à l‘uti-lisation de poison! La nature et les oiseaux vous en seront reconnaissants. Nous vous souhaitons beaucoup de succès et il nous serait agréable que vous recommandiez notre destructeur de mulots autour de vous.
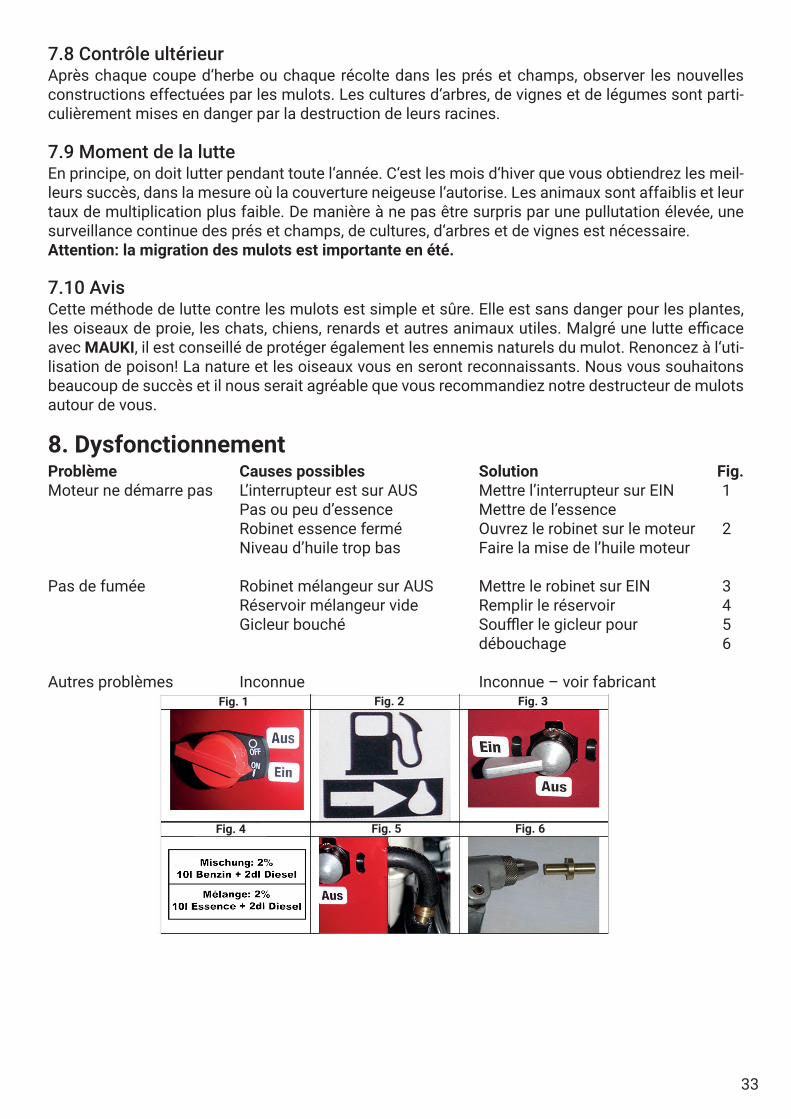
8. DysfonctionnementProblème Causes possibles Solution Fig.Moteur ne démarre pas L’interrupteur est sur AUS Mettre l’interrupteur sur EIN 1 Pas ou peu d’essence Mettre de l’essence Robinet essence fermé Ouvrez le robinet sur le moteur 2 Niveau d’huile trop bas Faire la mise de l’huile moteur
Pas de fumée Robinet mélangeur sur AUS Mettre le robinet sur EIN 3 Réservoir mélangeur vide Remplir le réservoir 4 Gicleur bouché Souffler le gicleur pour 5 débouchage 6
Autres problèmes Inconnue Inconnue – voir fabricantFig. 1 Fig. 2 Fig. 3
Fig. 4 Fig. 5 Fig. 6
34
9. Pièces de rechangeVeuillez, pour l‘entretien, les pièces de rechange ou toute autre information, vous adresser à votre revendeur spécialisé MAUKI ou au fabricant. Si vous vous adressez à votre centre de service ou à l‘usine, indiquez dans tous les cas le modèle, le numéro de série de l‘appareil et le numéro de série du moteur. Ces numéros aident le revendeur ou l‘usine à acquérir les informations correspondantes pour votre produit.
MAUKI Destructeur de mulots, Modèle GX200
N° de série: _______________________________ Date d‘achat:______________________________________
Centre de service:
Fabricant: Brühwiler Maschinen AG, Hauptstrasse 1, CH-8362 Balterswil Tel.: 071 973 80 40 (0041 71 973 80 40) Fax.: 071 973 80 49 (0041 71 973 80 49) E-Mail: [email protected] Web: www.mauki.ch
10. Conditions de garantieLa garantie est limitée, à l‘exclusion de toute autre prétention, au remplacement gratuit des pièces qui s‘avèrent inutilisables consécutivement à un vice de matière ou de fabrication pendant une pé-riode de garantie de 24 mois. La livraison des pièces de rechange intervient le plus rapidement pos-sible. Un retard dans la livraison de ces pièces ne justifie ni prétention à des dommages et intérêts de l‘acheteur, ni prolongation de la durée de la garantie. Les frais de montage et de transport ne sont pas compris. Sont exclues de la garantie les pièces qui sont inutilisables consécutivement à des travaux de réparation inconsidérés ou à une usure naturelle. La garantie s‘éteint lorsque l‘appareil est réparé par des ateliers non autorisés, des pièces de rechange qui ne sont pas d‘origine et sont usées, ainsi que lorsque le mode d‘emploi n‘a pas été consulaté ou si l‘appareil a été revendu. Pour le reste, les conditions de vente et de livraison du bureau de vente sont applicables.
35
11. EG - Déclaration de conformitéDECLARATION DE CONFORMITE CE (2006/42/EG, 2004/108/EG)
Le fabricant : Brühwiler Maschinen AG Hauptstrasse 1 CH-8362 Balterswil
déclare que la machine suivante :
Type : Destructeur de souris Marque : MAUKI Modèle : GX200
est conforme aux dispositions de la Directive Machines 2006/42/CE, y compris à ses modifications. Le produit a été développé et fabriqué en conformité avec les normes suivantes :
EN ISO 12100:2011-03 Sécurité des machines – Concepts de base, principes généraux de conception - Partie 1 : Terminologie de base, méthodologie (ISO 12100-1:2003) ; version allemande NE ISO 12100-1:2003
DIN EN ISO 13732-1:2008 Ergonomie de l’environnement thermique – Procédé d’évaluation des réactions humaines en cas de contact avec les surfaces - Partie 1 : surfaces chaudes (ISO 13732-1:2006) ; version allemande NEISO 13732-1:2008
DIN EN ISO 14982:2009 Machines agricoles et sylvicoles – Compatibilité électromagnétique – procédés de contrôle et critères d’évaluation
Est mandaté pour regrouper les documents techniques : Monsieur Beat Brühwiler, pour l’adresse, voir le fabricant
Etablie à : Balterswil le : 01.03.2021 Signataire : Beat Brühwiler, responsable du secteur d’activité
Signature :
Cachet de l’Institut Julius Kühne (JKI) CONTRÔLÉ ET RECONNU OFFICIELLEMENT
Institut de recherche fédéral pour les plantes de culture
36
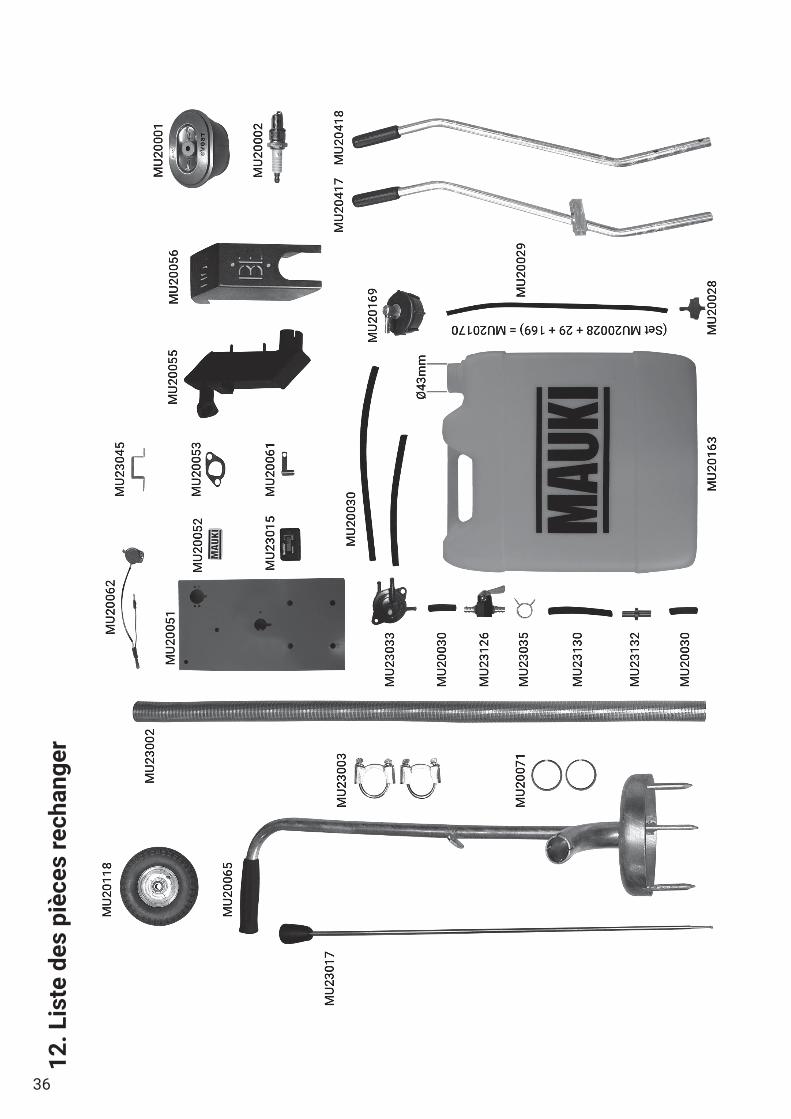
12. L
iste
des
piè
ces
rech
ange
r
37
MU2
3002
. . .
. . .
. . .
Tuya
u m
étal
lique
flex
ible
1,1
0 m
MU2
3003
. . .
. . .
. . .
Colli
er d
e se
rrage
gal
vani
séM
U200
09 *
. . .
. . .
. . M
oteu
r Hon
da G
X200
, vid
e, s
ans
sile
ncie
uxM
U200
09K
*. .
. . .
. . M
oteu
r Hon
da G
X200
, cpl
. ave
c si
lenc
ieux
et p
ompe
MU2
3015
. . .
. . .
. . .
Com
pteu
r d‘h
eure
s de
fonc
tionn
emen
tM
U230
17. .
. . .
. . .
. Ti
ge d
e pa
lpag
e ga
lvan
isée
, bou
ton
incl
usM
U201
18 .
. . .
. . .
. . R
oue
à br
ouet
te G
X200
MU2
0218
*. .
. . .
. . .
Tuy
au p
our r
oue
de b
roue
tte G
X200
MU2
3126
. . .
. . .
. . .
Robi
net d
‘ess
ence
en
mét
alM
U200
28. .
. . .
. . .
. Fi
ltre
à es
senc
eM
U200
29. .
. . .
. . .
. Tu
yau
d‘es
senc
e, Ø
9 m
m /
330
mm
(tuy
au d
ans
le ré
serv
oir)
MU2
0030
. . .
. . .
. . .
Tuya
u es
senc
e Ø
11,
5 m
m /
1 m
ètre
(bou
chon
de
rése
rvoi
r au
mot
eur)
MU2
3132
. . .
. . .
. . .
Buse
de
carb
uran
t en
laito
nM
U230
33. .
. . .
. . .
. Po
mpe
à c
arbu
rant
MU2
3035
. . .
. . .
. . .
Colli
er p
our d
urite
car
bura
nt m
étal
Ø11
mm
MU2
3045
. . .
. . .
. . .
Lien
ver
s ro
bine
t d‘e
ssen
ce 2
0x45
mm
gal
vani
séM
U200
53. .
. . .
. . .
. Jo
int p
our s
ilenc
ieux
Hon
da G
X200
MU2
0055
. . .
. . .
. . .
Sile
ncie
ux p
our M
od.G
X 20
0 (u
niqu
emen
t en
écha
nge)
MU2
0056
. . .
. . .
. . .
Prot
ectio
n si
lenc
ieux
GX2
00M
U200
62. .
. . .
. . .
. In
terr
upte
ur d
‘arr
êt d
u m
oteu
r Hon
daM
U201
63. .
. . .
. . .
. Bi
don
esse
nce
10 li
tres
GX2
00, s
ans
couv
ercl
e Ø
43m
mM
U200
65. .
. . .
. . .
. Cl
oche
d‘é
chap
pem
ent G
X200
MU2
0169
. . .
. . .
. . .
Couv
ercl
e de
bid
on Ø
43m
m p
our b
idon
d‘e
ssen
ce 2
0163
ave
c co
ude
MU2
0170
. . .
. . .
. . .
Jeu
de tu
yaux
de
rése
rvoi
r (av
ec fi
ltre
2002
8, tu
yau
2002
9, c
ouve
rcle
201
69)
MU2
0071
. . .
. . .
. . .
Bagu
e de
ser
rage
gal
vani
sée
pour
sile
ncie
uxM
U204
17. .
. . .
. . .
. Tu
be d
roit
avec
poi
gnée
en
caou
tcho
ucM
U204
18. .
. . .
. . .
. Tu
be g
auch
e av
ec p
oign
ée e
n ca
outc
houc
Pièc
es d
e se
rvic
e:M
U200
01. .
. . .
. . .
. Fi
ltre
à ai
r Hon
da 1
7210
-ZE1
-505
MU2
0002
. . .
. . .
. . .
Boug
ie d
‘allu
mag
e N
GK
BPR6
ESSA
E15W
40*.
. . .
. . .
Hui
le m
oteu
r
*N‘e
st p
as m
ontré
sur
l‘im
age
des
pièc
es d
e re
chan
ge
38
ITLe istruzioni per l‘uso sono protette da copyright. Tutti i diritti sono riservati, in particolare il diritto di ripro-duzione, traduzione ed elaborazione con sistemi elettronici.
INDICE MAUKI Elimina topo campagnolo - GX 2001. Introduzione . . . . . . . . . . . . . . . . . . . . . . . . . . . . . . . . . . . . . . . . . . . . . . . . . . . . . . . . . . . . . . . . . . . . . .39
1.1 Modalità di utilizzo. . . . . . . . . . . . . . . . . . . . . . . . . . . . . . . . . . . . . . . . . . . . . . . . . . . . . . . . . . . . .391.2 Costruzione. . . . . . . . . . . . . . . . . . . . . . . . . . . . . . . . . . . . . . . . . . . . . . . . . . . . . . . . . . . . . . . . . . .391.3 Campi d’applicazione . . . . . . . . . . . . . . . . . . . . . . . . . . . . . . . . . . . . . . . . . . . . . . . . . . . . . . . . . .39
2. Sicurezza . . . . . . . . . . . . . . . . . . . . . . . . . . . . . . . . . . . . . . . . . . . . . . . . . . . . . . . . . . . . . . . . . . . . . . . .402.1 Gas di scarico. . . . . . . . . . . . . . . . . . . . . . . . . . . . . . . . . . . . . . . . . . . . . . . . . . . . . . . . . . . . . . . . .402.2 Rischio di scottature . . . . . . . . . . . . . . . . . . . . . . . . . . . . . . . . . . . . . . . . . . . . . . . . . . . . . . . . . . .402.3 Rumorosità . . . . . . . . . . . . . . . . . . . . . . . . . . . . . . . . . . . . . . . . . . . . . . . . . . . . . . . . . . . . . . . . . . .402.4 Carburante . . . . . . . . . . . . . . . . . . . . . . . . . . . . . . . . . . . . . . . . . . . . . . . . . . . . . . . . . . . . . . . . . . .402.5 In genere . . . . . . . . . . . . . . . . . . . . . . . . . . . . . . . . . . . . . . . . . . . . . . . . . . . . . . . . . . . . . . . . . . . . .40
3. Caratteristiche tecniche . . . . . . . . . . . . . . . . . . . . . . . . . . . . . . . . . . . . . . . . . . . . . . . . . . . . . . . . . . . .414. Messa in funzione . . . . . . . . . . . . . . . . . . . . . . . . . . . . . . . . . . . . . . . . . . . . . . . . . . . . . . . . . . . . . . . . .41
4.1 Preparazione. . . . . . . . . . . . . . . . . . . . . . . . . . . . . . . . . . . . . . . . . . . . . . . . . . . . . . . . . . . . . . . . . .414.2 Avviamento del motore (vedi anche l’istruzioni per l’uso del motore) . . . . . . . . . . . . . . . . . . .414.3 Arresto del motore . . . . . . . . . . . . . . . . . . . . . . . . . . . . . . . . . . . . . . . . . . . . . . . . . . . . . . . . . . . . .42
5. Manutenzione . . . . . . . . . . . . . . . . . . . . . . . . . . . . . . . . . . . . . . . . . . . . . . . . . . . . . . . . . . . . . . . . . . . .426. Immagazzinamento . . . . . . . . . . . . . . . . . . . . . . . . . . . . . . . . . . . . . . . . . . . . . . . . . . . . . . . . . . . . . . .427. L’eliminazione del topo campagnolo con il MAUKI. . . . . . . . . . . . . . . . . . . . . . . . . . . . . . . . . . . . . .43
7.1 Sondare le gallerie del topo campagnolo . . . . . . . . . . . . . . . . . . . . . . . . . . . . . . . . . . . . . . . . . .437.2 Utilizzo della macchina . . . . . . . . . . . . . . . . . . . . . . . . . . . . . . . . . . . . . . . . . . . . . . . . . . . . . . . . .437.3 Controllo della distribuzione del fumo. . . . . . . . . . . . . . . . . . . . . . . . . . . . . . . . . . . . . . . . . . . . .437.4 Preparazione della galleria successiva . . . . . . . . . . . . . . . . . . . . . . . . . . . . . . . . . . . . . . . . . . . .437.5 Cambio postazione di lavoro . . . . . . . . . . . . . . . . . . . . . . . . . . . . . . . . . . . . . . . . . . . . . . . . . . . .437.6 Distruzione delle gallerie . . . . . . . . . . . . . . . . . . . . . . . . . . . . . . . . . . . . . . . . . . . . . . . . . . . . . . . .437.7 Procedure . . . . . . . . . . . . . . . . . . . . . . . . . . . . . . . . . . . . . . . . . . . . . . . . . . . . . . . . . . . . . . . . . . . .437.8 Ulteriore controllo . . . . . . . . . . . . . . . . . . . . . . . . . . . . . . . . . . . . . . . . . . . . . . . . . . . . . . . . . . . . .447.9 Periodi consigliati di utilizzo . . . . . . . . . . . . . . . . . . . . . . . . . . . . . . . . . . . . . . . . . . . . . . . . . . . . .447.10 Avviso importante . . . . . . . . . . . . . . . . . . . . . . . . . . . . . . . . . . . . . . . . . . . . . . . . . . . . . . . . . . . .44
8. Problematiche . . . . . . . . . . . . . . . . . . . . . . . . . . . . . . . . . . . . . . . . . . . . . . . . . . . . . . . . . . . . . . . . . . . .449. Servizio-Riparazioni . . . . . . . . . . . . . . . . . . . . . . . . . . . . . . . . . . . . . . . . . . . . . . . . . . . . . . . . . . . . . . .4510. Garanzia / Condizioni di garanzia . . . . . . . . . . . . . . . . . . . . . . . . . . . . . . . . . . . . . . . . . . . . . . . . . . .4511. Elenco dei pezzi di ricambio . . . . . . . . . . . . . . . . . . . . . . . . . . . . . . . . . . . . . . . . . . . . . . . . . . . . . . .4612. CE - Dichiarazione di conformità . . . . . . . . . . . . . . . . . . . . . . . . . . . . . . . . . . . . . . . . . . . . . . . . . . .48
39
1. IntroduzioneCongratulazioni per aver scelto di acquistare l’elimina topo campagnolo MAUKI. desideriamo che voi siate soddisfatti del vostro nuovo acquisto.
Importante: Preghiamo di leggere attentamente questo libretto di utilizzo, in modo da usare cor-rettamente il vostro apparecchio e svolgere una giusta manutenzione. Le istruzioni inoltre vi aiu-teranno ad evitare danni e pericoli a cose e persone.
1.1 Modalità di utilizzoUna miscela di benzina e diesel è aspirata, dosata con precisione e vaporizzata immediatamente dalla camera di combustione. Questo gas di scarico viene introdotto nelle gallerie sotterranee at-traverso un tubo metallico flessibile con estremità a forma di campana. La potenza del motore del MAUKI assicura una distribuzione rapida del gas di scarico, senza lasciare alcuna possibilità ai topi di fuggire. Il fumo raggiunge in pochi secondi le vie respiratorie, provocando una morte rapida e indolore.
1.2 CostruzioneLa robusta carriola è equipaggiata con una grande ruota pneumatica e una barra di sondaggio (per trovare le tane dei topi da distruggere). Il potente motore è di ultima tecnologia, durevole e di faci-le manutenzione. L’avviamento e la decompressione automatica assicurano una partenza senza difficoltà. Il flusso di fumo deve essere fermato durante gli spostamenti da un luogo all’altro per la sicurezza dell’operatore.
1.3 Campi d’applicazioneIl modello MAUKI, elimina topi campagnoli, è utilizzato esclusivamente per la lotta ai topi campag-noli e in particolare alla distruzione delle loro tane. Vogliate prendere nota delle seguenti restizioni di utilizzo:
1. Il dispositivo deve essere utilizzato solo all’aperto! Negli spazi chiusi c’è il rischio di intossicazio-ne da monossido!
2. Non è autorizzato il suo utilizzo in zone d’acqua protette e in zone di protezione acqua potabile I e II e sulle superfici in presenza di acqua potabile.
3. E’ vietato l’utilizzo in zone di produzione agricole (campi, serre, foreste ec..).
4. L’operatore è il solo responsabile del corretto utilizzo di tale macchina e del rispetto di queste restrizioni di utilizzo.
5. Non è consentito l‘uso del dispositivo a scopo di protezione delle piante in aree di coltivazione (campi, serre, foreste, ecc.).
6. L‘utente è l‘unico responsabile del corretto utilizzo dell‘apparecchiatura e del rispetto delle limit-azioni d‘uso.
7. Prima di acquistare o utilizzare il veicolo per la prima volta, chiedere un permesso alla propria autorità competente (ufficio distrettuale).
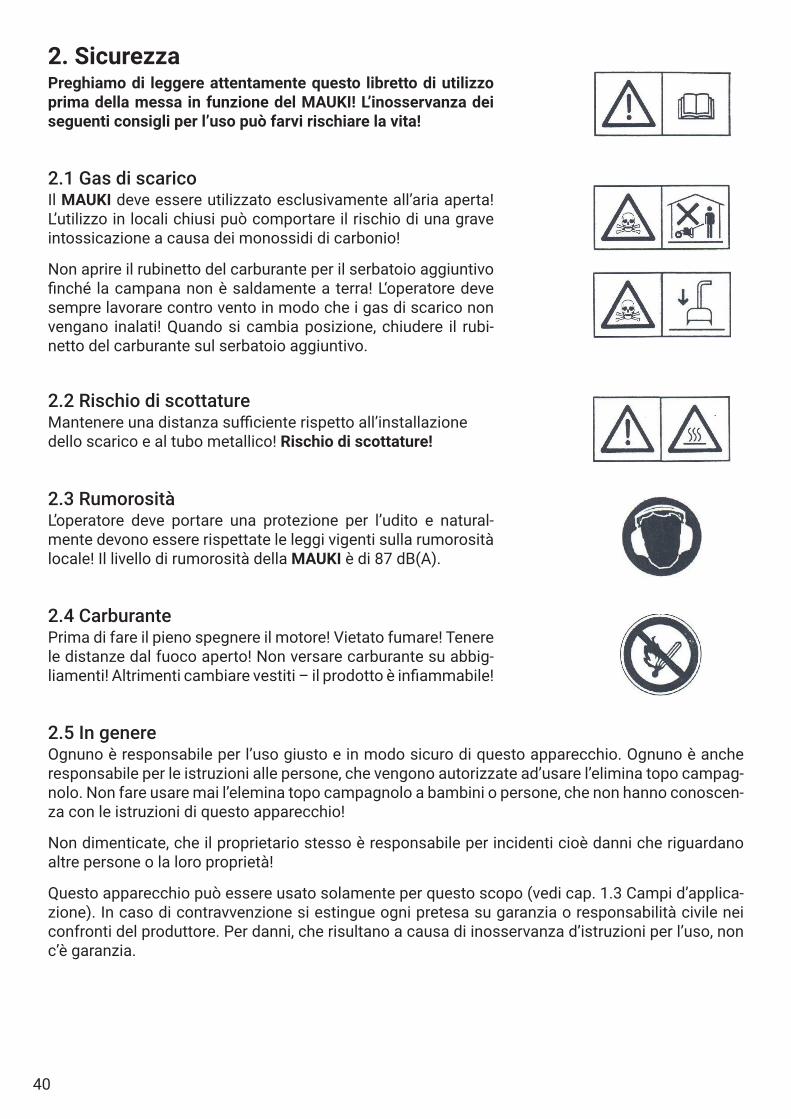
40
2. SicurezzaPreghiamo di leggere attentamente questo libretto di utilizzo prima della messa in funzione del MAUKI! L’inosservanza dei seguenti consigli per l’uso può farvi rischiare la vita!
2.1 Gas di scaricoIl MAUKI deve essere utilizzato esclusivamente all’aria aperta! L’utilizzo in locali chiusi può comportare il rischio di una grave intossicazione a causa dei monossidi di carbonio!
Non aprire il rubinetto del carburante per il serbatoio aggiuntivo finché la campana non è saldamente a terra! L‘operatore deve sempre lavorare contro vento in modo che i gas di scarico non vengano inalati! Quando si cambia posizione, chiudere il rubi-netto del carburante sul serbatoio aggiuntivo.
2.2 Rischio di scottatureMantenere una distanza sufficiente rispetto all’installazione dello scarico e al tubo metallico! Rischio di scottature!
2.3 RumorositàL’operatore deve portare una protezione per l’udito e natural-mente devono essere rispettate le leggi vigenti sulla rumorosità locale! Il livello di rumorosità della MAUKI è di 87 dB(A).
2.4 CarburantePrima di fare il pieno spegnere il motore! Vietato fumare! Tenere le distanze dal fuoco aperto! Non versare carburante su abbig-liamenti! Altrimenti cambiare vestiti – il prodotto è infiammabile!
2.5 In genereOgnuno è responsabile per l’uso giusto e in modo sicuro di questo apparecchio. Ognuno è anche responsabile per le istruzioni alle persone, che vengono autorizzate ad’usare l’elimina topo campag-nolo. Non fare usare mai l’elemina topo campagnolo a bambini o persone, che non hanno conoscen-za con le istruzioni di questo apparecchio!
Non dimenticate, che il proprietario stesso è responsabile per incidenti cioè danni che riguardano altre persone o la loro proprietà!
Questo apparecchio può essere usato solamente per questo scopo (vedi cap. 1.3 Campi d’applica-zione). In caso di contravvenzione si estingue ogni pretesa su garanzia o responsabilità civile nei confronti del produttore. Per danni, che risultano a causa di inosservanza d’istruzioni per l’uso, non c’è garanzia.

41
3. Caratteristiche tecnicheProduttore: Brühwiler Maschinen AG, Hauptstrasse 1, CH-8362 Balterswil Tel.: 071 973 80 40 (0041 71 973 80 40) Fax.: 071 973 80 49 (0041 71 973 80 49) E-Mail: [email protected] Web: www.mauki.chDescrizione: MAUKI Elimina topo campagnolo GX 200Dimensioni: 64 cm di altezza, 59 cm die larghezza, 126 cm di lunghezzaPeso: all’incirca 37 kg (senza carburante)Motore: Honda modello GX 200T QX4 Cilindrata 196 cm3
Potenza 4,1 kW/5,5 CVRumorosità: 3400 U/min: 87dB(A) 2200 U/min: 78dB(A)Carburante: Motore: benzina senza piombo (senza olio) Serbatoio: benzina senza piombo con un 2% di diesel (2dl di diesel per 10l di benzina)Onderstel: Carriola zingata con ruota con pneumaticoSerbatoio: Supplemantare, ogni 2dl di diesel per 10l di benzinaAccessori: incl. barra di sondaggio e l’istruzioni per l’usoGaranzia: 2 anni
4. Messa in funzione4.1 PreparazioneFare il pieno. Nota bene! La benzina è facilmente infiammabile ed esplosiva ! Il fuoco o l’esplosione possono provocare delle scottature o dei danni a cose e persone. Carburante serbare solamente in serbatoi, che sono stati fabbricati particolarmente per questo scopo. Serbare in modo inaccessibile ai bambini. Il pieno della macchina deve essere fatto all’aperto ed è vietato fumare mentre si svolge questa operazione. Effettuate il pieno utilizzando un imbuto. Completare il pieno prima di mettere la MAUKI in funzione. Non aprire mai il coperchio del serbatoio e non versare mai della benzina nel motore se questo è acceso o è ancora caldo. Non riempire completamente il serbatoio di carburan-te. Riempire finché il livello di benzina è al di sotto di 10 mm dal bordo inferiore del bocchettone di riempitura. Questo spazio libero permette al carburante di dilatarsi. Se si rovescia della benzina non avviare il motore sul posto ma spingere via l’apparecchio per evitare che la benzina prenda fuoco. O aspettare che il carburante sia vaporizzato.
Carburante: Motore Benzina senza piombo (senza olio) Serbatoio Massimo 10 litri di miscela tra benzina e diesel, proporzioni di miscela : 2% diesel (2dl di diesel per 10l di benzina). Nota Bene Il diesel non ha influenza sui effetto, ma serve solo a evidenziare il gas di scarico.
4.2 Avviamento del motore (vedi anche l’istruzioni per l’uso del motore)Attenzione! Non avviare il motore in locali chiusi in cui il pericoloso gas di monossido di carbonio potrebbe accumularsi.
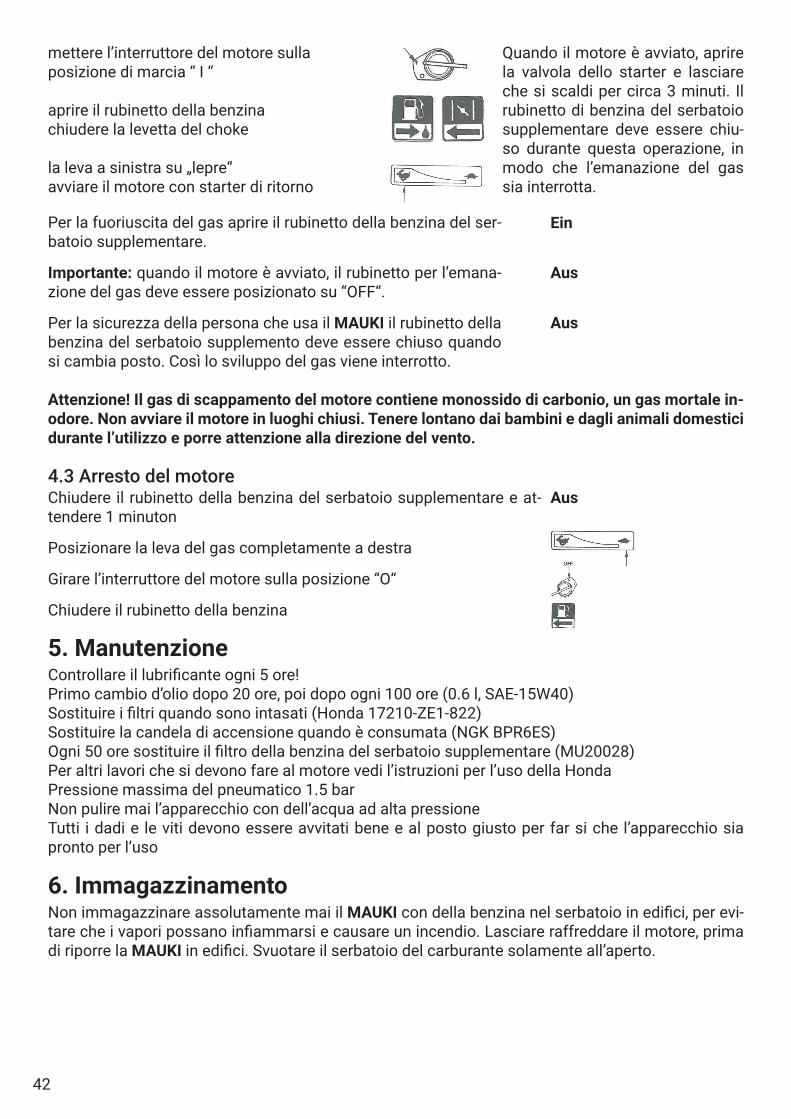
42
mettere l’interruttore del motore sulla posizione di marcia “ I “
aprire il rubinetto della benzinachiudere la levetta del choke
la leva a sinistra su „lepre“avviare il motore con starter di ritorno
Quando il motore è avviato, aprire la valvola dello starter e lasciare che si scaldi per circa 3 minuti. Il rubinetto di benzina del serbatoio supplementare deve essere chiu-so durante questa operazione, in modo che l’emanazione del gas sia interrotta.
Per la fuoriuscita del gas aprire il rubinetto della benzina del ser-batoio supplementare.
Importante: quando il motore è avviato, il rubinetto per l’emana-zione del gas deve essere posizionato su “OFF“.
Per la sicurezza della persona che usa il MAUKI il rubinetto della benzina del serbatoio supplemento deve essere chiuso quando si cambia posto. Così lo sviluppo del gas viene interrotto.
Ein
Aus
Aus
Attenzione! Il gas di scappamento del motore contiene monossido di carbonio, un gas mortale in-odore. Non avviare il motore in luoghi chiusi. Tenere lontano dai bambini e dagli animali domestici durante l’utilizzo e porre attenzione alla direzione del vento.
4.3 Arresto del motoreChiudere il rubinetto della benzina del serbatoio supplementare e at-tendere 1 minuton
Posizionare la leva del gas completamente a destra
Girare l’interruttore del motore sulla posizione “O“
Chiudere il rubinetto della benzina
Aus
5. ManutenzioneControllare il lubrificante ogni 5 ore!Primo cambio d’olio dopo 20 ore, poi dopo ogni 100 ore (0.6 l, SAE-15W40)Sostituire i filtri quando sono intasati (Honda 17210-ZE1-822)Sostituire la candela di accensione quando è consumata (NGK BPR6ES)Ogni 50 ore sostituire il filtro della benzina del serbatoio supplementare (MU20028)Per altri lavori che si devono fare al motore vedi l’istruzioni per l’uso della HondaPressione massima del pneumatico 1.5 barNon pulire mai l’apparecchio con dell’acqua ad alta pressioneTutti i dadi e le viti devono essere avvitati bene e al posto giusto per far si che l’apparecchio sia pronto per l’uso
6. ImmagazzinamentoNon immagazzinare assolutamente mai il MAUKI con della benzina nel serbatoio in edifici, per evi-tare che i vapori possano infiammarsi e causare un incendio. Lasciare raffreddare il motore, prima di riporre la MAUKI in edifici. Svuotare il serbatoio del carburante solamente all’aperto.

43
7. L’eliminazione del topo campagnolo con il MAUKI10 regole di base decisive per ottenere buoni risultati.
7.1 Sondare le gallerie del topo campagnoloRicercare le gallerie dei topi per mezzo della barra di sondaggio e aprire un buco del diametro di circa 5 cm. Attenzione: L’apparecchio si usa assolutamente all’aperto! In locali chiusi c’è grave pericolo di intossicazione a causa da monossidi di carbonio!
7.2 Utilizzo della macchinaPosizionare la campana e pressarla bene. Lasciare il motore avviato a pieno regime per circa 5 minuti. ATTENZIONE! Non aprire il rubinetto della benzina del serbatoio supplementare se la cam-pana non è ben pressata nel terreno!
7.3 Controllo della distribuzione del fumoControllare con precisione che tutte le gallerie siano riempite di gas (osservare il fumo che fuoriesce o eventualmente controllare con la barra di sondaggio). Questo sistema esige l’aggiunta di un 2% di diesel (gasolio) per rendere di fumo visibile. L’aggiunta del diesel non ha influenza sulla velenosità del effetto della MAUKI! Questo serve soltanto a marcare le tane del topo. ATTENZIONE! Durante questa operazione l’operatore deve posizionarsi sempre contro vento ri-spetto alla campana, in modo da evitare l’inalazione del fumo! È importante che non ci siano altre persone o animali nei paraggi durante l’utilizzo!
7.4 Preparazione della galleria successivaDurante il funzionamento di 5 minuti è possibile individuare la tana successiva e preparare il lavoro futuro. Individuare il buco con la barra di sondaggio. Nel caso in cui ci siano una o più gallerie (spes-so lunghe fino a 50 metri), si raccomanda di effettuare l’operazione in 2 o 3 punti.
7.5 Cambio postazione di lavoroIl rubinetto della benzina del serbatoio supplementare deve essere chiuso per la sicurezza dell’ope-ratore. In questo modo l’emanazione del gas è interrotta. Sollevare la campana e agganciarla alla macchina e con il piede chiudere subito il buco per evitare che il gas fuoriesca. Posizionare la mac-china sul nuovo buco preferibilmente già pronto e aprire il rubinetto della benzina e ripetere l’opera-zione.
7.6 Distruzione delle gallerieRitornare sulle gallerie trattate precedentemente e chiuderle tutte accuratamente. In questo modo evitate che eventuali topi che ancora circolano nella zona trovino delle gallerie aperte da poter uti-lizzare. Se tuttavia succedesse che un topo si introduce nuovamente in una galleria è necessario riaprirla per effettuare un secondo trattamento.
7.7 ProcedureÈ sempre meglio procedere in grandi aree magari insieme ai vicini. In caso di terreni in pendenza si comincia sempre dall’alto (i gas sono più pesanti dell’aria, perciò tendono a scendere). Nelle vici-nanze di ruscelli o ai margini di boschi si deve cominciare da lì e verso gli spazi aperti, per evitare ai topi questa via di scampo.
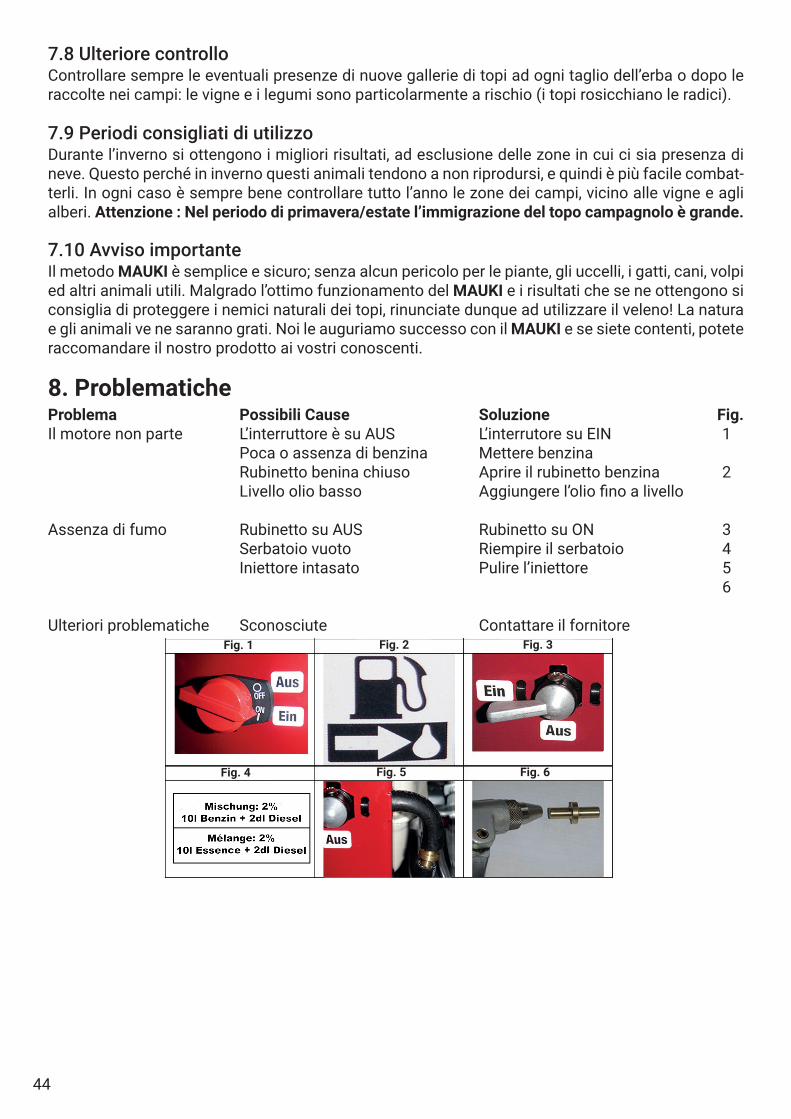
44
7.8 Ulteriore controlloControllare sempre le eventuali presenze di nuove gallerie di topi ad ogni taglio dell’erba o dopo le raccolte nei campi: le vigne e i legumi sono particolarmente a rischio (i topi rosicchiano le radici).
7.9 Periodi consigliati di utilizzoDurante l’inverno si ottengono i migliori risultati, ad esclusione delle zone in cui ci sia presenza di neve. Questo perché in inverno questi animali tendono a non riprodursi, e quindi è più facile combat-terli. In ogni caso è sempre bene controllare tutto l’anno le zone dei campi, vicino alle vigne e agli alberi. Attenzione : Nel periodo di primavera/estate l’immigrazione del topo campagnolo è grande.
7.10 Avviso importanteIl metodo MAUKI è semplice e sicuro; senza alcun pericolo per le piante, gli uccelli, i gatti, cani, volpi ed altri animali utili. Malgrado l’ottimo funzionamento del MAUKI e i risultati che se ne ottengono si consiglia di proteggere i nemici naturali dei topi, rinunciate dunque ad utilizzare il veleno! La natura e gli animali ve ne saranno grati. Noi le auguriamo successo con il MAUKI e se siete contenti, potete raccomandare il nostro prodotto ai vostri conoscenti.
8. ProblematicheProblema Possibili Cause Soluzione Fig.Il motore non parte L’interruttore è su AUS L’interrutore su EIN 1 Poca o assenza di benzina Mettere benzina Rubinetto benina chiuso Aprire il rubinetto benzina 2 Livello olio basso Aggiungere l’olio fino a livello
Assenza di fumo Rubinetto su AUS Rubinetto su ON 3 Serbatoio vuoto Riempire il serbatoio 4 Iniettore intasato Pulire l’iniettore 5 6
Ulteriori problematiche Sconosciute Contattare il fornitoreFig. 1 Fig. 2 Fig. 3
Fig. 4 Fig. 5 Fig. 6
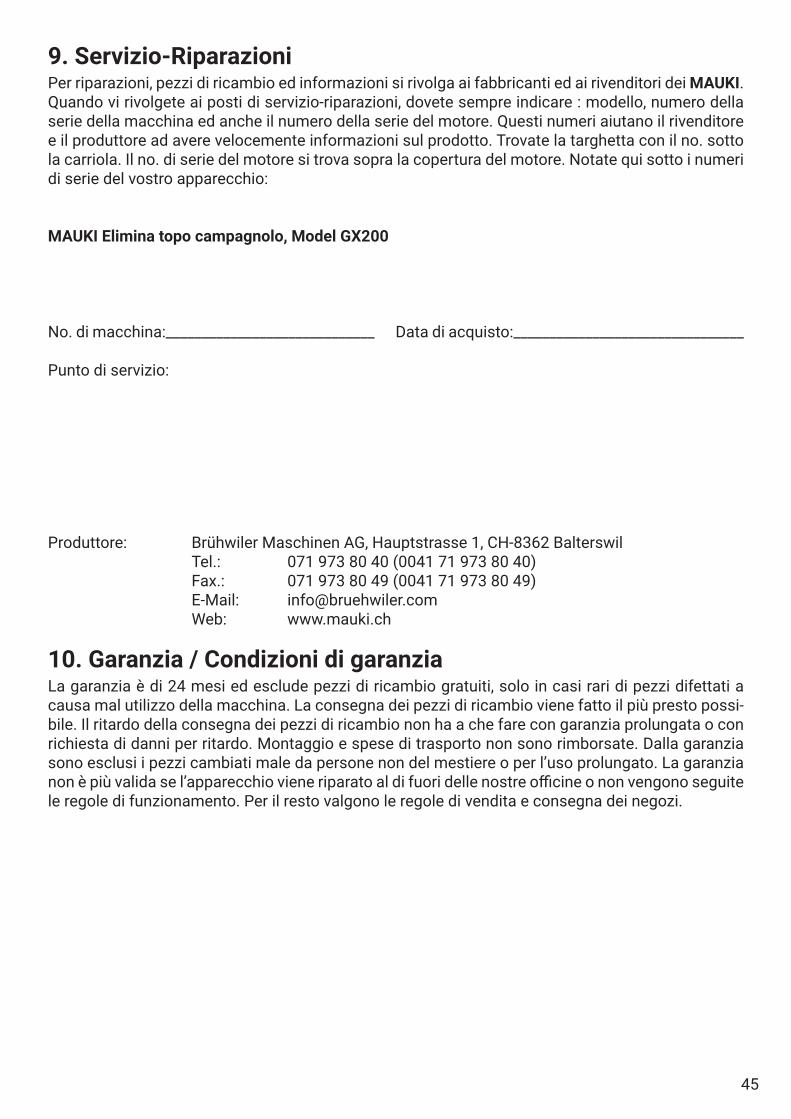
45
9. Servizio-RiparazioniPer riparazioni, pezzi di ricambio ed informazioni si rivolga ai fabbricanti ed ai rivenditori dei MAUKI. Quando vi rivolgete ai posti di servizio-riparazioni, dovete sempre indicare : modello, numero della serie della macchina ed anche il numero della serie del motore. Questi numeri aiutano il rivenditore e il produttore ad avere velocemente informazioni sul prodotto. Trovate la targhetta con il no. sotto la carriola. Il no. di serie del motore si trova sopra la copertura del motore. Notate qui sotto i numeri di serie del vostro apparecchio:
MAUKI Elimina topo campagnolo, Model GX200
No. di macchina:_____________________________ Data di acquisto:________________________________
Punto di servizio:
Produttore: Brühwiler Maschinen AG, Hauptstrasse 1, CH-8362 Balterswil Tel.: 071 973 80 40 (0041 71 973 80 40) Fax.: 071 973 80 49 (0041 71 973 80 49) E-Mail: [email protected] Web: www.mauki.ch
10. Garanzia / Condizioni di garanziaLa garanzia è di 24 mesi ed esclude pezzi di ricambio gratuiti, solo in casi rari di pezzi difettati a causa mal utilizzo della macchina. La consegna dei pezzi di ricambio viene fatto il più presto possi-bile. Il ritardo della consegna dei pezzi di ricambio non ha a che fare con garanzia prolungata o con richiesta di danni per ritardo. Montaggio e spese di trasporto non sono rimborsate. Dalla garanzia sono esclusi i pezzi cambiati male da persone non del mestiere o per l’uso prolungato. La garanzia non è più valida se l’apparecchio viene riparato al di fuori delle nostre officine o non vengono seguite le regole di funzionamento. Per il resto valgono le regole di vendita e consegna dei negozi.

46
11. E
lenc
o de
i pez
zi d
i ric
ambi
o
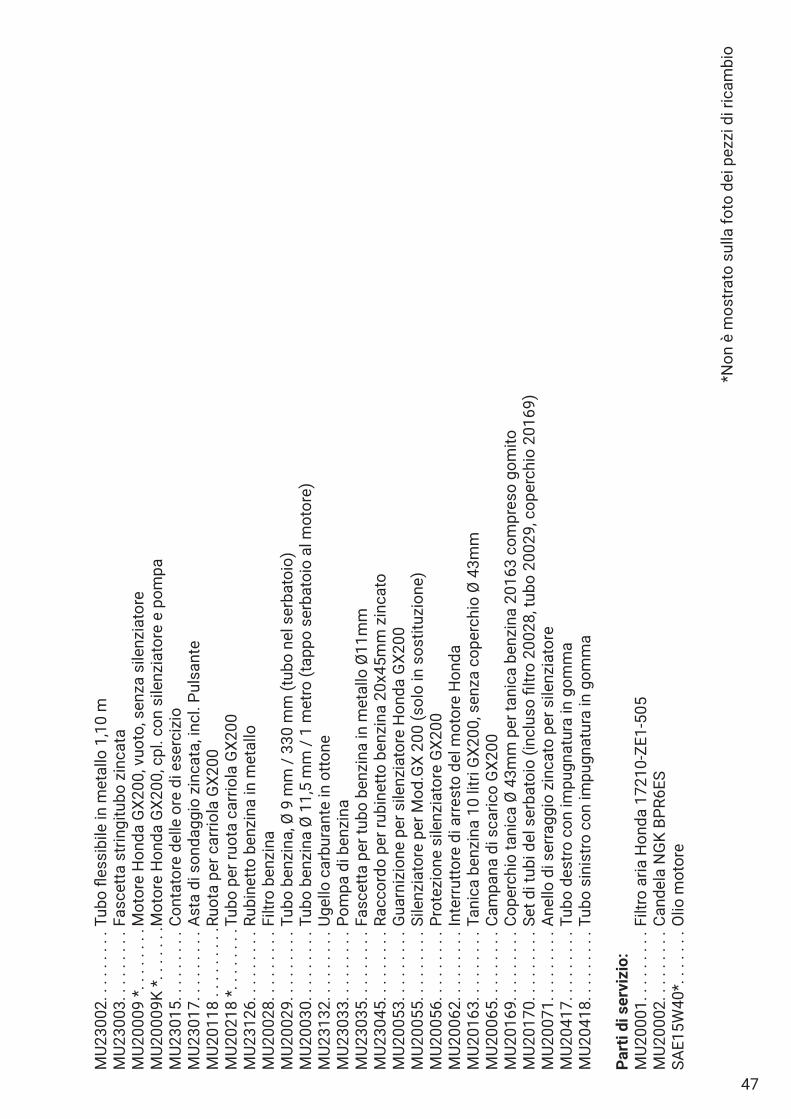
47
MU2
3002
. . .
. . .
. . .
Tubo
fles
sibi
le in
met
allo
1,1
0 m
MU2
3003
. . .
. . .
. . .
Fasc
etta
str
ingi
tubo
zin
cata
MU2
0009
*. .
. . .
. . .
Mot
ore
Hon
da G
X200
, vuo
to, s
enza
sile
nzia
tore
MU2
0009
K *.
. . .
. . .
Mot
ore
Hon
da G
X200
, cpl
. con
sile
nzia
tore
e p
ompa
MU2
3015
. . .
. . .
. . .
Cont
ator
e de
lle o
re d
i ese
rciz
ioM
U230
17. .
. . .
. . .
. As
ta d
i son
dagg
io z
inca
ta, i
ncl.
Puls
ante
MU2
0118
. . .
. . .
. . .
Ruo
ta p
er c
arrio
la G
X200
MU2
0218
*. .
. . .
. . .
Tub
o pe
r ruo
ta c
arrio
la G
X200
MU2
3126
. . .
. . .
. . .
Rubi
netto
ben
zina
in m
etal
loM
U200
28. .
. . .
. . .
. Fi
ltro
benz
ina
MU2
0029
. . .
. . .
. . .
Tubo
ben
zina
, Ø 9
mm
/ 33
0 m
m (t
ubo
nel s
erba
toio
)M
U200
30. .
. . .
. . .
. Tu
bo b
enzi
na Ø
11,
5 m
m /
1 m
etro
(tap
po s
erba
toio
al m
otor
e)M
U231
32. .
. . .
. . .
. U
gello
car
bura
nte
in o
ttone
MU2
3033
. . .
. . .
. . .
Pom
pa d
i ben
zina
MU2
3035
. . .
. . .
. . .
Fasc
etta
per
tubo
ben
zina
in m
etal
lo Ø
11m
mM
U230
45. .
. . .
. . .
. Ra
ccor
do p
er ru
bine
tto b
enzi
na 2
0x45
mm
zin
cato
MU2
0053
. . .
. . .
. . .
Gua
rniz
ione
per
sile
nzia
tore
Hon
da G
X200
MU2
0055
. . .
. . .
. . .
Sile
nzia
tore
per
Mod
.GX
200
(sol
o in
sos
tituz
ione
)M
U200
56. .
. . .
. . .
. Pr
otez
ione
sile
nzia
tore
GX2
00M
U200
62. .
. . .
. . .
. In
terr
utto
re d
i arr
esto
del
mot
ore
Hon
daM
U201
63. .
. . .
. . .
. Ta
nica
ben
zina
10
litri
GX2
00, s
enza
cop
erch
io Ø
43m
mM
U200
65. .
. . .
. . .
. Ca
mpa
na d
i sca
rico
GX2
00M
U201
69. .
. . .
. . .
. Co
perc
hio
tani
ca Ø
43m
m p
er ta
nica
ben
zina
201
63 c
ompr
eso
gom
ito
MU2
0170
. . .
. . .
. . .
Set d
i tub
i del
ser
bato
io (i
nclu
so fi
ltro
2002
8, tu
bo 2
0029
, cop
erch
io 2
0169
)M
U200
71. .
. . .
. . .
. An
ello
di s
erra
ggio
zin
cato
per
sile
nzia
tore
MU2
0417
. . .
. . .
. . .
Tubo
des
tro c
on im
pugn
atur
a in
gom
ma
MU2
0418
. . .
. . .
. . .
Tubo
sin
istro
con
impu
gnat
ura
in g
omm
a
Part
i di s
ervi
zio:
MU2
0001
. . .
. . .
. . .
Filtr
o ar
ia H
onda
172
10-Z
E1-5
05M
U200
02. .
. . .
. . .
. Ca
ndel
a N
GK
BPR6
ESSA
E15W
40*.
. . .
. . .
Olio
mot
ore
*Non
è m
ostra
to s
ulla
foto
dei
pez
zi d
i ric
ambi
o
48
12. CE - Dichiarazione di conformitàDichiarazione di conformità CE (2006/42/EG, 2004/108/EG) Il costruttore: Brühwiler Maschinen AG
Hauptstrasse 1 CH-8362 Balterswil
dichiara che la seguente macchina:
Tipo: eliminatopi Marchio: MAUKI Modello: GX200
è conforme alle disposizione della direttiva macchine 2006/42/CE, compresi i relativi emendamenti. Il prodotto è stato sviluppato e realizzato conformemente alle seguenti norme: EN ISO 12100:2011-03 Sicurezza del macchinario – Concetti fondamentali,
principi generali di progettazione - Parte 1: Terminologia e metodologia di base (ISO 12100-1:2003); versione tedesca EN ISO 12100-1:2003
DIN EN ISO 13732-1:2008 Ergonomia dell'ambiente termico – Metodi per la
valutazione della risposta dell'uomo al contatto con le superfici – Parte 1: Superfici calde (ISO 13732-1:2006); versione tedesca EN ISO 13732-1:2008
DIN EN ISO 14982:2009 Macchine per agricoltura e silvicoltura –
Compatibilità elettromagnetica – Procedura di verifica e criteri di valutazione
Il responsabile per la composizione della documentazione tecnica è: signor Beat Brühwiler, indirizzo, vedere costruttore Redatto in: Balterswil il: 01.03.2021 Firmato: Beat Brühwiler, responsabile settore Firma:
49
NLOp deze gebruikshandleiding rust auteursrecht. Alle rechten blijven voorbehouden, vooral het recht op verspreiding, vertaling en verwerking met elektronische systemen.
INHOUDSOPGAVE MAUKI Muizenverdelger - GX 200
1. Inleiding . . . . . . . . . . . . . . . . . . . . . . . . . . . . . . . . . . . . . . . . . . . . . . . . . . . . . . . . . . . . . . . . . . . . . . . . .501.1 Hoe werkt het apparaat . . . . . . . . . . . . . . . . . . . . . . . . . . . . . . . . . . . . . . . . . . . . . . . . . . . . . . . . .501.2 Constructie . . . . . . . . . . . . . . . . . . . . . . . . . . . . . . . . . . . . . . . . . . . . . . . . . . . . . . . . . . . . . . . . . . .501.3 Toepassingsbereik. . . . . . . . . . . . . . . . . . . . . . . . . . . . . . . . . . . . . . . . . . . . . . . . . . . . . . . . . . . . .50
2. Veiligheid . . . . . . . . . . . . . . . . . . . . . . . . . . . . . . . . . . . . . . . . . . . . . . . . . . . . . . . . . . . . . . . . . . . . . . . .512.1 Uitlaatgassen . . . . . . . . . . . . . . . . . . . . . . . . . . . . . . . . . . . . . . . . . . . . . . . . . . . . . . . . . . . . . . . . .512.2 Verbrandingsgevaar. . . . . . . . . . . . . . . . . . . . . . . . . . . . . . . . . . . . . . . . . . . . . . . . . . . . . . . . . . . .512.3 Lawaai . . . . . . . . . . . . . . . . . . . . . . . . . . . . . . . . . . . . . . . . . . . . . . . . . . . . . . . . . . . . . . . . . . . . . . .512.4 Brandstof. . . . . . . . . . . . . . . . . . . . . . . . . . . . . . . . . . . . . . . . . . . . . . . . . . . . . . . . . . . . . . . . . . . . .512.5 Algemeen . . . . . . . . . . . . . . . . . . . . . . . . . . . . . . . . . . . . . . . . . . . . . . . . . . . . . . . . . . . . . . . . . . . .51
3. Technische specificaties . . . . . . . . . . . . . . . . . . . . . . . . . . . . . . . . . . . . . . . . . . . . . . . . . . . . . . . . . . .524. In bedrijf stellen. . . . . . . . . . . . . . . . . . . . . . . . . . . . . . . . . . . . . . . . . . . . . . . . . . . . . . . . . . . . . . . . . . .52
4.1 Voorbereiding . . . . . . . . . . . . . . . . . . . . . . . . . . . . . . . . . . . . . . . . . . . . . . . . . . . . . . . . . . . . . . . . .524.2 Motor starten (zie ook handleiding motor) . . . . . . . . . . . . . . . . . . . . . . . . . . . . . . . . . . . . . . . . .524.3 Motor uitzetten. . . . . . . . . . . . . . . . . . . . . . . . . . . . . . . . . . . . . . . . . . . . . . . . . . . . . . . . . . . . . . . .53
5. Onderhoud . . . . . . . . . . . . . . . . . . . . . . . . . . . . . . . . . . . . . . . . . . . . . . . . . . . . . . . . . . . . . . . . . . . . . . .536. Opslag . . . . . . . . . . . . . . . . . . . . . . . . . . . . . . . . . . . . . . . . . . . . . . . . . . . . . . . . . . . . . . . . . . . . . . . . . . .537. Muizenbestrijding met MAUKI . . . . . . . . . . . . . . . . . . . . . . . . . . . . . . . . . . . . . . . . . . . . . . . . . . . . . .54
7.1 Muizengang onderzoeken. . . . . . . . . . . . . . . . . . . . . . . . . . . . . . . . . . . . . . . . . . . . . . . . . . . . . . .547.2 Het inwerkingstellen van de machine . . . . . . . . . . . . . . . . . . . . . . . . . . . . . . . . . . . . . . . . . . . . .547.3 Controle over de rookverdeling. . . . . . . . . . . . . . . . . . . . . . . . . . . . . . . . . . . . . . . . . . . . . . . . . . .547.4 Voorbereiden van het volgende muizenhol . . . . . . . . . . . . . . . . . . . . . . . . . . . . . . . . . . . . . . . . .547.5 Wisseling van locatie . . . . . . . . . . . . . . . . . . . . . . . . . . . . . . . . . . . . . . . . . . . . . . . . . . . . . . . . . . .547.6 Vernietiging van de holen . . . . . . . . . . . . . . . . . . . . . . . . . . . . . . . . . . . . . . . . . . . . . . . . . . . . . . .547.7 Indeling en handelswijze . . . . . . . . . . . . . . . . . . . . . . . . . . . . . . . . . . . . . . . . . . . . . . . . . . . . . . . .547.8 Controle. . . . . . . . . . . . . . . . . . . . . . . . . . . . . . . . . . . . . . . . . . . . . . . . . . . . . . . . . . . . . . . . . . . . . .557.9 Wanneer bestrijden . . . . . . . . . . . . . . . . . . . . . . . . . . . . . . . . . . . . . . . . . . . . . . . . . . . . . . . . . . . .557.10 Aanwijzing . . . . . . . . . . . . . . . . . . . . . . . . . . . . . . . . . . . . . . . . . . . . . . . . . . . . . . . . . . . . . . . . . .55
8. Storingen . . . . . . . . . . . . . . . . . . . . . . . . . . . . . . . . . . . . . . . . . . . . . . . . . . . . . . . . . . . . . . . . . . . . . . . .559. Servicelocatie . . . . . . . . . . . . . . . . . . . . . . . . . . . . . . . . . . . . . . . . . . . . . . . . . . . . . . . . . . . . . . . . . . . .5610. Garantievoorwaarden . . . . . . . . . . . . . . . . . . . . . . . . . . . . . . . . . . . . . . . . . . . . . . . . . . . . . . . . . . . . .5611. EG - Verklaring van ouvereenstemming . . . . . . . . . . . . . . . . . . . . . . . . . . . . . . . . . . . . . . . . . . . . .5712. Reserve onderdelen . . . . . . . . . . . . . . . . . . . . . . . . . . . . . . . . . . . . . . . . . . . . . . . . . . . . . . . . . . . . . .58
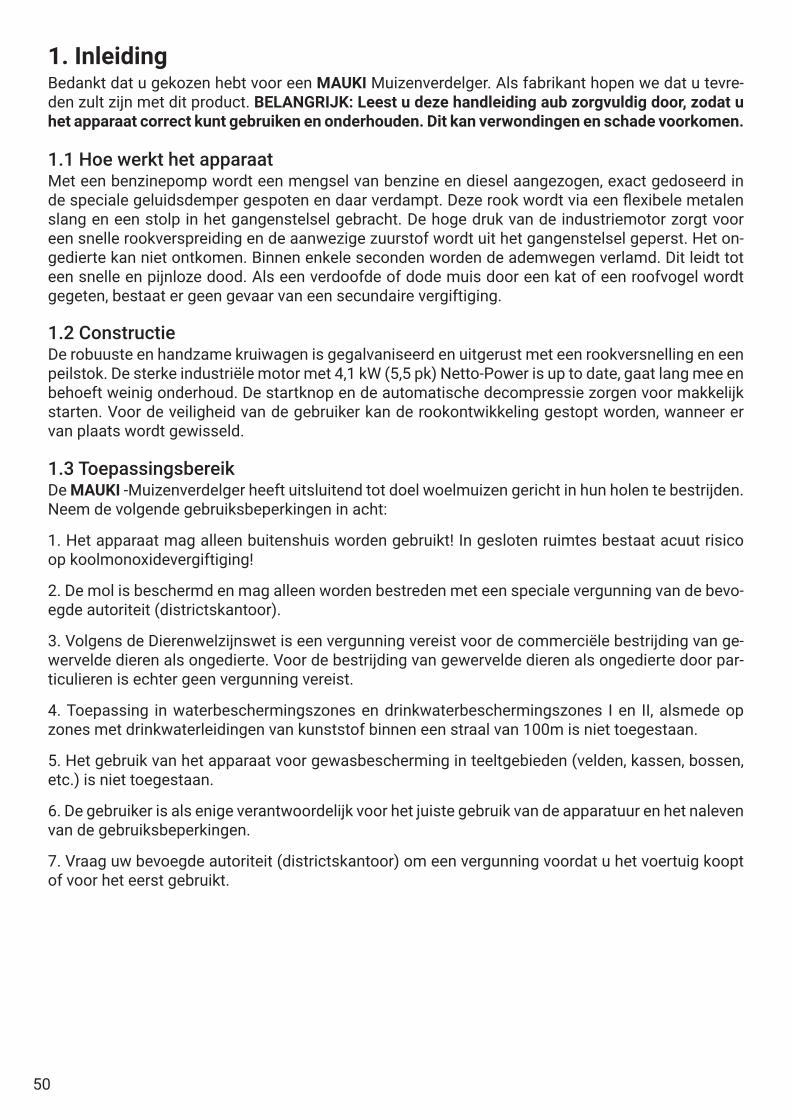
50
1. InleidingBedankt dat u gekozen hebt voor een MAUKI Muizenverdelger. Als fabrikant hopen we dat u tevre-den zult zijn met dit product. BELANGRIJK: Leest u deze handleiding aub zorgvuldig door, zodat u het apparaat correct kunt gebruiken en onderhouden. Dit kan verwondingen en schade voorkomen.
1.1 Hoe werkt het apparaatMet een benzinepomp wordt een mengsel van benzine en diesel aangezogen, exact gedoseerd in de speciale geluidsdemper gespoten en daar verdampt. Deze rook wordt via een flexibele metalen slang en een stolp in het gangenstelsel gebracht. De hoge druk van de industriemotor zorgt voor een snelle rookverspreiding en de aanwezige zuurstof wordt uit het gangenstelsel geperst. Het on-gedierte kan niet ontkomen. Binnen enkele seconden worden de ademwegen verlamd. Dit leidt tot een snelle en pijnloze dood. Als een verdoofde of dode muis door een kat of een roofvogel wordt gegeten, bestaat er geen gevaar van een secundaire vergiftiging.
1.2 ConstructieDe robuuste en handzame kruiwagen is gegalvaniseerd en uitgerust met een rookversnelling en een peilstok. De sterke industriële motor met 4,1 kW (5,5 pk) Netto-Power is up to date, gaat lang mee en behoeft weinig onderhoud. De startknop en de automatische decompressie zorgen voor makkelijk starten. Voor de veiligheid van de gebruiker kan de rookontwikkeling gestopt worden, wanneer er van plaats wordt gewisseld.
1.3 ToepassingsbereikDe MAUKI -Muizenverdelger heeft uitsluitend tot doel woelmuizen gericht in hun holen te bestrijden. Neem de volgende gebruiksbeperkingen in acht:
1. Het apparaat mag alleen buitenshuis worden gebruikt! In gesloten ruimtes bestaat acuut risico op koolmonoxidevergiftiging!
2. De mol is beschermd en mag alleen worden bestreden met een speciale vergunning van de bevo-egde autoriteit (districtskantoor).
3. Volgens de Dierenwelzijnswet is een vergunning vereist voor de commerciële bestrijding van ge-wervelde dieren als ongedierte. Voor de bestrijding van gewervelde dieren als ongedierte door par-ticulieren is echter geen vergunning vereist.
4. Toepassing in waterbeschermingszones en drinkwaterbeschermingszones I en II, alsmede op zones met drinkwaterleidingen van kunststof binnen een straal van 100m is niet toegestaan.
5. Het gebruik van het apparaat voor gewasbescherming in teeltgebieden (velden, kassen, bossen, etc.) is niet toegestaan.
6. De gebruiker is als enige verantwoordelijk voor het juiste gebruik van de apparatuur en het naleven van de gebruiksbeperkingen.
7. Vraag uw bevoegde autoriteit (districtskantoor) om een vergunning voordat u het voertuig koopt of voor het eerst gebruikt.
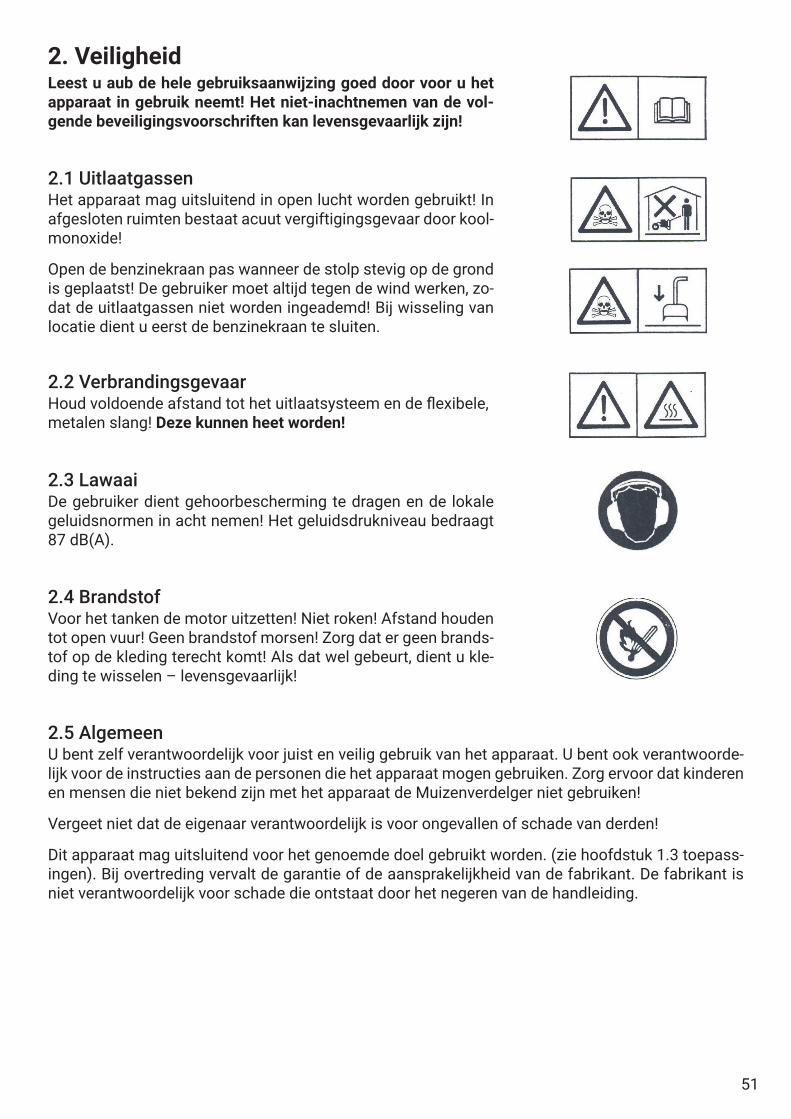
51
2. VeiligheidLeest u aub de hele gebruiksaanwijzing goed door voor u het apparaat in gebruik neemt! Het niet-inachtnemen van de vol-gende beveiligingsvoorschriften kan levensgevaarlijk zijn!
2.1 UitlaatgassenHet apparaat mag uitsluitend in open lucht worden gebruikt! In afgesloten ruimten bestaat acuut vergiftigingsgevaar door kool-monoxide!
Open de benzinekraan pas wanneer de stolp stevig op de grond is geplaatst! De gebruiker moet altijd tegen de wind werken, zo-dat de uitlaatgassen niet worden ingeademd! Bij wisseling van locatie dient u eerst de benzinekraan te sluiten.
2.2 VerbrandingsgevaarHoud voldoende afstand tot het uitlaatsysteem en de flexibele, metalen slang! Deze kunnen heet worden!
2.3 LawaaiDe gebruiker dient gehoorbescherming te dragen en de lokale geluidsnormen in acht nemen! Het geluidsdrukniveau bedraagt 87 dB(A).
2.4 BrandstofVoor het tanken de motor uitzetten! Niet roken! Afstand houden tot open vuur! Geen brandstof morsen! Zorg dat er geen brands-tof op de kleding terecht komt! Als dat wel gebeurt, dient u kle-ding te wisselen – levensgevaarlijk!
2.5 AlgemeenU bent zelf verantwoordelijk voor juist en veilig gebruik van het apparaat. U bent ook verantwoorde-lijk voor de instructies aan de personen die het apparaat mogen gebruiken. Zorg ervoor dat kinderen en mensen die niet bekend zijn met het apparaat de Muizenverdelger niet gebruiken!
Vergeet niet dat de eigenaar verantwoordelijk is voor ongevallen of schade van derden!
Dit apparaat mag uitsluitend voor het genoemde doel gebruikt worden. (zie hoofdstuk 1.3 toepass-ingen). Bij overtreding vervalt de garantie of de aansprakelijkheid van de fabrikant. De fabrikant is niet verantwoordelijk voor schade die ontstaat door het negeren van de handleiding.
52
3. Technische specificatiesFabrikant: Brühwiler Maschinen AG, Hauptstrasse 1, CH-8362 Balterswil Tel.: 071 973 80 40 (0041 71 973 80 40) Fax.: 071 973 80 49 (0041 71 973 80 49) E-Mail: [email protected] Web: www.mauki.chOmschrijving: MAUKI Muizenverdelger GX 200Afmetingen: Hoogte 64 cm, breedte 59 cm, lengte 126 cmGewicht: ca. 37 kg (zonder brandstof)Motor: Honda modèle GX 200T QX4 Cilinderinhoud 196 cm3
Netto Vermogen 4,1 kW/5,5 pkGeluidsniveau: 3400 U/min: 87dB(A) 2200 U/min: 78dB(A)Brandstof: Motor: Loodvrije benzine (geen oile) Bijmengingstank: Loodvrije benzine met 2% diesel (2dl diesel per 10l benzine)Onderstel: Gegalvaniseerde kruiwagen met luchtbandBijmengingstank: 10 Liter voor benzine-dieselmix (2dl diesel per 10l benzine)Toebehoren: Inclusief peilstuk en handleidingGarantie: 2 jaar
4. In bedrijf stellen4.1 VoorbereidingVoltanken. Pas op! Benzine is licht ontvlambaar en uiterst explosief! Vuur en explosies kunnen verbrandingen of materiële schade veroorzaken. Bewaar de brandstof in tanks die speciaal voor dit doel zijn gemaakt. Buiten bereik van kinderen bewaren. Het apparaat mag alleen in de open lucht volgetankt worden, gebruik hiervoor een trechter. Niet roken tijdens het tanken. Vul de brandstof bij voor u de motor start. Verwijder nooit het tankdeksel, of vul benzine bij, terwijl de motor loopt, of wanneer de motor nog warm is. Vul de brandstoftank niet tot de rand, tot 10 mm onder de opening. Zo heeft de vloeistof de ruimte om uit te zetten. Wanneer er benzine wordt gemorst, moet u niet proberen de motor te starten. Schuif het apparaat aan de kant en vermijd open vuur, totdat de ben-zinedamp vervluchtigd is.
Brandstof: Motor Loodvrije benzine (geen olie) Bijmengingstank Maximaal 10 liter benzine-dieselmengsel. Mengverhouding: 2 % diesel (2dl diesel per 10l benzine). Tip De diesel heeft geen invloed op de effect. Het maakt de uitlaatgassen zichtbaar.
4.2 Motor starten (zie ook handleiding motor)Pas op! Laat de motor niet aan in een afgesloten ruimte waar gevaarlijke koolmonoxidegassen zich kunnen verzamelen.
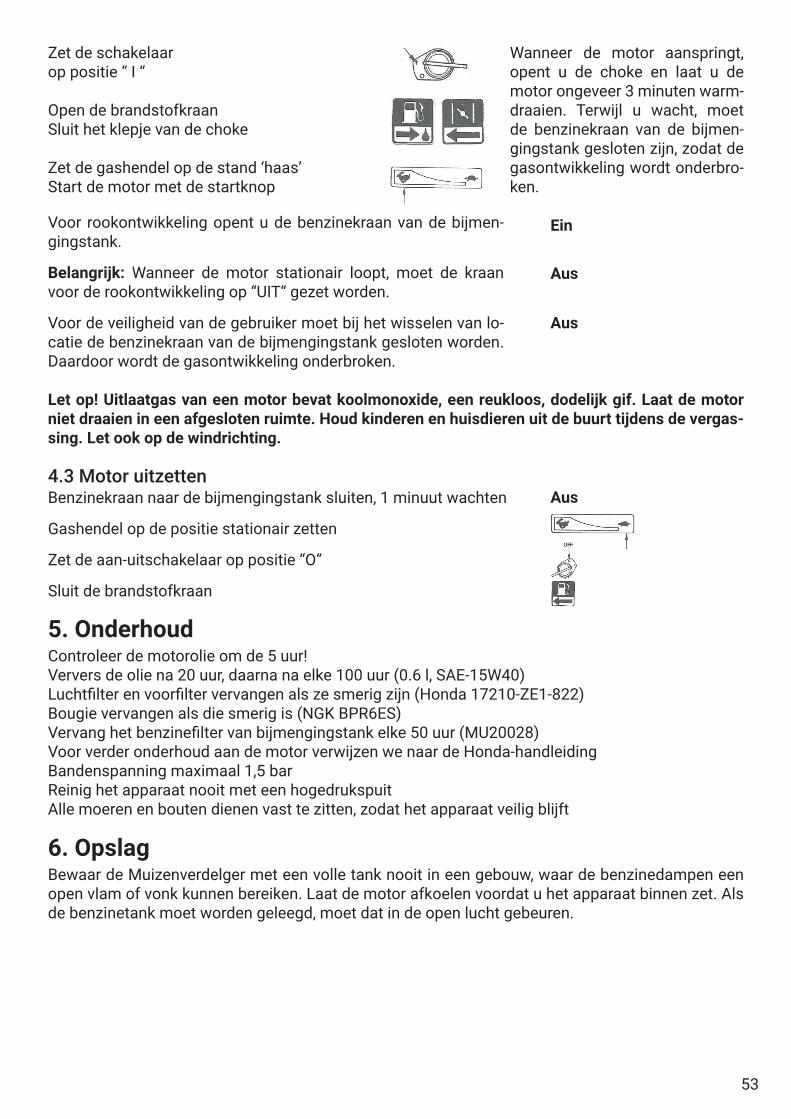
53
Zet de schakelaar op positie “ I “
Open de brandstofkraanSluit het klepje van de choke
Zet de gashendel op de stand ‘haas’Start de motor met de startknop
Wanneer de motor aanspringt, opent u de choke en laat u de motor ongeveer 3 minuten warm-draaien. Terwijl u wacht, moet de benzinekraan van de bijmen-gingstank gesloten zijn, zodat de gasontwikkeling wordt onderbro-ken.
Voor rookontwikkeling opent u de benzinekraan van de bijmen-gingstank.
Belangrijk: Wanneer de motor stationair loopt, moet de kraan voor de rookontwikkeling op “UIT“ gezet worden.
Voor de veiligheid van de gebruiker moet bij het wisselen van lo-catie de benzinekraan van de bijmengingstank gesloten worden. Daardoor wordt de gasontwikkeling onderbroken.
Ein
Aus
Aus
Let op! Uitlaatgas van een motor bevat koolmonoxide, een reukloos, dodelijk gif. Laat de motor niet draaien in een afgesloten ruimte. Houd kinderen en huisdieren uit de buurt tijdens de vergas-sing. Let ook op de windrichting.
4.3 Motor uitzettenBenzinekraan naar de bijmengingstank sluiten, 1 minuut wachten
Gashendel op de positie stationair zetten
Zet de aan-uitschakelaar op positie “O“
Sluit de brandstofkraan
Aus
5. OnderhoudControleer de motorolie om de 5 uur!Ververs de olie na 20 uur, daarna na elke 100 uur (0.6 l, SAE-15W40)Luchtfilter en voorfilter vervangen als ze smerig zijn (Honda 17210-ZE1-822)Bougie vervangen als die smerig is (NGK BPR6ES)Vervang het benzinefilter van bijmengingstank elke 50 uur (MU20028)Voor verder onderhoud aan de motor verwijzen we naar de Honda-handleidingBandenspanning maximaal 1,5 barReinig het apparaat nooit met een hogedrukspuitAlle moeren en bouten dienen vast te zitten, zodat het apparaat veilig blijft
6. OpslagBewaar de Muizenverdelger met een volle tank nooit in een gebouw, waar de benzinedampen een open vlam of vonk kunnen bereiken. Laat de motor afkoelen voordat u het apparaat binnen zet. Als de benzinetank moet worden geleegd, moet dat in de open lucht gebeuren.

54
7. Muizenbestrijding met MAUKI10 cruciale grondregels vormen het geheim van het succes.
7.1 Muizengang onderzoekenMet de peilstok zoekt u de muizengang en opent een gat van ongeveer 5 cm doorsnede. Let op: Het apparaat mag uitsluitend worden gebruikt in de open lucht! In afgesloten ruimten be-staat acuut vergiftigingsgevaar door koolmonoxide!
7.2 Het inwerkingstellen van de machineZet de stolp op de grond en druk deze goed aan. Laat de motor ongeveer 5 minuten met vol gas draaien. Let op! Open de benzinekraan van de bijmengingstank pas wanneer de stolp vast op de grond is gedrukt!
7.3 Controle over de rookverdelingControleer nauwkeurig bij aaneengesloten muizenhollen of alle gangen met rook zijn gevuld. (let op opstijgende rook, eventueel met de peilstok controleren) Om de kleurloze rook zichtbaar te maken, heeft het systeem een toevoeging van 2 % diesel nodig. De toevoeging van diesel of olie heeft geen invloed op de effect van MAUKI. Deze dient uitsluitend ter markering van de muizengangen. Let op! De gebruiker moet altijd tegen de wind staan ten opzichte van de stolp! Er mogen geen andere personen in de buurt staan, vooral geen kinderen of huisdieren!
7.4 Voorbereiden van het volgende muizenholGedurende de vijf minuten dat het uitroken duurt, kunt u het volgende hol zoeken en voorbereiden. Markeer het gat met de peilstok. Bij zeer grote muizenholen (soms tot 50 meter lang) raden wij aan de stolp op 2 of 3 plaatsen te gebruiken.
7.5 Wisseling van locatieVoor de veiligheid van de gebruiker moet bij het wisselen van locatie de benzinekraan van de bijmen-gingstank worden afgesloten. Daardoor worden de rookontwikkeling onderbroken. Til de stolp op, hang deze aan de machine en druk het gat direct met de voet vast, zodat de rook niet kan ontsnap-pen. Verschuif de machine naar de nieuwe locatie, plaats de stolp op het gat dat u heeft voorbereid en open de kraan.
7.6 Vernietiging van de holenGa terug naar het hol dat u heeft uitgerookt en stamp alle muizengangen dicht. Daarmee voorkomt u dat nieuwe muizen de geopende gangen vinden en deze weer opnieuw gebruiken. Wanneer een muis toch weer een nieuw nest in de gangen maakt, moet deze de ingangen omwoelen. Deze zijn dan makkelijk te herkennen en kunnen bij een tweede keer worden uitgerookt.
7.7 Indeling en handelswijzeRook altijd grote gedeeltes uit. Probeer ook uw buren over te halen om mee te doen. Wanneer de muizenhollen zich in een helling bevinden, kunt u het best bovenin beginnen met uitroken (gas is zwaarder dan zuurstof). Wanneer het veld grenst aan een bos of oever, moet u daar beginnen en naar de open weide toewerken. Muizen leggen hun vluchtwegen altijd in die richting aan.
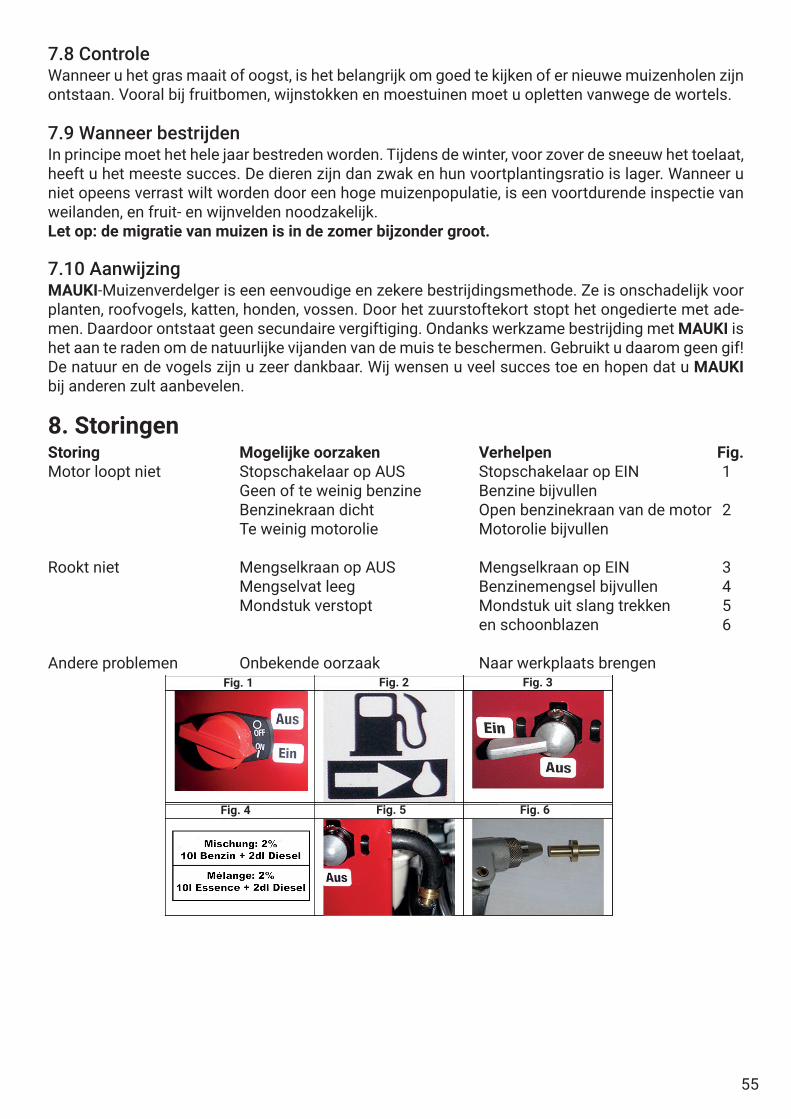
55
7.8 ControleWanneer u het gras maait of oogst, is het belangrijk om goed te kijken of er nieuwe muizenholen zijn ontstaan. Vooral bij fruitbomen, wijnstokken en moestuinen moet u opletten vanwege de wortels.
7.9 Wanneer bestrijdenIn principe moet het hele jaar bestreden worden. Tijdens de winter, voor zover de sneeuw het toelaat, heeft u het meeste succes. De dieren zijn dan zwak en hun voortplantingsratio is lager. Wanneer u niet opeens verrast wilt worden door een hoge muizenpopulatie, is een voortdurende inspectie van weilanden, en fruit- en wijnvelden noodzakelijk. Let op: de migratie van muizen is in de zomer bijzonder groot.
7.10 AanwijzingMAUKI-Muizenverdelger is een eenvoudige en zekere bestrijdingsmethode. Ze is onschadelijk voor planten, roofvogels, katten, honden, vossen. Door het zuurstoftekort stopt het ongedierte met ade-men. Daardoor ontstaat geen secundaire vergiftiging. Ondanks werkzame bestrijding met MAUKI is het aan te raden om de natuurlijke vijanden van de muis te beschermen. Gebruikt u daarom geen gif! De natuur en de vogels zijn u zeer dankbaar. Wij wensen u veel succes toe en hopen dat u MAUKI bij anderen zult aanbevelen.
8. StoringenStoring Mogelijke oorzaken Verhelpen Fig.Motor loopt niet Stopschakelaar op AUS Stopschakelaar op EIN 1 Geen of te weinig benzine Benzine bijvullen Benzinekraan dicht Open benzinekraan van de motor 2 Te weinig motorolie Motorolie bijvullen
Rookt niet Mengselkraan op AUS Mengselkraan op EIN 3 Mengselvat leeg Benzinemengsel bijvullen 4 Mondstuk verstopt Mondstuk uit slang trekken 5 en schoonblazen 6
Andere problemen Onbekende oorzaak Naar werkplaats brengenFig. 1 Fig. 2 Fig. 3
Fig. 4 Fig. 5 Fig. 6
56
9. ServicelocatieVoor het onderhoud, reserve-onderdelen of andere informatie kunt u het beste contact opnemen met uw MAUKI-dealer of de fabrikant. Als u contact opneemt met een dealer, moet u altijd het mo-del, het serienummer van het apparaat en het serienummer van de motor opgeven. Deze getallen helpen de dealer of de fabrikant om u de noodzakelijke informatie over uw product te geven. U vindt de gegevensplaat op de onderplaat van de kruiwagen. Het serienummer van de motor vindt u op de motorkast. Noteert u hier het serienummer van uw apparaat:
MAUKI Muizenverdelger, Model GX200
Machine Nr: ______________________________ Aankoopdatum: __________________________________
Servicepunt:
Fabrikant: Brühwiler Maschinen AG, Hauptstrasse 1, CH-8362 Balterswil Tel.: 071 973 80 40 (0041 71 973 80 40) Fax.: 071 973 80 49 (0041 71 973 80 49) E-Mail: [email protected] Web: www.mauki.ch
10. GarantievoorwaardenDeze garantie is beperkt tot gratis vervanging van onderdelen, welke binnen de garantieperiode van 24 maanden defect zijn geraakt, aantoonbaar als gevolg van materiaal- of productiefouten. De lever-ing van reserve-onderdelen geschiedt zo snel mogelijk. Vertraging van de levering van onderdelen is geen reden voor schadeclaims of verlenging van de garantieperiode. De montage en vervoerskosten worden niet vergoed. Onderdelen die zijn beschadigd door ondeskundige reparaties of slijtage, val-len niet onder de garantie. De garantie vervalt, als het apparaat niet in een gemachtigde werkplaats wordt gerepareerd, als niet-originele onderdelen worden gebruikt, als de handleiding genegeerd is. Verder gelden de bepalingen van de verkoper.

57
11. EG - Verklaring van ouvereenstemmingEG-conformiteitsverklaring (2006/42/EG, 2004/108/EG) De fabrikant: Brühwiler Maschinen AG
Hauptstrasse 1 CH-8362 Balterswil
verklaart dat de volgende machine:
type: muizendoder merk: MAUKI model: GX200
overeenstemt met de bepalingen van de machinerichtlijn 2006/42/EG, inclusief de wijzigingen. Het product is in overeenstemming met de volgende normen ontwikkeld en geproduceerd: EN ISO 12100:2011-03 Veiligheid van machines – Basisbegrippen,
algemene ontwerpbeginselen - Deel 1: Basisterminologie, methodologie (ISO 12100-1:2003)
DIN EN ISO 13732-1:2008 Ergonomie van de thermische omgeving –
Methoden voor de beoordeling van responsie van de mens op contact met oppervlakken - Deel 1: Contact met hete oppervlakken (ISO 13732-1:2006)
DIN EN ISO 14982:2009 Landbouw- en bosbouwmachines –
Elektromagnetische compatibiliteit – Beproevingsmethoden en aanvaardingscriteria
Gevolmachtigd tot het samenstellen van de technische documentatie: de heer Beat Brühwiler, adres: zie fabrikant Afgegeven in: Balterswil Op: 01.03.2021 Ondertekenaar: Beat Brühwiler, chef Handtekening:

58
12. R
eser
ve o
nder
dele
n

59
MU2
3002
. . .
. . .
. . .
Flex
ibel
e m
etal
en s
lang
1,1
0 m
MU2
3003
. . .
. . .
. . .
Geg
alva
nise
erde
sla
ngkl
emM
U200
09 *
. . .
. . .
. . M
otor
Hon
da G
X200
, lee
g, z
onde
r dem
per
MU2
0009
K *.
. . .
. . .
Mot
or H
onda
GX2
00, c
pl. m
et g
elui
ddem
per e
n po
mp
MU2
3015
. . .
. . .
. . .
Bedr
ijfsu
rent
elle
rM
U230
17. .
. . .
. . .
. G
egal
vani
seer
de s
onde
erst
ang,
incl
. Kno
pM
U201
18 .
. . .
. . .
. . W
iel n
aar k
ruiw
agen
GX2
00M
U202
18 *
. . .
. . .
. . S
lang
voo
r kru
iwag
enw
iel G
X200
MU2
3126
. . .
. . .
. . .
Met
alen
bra
ndst
ofkr
aan
MU2
0028
. . .
. . .
. . .
Benz
inefi
lter
MU2
0029
. . .
. . .
. . .
Benz
ines
lang
, Ø 9
mm
/ 33
0 m
m (s
lang
in d
e ta
nk)
MU2
0030
. . .
. . .
. . .
Benz
ines
lang
Ø 1
1,5
mm
/ 1
met
er (t
ankd
op n
aar m
otor
)M
U231
32. .
. . .
. . .
. M
essi
ng ta
nkpi
stoo
lM
U230
33. .
. . .
. . .
. Be
nzin
e po
mp
MU2
3035
. . .
. . .
. . .
Klem
voo
r bra
ndst
ofsl
ang
met
aal Ø
11m
mM
U230
45. .
. . .
. . .
. Li
nk n
aar b
rand
stof
kraa
n 20
x45m
m v
erzi
nkt
MU2
0053
. . .
. . .
. . .
Afdi
chtin
g vo
or u
itlaa
tdem
per H
onda
GX2
00M
U200
55. .
. . .
. . .
. G
elui
ddem
per v
oor M
od.G
X 20
0 (a
lleen
in ru
il)M
U200
56. .
. . .
. . .
. G
elui
ddem
perb
esch
erm
ing
GX2
00M
U200
62. .
. . .
. . .
. St
opsc
hake
laar
naa
r Hon
da-m
otor
MU2
0163
. . .
. . .
. . .
Benz
ineb
lik 1
0 lit
er G
X200
, zon
der d
ekse
l Ø 4
3 m
mM
U200
65. .
. . .
. . .
. Ui
tlaat
bel G
X200
MU2
0169
. . .
. . .
. . .
Jerr
ycan
dek
sel Ø
43m
m v
oor b
enzi
ne je
rryc
an 2
0163
incl
usie
f boc
ht
MU2
0170
. . .
. . .
. . .
Tank
slan
gens
et (i
nclu
sief
filte
r 200
28, s
lang
200
29, d
ekse
l 201
69)
MU2
0071
. . .
. . .
. . .
Geg
alva
nise
erde
kle
mrin
g vo
or g
elui
ddem
per
MU2
0417
. . .
. . .
. . .
Rech
ter b
uis
met
rubb
eren
grip
MU2
0418
. . .
. . .
. . .
Link
er b
uis
met
rubb
eren
grip
Serv
ice
onde
rdel
en:
MU2
0001
. . .
. . .
. . .
Luch
tfilte
r Hon
da 1
7210
-ZE1
-505
MU2
0002
. . .
. . .
. . .
Boug
ie N
GK
BPR6
ESSA
E15W
40*.
. . .
. . .
Mot
orol
ie
*Sta
at n
iet o
p de
foto
met
rese
rveo
nder
dele
n

6001.2021
WWW.MAUKI.CH
Hersteller / Manufacturer / Fabricant / Produttore / Fabrikant
Servicestelle / Service point / Centre de service / Punto di servizio / Servicepunt