
Swim Hand Book
36
Coach. Ahmed Abdulrazak
-
Upload
ahmedrako2000 -
Category
Education
-
view
239 -
download
0
Transcript of Swim Hand Book

Coach. Ahmed Abdulrazak

Coach. Ahmed Abdulrazak
Table of Contents
Freestyle
Floating …………………………………………………………………….…4
Legs movement……………………………………………………………......7
Common mistakes legs movement………...………………………………….9
Arm movement ……………………………………………………………….9
Common mistakes arm movement…………..………………………………13
Breathing ………………………………………………………………...….14
Timing and coordination ……………………………………………………16
How to dive in freestyle? ………………………………………………...…18
Rules and regulations in freestyle………………………………………..….22
Backstroke
Body position (floating) ……………………………………………………25
Legs movement……………………………………………………………..27
Common mistakes legs movement………..………………………….……..28
Arm movement………………………………………………………….…..29
Common mistakes arm movement…………………………………………..31
Breathing ……………………………………………………………...….…33
Common mistakes in breathing ……………………………………………..33
Timing and coordination……………………………………………….........34
Rules and regulations in backstroke………………………………………....35
USA swimming rulebook and helpful links…………………………………36

Coach. Ahmed Abdulrazak
Coach. Ahmed Abdulrazak
Floating
1-Relax 1- You have to relax. As soon as you master this, you will be able to “swim.”
2- Practice in shallow water until you have confidence in your natural ability to
float.
3-Hold your breath for a short moment and feel yourself essentially weightless
atop the water. Exhale and repeat.
Note: If you can float, but you’re still tense still you have problem.

Coach. Ahmed Abdulrazak
2-Improve Your Float Mechanics Gently press your weight onto your shoulder blades and let your head relax into the
water as if you are resting your head on a pillow. Or, if you are in streamline
position facing the sky, press the top of your hands into the water.
If your legs always sink, reach your hands above your head. By reaching your arms
above your head, you are creating a longer support above your waist, which gives
you more leverage for lifting your legs up to the surface.

Coach. Ahmed Abdulrazak
Coach. Ahmed Abdulrazak
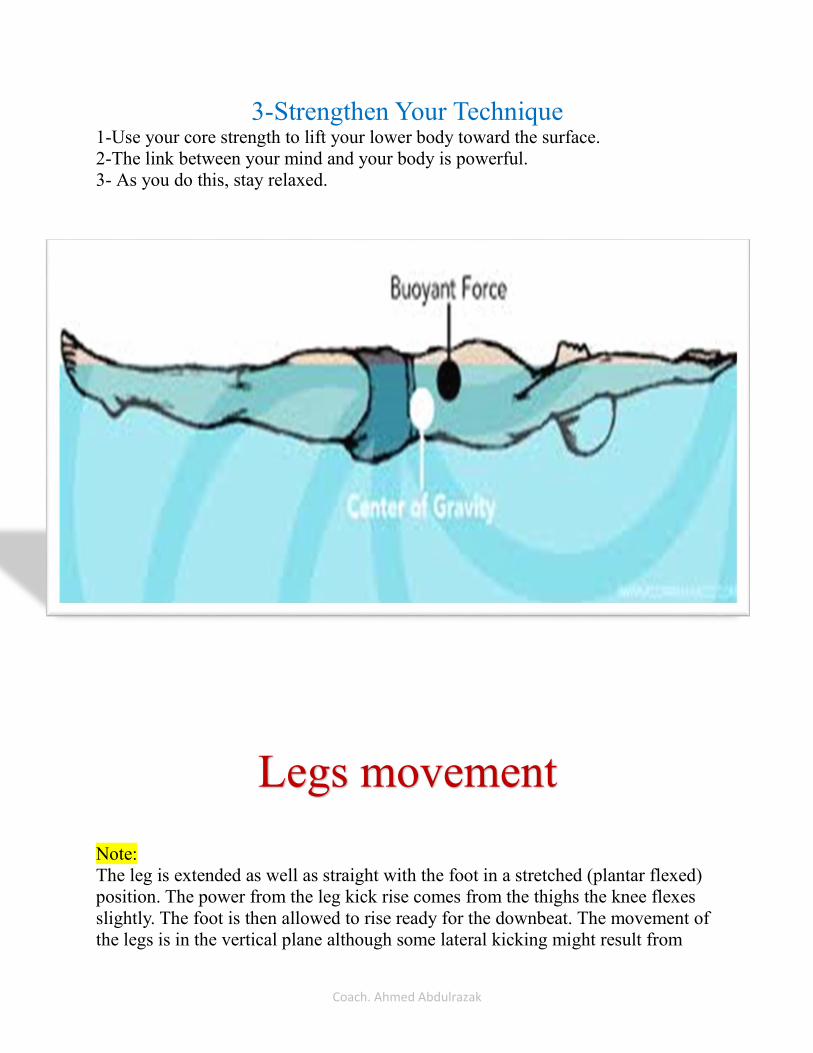
3-Strengthen Your Technique 1-Use your core strength to lift your lower body toward the surface.
2-The link between your mind and your body is powerful.
3- As you do this, stay relaxed.
Legs movement
Note:
The leg is extended as well as straight with the foot in a stretched (plantar flexed)
position. The power from the leg kick rise comes from the thighs the knee flexes
slightly. The foot is then allowed to rise ready for the downbeat. The movement of
the legs is in the vertical plane although some lateral kicking might result from

Coach. Ahmed Abdulrazak
rotation of the body in the longitudinal axis. The downbeat is powered from the
hips once the leg has moved about 30cms the foot starts to whip downwards until
the leg is fully extended. The foot is in an angled position toes touching.
1-Kick from the hip Many swimmers bend their knees too much whilst kicking - we call this kicking
from the knee. This creates large amounts of drag and is probably the number one
reason for a swimmer's legs to sink low in the water. Instead of kicking from the
knee you should kick from the hip with a relatively straight leg. See the animated
clips
2. Plantar flexed feet (Pointing Your Toes) Plantar flexion is technical jargon for pointing your toes. When you swim you
should always have your toes pointed, this presents a much lower profile to the
water. Not pointing your toes will push water forwards when you kick, slowing
you dramatically.

Coach. Ahmed Abdulrazak
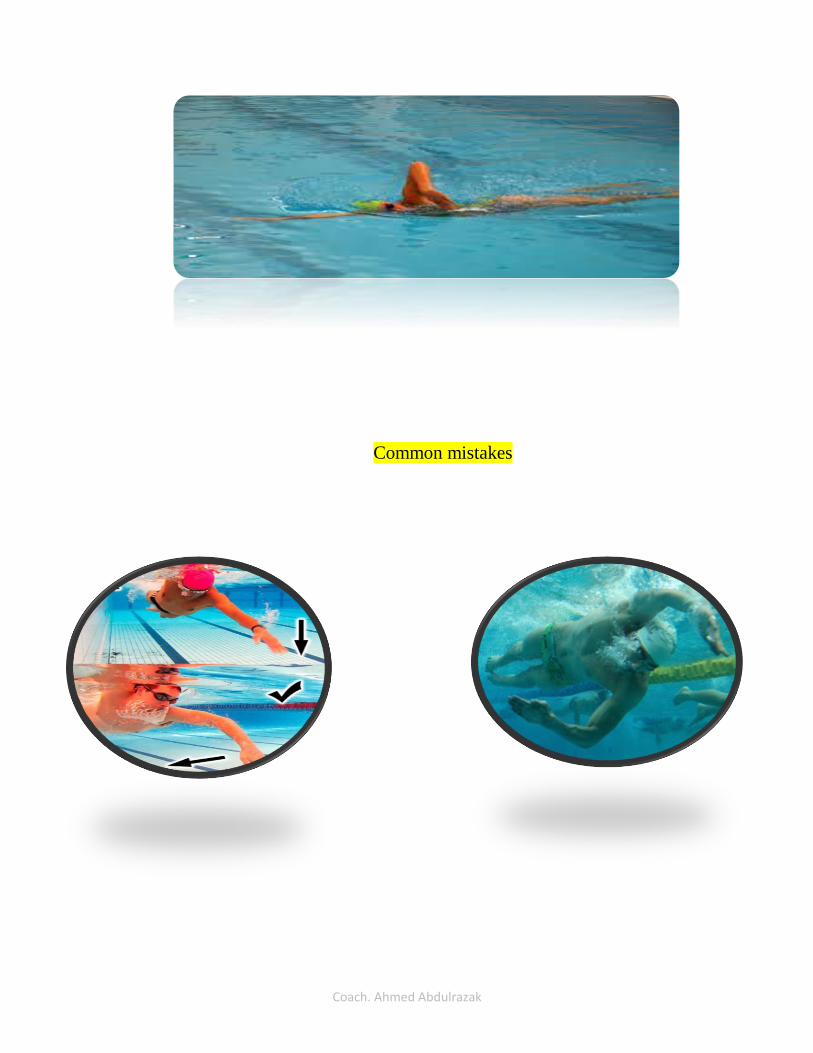
Common Mistakes
There are a few common mistakes in the flutter kick that decrease it's efficiency
and hence should be avoided:
• 1-Large kick
2-Bicycle kick
• 3-Bending your knee and pointing your toes during the upbeat
Arm movement
We have 6 steps in freestyle arm movement:
1- Entry.
2- Catch.
3- Pull.
4- Push.
5- Release.
6- Recovery

Coach. Ahmed Abdulrazak
Once the hands has passed the head, it enters the water with the fingertips first. The
rest of the arm moves through the hole opened by the hand in the water and
continues to move forward under the water until it is fully extended. The arm
stroke cycle can start anew.
2- Catch:
From the entry position the hand then moves forward, still remaining close
to the surface of the water. When the arm is near full extension the hands
sculls outwards and catches the water. From this position the hand sweeps
downward with the elbow beginning to flex, thus ensuring that the hand
keeps traveling in a downward direction. The elbow is kept high through
the down sweep as the hand starts to accelerate.
Coach. Ahmed Abdulrazak
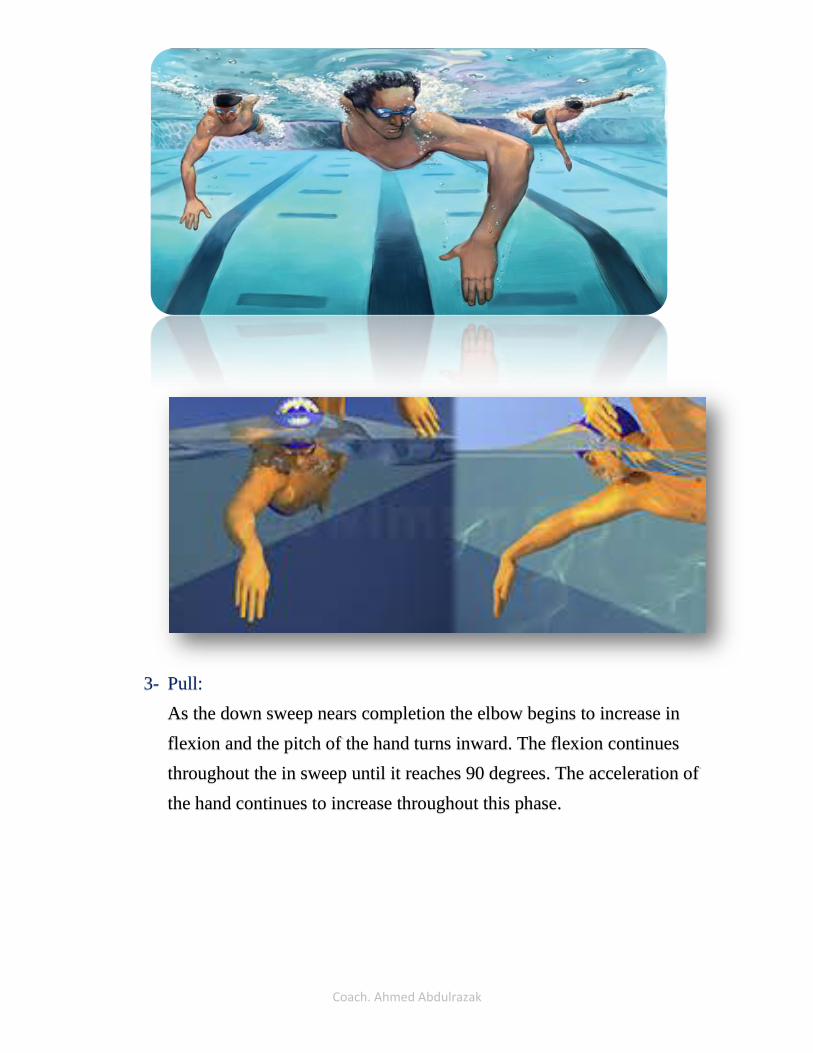
3- Pull:
As the down sweep nears completion the elbow begins to increase in
flexion and the pitch of the hand turns inward. The flexion continues
throughout the in sweep until it reaches 90 degrees. The acceleration of
the hand continues to increase throughout this phase.

Coach. Ahmed Abdulrazak
4- Push:
Upsweep the upsweep is the last of the underwater phase of the arm pull.
From the in sweep the hand pitch adjusts again to a backward and
outward position. The fingers point the bottom of the pool till the final
stages of the upsweep. When the hand passes the hip the wrist rotates, the
palm turns inward and releases the water. This places the little finger
close to the surface in preparation for the exit and recovery. The arm at
this point is close to full extension.
5- Release:
At the end of the upsweep no force should be applied because the
forearm and hand are mostly moving upward. Otherwise water would be
pushed upward, increasing drag and pushing the hips down. The
shoulder, upper arm and elbow exit the water in that order, followed by
the forearm and hand with the palm turned inward to minimize drag.
6- Recovery:
The elbow leads the recovery phase and is followed by the land leaving
the water, the tittle finger first. The moves forward close to the head in a
relaxed position .The elbow remains flexed and higher than the hand
throughout the recovery. The arm starts to extend forwards slightly in
preparation for entry.
Coach. Ahmed Abdulrazak
Common mistakes

Coach. Ahmed Abdulrazak
Breathing
How to Breathe in the Front Crawl Stroke
Let's now have an overview of the breathing technique used in the front crawl
stroke:
During an arm recovery with breathing, you roll more on your side than
during an arm recovery without breathing. This allows your face and mouth
to clear the water and so you can inhale.
The inhalation starts at the end of the upsweep (i.e. while your hand moves
from below the chest toward the hip during the propulsive phase of the arm
stroke), as soon as your mouth clears the water, and continues for the first
half of the arm recovery on the breathing side.
The second phase of the recovery lasts from the moment your recovering
hand passes the head to the moment it is fully extended forward underwater.
During this phase the shoulder and hence the body on the recovering side
will roll downward while the other side will move upward. Your head will
simply follow along and your face will turn downward.
As a consequence you should start to exhale as soon as the face turns
downward again. This prevents water entering into your mouth and nose.
You should then exhale slowly and continuously until the next arm recovery
with breathing.
You should forcefully expel the remaining air from your lungs while rolling
on your side to breathe so that you can inhale fresh air as soon as your
mouth clears the water.
The exhalation starts as soon as the head rolls back down and continues for the
rest of the stroke cycle
Breathing Tips
Here are some additional breathing tips for the front crawl stroke:
It is important to not hold your breath but to exhale continuously while your
face is turned downward in the water. This allows you to be more relaxed.

Coach. Ahmed Abdulrazak
Furthermore, there isn't enough time to both inhale and exhale while you are
on your side and your mouth has cleared the water. As a consequence you
must exhale all the air in the water before the mouth clears the water.
Another problem with holding your breath while swimming is that it
increases the pressure in your lungs and in your cardiovascular system. It
seems that this can be detrimental for your heart if done over the course of
many years.
Personally I begin by exhaling through both the nose and the mouth. This
allows me to expel any water that might have gotten in during the inhalation.
Once I have expelled all the water from my mouth, I close it and exhale for
the rest of the stroke cycle through the nose.
Beginners often lift their head first then roll on their side to breathe in.
However this causes their hips and legs to drop and should be avoided. The
cause of this is lack of balance, and especially balance when floating on the
side. Our swimming drills let you practice balance to correct this problem.
On the other hand, if you observe experienced swimmers, you'll notice that
when they breathe in it looks as if their head rests on the side on the water
surface. They don't lift their head to breathe in.
Additionally, don't anticipate the rotation of your body with your head. Roll
your body as a unit and let your head follow along. Just rotate your head a
little bit further at the end of the roll so that your mouth can clear the water.
In my opinion it is important to be able to breathe on both sides, so that you
can adapt to any situation you might encounter. For example, in a triathlon
event you might be stuck with a competitor splashing water with his feet
right into your face. If you can only breathe in on that side you have a
problem.
As explained above, always inhaling on the same side can make your stroke
asymmetrical. This in turn makes you less efficient and can also lead to

Coach. Ahmed Abdulrazak
swimming injuries, for example swimmer's shoulder. So it really is
important to learn breathing on both sides.
Finally, you can experiment with a nose clip to keep water out of your nose. This
way you only have to avoid getting water in your mouth. Once you have
internalized the coordination between breathing, arm movements and body roll you
will be able to progress
Prefect Timing & Coordination for
Smooth Swimming
Front crawl timing and coordination usually occurs naturally and correct stroke
timing is the result of your legs, arms and breathing in perfect harmony.
Arms should provide a continuous power and propulsive alternating action whilst
leg kicks also remain continuous and alternating.
However, there are a few variations.
Six beat cycle: each leg kicks three down kicks per arm cycle. The cycle is
normally taught to beginners and used for sprint swims.
Four beat cycle: each leg kicks down twice for each arm pull.
Two-beat cycle: each leg kicks one downbeat per arm cycle. This timing cycle is
normally used by long distance swimmers, where the leg kick acts as a counter
balance instead of a source of propulsion. This is not recommended for beginners.
Do You Make These Front Crawl Timing Mistakes?
These various timing and coordination cycles bring varying degrees of mistakes,
the most common being an attempt to kick too fast.

Coach. Ahmed Abdulrazak
The required speed of the leg kick and therefore the timing cycle required for the
stroke depends on the distance that is to be swum. A long distance swim requires
the leg kick to counter balance the arm action, so the two beat cycle is best used.
The short sprint requires a faster leg kick so the six beat cycle is needed so that the
legs can provide more propulsion.
It is easy to kick with a fast leg kick and unknowingly allow the arm action to also
speed up. This results in a loss of arm technique and overall body shape leading to
a poor and inefficient swimming stroke.
Catch up is the best swimming exercise to not only establish correct timing and
coordination cycle but to experiment with different timing cycles as the delayed
arm action slows down the exercise.
Catch up exercise along with many others can be found in the book below.

Coach. Ahmed Abdulrazak
How to Dive off a Starting Block
In competitive swimming, a good dive off the starting block is essential to winning
races and improving your times. If you watch any swimming star, such as Michael
Phelps, you will notice that they all have a great dive that gets them far out into the
pool in very little time. That of course is the goal of your dive. With some practice,
you will have a better dive in no time.
1. Learn how to dive without a starting block. If you can't dive from flat ground
into a pool, you definitely should not be diving off a starting block yet.
Coach. Ahmed Abdulrazak
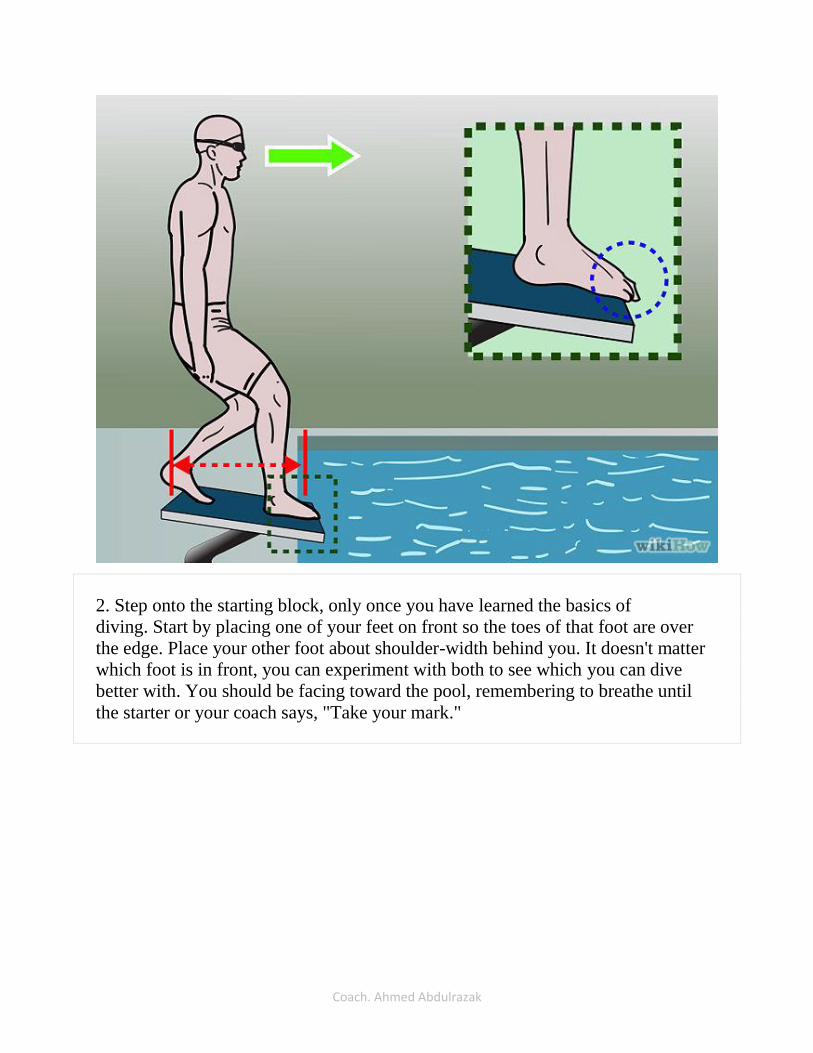
2. Step onto the starting block, only once you have learned the basics of
diving. Start by placing one of your feet on front so the toes of that foot are over
the edge. Place your other foot about shoulder-width behind you. It doesn't matter
which foot is in front, you can experiment with both to see which you can dive
better with. You should be facing toward the pool, remembering to breathe until
the starter or your coach says, "Take your mark."

Coach. Ahmed Abdulrazak
3. Crouch down with your feet where they were and grab the front of the starting
block with one hand at a time, once you hear, "take your mark." Bend down far
enough so your chest is touching the top of your thighs. When you become better, you
should be leaning enough forward so you feel like you could fall in at any time.
Remember to remain still though until you hear the signal to go.
Coach. Ahmed Abdulrazak
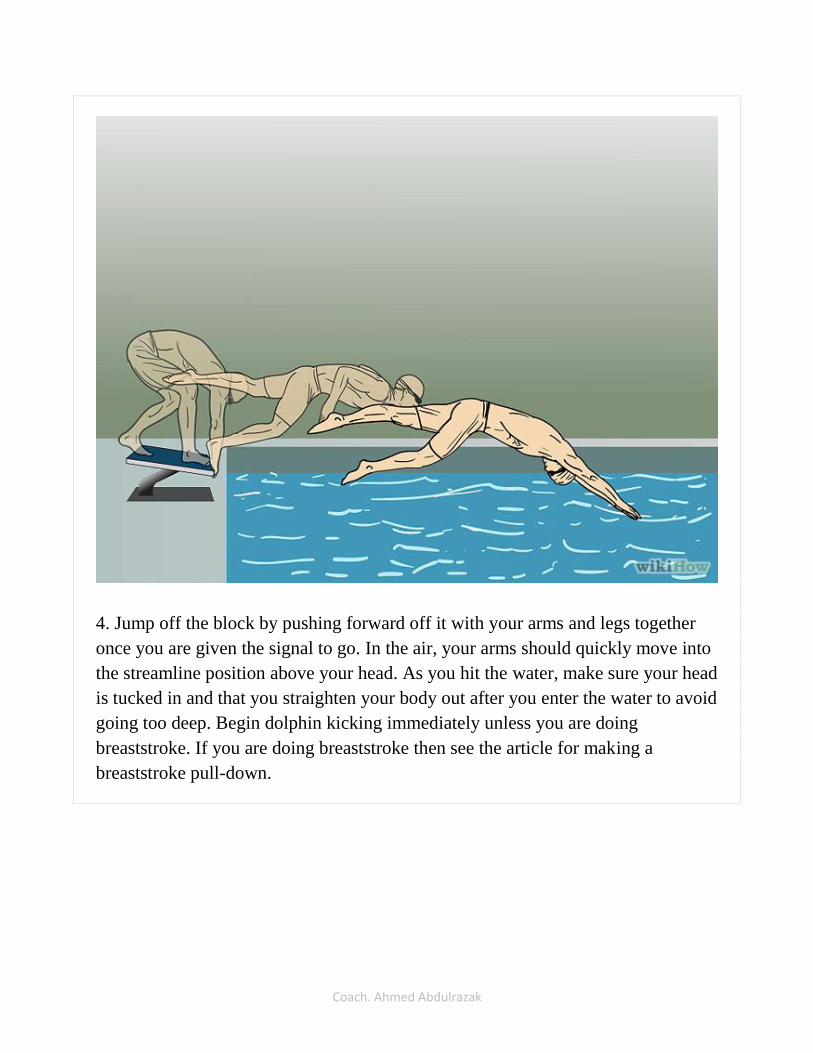
4. Jump off the block by pushing forward off it with your arms and legs together
once you are given the signal to go. In the air, your arms should quickly move into
the streamline position above your head. As you hit the water, make sure your head
is tucked in and that you straighten your body out after you enter the water to avoid
going too deep. Begin dolphin kicking immediately unless you are doing
breaststroke. If you are doing breaststroke then see the article for making a
breaststroke pull-down.
Coach. Ahmed Abdulrazak
Although freestyle refers to the ability to choose any stroke, the front crawl is most
commonly chosen among swimmers. During a race, the competitor circles the arms
forward in alternation and kicks the feet up and down about a foot apart (also
known as flutter kick). Although competitors can do whatever they please during
the freestyle stroke, it is not common to see someone doing dog paddle,
or sidestroke during a race or competition. Stand-alone freestyle events can also be
swum using one of the officially regulated strokes (breaststroke, butterfly,
and backstroke). For the freestyle part of medley competitions, however, one
cannot use breaststroke, butterfly, or backstroke. Freestyle competitions have also
been swum completely and partially in other styles, especially at lower ranking
competitions as some swimmers find their backstroke quicker than their front
crawl. During the Olympic Games, front crawl is swum almost exclusively during
freestyle. Some of the few rules are that swimmers must touch the end of the pool
during each length and cannot push off the bottom or hang on the wall or pull on
the lane lines during the course of the race. As with all competitive events, false
starts are not allowed (the number of false starts depends upon the particular
competitive rules for that competition).
Freestyle means "any style" for individual swims and any style but breaststroke,
butterfly, or backstroke for both the individual medley, and medley relay
competitions. The wall has to be touched at every turn and upon completion. Some
part of the swimmer must be above water at any time, except for the first 15 meters
after the start and every turn. This rule was introduced (see History of swimming)
to prevent swimmers from using the faster underwater swimming to their
advantage, or even swimming entire laps underwater. The exact FINA rules are:
Coach. Ahmed Abdulrazak
Freestyle means that in an event so designated the swimmer may swim any
style, except that in individual medley or medley relay events, freestyle means
any style other than backstroke, breaststroke, or butterfly
Some part of the swimmer must touch the wall upon completion of each length
and at the finish
Some part of the swimmer must break the surface of the water throughout the
race, except it shall be permissible for the swimmer to be completely
submerged during the turn and for a distance of not more than 15 meters after
the start and each turn. By that point the head must have broken the surface.
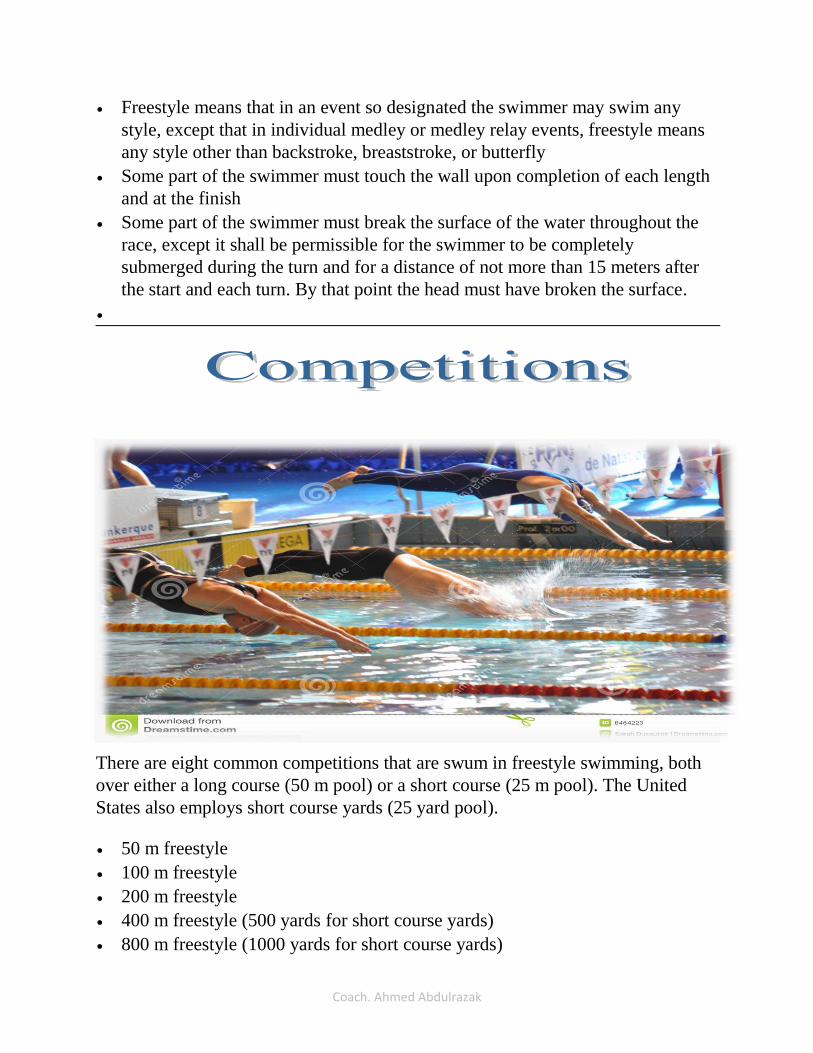
There are eight common competitions that are swum in freestyle swimming, both
over either a long course (50 m pool) or a short course (25 m pool). The United
States also employs short course yards (25 yard pool).
50 m freestyle
100 m freestyle
200 m freestyle
400 m freestyle (500 yards for short course yards)
800 m freestyle (1000 yards for short course yards)

Coach. Ahmed Abdulrazak
1500 m freestyle (1650 yards for short course yards)
4×50 m freestyle relay
4×100 m freestyle relay
4×200 m freestyle relay
Young swimmers (typically 8 years old and younger) have the option to swim a 25
yard/meters freestyle event.
Freestyle is also part of the medley over the following distances:
100 m individual medley (short 25 m pool only)
200 m individual medley
400 m individual medley
4×100 m medley relay
In the long distance races of 800 m and 1500 m, some meets hosted by FINA
(including the Olympics) only have the 800 m distance for women and the 1500 m
distance for men. However, FINA does keep records in the 1500 meters distance
for women and the 800 meters distance for men, and the FINA World
Championships, as well as many other meets, have both distances for both genders.
And I need to add some additions:
1- After dive and turn the swimmer should break the water with his head.
2- Not allowed any swimmer jump before the signal.
3- You can swim any stroke during freestyle race except relay races.
4- Before the race start we have different beeps:
- 3 beeps: swimmer should take his clothes off and wait behind the
block.
- Long beep: swimmer should be in the block and ready for the race,
then the referee to say take your mark then small beep to start the
race.
5- In relay race should the swimmer before dive his teammate touch the wall
finish.
6- We have 10 lanes in the Olympic swimming pool, but we using only 8 lanes
(each lane 2 meters except first and last lane 2.5 meters).
7- Eight swimmers participate in swimming competition and also in relay team
eight teams.
8- You can touch with any part of your body in race finish.

Coach. Ahmed Abdulrazak
For Easy Smooth and Efficient Swimming
Backstroke body position is flat and horizontal, with ears slightly below the water
surface. Your body position is an essential starting point for correct swimming
technique.
Correct Body Position for Easy Swimming
Good floaters will find this position relaxing and relatively easy, whereas poor
floaters will find it difficult to achieve a comfortable head position.
The head remains still throughout the stroke with the eyes looking slightly down
the body at a point the swimmer is swimming away from. The head position is
important because a raised head makes it more difficult to keep the hips raised in
the correct position which leads to a sitting type position in the water.
The hips and shoulders remain at or near the water surface but roll with the stroke.
The legs and feet should be extended and remain together to maximize efficiency,
with knees remaining below the water surface.
Backstroke Body Position Mistakes That Cause You to Sink
Ever get that feeling that you are sinking when you swim on your back? It is very
common to allow the legs to drop and the body position to become angled in the
water without knowing it is happening. This is usually caused either by allowing
the hips to drop or lifting the head slightly or a combination of both. As the legs
drop deeper the whole stroke becomes less efficient and more energy consuming.

Coach. Ahmed Abdulrazak
Performing a push and glide from holding the poolside is a good way of testing
how flat you can remain. Ensure that you look upwards as you push away and
stretch out so that your hips, legs and feet rise to the surface. The overall body
position is easily maintained with a correct and efficient leg kick.

Coach. Ahmed Abdulrazak
Legs movements Do You Kick Correctly?
Legs should be stretched out with toes pointed (plantar flexed) and ankles should
be relaxed and loose with toes pointing slightly inwards.
The amount of propulsion generated from the kick will depend on the size of the
feet, ankle mobility and strength of the legs.
The knee should bend slightly and then straighten as the leg kicks upwards. Toes
should kick to create a small splash but not break the water surface.
During specific leg practices the legs kick in a vertical plane. However, the arm
action causes the body to roll making the legs kick part sideways, part vertical and
partly to the other side.

Coach. Ahmed Abdulrazak
Common Backstroke Kick Mistakes
The most common fault with the leg kick during back stroke is closely related to
the body position, when the swimmer allows their legs to sink well below the water
surface. The toes should just break the water surface and the legs kicking from the
hip with a slight bend at the knee.
An easy exercise to help maintain leg kick technique at the correct level in the
water is to hold a float or kick board across the chest and perform the leg kick. The
float will provide support so that the swimmer can focus on kicking up towards the
water surface whilst maintaining a level head and level hips. Only then will the leg
kick be at its most efficient.

Coach. Ahmed Abdulrazak
Arm movements
Simple and Effective Swimming Technique
Backstroke arms provide the power and drive for backstroke so correct technique
is a must.
There are two possible arm actions for backstroke. The bent arm pull, which is
more effective because it is faster and has greater propulsion, and the straight arm
pull used in more recreational swimming.
Which Arm Technique Is Best For You?
Straight Arm Pull
Entry
The arm should be straight and as in line with the shoulder as possible. Hand
should be turned with palm facing outwards and little finger entering the water
first.
Propulsive phase (push)
The arm sweeps through the water in a semi-circle, pulling with force just under
the water surface, pulling to the outside of the hips.
Recovery
The thumb or the back of the hand should exit the water first. The shoulders roll
again with the shoulder of the recovering arm rolling upwards. The arm rotates
through 180 degrees over the shoulder. The palm is turned outwards during
recovery to ensure that the hand enters the water little finger first.

Coach. Ahmed Abdulrazak
Bent Arm Pull
This version of backstroke arm action is used more by competitive swimmers. As
the arm pulls through to completion, the overall path should follow the shape of the
letter S.
1- Entry
The entry is the same as the straight arm pull, with the little finger entering first,
the palm facing out and the arm close to the shoulder line.
2- Catch (downward sweep):
The palm should always face the direction of travel. The shoulders roll and the
elbow bends slightly as the arm sweeps downwards and outwards.
3- Pull (upwards sweep):
As the hand sweeps in line with the shoulder, the palm changes pitch to sweep
upwards and inwards. The elbow should then bend to 9o degrees and point to the
pool floor.
4- Push (second Downward sweep):
The arm action then sweeps inwards towards the thigh and the palm faces
downwards. The bent arm action is completed with the arm fully extended and the
hand pushing downwards to counter balance the shoulder roll.
5- Release and recovery:
The thumb or the back of the hand should exit the water first. The shoulders roll
again with the shoulder of the recovering arm rolling upwards. The arm rotates
through 180 degrees over the shoulder. The palm is turned outwards during
recovery to ensure that the hand enters the water little finger first.
Coach. Ahmed Abdulrazak
Do Your Backstroke Arms Have These Common Mistakes?
Two common faults cause backstroke arms to become weak and the overall stroke
inefficient. Firstly the upper arm must brush past the ear and the edge of the hand
must enter the water in line with the shoulder. If the hand enters the water wide of
the shoulder line then the arm pull with be incomplete and lack power.
Secondly it is very common to perform one arm pull at a time. In other words one
arm completes a full arm pull cycle before the second arm begins its arm cycle.
The arm pulls for back stroke should be continuous where one arm begins to pull
as the other arm begins to recover.
Practicing the arm technique whilst holding a float on the chest is a good way of
ensuring the hand is entering in line with the shoulder and that the arm pull is
complete. Once this has been mastered then the swimmer can practice the full
stroke ensuring the arms are performing continuous cycles.
Coach. Ahmed Abdulrazak
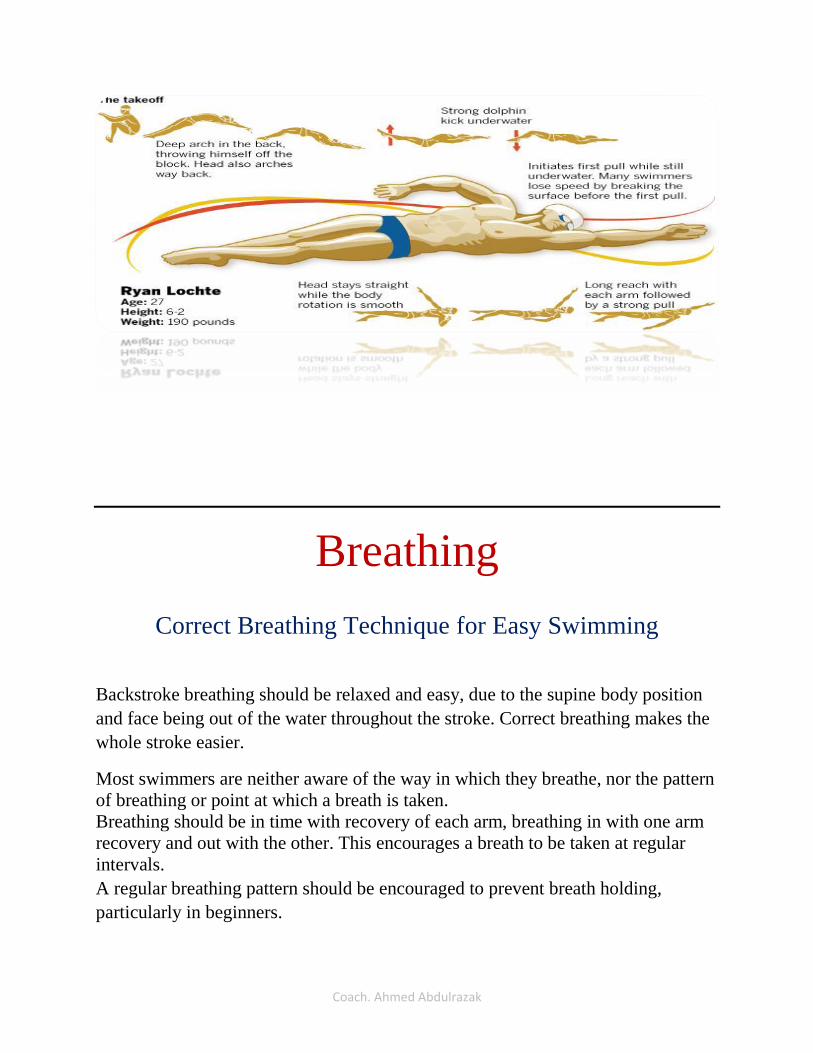
Breathing
Correct Breathing Technique for Easy Swimming
Backstroke breathing should be relaxed and easy, due to the supine body position
and face being out of the water throughout the stroke. Correct breathing makes the
whole stroke easier.
Most swimmers are neither aware of the way in which they breathe, nor the pattern
of breathing or point at which a breath is taken.
Breathing should be in time with recovery of each arm, breathing in with one arm
recovery and out with the other. This encourages a breath to be taken at regular
intervals.
A regular breathing pattern should be encouraged to prevent breath holding,
particularly in beginners.

Coach. Ahmed Abdulrazak
Common Backstroke Breathing Mistakes Breath holding is a common mistake made when swimming this stroke and the
result is a very tired and breathless swimmer. Do you ever feel like you become
out of breathe very quickly when swimming this stroke? It goes without saying that
swimming contains a very large element of fitness and stamina but this is only one
factor.
Breathing technique is essential and it is very common for swimmers, especially
beginners to hold their breath without knowing they are doing so.
Performing the stroke slowly at first or with floats to provide support, swimmers
must breathe out and then in again in time with each arm pull. Try to establish a
rhythm of breathing through each stroke cycle and this will help to prevent breath
holding and unnecessary tiredness and exhaustion.
An established breathing rhythm will help to maintain the timing and coordination
of the arms and legs as they pull and kick. It will also assist the swimmer to relax
and therefore swim with a calm, controlled and smooth swimming stroke.
Coach. Ahmed Abdulrazak
Timing and coordination
Improve Your Timing and Swim Smooth
Backstroke timing and coordination of arms and legs develops with practice. A smooth and effortless stroke is achieved with correct timing and coordination. Ideally there should be 6 leg kicks to one arm cycle.
The opposite leg kicks downwards at the beginning of each arm pull. This helps to balance the body. This may vary according to the swimmer’s level of coordination.
Arm action should be continuous. When one arm enters and begins to pull, the other should begin its recovery phase. Like front crawl, the timing and coordination for this stroke can be a 6 beat, 4 beat or one beat cycle, depending on the ability and level of coordination of the swimmer.
Common Backstroke Timing Mistakes That Cost Energy
A common mistake is performing one arm cycle at a time, resulting in an uneven and unbalanced stroke overall.
Timing and coordination problems occur with back stroke when the legs are allowed to sink below the water surface and the arm lose their continuity and pull one are at a time.
Counting in your head can sometimes help to maintain stroke rhythm and timing. If you are able to perform a 6 beat cycle then you should count to 3 during each arm pull, therefore kicking 3 legs kicks per arm pull.
If a one beat cycle comes more naturally then there should be one leg kick for each arm pull. Performing the stroke slowly at first will help to establish the rhythm and timing and only when you are proficient swimming at a slow steady pace should you try to increase speed.
With increases in speed comes the greater potential for the timing and coordination to become disrupted and the overall swimming stroke to lose it efficiency.

Coach. Ahmed Abdulrazak
BACKSTROKE
1 Prior to the starting signal, the swimmers shall line up in the water facing the
starting end, with both hands holding the starting grips. Standing in or on the gutter
or bending the toes over the lip of the gutter is prohibited.
2 At the signal for starting and after turning the swimmer shall push off and swim
upon his back throughout the race except when executing a turn as set forth in SW
6.4. The normal position on the back can include a roll movement of the body up to,
but not including 90 degrees from horizontal. The position of the head is not relevant.
3 Some part of the swimmer must break the surface of the water throughout the race.
It is permissible for the swimmer to be completely submerged during the turn, at the
finish and for a distance of not more than 15 meters after the start and each turn. By
that point the head must have broken the surface.
4 When executing the turn there must be a touch of the wall with some part of the
swimmer’s body in his/her respective lane. During the turn the shoulders may be
turned over the vertical to the breast after which a continuous single arm pull or a
continuous simultaneous double arm pull may be used to initiate the turn. The
swimmer must have returned to the position on the back upon leaving the wall.
5 Upon the finish of the race the swimmer must touch the wall while on the back in
his/her respective lane.
Backstroke races:
1- 50 meters.
2- 100 meters.
3- 200 meters.

Coach. Ahmed Abdulrazak
USA SWIMMING RULEBOOK
2015 USA Swimming Rulebook
2015 USA Swimming Mini-Rulebook
2014 USA Swimming Rulebook
2014 USA Swimming Mini-Rulebook
HELPFUL LINKS
FAQS
USOC Website
USADA Website
FINA Website
Our Kids Initiative - aligning rules from different swimming organizations