Pharmascan 2 User Manual V4.3 - Corum Group · Pharmascan 2 User Manual ... List Cost – This is...
30
Pharmascan 2 User Manual Date: 29 January 2015 Version 4.3
Transcript of Pharmascan 2 User Manual V4.3 - Corum Group · Pharmascan 2 User Manual ... List Cost – This is...

Pharmascan 2 User Manual
Date: 29 January 2015
Version 4.3

Corum Health Services 2 of 30 Pharmascan 2 User Manual V4.3.doc
Contents
1 INTRODUCTION 4
2 STARTING PHARMASCAN 5
3 STOCK CARDS 7
4 STOCKTAKE 12
4.1 Setting up Stocktake Options 12 4.2 Starting/Continuing a Stocktake 13 4.3 Rescanning an Item 15 4.4 Adding a Barcode to an Item 16 4.5 Stock Adjustments 18
5 ORDERS 19
5.1 Creating a New Order 19 5.2 Modifying an Order 20
6 RECEIPTING INVOICE 25
6.1 Receipting an Invoice. 25 6.2 Scanning an Item Not On Order. 29

Corum Health Services 3 of 30 Pharmascan 2 User Manual V4.3.doc
Document Information
ROLE NAME AND POSITION
Document Owner Vickie Edwards, National Operations Manager
Document Author Peter Simaris
Document Review Kerry Jackson, Technical Writer
VERSION UPDATE DATE
4.1 Final version for 2014 28/11/2014
4.2 Format and versioning update. 17/12/2014
4.3 Final 29/01/2015
NOTE: Printed copies are uncontrolled. Please ensure you have the latest version of this document before doing any work in relation to it.
Corum Health Services 4 of 30 Pharmascan 2 User Manual V4.3.doc
1 Introduction This document details how to use Pharmascan 2. This document covers all four Pharmascan 2 modules. The topics included are: Stock Cards – How to view and edit your LOTS Stock Cards via Pharmascan. Stocktake – How to perform a stocktake using your Pharmascan unit. Orders – How to create and modify an order using your Pharmascan unit. Receipting Invoice – How to receipt off outstanding invoices via Pharmascan. All actions performed on Pharmascan will be recorded back to LOTS wirelessly.

Corum Health Services 5 of 30 Pharmascan 2 User Manual V4.3.doc
2 Starting PharmaScan 1. To start PharmaScan, click Start on the top left of the screen then select PharmaScan2
on the main menu of the mobile unit.
2. You will be prompted to enter a Staff ID (see Figure 1)
Figure 1 3. Enter your Staff ID and select OK (or press [Enter]).
Note: Tap the letter on the keyboard to enter in your User ID. The keyboard can be shown/hidden by tapping on the blue keyboard icon in the bottom right-hand corner. Your User ID should be the same as the one you use in LOTS.
4. After a valid Staff ID is entered the PharmaScan main menu should appear and the application is ready for use (see Figure 2).

Corum Health Services 6 of 30 Pharmascan 2 User Manual V4.3.doc
Figure 2
Corum Health Services 7 of 30 Pharmascan 2 User Manual V4.3.doc
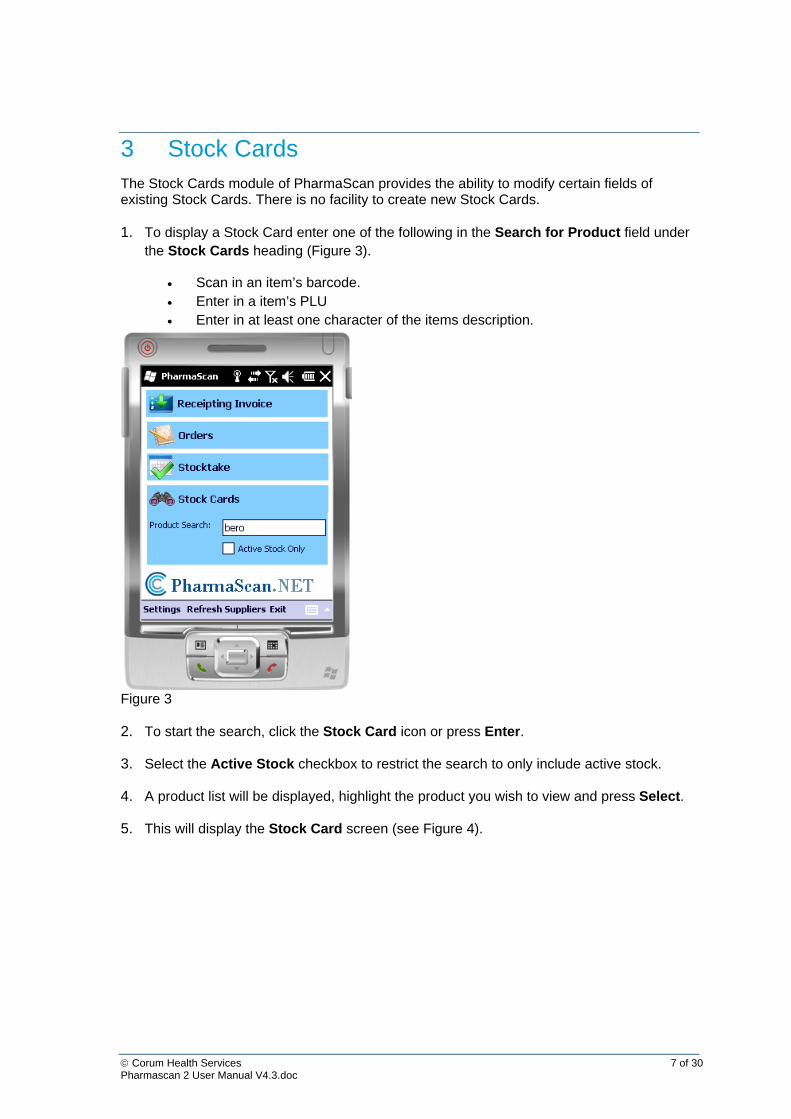
3 Stock Cards The Stock Cards module of PharmaScan provides the ability to modify certain fields of existing Stock Cards. There is no facility to create new Stock Cards. 1. To display a Stock Card enter one of the following in the Search for Product field under
the Stock Cards heading (Figure 3).
Scan in an item’s barcode. Enter in a item’s PLU Enter in at least one character of the items description.
Figure 3
2. To start the search, click the Stock Card icon or press Enter.
3. Select the Active Stock checkbox to restrict the search to only include active stock.
4. A product list will be displayed, highlight the product you wish to view and press Select.
5. This will display the Stock Card screen (see Figure 4).

Corum Health Services 8 of 30 Pharmascan 2 User Manual V4.3.doc
Figure 4 The first tab show is Main and it has the following fields:
PLU – This is the Price Look Up number and cannot be edited. Real Cost – This is real cost of the item and can be edited. Average Cost – This is the average cost of the item and cannot be edited. List Cost – This is the list cost of the item and this amount can be edited. Retail – This is the retail cost of the item and this amount can be edited. Markup on real cost – This is the markup expressed as a percentage. This
figure cannot be edited. Markup on list cost – This is the markup expressed as a percentage. This
figure can be edited. SOH – This field displays the products Stock On Hand and can be edited. Max SOH – This shows the maximum Stock On Hand you have set in LOTS and
is used for generated orders. This field cannot be edited. Min SOH – This shows the minimum Stock On Hand you have set in LOTS and
is used for used for generated orders. This field cannot be edited. Active Special Retail – If the item is on an active special, this will be displayed
towards the bottom of the screen. If the item is not on special, this part of the screen will remain blank.
Barcode – This shows of list of items barcodes. To remove a barcode highlight it and select the red cross.
Note: The following will be automatically recalculated: If List Cost is changed then Retail will be recalculated If Retail is changed then Markup will be recalculated If Markup is changed then Retail will be recalculated
Corum Health Services 9 of 30 Pharmascan 2 User Manual V4.3.doc
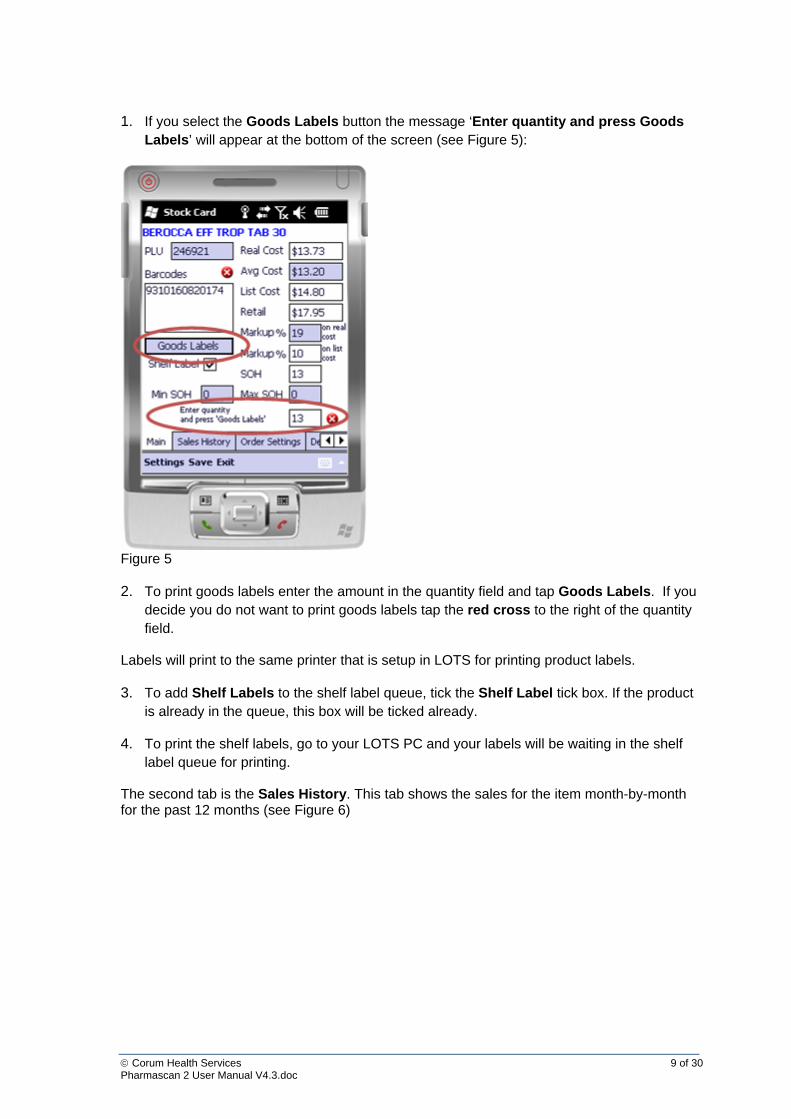
1. If you select the Goods Labels button the message ‘Enter quantity and press Goods Labels’ will appear at the bottom of the screen (see Figure 5):
Figure 5 2. To print goods labels enter the amount in the quantity field and tap Goods Labels. If you
decide you do not want to print goods labels tap the red cross to the right of the quantity field.
Labels will print to the same printer that is setup in LOTS for printing product labels. 3. To add Shelf Labels to the shelf label queue, tick the Shelf Label tick box. If the product
is already in the queue, this box will be ticked already.
4. To print the shelf labels, go to your LOTS PC and your labels will be waiting in the shelf label queue for printing.
The second tab is the Sales History. This tab shows the sales for the item month-by-month for the past 12 months (see Figure 6)

Corum Health Services 10 of 30 Pharmascan 2 User Manual V4.3.doc
Figure 6 The third tab is the Order Settings tab (see Figure 7). This tab allows you to view your ordering options that are set in LOTS Stock Cards.
Figure 7 1. The only field you can edit is the SOH (Stock On Hand).

Corum Health Services 11 of 30 Pharmascan 2 User Manual V4.3.doc
2. If you adjust the SOH value of the item, when you save the stock card you will be prompted to enter in a reason for the stock adjustment.
Note: The field is identical to the SOH field in the Main tab.
The fourth tab is the Departments tab. This allows you to set the department and sub-department for this item. (See figure 3.6)
Figure 8 1. When you have finished with the stock card and want to save any changes made, select
Save.
2. If you don’t want to save any changes simply select Exit.
This will return you to the main screen (Figure 2).
Corum Health Services 12 of 30 Pharmascan 2 User Manual V4.3.doc
4 Stocktake
4.1 Setting up Stocktake Options
It is necessary to set some options to tell PharmaScan the rules to follow for adding items to a Stocktake. 1. From the main screen tap the Settings button locate at the bottom of the screen. This will
open a new window with three tabs:
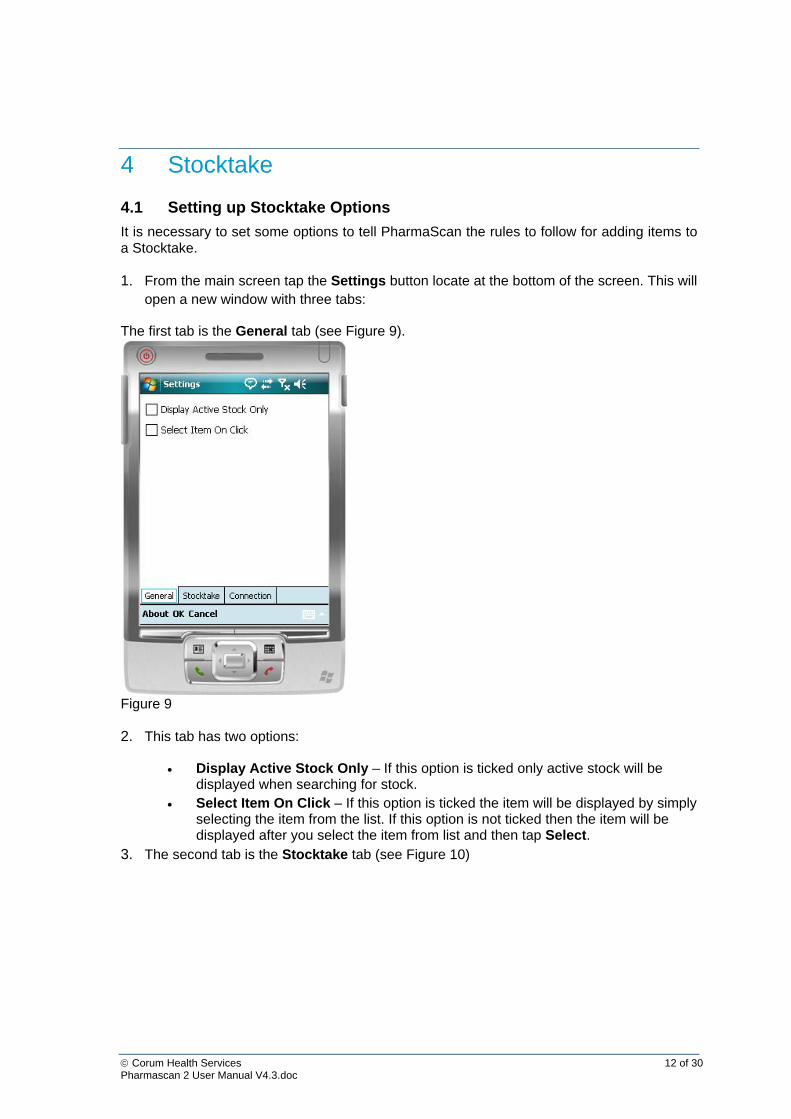
The first tab is the General tab (see Figure 9).
Figure 9 2. This tab has two options:
Display Active Stock Only – If this option is ticked only active stock will be displayed when searching for stock.
Select Item On Click – If this option is ticked the item will be displayed by simply selecting the item from the list. If this option is not ticked then the item will be displayed after you select the item from list and then tap Select.
3. The second tab is the Stocktake tab (see Figure 10)
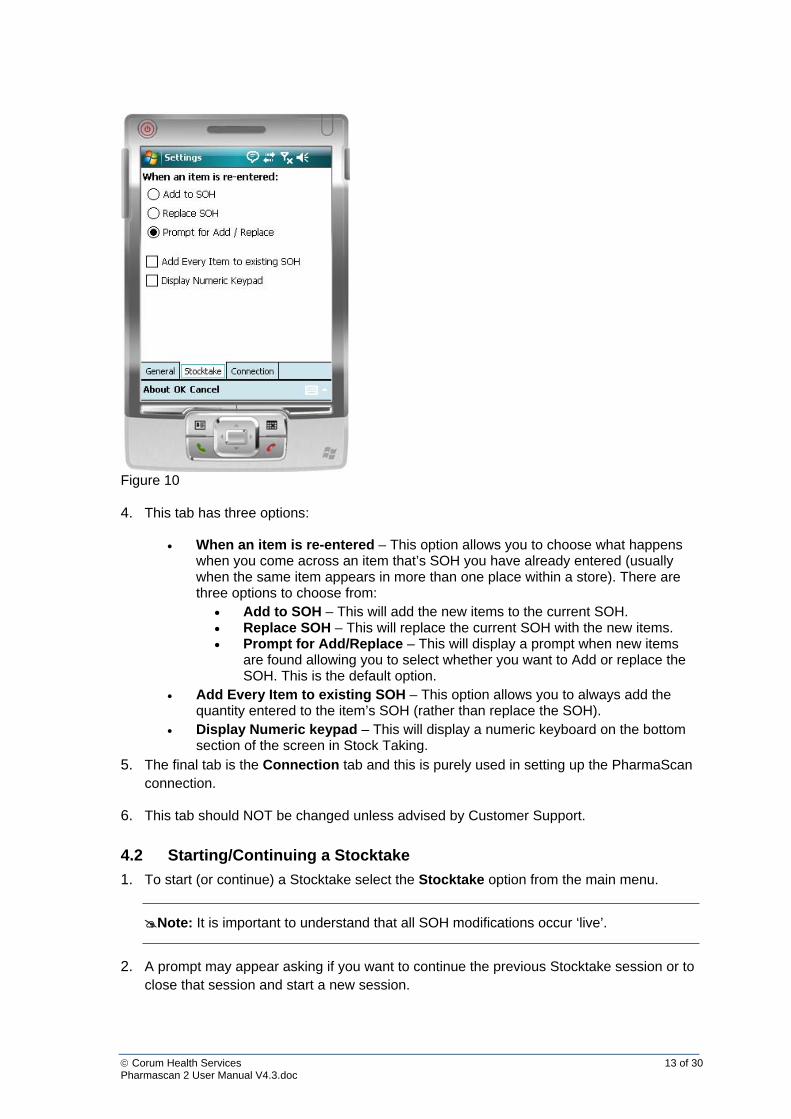
Corum Health Services 13 of 30 Pharmascan 2 User Manual V4.3.doc
Figure 10 4. This tab has three options:
When an item is re-entered – This option allows you to choose what happens when you come across an item that’s SOH you have already entered (usually when the same item appears in more than one place within a store). There are three options to choose from:
Add to SOH – This will add the new items to the current SOH. Replace SOH – This will replace the current SOH with the new items. Prompt for Add/Replace – This will display a prompt when new items
are found allowing you to select whether you want to Add or replace the SOH. This is the default option.
Add Every Item to existing SOH – This option allows you to always add the quantity entered to the item’s SOH (rather than replace the SOH).
Display Numeric keypad – This will display a numeric keyboard on the bottom section of the screen in Stock Taking.
5. The final tab is the Connection tab and this is purely used in setting up the PharmaScan connection.
6. This tab should NOT be changed unless advised by Customer Support.
4.2 Starting/Continuing a Stocktake
1. To start (or continue) a Stocktake select the Stocktake option from the main menu.
Note: It is important to understand that all SOH modifications occur ‘live’.
2. A prompt may appear asking if you want to continue the previous Stocktake session or to close that session and start a new session.

Corum Health Services 14 of 30 Pharmascan 2 User Manual V4.3.doc
Note: The only importance of starting a new session is to determine if an item is being scanned for the first time or if it has already been scanned (as different rules may apply based on the settings in Options). Once a selection is made the Stocktake window will be opened (either a new blank session or the previously saved session)
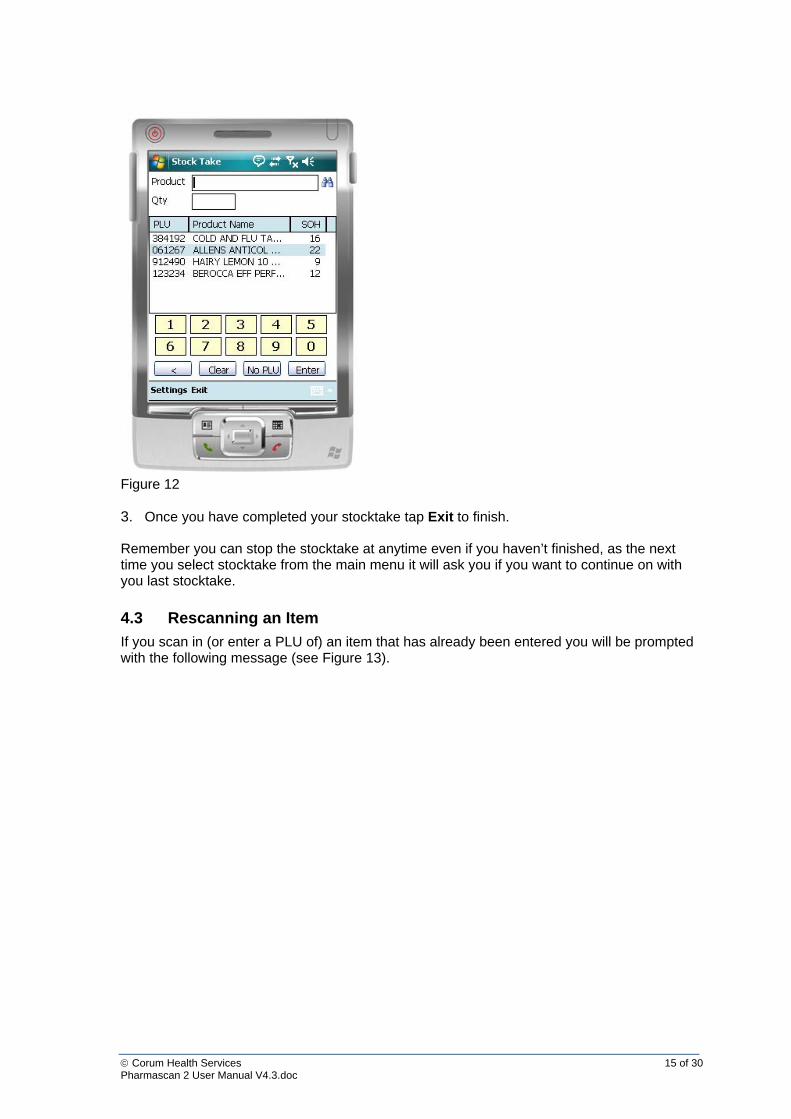
The stocktake window will display (see Figure 11).
Figure 11
Product – This will allow you to search for a product by either: Scanning in a barcode. Entering in a PLU. Entering in a description (or part of).
Qty – When the item is displayed you may amend the quantity using the keypad. Tap Enter to save your changes.
Product Name & SOH – Items saved will be added to the list. Most recent appears at the top of the list.
< – This is a backspace. Clear – This will clear the Product or Qty field. PLU (No PLU) – This will change the Product Name and SOH to display PLU,
Product Name and SOH (see Figure 12). Tapping No PLU in Figure 12 will revert back to the Figure 11 display.
Enter – Tab enter when you want to save the item and scan in the next item.
Corum Health Services 15 of 30 Pharmascan 2 User Manual V4.3.doc
Figure 12 3. Once you have completed your stocktake tap Exit to finish.
Remember you can stop the stocktake at anytime even if you haven’t finished, as the next time you select stocktake from the main menu it will ask you if you want to continue on with you last stocktake.
4.3 Rescanning an Item
If you scan in (or enter a PLU of) an item that has already been entered you will be prompted with the following message (see Figure 13).

Corum Health Services 16 of 30 Pharmascan 2 User Manual V4.3.doc
Figure 13 4. This message will only appear if you selected the Prompt for Add / Replace option in
Stocktake tab of Settings module.
You will then have the option to select: Add – This will add the item to the already updated SOH. Replace – This will replace the current SOH. Cancel – Select this if you have selected this product by mistake and wish to
return to the stocktake window. 5. Depending on what other option you selected in the Stocktake tab of Settings module
will determine what else will happen when an item has been entered in twice (refer to section 4.1 – Setting Up Stocktake Options).
4.4 Adding a Barcode to an Item
1. When performing a stocktake, if you scan in a barcode of an item and the barcode is not found the follow prompt will be displayed (see Figure 14).

Corum Health Services 17 of 30 Pharmascan 2 User Manual V4.3.doc
Figure 14 2. To add this barcode to an item, select Yes.
3. Selecting Yes will display the Add Barcode window, prompting yo to search for the product (by description or PLU). Tap in the description or PLU of the item you wish to add the barcode to then tap OK to select it from the list (see Figure 15).
Figure 15
Corum Health Services 18 of 30 Pharmascan 2 User Manual V4.3.doc
The item description and PLU displays on the screen. 4. Tap OK to confirm that you wish to add the barcode to the product.
5. The stocktake screen resumes.
4.5 Stock Adjustments
All stock adjustments made in the Stocktake function will be recorded in LOTS. The Reason field in LOTS (i.e. reason for adjustment) will be set to PharmaScan Stocktake for all adjustments made within the PharmaScan Stocktake module.

Corum Health Services 19 of 30 Pharmascan 2 User Manual V4.3.doc
5 Orders The Orders module of PharmaScan provides the ability to modify existing Orders that have not yet been transmitted, as well as providing the ability to create new blank Orders.
Note: It is not possible to delete an Order using the PharmaScan software. If you wish to delete an order it must be performed in LOTS Orders.
5.1 Creating a New Order
This section explains how to create an order for a supplier. Section: 5.2 – Modifying an Order explains how to add items to your order. 1. To create a new order, tap the Orders icon on the main menu.
A new window opens displaying all existing Orders that have a status of New (see Figure 16).
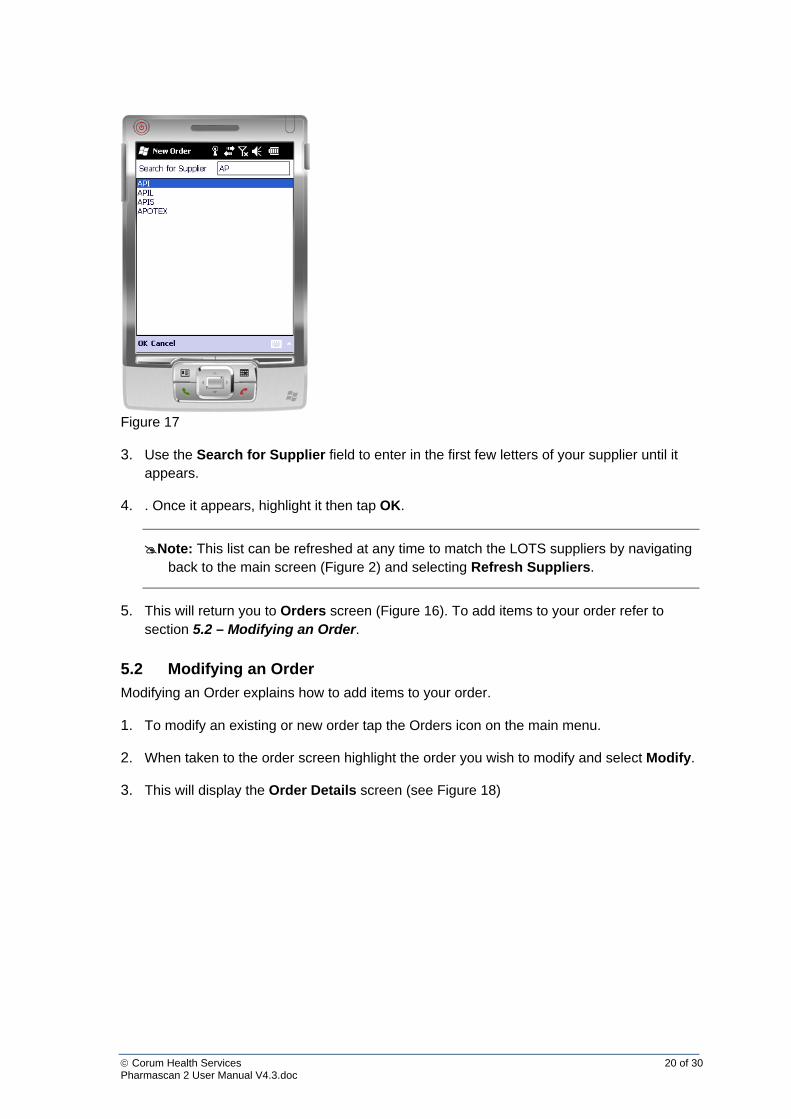
Figure 16 2. Selecting New will display a new window prompting you to select the supplier you wish to
order with (see Figure 17).
Corum Health Services 20 of 30 Pharmascan 2 User Manual V4.3.doc
Figure 17 3. Use the Search for Supplier field to enter in the first few letters of your supplier until it
appears.
4. . Once it appears, highlight it then tap OK.
Note: This list can be refreshed at any time to match the LOTS suppliers by navigating back to the main screen (Figure 2) and selecting Refresh Suppliers.
5. This will return you to Orders screen (Figure 16). To add items to your order refer to section 5.2 – Modifying an Order.
5.2 Modifying an Order
Modifying an Order explains how to add items to your order. 1. To modify an existing or new order tap the Orders icon on the main menu.
2. When taken to the order screen highlight the order you wish to modify and select Modify.
3. This will display the Order Details screen (see Figure 18)

Corum Health Services 21 of 30 Pharmascan 2 User Manual V4.3.doc
Figure 18 4. Add items to your orders by either:
Entering the partcode number. Entering in the PLU. Scanning in the barcode. Enter in the description (or part of).
5. You can add as many items to an order as you like. Each item added will be listed on the
screen (see Figure 5.2.2).
Corum Health Services 22 of 30 Pharmascan 2 User Manual V4.3.doc
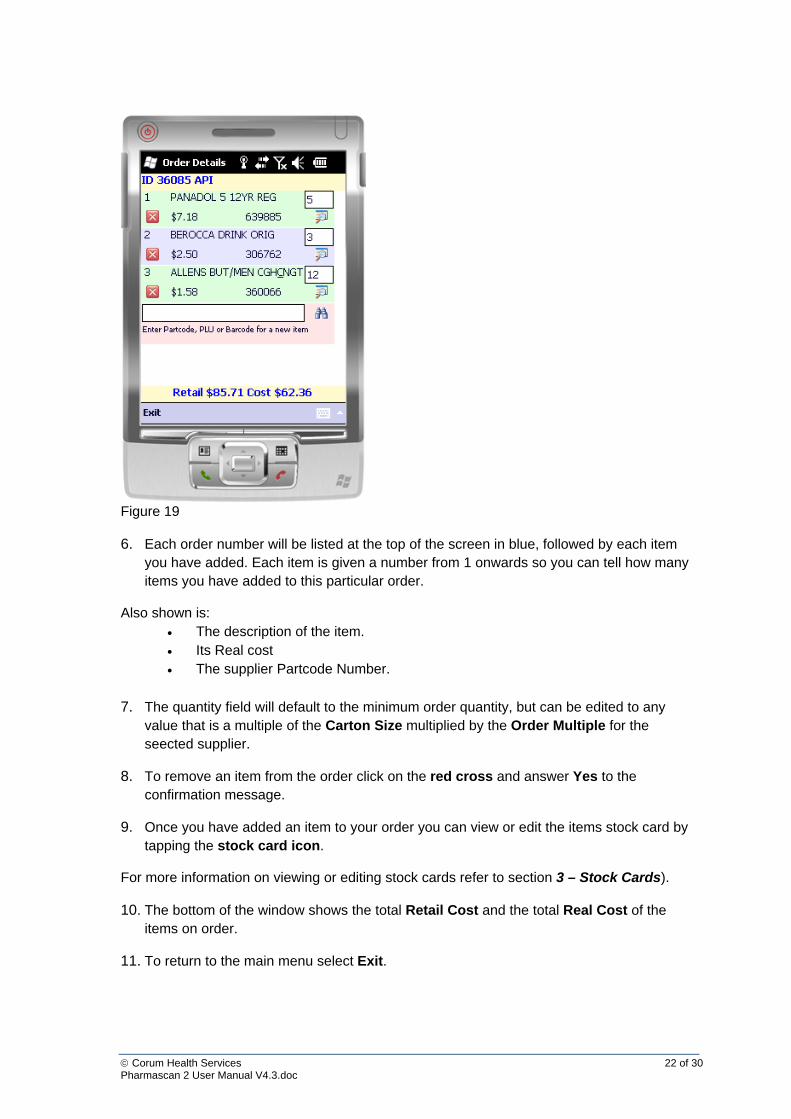
Figure 19 6. Each order number will be listed at the top of the screen in blue, followed by each item
you have added. Each item is given a number from 1 onwards so you can tell how many items you have added to this particular order.
Also shown is: The description of the item. Its Real cost The supplier Partcode Number.
7. The quantity field will default to the minimum order quantity, but can be edited to any value that is a multiple of the Carton Size multiplied by the Order Multiple for the seected supplier.
8. To remove an item from the order click on the red cross and answer Yes to the confirmation message.
9. Once you have added an item to your order you can view or edit the items stock card by tapping the stock card icon.
For more information on viewing or editing stock cards refer to section 3 – Stock Cards). 10. The bottom of the window shows the total Retail Cost and the total Real Cost of the
items on order.
11. To return to the main menu select Exit.

Corum Health Services 23 of 30 Pharmascan 2 User Manual V4.3.doc
Note: Once the order is complete, simply exit from the order and transmit from one of your LOTS PCs.
5.2.1 Adding an Item without a Partcode
If you try to add an item to an order that does not have a Partcode for the selected supplier the following prompt will appear (see Figure 20).
Figure 20 1. To add a Partcode to the item select Yes.
2. The Add Partcode screen appears (see Figure 21).

Corum Health Services 24 of 30 Pharmascan 2 User Manual V4.3.doc
Figure 20 There are three options to set.
Enter the Partcode to add – This field will allow you enter in the partcode you wish to use. After entering in the partcode, click on the binocular icon to ensure that the partcode is not assigned to another product for that supplier.
Order Multiple – This is the order quantity in multiples you are required to order in as defined by the supplier. For example, if you set this value to 4 then you would have to order either 4, 8, 12, 16 etc (multiples of 4).
Carton Size – The Carton Size is the number of retail units that is received from the supplier in each carton.
3. Once you have set all three options tap OK to be returned to the Order Details screen.
Corum Health Services 25 of 30 Pharmascan 2 User Manual V4.3.doc
6 Receipting Invoice The Receipting Invoice module allows you to select outstanding orders to receipt off, allowing you to check the invoice with what’s been delivered.
6.1 Receipting an Invoice.
1. To check a receipt with what’s being delivered tap the Receipting Invoice icon on the main menu.
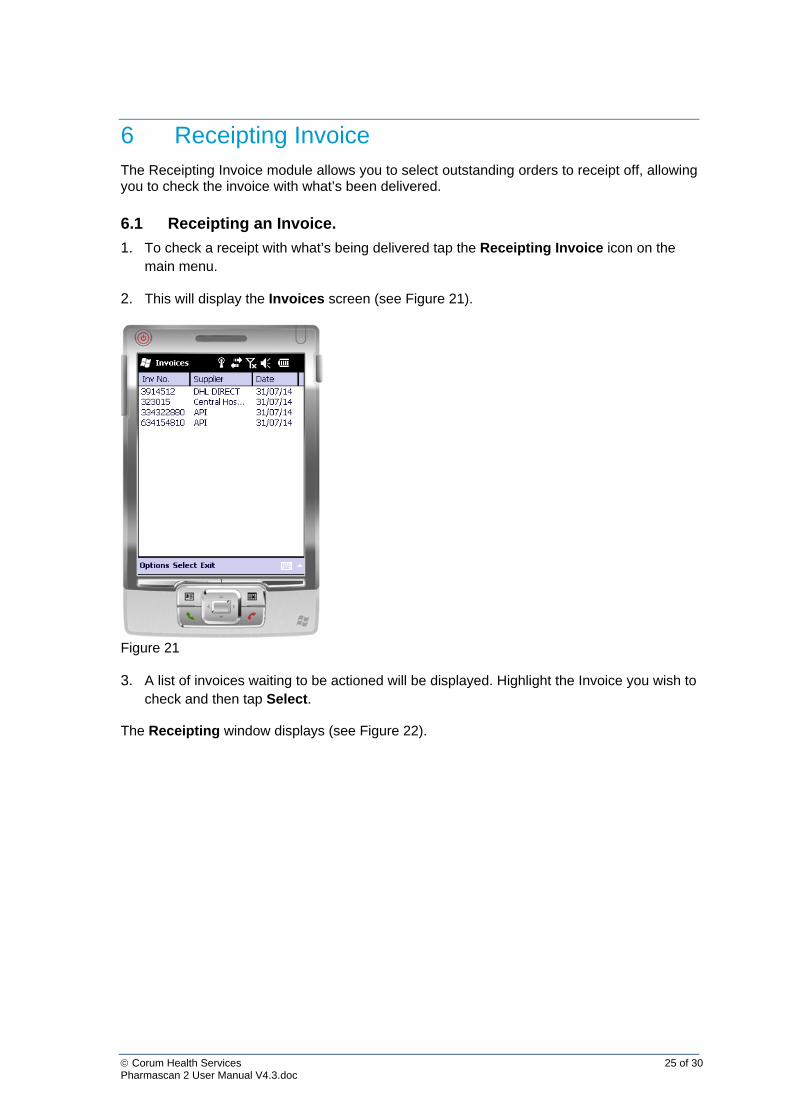
2. This will display the Invoices screen (see Figure 21).
Figure 21 3. A list of invoices waiting to be actioned will be displayed. Highlight the Invoice you wish to
check and then tap Select.
The Receipting window displays (see Figure 22).

Corum Health Services 26 of 30 Pharmascan 2 User Manual V4.3.doc
Figure 22
Note: IQty refers to the Invoice quantity. This is the amount you actually received. Qty refers to the quantity you ordered. By default, the IQty matches what the supply believes they have sent. To start a count, you must first Zero the IQty.
4. .To zero the this, click Options of the bottom left, then Zero. This will set the IQty to 0 and display a red colour in each field. (see figure 23).
Figure 23

Corum Health Services 27 of 30 Pharmascan 2 User Manual V4.3.doc
5. Each item on the order is listed in the bottom half of the window and the Invoice Number and Supplier are listed at the very top.
This window has three options to set. Product Code – Scan in the item’s barcode or enter in the items PLU or
description. Every time you scan a barcode that exists on this order, the count for the product ticks over by 1. You can simply scan each item as you go to get the total amount received.
Qty – Enter in the quantity of items received. If you type in an amount and then hit (=), it will prompt to either add or replace. This works similar to what you’d expect in stocktake. If you select Yes to add, it will plus that amount to the IQty field. If you hit No, it will replace the IQty total amount with the figure you entered for that item (see figure 24).
Note: Alternatively, to do a bulk count for an item, type in the Qty first then scan the barcode. Example: If you have a box of 6 of an item, instead of scanning the item 6 times, type 6 in the Qty field then scan the item. This will add plus 6. The red cross clears the Product Code field.
View – Once you have entered in the Product Code and Qty the IQty field will
turn a colour (see Figure 25).

Corum Health Services 28 of 30 Pharmascan 2 User Manual V4.3.doc
Figure 25 There are five colours and these colours can be viewed all at once or individually via the View drop-down list, they are:
All – This will show all items, regardless of their status (colour). Not Supplied (Red) – This colour defines not supplied items. Not supplied item
means that they were not received Under Supplied (Aqua) – This colour defines under supplied items. Under
Supplied occurs when the IQty value is less than the Qty value. Receipted (Green) – This colour defines fully receipted items. Receipted Items
mean the exact amount order was received (e.g. – the IQty and Qty values are equal).
Over Supplied (Yellow) – This colour defines over supplied items. Over supplier occurs when IQty value is grater than that of the Qty value.
If any of the items appear in grey that means the item has already been delivered.
6. To accurately receipt off your invoice, scan in the product code of each item and then enter the quantity received.
7. There are three Options available on the bottom left of the screen. (see Figure.26).

Corum Health Services 29 of 30 Pharmascan 2 User Manual V4.3.doc
Figure 26
Zero – This will allow you to reset the IQty values to zero. This is particularly
helpful because by default when an order is opened for the first time the IQty is set to what the supplier believes they have sent. By setting this value to zero will ensure you enter in the correct IQty value as you count through the items received.
Reset – This will allow you to reset the IQty values to their initial value. Legend – This will display a legend detailing what each field colour refers to (see
Figure 25). Select Exit to return to the Receipting screen. 8. Once you have receipted off your invoice tap Save to save the invoice to LOTS Orders
and return to the Pharmascan main menu.
Note: Don’t forget to deliver the invoice on a LOTS PC.
6.2 Scanning an Item Not On Order.
1. To check a receipt with what’s being delivered tap the Receipting Invoice icon on the main menu.
The Invoices screen displays (see Figure 27).

Corum Health Services 30 of 30 Pharmascan 2 User Manual V4.3.doc
Figure 27 A list of invoices waiting to be actioned displays. 2. Highlight the Invoice you wish to check and then tap Select.
3. When in the Receipting window, if you scan in a barcode of an item that is not on order you will receive the following prompt (see Figure 28).
Figure 28 4. Select OK to return to the Receipting screen.