Owner’s Manual - Roland · Once the connections have been completed, turn on power to your guitar...
2
* 5 1 0 0 0 0 4 1 5 7 - 0 2 * Thank you, and congratulations on your choice of the BOSS TU-12EX. Before using this unit, carefully read the sections entitled: “USING THE UNIT SAFELY” and “IMPORTANT NOTES” (supplied on a separate sheet). These sections provide important information concerning the proper operation of the unit. Additionally, in order to feel assured that you have gained a good grasp of every feature provided by your new unit, Owner’s Manual should be read in its entirety. The manual should be saved and kept on hand as a convenient reference. As shipped, the TU-12EX’s batteries are not yet installed. Be sure to read the section “Changing the Batteries,“ and then follow the instructions to install the batteries. Copyright © 2008 BOSS CORPORATION All rights reserved. No part of this publication may be reproduced in any form without the written permission of BOSS CORPORATION. fig.01?????? To prevent malfunction and/or damage to speakers or other devices, always turn down the volume, and turn off the power on all devices before making any connections. Once the connections have been completed, turn on power to your guitar amp or other amplification system last. By turning on devices in the wrong order, you risk causing malfunction and/or damage to speakers and other devices. J How to Use the Tuner (Auto CHROMATIC Mode) 1. Connect the instrument to be tuned to the INPUT jack. If you're tuning an acoustic instrument, use the built-in mic instead. To use the mic, make sure that nothing is connected to the INPUT or OUTPUT jacks, and place the TU-12EX near the instrument. 2. Press [POWER] to switch the power on. 3. Press [CHROMATIC/GUITAR] to enable the “CHROMATIC” setting (lighting the green indicator). In CHROMATIC mode, the TU-12EX automatically displays note names as you play them on your instrument. Most of the time, you'll find that CHROMATIC is the most convenient mode to use. If you're using a guitar or bass and wish to tune by specifying the string number first, use GUITAR mode. (Tuning using GUITAR mode is described in the next section.) 4. Play a single note on the instrument. Most of the time, you'll want to play an open string when tuning a guitar or bass. While the note is sounding, the note name is displayed. The meter and Tuning Guide show how far the note is from the correct pitch. 5. Tune the instrument. While playing a single note, adjust the instrument's tuning as necessary to display the target note's name. Once the desired note name is displayed, fine-tune the note's pitch by tuning the instrument so that and on the Tuning Guide light simultaneously and the meter's needle points to 0 (the center position). When the Accu-Pitch feature is on, the tuner makes a beeping sound when the note is stabilized at the correct pitch, informing you that the note is in tune. J How to Use the Tuner (Manual GUITAR Mode) 1. Connect the instrument to be tuned to the INPUT jack. If you're tuning an acoustic instrument, use the built-in mic instead. To use the mic, make sure that nothing is connected to the INPUT or OUTPUT jacks, and place the TU-12EX near the instrument. 2. Press [POWER] to switch the power on. 3. Press [CHROMATIC/GUITAR] to enable the “GUITAR” setting (lighting the red indicator). 4. Press [ ] or [ ] to light the indicator for the string number you want to tune. 5. Play the selected string number on your instrument. Play the string open, without fretting it. 6. Tune the string. Adjust the string's tuning so that both and on the Tuning Guide are lit and the meter's needle points to 0 (the center position). When the Accu-Pitch feature is on, the tuner makes a beeping sound when the note is stabilized at the correct pitch, informing you that the note is in tune. 7. Repeat Steps 4-6 as necessary to tune the rest of your instrument's strings. J TU-12EX Settings Changing the Reference Pitch for Tuning 1. Hold down [PITCH] and press [ ] or [ ] to choose the reference pitch you want. (Range of setting: 438 to 445 Hz) The indicator flashes. Choose the reference pitch you want by getting it to flash. 2. Release [PITCH] to set the selected reference pitch. Flat Tuning (Flat Feature) 1. Press [FLAT] to switch on the Flat feature (the red indicator lights). 2. Press [ ] or [ ] to set the number of flats (the number of flat semitones) that you wish to tune to. (Range of setting: to 6 ) For example, if you select two flats, the actual pitch of a tuned note will be two semitones below what is displayed by the TU-12EX. 3. Press [FLAT] again. This enables the setting for the Flat feature. Even if you don’t press [FLAT], the setting is enabled automatically after three seconds. 4. To disable the Flat feature, press [FLAT] so that its red indicator goes out. Tuning While Listening to the Reference Tone (Sound Mode) 1. Choose the type of tuning you want to use (e.g., Tuning Mode, Flat feature). 2. Press [ ] (Sound) to play the reference tone. 3. Press [ ] or [ ] until the indicator for the note name/string number you want to tune is lit. The sound of the note name/string number shown by the indicator is played. 4. Tune the instrument to the reference tone. When you're using Sound mode, tuning cannot be performed using the built-in mic (the built-in mic is disabled). 5. Press [ ] (Sound) to stop playing the reference tone. Calibrating the Meter’s Needle Rarely, the meter's needle may drift out of calibration, causing the needle to point slightly off from the 0 position even when the Tuning Guide's and indicators light simultaneously. This can occur over time as the unit is transported, or if the unit is handled in a rough fashion. During normal use, the meter's needle almost never drifts out of calibration. To adjust it, be sure to use a small flathead screwdriver (a 2.0 mm precision screwdriver). 1. Hold down [PITCH] and turn the power on. Confirm whether or not the needle is pointing at the 0 position. 2. If the meter's needle fails to point to the 0 position, use a flathead screwdriver (a 2.0 mm precision screwdriver) to turn the meter adjustment control until the needle points to 0. 3. After completing calibration, press [POWER] to switch off the power. J Useful Features Preventing Battery Drain If You Forget to Switch Off the Power (Auto Power Off Feature) When using battery power, if the TU-12EX remains in the state described below for approximately thirty minutes after it was turned on, the power will automatically be switched off. • No button has been pressed, and • No audio (including input from the built-in mic) has been detected. Deactivating the Auto Power Off Feature You can temporarily deactivate the Auto Power Off feature when you power up the TU-12EX. To do so, simultaneously hold down [ ] and [ ] while you press [POWER] to turn on the power. The Auto Power Off feature will be enabled the next time you turn on the power in the usual way. Using a Tone to Indicate Tuning is Completed (Accu-Pitch Feature) When the Accu-Pitch Feature is on, a beeping sound is played when the sound of the instrument you're tuning has stabilized at a pitch that is no more than three cents sharp or flat. This sound tells you that the pitch is in tune. Switching the Accu-Pitch Feature On and Off 1. Hold down [ ] (Sound) and press [POWER] to switch on the power. If no sound is heard from the unit as it's powered up, it means that the Accu-Pitch feature has been deactivated. To enable the Accu-Pitch feature, perform the same operation again; if you hear a beeping sound when the power comes on, it means that Accu-Pitch has been enabled. Memory Features Once batteries are installed in the TU-12EX, the settings described below are retained in memory even after the power is switched off. If the batteries are removed or are depleted, all data saved in memory may be lost. J Changing the Batteries The BATT. indicator flashes when the batteries begin to run down. Replace the batteries as soon as possible. * When turning the unit upside-down, place it on a soft cloth or the like so as to prevent damage to the panel. 1. Open the battery compartment (located on the bottom of the unit) by sliding the cover toward OPEN. 2. Remove the old batteries from the battery compartment. 3. Insert two of the same type of fresh AAA batteries. * Make sure the “+” and “-” ends of the batteries are oriented correctly. * Do not mix fresh batteries with used ones, or mix batteries of different types. Doing so can result in fluid leakage. 4. Slide the cover of the battery compartment back into place. J Specifications * In the interest of product improvement, the specifications and/or appearance of this unit are subject to change without prior notice. このたびは、BOSS チューナー TU-12EX をお買い上げいただきまし て、まことにありがとうございます。 この機器を正しくお使いいただくために、ご使用前に別紙「安全上のご 注意」と「使用上のご注意」をよくお読みください。また、この機器の 優れた機能を十分ご理解いただくためにも、取扱説明書をよくお読みく ださい。取扱説明書は必要なときにすぐに見ることができるよう、手元 に置いてください。 お買い上げ時、電池はセットされておりません。必ず「電池交換のしか た」にしたがって電池をセットしてください。 © 2008 ボス株式会社 本書の一部、もしくは全部を無断で複写・転載 することを禁じます。 fig.01?????? 他の機器と接続するときは、誤動作やスピーカーなどの破損を防ぐた め、必ずすべての機器の音量を絞った状態で電源を切ってください。 正しく接続したら、ギター・アンプなどの電源は最後に投入してくだ さい。手順を間違えると、誤動作をしたりスピーカーなどが破損する 恐れがあります。 ■ チューニングのしかた(オート・クロマチック・モード/ CHROMATIC) 1. チューニングする楽器を INPUT ジャックに接続します。 アコースティック楽器のチューニングには内蔵マイクを使用しますので、 INPUT/OUTPUTジャックには何も接続しないで、楽器の近くにTU-12EX を置いてください。 2. [POWER]を押して、電源をオンにします。 3. [CHROMATIC/GUITAR]を押して、「CHROMATIC」(緑インジ ケーター点灯)に設定します。 通常は自動的に音名を表示する「CHROMATIC」で使用します。 ギターやベースの弦を指定してチューニングしたいときは、 「GUITAR(マニュアル・ギター・モード)」に設定します。GUITAR によるチューニングのしかたは次項「チューニングのしかた(マニュ アル・ギター・モード/GUITAR)」をお読みください。 4. 楽器を単音で鳴らします。 鳴らした音に近い音名のインジケーターが点灯します。正確な音程とのズレ が、メーターとチューニング・ガイドで表示されます。 5. 楽器をチューニングします。 目的の音名のインジケーターと、チューニング・ガイドの と が両方点 灯し、メーターの針が 0(中央)を指すように楽器をチューニングします。安 定してピッチが合うと、「ピピッ」と鳴ってチューニング完了を知らせます。 (アキュピッチ機能) ■ チューニングのしかた(マニュアル・ギター・モード/ GUITAR) 1. チューニングする楽器を INPUT ジャックに接続します。 アコースティック楽器のチューニングには内蔵マイクを使用しますので、 INPUT/OUTPUTジャックには何も接続しないで、楽器の近くにTU-12EX を置いてください。 2. [POWER]を押して、電源をオンにします。 3. [CHROMATIC/GUITAR]を押して、「GUITAR」(赤インジケー ター点灯)に設定します。 4. [ ]または[ ]を押して、チューニングしたい弦番号のインジケー ターを点灯させます。 5. 楽器を単音で鳴らします。 正確な音程とのズレが、メーターとチューニング・ガイドで表示されます。 6. 楽器をチューニングします。 チューニング・ガイドの と が両方点灯し、メーターの針が 0(中央)を 指すように楽器をチューニングします。安定してピッチが合うと、「ピピッ」 と鳴ってチューニング完了を知らせます。(アキュピッチ機能) ■ TU-12EX の設定 チューニングの基準ピッチを変える 1. [PITCH]を押したまま、[ ]または[ ]を押して希望の基準ピッ チを設定します(設定範囲:438~ 445Hz)。 インジケーターが点滅します。希望の基準ピッチを点滅させます。 2. [PITCH]から指を離すと基準ピッチが設定されます。 フラット・チューニングをする(フラット機能) 1. [FLAT]を押して、フラット機能をオンにします(赤インジケーター 点灯)。 2. [ ]または[ ]を押して、希望のフラット数に設定します(設定 範囲: ~6 )。 3. 再度[FLAT]を押します。 フラット機能が設定されます。[FLAT]を押さなくても 3 秒経過すると自動 的に設定されます。 基準音を聞きながらチューニングする(サウンド・モード) 1. チューニングの種類(CHROMATIC /GUITARモード、フラット機 能)を設定します。 2. [ ]を押して、基準音を鳴らします。 3. [ ]または[ ]を押して、合わせたい音名または弦番号のインジ ケーターを点灯させます。 インジケーターに表示される音名または弦番号の音が鳴ります。 4. 基準音に合わせて楽器をチューニングします。 サウンド・モード使用時は、内蔵マイクによるチューニングはできま せん(メーターは動きません)。 5. 発音をとめるには再度[ ]を押します。 メーター針の調整をする 経年変化や衝撃等でメーター針のセンター位置がずれた場合、以下の操 作でセンター位置の調整ができます。 通常、メーター針のセンター位置がずれることはほとんどありませ ん。調整を行う場合には、必ず小さなマイナス(-)ドライバー(精密 ドライバー 2.0mm)を使用してください。また、無理な力を加えな いでください。故障の原因になります。 1. [PITCH]を押したまま、[POWER]を押して電源をオンにします。 メーターの針が 0 を指しているかを確認します。 2. メーターの針が 0 を指していないときは、マイナス(-)ドライバー (精密ドライバー 2.0mm)でメーター調整ボリュームを回し、0 を 指すように調整します。 3. 調整が終了したら[POWER]を押して電源を切ります。 ■ 便利な機能 電池使用時の電源の切り忘れを防ぐ(オート・パワー・オフ機能) 電池使用時に電源をオンにした後、以下の状態から約 30 分以上経過すると、 自動的に電源がオフになります。 • ボタン操作がされない状態 かつ、 • 音声が検知されない状態(内蔵マイクからの入力を含む) オート・パワー・オフ機能を無効にする [ ]と[ ]を同時に押したまま[POWER]を押して電源をオンにすると、 オート・パワー・オフ機能は働きません。 通常の操作で電源を入れ直すと、オート・パワー・オフ機能は有効になります。 チューニング完了を音で知らせる(アキュピッチ機能) チューニングしている楽器が安定して±3 セントの範囲に入ったときは、「ピ ピッ」音が聞こえます。この音でチューニング完了を知らせます。 アキュピッチ機能を無効/有効にする [ ]を押したまま、[POWER]を押して電源をオンにします。 このとき、本体から何も音が出ない状態であれば、アキュピッチ機能は無効に なっています。再度同じ操作で、電源オンと同時に「ピピッ」音が聞こえる と、アキュピッチ機能は有効になります。 メモリー機能 本体に乾電池を入れておくと、電源をオフにしても以下の設定を記憶します。 乾電池を取り外したり電池がなくなると、記憶内容が失われる場合が あります。 ■ 電池交換のしかた 電池がなくなるとBATT.インジケーターが点 滅します。このときは、すぐに電池を交換し てください。 ※ 本体を裏返す際は、パネルが破損しないように、 柔らかい布などの上に置いてください。 1. 本体底面の電池ボックスのカバーを OPEN の方向にスライドさせて開けます。 2. 古い電池を取り出します。 3. 同じ種類の新しい単 4 形乾電池 2 本をセットします。 ※ 電池の極性(+/ー)を間違えないように注意してください。 ※ 新しい電池と一度使用した電池や種類の違う電池を混ぜて使用しないでくだ さい。液漏れの原因になります。 4. 電池ボックスのカバーを元通りに閉じます。 ■ 主な仕様 規格および外観は改良のために予告なく変更する場合があります。 Owner’s Manual This plays the reference tone and the Accu-Pitch sound. These change various settings. The tuning indicator lights to show how close you are to the target pitch. Tuning Guide lights: pitch is flat (low) lights: pitch is sharp (high) Needle Meter CHROMATIC/GUITAR Meter Adjustment Control (bottom of the unit) Speaker This switches the power on and off. POWER FLAT Insert two AAA size batteries. Batteries Compartment (bottom of the unit) Built-in Mic (Down) / (Up) (Sound button) This changes the settings for the reference pitch. PITCH DC IN jack Connect to a guitar amp etc. Sound input via the INPUT jack is output unchanged from here. OUTPUT jack Connect the guitar, bass guitar, or other instrument to be tuned here. INPUT jack Indicators This changes the tuning mode. Green Indicator: Auto CHROMATIC mode Red indicator: Manual GUITAR mode (for tuning a single specified guitar/bass string) These show the current note's name (C-B), natural or sharp status (#), the guitar/bass string number, the master reference pitch (438-445), and a warning when the battery is low. Connect the AC adaptor (optional BOSS PSA series) here. This switches the Flat feature on and off. Use this to turn the reference tone's sound on and off. Use this when tuning acoustic instruments. Position the mic as closely as possible to the instrument. light simultaneously: in tune (± 3 cents) Auto CHROMATIC mode: Pressing [ ] and [ ], you can play reference tones in half-step incre- ments over five octaves (C2 to C7). Manual GUITAR mode: The pitch of the selected open string (7B to 1E) is played. When you're using the Flat feature, the pitch the reference tone is adjusted accordingly. Setting Original factory settings Tuning mode setting (CHROMATIC or GUITAR) CHROMATIC Reference pitch 440Hz String Numbers in Manual GUITAR Mode 6E Sounded reference tone CHROMATIC: C4 GUITAR: 6E Accu-Pitch feature settings ON (enabled) Flat tuning settings (number of semitones) Tuning Range E0 (20.6Hz) – C8 (4,186.0Hz) Expected battery life under contin- uous use (carbon) Approximately 15 hours This figure will vary depending on the actual conditions of use. Reference Pitch A4 (438–445Hz) Dimensions 147.5 (W) x 54.0 (D) x 23.9 (H) mm 5-13/16 (W) x 2-1/8 (D) x 1 (H) inches Tuning Accuracy ± 1 cent Weight 138 g, 5 oz (including batteries) Power Supply Dry battery R03 (carbon) or LR03 (alkaline); (AAA) type x 2; DC 3 V AC adaptor DC 9V (PSA series; optional) Accessories Dry battery (R03 (AAA) type) x 2 (carbon), Owner’s Manual, Soft Case, Leaflet (“USING THE UNIT SAFELY” and “IMPORTANT NOTES”), Information Current Draw 12 mA オート・クロマチック・ モード時 半音ごと C2 ~ C7(5 オクターブ)の基準音が鳴ります。 マニュアル・ギター・ モード時 7B から 1E までの開放弦の基準音程が鳴ります。 また、フラット・チューニング時はその設定に合わせて、発音する音程が変化します。 取扱説明書 CHROMATIC/GUITAR POWER FLAT PITCH チューニング・ガイド チューニングの目安を表示します。 点灯:ピッチが低い 点灯:ピッチが高い 同時点灯:ピッチが合っている(±3セント) 針式メーター インジケーター 音名表示(C-B)、#表示、弦番号表 示、基準ピッチ表示、フラット設定表 示、電池残警告表示をします。 DC INジャック BOSS PSAアダプターを接続します。 OUTPUTジャック ギター・アンプなどを接続します。 INPUTジャックからの入力音が そのまま出力されます。 INPUTジャック チューニングするギターやベース・ ギター等の楽器を接続します。 フラット機能をオン/オフします。 (サウンド・ボタン) 基準音の発音をオン/オフします。 (ダウン)/(アップ) 各種設定を変更します。 基準ピッチの設定を変更します。 電源をオン/オフします。 内蔵スピーカー 基準音、アキュピッチ音を 発音します。 電池ボックス(底面) 乾電池単4形(2本)を入れます。 メーター調整ボリューム(底面) 内蔵マイク アコースティック楽器をチューニングする ときに使用します。マイクをできる限り楽 器に近づけてください。マイクを使用する ときはINPUTジャック、OUTPUTジャック には何も接続しないでください。 チューニング・モードを切り替えます。 緑インジケーター:オート・クロマチック・モード 赤インジケーター:マニュアル・ギター・モード(ギター/ベースの弦指定) 設定 工場出荷時 チューニング・モード(CHROMATIC/GUITAR)の設定 CHROMATIC 基準ピッチ 440Hz マニュアル・ギター・モードでの弦番号 6E サウンド・モードで発音される音名 CHROMATIC: C4 GUITAR: 6E アキュピッチ機能のオン/オフの設定 オン フラット・チューニングの設定(フラット数) 測定範囲 E0(20.6Hz)~ C8(4,186.0Hz) 連続使用時の 電池の寿命 約 15 時間(マンガン) ※使用状態によって異なります 基準ピッチ A4(438 ~ 445Hz) 外形寸法 147.5(幅)× 54.0(奥行き)× 23.9(高さ)mm 内部測定精度 ± 1 セント 質量 138g(乾電池を含む) 電源 乾電池単 4 形× 2 本 (DC 3V)、BOSS PSA アダプター(別売) 付属品 乾電池単 4形(2本)、取扱説明書、 ソフト・ケース、安全上のご注意・使 用上のご注意チラシ 消費電流 12mA Vielen Dank und herzlichen Glückwunsch zu Ihrer Wahl des BOSS TU-12EX. Vor dem Betrieb des Gerätes lesen Sie bitte die folgenden aufgeführten Abschnitte sorgfältig durch: „SICHERER BETRIEB DES GERÄTES“ und „WICHTIGE HINWEISE“ (auf einem gesonderten Blatt beigefügt). Diese Abschnitte enthalten wichtige Informationen über die korrekte Bedienung des Gerätes. Um einen vollständigen Überblick über alle Funktionen des Gerätes zu erhalten, sollten Sie diese Bedienungsanleitung vollständig durchlesen. Bewahren Sie die Anleitung an einem sicheren Platz auf und verwenden Sie diese zu Referenzzwecken. Bei Auslieferung sind die Batterien des TU-12EX noch nicht eingelegt. Lesen Sie sich den Abschnitt „Auswechseln der Batterien“ durch, und folgen Sie dann den Anweisungen zum Einlegen der Batterien. Copyright © 2008 BOSS CORPORATION Alle Rechte vorbehalten. Diese Publikation darf weder ganz noch teilweise ohne schriftliche Genehmigung durch die BOSS CORPORATION reproduziert werden. Abb. 01?????? Um Fehlfunktionen und/oder Schäden an Lautsprechern oder anderen Geräten zu vermeiden, regeln Sie stets die Lautstärke herunter und schalten Sie alle Geräte aus, bevor Sie Verbindungen herstellen. Wenn Sie die Anschlüsse vorgenommen haben, schalten Sie den Gitarrenverstärker bzw. ein anderes Verstärkungssystem zuletzt ein. Wenn Sie die Geräte in der falschen Reihenfolge einschalten, besteht die Gefahr von Fehlfunktionen und/oder Schäden an Lautsprechern und anderen Geräten. J Verwendung des Stimmgeräts (Auto-CHROMATIC-Modus) 1. Schließen Sie das zu stimmende Instrument an der INPUT-Buchse an. Wenn Sie ein akustisches Instrument stimmen, verwenden Sie statt dessen das eingebaute Mikrofon. Um das Mikrofon zu verwenden, vergewissern Sie sich, dass an der INPUT- und der OUTPUT-Buchse nichts angeschlossen ist, und stellen Sie das TU-12EX nah am Instrument auf. 2. Drücken Sie die [POWER]-Taste, um das Gerät einzuschalten. 3. Drücken Sie die [CHROMATIC/GUITAR]-Taste, um die Einstellung „CHROMATIC“ zu aktivieren (die grüne LED leuchtet). Im CHROMATIC-Modus zeigt das TU-12EX automatisch die Namen der Töne und die Nummern der Saiten an, die Sie auf Ihrem Instrument spielen. Sie werden vermutlich feststellen, dass in den meisten Fällen der CHROMATIC-Modus am praktischsten ist. Wenn Sie eine Gitarre oder einen Bass stimmen und zuerst die Saitennummer angeben möchten, verwenden Sie den GUITAR-Modus. (Das Stimmen im GUITAR-Modus wird im nächsten Abschnitt beschrieben) 4. Spielen Sie einen einzelnen Ton auf dem Instrument. Beim Stimmen von Gitarre oder Bass empfiehlt sich meist das Spielen mit leerer Saite. Während der Ton erklingt, werden Notenname und Saitennummer angezeigt. Die Höhen- und die Richtanzeige zeigen an, wie weit der Ton von der richtigen Tonhöhe entfernt ist. 5. Stimmen Sie das Instrument. Ändern Sie, während Sie einen einzelnen Ton spielen, die Stimmung des Instruments, bis der gewünschte Notenname angezeigt wird. Sobald der beabsichtigte Notenname angezeigt wird, stellen Sie den Ton genau auf die richtige Höhe ein, indem Sie das Instrument stimmen, bis die Pfeile und der Richtanzeige gleichzeitig leuchten und die Nadel der Tonhöhenanzeige auf 0 zeigt (mittlere Stellung). Wenn die Accu-Pitch-Funktion eingeschaltet ist, ertönt ein Signalton, wenn der Ton auf der richtigen Höhe stabilisiert ist. Daran erkennen Sie, dass der Ton richtig gestimmt ist. J Verwendung des Stimmgeräts (Manual-GUITAR-Modus) 1. Schließen Sie das zu stimmende Instrument an der INPUT-Buchse an. Wenn Sie ein akustisches Instrument stimmen, verwenden Sie statt dessen das eingebaute Mikrofon. Um das Mikrofon zu verwenden, vergewissern Sie sich, dass an der INPUT- und der OUTPUT-Buchse nichts angeschlossen ist, und stellen Sie das TU-12EX nah am Instrument auf. 2. Drücken Sie die [POWER]-Taste, um das Gerät einzuschalten. 3. Drücken Sie die [CHROMATIC/GUITAR]-Taste, um die Einstellung „GUITAR“ zu aktivieren (die rote LED leuchtet). 4. Drücken Sie die Pfeiltasten [ ] bzw. [ ], bis die LED der zu stimmenden Saitennummer leuchtet. 5. Spielen Sie die ausgewählte Saitennummer auf Ihrem Instrument. Spielen Sie mit leerer Saite (ohne einen Bund zu greifen). 6. Stimmen Sie die Saite. Ändern Sie die Stimmung der Saite so, dass beide Pfeile ( und ) der Richtanzeige leuchten und die Nadel der Tonhöhenanzeige auf 0 zeigt (mittlere Stellung). Wenn die Accu-Pitch-Funktion eingeschaltet ist, ertönt ein Signalton, wenn der Ton auf der richtigen Höhe stabilisiert ist. Daran erkennen Sie, dass der Ton richtig gestimmt ist. 7. Wiederholen Sie nach Bedarf die Schritte 4–6, um die übrigen Saiten Ihres Instruments zu stimmen. J Einstellungen am TU-12EX Ändern der Referenztonhöhe für das Stimmen 1. Halten Sie die [PITCH]-Taste gedrückt, und wählen Sie mit den Pfeiltasten [ ] bzw. [ ] die gewünschte Referenztonhöhe aus. (Einstellungsbereich: 438 bis 445 Hz) Die entsprechende LED blinkt. 2. Lassen Sie die [PITCH]-Taste los, um die ausgewählte Referenztonhöhe einzustellen. Flat Tuning – Saiten tiefer stimmen (Flat-Funktion) 1. Drücken Sie die [FLAT]-Taste, um die Flat-Funktion einzuschalten (die rote LED leuchtet). 2. Stellen Sie mit den Pfeiltasten [ ] und [ ] die Anzahl der Halbtöne (Flat = Englisch für „erniedrigt“) ein, um die Sie die Saiten tiefer stimmen möchten. (Einstellungsbereich: bis 6 ) Wenn Sie zum Beispiel die Stimmung um zwei Halbtöne absenken, ist die tatsächliche Höhe der gestimmten Saite einen Ganzton tiefer als am TU-12EX angezeigt. 3. Drücken Sie erneut die [FLAT]-Taste. Dadurch wird die Einstellung für die Flat-Funktion aktiviert. Auch wenn Sie nicht die [FLAT]-Taste drücken, wird die Einstellung nach drei Sekunden automatisch aktiviert. 4. Um die Flat-Funktion zu deaktivieren, drücken Sie die [FLAT]-Taste, so dass die rote LED erlischt. Stimmen mit Hilfe von Referenztönen (Tonmodus) 1. Wählen Sie die gewünschte Stimmungsart aus (z. B., Stimmmodus, Flat-Funktion). 2. Drücken Sie die [ ]-Taste (Ton), um den Referenzton zu spielen. 3. Drücken Sie die Pfeiltasten [ ] oder [ ], bis die LED des zu stimmenden Notennamens bzw. der Saitennummer leuchtet. Der Ton, dessen Notenname/Saitennummer durch die LED angezeigt wird, wird gespielt. 4. Stimmen Sie das Instrument auf den Referenzton. Wenn Sie den Tonmodus verwenden, kann das Stimmen nicht mit Hilfe des eingebauten Mikrofons erfolgen (dieses ist deaktiviert). 5. Drücken Sie die [ ]-Taste (Ton), um die Referenzton-Wiedergabe zu stoppen. Kalibrieren der Nadel der Tonhöhenanzeige In seltenen Fällen kann sich die kalibrierte Nadel der Tonhöhenanzeige verstellen und zeigt dann nicht genau auf die Stellung 0, auch wenn die Pfeile und der Richtanzeige gleichzeitig leuchten. Dies kann im Lauf der Zeit eintreten, wenn das Gerät transportiert oder unsanft gehandhabt wird. Bei normalem Gebrauch verliert die Nadel der Tonhöhenanzeige fast nie ihre Kalibrierung. Verwenden Sie zur Einstellung einen Kreuzschlitz-Schraubendreher (einen 2,0-mm-Präzisions-Schraubendreher). 1. Halten Sie die [PITCH]-Taste gedrückt, und schalten Sie das Gerät ein. Sehen Sie nach, ob die Nadel genau auf die Stellung 0 zeigt. 2. Wenn die Nadel der Tonhöhenanzeige nicht auf 0 zeigt, drehen Sie vorsichtig mit einem kleinen Präzisions-Kreuzschlitz-Schraubendreher (2,0 mm) die Verstellschraube, bis die Nadel auf 0 zeigt. 3. Drücken Sie nach Abschluss der Kalibrierung die [POWER]-Taste, um das Gerät auszuschalten. J Nützliche Funktionen Verhindern von Batterieverbrauch, wenn Sie das Ausschalten vergessen (Auto-Power-Off-Funktion) Wenn das TU-12EX im Batteriebetrieb nach dem Einschalten für ca. 30 Minuten in einem der nachstehend beschriebenen Zustände verbleibt, schaltet es sich automatisch aus. • Keine Taste wurde gedrückt, und • Kein Audiosignal (einschließlich eines Eingangssignals vom eingebauten Mikrofon) wurde erkannt. Deaktivieren der Auto-Power-Off-Funktionen Sie können die Auto-Power-Off-Funktion vorübergehend deaktivieren, wenn Sie das TU-12EX einschalten. Halten Sie dazu die Pfeiltasten [ ] und [ ] gedrückt, während Sie das Gerät mit der [POWER]-Taste einschalten. Die Auto-Power-Off-Funktion wird aktiviert, wenn Sie das Gerät auf normale Weise einschalten. Verwenden eines Signals, um das Ende des Stimmvorgangs anzuzeigen (Accu-Pitch-Funktion) Wenn die Accu-Pitch-Funktion eingeschaltet ist, erklingt ein Signalton, wenn sich die Tonhöhe des zu stimmenden Instruments im Bereich von drei Cent über oder unter der richtigen Tonhöhe stabilisiert. Dieses Signal weist Sie darauf hin, dass die Tonhöhe richtig ist. Ein- und Ausschalten der Accu-Pitch-Funktion 1. Halten Sie die [ ]-Taste (Ton) gedrückt, und schalten Sie das Gerät mit der [POWER]-Taste ein. Wenn während des Einschaltens kein Signal ertönt, bedeutet das, dass die Accu-Pitch-Funktion deaktiviert ist. Führen Sie zum Aktivieren der Accu-Pitch-Funktion den gleichen Vorgang erneut aus; wenn Sie beim Einschalten einen Signalton hören, bedeutet das, dass die Accu-Pitch-Funktion aktiviert ist. Speicherfunktionen Wenn in den TU-12EX Batterien eingelegt sind, bleiben die nachstehend beschriebenen Einstellungen auch beim Ausschalten im Speicher erhalten. Wenn die Batterien herausgenommen werden oder leer sind, könnten alle gespeicherten Daten verloren gehen. J Auswechseln der Batterien Die BATT.-LED blinkt, wenn die Batteriespannung nachlässt. Ersetzen Sie die Batterien so bald wie möglich. * Legen Sie das Gerät, wenn Sie es umdrehen, auf ein weiches Tuch oder etwas Ähnliches, um eine Beschädigung des Bedienfelds zu vermeiden. 1. Öffnen Sie das Batteriefach (an der Unterseite des Geräts), indem Sie die Abdeckung in Richtung OPEN (Öffnen) schieben. 2. Entnehmen Sie die alten Batterien aus dem Batteriefach. 3. Legen Sie zwei neue AAA-Batterien desselben Typs ein. * Achten Sie darauf, die Pole „+“ und „–“ der Batterien richtig auszurichten. * Verwenden Sie nicht gleichzeitig neue Batterien und gebrauchte Batterien oder Batterien verschiedenen Typs. Dadurch könnte Batterieflüssigkeit austreten. 4. Schließen Sie die Abdeckung des Batteriefachs wieder. J Technische Daten * Änderungen der technischen Daten und des Designs sind möglich und bedürfen keiner vorherigen Ankündigung. * Für Druckfehler wird keine Haftung übernommen. Nous vous remercions d’avoir choisi le BOSS TU-12EX et vous en félicitons. Avant d’utiliser cet appareil, lisez attentivement les sections suivantes : « UTILISATION DE L’APPAREIL DE FAÇON SÉCURISÉE » et « REMARQUES IMPORTANTES » (livrées séparément). Ces sections fournissent d’importantes informations relatives au bon fonctionnement de l’appareil. En outre, pour être sûr d'avoir bien intégré chacune des fonctionnalités fournies par votre appareil, il est nécessaire de lire le mode d'emploi dans son intégralité. Vous devez conserver ce manuel sous la main afin de pouvoir vous y reporter au besoin. Les piles ne sont pas encore installées sur le TU-12EX livré. Veillez à lire la section « Remplacement des piles » pour suivre la procédure d’installation des piles. Copyright © 2008 BOSS CORPORATION Tous droits réservés. Toute reproduction intégrale ou partielle de cette publication est interdite sous quelque forme que ce soit sans l’autorisation écrite de BOSS CORPORATION. fig.01?????? Afin d’éviter tout dysfonctionnement et/ou dommage aux haut-parleurs et aux autres appareils, réduisez le volume de tous vos appareils au minimum, puis mettez-les hors tension avant d’effectuer vos branchements. Une fois les connexions établies, mettez sous tension votre amplificateur de guitare ou autre. Si vous ne respectez pas cet ordre, vous risquez de provoquer des dysfonctionnements et/ou d’endommager les enceintes et autres appareils. J Utilisation de l’accordeur (mode Auto CHROMATIC) 1. Branchez l’instrument à accorder à la prise INPUT. Si vous accordez un instrument acoustique, utilisez le micro intégré. Pour utiliser le micro, veillez à ce qu’aucun élément ne soit branché sur les prises INPUT ou OUTPUT et placez le TU-12EX près de l’instrument. 2. Pour mettre sous tension, appuyez sur [POWER]. 3. Pour activer le réglage « CHROMATIC » (qui allume le voyant vert), appuyez sur [CHROMATIC/GUITAR]. En mode CHROMATIC, le TU-12EX affiche automatiquement les noms des notes et les numéros des cordes de l’instrument lorsque vous jouez les notes. Vous constaterez la plupart du temps que le mode le plus pratique à utiliser est le mode CHROMATIC. Si votre instrument est une guitare ou une basse et que vous souhaitez l’accorder en commençant par indiquer un numéro de corde, utilisez le mode GUITAR. (L’accordage en mode GUITAR est décrit à la section suivante.) 4. Jouez une note sur votre instrument. La plupart du temps, vous accordez une guitare ou une basse en jouant une note sur une corde à vide. Lorsque le son de la note est émis, le nom de la note et le numéro de la corde s’affichent. Le vumètre et le guide d’accord montrent l’écart de la note par rapport au diapason correct. 5. Accordez l’instrument. Lorsque vous jouez une simple note, accordez l’instrument de façon appropriée pour afficher le nom de la note voulue. Lorsque le nom de la note voulue s’affiche, affinez l’accordage de la note en accordant l’instrument jusqu’à ce que et s’allument simultanément sur le guide d’accord et que l’aiguille du vumètre se place sur 0 (la position centrale). Lorsque la fonction Accu-Pitch est activée, l’accordeur émet un signal sonore lorsque la note est accordée correctement. J Utilisation de l’accordeur (mode Manual GUITAR) 1. Branchez l’instrument à accorder à la prise INPUT. Si vous accordez un instrument acoustique, utilisez le micro intégré. Pour utiliser le micro, veillez à ce qu’aucun élément ne soit branché sur les prises INPUT ou OUTPUT et placez le TU-12EX près de l’instrument. 2. Pour mettre sous tension, appuyez sur [POWER]. 3. Pour activer le paramètre « GUITAR » (qui allume le voyant rouge), appuyez sur [CHROMATIC/GUITAR]. 4. Pour allumer le voyant correspondant au numéro de la corde à accorder, appuyez sur [ ] ou [ ]. 5. Jouez le numéro de corde que vous avez sélectionné sur votre instrument. Jouez la corde à vide sans faire pleurer la note. 6. Accordez la corde. Réglez l’accord de la corde jusqu’à ce que et s’allument sur le guide d’accord et que l’aiguille du vumètre se place sur 0 (la position centrale). Lorsque la fonction Accu-Pitch est activée, l’accordeur émet un signal sonore lorsque la note est accordée correctement. 7. Répétez les étapes 4 à 6 au besoin pour accorder les autres cordes de votre instrument. J Paramètres de TU-12EX Changement du diapason de référence pour l’accordage 1. Appuyez sur le bouton [PITCH] et maintenez-le enfoncé et appuyez sur [ ] ou [ ] pour choisir le diapason de référence voulu. (Plage de réglage : de 438 à 445 Hz) Le voyant clignote. Choisissez le diapason de référence voulu. Son voyant clignote lorsqu’il est atteint. 2. Relâchez le bouton [PITCH] pour choisir le diapason de référence sélectionné. Accord altéré (fonction Flat) 1. Appuyez sur [FLAT] pour passer à la fonction Flat (le voyant rouge s’allume). 2. Appuyez sur [ ] ou [ ] pour définir le nombre de demi-tons altérés à utiliser pour accorder. (Plage de réglage : de à 6 ) Par exemple, si vous sélectionnez deux demi-tons altérés, le ton réel d’une note accordée sera placé deux demi-tons au-dessus du ton affiché par le TU-12EX. 3. Appuyez de nouveau sur [FLAT]. Cela permet de régler la fonction Flat. Même si vous n’appuyez pas sur [FLAT], le réglage Flat est activé automatiquement au bout de trois secondes. 4. Pour désactiver la fonction Flat, appuyez sur [FLAT]. Le voyant rouge s’éteint. Accord avec écoute du diapason de référence (Mode Sound) 1. Choisissez le type d’accord voulu (par exemple mode Tuning, fonction Flat). 2. Pour jouer le diapason de référence, appuyez sur [ ] (Sound). 3. Appuyez sur [ ] ou [ ] jusqu’à ce que le voyant correspondant au nom de la note ou au numéro de la corde à accorder s’allume. Le son du nom de note ou du numéro de corde affiché par le voyant est émis. 4. Accordez l’instrument sur la note de référence. Lorsque vous utilisez le mode Sound, l’accordage n’est pas réalisable avec le micro intégré (celui-ci est désactivé). 5. Appuyez sur [ ] (Sound) pour arrêter l’émission du diapason de référence. Calibrage de l’aiguille du vumètre Il est rare que l’aiguille du vumètre dévie de son calibrage et que l’aiguille s’écarte légèrement de la position 0, même si les voyants du guide d’accord et sont tous deux allumés. Ce phénomène peut se produire au fil du temps si l’appareil est transporté ou s’il est manipulé brutalement. En utilisation normale, l’aiguille du vumètre ne dévie pratiquement jamais de son calibrage. Pour l’ajuster, veillez à utiliser un petit tournevis à tête plate de précision (de 2,0 mm). 1. Maintenez le bouton [PITCH] enfoncé et mettez l’appareil sous tension. Vérifiez que l’aiguille pointe vers la position 0. 2. Si l'aiguille ne pointe pas vers 0, vissez la vis de réglage à l’aide d’un tournevis à tête plate de précision (2,0 mm) jusqu’à ce que l’aiguille pointe vers 0. 3. Une fois le calibrage effectué, appuyez sur [POWER] pour mettre l’appareil hors tension. J Fonctions utiles Eviter la perte de charge des piles en cas d’oubli de mise hors tension (fonction Auto Power Off) Lorsque le TU-12EX est alimenté par piles, il est automatiquement mis hors tension lorsqu'il demeure dans l'état décrit ci-dessous pendant environ trente minutes à partir de sa mise sous tension. • Aucun bouton n'a été activé, et • Aucun son (y compris provenant du micro intégré) n'a été détecté. Désactivation de la fonction Auto Power Off Vous pouvez désactiver provisoirement la fonction Auto Power Off lors de la mise sous tension du TU-12EX. Pour cela, appuyez simultanément sur [ ] et [ ] lors de la mise sous tension avec le bouton [POWER]. La fonction Auto Power Off s'active à la prochaine mise sous tension normale de l’appareil. Signal avertissant que l’accordage est terminé (Fonction Accu-Pitch) Lorsque la fonction Accu-Pitch est activée, un signal sonore est émis lorsque le son de l’instrument que vous accordez se stabilise à un diapason situé dans une plage de trois centièmes au-dessus ou en dessous de la note correcte. Ce signal vous avertit que le diapason est réglé. Activation et désactivation de la fonction Accu-Pitch 1. Appuyez sur le bouton [ ] (Sound) et maintenez-le enfoncé tout en appuyant sur [POWER] pour mettre sous tension. Si aucun son n’est émis par l’appareil lors de sa mise sous tension, la fonction Accu-Pitch a été désactivée. Pour activer la fonction Accu-Pitch, renouvelez l’opération. Si un signal sonore est émis lors de la mise sous tension, la fonction Accu-Pitch a été activée. Fonctions de mémoire Une fois que les piles ont été installées dans le TU-12EX, les réglages décrits ci-dessous sont conservés en mémoire même pendant que l’appareil est hors tension. Si les piles sont retirées ou déchargées, toutes les données sauvegardées dans la mémoire risquent d'être perdues. J Remplacement des piles Le voyant BATT. clignote lorsque les pies commencent à s’épuiser. Remplacez-les dès que possible. * Lorsque vous retournez l’appareil, placez-le sur un chiffon doux pour éviter d’endommager le panneau. 1. Ouvrez le compartiment à piles (situé au bas de l’appareil) en faisant glisser le couvercle vers OPEN. 2. Retirez les piles usagées du compartiment à piles. 3. Insérez deux piles neuves de même type (AAA). * Vérifiez que les signes « + » et « - » sont orientés correctement. * Ne mélangez pas des piles neuves avec des piles usagées, ni des piles de types différents. Vous risqueriez de provoquer une fuite de liquide. 4. Remettez en place le couvercle du compartiment à piles. J Fiche technique * En vue d’améliorer le produit, ses caractéristiques techniques et/ou son aspect peuvent être modifiés sans avis préalable. Bedienungsanleitung Spielt den Referenzton und den Accu-Pitch-Ton. Zum Ändern verschiedener Einstellungen. Die Pfeile leuchten, um anzuzeigen, wie nah Sie der Zieltonhöhe sind. Richtanzeige leuchten gleichzeitig: richtig gestimmt (± 3 Cents) leuchtet: Tonhöhe zu niedrig leuchtet: Tonhöhe zu hoch Tonhöhenanzeige CHROMATIC/GUITAR Lautsprecher Verstellregler für die Tonhöhenanzeige (an der Unterseite) Schaltet das Gerät ein und aus. POWER FLAT Batteriefach (an der Unterseite) Eingebautes Mikrofon (Auf)/ (Ab) (Ton-Taste) Ändert die Einstellungen für die Referenztonhöhe. PITCH DC-IN-Buchse Schließen Sie hier einen Gitarrenverstärker usw. an. Über die INPUT-Buchse eingespeiste Signale werden hier unverändert ausgegeben. OUTPUT-Buchse Schließen Sie hier eine Gitarre, einen Bass oder ein anderes zu stimmendes Instrument an. INPUT-Buchse LEDs Ändert den Stimmmodus. Grüne LED: Auto-CHROMATIC-Modus Rote LED: Manual-GUITAR-Modus (zum Stimmen einer einzelnen angegebenen Gitarren-/Bass-Saite) Zeigen den Namen des aktuellen Tons (C–B; deutsch: C–H), den normalen oder erhöhten (#) Zustand, die Gitarren-/ Bass-Saitennummer, die Gesamt-Referenztonhöhe (438–445) sowie eine Warnung bei schwacher Batterie an. Schließen Sie hier den Netzadapter (optional; PSA-Serie von BOSS) an. Schaltet die Flat-Funktion ein oder aus. Hiermit schalten Sie die Tonausgabe des Referenztons ein und aus. Verwenden Sie dieses Mikrofon zum Stimmen von akustischen Instrumenten. Positionieren Sie das Mikrofon so nah am Instrument wie möglich. Legen Sie zwei AAA-Batterien desselben Typs ein. MERKE MERKE Auto-CHROMATIC- Modus: Mit den Pfeiltasten [ ] und [ ] können Sie über fünf Oktaven (C2 bis C7) Referenztöne in Halbtonschritten spielen. Manual-GUITAR- Modus: Die Tonhöhe der ausgewählten leeren Saite (7B bis 1E) wird gespielt. Wenn Sie die Flat-Funktion verwenden, wird die Tonhöhe des Referenztons automatisch daran angepasst. Einstellung Standardeinstellungen Stimmmodus-Einstellung (CHROMATIC oder GUITAR) CHROMATIC Referenztonhöhe 440 Hz Saitennummern im Manual-GUITAR-Modus 6E Notennamen-Auswahl im Tonmodus CHROMATIC: C4 GUITAR: 6E Einstellungen der Accu-Pitch-Funktion ON (aktiviert) Einstellungen der Flat-Funktion (Anzahl der Halbtöne) Stimmbereich E0 (20,6 Hz) – C8 (4.186,0 Hz) Maximale Batterielebensdaue r bei Dauerbetrieb (Kohlebatterie) Etwa 15 Stunden Dieser Wert variiert je nach den tatsächlichen Betriebsbedingungen. Referenztonhöhe A4 (438–445 Hz) Abmessungen 147,5 (B) x 54,0 (T) x 23,9 (H) mm 5-13/16 (B) x 2-1/8 (T) x 1 (H) Zoll Stimmgenauigkeit ± 1 Cent Gewicht 138 g, 5 oz (einschließlich Batterien) Stromversorgung 2 Trockenbatterien R03 (Kohle) oder LR03 (Alkali) des Typs AAA; DC 3V 9V-Gleichstrom-Netzada pter (PSA-Serie; optional) Beigefügtes Zubehör 2 Trockenbatterien (R03, Typ AAA) (Kohle), Bedienungsanleitung, Behälter, Faltblatt („SICHERER BETRIEB DES GERÄTES“ und „WICHTIGE HINWEISE“), Seite „Information“ Durchflussstrom 12 mA MERKE MERKE MERKE MERKE Mode d'emploi Permet d’écouter la note de référence et le signal sonore Accu-Pitch. Permettent de modifier divers paramètres. Le voyant d’accord s’allume pour indiquer la proximité avec l’accord cible. Guide d’accord s’allume : l’accord est trop bas (bémol) s’allument simultanément : accord correct (± 3 cents) s’allume : l’accord est trop haut (dièse) Aiguille du vumètre CHROMATIC/GUITAR Bouton de réglage du vumètre (bas de l’appareil) Haut-parleur Met l’appareil sous/hors tension. POWER FLAT Insérez deux piles de type AAA. Compartiment à piles (bas de l’appareil) Micro intégré (Bas)/ (Haut) (bouton Sound) Modifie les paramètres du diapason de référence. PITCH Prise DC IN Connectez-la à un amplificateur de guitare, etc. Le signal sonore qui entre via la prise INPUT ressort inchangé de cette prise. Prise OUTPUT Branchez la guitare, la guitare basse ou tout autre instrument à accorder ici. Prise INPUT Voyants Modifie le mode d’accordage. Voyant vert : mode Auto CHROMATIC Voyant rouge : mode Manual GUITAR (pour accorder une corde de guitare/basse spécifique) Ils indiquent le nom de la note actuelle (C-B), un état naturel ou aigu (#), le numéro de corde de basse/ guitare, le diapason de référence principal (438-445) et un avertissement si la charge des piles est faible. Branchez l’adaptateur secteur (facultatif sur la série BOSS PSA) ici. Active et désactive la fonction Flat. Permet d’activer et de désactiver le son de la note de référence. À utiliser lors de l’accord d’instruments acoustiques. Placez le micro aussi près que possible de l’instrument. Mode Auto CHROMATIC : Pour jouer des notes de référence par incréments d’un demi-ton sur cinq octaves (C2 to C7), appuyez sur [ ] et [ ]. Mode Manual GUITAR : La note de la corde à vide choisie (7B à 1E) est jouée. Lorsque vous utilisez la fonction Flat, la note du diapason de référence est réglée en conséquence. Réglage Paramètres d’usine d’origine Mode d’accordage (CHROMATIC ou GUITAR) CHROMATIC Diapason de référence 440 Hz Numéros de corde en mode Manual GUITAR 6E (6ème corde/Mi3) Note de référence émise CHROMATIC: C4 (Do4) GUITAR : 6E (6ème corde/Mi3) Paramètres de la fonction Accu-Pitch ON (activée) Paramètres d’accord altéré (nombre de demi-tons) Plage d’accordage E0 (Mi0 - 20,6 Hz) à C8 (Do8 - 4,186,0 Hz) Durée de vie prévisible des piles en utilisation continue (carbone) Environ 15 heures Ce chiffre varie en fonction des conditions réelles d’utilisation. Diapason de référence A4 (438–445 Hz) Dimensions 147,5 (L) x 54,0 (P) x 23,9 (H) mm Précision d’accordage ± 1 centième Poids 138 g (piles comprises) Alimentation électrique Pile sèche R03 (carbone) ou LR03 (alcaline); type AAA x 2; 3 V continu Adaptateur secteur 9 V continu (série PSA ; facultatif ) Accessoires Pile sèche (type R03 (AAA)) x 2 (carbone), Mode d’emploi, Abri, dépliant (« UTILISATION DE L’APPAREIL DE FAÇON SÉCURISÉE » et « REMARQUES IMPORTANTES »), Informations Consommation 12 mA
Transcript of Owner’s Manual - Roland · Once the connections have been completed, turn on power to your guitar...
TU-12EX_2.fm 1 ページ 2009年5月11日 月曜日 午後4時57分
Thank you, and congratulations on your choice of the BOSS TU-12EX.Before using this unit, carefully read the sections entitled: “USING THE UNIT SAFELY” and“IMPORTANT NOTES” (supplied on a separate sheet). These sections provide importantinformation concerning the proper operation of the unit. Additionally, in order to feelassured that you have gained a good grasp of every feature provided by your new unit,Owner’s Manual should be read in its entirety. The manual should be saved and kept onhand as a convenient reference.As shipped, the TU-12EX’s batteries are not yet installed. Be sure to read the section“Changing the Batteries,“ and then follow the instructions to install the batteries.Copyright © 2008 BOSS CORPORATIONAll rights reserved. No part of this publication may be reproduced in any formwithout the written permission of BOSS CORPORATION.
fig.01??????
To prevent malfunction and/or damage to speakers or other devices,always turn down the volume, and turn off the power on all devices beforemaking any connections.Once the connections have been completed, turn on power to your guitaramp or other amplification system last. By turning on devices in the wrongorder, you risk causing malfunction and/or damage to speakers and otherdevices.
How to Use the Tuner (Auto CHROMATIC Mode)1. Connect the instrument to be tuned to the INPUT jack.
If you're tuning an acoustic instrument, use the built-in mic instead. To use the mic,make sure that nothing is connected to the INPUT or OUTPUT jacks, and place theTU-12EX near the instrument.
2. Press [POWER] to switch the power on.3. Press [CHROMATIC/GUITAR] to enable the “CHROMATIC” setting
(lighting the green indicator).In CHROMATIC mode, the TU-12EX automatically displays note names as you playthem on your instrument. Most of the time, you'll find that CHROMATIC is the mostconvenient mode to use.
If you're using a guitar or bass and wish to tune by specifying the stringnumber first, use GUITAR mode. (Tuning using GUITAR mode is describedin the next section.)
4. Play a single note on the instrument.Most of the time, you'll want to play an open string when tuning a guitar or bass.While the note is sounding, the note name is displayed.The meter and Tuning Guide show how far the note is from the correct pitch.
5. Tune the instrument.While playing a single note, adjust the instrument's tuning as necessary to displaythe target note's name. Once the desired note name is displayed, fine-tune thenote's pitch by tuning the instrument so that and on the Tuning Guidelight simultaneously and the meter's needle points to 0 (the center position).When the Accu-Pitch feature is on, the tuner makes a beeping sound when the noteis stabilized at the correct pitch, informing you that the note is in tune.
How to Use the Tuner (Manual GUITAR Mode)1. Connect the instrument to be tuned to the INPUT jack.
If you're tuning an acoustic instrument, use the built-in mic instead. To use the mic,make sure that nothing is connected to the INPUT or OUTPUT jacks, and place theTU-12EX near the instrument.
2. Press [POWER] to switch the power on.3. Press [CHROMATIC/GUITAR] to enable the “GUITAR” setting
(lighting the red indicator).4. Press [ ] or [ ] to light the indicator for the string number you want
to tune.5. Play the selected string number on your instrument.
Play the string open, without fretting it.
6. Tune the string.Adjust the string's tuning so that both and on the Tuning Guide are lit and
the meter's needle points to 0 (the center position).When the Accu-Pitch feature is on, the tuner makes a beeping sound when the noteis stabilized at the correct pitch, informing you that the note is in tune.
7. Repeat Steps 4-6 as necessary to tune the rest of your instrument'sstrings.
TU-12EX SettingsChanging the Reference Pitch for Tuning
1. Hold down [PITCH] and press [ ] or [ ] to choose the referencepitch you want. (Range of setting: 438 to 445 Hz)The indicator flashes. Choose the reference pitch you want by getting it to flash.
2. Release [PITCH] to set the selected reference pitch.
Flat Tuning (Flat Feature)
1. Press [FLAT] to switch on the Flat feature (the red indicator lights).2. Press [ ] or [ ] to set the number of flats (the number of flat
semitones) that you wish to tune to. (Range of setting: to 6 )For example, if you select two flats, the actual pitch of a tuned note will be twosemitones below what is displayed by the TU-12EX.
3. Press [FLAT] again.This enables the setting for the Flat feature. Even if you don’t press [FLAT], thesetting is enabled automatically after three seconds.
4. To disable the Flat feature, press [FLAT] so that its red indicator goes out.
Tuning While Listening to the Reference Tone (Sound Mode)
1. Choose the type of tuning you want to use (e.g., Tuning Mode, Flatfeature).
2. Press [ ] (Sound) to play the reference tone.3. Press [ ] or [ ] until the indicator for the note name/string number
you want to tune is lit.The sound of the note name/string number shown by the indicator is played.
4. Tune the instrument to the reference tone.When you're using Sound mode, tuning cannot be performed using thebuilt-in mic (the built-in mic is disabled).
5. Press [ ] (Sound) to stop playing the reference tone.
Calibrating the Meter’s Needle
Rarely, the meter's needle may drift out of calibration, causing the needle to pointslightly off from the 0 position even when the Tuning Guide's and indicatorslight simultaneously. This can occur over time as the unit is transported, or if the unit ishandled in a rough fashion.
During normal use, the meter's needle almost never drifts out of calibration.To adjust it, be sure to use a small flathead screwdriver (a 2.0 mm precisionscrewdriver).
1. Hold down [PITCH] and turn the power on.Confirm whether or not the needle is pointing at the 0 position.
2. If the meter's needle fails to point to the 0 position, use a flatheadscrewdriver (a 2.0 mm precision screwdriver) to turn the meteradjustment control until the needle points to 0.
3. After completing calibration, press [POWER] to switch off the power.
Useful FeaturesPreventing Battery Drain If You Forget to Switch Off the
Power (Auto Power Off Feature)
When using battery power, if the TU-12EX remains in the state described below forapproximately thirty minutes after it was turned on, the power will automatically beswitched off.• No button has been pressed, and
• No audio (including input from the built-in mic) has been detected.
Deactivating the Auto Power Off Feature
You can temporarily deactivate the Auto Power Off feature when you power up the
TU-12EX. To do so, simultaneously hold down [ ] and [ ] while you press[POWER] to turn on the power.The Auto Power Off feature will be enabled the next time you turn on the power inthe usual way.
Using a Tone to Indicate Tuning is Completed
(Accu-Pitch Feature)
When the Accu-Pitch Feature is on, a beeping sound is played when the sound ofthe instrument you're tuning has stabilized at a pitch that is no more than threecents sharp or flat. This sound tells you that the pitch is in tune.
Switching the Accu-Pitch Feature On and Off
1. Hold down [ ] (Sound) and press [POWER] to switch on the power.If no sound is heard from the unit as it's powered up, it means that the Accu-Pitchfeature has been deactivated. To enable the Accu-Pitch feature, perform the sameoperation again; if you hear a beeping sound when the power comes on, it meansthat Accu-Pitch has been enabled.
Memory Features
Once batteries are installed in the TU-12EX, the settings described below areretained in memory even after the power is switched off.
If the batteries are removed or are depleted, all data saved in memory maybe lost.
Changing the BatteriesThe BATT. indicator flashes when the batteries begin torun down.Replace the batteries as soon as possible.
* When turning the unit upside-down, place it on a soft cloth orthe like so as to prevent damage to the panel.
1. Open the battery compartment (locatedon the bottom of the unit) by sliding thecover toward OPEN.
2. Remove the old batteries from the battery compartment.3. Insert two of the same type of fresh AAA batteries.
* Make sure the “+” and “-” ends of the batteries are oriented correctly.* Do not mix fresh batteries with used ones, or mix batteries of different types. Doing so can result in
fluid leakage.
4. Slide the cover of the battery compartment back into place.
Specifications
* In the interest of product improvement, the specifications and/or appearance of this unit are subject tochange without prior notice.
このたびは、BOSS チューナー TU-12EX をお買い上げいただきまして、まことにありがとうございます。この機器を正しくお使いいただくために、ご使用前に別紙「安全上のご注意」と「使用上のご注意」をよくお読みください。また、この機器の優れた機能を十分ご理解いただくためにも、取扱説明書をよくお読みください。取扱説明書は必要なときにすぐに見ることができるよう、手元に置いてください。お買い上げ時、電池はセットされておりません。必ず「電池交換のしかた」にしたがって電池をセットしてください。© 2008 ボス株式会社 本書の一部、もしくは全部を無断で複写・転載することを禁じます。
fig.01??????
他の機器と接続するときは、誤動作やスピーカーなどの破損を防ぐため、必ずすべての機器の音量を絞った状態で電源を切ってください。正しく接続したら、ギター・アンプなどの電源は最後に投入してください。手順を間違えると、誤動作をしたりスピーカーなどが破損する恐れがあります。
■ チューニングのしかた(オート・クロマチック・モード/CHROMATIC)1. チューニングする楽器を INPUTジャックに接続します。
アコースティック楽器のチューニングには内蔵マイクを使用しますので、INPUT/OUTPUTジャックには何も接続しないで、楽器の近くにTU-12EXを置いてください。
2. [POWER]を押して、電源をオンにします。3. [CHROMATIC/GUITAR]を押して、「CHROMATIC」(緑インジケーター点灯)に設定します。通常は自動的に音名を表示する「CHROMATIC」で使用します。
ギターやベースの弦を指定してチューニングしたいときは、「GUITAR(マニュアル・ギター・モード)」に設定します。GUITARによるチューニングのしかたは次項「チューニングのしかた(マニュアル・ギター・モード/ GUITAR)」をお読みください。
4. 楽器を単音で鳴らします。鳴らした音に近い音名のインジケーターが点灯します。正確な音程とのズレが、メーターとチューニング・ガイドで表示されます。
5. 楽器をチューニングします。目的の音名のインジケーターと、チューニング・ガイドの と が両方点灯し、メーターの針が0(中央)を指すように楽器をチューニングします。安定してピッチが合うと、「ピピッ」と鳴ってチューニング完了を知らせます。(アキュピッチ機能)
■ チューニングのしかた(マニュアル・ギター・モード/GUITAR)1. チューニングする楽器を INPUTジャックに接続します。
アコースティック楽器のチューニングには内蔵マイクを使用しますので、INPUT/OUTPUTジャックには何も接続しないで、楽器の近くにTU-12EXを置いてください。
2. [POWER]を押して、電源をオンにします。3. [CHROMATIC/GUITAR]を押して、「GUITAR」(赤インジケーター点灯)に設定します。
4. [ ]または[ ]を押して、チューニングしたい弦番号のインジケーターを点灯させます。
5. 楽器を単音で鳴らします。正確な音程とのズレが、メーターとチューニング・ガイドで表示されます。
6. 楽器をチューニングします。チューニング・ガイドの と が両方点灯し、メーターの針が0(中央)を指すように楽器をチューニングします。安定してピッチが合うと、「ピピッ」と鳴ってチューニング完了を知らせます。(アキュピッチ機能)
■ TU-12EX の設定チューニングの基準ピッチを変える1. [PITCH]を押したまま、[ ]または[ ]を押して希望の基準ピッチを設定します(設定範囲:438~ 445Hz)。インジケーターが点滅します。希望の基準ピッチを点滅させます。
2. [PITCH]から指を離すと基準ピッチが設定されます。フラット・チューニングをする(フラット機能)1. [FLAT]を押して、フラット機能をオンにします(赤インジケーター点灯)。
2. [ ]または[ ]を押して、希望のフラット数に設定します(設定範囲: ~6 )。
3. 再度[FLAT]を押します。フラット機能が設定されます。[FLAT]を押さなくても 3 秒経過すると自動的に設定されます。
基準音を聞きながらチューニングする(サウンド・モード)1. チューニングの種類(CHROMATIC/GUITARモード、フラット機能)を設定します。
2. [ ]を押して、基準音を鳴らします。3. [ ]または[ ]を押して、合わせたい音名または弦番号のインジケーターを点灯させます。インジケーターに表示される音名または弦番号の音が鳴ります。
4. 基準音に合わせて楽器をチューニングします。サウンド・モード使用時は、内蔵マイクによるチューニングはできません(メーターは動きません)。
5. 発音をとめるには再度[ ]を押します。
メーター針の調整をする経年変化や衝撃等でメーター針のセンター位置がずれた場合、以下の操作でセンター位置の調整ができます。
通常、メーター針のセンター位置がずれることはほとんどありません。調整を行う場合には、必ず小さなマイナス(-)ドライバー(精密ドライバー 2.0mm)を使用してください。また、無理な力を加えないでください。故障の原因になります。
1. [PITCH]を押したまま、[POWER]を押して電源をオンにします。メーターの針が0を指しているかを確認します。
2. メーターの針が0を指していないときは、マイナス(-)ドライバー(精密ドライバー2.0mm)でメーター調整ボリュームを回し、0を指すように調整します。
3. 調整が終了したら[POWER]を押して電源を切ります。
■ 便利な機能電池使用時の電源の切り忘れを防ぐ(オート・パワー・オフ機能)
電池使用時に電源をオンにした後、以下の状態から約 30 分以上経過すると、自動的に電源がオフになります。• ボタン操作がされない状態 かつ、• 音声が検知されない状態(内蔵マイクからの入力を含む)
オート・パワー・オフ機能を無効にする[ ]と[ ]を同時に押したまま[POWER]を押して電源をオンにすると、オート・パワー・オフ機能は働きません。通常の操作で電源を入れ直すと、オート・パワー・オフ機能は有効になります。
チューニング完了を音で知らせる(アキュピッチ機能)チューニングしている楽器が安定して±3 セントの範囲に入ったときは、「ピピッ」音が聞こえます。この音でチューニング完了を知らせます。
アキュピッチ機能を無効/有効にする[ ]を押したまま、[POWER]を押して電源をオンにします。このとき、本体から何も音が出ない状態であれば、アキュピッチ機能は無効になっています。再度同じ操作で、電源オンと同時に「ピピッ」音が聞こえると、アキュピッチ機能は有効になります。
メモリー機能本体に乾電池を入れておくと、電源をオフにしても以下の設定を記憶します。
乾電池を取り外したり電池がなくなると、記憶内容が失われる場合があります。
■ 電池交換のしかた電池がなくなるとBATT.インジケーターが点滅します。このときは、すぐに電池を交換してください。※本体を裏返す際は、パネルが破損しないように、柔らかい布などの上に置いてください。
1. 本体底面の電池ボックスのカバーをOPENの方向にスライドさせて開けます。
2. 古い電池を取り出します。3. 同じ種類の新しい単4形乾電池2本をセットします。※電池の極性(+/ー)を間違えないように注意してください。※新しい電池と一度使用した電池や種類の違う電池を混ぜて使用しないでください。液漏れの原因になります。
4. 電池ボックスのカバーを元通りに閉じます。
■ 主な仕様
規格および外観は改良のために予告なく変更する場合があります。
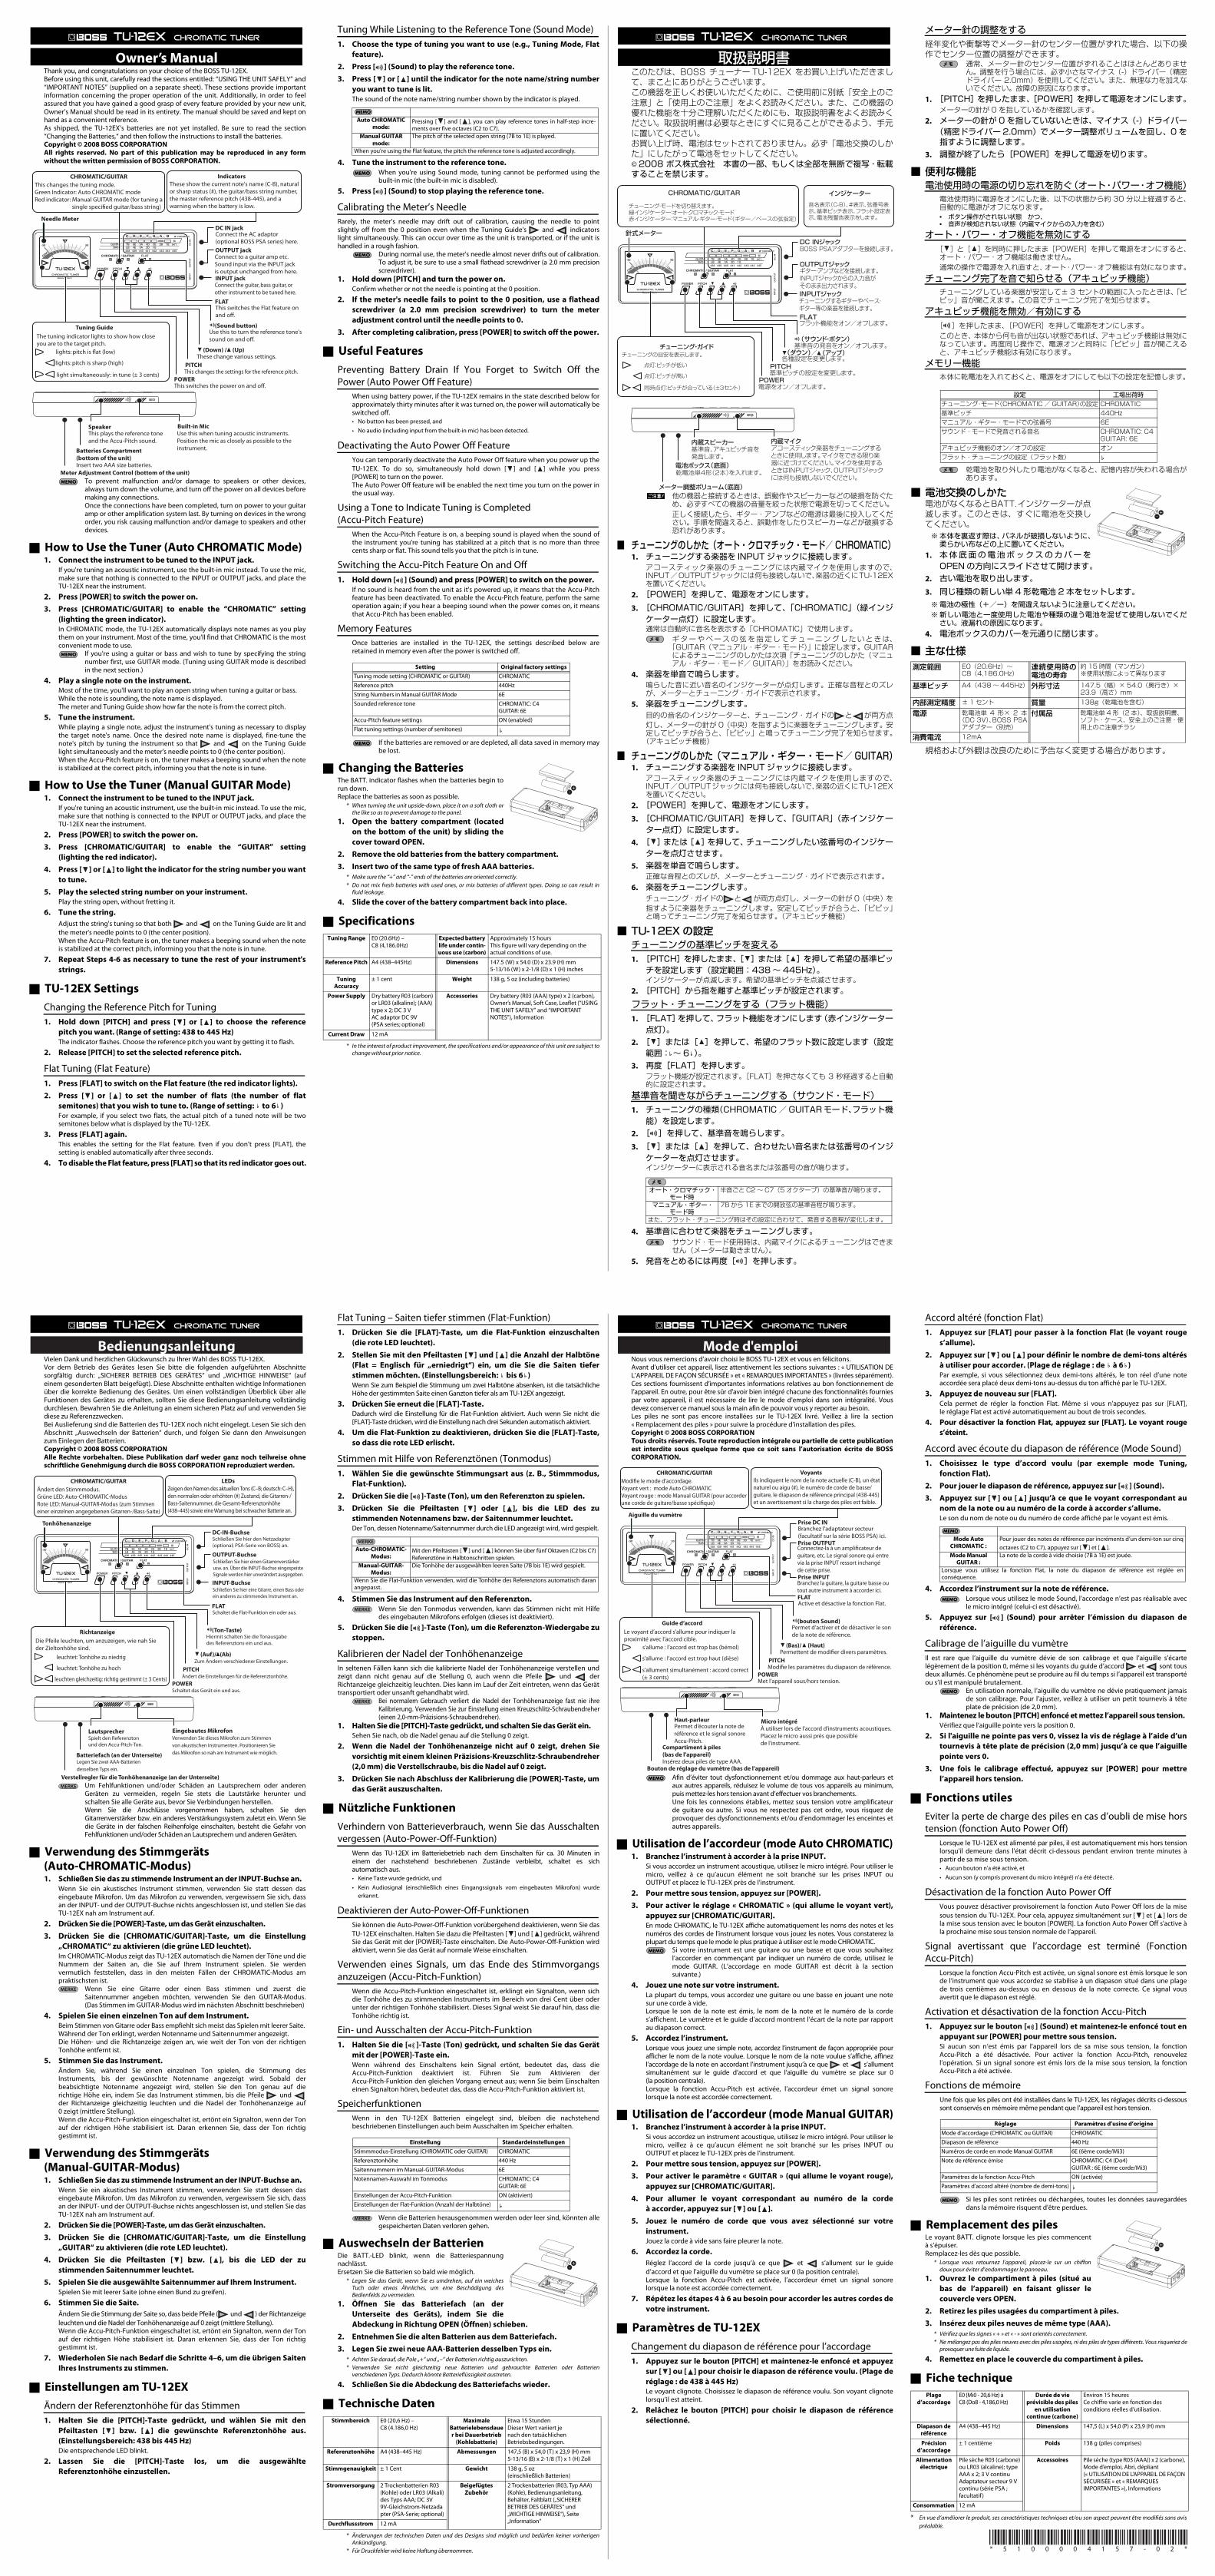
Owner’s Manual
This plays the reference tone
and the Accu-Pitch sound.
These change various settings.
The tuning indicator lights to show how close
you are to the target pitch.
Tuning Guide
lights: pitch is flat (low)
lights: pitch is sharp (high)
Needle Meter
CHROMATIC/GUITAR
Meter Adjustment Control (bottom of the unit)
Speaker
This switches the power on and off.POWER
FLAT
Insert two AAA size batteries.
Batteries Compartment (bottom of the unit)
Built-in Mic
(Down) / (Up)
(Sound button)
This changes the settings for the reference pitch.PITCH
DC IN jack
Connect to a guitar amp etc.
Sound input via the INPUT jack
is output unchanged from here.
OUTPUT jack
Connect the guitar, bass guitar, or
other instrument to be tuned here.
INPUT jack
IndicatorsThis changes the tuning mode.
Green Indicator: Auto CHROMATIC mode
Red indicator: Manual GUITAR mode (for tuning a
single specified guitar/bass string)
These show the current note's name (C-B), natural
or sharp status (#), the guitar/bass string number,
the master reference pitch (438-445), and a
warning when the battery is low.
Connect the AC adaptor
(optional BOSS PSA series) here.
This switches the Flat feature on
and off.
Use this to turn the reference tone's
sound on and off.
Use this when tuning acoustic instruments.
Position the mic as closely as possible to the
instrument.
light simultaneously: in tune (± 3 cents)
Auto CHROMATIC mode:
Pressing [ ] and [ ], you can play reference tones in half-step incre-ments over five octaves (C2 to C7).
Manual GUITAR mode:
The pitch of the selected open string (7B to 1E) is played.
When you're using the Flat feature, the pitch the reference tone is adjusted accordingly.
Setting Original factory settingsTuning mode setting (CHROMATIC or GUITAR) CHROMATIC
Reference pitch 440Hz
String Numbers in Manual GUITAR Mode 6E
Sounded reference tone CHROMATIC: C4GUITAR: 6E
Accu-Pitch feature settings ON (enabled)
Flat tuning settings (number of semitones)
Tuning Range E0 (20.6Hz) – C8 (4,186.0Hz)
Expected battery life under contin-uous use (carbon)
Approximately 15 hoursThis figure will vary depending on the actual conditions of use.
Reference Pitch A4 (438–445Hz) Dimensions 147.5 (W) x 54.0 (D) x 23.9 (H) mm5-13/16 (W) x 2-1/8 (D) x 1 (H) inches
Tuning Accuracy
± 1 cent Weight 138 g, 5 oz (including batteries)
Power Supply Dry battery R03 (carbon) or LR03 (alkaline); (AAA) type x 2; DC 3 VAC adaptor DC 9V (PSA series; optional)
Accessories Dry battery (R03 (AAA) type) x 2 (carbon), Owner’s Manual, Soft Case, Leaflet (“USING THE UNIT SAFELY” and “IMPORTANT NOTES”), Information
Current Draw 12 mA
オート・クロマチック・モード時
半音ごとC2~C7(5オクターブ)の基準音が鳴ります。
マニュアル・ギター・モード時
7Bから 1Eまでの開放弦の基準音程が鳴ります。
また、フラット・チューニング時はその設定に合わせて、発音する音程が変化します。
取扱説明書
CHROMATIC/GUITAR
POWER
FLAT
PITCH
チューニング・ガイドチューニングの目安を表示します。
点灯:ピッチが低い
点灯:ピッチが高い
同時点灯:ピッチが合っている(±3セント)
針式メーター
インジケーター
音名表示(C-B)、#表示、弦番号表示、基準ピッチ表示、フラット設定表示、電池残警告表示をします。
DC INジャックBOSS PSAアダプターを接続します。
OUTPUTジャックギター・アンプなどを接続します。INPUTジャックからの入力音がそのまま出力されます。INPUTジャックチューニングするギターやベース・ギター等の楽器を接続します。
フラット機能をオン/オフします。
(サウンド・ボタン)基準音の発音をオン/オフします。
(ダウン)/(アップ)各種設定を変更します。
基準ピッチの設定を変更します。
電源をオン/オフします。
内蔵スピーカー基準音、アキュピッチ音を発音します。
電池ボックス(底面)乾電池単4形(2本)を入れます。
メーター調整ボリューム(底面)
内蔵マイクアコースティック楽器をチューニングするときに使用します。マイクをできる限り楽器に近づけてください。マイクを使用するときはINPUTジャック、OUTPUTジャックには何も接続しないでください。
チューニング・モードを切り替えます。緑インジケーター:オート・クロマチック・モード赤インジケーター:マニュアル・ギター・モード(ギター/ベースの弦指定)
設定 工場出荷時チューニング・モード(CHROMATIC/ GUITAR)の設定 CHROMATIC基準ピッチ 440Hzマニュアル・ギター・モードでの弦番号 6Eサウンド・モードで発音される音名 CHROMATIC: C4
GUITAR: 6Eアキュピッチ機能のオン/オフの設定 オンフラット・チューニングの設定(フラット数)
測定範囲 E0(20.6Hz)~C8(4,186.0Hz)
連続使用時の電池の寿命
約15時間(マンガン)※使用状態によって異なります
基準ピッチ A4(438~445Hz) 外形寸法 147.5(幅)×54.0(奥行き)×23.9(高さ)mm
内部測定精度 ±1セント 質量 138g(乾電池を含む)
電源 乾電池単 4 形× 2 本(DC 3V)、BOSS PSAアダプター(別売)
付属品 乾電池単4形(2本)、取扱説明書、ソフト・ケース、安全上のご注意・使用上のご注意チラシ
消費電流 12mA
* 5 1 0 0 0 0 4 1 5 7 - 0 2 *
Vielen Dank und herzlichen Glückwunsch zu Ihrer Wahl des BOSS TU-12EX.Vor dem Betrieb des Gerätes lesen Sie bitte die folgenden aufgeführten Abschnittesorgfältig durch: „SICHERER BETRIEB DES GERÄTES“ und „WICHTIGE HINWEISE“ (aufeinem gesonderten Blatt beigefügt). Diese Abschnitte enthalten wichtige Informationenüber die korrekte Bedienung des Gerätes. Um einen vollständigen Überblick über alleFunktionen des Gerätes zu erhalten, sollten Sie diese Bedienungsanleitung vollständigdurchlesen. Bewahren Sie die Anleitung an einem sicheren Platz auf und verwenden Siediese zu Referenzzwecken.Bei Auslieferung sind die Batterien des TU-12EX noch nicht eingelegt. Lesen Sie sich denAbschnitt „Auswechseln der Batterien“ durch, und folgen Sie dann den Anweisungenzum Einlegen der Batterien.Copyright © 2008 BOSS CORPORATIONAlle Rechte vorbehalten. Diese Publikation darf weder ganz noch teilweise ohneschriftliche Genehmigung durch die BOSS CORPORATION reproduziert werden.
Abb. 01??????
Um Fehlfunktionen und/oder Schäden an Lautsprechern oder anderenGeräten zu vermeiden, regeln Sie stets die Lautstärke herunter undschalten Sie alle Geräte aus, bevor Sie Verbindungen herstellen.Wenn Sie die Anschlüsse vorgenommen haben, schalten Sie denGitarrenverstärker bzw. ein anderes Verstärkungssystem zuletzt ein. Wenn Siedie Geräte in der falschen Reihenfolge einschalten, besteht die Gefahr vonFehlfunktionen und/oder Schäden an Lautsprechern und anderen Geräten.
Verwendung des Stimmgeräts (Auto-CHROMATIC-Modus)1. Schließen Sie das zu stimmende Instrument an der INPUT-Buchse an.
Wenn Sie ein akustisches Instrument stimmen, verwenden Sie statt dessen daseingebaute Mikrofon. Um das Mikrofon zu verwenden, vergewissern Sie sich, dassan der INPUT- und der OUTPUT-Buchse nichts angeschlossen ist, und stellen Sie dasTU-12EX nah am Instrument auf.
2. Drücken Sie die [POWER]-Taste, um das Gerät einzuschalten.3. Drücken Sie die [CHROMATIC/GUITAR]-Taste, um die Einstellung
„CHROMATIC“ zu aktivieren (die grüne LED leuchtet).Im CHROMATIC-Modus zeigt das TU-12EX automatisch die Namen der Töne und dieNummern der Saiten an, die Sie auf Ihrem Instrument spielen. Sie werdenvermutlich feststellen, dass in den meisten Fällen der CHROMATIC-Modus ampraktischsten ist.
Wenn Sie eine Gitarre oder einen Bass stimmen und zuerst dieSaitennummer angeben möchten, verwenden Sie den GUITAR-Modus.(Das Stimmen im GUITAR-Modus wird im nächsten Abschnitt beschrieben)
4. Spielen Sie einen einzelnen Ton auf dem Instrument.Beim Stimmen von Gitarre oder Bass empfiehlt sich meist das Spielen mit leerer Saite.Während der Ton erklingt, werden Notenname und Saitennummer angezeigt.Die Höhen- und die Richtanzeige zeigen an, wie weit der Ton von der richtigenTonhöhe entfernt ist.
5. Stimmen Sie das Instrument.Ändern Sie, während Sie einen einzelnen Ton spielen, die Stimmung desInstruments, bis der gewünschte Notenname angezeigt wird. Sobald derbeabsichtigte Notenname angezeigt wird, stellen Sie den Ton genau auf dierichtige Höhe ein, indem Sie das Instrument stimmen, bis die Pfeile und der Richtanzeige gleichzeitig leuchten und die Nadel der Tonhöhenanzeige auf0 zeigt (mittlere Stellung).Wenn die Accu-Pitch-Funktion eingeschaltet ist, ertönt ein Signalton, wenn der Tonauf der richtigen Höhe stabilisiert ist. Daran erkennen Sie, dass der Ton richtiggestimmt ist.
Verwendung des Stimmgeräts (Manual-GUITAR-Modus)1. Schließen Sie das zu stimmende Instrument an der INPUT-Buchse an.
Wenn Sie ein akustisches Instrument stimmen, verwenden Sie statt dessen daseingebaute Mikrofon. Um das Mikrofon zu verwenden, vergewissern Sie sich, dassan der INPUT- und der OUTPUT-Buchse nichts angeschlossen ist, und stellen Sie dasTU-12EX nah am Instrument auf.
2. Drücken Sie die [POWER]-Taste, um das Gerät einzuschalten.3. Drücken Sie die [CHROMATIC/GUITAR]-Taste, um die Einstellung
„GUITAR“ zu aktivieren (die rote LED leuchtet).4. Drücken Sie die Pfeiltasten [ ] bzw. [ ], bis die LED der zu
stimmenden Saitennummer leuchtet.5. Spielen Sie die ausgewählte Saitennummer auf Ihrem Instrument.
Spielen Sie mit leerer Saite (ohne einen Bund zu greifen).
6. Stimmen Sie die Saite.Ändern Sie die Stimmung der Saite so, dass beide Pfeile ( und ) der Richtanzeige
leuchten und die Nadel der Tonhöhenanzeige auf 0 zeigt (mittlere Stellung).Wenn die Accu-Pitch-Funktion eingeschaltet ist, ertönt ein Signalton, wenn der Tonauf der richtigen Höhe stabilisiert ist. Daran erkennen Sie, dass der Ton richtiggestimmt ist.
7. Wiederholen Sie nach Bedarf die Schritte 4–6, um die übrigen SaitenIhres Instruments zu stimmen.
Einstellungen am TU-12EXÄndern der Referenztonhöhe für das Stimmen
1. Halten Sie die [PITCH]-Taste gedrückt, und wählen Sie mit denPfeiltasten [ ] bzw. [ ] die gewünschte Referenztonhöhe aus.(Einstellungsbereich: 438 bis 445 Hz)Die entsprechende LED blinkt.
2. Lassen Sie die [PITCH]-Taste los, um die ausgewählteReferenztonhöhe einzustellen.
Flat Tuning – Saiten tiefer stimmen (Flat-Funktion)
1. Drücken Sie die [FLAT]-Taste, um die Flat-Funktion einzuschalten(die rote LED leuchtet).
2. Stellen Sie mit den Pfeiltasten [ ] und [ ] die Anzahl der Halbtöne(Flat = Englisch für „erniedrigt“) ein, um die Sie die Saiten tieferstimmen möchten. (Einstellungsbereich: bis 6 )Wenn Sie zum Beispiel die Stimmung um zwei Halbtöne absenken, ist die tatsächlicheHöhe der gestimmten Saite einen Ganzton tiefer als am TU-12EX angezeigt.
3. Drücken Sie erneut die [FLAT]-Taste.Dadurch wird die Einstellung für die Flat-Funktion aktiviert. Auch wenn Sie nicht die[FLAT]-Taste drücken, wird die Einstellung nach drei Sekunden automatisch aktiviert.
4. Um die Flat-Funktion zu deaktivieren, drücken Sie die [FLAT]-Taste,so dass die rote LED erlischt.
Stimmen mit Hilfe von Referenztönen (Tonmodus)
1. Wählen Sie die gewünschte Stimmungsart aus (z. B., Stimmmodus,Flat-Funktion).
2. Drücken Sie die [ ]-Taste (Ton), um den Referenzton zu spielen.3. Drücken Sie die Pfeiltasten [ ] oder [ ], bis die LED des zu
stimmenden Notennamens bzw. der Saitennummer leuchtet.Der Ton, dessen Notenname/Saitennummer durch die LED angezeigt wird, wird gespielt.
4. Stimmen Sie das Instrument auf den Referenzton.Wenn Sie den Tonmodus verwenden, kann das Stimmen nicht mit Hilfedes eingebauten Mikrofons erfolgen (dieses ist deaktiviert).
5. Drücken Sie die [ ]-Taste (Ton), um die Referenzton-Wiedergabe zustoppen.
Kalibrieren der Nadel der Tonhöhenanzeige
In seltenen Fällen kann sich die kalibrierte Nadel der Tonhöhenanzeige verstellen undzeigt dann nicht genau auf die Stellung 0, auch wenn die Pfeile und derRichtanzeige gleichzeitig leuchten. Dies kann im Lauf der Zeit eintreten, wenn das Gerättransportiert oder unsanft gehandhabt wird.
Bei normalem Gebrauch verliert die Nadel der Tonhöhenanzeige fast nie ihreKalibrierung. Verwenden Sie zur Einstellung einen Kreuzschlitz-Schraubendreher(einen 2,0-mm-Präzisions-Schraubendreher).
1. Halten Sie die [PITCH]-Taste gedrückt, und schalten Sie das Gerät ein.Sehen Sie nach, ob die Nadel genau auf die Stellung 0 zeigt.
2. Wenn die Nadel der Tonhöhenanzeige nicht auf 0 zeigt, drehen Sievorsichtig mit einem kleinen Präzisions-Kreuzschlitz-Schraubendreher(2,0 mm) die Verstellschraube, bis die Nadel auf 0 zeigt.
3. Drücken Sie nach Abschluss der Kalibrierung die [POWER]-Taste, umdas Gerät auszuschalten.
Nützliche FunktionenVerhindern von Batterieverbrauch, wenn Sie das Ausschalten
vergessen (Auto-Power-Off-Funktion)
Wenn das TU-12EX im Batteriebetrieb nach dem Einschalten für ca. 30 Minuten ineinem der nachstehend beschriebenen Zustände verbleibt, schaltet es sichautomatisch aus.
• Keine Taste wurde gedrückt, und
• Kein Audiosignal (einschließlich eines Eingangssignals vom eingebauten Mikrofon) wurde
erkannt.
Deaktivieren der Auto-Power-Off-Funktionen
Sie können die Auto-Power-Off-Funktion vorübergehend deaktivieren, wenn Sie das
TU-12EX einschalten. Halten Sie dazu die Pfeiltasten [ ] und [ ] gedrückt, währendSie das Gerät mit der [POWER]-Taste einschalten. Die Auto-Power-Off-Funktion wirdaktiviert, wenn Sie das Gerät auf normale Weise einschalten.
Verwenden eines Signals, um das Ende des Stimmvorgangs
anzuzeigen (Accu-Pitch-Funktion)
Wenn die Accu-Pitch-Funktion eingeschaltet ist, erklingt ein Signalton, wenn sichdie Tonhöhe des zu stimmenden Instruments im Bereich von drei Cent über oderunter der richtigen Tonhöhe stabilisiert. Dieses Signal weist Sie darauf hin, dass dieTonhöhe richtig ist.
Ein- und Ausschalten der Accu-Pitch-Funktion
1. Halten Sie die [ ]-Taste (Ton) gedrückt, und schalten Sie das Gerätmit der [POWER]-Taste ein.Wenn während des Einschaltens kein Signal ertönt, bedeutet das, dass dieAccu-Pitch-Funktion deaktiviert ist. Führen Sie zum Aktivieren derAccu-Pitch-Funktion den gleichen Vorgang erneut aus; wenn Sie beim Einschalteneinen Signalton hören, bedeutet das, dass die Accu-Pitch-Funktion aktiviert ist.
Speicherfunktionen
Wenn in den TU-12EX Batterien eingelegt sind, bleiben die nachstehendbeschriebenen Einstellungen auch beim Ausschalten im Speicher erhalten.
Wenn die Batterien herausgenommen werden oder leer sind, könnten allegespeicherten Daten verloren gehen.
Auswechseln der BatterienDie BATT.-LED blinkt, wenn die Batteriespannungnachlässt.Ersetzen Sie die Batterien so bald wie möglich.
* Legen Sie das Gerät, wenn Sie es umdrehen, auf ein weichesTuch oder etwas Ähnliches, um eine Beschädigung desBedienfelds zu vermeiden.
1. Öffnen Sie das Batteriefach (an derUnterseite des Geräts), indem Sie dieAbdeckung in Richtung OPEN (Öffnen) schieben.
2. Entnehmen Sie die alten Batterien aus dem Batteriefach.3. Legen Sie zwei neue AAA-Batterien desselben Typs ein.
* Achten Sie darauf, die Pole „+“ und „–“ der Batterien richtig auszurichten.* Verwenden Sie nicht gleichzeitig neue Batterien und gebrauchte Batterien oder Batterien
verschiedenen Typs. Dadurch könnte Batterieflüssigkeit austreten.
4. Schließen Sie die Abdeckung des Batteriefachs wieder.
Technische Daten
* Änderungen der technischen Daten und des Designs sind möglich und bedürfen keiner vorherigenAnkündigung.
* Für Druckfehler wird keine Haftung übernommen.
Nous vous remercions d’avoir choisi le BOSS TU-12EX et vous en félicitons.Avant d’utiliser cet appareil, lisez attentivement les sections suivantes : « UTILISATION DEL’APPAREIL DE FAÇON SÉCURISÉE » et « REMARQUES IMPORTANTES » (livrées séparément).Ces sections fournissent d’importantes informations relatives au bon fonctionnement del’appareil. En outre, pour être sûr d'avoir bien intégré chacune des fonctionnalités fourniespar votre appareil, il est nécessaire de lire le mode d'emploi dans son intégralité. Vousdevez conserver ce manuel sous la main afin de pouvoir vous y reporter au besoin.Les piles ne sont pas encore installées sur le TU-12EX livré. Veillez à lire la section« Remplacement des piles » pour suivre la procédure d’installation des piles.Copyright © 2008 BOSS CORPORATIONTous droits réservés. Toute reproduction intégrale ou partielle de cette publicationest interdite sous quelque forme que ce soit sans l’autorisation écrite de BOSSCORPORATION.
fig.01??????
Afin d’éviter tout dysfonctionnement et/ou dommage aux haut-parleurs etaux autres appareils, réduisez le volume de tous vos appareils au minimum,puis mettez-les hors tension avant d’effectuer vos branchements.Une fois les connexions établies, mettez sous tension votre amplificateurde guitare ou autre. Si vous ne respectez pas cet ordre, vous risquez deprovoquer des dysfonctionnements et/ou d’endommager les enceintes etautres appareils.
Utilisation de l’accordeur (mode Auto CHROMATIC)1. Branchez l’instrument à accorder à la prise INPUT.
Si vous accordez un instrument acoustique, utilisez le micro intégré. Pour utiliser lemicro, veillez à ce qu’aucun élément ne soit branché sur les prises INPUT ouOUTPUT et placez le TU-12EX près de l’instrument.
2. Pour mettre sous tension, appuyez sur [POWER].3. Pour activer le réglage « CHROMATIC » (qui allume le voyant vert),
appuyez sur [CHROMATIC/GUITAR].En mode CHROMATIC, le TU-12EX affiche automatiquement les noms des notes et lesnuméros des cordes de l’instrument lorsque vous jouez les notes. Vous constaterez laplupart du temps que le mode le plus pratique à utiliser est le mode CHROMATIC.
Si votre instrument est une guitare ou une basse et que vous souhaitezl’accorder en commençant par indiquer un numéro de corde, utilisez lemode GUITAR. (L’accordage en mode GUITAR est décrit à la sectionsuivante.)
4. Jouez une note sur votre instrument.La plupart du temps, vous accordez une guitare ou une basse en jouant une notesur une corde à vide. Lorsque le son de la note est émis, le nom de la note et le numéro de la cordes’affichent. Le vumètre et le guide d’accord montrent l’écart de la note par rapportau diapason correct.
5. Accordez l’instrument.Lorsque vous jouez une simple note, accordez l’instrument de façon appropriée pourafficher le nom de la note voulue. Lorsque le nom de la note voulue s’affiche, affinezl’accordage de la note en accordant l’instrument jusqu’à ce que et s’allumentsimultanément sur le guide d’accord et que l’aiguille du vumètre se place sur 0(la position centrale).Lorsque la fonction Accu-Pitch est activée, l’accordeur émet un signal sonorelorsque la note est accordée correctement.
Utilisation de l’accordeur (mode Manual GUITAR)1. Branchez l’instrument à accorder à la prise INPUT.
Si vous accordez un instrument acoustique, utilisez le micro intégré. Pour utiliser lemicro, veillez à ce qu’aucun élément ne soit branché sur les prises INPUT ouOUTPUT et placez le TU-12EX près de l’instrument.
2. Pour mettre sous tension, appuyez sur [POWER].3. Pour activer le paramètre « GUITAR » (qui allume le voyant rouge),
appuyez sur [CHROMATIC/GUITAR].4. Pour allumer le voyant correspondant au numéro de la corde
à accorder, appuyez sur [ ] ou [ ].5. Jouez le numéro de corde que vous avez sélectionné sur votre
instrument.Jouez la corde à vide sans faire pleurer la note.
6. Accordez la corde.Réglez l’accord de la corde jusqu’à ce que et s’allument sur le guide
d’accord et que l’aiguille du vumètre se place sur 0 (la position centrale).Lorsque la fonction Accu-Pitch est activée, l’accordeur émet un signal sonorelorsque la note est accordée correctement.
7. Répétez les étapes 4 à 6 au besoin pour accorder les autres cordes devotre instrument.
Paramètres de TU-12EXChangement du diapason de référence pour l’accordage
1. Appuyez sur le bouton [PITCH] et maintenez-le enfoncé et appuyezsur [ ] ou [ ] pour choisir le diapason de référence voulu. (Plage deréglage : de 438 à 445 Hz)Le voyant clignote. Choisissez le diapason de référence voulu. Son voyant clignotelorsqu’il est atteint.
2. Relâchez le bouton [PITCH] pour choisir le diapason de référencesélectionné.
Accord altéré (fonction Flat)
1. Appuyez sur [FLAT] pour passer à la fonction Flat (le voyant rouges’allume).
2. Appuyez sur [ ] ou [ ] pour définir le nombre de demi-tons altérésà utiliser pour accorder. (Plage de réglage : de à 6 )Par exemple, si vous sélectionnez deux demi-tons altérés, le ton réel d’une noteaccordée sera placé deux demi-tons au-dessus du ton affiché par le TU-12EX.
3. Appuyez de nouveau sur [FLAT].Cela permet de régler la fonction Flat. Même si vous n’appuyez pas sur [FLAT],le réglage Flat est activé automatiquement au bout de trois secondes.
4. Pour désactiver la fonction Flat, appuyez sur [FLAT]. Le voyant rouges’éteint.
Accord avec écoute du diapason de référence (Mode Sound)
1. Choisissez le type d’accord voulu (par exemple mode Tuning,fonction Flat).
2. Pour jouer le diapason de référence, appuyez sur [ ] (Sound).3. Appuyez sur [ ] ou [ ] jusqu’à ce que le voyant correspondant au
nom de la note ou au numéro de la corde à accorder s’allume.Le son du nom de note ou du numéro de corde affiché par le voyant est émis.
4. Accordez l’instrument sur la note de référence.Lorsque vous utilisez le mode Sound, l’accordage n’est pas réalisable avecle micro intégré (celui-ci est désactivé).
5. Appuyez sur [ ] (Sound) pour arrêter l’émission du diapason deréférence.
Calibrage de l’aiguille du vumètre
Il est rare que l’aiguille du vumètre dévie de son calibrage et que l’aiguille s’écartelégèrement de la position 0, même si les voyants du guide d’accord et sont tousdeux allumés. Ce phénomène peut se produire au fil du temps si l’appareil est transportéou s’il est manipulé brutalement.
En utilisation normale, l’aiguille du vumètre ne dévie pratiquement jamaisde son calibrage. Pour l’ajuster, veillez à utiliser un petit tournevis à têteplate de précision (de 2,0 mm).
1. Maintenez le bouton [PITCH] enfoncé et mettez l’appareil sous tension.Vérifiez que l’aiguille pointe vers la position 0.
2. Si l'aiguille ne pointe pas vers 0, vissez la vis de réglage à l’aide d’untournevis à tête plate de précision (2,0 mm) jusqu’à ce que l’aiguillepointe vers 0.
3. Une fois le calibrage effectué, appuyez sur [POWER] pour mettrel’appareil hors tension.
Fonctions utilesEviter la perte de charge des piles en cas d’oubli de mise hors
tension (fonction Auto Power Off)
Lorsque le TU-12EX est alimenté par piles, il est automatiquement mis hors tensionlorsqu'il demeure dans l'état décrit ci-dessous pendant environ trente minutes àpartir de sa mise sous tension.
• Aucun bouton n'a été activé, et
• Aucun son (y compris provenant du micro intégré) n'a été détecté.
Désactivation de la fonction Auto Power Off
Vous pouvez désactiver provisoirement la fonction Auto Power Off lors de la mise
sous tension du TU-12EX. Pour cela, appuyez simultanément sur [ ] et [ ] lors dela mise sous tension avec le bouton [POWER]. La fonction Auto Power Off s'active àla prochaine mise sous tension normale de l’appareil.
Signal avertissant que l’accordage est terminé (Fonction
Accu-Pitch)
Lorsque la fonction Accu-Pitch est activée, un signal sonore est émis lorsque le sonde l’instrument que vous accordez se stabilise à un diapason situé dans une plagede trois centièmes au-dessus ou en dessous de la note correcte. Ce signal vousavertit que le diapason est réglé.
Activation et désactivation de la fonction Accu-Pitch
1. Appuyez sur le bouton [ ] (Sound) et maintenez-le enfoncé tout enappuyant sur [POWER] pour mettre sous tension.Si aucun son n’est émis par l’appareil lors de sa mise sous tension, la fonctionAccu-Pitch a été désactivée. Pour activer la fonction Accu-Pitch, renouvelezl’opération. Si un signal sonore est émis lors de la mise sous tension, la fonctionAccu-Pitch a été activée.
Fonctions de mémoire
Une fois que les piles ont été installées dans le TU-12EX, les réglages décrits ci-dessoussont conservés en mémoire même pendant que l’appareil est hors tension.
Si les piles sont retirées ou déchargées, toutes les données sauvegardéesdans la mémoire risquent d'être perdues.
Remplacement des pilesLe voyant BATT. clignote lorsque les pies commencentà s’épuiser.Remplacez-les dès que possible.
* Lorsque vous retournez l’appareil, placez-le sur un chiffondoux pour éviter d’endommager le panneau.
1. Ouvrez le compartiment à piles (situé aubas de l’appareil) en faisant glisser lecouvercle vers OPEN.
2. Retirez les piles usagées du compartiment à piles.3. Insérez deux piles neuves de même type (AAA).
* Vérifiez que les signes « + » et « - » sont orientés correctement.* Ne mélangez pas des piles neuves avec des piles usagées, ni des piles de types différents. Vous risqueriez de
provoquer une fuite de liquide.
4. Remettez en place le couvercle du compartiment à piles.
Fiche technique
* En vue d’améliorer le produit, ses caractéristiques techniques et/ou son aspect peuvent être modifiés sans avispréalable.
Bedienungsanleitung
Spielt den Referenzton
und den Accu-Pitch-Ton.
Zum Ändern verschiedener Einstellungen.
Die Pfeile leuchten, um anzuzeigen, wie nah Sie
der Zieltonhöhe sind.
Richtanzeige
leuchten gleichzeitig: richtig gestimmt (± 3 Cents)
leuchtet: Tonhöhe zu niedrig
leuchtet: Tonhöhe zu hoch
Tonhöhenanzeige
CHROMATIC/GUITAR
Lautsprecher
Verstellregler für die Tonhöhenanzeige (an der Unterseite)
Schaltet das Gerät ein und aus.
POWER
FLAT
Batteriefach (an der Unterseite)
Eingebautes Mikrofon
(Auf)/ (Ab)
(Ton-Taste)
Ändert die Einstellungen für die Referenztonhöhe.
PITCH
DC-IN-Buchse
Schließen Sie hier einen Gitarrenverstärker
usw. an. Über die INPUT-Buchse eingespeiste
Signale werden hier unverändert ausgegeben.
OUTPUT-Buchse
Schließen Sie hier eine Gitarre, einen Bass oder
ein anderes zu stimmendes Instrument an.
INPUT-Buchse
LEDsÄndert den Stimmmodus.
Grüne LED: Auto-CHROMATIC-Modus
Rote LED: Manual-GUITAR-Modus (zum Stimmen
einer einzelnen angegebenen Gitarren-/Bass-Saite)
Zeigen den Namen des aktuellen Tons (C–B; deutsch: C–H),
den normalen oder erhöhten (#) Zustand, die Gitarren-/
Bass-Saitennummer, die Gesamt-Referenztonhöhe
(438–445) sowie eine Warnung bei schwacher Batterie an.
Schließen Sie hier den Netzadapter
(optional; PSA-Serie von BOSS) an.
Schaltet die Flat-Funktion ein oder aus.
Hiermit schalten Sie die Tonausgabe
des Referenztons ein und aus.
Verwenden Sie dieses Mikrofon zum Stimmen
von akustischen Instrumenten. Positionieren Sie
das Mikrofon so nah am Instrument wie möglich.
Legen Sie zwei AAA-Batterien
desselben Typs ein.
MERKE
MERKE
Auto-CHROMATIC-Modus:
Mit den Pfeiltasten [ ] und [ ] können Sie über fünf Oktaven (C2 bis C7)Referenztöne in Halbtonschritten spielen.
Manual-GUITAR-Modus:
Die Tonhöhe der ausgewählten leeren Saite (7B bis 1E) wird gespielt.
Wenn Sie die Flat-Funktion verwenden, wird die Tonhöhe des Referenztons automatisch daranangepasst.
Einstellung StandardeinstellungenStimmmodus-Einstellung (CHROMATIC oder GUITAR) CHROMATIC
Referenztonhöhe 440 Hz
Saitennummern im Manual-GUITAR-Modus 6E
Notennamen-Auswahl im Tonmodus CHROMATIC: C4GUITAR: 6E
Einstellungen der Accu-Pitch-Funktion ON (aktiviert)
Einstellungen der Flat-Funktion (Anzahl der Halbtöne)
Stimmbereich E0 (20,6 Hz) – C8 (4.186,0 Hz)
Maximale Batterielebensdauer bei Dauerbetrieb
(Kohlebatterie)
Etwa 15 StundenDieser Wert variiert je nach den tatsächlichen Betriebsbedingungen.
Referenztonhöhe A4 (438–445 Hz) Abmessungen 147,5 (B) x 54,0 (T) x 23,9 (H) mm5-13/16 (B) x 2-1/8 (T) x 1 (H) Zoll
Stimmgenauigkeit ± 1 Cent Gewicht 138 g, 5 oz (einschließlich Batterien)
Stromversorgung 2 Trockenbatterien R03 (Kohle) oder LR03 (Alkali) des Typs AAA; DC 3V9V-Gleichstrom-Netzadapter (PSA-Serie; optional)
Beigefügtes Zubehör
2 Trockenbatterien (R03, Typ AAA) (Kohle), Bedienungsanleitung, Behälter, Faltblatt („SICHERER BETRIEB DES GERÄTES“ und „WICHTIGE HINWEISE“), Seite „Information“Durchflussstrom 12 mA
MERKE
MERKE
MERKE
MERKE
Mode d'emploi
Permet d’écouter la note de
référence et le signal sonore
Accu-Pitch.
Permettent de modifier divers paramètres.
Le voyant d’accord s’allume pour indiquer la
proximité avec l’accord cible.
Guide d’accord
s’allume : l’accord est trop bas (bémol)
s’allument simultanément : accord correct
(± 3 cents)
s’allume : l’accord est trop haut (dièse)
Aiguille du vumètre
CHROMATIC/GUITAR
Bouton de réglage du vumètre (bas de l’appareil)
Haut-parleur
Met l’appareil sous/hors tension.POWER
FLAT
Insérez deux piles de type AAA.
Compartiment à piles(bas de l’appareil)
Micro intégré
(Bas)/ (Haut)
(bouton Sound)
Modifie les paramètres du diapason de référence.PITCH
Prise DC IN
Connectez-la à un amplificateur de
guitare, etc. Le signal sonore qui entre
via la prise INPUT ressort inchangé
de cette prise.
Prise OUTPUT
Branchez la guitare, la guitare basse ou
tout autre instrument à accorder ici.
Prise INPUT
VoyantsModifie le mode d’accordage.
Voyant vert : mode Auto CHROMATIC
Voyant rouge : mode Manual GUITAR (pour accorder
une corde de guitare/basse spécifique)
Ils indiquent le nom de la note actuelle (C-B), un état
naturel ou aigu (#), le numéro de corde de basse/
guitare, le diapason de référence principal (438-445)
et un avertissement si la charge des piles est faible.
Branchez l’adaptateur secteur
(facultatif sur la série BOSS PSA) ici.
Active et désactive la fonction Flat.
Permet d’activer et de désactiver le son
de la note de référence.
À utiliser lors de l’accord d’instruments acoustiques.
Placez le micro aussi près que possible
de l’instrument.
Mode Auto CHROMATIC :
Pour jouer des notes de référence par incréments d’un demi-ton sur cinq
octaves (C2 to C7), appuyez sur [ ] et [ ].
Mode Manual GUITAR :
La note de la corde à vide choisie (7B à 1E) est jouée.
Lorsque vous utilisez la fonction Flat, la note du diapason de référence est réglée enconséquence.
Réglage Paramètres d’usine d’origineMode d’accordage (CHROMATIC ou GUITAR) CHROMATIC
Diapason de référence 440 Hz
Numéros de corde en mode Manual GUITAR 6E (6ème corde/Mi3)
Note de référence émise CHROMATIC: C4 (Do4)GUITAR : 6E (6ème corde/Mi3)
Paramètres de la fonction Accu-Pitch ON (activée)
Paramètres d’accord altéré (nombre de demi-tons)
Plage d’accordage
E0 (Mi0 - 20,6 Hz) à C8 (Do8 - 4,186,0 Hz)
Durée de vie prévisible des piles
en utilisation continue (carbone)
Environ 15 heuresCe chiffre varie en fonction des conditions réelles d’utilisation.
Diapason de référence
A4 (438–445 Hz) Dimensions 147,5 (L) x 54,0 (P) x 23,9 (H) mm
Précision d’accordage
± 1 centième Poids 138 g (piles comprises)
Alimentation électrique
Pile sèche R03 (carbone) ou LR03 (alcaline); type AAA x 2; 3 V continuAdaptateur secteur 9 V continu (série PSA ; facultatif )
Accessoires Pile sèche (type R03 (AAA)) x 2 (carbone), Mode d’emploi, Abri, dépliant (« UTILISATION DE L’APPAREIL DE FAÇON SÉCURISÉE » et « REMARQUES IMPORTANTES »), Informations
Consommation 12 mA
TU-12EX_2.fm 2 ページ 2009年5月11日 月曜日 午後4時57分
Grazie e congratulazioni per aver scelto il BOSS TU-12EX.Prima di utilizzare questa unità, leggere attentamente le sezioni intitolate "UTILIZZOSICURO DELL'UNITÀ" e "NOTE IMPORTANTI" (su un foglio a parte) che contengonoimportanti informazioni sul corretto impiego dell'unità. È inoltre consigliabile leggereper intero il Manuale dell'utente, per assicurarsi di aver compreso appieno tutte lefunzioni offerte dalla nuova unità acquistata. Si consiglia di conservare e tenere a portatadi mano il Manuale come riferimento utile.Al momento della consegna, nel TU-12EX non sono installate le batterie. Leggere lasezione "Sostituzione delle batterie" e seguire le istruzioni per installare le batterie.Copyright © 2008 ROLAND CORPORATIONTutti i diritti riservati. Nessuna parte di questo documento può essere in alcunmodo riprodotta senza autorizzazione scritta di BOSS CORPORATION.
fig.01??????
Per evitare malfunzionamenti e/o danni ai diffusori o ad altri dispositivi,abbassare sempre il volume e spegnere tutti i dispositivi prima dieffettuare qualsiasi collegamento.Una volta effettuati i collegamenti, accendere l'amplificatore della chitarrao altri impianti di amplificazione per ultimi. Se si segue un ordine diaccensione sbagliato, si rischiano malfunzionamenti e/o danni aglialtoparlanti e agli altri dispositivi.
Uso dell'accordatore (modalità Auto CHROMATIC)1. Collegare lo strumento da accordare al jack INPUT.
Per accordare uno strumento acustico, utilizzare il microfono incorporato.Assicurarsi di non aver collegato nulla ai jack INPUT o OUTPUT e posizionare ilTU-12EX vicino allo strumento.
2. Premere [POWER] per accendere l'unità.3. Premere [CHROMATIC/GUITAR] per attivare l'impostazione
"CHROMATIC" (l'indicatore verde si accenderà).In modalità CHROMATIC, il TU-12EX mostra automaticamente i nomi delle notee i numeri delle corde suonate sullo strumento. Questa è la modalità di accordaturapiù comune.
Se si usa una chitarra o un basso e si desidera eseguire l'accordaturaspecificando prima il numero di corda, attivare la modalità GUITAR.L'accordatura mediante questa modalità è descritta nella sezione successiva.
4. Suonare una nota sullo strumento.Il più delle volte conviene suonare una corda aperta quando si accorda una chitarrao un basso.Viene visualizzato il nome della nota e il numero di corda.L'indicatore e la Guida per l'accordatura indicano quanto manca alla correttaintonazione della nota.
5. Accordare lo strumento.Quando si suona una nota, regolare l'accordatura dello strumento in modo davisualizzare il nome della nota che si desidera ottenere. Quando viene visualizzato,regolare con precisione l'intonazione della nota finché e non si accendonocontemporaneamente nella Guida per l'accordatura e l'ago dell'indicatore nonè puntato sullo 0 (posizione centrale).Se è attiva la funzione Accu-Pitch, l'accordatore emette un "bip" quando la notaraggiunge l'intonazione giusta.
Uso dell'accordatore (modalità Manual GUITAR)1. Collegare lo strumento da accordare al jack INPUT.
Per accordare uno strumento acustico, utilizzare il microfono incorporato.Assicurarsi di non aver collegato nulla ai jack INPUT o OUTPUT e posizionare ilTU-12EX vicino allo strumento.
2. Premere [POWER] per accendere l'unità.3. Premere [CHROMATIC/GUITAR] per attivare l'impostazione
"GUITAR" (l'indicatore rosso si accenderà).4. Premere [ ] o [ ] per far accendere l'indicatore per il numero di
corda che si desidera accordare.5. Suonare il numero di corda selezionato sullo strumento.
Suonare la corda aperta, senza premerla.
6. Accordare la corda.Regolare l'intonazione della corda finché e non si accendono nella Guida
per l'accordatura e l'ago dell'indicatore non è puntato sullo 0 (posizione centrale).Se è attiva la funzione Accu-Pitch, l'accordatore emette un "bip" quando la notaraggiunge l'intonazione giusta.
7. Ripetere i passaggi da 4 a 6 per accordare le altre corde dellostrumento.
Impostazioni del TU-12EXCome cambiare il tono di riferimento per l'accordatura
1. Tenere premuto [PITCH] e premere [ ] o [ ] per scegliere il tono diriferimento desiderato. (Gamma di impostazioni: da 438 a 445 Hz)L'indicatore lampeggia. Scegliere il tono di riferimento desiderato facendololampeggiare.
2. Lasciare [PITCH] per impostare il tono di riferimento selezionato.
Accordatura flat (funzione Flat)
1. Premere [FLAT] per attivare la funzione Flat (l'indicatore rosso si accende).2. Premere [ ] o [ ] per impostare il numero di semitoni flat (bemolle)
su cui basare l'accordatura. (Gamma di impostazioni: da a 6 )Ad esempio, se si selezionano due bemolle, l'intonazione effettiva di una notaaccordata sarà due semitoni sotto l'indicazione visualizzata dal TU-12EX.
3. Premere di nuovo [FLAT].Verrà attivata l'impostazione per la funzione Flat. Anche se non si preme [FLAT],l'impostazione verrà attivata automaticamente dopo tre secondi.
4. Per disattivare la funzione Flat, premere [FLAT] finché l'indicatorerosso non si spegne.
Accordatura con l'ascolto del tono di riferimento (modalità
Sound)
1. Scegliere il tipo di accordatura desiderato, ad esempio modalità diaccordatura o funzione Flat.
2. Premere [ ] (Sound) per ascoltare il tono di riferimento.3. Premere [ ] o [ ] finché non si accende l'indicatore per il nome
della nota o il numero di corda che si desidera accordare.Viene emesso il suono della nota o della corda mostrata dall'indicatore.
4. Accordare lo strumento in base al tono di riferimento.Se si usa la modalità Sound, non è possibile effettuare l'accordaturamediante il microfono incorporato, in quanto è disattivato.
5. Premere [ ] (Sound) per arrestare la riproduzione del tono diriferimento.
Calibrazione dell'ago dell'indicatore
Potrebbe accadere, raramente, che l'ago dell'indicatore non sia più calibratocorrettamente, tanto da puntare leggermente distante dalla posizione 0 anche se gliindicatori e della Guida per l'accordatura si accendono contemporaneamente.Ciò potrebbe verificarsi col passare del tempo o se l'unità viene usata con poca cura.
Se usato normalmente, l'ago dell'indicatore non perde praticamente mai lagiusta calibrazione. Per regolarla, utilizzare un cacciavite a testa piatta(cacciavite di precisione da 2 mm).
1. Tenere premuto [PITCH] e accendere l'unità.Verificare se l'ago punta alla posizione 0.
2. Qualora l'ago dell'indicatore non punti alla posizione 0, utilizzare uncacciavite a testa piatta (cacciavite di precisione da 2 mm) perruotare l'apposita vite di regolazione finché l'ago non punta allo 0.
3. Al termine della calibrazione, premere [POWER] per spegnere l'unità.
Funzioni utiliPrevenzione dello scaricamento delle batterie se ci si dimentica
di spegnere l'unità (funzione di spegnimento automatico)
Quando si utilizza l'alimentazione a batteria, se il TU-12EX rimane nello statodescritto di seguito per oltre trenta minuti dopo l'accensione, verrà spentoautomaticamente.
• Non è stato premuto alcun pulsante e
• Nessun audio rilevato (compreso l'ingresso dal microfono incorporato).
Disattivazione della funzione di spegnimento automatico
È possibile disattivare momentaneamente la funzione di spegnimento automaticoquando si accende il TU-12EX. Per fare ciò, tenere premuti contemporaneamente
[ ] e [ ] quando si preme [POWER] per accendere l'unità.La funzione di spegnimento automatico sarà attivata la prossima volta che siaccende normalmente l'unità.
Emissione di un suono per indicare il completamento
dell'accordatura (funzione Accu-Pitch)
Se la funzione Accu-Pitch è attivata, verrà emesso un "bip" quando il suono dellostrumento che si sta accordando si è stabilizzato su un'intonazione non oltre trecentesimi in diesis o bemolle. Questo suono indica che l'accordatura è corretta.
Attivazione e disattivazione della funzione Accu-Pitch
1. Tenere premuto [ ] (Sound) e premere [POWER] per accendere l'unità.Se non viene emesso nessun suono all'accensione dell'unità, significa che la funzioneAccu-Pitch è disattivata. Per attivarla, ripetere la stessa operazione; se viene emessoun "bip" all'accensione dell'unità, significa che la funzione Accu-Pitch è attivata.
Funzioni di memorizzazione
Quando le batterie vengono inserite nel TU-12EX, le impostazioni descritte diseguito vengono conservate in memoria anche dopo lo spegnimento dell'unità.
Se le batterie vengono rimosse o si esauriscono, tutti i dati salvati inmemoria possono andare persi.
Sostituzione delle batterieL'indicatore BATT. lampeggia quando le batterie inizianoa scaricarsi.Sostituire le batterie appena possibile.
* Quando si capovolge l'unità, posizionarla su un pannomorbido o materiali simili per evitare danni al pannello.
1. Aprire il vano batterie situato sottol'unità facendo scorrere il coperchio versola posizione OPEN.
2. Togliere le vecchie batterie.3. Inserire due batterie AAA nuove e dello stesso tipo.
* Assicurarsi che i poli "+" e "-" delle batterie siano orientati correttamente.* Non utilizzare batterie nuove insieme a batterie usate o batterie di tipi diversi. Ciò potrebbe causare la
perdita di liquido.
4. Chiudere il coperchio del vano batterie.
Specifiche
* Allo scopo di migliorare il prodotto, le specifiche e/o l'aspetto di questa unità sono soggettia modifiche senza preavviso.
Muchas gracias y enhorabuena por haber elegido el BOSS TU-12EX.Antes de utilizar el equipo, lea atentamente las secciones tituladas: “UTILIZACIÓN SEGURADE LA UNIDAD” y “NOTAS IMPORTANTES” (que se suministran en una hoja aparte).En estas secciones encontrará información importante acerca de la utilización correcta dela unidad. Además, para asegurarse de que conoce adecuadamente todas lascaracterísticas de su nuevo equipo, debe leer íntegramente el Manual de instrucciones.El manual se debe guardar en un lugar accesible para consultas futuras.Cuando se entrega, las pilas del TU-12EX no están instaladas. Asegúrese de leer la sección“Cambio de las pilas” y, a continuación, siga las instrucciones para instalar las pilas.Copyright © 2008 BOSS CORPORATIONTodos los derechos reservados. Ninguna parte de esta publicación se puedereproducir en forma alguna sin el permiso por escrito de BOSS CORPORATION.
fig.01??????
Para evitar que los altavoces u otros dispositivos funcionen de maneradeficiente o se dañen, reduzca siempre el volumen y apague todos losdispositivos antes de proceder a cualquier conexión.Una vez realizadas las conexiones, encienda el amplificador de guitarrau otro sistema de amplificación en último lugar. Si enciende losdispositivos en un orden incorrecto, podría causar anomalías en elfuncionamiento o posibles daños en los altavoces y los demás dispositivos.
Cómo usar el afinador (modo Auto CHROMATIC)1. Conecte el instrumento que desea afinar en el conector INPUT.
Si va a afinar un instrumento acústico, utilice el micrófono integrado en su lugar.Para usar el micrófono, asegúrese de que no haya nada conectado en losconectores INPUT u OUTPUT y acerque el TU-12EX al instrumento.
2. Pulse [POWER] para encender la unidad.3. Pulse [CHROMATIC/GUITAR] para activar el ajuste “CHROMATIC”
(se ilumina el indicador verde).En el modo CHROMATIC, el TU-12EX muestra automáticamente los nombres denota y los números de cuerda conforme se tocan en el instrumento. En la mayoríade los casos, el modo CHROMATIC es el más adecuado que se debe utilizar.
Si usa una guitarra o un bajo y desea afinarlo especificando primero elnúmero de cuerda, utilice el modo GUITAR. La afinación con el modoGUITAR se describe en la siguiente sección.
4. Toque una nota en el instrumento.En la mayoría de los casos, se toca una cuerda al aire al afinar una guitarra o bajo.Mientras suena la nota, se muestran el nombre de nota y el número de cuerda.El medidor y la guía de afinación muestran lo alejada que está la nota del tonocorrecto.
5. Afine el instrumento.Mientras toca una sola nota, ajuste la afinación del instrumento según sea necesariopara mostrar el nombre de nota objetivo. Una vez se muestre el nombre de la notadeseada, realice una afinación precisa del tono de la nota afinando el instrumento demodo que y de la guía de afinación se iluminen simultáneamente y la agujadel medidor apunte al 0 (la posición central).Si la función Accu-Pitch está activada, el afinador emite un pitido cuando la nota seestabiliza en el tono correcto e informa de que la nota está afinada.
Cómo usar el afinador (modo Manual GUITAR)1. Conecte el instrumento que desea afinar en el conector INPUT.
Si va a afinar un instrumento acústico, utilice el micrófono integrado en su lugar.Para usar el micrófono, asegúrese de que no haya nada conectado en losconectores INPUT u OUTPUT y acerque el TU-12EX al instrumento.
2. Pulse [POWER] para encender la unidad.3. Pulse [CHROMATIC/GUITAR] para activar el ajuste “GUITAR”
(se ilumina el indicador rojo).4. Pulse [ ] o [ ] para iluminar el indicador del número de cuerda que
desea afinar.5. Toque el número de cuerda seleccionado en el instrumento.
Toque la cuerda al aire, sin rozarla.
6. Afine la cuerda.Ajuste la afinación de la cuerda de modo que y de la guía de afinación se
iluminen y la aguja del medidor apunte al 0 (la posición central).Si la función Accu-Pitch está activada, el afinador emite un pitido cuando la nota seestabiliza en el tono correcto e informa de que la nota está afinada.
7. Repita los pasos 4 a 6 según sea necesario para afinar el resto de lascuerdas del instrumento.
Ajustes de TU-12EXCambio del tono de referencia para la afinación
1. Mantenga pulsado [PITCH] y pulse [ ] o [ ] para seleccionar el tonode referencia que desee. (Rango de ajuste: 438 a 445 Hz)El indicador parpadea. Seleccione el tono de referencia que desee haciendo queparpadee.
2. Suelte [PITCH] para establecer el tono de referencia seleccionado.
Afinación de bemol (función de bemol)
1. Pulse [FLAT] para activar la función de bemol (se ilumina elindicador rojo).
2. Pulse [ ] o [ ] para el establecer el número de bemoles (el númerode semitonos bemoles) que desea afinar. (Rango de ajuste: a 6 )Por ejemplo, si selecciona dos bemoles, el tono real de una nota afinada estará dossemitonos por debajo de lo que muestra el TU-12EX.
3. Vuelva a pulsar [FLAT].De este modo se activa el ajuste de la función de bemol. Incluso si no pulsa [FLAT],el ajuste se activa automáticamente al cabo de tres segundos.
4. Para desactivar la función de bemol, pulse [FLAT] para que seapague el indicador rojo.
Afinación mientras se escucha el tono de referencia (modo
de sonido)
1. Seleccione el modo de afinación que desee utilizar (por ejemplo,modo de afinación, función de bemol, etc.).
2. Pulse [ ] (sonido) para reproducir el tono de referencia.3. Pulse [ ] o [ ] hasta que se ilumine el indicador del nombre de
nota/número de cuerda que desee.Se reproduce el sonido del nombre de la nota/número de cuerda mostrado porel indicador.
4. Afine el instrumento según el tono de referencia.Cuando se utiliza el modo de sonido, la afinación no se puede efectuar conel micrófono integrado (está desactivado).
5. Pulse [ ] (sonido) para detener la reproducción del tono dereferencia.
Calibración de la aguja del medidor
En muy pocas ocasiones la aguja del medidor puede perder la calibración, lo que puedeprovocar que se desvíe ligeramente de la posición 0, incluso si los indicadores y de la guía de afinación están iluminados simultáneamente. Esto puede suceder con eltiempo cuando la unidad se transporta o si no se trata con cuidado.
Durante el uso normal, la aguja del medidor casi nunca perderála calibración. Para ajustarla utilice un destornillador plano pequeño (undestornillador de precisión de 2,0 mm).
1. Mantenga pulsado [PITCH] y encienda la unidad.Confirme si la aguja señala o no la posición 0.
2. Si la aguja del medidor no señala la posición 0, utilice undestornillador plano (destornillador de precisión de 2,0 mm) paragirar el tornillo de ajuste del medidor hasta que la aguja señale 0.
3. Tras finalizar la calibración, pulse [POWER] para apagar la unidad.
Funciones útilesCómo evitar que las pilas se agoten si se olvida apagar la
unidad (función de apagado automático)
Cuando se utiliza la alimentación por pilas, si el TU-12EX permanece en el estadodescrito a continuación durante aproximadamente treinta minutos después deencenderlo, se apagará automáticamente.• No se ha pulsado ningún botón y
• No se ha detectado audio (incluida la entrada del micrófono integrado).
Desactivación de la función de apagado automático
Puede desactivar temporalmente la función de apagado automático al encender el
TU-12EX. Para ello, mantenga pulsados simultáneamente [ ] y [ ] mientras pulsa[POWER] para encender la unidad.La función de apagado automático se activará la próxima vez que se encienda launidad de la forma habitual.
Uso de un tono para indicar que ha finalizado la afinación
(función Accu-Pitch)
Cuando la función Accu-Pitch está activada, suena un pitido cuando el sonido delinstrumento que está afinando se estabiliza en un tono que no sea más de trescentésimas agudo o bemol. Este sonido indica que el tono está afinado.
Activación y desactivación de la función Accu-Pitch
1. Mantenga pulsado [ ] (sonido) y pulse [POWER] para encender launidad.Si no se oye ningún sonido de la unidad mientras se enciende, significa que lafunción Accu-Pitch se ha desactivado. Para activarla, vuelva a realizar la mismaoperación; si oye un pitido cuando se enciende la unidad, significa que se haactivado Accu-Pitch.
Funciones de memoria
Una vez colocadas las pilas en el TU-12EX, los ajustes descritos a continuación semantienen en la memoria incluso si se apaga la unidad.
Si las pilas se agotan o se retiran, los datos guardados en memoria podríanperderse.
Cambio de las pilasEl indicador BATT. parpadea cuando las pilas comienzana agotarse.Sustituya las pilas lo antes posible.
* Cuando vaya a poner la unidad al revés, colóquela sobre unpaño suave o similar para no dañar el panel.
1. Abra el compartimento de las pilas(situado en la parte inferior de la unidad)deslizando la tapa hacia la posición OPEN.
2. Retire las pilas gastadas del compartimento de las pilas.3. Inserte dos pilas nuevas del mismo tipo, AAA.
* Asegúrese de que los polos “+” y “-” de las pilas están orientados correctamente.* No mezcle pilas nuevas con pilas usadas, ni pilas de diferentes tipos. Si lo hace, se puede producir
derrame de líquidos.
4. Deslice la tapa del compartimento de las pilas para volver a ponerlaen su sitio.
Especificaciones
* Con el fin de mejorar el producto, las especificaciones y/o el aspecto de la unidad pueden modificarse sinprevio aviso.
Manuale dell'utente
Riproduce il suono di riferimento
e quello della funzione Accu-Pitch
Servono per cambiare varie impostazioni.
L'indicatore dell'accordatura si accende per
segnalare quanto si è vicini al tono desiderato.
Guida per l'accordatura
si accende: il tono tende al bemolle (basso)
si accendono contemporaneamente:
l'accordatura è esatta (± 3 centesimi)
si accende: il tono tende al diesis (alto)
Indicatore ad ago
CHROMATIC/GUITAR
Regolatore dell'indicatore (sotto l'unità)
Altoparlante
Interruttore di accensione e spegnimento.POWER
FLAT
Inserire due batterie AAA.
Vano batterie(sotto l'unità)
Microfono incorporato
(Su) (Giù)
(Pulsante audio)
Cambia l'impostazione del tono di riferimento.PITCH
Jack DC IN
Collegamento per un amplificatoreper chitarra e altre apparecchiaturesimili. L'ingresso del suono attraversoil jack INPUT viene trasmesso daqui senza essere modificato.
Jack OUTPUT
Collegare qui una chitarra, un basso
o qualsiasi altro strumento da accordare.
Jack INPUT
IndicatoriConsente di cambiare la modalità di accordatura.
Indicatore verde: modalità Auto CHROMATIC.
Indicatore rosso: modalità Manual GUITAR (per
accordare una singola corda di chitarra o basso).
Indicano il nome della nota (C-B), se è naturale
o diesis (#), il numero di corda di basso o chitarra,
il tono di riferimento principale (438-445) e l'avviso
di batteria scarica.
Collegare qui l'adattatore CA
(optional per la serie BOSS PSA).
Attiva o disattiva la funzione Flat.
Utilizzarlo per attivare o disattivare
l'audio del suono di riferimento.
Da utilizzare per accordare strumenti acustici.
Posizionare il microfono il più vicino possibile
allo strumento.
Modalità Auto CHROMATIC:
Premendo [ ] e [ ], si possono riprodurre toni di riferimento conincrementi di mezzo passo su cinque ottave (dalla C2 alla C7).
Modalità Manual GUITAR:
Viene emesso il suono della corda aperta selezionata (da 7B a 1E).
Se si usa la funzione Flat, l'intonazione del tono di riferimento viene adattata di conseguenza.
Impostazione Impostazioni di fabbrica originali
Impostazione della modalità di accordatura (CHROMATIC o GUITAR)
CHROMATIC
Tono di riferimento 440Hz
Numero di corda in modalità Manual GUITAR 6E
Tono di riferimento riprodotto CHROMATIC: C4GUITAR: 6E
Impostazioni della funzione Accu-Pitch ON (attivata)
Impostazioni dell'accordatura flat (numero di semitoni)
Gamma di accordatura
E0 (20,6Hz) - C8 (4186,0Hz) Durata prevista delle batterie
(al carbonio) con uso continuo
Circa 15 oreDipende dalle condizioni di uso.
Tono di riferimento
A4 (438 - 445Hz) Dimensioni 147,5 (L) x 54,0 (P) x 23,9 (A) mm5-13/16 (L) x 2-1/8 (P) x 1 (A) pollici
Precisione dell'accordatura
± 1 centesimo Peso 138 g, 5 oz (batterie incluse)
Alimentazione Batteria Dry R03 (al carbonio) o LR03 (alcaline); tipo AAA x 2; CC a 3VAdattatore CA con CC a 9V (serie PSA; optional)
Accessori Batteria Dry R03 tipo AAA x 2 (al carbonio), Manuale dell'utente, Coperta, foglio esplicativo ("UTILIZZO SICURO DELL'UNITÀ" e "NOTE IMPORTANTI"), informazioni
Portata attuale 12 mA
Manual de instrucciones
Reproduce el tono de referencia
y el sonido de Accu-Pitch.
Permiten cambiar varios ajustes.
El indicador de afinación se ilumina para mostrar
lo cerca que se está del tono de destino.
Guía de afinación
se ilumina: el tono es bemol (bajo)
Medidor de aguja
CHROMATIC/GUITAR
Control de ajuste del medidor (parte inferior de la unidad)
Altavoz
Apaga y enciende el aparato.POWER
FLAT
Inserte dos pilas de tamaño AAA.
Compartimento de las pilas(parte inferior de la unidad)
Micrófono integrado
(Abajo) / (arriba)
(Botón de sonido)
Permite cambiar los ajustes del tono de referencia.PITCH
Conector DC IN
Se conecta a un amplificador de guitarra,
etc. El sonido que se recibe en el conector
INPUT se envía sin modificar.
Conector OUTPUT
Aquí se conecta la guitarra, el bajo
u otro instrumento que se desee afinar.
Conector INPUT
IndicadoresPermite cambiar el modo de afinación.
Indicador verde: modo Auto CHROMATIC
Indicador rojo: modo Manual GUITAR (para afinar
una sola cuerda de guitarra/bajo)
Muestran el nombre de la nota actual (Do-Si), el estado
natural o alto (#), el número de la cuerda de la guitarra/
bajo, el tono de referencia principal (438-445) y una
advertencia cuando queda poca energía en las pilas.
Aquí se conecta el adaptador
de CA (serie BOSS PSA opcional).
Activa y desactiva la función
de bemol.
Utilícelo para activar y desactivar
el sonido del tono de referencia.
Utilícelo cuando afine instrumentos acústicos.
Coloque el micrófono lo más cerca posible
del instrumento.
se ilumina: el tono es agudo (alto)
se iluminan simultáneamente: afinado
(± 3 centésimas)
NOTA
NOTA
Modo Auto CHROMATIC:
Si pulsa [ ] y [ ], puede reproducir tonos de referencia enincrementos de semitonos en cinco octavas (C2 a C7).
Modo Manual GUITAR:
Suena el tono de la cuerda al aire seleccionada (7B a 1E).
Cuando se utiliza la función de bemol, el tono de referencia se ajusta en consecuencia.
Ajuste Ajustes de fábrica originales
Ajuste de modo de afinación (CHROMATIC o GUITAR) CHROMATIC
Tono de referencia 440 Hz
Números de cuerda en el modo Manual GUITAR 6E
Tono de referencia reproducido CHROMATIC: C4GUITAR: 6E
Ajustes de la función Accu-Pitch ON (activada)
Ajustes de la afinación de bemol (número de semitonos)
Rango de afinación
E0 (20,6 Hz) – C8 (4.186 Hz) Duración prevista de las pilas con
un uso continuo (carbono)
Aproximadamente 15 horasEsta cifra varía según las condiciones de uso reales.
Tono de referencia
A4 (438–445 Hz) Dimensiones 147,5 (anchura) x 54,0 (fondo) x 23,9 (altura) mm5-13/16 (ancho) x 2-1/8 (fondo) x 1 (alto) pulgadas
Precisión de afinación
± 1 centésima Peso 138 g, 5 oz (incluidas las pilas)
Fuente de alimentación
Pila seca R03 (carbono) o LR03 (alcalina); 2 de tipo AAA; CC 3 VAdaptador de CA a CC 9 V (serie PSA, opcional)
Accesorios Pila seca (R03 tipo AAA) x 2 (carbono), manual de instrucciones, tapa, folleto (“UTILIZACIÓN SEGURA DE LA UNIDAD” y “NOTAS IMPORTANTES”), información
Consumo 12 mA
NOTA
NOTA
NOTA
NOTA
* 5 1 0 0 0 0 4 1 5 7 - 0 2 *
Obrigado e parabéns por sua escolha do BOSS TU-12EX.Antes de usar este equipamento, leia com atenção as seguintes seções: “USO SEGURODO EQUIPAMENTO” e “OBSERVAÇÕES IMPORTANTES” (fornecidos em uma folhaseparada). Essas seções oferecem informações importantes sobre o uso correto doequipamento. Além disso, para que você conheça todos os recursos do seu novoequipamento, o Manual do proprietário deve ser lido por completo. O manual deverá serguardado em local de fácil acesso para consultas futuras.As pilhas acompanham o produto, porém desligadas do aparelho. Leia a seção“Trocando as pilhas” para instalar as mesmas.Copyright © 2008 BOSS CORPORATIONTodos os direitos reservados. Nenhuma parte desta publicação poderá serreproduzida em qualquer formato sem permissão por escrito da BOSSCORPORATION.
fig.01??????
Para evitar mau funcionamento e/ou danos aos alto-falantes ou a outrosaparelhos, diminua sempre o volume e desligue todos os aparelhos antesde fazer qualquer conexão.Uma vez estabelecidas as conexões, ligue a energia do amplificador daguitarra ou outro sistema de amplificação por último. Ao ligá-los na ordemerrada, você corre o risco de mau funcionamento e/ou danos emalto-falantes e em outros aparelhos.
Como usar o afinador (modo Auto CHROMATIC)1. Conecte o instrumento a ser afinado ao plugue INPUT.
Para afinar um instrumento acústico, use o microfone interno em seu lugar. Parausar o microfone, verifique se não há nada conectado aos plugues INPUT ouOUTPUT e coloque o TU-12EX próximo ao instrumento.
2. Pressione [POWER] para ligar a energia.3. Pressione [CHROMATIC/GUITAR] para ativar a afinação
“CHROMATIC” (o indicador verde acende).No modo CHROMATIC, o TU-12EX exibe automaticamente os nomes das notas e osnúmeros das cordas enquanto você as toca no instrumento. Na maioria das vezes,você considerará CHROMATIC o modo mais prático de uso.
Caso você esteja usando violão/guitarra ou baixo e queira afinarespecificando o número da corda inicialmente, use o modo GUITAR.(A afinação usando o modo GUITAR é descrita na próxima seção.)
4. Toque uma única nota no instrumento.Quase sempre, você desejará tocar uma corda solta ao afinar violão/guitarra ou baixo.Enquanto a nota reverbera, o nome da nota e o número da corda são exibidos.O medidor e o Guia de afinação mostram a distância da nota em relação à altura correta.
5. Afine o instrumento.Enquanto toca uma única nota, ajuste a afinação do instrumento conformenecessário para exibir o nome da nota desejada. Uma vez exibido o nome da notadesejada, ajuste a afinação da altura da nota afinando o instrumento para que e no Guia de afinação acendam simultaneamente e a agulha do medidoraponte para 0 (a posição central).Quando o recurso Accu-Pitch está ligado, o afinador emite um bipe quando a notase estabiliza na altura correta, informando que a nota está afinada.
Como usar o afinador (modo Manual GUITAR)1. Conecte o instrumento a ser afinado ao plugue INPUT.
Para afinar um instrumento acústico, use o microfone interno em seu lugar. Parausar o microfone, verifique se não há nada conectado aos plugues INPUT ouOUTPUT e coloque o TU-12EX próximo ao instrumento.
2. Pressione [POWER] para ligar a energia.3. Pressione [CHROMATIC/GUITAR] para ativar a afinação “GUITAR”
(o indicador vermelho acende).4. Pressione [ ] ou [ ] para acender o indicador do número da corda
que você deseja afinar.5. Toque o número da corda selecionada no instrumento.
Toque a corda solta sem pressioná-la.
6. Afine a corda.Ajuste a afinação da corda para que e no Guia de afinação acendam
e a agulha do medidor aponte para 0 (a posição central).Quando o recurso Accu-Pitch está ligado, o afinador emite um bipe quando a notase estabiliza na altura correta, informando que a nota está afinada.
7. Repita as etapas de 4 a 6 conforme necessário para afinar o restantedas cordas do instrumento.
Ajustes do TU-12EXAlterando a altura de referência da afinação
1. Mantenha [PITCH] pressionado e pressione [ ] ou [ ] para escolhera altura de referência desejada. (Intervalo de ajuste: 438 a 445 Hz)O indicador pisca. Escolha a altura de referência desejada fazendo-a piscar.
2. Solte [PITCH] para ajustar a altura de referência selecionada.
Afinação em bemol (recurso Flat)
1. Pressione [FLAT] para ativar o recurso Flat (o indicador vermelhoacende).
2. Pressione [ ] ou [ ] para ajustar o número de bemóis (o número desemitons em bemol) em que você deseja afinar. (Intervalo de ajuste:
a 6 )Por exemplo, se você selecionar dois bemóis, a altura real de uma nota afinada serádois semitons abaixo do que é exibido pelo TU-12EX.
3. Pressione [FLAT] novamente.Isso permite o ajuste do recurso Flat. Mesmo que você não pressionar [FLAT],o ajuste será ativado automaticamente depois de três segundos.
4. Para desativar o recurso Flat, pressione [FLAT] para que o indicadorvermelho desapareça.
Afinando ouvindo o tom de referência (modo Sound)
1. Escolha o tipo de afinação que você deseja usar (por exemplo, modoTuning, recurso Flat).
2. Pressione [ ] (Sound) para reproduzir o tom de referência.3. Pressione [ ] ou [ ] até que acenda o indicador do nome da
nota/número da corda que você deseja afinar.O som do nome da nota/número da corda mostrada pelo indicador é reproduzido.
4. Afine o instrumento de acordo com o tom de referência.Quando você está usando o modo Sound, não é possível afinar usandoo microfone interno (o microfone interno é desativado).
5. Pressione [ ] (Sound) a fim de parar a reprodução do tom dereferência.
Calibrando a agulha do medidor
Raramente, a agulha do medidor pode se descalibrar, fazendo com que ela aponte umpouco além da posição 0, mesmo quando os indicadores e do Guia de ajusteacendem simultaneamente. Isso pode ocorrer com o passar do tempo, à medida queo equipamento é transportado, ou caso ele seja manipulado com força excessiva.
Durante o uso normal, a agulha do medidor praticamente jamais sedescalibra. Para ajustá-lo, não se esqueça de usar uma chave de fendapequena (uma chave de 2,0 mm).
1. Mantenha [PITCH] pressionado e ligue a energia.Confirme se a agulha está ou não apontando para a posição 0.
2. Se a agulha do medidor não apontar para a posição 0, use umachave de fenda (uma chave de fenda de 2,0 mm) para girar oparafuso de ajuste do medidor até que a agulha aponte para 0.
3. Depois de concluir a calibragem, pressione [POWER] para desligara energia.
Recursos úteisEvitando a descarga da bateria caso você se esqueça de
desligar o afinador (recurso Auto Power Off)
Ao usar a energia das pilhas, se o TU-12EX continuar no estado descrito abaixo poraproximadamente trinta minutos depois de ser ligado, o afinador será desligadoautomaticamente.• Nenhum botão foi pressionado e
• Nenhum áudio (incluindo a entrada pelo microfone interno) foi detectado.
Desativando o recurso Auto Power Off
É possível desativar temporariamente o recurso Auto Power Off quando você ligar
o TU-12EX. Para isso, mantenha [ ] e [ ] pressionados simultaneamenteenquanto você pressiona [POWER] para ligar o afinador.O recurso Auto Power Off sempre será ativado na próxima vez em que você ligar oafinador da maneira usual.
Usando um tom para indicar que a afinação foi concluída
(recurso Accu-Pitch)
Quando o recurso Accu-Pitch está ativado, é reproduzido um bipe quando o som doinstrumento que você está afinando se estabilizar em uma altura inferior a trêscentésimos em sustenido ou bemol. Esse som informa que a nota está afinada.
Ativando e desativando o recurso Accu-Pitch
1. Mantenha [ ] (Sound) pressionado e pressione [POWER] para ligaro afinador.Caso nenhum som seja emitido pelo equipamento ao ser ligado, isso significa queo recurso Accu-Pitch foi desativado. Para ativá-lo, realize a mesma operaçãonovamente; caso você ouça um bipe quando o afinador for ligado, isso significa queAccu-Pitch foi ativado.
Recursos de memória
Uma vez instaladas as pilhas no TU-12EX, os ajustes descritos abaixo são mantidosna memória mesmo depois que a energia é desligada.
Se as pilhas forem removidas ou acabarem, todos os dados salvos namemória podem ser perdidos.
Trocando as pilhasO indicador BATT. pisca quando as pilhas começama descarregar.Troque as pilhas assim que possível.
* Ao colocar o equipamento de cabeça para baixo, coloque-osobre um pano macio ou algo parecido para evitar danos aopainel.
1. Abra o compartimento de pilhas (localizadona parte inferior do equipamento)deslizando a tampa no sentido de OPEN.
2. Remova as pilhas velhas do compartimento de pilhas.3. Coloque duas pilhas novas AAA do mesmo tipo.
* Verifique se os pólos “+” e “-” das pilhas estão na orientação correta.* Não misture pilhas novas com pilhas usadas ou pilhas de tipos diferentes. Isso pode resultar no
vazamento do fluido.
4. Recoloque a tampa do compartimento de pilhas.
Especificações
* Com a finalidade de aprimorar o produto, as especificações e/ou aparência deste equipamento estãosujeitas a mudanças sem aviso prévio.
Bedankt en gefeliciteerd met uw keuze voor de BOSS TU-12EX.Lees zorgvuldig onderstaande hoofdstukken voordat u dit apparaat gebruikt: “HETAPPARAAT VEILIG GEBRUIKEN” en “BELANGRIJKE OPMERKINGEN” (bijgeleverd op eenapart blad). Deze hoofdstukken bevatten belangrijke informatie over de juiste bedieningvan het apparaat. Om er bovendien zeker van te zijn dat u elke functie van uw nieuweapparaat goed begrijpt, leest u best de hele gebruikershandleiding. De handleidingmoet als handige referentie worden bewaard en voorhanden zijn.Bij levering zijn de batterijen van de TU-12EX nog niet geplaatst. Lees ook het hoofdstuk“De batterijen vervangen” en volg de instructies om de batterijen te plaatsen.Copyright © 2008 BOSS CORPORATIONAlle rechten voorbehouden. Niets uit deze uitgave mag op enige manier wordengereproduceerd zonder schriftelijke toestemming van BOSS CORPORATION.
fig.01??????
Zet het volume altijd lager en schakel alle apparaten uit voordatu aansluitingen maakt om defecten en/of schade aan luidsprekers ofandere apparaten te voorkomen.Schakel uw gitaarversterker of ander versterkingssysteem als laatste inzodra alle aansluitingen zijn gebeurd. Als u de apparaten in de verkeerdevolgorde inschakelt, kunnen er defecten optreden en/of kan er schade aande luidsprekers en andere apparaten ontstaan.
Het stemapparaat gebruiken (Auto CHROMATIC-modus)1. Sluit het instrument dat moet worden gestemd aan op de
INPUT-aansluiting.Gebruik de ingebouwde microfoon als u een akoestisch instrument stemt. Zorgervoor dat er niets is aangesloten op de INPUT- of OUTPUT-aansluitingen en plaatsde TU-12EX in de buurt van het instrument om de microfoon te gebruiken.
2. Druk op [POWER] om het apparaat in te schakelen.3. Druk op [CHROMATIC/GUITAR] om de instelling "CHROMATIC" te
kiezen (het groene lampje licht op).In de modus CHROMATIC toont de TU-12EX automatisch de nootnamen ensnaarnummers terwijl u ze op uw instrument speelt. Meestal is CHROMATIC demeest gebruiksvriendelijke modus.
Als u een gitaar of bas gebruikt en een specifiek snaarnummer eerst wiltstemmen, gebruikt u de GUITAR-modus. (Stemmen met de GUITAR-moduswordt in de volgende sectie beschreven.)
4. Speel een enkele noot op het instrument.Meestal zult u een open snaar spelen om een gitaar of bas te stemmen.Terwijl de noot weerklinkt, verschijnen de nootnaam en het snaarnummer.De meter en de stemgids tonen hoe ver de noot van de correcte toonhoogte ligt.
5. Stem het instrument.Terwijl een enkele noot wordt gespeeld, past u de stemming van het instrumentzonodig aan om de beoogde nootnaam weer te geven. Met de beoogdestemhoogte weergegeven, stem het instrument zodat en op de stemgidsgelijktijdig oplichten en de naald van de meter naar 0 wijst (de centrale positie).Als de Accu Pitch-functie is ingeschakeld, maakt het stemapparaat een piependgeluid als de noot gestabiliseerd is op de juiste toonhoogte, waardoor u weet datde noot correct gestemd is.
Het stemapparaat gebruiken (Manual GUITAR-modus)1. Sluit het instrument dat moet worden gestemd aan op de
INPUT-aansluiting.Gebruik de ingebouwde microfoon als u een akoestisch instrument stemt. Zorgervoor dat er niets is aangesloten op de INPUT- of OUTPUT-aansluitingen en plaatsde TU-12EX in de buurt van het instrument om de microfoon te gebruiken.
2. Druk op [POWER] om het apparaat in te schakelen.3. Druk op [CHROMATIC/GUITAR] om de instelling "GUITAR" te kiezen
(het rode lampje licht op).4. Druk op [ ] of [ ] om het lampje voor het snaarnummer dat u wilt
stemmen te doen oplichten.5. Speel het geselecteerde snaarnummer op uw instrument.
Speel de snaar open, zonder frets in te drukken.
6. Stem de snaar.Stem de snaar zodat en op de stemgids oplichten en de naald van de
meter naar 0 wijst (de centrale positie).Als de Accu Pitch-functie is ingeschakeld, maakt het stemapparaat een piependgeluid als de noot gestabiliseerd is op de juiste toonhoogte, waardoor u weet datde noot correct gestemd is.
7. Herhaal stappen 4-6 zover nodig om de rest van de snaren van uwinstrument te stemmen.
TU-12EX-instellingenDe referentietoonhoogte voor het stemmen wijzigen
1. Houd [PITCH] ingedrukt en druk op [ ] of [ ] om dereferentietoonhoogte te kiezen die u wenst. (Instelbereik: 438 tot445 Hz)Het lampje knippert. Kies de referentietoonhoogte die u wilt door het te latenknipperen.
2. Laat [PITCH] los om de geselecteerde referentietoonhoogte in te stellen.
Flat Tuning (Flat-functie)
1. Druk op [FLAT] om de Flat-functie te starten (het rode lampje licht op).2. Druk op [ ] of [ ] om het aantal bemollen (aantal lagere halve
tonen) in te stellen waarop u wilt stemmen. (Instelbereik: tot 6 )Als u bijvoorbeeld twee bemollen selecteert, zal de uiteindelijke toonhoogte van eengestemde noot twee halve tonen lager liggen dan wordt weergegeven door de TU-12EX.
3. Druk opnieuw op [FLAT].Dit activeert de instelling voor de Flat-functie. Zelfs als u niet op [FLAT] drukt, wordtde instelling automatisch ingeschakeld na drie seconden.
4. Druk op [FLAT] zodat het rode lampje wordt uitgeschakeld om deFlat-functie te deactiveren.
Stemmen terwijl u naar de referentietoon luistert (geluidsmodus)
1. Kies de stemmethode die u wilt gebruiken (bv. Stemmodus,Flat-functie).
2. Druk op [ ] (geluid) om de referentietoon te spelen.3. Druk op [ ] of [ ] tot het lampje voor de nootnaam/het
snaarnummer die/dat u wilt stemmen brandt.Het geluid van de nootnaam/het snaarnummer die/dat door het lampje wordtweergegeven, wordt afgespeeld.
4. Stem het instrument volgens de referentietoonhoogte.Als u de geluidsmodus gebruikt, kan stemmen niet met de ingebouwdemicrofoon worden gedaan (de ingebouwde microfoon is uitgeschakeld).
5. Druk op [ ] (geluid) om de referentietoon te stoppen.
De naald van de meter kalibreren
In uitzonderlijke gevallen wijkt de naald van de meter af van de kalibratie, waardoor denaald lichtjes afwijkt van de 0-positie, zelfs als de stemgidslampjes en gelijktijdig branden. Dit kan na een tijd gebeuren als het apparaat wordt vervoerd of alshet apparaat ruw wordt behandeld.
Bij normaal gebruik wijkt de naald van de meter bijna nooit af van dekalibratie. Om dit aan te passen, dient u een kleine platte schroevendraaier tegebruiken ( een precisieschroevendraaier van 2,0 mm).
1. Houd [PITCH] ingedrukt en schakel het apparaat in.Controleer of de naald al dan niet naar de 0-positie wijst.
2. Als de naald van de meter afwijkt van de 0-positie, gebruik dan eenplatte schroevendraaier (een precisieschroevendraaier van 2,0 mm)om de regelschroef te draaien tot de naald naar 0 wijst.
3. Na voltooiing van de kalibratie, druk op [POWER] om het apparaatuit te schakelen.
Handige functiesVermijden dat de batterij leegloopt als u het apparaat vergeet
uit te schakelen (automatische uitschakelingsfunctie)
Als de TU-12EX is ingeschakeld en door batterijen van stroom wordt voorzien,wordt het apparaat automatisch uitgeschakeld als het ongeveer 30 minuten in devolgende toestand blijft.
• zonder dat er een toets wordt ingedrukt en
• zonder audio (inclusief invoer van de ingebouwde microfoon).
De automatische uitschakelingsfunctie deactiveren
U kunt tijdelijk de automatische uitschakelingsfunctie deactiveren als u de TU-12EX
inschakelt. Om dit te doen, houdt u [ ] en [ ] gelijktijdig ingedrukt terwijl u op[POWER] drukt om het apparaat in te schakelen.De automatische uitschakelingsfunctie zal ingeschakeld zijn als u de volgende keerhet apparaat op de gewone manier inschakelt.
Een toon gebruiken om aan te geven dat het stemmen
voltooid is (Accu-Pitch-functie)
Als de Accu-Pitch-functie is ingeschakeld, wordt een piepend geluid weergegevenals de toonhoogte van het instrument dat u stemt stabiliseert in een bereik van driecent boven of onder de correcte toonhoogte. Dit geluid geeft aan dat detoonhoogte correct is.
De Accu-Pitch-functie in- en uitschakelen.
1. Houd [ ] (Geluid) ingedrukt en druk op [POWER] om het apparaatin te schakelen.Als de Accu-Pitch-functie is ingeschakeld, wordt een piepend geluid weergegevenals de toonhoogte van het instrument dat u stemt, stabiliseert in een bereik vandrie cent boven of onder de correcte toonhoogte. Om de Accu-Pitch-functie in teschakelen, herhaalt u de handeling; als u een piepend geluid hoort als het apparaatwordt ingeschakeld, is de Accu-Pitch-functie ingeschakeld.
Geheugenfuncties
Zodra de batterijen in de TU-12EX zijn geplaatst, worden onderstaande instellingenin het geheugen bewaard, zelfs nadat het apparaat wordt uitgeschakeld.
Als de batterijen verwijderd of leeg zijn, bent u mogelijk alle opgeslagengegevens in het geheugen kwijt.
De batterijen vervangenHet BATT.-lampje knippert als de batterijen leeglopen.Vervang de batterijen zo snel mogelijk.
* Als u het apparaat plat legt, plaats het dan op een zachte doekof iets dergelijks om schade aan het paneel te voorkomen.
1. Open het batterijvak (aan de onderkantvan het apparaat) door de klep naarOPEN te schuiven.
2. Verwijder de oude batterijen uit het batterijvak.3. Plaats twee nieuwe AAA-batterijen van hetzelfde type.
* Zorg ervoor dat de “+” en “-”-aanduidingen van de batterijen juist zijn gericht.* Combineer geen nieuwe batterijen met gebruikte en meng geen verschillende typen batterijen. Dit kan
vloeistoflekken veroorzaken.
4. Schuif de klep van het batterijvak terug op zijn plaats.
Specificaties
* Met het oog op productverbetering, kunnen de specificaties en/of het uitzicht van dit toestel wordengewijzigd zonder voorafgaande kennisgeving.
Manual de Instruções
Reproduz o tom de referência
e o som de Accu-Pitch.
Alteram vários ajustes.
O indicador de afinação acende para mostrar
a que distância você está da altura desejada.
Guia de afinação
acende: altura em bemol (baixa)
acendem simultaneamente: afinado (± 3 centésimos)
acende: altura em sustenido (alta)
Medidor com agulha
CHROMATIC/GUITAR
Controle de ajuste do medidor (parte inferior do equipamento)
Alto-falante
Liga e desliga o afinador.POWER
FLAT
Coloque duas pilhas de tamanho AAA.
Compartimento de pilhas (parte inferior do equipamento)
Microfone interno
(Para baixo)/
(Botão Sound)
Alteram os ajustes da altura de referência.PITCH
Plugue DC IN
Conecte a um amplificador de guitarra etc.
A entrada do som por meio do plugue
INPUT é reproduzida aqui sem alterações.
Plugue OUTPUT
Conecte aqui o violão, a guitarra, o baixo
ou outro instrumento a ser afinado.
Plugue INPUT
IndicadoresIsso altera o modo de afinação. Indicador verde:
modo Auto CHROMATIC Indicador vermelho:
modo Manual GUITAR (para afinação de uma
única corda de violão/guitarra/baixo especificada)
Eles mostram o nome da nota atual (C-B), o estado
natural ou sustenido (#), o número da corda do
violão/guitarra/baixo, a altura de referência principal
(438-445) e um aviso quando as pilhas estão fracas.
Conecte o adaptador CA
(série BOSS PSA opcional) aqui.
Ativa e desativa o recurso Flat.
Use-o para ativar e desativar
o tom de referência.
Use-o ao afinar instrumentos acústicos.
Coloque o microfone o mais próximo
possível do instrumento.
(Para cima)
Modo Auto CHROMATIC:
Pressionando [ ] e [ ], é possível reproduzir tons de referência emincrementos de semitom em cinco oitavas (de C2 a C7).
Modo Manual GUITAR:
A altura da corda solta selecionada (7B a 1E) é reproduzida.
Quando você está usando o recurso Flat, a altura do tom de referência é ajustada de acordo.
Ajuste Ajustes de fábrica originais
Ajuste do modo de afinação (CHROMATIC ou GUITAR) CHROMATIC
Altura de referência 440Hz
Números de corda no modo Manual GUITAR 6E
Tom de referência produzido CHROMATIC: C4GUITAR: 6E
Ajustes do recurso Accu-Pitch ON (ativado)
Ajustes da afinação em bemol (número de semitons)
Faixa de afinação
E0 (20,6 Hz) – C8 (4.186,0 Hz)
Expectativa de duração da pilha em uso contínuo
(carbono)
Aproximadamente 15 horasEsse número pode variar dependendo das condições reais de uso.
Altura de referência
A4 (de 438 a 445 Hz) Dimensões 147,5 (L) x 54,0 (P) x 23,9 (A) mm5 13/16 (L) x 2 1/8 (P) x 1 (A) polegadas
Precisão da afinação
± 1 centésimo Peso 138 g, 5 oz (incluindo pilhas)
Fonte de alimentação
2 pilhas R03 (carbono) ou LR03 (alcalina); tipo (AAA); 3V CCAdaptador CA CC 9V(série PSA; opcional)
Acessórios 2 pilhas carbono (tipo R03 (AAA)), Manual do proprietário, Cobertura, Folheto (“USO SEGURO DO EQUIPAMENTO” e “OBSERVAÇÕES IMPORTANTES”), Informações
Consumo 12 mA
Gebruikershandleiding
Dit speelt de referentietoon
en het Accu Pitch-geluid.
Deze wijzigen verschillende instellingen.
Het stemlampje toont hoe dicht u zich bij de
beoogde toonhoogte bevindt.
Stemgids
licht op: toon is te laag
lichten tegelijkertijd op: correct
gestemd (± 3 cent)
licht op: toon is te hoog
Naaldmeter
CHROMATIC/GUITAR
Meteraanpassingsbediening (onderkant van het apparaat)
Luidspreker
Dit schakelt het apparaat in en uit.POWER
FLAT
Plaats twee AAA-batterijen.
Batterijvak(onderkant van het apparaat)
Ingebouwde microfoon
(omlaag)/ (omhoog)
(Geluidsknop)
Dit wijzigt de instellingen voor de referentietoonhoogte.PITCH
DC IN-aansluiting
Sluit hier een gitaarversterker enz. aan.
Geluidsinvoer via de INPUT-aansluiting
wordt vanaf hier ongewijzigd weergegeven.
OUTPUT-aansluiting
Sluit de gitaar, basgitaar of een ander
instrument aan dat moet worden gestemd.
INPUT-aansluiting
LampjesDit wijzigt de stemmodus
Groen lampje: Auto CHROMATIC-modus
Rood lampje: Manual GUITAR-modus (voor het
stemmen van een specifieke
gitaar-/bassnaar)
Deze tonen de naam van de huidige noot (C-B),
de status (normale of verhoogde (#) noot), het
snaarnummer van de bas/gitaar, de
hoofdreferentietoonhoogte (438-445) en een
waarschuwing als de batterij leegloopt.
Sluit de netstroomadapter (optionele
BOSS PSA-reeks) hier aan.
Dit schakelt de Flat-functie in en uit.
Gebruik dit om het referentietoongeluid
in en uit te schakelen.
Gebruik dit om akoestische instrumenten te stemmen.
Plaats de microfoon zo dicht mogelijk bij het instrument.
Auto CHROMATIC-modus:
Door op [ ] en [ ] te drukken, kunt u referentietonen in stappen vanhalve tonen of vijf octaven (C2 tot C7) weergeven.
Manual GUITAR-modus:
De toonhoogte van de geselecteerde open snaar (7B tot 1E) wordtgespeeld.
Als u de Flat-functie gebruikt, wordt de toonhoogte van de referentietoon overeenkomstigaangepast.
Instelling Originele fabrieksinstellingen
Stemmodusinstelling (CHROMATIC of GUITAR) CHROMATIC
Referentietoonhoogte 440Hz
Snaarnummers in Manual GUITAR-modus 6E
Weergegeven referentietoonhoogte CHROMATIC: C4GUITAR: 6E
Instellingen van Accu-Pitch-functie ON (ingeschakeld)
Flat tuning-instellingen (aantal halve tonen)
Stembereik E0 (20,6Hz) – C8 (4.186,0Hz)
Verwachte batterijduur onder
voortdurend gebruik (carbon)
Ongeveer 15 uurDeze waarde varieert afhankelijk van de werkelijke gebruiksomstandigheden.
Referentietoonhoogte A4 (438–445Hz) Afmetingen 147,5 (B) x 54,0 (D) x 23,9 (H) mm5-13/16 (B) x 2-1/8 (D) x 1 (H)inch
Stemnauwkeurigheid ± 1 cent Gewicht 138 g, 5 oz (inclusief batterijen)
Voeding Droge batterij R03 (koolstof) of LR03 (alkaline); (AAA) type x 2; DC 3VNetstroomadapter DC 9V (PSA-reeks, optioneel)
Accessoires Droge batterij (R03 (AAA) type) x 2 (koolstof), gebruikershandleiding, beschermhoes, infoblad (“HET APPARAAT VEILIG GEBRUIKEN” en “BELANGRIJKE OPMERKINGEN”), informatie
Stroomverbruik 12 mA