OpenCV 2 0 Installation
11
Many of us thought of doing project in computer vision using OpenCV library. But beginners find it difficult to use the OpenCV library because of the installation problem. So here is an attempt to solve the problem of installation of the same. I assume os: windows XP and visual studio 2008 Express Edition. Step by Step Installation of OpenCV 2.0 1. Get the OpenCV 2.0 from ! 2. "#$%##$#$# 3. "&'%(!( And it is easy to install c make and vs2008. After installing them install OpenCV (order does not matter) in C:\OpenCV2.0 (recommended) and make sure that you choose the option as shown in the fig below (do not choose the first one ). Then press next and don’t change any configuration. And finish the installation.
Transcript of OpenCV 2 0 Installation

8/6/2019 OpenCV 2 0 Installation
http://slidepdf.com/reader/full/opencv-2-0-installation 1/11
Many of us thought of doing project in computer vision using OpenCV library. But beginnersfind it difficult to use the OpenCV library because of the installation problem. So here is an
attempt to solve the problem of installation of the same. I assume os: windows XP andvisual studio 2008 Express Edition.
Step by Step Installation of OpenCV 2.01. Get the OpenCV 2.0 from
! 2. " # $ % # # $ # $ #
3. " & ' % (! (
And it is easy to install cmake and vs2008. After installing them install OpenCV (order doesnot matter) in C:\OpenCV2.0 (recommended) and make sure that you choose the option asshown in the fig below (do not choose the first one ).
Then press next and don’t change any configuration. And finish the installation.

8/6/2019 OpenCV 2 0 Installation
http://slidepdf.com/reader/full/opencv-2-0-installation 2/11
Now it is time to configure the: CMake ( it has to be done with little care so that the restconfiguration is easy .
1. Go to Start-> all programs-> cmake-gui and configure as shown in the fig below. Eachentry explained.
1. For the first option ( where is the source code ) choose the installation directory of OpenCV2.0 using Browse Source button )
2. For the option ( where to build binaries ) choose the folder vs2008 ( but any name can be
given in the C:/OpenCV2.0/xyz). it is better to give vs2008 for generic but you canspecify any folder you want. (no need to create the folder vs2008 or xyz inc:/OpenCV2.0 explicitly the cmake will ask and it will create for you ).
3. Then press the Configure button (left bottom corner). Then the cmake will show you lotsof option as shown in the figure below.

8/6/2019 OpenCV 2 0 Installation
http://slidepdf.com/reader/full/opencv-2-0-installation 3/11
4. Now choose the visual studio 9 2008 as shown in the figure above and click finish andthe cmake will display the fig shown below. This is important step for the success.
5. Choose the option as shown in the figure.

8/6/2019 OpenCV 2 0 Installation
http://slidepdf.com/reader/full/opencv-2-0-installation 4/11
The option chosen: BUILD_EXAMPLES, BUILD_PACKAGES, BUILD_TEST,INSTALL_C_EXAMPLES, OPENCV_BUILD_3RDPARTY_LIBS,OPENCV_WHOLE_PROGRAM_OPTIMIZATION .
6. Now press Configure and the red color will disappear.7. Then, press Generate button (next to the Configure button) to complete the process. close
the cmake gui .8. Now come to Start->visual studio IDE and open the project where you have stored the
binaries (remember the second option of cmake). In this case I chosenC:/OpenCV2.0/vs2008/OpenCV, as shown in the figure.
9. Now press open to view all files related to opencv left side as shown in the fig below.Then build the project by choosing Build-> Build option ( important to build in bothDebug and Release ). Make sure that option debug is chosen (red circle).

8/6/2019 OpenCV 2 0 Installation
http://slidepdf.com/reader/full/opencv-2-0-installation 5/11
Ensure that message in output message window will display WARNING MEASSAGES (ignorethem) , 0 errors, Number of build , Number of up-to-date, and number of skipped. The point isyou should not get any errors (if you get the errors means the cmake options are not selectedproperly), in that case delete the vs2008 folder and repeat the cmake part through all over.
10. Next repeat the build process ( in case of success in the previous step) for Release option.make sure that you don’t get the errors.
11. Now after the success full build, close the project (not the IDE).12. Verify the required files (cv200d.lib, cvaux200d.lib etc is created by going
C:/OpenCV2.0/vs2008/lib/Debug and in ../Release (cv200.lib, cvaux200.lib etc)). If youfind them then your build process is correct otherwise the build process is not correct. If you see the required lib file then proceed with the next step.
13. Add C:/OpenCV2.0/vs2008/lib/Debug; C:/OpenCV2.0/vs2008/lib/Release to yoursystem path by, Mycomputer->properties->Advanced-> Environment variable->PATH->edit as circled and press ok as shown in the figure below ( this step is not
required but for the safer side I do it )

8/6/2019 OpenCV 2 0 Installation
http://slidepdf.com/reader/full/opencv-2-0-installation 6/11
14. In vc++ IDE go to Tool->Options->project and solution->vc++directories , as shownin the fig below.For the option Show directories for: select Include files : after that click in the box belowand include C:\OpenCV2.0\include\opencv (using the browse button which appearswhen you click in the lost entry) don’t delete any previous entries of vc++,
8/6/2019 OpenCV 2 0 Installation
http://slidepdf.com/reader/full/opencv-2-0-installation 7/11
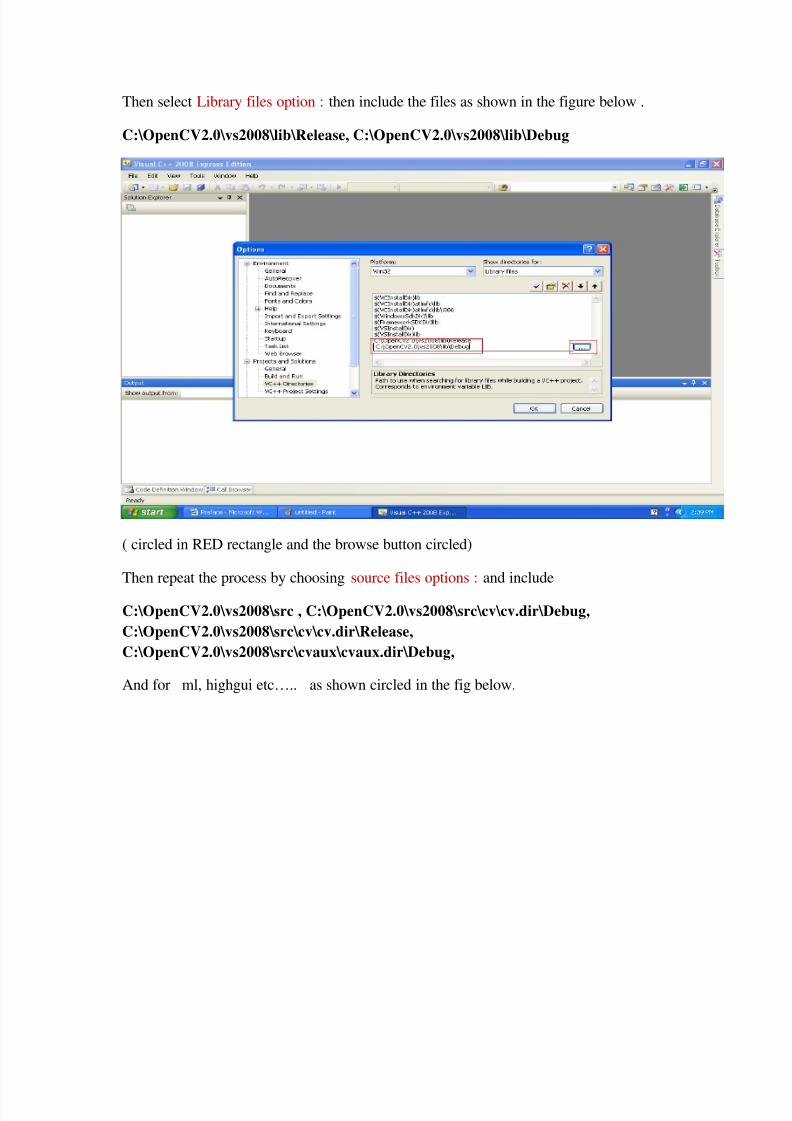
Then select Library files option : then include the files as shown in the figure below .
C:\OpenCV2.0\vs2008\lib\Release, C:\OpenCV2.0\vs2008\lib\Debug
( circled in RED rectangle and the browse button circled)
Then repeat the process by choosing source files options : and include
C:\OpenCV2.0\vs2008\src , C:\OpenCV2.0\vs2008\src\cv\cv.dir\Debug,C:\OpenCV2.0\vs2008\src\cv\cv.dir\Release,C:\OpenCV2.0\vs2008\src\cvaux\cvaux.dir\Debug,
And for ml, highgui etc….. as shown circled in the fig below.

8/6/2019 OpenCV 2 0 Installation
http://slidepdf.com/reader/full/opencv-2-0-installation 8/11
15. After successful completion of above steps .Now time to write some opencv programme.
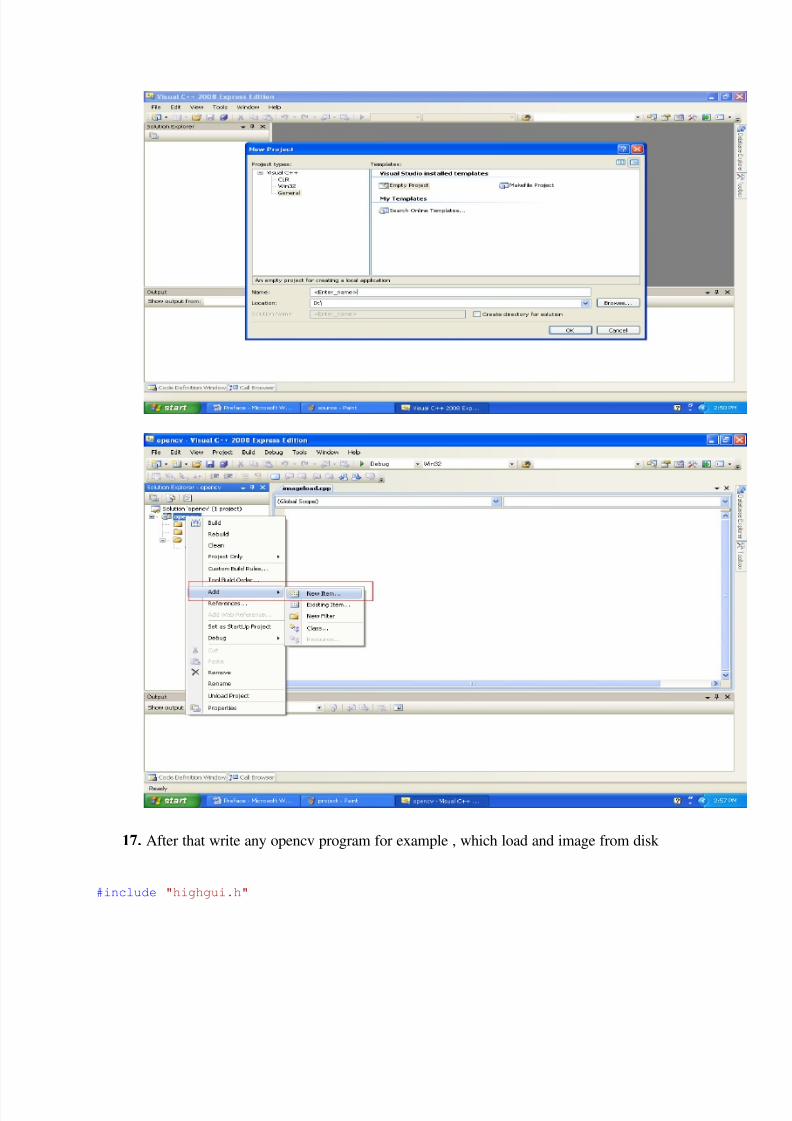
16. In the IDE Open File->New->project the window will appear choose empty project and give the name of the project and click ok (see fig below) I have given as opencv (see option < Enter_name >) and the IDE will show the solution browser. And right click on the opencv project Add ->New item and give the c++ file name ( hereimageload.cpp) is given as shown in the next figure respectively.
8/6/2019 OpenCV 2 0 Installation
http://slidepdf.com/reader/full/opencv-2-0-installation 9/11
17. After that write any opencv program for example , which load and image from disk
#include "highgui.h"

8/6/2019 OpenCV 2 0 Installation
http://slidepdf.com/reader/full/opencv-2-0-installation 10/11
int main ( int argc, char ** argv){
IplImage* img= cvLoadImage(argv[1]);cvNamedWindow( "e" , CV_WINDOW_AUTOSIZE);cvShowImage( "e" ,img);cvWaitKey(0);cvReleaseImage(&img);cvDestroyWindow( "e" );
}
18. If you build you will get surely errors. Don’t worry another last importantconfiguration need to be done.
19. Go to Project->Properties ( in this case opencv properties) and select Configurationproperties->Linker->Input and goto additional Dependencies and copy these filename their : cv200.lib cvaux200.lib highgui200.lib cxcore200.lib ml200.libopencv_ffmpeg200.lib cxts200.lib
(observe no commas, and has to do this step for each new project) as shown in the figbelow
and press ok /apply .
20. Then build no errors will be displayed.21. Then open command prompt by Start->Run->cmd,

8/6/2019 OpenCV 2 0 Installation
http://slidepdf.com/reader/full/opencv-2-0-installation 11/11
22. Change dir to the project debug folder and execute the .exe file by giving the image fileas the argument ( make sure that the file is in debug folder for simplicity )
Welcome to OpenCV. Lookingforward to share furtherOpenCV knowledge andcontribute to its development.Any question about installation please contact me : [email protected]