
MODEL GF II OPERATOR’S MANUAL - Commercial...
30
MODEL GF – II OPERATOR’S MANUAL Covering Quik n’ Crispy Part Numbers: 600015 600020 600025 600035
-
Upload
duongthuan -
Category
Documents
-
view
214 -
download
1
Transcript of MODEL GF II OPERATOR’S MANUAL - Commercial...

MODEL GF – II OPERATOR’S MANUAL
Covering Quik n’ Crispy Part Numbers:
600015 600020 600025 600035

©2016 QNC, Inc. 0601 230V ECOM Page 2

©2016 QNC, Inc. 0601 230V ECOM Page 3
Table of Contents
INTRODUCTION 4
PACKING LIST 4
INSTALLATION INSTRUCTIONS 5
INSTALLATION PROCEDURES 6
POSITIONING THE SEPARATION WALL AND SPLASHGUARD 8
THE INITIAL OPERATION OF YOUR QUIK N' CRISPY® 11
RECALIBRATING THE TOUCH SCREEN 12
RECIPE TIME AND TEMPERATURE SETTINGS 13
CONFIGURATION ACCESS 14
RECIPE EDITING 15
NAME & COOK SEGMENT EDITING 16
COOKING A RECIPE 17
COOKING WINDOW 18
COOKING PROCEDURES 19
CLEANING PROCEDURES 23
PRODUCT REGISTRATION 27
SERVICE 27
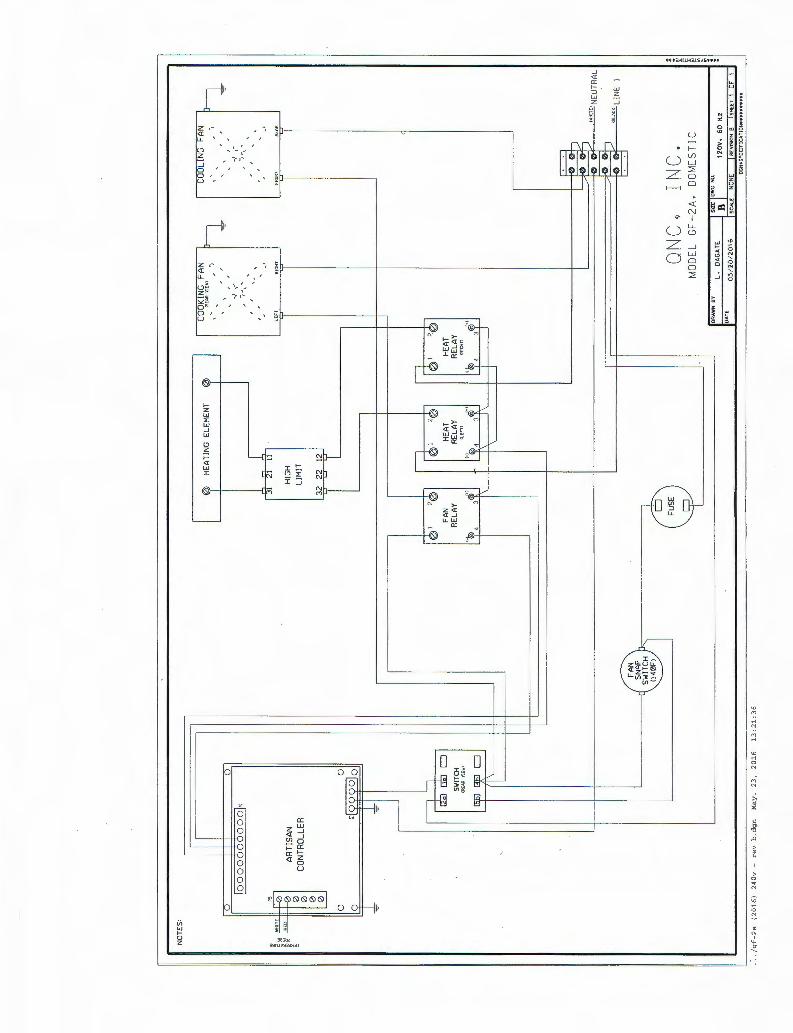
WIRING DIAGRAMS 28
©2016 QNC, Inc. 0601 230V ECOM Page 4
INTRODUCTION Marketed since 1990, the Quik n' Crispy® Fat Free Fryer is the result of years of research, development, and refinement. By using the principles of forced hot air and radiant heat, the Quik n' Crispy can quickly cook and brown a number of "oven ready" convenience foods. This easy‐to‐use countertop greaseless fryer safely and efficiently eliminates the health concerns, expense, and operating difficulties inherent with hot oil cooking processes.
PACKING LIST
Included in the Quik n' Crispy® Greaseless Fryer packing carton are the following items: 1 Quik n' Crispy® Greaseless Fryer 1 Cooking Basket Assembly 1 Cooking Basket Handle & Mounting Screws 1 Drip Tray 1 Separation Wall Panel 1 Removable Front Panel 1 Splash Guard for Cooking Chamber Ceiling 4 Adjustable Legs 1 Operator's Manual 1 Product Registration Form
©2016 QNC, Inc. 0601 230V ECOM Page 5
INSTALLATION INSTRUCTIONS
Before the installation of your Quik n' Crispy®, a suitable position in your retail location should be selected. Points to consider when selecting a location are: 1. Accessibility by store employees 2. Proximity to customers 3. Proximity to refrigerator and freezer equipment 4. Proximity to other retail points of sale to take advantage of cross
merchandising opportunities 5. Sight‐line of customer (to enhance customer perception of "fresh"
preparation). The Quik n' Crispy® should be mounted on a sturdy food service appropriate table. Stainless steel would be the preferable material. Allow for a certain amount of work space near the Quik n' Crispy® Greaseless Fryer so that operators will not have to work in a confined location. We recommend a minimum of 1” or 2.54 cm. of space between the rear, sides and top of the Quik n' Crispy, and the walls, ceiling or other structural surfaces of your facility. In addition to suitable locations, accommodation must be made for the necessary electrical hookups. Please note the following electrical specifications.
Electrical Specifications Single phase only • 50 / 60 Hz.
USA domestic unit plugs and power cords (6’) are shown on Page 2 on the Specification Sheet. International unit Information is below.
Cord: 2 m. length HO7RN‐F 3G1.5 mm2 Plug: British Standard 240 volt, 50 Hz.; 13 amp max. Or Continental European "Schuko" 220 volt ‐ 230 volt, 50 Hz.; 16 amp max.
©2016 QNC, Inc. 0601 230V ECOM Page 6
INSTALLATION PROCEDURES 1. The weight of the Quik n’ Crispy is approximately 70 lb. / 25 kg. The use
of a second person is advised for portions of this installation. 2. Open the shipping carton and fold back the shipping carton flaps. With
the flaps folded back, rotate the carton upside down on the floor. 3. Lift the carton leaving the Quik n' Crispy® and the corrugated packing set
in place on the floor. 4. Remove the corrugated packing set from around the Quik n' Crispy®. 5. Remove the cooking basket handle, mounting screws, and adjustable
legs from the Operators Manual zip lock bag. 6. Screw the 4 adjustable legs into the bottom of the fryer. 7. Lift the fryer into position on the designated counter. Again, we
recommend minimum of 1” / 2.54 cm. clearance from any adjacent walls or equipment.
8. Adjust the legs to balance the fryer on the designated counter. 9. Attach the cooking basket handle to the cooking basket. A #2 Phillips
head screwdriver and a 5/16" wrench are recommended. 10. Inspect the separation wall panel and look to see that it is mounted
properly. Because this is a five‐step process, we have included a separate installation procedure on pages 5 to 7. Please turn to page 5 at this time and install the separation wall panel.
11. Once the separation wall panel is installed, place the drip tray onto the
bottom drawer guides, angle it upwards to a 45° angle to clear the stop and slide it in. This tray should slide in freely.
©2016 QNC, Inc. 0601 230V ECOM Page 7
12. Place the cooking basket onto the drip tray. The two parts should now slide in and out of the hot‐air fryer in unison.
13. At this point, be sure that the electrical breaker for the Quik n' Crispy®
Greaseless Fryer is in the "OFF" position. Plug in your Quik n' Crispy® Greaseless Fryer, then turn the circuit breaker to the "ON" position.
©2016 QNC, Inc. 0601 230V ECOM Page 8
POSITIONING THE SEPARATION WALL AND SPLASHGUARD
WARNING! Before proceeding, make sure the Quik n' Crispy power switch is in the “OFF” position (this is the left position of the On/Off Switch) and that the fan blower is stationary and that the cooking chamber and heating element are not hot! 1. Lift the Removable Front Panel (RFP) that is located directly above the
Cooking Basket by applying slight upward pressure. It should slide out at an upward angle.
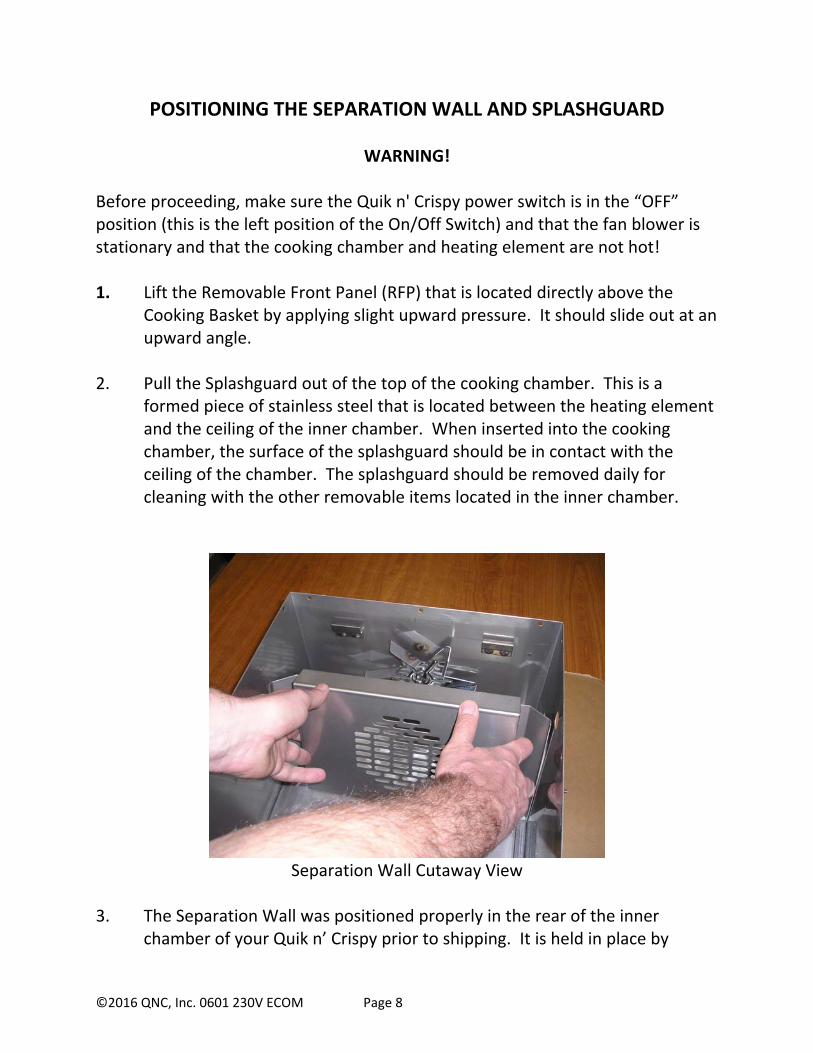
2. Pull the Splashguard out of the top of the cooking chamber. This is a
formed piece of stainless steel that is located between the heating element and the ceiling of the inner chamber. When inserted into the cooking chamber, the surface of the splashguard should be in contact with the ceiling of the chamber. The splashguard should be removed daily for cleaning with the other removable items located in the inner chamber.
Separation Wall Cutaway View
3. The Separation Wall was positioned properly in the rear of the inner
chamber of your Quik n’ Crispy prior to shipping. It is held in place by

©2016 QNC, Inc. 0601 230V ECOM Page 9
gravity with two inverted “U” channels that are formed on the back of the Separation Wall, mating with two “U” channel tabs that are located on either side of the fan (See picture above) on the rear wall of the cooking chamber. The Separation Wall can often come off the tabs that hold it in place during shipping. Please check and confirm that it is installed properly by removing and replacing the Separation Wall at this time. The photo above illustrates how the separation wall is installed. It was taken with the top off of the Quik n’ Crispy in order to clearly show the installation. It is not necessary to remove the top to accomplish this procedure.
4. Place your hands on each side of the Separation Wall and lift it straight up
to the ceiling of the chamber to clear the mounting tabs. Pull the Separation Wall towards you until it makes contact with the Heating Element. Now pull the bottom of the Separation Wall out first and angle it out of the inner chamber with the bottom of the Separation Wall coming out of the inner chamber first.
5. Reverse the process and reinstall the Separation Wall by grasping it by the
sides with both hands and insert it into the front opening of the Quik n' Crispy, entering the front opening just above the top set of Drip Tray guides. Insert the wall straight back into the Quik n' Crispy until you touch the rear wall of the cooking chamber keeping the Separation Wall parallel to the floor of the Quik n' Crispy.
6. Angle the top portion of the Separation Wall upward towards the ceiling of
the inner chamber until it comes in contact with the ceiling. Slide the Separation Wall further back into the inner chamber so that it comes in contact with the rear wall of the inner chamber. Now lower the Separation Wall so that the two tabs of the Separation Wall catch onto the tabs on the top right and left sides of the rear wall of the cooking chamber. The Separation Wall should now be hanging upright, with the bottom of the Separation Wall approximately .25" / .635 cm up off the floor of the cooking chamber.
7. Slide the Splashguard back into the top of the inner chamber. Please note
that the surface of the splashguard should be closest to the ceiling of the inner chamber.

©2016 QNC, Inc. 0601 230V ECOM Page 10
8. Place the Removable Front Panel back onto the front of the Quik n’ Crispy.
It will slide down at an angle onto the four pins that are located on the front of the unit.
9. Please note that on the INTERNATIONAL UNITS ONLY, there is a safety switch installed on the right rear wall of the cooking chamber. This switch will be depressed when the Separation Wall is properly installed. If the Separation is not properly installed, the safety switch will remain in the Open Position, and the cooking blower will not operate. Insure that when the Separation Wall is installed that the flat part is making solid contact with the rear wall of the oven chamber and depressing the safety switch.

©2016 QNC, Inc. 0601 230V ECOM Page 11
THE INITIAL OPERATION OF YOUR QUIK N' CRISPY® The first operating cycle after installation should be a confirmation of the hot‐air fryer's proper working order. To do this, we recommend that you depress the switch to the right "POWER ON" position. The controller should display the Quik n’ Crispy logo with the caption “Touch to Start”.
Next, touch the screen and the next screen will display the 15 Recipes that have been preprogrammed into your Quik n’ Crispy. These settings are shown on the next page:

©2016 QNC, Inc. 0601 230V ECOM Page 12
RECALIBRATING THE TOUCH SCREEN
The LCD Touch Screen Control Panel has been calibrated at our factory prior to shipping your Quik n’ Crispy. However, if you determine that the calibration isn’t accurate, it’s easy to recalibrate the touch screen.
1. Turn the Quik n’ Crispy on and wait for the Quik n’ Crispy logo screen to appear. Using your finger or stylus, hold down on the logo screen for 5 seconds until you hear a double beep.
2. The next screen will read “Performing touch screen calibration”. Touch
the screen to continue.
3. You will then have 4 circles appear, one at a time, in each corner of the
screen. Press and release on each of the filled circles. If you are satisfied with the initial calibration then touch the screen to continue. If you wish to do over, repeat the process from Step 1.

©2016 QNC, Inc. 0601 230V ECOM Page 13
RECIPE TIME AND TEMPERATURE SETTINGS Below are the cooking time and temperatures that have been preprogrammed into each of the 15 menus. If you desire to change any of these settings, please see the following section.
Menu Temperature F° Temperature F° Temperature C° Time
120 Volt Units 208/240 Volt Units International
1 420° 400° 215° 1:00
2 420° 400° 215° 2:00
3 420° 400° 215° 2:30
4 420° 400° 215° 3:00
5 420° 400° 215° 3:30
6 420° 400° 215° 4:00
7 420° 400° 215° 4:30
8 420° 400° 215° 5:00
9 420° 400° 215° 5:30
10 420° 400° 215° 6:00
11 400° 370° 205° 6:30
12 400° 370° 205° 7:00
13 400° 370° 205° 7:30
14 400° 370° 205° 8:00
15 400° 370° 205° 8:30
The following section will explain in more detail how to access the programmable features of the LCD Controller. Please note that to access the configuration screen, the bottom right hand corner of the display must be held until the operator hears a double chirp.
LCD Controller User’s Manual
CONFIGURATION ACCESS
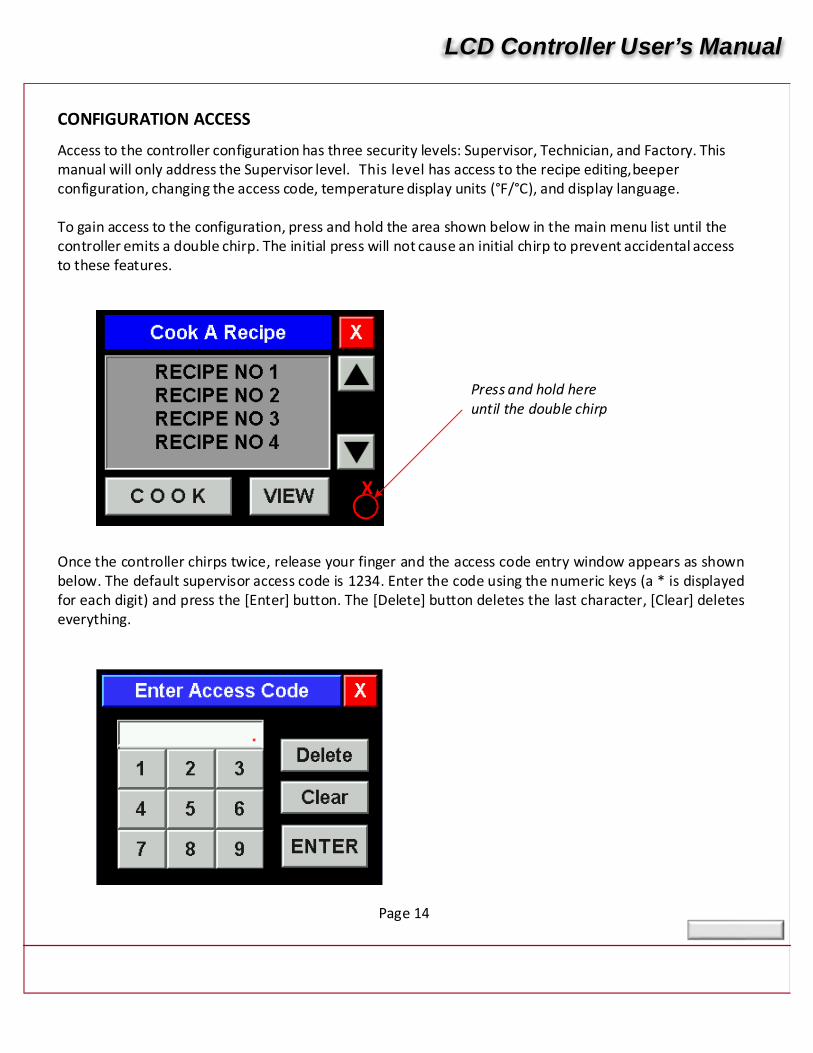
Access to the controller configuration has three security levels: Supervisor, Technician, and Factory. This manual will only address the Supervisor level. This level has access to the recipe editing, beeper configuration, changing the access code, temperature display units (°F/°C), and display language. To gain access to the configuration, press and hold the area shown below in the main menu list until the controller emits a double chirp. The initial press will not cause an initial chirp to prevent accidental access to these features.
Press and hold here until the double chirp
X
Once the controller chirps twice, release your finger and the access code entry window appears as shown below. The default supervisor access code is 1234. Enter the code using the numeric keys (a * is displayed for each digit) and press the [Enter] button. The [Delete] button deletes the last character, [Clear] deletes everything.
Page 14
LCD Controller User’s Manual
RECIPE EDITING
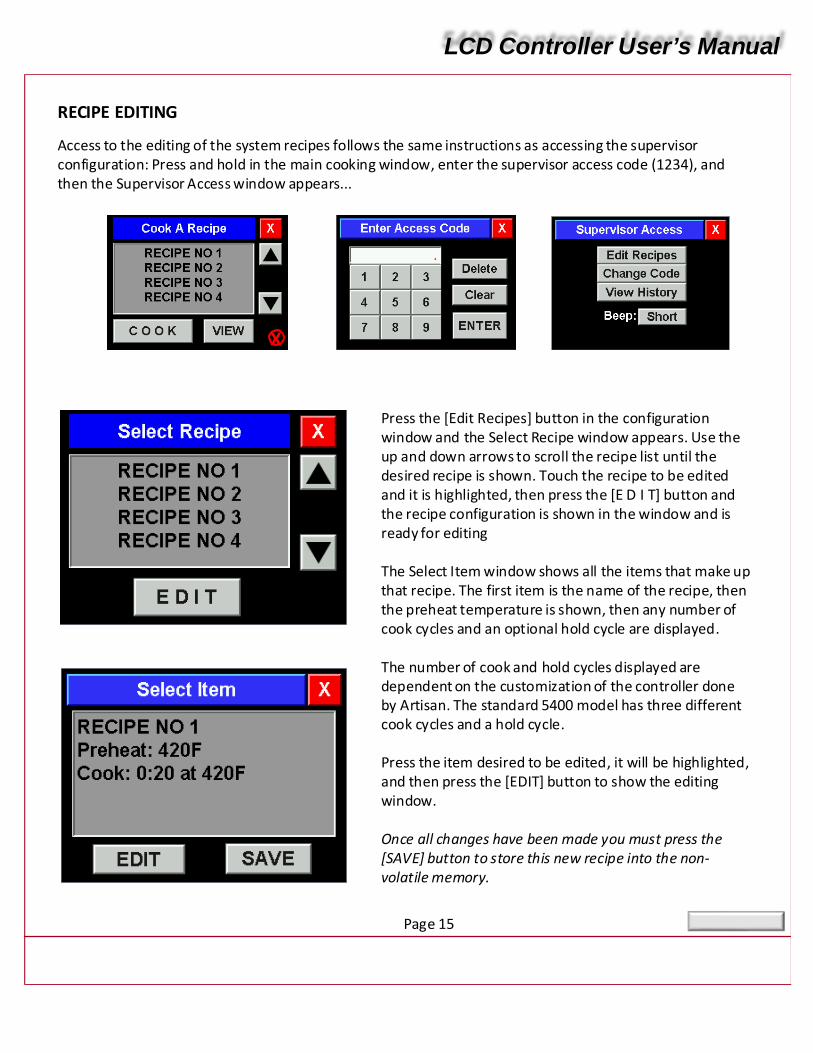
Access to the editing of the system recipes follows the same instructions as accessing the supervisor configuration: Press and hold in the main cooking window, enter the supervisor access code (1234), and then the Supervisor Access window appears...
X
Press the [Edit Recipes] button in the configuration window and the Select Recipe window appears. Use the up and down arrows to scroll the recipe list until the desired recipe is shown. Touch the recipe to be edited and it is highlighted, then press the [E D I T] button and the recipe configuration is shown in the window and is ready for editing
The Select I tem window shows all the items that make up that recipe. The first item is the name of the recipe, then the preheat temperature is shown, then any number of cook cycles and an optional hold cycle are displayed.
The number of cook and hold cycles displayed are dependent on the customization of the controller done by Artisan. The standard 5400 model has three different cook cycles and a hold cycle.
Press the item desired to be edited, it will be highlighted, and then press the [EDIT] button to show the editing window.
Once all changes have been made you must press the [SAVE] button to store this new recipe into the non‐ volatile memory.
Page 15
LCD Controller User’s Manual
NAME & COOK SEGMENT EDITING
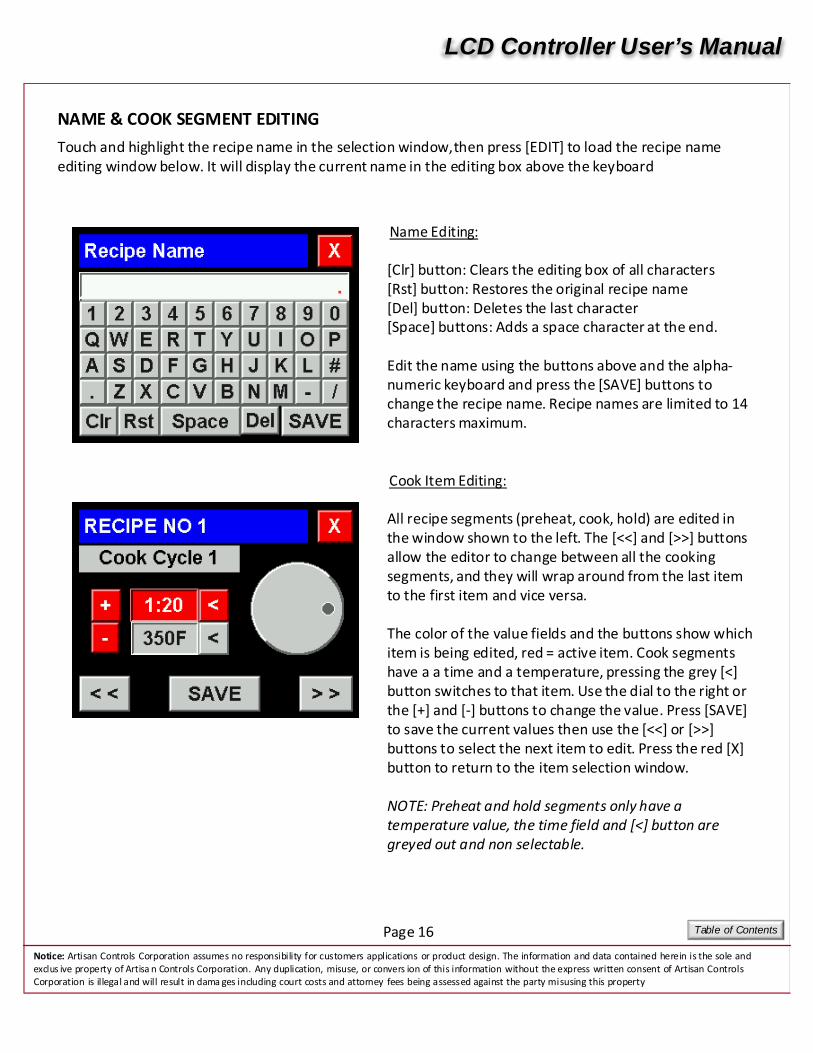
Touch and highlight the recipe name in the selection window, then press [EDIT] to load the recipe name editing window below. It will display the current name in the editing box above the keyboard
Name Editing:
[Clr] button: Clears the editing box of all characters [Rst] button: Restores the original recipe name [Del] button: Deletes the last character [Space] buttons: Adds a space character at the end.
Edit the name using the buttons above and the alpha‐ numeric keyboard and press the [SAVE] buttons to change the recipe name. Recipe names are limited to 14 characters maximum.
Cook Item Editing:
All recipe segments (preheat, cook, hold) are edited in the window shown to the left. The [<<] and [>>] buttons allow the editor to change between all the cooking segments, and they will wrap around from the last item to the first item and vice versa.
The color of the value fields and the buttons show which item is being edited, red = active item. Cook segments have a a time and a temperature, pressing the grey [<] button switches to that item. Use the dial to the right or the [+] and [‐] buttons to change the value. Press [SAVE] to save the current values then use the [<<] or [>>] buttons to select the next item to edit. Press the red [X] button to return to the item selection window.
NOTE: Preheat and hold segments only have a temperature value, the time field and [<] button are greyed out and non selectable.
Page 16 Table of Contents
Notice: Artisan Controls Corporation assumes no responsibility for cus tomers applications or product design. The information a nd data contained herein is the sole and exclus ive property of Artisa n Controls Corporation. Any duplication, misuse, or convers ion of this information without the express written consent of Artisan Controls Corporation is illega l a nd will result in dama ges including court costs and attorney fees being a ssess ed against the party mi susing this property

LCD Controller User’s Manual
COOKING A RECIPE
Touch and highlight the recipe name in the selection window , then press [VIEW] to view the recipe details as shown in the window to the right. Press the [C O O K] button to open the window showing the [PREHEAT] and [C O O K] buttons in order to start cooking
Touching the [T] button will display the current oven temperature. Press the [PREHEAT] or [C O O K] buttons to start cooking.
The cooking progress is displayed in the above window. See the next page for more details
Page 17 Table of Contents
LCD Controller User’s Manual
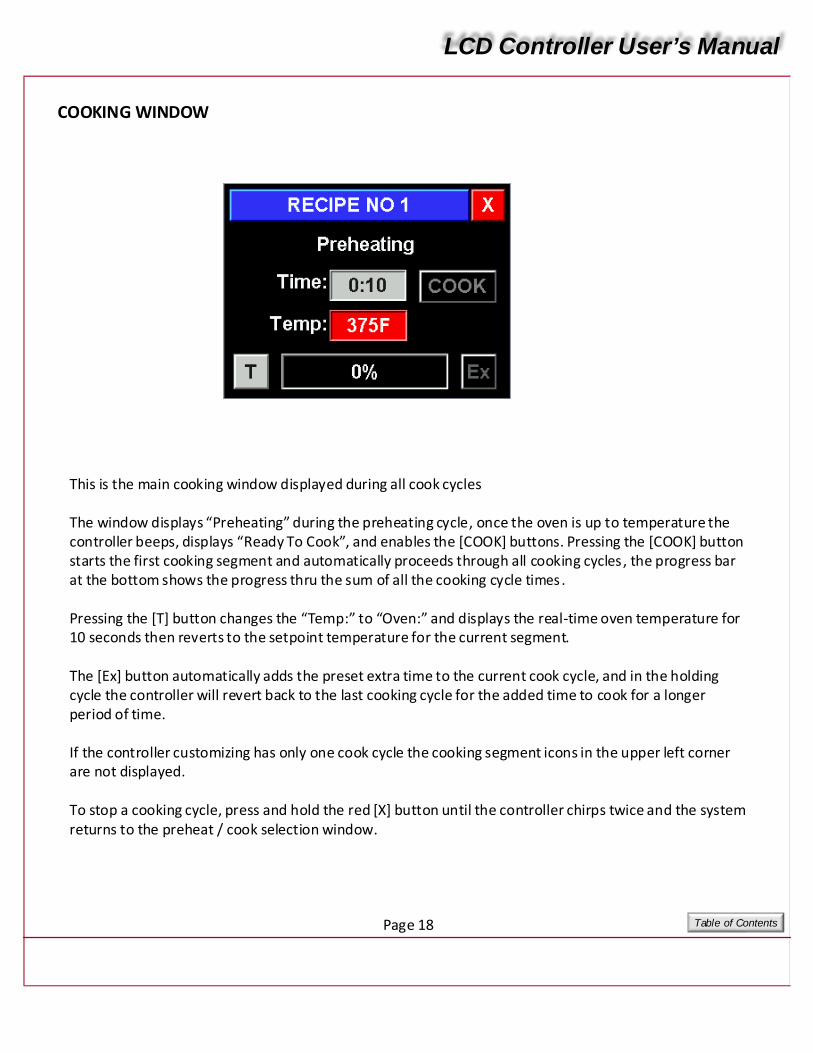
COOKING WINDOW
This is the main cooking window displayed during all cook cycles
The window displays “Preheating” during the preheating cycle , once the oven is up to temperature the controller beeps, displays “Ready To Cook”, and enables the [COOK] buttons. Pressing the [COOK] button starts the first cooking segment and automatically proceeds through all cooking cycles , the progress bar at the bottom shows the progress thru the sum of all the cooking cycle times .
Pressing the [T] button changes the “Temp:” to “Oven:” and displays the real‐time oven temperature for 10 seconds then reverts to the setpoint temperature for the current segment.
The [Ex] button automatically adds the preset extra time to the current cook cycle, and in the holding cycle the controller will revert back to the last cooking cycle for the added time to cook for a longer period of time.
If the controller customizing has only one cook cycle the cooking segment icons in the upper left corner are not displayed.
To stop a cooking cycle, press and hold the red [X] button until the controller chirps twice and the system returns to the preheat / cook selection window.
Page 18 Table of Contents

©2016 QNC, Inc. 0601 230V ECOM Page 19
COOKING PROCEDURES The Quik n' Crispy can fry, grill, and bake a wide array of frozen, oven‐ready products available through normal food service distribution and wholesale clubs. To prepare "fried" menu items in the Quik n’ Crispy, the foods selected must have oven preparation directions listed on the package. As an example, egg rolls, corn dogs, beer battered or tempura battered vegetables and battered cheese sticks are typically fryable or bakeable. Seasoned or coated French fries or potato wedges are fryable or bakeable. These types of products will come out of the Quik n' Crispy crisp on the outside and moist on the inside as if they were fried. To prepare a non‐battered, non‐coated, or non‐seasoned menu item, it must be a bakeable version. To prepare shoestring or crinkle cut French fries, or skin‐on potato wedges, you must use a bakeable version. Menu items prepared in the Quik n' Crispy that do not have baking directions listed on the package will typically be soggy and limp, and will not change in color from a pale white to a golden brown. Contact your food distributor to order the correct version of the menu item to prepare. If the food distributor salesperson is not sure of the menu items that can be prepared in the Quik n’ Crispy, have them review the 32 page menu found in this Operators Manual, or have them contact the Quik n’ Crispy distributor, or QNC, Inc. directly. To prepare breaded items such as chicken nuggets and chicken strips either a pre‐cooked or a fully cooked product must be used. Pre‐cooked means that the product has been partially cooked, is pre‐browned on the outside, and the interior of the product is raw. Fully cooked means that the product is cooked on both the outside and the interior. You cannot prepare ready‐to‐cook items that have a white breading on the outside. They will cook, but they will not turn golden brown in the Quik n' Crispy. To grill foods in the Quik n' Crispy, you should use pre‐cooked or fully cooked meat, poultry, or fish products. As an example, hot dogs and some sausages are fully cooked products and could be consumed cold right from the package. These items will grill in the Quik n' Crispy with a charbroiled appearance. To prepare grilled chicken breasts or hamburgers, use fully cooked products. These products
©2016 QNC, Inc. 0601 230V ECOM Page 20
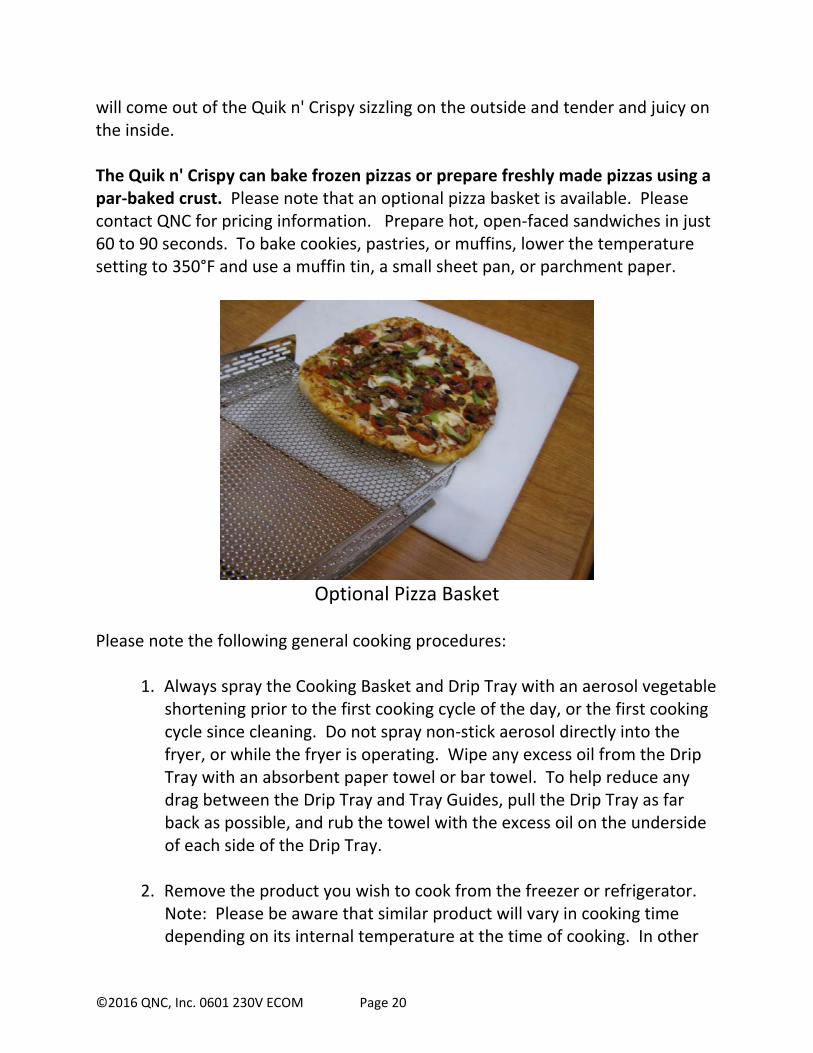
will come out of the Quik n' Crispy sizzling on the outside and tender and juicy on the inside. The Quik n' Crispy can bake frozen pizzas or prepare freshly made pizzas using a par‐baked crust. Please note that an optional pizza basket is available. Please contact QNC for pricing information. Prepare hot, open‐faced sandwiches in just 60 to 90 seconds. To bake cookies, pastries, or muffins, lower the temperature setting to 350°F and use a muffin tin, a small sheet pan, or parchment paper.
Optional Pizza Basket
Please note the following general cooking procedures:
1. Always spray the Cooking Basket and Drip Tray with an aerosol vegetable shortening prior to the first cooking cycle of the day, or the first cooking cycle since cleaning. Do not spray non‐stick aerosol directly into the fryer, or while the fryer is operating. Wipe any excess oil from the Drip Tray with an absorbent paper towel or bar towel. To help reduce any drag between the Drip Tray and Tray Guides, pull the Drip Tray as far back as possible, and rub the towel with the excess oil on the underside of each side of the Drip Tray.
2. Remove the product you wish to cook from the freezer or refrigerator.
Note: Please be aware that similar product will vary in cooking time depending on its internal temperature at the time of cooking. In other

©2016 QNC, Inc. 0601 230V ECOM Page 21
words, frozen fried chicken will take longer to cook than the same fried chicken that has been thawed in the refrigerator.
3. If this is the first cooking cycle of the day the Quik n' Crispy® Greaseless
Fryer needs to be warmed up to 210°C. This should take 4 to 5 minutes. 210°C is the temperature at which you will prepare most or all of your menu items in your 230V Quik n' Crispy®. Cooking at a temperature higher than this can cause the Quik n' Crispy® to smoke. If smoke is emitted from the Quik n' Crispy®, lower the temperature setting.
4. Grab the handle and slide the Cooking Basket and Drip Tray approximately 2/3 of the way out of the Quik n’ Crispy. The Drip Tray will act as a crumb catcher while placing the food product into the Cooking Basket.
1. 2. Placing Items in Cooking Basket
5. Arrange the product to be cooked in a single layer in the Cooking Basket.
Avoid stacking the product to be cooked. An even single layer of product will cook more evenly than products placed into the Cooking Basket in a stacked or clumped arrangement.

©2016 QNC, Inc. 0601 230V ECOM Page 22
6. Select a Menu time to approximately 70% of the food manufacturer's suggested convection oven cooking times. As an example, if the suggested convection oven cooking time is 10 minutes, this item should take approximately 7 minutes in the Quik n' Crispy. If Menu 12 is programmed to 7 minutes, use this menu program. Review the enclosed 32 page menu for suggested cooking times for various menu items.
7. Please be aware that variations in the cooking times will occur depending on the internal temperature of the food product, variances in voltages, and the quantity of food being cooked at one time. We suggest that you experiment with cooking times and temperatures and record the results for future reference. This testing will prevent under‐cooking or burning of food products.
8. Pull the Drip Tray and Cooking Basket out simultaneously upon completion of the cooking process. Remove cooked product with spatula or tongs or, in the case of food products like oven chips, remove the Cooking Basket with both hands on the handle, and dump the food product into a foil pan or holding container.
Emptying the Cooking Basket

©2016 QNC, Inc. 0601 230V ECOM Page 23
CLEANING PROCEDURES
NOTE: PRIOR TO ANY CLEANING OR MAINTENANCE, THE ON/OFF POWER SWITCH MUST BE IN THE LEFT "OFF" POSITION. THIS SAFETY
PRECAUTION WILL PREVENT ACCIDENTAL EXPOSURE TO HIGH VOLTAGE. There are two types of cleaning procedures recommended for the Quik n' Crispy. The first is to prevent product buildup on the Cooking Basket during the day, as well as transfer of flavors from one product to the next. This is accomplished by using the following procedure:
1. After preparing menu items in the Quik n’ Crispy, a layer or coating of sauce, crumbs, or batter may be deposited on the Cooking Basket or Drip Tray. You should remove these deposits before cooking another batch of food. Pull back on the Cooking Basket and with it still over the Drip Tray; brush the inside of the basket with a brass bristle brush. Turn the basket over and repeat brushing in the other direction. All large food particles should then be removed from the Cooking Basket.
Brushing the Cooking Basket
©2016 QNC, Inc. 0601 230V ECOM Page 24
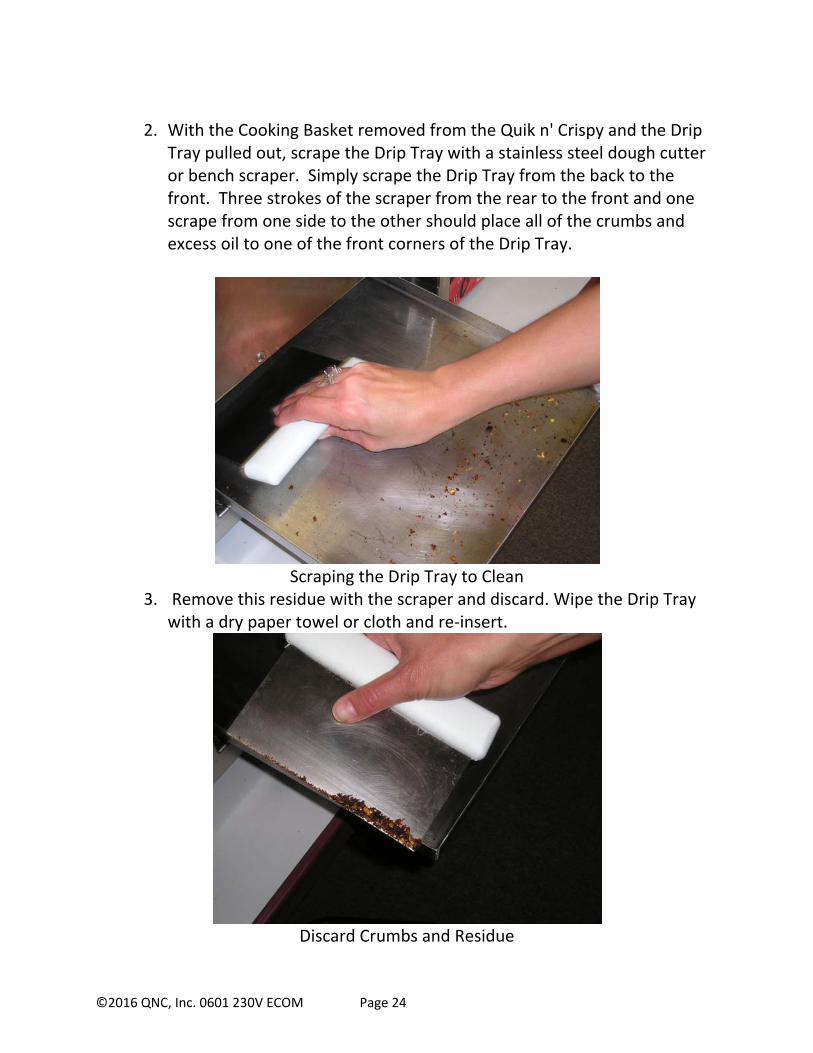
2. With the Cooking Basket removed from the Quik n' Crispy and the Drip
Tray pulled out, scrape the Drip Tray with a stainless steel dough cutter or bench scraper. Simply scrape the Drip Tray from the back to the front. Three strokes of the scraper from the rear to the front and one scrape from one side to the other should place all of the crumbs and excess oil to one of the front corners of the Drip Tray.
Scraping the Drip Tray to Clean
3. Remove this residue with the scraper and discard. Wipe the Drip Tray with a dry paper towel or cloth and re‐insert.
Discard Crumbs and Residue

©2016 QNC, Inc. 0601 230V ECOM Page 25
Both the brass bristle brush and bench scraper are available from QNC, Inc. or your Quik n' Crispy distributor.
For complete cleaning at the end of the day, repeat the above procedure, and
then: 1. Remove the Cooking Basket Assembly from the Quik n’ Crispy, and with
the use of oven mitts, lift the Removable Front Panel that is located directly above the Cooking Basket by applying slight upward pressure. Pull the Splashguard out of the top of the cooking chamber and then remove the Drip Tray from the cooking chamber. After you have
allowed the Separation Wall to cool down, remove it from the interior of the Quik n’ Crispy (The time to cool the Separation Wall can be reduced by turning on the fan motor only with the power switch pushed to the left “Fan Only” position).
2. Place the Cooking Basket, Drip Tray, Splashguard, the two piece
Removable Front Panel, and Separation Wall (which has been removed according to a reversal of the installation procedures on pages 7 and 8 of this manual) into a sink containing a pre‐soak solution with a commercial degreaser. We suggest that the use of a wire brush for cleaning the Cooking Basket and green scrubbing pad for other stainless steel items. The items should then be cleaned according to local health department guidelines. This usually requires the steps of washing, rinsing, sanitizing, and air‐drying.
An alternative to cleaning these 4 parts in your sink is to soak them
overnight in a solution of Dip Tank Cleaner (DTC‐2), and water. CAUTION: ALWAYS WEAR RUBBER GLOVES AND EYE PROTECTION WHEN HANDLING CAUSTIC CHEMICALS. DTC‐2 is a caustic chemical available from either your Quik n' Crispy distributor or QNC, Inc. Please call 1‐888‐668‐3687 for more information. A complete 2 lb. Jar of DTC‐2 should be added to 8 gallons of water in a 10‐gallon storage container. This solution should be reused for 30 to 45 days depending on the quantity and types of foods prepared in the Quik n’ Crispy. A minimum of 4 hours of soaking is recommended to remove baked‐on carbonized grease that may be on these parts. During this time the grease will
©2016 QNC, Inc. 0601 230V ECOM Page 26
dissolve and the Cooking Basket, Drip Tray, Splashguard, two piece Removable Front Panel, and Separation Wall will be cleaned of the carbonized build‐up. Prior to re‐inserting these parts into your Quik n' Crispy, wash, rinse and sanitize them. Allow them to air dry and then place them back into the Quik n' Crispy.
3. Depending on the amount of carbonized food accumulation on the
inside of the Quik n' Crispy, it may be necessary to clean the inside of the cooking chamber with a commercial oven cleaner possibly as often as each day or as infrequently as once a week. The frequency depends on the quantity of foods you prepare and the oil content of these various foods. Always use these products in accordance with manufacturer's directions.
QNC, or your Quik n' Crispy® distributor, has available an oven cleaner
called Dip‐R‐Spray, an excellent cleaner for use in your Quik n' Crispy®. It is safe to use and is the quickest, easiest to use oven cleaner that we have evaluated to date. It is applied to the interior of the oven after it has been pre‐warmed to 94° C. Upon contact with the spray, the carbonized grease is dissolved and easily removed with a damp cloth. The interior of the oven is then sprayed lightly with a vinegar and water solution to neutralize the Dip‐R‐Spray and wiped with a clean cloth. The interior of the unit will be left clean and streak free.
The Quik n' Crispy is now ready for the next use. Please note that we recommend the replacement of the Quik n’ Crispy Dip Tank Cleaner solution every 30 days. During this 30 day time period, the DTC‐2 solution will start to neutralize and loose its effectiveness. The chemical reaction of the active chemicals in the DTC‐2 in conjunction with the grease or carbon that is adhered to the interior components of your Quik n’ Crispy forms a crude form of soap that floats to top of your soaking container. This can be removed periodically with a disposable coffee filter or some other type of skimmer. At the end of the 30 days the solution can be disposed of in your sewage system. The pH in the end solution is typically milder than that of a drain cleaner. If you are utilizing a septic system, or you wish to further neutralize the solution prior to

©2016 QNC, Inc. 0601 230V ECOM Page 27
disposing, you can neutralize the solution by pouring vinegar slowly into the solution while stirring. The pH target is 6.5 to 8.5. You can obtain a pH test kit from a swimming pool chemicals supply store.
PRODUCT REGISTRATION
After having thoroughly reviewed the Operator's Manual, please take a moment to register your Quik n’ Crispy to activate your warranty. If you have Internet access, please go online at http://www.q‐n‐c.com and then, on the left side of the screen, click on “Warranty Registration” to complete and submit your registration electronically. Or you may complete the enclosed Product Registration form and mail it to QNC, Inc. If the Product Registration form was misplaced or one was not included with your Quik n' Crispy, go online as described above, contact your distributor, or e‐mail at sales@q‐n‐c.com for a replacement registration form. Your Quik n' Crispy has a limited warranty of 1 year on all other parts and labor from the date of installation of your unit. See the Product Registration for more specific information.
SERVICE In the event that you have questions on the operation of your Quik n' Crispy® Greaseless Fryer or feel that it requires service, contact your installing distributor or QNC, Inc. at the number listed above. If a service call is required, we will schedule one promptly.
NO
TE
S'
JJ 0
[oo
oo
66
6o
oo
l,
PS
I ~;:'
II ffl
AR
TJSA
N
CO
NTR
OLL
ER
0 0 ~
0 0
11
~nr
o =
... ~D
SWIT
CH
m
£AR
V
IE
~iCJ
· ./
gf-
2a
(2
01
6)
24
0v
-rev
b
.dg
n
Ma
y.
23
, 2
01
6
13
:21
:36
FAN
SN
AP
SW!T
CH'l
(!4
0F
l
~'
' ,,,,
.,,
l 0
I 31
21
II
HIG
H
LIM
IT
32
2
2
12
I @I
2®
,_® 4
FAN
RELA
Y ciD --, ~
I 2@
)
<-> :a4
HEA
T RE
LAY ~
®
CO
OK
ING
FA
N
IAE
AR
V!E
I(J
CO
OLI
NG
FA
N
h ~
-, -,
-J
,--J
'
-,-, ..
-,-, ..
'·
'
~I
2(0)
H
EAT
RELA
Y
<-®,
if
I 1
~~=
-"'""""
~-
lt---f---"'--A
CKJL
JNE
1 II
.
.
ONC~
INC
. M
ODEL
GF
-2A
. DO
MES
TIC
1 s:-o
wc NO.
ORA
WN
BY
l,
OA
GA
TE
DATE
QJ
/20
12
016
12
0V
. 6
0
HZ
SCJ.L
E N
ON
E
REVI
SIO
N 8
I SH
(rl
1 O
F
1
OG
N155
PEC
:JFI
CA
TJ0H
f•n
n••••

NO
TES
'
0
IOO
OO
OO
OO
OO
I;
•1'5
-~""
~ R
EO
• 0 0 0 ~
0 lo +
AR
TIS
AN
C
ON
TR
OL
LE
R
0
~~0
.J,.
.---
-- ~D
SW
ITC
H
~~D
I Ill
I
./g
f-2
a
(20
16
) 2
40
v-
rev
b
.dg
n
May
. 2
3,
20
16
1
3:4
0:5
5
FAN
SNA
P SW
ITCH
<
I40
Fl
l
~" '''
''''
1 o
I 31
2
1 11
HIG
H
LIM
IT
32
2
2
12
T 0
T
1@1
2@ ~
I 2@
FA
N RE
LAY $
,_, :0)4
HEAT
RE
LAY 3~
·1
@
CO
OK
ING
FA
N
IR£A
RV
lE11
1 C
OO
LIN
G
FAN
-, h
-, 11
. --1
,-
--1
,--,-
\ ..
-,-\
...
~I
2@
1-~4
HEAT
RE
LAY 3r~
t
I I
= = -"'
"'""" I. ""'
LIN
E!
~
.,
__ ,_
__
>
Bl•
CK
I LI
NE
1 II
..
ONC~
INC
. M
ODEL
G
F-Z
A.
DO
MES
TIC
l~RA
WN B
Y
_rAT(
L.
OAG
AT
E
03
/20
/20
16
-f SIB
t I ow
e N
O.
24
0V
. 6
0
Hz
SCAL
E N
ON
E
RE
VIS
ION
B
I S
HE
ET
1 O
F
1
DC
Nt:S
PEC
lFIC
ATI
ON
t:t:
t:tt
UU
t

NO
TE
S'
0 0
00
00
00
00
01
<
ART
ISA
N
CON
TRO
LLER
II f ;~-fl
. tl !J ! f ~-
c@
ffi:
Jo
E5fl I) .; r' ~:
SWIT
CH
"11 ~
CO
OK
ING
FA
N
CO
OL
IN-G
FA
N
~~
~: f1
f il
j
HEA
TIN
G
ELEM
ENT
:31~
HIG
H
LIM
IT
32
22
12
t:;
J w
w
11-
IRE
AR
VIf
WI
·;I
FAN
SA
FET
Y
S\IJ
TC
H -1
,-
-,-, ..
' ;
-1,-
-.-,
... . .
---
-.
--:1 ~~-
·----~· ·~
-~----
---
.. --<SI
---·-·--
.. .:..
-· -.-
____
__
. .1,
I! tl
,,_
--·"
--·
---
-·'"
">''·
"-~-
t~:·
---~
~·"·~
'".-.
, ... -
: .. ::
: .. ---
--
_-..__;:
· ....
.. m •
f _
_ .-.,--,::-·-;,-
"""~
·-:-:-.----+
...
. ~ ~:..
. '~ . ..
:: ---
·"~----
L.._.
J,_;:O)~ .. ,"
"._,
.,_.y
--·-~
· ...
-.
. .,
... -
--··:
~-~::·
~~-:..::.
. .. ~:.::
_ :,.;
;-==:;_
----r-
ONC~
INC
. M
ODEL
G
F--2
A.
EXPO
RT
-, .,.·
_ ' ...
:::_
,._
....
;_..._
,_,_
" .,
.,..
_ ·-
· •
__
.,._
, .. _
,-,c
.0:.
:..-
••:,:
-,.,,,,
_{~ .
.. -
• •
•""-• ·
'•--
:;.,.
, ..
, :.;
.·-~
· -
-~--
-D
RA
WN
B
Y
L.
OA
GA
TE
02
/29
/20
16
siZE
ow
e NO
.
B
23
0V
• 5
0
HZ
OA
T(
SC
J.tE
N
ON
E
RE
VIS
ION
A
1 S
HE
f:T
1 O
F
1
OG
NsS
PE
CIF
JCII
TIO
NU
IU.U
UJ
./ex
po
rt
gf-
2a
(2
01
6)
.dg
n
Feb
. 2
9,
20
16
1
3:0
6:2
0