GPI-M8 6 This instantaneous water heater (fig. 1) is intended to provide the economical heating of...
44
WH-GPI_M8-M-16(2) Printed in Germany GPI-M8 即時網上登記保用 Online Warranty Registration
Transcript of GPI-M8 6 This instantaneous water heater (fig. 1) is intended to provide the economical heating of...

MADE IN GERMANY
WH-GPI_M8-M-16(2)Printed in Germany
MADE IN GERMANY
GPI-M8
即時網上登記保用Online Warranty Registration

GPI-M8
2
1
3
8
7
6
5
9
4
2
When ordering spare parts, please always specify the appliance model, power rating and serial number!
Pos. Description1 Adjusting screw for water flow rate2 Hood with control panel3 Heating cartridge4 Safety temperature limiter5 Filter6 Water connector7 Wall bracket8 Safety earthing terminal9 Cable grommet
1. Overview
Read these operating instructions carefully before installing and using the heater!
3
German Pool
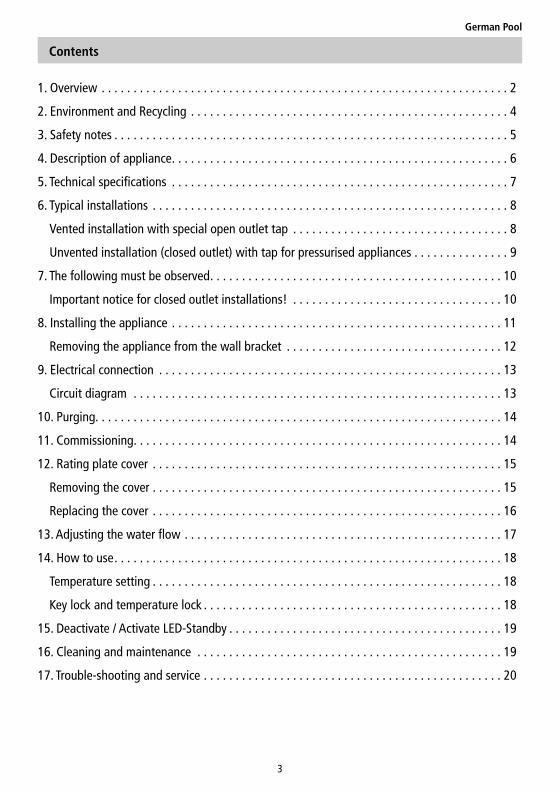
Contents
1. Overview . . . . . . . . . . . . . . . . . . . . . . . . . . . . . . . . . . . . . . . . . . . . . . . . . . . . . . . . . . . . . . . . 2
2. Environment and Recycling . . . . . . . . . . . . . . . . . . . . . . . . . . . . . . . . . . . . . . . . . . . . . . . . . . 4
3. Safety notes . . . . . . . . . . . . . . . . . . . . . . . . . . . . . . . . . . . . . . . . . . . . . . . . . . . . . . . . . . . . . . 5
4. Description of appliance . . . . . . . . . . . . . . . . . . . . . . . . . . . . . . . . . . . . . . . . . . . . . . . . . . . . . 6
5. Technical specifications . . . . . . . . . . . . . . . . . . . . . . . . . . . . . . . . . . . . . . . . . . . . . . . . . . . . . 7
6. Typical installations . . . . . . . . . . . . . . . . . . . . . . . . . . . . . . . . . . . . . . . . . . . . . . . . . . . . . . . . 8
Vented installation with special open outlet tap . . . . . . . . . . . . . . . . . . . . . . . . . . . . . . . . . . 8
Unvented installation (closed outlet) with tap for pressurised appliances . . . . . . . . . . . . . . . 9
7. The following must be observed . . . . . . . . . . . . . . . . . . . . . . . . . . . . . . . . . . . . . . . . . . . . . . 10
Important notice for closed outlet installations! . . . . . . . . . . . . . . . . . . . . . . . . . . . . . . . . . 10
8. Installing the appliance . . . . . . . . . . . . . . . . . . . . . . . . . . . . . . . . . . . . . . . . . . . . . . . . . . . . 11
Removing the appliance from the wall bracket . . . . . . . . . . . . . . . . . . . . . . . . . . . . . . . . . . 12
9. Electrical connection . . . . . . . . . . . . . . . . . . . . . . . . . . . . . . . . . . . . . . . . . . . . . . . . . . . . . . 13
Circuit diagram . . . . . . . . . . . . . . . . . . . . . . . . . . . . . . . . . . . . . . . . . . . . . . . . . . . . . . . . . . 13
10. Purging. . . . . . . . . . . . . . . . . . . . . . . . . . . . . . . . . . . . . . . . . . . . . . . . . . . . . . . . . . . . . . . . 14
11. Commissioning . . . . . . . . . . . . . . . . . . . . . . . . . . . . . . . . . . . . . . . . . . . . . . . . . . . . . . . . . . 14
12. Rating plate cover . . . . . . . . . . . . . . . . . . . . . . . . . . . . . . . . . . . . . . . . . . . . . . . . . . . . . . . 15
Removing the cover . . . . . . . . . . . . . . . . . . . . . . . . . . . . . . . . . . . . . . . . . . . . . . . . . . . . . . . 15
Replacing the cover . . . . . . . . . . . . . . . . . . . . . . . . . . . . . . . . . . . . . . . . . . . . . . . . . . . . . . . 16
13. Adjusting the water flow . . . . . . . . . . . . . . . . . . . . . . . . . . . . . . . . . . . . . . . . . . . . . . . . . . 17
14. How to use . . . . . . . . . . . . . . . . . . . . . . . . . . . . . . . . . . . . . . . . . . . . . . . . . . . . . . . . . . . . . 18
Temperature setting . . . . . . . . . . . . . . . . . . . . . . . . . . . . . . . . . . . . . . . . . . . . . . . . . . . . . . . 18
Key lock and temperature lock . . . . . . . . . . . . . . . . . . . . . . . . . . . . . . . . . . . . . . . . . . . . . . . 18
15. Deactivate / Activate LED-Standby . . . . . . . . . . . . . . . . . . . . . . . . . . . . . . . . . . . . . . . . . . . 19
16. Cleaning and maintenance . . . . . . . . . . . . . . . . . . . . . . . . . . . . . . . . . . . . . . . . . . . . . . . . 19
17. Trouble-shooting and service . . . . . . . . . . . . . . . . . . . . . . . . . . . . . . . . . . . . . . . . . . . . . . . 20

GPI-M8
4
GERMAN POOL is very conscious of environmental protection, and this extends to its packa g ing materials. You can help the environment by carefully segregating waste.
The packaging is essential to protect the components whilst in transit. It is made from environmentally-friendly, re-usable corrugated cardboard. The plastic bags are made of re cyclable polythene (PE).
The plastic components of the appliance are marked with a material code so that they can be recycled at the end of their useful life. These valuable materials are 100 % recyclable, provided they are correctly segregated.
2. Environment and Recycling
5
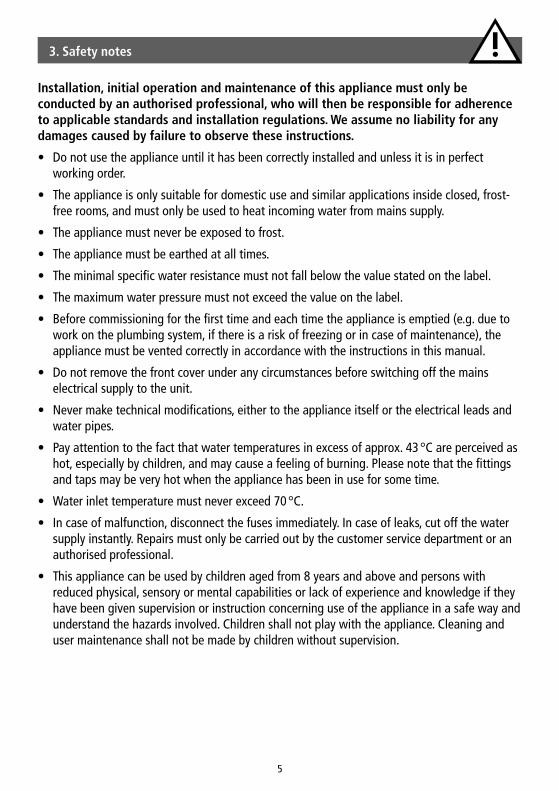
3. Safety notes
Installation, initial operation and maintenance of this appliance must only be conducted by an authorised professional, who will then be responsible for adherence to applicable standards and installation regulations. We assume no liability for any damages caused by failure to observe these instructions.
• Do not use the appliance until it has been correctly installed and unless it is in perfect working order.
• The appliance is only suitable for domestic use and similar applications inside closed, frost-free rooms, and must only be used to heat incoming water from mains supply.
• The appliance must never be exposed to frost.
• The appliance must be earthed at all times.
• The minimal specific water resistance must not fall below the value stated on the label.
• The maximum water pressure must not exceed the value on the label.
• Before commissioning for the first time and each time the appliance is emptied (e.g. due to work on the plumbing system, if there is a risk of freezing or in case of maintenance), the appliance must be vented correctly in accordance with the instructions in this manual.
• Do not remove the front cover under any circumstances before switching off the mains electrical supply to the unit.
• Never make technical modifications, either to the appliance itself or the electrical leads and water pipes.
• Pay attention to the fact that water temperatures in excess of approx. 43 °C are perceived as hot, especially by children, and may cause a feeling of burning. Please note that the fittings and taps may be very hot when the appliance has been in use for some time.
• Water inlet temperature must never exceed 70 °C.
• In case of malfunction, disconnect the fuses immediately. In case of leaks, cut off the water supply instantly. Repairs must only be carried out by the customer service department or an authorised professional.
• This appliance can be used by children aged from 8 years and above and persons with reduced physical, sensory or mental capabilities or lack of experience and knowledge if they have been given supervision or instruction concerning use of the appliance in a safe way and understand the hazards involved. Children shall not play with the appliance. Cleaning and user maintenance shall not be made by children without supervision.

GPI-M8
6
This instantaneous water heater (fig. 1) is intended to provide the economical heating of water sufficient for a single outlet i.e. kitchen sink or wash basin and can be installed with a sanitary water fitting.
When the hot-water tap is opened, the heater switches itself on automatically when the minimum water flow rate is exceeded and heats the water as it passes through the appliance.
The heater is pre-set in the factory to an outlet temperature of about 38 °C, which is ideal for washing your hands. When this temperature is reached, the electronic regulator reduces the power in order to ensure that the outlet temperature does not exceed this value. This automatic temperature regulation means that it is only necessary to open the hot water tap to obtain water at a constant, safe temperature for washing hands. At the control panel the temperatures 35 °C (ECO), 38 °C (COMFORT) and 45 °C (MAX) can be selected. Cold water may be added if a lower temperature is required.
If the flow rate is too low, if the flow pressure is too low, or if the warm-water tap is closed, the appliance switches itself off automatically. For an optimum flow of water, always fit the special jet regulator enclosed with the appliance. This regulator is inserted into the thread on the end of the tap and fits into any standard sleeve size M 22/24.
The maximum possible outlet temperature is determined by the temperature of the incoming water, the rate of flow and the heating power of the heater. The flow rate can be preset (chapter “Adjusting the water flow“).
4. Description of appliance
1

7
German Pool
5. Technical specifications
Type GPI-M8
Capacity liter 0.2
Nominal pressure MPa (bar) 1 (10)
Heating system Bare resistance element
Required water resistance at 15 °C in Ω cm
≥ 800
Electric supply 1/N/PE~ 220 V
Nominal power rating 6.0 kW
Nominal current 27 A
Temperature choice 35 °C – 38 °C – 45 °C
Factory temperature setting 38 °C
Maximum inlet temperature 70 °C
Factory flow setting at 3 bar 4.5 l/min
Maximum temperature increase at rated power and a flow rate of…1)
2.0 l/min 43 K
2.5 l/min 34 K
3.0 l/min 29 K
3.5 l/min 24 K
4.0 l/min 21 K
Required l/min to switch on 1.5
Required l/min to switch off 1.3
Min. required cable size 2) mm2 4.0
Weight filled with water approx. 1.5 kg
Dimensions (H × W × D) 13.5 × 18.6 × 8.7 cm
Protection class acc. to VDE 1
Type of protection according to VDE IP 25
1) Temperature rise (Kelvin) + cold-water temperature = maximum hot-water temperature (°C) ≤ 70 °C2) The cable size must not exceed 4 mm2

GPI-M8
8
Vented installation with special open outlet tap
6. Typical installations
3
Angle valve G 3/8“
Electrical connection with mains power cable (shorten if necessary)
Angl
e va
lve
appr
ox. 5
50
Top
edge
of w
ash
basi
n ap
prox
.. 85
0
Axis
wal
l bra
cket
app
rox.
520
Cabl
e en
try
appr
ox. 5
53
Fit jet regulator CSP 6:

9
German Pool
Unvented installation (closed outlet) with tap for pressurised appliances
6. Typical installations
4
Electrical connection with mains power cable (shorten if necessary)
Angl
e va
lve
appr
ox. 5
50
Top
edge
of w
ash
basi
n ap
prox
.. 85
0
Axis
wal
l bra
cket
app
rox.
520
Cabl
e en
try
appr
ox. 5
53
Angle valve G 3/8“
Dimensions in mm
Fit jet regulator CSP 6:

GPI-M8
10
The heater is installed as shown in the immediate vicinity of the outlet in a frost-free room. Note the following during installation:
• Installation must comply with all statutory regulations, as well as those of the local electricity and water supply companies
• Check technical data and the information on the rating plate under the cover (chapter “Removing the cover“).
• Ensure that all accessories are removed from the packing materials.
• Easy access to the appliance shall be guaranteed at all times. An external shut-off valve has to be installed.
• Thoroughly rinse the water pipes before connection.
• Optimum operation is ensured at a water flow pressure of 0.2 to 0.4 MPa (2–4 bar). The appliance must not be subjected to pressure exceeding 1 MPa (10 bar).
Important notice for closed outlet installations!
If a non return valve is neces sary for installation it must be installed in the hot water outlet line after the instant water heater.
A non return valve must NOT be fitted in the cold inlet line before the appliance!
7. The following must be observed

11
German Pool
• Install the appliance with the water connectors vertically upwards for direct connection to the sanitary tap.
• Secure the wall bracket to the wall with screws and suitable wall plugs (fig. 5).
• Place the appliance on the wall bracket and snap it into position (fig. 6). The appliance may only be operated, if it has been placed properly into the wall bracket!
• Tap connection (fig. 7): Cold water inlet (blue) and hot water outlet (red) are marked on the rating plate (under the rating plate cover).
• Connect the appropriate pipe or hose of the sanitary tap with the red marked hot water outlet. Avoid exerting any kind of mechanical pressure exerted on the appliance, e.g. by water pipes etc.
• After installation, carefully check all connections for leaks and rectify as necessary.
• In order to obtain an optimum water jet at low flow rates, always insert the enclosed jet regulator into the sleeve of the tap outlet. This insert fits commercially available sleeves with an M 22 or M 24 thread.
8. Installing the appliance
5 6
7
a
d
a
b
c
e
a. Sealb. Strainerc. Cold water-connection (inlet)d. Hot water-connection (outlet)e. Rating plate cover

GPI-M8
12
8. Installing the appliance
Removing the appliance from the wall bracket
Put the wide screwdriver tip into the interlock between the water connections unil it stops and press it slightly upwards(1), tilt the appliance forward by max. 15° (2) and remove it upwards (3).
8

13
German Pool
Fill the appliance completely with water by repeatedly opening and closing the hot-water tap before connecting to electrical power. The heating element may be damaged if this is not done!
• Check that the power supply is switched off prior to electrical connection.
• The mains cable must be permanently connected via connecting box as shown in the circuit diagram (see fig. 9). The earth conductor must be connected.
• A circuit breaker in accordance with IEC with a contact opening gap of at least 3 mm for each pole must be provided on the mains side of the connecting box.
• The wiring cross-section must be well adapted to the corresponding power rating.
• To protect the appliance, a fuse element must be fitted with a tripping current commensurate with the nominal current of the appliance.
9. Electrical connection
1
3
2
Circuit diagram 1. Electronic regulator
2. Heating element
3. Safety thermal cut-out
9

GPI-M8
14
To prevent damage to the appliance, the instantaneous water heater must be purged of air before using it for the first time.
Each time it is emptied (e.g. after work on the plumbing system, if there is a risk of frost or following repair work), the appliance must be purged of air before it is used again.
1. Disconnect the appliance from the electrical supply.
2. Open and close the hot water tap until no more air emerges from the pipe and all air has been eliminated from the water heater.
3. Only then you should reconnect the power supply to the unit.
10. Purging
11. Commissioning
Do not switch on the electric power at this time!
1. Open the hot-water tap and allow water to flow until it emerges free of air bubbles.
2. Now close the circuit breaker to connect the electrical supply. After a short power-up delay the water heats up.
3. Set the desired outlet temperature and adjust the water flow rate, if, for example, the temperature can not be reached.
4. Explain the functions of the heater to the user and ensure that he knows how to use it. Hand over these operating instructions to the user.
15
German Pool
10
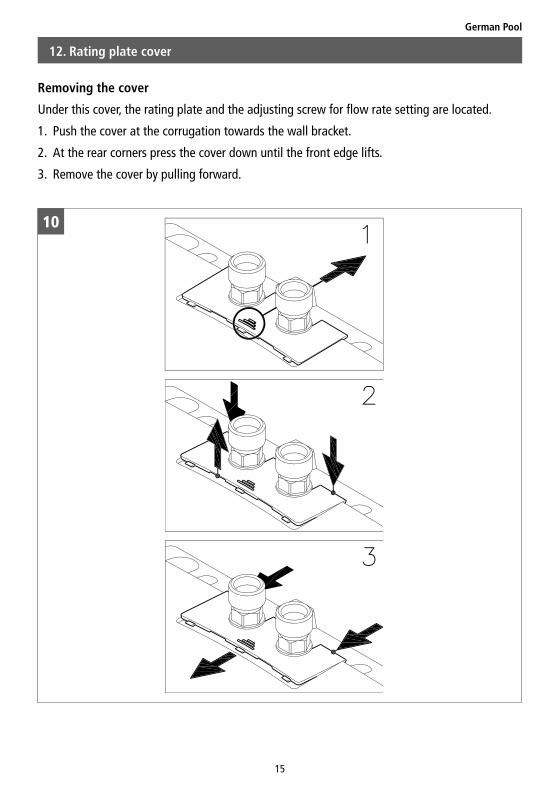
Removing the cover
Under this cover, the rating plate and the adjusting screw for flow rate setting are located.
1. Push the cover at the corrugation towards the wall bracket.
2. At the rear corners press the cover down until the front edge lifts.
3. Remove the cover by pulling forward.
12. Rating plate cover

GPI-M8
16
Replacing the cover
1. Push the cover flat towards the wall bracket under the edges of the water connections.
2. Press down the front edge of the cover and push it forward again at the rear edge until it fits.
11
12. Rating plate cover
Rating plate cover
On the inner part of the cover you can find the name of the application type (1), as well as the serial number (2) and the article number (3).
1 32

17
German Pool
Direction FlowTem pe ra ture
in crease
– ++ –
12
Decreasing the flow rate:Turning the adjusting screw clockwise decreases the flow rate, thus making a higher outlet temperature possible.
Increasing the flow rate:Turning the adjusting screw counter-clockwise increases the flow rate, thus reducing the possible outlet temperature.
13. Adjusting the water flow

GPI-M8
18
Temperature setting
The touch key allows you to select one of three preset temperatures.
Every key press sets the temperature to the next level:
35 °C 38 °C 45 °C (MAX)
Pressing the key once again, starts the cycle all over.
The currently selected temperature is indicated by one of three coloured LEDs.
Key lock and temperature lock
The currently selected temperature setting can be locked against unintended alteration. Thus, the temperature can not be changed by a single keypress anymore.
Activate keylock / Deactivate keylock:Press touch key (for approx. 5 seconds) until the active LED goes out, then release touch key.
14. How to use
13
Three coloured LEDs
Touch key
19
German Pool
Three coloured LEDs
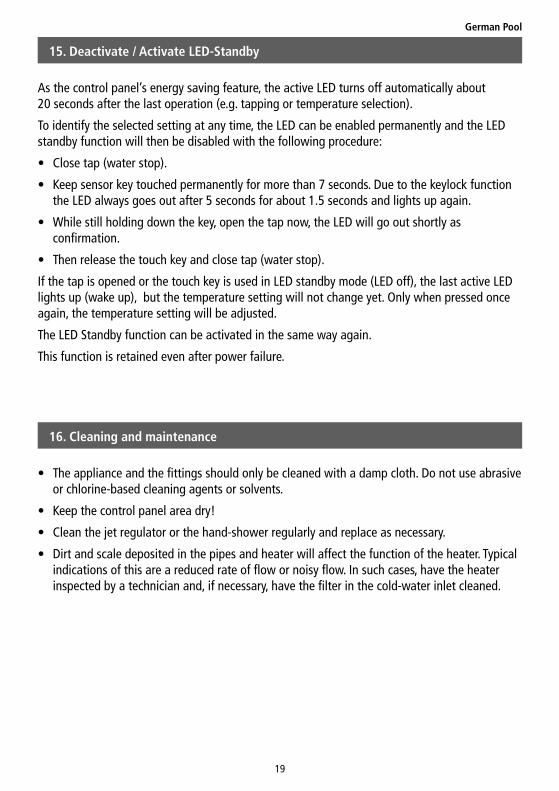
15. Deactivate / Activate LED-Standby
As the control panel’s energy saving feature, the active LED turns off automatically about 20 seconds after the last operation (e.g. tapping or temperature selection).
To identify the selected setting at any time, the LED can be enabled permanently and the LED standby function will then be disabled with the following procedure:
• Close tap (water stop).
• Keep sensor key touched permanently for more than 7 seconds. Due to the keylock function the LED always goes out after 5 seconds for about 1.5 seconds and lights up again.
• While still holding down the key, open the tap now, the LED will go out shortly as confirmation.
• Then release the touch key and close tap (water stop).
If the tap is opened or the touch key is used in LED standby mode (LED off), the last active LED lights up (wake up), but the temperature setting will not change yet. Only when pressed once again, the temperature setting will be adjusted.
The LED Standby function can be activated in the same way again.
This function is retained even after power failure.
16. Cleaning and maintenance
• The appliance and the fittings should only be cleaned with a damp cloth. Do not use abrasive or chlorine-based cleaning agents or solvents.
• Keep the control panel area dry!
• Clean the jet regulator or the hand-shower regularly and replace as necessary.
• Dirt and scale deposited in the pipes and heater will affect the function of the heater. Typical indications of this are a reduced rate of flow or noisy flow. In such cases, have the heater inspected by a technician and, if necessary, have the filter in the cold-water inlet cleaned.

GPI-M8
20
The following table will help you to determine and rectify the reasons for possible problems.
Fault Cause Action
No water flows Water supply is turned offOpen the main water valve and the shut-off valve
Water flows more slowly than expected
The jet regulator is not fitted Fit the special jet regulator
Water pressure is not sufficient
Check the water flow pressure, check the water flow adjustment
Dirt in the pipesRemove any dirt from the filter, valves and taps / check the technical data
The heater switches itself on and off
Water pressure is varying, flow rate is too low
Remove any dirt / increase the flow water pressure, close other taps, open the shut-off valve further
Water remains cold
Water pressure is not sufficient
Adjust the water flow, open the shut-off valve, fit the special jet regulator, check water pressure
Dirt Remove dirt from the inlet and outlet
Hot water temperature varies
Supply voltage varies Check the supply voltage
Water connections mixed up Check installation
Hot water tempe-rature too low and one LED flashes slowly
Flow rate is too high or inlet temperature is too low
Adjust the flow either at the tap, the valve or the flow adjustment screw (chapter “Adjusting the water flow“)
One LED flashes fast and water remains cold
Temperature sensor defectiveReplace temperature sensor (authorized technician)
Heating element defective Replace heating element (authorized technician)
All LEDs flash fast and water gets warm
(Cable of) control panel defectice
Reposition connector of control panel (authorized technician)
Replace control panel (authorized technician)
All LEDs flash fast and water remains cold
Power unit defective Call service
LED turns off shortly after keypress
Keylock is active Deactivate keylock (chapter “How to use“)
17. Trouble-shooting and service

21
German Pool
17. Trouble-shooting and service
LED flashes after keypress
Touch key was not touched in centre
Don‘t touch the touch key for approx. 3 seconds (until LED lights normally); for proper handling touch the touch key right in the centreTouch key calibration active
No LED lights LED Standby activeCheck LED by touching the touchkey. If still no LED lights up: Check the fuses!
If you cannot rectify the fault with the aid of this table, please contact:
We can either give you the name and address of an authorised customer service company or repair the heater ourselves. In the latter case, please send in the heater (at your cost and risk) with details of the problem and a copy of the sales invoice.
Fon: +49 (0) 4131 - 89 01- 40 Fax: +49 (0) 4131 - 89 01- 41
E-mail: [email protected] Internet: www.clage.com
CLAGE GmbH Central customer service
Pirolweg 8 21337 Lüneburg Germany

GPI-M8
22
1
3
8
7
6
5
9
4
2
訂購備用零件時,請務必指定熱水器型號、額定功率和序號!
位置 說明
1 水流量調整螺絲2 外蓋 (附控制板)
3 發熱匣4 安全溫度限制器5 濾網6 供水接頭7 掛接背板8 安全接地端子9 電線封環
1. 概覽
安裝及使用熱水器之前,請詳閱操作指示!

23
德國寶
目錄
1. 概覽 . . . . . . . . . . . . . . . . . . . . . . . . . . . . . . . . . . . . . . . . . . . . . . . . . . . . . . . . . . . . . . . . . . . 22
2. 環境與回收 . . . . . . . . . . . . . . . . . . . . . . . . . . . . . . . . . . . . . . . . . . . . . . . . . . . . . . . . . . . . . 24
3. 安全指示 . . . . . . . . . . . . . . . . . . . . . . . . . . . . . . . . . . . . . . . . . . . . . . . . . . . . . . . . . . . . . . . 25
4. 熱水器說明 . . . . . . . . . . . . . . . . . . . . . . . . . . . . . . . . . . . . . . . . . . . . . . . . . . . . . . . . . . . . . 26
5. 技術規格 . . . . . . . . . . . . . . . . . . . . . . . . . . . . . . . . . . . . . . . . . . . . . . . . . . . . . . . . . . . . . . . 27
6. 一般安裝方式 . . . . . . . . . . . . . . . . . . . . . . . . . . . . . . . . . . . . . . . . . . . . . . . . . . . . . . . . . . . 28
使用特殊開口水龍頭的排氣安裝方式 . . . . . . . . . . . . . . . . . . . . . . . . . . . . . . . . . . . . . . 28
使用加壓熱水器專用水龍頭的非排氣安裝方式 (封閉出水管線) . . . . . . . . . . . . . . 29
7. 請務必遵守下列規定 . . . . . . . . . . . . . . . . . . . . . . . . . . . . . . . . . . . . . . . . . . . . . . . . . . . . 30
封閉出水管線安裝作業重要事項! . . . . . . . . . . . . . . . . . . . . . . . . . . . . . . . . . . . . . . . . 30
8. 安裝熱水器 . . . . . . . . . . . . . . . . . . . . . . . . . . . . . . . . . . . . . . . . . . . . . . . . . . . . . . . . . . . . . 31
將熱水器從掛接背板取下 . . . . . . . . . . . . . . . . . . . . . . . . . . . . . . . . . . . . . . . . . . . . . . . . 32
9. 連接電源線 . . . . . . . . . . . . . . . . . . . . . . . . . . . . . . . . . . . . . . . . . . . . . . . . . . . . . . . . . . . . . 33
電路圖 . . . . . . . . . . . . . . . . . . . . . . . . . . . . . . . . . . . . . . . . . . . . . . . . . . . . . . . . . . . . . . . . . 33
10. 排氣 . . . . . . . . . . . . . . . . . . . . . . . . . . . . . . . . . . . . . . . . . . . . . . . . . . . . . . . . . . . . . . . . . . 34
11. 試機 . . . . . . . . . . . . . . . . . . . . . . . . . . . . . . . . . . . . . . . . . . . . . . . . . . . . . . . . . . . . . . . . . . 34
拆下外蓋 . . . . . . . . . . . . . . . . . . . . . . . . . . . . . . . . . . . . . . . . . . . . . . . . . . . . . . . . . . . . . . . 35
裝回外蓋 . . . . . . . . . . . . . . . . . . . . . . . . . . . . . . . . . . . . . . . . . . . . . . . . . . . . . . . . . . . . . . . 36
13. 調整水流量 . . . . . . . . . . . . . . . . . . . . . . . . . . . . . . . . . . . . . . . . . . . . . . . . . . . . . . . . . . . 37
14. 使用方式 . . . . . . . . . . . . . . . . . . . . . . . . . . . . . . . . . . . . . . . . . . . . . . . . . . . . . . . . . . . . . . 38
溫度設定 . . . . . . . . . . . . . . . . . . . . . . . . . . . . . . . . . . . . . . . . . . . . . . . . . . . . . . . . . . . . . . . 38
按鍵鎖和溫度鎖 . . . . . . . . . . . . . . . . . . . . . . . . . . . . . . . . . . . . . . . . . . . . . . . . . . . . . . . . . 38
15. 停用/啟動 LED 指示燈休眠功能 . . . . . . . . . . . . . . . . . . . . . . . . . . . . . . . . . . . . . . . . . 39
16. 清潔與維護 . . . . . . . . . . . . . . . . . . . . . . . . . . . . . . . . . . . . . . . . . . . . . . . . . . . . . . . . . . . 39
17. 故障排除與維修 . . . . . . . . . . . . . . . . . . . . . . . . . . . . . . . . . . . . . . . . . . . . . . . . . . . . . . . 40

GPI-M8
24
德國寶非常注重環保,對包裝材料亦如是。只要確實做好垃圾分類,就有助於保護環境。
包裝是運輸過程中用於保護零件的重要資源。本產品包裝材料一律採用環保、可回收的瓦楞紙板。塑膠袋則以可回收聚乙烯 (PE) 製成。
本熱水器的塑膠零件均標有原料代碼,使用完畢後即可回收。只要確實分類,這些全是 100 % 可回收的有用材料。
2. 環境與回收
25
3. 安全指示
僅能由獲得授權的專業人士安裝、初步操作及保養本熱水器,以確保能遵守適用的標準及安裝規定。本公司對未遵照此指定所致損失概不負責。
· 除非已正確安裝並處於最佳運作狀態,否則切勿使用本熱水器。
· 本熱水器只適宜用於家居用途,及在封閉、不結霜的室內使用,且只可用於加熱自來水。
· 切勿將本熱水器置於結霜環境下。
· 本熱水器必須隨時接地。
· 最低水比電阻不可低於標籤上所列之數值。
· 最高水壓不得高於標籤上所列之數值。
· 初次試機前及每次需要將熱水器內的儲水排空時 (例如:進行供水系統維修或有結霜可能或維修保養),需依本說明書內之有關指示將熱水器內的空氣排出。
· 在任何情況下,均勿在關掉電源前打開前蓋。
· 切勿對本熱水器 (包括熱水器機體、電線或水管) 進行任何技術性改動。
· 請注意,高於 43 °C 的水會被界定為熱水 (對於兒童尤甚),且可能導致燙傷。熱水器經使用一段時間後,配件和水龍頭的溫度可能非常高。
· 入水溫度不得超過 70 °C。
· 發生故障時,請立即切斷保險絲。如有漏水,應立即關掉水源,並且必須由客戶服務部或授權專業人員維修。
· 凡在有適當監督下,或已事前獲悉熱水器使用安全說明,並瞭解相關危害的前提下,8 歲以上兒童及身體、感官或心理障礙者或經驗及知識不足者,亦可使用本熱水器。禁止兒童隨意操作本熱水器。禁止兒童在未經適當監督的情況下進行清潔與使用者維修保養工作。

GPI-M8
26
本即熱式熱水器 (圖 1) 適用於以節電方式加熱廚房水槽或洗臉槽單次使用所需水量,可與衛浴配件一同安裝。
打開熱水水龍頭後,一旦水流量大於最小水流量,熱水器會自動開啟並將流經熱水器的水加溫。
熱水器的原廠預設出水溫度約 38 °C,是適合洗手的溫度。達到此溫度時,電子調節器會降低功率,確保出水溫度不會超過設定值。由於具備此項自動調溫功能,因此只要打開熱水水龍頭,就有保持安全水溫的用水可供洗手。您可以在控制板上選擇 35 °C (節電)、38 °C (舒適) 或 45 °C (最大) 三種溫度。如需降溫可添加冷水。
若水流量太小、水壓過低或溫水水龍頭未打開,熱水器會自動關閉。為保持最適合的水流量,請務必安裝本熱水器隨附的特殊噴水調節器。此調節器需插入水龍頭末端的螺紋,並且可安裝於任何標準的 M 22/24 套筒。
最大出水溫度取決於入水水溫、水流量,以及熱水器的發熱功率。您可以預設水流量 (請參閱「調整水流量」一章)。
4. 熱水器說明
1

27
德國寶
5. 技術規格
類型 GPI-M8
水量 公升 0.2
標稱壓力 MPa (bar) 1 (10)
加熱系統 裸電阻元件
要求的水比電阻 (15 °C 時,Ω cm) ≥ 800
電源 1/N/PE~ 220 V
標稱功率 6.0 kW
標稱電流 27 A
溫度選擇 35 °C – 38 °C – 45 °C
原廠溫度設定 38 °C
最大入水溫度 70 °C
原廠水流量設定 (3 bar 時) 4.5 L/min
額定功率下不同水流量時的最大溫升…1)
2.0 L/min 43 K
2.5 L/min 34 K
3.0 L/min 29 K
3.5 L/min 24 K
4.0 L/min 21 K
開機所需流量 (L/min) 1.5
關機所需流量 (L/min) 1.3
電源線尺寸下限2) mm2 4.0
重量 (注滿水時) 約 1.5 kg
尺寸 (高 × 寬 × 深) 13.5 × 18.6 × 8.7 cm
VDE 防護等級 1
VDE 防護類型 IP 25
1) 溫度上升 (凱氏度) + 冷水溫度 = 熱水最高水溫 (°C) ≤ 70 °C2) 電線尺寸不得超過 4 mm2

GPI-M8
28
使用特殊開口水龍頭的排氣安裝方式
6. 一般安裝方式
3
角閥 G 3/8"
主電源線連接方式 (如有必要可縮短)
角閥
約 5
50
洗臉
槽上
緣約
850
掛接
背板
軸約
520
電線
穿入
口約
553
安裝噴水調節器 CSP 6:

29
德國寶
使用加壓熱水器專用水龍頭的非排氣安裝方式 (封閉出水管線)
6. 一般安裝方式
4
主電源線連接方式 (如有必要可縮短)
角閥
約 5
50
洗臉
槽上
緣約
850
掛接
背板
軸約
520
電線
穿入
口約
553
角閥 G 3/8"
尺寸 (mm)
安裝噴水調節器 CSP 6:
GPI-M8
30
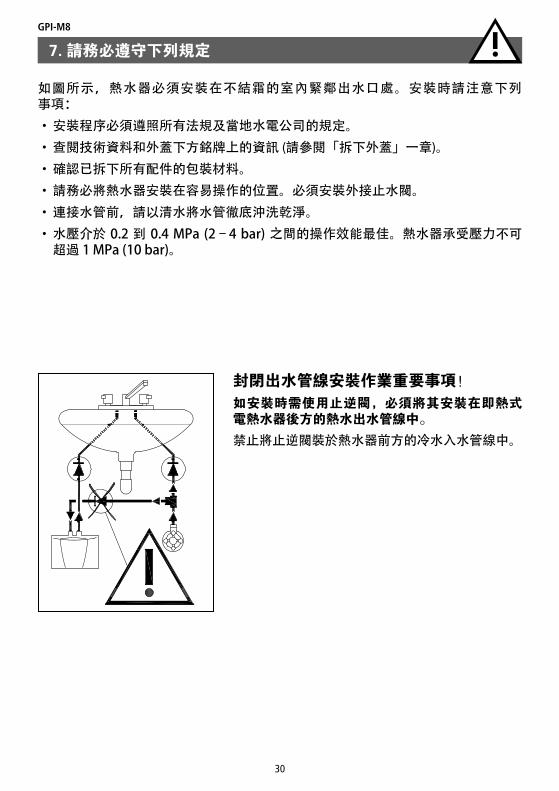
如圖所示,熱水器必須安裝在不結霜的室內緊鄰出水口處。安裝時請注意下列 事項:
· 安裝程序必須遵照所有法規及當地水電公司的規定。
· 查閱技術資料和外蓋下方銘牌上的資訊 (請參閱「拆下外蓋」一章)。
· 確認已拆下所有配件的包裝材料。
· 請務必將熱水器安裝在容易操作的位置。必須安裝外接止水閥。
· 連接水管前,請以清水將水管徹底沖洗乾淨。
· 水壓介於 0.2 到 0.4 MPa (2–4 bar) 之間的操作效能最佳。熱水器承受壓力不可超過 1 MPa (10 bar)。
封閉出水管線安裝作業重要事項!如安裝時需使用止逆閥,必須將其安裝在即熱式電熱水器後方的熱水出水管線中。
禁止將止逆閥裝於熱水器前方的冷水入水管線中。
7. 請務必遵守下列規定

31
德國寶
· 安裝熱水器時,供水接頭必須垂直朝上,直接連接衛浴水龍頭。
· 使用螺絲和尺寸適中的壁塞固定掛接背板 (圖 5)。
· 將熱水器置於掛接背板上,再將其卡入定位 (圖 6)。熱水器必須正確裝妥於掛接背板,否則不可操作。
· 連接水龍頭 (圖 7):冷水入水管 (藍色) 和熱水出水管 (紅色) 均標示於銘牌上 (位於銘牌外蓋下方)。
· 將正確的衛浴水龍頭水管或水喉管連接至標示紅色的熱水出水口。避免水管等零件對熱水器施加機械壓力。
· 安裝完畢後,仔細檢查所有連接處是否有滲漏情形,並視需要排除問題。
請將隨附的噴水調節器插入水龍頭出水口套筒內,以便在低水流量時發揮最佳噴水效能。此插件可配合市售的 M 22 或 M 24 螺紋套筒。
8. 安裝熱水器
5 6
7
a
d
a
b
c
e
a. 密封墊b. 濾網c. 冷水接管 (入水)d. 熱水接管 (出水)e. 銘牌外蓋

GPI-M8
32
8. 安裝熱水器
將熱水器從掛接背板取下 將平頭螺絲起子尖端插入水管連接之間的交界處,直到停止不動為止,輕壓螺絲起子使其朝上方翹起 (1),將熱水器傾斜 (不超過 15°) (2),朝上拆下熱水器 (3)。
8

33
德國寶
接上電源前,請反覆開關熱水水龍頭,將熱水器注滿水。如果未進行此步驟,可能會損壞發熱線!
· 連接電源線前,請先檢查是否已關閉電源。
· 必須按照電路圖所示圖例經接線箱永久連接電源線 (請參閱圖 9)。請務必接上接地線。
· 接線箱的電源端必須要有符合 IEC 標準的斷路器 (每一極的接觸開口至少要有 3 公釐)。
· 線路橫切面必須完全符合額定功率。
· 為保護本熱水器,應以等同於本熱水器額定電流的跳脫電流裝設保險絲元件。
9. 連接電源線
1
3
2
電路圖1. 電子調節器
2. 發熱絲
3. 安全熱斷路器
9
GPI-M8
34
為避免損壞本即熱式電熱水器,第一次使用前必須先排出熱水器中的空氣。
每次將熱水器排空後 (如進行供水系統維修後、可能結霜或需要後續維修時),必須將熱水器內的空氣排出,才能再度使用熱水器。
1. 拔下熱水器的電源插頭。
2. 開關熱水水龍頭,直到水管不再排出任何空氣,而且熱水器內部的空氣全數排空為止。
3. 完成此步驟之後,才能插回熱水器電源插頭。
10. 排氣
11. 試機
此時切勿打開電源!
1. 打開熱水水龍頭,讓水流出直到沒有氣泡為止。
2. 現在請關閉斷路器,然後連接電源。經過片刻開機延遲之後,水溫就會升高。
3. 設定所需的出水溫度,如果無法達到理想溫度或有其他問題,請調整水流量。
4. 向使用者說明熱水器的功能,並確認使用者瞭解使用方式。將操作指示轉告使 用者。
35
德國寶
10
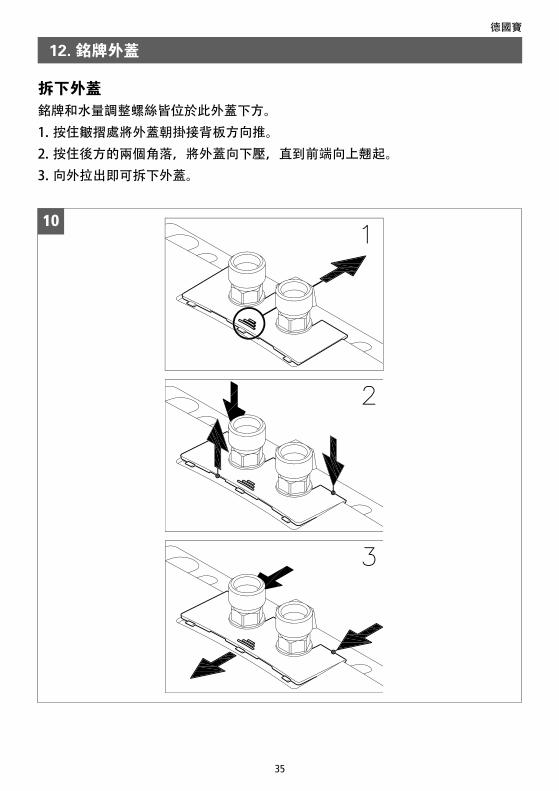
拆下外蓋銘牌和水量調整螺絲皆位於此外蓋下方。
1. 按住皺摺處將外蓋朝掛接背板方向推。
2. 按住後方的兩個角落,將外蓋向下壓,直到前端向上翹起。
3. 向外拉出即可拆下外蓋。
12. 銘牌外蓋
GPI-M8
36
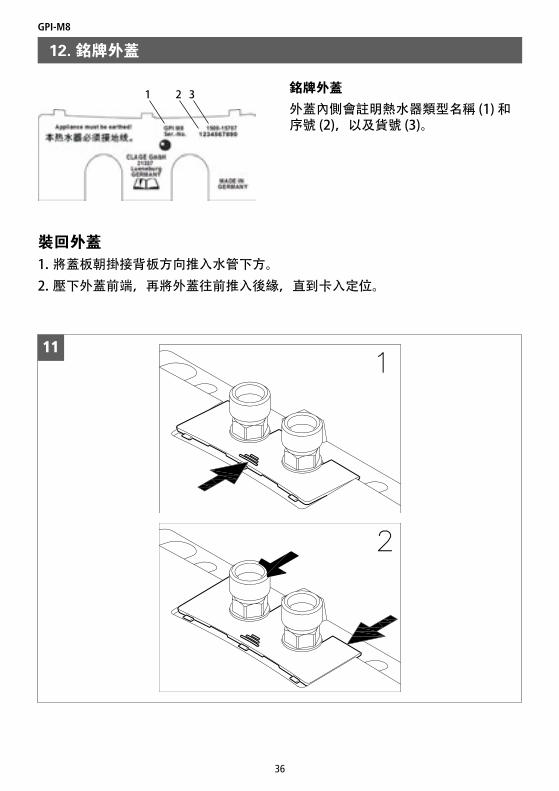
裝回外蓋1. 將蓋板朝掛接背板方向推入水管下方。
2. 壓下外蓋前端,再將外蓋往前推入後緣,直到卡入定位。
11
12. 銘牌外蓋
銘牌外蓋
外蓋內側會註明熱水器類型名稱 (1) 和序號 (2),以及貨號 (3)。
1 32

37
德國寶
方向 流量 溫度上升
– ++ –
12
將水流量調小:
順時鐘方向轉動調整螺絲可以將水流量調小,出水溫度也會變高。
將水流量調大:
逆時鐘方向轉動調整螺絲可將水流量調大,出水溫度會降低。
13. 調整水流量

GPI-M8
38
溫度設定您可以使用觸控按鍵 選擇三種預設溫度的其中一種。
每按一下按鍵即可將溫度設為下一個等級:
35 °C 38 °C 45 °C (最大)。
再按下 鍵,即可重新循環。
本熱水器具有三個彩色 LED 指示燈,其中一個會亮起以指出目前所選溫度。
按鍵鎖和溫度鎖您可以鎖住目前選定的溫度設定,避免不慎更改。鎖定溫度後,按下按鍵也無法變更溫度。
啟動按鍵鎖/停用按鍵鎖:
按住觸控按鍵 (約 5 秒),直到亮著的 LED 指示燈熄滅,然後放開觸控按鍵。
14. 使用方式
13
三個彩色 LED 指示燈
觸控按鍵

39
德國寶
三個彩色 LED 指示燈
15. 停用/啟動 LED 指示燈休眠功能
控制板具有節電功能,原本亮著的 LED 指示燈會在最近一次操作 (如選擇用水量或溫度) 結束約 20 秒後自動熄滅。
為方便隨時確認所選設定,可以依照下列程序永久啟用 LED 指示燈,隨即停用 LED 指示燈休眠功能:
· 關上水龍頭 (停止供水)。
· 按住感應按鍵 7 秒以上。由於按鍵鎖功能的緣故,LED 一律會在 5 秒後熄滅約 1.5 秒,然後再次亮起。
· 繼續按住按鍵,打開水龍頭,LED 指示燈會在不久後確認熄滅。
· 放開觸控按鍵並關上水龍頭 (停止供水)。
如果水龍頭開著,或者在 LED 指示燈進入休眠模式 (LED 指示燈熄滅) 時使用觸控按鍵,最近亮著的 LED 指示燈會亮起 (喚醒),但溫度設定還不會出現變化。必須再按一次觸控按鍵才能調整溫度。
您可以按照相同的方式再次啟動 LED 指示燈休眠功能。
即便是在斷電的情況下,仍然可以使用此功能。
16. 清潔與維護
· 請一律使用濕布擦拭本熱水器和配件。請勿使用具侵蝕作用或含氯的清潔劑或 溶劑。
· 控制板必須保持乾燥!
· 清潔噴水調節器或手持蓮蓬頭,並且視需要進行更換。
· 堆積在水管和熱水器中的污物和水垢會影響熱水器功能。如果水流量變小或出水時發出雜音,表示可能堆積了過多的污物和水垢。此時需請技術人員檢查熱水器,如有必要則需清潔冷水入水口的濾網。

GPI-M8
40
下表可協助您判斷發生問題的可能原因及排除問題。
故障 原因 解決方法
流不出水 供水管未打開 打開自來水管水閥和止水閥
水流速度低於 預期
噴水調節器規格不符 安裝特殊規格的噴水調節器
水壓不足 檢查水壓,檢查水流調整情形
水管中有污物 清掉濾網、水閥和水龍頭的污物/ 查閱技術資料
熱水器開關自動打開和關閉
水壓忽高忽低, 水流量太小
清掉污物/將水壓調大,關上其他水龍頭,將止水閥開得更大
水溫沒有升高水壓不足 調整水流量,打開止水閥,安裝特殊規格
的噴水調節器,檢查水壓
污物 清掉入水口和出水口的污物
熱水溫度忽高 忽低
電壓不穩 檢查電壓
水管混接 檢查安裝方式
熱水水溫過低且其中一個 LED 指示燈慢速閃爍
水流量太大或入水水溫 過低
調整水龍頭、水閥或水流調整螺絲的水量 (請參閱「調整水流量」一章)
其中一個 LED 指示燈快速閃爍且水溫仍未升高
溫度感應器故障 更換溫度感應器 (需由合格技術人員進行)
發熱線故障 更換發熱線 (需由合格技術人員進行)
所有 LED 指示燈快速閃爍且水溫升高
控制板 (的電線) 故障調整控制板接頭位置 (需由合格技術人員進行)
更換控制板 (需由合格技術人員進行)
所有 LED 指示燈快速閃爍且水溫仍未升高
電源設備故障 送修
按下按鍵後,LED 指示燈很快就熄滅
按鍵鎖已開啟 停用按鍵鎖 (請參閱「使用方式」一章)
17. 故障排除與維修

41
德國寶
17. 故障排除與維修
按下按鍵後,LED 指示燈快速閃爍
沒有按下觸控按鍵的中央 停止操作觸控按鍵約 3 秒 (等到 LED 指示燈恢復正常為止);為正確操作,請按下觸控按鍵的正中央觸控按鍵校準功能已啟動
LED 指示燈未亮起
LED 指示燈休眠功能 已開啟
按下觸控按鍵以檢查 LED 指示燈。 如 LED 指示燈仍未亮起:檢查保險絲!
參閱上表後若仍無法排除故障,請聯絡:
我們可以提供合格客戶服務公司的名稱和地址,也可以由本公司自行維修熱水器。如欲由本公司自行維修,請將熱水器寄回 (運費自付且風險由您自行承擔),詳細註明問題所在並附上發票影本。
電話: +49 (0) 4131 - 89 01- 40 傳真: +49 (0) 4131 - 89 01- 41
電子郵件: [email protected] 網址: www.clage.com
CLAGE GmbH Central customer service
Pirolweg 8 21337 Lüneburg Germany

Notes
GPI-M8
德國寶(香港)有限公司香港 香港 Hong Kong
九龍灣啟興道1-3號九龍貨倉10樓
+852 2333 6249電話:
+852 2356 9798傳真:
地址:
German Pool (Hong Kong) Limited
10/F, Kowloon Godown1-3 Kai Hing Road, Kowloon Bay, Kowloon, Hong Kong
Tel : +852 2333 6249Fax : +852 2356 9798 EmailAddress :
客戶服務部 客戶服務部 Customer Service Centre
電郵:
德國寶(香港)有限公司
九龍灣啟興道1-3號九龍貨倉10樓
+852 2333 6249電話:
+852 2356 9798傳真:
地址:
澳門 澳門 Macau
澳門俾利喇街145號寶豐工業大廈3樓
+853 2875 2699電話:
+853 2875 2661傳真:地址: 3/F, Edificio Industrial Pou Fung,
145 Rua de Francisco Xavier Pereira, Macau
Tel : +853 2875 2699Fax : +853 2875 2661Address :澳門俾利喇街145號
寶豐工業大廈3樓
+853 2875 2699電話:
+853 2875 2661傳真:地址:
中國 中國 China
+86 400 830 3838全國服務熱線:
+86 0757 2336 0284傳真:[email protected]電郵:
+86 400 830 3838全國服務熱線:
+86 0757 2336 0284傳真:[email protected]電郵:
+86 400 830 3838China Customer Service Hotline
Under normal operations, the product will receivea 1-year full warrently provided by German Pool(effective starting from the date of purchase).
:
: +86 0757 2336 0284 : [email protected]
FaxEmail

© 版權所有。未獲德國寶授權,不得翻印、複製或使用本說明書作任何商業用途,違者必究。 © 版權所有。未獲德國寶授權,不得翻印、複製或使用本說明書作任何商業用途,違者必究。© All rights reserved. Copying, reproducing or using the contents of this manual is not allowed without prior authorization from German Pool, violators will be prosecuted.
德 國 寶 ( 香 港 ) 有 限 公 司 德 國 寶 ( 香 港 ) 有 限 公 司
German Poo l (Hon g Kon g ) L im i te d
Room 113. Newport Centre Phase II. 116 Ma Tau Kok Road. Tokwawan. Kowloon. Hong Kong.電話 傳真
電話 傳真
3/F, Takshun Plaza, Nanguo East Road, Shunde, Foshan, Guangdong
3/F, Edificio Industrial Pou Fung, 145 Rua de Francisco Xavier Pereira, Macau電話傳真
電話 Tel: +852 2773 2888傳真 Fax:+852 2765 8215
電話 Tel:+86 757 2980 8308傳真 Fax:+86 757 2980 8318
電話 Tel:+853 2875 2699傳真 Fax:+853 2875 2661
香港九龍土瓜灣馬頭角道116號新寶工商中心2期113號室
廣東省佛山市順德區大良南國東路德順廣場三層
澳門俾利喇街145號寶豐工業大廈3樓
香港Hong Kong香港九龍土瓜灣馬頭角道116號新寶工商中心2期113號室
中國China廣東省佛山市順德區大良南國東路德順廣場三層
澳門香港 中國 澳門
澳門俾利喇街145號寶豐工業大廈3樓
Macau
HONG KONG TOP BRAND TEN YEARACHIEVEMENT AWARD
產品
規格
及設
計如
有變
更¸
恕不
另行
通知
。產品規格及設計如有變更﹐恕不另行通知。
Spec
ifica
tion
and
des
ign
are
subj
ect t
o ch
ange
with
out p
rior n
otic
e.
912
0-14
110
EN
-ZHT
C 1
1.13
PD
F
WH-GPI_M8-M-16(2)