Dealer Access Portal (DAP) Guide - Axiom Admin€¦ · Finance Amount ... As an example, with Axiom...
14
Dealer Access Portal (DAP) Guide
Transcript of Dealer Access Portal (DAP) Guide - Axiom Admin€¦ · Finance Amount ... As an example, with Axiom...

Dealer Access Portal (DAP) Guide

2
Access to the Portal
To Log into Axiom Admin Dealer Access Portal please enter www.scsautoexpress.com/scs.dap.axa/ into any web browser and enter your user name and password
User Name:
Password:
Note: The first time logging in, users will be prompted to change the password provided by Axiom DAP Support. If you forget your password or are locked out, please contact DAP Support at [email protected].
eContracting
To start eContracting, you will need to first obtain a Quote. You will see on your tool bar the word Quote, with
the options of New or Search. From here you can either create a New Quote, or search for a Quote that was
previously created.

3
Selecting New, the following page will appear. If you only need to obtain a quote for a product, the Customer
and Lienholder information will not be needed. You will need to enter the following:
VIN
Odometer
Manufacture Warranty Start Date
Vehicle Purchase Price
Vehicle Purchase Date
To Quote a Gap Contract you will also need to add:
Deal Type
Term
Finance Amount
MSRP
APR

4
Rating the Contract
Once the required information is entered, you will see the products begin to eRate. There are 6 columns for each
product type, some products also include Options. Here is a description of the columns:
Program – Each Product type can have multiple programs. (ex: Vehicle Service Contracts have
VSC – New, VSC – Wrap, VSC – Preowned and VSC – High Mileage). Please choose a program type.
Type – New or Used – Each program is considered new, except for VSC – Preowned and VSC – High
Mileage they are Used.
Plan – Some products have multiple plans, for example, Vehicle Service Contracts can be sold as
Premium, Gold, Silver or Bronze. Please choose a plan.
Term – This is the terms for which the product is effective. All terms are formatted as Month/Mileage. If
the mileage is 999,999, the plan is only restricted by months, not miles.
Deductible – Some of our plans have multiple deductibles, which change the retail price. Please choose a
deductible.
Retail – Your Remit cost will automatically populate in this box. From here you can adjust the price of
the plan to create your retail cost. This retail amount cannot go below the remit price.
Options – These options allow you to enter additional information on to the contract and/or add
additional services. As an example, with Axiom Key Fob, the options allow you to select the number of
Key Fobs available at the time of purchase.

5
Creating a Contract
To create a contract from a Quote, additional information is required. At the top of the screen you will find an
area to enter the Customer information. The following are required fields:
First Name, Last Name
Address, City, State
Primary Phone Number
Email Address
Once the Customer information and the Vehicle information has been entered, you will be able to Submit a
contract. If you would like the Loan or Lienholder information to appear on the contract, please enter it before
submitting. Loan information is required for GAP contracts.
To Submit a contract, go to the far right of the program list and click Submit. This will generate a contract for the
product that you have selected. This will then begin the life cycle of a contract.
Note: You can submit multiple contracts; they will just need to be for different product types. This is set to
prevent the user from selling redundant plans. Example, you can submit a VSC plan and Key Fob, but can’t
submit VSC – New Car and VSC Wrap.

6
Contracts
Once a contract is Submitted, it can be found by using the Contract Search tab. Scroll over the tab and select
“Search”.
There are many ways to search for a contract. An example of the drop down list is below.
Once A contract is created, it will go through several changes. As a contract changes status, you will see the
emblem next to the contract change, below is a key for the different statuses.
Pending – a created contract that has yet to be billed. The contract will remain in this status until it is
remitted. Until it is remitted you will still be allowed to Edit or Void the contract, however once it is
remitted you will need to contact Axiom directly to make any changes.
Pending Billed – a contract will move from Pending to Pending Billed once it is remitted.
Activated – once payment is received for the contract it will move from Pending Billed to Activated.
Void – a contract can be voided at the seller level up to the point that it is remitted. Once it is remitted it
will need to be canceled by Axiom and require a cancelation request.
Canceled – Cancellations can only be done by Axiom after receiving a cancelation request form.
Expired – The Contract has reached the end of its terms.
Rejected – A contract can only be rejected by Axiom. You will be notified if a contract is rejected.
7
Editing a Contract
A contract can be edited once it is Submitted and while it remains “Pending”. Once it is Remitted, it will move
into the “Pending Billed” phase, and it will become locked from editing. If a contract needs to be edited for any
reason after it is remitted, please contact Axiom DAP Support. [email protected]
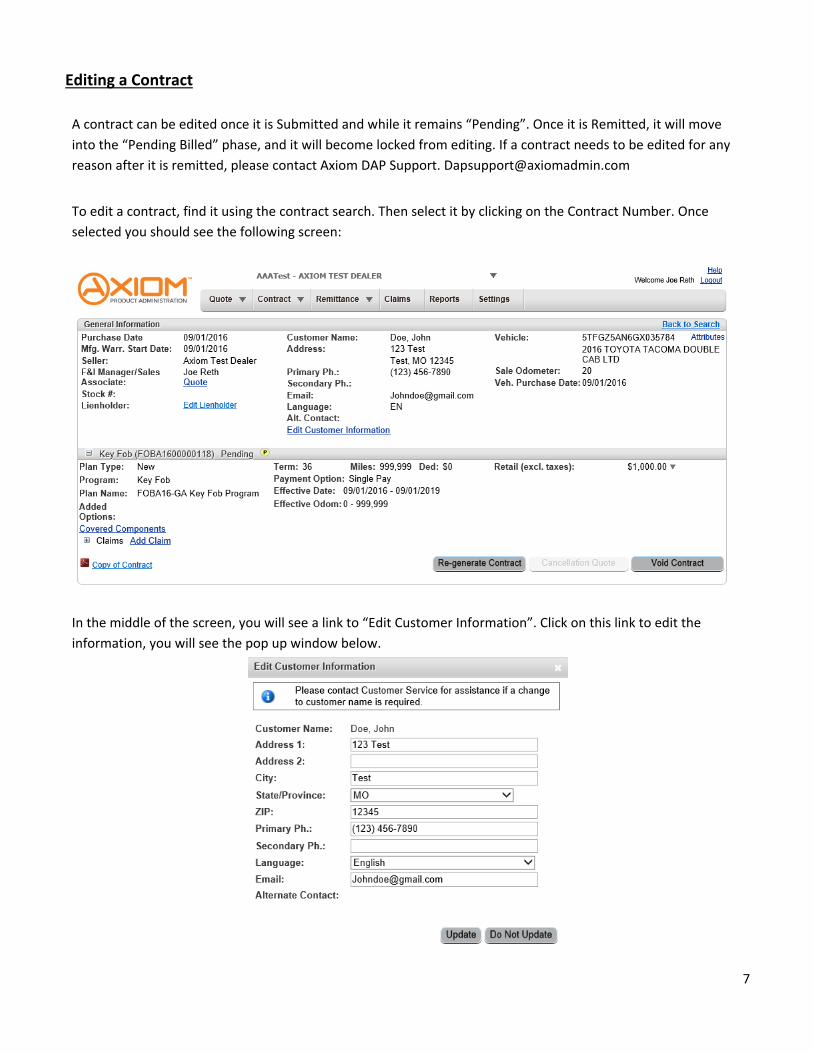
To edit a contract, find it using the contract search. Then select it by clicking on the Contract Number. Once
selected you should see the following screen:
In the middle of the screen, you will see a link to “Edit Customer Information”. Click on this link to edit the
information, you will see the pop up window below.

8
Voiding a Contract
From the contract screen you can Void a contract, as long as it has not been remitted. Please note, the contract
terms and retail price can’t be edited once a contract is created. It will need to be voided and resubmitted.
To void a contract, click on Void Contract. A popup screen will appear to confirm that you would like to void, click
“Confirm Void”.
If you would like to resubmit the contract with different terms, you will need to return to Contract Quote. This
can be done on the Contract Screen by clicking the “Quote” link on the left side of the General Information box,
or it can be found by going to the Quote Search tab on the tool bar. Once there you will notice that any contract
that has been generated from this quote will be listed at the bottom of the screen. This will include the voided
contacts.
Once a contract is voided, all aspects of the contract can now be edited on the Quote Screen. Once the changes
have been made, you can resubmit the contract.
9
Creating Remittances
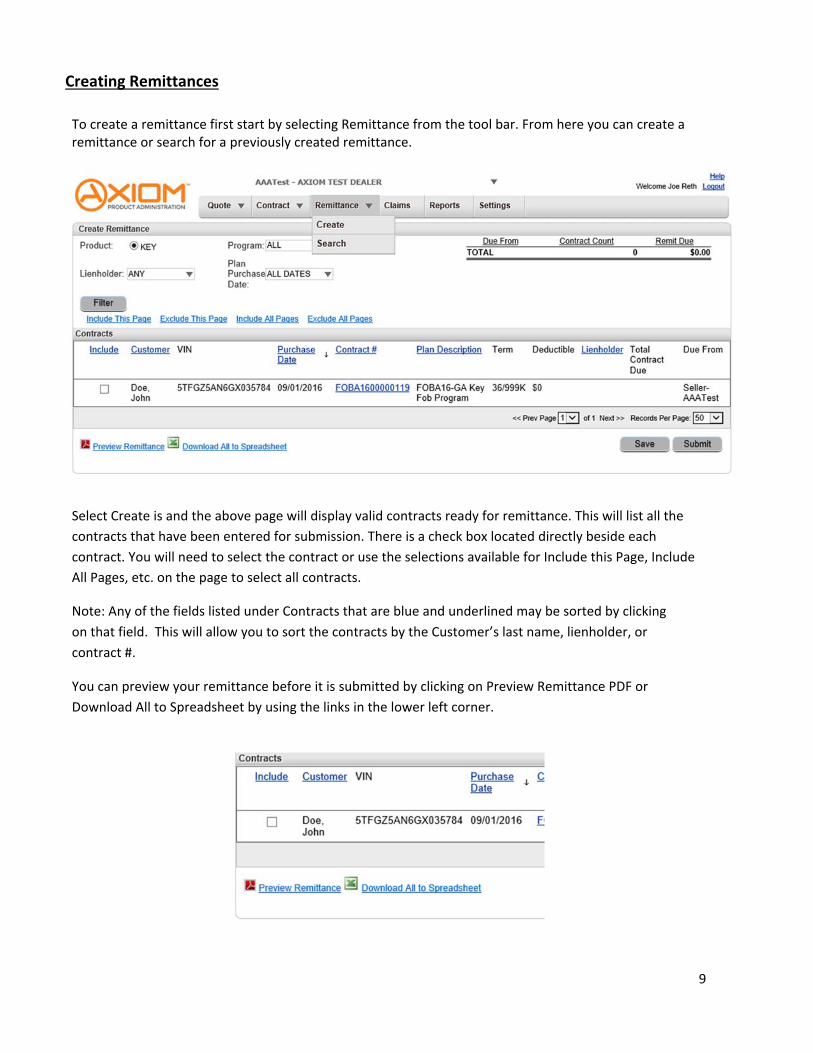
To create a remittance first start by selecting Remittance from the tool bar. From here you can create a remittance or search for a previously created remittance.
Select Create is and the above page will display valid contracts ready for remittance. This will list all the
contracts that have been entered for submission. There is a check box located directly beside each
contract. You will need to select the contract or use the selections available for Include this Page, Include
All Pages, etc. on the page to select all contracts.
Note: Any of the fields listed under Contracts that are blue and underlined may be sorted by clicking
on that field. This will allow you to sort the contracts by the Customer’s last name, lienholder, or
contract #.
You can preview your remittance before it is submitted by clicking on Preview Remittance PDF or
Download All to Spreadsheet by using the links in the lower left corner.

10
Once ready to submit your remittance please click save and then click submit.
Once you click on the Submit button, the following popup will appear indicating the number of contracts
and amount to be remitted to Axiom Product Administration. Once you have validated the amount, you
can click Submit. If you have changes, click Go Back. (Going back will require that you resubmit the
contracts.
Once Submitted, a Remittance register will automatically be generated for your records. This report will
include the contract information along with the total due for the remittance. Please follow the
instructions on this report to submit payment. Once a remittance is created the contracts will move from
Pending to Pending Billed. Once payment is received the contract will move from Pending Billed to
Activated.
11
Remittance Search
To look up previously submitted Remittances, click on Remittance, then Search. This will allow you to
Reprint a Remittance Register.
After you have selected Search, a page will appear that will show all previously submitted Remittance.
You can also search by a Submission Date.
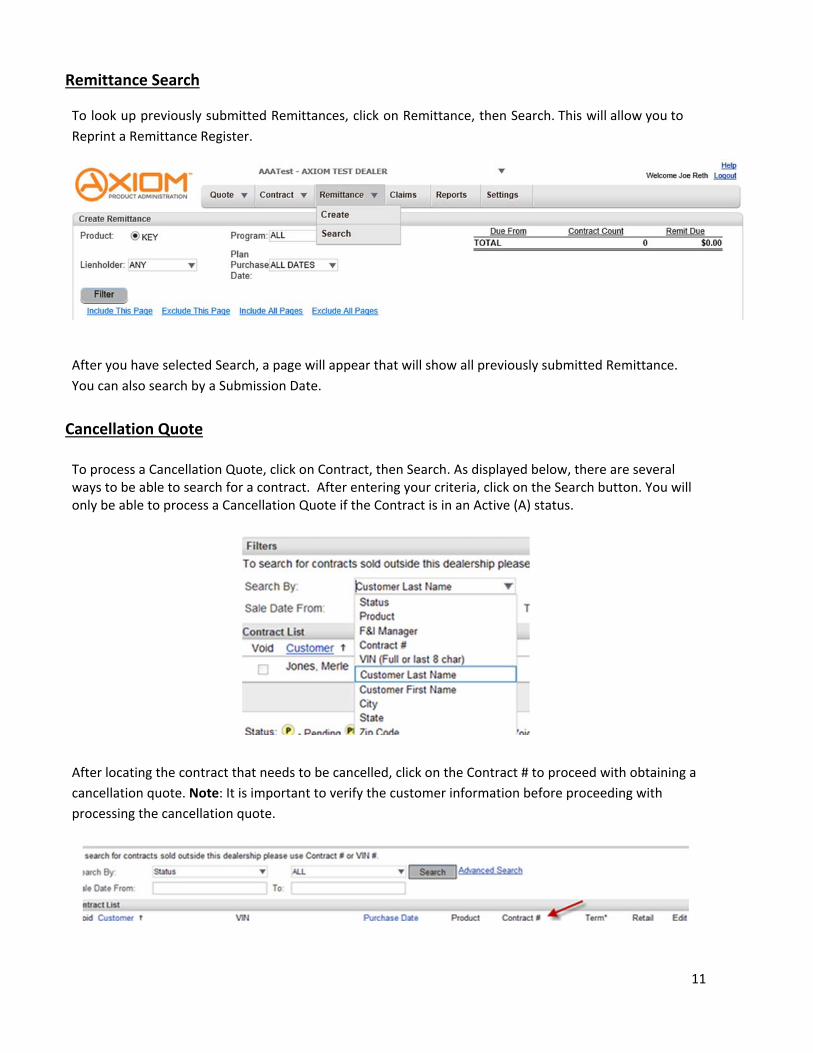
Cancellation Quote To process a Cancellation Quote, click on Contract, then Search. As displayed below, there are several ways to be able to search for a contract. After entering your criteria, click on the Search button. You will only be able to process a Cancellation Quote if the Contract is in an Active (A) status.
After locating the contract that needs to be cancelled, click on the Contract # to proceed with obtaining a
cancellation quote. Note: It is important to verify the customer information before proceeding with
processing the cancellation quote.

12
Next, you will click on the Cancellation Quote button at the bottom of the General Information screen.
A screen will appear to enter in the following information:
Cancel Date
Cancel Odometer
Cancel Reason
After entering the information, click on the Calculate button at the bottom of the page.
13
In the Cancellation Rates section of the page, the Cancellation Refund Amount will be displayed for the total amount of the refund. The amount that will be refunded by Axiom is the Net Refund from Admin.
From this page, you can save the cancellation quote by clicking on the Save Quote button at the bottom
of the page. To print the cancellation quote, click on the printer icon on your tool bar. To cancel a
contract, you will need to fill out a cancellation form and follow the instructions to submit it properly.
Claims
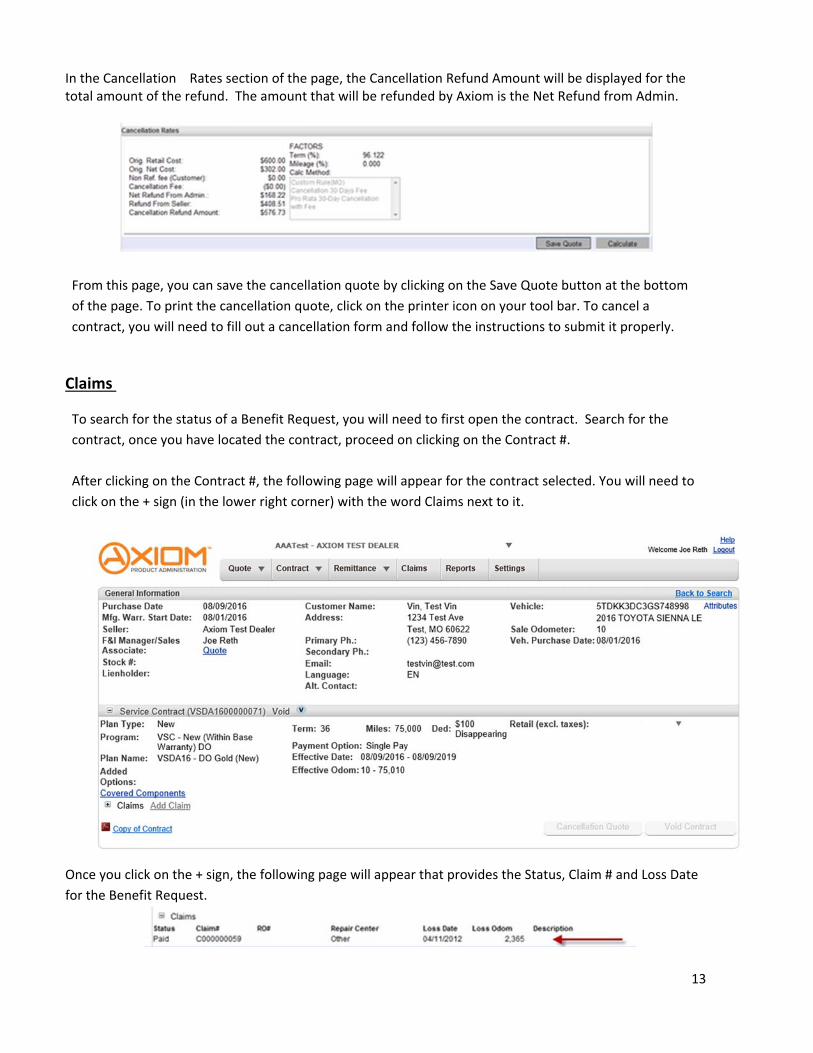
To search for the status of a Benefit Request, you will need to first open the contract. Search for the
contract, once you have located the contract, proceed on clicking on the Contract #.
After clicking on the Contract #, the following page will appear for the contract selected. You will need to
click on the + sign (in the lower right corner) with the word Claims next to it.
Once you click on the + sign, the following page will appear that provides the Status, Claim # and Loss Date
for the Benefit Request.

14
Reporting
On the first day of the month, your Billing Statement will be available on DAP. Click on Reports to bring
up your Billing Statement. If you process multiple locations, you will need to locate the correct location
prior to generating the report.
Remitting Payment to Axiom Product Administration
Please provide a copy of the Remittance Register printed from DAP and a Check for the amount reflected in the Remittance Register to the below listed address.
Axiom Product Administration 30 W Highway D, Suite 204
New Melle, MO, 63365
Additional Questions
Please visit our website at axiomadmin.com, email [email protected] or call (844) 252‐0937.