Business Storage - seagate.com · 이 퀵 스타트 가이드 사용 방법 Seagate 4베이...
16
QUICK START GUIDE GUIDE DE DÉMARRAGE RAPIDE GUIDA DI AVVIO RAPIDO SCHNELLSTARTANLEITUNG GUÍA DE INICIO RÁPIDO SNELSTARTHANDLEIDING GUIA DE INÍCIO RÁPIDO RYCHLÝ PRŮVODCE SPUŠTĚNÍM КРАТКОЕ РУКОВОДСТВО ПОЛЬЗОВАТЕЛ 快速入门指南 퀵 스타트 가이드 Business Storage 4-BAY RACKMOUNT NAS Print Date:2013-Nov-7 09:19:05 CST Working; Prod Rel; A; 100740947 Seagate Confidential
Transcript of Business Storage - seagate.com · 이 퀵 스타트 가이드 사용 방법 Seagate 4베이...
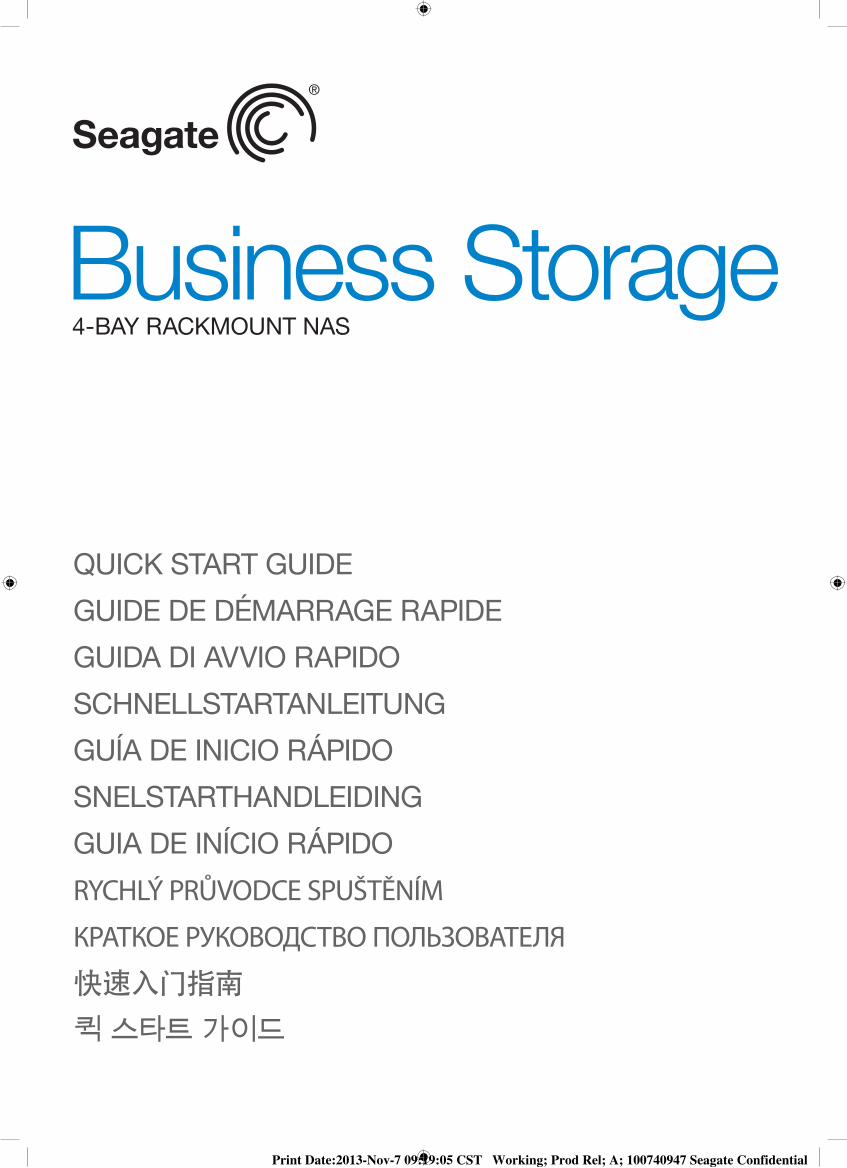
QUICK START GUIDE
GUIDE DE DÉMARRAGE RAPIDE
GUIDA DI AVVIO RAPIDO
SCHNELLSTARTANLEITUNG
GUÍA DE INICIO RÁPIDO
SNELSTARTHANDLEIDING
GUIA DE INÍCIO RÁPIDO
RYCHLÝ PRŮVODCE SPUŠTĚNÍM
КРАТКОЕ РУКОВОДСТВО ПОЛЬЗОВАТЕЛЯ�
�快速入门指南
퀵 스타트 가이드
Business Storage4-BAY RACKMOUNT NAS
Print Date:2013-Nov-7 09:19:05 CST Working; Prod Rel; A; 100740947 Seagate Confidential
2
How to use this Quick Start Guide The Seagate 4-bay Rackmount NAS is available with
disks or without disks. Rackmount NAS with disks are preconfigured for use out of the box. If your NAS was delivered with disks, skip all steps marked Empty enclosure.
Mode d’utilisation de ce guide de démarrage rapide
Le serveur Seagate 4-Bay Rackmount NAS est vendu avec ou sans disques. Préconfigurés, les serveurs Rackmount NAS avec disques sont prêts à l’emploi. Si votre serveur NAS est livré avec des disques, ignorez toutes les étapes portant la mention Boîtier vide.
Come utilizzare questa rapida guida introduttiva
Seagate da 4 alloggiamenti con montaggio in rack è disponibile con o senza dischi. Le unità NAS con montaggio in rack dotate di dischi sono preconfigurate per un utilizzo immediato. Se l’unità NAS è stata consegnata completa dei dischi, saltare i passaggi contrassegnati Allegato vuoto.
Hinweise zur Verwendung dieser Schnellstartanleitung
Das Seagate 4-Bay Rackmount NAS ist mit und ohne Festplatten erhältlich. Rackmount NAS mit Festplatten sind für den direkten Einsatz vorkonfiguriert. Falls Ihr NAS mit Festplatten geliefert wurde, können Sie alle mit Leeres Gehäuse gekennzeichneten Schritte überspringen.
Cómo usar esta Guía de inicio rápido El Seagate 4-bay Rackmount NAS está disponible con
discos o sin discos. El Rackmount NAS con discos está preconfigurado para usar de inmediato. Si su NAS fue entregado con discos, salte todos los pasos marcados Cierre vacío.
EN
FR
IT
DE
ES
Deze Snelstarthandleiding gebruiken De Seagate 4-bay Rackmount NAS is beschikbaar met
of zonder schijven. Rackmount NAS met schijven zijn vooraf geconfigureerd voor direct gebruik. Als uw NAS met schijven is geleverd, kunt u alle stappen overslaan met Lege behuizing.
Como usar este Guia de início rápido O Seagate 4-Bay Rackmount NAS está disponível com
discos ou sem eles. O Rackmount NAS com discos é pré-configurado para uso de fábrica. Se o seu NAS foi fornecido com discos, pule todas as etapas marcadas Compartimento vazio.
Как работать с этим «Кратким руководством пользователя»
Seagate Rackmount NAS с 4 отсеками может поставляться с дисками или без дисков. Rackmount NAS с дисками предварительно настроен для использования сразу после покупки. Если NAS поставляется с дисками, пропустите все этапы под заголовком «Распакуйте устройство».
Jak tuto příručku rychlého spuštění používat Úložiště Seagate NAS se 4 pozicemi s montáží do racku se
dodává s disky nebo bez disků. Úložiště NAS s montáží do racku dodávané s disky jsou předem nakonfigurována tak, aby je bylo možné používat ihned po vybalení. Pokud bylo vaše úložiště NAS dodáno s disky, přeskočte všechny kroky označené jako Prázdná krabice.
如何使用此《快速入门指南》 Seagate 4-bay Rackmount NAS 以带硬盘和不带硬盘两种
形式提供。带硬盘的 Rackmount NAS 已预先配置,可以开箱即用。如果您的 NAS 带有硬盘,请跳过所有标示为空机箱的步骤。
이 퀵 스타트 가이드 사용 방법 Seagate 4베이 Rackmount NAS는 디스크와 함께
사용하거나 디스크 없이 사용할 수 있습니다. 디스크가 있는 Rackmount NAS는 상자를 개봉하면 바로 사용할 수 있도록 사전 구성되어 있습니다. NAS에 디스크가 있는 경우 생략하십시오라고 표시된 모든 단계를 생략하십시오.
NL
PTBR
RU
CS
ZHCN
KO
Print Date:2013-Nov-7 09:19:05 CST Working; Prod Rel; A; 100740947 Seagate Confidential
3
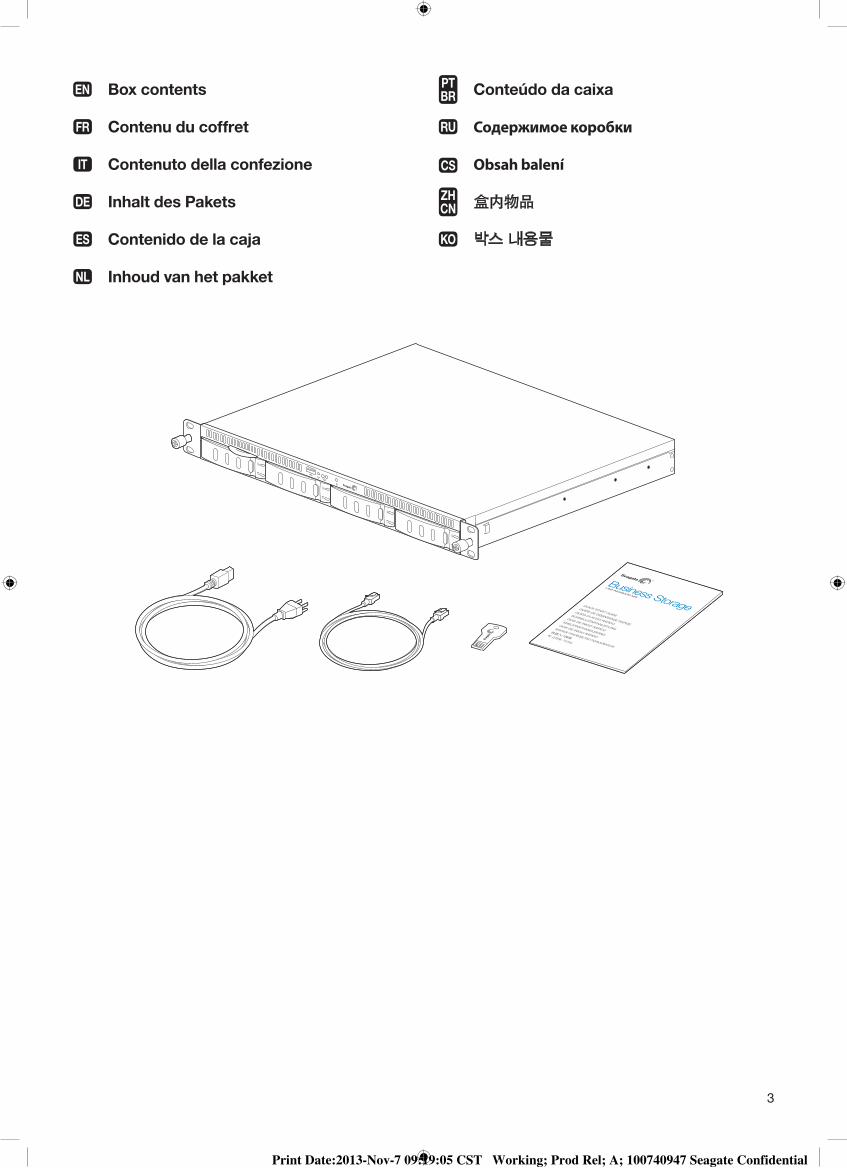
Box contents
Contenu du coffret
Contenuto della confezione
Inhalt des Pakets
Contenido de la caja
Inhoud van het pakket
EN
FR
IT
DE
ES
NL
Conteúdo da caixa
Содержимое коробки
Obsah balení
盒内物品
박스 내용물
PTBR
RU
CS
ZHCN
KO
Print Date:2013-Nov-7 09:19:05 CST Working; Prod Rel; A; 100740947 Seagate Confidential
4
Empty enclosure
Prepare the NAS OS Installer The included USB key is shipped with software installers
to set up your NAS. Seagate periodically adds new features to software and recommends updating the key before proceeding:
1. Go to http://www.seagate.com/naskey to download the installer.
2. Launch the installer and follow the on-screen instructions.
Boîtier vide
Préparation du programme d’installation du système d’exploitation NAS
La clé USB est fournie avec des programmes d’installation de logiciels pour configurer votre serveur NAS. Seagate équipe régulièrement les logiciels de nouvelles fonctionnalités et recommande une mise à jour de la clé avant de poursuivre :
1. Accédez à la page http://www.seagate.com/naskey pour télécharger le programme d’installation.
2. Lancez le programme d’installation et suivez les instructions à l’écran.
Allegato vuoto
Preparare il programma di installazione NAS OS La chiave USB inclusa viene inviata con il programma
di installazione del software per configurare l’unità NAS. Seagate aggiunge periodicamente nuove funzionalità al software e consiglia di eseguire l’aggiornamento della chiave prima di procedere:
1. Visitare http://www.seagate.com/naskey per scaricare il programma di installazione.
2. Avviare il programma di installazione e seguire le istruzioni visualizzate sullo schermo.
Leeres Gehäuse
Vorbereiten des NAS BS-Installationsprogramms Der im Lieferumfang enthaltene USB-Stick enthält
Installationssoftware zur Einrichtung Ihres NAS. Seagate stattet die Software regelmäßig mit neuen Funktionen aus und empfiehlt, den Stick vor dem Fortfahren zu aktualisieren:
1. Gehen Sie zu http://www.seagate.com/naskey, um das Installationsprogramm herunterzuladen.
2. Starten Sie das Installationsprogramm und befolgen Sie die Anweisungen auf dem Bildschirm.
EN
FR
IT
DE
Cierre vacío
Prepare el Instalador de NAS OS La llave USB se incluye con los instaladores del software
para configurar su NAS. Seagate periódicamente agrega nuevas funciones y recomienda actualizar la llave antes de proceder:
1. Vaya a http://www.seagate.com/naskey para descargar el instalador.
2. Inicie el instalador y siga las instrucciones en pantalla.
Lege behuizing
Het NAS OS-installatieprogramma voorbereiden De meegeleverde USB-sleutel is voorzien van software-
installatieprogramma’s om uw NAS in te stellen. Seagate voegt regelmatig nieuwe functies toe aan software en adviseert de sleutel bij te werken voordat u doorgaat:
1. Ga naar http://www.seagate.com/naskey om het installatieprogramma te downloaden.
2. Open het installatieprogramma en volg de instructies op het scherm.
Compartimento vazio
Prepare o instalador do sistema operacional do NAS A chave USB incluída vem com instaladores de
software para configurar o NAS. A Seagate adiciona periodicamente novos recursos ao software e recomenda a atualização antes de continuar:
1. Acesse http://www.seagate.com/naskey para fazer o download do instalador.
2. Inicie o instalador e siga as instruções na tela.
Распакуйте устройство
Подготовьте установщик NAS OS Входящий в комплект USB-накопитель поставляется
с программными установщиками для настройки NAS. Компания Seagate периодически добавляет новые возможности программного обеспечения и рекомендует обновить его, прежде чем продолжить.
1. Перейдите на страницу http://www.seagate.com/naskey для загрузки установщика.
2. Запустите установщик и выполните инструкции, появляющиеся на экране.
Prázdná krabice
Příprava instalačního programu operačního systému úložiště NAS
Přiložený USB flash disk je dodáván s instalačním softwarem pro instalaci úložiště NAS. Společnost Seagate do softwaru pravidelně přidává nové funkce a před pokračováním doporučuje aktualizaci softwaru na USB flash disku:
1. Přejděte na web http://www.seagate.com/naskey a stáhněte si instalační program.
2. Spusťte instalační program a postupujte podle pokynů na obrazovce.
ES
NL
PTBR
RU
CS
Empty enclosure | Boîtier vide | Allegato vuoto | Leeres Gehäuse | Cierre vacío | Lege behuizing | Compartimento vazio | Распакуйте устройство | Prázdná krabice | 空机箱 | 생략하십시오
Print Date:2013-Nov-7 09:19:05 CST Working; Prod Rel; A; 100740947 Seagate Confidential
5
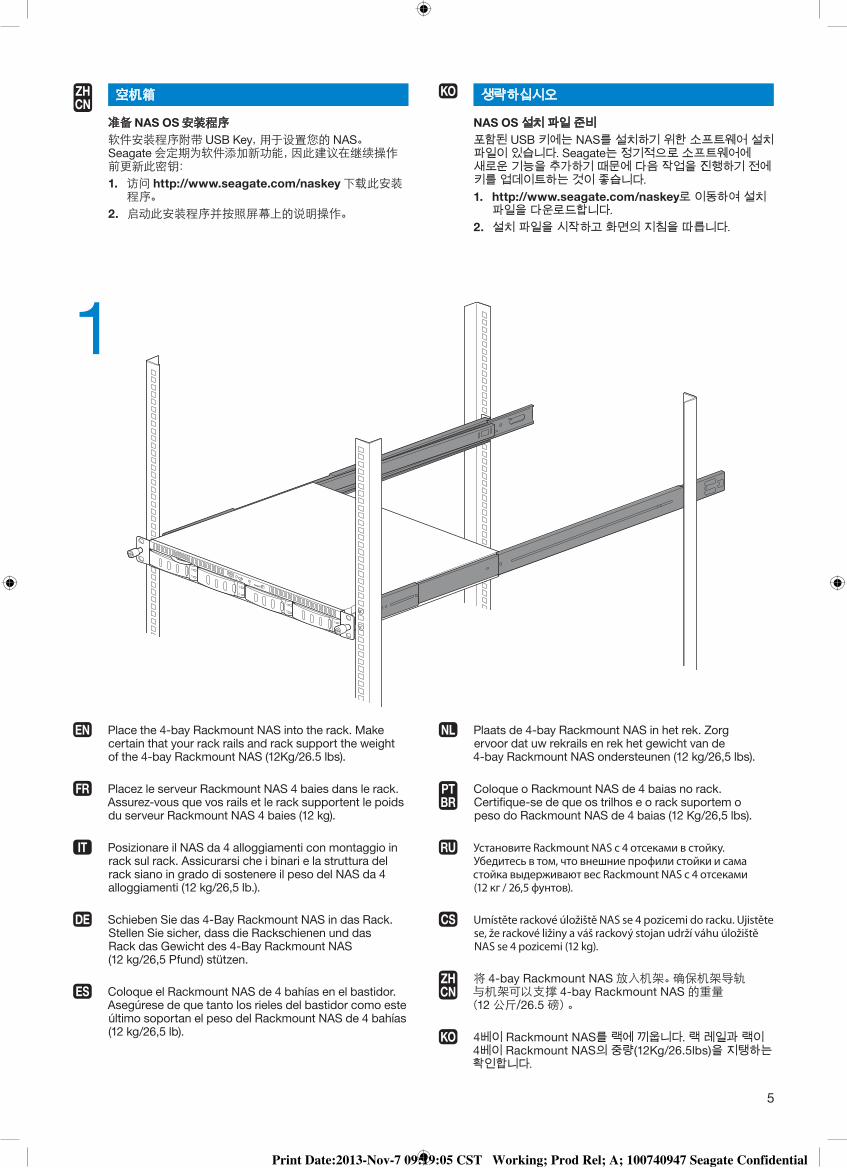
1
Place the 4-bay Rackmount NAS into the rack. Make certain that your rack rails and rack support the weight of the 4-bay Rackmount NAS (12Kg/26.5 lbs).
Placez le serveur Rackmount NAS 4 baies dans le rack. Assurez-vous que vos rails et le rack supportent le poids du serveur Rackmount NAS 4 baies (12 kg).
Posizionare il NAS da 4 alloggiamenti con montaggio in rack sul rack. Assicurarsi che i binari e la struttura del rack siano in grado di sostenere il peso del NAS da 4 alloggiamenti (12 kg/26,5 lb.).
Schieben Sie das 4-Bay Rackmount NAS in das Rack. Stellen Sie sicher, dass die Rackschienen und das Rack das Gewicht des 4-Bay Rackmount NAS (12 kg/26,5 Pfund) stützen.
Coloque el Rackmount NAS de 4 bahías en el bastidor. Asegúrese de que tanto los rieles del bastidor como este último soportan el peso del Rackmount NAS de 4 bahías (12 kg/26,5 lb).
EN
FR
IT
DE
ES
Plaats de 4-bay Rackmount NAS in het rek. Zorg ervoor dat uw rekrails en rek het gewicht van de 4-bay Rackmount NAS ondersteunen (12 kg/26,5 lbs).
Coloque o Rackmount NAS de 4 baias no rack. Certifique-se de que os trilhos e o rack suportem o peso do Rackmount NAS de 4 baias (12 Kg/26,5 lbs).
Установите Rackmount NAS с 4 отсеками в стойку. Убедитесь в том, что внешние профили стойки и сама стойка выдерживают вес Rackmount NAS с 4 отсеками (12 кг / 26,5 фунтов).
Umístěte rackové úložiště NAS se 4 pozicemi do racku. Ujistěte se, že rackové ližiny a váš rackový stojan udrží váhu úložiště NAS se 4 pozicemi (12 kg).
将 4-bay Rackmount NAS 放入机架。确保机架导轨 与机架可以支撑 4-bay Rackmount NAS 的重量
(12 公斤/26.5 磅)。
4베이 Rackmount NAS를 랙에 끼웁니다. 랙 레일과 랙이 4베이 Rackmount NAS의 중량(12Kg/26.5lbs)을 지탱하는 확인합니다.
NL
PTBR
RU
CS
ZHCN
KO
空机箱
准备 NAS OS 安装程序 软件安装程序附带 USB Key,用于设置您的 NAS。
Seagate 会定期为软件添加新功能,因此建议在继续操作前更新此密钥:
1. 访问 http://www.seagate.com/naskey 下载此安装程序。
2. 启动此安装程序并按照屏幕上的说明操作。
ZHCN
생략하십시오
NAS OS 설치 파일 준비 포함된 USB 키에는 NAS를 설치하기 위한 소프트웨어 설치
파일이 있습니다. Seagate는 정기적으로 소프트웨어에 새로운 기능을 추가하기 때문에 다음 작업을 진행하기 전에 키를 업데이트하는 것이 좋습니다.
1. http://www.seagate.com/naskey로 이동하여 설치 파일을 다운로드합니다.
2. 설치 파일을 시작하고 화면의 지침을 따릅니다.
KO
Print Date:2013-Nov-7 09:19:05 CST Working; Prod Rel; A; 100740947 Seagate Confidential
6
2
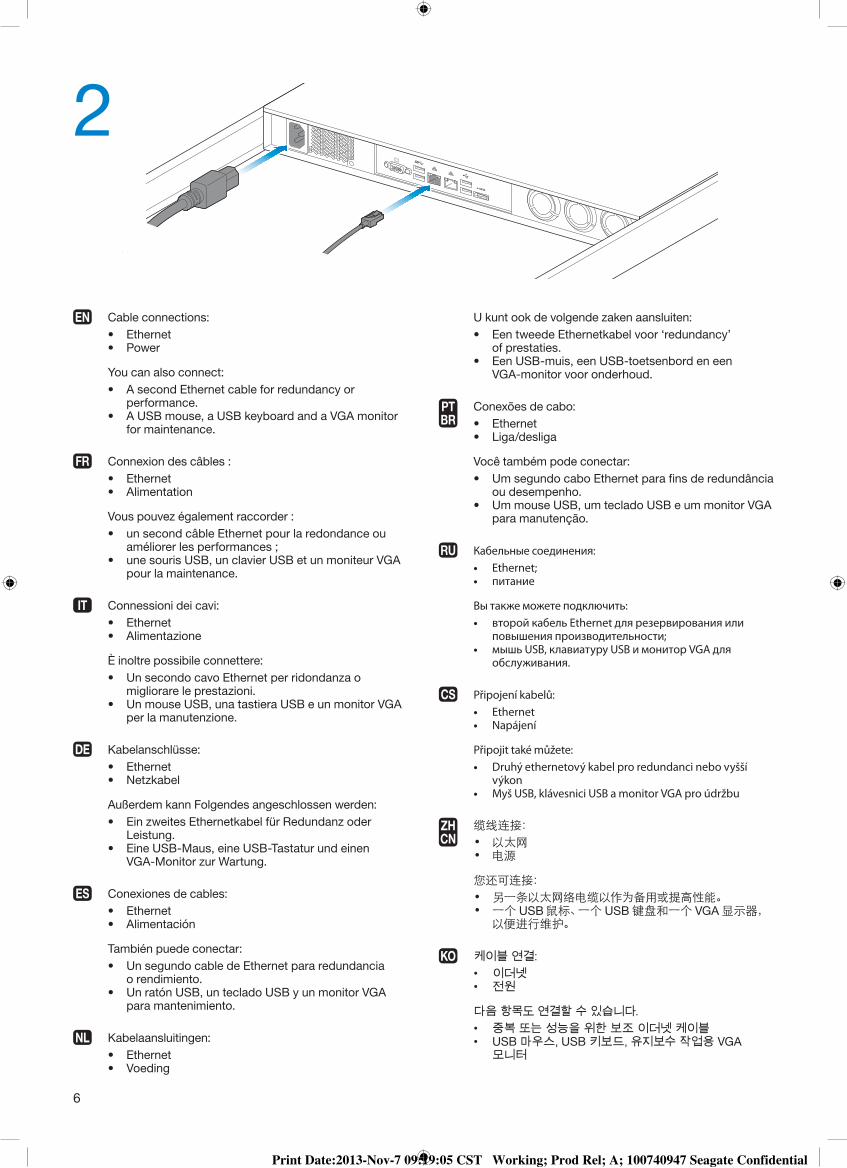
Cable connections: • Ethernet • Power
You can also connect: • AsecondEthernetcableforredundancyor
performance. • AUSBmouse,aUSBkeyboardandaVGAmonitor
for maintenance.
Connexion des câbles : • Ethernet • Alimentation
Vous pouvez également raccorder : • unsecondcâbleEthernetpourlaredondanceou
améliorer les performances ; • unesourisUSB,unclavierUSBetunmoniteurVGA
pour la maintenance.
Connessioni dei cavi: • Ethernet • Alimentazione
È inoltre possibile connettere: • UnsecondocavoEthernetperridondanzao
migliorare le prestazioni. • UnmouseUSB,unatastieraUSBeunmonitorVGA
per la manutenzione.
Kabelanschlüsse: • Ethernet • Netzkabel
Außerdem kann Folgendes angeschlossen werden: • EinzweitesEthernetkabelfürRedundanzoder
Leistung. • EineUSB-Maus,eineUSB-Tastaturundeinen
VGA-Monitor zur Wartung.
Conexiones de cables: • Ethernet • Alimentación
También puede conectar: • UnsegundocabledeEthernetpararedundancia
o rendimiento. • UnratónUSB,untecladoUSByunmonitorVGA
para mantenimiento.
Kabelaansluitingen: • Ethernet • Voeding
EN
FR
IT
DE
ES
NL
U kunt ook de volgende zaken aansluiten: • EentweedeEthernetkabelvoor‘redundancy’
of prestaties. • EenUSB-muis,eenUSB-toetsenbordeneen
VGA-monitor voor onderhoud.
Conexões de cabo: • Ethernet • Liga/desliga
Você também pode conectar: • UmsegundocaboEthernetparafinsderedundância
ou desempenho. • UmmouseUSB,umtecladoUSBeummonitorVGA
para manutenção.
Кабельные соединения: • Ethernet; • питание
Вы также можете подключить: • второй кабель Ethernet для резервирования или
повышения производительности; • мышь USB, клавиатуру USB и монитор VGA для
обслуживания.
Připojení kabelů: • Ethernet • Napájení
Připojit také můžete: • Druhý ethernetový kabel pro redundanci nebo vyšší
výkon • Myš USB, klávesnici USB a monitor VGA pro údržbu
缆线连接: • 以太网 • 电源
您还可连接: • 另一条以太网络电缆以作为备用或提高性能。 • 一个 USB 鼠标、一个 USB 键盘和一个 VGA 显示器,
以便进行维护。
케이블 연결: • 이더넷 • 전원
다음 항목도 연결할 수 있습니다. • 중복 또는 성능을 위한 보조 이더넷 케이블 • USB 마우스, USB 키보드, 유지보수 작업용 VGA
모니터
PTBR
RU
CS
ZHCN
KO
Print Date:2013-Nov-7 09:19:05 CST Working; Prod Rel; A; 100740947 Seagate Confidential
7
3
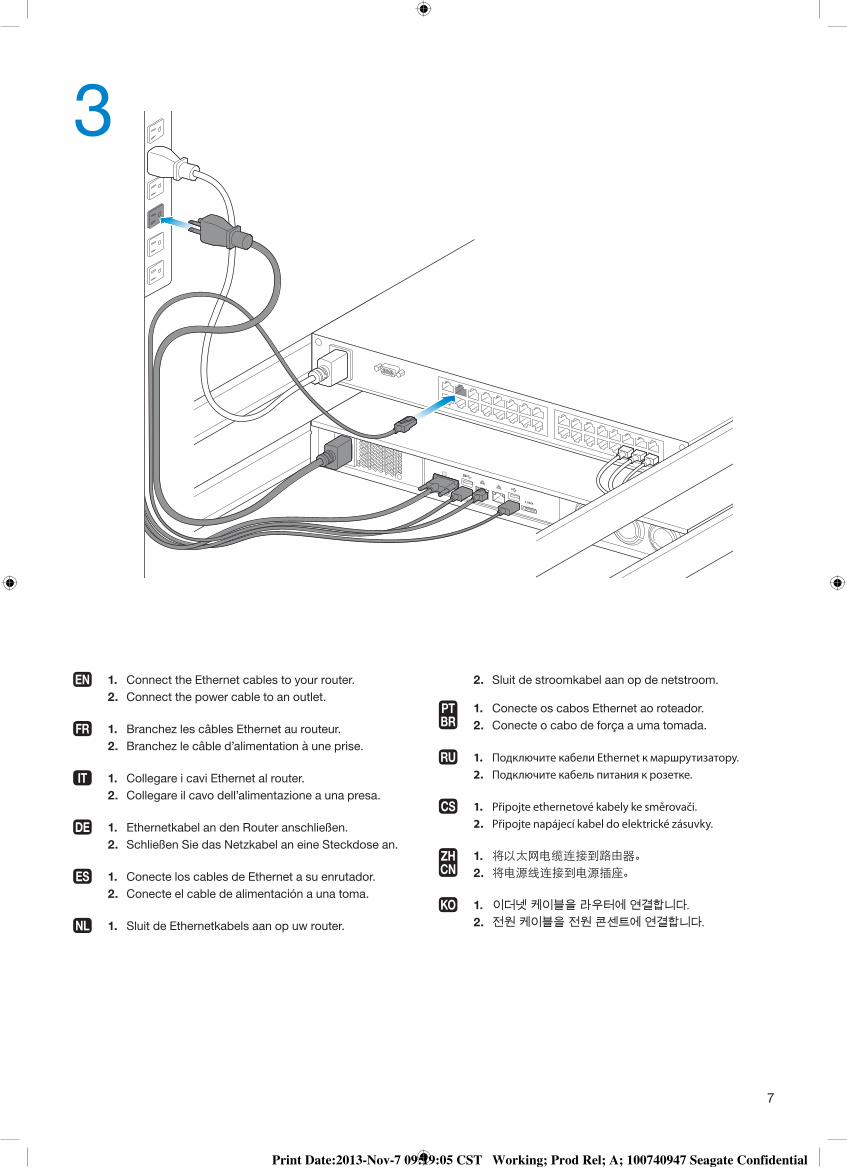
1. Connect the Ethernet cables to your router. 2. Connect the power cable to an outlet.
1. Branchez les câbles Ethernet au routeur. 2. Branchez le câble d’alimentation à une prise.
1. Collegare i cavi Ethernet al router. 2. Collegare il cavo dell’alimentazione a una presa.
1. Ethernetkabel an den Router anschließen. 2. Schließen Sie das Netzkabel an eine Steckdose an.
1. Conecte los cables de Ethernet a su enrutador. 2. Conecte el cable de alimentación a una toma.
1. Sluit de Ethernetkabels aan op uw router.
EN
FR
IT
DE
ES
NL
2. Sluit de stroomkabel aan op de netstroom.
1. Conecte os cabos Ethernet ao roteador. 2. Conecte o cabo de força a uma tomada.
1. Подключите кабели Ethernet к маршрутизатору. 2. Подключите кабель питания к розетке.
1. Připojte ethernetové kabely ke směrovači. 2. Připojte napájecí kabel do elektrické zásuvky.
1. 将以太网电缆连接到路由器。 2. 将电源线连接到电源插座。
1. 이더넷 케이블을 라우터에 연결합니다. 2. 전원 케이블을 전원 콘센트에 연결합니다.
PTBR
RU
CS
ZHCN
KO
Print Date:2013-Nov-7 09:19:05 CST Working; Prod Rel; A; 100740947 Seagate Confidential
8
4
Compartimento vazio
Conecte a chave USB Seagate à porta USB dianteira.
Распакуйте устройство
Подключите USB-накопитель Seagate к переднему порту USB.
Prázdná krabice
Připojte USB flash disk Seagate do předního portu USB.
空机箱
将 Seagate USB Key 连接到前端 USB 端口。
생략하십시오
Seagate USB 키를 전면 USB 포트에 연결합니다.
PTBR
RU
CS
ZHCN
KO
Empty enclosure | Boîtier vide | Allegato vuoto | Leeres Gehäuse | Cierre vacío | Lege behuizing | Compartimento vazio | Распакуйте устройство | Prázdná krabice | 空机箱 | 생략하십시오
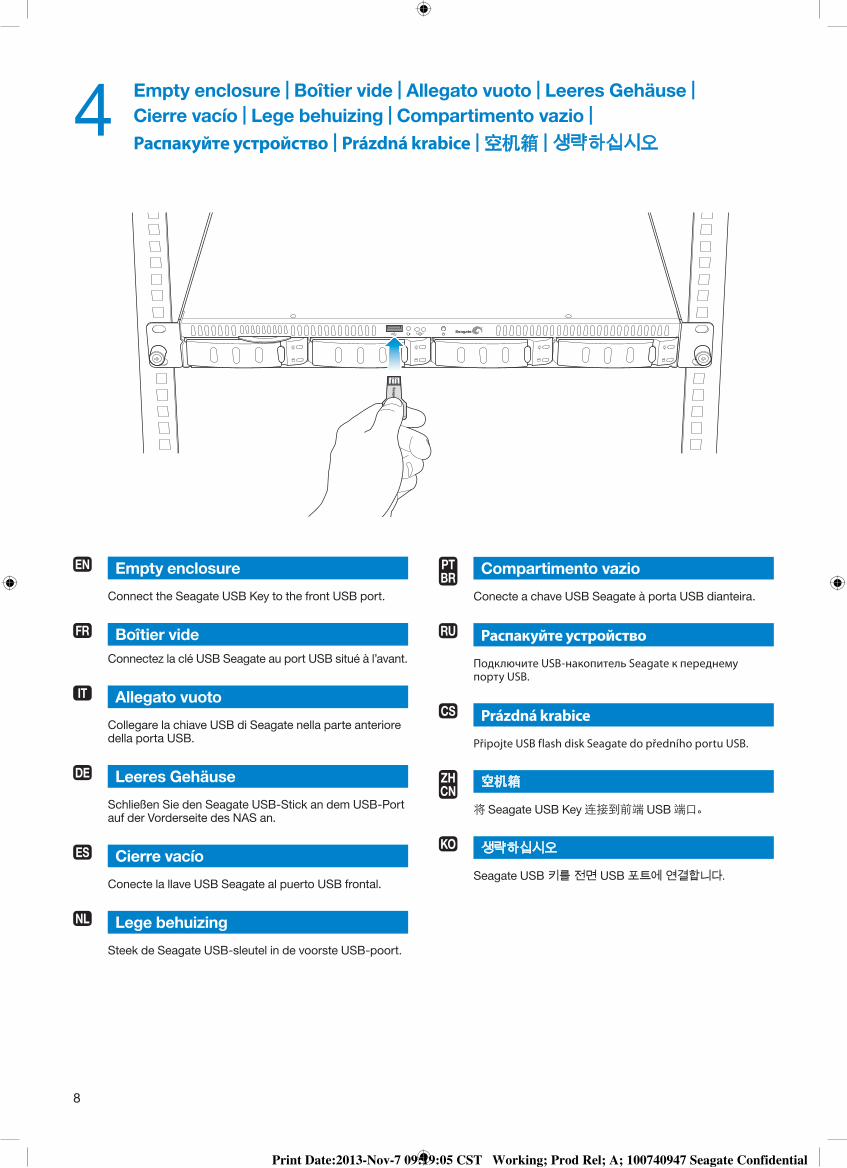
Empty enclosure
Connect the Seagate USB Key to the front USB port.
Boîtier vide
Connectez la clé USB Seagate au port USB situé à l’avant.
Allegato vuoto
Collegare la chiave USB di Seagate nella parte anteriore della porta USB.
Leeres Gehäuse
Schließen Sie den Seagate USB-Stick an dem USB-Port auf der Vorderseite des NAS an.
Cierre vacío
Conecte la llave USB Seagate al puerto USB frontal.
Lege behuizing
Steek de Seagate USB-sleutel in de voorste USB-poort.
EN
FR
IT
DE
ES
NL
Print Date:2013-Nov-7 09:19:05 CST Working; Prod Rel; A; 100740947 Seagate Confidential
9
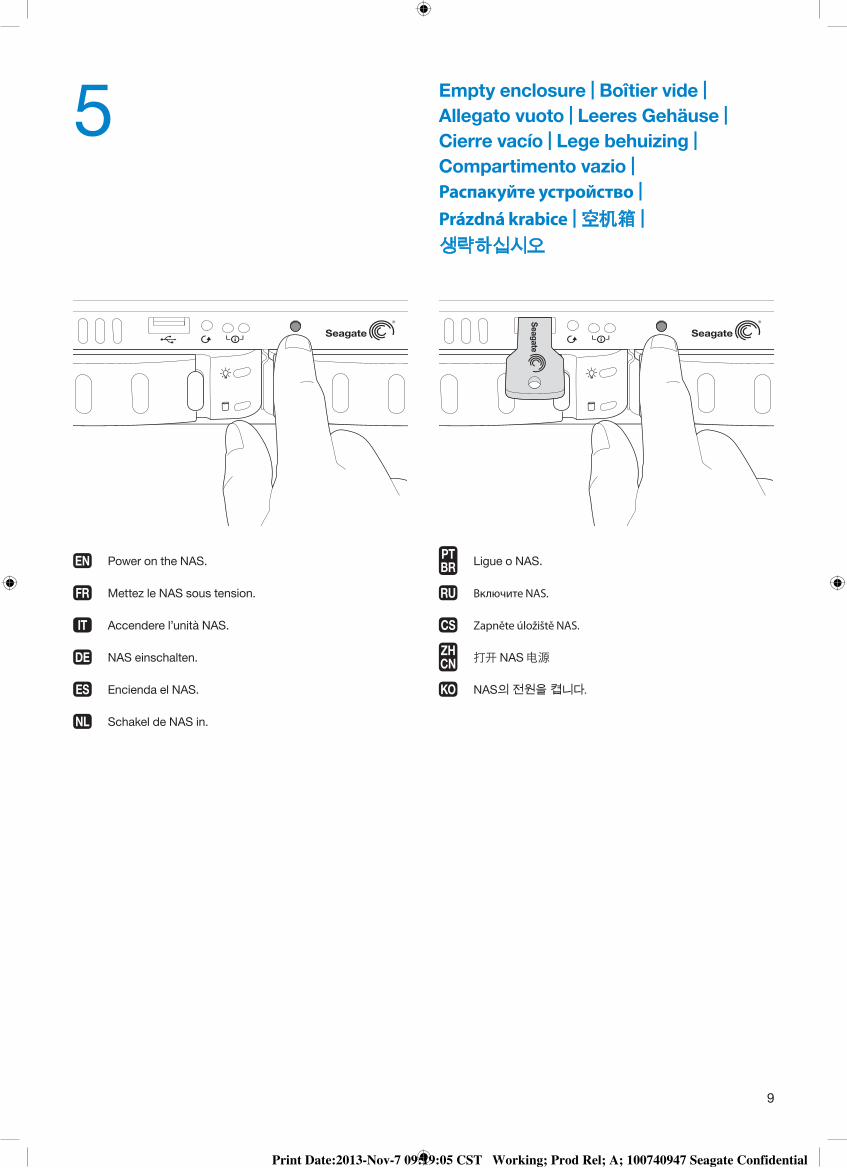
5
Power on the NAS.
Mettez le NAS sous tension.
Accendere l’unità NAS.
NAS einschalten.
Encienda el NAS.
Schakel de NAS in.
EN
FR
IT
DE
ES
NL
Ligue o NAS.
Включите NAS.
Zapněte úložiště NAS.
打开 NAS 电源
NAS의 전원을 켭니다.
PTBR
RU
CS
ZHCN
KO
Empty enclosure | Boîtier vide | Allegato vuoto | Leeres Gehäuse | Cierre vacío | Lege behuizing | Compartimento vazio | Распакуйте устройство | Prázdná krabice | 空机箱 | 생략하십시오
Print Date:2013-Nov-7 09:19:05 CST Working; Prod Rel; A; 100740947 Seagate Confidential
10
6 Empty enclosure | Boîtier vide | Allegato vuoto | Leeres Gehäuse | Cierre vacío | Lege behuizing | Compartimento vazio | Распакуйте устройство | Prázdná krabice | 空机箱 | 생략하십시오
1
2 3
4
Print Date:2013-Nov-7 09:19:05 CST Working; Prod Rel; A; 100740947 Seagate Confidential
11
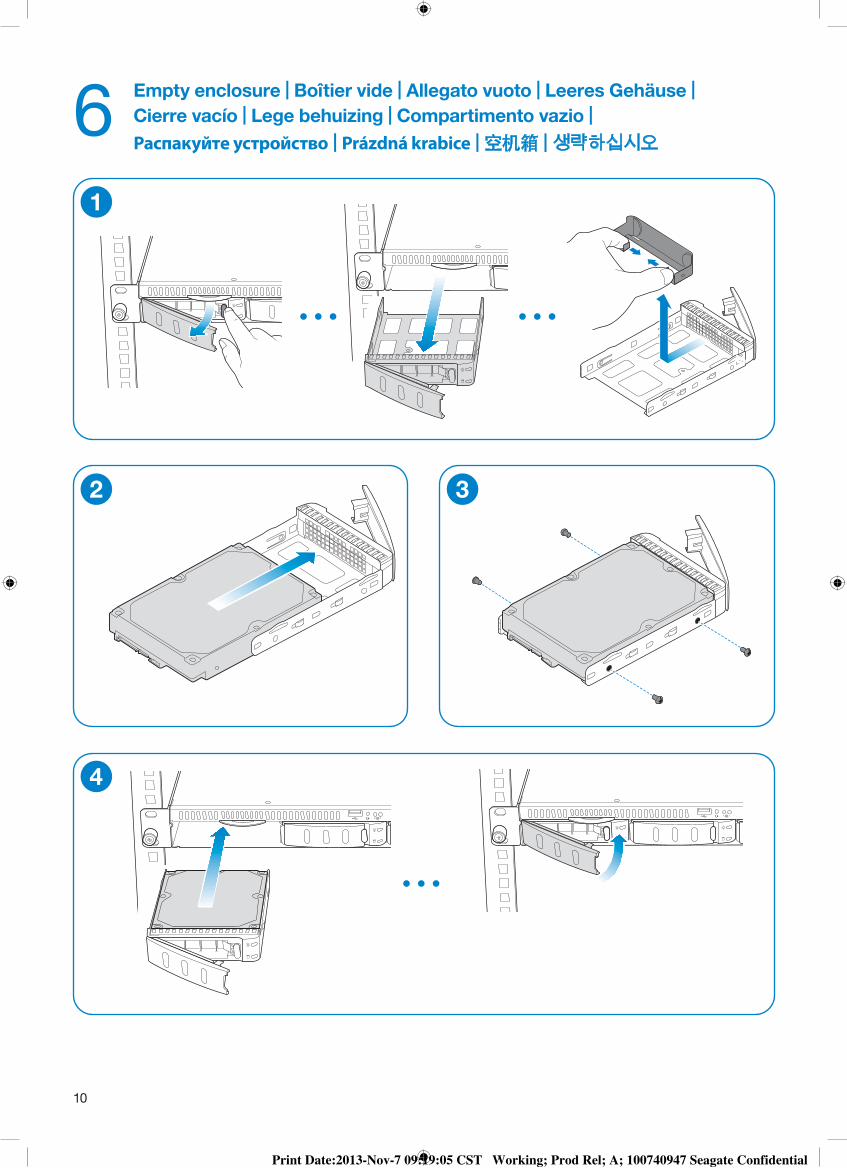
Empty enclosure
IMPORTANT:• Seagaterecommendsinsertingdisksfromleft
to right.• Emptytraysmuststayinthebaysforproperairflow.• Makecertainthatyouareproperlygroundedbefore
touching the disks.
1. Remove empty disk trays from the 4-bay Rackmount NAS.
2. Insert the drives into the trays. Confirm that the SATA connection is at the rear of the tray.
3. Screw the drives to the trays, two screws on each side. 4. Insert the disks into the NAS bays. Push each disk
into the bay as far as it will go before closing the tray handle.
Boîtier vide
IMPORTANT :• Seagaterecommanded’insérerlesdisquesdela
gauche vers la droite.• Lesplateauxvidesdoiventresterdanslesbaiesafin
d’assurer une parfaite circulation de l’air.• Assurez-vousd’êtrecorrectementreliéàlamasse
avant de manipuler les disques.
1. Retirez les plateaux de disques vides du serveur Rackmount NAS 4 baies.
2. Insérez les disques dans les plateaux. Vérifiez que le connecteur SATA est situé à l’arrière du plateau.
3. Fixez les disques aux plateaux à l’aide de deux vis de chaque côté.
4. Insérez les disques dans les baies du NAS. Poussez chaque disque aussi loin que possible dans la baie avant de refermer la poignée du plateau.
Allegato vuoto
IMPORTANTE:• Seagateraccomandadiinserireidischidasinistra
verso destra.• Isupportivuotidevonorestareneglialloggiamenti
per una corretta ventilazione.• Accertarsidiseguireleprocedureperimpedire
possibili scariche elettrostatiche prima di toccare i dischi.
1. Rimuovere i supporti vuoti per dischi dal NAS da 4 alloggiamenti con montaggio in rack.
2. Inserire le unità nei supporti. Confermare che la connessione SATA si trova sul retro del supporto.
3. Avvitare le unità ai supporti con due viti per ogni lato. 4. Inserire i dischi negli alloggiamenti NAS. Spingere i
dischi nei rispettivi alloggiamenti quanto consentito dallo spazio disponibile prima di chiudere il supporto.
EN
FR
IT
Leeres Gehäuse
WICHTIG:• Seagateempfiehlt,dieFestplattenvonlinksnach
rechts hineinzuschieben.• LeereFächermüssenindenGeräteschächten
bleiben, damit eine optimale Belüftung gewährleistet ist.
• Sicherstellen,dasseineordnungsgemäßeErdungvorhanden ist, bevor Sie die Festplatten berühren.
1. Entfernen Sie leere Festplattenfächer aus dem 4-Bay Rackmount NAS.
2. Schieben Sie die Laufwerke in die Fächer. Prüfen Sie, ob die SATA-Verbindung an der Rückseite des Fachs hergestellt wurde.
3. Verschrauben Sie die Laufwerke auf jeder Seite mit zwei Schrauben mit den Fächern.
4. Schieben Sie die Festplatten in die NAS Geräteschächte. Schieben Sie jede Festplatte so weit wie möglich in den Schacht, bevor Sie den Hebel des Fachs schließen.
Cierre vacío
IMPORTANTE:• Seagaterecomiendainsertardiscosdeizquierda
a derecha.• Lasbandejasvacíasdebenmantenerseenlas
bahías para que el flujo de aire sea el apropiado.• Asegúresedequelaconexiónatierraseala
apropiada antes de tocar los discos.
1. Quite las bandejas de discos vacías del Rackmount NAS de 4 bahías.
2. Inserte los discos en las bandejas. Confirme que la conexión SATA se encuentra en la parte trasera de la bandeja.
3. Atornille las unidades a las bandejas, dos tornillos a cada lado.
4. Inserte los discos en las bahías NAS. Empuje cada disco en la bahía tan lejos como pueda ir antes de cerrar el asa de la bandeja.
Lege behuizing
BELANGRIJK:• Seagateadviseertomschijvenvanlinksnaarrechts
te plaatsen.• Legetraysmoetenindebaysblijvenvoordejuiste
luchtstroom.• Zorgdatugoedgeaardbentvoordatudeschijven
aanraakt.
1. Verwijder lege schijftrays uit de 4-bay Rackmount NAS. 2. Steek de schijven in de trays. Controleer of de SATA-
aansluiting aan de achterzijde van de tray zit. 3. Zet de schijven met twee schroeven aan iedere zijde
vast in de trays. 4. Steek de schijven in de bays van de NAS. Duw
iedere schijf zo ver mogelijk in de bay voordat u het trayhandvat sluit.
DE
ES
NL
Print Date:2013-Nov-7 09:19:05 CST Working; Prod Rel; A; 100740947 Seagate Confidential
12
Compartimento vazio
IMPORTANTE:• ASeagaterecomendainserirosdiscosdaesquerda
para a direita.• Paraproporcionarumfluxodearadequado,as
bandejas vazias devem ficar nas baias.• Antesdetocarnosdiscos,certifique-sedeterum
aterramento adequado.
1. Tire as bandejas de disco vazias do Rackmount NAS com 4 baias.
2. Insira as unidades nas bandejas. Certifique-se de que a conexão do SATA esteja na parte traseira da bandeja.
3. Parafuse as unidades às bandejas, com dois parafusos de cada lado.
4. Insira os discos nas baias do NAS. Antes de fechar a bandeja, empurre cada disco para dentro da baia até o fundo.
Распакуйте устройство
ВАЖНО!• КомпанияSeagateрекомендуетвставлятьдиски
слева направо.• Пустыелоткидолжныоставатьсявотсекахдля
обеспечения потока воздуха.• Убедитесь,чтовызаземлены,преждечемкасаться
дисков.
1. Выньте пустые лотки для дисков из Rackmount NAS с 4 отсеками.
2. Вставьте диски в лотки. Убедитесь в том, что разъем SATA находится в задней части лотка.
3. Прикрепите диски к лоткам, используя по два винта с каждой стороны.
4. Вставьте диски в отсеки NAS. Вдвигайте каждый диск в отсек до тех пор, пока он не закроет рукоятку лотка.
Prázdná krabice
DŮLEŽITÉ:• SpolečnostSeagatedoporučujevkládatdiskyzleva
doprava.• Prázdnézásobníkymusízůstatnapozicíchprosprávné
proudění vzduchu.• Nežsedotknetedisků,řádněseuzemněte.
1. Vyjměte z úložiště NAS s montáží do racku se 4 pozicemi prázdné zásobníky disků.
2. Vložte do zásobníků disky. Zkontrolujte, že připojení SATA je v zadní části zásobníku.
3. Přišroubujte disky do zásobníků dvěma šroubky na každé straně.
4. Vložte disky do pozic úložiště NAS. Zatlačte každý disk do pozice až na doraz a zavřete rukojeť zásobníku.
PTBR
RU
CS
空机箱
重要事项:
• Seagate 建议从左到右插入硬盘。• 空抽取盒必须放在托盘中以确保适当的通风。• 在触摸硬盘前必须确保已正确接地。
1. 从 4-bay Rackmount NAS 中取下空硬盘抽取盒。 2. 将硬盘插入抽取盒。确认 SATA 接口在抽取盒的后面。 3. 用螺丝将硬盘固定到抽取盒上,每侧各安装两颗螺丝。 4. 将硬盘插入 NAS 托盘。将每个硬盘完全按入托盘,
然后扣合抽取盒手柄。
생략하십시오
중요:• Seagate는 디스크를 왼쪽에 오른쪽으로 삽입할 것을
권장합니다.• 빈 트레이는 적절한 환기를 위해 베이에 두어야
합니다.• 디스크를 만지기 전에 적절하게 접지하십시오.
1. 4베이 Rackmount NAS에서 빈 디스크 트레이를 제거합니다.
2. 디스크를 트레이에 삽입합니다. 트레 후면에 SATA 연결부가 있는지 확인합니다.
3. 드라이브를 트레이에 끼우고 두 개의 나사를 사용하여 트레이 양쪽을 조입니다.
4. 디스크를 NAS 베이에 삽입합니다. 각 디스크를 베이에 끝까지 밀어 넣은 다음 트레이 손잡이를 닫습니다.
ZHCN
KO
Print Date:2013-Nov-7 09:19:05 CST Working; Prod Rel; A; 100740947 Seagate Confidential
13
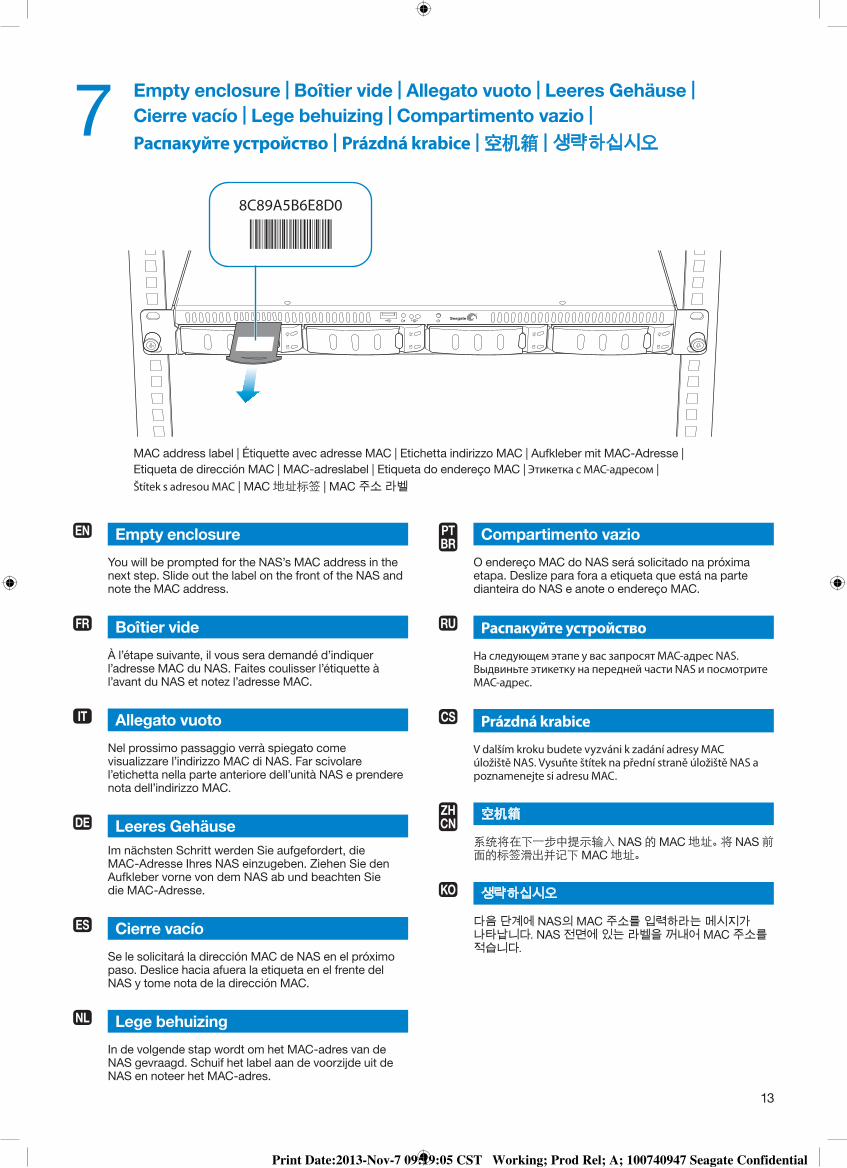
78C89A5B6E8D0
Empty enclosure
You will be prompted for the NAS’s MAC address in the next step. Slide out the label on the front of the NAS and note the MAC address.
Boîtier vide
À l’étape suivante, il vous sera demandé d’indiquer l’adresse MAC du NAS. Faites coulisser l’étiquette à l’avant du NAS et notez l’adresse MAC.
Allegato vuoto
Nel prossimo passaggio verrà spiegato come visualizzare l’indirizzo MAC di NAS. Far scivolare l’etichetta nella parte anteriore dell’unità NAS e prendere nota dell’indirizzo MAC.
Leeres Gehäuse
Im nächsten Schritt werden Sie aufgefordert, die MAC-Adresse Ihres NAS einzugeben. Ziehen Sie den Aufkleber vorne von dem NAS ab und beachten Sie die MAC-Adresse.
Cierre vacío
Se le solicitará la dirección MAC de NAS en el próximo paso. Deslice hacia afuera la etiqueta en el frente del NAS y tome nota de la dirección MAC.
Lege behuizing
In de volgende stap wordt om het MAC-adres van de NAS gevraagd. Schuif het label aan de voorzijde uit de NAS en noteer het MAC-adres.
EN
FR
IT
DE
ES
NL
Compartimento vazio
O endereço MAC do NAS será solicitado na próxima etapa. Deslize para fora a etiqueta que está na parte dianteira do NAS e anote o endereço MAC.
Распакуйте устройство
На следующем этапе у вас запросят MAC-адрес NAS. Выдвиньте этикетку на передней части NAS и посмотрите MAC-адрес.
Prázdná krabice
V dalším kroku budete vyzváni k zadání adresy MAC úložiště NAS. Vysuňte štítek na přední straně úložiště NAS a poznamenejte si adresu MAC.
空机箱
系统将在下一步中提示输入 NAS 的 MAC 地址。将 NAS 前面的标签滑出并记下 MAC 地址。
생략하십시오
다음 단계에 NAS의 MAC 주소를 입력하라는 메시지가 나타납니다. NAS 전면에 있는 라벨을 꺼내어 MAC 주소를 적습니다.
PTBR
RU
CS
ZHCN
KO
MAC address label | Étiquette avec adresse MAC | Etichetta indirizzo MAC | Aufkleber mit MAC-Adresse | Etiqueta de dirección MAC | MAC-adreslabel | Etiqueta do endereço MAC | Этикетка с MAC-адресом | Štítek s adresou MAC | MAC 地址标签 | MAC 주소 라벨
Empty enclosure | Boîtier vide | Allegato vuoto | Leeres Gehäuse | Cierre vacío | Lege behuizing | Compartimento vazio | Распакуйте устройство | Prázdná krabice | 空机箱 | 생략하십시오
Print Date:2013-Nov-7 09:19:05 CST Working; Prod Rel; A; 100740947 Seagate Confidential
14
9
8
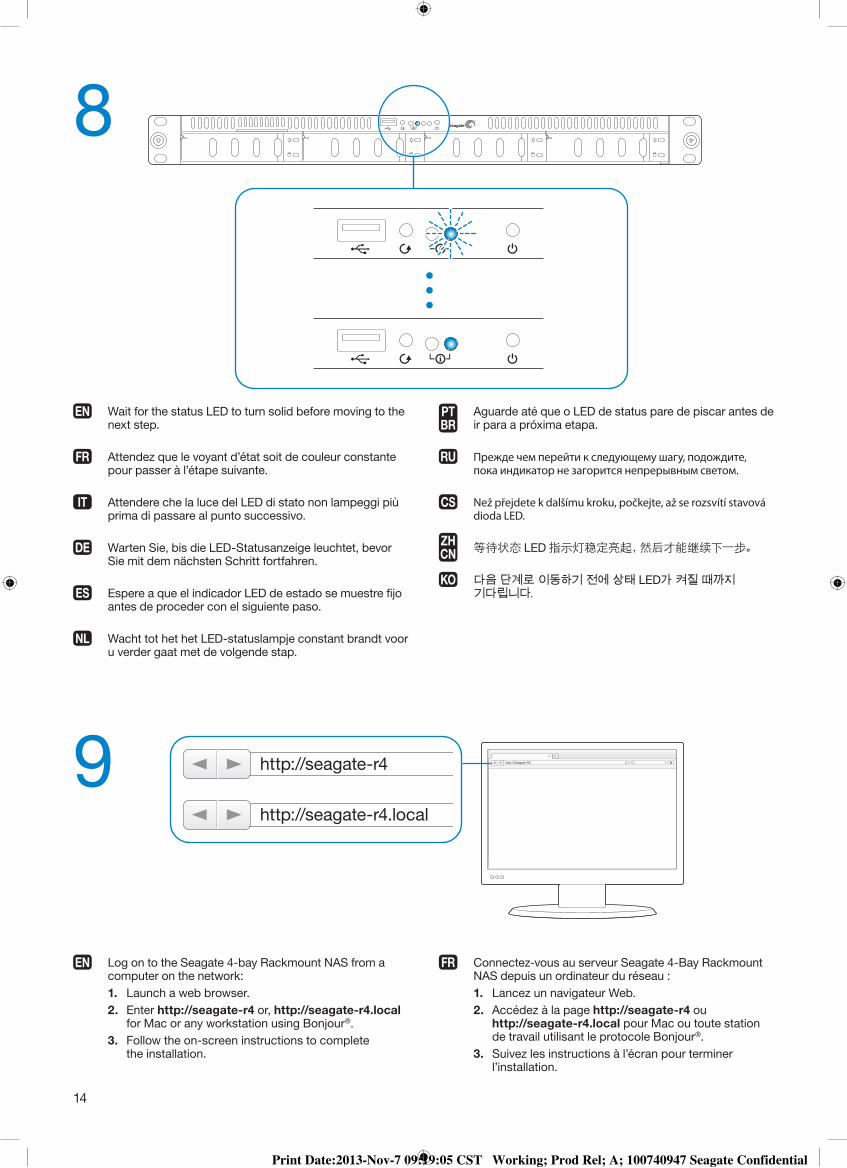
Log on to the Seagate 4-bay Rackmount NAS from a computer on the network:
1. Launch a web browser. 2. Enter http://seagate-r4 or, http://seagate-r4.local
for Mac or any workstation using Bonjour®. 3. Follow the on-screen instructions to complete
the installation.
EN
Wait for the status LED to turn solid before moving to the next step.
Attendez que le voyant d’état soit de couleur constante pour passer à l’étape suivante.
Attendere che la luce del LED di stato non lampeggi più prima di passare al punto successivo.
Warten Sie, bis die LED-Statusanzeige leuchtet, bevor Sie mit dem nächsten Schritt fortfahren.
Espere a que el indicador LED de estado se muestre fijo antes de proceder con el siguiente paso.
Wacht tot het het LED-statuslampje constant brandt voor u verder gaat met de volgende stap.
EN
FR
IT
DE
ES
NL
Aguarde até que o LED de status pare de piscar antes de ir para a próxima etapa.
Прежде чем перейти к следующему шагу, подождите, пока индикатор не загорится непрерывным светом.
Než přejdete k dalšímu kroku, počkejte, až se rozsvítí stavová dioda LED.
等待状态 LED 指示灯稳定亮起,然后才能继续下一步。
다음 단계로 이동하기 전에 상태 LED가 켜질 때까지 기다립니다.
PTBR
RU
CS
ZHCN
KO
http://Seagate-R4 http://seagate-r4
http://seagate-r4.local
Connectez-vous au serveur Seagate 4-Bay Rackmount NAS depuis un ordinateur du réseau :
1. Lancez un navigateur Web. 2. Accédez à la page http://seagate-r4 ou
http://seagate-r4.local pour Mac ou toute station de travail utilisant le protocole Bonjour®.
3. Suivez les instructions à l’écran pour terminer l’installation.
FR
Print Date:2013-Nov-7 09:19:05 CST Working; Prod Rel; A; 100740947 Seagate Confidential
15
Войдите на Seagate Rackmount NAS с 4 отсеками с компьютера в сети:
1. Запустите веб-браузер. 2. Введите http://seagate-r4 или http://seagate-r4.local
для компьютера Mac или любой рабочей станции с помощью Bonjour®.
3. Для завершения установки следуйте инструкциям на экране.
Přihlaste se k rackovému úložišti Seagate NAS se 4 pozicemi z počítače v síti:
1. Spusťte webový prohlížeč. 2. Zadejte adresu http://seagate-r4 nebo
http://seagate-r4.local pro počítač Mac nebo jakoukoli pracovní stanici využívající řešení Bonjour®.
3. Při instalaci postupujte podle pokynů na obrazovce.
通过接入网络的计算机登录 Seagate 4-bay Rackmount NAS:
1. 启动 Web 浏览器。 2. 输入 http://seagate-r4 或 http://seagate-r4.local (对于使用 Bonjour® 的 Mac 或任何工作站)。 3. 按照屏幕上的说明完成安装。
네트워크에 있는 컴퓨터에서 Seagate 4베이 Rackmount NAS에 로그인하십시오.
1. 웹 브라우저를 시작합니다. 2. http://seagate-r4를 입력하거나 Mac 또는
Bonjour®를 사용하는 워크스테이션의 경우 http://seagate-r4.local을 입력합니다.
3. 화면의 지침을 따라 설정을 완료합니다.
RU
CS
ZHCN
KO
Accedere al NAS Seagate da 4 alloggiamenti con montaggio in rack da un computer presente sulla rete:
1. Avviare un browser Web. 2. Digitare http://seagate-r4 o http://seagate-r4.local
per Mac o qualsiasi altra workstation che utilizza Bonjour®.
3. Seguire le istruzioni visualizzate sullo schermo per completare l’installazione.
Melden Sie sich von einem Computer im Netzwerk aus an dem Seagate 4-Bay Rackmount NAS an:
1. Starten Sie einen Webbrowser. 2. Geben Sie http://seagate-r4 oder
http://seagate-r4.local für Mac oder Workstations, die Bonjour® einsetzen, in die Adresszeile ein.
3. Folgen Sie den Bildschirmanweisungen, um die Installation abzuschließen.
Inicie sesión en Seagate 4-bay Rackmount NAS desde un ordenador en la red:
1. Inicie un navegador web. 2. Ingrese http://seagate-r4 o, http://seagate-r4.local
para Mac o cualquier estación de trabajo que utilice Bonjour®.
3. Siga las instrucciones en pantalla para completar la instalación.
Log in op de Seagate 4-bay Rackmount NAS vanaf een computer in het netwerk:
1. Open een webbrowser. 2. Typ http://seagate-r4 in (of http://seagate-r4.
local op een Mac of een werkstation dat Bonjour® gebruikt).
3. Volg de aanwijzingen op het scherm om de installatie te voltooien.
Faça logon no Seagate 4-Bay Rackmount NAS usando um computador na rede:
1. Inicie um navegador da web.
2. Insira http://seagate-r4 ou http://seagate-r4.local para o Mac ou qualquer estação de trabalho usando o Bonjour®.
3. Siga as instruções na tela para concluir a instalação.
IT
DE
ES
NL
PTBR
“O” indicates the hazardous and toxic substance content of the part (at the homogenous material level) is lower than the threshold defined by the RoHS MCV Standard.“X” indicates the hazardous and toxic substance content of the part (at the homogenous material level) is over the threshold defined by the RoHS MCV Standard.The Environment Friendly Use Period for These Products is 20 Years
OOOOOXOOOOOXOOOOOXOOOOOOOOOOOOOOOOOOOOOOOOOOOOOO
Toxic or Hazardous Substances or Elements
Name of PartsHDDPrinted Circuit AssembliesPower Supply UnitCoin Type BatteryPlastic Enclosure ChassisScrews, Clips and FastenersRetail Box, and Packaging Components
OOOOOOExternal CablesOOOOOOInternal Cables
OOOOOOQuick Start Guide, USB Key, Stickers andLabels (Paper and PET)
OOOOOOPET Bags
Lead (Pb)
Mercury (Hg)
Cadmium (Cd)
HexavalentChromium (Cr6+)
PolybrominatedDiphenyl (PBB)
Polybrominated Diphenyl Ether (PBDE)
“O” 表示部件的危险和有毒物质含量(在均质材料水平下)低于 RoHS MCV 标准规定的临界水平。“X” 表示部件的危险和有毒物质含量(在均质材料水平下)高于 RoHS MCV 标准规定的临界水平。这些产品的环境友好使用期限为 20年
OOOOOXOOOOOXOOOOOXOOOOOOOOOOOOOOOOOOOOOOOOOOOOOO
HDD印刷电路板组件电源设备硬币型电池塑胶外壳 机箱螺丝、扣件和紧固件零售包装盒及包装组件
OOOOOO外部电缆
OOOOOO内部电缆
OOOOOO快速入门指南、USB Key、贴纸及标签(纸质和 PET)
OOOOOOPET 包
铅 汞 镉 六价铬 多溴联苯 多溴二苯醚
有毒有害物质或元素
部件名称
Print Date:2013-Nov-7 09:19:05 CST Working; Prod Rel; A; 100740947 Seagate Confidential
© 2013 Seagate Technology LLC. All rights reserved. Seagate, Seagate Technology, and the Wave logo are trademarks or registered trademarks of Seagate Technology LLC or one of its affiliated companies in the United States and/or other countries. All other trademarks or registered trademarks are the property of their respective owners. When referring to hard drive capacity, one gigabyte, or GB, equals one billion bytes and one terabyte, or TB, equals one thousand billion bytes. Your computer’s operating system may use a different standard of measurement and report a lower capacity. In addition, some of the listed capacity is used for formatting and other functions and will not be available for data storage. The export or re-export of hardware or software containing encryption may be regulated by the U.S. Department of Commerce, Bureau of Industry and Security (for more information, visit www.bis.doc.gov). Seagate reserves the right to change, without notice, product offerings or specifications.
Seagate Technology LLC10200 S. De Anza Blvd.Cupertino, CA 95014 U.S.A.
Model: SRN04U
PN: 100740947 10/13
Seagate Technology InternationalKoolhovenlaan 11119 NB Schiphol-RijkThe Netherlands
100740947
www.seagate.com/supportVisit us at our Support pages for assistance with:• Installation: Additional instructions and troubleshooting assistance•Warranty InformationTo contact support, visit us at our Contact Us page.
NOTE: To protect your data, always follow the safe removal procedures for your operating system when disconnecting your product.
FCC DECLARATION OF CONFORMANCE
This device complies with Part 15 of the FCC Rules. Operation is subject to the following two conditions: (1) this device may not cause harmful interference, and (2) this device must accept any interference received, including interference that may cause undesired operation.
CLASS A
NOTE: This equipment has been tested and found to comply with the limits for a Class A digital device, pursuant to Part 15 of the FCC Rules. These limits are designed to provide reasonable protection against harmful interference when the equipment is operated in a commercial environment. This equipment generates, uses, and can radiate radio frequency energy and, if not installed and used in accordance with the instruction manual, may cause harmful interference to radio communications. Operation of this equipment in a residential area is likely to cause harmful interference in which case the user will be required to correct the interference at his own expense.
www.seagate.com/supportConsultez les pages de support technique de notre site pour toute question relative aux points suivants :• Installation : Instructions supplémentaires et assistance dépannage• Informations sur la garantiePour contacter le support technique, consultez la page Nous contacter.
REMARQUE : Pour protéger vos données, suivez toujours les procédures de retrait sécurisé correspondant à votre système d’exploitation lors de la déconnexion du produit.
www.seagate.com/supportLe pagine di assistenza del nostro sito offrono supporto sugli argomenti indicati di seguito:• Installazione: istruzioni aggiuntive e assistenza per la risoluzione dei problemi• Informazioni sulla garanziaPer contattare il nostro servizio di assistenza consultate la pagina Come contattarci.
NOTA: per proteggere i dati, disconnettere sempre il dispositivo applicando la procedura di rimozione sicura dell’hardware.
www.seagate.com/supportAuf unseren Support-Seiten finden Sie hilfreiche Informationen:• Installation: Weitere Anleitungen und Hilfe bei der Fehlersuche•GarantieinformationenWeitere Unterstützung erhalten Sie auf unserer Kontakt-Seite.
HINWEIS: Befolgen Sie immer die Anweisungen Ihres Betriebssystems zum sicheren Entfernen der Festplatte, um die Integrität Ihrer Daten zu gewährleisten.
www.seagate.com/supportConsulte nuestras páginas de asistencia técnica para recibir ayuda sobre:• Instalación: Instrucciones adicionales y asistencia para la resolución de problemas• Información de garantíasPara ponerse en contacto con el servicio de asistencia técnica, consulte nuestra página Contacto.
NOTA: Para proteger sus datos, asegúrese de seguir los procedimientos de extracción segura de su sistema operativo siempre que desconecte el producto.
EN
FR
IT
DE
ES
www.seagate.com/supportGa voor hulp naar de volgende ondersteuningspagina’s:• Installation: Aanvullende aanwijzingen en hulp bij het oplossen van problemen.•Warranty Information: Alles over garantieAls u in contact wilt komen met onze afdeling Ondersteuning, gaat u dan naar de pagina Contact Us.
OPMERKING: Volg ter bescherming van uw gegevens altijd de procedures van uw besturingssysteem voor het veilig verwijderen van hardware als u het product wilt loskoppelen.
www.seagate.com/supportVisite as nossas páginas de suporte para obter assistência com:• Instalação: Instruções adicionais e ajuda para resolver problemas.• Informação sobre a garantia Para entrar em contato com o suporte, visite a nossa página Contato.
NOTA: Para proteger os seus dados, sempre que pretender desligar o seu produto, cumpra os procedimentos de remoção segura aplicáveis ao seu sistema operativo.
www.seagate.com/supportНа веб-страницах службы поддержки содержится следующая полезная информация.• Установка: дополнительные инструкции и помощь в устранении неполадок• Информация о гарантийных обязательствахЧтобы обратиться в службу поддержки, посетите страницу Contact Us (Адреса для связи).
ПРИМЕЧАНИЕ. Чтобы обеспечить сохранность данных, при отключении изделия всегда выполняйте в операционной системе процедуру безопасного извлечения.
www.seagate.com/supportNavštivte nás na Stránkách podpory, potřebujete-li pomoc v těchto oblastech:• Instalace: dodatečné pokyny a pomoc s řešením problémů.• Informace o záruceChcete-li kontaktovat oddělení podpory, navštivte nás na naší stránce Kontakty.
POZNÁMKA: Při odpojování výrobku vždy dodržujte postup bezpečného odebrání pro váš operační systém za účelem ochrany svých dat.
www.seagate.com/support请访问我们的“支持”页按照以下分类获取帮助:• 安装:附加说明和故障排除帮助• 质保信息�要与支持人员联系,请访问“与我们联系”页。
注意:为保护您的数据,请在断开产品时,总是按照适用于您的操作系统的安全卸下过程操作。
www.seagate.com/support하기 사항과 관련된 도움말은 당사의 Support 페이지에서 찾아볼 수 있습니다.• 설치: 추가 지침 및 문제 해결 지원• 보증 정보문의가 있을 경우 당사의 Contact Us 페이지를 방문해 주십시오.
참고: 보다 안전한 데이터 보호를 위해서 제품과의 연결을 끊을 때에 항상 하드웨어 안전 제거 절차를 준수하십시오.
NL
PT_BR
RU
CS
ZH_CN
KO
Print Date:2013-Nov-7 09:19:05 CST Working; Prod Rel; A; 100740947 Seagate Confidential

![Seagate 8-Bay Rackmount NAS Kullanım KılavuzuYunanca] ΜΕ ΤΗΝ ΠΑΡΟΥΣ SeagateΔΗΛΩΝΕΙ ΟΤΙRackmount NASΣΥΜΜΟΡΦΩΝΕΤΑΙ ΠΡΟΣ ...](https://static.fdocument.pub/doc/165x107/5aee3ed27f8b9a455690cafc/seagate-8-bay-rackmount-nas-kullanim-kilavuzu-yunanca-.jpg)

![Encase Basic - index-of.co.ukindex-of.co.uk/Forensic/Encase Basic [ccibomb].pdf · 2019-03-07 · Encase Forensic 방법롞에는 조사관이 2nd Hard drive를 사용하거나, 적어도](https://static.fdocument.pub/doc/165x107/5e53ab4196578f290c2aacff/encase-basic-index-ofcoukindex-ofcoukforensicencase-basic-ccibombpdf.jpg)