


Languages
Pages
Legal

WP2 Action de démonstration Libnam – mars 2014 | Nous remercions les participants et les formateurs (entreprise Junalik et Matt Robinson) aux deux actions de démonstration qui ont permis de construire cette fiche pédagogique et plus
particulièrement Etudes et Chantiers et son équipe de Rostrenen, le CSBT, l’IFSTTAR
1
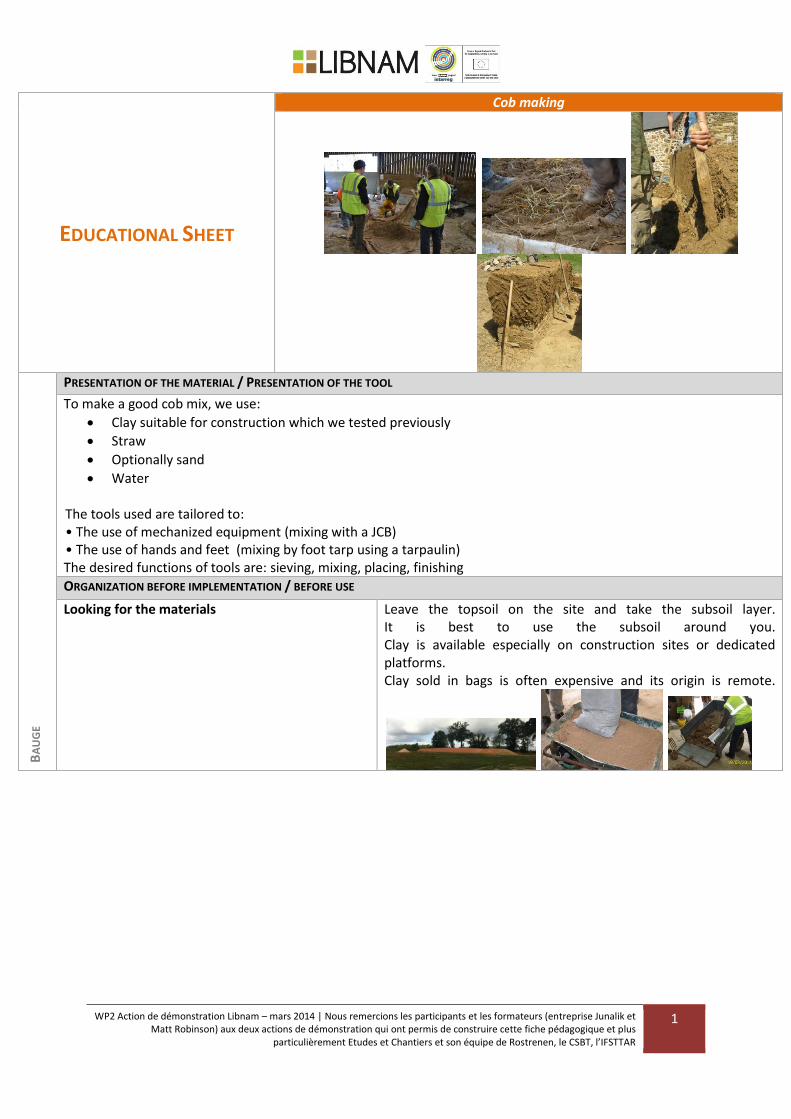
EDUCATIONAL SHEET
Cob making
BA
UG
E
PRESENTATION OF THE MATERIAL / PRESENTATION OF THE TOOL
To make a good cob mix, we use:
Clay suitable for construction which we tested previously
Straw
Optionally sand
Water The tools used are tailored to: • The use of mechanized equipment (mixing with a JCB) • The use of hands and feet (mixing by foot tarp using a tarpaulin) The desired functions of tools are: sieving, mixing, placing, finishing
ORGANIZATION BEFORE IMPLEMENTATION / BEFORE USE
Looking for the materials
Leave the topsoil on the site and take the subsoil layer. It is best to use the subsoil around you. Clay is available especially on construction sites or dedicated platforms. Clay sold in bags is often expensive and its origin is remote.
WP2 Action de démonstration Libnam – mars 2014 | Nous remercions les participants et les formateurs (entreprise Junalik et Matt Robinson) aux deux actions de démonstration qui ont permis de construire cette fiche pédagogique et plus
particulièrement Etudes et Chantiers et son équipe de Rostrenen, le CSBT, l’IFSTTAR
2
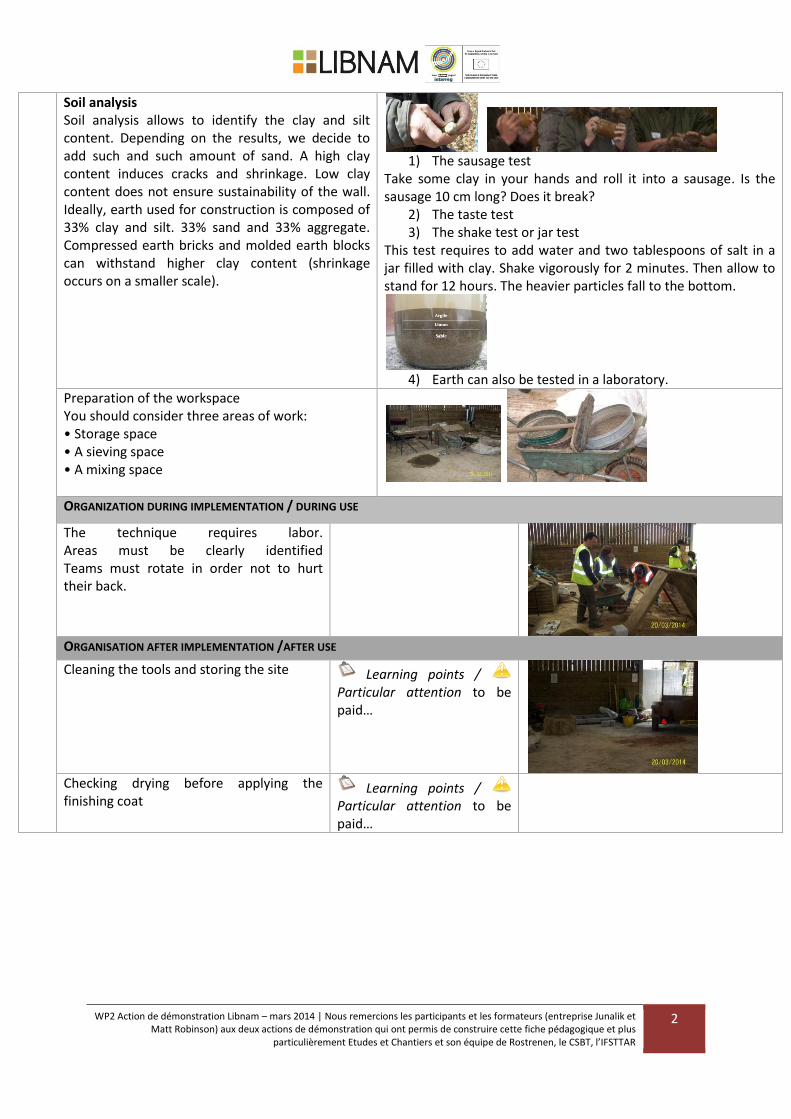
Soil analysis Soil analysis allows to identify the clay and silt content. Depending on the results, we decide to add such and such amount of sand. A high clay content induces cracks and shrinkage. Low clay content does not ensure sustainability of the wall. Ideally, earth used for construction is composed of 33% clay and silt. 33% sand and 33% aggregate. Compressed earth bricks and molded earth blocks can withstand higher clay content (shrinkage occurs on a smaller scale).
1) The sausage test
Take some clay in your hands and roll it into a sausage. Is the sausage 10 cm long? Does it break?
2) The taste test 3) The shake test or jar test
This test requires to add water and two tablespoons of salt in a jar filled with clay. Shake vigorously for 2 minutes. Then allow to stand for 12 hours. The heavier particles fall to the bottom.
4) Earth can also be tested in a laboratory.
Preparation of the workspace You should consider three areas of work: • Storage space • A sieving space • A mixing space
ORGANIZATION DURING IMPLEMENTATION / DURING USE
The technique requires labor. Areas must be clearly identified Teams must rotate in order not to hurt their back.
ORGANISATION AFTER IMPLEMENTATION /AFTER USE
Cleaning the tools and storing the site Learning points / Particular attention to be paid…
Checking drying before applying the finishing coat
Learning points / Particular attention to be paid…
WP2 Action de démonstration Libnam – mars 2014 | Nous remercions les participants et les formateurs (entreprise Junalik et Matt Robinson) aux deux actions de démonstration qui ont permis de construire cette fiche pédagogique et plus
particulièrement Etudes et Chantiers et son équipe de Rostrenen, le CSBT, l’IFSTTAR
3
IMPLEMENTATION /USE
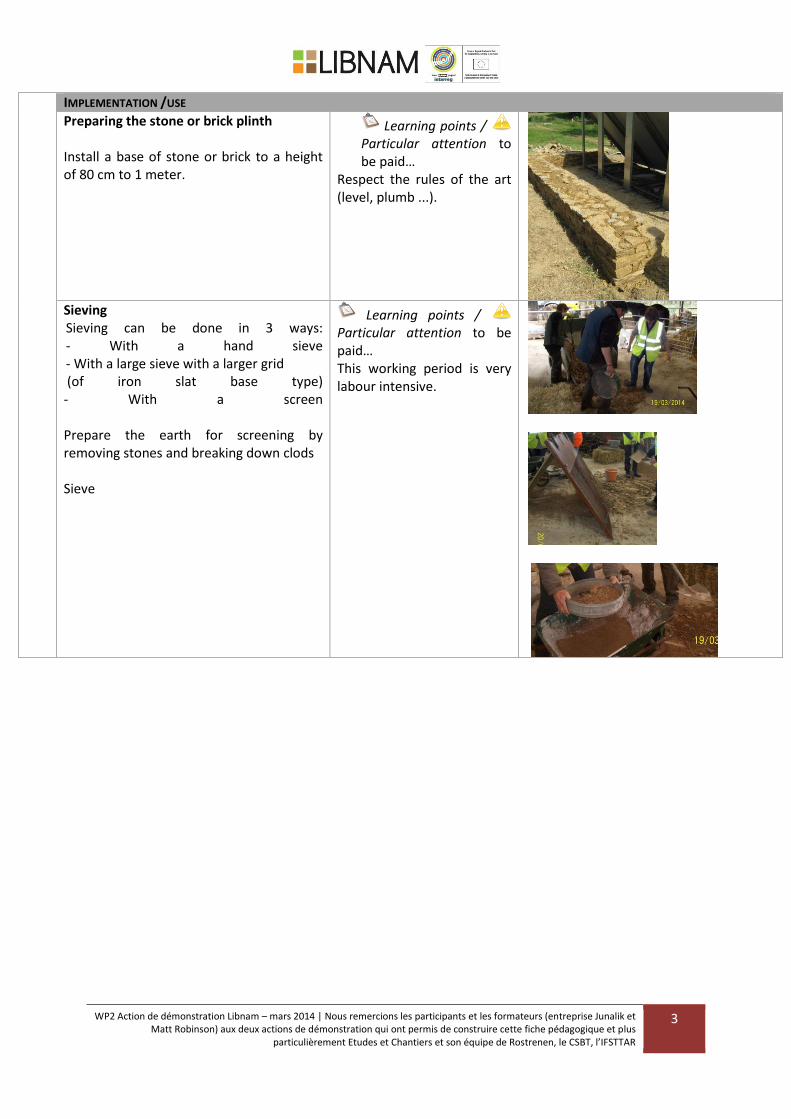
Preparing the stone or brick plinth Install a base of stone or brick to a height of 80 cm to 1 meter.
Learning points / Particular attention to be paid…
Respect the rules of the art (level, plumb ...).
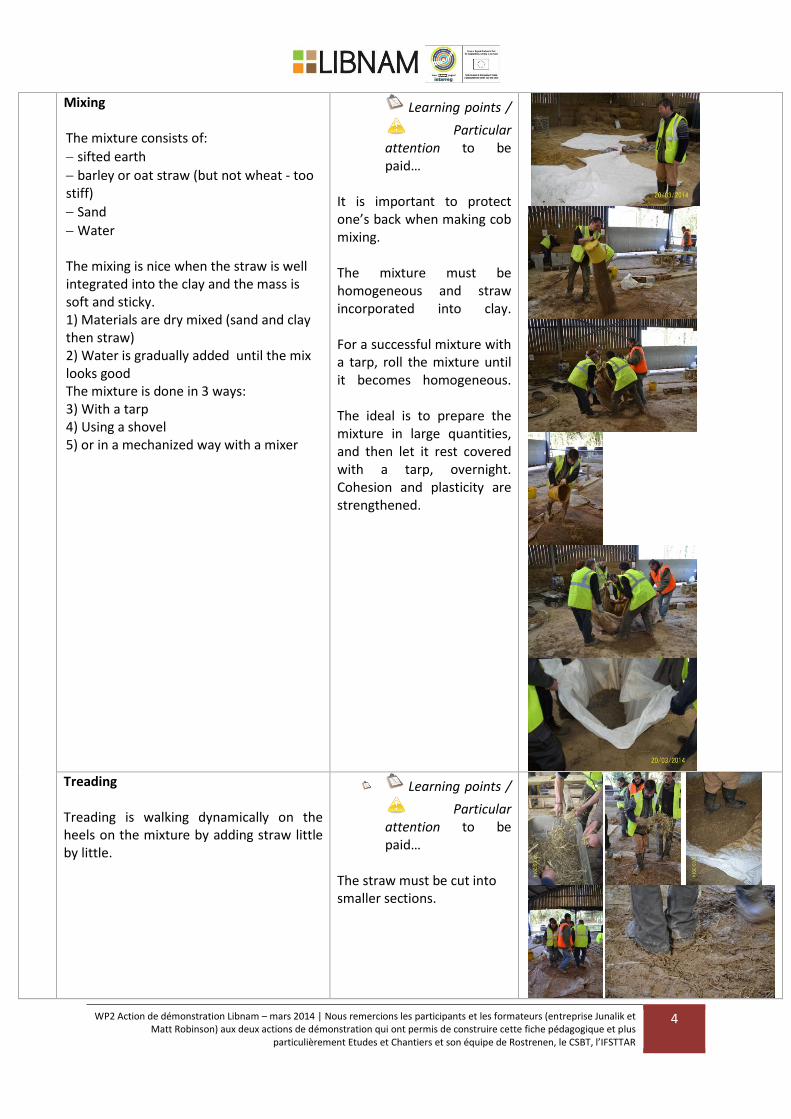
Sieving Sieving can be done in 3 ways: - With a hand sieve - With a large sieve with a larger grid (of iron slat base type) - With a screen Prepare the earth for screening by removing stones and breaking down clods Sieve
Learning points / Particular attention to be paid… This working period is very labour intensive.
WP2 Action de démonstration Libnam – mars 2014 | Nous remercions les participants et les formateurs (entreprise Junalik et Matt Robinson) aux deux actions de démonstration qui ont permis de construire cette fiche pédagogique et plus
particulièrement Etudes et Chantiers et son équipe de Rostrenen, le CSBT, l’IFSTTAR
4
Mixing The mixture consists of:
sifted earth
barley or oat straw (but not wheat - too stiff)
Sand
Water The mixing is nice when the straw is well integrated into the clay and the mass is soft and sticky. 1) Materials are dry mixed (sand and clay then straw) 2) Water is gradually added until the mix looks good The mixture is done in 3 ways: 3) With a tarp 4) Using a shovel 5) or in a mechanized way with a mixer
Learning points /
Particular attention to be paid…
It is important to protect one’s back when making cob mixing. The mixture must be homogeneous and straw incorporated into clay. For a successful mixture with a tarp, roll the mixture until it becomes homogeneous. The ideal is to prepare the mixture in large quantities, and then let it rest covered with a tarp, overnight. Cohesion and plasticity are strengthened.
Treading Treading is walking dynamically on the heels on the mixture by adding straw little by little.
Learning points /
Particular attention to be paid…
The straw must be cut into smaller sections.
WP2 Action de démonstration Libnam – mars 2014 | Nous remercions les participants et les formateurs (entreprise Junalik et Matt Robinson) aux deux actions de démonstration qui ont permis de construire cette fiche pédagogique et plus
particulièrement Etudes et Chantiers et son équipe de Rostrenen, le CSBT, l’IFSTTAR
5
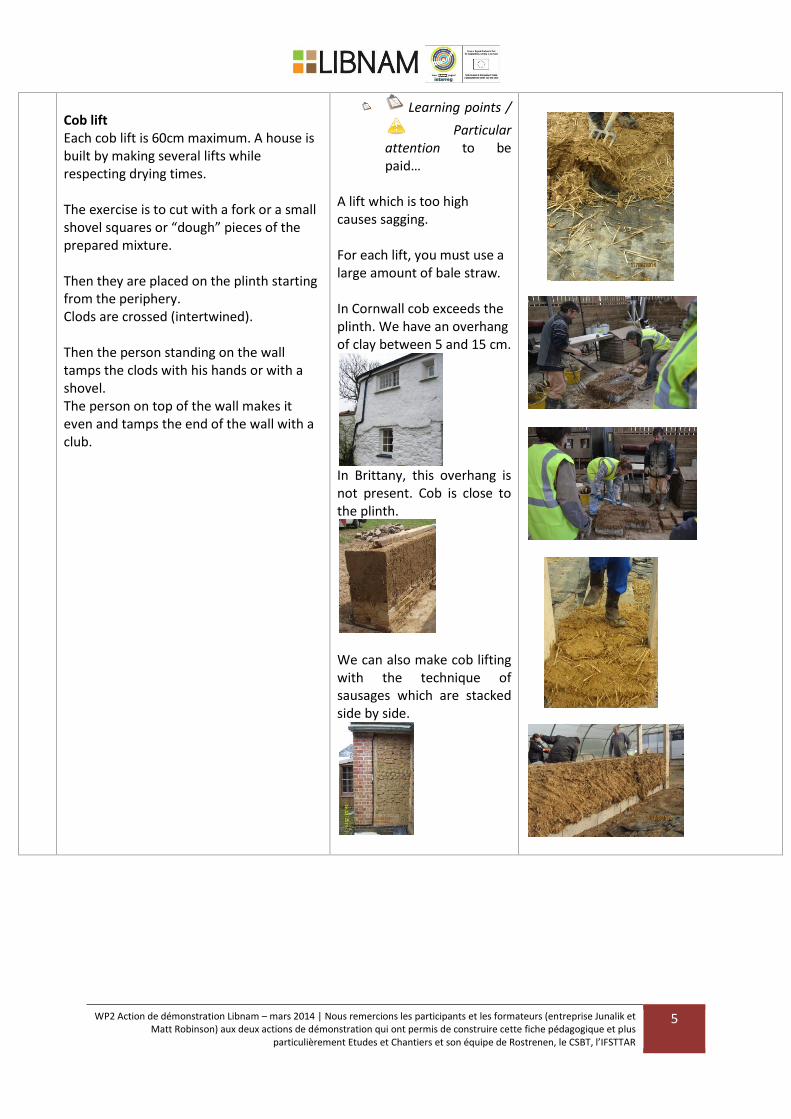
Cob lift Each cob lift is 60cm maximum. A house is built by making several lifts while respecting drying times. The exercise is to cut with a fork or a small shovel squares or “dough” pieces of the prepared mixture. Then they are placed on the plinth starting from the periphery. Clods are crossed (intertwined). Then the person standing on the wall tamps the clods with his hands or with a shovel. The person on top of the wall makes it even and tamps the end of the wall with a club.
Learning points /
Particular attention to be paid…
A lift which is too high causes sagging. For each lift, you must use a large amount of bale straw. In Cornwall cob exceeds the plinth. We have an overhang of clay between 5 and 15 cm.
In Brittany, this overhang is not present. Cob is close to the plinth.
We can also make cob lifting with the technique of sausages which are stacked side by side.

WP2 Action de démonstration Libnam – mars 2014 | Nous remercions les participants et les formateurs (entreprise Junalik et Matt Robinson) aux deux actions de démonstration qui ont permis de construire cette fiche pédagogique et plus
particulièrement Etudes et Chantiers et son équipe de Rostrenen, le CSBT, l’IFSTTAR
6
BA
UG
E
TOOLS
STEP 1 Sieving
MATERIALS / TOOLS Sieve
STEP 2 Mixing
MATERIALS / TOOLS Tarpaulin Bucket Foot
STEP 3 Cob Lifting / Walling
MATÉRIALS / TOOLS Trimmer Fork Club Foot
Safety equipment
- Safety boots - Gloves (for stones…) - Vigilance must be paid to the postures in particular regarding back pain
Top Related