TME-M770 - Alpine Europe · TME-M770 6.5-INCH TOUCH PANEL ... (RCS PONTOISE B 338 101 280) 98, Rue...
30
R EN DE FR ES IT SE CH TME-M770 6.5-INCH TOUCH PANEL WIDE LCD MONITOR ALPINE ELECTRONICS, INC. 1-1-8 Nishi Gotanda, Shinagawa-ku, Tokyo 141-0031, Japan Phone 03-5496-8231 ALPINE ELECTRONICS OF AMERICA, INC. 19145 Gramercy Place, Torrance, California 90501, U.S.A. Phone 1-800-ALPINE-1 (1-800-257-4631) ALPINE ELECTRONICS OF CANADA, INC. 7300 Warden Ave., Suite 203, Markham, Ontario L3R 9Z6, Canada Phone 1-800-ALPINE-1 (1-800-257-4631) ALPINE ELECTRONICS FRANCE S.A.R.L. (RCS PONTOISE B 338 101 280) 98, Rue de la Belle Etoile, Z.I. Paris Nord II, B.P. 50016, 95945, Roissy Charles de Gaulle Cedex, France Phone 01-48 63 89 89 ALPINE ITALIA S.p.A. Viale C. Colombo 8, 20090 Trezzano Sul Naviglio (MI), Italy Phone 02-48 47 81 ALPINE ELECTRONICS DE ESPAÑA, S.A. Portal de Gamarra 36, Pabellón, 32 01013 Vitoria (Alava) - APDO 133, Spain Phone 945-283588 ALPINE ELECTRONICS OF AUSTRALIA PTY. LTD. 6-8 Fiveways Boulevarde Keysborough, Victoria 3173, Australia Phone 03-9769-0000 ALPINE ELECTRONICS GmbH Frankfurter Ring 117, 80807 München, Germany Phone 089-32 42 640 ALPINE ELECTRONICS OF U.K., LTD. Fletchamstead Highway, Coventry CV4 9TW. U.K. Phone 0870-33 33 763 Designed by ALPINE Japan Printed in China (S) 68-00493Z17-B Qingdao Dongli Xinhaiyuan Printing Co., Ltd. No.17, jiushuidong road, Qingdao, China • OWNER'S MANUAL Please read before using this equipment. • BEDIENUNGSANLEITUNG Lesen Sie diese Bedienungsanleitung bitte vor Gebrauch des Gerätes. • MODE D'EMPLOI Veuillez lire avant d’utiliser cet appareil. • MANUAL DE OPERACIÓN Léalo antes de utilizar este equipo. • ISTRUZIONI PER L’USO Si prega di leggere prima di utilizzare il attrezzatura. • ANVÄNDARHANDLEDNING Innan du använder utrustningen bör du läsa igenom denna användarhandledning. • FOR CAR USE ONLY/NUR FÜR AUTOMOBIL GEBRAUCH/POUR APPLICATION AUTOMOBILE UNIQUEMENT/ PARA USO EN AUTOMÓVILES/SOLO PER L'UTILIZZO IN AUTOMOBILE/ENDAST FÖR BILBRUK/
Transcript of TME-M770 - Alpine Europe · TME-M770 6.5-INCH TOUCH PANEL ... (RCS PONTOISE B 338 101 280) 98, Rue...

R EN
DE
FR
ES
IT
SE
CH
TME-M7706.5-INCH TOUCH PANEL WIDE LCD MONITOR
ALPINE ELECTRONICS, INC.1-1-8 Nishi Gotanda,
Shinagawa-ku, Tokyo 141-0031, JapanPhone 03-5496-8231
ALPINE ELECTRONICS OF AMERICA, INC.19145 Gramercy Place, Torrance,
California 90501, U.S.A.Phone 1-800-ALPINE-1 (1-800-257-4631)
ALPINE ELECTRONICS OF CANADA, INC.7300 Warden Ave., Suite 203, Markham,
Ontario L3R 9Z6, CanadaPhone 1-800-ALPINE-1 (1-800-257-4631)
ALPINE ELECTRONICS FRANCE S.A.R.L.(RCS PONTOISE B 338 101 280)
98, Rue de la Belle Etoile, Z.I. ParisNord II, B.P. 50016, 95945, RoissyCharles de Gaulle Cedex, France
Phone 01-48 63 89 89
ALPINE ITALIA S.p.A.Viale C. Colombo 8,
20090 Trezzano Sul Naviglio (MI), ItalyPhone 02-48 47 81
ALPINE ELECTRONICS DE ESPAÑA, S.A.Portal de Gamarra 36, Pabellón, 32
01013 Vitoria (Alava) - APDO 133, SpainPhone 945-283588
ALPINE ELECTRONICS OF AUSTRALIA PTY. LTD.6-8 Fiveways Boulevarde Keysborough,
Victoria 3173, AustraliaPhone 03-9769-0000
ALPINE ELECTRONICS GmbHFrankfurter Ring 117, 80807 München,
GermanyPhone 089-32 42 640
ALPINE ELECTRONICS OF U.K., LTD.Fletchamstead Highway,Coventry CV4 9TW. U.K.Phone 0870-33 33 763
Designed by ALPINE JapanPrinted in China (S)
68-00493Z17-B
Qingdao Dongli XinhaiyuanPrinting Co., Ltd.No.17, jiushuidong road,Qingdao, China
• OWNER'S MANUALPlease read before using this equipment.
• BEDIENUNGSANLEITUNGLesen Sie diese Bedienungsanleitung bitte vorGebrauch des Gerätes.
• MODE D'EMPLOIVeuillez lire avant d’utiliser cet appareil.
• MANUAL DE OPERACIÓNLéalo antes de utilizar este equipo.
• ISTRUZIONI PER L’USOSi prega di leggere prima di utilizzare ilattrezzatura.
• ANVÄNDARHANDLEDNINGInnan du använder utrustningen bör du läsaigenom denna användarhandledning.
•
FOR CAR USE ONLY/NUR FÜR AUTOMOBIL GEBRAUCH/POUR APPLICATION AUTOMOBILE UNIQUEMENT/PARA USO EN AUTOMÓVILES/SOLO PER L'UTILIZZO IN AUTOMOBILE/ENDAST FÖR BILBRUK/


1-EN
FR
ES
DE
IT
SE
CH
ContentsOperating Instructions
WARNING
WARNING .................................................. 2
CAUTION ................................................... 3
PRECAUTIONS ......................................... 3
Basic Operation
Screen Display ON/OFF .................................... 4
Adjusting the Volume ......................................... 4
Switching the Source ......................................... 4
Other Useful FeaturesSetup Operation ................................................. 5
VISUAL EQTM Operation .................................. 7
Changing to Another Product’s Source .............. 8
Operating Other Products .................................. 8
InformationIn Case of Difficulty ........................................ 10
Specifications ................................................... 10
ENGLISH
Installation and ConnectionsWarning ........................................................... 11
Caution ............................................................ 11
Precautions ...................................................... 12
Installation ...................................................... 13
Connections .................................................... 16

2-EN
WARNINGThis symbol means important instructions.Failure to heed them can result in seriousinjury or death.
DO NOT OPERATE ANY FUNCTION THAT TAKESYOUR ATTENTION AWAY FROM SAFELY DRIVINGYOUR VEHICLE.
Any function that requires your prolonged attentionshould only be performed after coming to a complete stop.Always stop the vehicle in a safe location beforeperforming these functions. Failure to do so may result inan accident.
KEEP THE VOLUME AT A LEVEL WHERE YOU CANSTILL HEAR OUTSIDE NOISE WHILE DRIVING.
Failure to do so may result in an accident.
MINIMIZE DISPLAY VIEWING WHILE DRIVING.
Viewing the display may distract the driver from lookingahead of the vehicle and cause an accident.
DO NOT DISASSEMBLE OR ALTER.
Doing so may result in an accident, fire or electric shock.
USE THIS PRODUCT FOR MOBILE 12V APPLICATIONS.
Use for other than its designed application may result infire, electric shock or other injury.
KEEP SMALL OBJECTS SUCH AS BATTERY OUT OFTHE REACH OF CHILDREN.
Swallowing them may result in serious injury. Ifswallowed, consult a physician immediately.
USE THE CORRECT AMPERE RATING WHENREPLACING FUSES.
Failure to do so may result in fire or electric shock.
WARNINGDO NOT WATCH VIDEO WHILE DRIVING.
Watching the video may distract the driver from lookingahead of the vehicle and cause an accident.
INSTALL THE PRODUCT CORRECTLY SO THAT THEDRIVER CANNOT WATCH TV/VIDEO UNLESS THEVEHICLE IS STOPPED AND THE EMERGENCY BRAKEIS APPLIED.
It is dangerous for the driver to watch TV/Video whiledriving a vehicle. Installing this product incorrectlyenables the driver to watch TV/Video while driving. Thismay cause a distraction, preventing the driver fromlooking ahead, thus causing an accident. The driver orother people could be severely injured.

3-EN
FR
ES
DE
IT
SE
CH
CAUTIONThis symbol means important instructions.Failure to heed them can result in injury ormaterial property damage.
HALT USE IMMEDIATELY IF A PROBLEM APPEARS.
Failure to do so may cause personal injury or damage tothe product. Return it to your authorized Alpine dealer orthe nearest Alpine Service Centre for repairing.
PRECAUTIONSTemperature
Be sure the temperature inside the vehicle is between+45°C (+113°F) and 0°C (+32°F) before turning your uniton.
Fuse Replacement
When replacing the fuse(s), the replacement must be ofthe same amperage as shown on the fuse holder. If thefuse(s) blows more than once, carefully check allelectrical connections for shorted circuitry. Also have yourvehicle’s voltage regulator checked.
Maintenance
If you have problems, do not attempt to repair the unityourself. Return it to your Alpine dealer or the nearestAlpine Service Station for servicing.
Installation Location
Make sure the TME-M770 will not be exposed to:• Direct sun and heat• High humidity• Excessive dust• Excessive vibrations
• After turning the system off, a slight ghost of the imagewill remain temporarily. This is an effect peculiar toLCD technology and is normal.
• Under cold temperature conditions, the screen maylose contrast temporarily. After a short warm-upperiod, it will return to normal.
About the Touch Switch
• To protect the display, lightly touch the screen with thetip of your finger.
• If there is no response from the switch, then move yourfinger away from the screen and touch again.

4-EN
Basic Operation
Screen Display ON/OFF
1 Press the POWER button.
2 To turn off the POWER, press the POWERbutton again.
• If properly connected, the monitors mainPOWER will turn off when the vehicle'signition switch is off. If the main power lampilluminates in the STAND BY mode, thevehicle's battery may be discharged.
• After turning the system off, a slight ghost ofthe image will remain temporarily. This is aneffect peculiar to LCD technology and isnormal.
• Under cold temperature conditions, thescreen may lose contrast temporarily. After ashort warm-up period, it will return to normal.
Adjusting the Volume
1 Adjust the volume level by pressing the or button.
POWER(VOLUME DOWN) (VOLUME UP) Illumination sensor
Main power lamp
Switching the Source
1 Touch the option part of the display to displayeach source operation screen or sourceselection screen.
2 If each source operation screen is displayed,touch CONTROL on the upper right side of thescreen to display the source selection screen.
• The source selection screen is displayed by touching“CONTROL” as described below, depending on thecurrent source.When touched while the current source is GAME,AUX 1 or AUX 2 : Source selection screenWhen touched while the current source is EXT.DVD:EXT.DVD operation screen → Source selectionscreenWhen touched while the current source is TV: TVoperation screen → Source selection screenWhen touched while the current source is LINK:AUDIO operation screen → EXT.DVD operationscreen → TV operation screen → Source selectionscreen
3 Touch the source (NAV. / AUX 1/ AUX 2) youwant to view.
• The AUX 1, AUX 2 source name changes to theselected mode name in the next item “SETUPoperation” - “6External input name setting”. Also,“NAV.” is only displayed when “7 NavigationSettings” in following section, “Setup Operation”, isset to “ON”.
• The operation screens for the different sources aswell as the source selection screen turn offautomatically if no operation is performed for 5seconds.
CONTROLSOURCE
NAV. AUX 1 AUX 2 SETUP VISUAL EQ SOURCE P 1/2

5-EN
Other Useful Features
ZOOM
CINEMA
WIDE
1 Display mode selection for the display(DISPLAY MODE)
Normal images areexpanded uniformly inthe horizontal directionand are displayed overthe entire screen.
Normal images areexpanded in thehorizontal direction andare displayed over theentire screen. Theexpansion ratioincreases towards theright and left edges ofthe screen.
Normal images areexpanded in thehorizontal and verticaldirections. The top andbottom of the image arecut off. This mode issuited for 16:9 cinemasize images.
Normal image (4:3)
2 Dimmer adjustment (DIMMER)
HIGH : The backlighting is set to the valueadjusted at “DIMMER HIGH LEVEL”.
LOW : The backlighting is set to the valueadjusted at “DIMMER LOW LEVEL”.
AUTO: Display illumination can be adjustedautomatically depending on thebrightness in the car. (Within therange of DIMMER HIGH LEVEL andDIMMER LOW LEVEL)
Continued
NORMAL
SETUP
SOUND OUT MONITOR
AUX OUT LINK
DIMMER HIGH
DISPLAY MODE WIDE
RETURN
Setup Operation
1 Touch the option part of the display to displayeach source operation screen or sourceselection screen.
2 If each source operation screen is displayed,touch CONTROL on the upper right side of thescreen to display the source selection screen.
3 Touch SETUP.
4 Select the desired setting item screen bytouching or .
5 Change the setting by touching or .

6-EN
Other Useful Features9 Dimmer LOW level adjustment (DIMMER
LOW LEVEL)
Adjusts the LOW LEVEL (0 (MIN) to 15(MAX)) of the dimmer.
p Touch panel adjustment (SCREENALIGNMENT)
Adjust if the LCD display position and touchpanel position do not match.
: Reset to default settings. : Changes to adjustment screen. The
adjustment method is as follows.1) Touch from SCREEN ALIGNMENT.
The screen changes to the adjustmentscreen.
2) Touch the mark on the lower left sideof the screen.The adjustment screen switches.
3) Touch the mark on the upper right sideof the screen.When the adjustment is finished, thescreen returns to the SETUP screen.
• If you touch RETURN on the adjustment screen,nothing is adjusted and the screen returns to theSETUP screen.
6 When the settings are completed, touchRETURN.The screen returns to the source selectionscreen.
3 Rear monitor select function (AUX OUT)
LINK : Output the video/audio portionshown on the main monitor, to therear monitor.
AUX1 : Output the AUX1 video/audio to therear monitor.
AUX2 : Output the AUX2 video/audio to therear monitor.
4 Change sound output (SOUND OUT)
MONITOR : Outputs sound through thebuilt-in speakers.
HEADPHONE : Outputs sound toheadphones if connected.
*Note that sound will not be output unlessthe audio output settings are appropriate.
5 External input sound level adjustment(AUX IN 1 LEVEL/AUX IN 2 LEVEL)
HIGH : Sets the sound level at a high level.LOW : Reduces the sound level.
6 External input name setting (AUX IN 1MODE/AUX IN 2 MODE)
Select the name from the following list, to beused for the product using the external inputmode. This will apply to the touch switchname at source selection time and thesource name during playback change.
OFF/TV/EXT.DVD/GAME/AUX 1 (2)/LINK(AUX 1 MODE only)
• Set to “LINK” when the IVA-D300 series or VPE-S431 is connected. (Be sure to connect to the “AUXIN 1” connector.)
• Set to “EXT.DVD” when the DVA-5210 , DVA-5205series, DHA-S680 series or the like is connected.
• Set to “TV” if a TV tuner is connected to thisproduct.
• The way the source operation screens and the sourceselection screen switches when “CONTROL” istouched differs according to the selected mode. (Seepage 4 “Switching the Source”, step 2.)
7 Navigation settings (NAV. IN)
When the navigation is connected, set toON.
8 Dimmer HIGH level adjustment (DIMMERHIGH LEVEL)
Adjusts the HIGH LEVEL (16 (MIN) to 31(MAX)) of the dimmer.

7-EN
VISUAL EQTM Operation
1 Touch the option part of the display to displayeach source operation screen or sourceselection screen.
2 If each source operation screen is displayed,touch CONTROL on the upper right side of thescreen to display the source selection screen.
3 Touch VISUAL EQ.
4 Select the desired setting by touching or .
5 Change the selected setting by touching or .
1 VISUAL EQ mode (manufacturer’s settings)selection (VISUAL EQ MODE)
OFF : Default setting.NIGHT M. : Suitable for movies with a lot of
dark scenes.SOFT : Suitable for movies with
computer graphics oranimation.
SHARP : Suitable for old movies whoseresolution is unclear.
CONTRAST: Suitable for the latest movies.P.SET-1, 2 : Accesses the preset number
stored in step “7 Storing”.
• To return to the default values after selecting one ofthe modes between “NIGHT M.” and “CONTRAST”then adjusting the image brightness, color densityand so on to suit your tastes, set this function to“OFF”.
2 Brightness adjustment (BRIGHT)
Allows the brightness (–15 (MIN)~+15 (MAX))of the picture.
3 Color depth adjustment (COLOR)
Change depth can be adjusted from –15(MIN) to +15 (MAX).*Adjustment cannot be made in the
NAVIGATION (RGB connection) mode.
VISUAL EQ
VISUAL EQ MODE OFF
RETURN
4 Tint tone adjustment (TINT)
Tint tone can be adjusted from G15 (G MAX)to R15 (R MAX).*Adjustment cannot be made in the
NAVIGATION (RGB connection) mode.
5 Contrast adjustment (CONTRAST)
Contrast can be adjusted from –15 (LOW) to+15 (HIGH).
6 Screen quality adjustment (SHARP)
Screen quality can be adjusted from –15(SOFT) to +15 (HARD).
7 Storing (USER MEMORY)
You can store the settings adjusted in steps2 to 6 in the following way.
1) Touch or from USER MEMORY afteradjusting settings 2 to 6, and select thepreset number you want to store in(P.SET-1, 2).
2) After selecting the preset No., touch“WRITE”.
• P.SET-1, 2 stored here can be accessed from“1 VISUAL EQ mode selection”.
• If 2 to 6 are adjusted, VISUAL EQ mode in 1changes to “CUSTOM”.
6 When setting is completed, touch RETURN.The screen changes to the source selectionscreen.

8-EN
Operating Other Products
When the TME-M770 is used in combination with a product designed to be operated from the TME-M770(IVA-D300 series, DVA-5210, DHA-S680 series, etc.), some of the operations on the other product can beperformed from the TME-M770. Below are some examples of the operations that can be performed.
Operating a DVD in the IVA-D300 series
1 Touch any point on the display.The “AUDIO” operation screen appears.
Other Useful FeaturesChanging to Another Product’s Source
When used with touch panel compatible productssuch as the IVA-D300 series/VPE-S431, sourcesconnected to those products are also selectable.
1 Touch the option part of the display to displayeach source operation screen or sourceselection screen.
2 If each source operation screen is displayed,touch CONTROL on the upper right side of thescreen to display the source selection screen.
3 Touch SOURCE.
<When the AUX IN 1 connection destination is theIVA-D300 series etc.>
Each time you touch “SOURCE”, the sourcechanges.The source depends on the settings andconnections of the product used together withthe IVA-D300 series.Refer to the combined products instructionsmanuals.
• Receives the remote control signal from connectedALPINE products such as navigation and DVD players.
Remote Control Sensor
Remote sensor
CONTROLAUDIO
MENU P 1/2
CONTROLAUDIO
RETURN TOPMENUENTER P 2/2
1 2 3 4 5 6 7 8 9 p q w e
Changepages
<When the AUX IN 1 connection destination is VPE-S431>
After touching “SOURCE”, change the sourcewith the following operation.1) Touch “P 1/2”.
The screen changes to “P 2/2”.2) Touch “ ” “ ” “ ” “ ” to select the
desired source. Touch “ENTER”.Touch “RETURN” to return to the previousscreen.
• When “SETUP” is selected, the setup operation onthe VPE-S431 can be performed in the same way asthe source selection operation. For details on thesetup items, see the VPE-S431’s operatinginstructions.
CONTROLSOURCE
NAV. AUX 1 AUX 2 SETUP VISUAL EQ SOURCE P 1/2

9-EN
Operating the DVA-5210 and the DHA-S680 series
1 Touch the option part of the display.The screen changes to the operation screen for each source.
2 Touch “CONTROL” on the upper right side of the screen.Display the “EXT.DVD” operation screen.
If a TV is operated (A TV tuner is connected)
1 Touch the option part of the display.The screen changes to the operation screen for each source.
2 Touch “CONTROL” on the upper right side of the screen.Display the “TV” operation screen.
Continued
ł
TouchPlay from start of current chapter
Play/pause
Play next chapter
PRE STOP/STOP––
Call out DVD menuSwitch page (function guide)
Move menu cursorEnter (DVD menu)
––
Switch page (function guide)
Long touch2x fast reverse/8x fast reverse after 5 seconds
–2x fast forward/8x fast forward after 5 seconds
Slow play (from pause mode)STOP
–––––––
Call out DVD top menu–
Operation of DVD in IVA-D300 series
12
456789pqw
3
e
CONTROLEXT.DVD
MENU P 1/2
CONTROLAUDIO
RETURN TOPMENUENTER P 2/2
1 2 3 4 5 6 7 8 9 p q w e
Touch
Play from start of current chapter
Play/pause
Play next chapter
PRE STOP/STOP––
Call out DVD menuSwitch page (function guide)
Move menu cursorEnter (DVD menu)
Move back 1 screen(DVD player setup)*
Cue to start of chapter, track orelapsed time
Switch page (function guide)
Long touch2x fast reverse/
8x fast reverse after 5 seconds–
2x fast forward/8x fast forward after 5 secondsSlow play (from pause mode)
––
Call out DVD player setup screen*–––
–
Call out DVD top menu
–
Operation of a DVD player (DVA-5210)Touch
Play from start of current chapter
Play
Play next chapter
PRE STOP/STOPSwitch DISCSwitch DISC
Call out DVD menuSwitch page (function guide)
Move menu cursorEnter (DVD menu)Move back 1 screen
(DVD changer setup)* Cue to start of chapter, track or
elapsed timeSwitch page (function guide)
Long touch
16x fast reverse
Slow play
16x fast forward
–STOP –
–Call out DVD changer setup screen*
–––
–
Call out DVD top menu
–
Operation of a DVD changer (DHA-S680 series)
1
2
456789p
q
w
3
e* Stop mode only * Stop mode only
Changepages
CONTROLTV
A.MEMO P.DN P.UP BAND
1 2 3 4 5 6
TouchChannel down
Channel upAuto memory –
Preset channel downPreset channel up
Change band
Long touch––
–––
TV Operation
12
456
3

10-EN
In Case of Difficulty
If you encounter a problem, please review the items inthe following checklist. This guide will help you isolatethe problem if the unit is at fault. Otherwise, make surethe rest of your system is properly connected or consultyour authorized Alpine dealer.
No function or display.• Car's ignition is off.
- Turn the ignition on.• No fuse or blown fuse.
- Check the cause and replace the fuse.• Incorrect connections.
- Check connection and remedy.• Vehicle's battery is weak.
- Check the voltage of vehicle's battery.
Unclear picture display.• Fluorescent tube is exhausted.
- Replace the fluorescent tube*.
No picture display.• Brightness control is set for minimum brightness control.
- Adjust the brightness.• Incorrect setting of the VTR mode.
- Switch to the correct mode.• Protective circuit is on because of high temperature.
- Wait until the temperature inside the vehicle comesdown to the operating temperature range (45°C).
• Incorrect or open connection with the Monitor, AVinterface unit.- Check the connection and remedy.
Picture color is poor.• Brightness/Color/Tint control are not set to the proper
positions.- Check each control.
Spots or dotted lines/stripes appear.• Caused by neon signs, high-voltage power lines, CB
transmitter, other vehicle's ignition plugs, etc.- Change the location of your vehicle.
Unit does not operate.• Monitor's power is not turned on.
- Turn on the monitor's power.
InformationNavigation screen is not displayed or navigationsystem’s remote controller keys do not work.• Navigation system’s power is turned off.
- Press the ON/OFF (POWER) button on the navigationsystem’s remote controller to turn the navigationsystem’s power on.
* The fluorescent tube replacement is not free of chargeeven within the warranty period, for the tube is an articleof consumption.
Specifications
MONITORScreen Size 6.5-typeDisplay System Low reflection rear
projection type TN liquidcrystal panel
Drive System Active matrix drive,normally white display
Number of Picture Elements 280,800 pcs. (H:1200 xV:234 dots)
Effective Number of Picture Elements 99.99% or moreLight Source Internal optical system (U-
type cold cathode fluorescenttube)
Dimensions (W x H x D) 161 x 109 x 28.5mmWeight 360g
AV Interface UnitDimensions (W x H x D) 180 x 119 x 28.5 mmWeight 550g
• Due to continuous product improvement,specifications and design are subject to changewithout notice.
• The LCD panel is manufactured using an extremelyhigh precision manufacturing technology. Its effectivepixel ratio is over 99.99%. This means that there is apossibility that 0.01% of the pixels could be eitheralways ON or OFF.
• When connecting an IVA-D300 series to the TME-M770, be sure to connect it to the “AUX IN 1” connector and set the“AUX IN MODE” setting (SETUP) to “LINK”.
• When connecting a DVA-5210, DHA-S680 series, etc., to the TME-M770, set the “AUX IN MODE” setting (SETUP) to“EXT.DVD”.
• When connecting a TV tuner to the TME-M770, set the “AUX IN MODE” setting (SETUP) to “TV”.• The TME-M770 and other components connected to it can be operated with a separately sold remote control unit. For
instructions on operations using the remote control unit, see the remote control unit’s operating instructions. Whenoperating an IVA-D300 series, see the “Rear Entertainment Function” section of the IVA-D300 series’s operatinginstructions.
• Depending on the connected component, some functions and operations may differ. Also refer to the operatinginstructions of the connected component.
Other Useful Features
11-EN
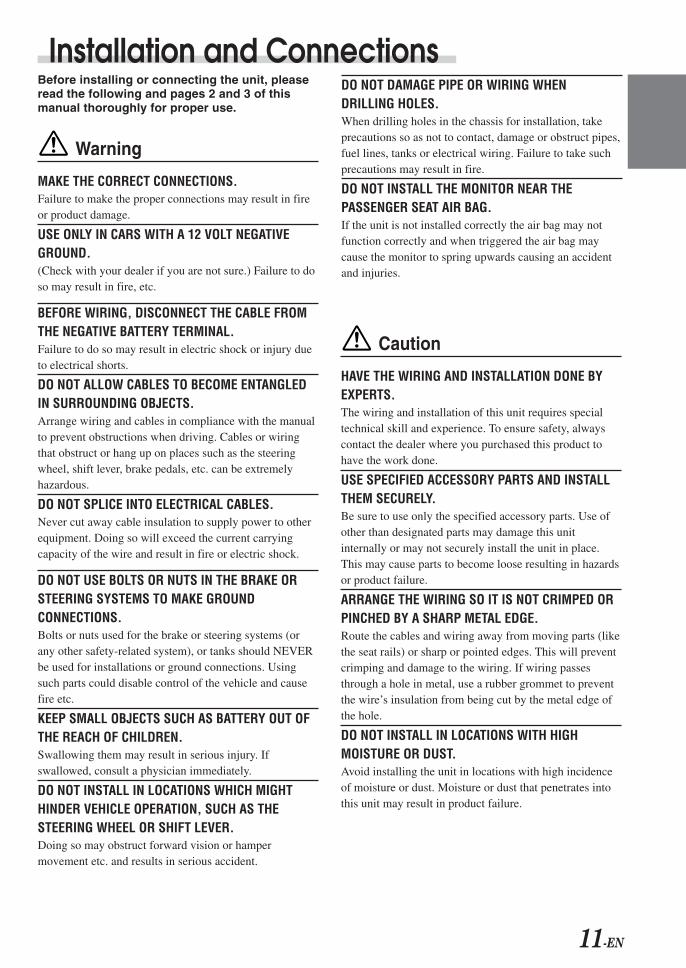
Before installing or connecting the unit, pleaseread the following and pages 2 and 3 of thismanual thoroughly for proper use.
Warning
MAKE THE CORRECT CONNECTIONS.Failure to make the proper connections may result in fireor product damage.
USE ONLY IN CARS WITH A 12 VOLT NEGATIVEGROUND.(Check with your dealer if you are not sure.) Failure to doso may result in fire, etc.
BEFORE WIRING, DISCONNECT THE CABLE FROMTHE NEGATIVE BATTERY TERMINAL.Failure to do so may result in electric shock or injury dueto electrical shorts.
DO NOT ALLOW CABLES TO BECOME ENTANGLEDIN SURROUNDING OBJECTS.Arrange wiring and cables in compliance with the manualto prevent obstructions when driving. Cables or wiringthat obstruct or hang up on places such as the steeringwheel, shift lever, brake pedals, etc. can be extremelyhazardous.
DO NOT SPLICE INTO ELECTRICAL CABLES.Never cut away cable insulation to supply power to otherequipment. Doing so will exceed the current carryingcapacity of the wire and result in fire or electric shock.
DO NOT USE BOLTS OR NUTS IN THE BRAKE ORSTEERING SYSTEMS TO MAKE GROUNDCONNECTIONS.Bolts or nuts used for the brake or steering systems (orany other safety-related system), or tanks should NEVERbe used for installations or ground connections. Usingsuch parts could disable control of the vehicle and causefire etc.
KEEP SMALL OBJECTS SUCH AS BATTERY OUT OFTHE REACH OF CHILDREN.Swallowing them may result in serious injury. Ifswallowed, consult a physician immediately.
DO NOT INSTALL IN LOCATIONS WHICH MIGHTHINDER VEHICLE OPERATION, SUCH AS THESTEERING WHEEL OR SHIFT LEVER.Doing so may obstruct forward vision or hampermovement etc. and results in serious accident.
Caution
HAVE THE WIRING AND INSTALLATION DONE BYEXPERTS.The wiring and installation of this unit requires specialtechnical skill and experience. To ensure safety, alwayscontact the dealer where you purchased this product tohave the work done.
USE SPECIFIED ACCESSORY PARTS AND INSTALLTHEM SECURELY.Be sure to use only the specified accessory parts. Use ofother than designated parts may damage this unitinternally or may not securely install the unit in place.This may cause parts to become loose resulting in hazardsor product failure.
ARRANGE THE WIRING SO IT IS NOT CRIMPED ORPINCHED BY A SHARP METAL EDGE.Route the cables and wiring away from moving parts (likethe seat rails) or sharp or pointed edges. This will preventcrimping and damage to the wiring. If wiring passesthrough a hole in metal, use a rubber grommet to preventthe wire’s insulation from being cut by the metal edge ofthe hole.
DO NOT INSTALL IN LOCATIONS WITH HIGHMOISTURE OR DUST.Avoid installing the unit in locations with high incidenceof moisture or dust. Moisture or dust that penetrates intothis unit may result in product failure.
Installation and ConnectionsDO NOT DAMAGE PIPE OR WIRING WHENDRILLING HOLES.When drilling holes in the chassis for installation, takeprecautions so as not to contact, damage or obstruct pipes,fuel lines, tanks or electrical wiring. Failure to take suchprecautions may result in fire.
DO NOT INSTALL THE MONITOR NEAR THEPASSENGER SEAT AIR BAG.If the unit is not installed correctly the air bag may notfunction correctly and when triggered the air bag maycause the monitor to spring upwards causing an accidentand injuries.

12-EN
Installation and ConnectionsIMPORTANTPlease record the serial number of your unit inthe space provided below and keep it as apermanent record. The serial number plate islocated on the rear of the monitor or on thebottom of the AV interface unit.
SERIAL NUMBER:INSTALLATION DATE:INSTALLATION TECHNICIAN:PLACE OF PURCHASE:
Precautions
• Be sure to disconnect the cable from the (–) batterypost before installing your TME-M770. This willreduce any chance of damage to the unit in case of ashort-circuit.
• Be sure to connect the color coded leads according tothe diagram. Incorrect connections may cause the unitto malfunction or damage the vehicle's electricalsystem.
• When making connections to the car’s electricalsystem, be aware of the factory installed components(e.g. on-board computer). Do not tap into these leads toprovide power for this unit. When connecting theTME-M770 to the fuse box, make sure the fuse for theintended circuit of the TME-M770 has the appropriateamperage. Failure to do so may result in damage to theunit and/or the vehicle. When in doubt, consult yourALPINE dealer.
• The TME-M770 uses female RCA-type jacks forconnection to other units having RCA connectors. Youmay need an adaptor to connect other units. If so,please contact your authorized ALPINE dealer forassistance.

13-EN
Installation
Installing AV Interface UnitThis Unit can be placed inside the trunk, on thekick panel of the front passenger's seat orunderdash. However, to avoid unnecessarysignal wiring, it is better to mount the Unit asclose as possible to the Display.DO NOT MOUNT THE INTERFACE UNIT INLOCATIONS EXPOSED TO MOISTURE OREXTREME HEAT (such as the enginecompartment).
Velcro fastener Mounting:1. Place a Velcro fastener onto the mounting
surface. The rough side should be facing the unit.2. Remove the backing to the adhesive on the
Velcro strips. Press the unit onto the mountinglocation.
�
TOUCH PANEL WIDE LCD MONITOR
� POWER SUPPLY
� RGB IN
� PHONE OUT
� DISPLY OUT
� AUX OUT
� AUX IN 2
� AUX IN 1
VIDEO
AUDIOL
R
VIDEO
AUDIOL
R
VIDEO
AUDIOL
R
TME-M770
Velcro fastener(included)
TOUCH PANEL WIDE LCD MONITOR
� POWER SUPPLY
� RGB IN
� PHONE OUT
� DISPLY OUT
� AUX OUT
� AUX IN 2
� AUX IN 1
VIDEO
AUDIOL
R
VIDEO
AUDIOL
R
VIDEO
AUDIOL
R
TME-M770
Self-tapping screws (M4 x 14)
Attaching with screws1. Place the unit on the location chosen for installa-
tion.2. Mark the screw locations using the unit as a
template.3. Drill a hole less than 3 mm in diameter.
WARNINGWhen you are drilling a hole in the car body,be careful not to damage pipes, tanks orelectrical wiring etc.. It might cause an acci-dent or a fire.
4. Firmly attach the unit using 4 of the supplied self-tapping screws (M4 x 14).

14-EN
Installation and ConnectionsAttaching the monitor and stand
CAUTIONDo not install the monitor near the frontpassenger seat air bag system.
<Mount it using the supplied bracket>• When mounting with other than the attached Mounting
Bracket, use the attached L shape bracket dependingon usage.
1 Remove the main unit attachment fitting.
2 Loosen the main unit attachment fitting with a coinetc., slide it into the track on the rear of the mainunit and temporarily fasten it. Then fix it to thestand.
3 Check the sticking position.1Temporarily fasten the stand with gum tape.2Loosen the adjustment screws, and adjust to a
safe, viewable position.
Main unitattachment fitting
Pull this part to release.
Slide in an upwarddirection.
In order to use safely, attach to the followingplaces.• Stable and secure places.• Places that will not have your view blocked by
the main unit when driving.• Places that you will not hit against if you lean
forward while you wearing your seatbelt.• Places where the main unit cannot hit against
the steering wheel while driving.
• Be aware that if the surface of the dashboard is leather, woodenpanel, stretched fabric or any non-resin based product, then thesurface will be damaged when you remove the stand.
• Do not place the main unit directly in front of the air conditionervents.
The fixed arm tilts towards theseat side.
If the main unitinvades your line ofsight then it willblock your view.
Dashboard
Line of sight
Main unit
Front glass sideSeat side
Angleadjustmentscrew

15-EN
4 Remove the main unit from the stand.
5 Remove the mount from the stand and stick it tothe dashboard etc..Remove any dirt on the place to install, using thesupplied cloth.
• If the temperature in the car is low (Winter), then firstheat up the place where you are going to stick themount with a hairdryer etc.
• Do not apply force to the mount, or expose tohumidity, within 24 hours after attaching.
• If the mount is not firmly stuck, then we recommendthat you attach with the supplied fixing screws.
6 Attach the main unit to the stand as shown in step2.Use the cable clamps to fix the cables.
• Before using, check that the main unit and the stand,and the stand and the place where it is attached tothe car are fixed securely.
Fixing screws(M4 x 12 Supplied)
If the place ofattachment iscurved, thenbend this partto match theshape. Mount
16-EN
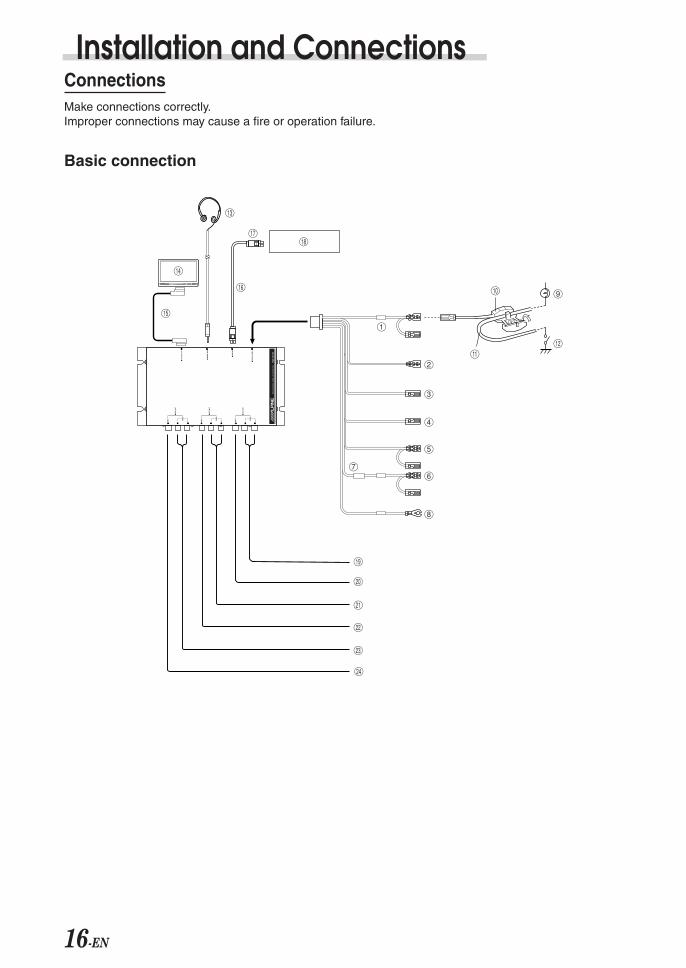
ConnectionsMake connections correctly.Improper connections may cause a fire or operation failure.
Installation and Connections
Basic connection
u
y
i
7
2q
w
p 9
3
4
5
6
1
8
e
t
o
;
a
s
d
f
� � �
r
�
�
�
�
TO
UC
H P
AN
EL
WID
E L
CD
MO
NIT
OR
E
17-EN
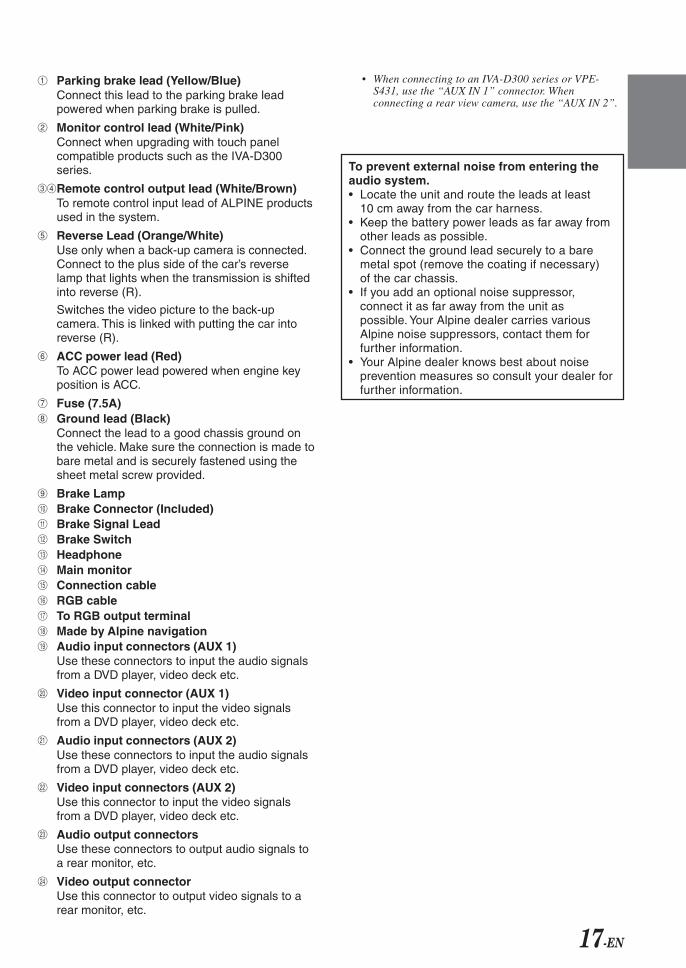
1 Parking brake lead (Yellow/Blue)Connect this lead to the parking brake leadpowered when parking brake is pulled.
2 Monitor control lead (White/Pink)Connect when upgrading with touch panelcompatible products such as the IVA-D300series.
34Remote control output lead (White/Brown)To remote control input lead of ALPINE productsused in the system.
5 Reverse Lead (Orange/White)Use only when a back-up camera is connected.Connect to the plus side of the car’s reverselamp that lights when the transmission is shiftedinto reverse (R).
Switches the video picture to the back-upcamera. This is linked with putting the car intoreverse (R).
6 ACC power lead (Red)To ACC power lead powered when engine keyposition is ACC.
7 Fuse (7.5A)8 Ground lead (Black)
Connect the lead to a good chassis ground onthe vehicle. Make sure the connection is made tobare metal and is securely fastened using thesheet metal screw provided.
9 Brake Lampp Brake Connector (Included)q Brake Signal Leadw Brake Switche Headphoner Main monitort Connection cabley RGB cableu To RGB output terminali Made by Alpine navigationo Audio input connectors (AUX 1)
Use these connectors to input the audio signalsfrom a DVD player, video deck etc.
; Video input connector (AUX 1)Use this connector to input the video signalsfrom a DVD player, video deck etc.
a Audio input connectors (AUX 2)Use these connectors to input the audio signalsfrom a DVD player, video deck etc.
s Video input connectors (AUX 2)Use this connector to input the video signalsfrom a DVD player, video deck etc.
d Audio output connectorsUse these connectors to output audio signals toa rear monitor, etc.
f Video output connectorUse this connector to output video signals to arear monitor, etc.
To prevent external noise from entering theaudio system.• Locate the unit and route the leads at least
10 cm away from the car harness.• Keep the battery power leads as far away from
other leads as possible.• Connect the ground lead securely to a bare
metal spot (remove the coating if necessary)of the car chassis.
• If you add an optional noise suppressor,connect it as far away from the unit aspossible. Your Alpine dealer carries variousAlpine noise suppressors, contact them forfurther information.
• Your Alpine dealer knows best about noiseprevention measures so consult your dealer forfurther information.
• When connecting to an IVA-D300 series or VPE-S431, use the “AUX IN 1” connector. Whenconnecting a rear view camera, use the “AUX IN 2”.
18-EN
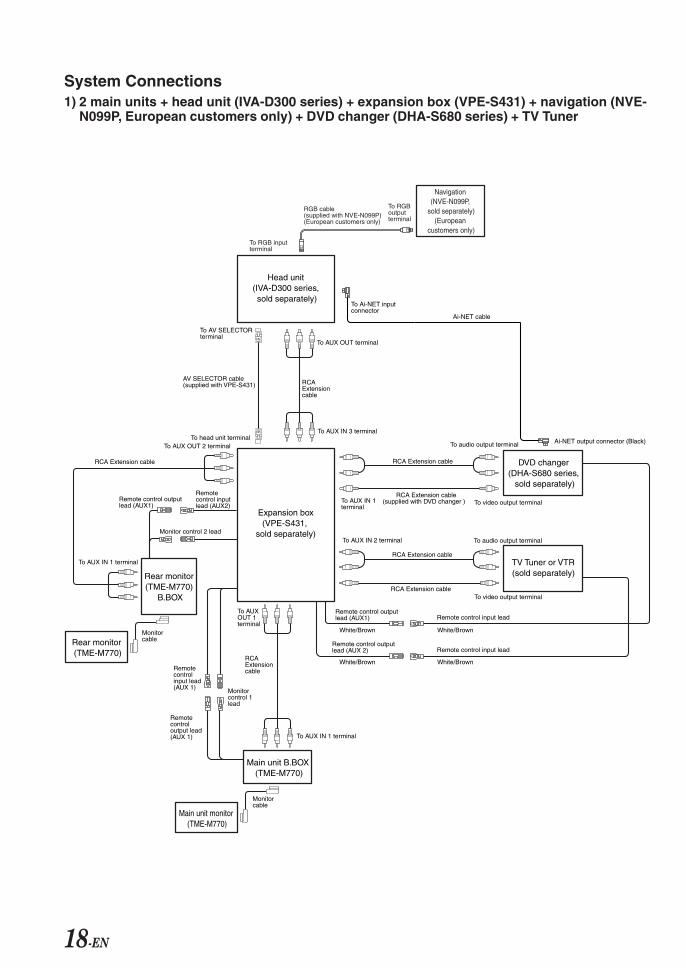
System Connections1) 2 main units + head unit (IVA-D300 series) + expansion box (VPE-S431) + navigation (NVE-
N099P, European customers only) + DVD changer (DHA-S680 series) + TV Tuner
To RGB output terminal
To RGB input terminal
RGB cable (supplied with NVE-N099P)(European customers only)
Navigation (NVE-N099P,
sold separately)(European
customers only)
To Ai-NET input connector
Expansion box(VPE-S431,
sold separately)
To AV SELECTOR terminal
To head unit terminal
AV SELECTOR cable (supplied with VPE-S431)
RCA Extension cable
RCA Extension cable
To AUX OUT 2 terminal
To AUX IN 3 terminal
To AUX OUT terminal
To AUX OUT 1 terminal
Monitor control 2 lead
Remote control output lead (AUX1)
Remotecontrol output lead (AUX 1)
Remote control input lead (AUX2)
Remotecontrol input lead (AUX 1)
To AUX IN 1 terminal
RCA Extension cable
RCAExtensioncable
RCA Extension cable
To audio output terminal
To audio output terminal
To video output terminal
To video output terminal
RCA Extension cable (supplied with DVD changer )
RCA Extension cable
Remote control input lead
White/Brown
White/Brown
White/Brown
White/Brown
Remote control output lead (AUX1)
Remote control output lead (AUX 2) Remote control input lead
To AUX IN 2 terminal
To AUX IN 1 terminal
To AUX IN 1 terminal
Monitor cable
Ai-NET cable
Ai-NET output connector (Black)
Rear monitor (TME-M770)
Rear monitor (TME-M770)
B.BOX
Monitor control 1 lead
Monitor cable
Main unit monitor (TME-M770)
Main unit B.BOX (TME-M770)
Head unit (IVA-D300 series, sold separately)
TV Tuner or VTR (sold separately)
DVD changer (DHA-S680 series,
sold separately)

19-EN
2) Main unit + navigation (NVE-N099P, European customers only) + DVD player (such asDVA-5210)
3) Main unit and head unit (IVA-D300 series)
To AUX IN 1 terminal
RCA Extension cable
To audio output terminal
RCA Extension cable (supplied with DVD player) To video output terminal
Remote control input leadRemote control output lead (AUX1)
White/Brown White/Brown
To RGB output terminal
To RGB input terminal
RGB cable (supplied with NVE-N099P)(European customers only)
Monitor cable
Main unit monitor (TME-M770)
Main unit B.BOX (TME-M770)
DVD player (such as DVA-5210,
sold separately)
Navigation (NVE-N099P,
sold separately)(European
customers only)
RCA Extension cable
To AUX OUT terminal
Remotecontroloutput lead (AUX1)
Remotecontrolinput lead
To AUX IN 1 terminal
Monitor control lead
Monitor cable
Main unit monitor (TME-M770)
Main unit B.BOX (TME-M770)
Head unit (IVA-D300 series, sold separately)


Fahrzeugmarke: Typ:
Amtl. Kennzeichen:
Name des Halters:
Straße:
Wohnort:
Bitte füllen Sie diesen Pass vollständig aus und bewahren Sie ihnaußerhalb des Fahrzeugs auf:Im Falle eines Diebstahls wird für Sie die Schadensabwicklung mit derVersicherung einfacher, und Sie erleichtern der Polizei die Fahndungnach den Tätern.
R
Car Audio and Navigation Systems
GERÄTE-PASSAUDIO SYSTEME

Tipps der Polizei:[ Stellen Sie Ihr Fahrzeug stets gut sichtbar ab.[ Verschließen Sie Türen, Fenster, Schiebedach und Kofferraum immer, auch bei nur kurzer Abwesenheit.[ Lassen Sie keine Wertsachen sichtbar im Auto liegen.[ Wird Ihr Fahrzeug aufgebrochen, wenden Sie sich sofort an die nächste Polizeidienststelle.[ Belassen Sie Ihr Fahrzeug nach einem Aufbruch im Originalzustand.[ Informieren Sie sich über technische Sicherungsmöglichkeiten bei einer kriminalpolizeilichen
Beratungsstelle.
Gerät 1
Modell-Nr.:
Hersteller:
Seriennummer:
A L
Kaufdatum: Preis:
Händlerstemple

Product InformationCard
EnglishFilling in this ProductInformation Card is voluntary. Ifyou fill in this card and send it toAlpine, your data will betabulated into reference data forfuture Alpine productdevelopment. In addition, in thefuture you may receiveinformation about new productsor Survey Mail requestingadditional opinions about Alpineproducts or services. If youagree to the above term, pleasesign your name in the indicatedspace and return the card. Anyadditional comments or inquiriesmay be sent to : Person in chargeof Customer Service departmentAlpine Electronics (Europe)GmbH.Frankfurter Ring 117, 80807München, GermanyPhone: +49-(0)89-32 42 640
Q1. PRODUCT PURCHASED1. Cassette Player2. CD Player3. MD Player4. DVD Player5. CD Changer6. Amplifier7. Speaker8. Subwoofer9. Monitor Controller
10. Video Monitor11. Navigation12. Processor/Equalizer13. CD/Video CD Changer14. Other
Q2. MODELNUMBER:
Q3. DATE OF PURCHASE:Month:Year:
Q4. If navigation system, whichmonitor?
1. Alpine → (ModelNo.)
2. Other → (BrandName)
Q5. STORE TYPE WHEREPURCHASED:
1. Car Audio Specialist2. Audio/Video Store3. Electronics/Appliance Store4. Car Accessories Shop5. Other
Q6. Type of vehicle in whichthis unit is installed:Make:Model:Purchased ModelYear:Year:
Q7. How was this vehiclepurchased?
1. Purchase2. Lease
Produkt-Informationskarte
DeutschDas Ausfüllen dieserProduktinformations-Karte istfreiwillig. Sollten Sie diese Kartevervollständigen, so werden die Datenfür zukünftige Produktentwicklungenvon Alpine als Referenzdatenherangezogen. Ebenso können Sie inder Zukunft Informationen über neueAlpine Produkte erhalten oder unsauch Ihre Meinung über AlpineProdukte und Dienstleistungen imRahmen von Kunden-Befragungenmitteilen. Stimmen Sie dem Kontaktdurch Alpine zu, so würden wir Siebitten, in dem dafür vorgesehenen Feldzu unterschreiben und die Kartekostenfrei an uns zurückzuschicken.Zusätzliche Kommentare undMeinungen können Sie gerne an denzuständigen Kontakt im KundendienstAlpine Electronics (Europe) GmbHsenden.Frankfurter Ring 117, 80807München, GermanyPhone: 089-32 42 640
Q1. gekauftes Gerät1. Kassetten-Spieler2. CD-Spieler3. MD-Spieler4. DVD-Spieler5. CD-Wechsler6. Verstärker7. Lautsprecher8. Subwoofer9. Monitor-Controller
10. Video-Monitor11. Navigationssystem12. Prozessor/Equalizer13. CD/Video-CD-Wechsler14. andere
Q2. Modellnummer:Q3. Kaufdatum:
Monat:Jahr:
Q4. Falls Navigationssystem:Welcher Monitor?
1. Alpine →(Modellnr.)
2. Anderer Hersteller →(Herstellername)
Q5. Art des Geschäfts, in demSie das Gerät gekaufthaben:
1. Spezialist für Auto-Audioanlagen
2. Audio/Video-Geschäft3. Elektro-Geschäft4. Autozubehör-Geschäft5. Anderer
HerstellerQ6. Art des Fahrzeugs, in das
das Gerät installiert wurde:Marke:Modell:gekauft imJahr:Baujahr:
Q7. Wie haben Sie dasFahrzeug gekauft?
1. Kauf2. Leasing
Appendix
Q8. Purpose of buying thisunit?
1. Addition2. Replacement↓• Previous brand replaced?1. Factory installed2. Alpine3. Other → (Brand
Name)Q9. Have you purchased
Alpine products before?1. First time2. Two or More times
Q10.When you purchased thisAlpine unit, did youcompare it with otherbrand?
1. Yes → (BrandName)
2. No.Q11.GENDER
1. Male2. Female
Q12.AGEQ13.MARITAL STATUS
1. Single2. Married
Q14.OCCUPATION1. Company Owner/Self-
employed/Freelance2. Manager3. Company Employee4. Civil Servant5. Educator6. Student7. Other
Q15.Comments
Q8. Zweck des Kaufs diesesGeräts?
1. Zusätzlich2. Austausch↓• Marke des ausgetauschten
Geräts?1. Serienmäßige Ausstattung2. Alpine3. Anderer Hersteller →
(Herstellername)Q9. War dies das erste Mal,
dass Sie ein Alpine-Gerätgekauft haben?
1. Erstes Mal2. Zweites Mal oder öfter
Q10.Haben Sie dieses Alpine-Gerät vor dem Kauf mitGeräten anderer Herstellerverglichen?
1. Ja →(Herstellername)
2. NeinQ11.Geschlecht
1. Männlich2. Weiblich
Q12.AlterQ13.Familienstand
1. Ledig2. Verheiratet
Q14.Beruf1. Selbständige/Firmeninhaber/
freiberuflich Tätige2. Leitende Angestellte3. Sonstige Angestellte4. Beamte5. Schulbildung6. Studium7. Sonstige
Q15.Kommentar:

Tarjeta de informacióndel producto
EspañolEl envío de la informaciónsolicitada es voluntario. Si Vd.nos la remite, será utilizada demodo confidencial para eldesarrollo de futuros productosAlpine. Si Vd. desea recibirinformación sobre nuevosproductos de nuestra gama,indique su nombre en el espaciodesignado y remítanos la tarjeta.Cualquier solicitud adicionalpuede ser enviada a : Personaresponsable del Servicio deAtención al Cliente de AlpineElectronics (Europe) GmbH.Frankfurter Ring 117, 80807München, GermanyPhone: +49-(0)89-32 42 640
Q1. Producto Comprado1. Radio/Cassette2. Radio/CD3. Reproductor de MD4. Reproductor de DVD5. Cambiador de CD6. Amplificador7. Altavoz8. Subwoofer9. Monitor de control
10. Monitor de video11. Sistema de navegación12. Procesador/Ecualizador13. Cambiador de CD/Video CD14. Otros
Q2. Número demodelo:
Q3. Fecha de compra:Mes:Año:
Q4. En caso de sistema denavegación, ¿quémonitor?
1. Alpine → (N° demodelo)
2. Otros → (Nombre demarca)
Q5. TIPO DE TIENDA DONDECOMPRÓ:
1. Especialista en audio deautomóviles
2. Tienda de audio/video3. Tienda de electrónica/
electrodomésticos4. Tienda de accesorios
automovilísticos5. Otros
Q6. Tipo de vehiculo en que launidad está instalada:Marca:Modelo:Año de Año delcompra:modelo:
Q7. ¿Cómo fue comprado estevehiculo?
1. compra2. Leasing
Carte d’informationssur le produit
FrançaisEn remplissant volontairementcette fiche, et en l’envoyant àAlpine, vous acceptez que cesinformations soient utilisées parAlpine, dans le cadre dedéveloppement de nouveauxproduits. Par ailleurs, vousautorisez Alpine à sollicitervotre opinion par mailing sur denouveaux produits ou services.Si vous acceptez les termes ci-dessus, veuillez signer cettecarte à l’endroit indiqué, et nousla retourner. Tout autrecommentaire ou demande doitêtre adressé à l’attention de:Responsable du serviceconsommateur AlpineElectronics (Europe) GmbH.Frankfurter Ring 117, 80807München, GermanyPhone: +49-(0)89-32 42 640
Q1. PRODUIT ACHETE1. Lecteur de cassette2. Lecteur de CD3. Lecteur MD4. Lecteur DVD5. Changeur de CD6. Amplificateur7. Haut-parleur8. Haut-parleur de graves9. Station Multimedia
10. Moniteur Vidéo11. Navigation12. Processeur/Egaliseur13. Changeur de CD/CD Vidéo14. Autre
Q2. NUMERO DUMODELE:
Q3. DATE D’ACHAT:Mois:Année:
Q4. Si c’est un système denavigation, quel moniteur?
1. Alpine → (N° dumodèle)
2. Autre →(Marque)
Q5. TYPE DE MAGASIN OUVOUS AVEZ ACHETE LEPRODUIT:
1. Spécialiste autoradio2. Magasin audio/vidéo3. Magasin d’électronique/
appareils4. Magasin d’accessoires
automobiles5. Autre
Q6. Type de véhicule danslequel cet appareil estinstallé:Marque:Modèle:Année Année dud’achat:modèle:
Q7. Comment avez-vousacheté ce véhicule?
1. Achat2. Location-bail
Q8. Pourquoi avez-vous acheté cetappareil?
1. Addition2. Remplacement↓• Marque précédente
remplacée?1. Installée en usine2. Alpine3. Autre →
(Marque)Q9. Aviez-vous déjà acheté
des produits Alpine?1. Première fois2. Deux fois ou plus
Q10.Lorsque vous avez achetéce produit Alpine, l’avez-vous comparé à une autremarque?
1. Oui → (Marque)2. Non
Q11.SEXE1. Masculin2. Féminin
Q12.AGEQ13.SITUATION DE FAMILLE
1. Célibataire2. Marié
Q14.PROFESSION1. Entrepreneur/Travailleur
indépendant/Free-lance2. Directeur3. Employé de bureau4. Fonctionnaire5. Educateur6. Etudiant7. Autre
Q15.Commentaires
Q8. ¿Propósito de compraresta unidad?
1. Mejora del sistema2. Sustitución↓• ¿Sustitución de marca anterior?1. Instalado en la fábrica2. Alpine3. Otros → (Nombre de
marca)Q9. ¿Ha comprado Vd.
productos Alpineanteriormente?
1. Primera vez2. Dos o más veces
Q10.Cuando usted compró estaunidad Alpine, ¿lacomparó con otrosfabricantes?
1. Si → (Nombre demarca)
2. NoQ11.SEXO
1. Masculino2. Femenino
Q12.EdadQ13.Estado civil
1. Soltero2. Casado
Q14.Ocupación1. Propietario de empresa/
Autónomo/Profesionalindependiente
2. Gerente3. Empleado de compañia4. Empleado público5. Profesor6. Estudiante7. Otros
Q15.Comentarios
Q8. Scopo acquisto1. Aggiunta2. Sostituzione↓• Marca sostituita1. Installato di fabbrica2. Alpine3. Altro → (Nome
marca)Q9. Avevate già acquistato
prodotti Alpine?1. No2. Due o tre volte
Q10.Nell’acquistarlo, aveteparagonato questoprodotto ad un’altramarca?
1. Si → (Nomemarca)
2. NoQ11.SESSO
1. Maschile2. Femminile
Q12.ETÀQ13.STATO CIVILE
1. Celibe/nubile2. Coniugato/coniugata
Q14.LAVORO1. Proprietario di azienda/
artigiano/libero professionista2. Manager3. Impiegato4. Impiegato statale5. Insegnante6. Studente7. Altro
Q15.Commenti
Scheda informazioniprodotto
ItalianoLa compilazione di questa formulario èvolontaria. Se compilate questoformulario, ritornandolo ad Alpine, iVostri dati saranno raccolti in un file diriferimento per lo sviluppo dei nuoviprodotti Alpine. In aggiunta Voipotrete ricevere in futuro informazioniriguardanti i nuovi prodotti o larichiesta di una Vostra opinione circa iprodotti o i servizi forniti da Alpine. Sesiete d’accordo, Vi preghiamo diritornarci il formulario completatonegli appositi spazi con i Vostri dati. Incaso desideriate fornire altri commentio richiedere informazioni aggiuntive,potete indirizzare il tutto a :Responsabile dipartimento ServizioClienti Alpine Electronics (Europe)GmbH.Frankfurter Ring 117, 80807 München,GermanyPhone: +49-(0)89-32 42 640
Q1. PRODOTTOACQUISTATO
1. Lettore di cassette2. Lettore CD3. Lettore MD4. Lettore DVD5. CD Changer6. Amplificatore7. Altoparlante8. Subwoofer9. Radio Monitor
10. Monitor video11. Sistema di navigazione12. Processore/equalizzatore13. Cambia CD/Video CD14. Altro
Q2. NUMEROMODELLO:
Q3. DATA DI ACQUISTO:Mese:Anno:
Q4. In caso di acquisto di unsistema di navigazione,quale monitor possiede?
1. Alpine → (No.Modello)
2. Altro → Nomemarca
Q5. NEGOZIO DI ACQUISTO:1. Specialista Car Stereo2. Negozio di audio/video3. Negozio di elettronica/
elettrodomestici4. Negozio accessori automobile5. Altro
Q6. Tipo di veicolo posseduto:Marca:Modello:Anno Annoacquisto:modello:
Q7. Modalità acquisto1. Acquisto2. Leasing

I agree to the above stated terms of the Alpine Product Information Card.Ich stimme dem Kontakt durch Alpine für Informations- und Befragungszwecke zu.J’accepte les termes de cette carte d’information produit Alpine.Estoy conforme con los términos de la tarjeta de información sobre producto de Alpine.Accetto i termini della scheda informazioni prodotti Alpine.
(Signature/Unterschrift/Signature/Firma)
(Date/Datum/Date/Fecha/Data)
Name/Nom/Nombre/Nome
(First Name/Vorname/Prénom/Primer nomble/Nome)
(Surname/Familienname/Nom de famille/Apellido/Cognome)
Home Address/Privatanschrift/Adresse/Dirección/Indirizzo
Telephone Number:
(Street/Straße/Rue/Calle/Via) (Post Code/Postleitzahl/Code postal/Código postal/Codice postale)
(Town/City/Stadt/Ville/Ciudad/Città) (Country/Land/Pays/País/Paese)
E-Mail/Correo electrónico:
Q1 NO.Other
Q9 NO.
Q15 Comments
Q2
Q5 NO.Other
Month YearQ3
Q6 Make:
Purchased Year: ModelYear:
Model:
NO.1. Model No.
NO.2. Brand NameQ4
NO.Q7 NO. Previous brand replaced. Brand Name
2 1. 2. 3.1Q8
NO.
Brand Name
2
1Q10NO.
Q11
Q13NO.
years oldQ12 NO.
OtherQ14

LU
FTPO
RT
PAR
AV
ION
PR
IOR
ITA
IRE
NE
PA
S A
FF
RA
NC
HIR
NIC
HT
FR
EIM
AC
HE
NN
O S
TAM
P R
EQ
UIR
ED
RE
PO
NS
E P
AY
EE
/ WE
RB
EA
NT
WO
RT
ALL
EM
AG
NE
ALP
INE
ELE
CTR
ON
ICS
(EU
RO
PE
) Gm
bH
Fran
kfur
ter R
ing
117,
808
07 M
ünch
en,
Ger
man
y