Setting up Eclipse (Windows), or GCC (Mac) Setting...
29
ECE3411 – Fall 2015 Marten van Dijk, Syed Kamran Haider Department of Electrical & Computer Engineering University of Connecticut Email: {vandijk, syed.haider}@engr.uconn.edu Setting up Eclipse (Windows), or GCC (Mac) Setting up Atmel Studio (Windows & Mac) Lecture # 0
Transcript of Setting up Eclipse (Windows), or GCC (Mac) Setting...
ECE3411 – Fall 2015
Marten van Dijk, Syed Kamran HaiderDepartment of Electrical & Computer Engineering
University of Connecticut
Email: {vandijk, syed.haider}@engr.uconn.edu
Setting up Eclipse (Windows), or GCC (Mac)Setting up Atmel Studio (Windows & Mac)
Lecture # 0
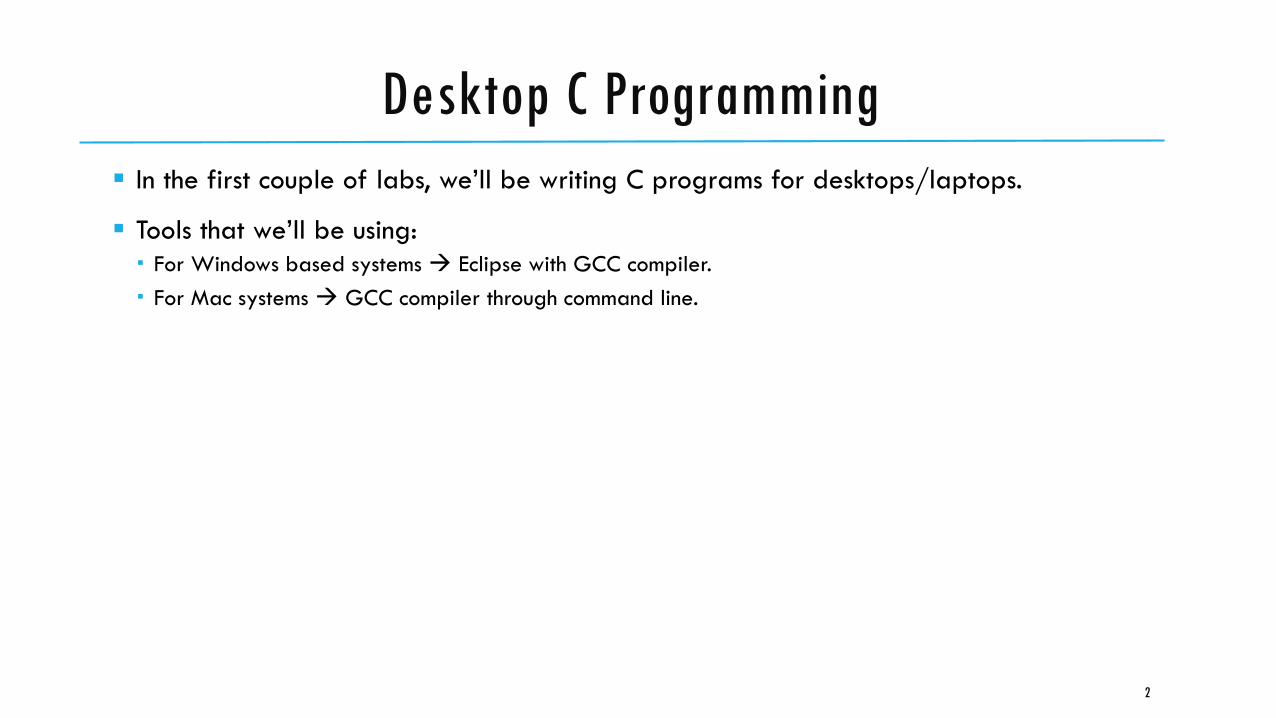
Desktop C Programming
In the first couple of labs, we’ll be writing C programs for desktops/laptops.
Tools that we’ll be using:
For Windows based systems Eclipse with GCC compiler.
For Mac systems GCC compiler through command line.
2
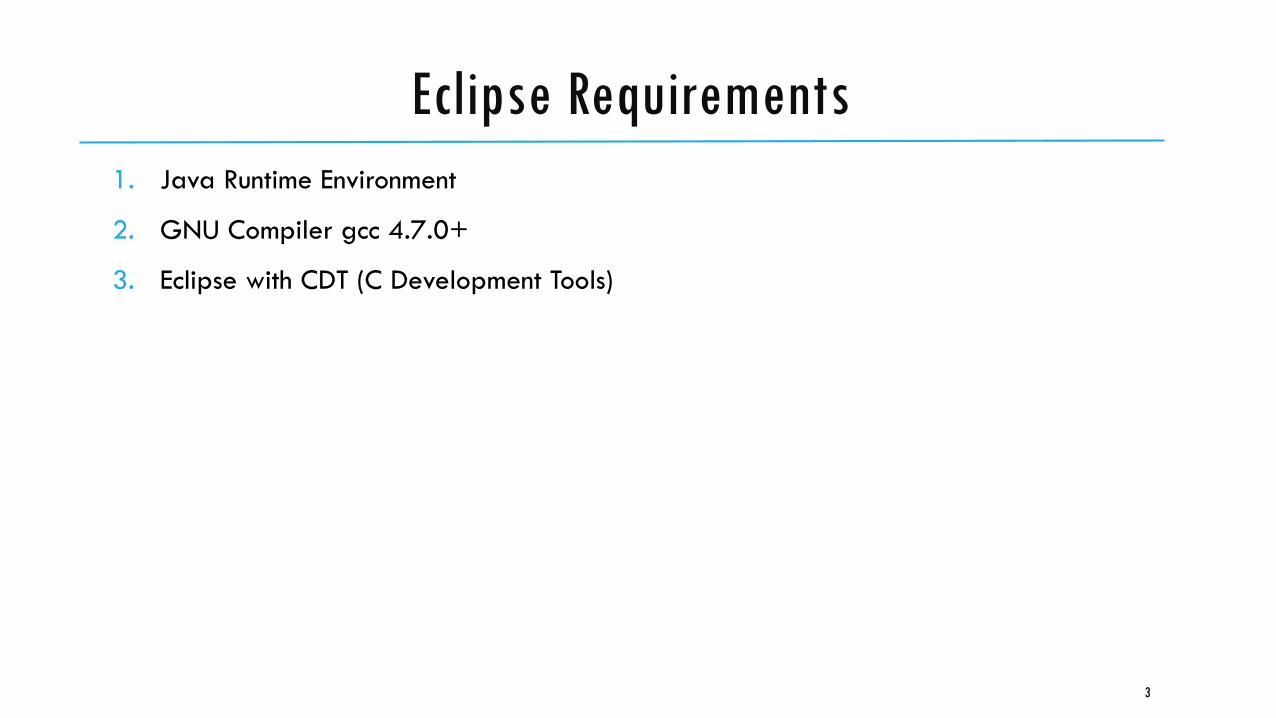
Eclipse Requirements
1. Java Runtime Environment
2. GNU Compiler gcc 4.7.0+
3. Eclipse with CDT (C Development Tools)
3
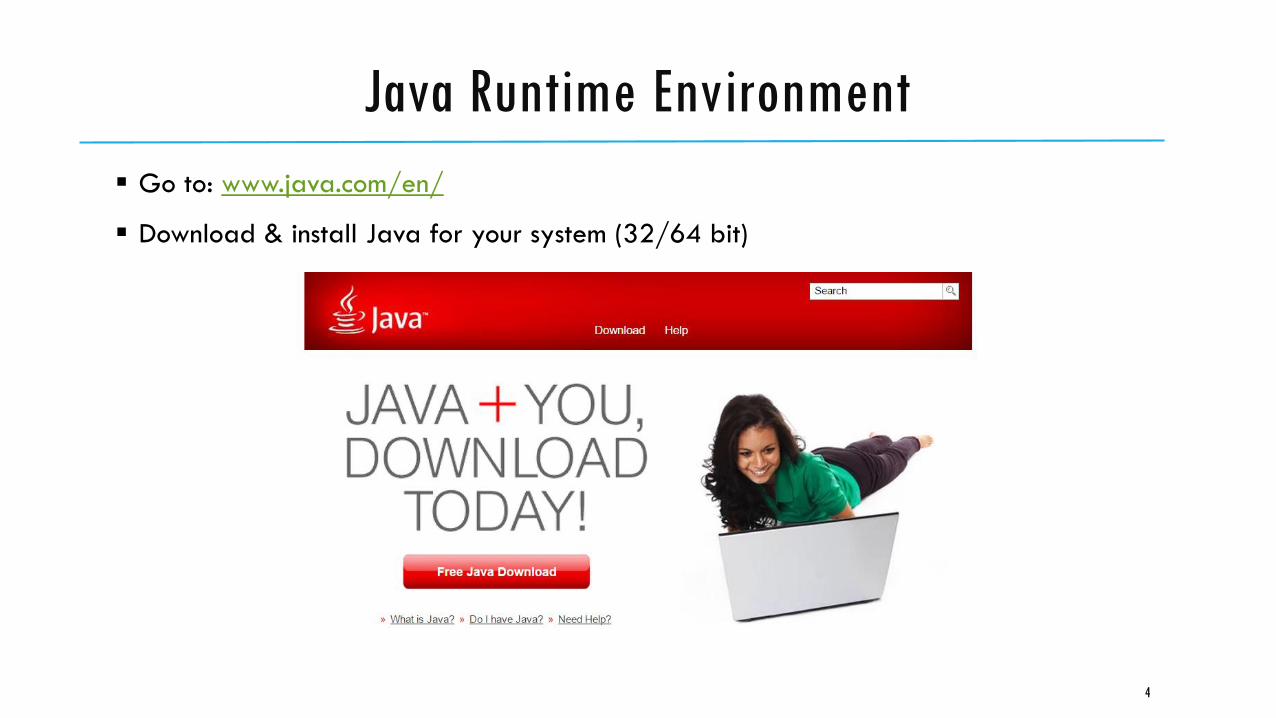
Go to: www.java.com/en/
Download & install Java for your system (32/64 bit)
Java Runtime Environment
4
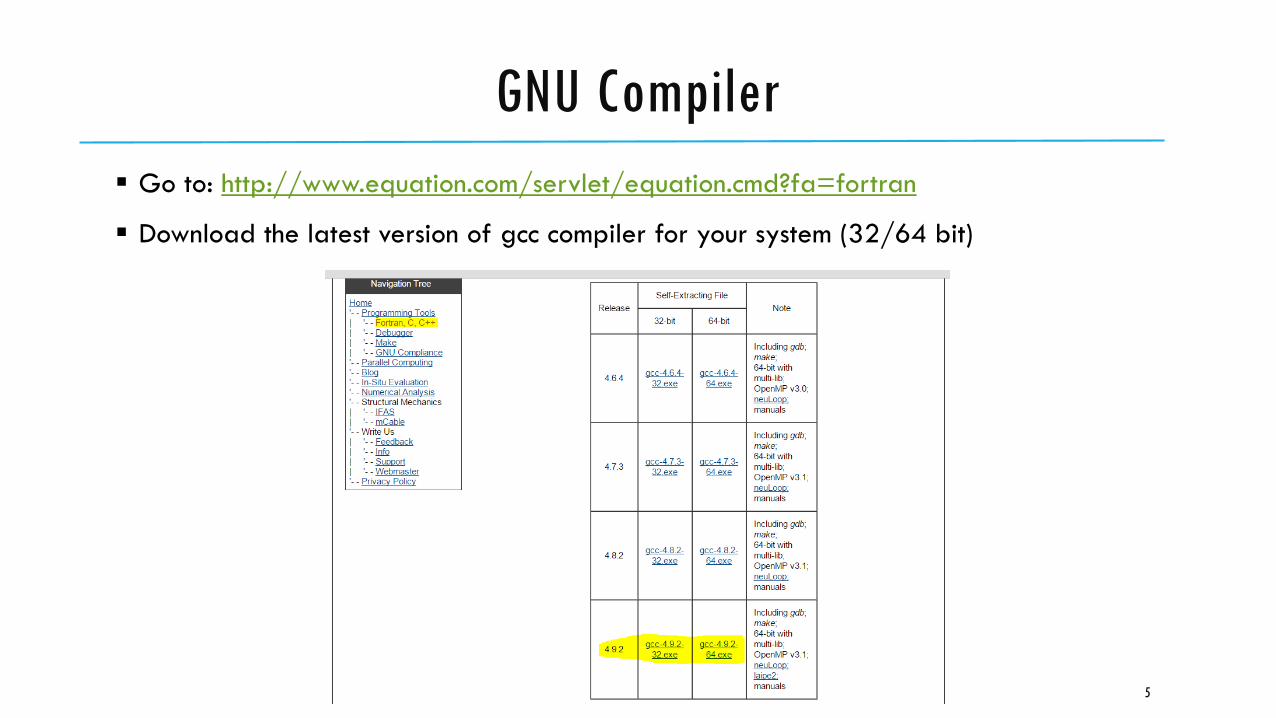
Go to: http://www.equation.com/servlet/equation.cmd?fa=fortran
Download the latest version of gcc compiler for your system (32/64 bit)
GNU Compiler
5
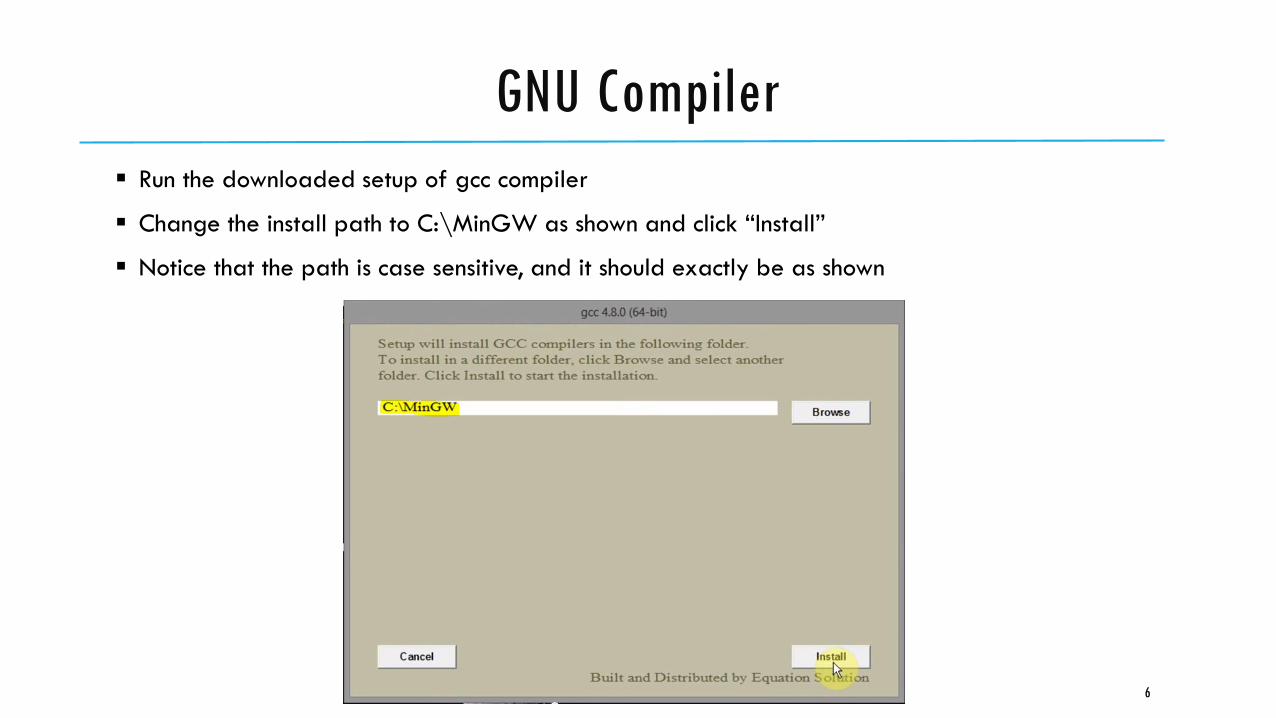
Run the downloaded setup of gcc compiler
Change the install path to C:\MinGW as shown and click “Install”
Notice that the path is case sensitive, and it should exactly be as shown
GNU Compiler
6
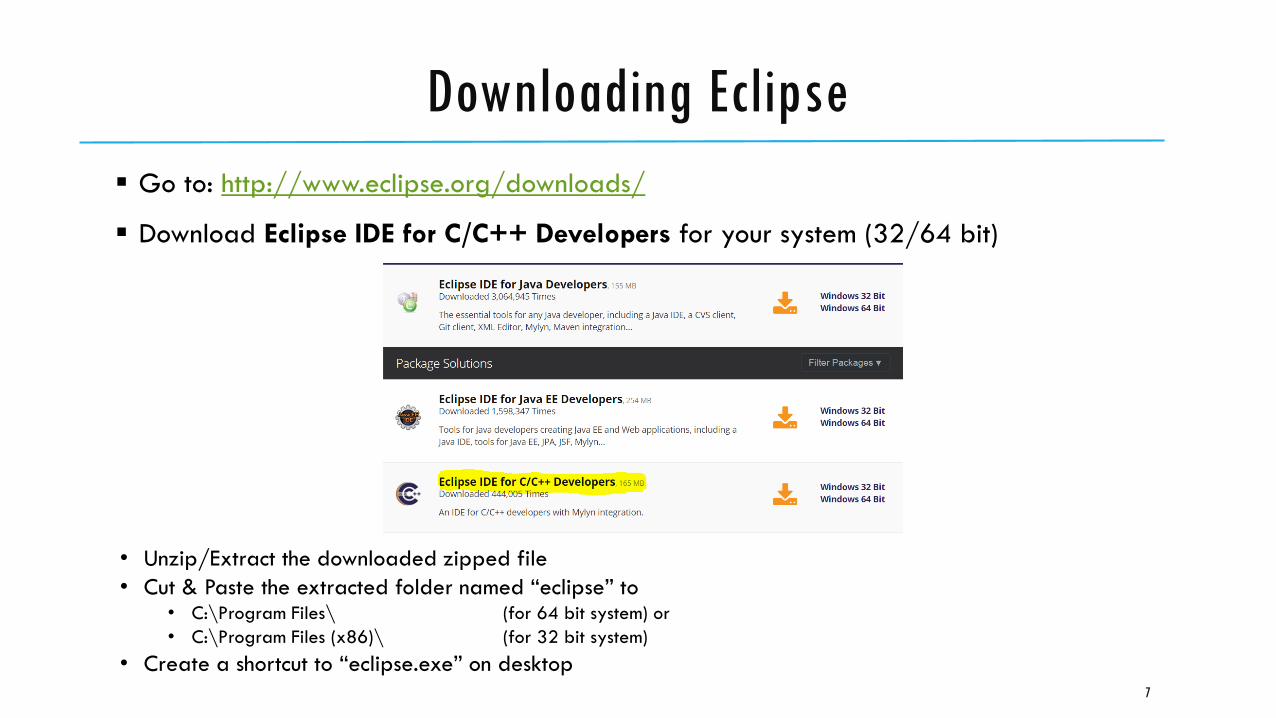
Go to: http://www.eclipse.org/downloads/
Download Eclipse IDE for C/C++ Developers for your system (32/64 bit)
Downloading Eclipse
7
• Unzip/Extract the downloaded zipped file
• Cut & Paste the extracted folder named “eclipse” to• C:\Program Files\ (for 64 bit system) or
• C:\Program Files (x86)\ (for 32 bit system)
• Create a shortcut to “eclipse.exe” on desktop

Full tutorial for setting up Eclipse can be found at: https://www.youtube.com/watch?v=KfKvDIrabUw
Eclipse Youtube Tutorial
8
GCC on Mac
Turn on the terminal within Mac OS X (or Linux)
On Mac, run the following command from your terminal to install GCC (if you don’t have it already)
xcode-select --install
Assume that we have a C source file “hello.c”. You can compile “hello.c” into an executable file called “hello” by the following command:
gcc -o hello hello.c
If the program is compiled without errors, you can execute the program by typing:
./hello <arguments if any>
9
Setting up Atmel Studio on Windows
Follow the Quick Start guide found at the link below:Getting started with ATmega168PB
Using this guide:
Install the Atmel Studio on your Windows Machine
Run a quick test program on your Xplained Mini kit. (Notice that this document targets ATmega168PB Xplained Mini kit as an example, however similar steps are required for ATmega328P Xplained Mini kit.)
Other resources include
ATmega328P-Xplained-Mini_UserGuide.pdf
ATmega328P Xplained Mini Schematic & Design Documentation
10
Setting up Atmel Studio on Mac
Mac users will need to install a Windows OS on their systems in order to install Atmel Studio
The following slides provide detailed information on
Getting Microsoft Windows 7 and/or 8 that are available to students via uconn.onthehub.com
Installing Windows on Mac machines
11
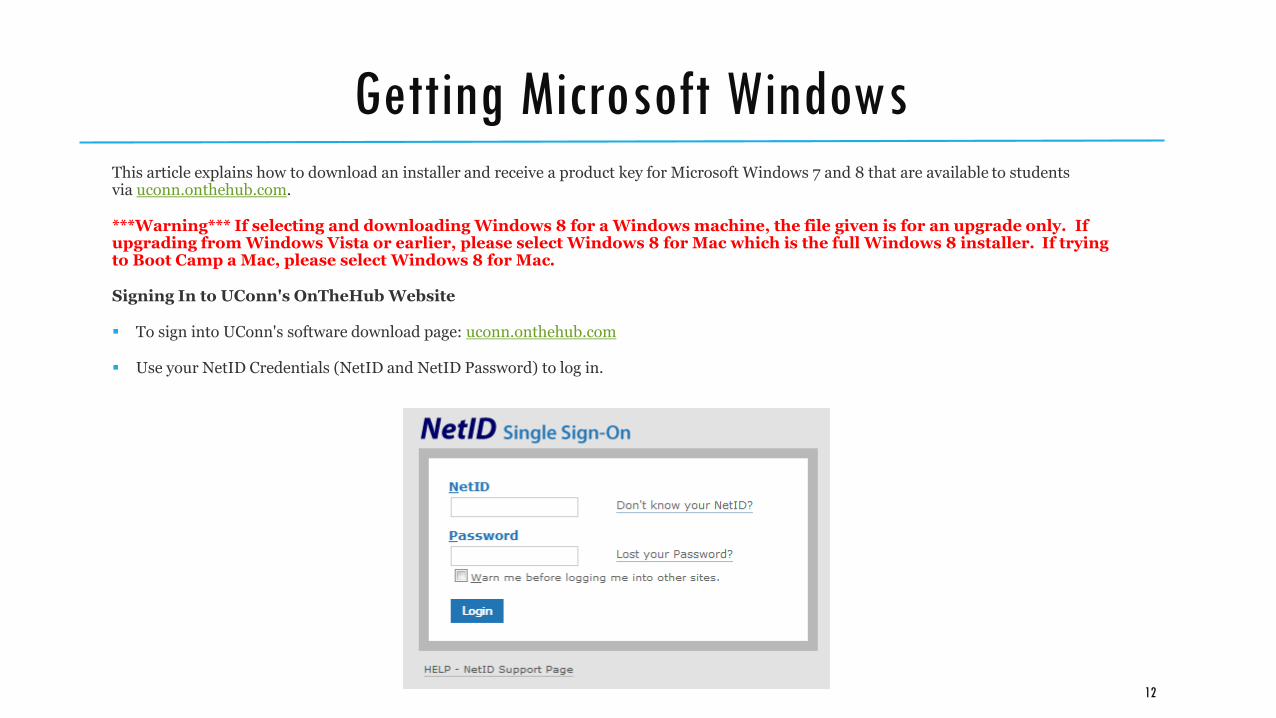
Getting Microsoft WindowsThis article explains how to download an installer and receive a product key for Microsoft Windows 7 and 8 that are available to students via uconn.onthehub.com.
***Warning*** If selecting and downloading Windows 8 for a Windows machine, the file given is for an upgrade only. If upgrading from Windows Vista or earlier, please select Windows 8 for Mac which is the full Windows 8 installer. If trying to Boot Camp a Mac, please select Windows 8 for Mac.
Signing In to UConn's OnTheHub Website
To sign into UConn's software download page: uconn.onthehub.com
Use your NetID Credentials (NetID and NetID Password) to log in.
12
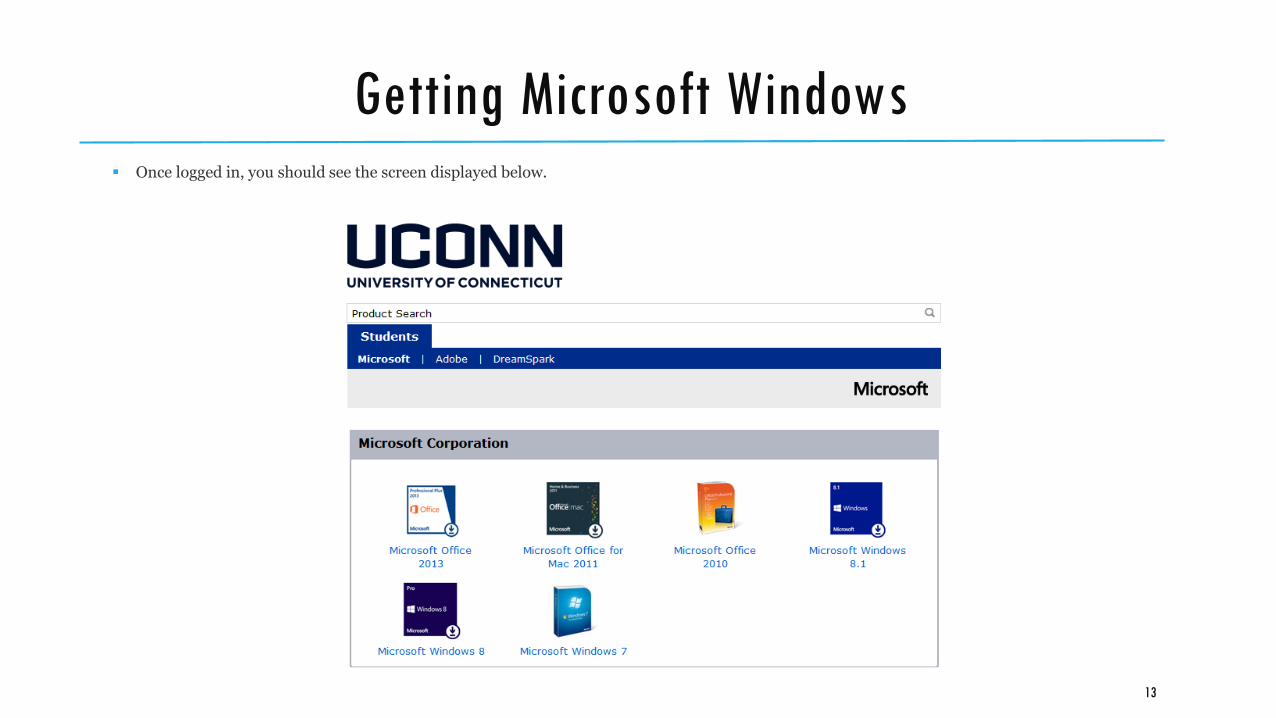
Getting Microsoft Windows Once logged in, you should see the screen displayed below.
13

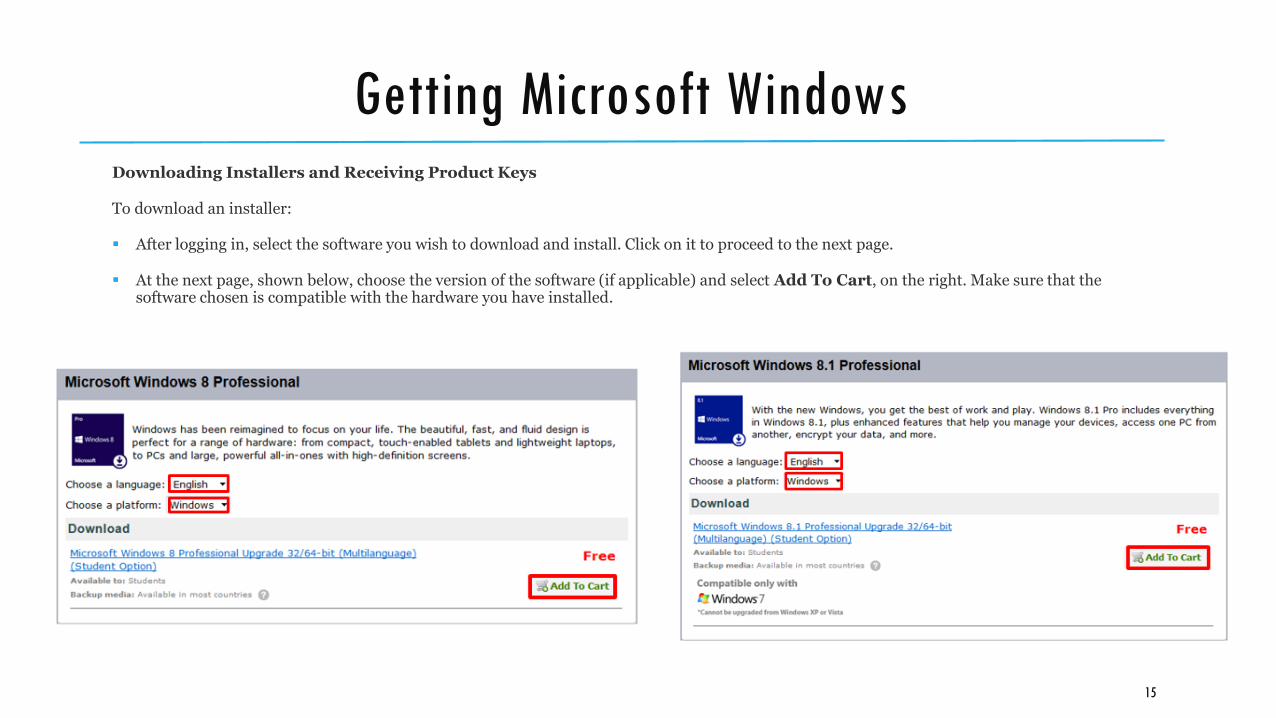
Getting Microsoft WindowsDownloading Installers and Receiving Product Keys
To download an installer:
After logging in, select the software you wish to download and install. Click on it to proceed to the next page.
At the next page, shown below, choose the version of the software (if applicable) and select Add To Cart, on the right. Make sure that the software chosen is compatible with the hardware you have installed.
14
Getting Microsoft WindowsDownloading Installers and Receiving Product Keys
To download an installer:
After logging in, select the software you wish to download and install. Click on it to proceed to the next page.
At the next page, shown below, choose the version of the software (if applicable) and select Add To Cart, on the right. Make sure that the software chosen is compatible with the hardware you have installed.
15
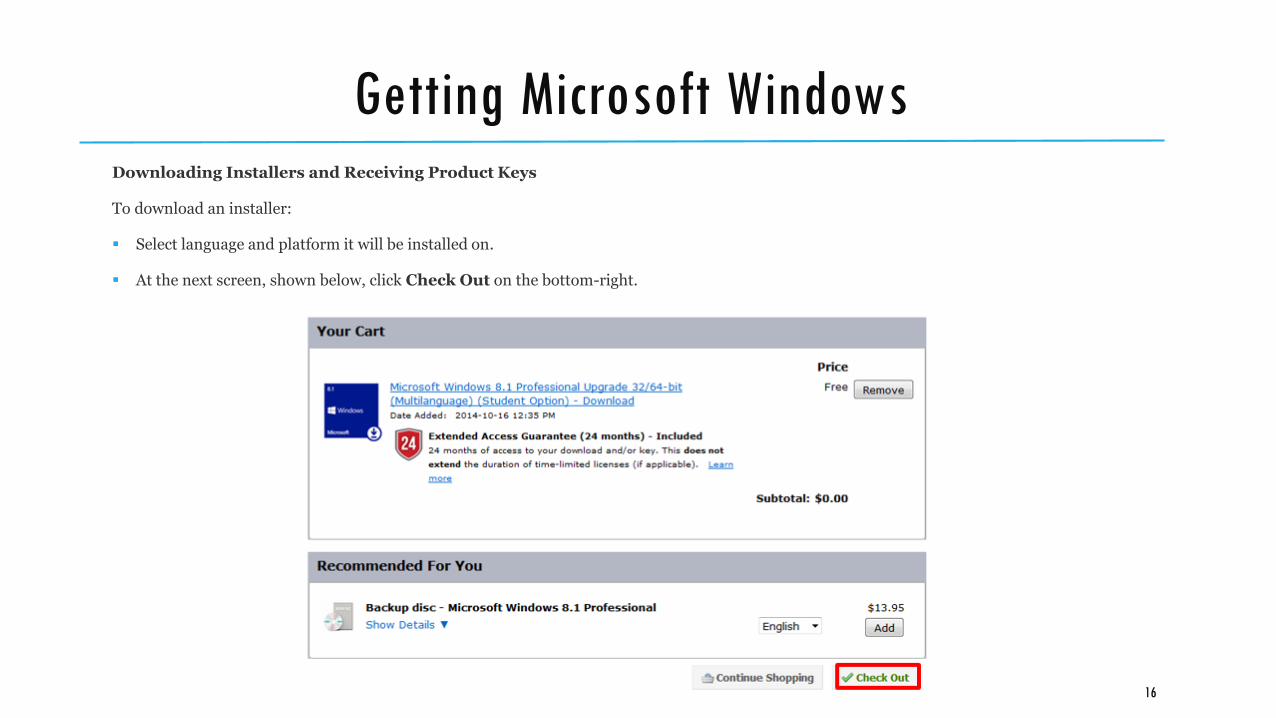
Getting Microsoft WindowsDownloading Installers and Receiving Product Keys
To download an installer:
Select language and platform it will be installed on.
At the next screen, shown below, click Check Out on the bottom-right.
16
Getting Microsoft WindowsDownloading Installers and Receiving Product Keys
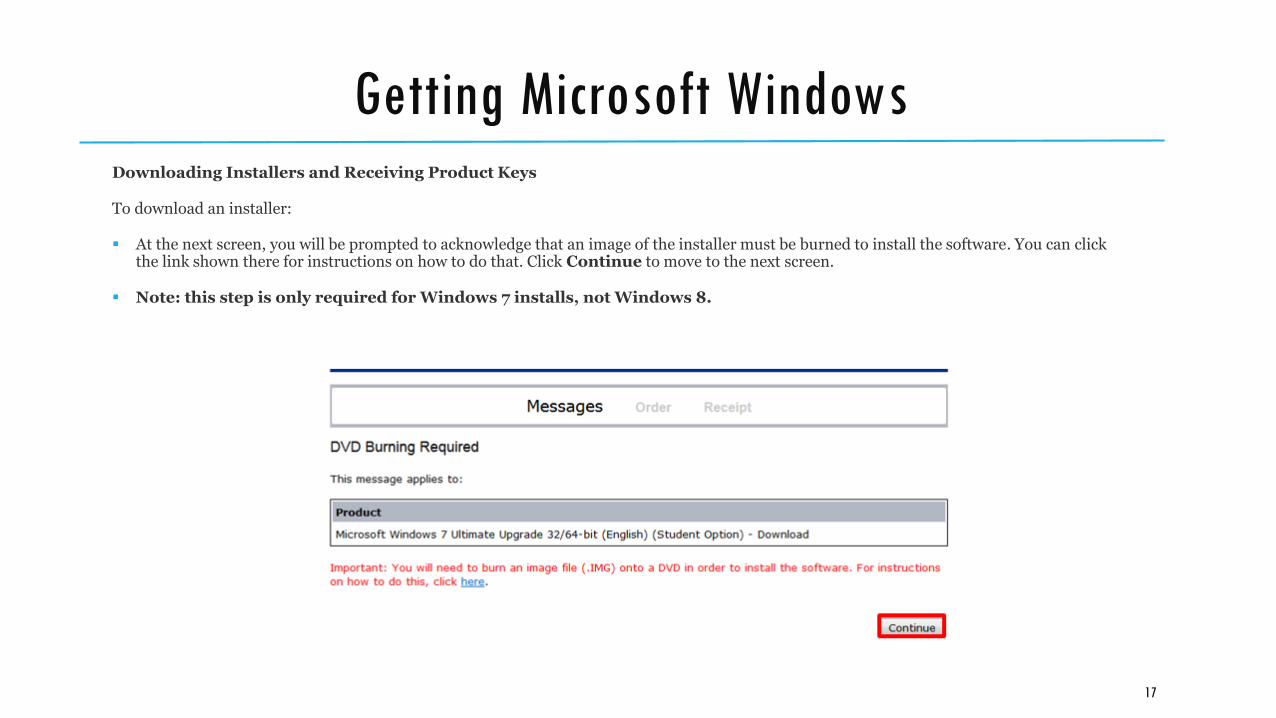
To download an installer:
At the next screen, you will be prompted to acknowledge that an image of the installer must be burned to install the software. You can click the link shown there for instructions on how to do that. Click Continue to move to the next screen.
Note: this step is only required for Windows 7 installs, not Windows 8.
17
Getting Microsoft WindowsDownloading Installers and Receiving Product Keys
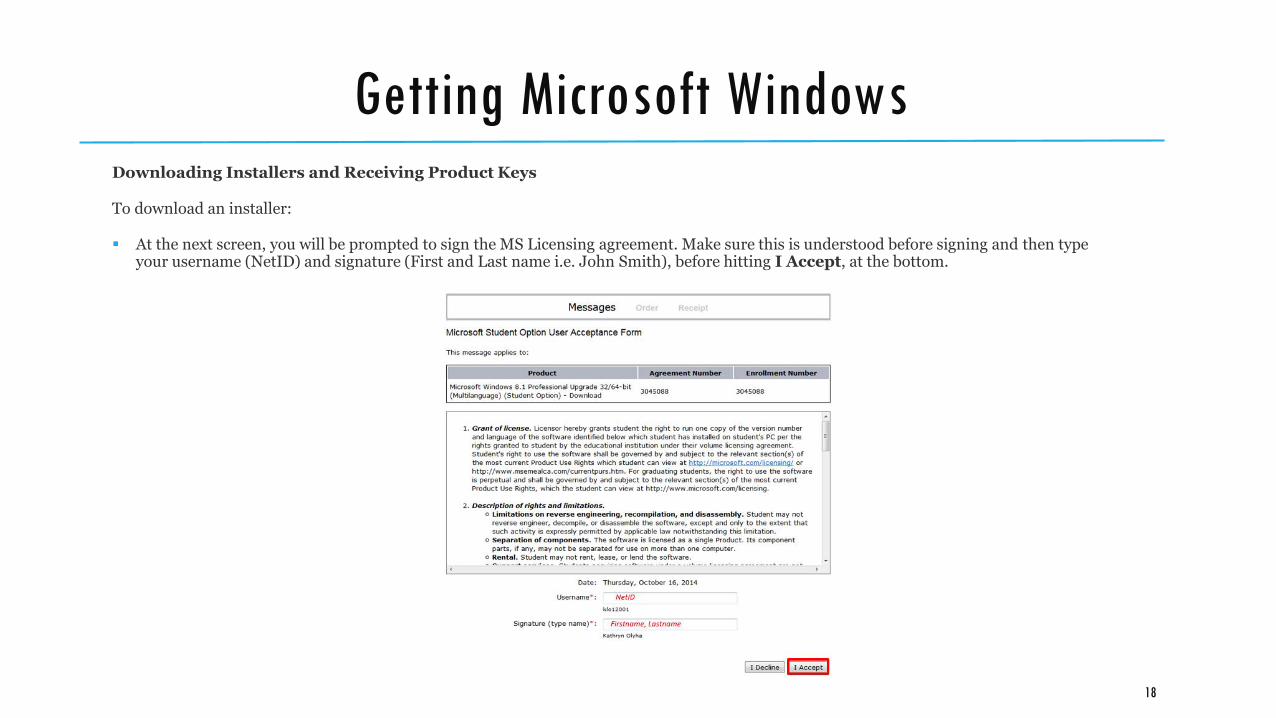
To download an installer:
At the next screen, you will be prompted to sign the MS Licensing agreement. Make sure this is understood before signing and then type your username (NetID) and signature (First and Last name i.e. John Smith), before hitting I Accept, at the bottom.
18
Getting Microsoft WindowsDownloading Installers and Receiving Product Keys
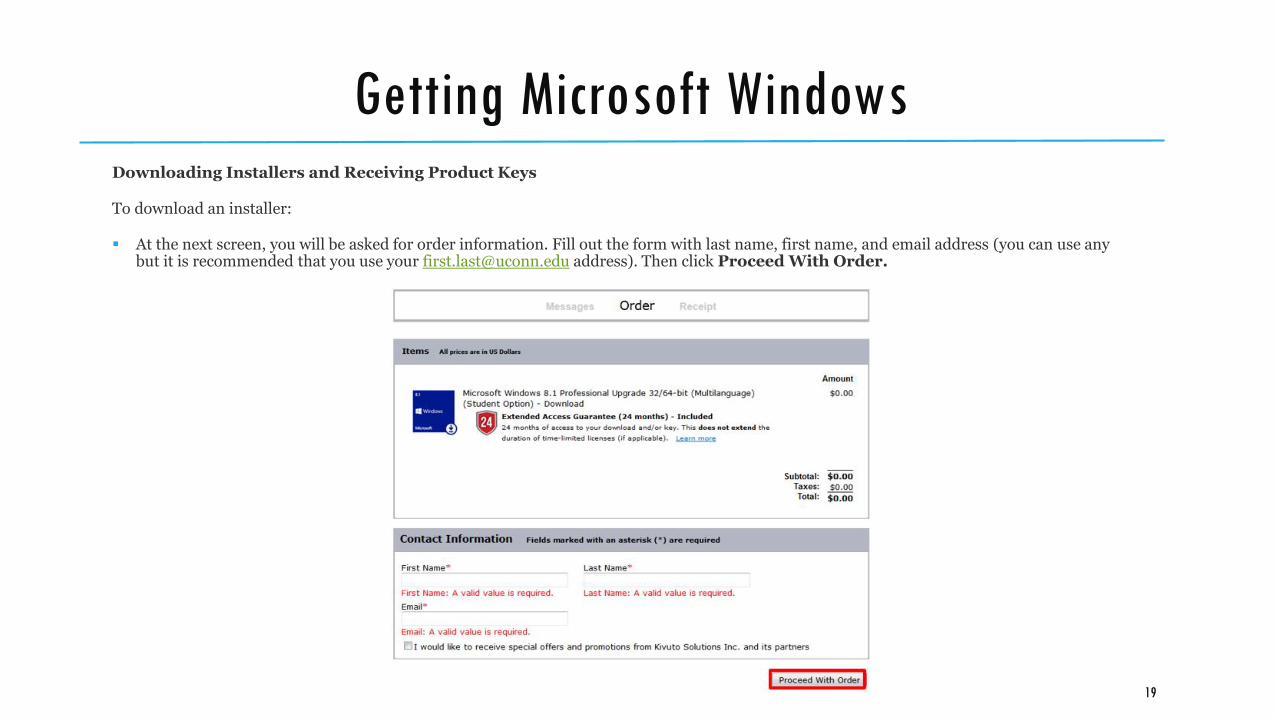
To download an installer:
At the next screen, you will be asked for order information. Fill out the form with last name, first name, and email address (you can use any but it is recommended that you use your [email protected] address). Then click Proceed With Order.
19
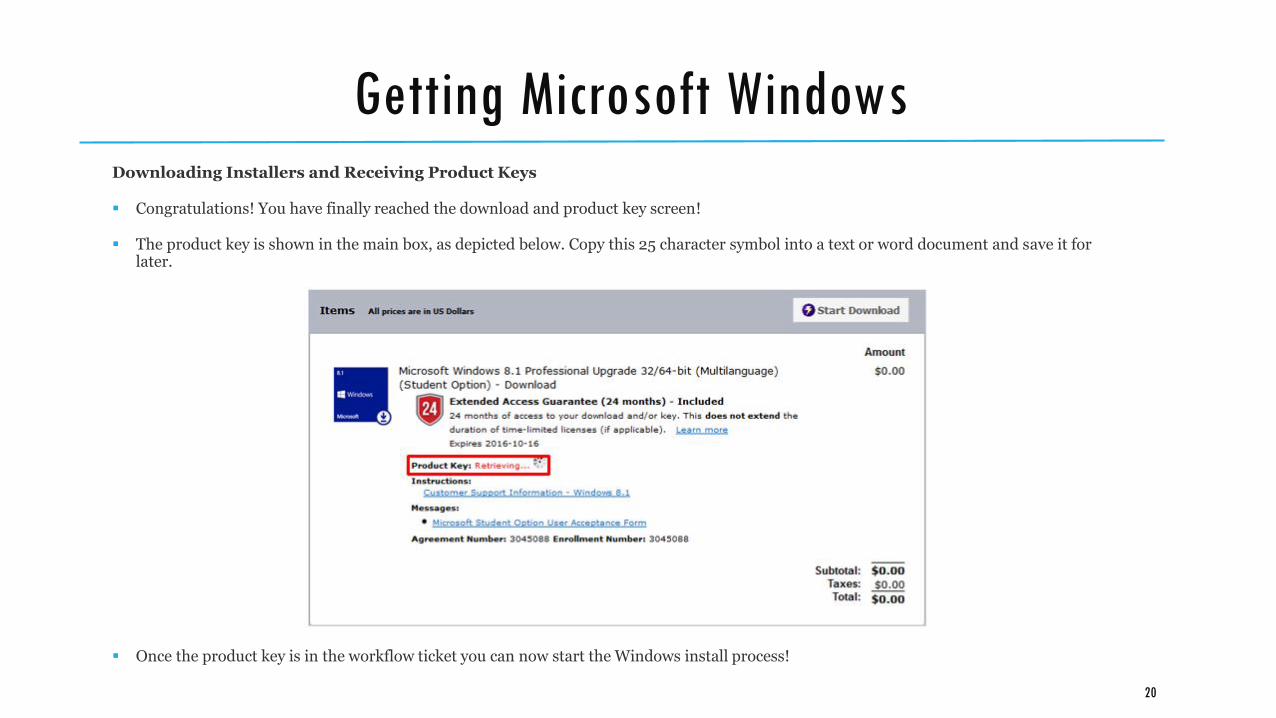
Getting Microsoft WindowsDownloading Installers and Receiving Product Keys
Congratulations! You have finally reached the download and product key screen!
The product key is shown in the main box, as depicted below. Copy this 25 character symbol into a text or word document and save it for later.
Once the product key is in the workflow ticket you can now start the Windows install process!
20
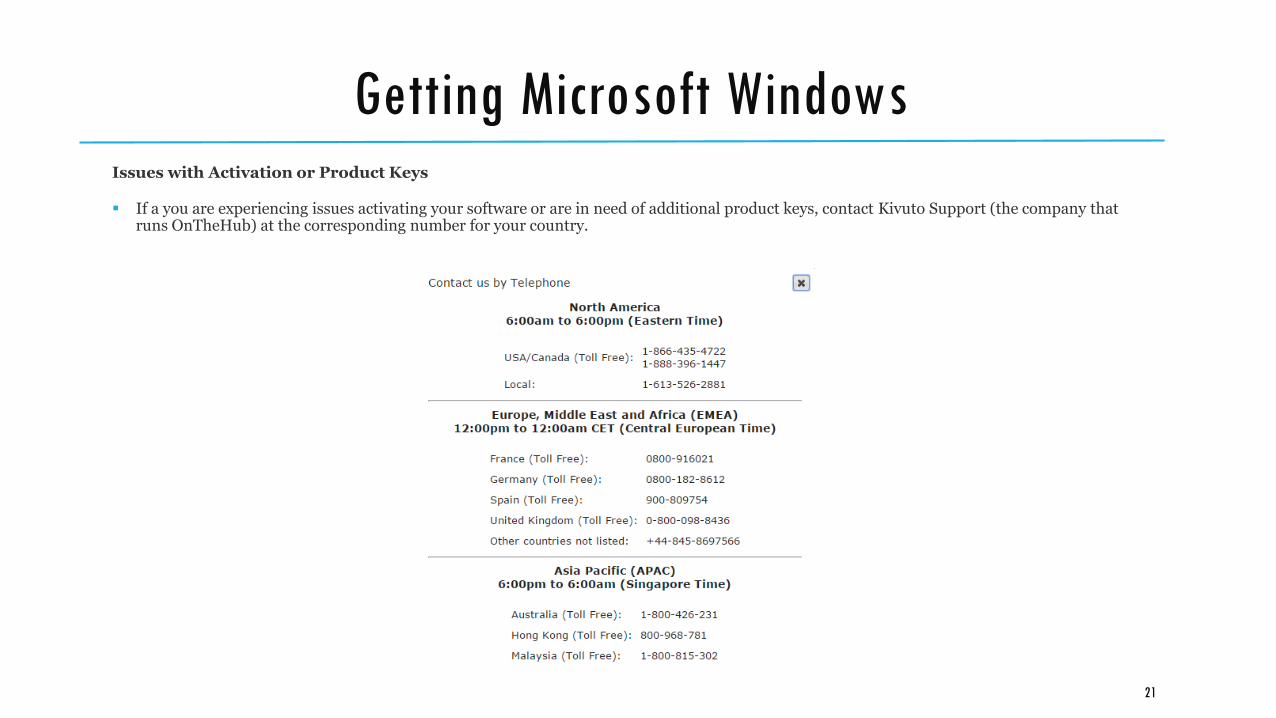
Getting Microsoft WindowsIssues with Activation or Product Keys
If a you are experiencing issues activating your software or are in need of additional product keys, contact Kivuto Support (the company that runs OnTheHub) at the corresponding number for your country.
21
Installing Windows on MacBoot Camp Assistant helps you install Microsoft Windows on a Mac. After installing, you can restart your Mac and switch between OSX and Windows. This article describes, step-by-step, how to install Windows on an Apple computer using Boot Camp Assistant.
Prerequisites
Student needs to have an Intel-based Mac.
Student needs to have access and copy down the product key(s) necessary for the installation process
If the client wants Office, they will need a product key for Windows and a product key for Office.
Data backup- HIGHLY recommended.
100GB free space recommended on large (500GB or larger) hard drives; 40GB minimum required on smaller drives.
2GB of RAM.
Snow Leopard (OSX 10.6) or higher.
22
Installing Windows on MacWindows 7 64-bit
Macbook Pro (13-inch, Mid 2009) and later
Macbook Pro (15-inch, Early 2008) and later
Macbook Pro (17-inch, Early 2008) and later
Mac Pro (Early 2008) and later
iMac (21.5-inch, Late 2009)
iMac (27-inch, Late 2009)
iMac (27-inch, Quad Core, Late 2009)
MacBook (13-inch, Late 2009) and later
iMac (21.5-inch, Mid 2010)
iMac (27-inch, Mid 2010)
Mac mini (Mid 2010)
23
Installing Windows on MacWindows 8
Macbook Air (Mid 2011 or newer)
Macbook Pro (15-inch and 17-inch, Mid 2010)
Macbook Pro (Early 2011 or newer)
Mac Pro (Early 2009 or newer)
Mac Mini (Mid 2011 or newer)
iMac (27-inch, Mid 2010)
iMac (21.5-inch, Mid 2011 or newer)
24
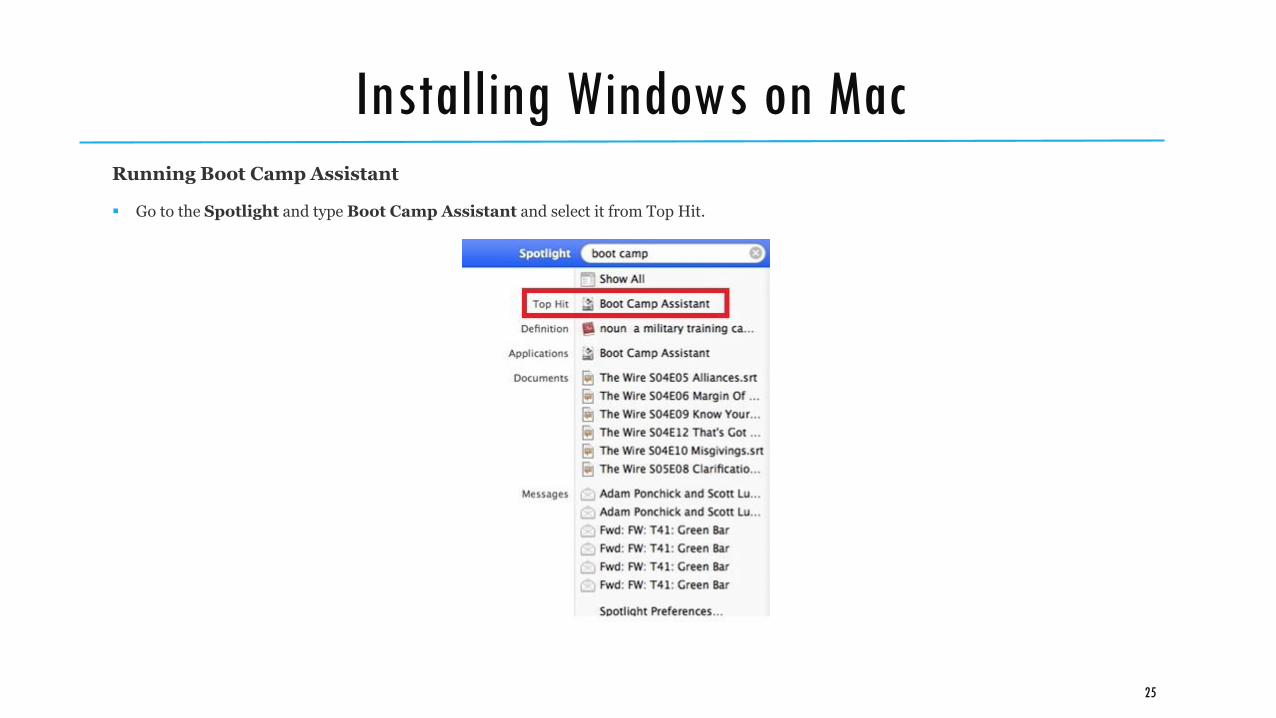
Installing Windows on MacRunning Boot Camp Assistant
Go to the Spotlight and type Boot Camp Assistant and select it from Top Hit.
25
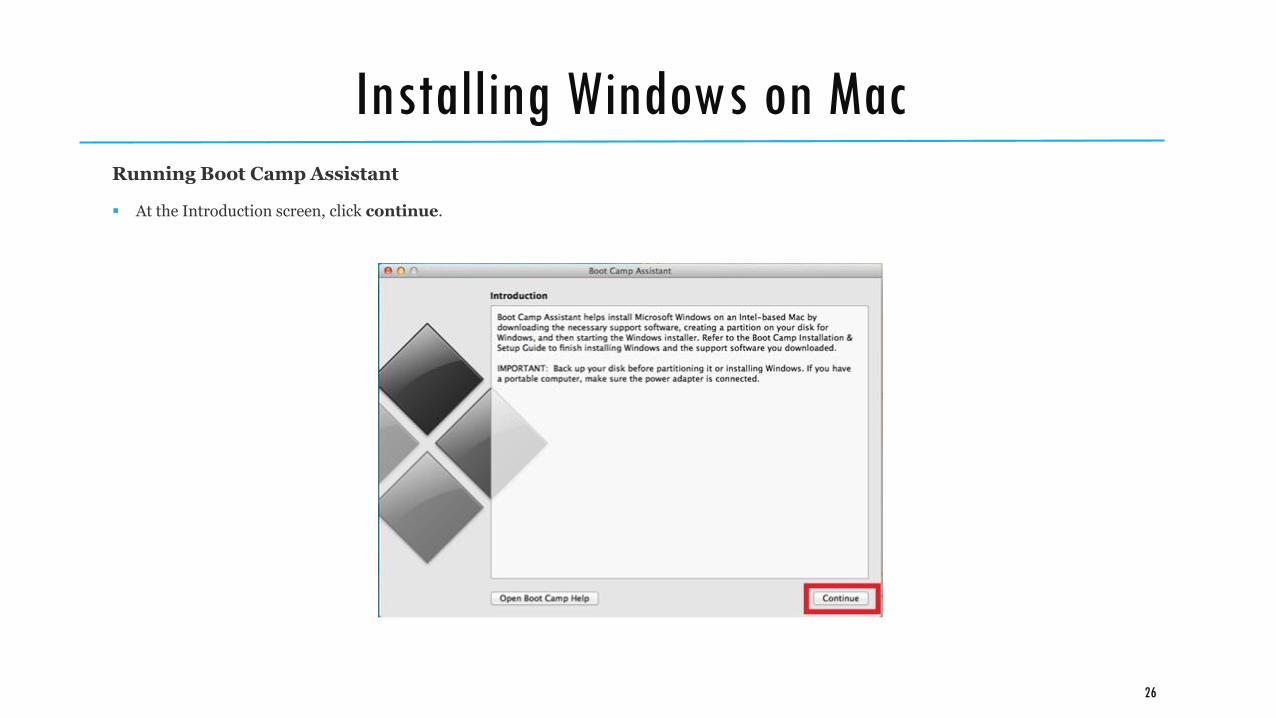
Installing Windows on MacRunning Boot Camp Assistant
At the Introduction screen, click continue.
26
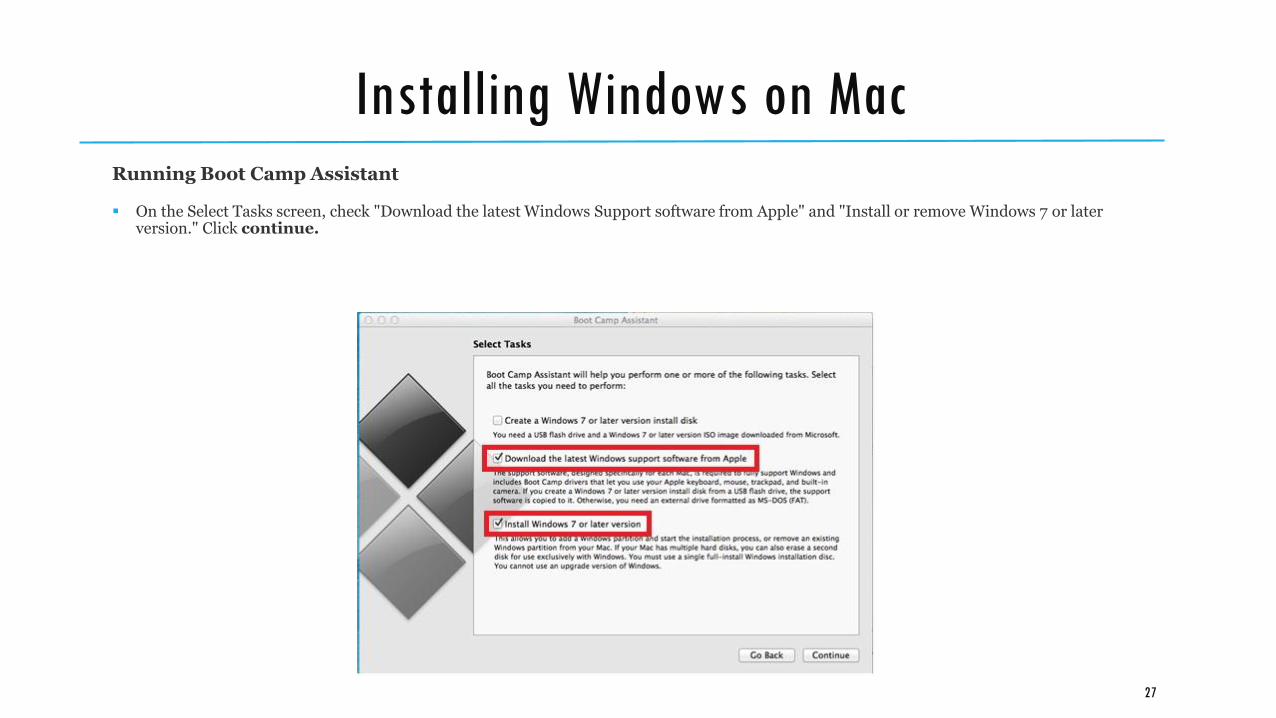
Installing Windows on MacRunning Boot Camp Assistant
On the Select Tasks screen, check "Download the latest Windows Support software from Apple" and "Install or remove Windows 7 or later version." Click continue.
27
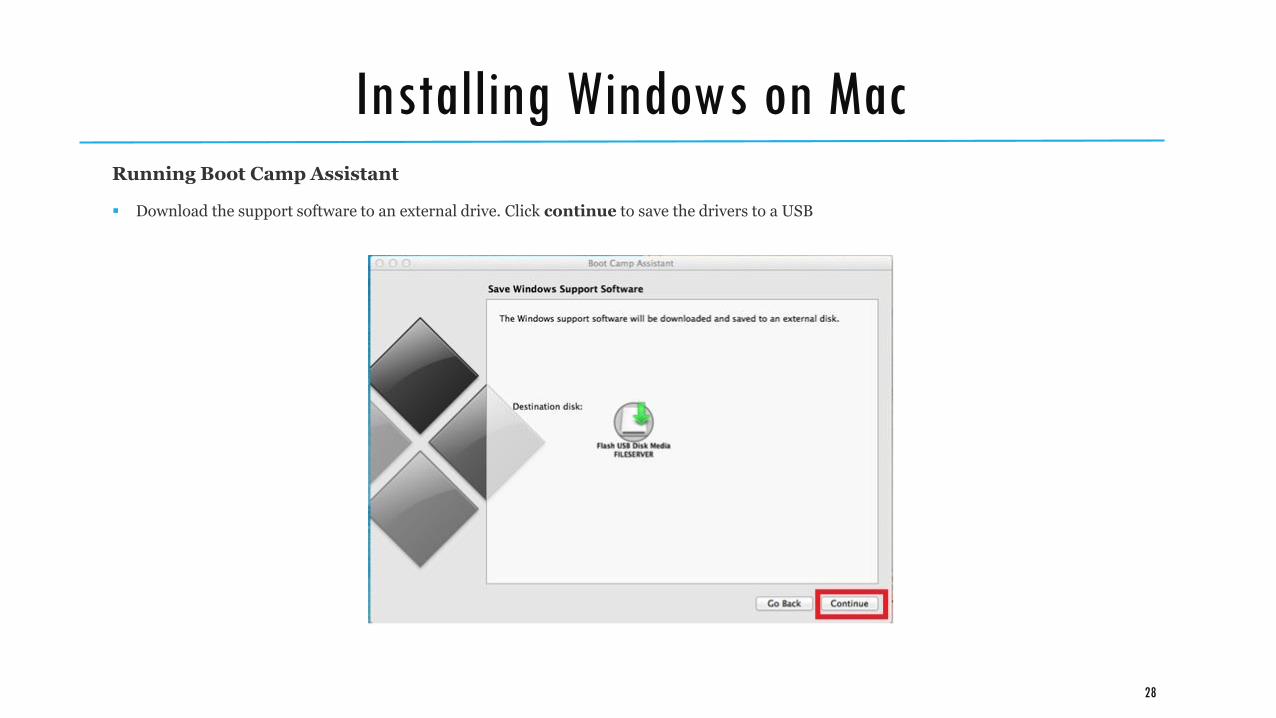
Installing Windows on MacRunning Boot Camp Assistant
Download the support software to an external drive. Click continue to save the drivers to a USB
28
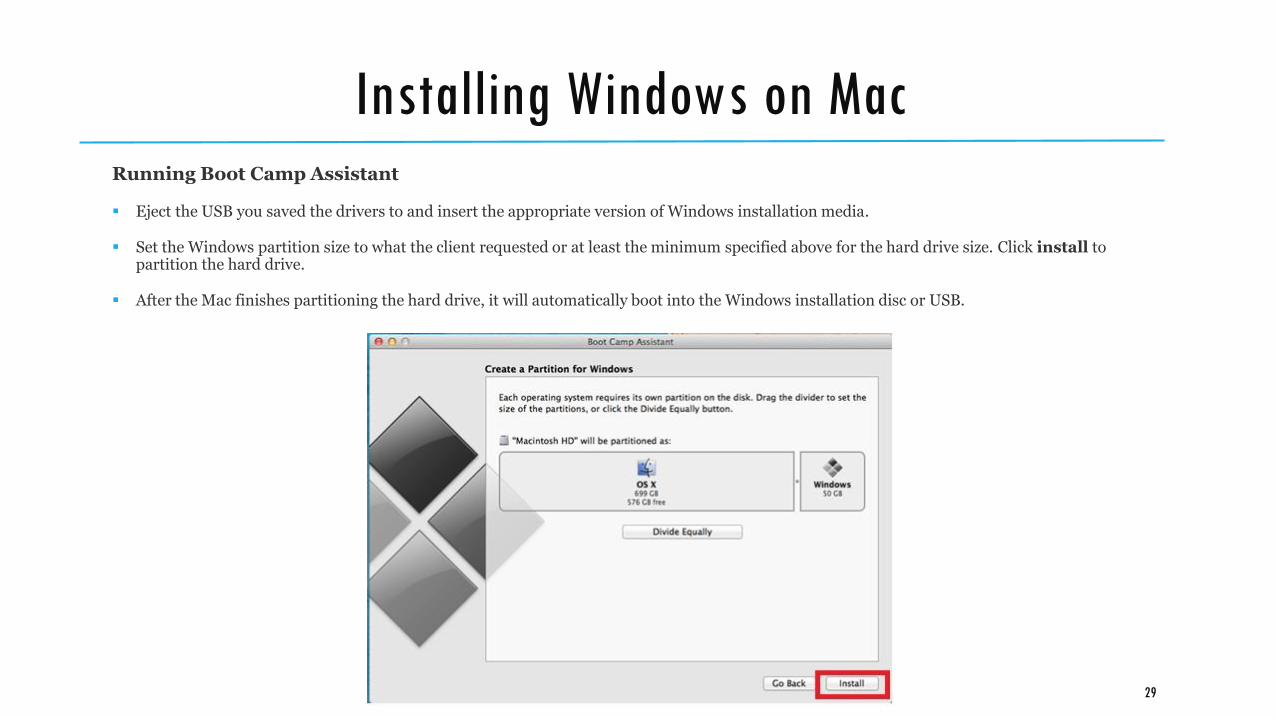
Installing Windows on MacRunning Boot Camp Assistant
Eject the USB you saved the drivers to and insert the appropriate version of Windows installation media.
Set the Windows partition size to what the client requested or at least the minimum specified above for the hard drive size. Click install to partition the hard drive.
After the Mac finishes partitioning the hard drive, it will automatically boot into the Windows installation disc or USB.
29

![Redwood Anwendertage 2015 - Eclipse [Schreibgeschützt] · 2015. 5. 4. · Tipps & Tricks. Was ist Eclipse. Eclipse Eclipse(von englisch eclipse‚Sonnenfinsternis‘, ‚Finsternis‘,](https://static.fdocument.pub/doc/165x107/60e8ab6cf8fa6d37e6282437/redwood-anwendertage-2015-eclipse-schreibgeschtzt-2015-5-4-tipps-.jpg)


![[Unix Programming] gcc & make](https://static.fdocument.pub/doc/165x107/56814914550346895db64aa1/unix-programming-gcc-make.jpg)