Twitter: @ketab n - Amazon S3€¦ · Twitter: @ketab_n. Twitter: @ketab_n. Twitter: @ketab_n
Last Modified: 9/4/2014v4.3
ROAMpayTM X4 User Guide
1
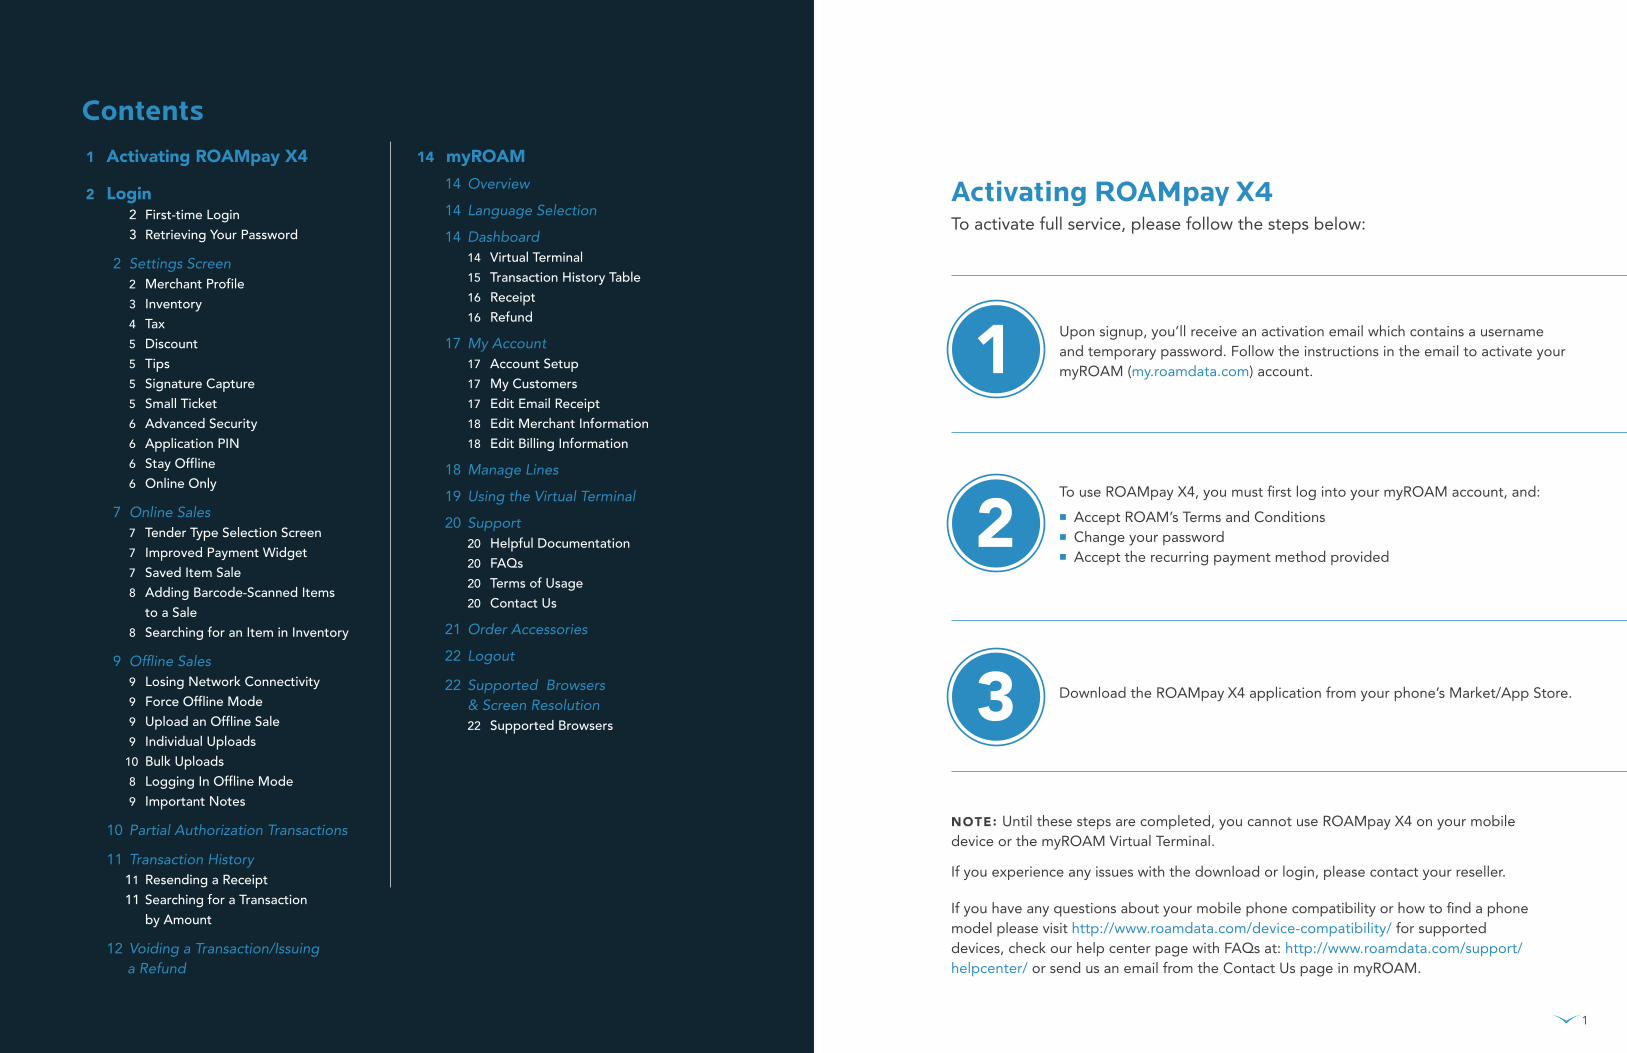
To activate full service, please follow the steps below:
Upon signup, you’ll receive an activation email which contains a username and temporary password. Follow the instructions in the email to activate your myROAM (my.roamdata.com) account.
To use ROAMpay X4, you must first log into your myROAM account, and:
Accept ROAM’s Terms and Conditions Change your password Accept the recurring payment method provided
Download the ROAMpay X4 application from your phone’s Market/App Store.
NOTE: Until these steps are completed, you cannot use ROAMpay X4 on your mobile device or the myROAM Virtual Terminal.
If you experience any issues with the download or login, please contact your reseller.
Activating ROAMpay X4
2
3
1
If you have any questions about your mobile phone compatibility or how to find a phone model please visit http://www.roamdata.com/device-compatibility/ for supported devices, check our help center page with FAQs at: http://www.roamdata.com/support/helpcenter/ or send us an email from the Contact Us page in myROAM.
Contents 1 Activating ROAMpay X4
2 Login 2 First-time Login 3 Retrieving Your Password
2 Settings Screen 2 Merchant Profile 3 Inventory 4 Tax 5 Discount 5 Tips 5 Signature Capture 5 Small Ticket 6 Advanced Security 6 Application PIN 6 Stay Offline 6 Online Only
7 Online Sales 7 Tender Type Selection Screen 7 Improved Payment Widget 7 Saved Item Sale 8 Adding Barcode-Scanned Items to a Sale 8 Searching for an Item in Inventory
9 Offline Sales 9 Losing Network Connectivity 9 Force Offline Mode 9 Upload an Offline Sale 9 Individual Uploads 10 Bulk Uploads 8 Logging In Offline Mode 9 Important Notes
10 Partial Authorization Transactions
11 Transaction History 11 Resending a Receipt 11 Searching for a Transaction by Amount
12 Voiding a Transaction/Issuing a Refund
14 myROAM
14 Overview
14 Language Selection
14 Dashboard 14 Virtual Terminal 15 Transaction History Table 16 Receipt 16 Refund
17 My Account 17 Account Setup 17 My Customers 17 Edit Email Receipt
18 Edit Merchant Information 18 Edit Billing Information
18 Manage Lines
19 Using the Virtual Terminal
20 Support 20 Helpful Documentation 20 FAQs 20 Terms of Usage 20 Contact Us
21 Order Accessories
22 Logout
22 Supported Browsers & Screen Resolution 22 Supported Browsers
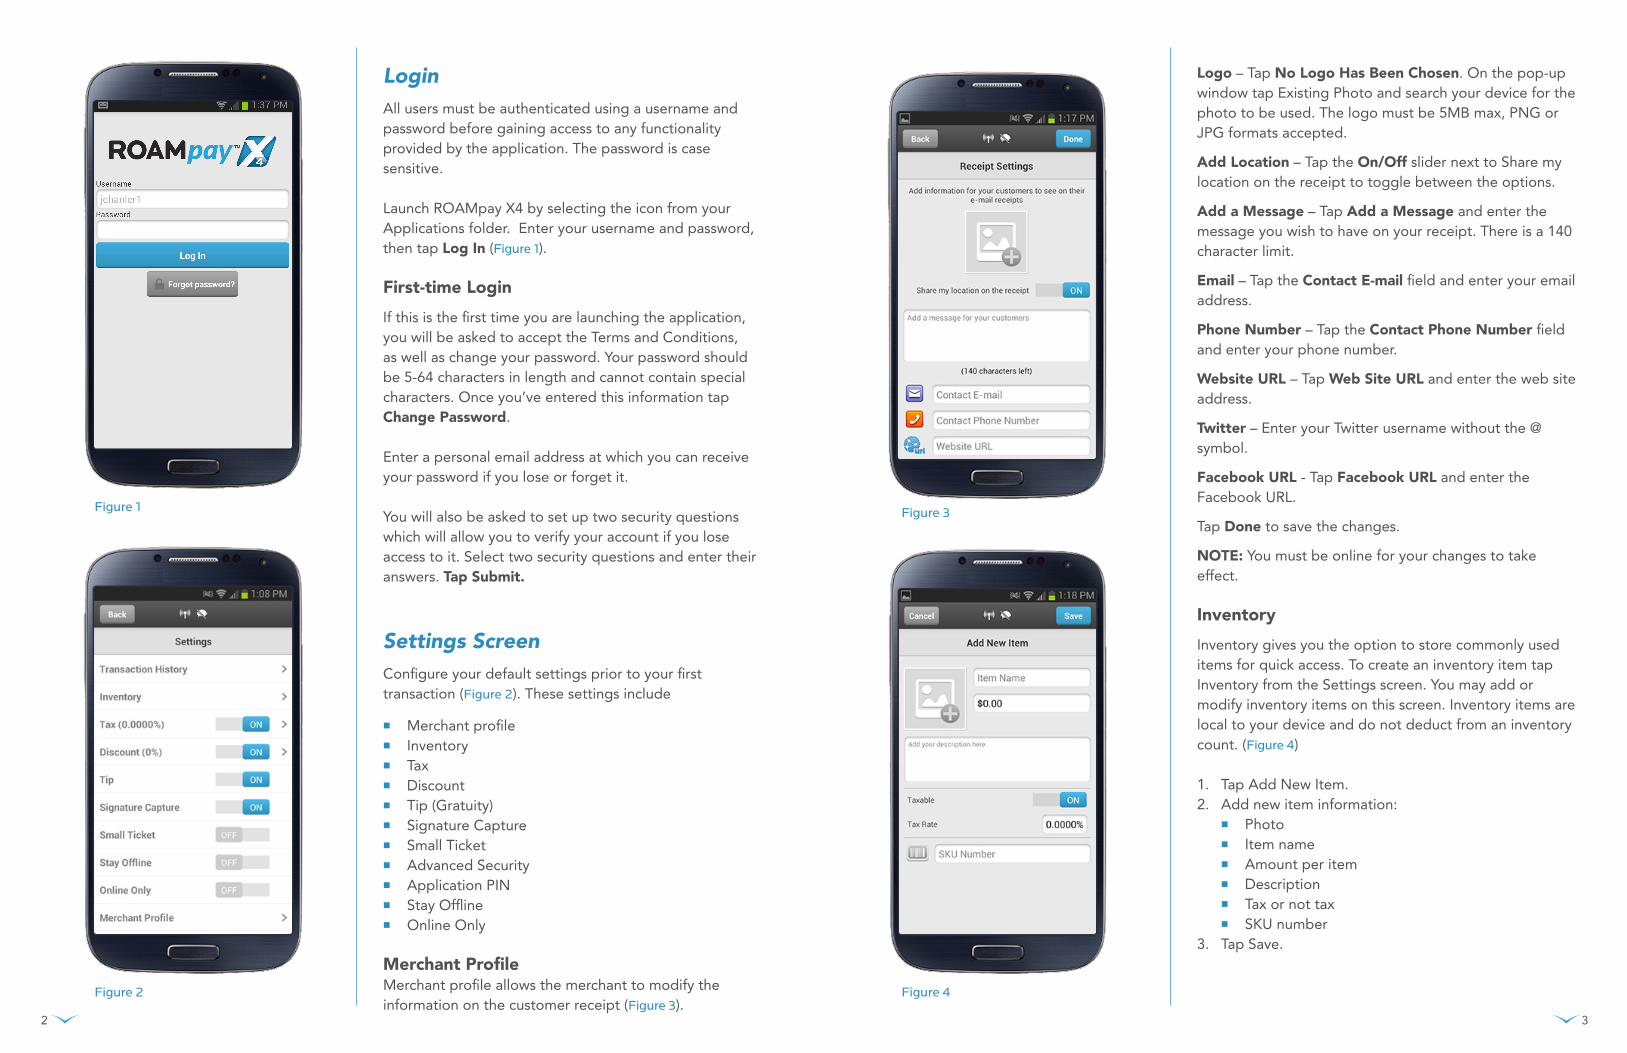
LoginAll users must be authenticated using a username and password before gaining access to any functionality provided by the application. The password is case sensitive.
Launch ROAMpay X4 by selecting the icon from your Applications folder. Enter your username and password, then tap Log In (Figure 1).
First-time Login
If this is the first time you are launching the application, you will be asked to accept the Terms and Conditions, as well as change your password. Your password should be 5-64 characters in length and cannot contain special characters. Once you’ve entered this information tap Change Password.
Enter a personal email address at which you can receive your password if you lose or forget it.
You will also be asked to set up two security questions which will allow you to verify your account if you lose access to it. Select two security questions and enter their answers. Tap Submit.
Settings ScreenConfigure your default settings prior to your first transaction (Figure 2). These settings include
n Merchant profilen Inventoryn Taxn Discountn Tip (Gratuity)n Signature Capturen Small Ticketn Advanced Securityn Application PINn Stay Offlinen Online Only
Merchant ProfileMerchant profile allows the merchant to modify the information on the customer receipt (Figure 3).
Logo – Tap No Logo Has Been Chosen. On the pop-up window tap Existing Photo and search your device for the photo to be used. The logo must be 5MB max, PNG or JPG formats accepted.
Add Location – Tap the On/Off slider next to Share my location on the receipt to toggle between the options.
Add a Message – Tap Add a Message and enter the message you wish to have on your receipt. There is a 140 character limit.
Email – Tap the Contact E-mail field and enter your email address.
Phone Number – Tap the Contact Phone Number field and enter your phone number.
Website URL – Tap Web Site URL and enter the web site address.
Twitter – Enter your Twitter username without the @ symbol.
Facebook URL - Tap Facebook URL and enter the Facebook URL.
Tap Done to save the changes.
NOTE: You must be online for your changes to take effect.
Inventory
Inventory gives you the option to store commonly used items for quick access. To create an inventory item tap Inventory from the Settings screen. You may add or modify inventory items on this screen. Inventory items are local to your device and do not deduct from an inventory count. (Figure 4)
1. Tap Add New Item.2. Add new item information:
n Photon Item namen Amount per itemn Descriptionn Tax or not taxn SKU number
3. Tap Save.
Figure 1
Figure 2
2 3
Figure 3
Figure 4
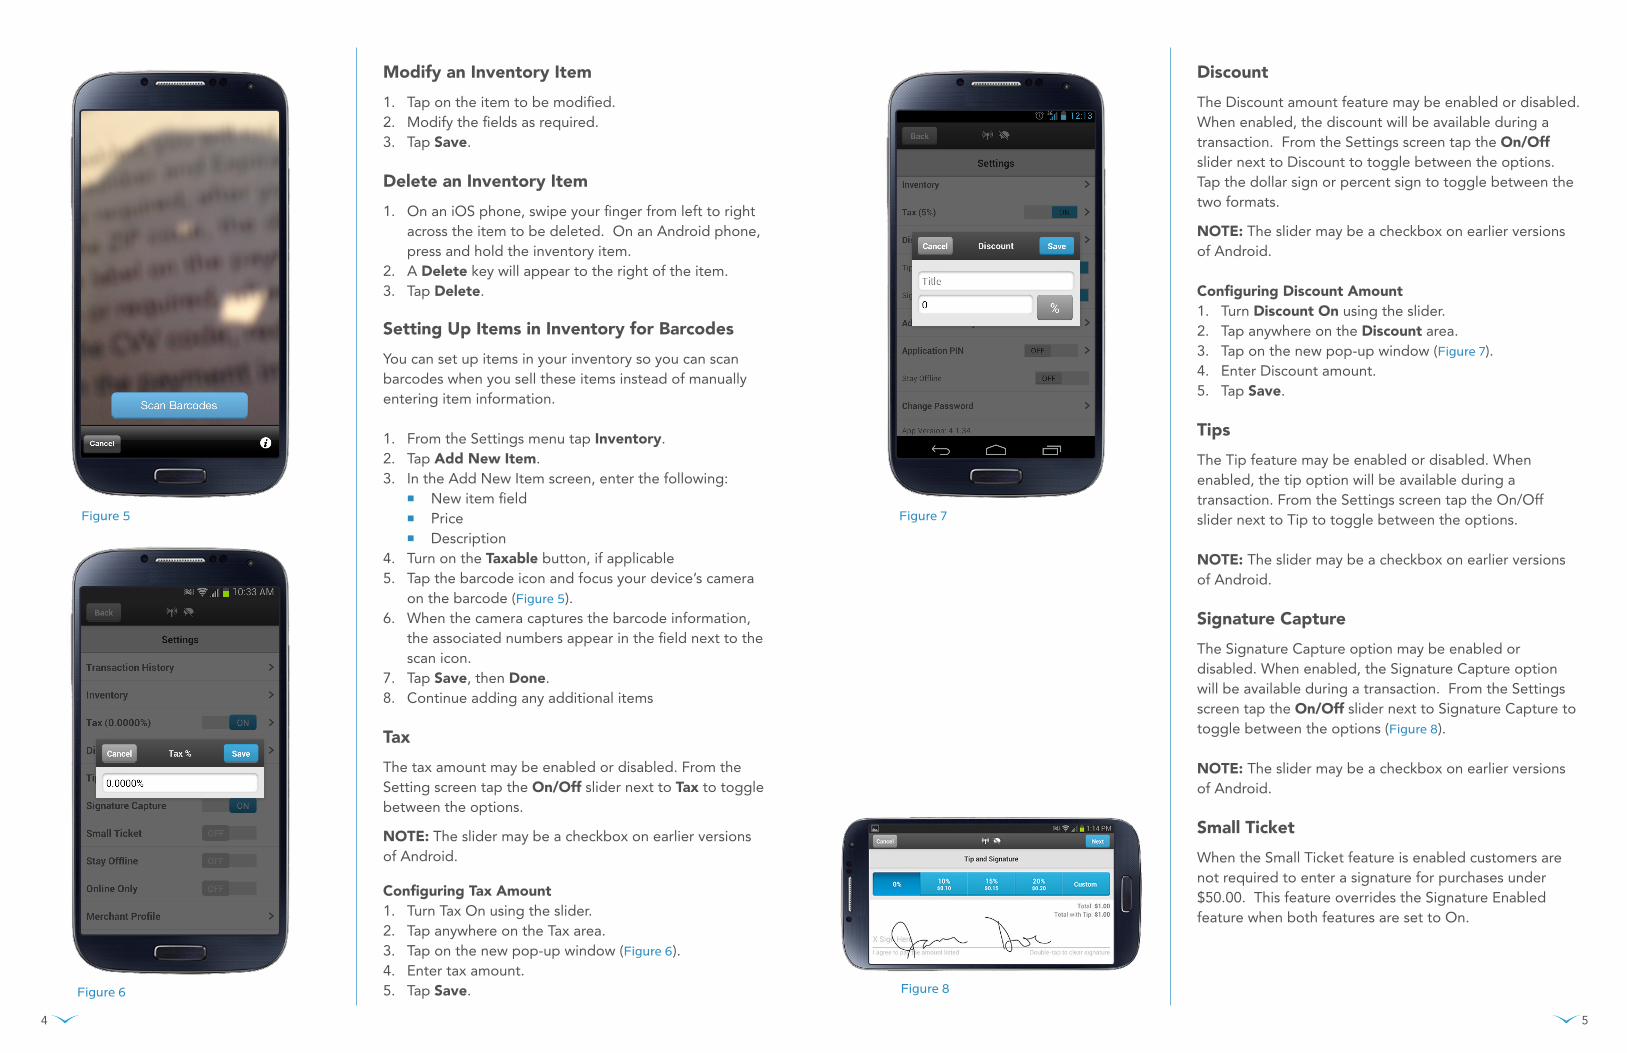
Modify an Inventory Item
1. Tap on the item to be modified.2. Modify the fields as required.3. Tap Save.
Delete an Inventory Item
1. On an iOS phone, swipe your finger from left to right across the item to be deleted. On an Android phone, press and hold the inventory item.
2. A Delete key will appear to the right of the item.3. Tap Delete.
Setting Up Items in Inventory for Barcodes
You can set up items in your inventory so you can scan barcodes when you sell these items instead of manually entering item information.
1. From the Settings menu tap Inventory.2. Tap Add New Item.3. In the Add New Item screen, enter the following:
n New item fieldn Pricen Description
4. Turn on the Taxable button, if applicable5. Tap the barcode icon and focus your device’s camera
on the barcode (Figure 5).6. When the camera captures the barcode information,
the associated numbers appear in the field next to the scan icon.
7. Tap Save, then Done.8. Continue adding any additional items
Tax
The tax amount may be enabled or disabled. From the Setting screen tap the On/Off slider next to Tax to toggle between the options.
NOTE: The slider may be a checkbox on earlier versions of Android.
Configuring Tax Amount1. Turn Tax On using the slider.2. Tap anywhere on the Tax area.3. Tap on the new pop-up window (Figure 6).4. Enter tax amount.5. Tap Save.
Discount
The Discount amount feature may be enabled or disabled. When enabled, the discount will be available during a transaction. From the Settings screen tap the On/Off slider next to Discount to toggle between the options. Tap the dollar sign or percent sign to toggle between the two formats.
NOTE: The slider may be a checkbox on earlier versions of Android.
Configuring Discount Amount1. Turn Discount On using the slider.2. Tap anywhere on the Discount area.3. Tap on the new pop-up window (Figure 7).4. Enter Discount amount.5. Tap Save.
Tips
The Tip feature may be enabled or disabled. When enabled, the tip option will be available during a transaction. From the Settings screen tap the On/Off slider next to Tip to toggle between the options.
NOTE: The slider may be a checkbox on earlier versions of Android.
Signature Capture
The Signature Capture option may be enabled or disabled. When enabled, the Signature Capture option will be available during a transaction. From the Settings screen tap the On/Off slider next to Signature Capture to toggle between the options (Figure 8).
NOTE: The slider may be a checkbox on earlier versions of Android.
Small Ticket
When the Small Ticket feature is enabled customers are not required to enter a signature for purchases under $50.00. This feature overrides the Signature Enabled feature when both features are set to On.
Figure 8
4 5
Figure 6
Figure 5 Figure 7
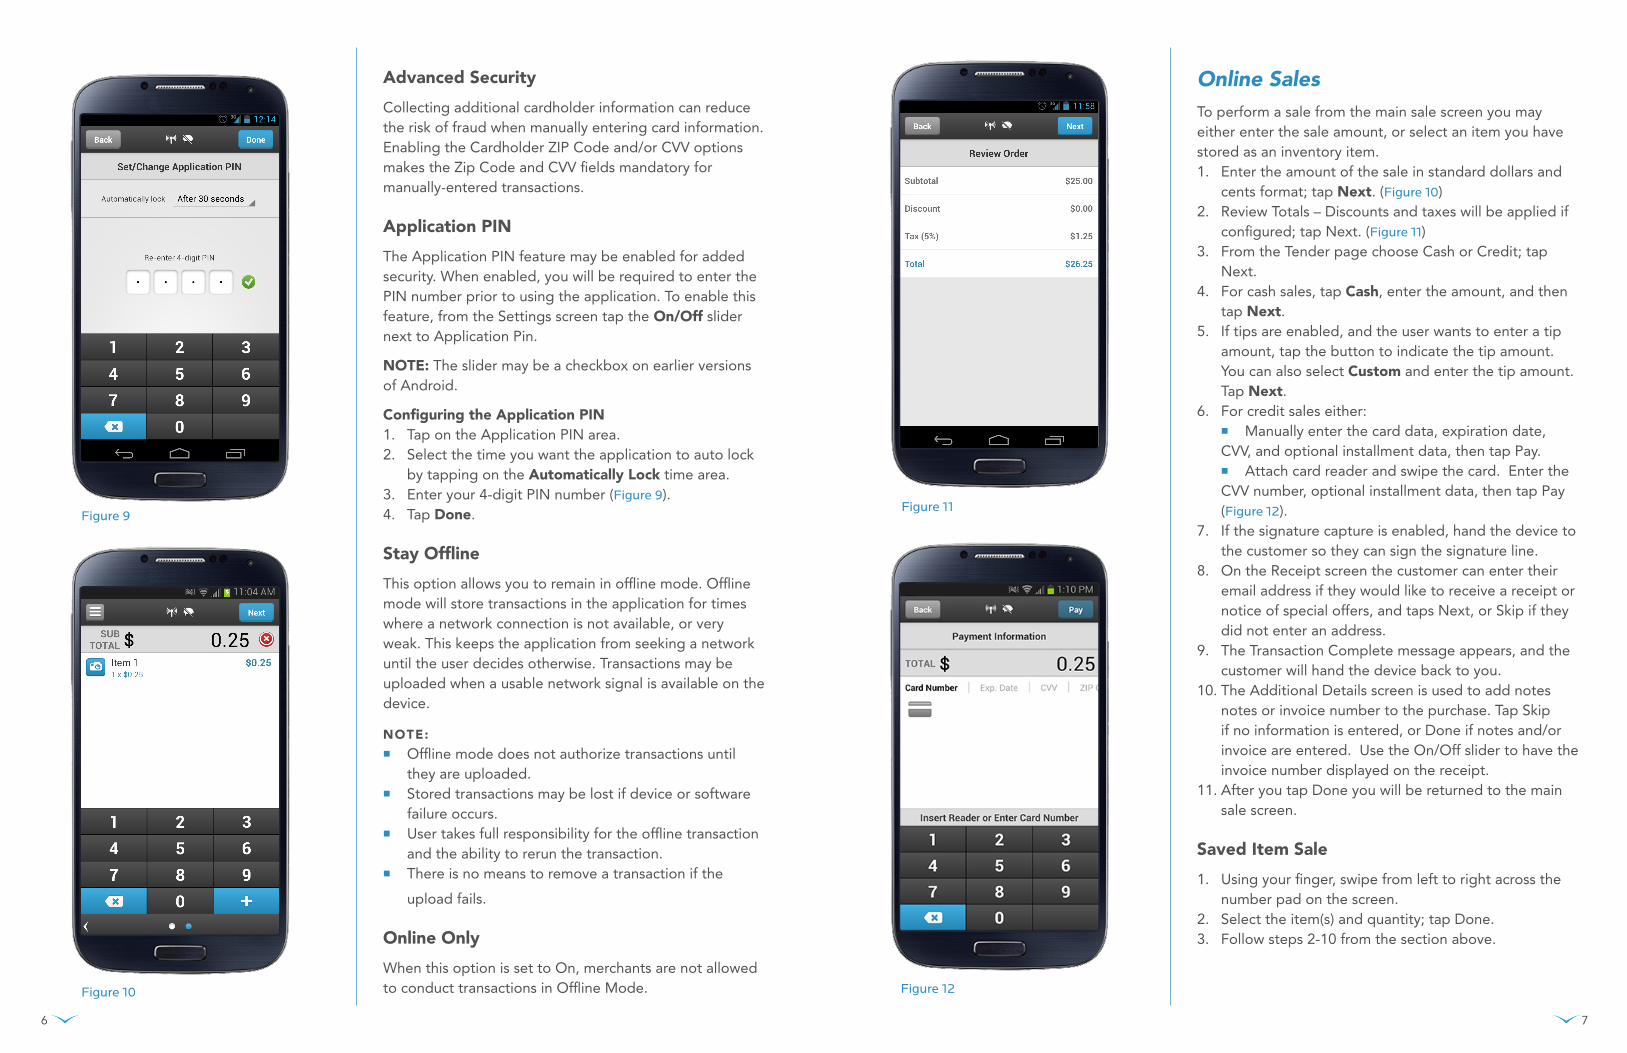
Advanced Security
Collecting additional cardholder information can reduce the risk of fraud when manually entering card information. Enabling the Cardholder ZIP Code and/or CVV options makes the Zip Code and CVV fields mandatory for manually-entered transactions.
Application PIN
The Application PIN feature may be enabled for added security. When enabled, you will be required to enter the PIN number prior to using the application. To enable this feature, from the Settings screen tap the On/Off slider next to Application Pin.
NOTE: The slider may be a checkbox on earlier versions of Android.
Configuring the Application PIN1. Tap on the Application PIN area.2. Select the time you want the application to auto lock
by tapping on the Automatically Lock time area.3. Enter your 4-digit PIN number (Figure 9).4. Tap Done.
Stay Offline
This option allows you to remain in offline mode. Offline mode will store transactions in the application for times where a network connection is not available, or very weak. This keeps the application from seeking a network until the user decides otherwise. Transactions may be uploaded when a usable network signal is available on the device.
NOTE:n Offline mode does not authorize transactions until
they are uploaded.n Stored transactions may be lost if device or software
failure occurs.n User takes full responsibility for the offline transaction
and the ability to rerun the transaction.n There is no means to remove a transaction if the
upload fails.
Online Only
When this option is set to On, merchants are not allowed to conduct transactions in Offline Mode.
Online SalesTo perform a sale from the main sale screen you may either enter the sale amount, or select an item you have stored as an inventory item.1. Enter the amount of the sale in standard dollars and
cents format; tap Next. (Figure 10)2. Review Totals – Discounts and taxes will be applied if
configured; tap Next. (Figure 11)3. From the Tender page choose Cash or Credit; tap
Next.4. For cash sales, tap Cash, enter the amount, and then
tap Next.5. If tips are enabled, and the user wants to enter a tip
amount, tap the button to indicate the tip amount. You can also select Custom and enter the tip amount. Tap Next.
6. For credit sales either:n Manually enter the card data, expiration date,
CVV, and optional installment data, then tap Pay.n Attach card reader and swipe the card. Enter the
CVV number, optional installment data, then tap Pay (Figure 12).
7. If the signature capture is enabled, hand the device to the customer so they can sign the signature line.
8. On the Receipt screen the customer can enter their email address if they would like to receive a receipt or notice of special offers, and taps Next, or Skip if they did not enter an address.
9. The Transaction Complete message appears, and the customer will hand the device back to you.
10. The Additional Details screen is used to add notes notes or invoice number to the purchase. Tap Skip if no information is entered, or Done if notes and/or invoice are entered. Use the On/Off slider to have the invoice number displayed on the receipt.
11. After you tap Done you will be returned to the main sale screen.
Saved Item Sale
1. Using your finger, swipe from left to right across the number pad on the screen.
2. Select the item(s) and quantity; tap Done.3. Follow steps 2-10 from the section above.
6 7
Figure 11Figure 9
Figure 10 Figure 12
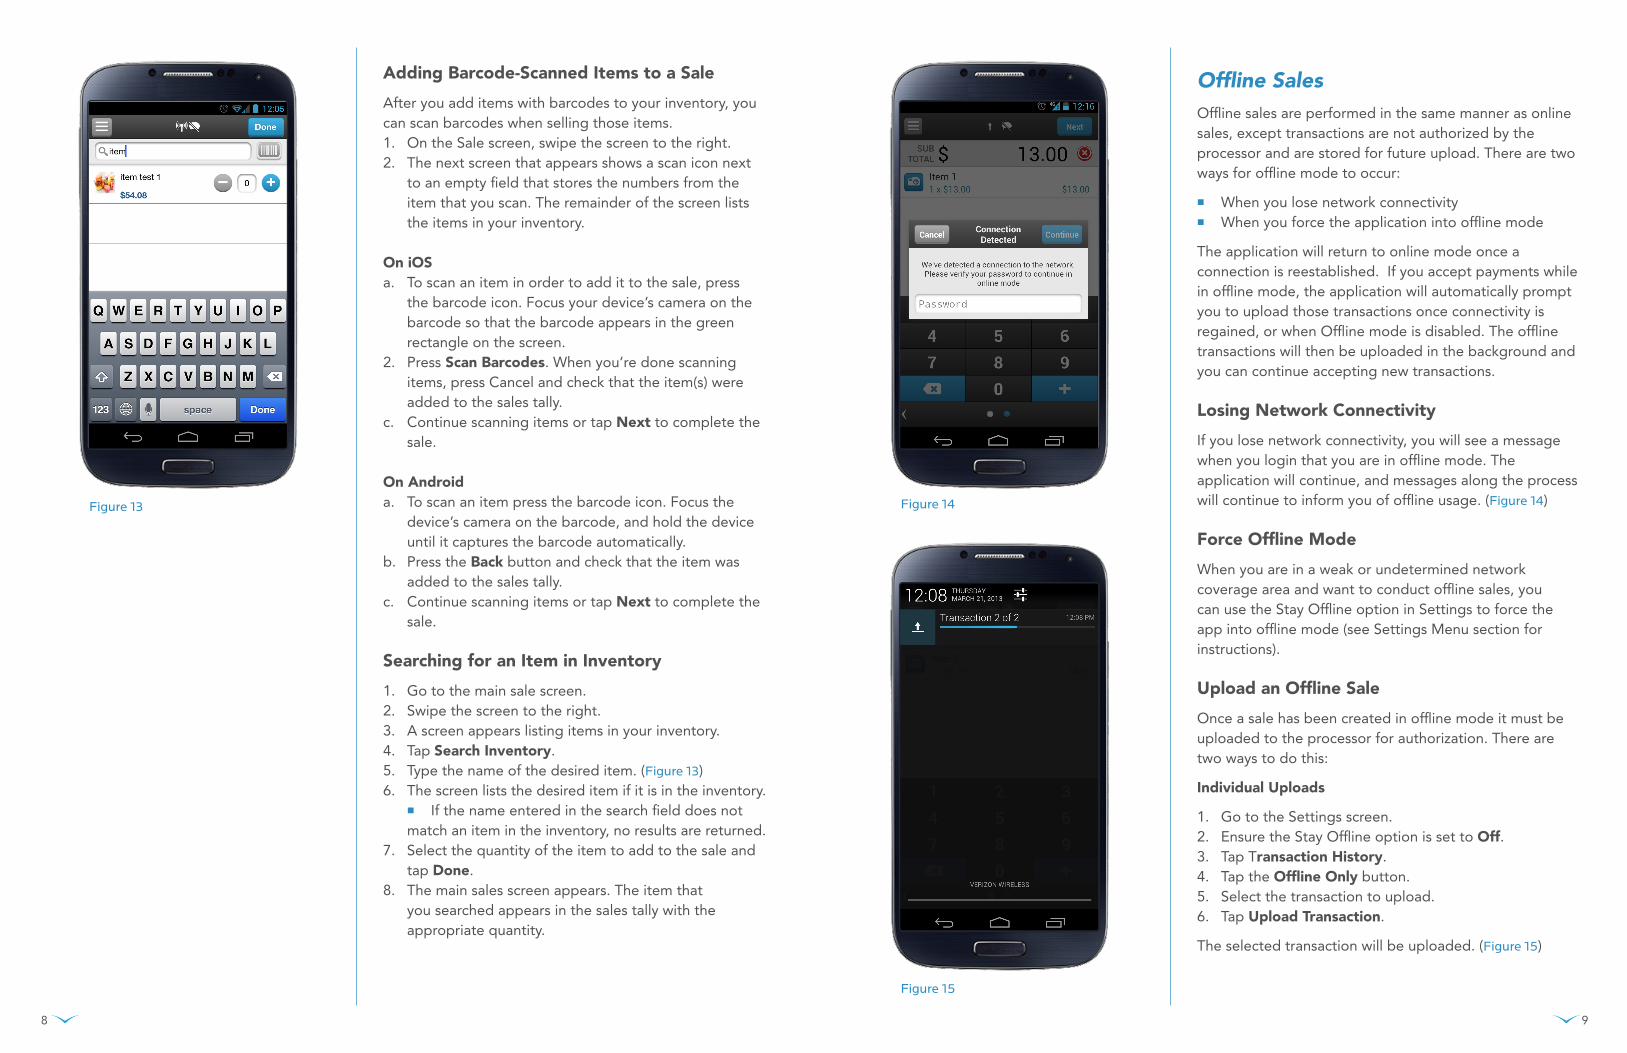
Adding Barcode-Scanned Items to a Sale
After you add items with barcodes to your inventory, you can scan barcodes when selling those items.1. On the Sale screen, swipe the screen to the right.2. The next screen that appears shows a scan icon next
to an empty field that stores the numbers from the item that you scan. The remainder of the screen lists the items in your inventory.
On iOSa. To scan an item in order to add it to the sale, press
the barcode icon. Focus your device’s camera on the barcode so that the barcode appears in the green rectangle on the screen.
2. Press Scan Barcodes. When you’re done scanning items, press Cancel and check that the item(s) were added to the sales tally.
c. Continue scanning items or tap Next to complete the sale.
On Androida. To scan an item press the barcode icon. Focus the
device’s camera on the barcode, and hold the device until it captures the barcode automatically.
b. Press the Back button and check that the item was added to the sales tally.
c. Continue scanning items or tap Next to complete the sale.
Searching for an Item in Inventory
1. Go to the main sale screen.2. Swipe the screen to the right.3. A screen appears listing items in your inventory.4. Tap Search Inventory.5. Type the name of the desired item. (Figure 13)6. The screen lists the desired item if it is in the inventory.
n If the name entered in the search field does not match an item in the inventory, no results are returned.
7. Select the quantity of the item to add to the sale and tap Done.
8. The main sales screen appears. The item that you searched appears in the sales tally with the appropriate quantity.
Offline SalesOffline sales are performed in the same manner as online sales, except transactions are not authorized by the processor and are stored for future upload. There are two ways for offline mode to occur:
n When you lose network connectivityn When you force the application into offline mode
The application will return to online mode once a connection is reestablished. If you accept payments while in offline mode, the application will automatically prompt you to upload those transactions once connectivity is regained, or when Offline mode is disabled. The offline transactions will then be uploaded in the background and you can continue accepting new transactions.
Losing Network Connectivity
If you lose network connectivity, you will see a message when you login that you are in offline mode. The application will continue, and messages along the process will continue to inform you of offline usage. (Figure 14)
Force Offline Mode
When you are in a weak or undetermined network coverage area and want to conduct offline sales, you can use the Stay Offline option in Settings to force the app into offline mode (see Settings Menu section for instructions).
Upload an Offline Sale
Once a sale has been created in offline mode it must be uploaded to the processor for authorization. There are two ways to do this:
Individual Uploads
1. Go to the Settings screen.2. Ensure the Stay Offline option is set to Off.3. Tap Transaction History.4. Tap the Offline Only button.5. Select the transaction to upload.6. Tap Upload Transaction.
The selected transaction will be uploaded. (Figure 15)
Figure 13
Figure 15
Figure 14
8 9
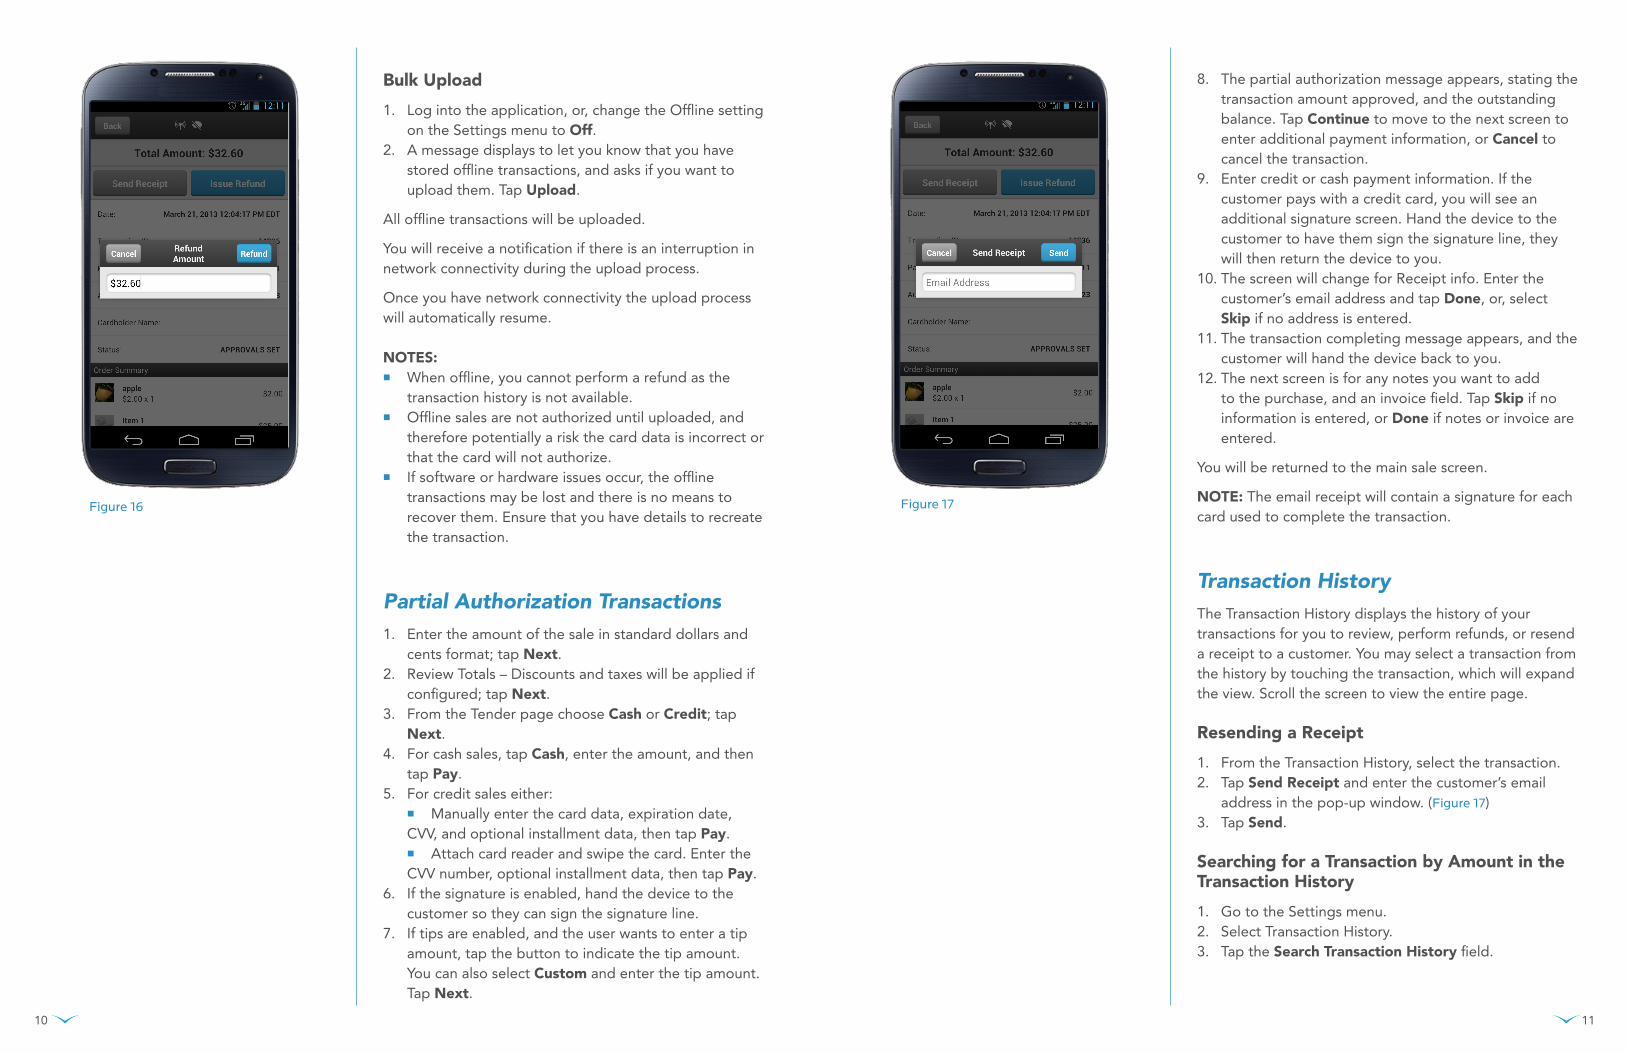
Bulk Upload
1. Log into the application, or, change the Offline setting on the Settings menu to Off.
2. A message displays to let you know that you have stored offline transactions, and asks if you want to upload them. Tap Upload.
All offline transactions will be uploaded.
You will receive a notification if there is an interruption in network connectivity during the upload process.
Once you have network connectivity the upload process will automatically resume.
NOTES:n When offline, you cannot perform a refund as the
transaction history is not available.n Offline sales are not authorized until uploaded, and
therefore potentially a risk the card data is incorrect or that the card will not authorize.
n If software or hardware issues occur, the offline transactions may be lost and there is no means to recover them. Ensure that you have details to recreate the transaction.
Partial Authorization Transactions1. Enter the amount of the sale in standard dollars and
cents format; tap Next.2. Review Totals – Discounts and taxes will be applied if
configured; tap Next.3. From the Tender page choose Cash or Credit; tap
Next.4. For cash sales, tap Cash, enter the amount, and then
tap Pay.5. For credit sales either:
n Manually enter the card data, expiration date, CVV, and optional installment data, then tap Pay.n Attach card reader and swipe the card. Enter the
CVV number, optional installment data, then tap Pay.6. If the signature is enabled, hand the device to the
customer so they can sign the signature line.7. If tips are enabled, and the user wants to enter a tip
amount, tap the button to indicate the tip amount. You can also select Custom and enter the tip amount. Tap Next.
8. The partial authorization message appears, stating the transaction amount approved, and the outstanding balance. Tap Continue to move to the next screen to enter additional payment information, or Cancel to cancel the transaction.
9. Enter credit or cash payment information. If the customer pays with a credit card, you will see an additional signature screen. Hand the device to the customer to have them sign the signature line, they will then return the device to you.
10. The screen will change for Receipt info. Enter the customer’s email address and tap Done, or, select Skip if no address is entered.
11. The transaction completing message appears, and the customer will hand the device back to you.
12. The next screen is for any notes you want to add to the purchase, and an invoice field. Tap Skip if no information is entered, or Done if notes or invoice are entered.
You will be returned to the main sale screen.
NOTE: The email receipt will contain a signature for each card used to complete the transaction.
Transaction HistoryThe Transaction History displays the history of your transactions for you to review, perform refunds, or resend a receipt to a customer. You may select a transaction from the history by touching the transaction, which will expand the view. Scroll the screen to view the entire page.
Resending a Receipt
1. From the Transaction History, select the transaction.2. Tap Send Receipt and enter the customer’s email
address in the pop-up window. (Figure 17)3. Tap Send.
Searching for a Transaction by Amount in the Transaction History
1. Go to the Settings menu.2. Select Transaction History.3. Tap the Search Transaction History field.
10 11
Figure 16 Figure 17
13
4. Enter the exact amount of the transaction.5. The screen lists all transactions for the amount
entered. If there are no transactions for that amount, no results display.
6. Tap an individual transaction in the list to display the details.
Issuing a Refund
When you need to refund a transaction, the app will first determine if it’s able to void the transaction. If the transaction has already been settled, the app will perform a refund. (Figure 16)
To issue a refund, go to the Transaction History screen, open the transaction and tap Issue Refund. You can issue a full refund, or partial amount of the sale, not to exceed the total amount of the sale. Enter the amount of the refund and tap Done.
NOTE: Refunds can only be performed while online.
12
14
myROAM
Overview
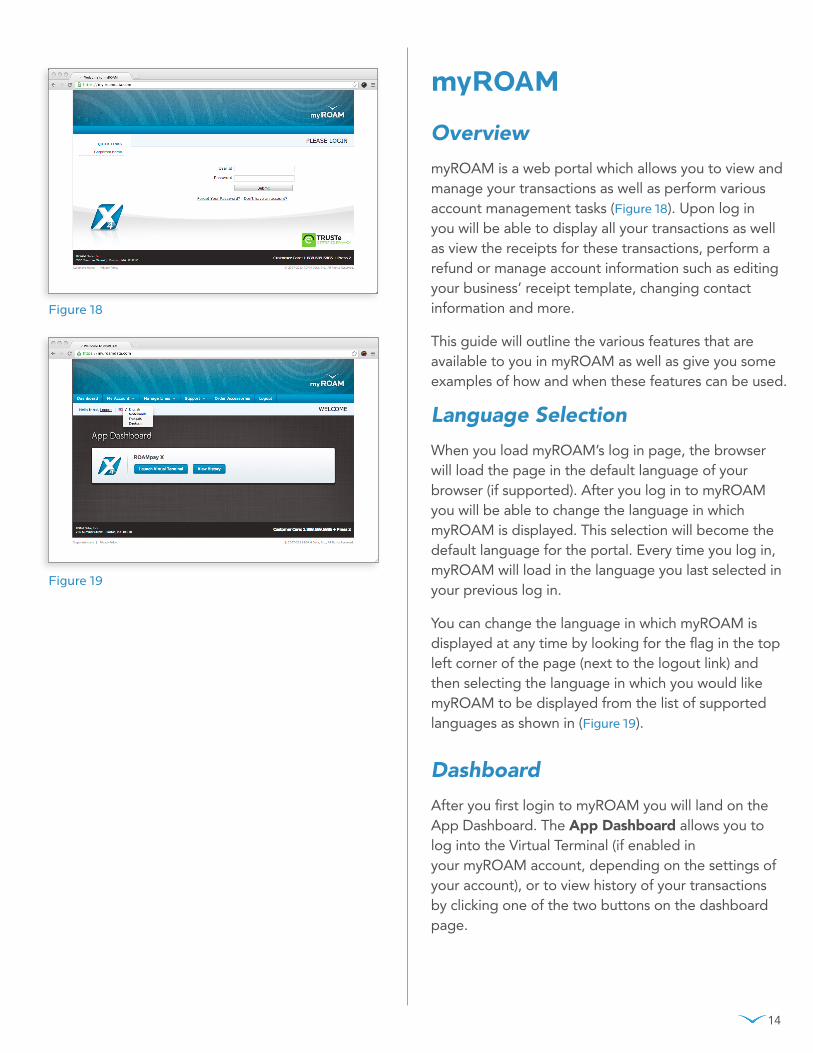
myROAM is a web portal which allows you to view and manage your transactions as well as perform various account management tasks (Figure 18). Upon log in you will be able to display all your transactions as well as view the receipts for these transactions, perform a refund or manage account information such as editing your business’ receipt template, changing contact information and more.
This guide will outline the various features that are available to you in myROAM as well as give you some examples of how and when these features can be used.
Language Selection
When you load myROAM’s log in page, the browser will load the page in the default language of your browser (if supported). After you log in to myROAM you will be able to change the language in which myROAM is displayed. This selection will become the default language for the portal. Every time you log in, myROAM will load in the language you last selected in your previous log in.
You can change the language in which myROAM is displayed at any time by looking for the flag in the top left corner of the page (next to the logout link) and then selecting the language in which you would like myROAM to be displayed from the list of supported languages as shown in (Figure 19).
Dashboard
After you first login to myROAM you will land on the App Dashboard. The App Dashboard allows you to log into the Virtual Terminal (if enabled in your myROAM account, depending on the settings of your account), or to view history of your transactions by clicking one of the two buttons on the dashboard page.
Figure 19
Figure 18
11
Virtual Terminal
The Virtual Terminal is a web application that allows you to run transactions similar to the mobile app. If the virtual terminal is available to you, click the Launch Virtual Terminal button to launch it. If the Virtual terminal is not available to you, you will not see this button on the dashboard page.
Transaction History Table
Click the View History button to display a list of all your transactions. When logged in as a masterline you can view the transactions for each or all of your sublines by using the drop-down menu in the top right corner. When logged in as a subline or if subline management is not available on your account you will only see your own transactions and a drop down will not be available on the top right.
Use the drop-down menu in the upper left corner of the page to change the number of entries displayed. Use the Filter by Date Range fields to search for transactions during a specific time period. Click on a column title to sort your transactions.
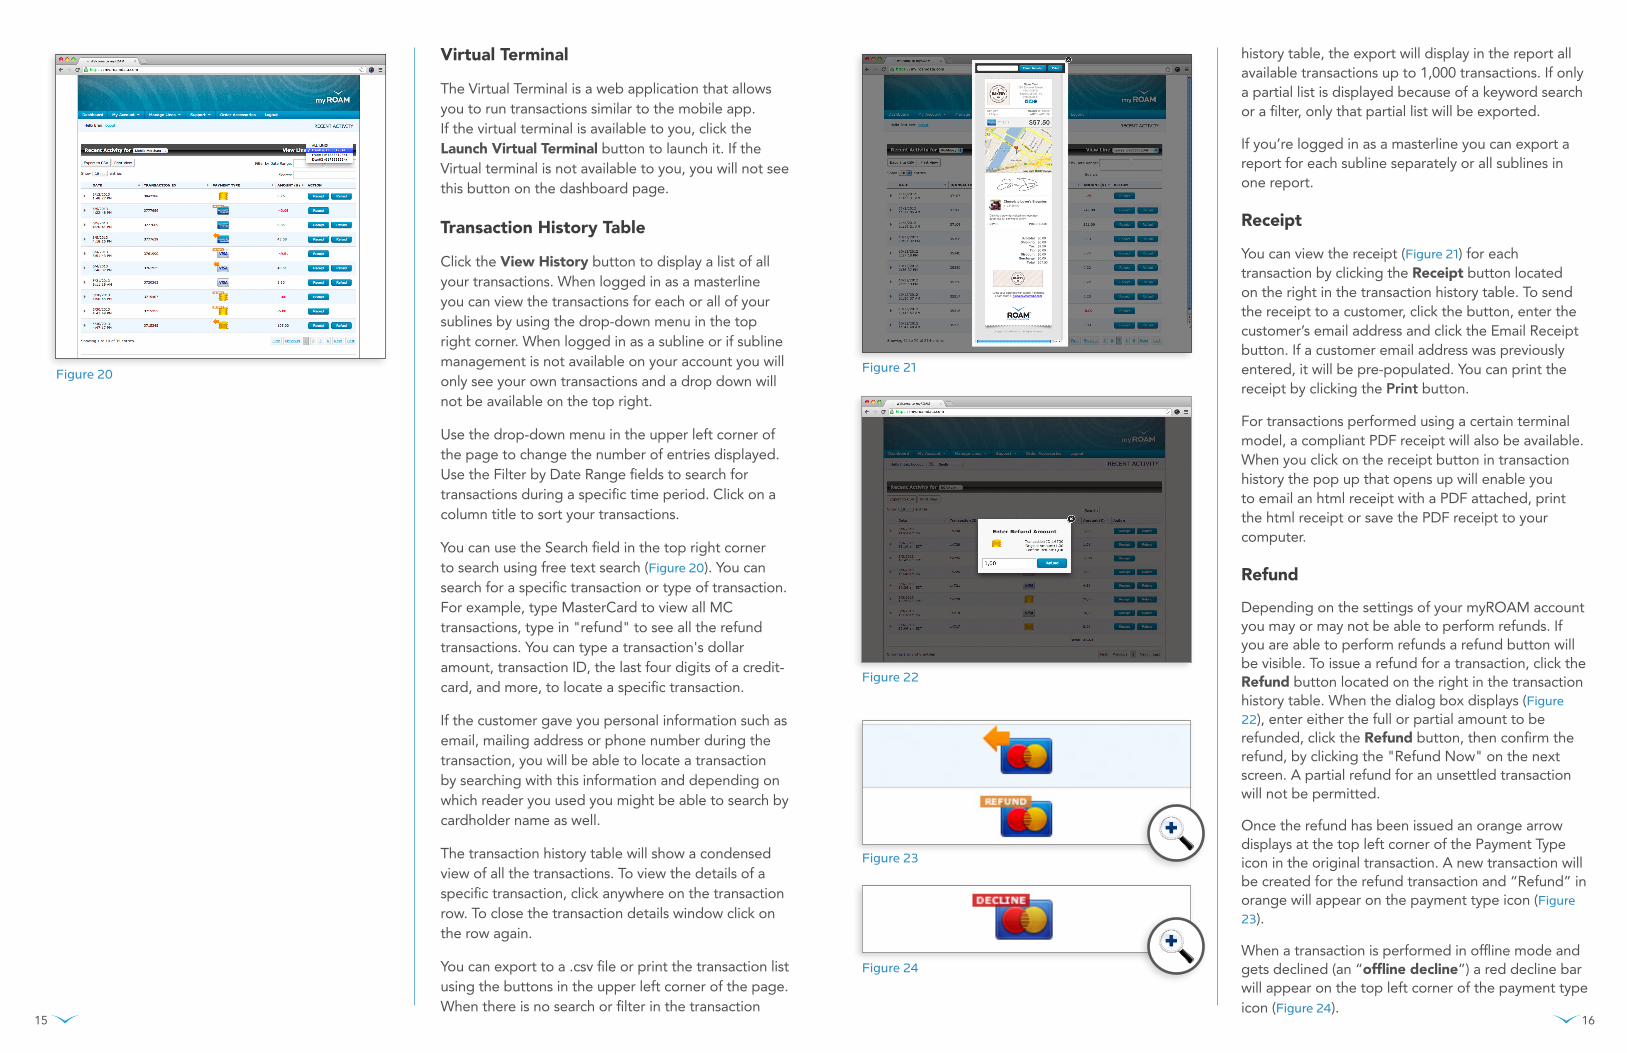
You can use the Search field in the top right corner to search using free text search (Figure 20). You can search for a specific transaction or type of transaction. For example, type MasterCard to view all MC transactions, type in "refund" to see all the refund transactions. You can type a transaction's dollar amount, transaction ID, the last four digits of a credit-card, and more, to locate a specific transaction.
If the customer gave you personal information such as email, mailing address or phone number during the transaction, you will be able to locate a transaction by searching with this information and depending on which reader you used you might be able to search by cardholder name as well.
The transaction history table will show a condensed view of all the transactions. To view the details of a specific transaction, click anywhere on the transaction row. To close the transaction details window click on the row again.
You can export to a .csv file or print the transaction list using the buttons in the upper left corner of the page. When there is no search or filter in the transaction
history table, the export will display in the report all available transactions up to 1,000 transactions. If only a partial list is displayed because of a keyword search or a filter, only that partial list will be exported.
If you’re logged in as a masterline you can export a report for each subline separately or all sublines in one report. Receipt
You can view the receipt (Figure 21) for each transaction by clicking the Receipt button located on the right in the transaction history table. To send the receipt to a customer, click the button, enter the customer’s email address and click the Email Receipt button. If a customer email address was previously entered, it will be pre-populated. You can print the receipt by clicking the Print button.
For transactions performed using a certain terminal model, a compliant PDF receipt will also be available. When you click on the receipt button in transaction history the pop up that opens up will enable you to email an html receipt with a PDF attached, print the html receipt or save the PDF receipt to your computer. Refund
Depending on the settings of your myROAM account you may or may not be able to perform refunds. If you are able to perform refunds a refund button will be visible. To issue a refund for a transaction, click the Refund button located on the right in the transaction history table. When the dialog box displays (Figure 22), enter either the full or partial amount to be refunded, click the Refund button, then confirm the refund, by clicking the "Refund Now" on the next screen. A partial refund for an unsettled transaction will not be permitted.
Once the refund has been issued an orange arrow displays at the top left corner of the Payment Type icon in the original transaction. A new transaction will be created for the refund transaction and “Refund” in orange will appear on the payment type icon (Figure 23).
When a transaction is performed in offline mode and gets declined (an “offline decline”) a red decline bar will appear on the top left corner of the payment type icon (Figure 24).
15 16
Figure 24
Figure 23
Figure 22
Figure 21Figure 20
My AccountThis contains the following links:
Account Setup My Customers Edit Email Receipt Edit Merchant Information Edit Billing Information
Account Setup
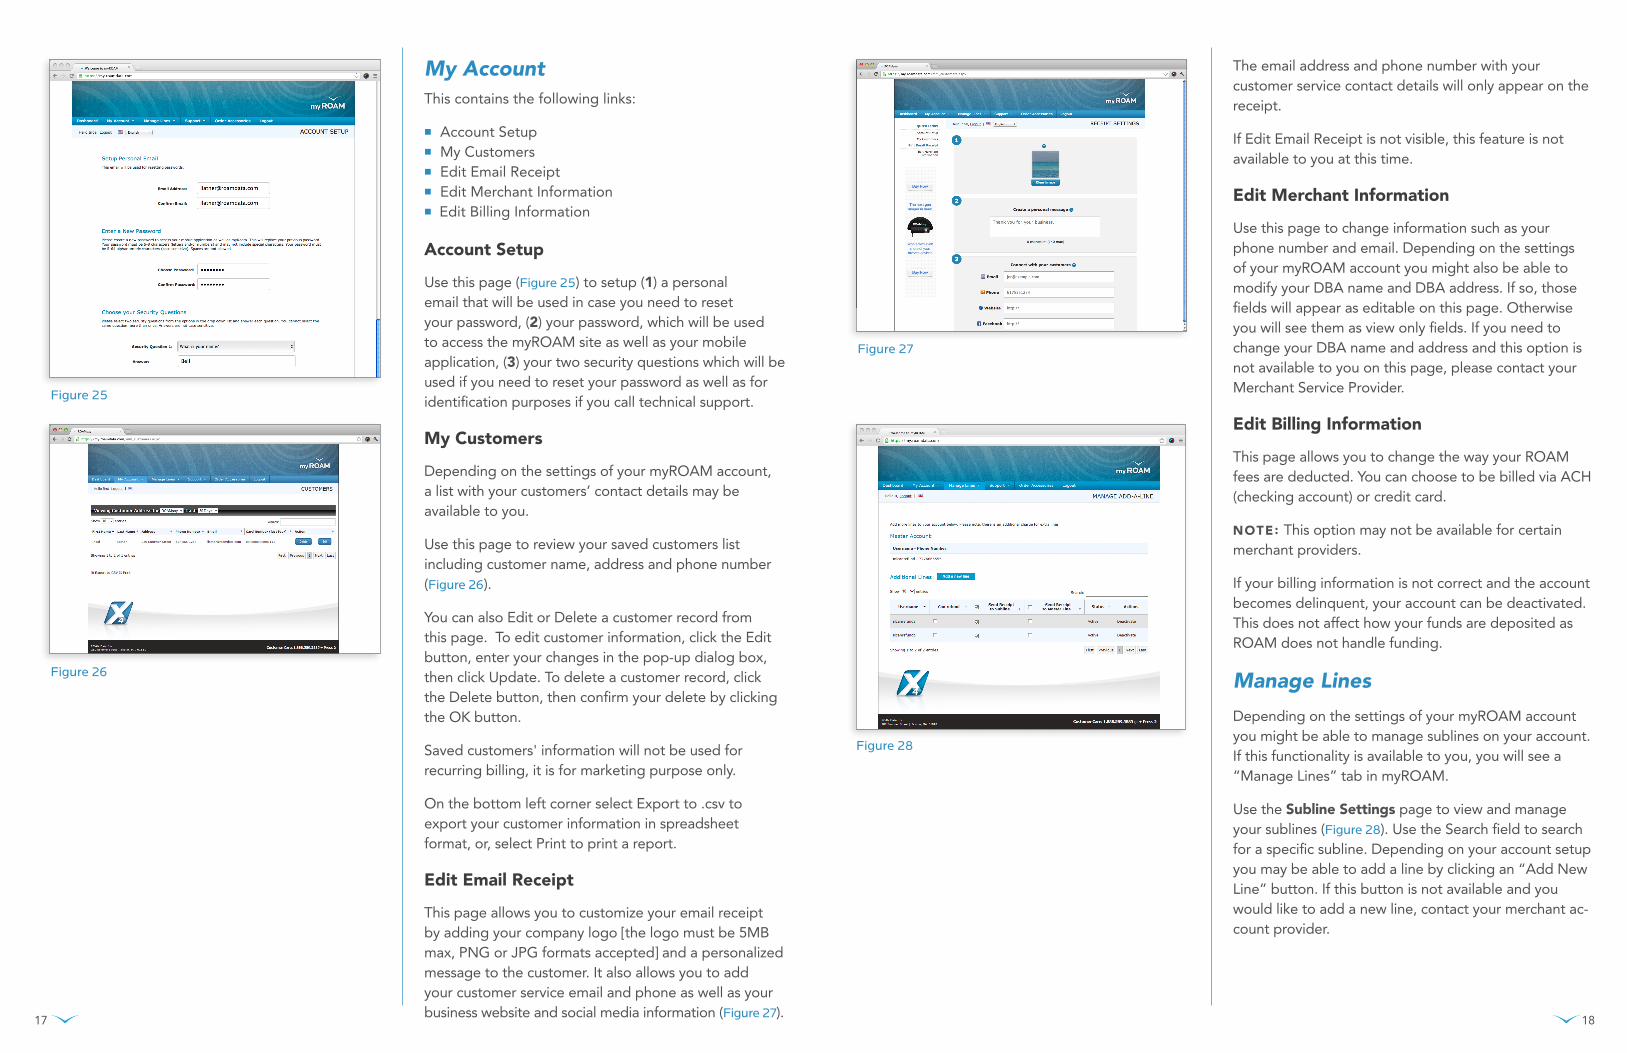
Use this page (Figure 25) to setup (1) a personal email that will be used in case you need to reset your password, (2) your password, which will be used to access the myROAM site as well as your mobile application, (3) your two security questions which will be used if you need to reset your password as well as for identification purposes if you call technical support.
My Customers
Depending on the settings of your myROAM account, a list with your customers’ contact details may be available to you.
Use this page to review your saved customers list including customer name, address and phone number (Figure 26).
You can also Edit or Delete a customer record from this page. To edit customer information, click the Edit button, enter your changes in the pop-up dialog box, then click Update. To delete a customer record, click the Delete button, then confirm your delete by clicking the OK button.
Saved customers' information will not be used for recurring billing, it is for marketing purpose only.
On the bottom left corner select Export to .csv to export your customer information in spreadsheet format, or, select Print to print a report.
Edit Email Receipt
This page allows you to customize your email receipt by adding your company logo [the logo must be 5MB max, PNG or JPG formats accepted] and a personalized message to the customer. It also allows you to add your customer service email and phone as well as your business website and social media information (Figure 27).
The email address and phone number with your customer service contact details will only appear on the receipt.
If Edit Email Receipt is not visible, this feature is not available to you at this time.
Edit Merchant Information
Use this page to change information such as your phone number and email. Depending on the settings of your myROAM account you might also be able to modify your DBA name and DBA address. If so, those fields will appear as editable on this page. Otherwise you will see them as view only fields. If you need to change your DBA name and address and this option is not available to you on this page, please contact your Merchant Service Provider.
Edit Billing Information
This page allows you to change the way your ROAM fees are deducted. You can choose to be billed via ACH (checking account) or credit card.
NOTE: This option may not be available for certain merchant providers.
If your billing information is not correct and the account becomes delinquent, your account can be deactivated. This does not affect how your funds are deposited as ROAM does not handle funding. Manage Lines
Depending on the settings of your myROAM account you might be able to manage sublines on your account. If this functionality is available to you, you will see a “Manage Lines” tab in myROAM.
Use the Subline Settings page to view and manage your sublines (Figure 28). Use the Search field to search for a specific subline. Depending on your account setup you may be able to add a line by clicking an “Add New Line” button. If this button is not available and you would like to add a new line, contact your merchant ac-count provider.
1817
Figure 28
Figure 25
Figure 26
Figure 27
Can Refund: Check the “Can refund” box to allow a subline to issue refunds. The “Can refund” column only displays when the feature is enabled to you.
Send Receipt: As a masterline you can determine who will receive the receipts: you, your sublines or both of you.
De/Activate: You can deactivate or activate each sub-line and depending on the version of myROAM account that you are using you might be able to move a subline to reassign it to a different user.
Using the Virtual Terminal
The Virtual Terminal allows you to accept card-not-present and cash payments in myROAM when your mobile phone is not available, or when there is no wireless connectivity.
To reach the Virtual Terminal, click the Launch Virtual Terminal button on the Dashboard.
To conduct a card-not-present or cash transaction:
1. Enter the amount of the transaction
2. Enter the amount of the Discount, Tax and Tip. Choose percentage or dollar amount by clicking the corresponding button.
3. Choose a payment type of Cash or Credit.
a. For Credit payment enter Card Number, Expiration Date, CVV, Zip/Postal Code and optional email address
b. For Cash payment enter Cash Amount and optional email address
4. Enter an Invoice Number and Description. Check the check box to include this information on the customer receipt.
5. Enter the customer information.
6. Click the Review Order button. If the information displayed is correct click Make Payment, otherwise click Cancel and correct the information.
Once you click the Make Payment button the transaction information will be available in your Transaction History.
19
Support
This tab has the following categories:
Helpful Documentation Terms of Usage FAQs Contact Us
Helpful Documentation
User guide and Reader instructions booklet are avail-able on this page. This user guide can be found in this section. FAQs
The FAQ link opens the ROAM Help Center in a new browser window. The FAQs are arranged by category, and provide information on getting started, managing your account, using key features in the mobile applica-tion and myROAM.The same ROAM Help Center page available from the FAQs is also available from the Contact Us page.
Terms of Usage
The terms and conditions on this page are the same set accepted when signing up for the ROAMpay X4 appli-cation. They are displayed here for general reference.
Contact Us
Most issues can be resolved by contacting your merchant service provider. Please contact them for all questions, including training, funding, and fees.
If you’re unable to resolve your question or problem via your merchant service provider, use the online form on the “contact us” page to email ROAM’s technical support.
20
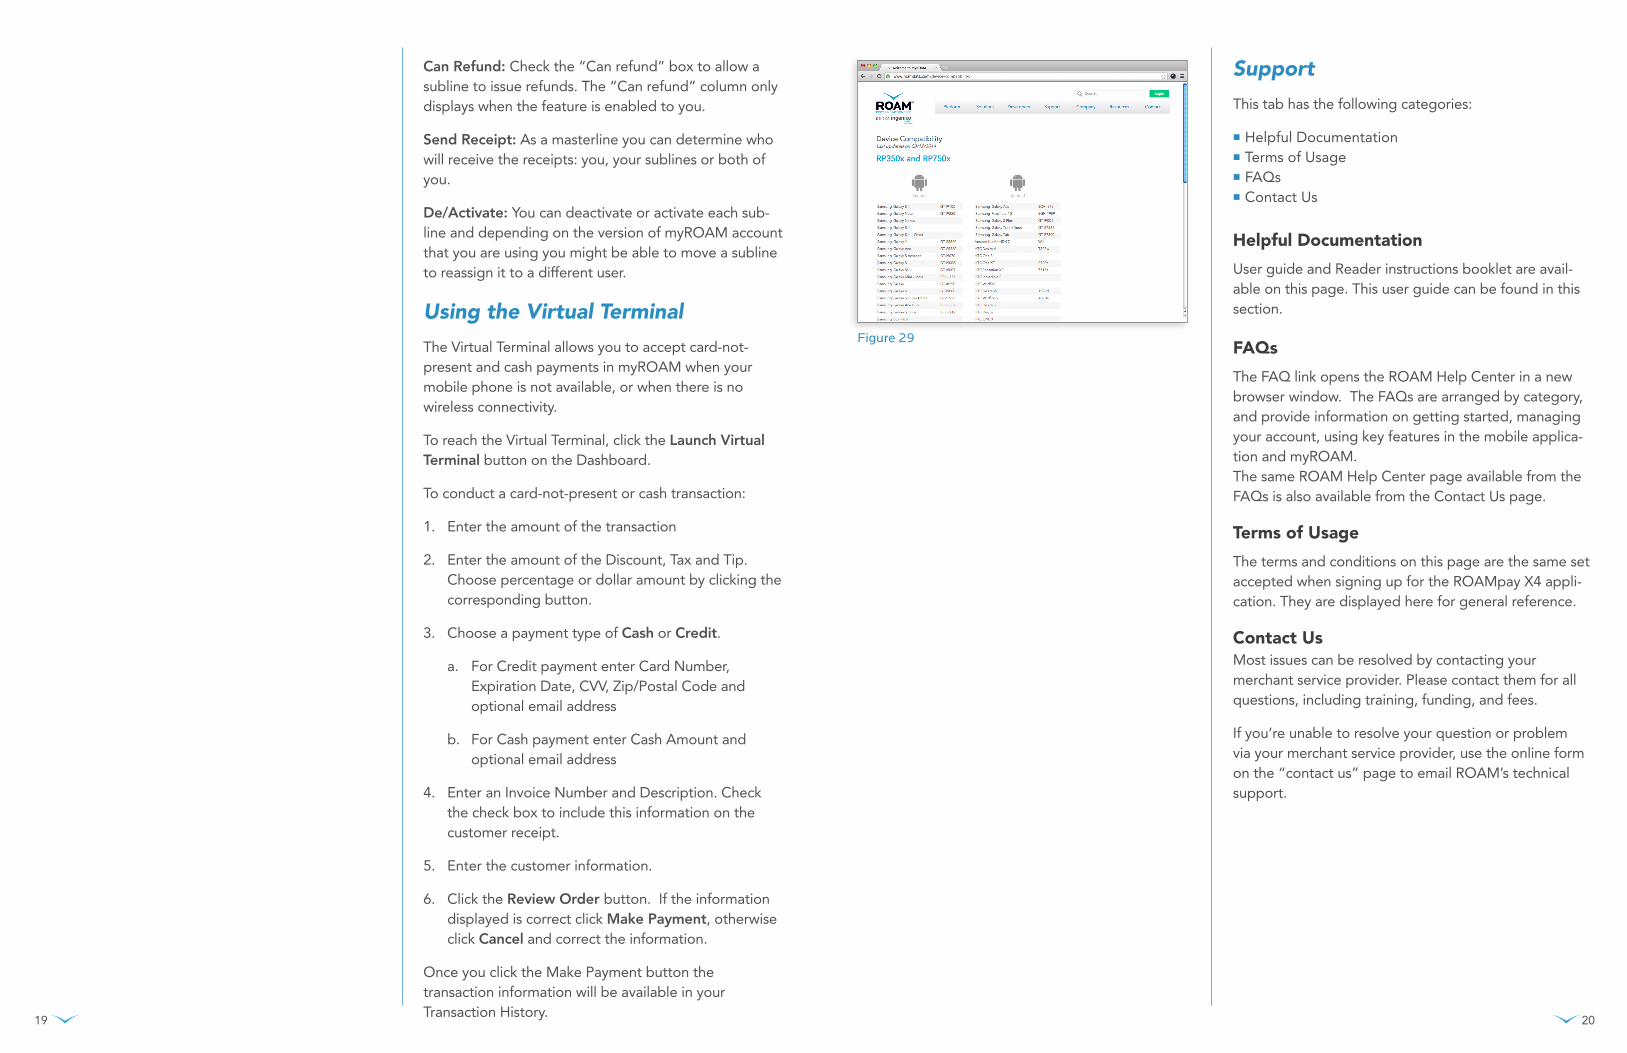
Figure 29
Order Accessories
You can purchase a ROAM reader for your mobile device via this tab.
To ensure your tab is supported, please visit devices.roamdata.com (Figure 29).
If Order Accessories is not visible, please contact your merchant service provider for information about accessories.
LogoutClick this tab to log out of myROAM.
Supported Browsers
Supported Browsers
myROAM is supported on the following browsers: The latest version of Chrome, Safari, Firefox and Opera, as well as IE8 and above.
21 22

280 Summer Street, Boston, MA 02210 | 1.888.589.5885 | [email protected] | www.roamdata.com
More InformationWeb:www.roamdata.com
Supported devices:http://www.roamdata.com/device-compatibility/
For sales inquiry:888.589.5885 + press 1
Customer support:[email protected]
General inquiry:[email protected]
Contact
Follow
Our blog:http://blog.roamdata.com
Social Media:
facebook.com/roampay
twitter.com/roamdata