Rendering / Servicing Provider - Illinois.gov · Please complete all fields. At a minimum, all...
53
Rendering / Servicing Provider
Transcript of Rendering / Servicing Provider - Illinois.gov · Please complete all fields. At a minimum, all...

Rendering / Servicing Provider
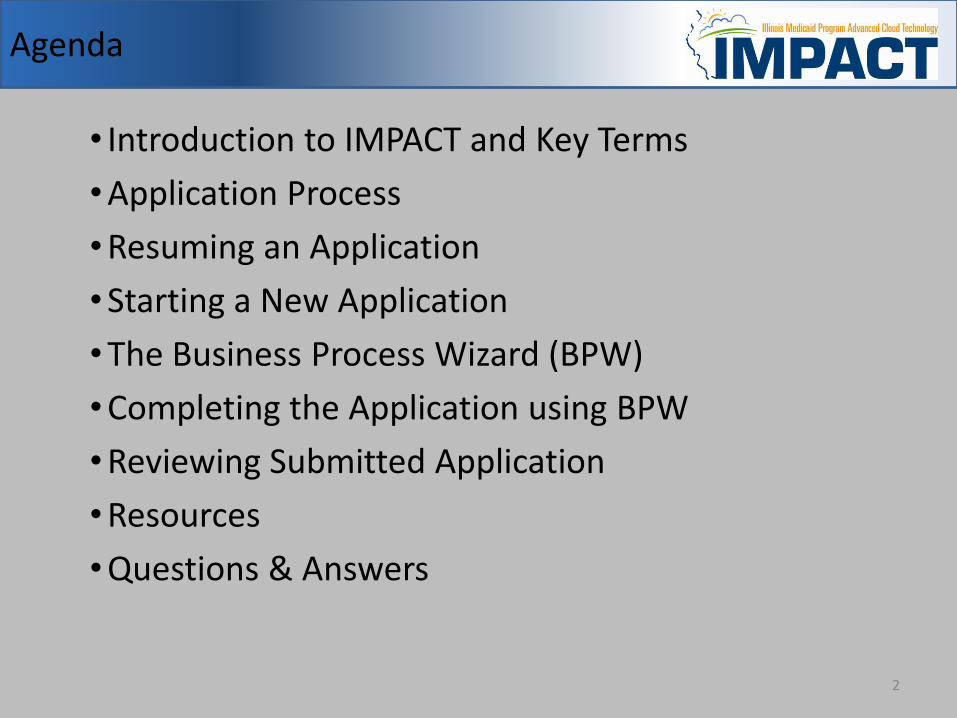
• Introduction to IMPACT and Key Terms
•Application Process
•Resuming an Application
•Starting a New Application
•The Business Process Wizard (BPW)
•Completing the Application using BPW
•Reviewing Submitted Application
•Resources
•Questions & Answers
Agenda
2
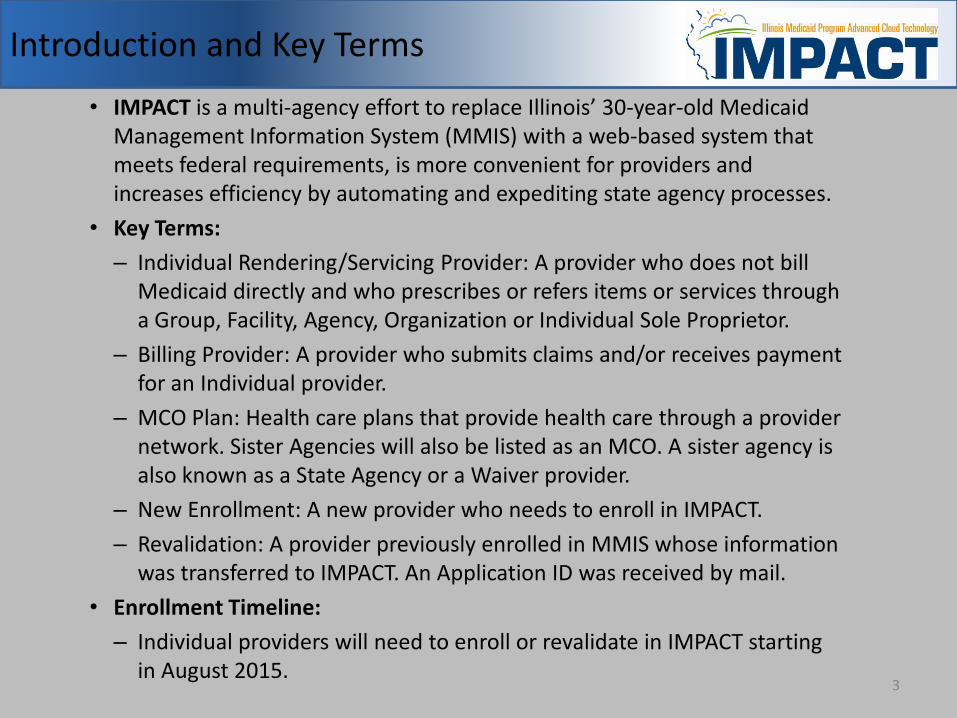
• IMPACT is a multi-agency effort to replace Illinois’ 30-year-old Medicaid Management Information System (MMIS) with a web-based system that meets federal requirements, is more convenient for providers and increases efficiency by automating and expediting state agency processes.
• Key Terms:
– Individual Rendering/Servicing Provider: A provider who does not bill Medicaid directly and who prescribes or refers items or services through a Group, Facility, Agency, Organization or Individual Sole Proprietor.
– Billing Provider: A provider who submits claims and/or receives payment for an Individual provider.
– MCO Plan: Health care plans that provide health care through a provider network. Sister Agencies will also be listed as an MCO. A sister agency is also known as a State Agency or a Waiver provider.
– New Enrollment: A new provider who needs to enroll in IMPACT.
– Revalidation: A provider previously enrolled in MMIS whose information was transferred to IMPACT. An Application ID was received by mail.
• Enrollment Timeline:
– Individual providers will need to enroll or revalidate in IMPACT starting in August 2015.
Introduction and Key Terms
3
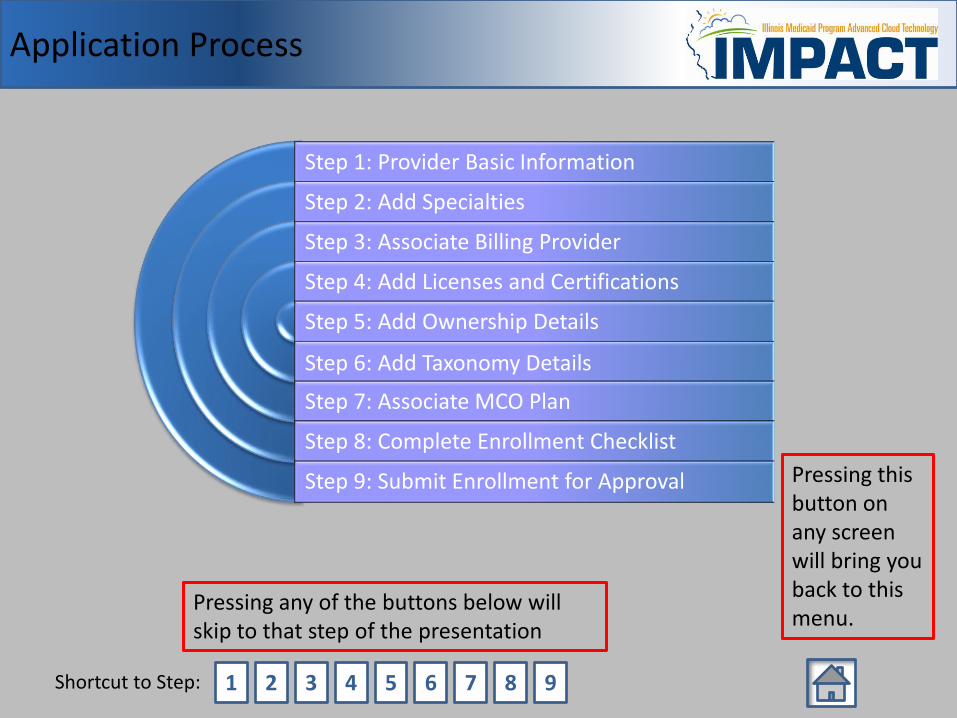
Application Process
Step 1: Provider Basic Information
Step 2: Add Specialties
Step 3: Associate Billing Provider
Step 4: Add Licenses and Certifications
Step 5: Add Ownership Details
Step 6: Add Taxonomy Details
Step 7: Associate MCO Plan
Step 8: Complete Enrollment Checklist Step 9: Submit Enrollment for Approval
Shortcut to Step: 1 2 3 4 5 6 7 8 9
Pressing this button on any screen will bring you back to this menu.
Pressing any of the buttons below will skip to that step of the presentation

Start New Application
5
•After completing the sign-on, click on IMPACT Provider Enrollment.
• In regards to completing an application, there are two options: New Enrollment or Resuming an application.

Start New Application
6
• To resume (or revalidate) an application, click on Track Application. • The application number was either mailed out on a yellow card (revalidation)
or sent to the listed email address (In-process application).
• Enter the Application ID for the application you want to access. •After entering the ID number, click Submit. • This process will then go directly to the Business Process Wizard (BPW).
Start New Application
7
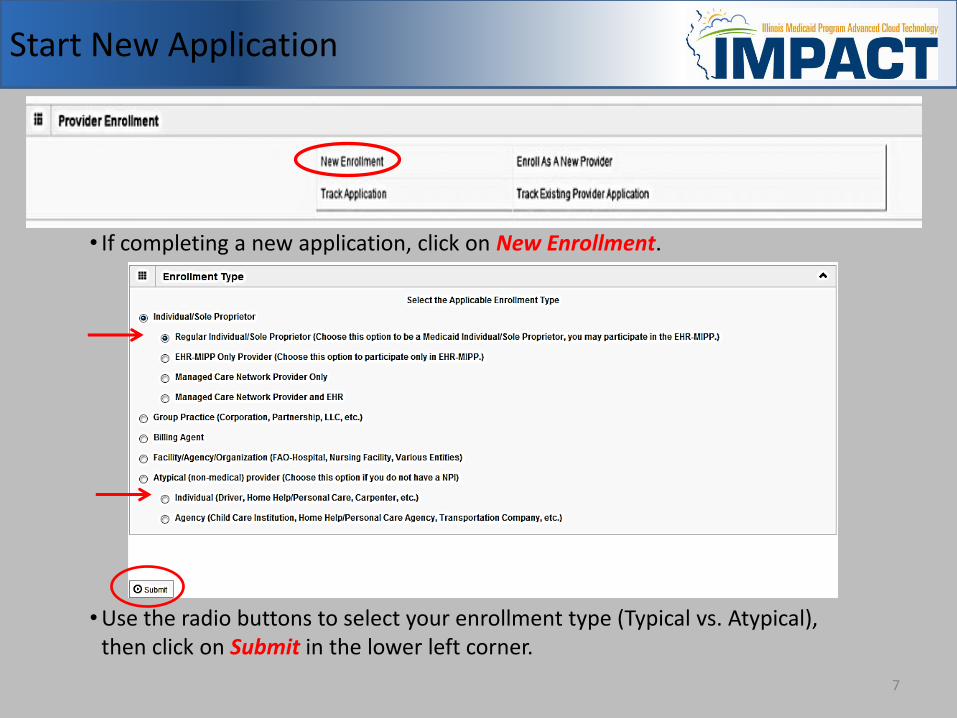
• If completing a new application, click on New Enrollment.
•Use the radio buttons to select your enrollment type (Typical vs. Atypical), then click on Submit in the lower left corner.
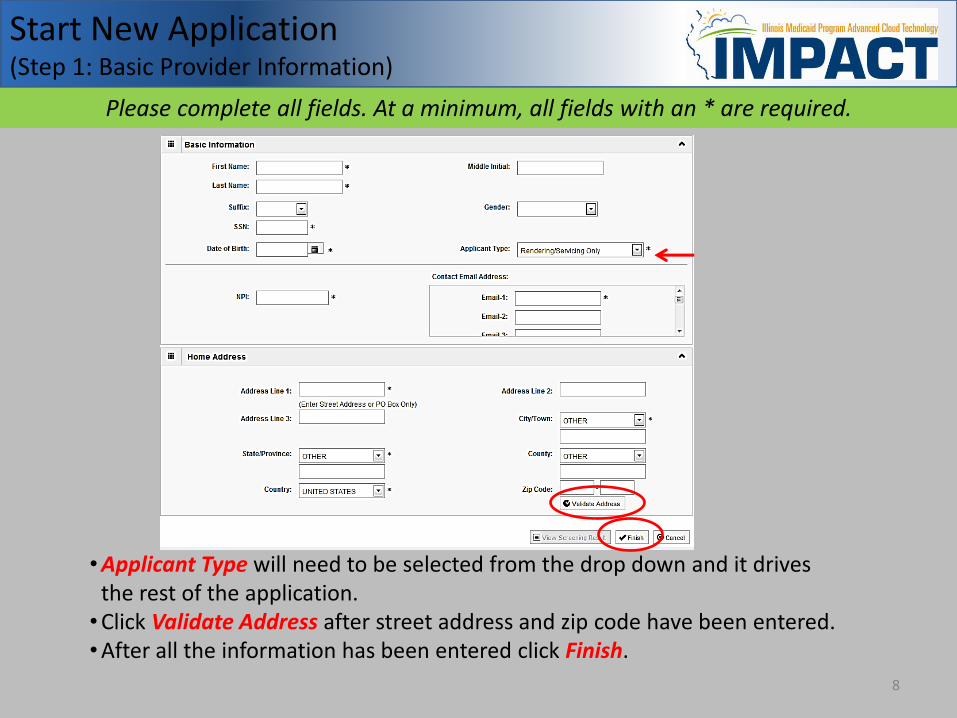
Please complete all fields. At a minimum, all fields with an * are required.
Start New Application (Step 1: Basic Provider Information)
•Applicant Type will need to be selected from the drop down and it drives the rest of the application.
•Click Validate Address after street address and zip code have been entered. •After all the information has been entered click Finish.
8
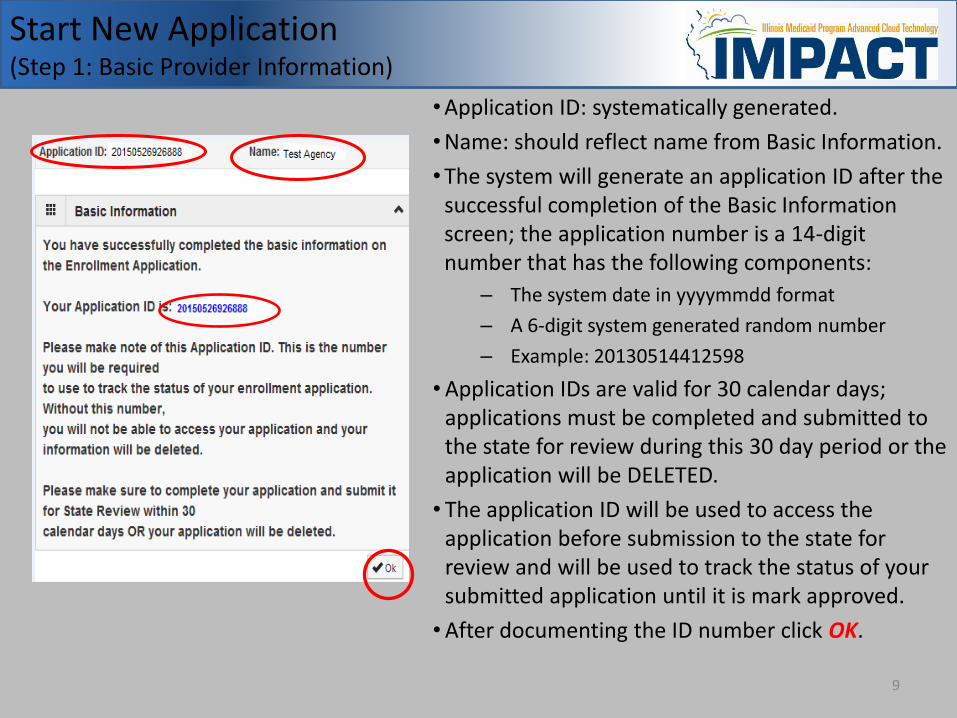
•Application ID: systematically generated.
•Name: should reflect name from Basic Information.
•The system will generate an application ID after the successful completion of the Basic Information screen; the application number is a 14-digit number that has the following components:
– The system date in yyyymmdd format
– A 6-digit system generated random number
– Example: 20130514412598
•Application IDs are valid for 30 calendar days; applications must be completed and submitted to the state for review during this 30 day period or the application will be DELETED.
• The application ID will be used to access the application before submission to the state for review and will be used to track the status of your submitted application until it is mark approved.
•After documenting the ID number click OK.
Start New Application (Step 1: Basic Provider Information)
9
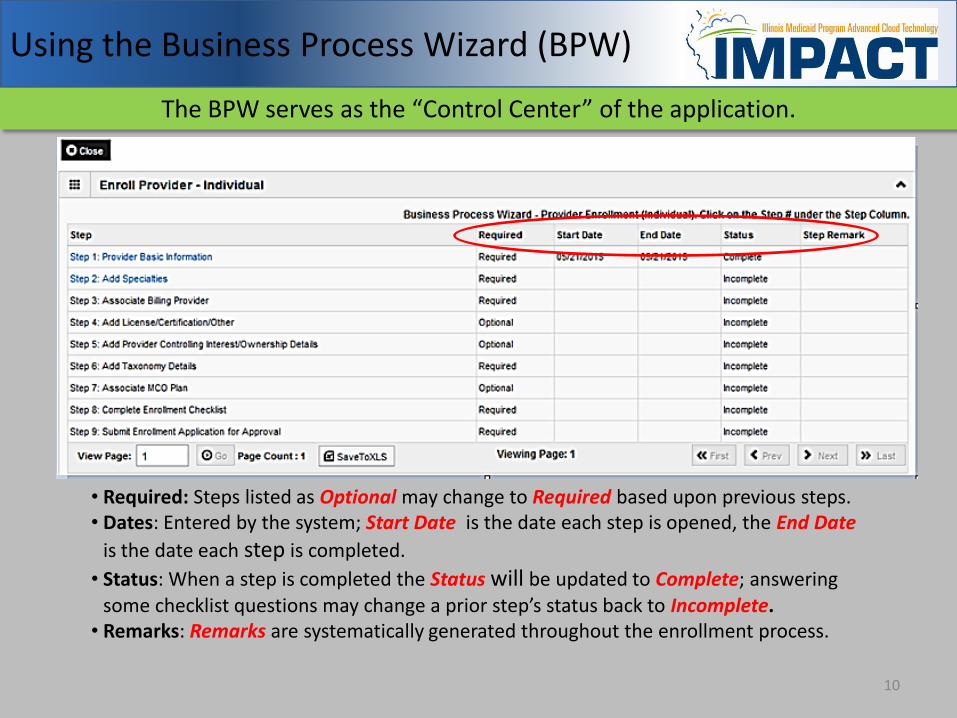
Using the Business Process Wizard (BPW)
The BPW serves as the “Control Center” of the application.
• Required: Steps listed as Optional may change to Required based upon previous steps. • Dates: Entered by the system; Start Date is the date each step is opened, the End Date
is the date each step is completed.
• Status: When a step is completed the Status will be updated to Complete; answering some checklist questions may change a prior step’s status back to Incomplete.
• Remarks: Remarks are systematically generated throughout the enrollment process.
10
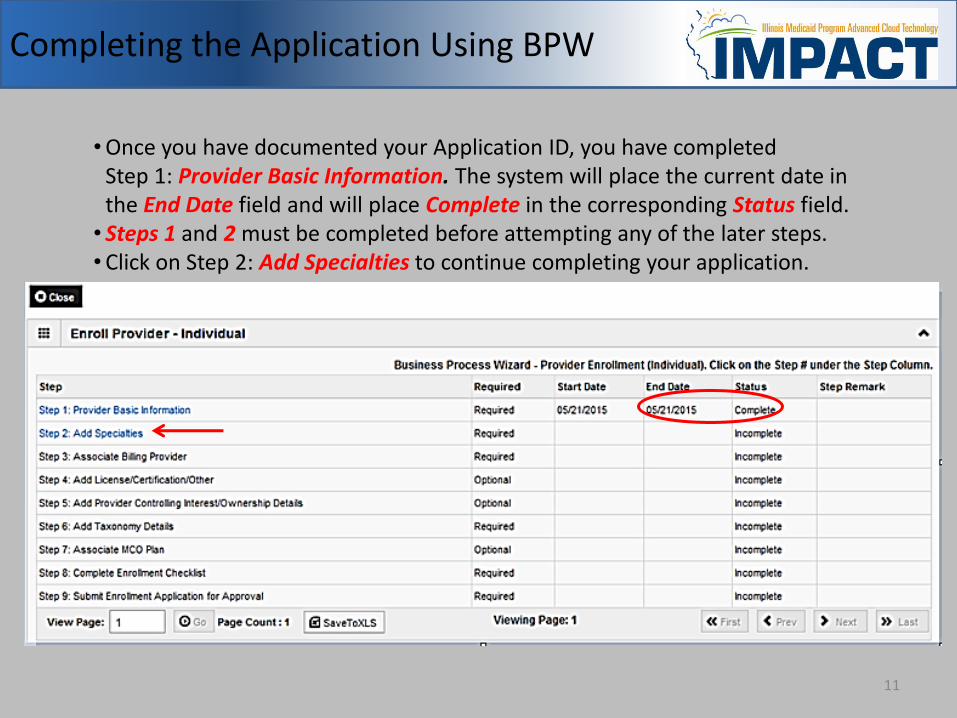
•Once you have documented your Application ID, you have completed Step 1: Provider Basic Information. The system will place the current date in the End Date field and will place Complete in the corresponding Status field.
• Steps 1 and 2 must be completed before attempting any of the later steps. •Click on Step 2: Add Specialties to continue completing your application.
Completing the Application Using BPW
11

•Click the Add button in the upper left corner.
Step 2: Add Specialties
12
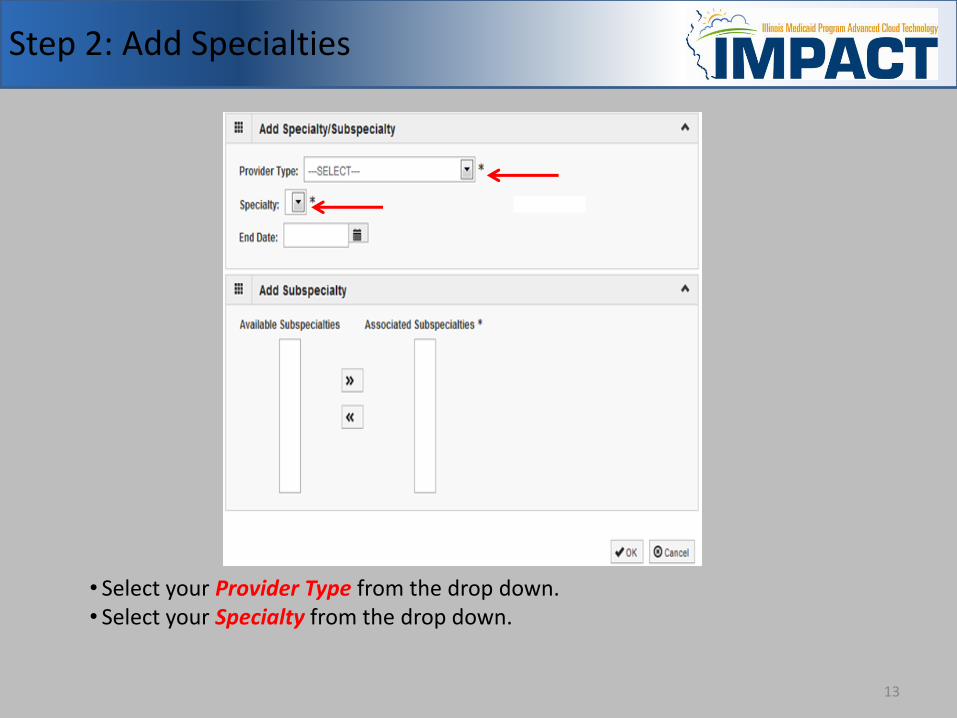
• Select your Provider Type from the drop down. • Select your Specialty from the drop down.
Step 2: Add Specialties
13
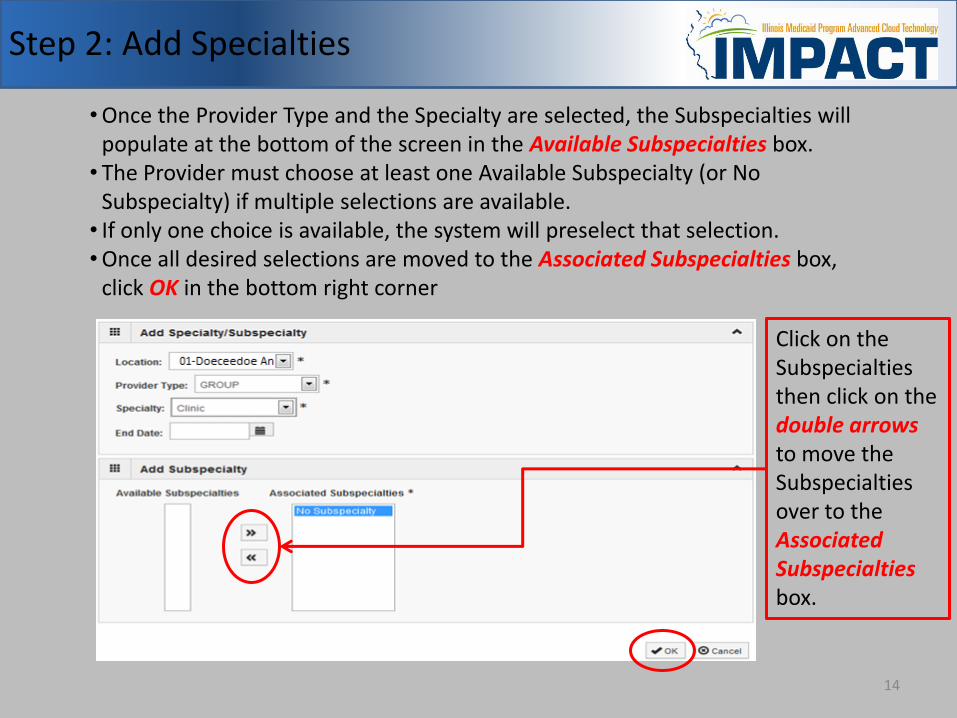
Step 2: Add Specialties
•Once the Provider Type and the Specialty are selected, the Subspecialties will populate at the bottom of the screen in the Available Subspecialties box.
• The Provider must choose at least one Available Subspecialty (or No Subspecialty) if multiple selections are available.
• If only one choice is available, the system will preselect that selection. •Once all desired selections are moved to the Associated Subspecialties box,
click OK in the bottom right corner
Click on the Subspecialties then click on the double arrows to move the Subspecialties over to the Associated Subspecialties box.
14
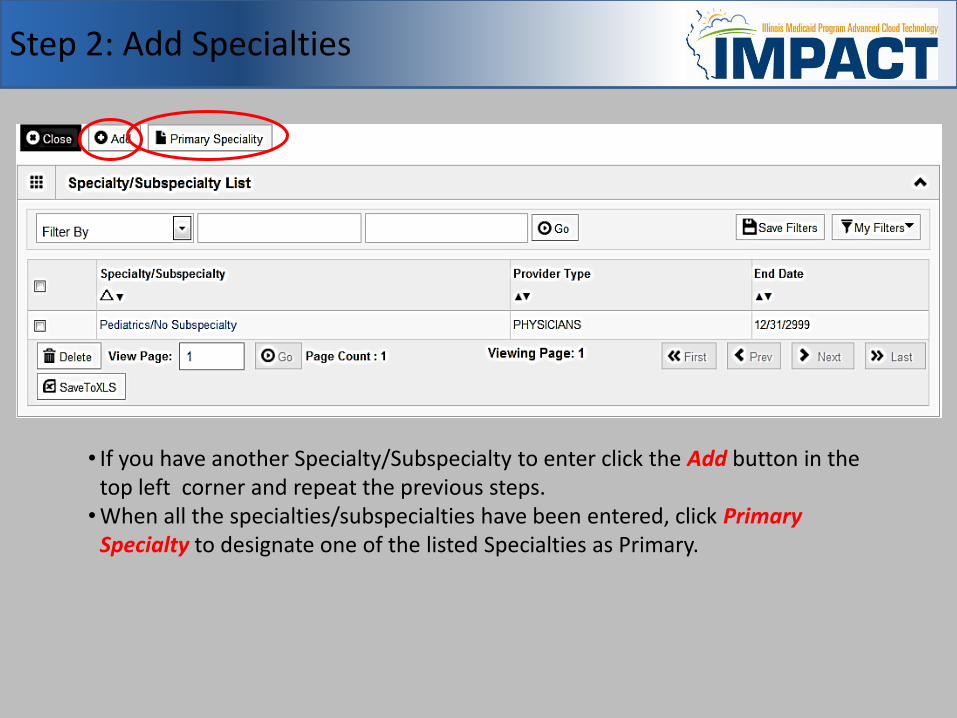
• If you have another Specialty/Subspecialty to enter click the Add button in the top left corner and repeat the previous steps.
•When all the specialties/subspecialties have been entered, click Primary Specialty to designate one of the listed Specialties as Primary.
Step 2: Add Specialties
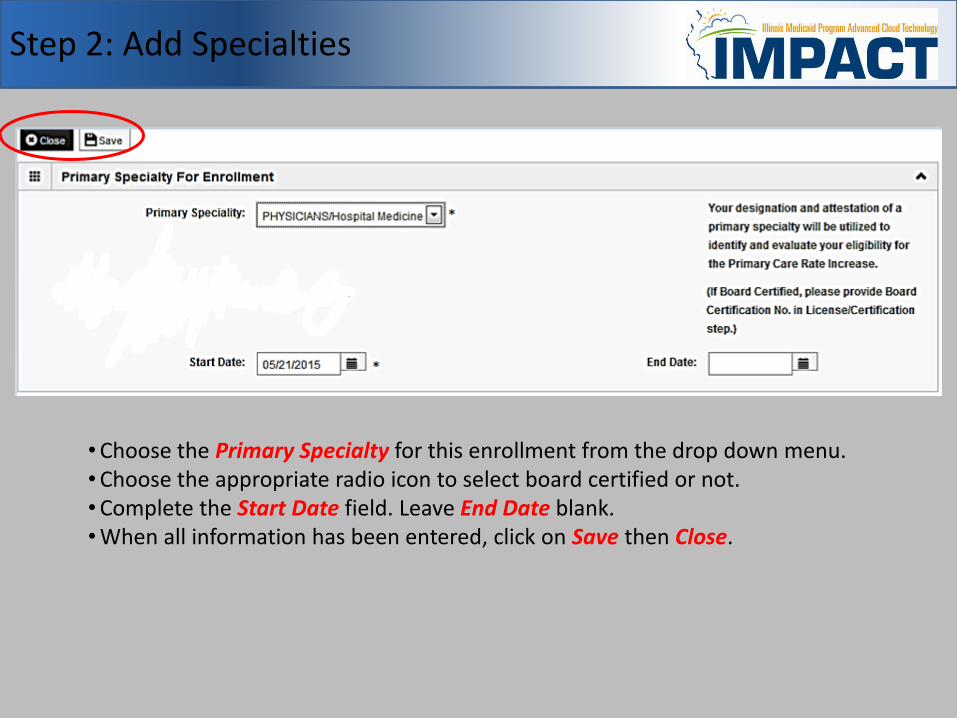
•Choose the Primary Specialty for this enrollment from the drop down menu. •Choose the appropriate radio icon to select board certified or not. •Complete the Start Date field. Leave End Date blank. •When all information has been entered, click on Save then Close.
Step 2: Add Specialties
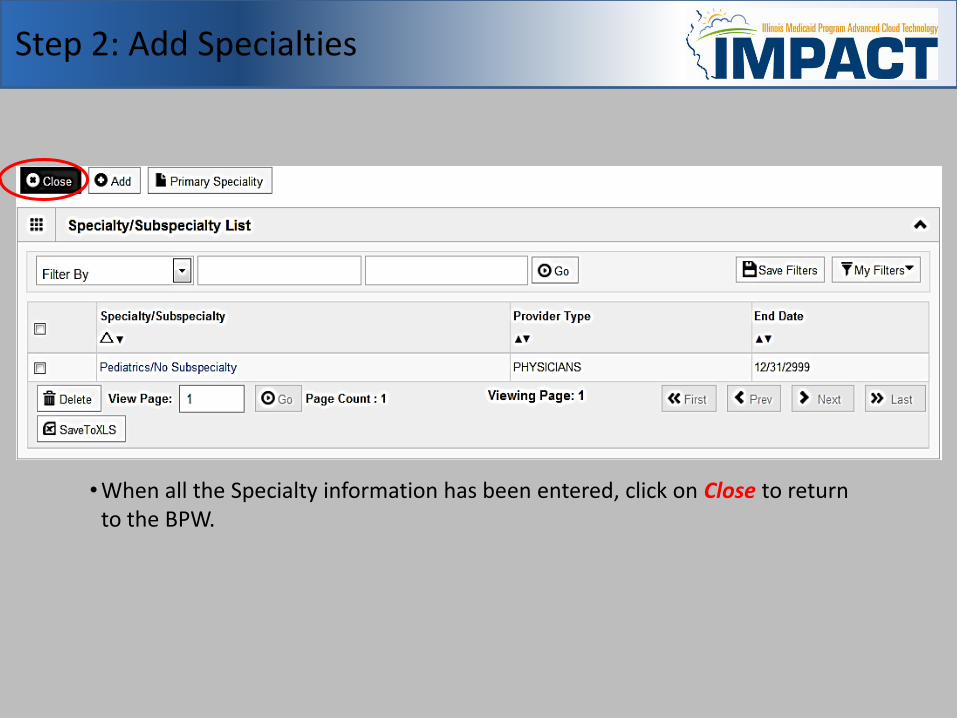
•When all the Specialty information has been entered, click on Close to return to the BPW.
Step 2: Add Specialties
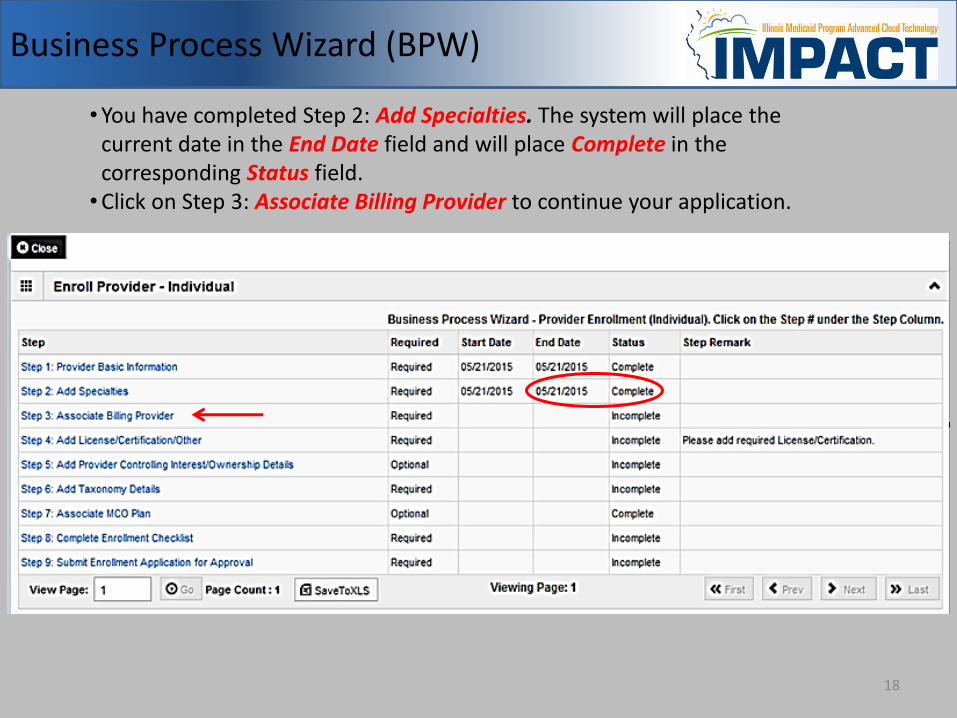
•You have completed Step 2: Add Specialties. The system will place the current date in the End Date field and will place Complete in the corresponding Status field.
•Click on Step 3: Associate Billing Provider to continue your application.
Business Process Wizard (BPW)
18
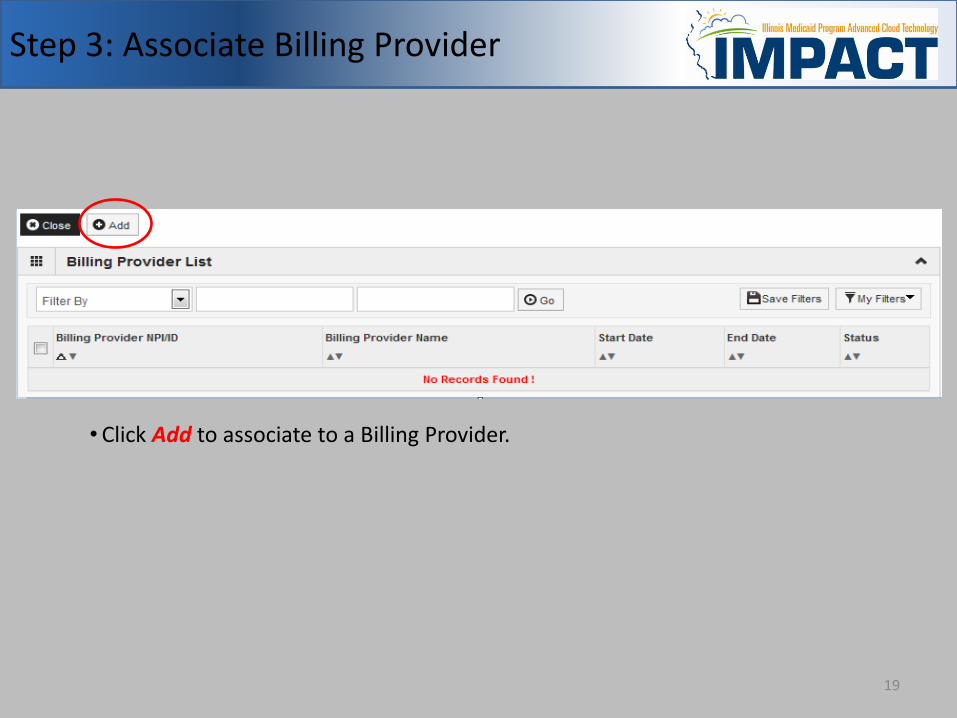
Step 3: Associate Billing Provider
• Click Add to associate to a Billing Provider.
19
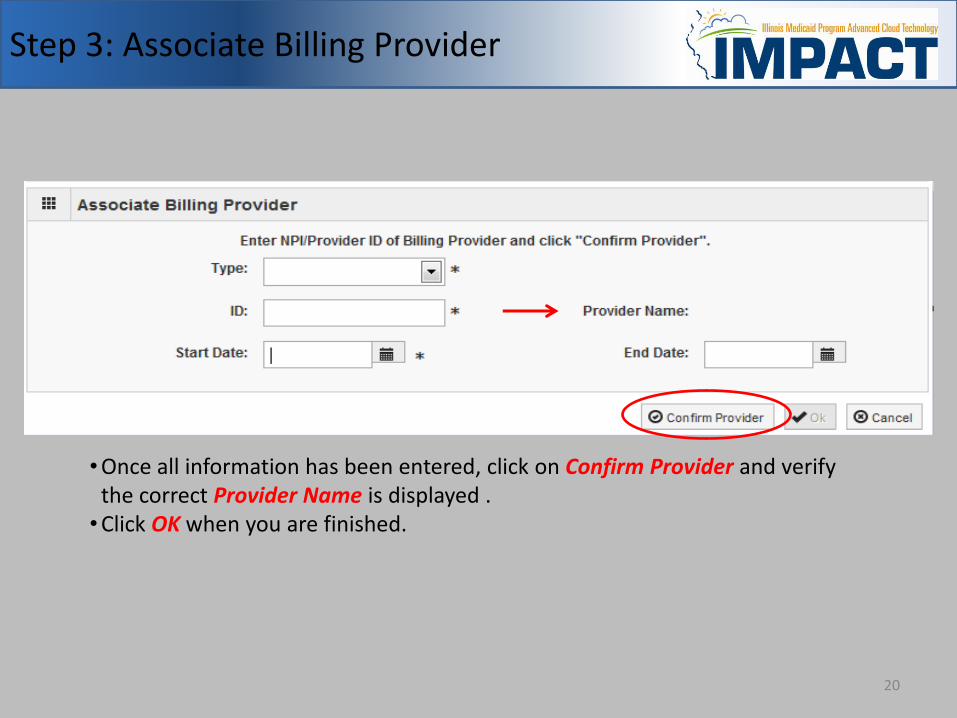
Step 3: Associate Billing Provider
•Once all information has been entered, click on Confirm Provider and verify the correct Provider Name is displayed .
•Click OK when you are finished.
20
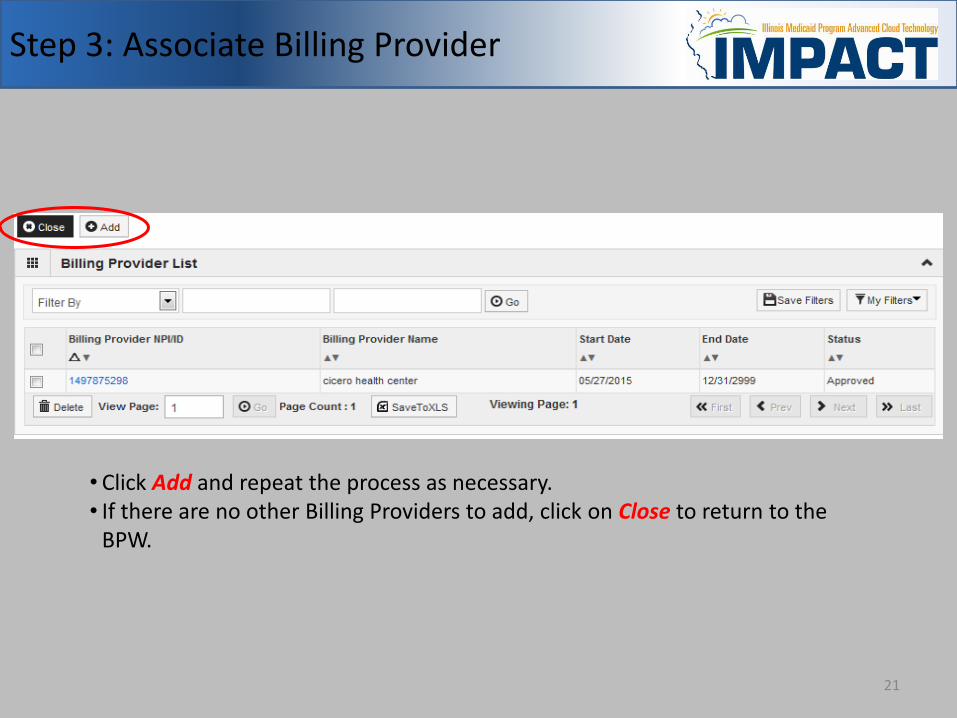
Step 3: Associate Billing Provider
• Click Add and repeat the process as necessary. • If there are no other Billing Providers to add, click on Close to return to the
BPW.
21
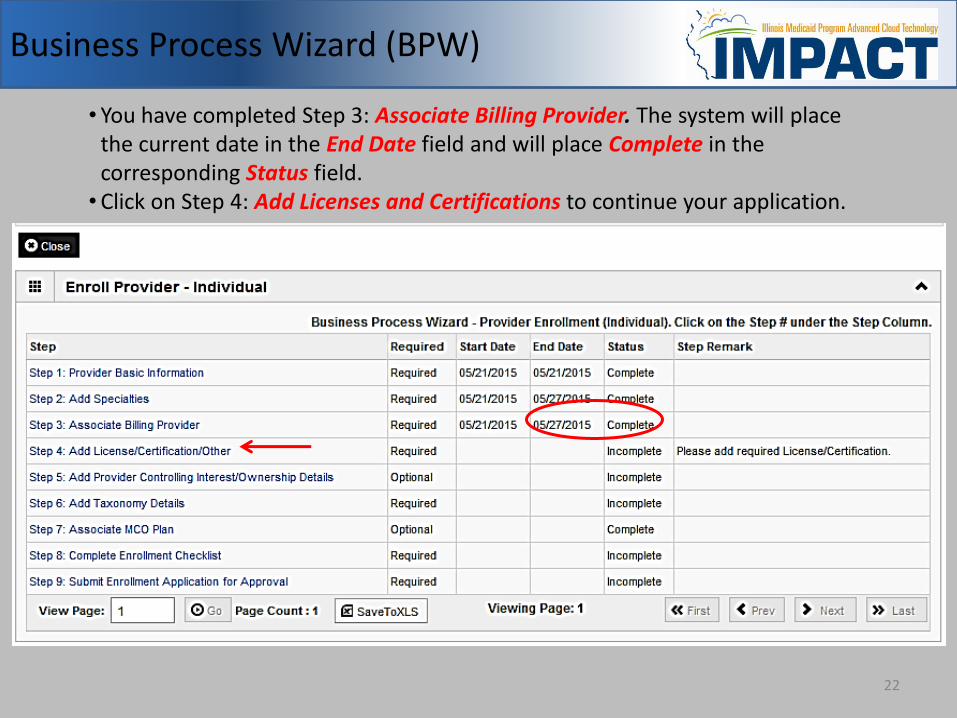
• You have completed Step 3: Associate Billing Provider. The system will place the current date in the End Date field and will place Complete in the corresponding Status field.
•Click on Step 4: Add Licenses and Certifications to continue your application.
Business Process Wizard (BPW)
22
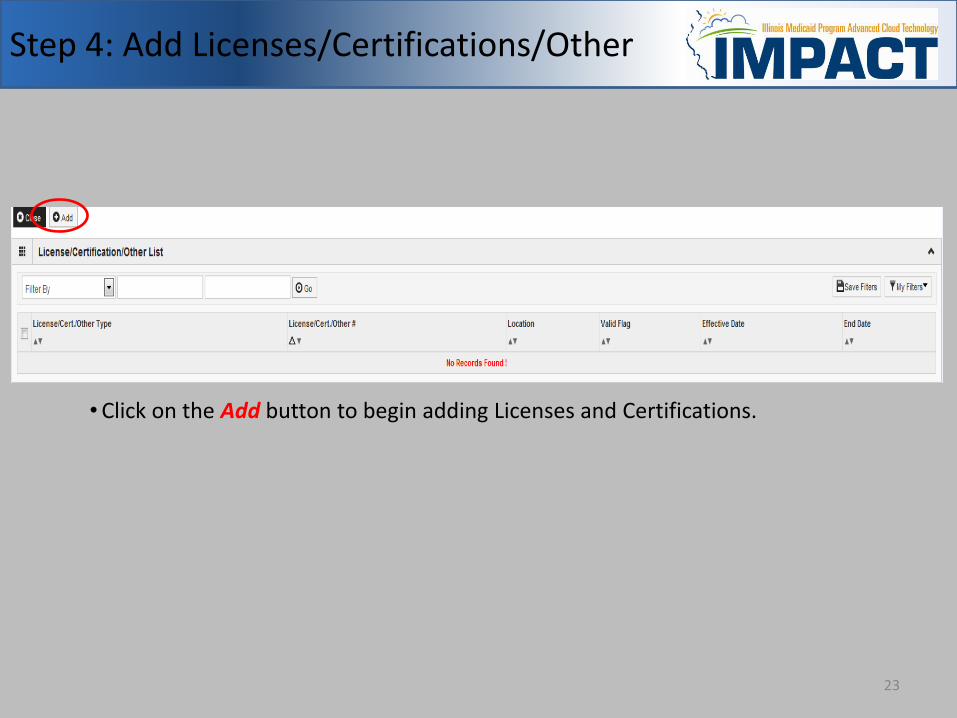
Step 4: Add Licenses/Certifications/Other
•Click on the Add button to begin adding Licenses and Certifications.
23
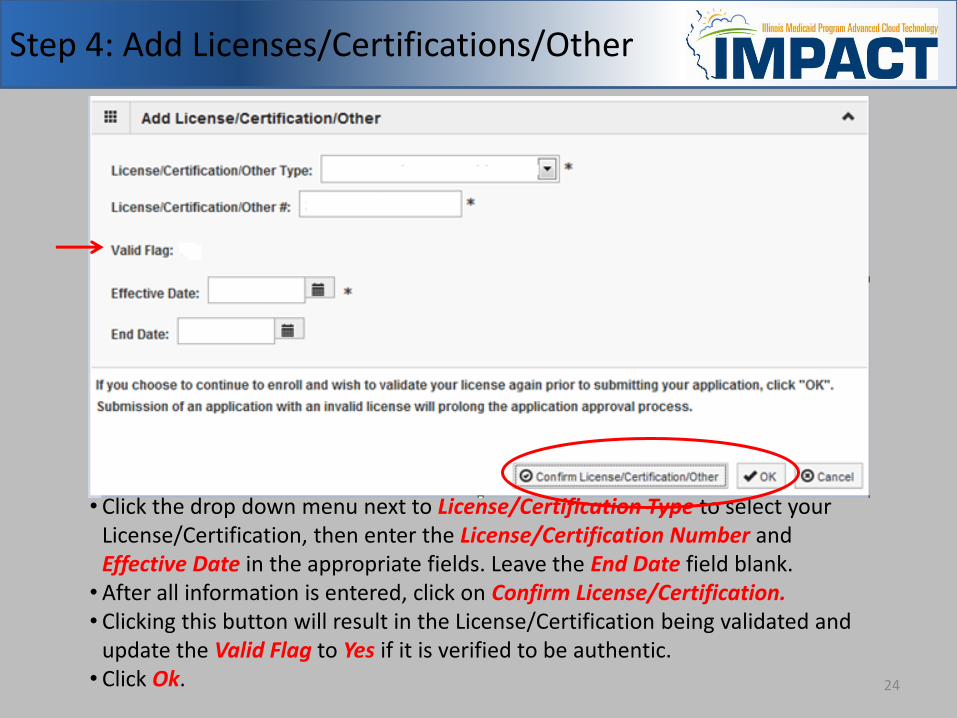
• Click the drop down menu next to License/Certification Type to select your License/Certification, then enter the License/Certification Number and Effective Date in the appropriate fields. Leave the End Date field blank.
• After all information is entered, click on Confirm License/Certification. • Clicking this button will result in the License/Certification being validated and
update the Valid Flag to Yes if it is verified to be authentic. • Click Ok.
Step 4: Add Licenses/Certifications/Other
24
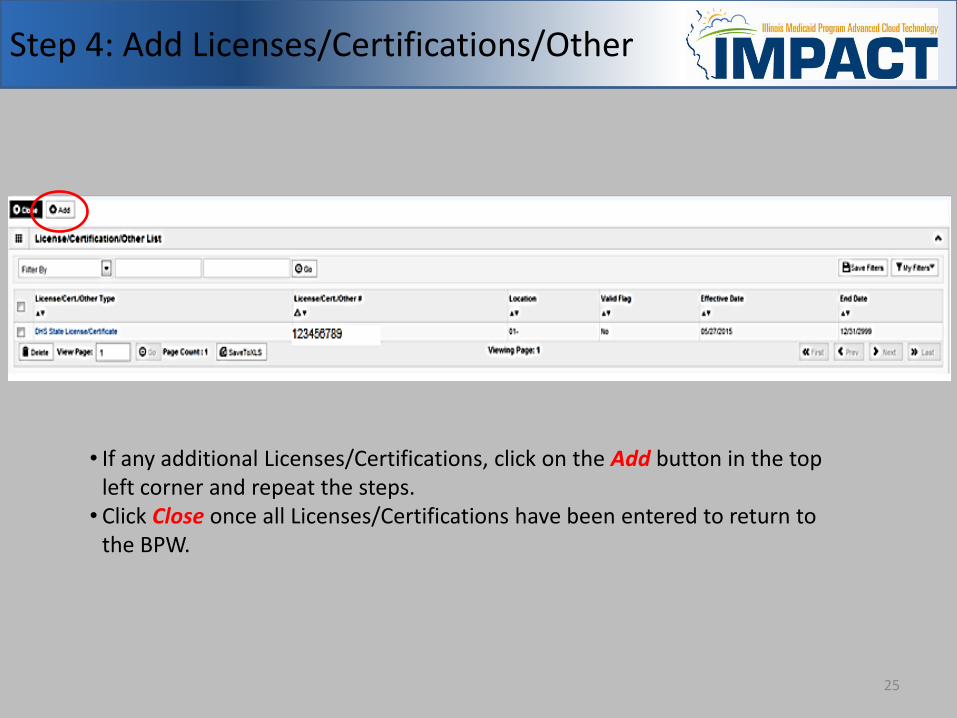
• If any additional Licenses/Certifications, click on the Add button in the top left corner and repeat the steps.
• Click Close once all Licenses/Certifications have been entered to return to the BPW.
Step 4: Add Licenses/Certifications/Other
25
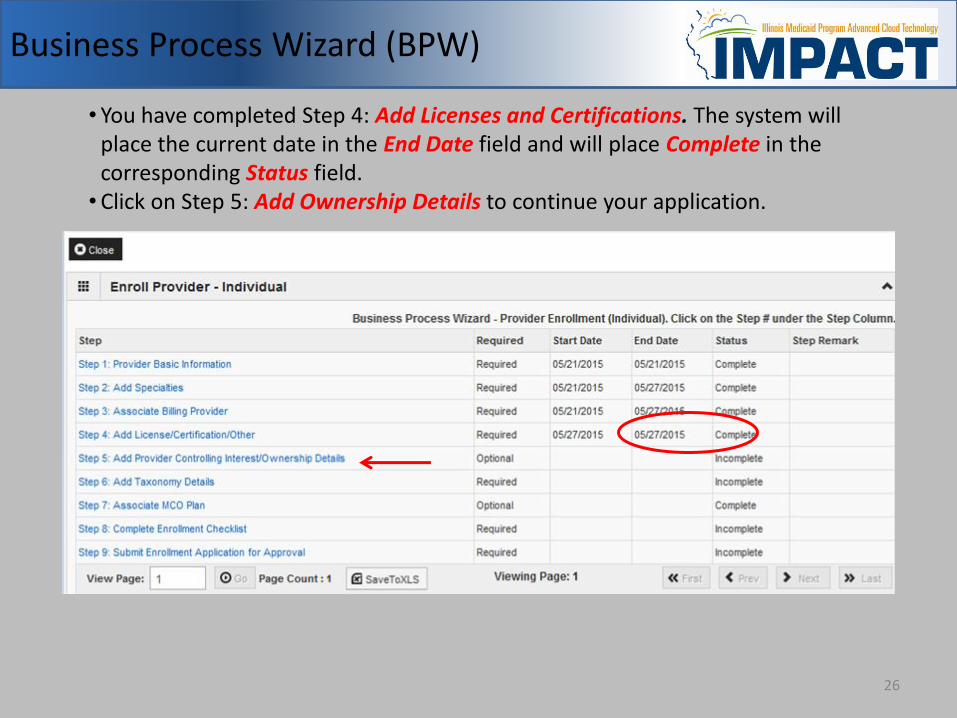
• You have completed Step 4: Add Licenses and Certifications. The system will place the current date in the End Date field and will place Complete in the corresponding Status field.
•Click on Step 5: Add Ownership Details to continue your application.
Business Process Wizard (BPW)
26

27
• It is required that ownership of 5% or more in any other Medicaid/Medicare entity be entered.
• To enter Ownership details in another Medicaid/Medicare Entity, click on Add Other Owned Entity.
Step 5: Controlling Interest/Ownership

28
Step 5: Controlling Interest/Ownership
•After entering the street address and zip code, click Validate Address. •When all information is complete, click OK. •Repeat these steps to add ownership in another Medicaid/Medicare Entity.
Please complete all fields. At a minimum, all fields with an * are required.
29
Step 5: Controlling Interest/Ownership
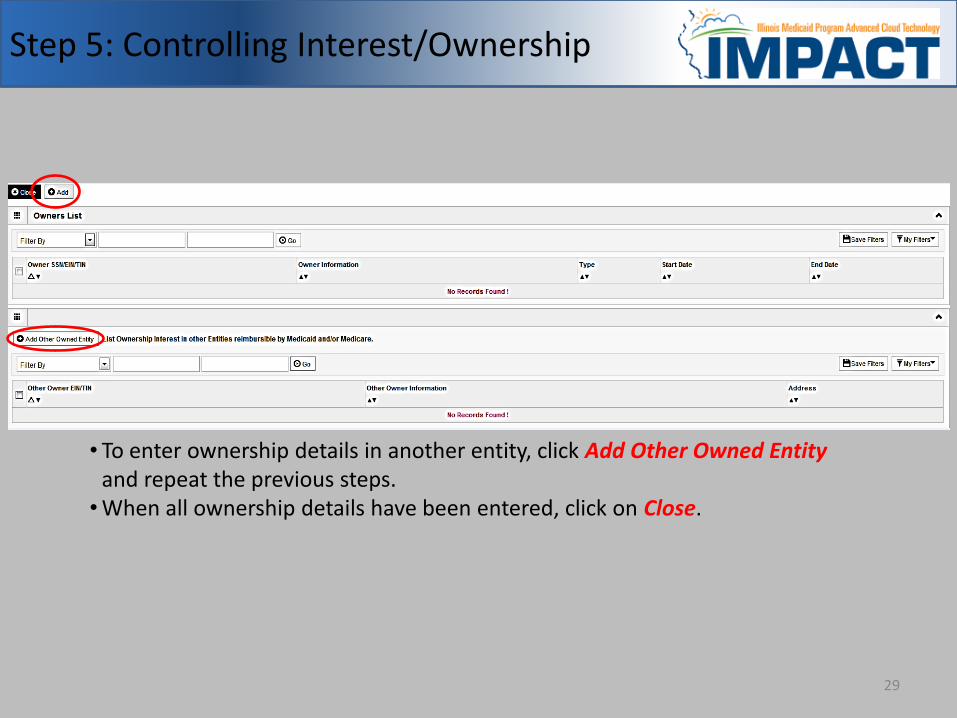
• To enter ownership details in another entity, click Add Other Owned Entity and repeat the previous steps.
•When all ownership details have been entered, click on Close.
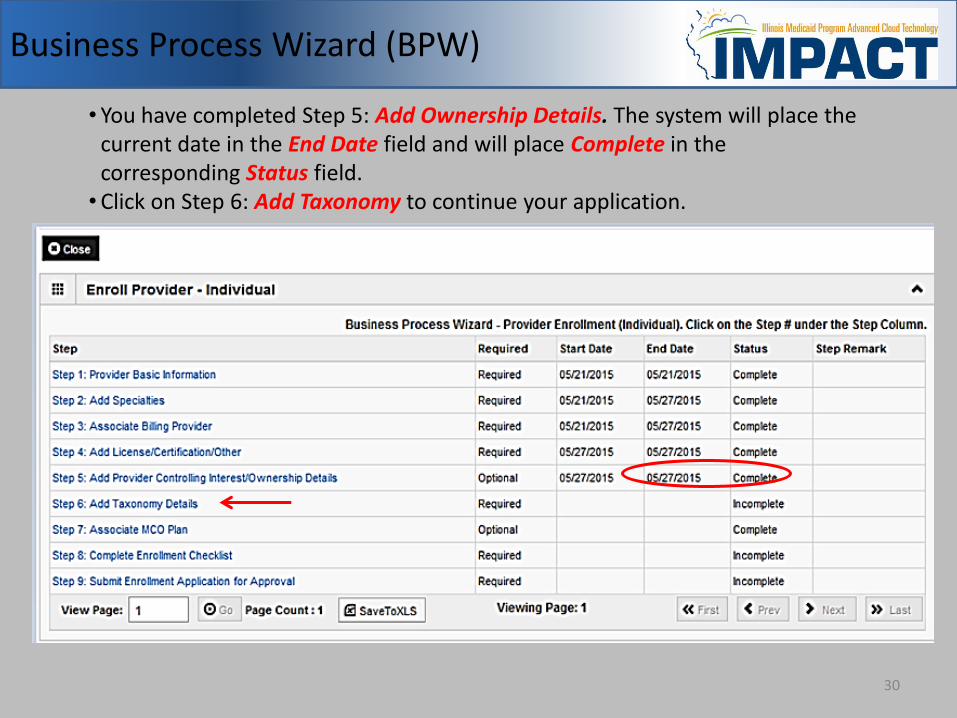
• You have completed Step 5: Add Ownership Details. The system will place the current date in the End Date field and will place Complete in the corresponding Status field.
•Click on Step 6: Add Taxonomy to continue your application.
Business Process Wizard (BPW)
30
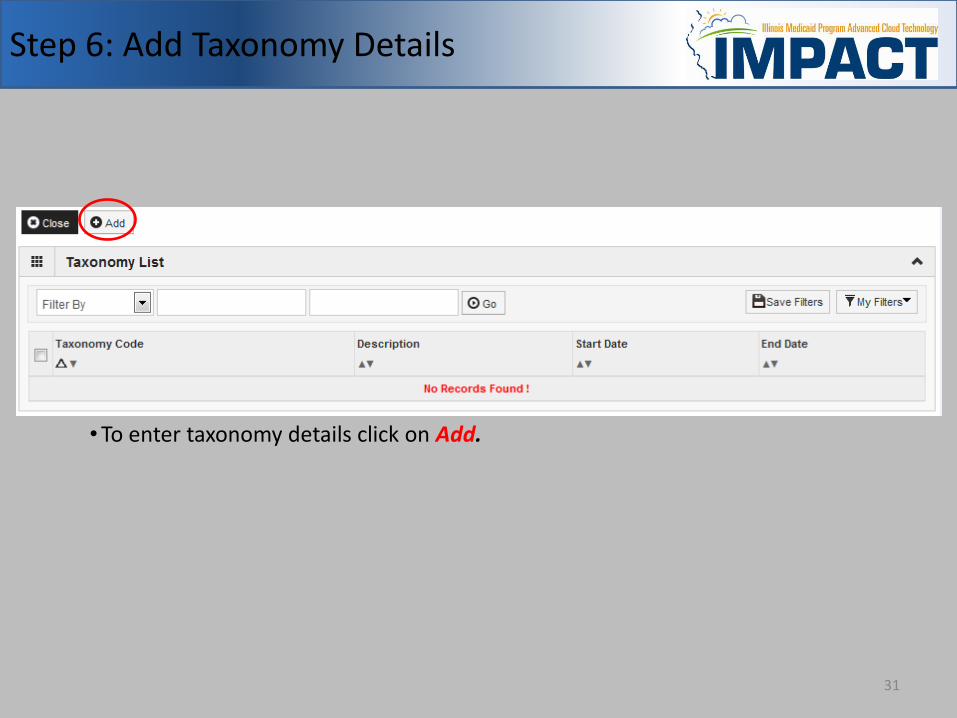
•To enter taxonomy details click on Add.
Step 6: Add Taxonomy Details
31

• If the code is known, enter the Taxonomy Code and the Start Date. •End Date: Leave blank. This can be updated at a later time. •Click on Confirm Taxonomy and verify Description is populated correctly. •Click on OK to finalize the submission.
Step 6: Add Taxonomy Details
32

• If code is not known, click on the t to the right of the box to access The National Uniform Claim Committee Taxonomy Code list. This will open a web browser window.
•At least one of the Taxonomy Codes entered in IMPACT must be the Taxonomy Code registered with the National Plan and Provider Enumeration System (NPPES).
Step 6: Add Taxonomy Details
33
Step 6: Add Taxonomy Details
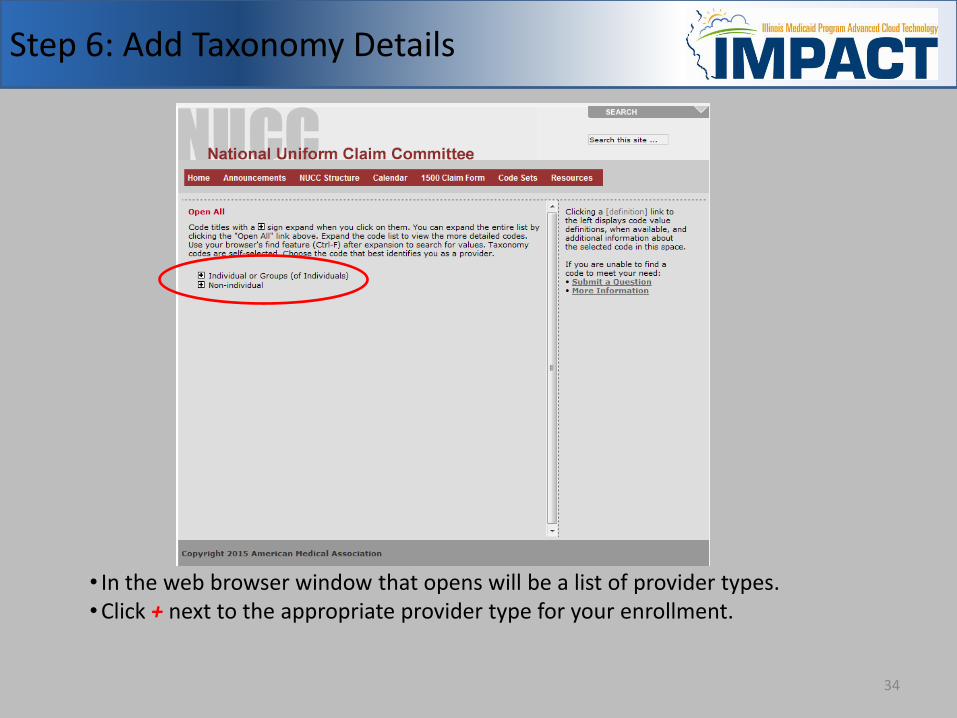
• In the web browser window that opens will be a list of provider types. •Click + next to the appropriate provider type for your enrollment.
34

Step 6: Add Taxonomy Details
•Click on the + next to the appropriate profession listed under the heading which you previously selected.
35

Step 6: Add Taxonomy Details
• Click on the + next to the appropriate profession listed under the heading
which you previously selected.
•Make a note of the Taxonomy Code that is correct for your area of practice.
• Click on the X button in the upper right corner to close the National Uniform
Claim Committee webpage.
36

•Enter the Taxonomy Code and the Start Date. • Leave End Date blank. This can be updated at a later time. •Click on Confirm Taxonomy and verify Description is populated correctly. •Click on OK to finalize the submission.
Step 6: Add Taxonomy Details
37

•Repeat the steps by clicking on the Add button for any additional Taxonomy
Codes that need to be entered. •Otherwise, click on the Close button in the upper left corner.
Step 6: Add Taxonomy Details
38
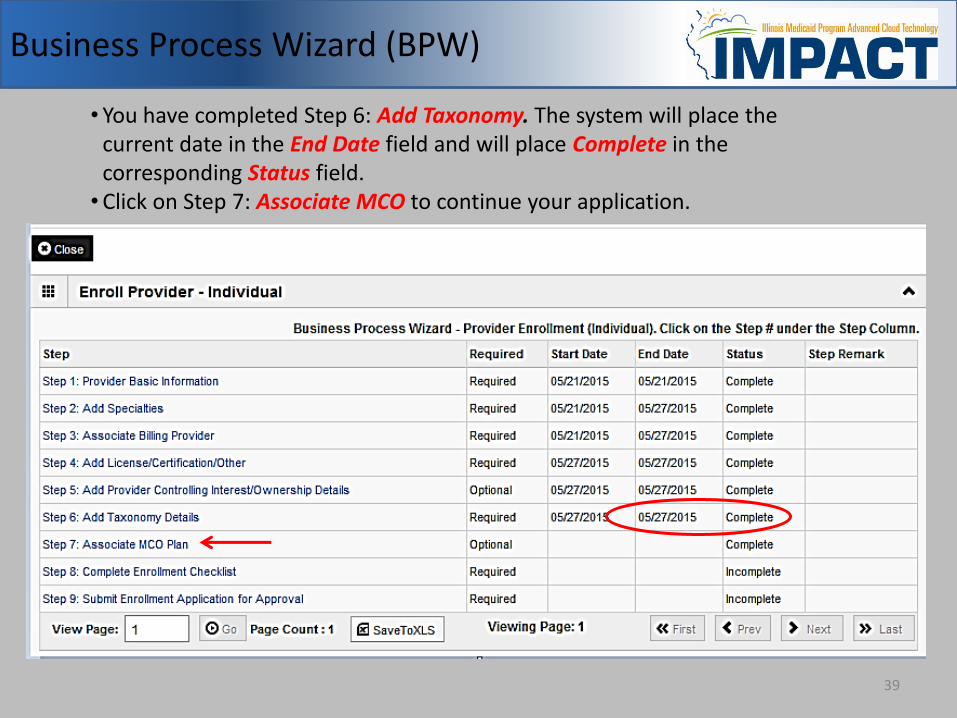
• You have completed Step 6: Add Taxonomy. The system will place the current date in the End Date field and will place Complete in the corresponding Status field.
•Click on Step 7: Associate MCO to continue your application.
Business Process Wizard (BPW)
39

Step 7: Associate MCO Plan
•Click Add to associate a MCO plan for which there is a current valid contract. •Specific MCO plans can be added only once to the application. •Sister Agencies will also be listed as an MCO Plan. A sister agency is also
known as a State Agency or a Waiver provider.
40
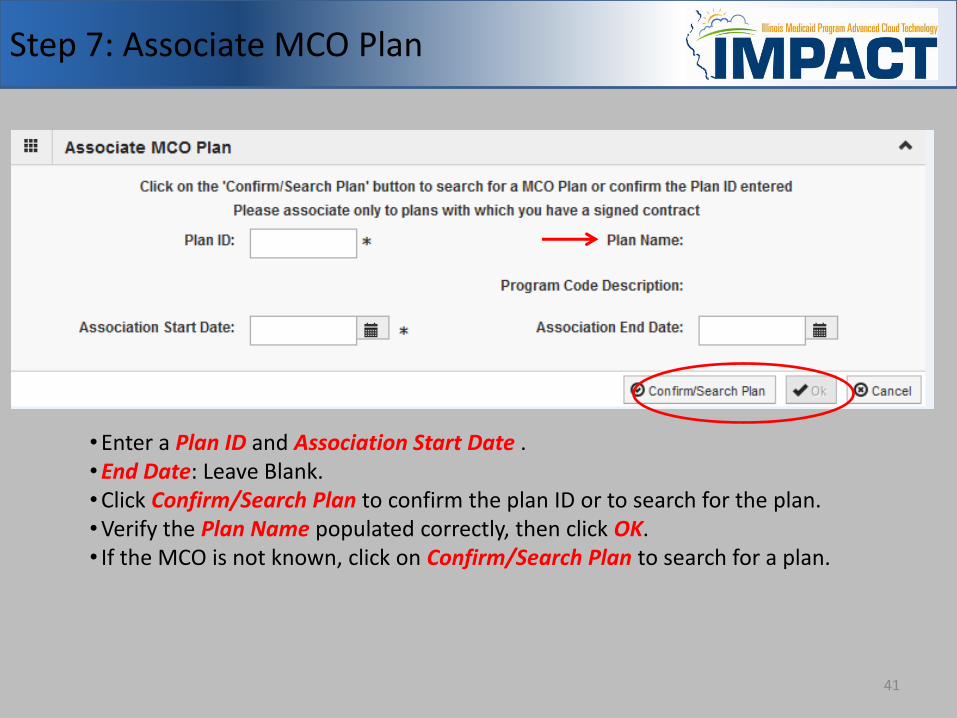
Step 7: Associate MCO Plan
•Enter a Plan ID and Association Start Date . •End Date: Leave Blank. •Click Confirm/Search Plan to confirm the plan ID or to search for the plan. •Verify the Plan Name populated correctly, then click OK. • If the MCO is not known, click on Confirm/Search Plan to search for a plan.
41

Step 7: Associate MCO Plan
•Use the Filter By drop down and enter desired information to filter the available MCO plans.
•When the desired MCO plan is located, click on the checkbox next to the that line then, click Select.
42

Step 7: Associate MCO Plan
•Verify the MCO Plan information populated correctly. •Click OK.
43
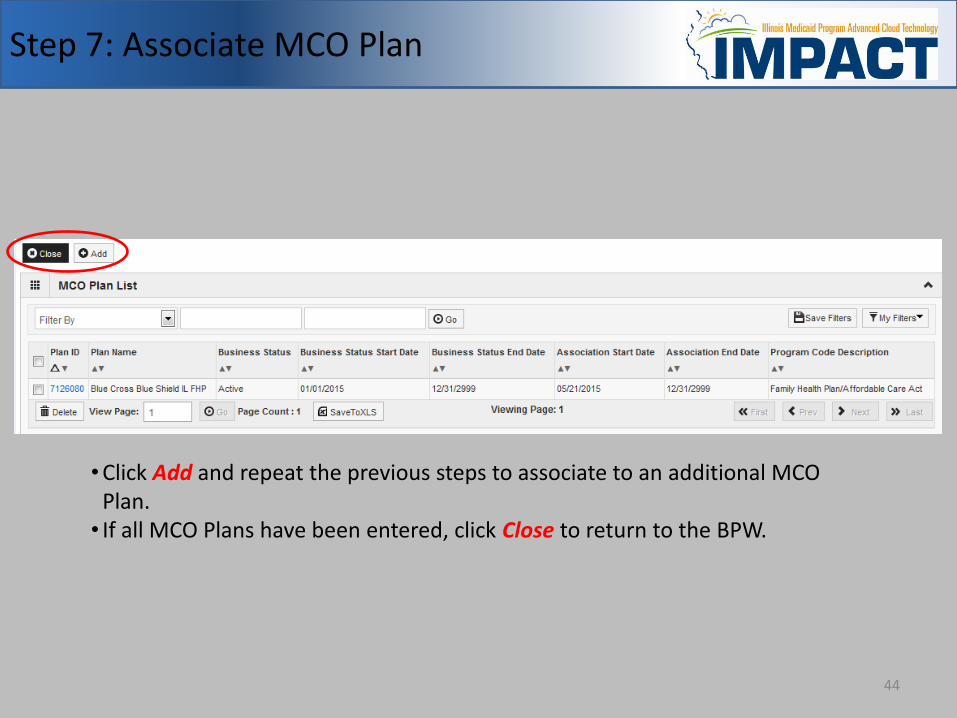
Step 7: Associate MCO Plan
•Click Add and repeat the previous steps to associate to an additional MCO Plan.
• If all MCO Plans have been entered, click Close to return to the BPW.
44

• You have completed Step 7: Associate MCO. The system will place the current date in the End Date field and will place Complete in the corresponding Status field.
•Click on Step 8: Complete Enrollment Checklist to continue your application.
Business Process Wizard (BPW)
45
Step : Associate Billing Agent
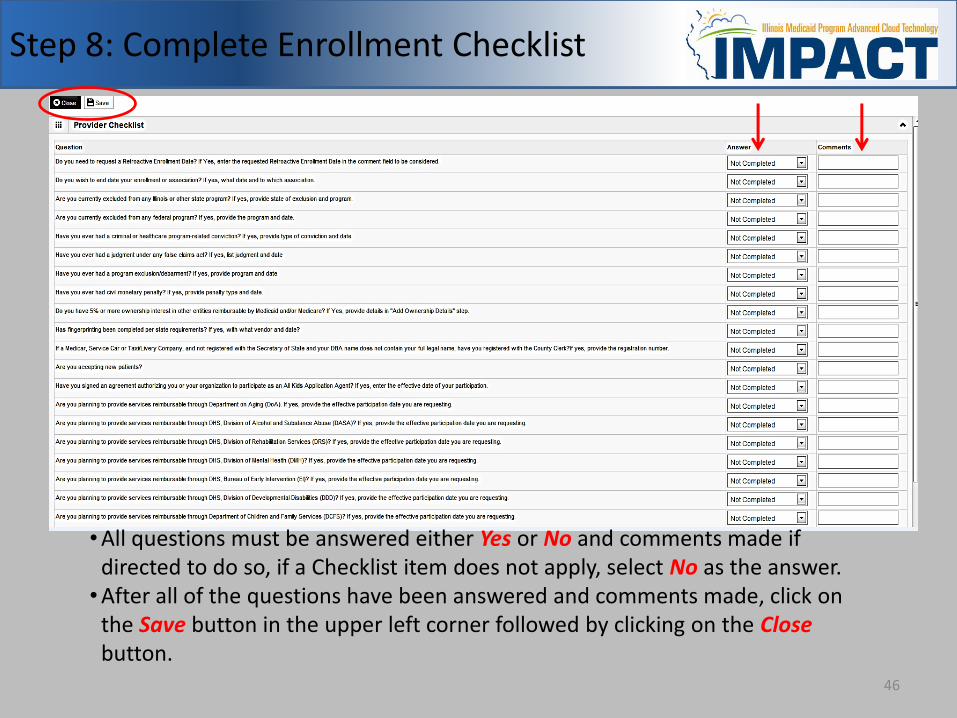
•All questions must be answered either Yes or No and comments made if directed to do so, if a Checklist item does not apply, select No as the answer.
•After all of the questions have been answered and comments made, click on the Save button in the upper left corner followed by clicking on the Close button.
Step 8: Complete Enrollment Checklist
46

• You have completed Step 8: Complete Enrollment Checklist. The system will place the current date in the End Date field and will place Complete in the corresponding Status field.
•Click on Step 9: Submit Enrollment Application to continue your application.
Business Process Wizard (BPW)
47
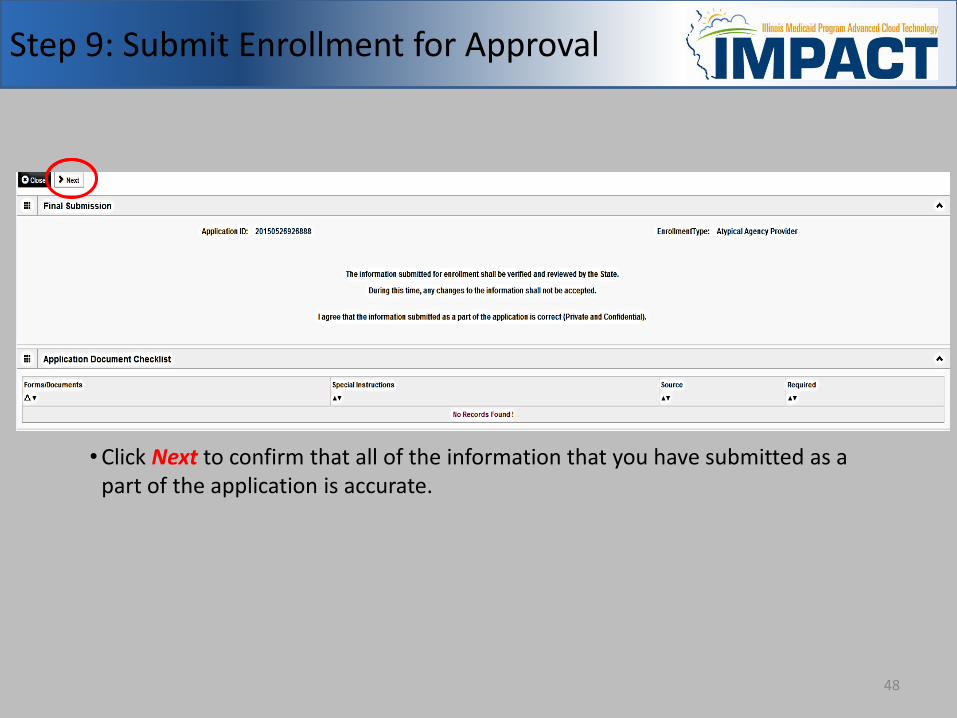
•Click Next to confirm that all of the information that you have submitted as a part of the application is accurate.
Step 9: Submit Enrollment for Approval
48
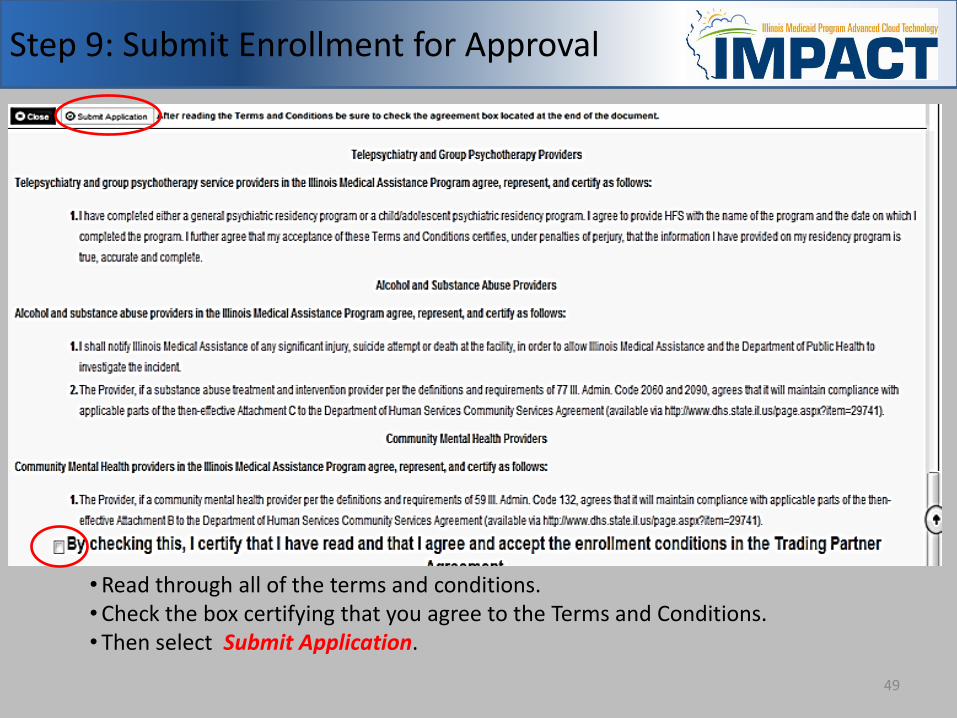
•Read through all of the terms and conditions. •Check the box certifying that you agree to the Terms and Conditions. • Then select Submit Application.
Step 9: Submit Enrollment for Approval
49
Business Process Wizard (BPW)
50
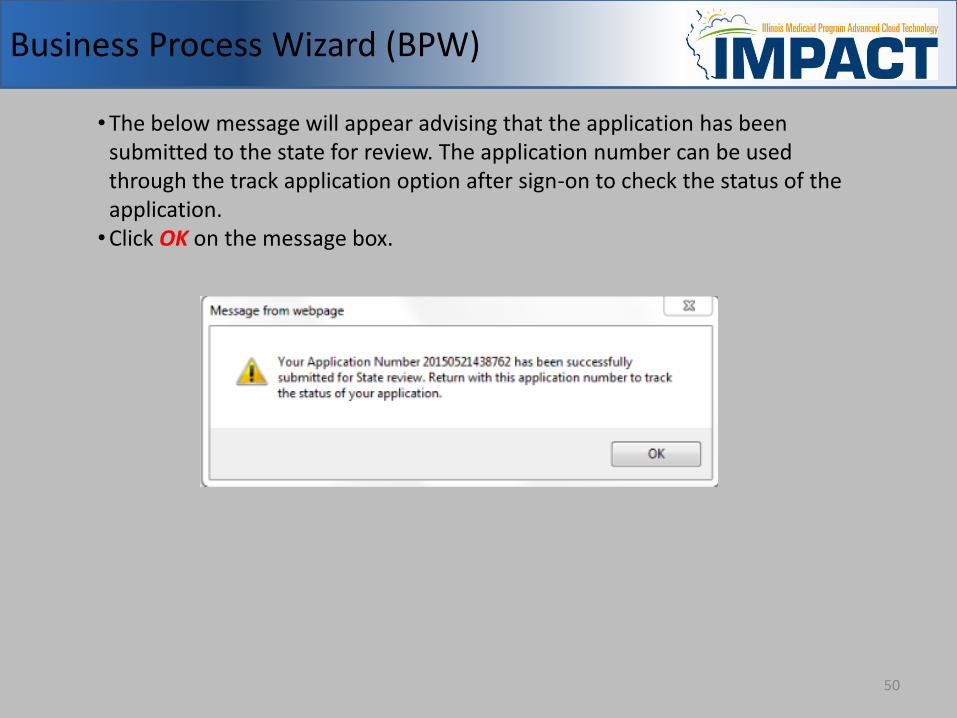
•The below message will appear advising that the application has been submitted to the state for review. The application number can be used through the track application option after sign-on to check the status of the application.
•Click OK on the message box.
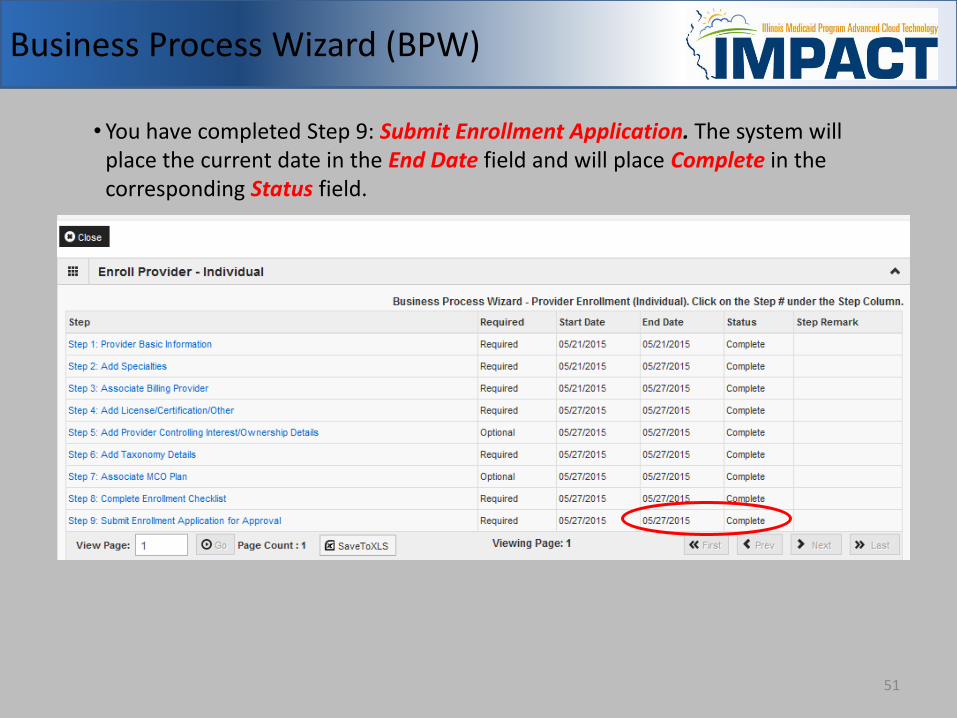
• You have completed Step 9: Submit Enrollment Application. The system will place the current date in the End Date field and will place Complete in the corresponding Status field.
Business Process Wizard (BPW)
51

• For more information regarding IMPACT, please visit http://www.illinois.gov/hfs/impact/Pages/AboutIMPACT.aspx
• Check out the definitions of common terms at http://www.illinois.gov/hfs/impact/Pages/Glossary.aspx
Resources
52
Questions and Answers
•FAQ’s can be found at http://www.illinois.gov/hfs/impact/Pages/faqs.aspx to help resolve common questions and problems when submitting applications.
•General questions regarding IMPACT can be addressed to: Email: [email protected] Phone: 1-877-782-5565
53