REFRIGERADOR FRIGORÍFICO FRIDGE · 2015-03-20 · REFRIGERADOR FRIGORÍFICO FRIDGE DRS635JE 2223...
13
REFRIGERADOR FRIGORÍFICO FRIDGE DRS635JE 2223 395-22 LES NOUVEAUX OBJECT DE VALEUR Service Consommateurs De Dietrich BP 9526 - 95069 Cergy Pontoise Cedex - France Tel : +33 (0) 825 06 16 04 0,15Eur TTC/MN Service Après vente De Dietrich Tel : +33 (0) 801 63 25 25 Prix appel local Brandt Appliances - 7 rue Henri Becquerel 92854 Rueil-Malmaison cedex - France S.A.S. au capital de 10 000 000 Euros - RCS Nanterre B 440 302 347
Transcript of REFRIGERADOR FRIGORÍFICO FRIDGE · 2015-03-20 · REFRIGERADOR FRIGORÍFICO FRIDGE DRS635JE 2223...

REFRIGERADORFRIGORÍFICO
FRIDGEDRS635JE
2223 395-22
LES NOUVEAUX OBJECT DE VALEUR
Service Consommateurs De Dietrich
BP 9526 - 95069 Cergy Pontoise Cedex - France
Tel : +33 (0) 825 06 16 040,15Eur TTC/MN
Service Après vente De Dietrich
Tel : +33 (0) 801 63 25 25Prix appel local
Brandt Appliances - 7 rue Henri Becquerel
92854 Rueil-Malmaison cedex - France
S.A.S. au capital de 10 000 000 Euros - RCS Nanterre B 440 302 347
27
WARNINGSIt is most important that this instruction book should be retained with the appliance for futurereference. Should the appliance be sold or transferred to another owner, or should you move houseand leave the appliance, always ensure that the book is supplied with the appliance in order that thenew owner can be acquainted with the functioning of the appliance and the relevant warnings.
If this appliance featuring magnetic door seals is to replace an older appliance having a spring lock(latch) on the door or lid, be sure to make that spring lock unusable before you discard the oldappliance.This will prevent it from becoming a death-trap for a child.
These warnings are provided in the interest of safety.You must read them carefully before installing orusing the appliance.
General Safety• This appliance is designed to be operated by
adults. Children should not be allowed to tamperwith the controls or play with the product.
• It is dangerous to alter the specifications ormodify this product in any way.
• Before any cleaning or maintenance work is carriedout, be sure to switch off and unplug the appliance.
• This appliance is heavy. Care should be takenwhen moving it
• Ice lollies can cause frost burns if consumedstraight from the appliance.
• Take utmost care when handling yourappliance so as not to cause any damages tothe cooling unit with consequent possiblefluid leakages.
• The appliance must not be located close toradiators or gas cookers.
• Avoid prolonged exposure of the appliance todirect sunlight.
• There must be adequate ventilation round theback of the appliance and any damage to therefrigerant circuit must be avoided.
• For freezers only (except built-in models): anideal location is the cellar or basement.
• Do not use other electrical appliances (suchas ice cream makers) inside of refrigeratingappliances.
Service/Repair• Any electrical work required to install this
appliance should be carried out by a qualifiedelectrician or competent person
• This product should be serviced by an authorizedService Centre, and only genuine spare partsshould be used.
• Under no circumstances should you attempt torepair the appliance yourself. Repairs carried outby inexperienced persons may cause injury ormore serious malfunctioning. Refer to your localService Centre, and always insist on genuinespare parts.
• This appliance contains hydrocarbons in itscooling unit; maintenance and recharging musttherefore only be carried out by authorizedtechnicians.
Use• The domestic refrigerators and freezers are
designed to be used specifically for the storageof edible foodstuffs only.
• Best performance is obtained with ambienttemperature between +18°C and +43°C (class T);+18°C and +38°C (class ST); +16°C and +32°C(class N); +10°C and +32°C (class SN). Theclass of your appliance is shown on its ratingplate.
Warning: when the ambient temperature is notincluded within the range indicated for the classof this appliance, the following instructions mustbe observed: when the ambient temperaturedrops below the minimum level, the storagetemperature in the freezer compartment cannotbe guaranteed; therefore it is advisable to use thefood stored as soon as possible.
• Frozen food must not be re-frozen once it hasbeen thawed out.
• Manufacturers’ storage recommendations shouldbe strictly adhered to. Refer to relevantinstructions.
• The inner lining of the appliance consists ofchannels through which the refrigerant passes. Ifthese should be punctured this would damage theappliance beyond repair and cause food loss. DONOT USE SHARP INSTRUMENTS to scrape offfrost or ice. Frost may be removed by using aplastic scraper. Under no circumstances shouldsolid ice be forced off the liner. Solid ice should beallowed to thaw when defrosting the appliance.
28
CONTENTSWarnings . . . . . . . . . . . . . . . . . . . . . . . . . . . . . . . . . . . . . . . . . . . . . . . . . . . . . . . . . . . . . . . . . . . . . . . . . . .27
Use - Cleaning the interior - Control panel - Display - . . . . . . . . . . . . . . . . . . . . . . . . . . . . . . . . . . . . . . . . . . . . .29
Use - Operation - Activation of functions - Switching off - Temperature regulation - Shopping function . . . . . . . .
Fresh food refrigeration - Door open acoustic alarm . . . . . . . . . . . . . . . . . . . . . . . . . . . . . . . . . . . . . . . . . . . . . . .30
Use - Food protection - Air recycling . . . . . . . . . . . . . . . . . . . . . . . . . . . . . . . . . . . . . . . . . . . . . . . . . . . . . . . . . . .31
Hints - Movable shelves - Positioning the door shelves - Hints for refrigeration . . . . . . . . . . . . . . . . . . . . . . . . . .32
Maintenance - Periods of no operation - Periodic cleaning - Interior light -Defrosting . . . . . . . . . . . . . . . . .33
Customer service and spare parts - Technical information - Installation - Location - Shelf-holders . . .34
Installation - Electrical connection - Door reversibility . . . . . . . . . . . . . . . . . . . . . . . . . . . . . . . . . . . . . . . . .35
Installation - Building-in instructions . . . . . . . . . . . . . . . . . . . . . . . . . . . . . . . . . . . . . . . . . . . . . . . . . . . . . . .36
• Do not place carbonated or fizzy drinks in thefreezer as it creates pressure on the container,which may cause it to explode, resulting indamage to the appliance. Do not use amechanical device or any artificial means tospeed up the thawing process other than thoserecommended by the manufacturer. Never usemetal objects for cleaning your appliance as itmay get damaged.
Installation• During normal operation, the condenser and
compressor at the back of the appliance heat upconsiderably. For safety reasons, minimumventilation must be as shown in the instructions.
Attention: keep ventilation openings clear ofobstruction.
• Care must be taken to ensure that the appliancedoes not stand on the electrical supply cable.
Important: if the supply cord is damaged, it mustbe replaced by a special cord or assembly availa-ble from the manufacturer or its service agent.
• If the appliance is transported horizontally, it ispossible that the oil contained in the compressorflows in the refrigerant circuit. It is advisable towait at least two hours before connecting theappliance to allow the oil to flow back in thecompressor.
• There are working parts in this product whichheat up. Always ensure that there is adequateventilation as a failure to do this will result incomponent failure and possible food loss. Seeinstallation instructions.
• Parts which heat up should not be exposed.Wherever possible the back of the product shouldbe against a wall.
Environment ProtectionThis appliance does not contain gasses whichcould damage the ozone layer, in either itsrefrigerant circuit or insulation materials.Theappliance shall not be discarded together withthe urban refuse and rubbish. Avoid damagingthe cooling unit, especially at the rear near theheat exchanger. Information on your localdisposal sites may be obtained from municipalauthorities.The materials used on this appliancemarked by the symbol are recyclable.
Disposal of old Appliances
The symbol on the product or on its packagingindicates that this product may not be treated ashousehold waste. Instead it shall be handed over tothe applicable collection point for the recycling ofelectrical and electronic equipment. By ensuring thisproduct is disposed of correctly, you will help preventpotential negative consequences for theenvironment and human health, which couldotherwise be caused by inappropriate wastehandling of this product. For more detailedinformation about recycling of this product, pleasecontact your local city office, your household wastedisposal service or the shop where you purchasedthe product.
29
Cleaning the interiorBefore using the appliance for the first time, washthe interior and all internal accessories with luke-warm water and some neutral soap so as to removethe typical smell of a brand-new product, then drythoroughly.
USE
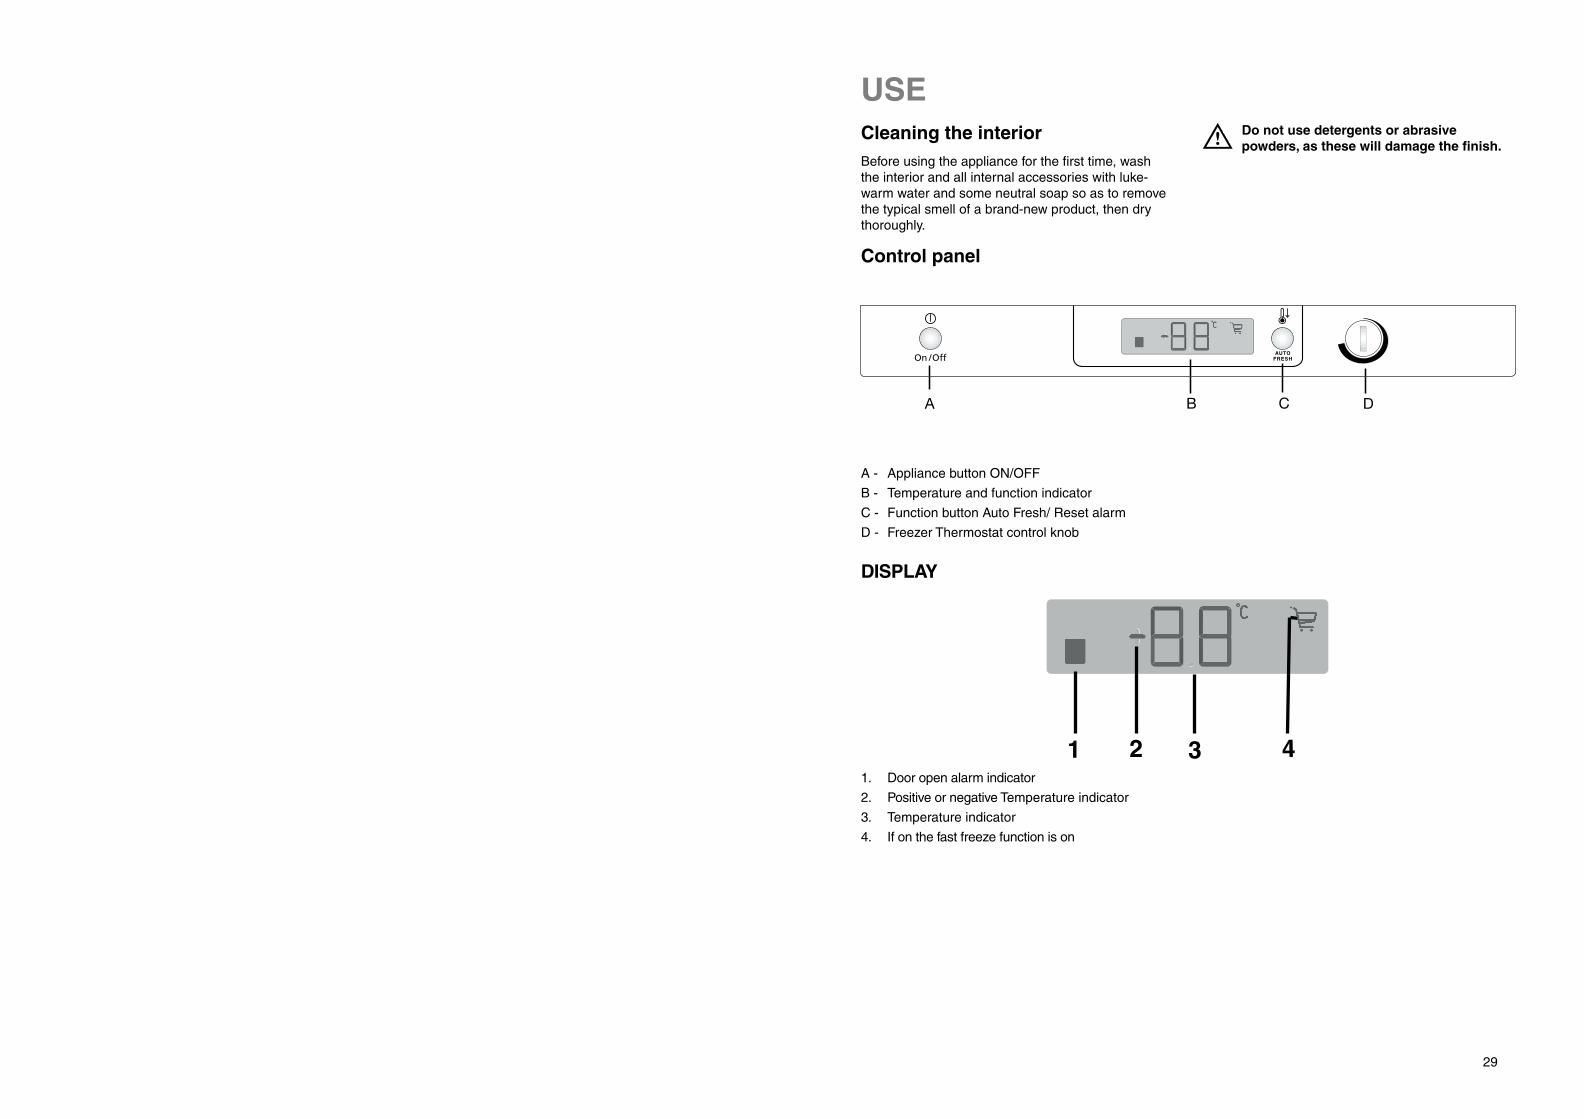
Control panel
Do not use detergents or abrasivepowders, as these will damage the finish.
A - Appliance button ON/OFF
B - Temperature and function indicator
C - Function button Auto Fresh/ Reset alarm
D - Freezer Thermostat control knob
DISPLAY
1. Door open alarm indicator
2. Positive or negative Temperature indicator
3. Temperature indicator
4. If on the fast freeze function is on
� � �
� � � �
�������
30
Switching offThe appliance is shut off by holding down key (A) formore than 1 second. After this, a countdown of thetemperature from -3 -2 -1 will be shown.
When the appliance is shut off, display (B) also goesoff.
Activation of functionsEach time key C is pressed, the following functions areactivated in a clockwise direction:
Symbol 4 : rapid freezing function.
No Symbol: Normal operation
Operation
After plugging the plug into the power outlet, if thedisplay is not illuminated, press key (A), appliance on.
As soon as the appliance is turned on, the followingsignals will appear on the control panel:
• symbol (2) will be positive, indicating that thetemperature is positive.
Place the freezer thermostat control knob (D) in amiddle position, and the appliance will be set up toprovide the following temperature:
roughly +5°C in the refrigerator.
Fresh food refrigerationTo obtain the best performance:
• do not store warm food or evaporating liquids inthe refrigerator;
• do cover or wrap the food, particularly if it has astrong flavour.
• Position food so that air can circulate freely roundit.
Temperature regulationThe temperature is automatically regulated and canbe increased to achieve a higher temperature(warmer) or reduced (colder) by rotating thethermostat knob clockwise.
However, the exact setting should be chosenkeeping in mind that the temperature inside therefrigerator depends on:
• room temperature;
• how often the door is opened;
• the quantity of food stored;
• location of appliance.
We suggest placing the knob in the middle position toobtain an internal temperature of approximately +5° C.
Important
If the ambient temperature is high or theappliance is fully loaded, and the appliance isset to the lowest temperatures, it may runcontinuously causing frost to form on the rearwall. In this case the dial must be set to a highertemperature to allow automatic defrosting andtherefore reduced energy consumption.
Use of the fridge compartment
Shopping Function
If you need to insert a large amount of warm food, forexample after doing the grocery shopping, we suggestactivating the Shopping function to chill the productsmore rapidly and to avoid warming the other foodwhich is already in the refrigerator and/or freezer.
The shopping function is activated by pressing key C(several times if necessary) until the corresponding
icon appears
The shopping function shuts off automatically afterapproximately 6 hours.
It is possible to de-activate the function at any time bypressing key C (see paragraph "Function Activation").
Door open acoustic alarmAn acoustic alarm will sound when the door is leftopen for around 5 minutes.
The door open alarm conditions are indicated by:
- flashing symbol (1);
- red display illumination;
- beeping sound.
Press the button (C) to stop the acoustic alarm.
When normal conditions are restored (door closed):
- the acoustic alarm will stop.
31
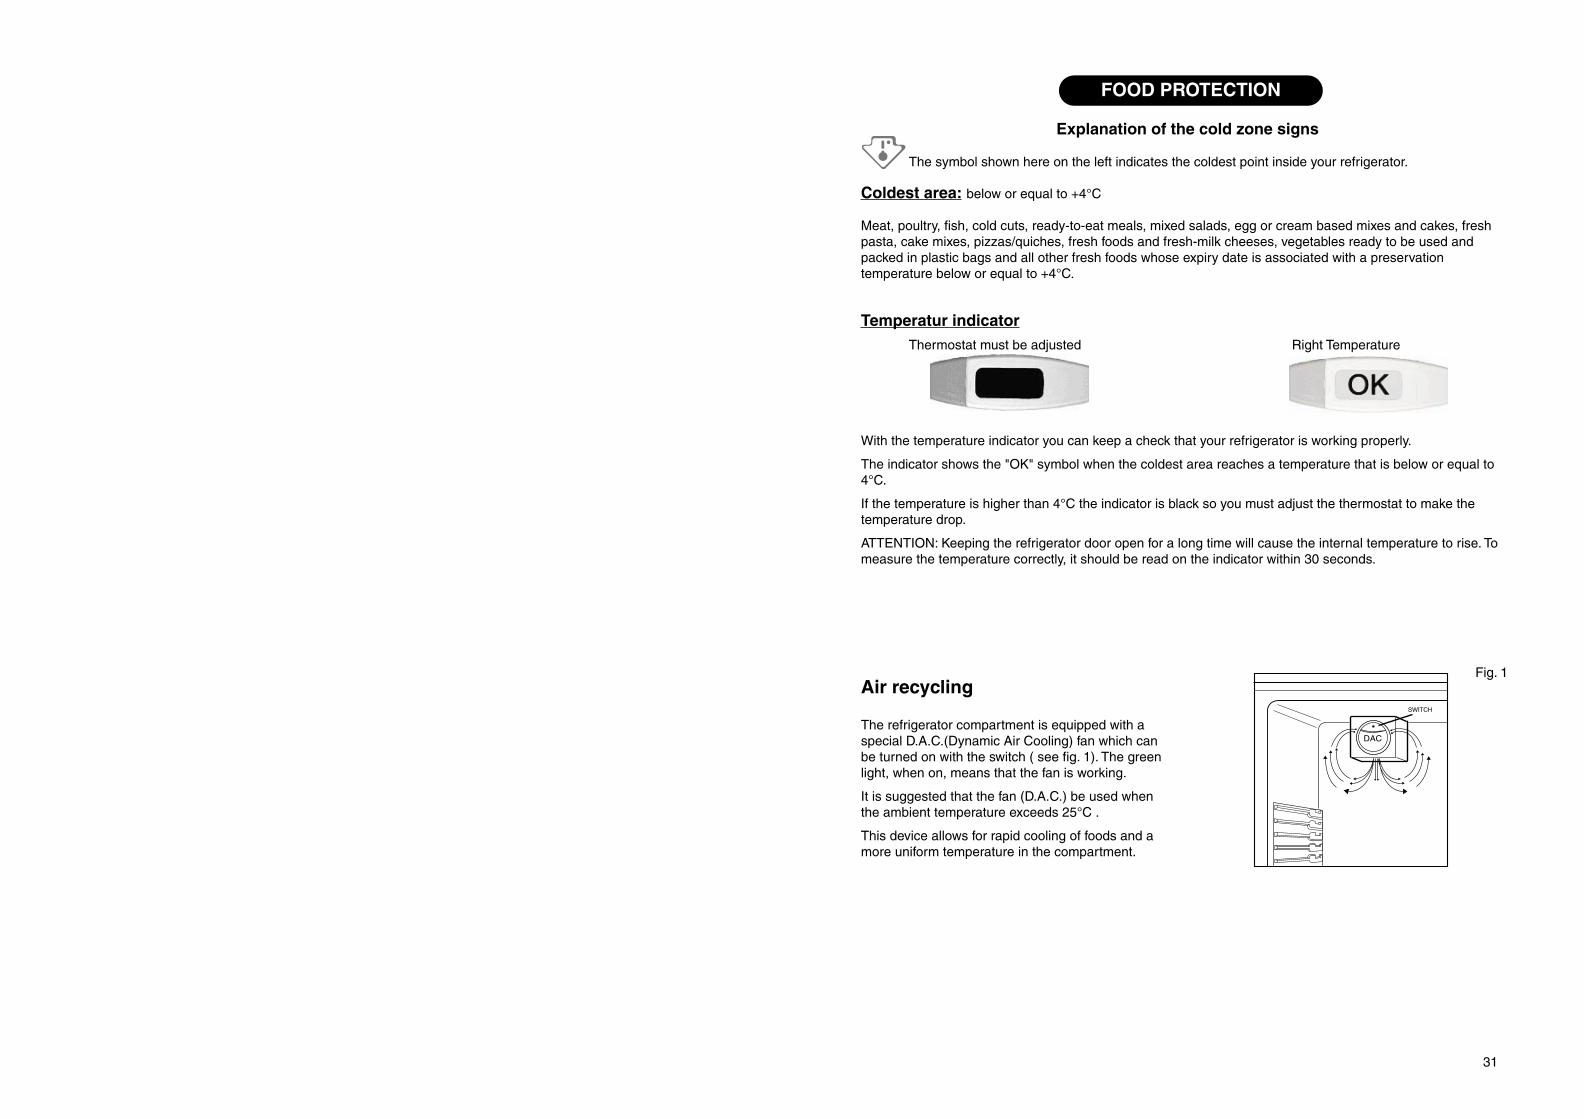
Explanation of the cold zone signs
The symbol shown here on the left indicates the coldest point inside your refrigerator.
Coldest area: below or equal to +4°C
Meat, poultry, fish, cold cuts, ready-to-eat meals, mixed salads, egg or cream based mixes and cakes, freshpasta, cake mixes, pizzas/quiches, fresh foods and fresh-milk cheeses, vegetables ready to be used andpacked in plastic bags and all other fresh foods whose expiry date is associated with a preservationtemperature below or equal to +4°C.
Temperatur indicatorThermostat must be adjusted Right Temperature
With the temperature indicator you can keep a check that your refrigerator is working properly.
The indicator shows the "OK" symbol when the coldest area reaches a temperature that is below or equal to4°C.
If the temperature is higher than 4°C the indicator is black so you must adjust the thermostat to make thetemperature drop.
ATTENTION: Keeping the refrigerator door open for a long time will cause the internal temperature to rise. Tomeasure the temperature correctly, it should be read on the indicator within 30 seconds.
FOOD PROTECTION
Air recycling
The refrigerator compartment is equipped with aspecial D.A.C.(Dynamic Air Cooling) fan which canbe turned on with the switch ( see fig. 1). The greenlight, when on, means that the fan is working.
It is suggested that the fan (D.A.C.) be used whenthe ambient temperature exceeds 25°C .
This device allows for rapid cooling of foods and amore uniform temperature in the compartment.
�����
Fig. 1
HINTS
32
����
Hints for refrigerationUseful hints:
Meat (all types): wrap in polythene bags and placeon the glass shelf above the vegetable drawer.
For safety, store in this way only one or two daysat the most.
Cooked foods, cold dishes, etc..: these should becovered and may be placed on any shelf.
Fruit and vegetables: these should be thoroughlycleaned and placed in the special drawer(s)provided.
Butter and cheese: these should be placed inspecial airtight containers or wrapped in aluminiumfoil or polythene bags to exclude as much air aspossible.
Milk bottles: these should have a cap and shouldbe stored in the bottle rack on the door.
Bananas, potatoes, onions and garlic, if notpacked, must not be kept in the refrigerator.
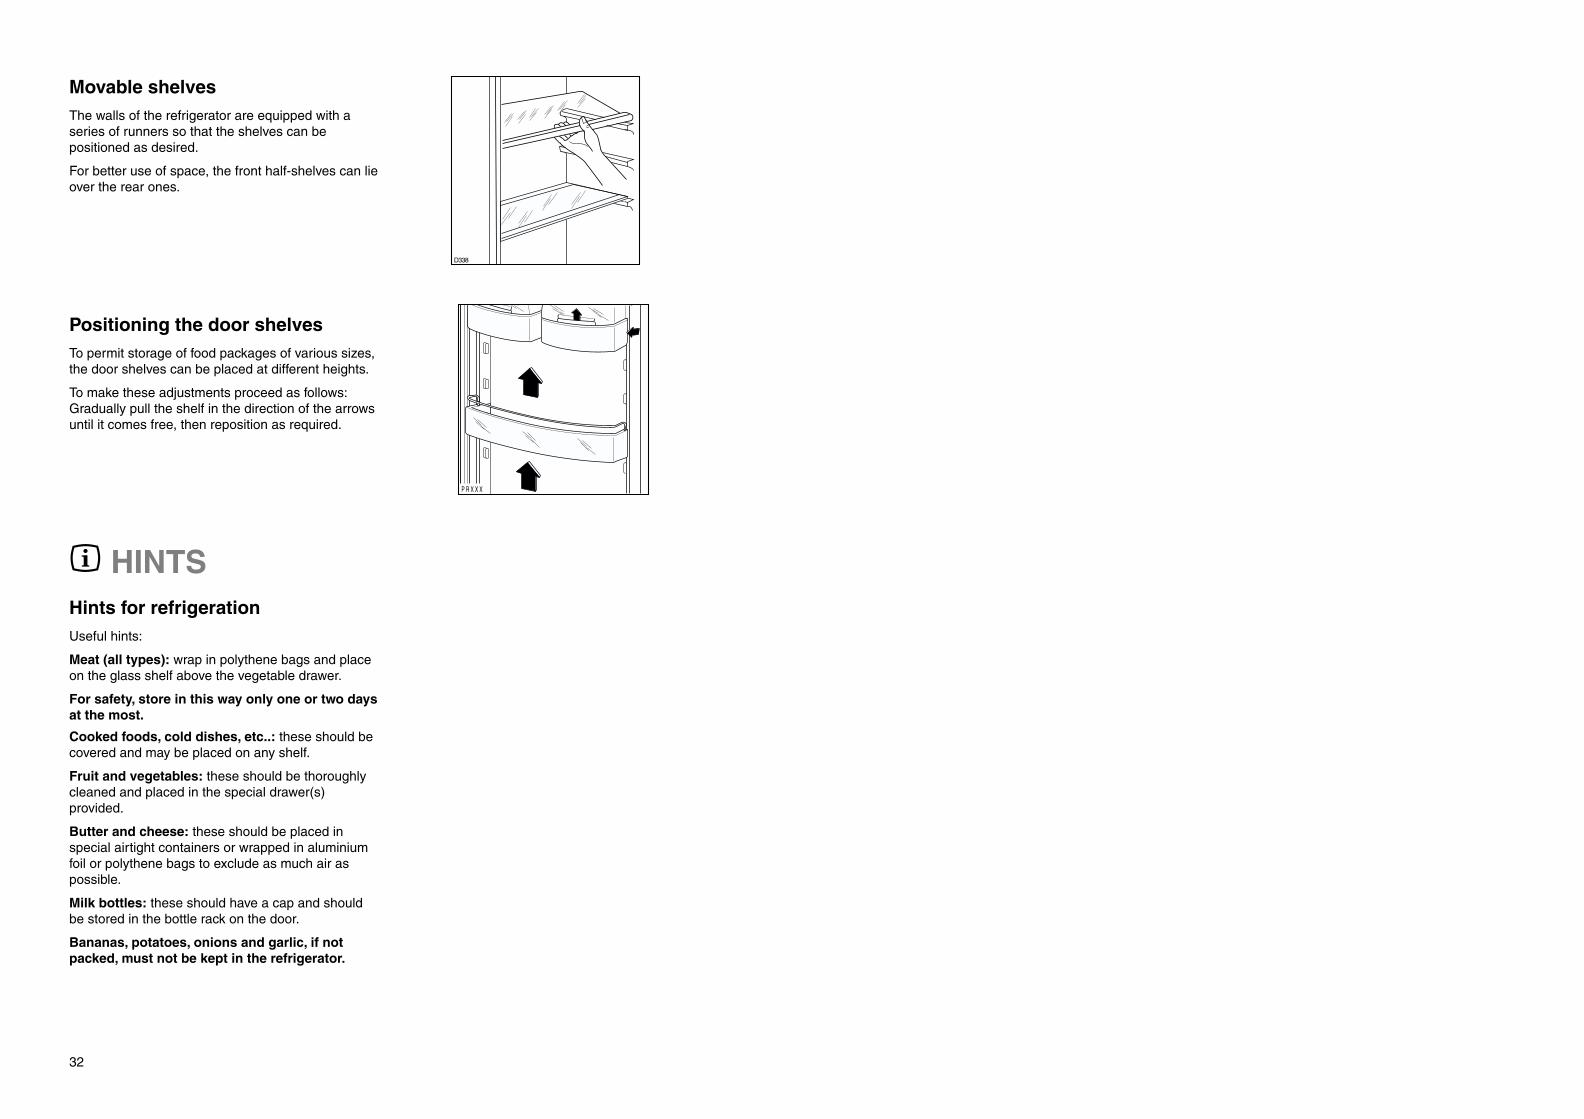
Positioning the door shelvesTo permit storage of food packages of various sizes,the door shelves can be placed at different heights.
To make these adjustments proceed as follows:Gradually pull the shelf in the direction of the arrowsuntil it comes free, then reposition as required.
Movable shelvesThe walls of the refrigerator are equipped with aseries of runners so that the shelves can bepositioned as desired.
For better use of space, the front half-shelves can lieover the rear ones.
� � � � �
33
MAINTENANCE
Unplug the appliance before carrying outany maintenance operation.
Warning
This appliance contains hydrocarbons in its coolingunit; maintenance and recharging must thereforeonly be carried out by authorized technicians.
Periodic cleaningClean the inside with warm water and bicarbonate ofsoda. Rinse and dry thoroughly.
Clean the condenser (black grill) and thecompressor at the back of the appliance with abrush or a vacuum cleaner. This operstion willimprove the performance of the appliance and saveelectricity consumption.
Periods of non-operationWhen the appliance is not in use for long periods,take the following precautions:
remove the plug from the wall socket;
remove all food;
defrost and clean the interior and all accessories;
leave the door ajar to allow air to circulate to preventunpleasant smells.
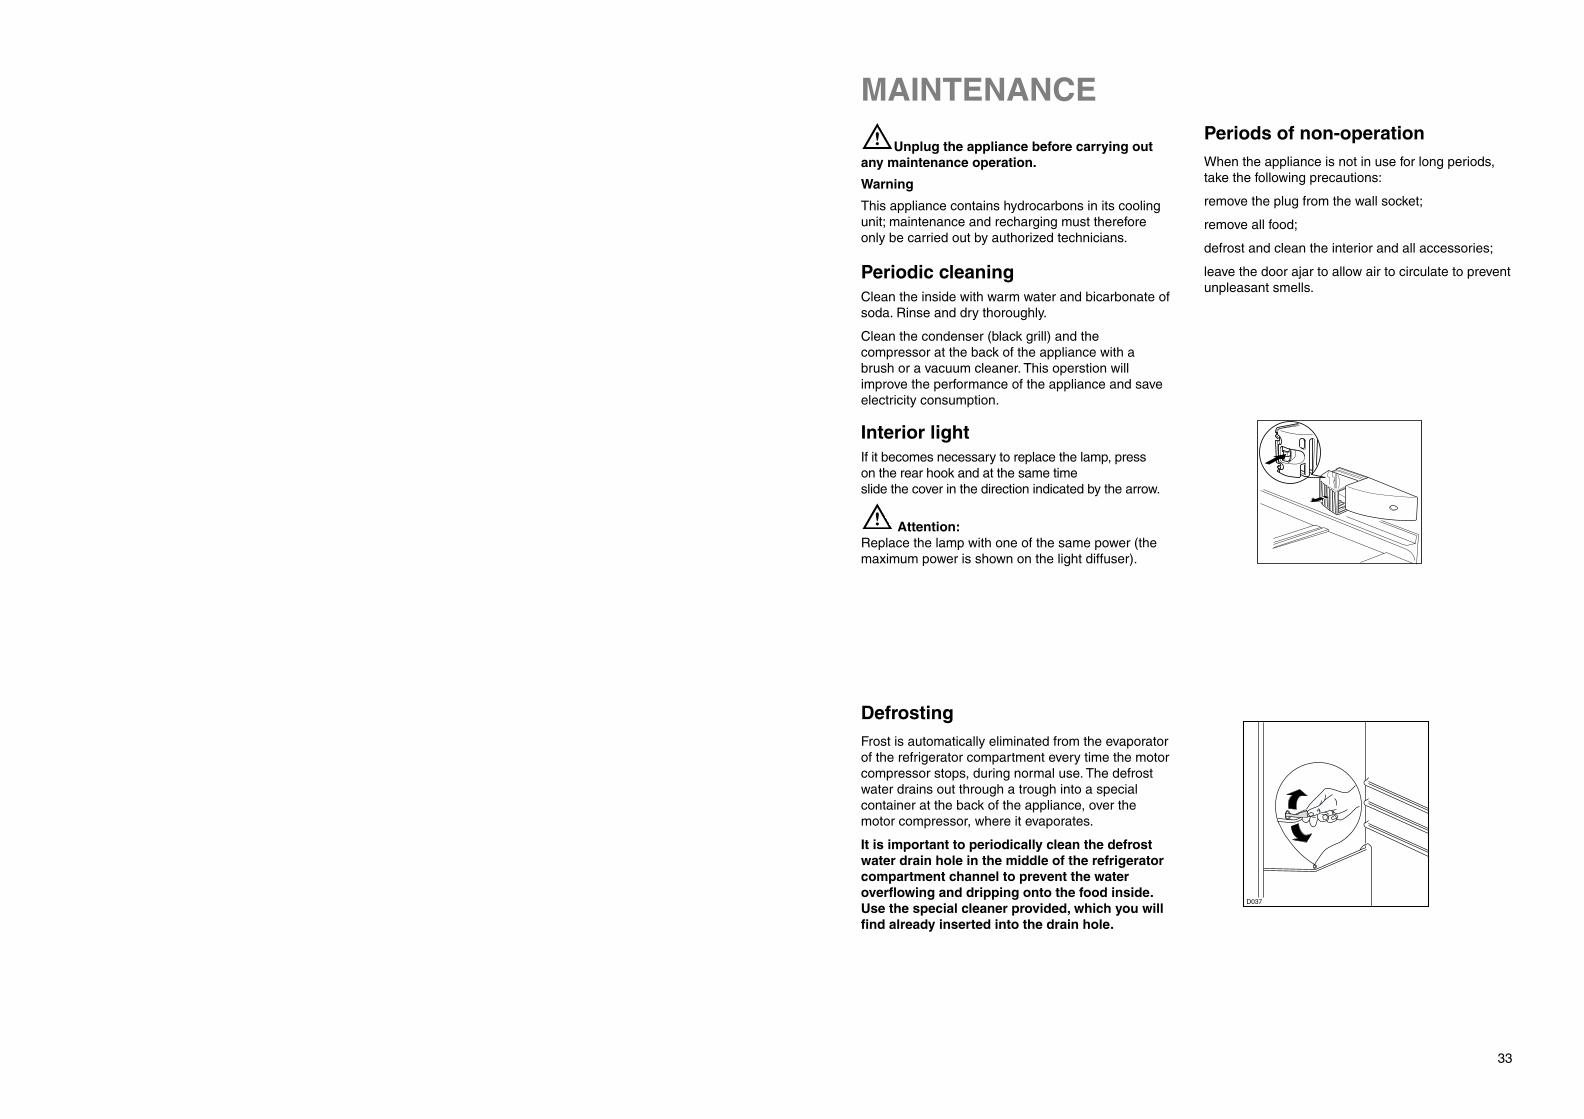
Interior lightIf it becomes necessary to replace the lamp, press on the rear hook and at the same time slide the cover in the direction indicated by the arrow.
Attention:Replace the lamp with one of the same power (themaximum power is shown on the light diffuser).
DefrostingFrost is automatically eliminated from the evaporatorof the refrigerator compartment every time the motorcompressor stops, during normal use. The defrostwater drains out through a trough into a specialcontainer at the back of the appliance, over themotor compressor, where it evaporates.
It is important to periodically clean the defrostwater drain hole in the middle of the refrigeratorcompartment channel to prevent the wateroverflowing and dripping onto the food inside.Use the special cleaner provided, which you willfind already inserted into the drain hole.
� ��
34
INSTALLATIONLocationThe appliance should be installed well away fromsources of heat such as radiators, boilers, directsunlight etc.
ATTENTION!
It must be possible to disconnect the appliance fromthe mains power supply; the plug must therefore beeasily accessible after installation.
CUSTOMER SERVICE AND SPARE PARTSIf the appliance is not functioning properly, checkthat:
• the plug is firmly in the wall socket and the mainspower switch is on;
• there is an electricity supply (find out by pluggingin another appliance);
• the thermostat knob is in the correct position.
• If there are water drops on the bottom of thecabinet, check that the defrost water drain
opening is not obstructed (see “Defrosting”section).
• If your appliance is still not working properly aftermaking the above checks, contact the nearestservice centre.
To obtain fast service, it is essential that when youapply for it you specify the model and serial numberof your appliance which can be found on theguarantee certificate or on the rating plate locatedinside the appliance, on the bottom left-hand side.
TECHNICAL INFORMATIONThe technical infomation are situated in the rating plate on the internal left side of the appliance .
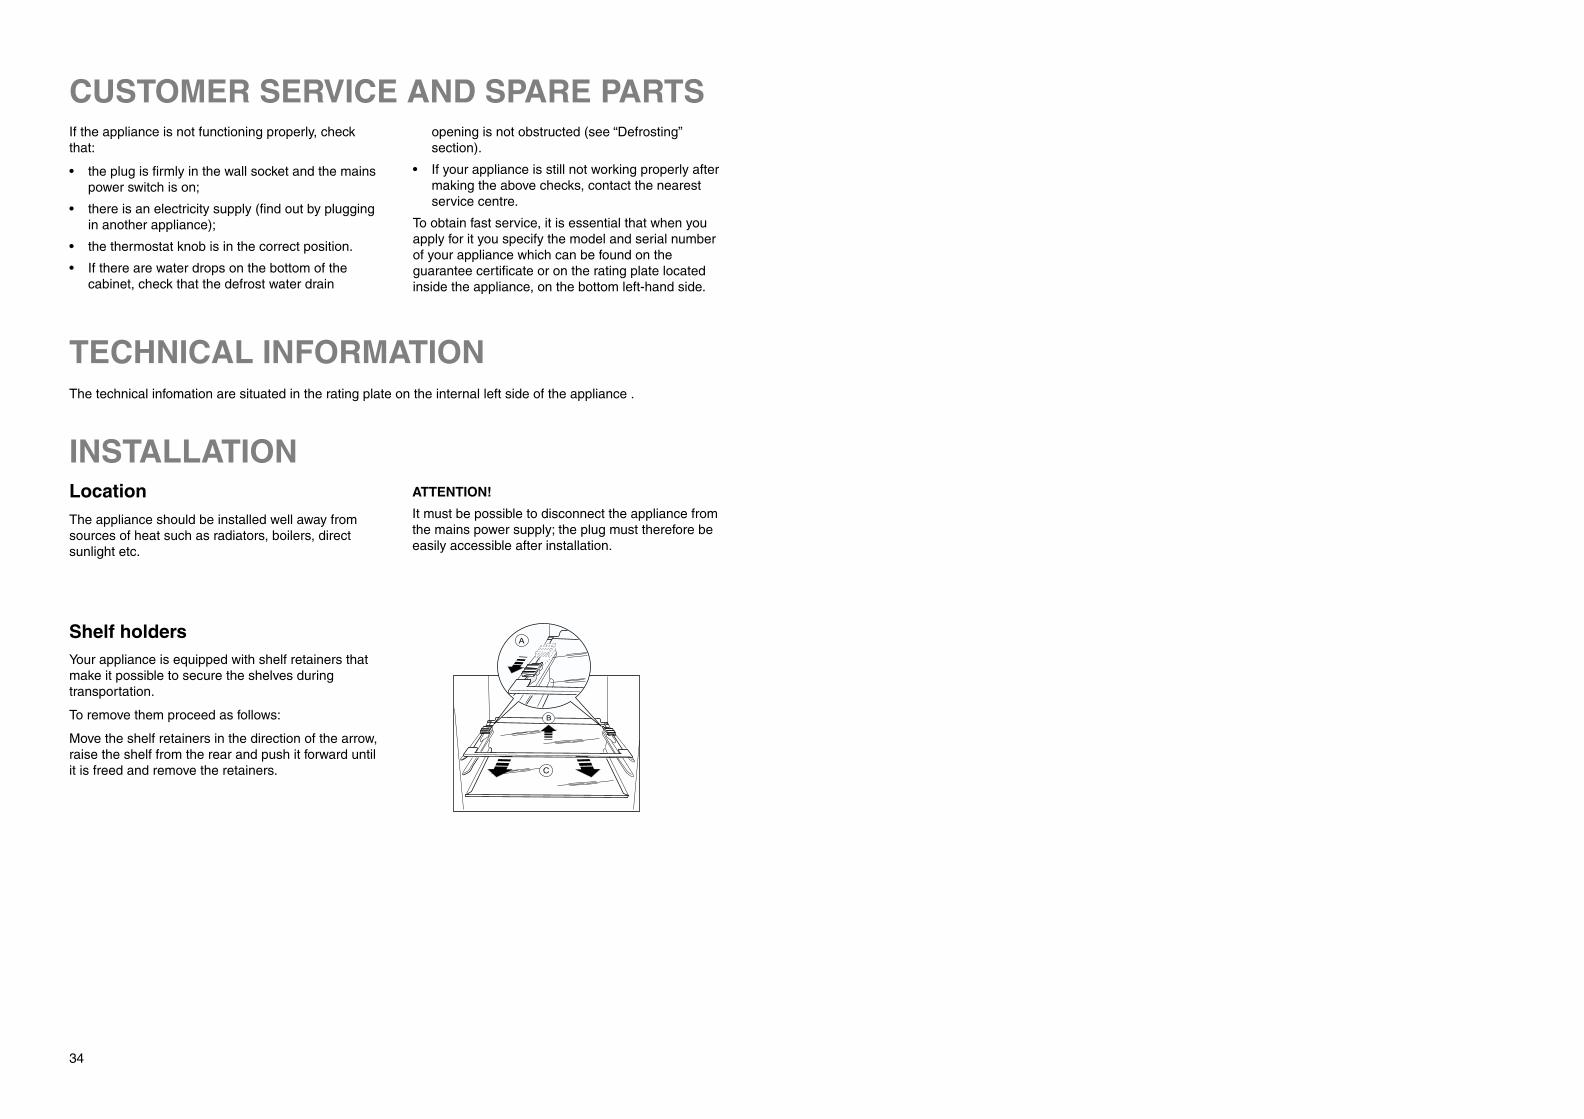
Shelf holdersYour appliance is equipped with shelf retainers thatmake it possible to secure the shelves duringtransportation.
To remove them proceed as follows:
Move the shelf retainers in the direction of the arrow,raise the shelf from the rear and push it forward untilit is freed and remove the retainers.
�
�
�
35
Electrical connectionBefore plugging in, ensure that the voltage andfrequency shown on the serial number platecorrespond to your domestic power supply. Voltagecan vary by ±6% of the rated voltage.
For operation with different voltages, a suitably sizedauto-transformer must be used.
The appliance must be earthed.
The power supply cable plug is provided with acontact for this purpose.
If the domestic power supply socket is not earthed,connect the appliance to a separate earth incompliance with current regulations, consulting aspecialist technician.
The Manufacturer declines all responsibility ifthe above safety precautions are not observed.
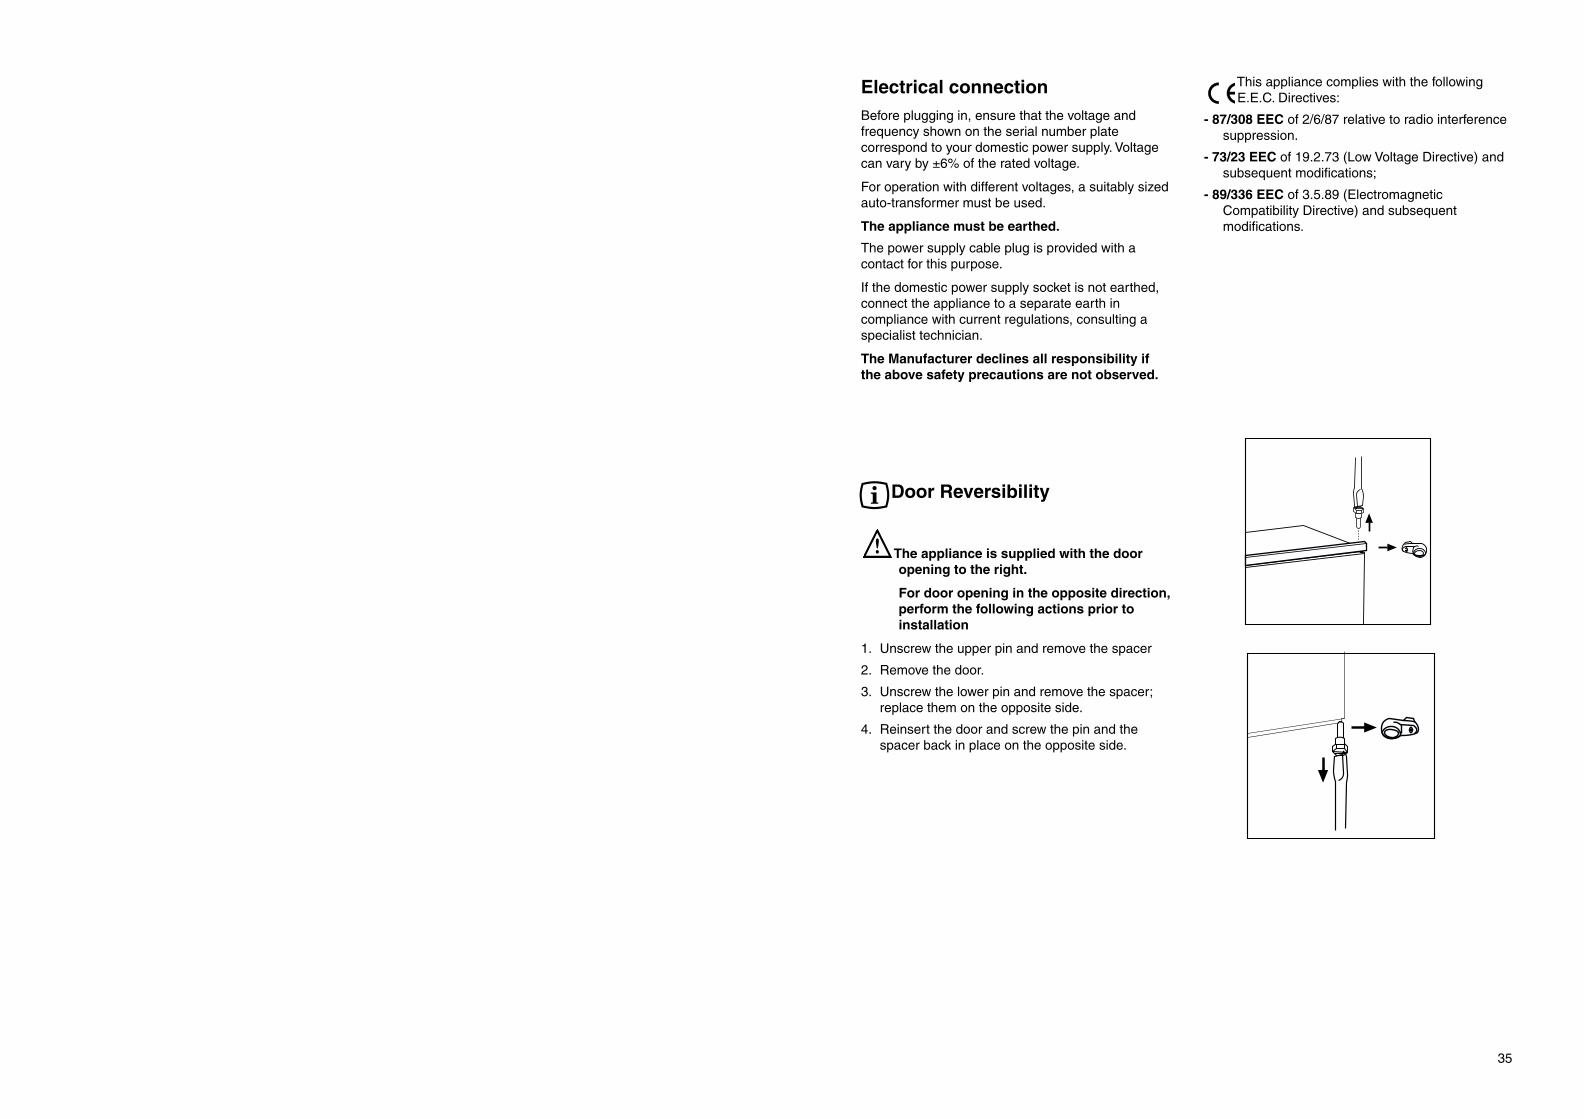
Door Reversibility
The appliance is supplied with the dooropening to the right.
For door opening in the opposite direction,perform the following actions prior toinstallation
1. Unscrew the upper pin and remove the spacer
2. Remove the door.
3. Unscrew the lower pin and remove the spacer;replace them on the opposite side.
4. Reinsert the door and screw the pin and thespacer back in place on the opposite side.
This appliance complies with the followingE.E.C. Directives:
- 87/308 EEC of 2/6/87 relative to radio interferencesuppression.
- 73/23 EEC of 19.2.73 (Low Voltage Directive) andsubsequent modifications;
- 89/336 EEC of 3.5.89 (ElectromagneticCompatibility Directive) and subsequentmodifications.

36
�� �
�����
�
�
Building-in instructionsDimensions of housing
Height (1) 1780 mm
Depth (2) 550 mm
Width (3) 560 mm
For safety reasons, minimum ventilation must be asshown in Fig.
Attention: keep ventilation openings clear ofobstruction.
It is necessary that the niche is provided with aconduct of ventilation having the followingdimensions:
Depth 50 mm
Width 540 mm
� �
��� ��
��
���
����
Fit the appliance in the niche by making sure that itstands against the interior surface of the unit on theside where the door hinges of the appliances arefitted. Insert the appliance until the upper strip buttsup against the unit (1) and make sure that the lowerhinge is in line with the surface of the unit (2).
�
�
��
���
����
Drill the unit using a Ø 2.5 mm drill (10 mm max.penetration);
Fix the square fitting to the appliance.
37
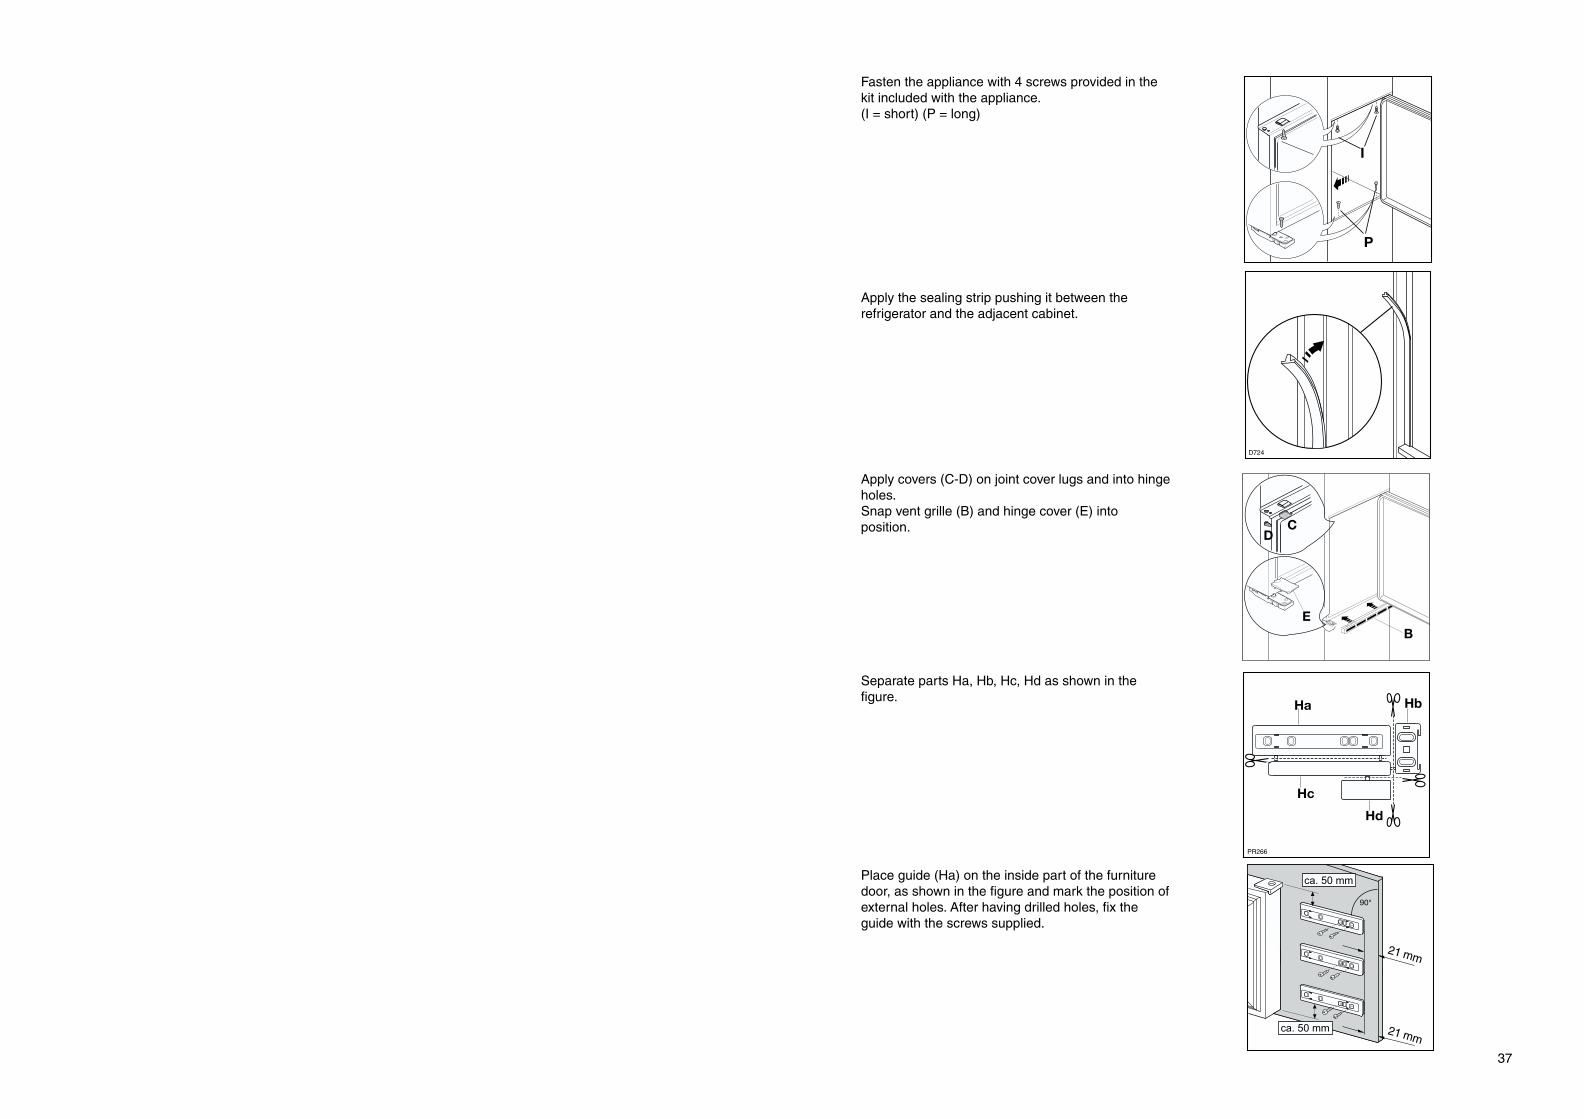
Apply covers (C-D) on joint cover lugs and into hingeholes.Snap vent grille (B) and hinge cover (E) intoposition.
����
�� ��
��
��
Separate parts Ha, Hb, Hc, Hd as shown in thefigure.
��
�
Place guide (Ha) on the inside part of the furnituredoor, as shown in the figure and mark the position ofexternal holes. After having drilled holes, fix theguide with the screws supplied.
�
���������
���
���������
�
���
Apply the sealing strip pushing it between therefrigerator and the adjacent cabinet.
�
Fasten the appliance with 4 screws provided in thekit included with the appliance.(I = short) (P = long)
38
After having reversed the opening direction ofthe doors check that all the screws are properlytightened and that the magnetic seal adheres tothe cabinet. If the ambient temperature is cold(i.e. in Winter), the gasket may not fit perfectly tothe cabinet. In that case, wait for the naturalfitting of the gasket or accelerate this process byheating up the part involved with a normalhairdrier.
�����
��
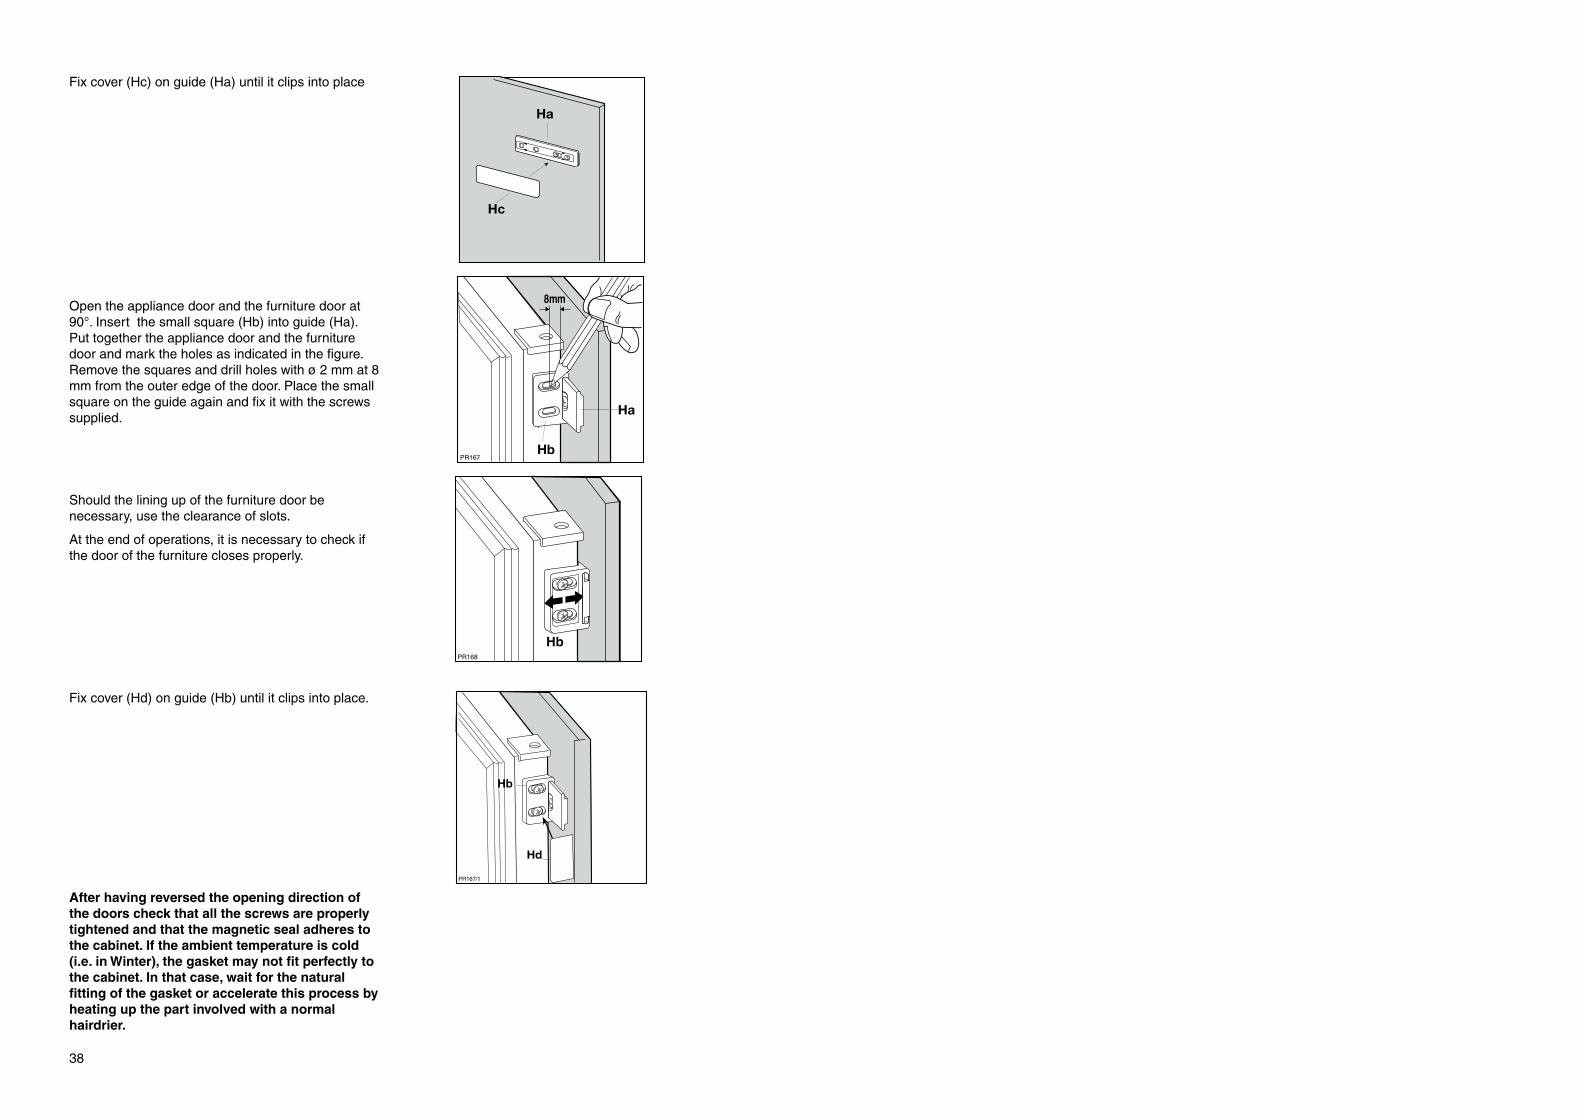
Should the lining up of the furniture door benecessary, use the clearance of slots.
At the end of operations, it is necessary to check ifthe door of the furniture closes properly.
�������
��
��
Fix cover (Hd) on guide (Hb) until it clips into place.
Fix cover (Hc) on guide (Ha) until it clips into place
����
��
��
�����
��
��
���Open the appliance door and the furniture door at90°. Insert the small square (Hb) into guide (Ha).Put together the appliance door and the furnituredoor and mark the holes as indicated in the figure.Remove the squares and drill holes with ø 2 mm at 8mm from the outer edge of the door. Place the smallsquare on the guide again and fix it with the screwssupplied.