RabbitMQ for .NET Developers Part1-Notes
99
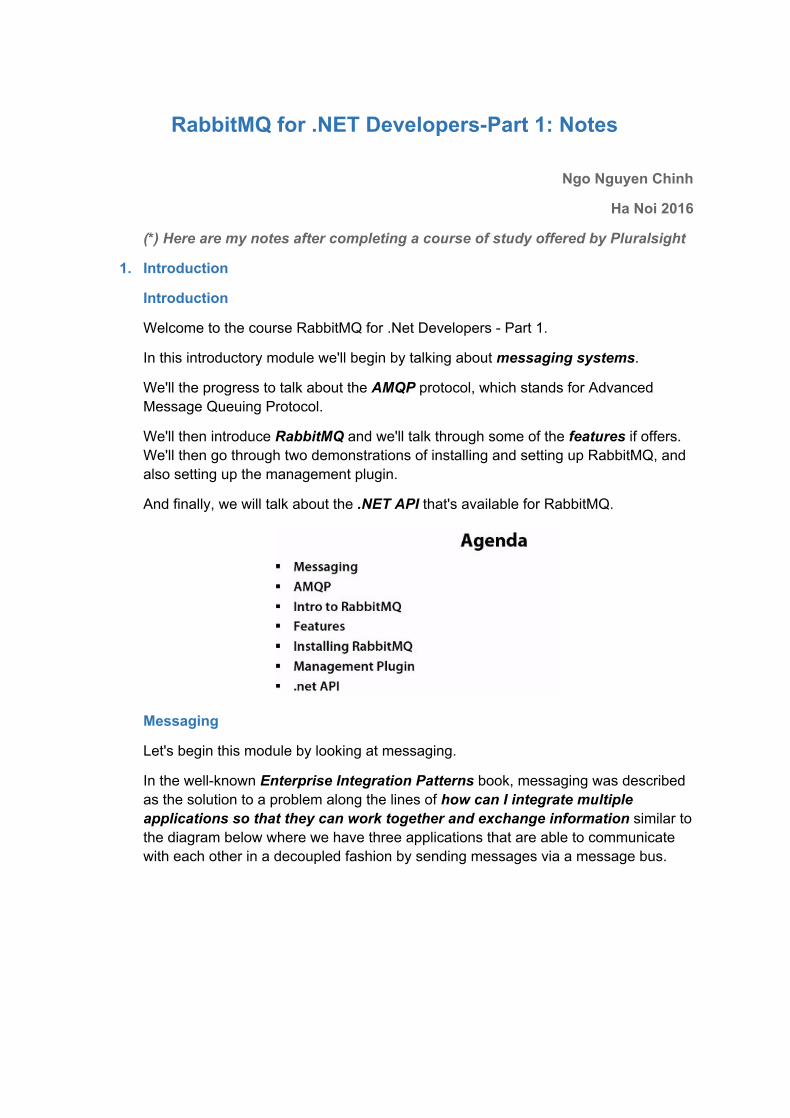
RabbitMQ for .NET DevelopersPart 1: Notes Ngo Nguyen Chinh Ha Noi 2016 (*) Here are my notes after completing a course of study offered by Pluralsight 1. Introduction Introduction Welcome to the course RabbitMQ for .Net Developers Part 1. In this introductory module we'll begin by talking about messaging systems. We'll the progress to talk about the AMQP protocol, which stands for Advanced Message Queuing Protocol. We'll then introduce RabbitMQ and we'll talk through some of the features if offers. We'll then go through two demonstrations of installing and setting up RabbitMQ, and also setting up the management plugin. And finally, we will talk about the .NET API that's available for RabbitMQ. Messaging Let's begin this module by looking at messaging. In the wellknown Enterprise Integration Patterns book, messaging was described as the solution to a problem along the lines of how can I integrate multiple applications so that they can work together and exchange information similar to the diagram below where we have three applications that are able to communicate with each other in a decoupled fashion by sending messages via a message bus.
-
Upload
chinh-nguyen -
Category
Technology
-
view
502 -
download
2
Transcript of RabbitMQ for .NET Developers Part1-Notes
RabbitMQ for .NET DevelopersPart 1: Notes
Ngo Nguyen Chinh
Ha Noi 2016
(*) Here are my notes after completing a course of study offered by Pluralsight
1. Introduction
Introduction
Welcome to the course RabbitMQ for .Net Developers Part 1.
In this introductory module we'll begin by talking about messaging systems.
We'll the progress to talk about the AMQP protocol, which stands for Advanced Message Queuing Protocol.
We'll then introduce RabbitMQ and we'll talk through some of the features if offers. We'll then go through two demonstrations of installing and setting up RabbitMQ, and also setting up the management plugin.
And finally, we will talk about the .NET API that's available for RabbitMQ.
Messaging
Let's begin this module by looking at messaging.
In the wellknown Enterprise Integration Patterns book, messaging was described as the solution to a problem along the lines of how can I integrate multiple applications so that they can work together and exchange information similar to the diagram below where we have three applications that are able to communicate with each other in a decoupled fashion by sending messages via a message bus.
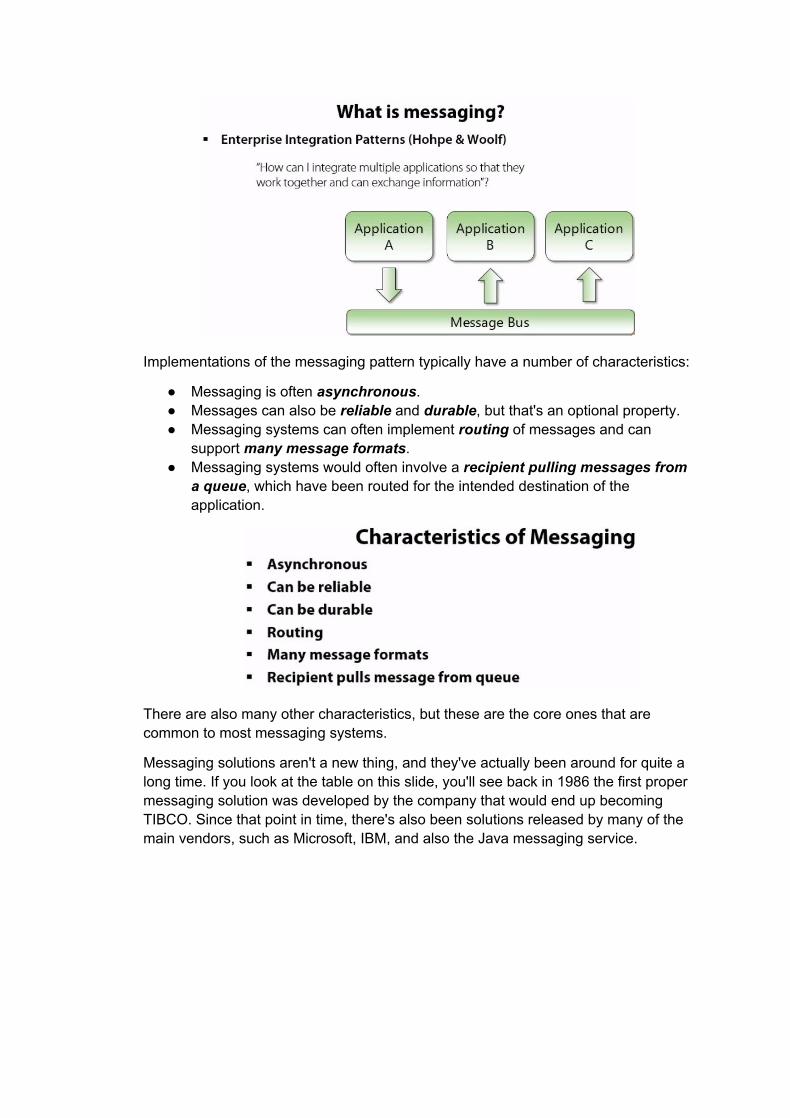
Implementations of the messaging pattern typically have a number of characteristics:
● Messaging is often asynchronous. ● Messages can also be reliable and durable, but that's an optional property. ● Messaging systems can often implement routing of messages and can
support many message formats. ● Messaging systems would often involve a recipient pulling messages from
a queue, which have been routed for the intended destination of the application.
There are also many other characteristics, but these are the core ones that are common to most messaging systems.
Messaging solutions aren't a new thing, and they've actually been around for quite a long time. If you look at the table on this slide, you'll see back in 1986 the first proper messaging solution was developed by the company that would end up becoming TIBCO. Since that point in time, there's also been solutions released by many of the main vendors, such as Microsoft, IBM, and also the Java messaging service.
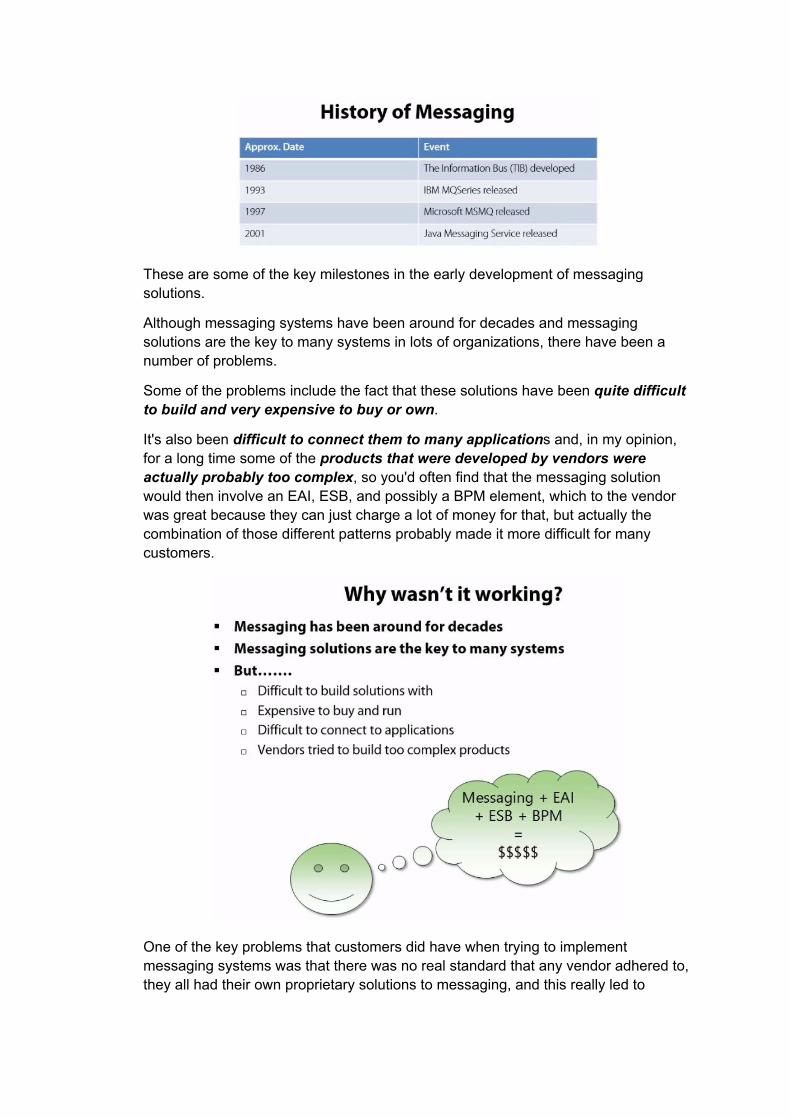
These are some of the key milestones in the early development of messaging solutions.
Although messaging systems have been around for decades and messaging solutions are the key to many systems in lots of organizations, there have been a number of problems.
Some of the problems include the fact that these solutions have been quite difficult to build and very expensive to buy or own.
It's also been difficult to connect them to many applications and, in my opinion, for a long time some of the products that were developed by vendors were actually probably too complex, so you'd often find that the messaging solution would then involve an EAI, ESB, and possibly a BPM element, which to the vendor was great because they can just charge a lot of money for that, but actually the combination of those different patterns probably made it more difficult for many customers.
One of the key problems that customers did have when trying to implement messaging systems was that there was no real standard that any vendor adhered to, they all had their own proprietary solutions to messaging, and this really led to
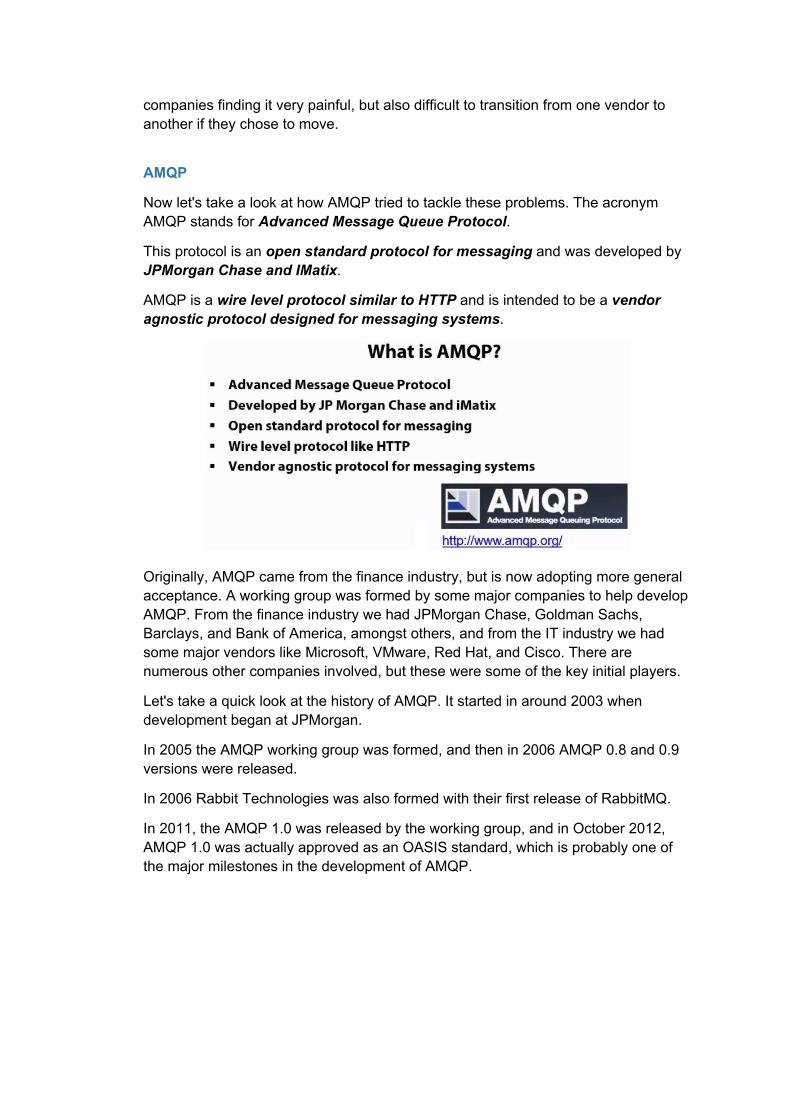
companies finding it very painful, but also difficult to transition from one vendor to another if they chose to move.
AMQP
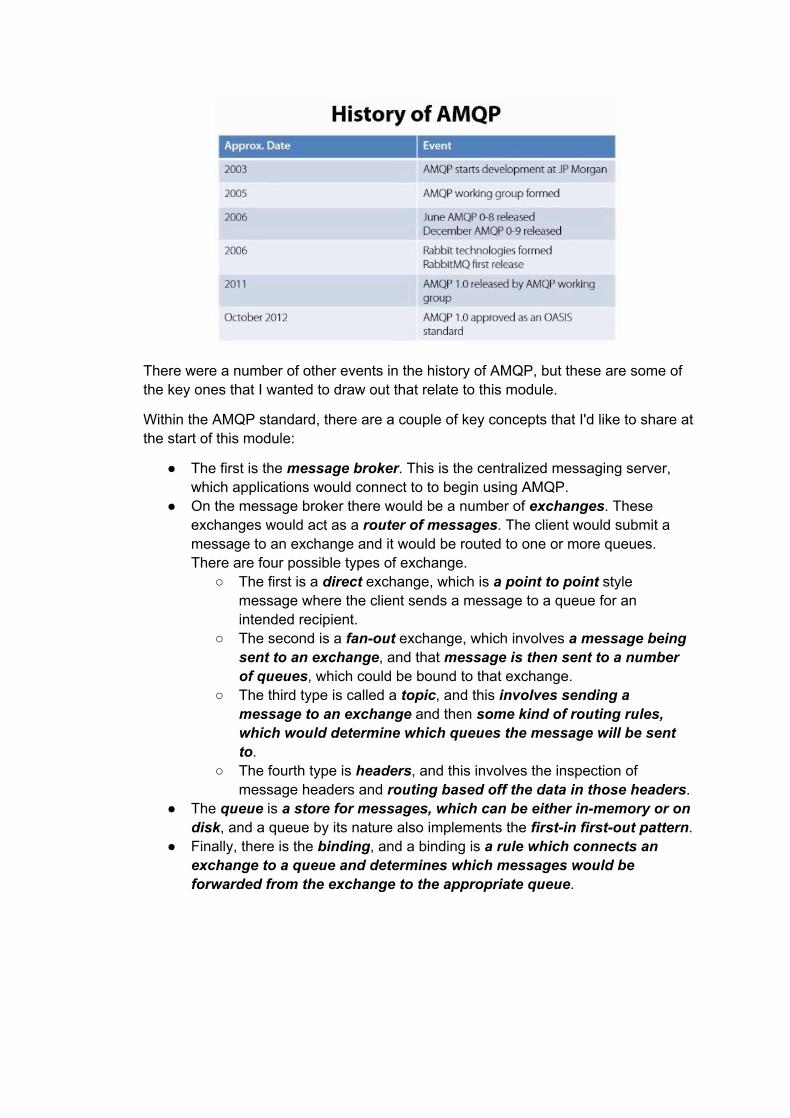
Now let's take a look at how AMQP tried to tackle these problems. The acronym AMQP stands for Advanced Message Queue Protocol.
This protocol is an open standard protocol for messaging and was developed by JPMorgan Chase and IMatix.
AMQP is a wire level protocol similar to HTTP and is intended to be a vendor agnostic protocol designed for messaging systems.
Originally, AMQP came from the finance industry, but is now adopting more general acceptance. A working group was formed by some major companies to help develop AMQP. From the finance industry we had JPMorgan Chase, Goldman Sachs, Barclays, and Bank of America, amongst others, and from the IT industry we had some major vendors like Microsoft, VMware, Red Hat, and Cisco. There are numerous other companies involved, but these were some of the key initial players.
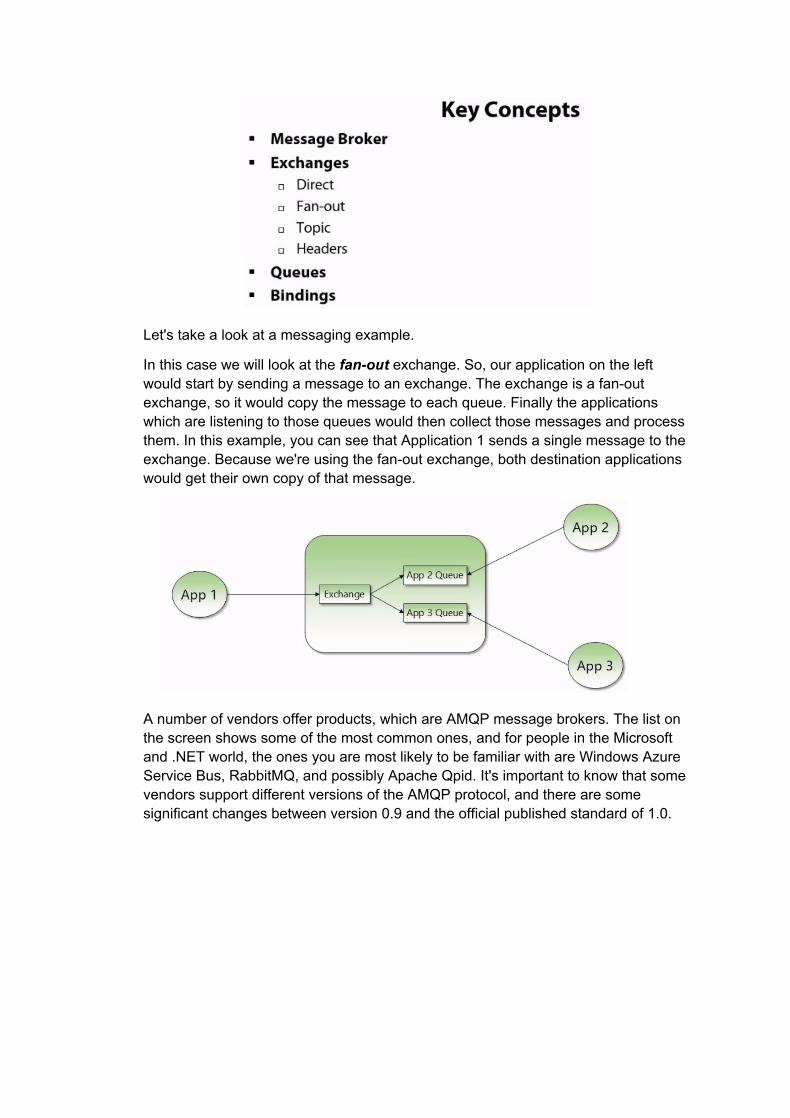
Let's take a quick look at the history of AMQP. It started in around 2003 when development began at JPMorgan.
In 2005 the AMQP working group was formed, and then in 2006 AMQP 0.8 and 0.9 versions were released.
In 2006 Rabbit Technologies was also formed with their first release of RabbitMQ.
In 2011, the AMQP 1.0 was released by the working group, and in October 2012, AMQP 1.0 was actually approved as an OASIS standard, which is probably one of the major milestones in the development of AMQP.
There were a number of other events in the history of AMQP, but these are some of the key ones that I wanted to draw out that relate to this module.
Within the AMQP standard, there are a couple of key concepts that I'd like to share at the start of this module:
● The first is the message broker. This is the centralized messaging server, which applications would connect to to begin using AMQP.
● On the message broker there would be a number of exchanges. These exchanges would act as a router of messages. The client would submit a message to an exchange and it would be routed to one or more queues. There are four possible types of exchange.
○ The first is a direct exchange, which is a point to point style message where the client sends a message to a queue for an intended recipient.
○ The second is a fanout exchange, which involves a message being sent to an exchange, and that message is then sent to a number of queues, which could be bound to that exchange.
○ The third type is called a topic, and this involves sending a message to an exchange and then some kind of routing rules, which would determine which queues the message will be sent to.
○ The fourth type is headers, and this involves the inspection of message headers and routing based off the data in those headers.
● The queue is a store for messages, which can be either inmemory or on disk, and a queue by its nature also implements the firstin firstout pattern.
● Finally, there is the binding, and a binding is a rule which connects an exchange to a queue and determines which messages would be forwarded from the exchange to the appropriate queue.
Let's take a look at a messaging example.
In this case we will look at the fanout exchange. So, our application on the left would start by sending a message to an exchange. The exchange is a fanout exchange, so it would copy the message to each queue. Finally the applications which are listening to those queues would then collect those messages and process them. In this example, you can see that Application 1 sends a single message to the exchange. Because we're using the fanout exchange, both destination applications would get their own copy of that message.
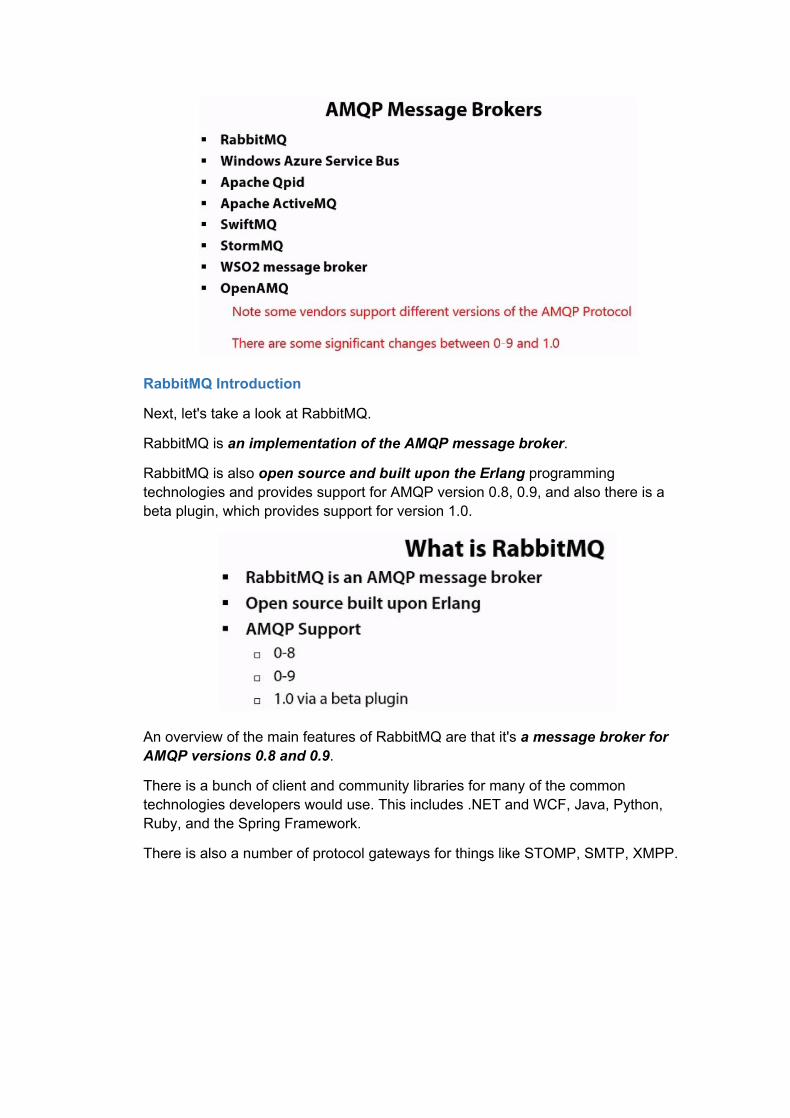
A number of vendors offer products, which are AMQP message brokers. The list on the screen shows some of the most common ones, and for people in the Microsoft and .NET world, the ones you are most likely to be familiar with are Windows Azure Service Bus, RabbitMQ, and possibly Apache Qpid. It's important to know that some vendors support different versions of the AMQP protocol, and there are some significant changes between version 0.9 and the official published standard of 1.0.
RabbitMQ Introduction
Next, let's take a look at RabbitMQ.
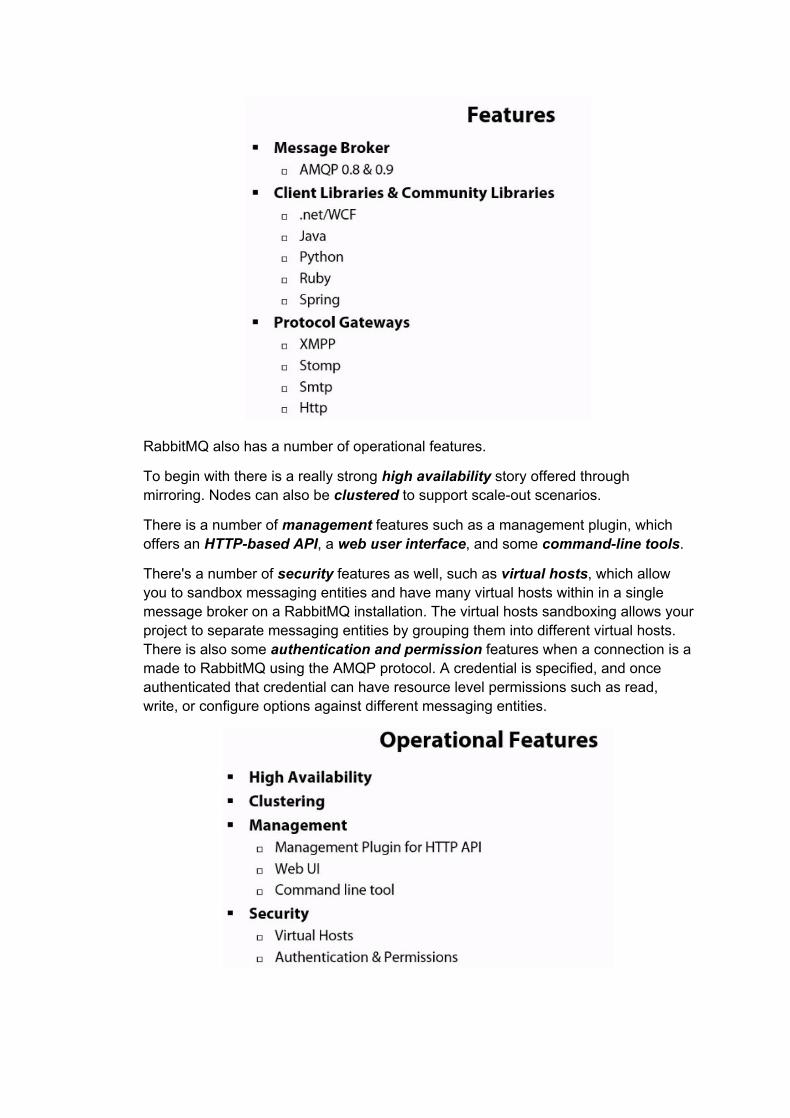
RabbitMQ is an implementation of the AMQP message broker.
RabbitMQ is also open source and built upon the Erlang programming technologies and provides support for AMQP version 0.8, 0.9, and also there is a beta plugin, which provides support for version 1.0.
An overview of the main features of RabbitMQ are that it's a message broker for AMQP versions 0.8 and 0.9.
There is a bunch of client and community libraries for many of the common technologies developers would use. This includes .NET and WCF, Java, Python, Ruby, and the Spring Framework.
There is also a number of protocol gateways for things like STOMP, SMTP, XMPP.
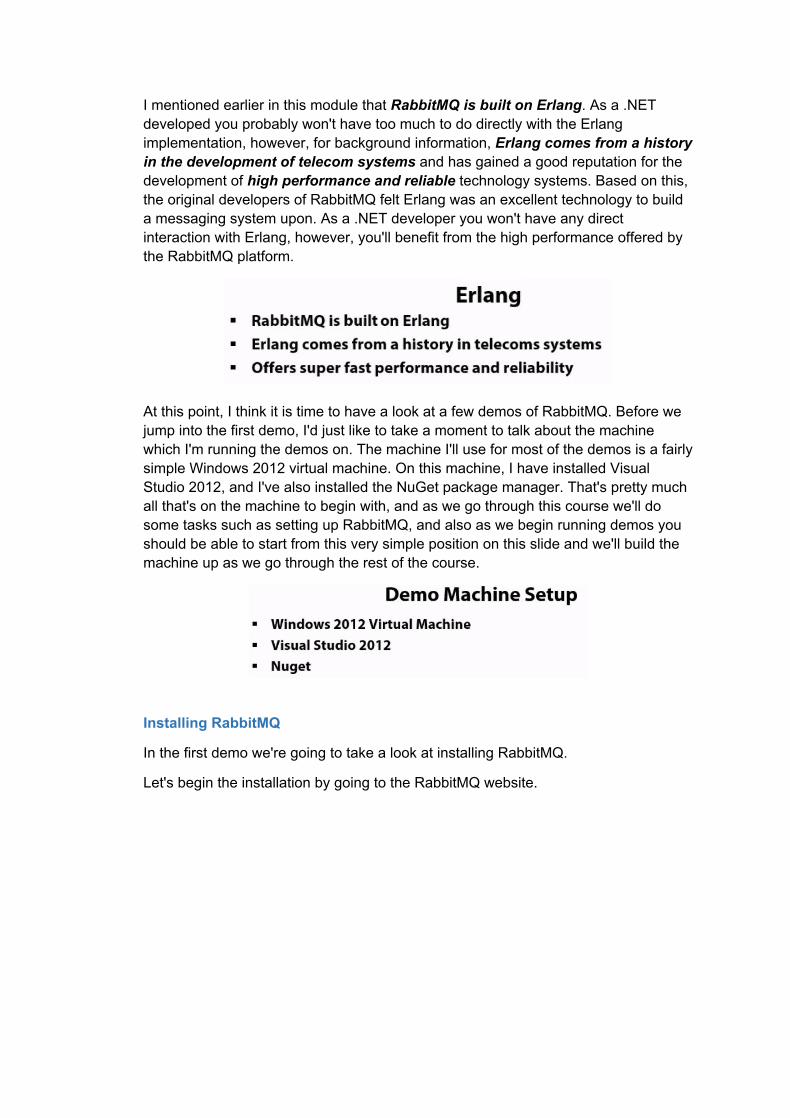
RabbitMQ also has a number of operational features.
To begin with there is a really strong high availability story offered through mirroring. Nodes can also be clustered to support scaleout scenarios.
There is a number of management features such as a management plugin, which offers an HTTPbased API, a web user interface, and some commandline tools.
There's a number of security features as well, such as virtual hosts, which allow you to sandbox messaging entities and have many virtual hosts within in a single message broker on a RabbitMQ installation. The virtual hosts sandboxing allows your project to separate messaging entities by grouping them into different virtual hosts. There is also some authentication and permission features when a connection is a made to RabbitMQ using the AMQP protocol. A credential is specified, and once authenticated that credential can have resource level permissions such as read, write, or configure options against different messaging entities.
I mentioned earlier in this module that RabbitMQ is built on Erlang. As a .NET developed you probably won't have too much to do directly with the Erlang implementation, however, for background information, Erlang comes from a history in the development of telecom systems and has gained a good reputation for the development of high performance and reliable technology systems. Based on this, the original developers of RabbitMQ felt Erlang was an excellent technology to build a messaging system upon. As a .NET developer you won't have any direct interaction with Erlang, however, you'll benefit from the high performance offered by the RabbitMQ platform.
At this point, I think it is time to have a look at a few demos of RabbitMQ. Before we jump into the first demo, I'd just like to take a moment to talk about the machine which I'm running the demos on. The machine I'll use for most of the demos is a fairly simple Windows 2012 virtual machine. On this machine, I have installed Visual Studio 2012, and I've also installed the NuGet package manager. That's pretty much all that's on the machine to begin with, and as we go through this course we'll do some tasks such as setting up RabbitMQ, and also as we begin running demos you should be able to start from this very simple position on this slide and we'll build the machine up as we go through the rest of the course.
Installing RabbitMQ
In the first demo we're going to take a look at installing RabbitMQ.
Let's begin the installation by going to the RabbitMQ website.
On the website we next need to go to the Installation page, and from there the Windows section. On this section we need to look for the Erlang installer, and that will redirect us to the Erlang website where we can begin the installation and download of the Erlang binaries.
The next step is to install Erlang. So we'll run that and go through the installation wizard, and we'll pretty much just take all of the default settings.
Now that we've completed the installation of Erlang, we can go back to the RabbitMQ site and start downloading the RabbitMQ server.
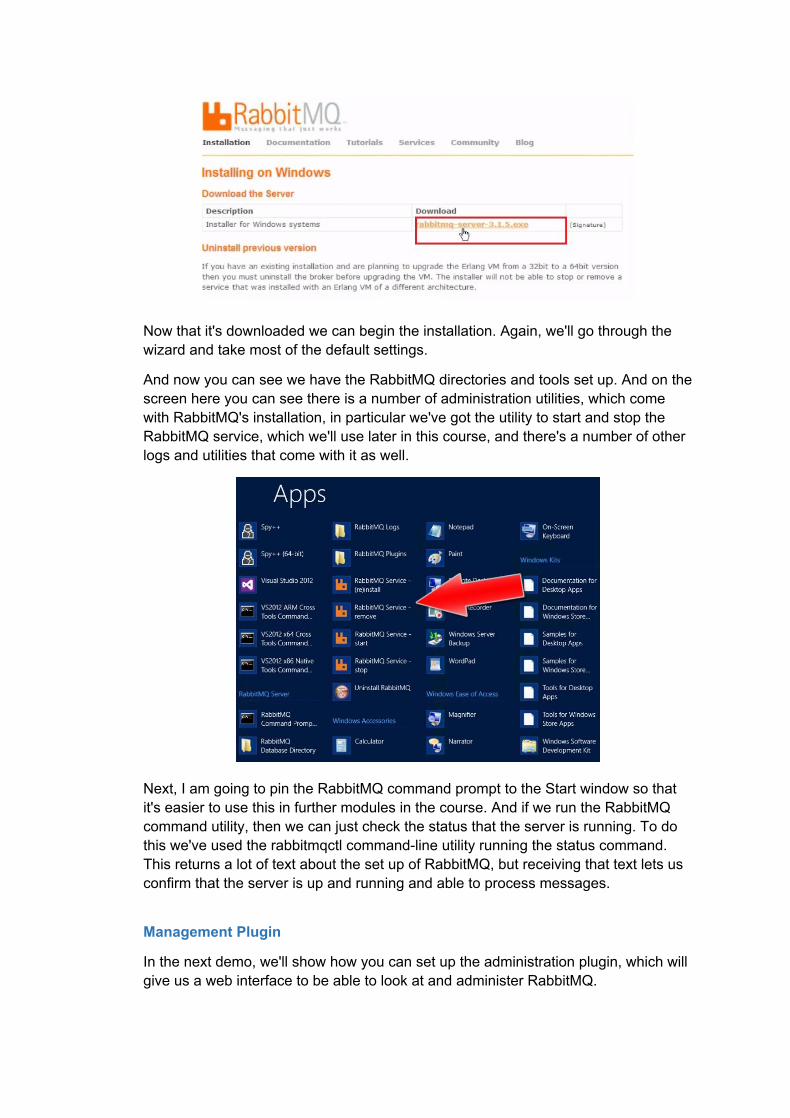
Now that it's downloaded we can begin the installation. Again, we'll go through the wizard and take most of the default settings.
And now you can see we have the RabbitMQ directories and tools set up. And on the screen here you can see there is a number of administration utilities, which come with RabbitMQ's installation, in particular we've got the utility to start and stop the RabbitMQ service, which we'll use later in this course, and there's a number of other logs and utilities that come with it as well.
Next, I am going to pin the RabbitMQ command prompt to the Start window so that it's easier to use this in further modules in the course. And if we run the RabbitMQ command utility, then we can just check the status that the server is running. To do this we've used the rabbitmqctl commandline utility running the status command. This returns a lot of text about the set up of RabbitMQ, but receiving that text lets us confirm that the server is up and running and able to process messages.
Management Plugin
In the next demo, we'll show how you can set up the administration plugin, which will give us a web interface to be able to look at and administer RabbitMQ.
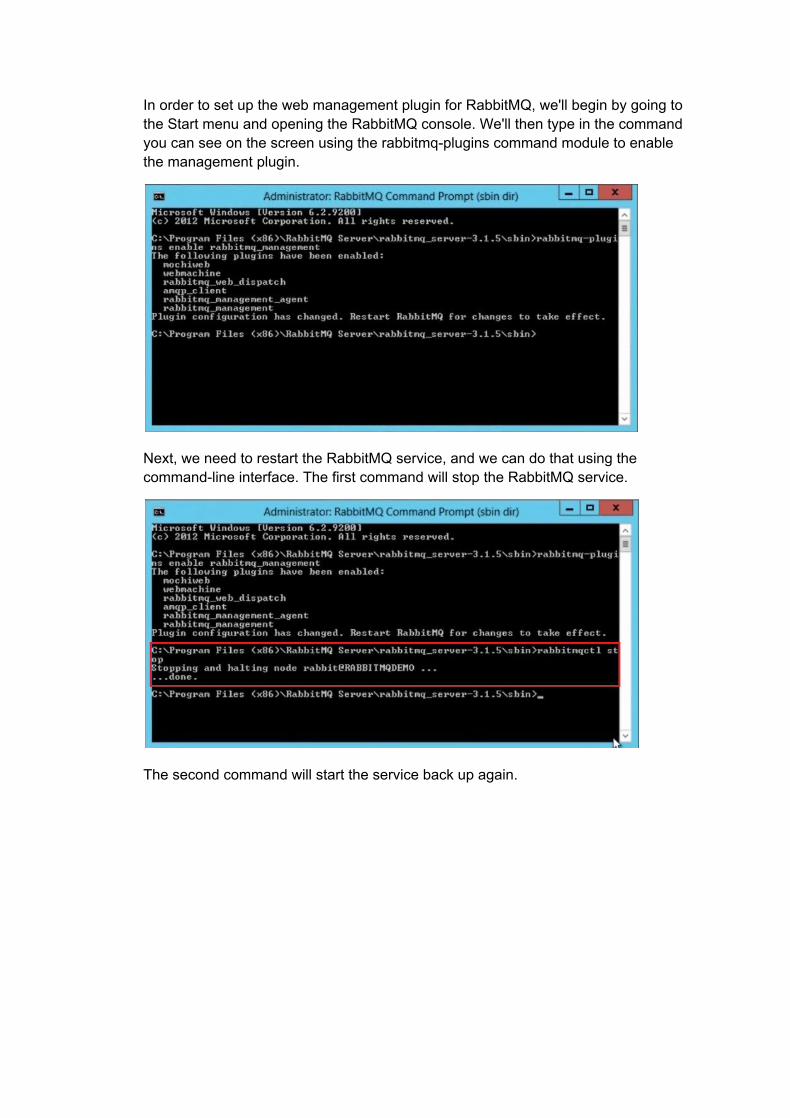
In order to set up the web management plugin for RabbitMQ, we'll begin by going to the Start menu and opening the RabbitMQ console. We'll then type in the command you can see on the screen using the rabbitmqplugins command module to enable the management plugin.
Next, we need to restart the RabbitMQ service, and we can do that using the commandline interface. The first command will stop the RabbitMQ service.
The second command will start the service back up again.
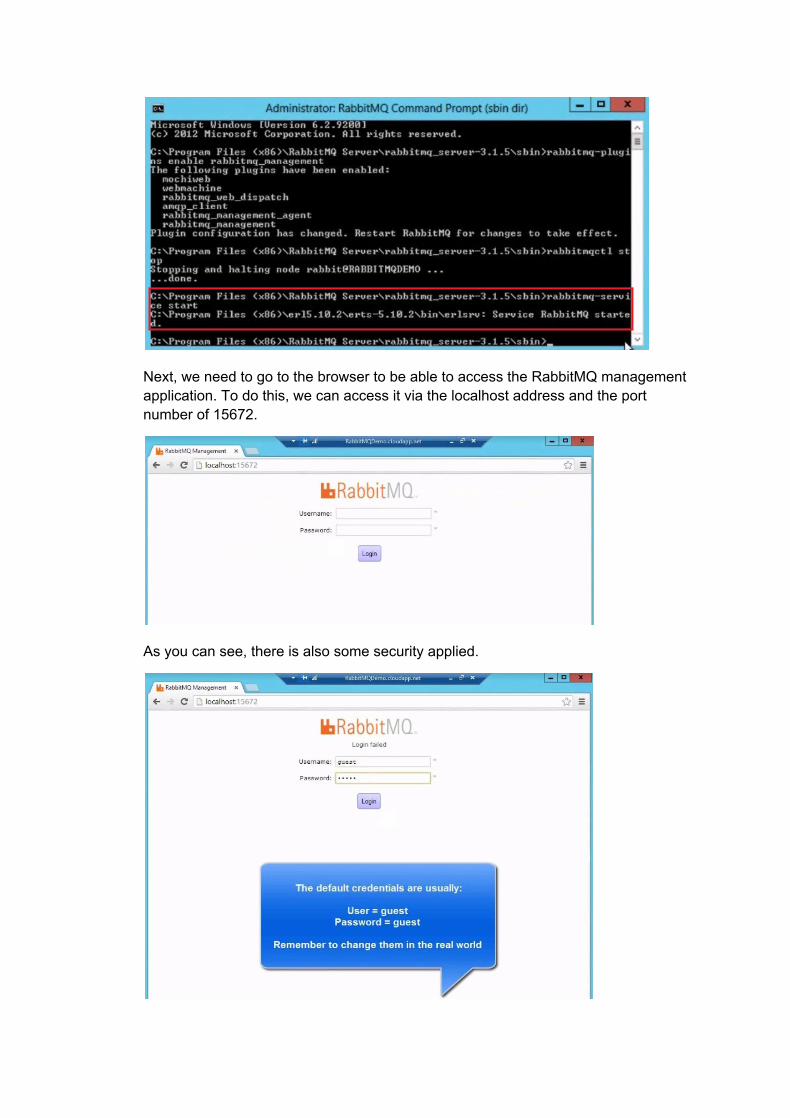
Next, we need to go to the browser to be able to access the RabbitMQ management application. To do this, we can access it via the localhost address and the port number of 15672.
As you can see, there is also some security applied.
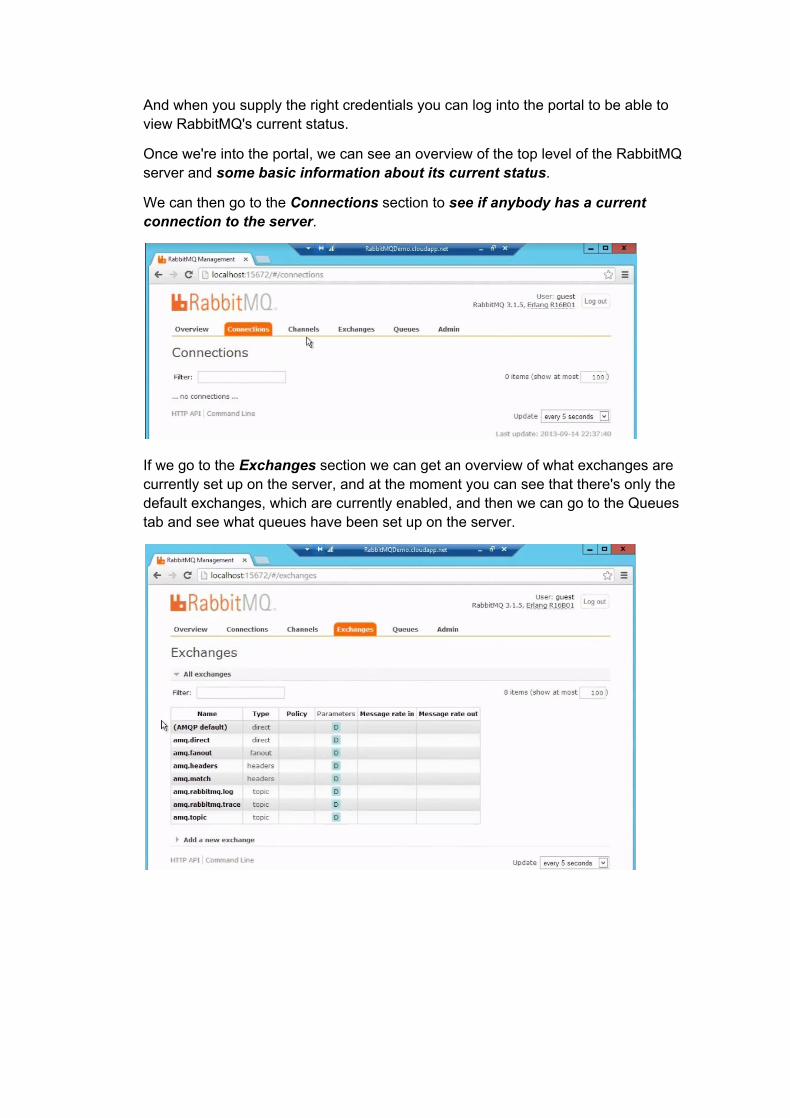
And when you supply the right credentials you can log into the portal to be able to view RabbitMQ's current status.
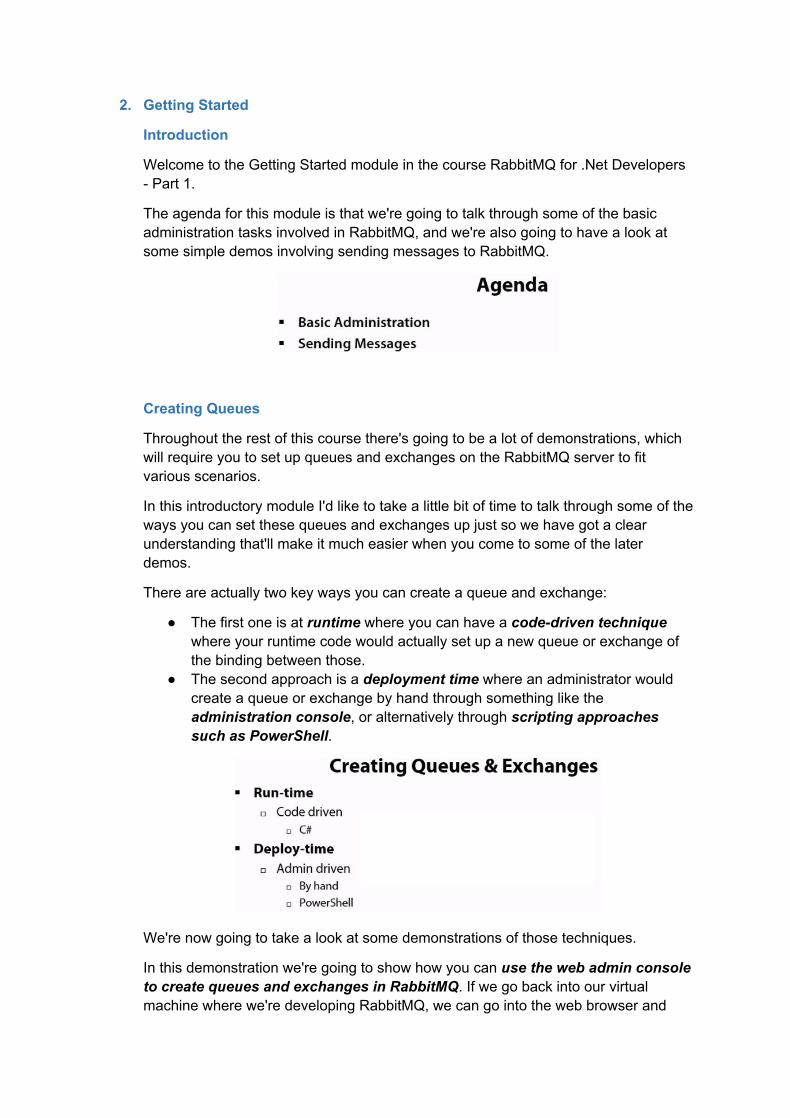
Once we're into the portal, we can see an overview of the top level of the RabbitMQ server and some basic information about its current status.
We can then go to the Connections section to see if anybody has a current connection to the server.
If we go to the Exchanges section we can get an overview of what exchanges are currently set up on the server, and at the moment you can see that there's only the default exchanges, which are currently enabled, and then we can go to the Queues tab and see what queues have been set up on the server.
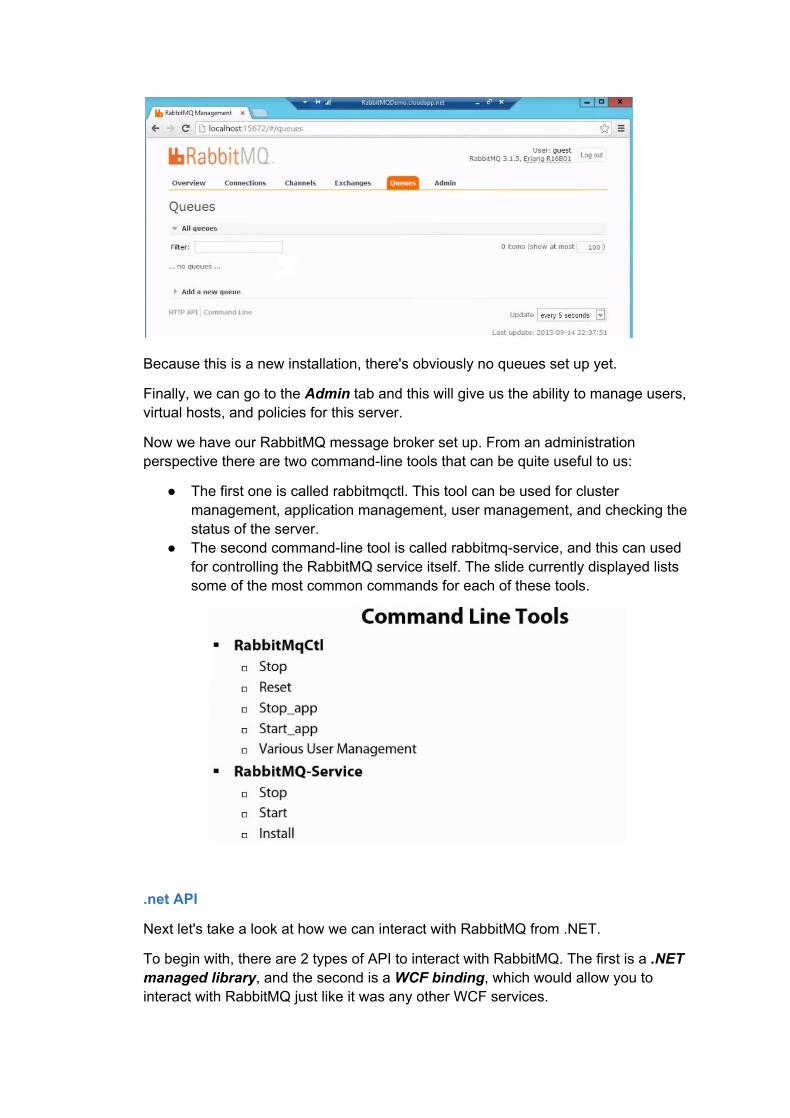
Because this is a new installation, there's obviously no queues set up yet.
Finally, we can go to the Admin tab and this will give us the ability to manage users, virtual hosts, and policies for this server.
Now we have our RabbitMQ message broker set up. From an administration perspective there are two commandline tools that can be quite useful to us:
● The first one is called rabbitmqctl. This tool can be used for cluster management, application management, user management, and checking the status of the server.
● The second commandline tool is called rabbitmqservice, and this can used for controlling the RabbitMQ service itself. The slide currently displayed lists some of the most common commands for each of these tools.
.net API
Next let's take a look at how we can interact with RabbitMQ from .NET.
To begin with, there are 2 types of API to interact with RabbitMQ. The first is a .NET managed library, and the second is a WCF binding, which would allow you to interact with RabbitMQ just like it was any other WCF services.
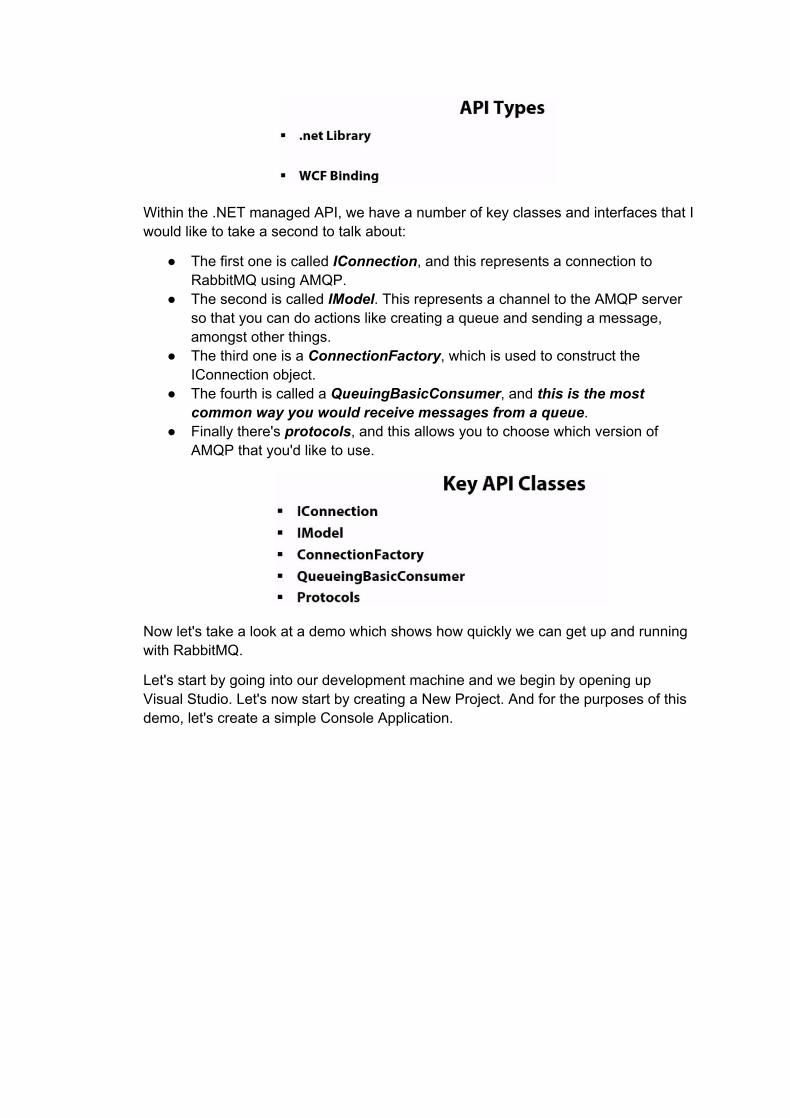
Within the .NET managed API, we have a number of key classes and interfaces that I would like to take a second to talk about:
● The first one is called IConnection, and this represents a connection to RabbitMQ using AMQP.
● The second is called IModel. This represents a channel to the AMQP server so that you can do actions like creating a queue and sending a message, amongst other things.
● The third one is a ConnectionFactory, which is used to construct the IConnection object.
● The fourth is called a QueuingBasicConsumer, and this is the most common way you would receive messages from a queue.
● Finally there's protocols, and this allows you to choose which version of AMQP that you'd like to use.
Now let's take a look at a demo which shows how quickly we can get up and running with RabbitMQ.
Let's start by going into our development machine and we begin by opening up Visual Studio. Let's now start by creating a New Project. And for the purposes of this demo, let's create a simple Console Application.
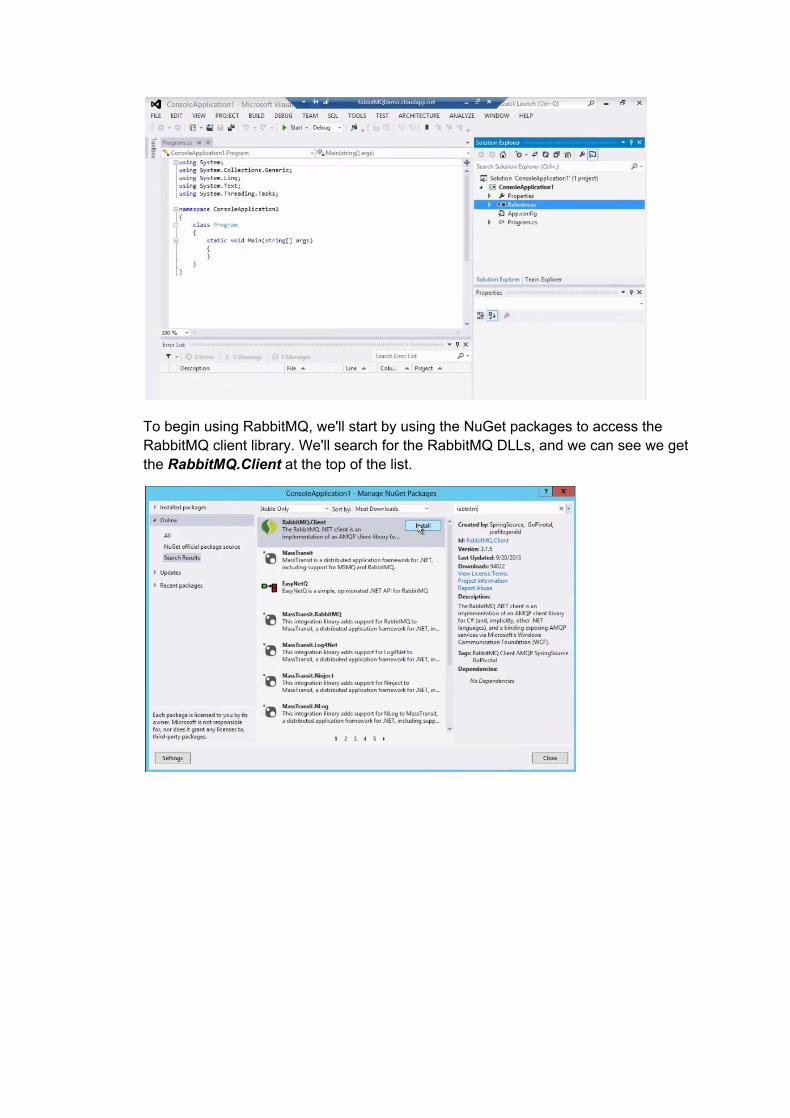
To begin using RabbitMQ, we'll start by using the NuGet packages to access the RabbitMQ client library. We'll search for the RabbitMQ DLLs, and we can see we get the RabbitMQ.Client at the top of the list.
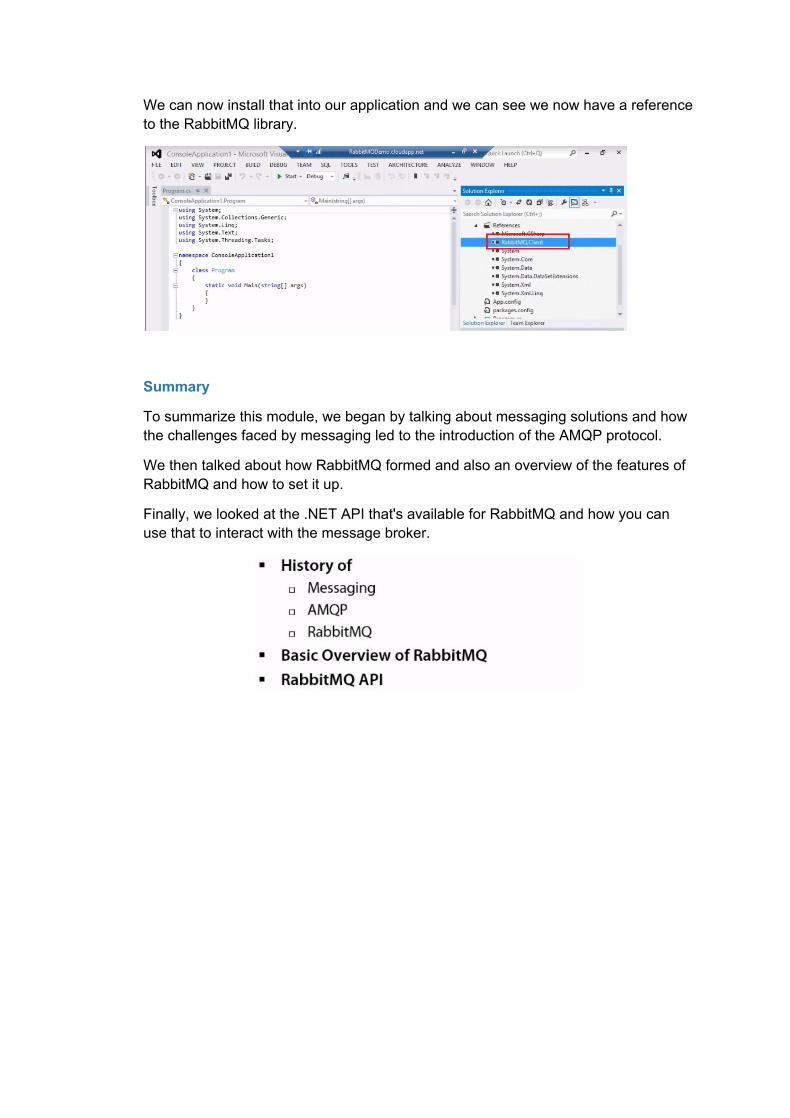
We can now install that into our application and we can see we now have a reference to the RabbitMQ library.
Summary
To summarize this module, we began by talking about messaging solutions and how the challenges faced by messaging led to the introduction of the AMQP protocol.
We then talked about how RabbitMQ formed and also an overview of the features of RabbitMQ and how to set it up.
Finally, we looked at the .NET API that's available for RabbitMQ and how you can use that to interact with the message broker.
2. Getting Started
Introduction
Welcome to the Getting Started module in the course RabbitMQ for .Net Developers Part 1.
The agenda for this module is that we're going to talk through some of the basic administration tasks involved in RabbitMQ, and we're also going to have a look at some simple demos involving sending messages to RabbitMQ.
Creating Queues
Throughout the rest of this course there's going to be a lot of demonstrations, which will require you to set up queues and exchanges on the RabbitMQ server to fit various scenarios.
In this introductory module I'd like to take a little bit of time to talk through some of the ways you can set these queues and exchanges up just so we have got a clear understanding that'll make it much easier when you come to some of the later demos.
There are actually two key ways you can create a queue and exchange:
● The first one is at runtime where you can have a codedriven technique where your runtime code would actually set up a new queue or exchange of the binding between those.
● The second approach is a deployment time where an administrator would create a queue or exchange by hand through something like the administration console, or alternatively through scripting approaches such as PowerShell.
We're now going to take a look at some demonstrations of those techniques.
In this demonstration we're going to show how you can use the web admin console to create queues and exchanges in RabbitMQ. If we go back into our virtual machine where we're developing RabbitMQ, we can go into the web browser and
add the URL for the local RabbitMQ admin console. If we add the credentials to be able to login to the admin console, we'll then see an overview of how this is configured.
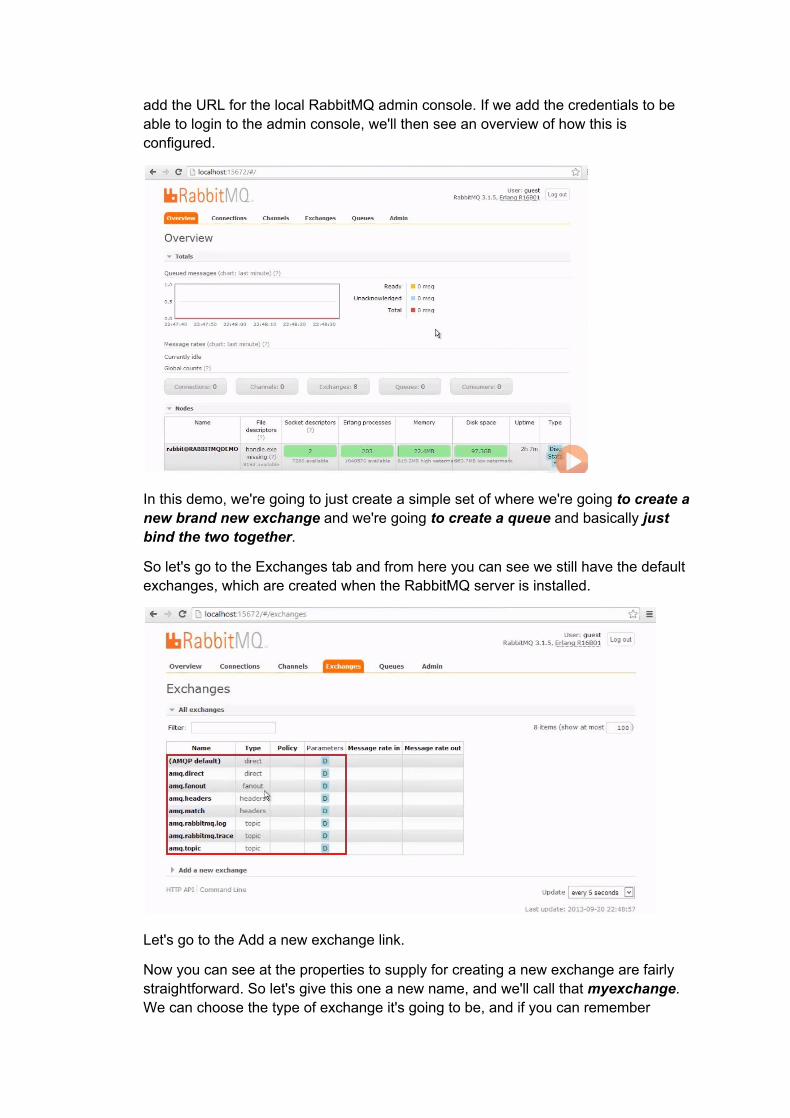
In this demo, we're going to just create a simple set of where we're going to create a new brand new exchange and we're going to create a queue and basically just bind the two together.
So let's go to the Exchanges tab and from here you can see we still have the default exchanges, which are created when the RabbitMQ server is installed.
Let's go to the Add a new exchange link.
Now you can see at the properties to supply for creating a new exchange are fairly straightforward. So let's give this one a new name, and we'll call that myexchange. We can choose the type of exchange it's going to be, and if you can remember
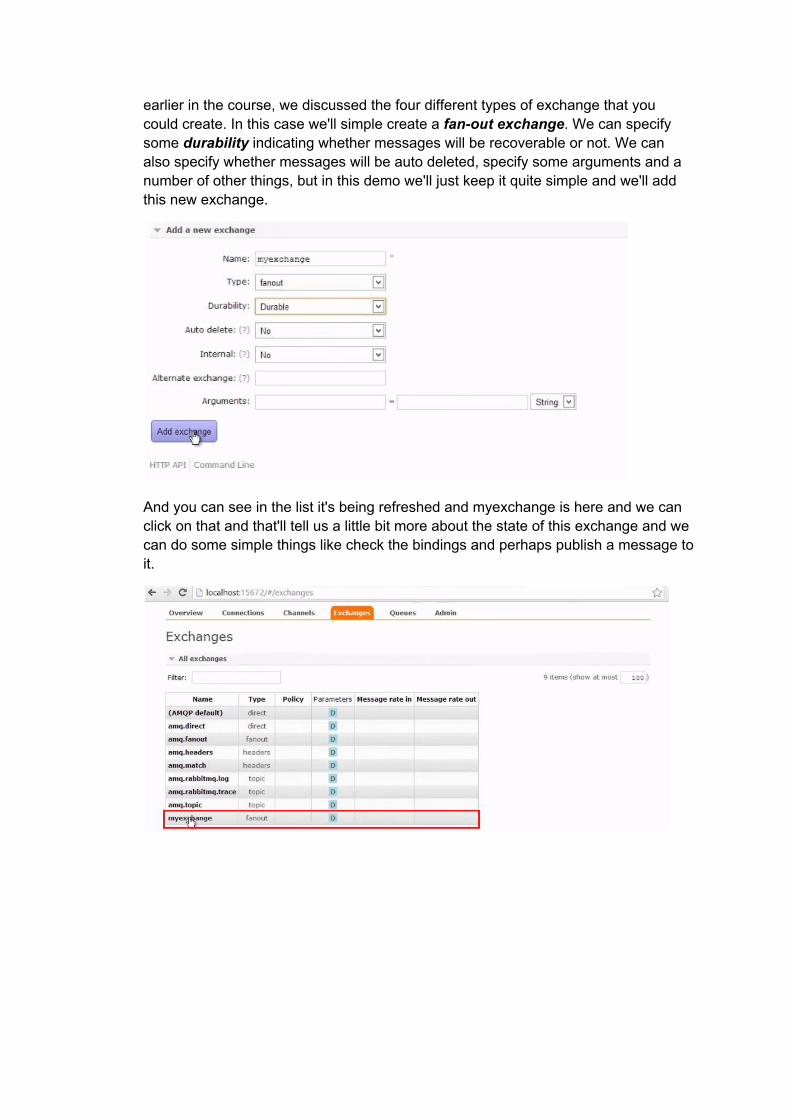
earlier in the course, we discussed the four different types of exchange that you could create. In this case we'll simple create a fanout exchange. We can specify some durability indicating whether messages will be recoverable or not. We can also specify whether messages will be auto deleted, specify some arguments and a number of other things, but in this demo we'll just keep it quite simple and we'll add this new exchange.
And you can see in the list it's being refreshed and myexchange is here and we can click on that and that'll tell us a little bit more about the state of this exchange and we can do some simple things like check the bindings and perhaps publish a message to it.
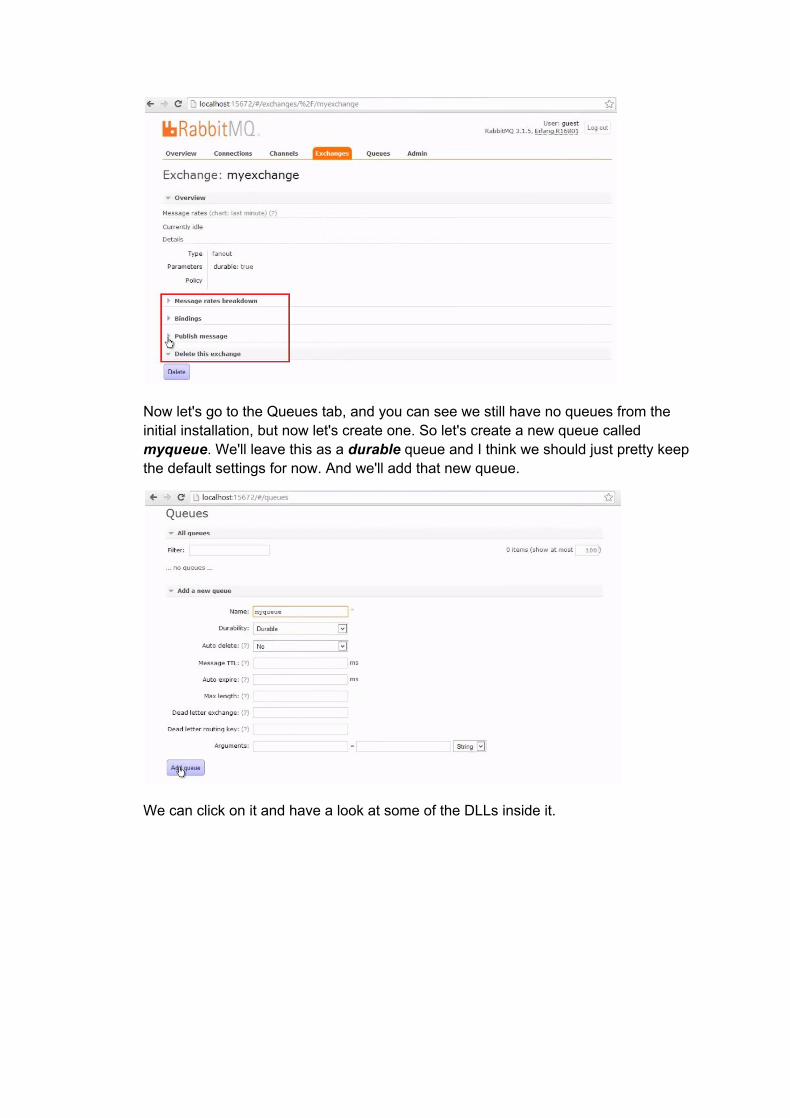
Now let's go to the Queues tab, and you can see we still have no queues from the initial installation, but now let's create one. So let's create a new queue called myqueue. We'll leave this as a durable queue and I think we should just pretty keep the default settings for now. And we'll add that new queue.
We can click on it and have a look at some of the DLLs inside it.
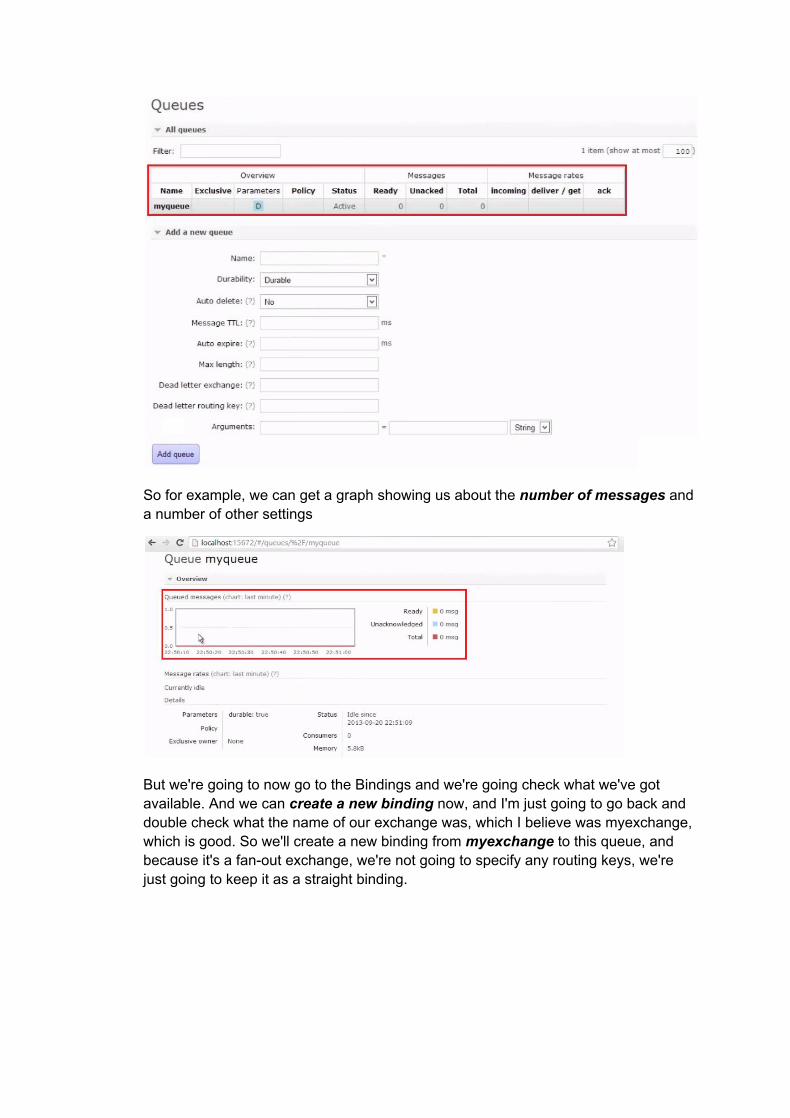
So for example, we can get a graph showing us about the number of messages and a number of other settings
But we're going to now go to the Bindings and we're going check what we've got available. And we can create a new binding now, and I'm just going to go back and double check what the name of our exchange was, which I believe was myexchange, which is good. So we'll create a new binding from myexchange to this queue, and because it's a fanout exchange, we're not going to specify any routing keys, we're just going to keep it as a straight binding.
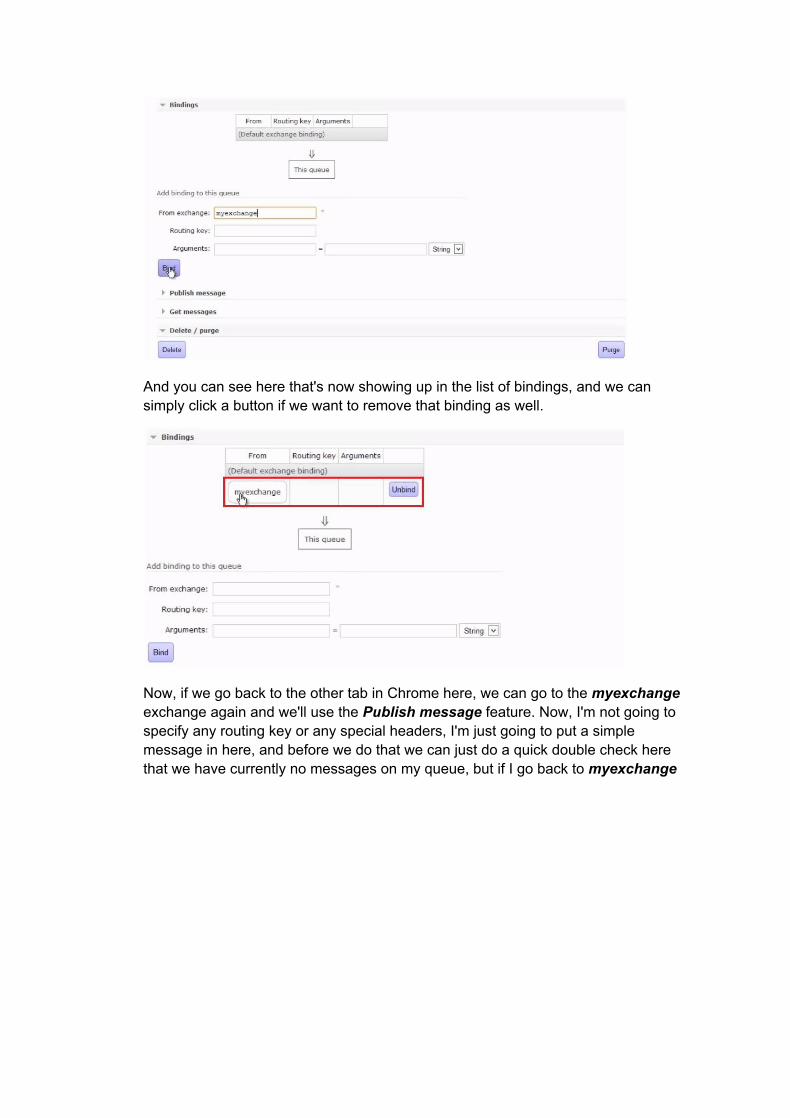
And you can see here that's now showing up in the list of bindings, and we can simply click a button if we want to remove that binding as well.
Now, if we go back to the other tab in Chrome here, we can go to the myexchange exchange again and we'll use the Publish message feature. Now, I'm not going to specify any routing key or any special headers, I'm just going to put a simple message in here, and before we do that we can just do a quick double check here that we have currently no messages on my queue, but if I go back to myexchange
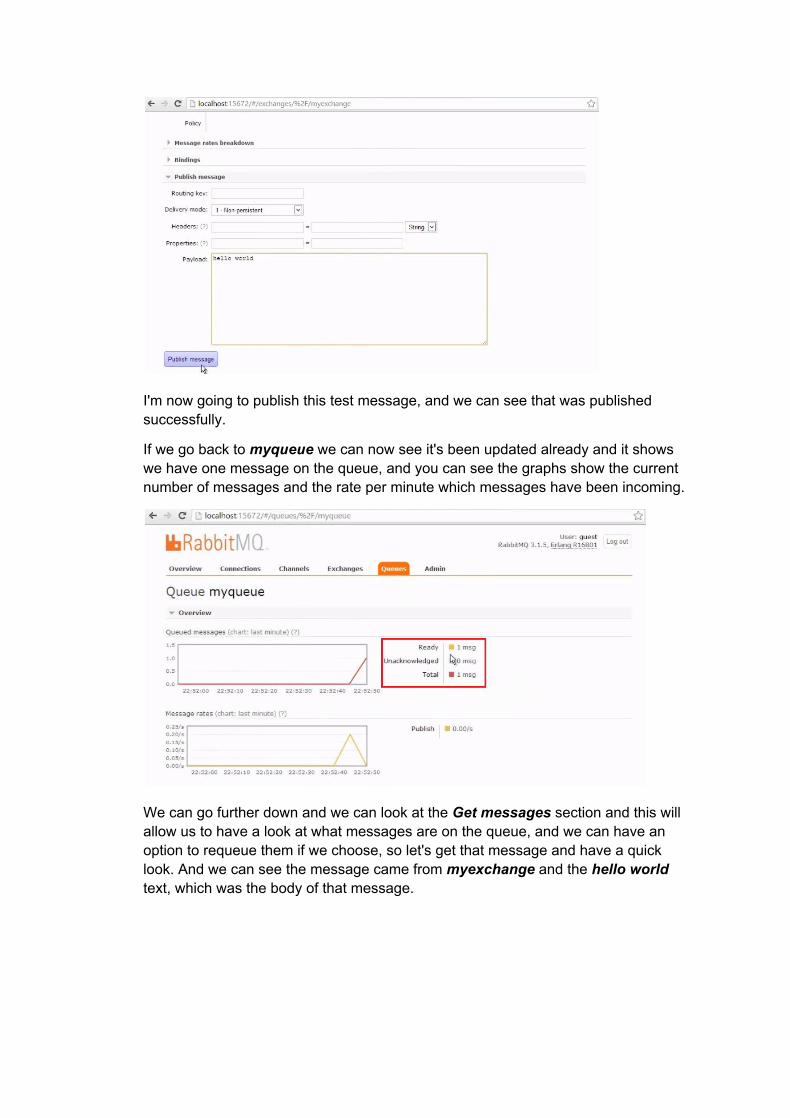
I'm now going to publish this test message, and we can see that was published successfully.
If we go back to myqueue we can now see it's been updated already and it shows we have one message on the queue, and you can see the graphs show the current number of messages and the rate per minute which messages have been incoming.
We can go further down and we can look at the Get messages section and this will allow us to have a look at what messages are on the queue, and we can have an option to requeue them if we choose, so let's get that message and have a quick look. And we can see the message came from myexchange and the hello world text, which was the body of that message.
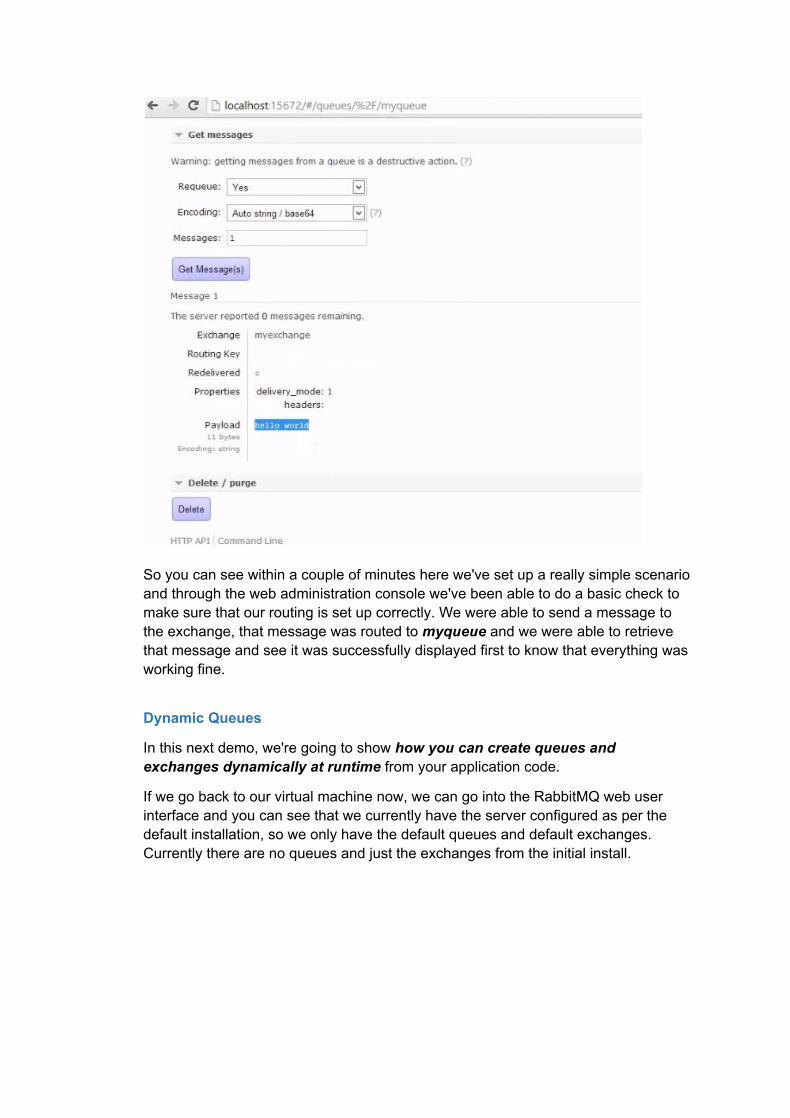
So you can see within a couple of minutes here we've set up a really simple scenario and through the web administration console we've been able to do a basic check to make sure that our routing is set up correctly. We were able to send a message to the exchange, that message was routed to myqueue and we were able to retrieve that message and see it was successfully displayed first to know that everything was working fine.
Dynamic Queues
In this next demo, we're going to show how you can create queues and exchanges dynamically at runtime from your application code.
If we go back to our virtual machine now, we can go into the RabbitMQ web user interface and you can see that we currently have the server configured as per the default installation, so we only have the default queues and default exchanges. Currently there are no queues and just the exchanges from the initial install.
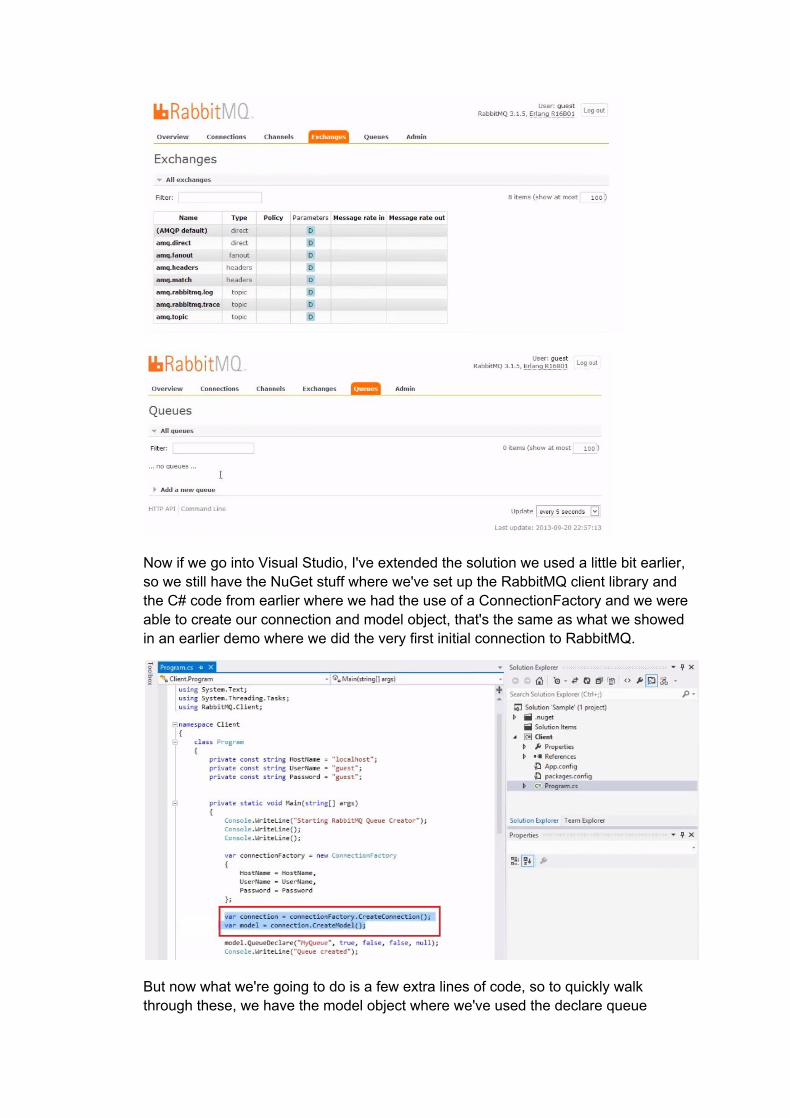
Now if we go into Visual Studio, I've extended the solution we used a little bit earlier, so we still have the NuGet stuff where we've set up the RabbitMQ client library and the C# code from earlier where we had the use of a ConnectionFactory and we were able to create our connection and model object, that's the same as what we showed in an earlier demo where we did the very first initial connection to RabbitMQ.
But now what we're going to do is a few extra lines of code, so to quickly walk through these, we have the model object where we've used the declare queue
method where we've declared MyQueue and we've set some properties about how we want that queue configured. So let's take a quick look at those. We've said that we'd like the queue to be durable, but not exclusive, we don't want to auto delete, and we don't have any special arguments for this particular queue.
We're then going to declare our exchange, which again is going to be called MyExchange, and in this case it's going to be of type topic.
Next, we're going to bind the queue to the exchange, and in this case we're going to specify that there is going to be a particular routing key, which you can see in the parameters here, we're going to specify that if the message contains the word cars as part of its routing key, then that would route from MyExchange to MyQueue.
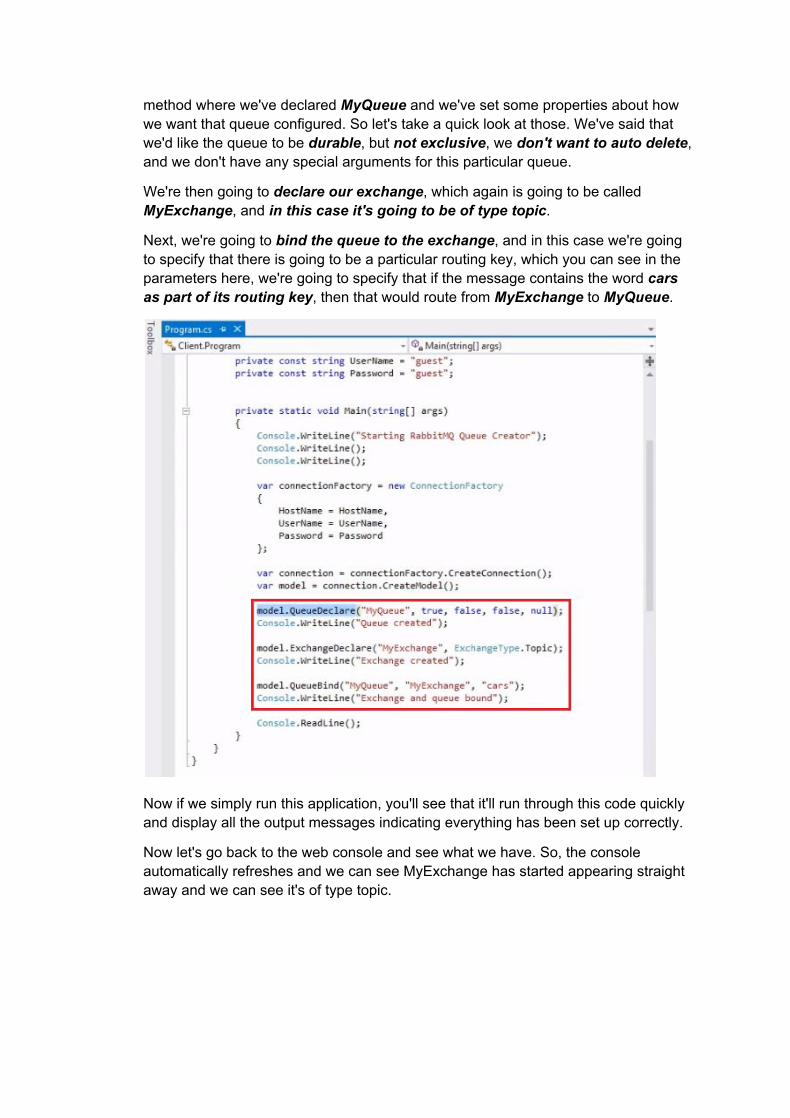
Now if we simply run this application, you'll see that it'll run through this code quickly and display all the output messages indicating everything has been set up correctly.
Now let's go back to the web console and see what we have. So, the console automatically refreshes and we can see MyExchange has started appearing straight away and we can see it's of type topic.
If we go and have a quick look in here and we can see that we've got just the basic information we had earlier.
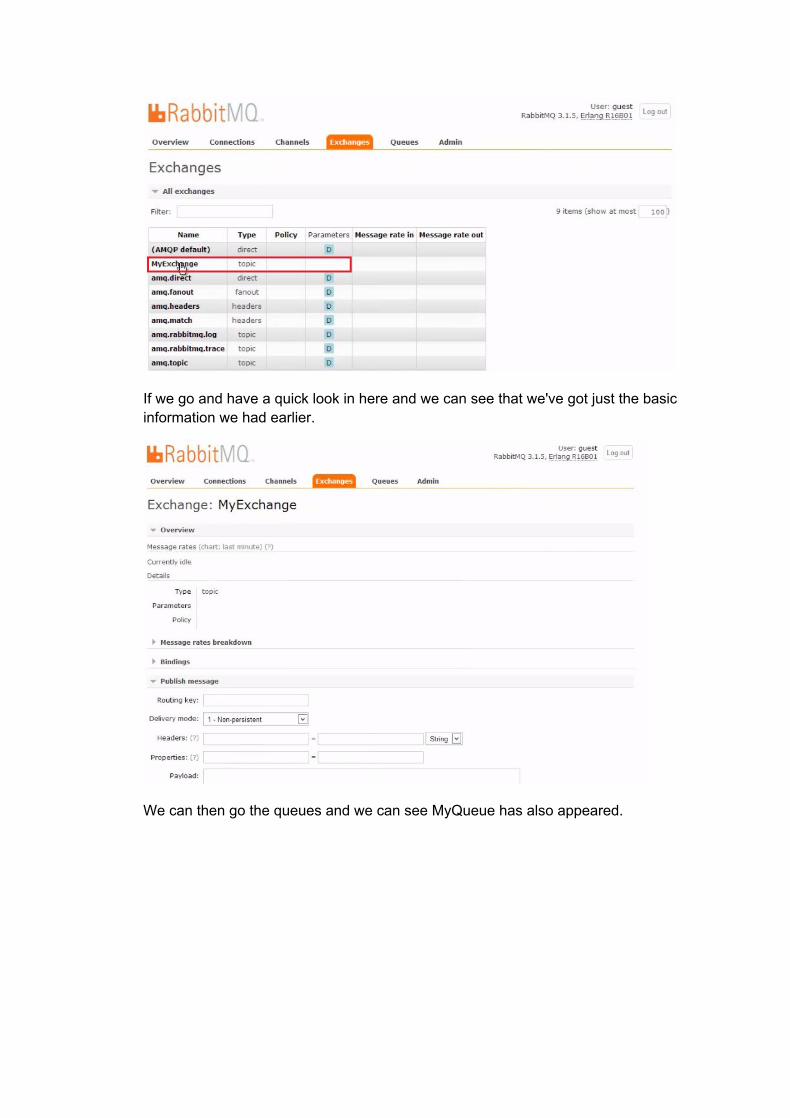
We can then go the queues and we can see MyQueue has also appeared.
We can see there are no messages on it yet, but we do have the binding from MyExchange where the routing key should be cars. Otherwise, we've still just got the default settings we used.
Creating queues with Powershell
In this next demo we'll show how you can use PowerShell to administer and create queues and exchanges in your RabbitMQ server.
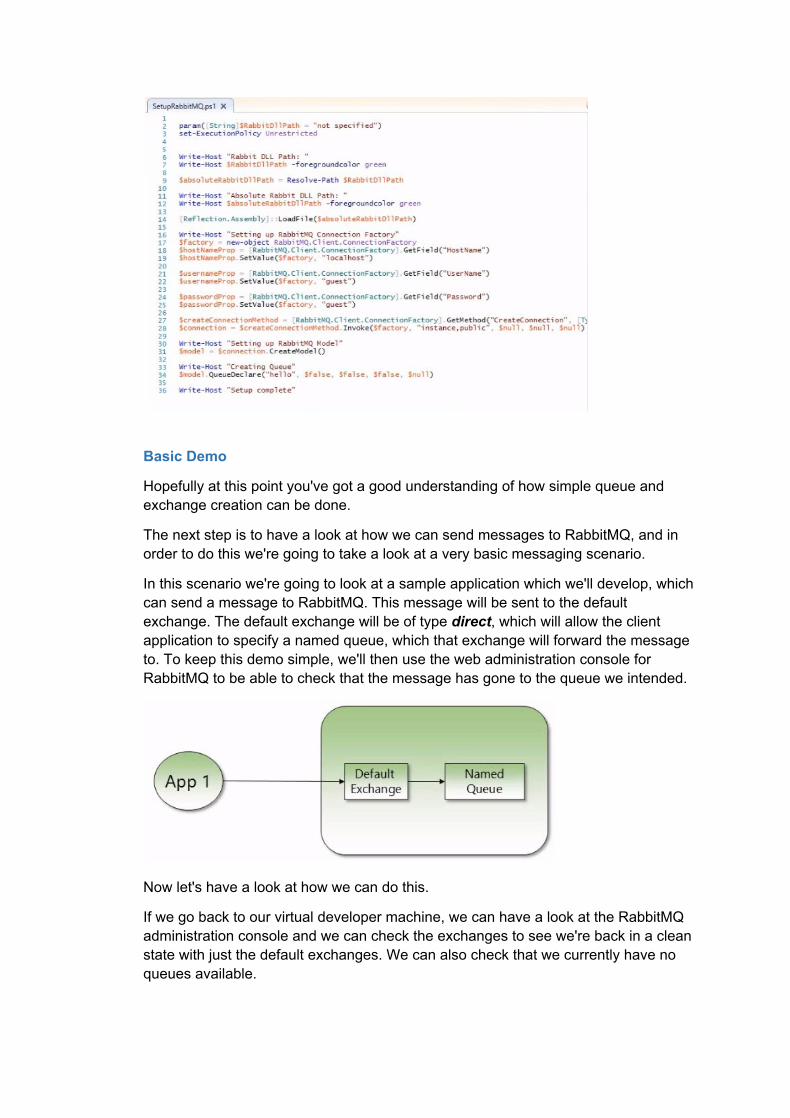
Basic Demo
Hopefully at this point you've got a good understanding of how simple queue and exchange creation can be done.
The next step is to have a look at how we can send messages to RabbitMQ, and in order to do this we're going to take a look at a very basic messaging scenario.
In this scenario we're going to look at a sample application which we'll develop, which can send a message to RabbitMQ. This message will be sent to the default exchange. The default exchange will be of type direct, which will allow the client application to specify a named queue, which that exchange will forward the message to. To keep this demo simple, we'll then use the web administration console for RabbitMQ to be able to check that the message has gone to the queue we intended.
Now let's have a look at how we can do this.
If we go back to our virtual developer machine, we can have a look at the RabbitMQ administration console and we can check the exchanges to see we're back in a clean state with just the default exchanges. We can also check that we currently have no queues available.
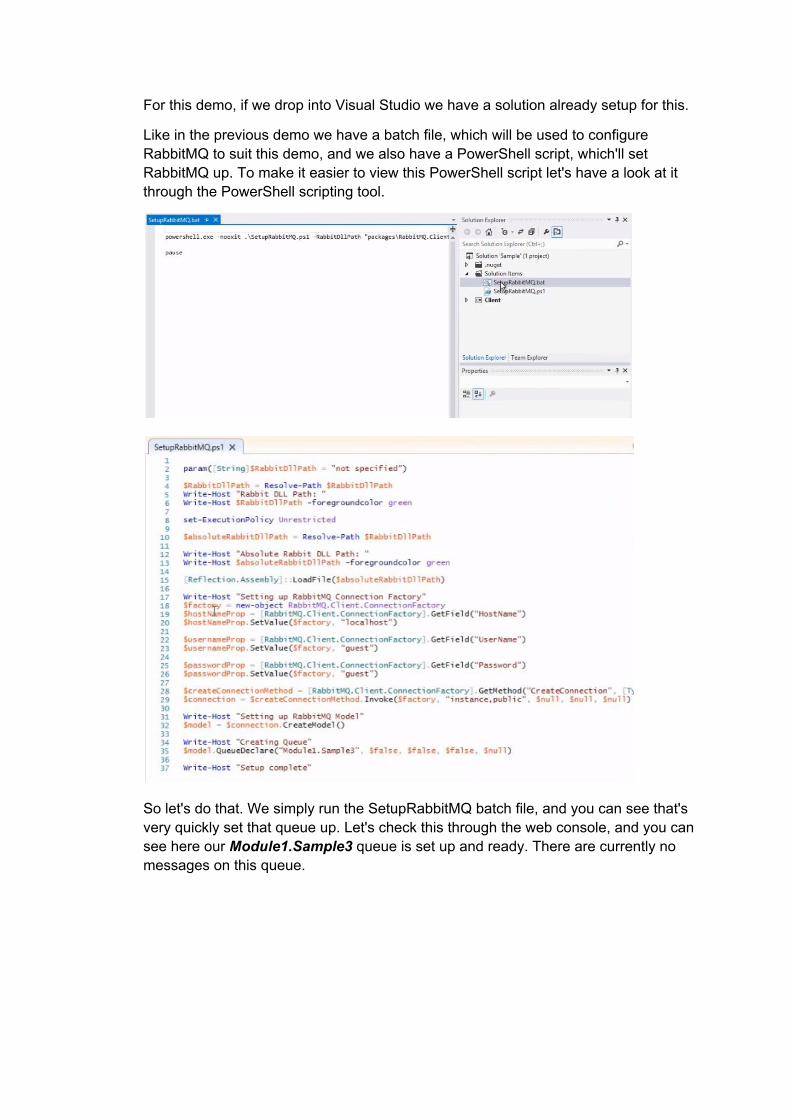
For this demo, if we drop into Visual Studio we have a solution already setup for this.
Like in the previous demo we have a batch file, which will be used to configure RabbitMQ to suit this demo, and we also have a PowerShell script, which'll set RabbitMQ up. To make it easier to view this PowerShell script let's have a look at it through the PowerShell scripting tool.
So let's do that. We simply run the SetupRabbitMQ batch file, and you can see that's very quickly set that queue up. Let's check this through the web console, and you can see here our Module1.Sample3 queue is set up and ready. There are currently no messages on this queue.
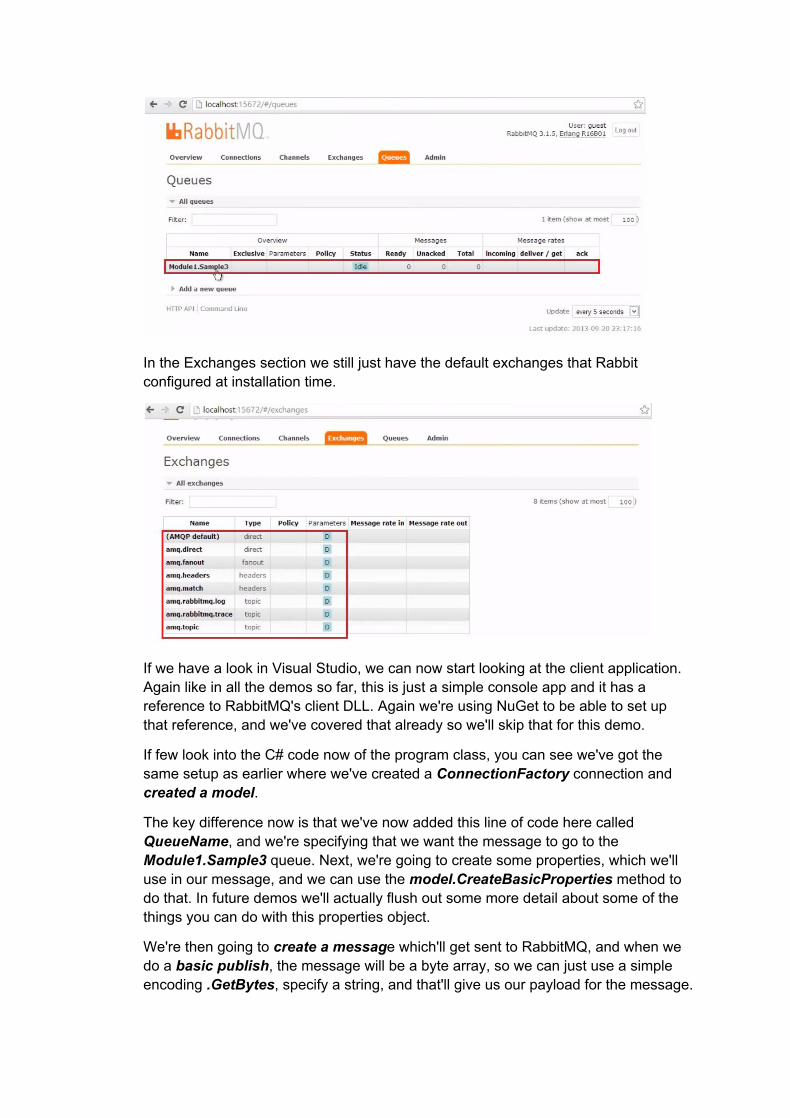
In the Exchanges section we still just have the default exchanges that Rabbit configured at installation time.
If we have a look in Visual Studio, we can now start looking at the client application. Again like in all the demos so far, this is just a simple console app and it has a reference to RabbitMQ's client DLL. Again we're using NuGet to be able to set up that reference, and we've covered that already so we'll skip that for this demo.
If few look into the C# code now of the program class, you can see we've got the same setup as earlier where we've created a ConnectionFactory connection and created a model.
The key difference now is that we've now added this line of code here called QueueName, and we're specifying that we want the message to go to the Module1.Sample3 queue. Next, we're going to create some properties, which we'll use in our message, and we can use the model.CreateBasicProperties method to do that. In future demos we'll actually flush out some more detail about some of the things you can do with this properties object.
We're then going to create a message which'll get sent to RabbitMQ, and when we do a basic publish, the message will be a byte array, so we can just use a simple encoding .GetBytes, specify a string, and that'll give us our payload for the message.
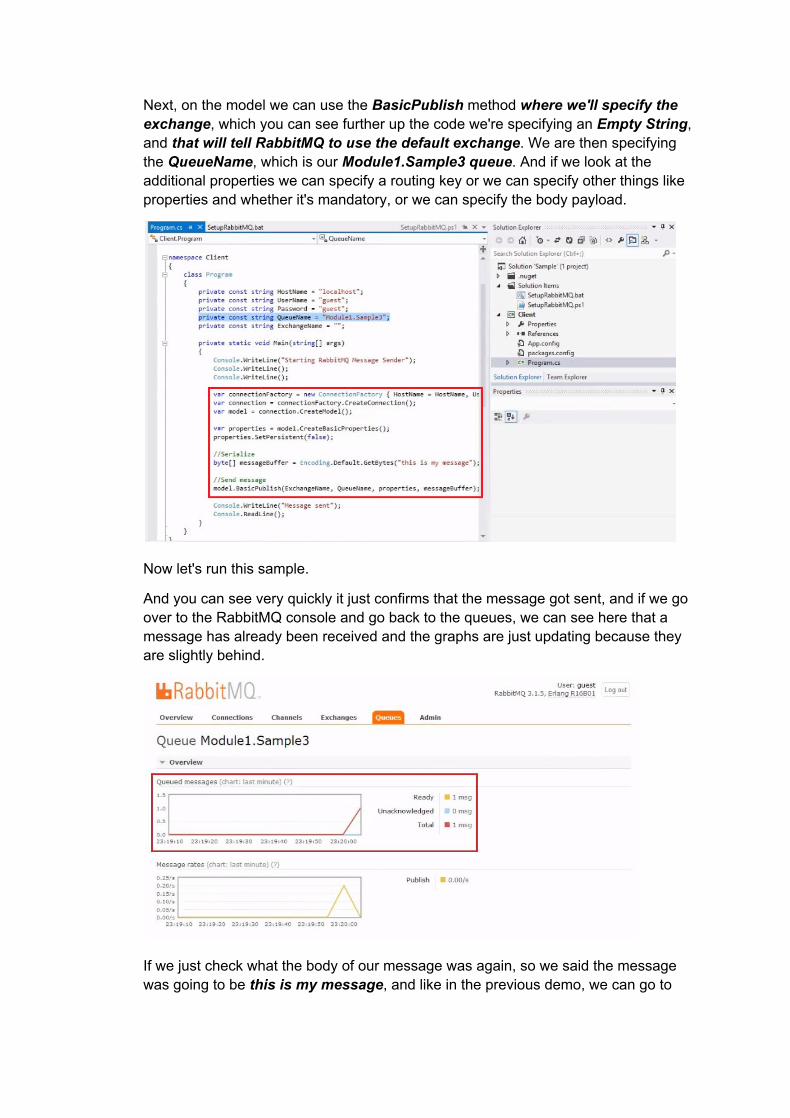
Next, on the model we can use the BasicPublish method where we'll specify the exchange, which you can see further up the code we're specifying an Empty String, and that will tell RabbitMQ to use the default exchange. We are then specifying the QueueName, which is our Module1.Sample3 queue. And if we look at the additional properties we can specify a routing key or we can specify other things like properties and whether it's mandatory, or we can specify the body payload.
Now let's run this sample.
And you can see very quickly it just confirms that the message got sent, and if we go over to the RabbitMQ console and go back to the queues, we can see here that a message has already been received and the graphs are just updating because they are slightly behind.
If we just check what the body of our message was again, so we said the message was going to be this is my message, and like in the previous demo, we can go to
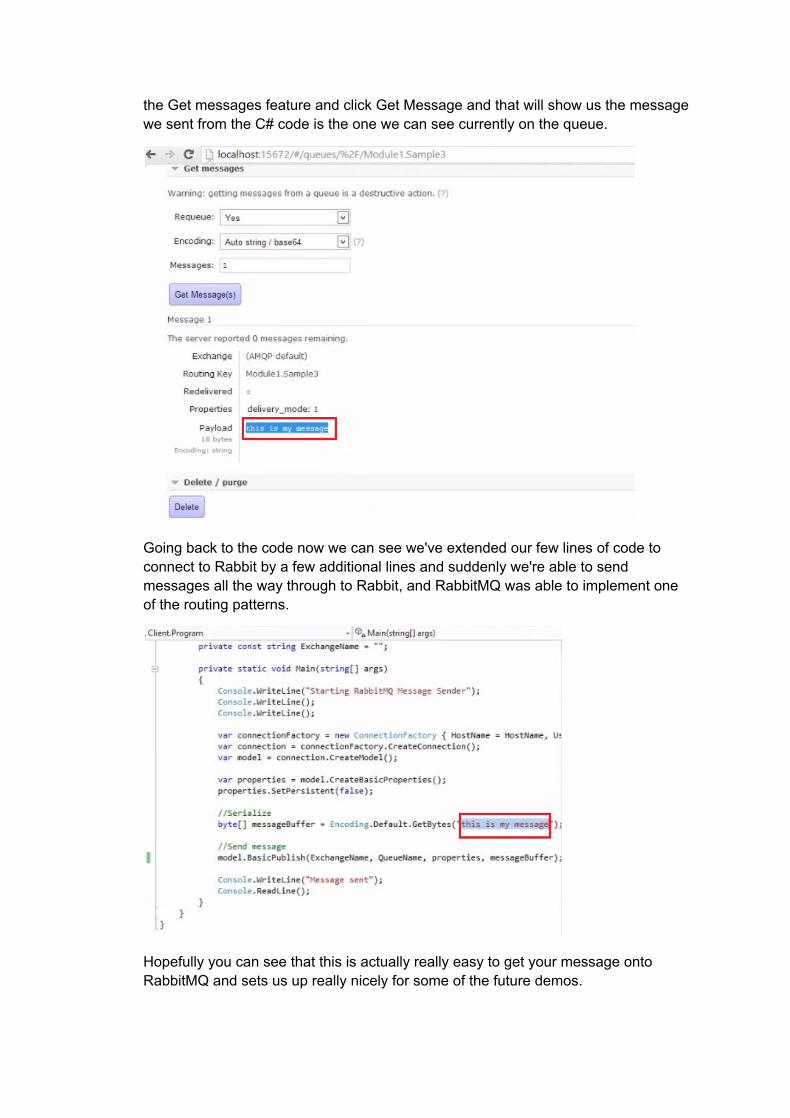
the Get messages feature and click Get Message and that will show us the message we sent from the C# code is the one we can see currently on the queue.
Going back to the code now we can see we've extended our few lines of code to connect to Rabbit by a few additional lines and suddenly we're able to send messages all the way through to Rabbit, and RabbitMQ was able to implement one of the routing patterns.
Hopefully you can see that this is actually really easy to get your message onto RabbitMQ and sets us up really nicely for some of the future demos.
Persistence
Now let's talk about persistence.
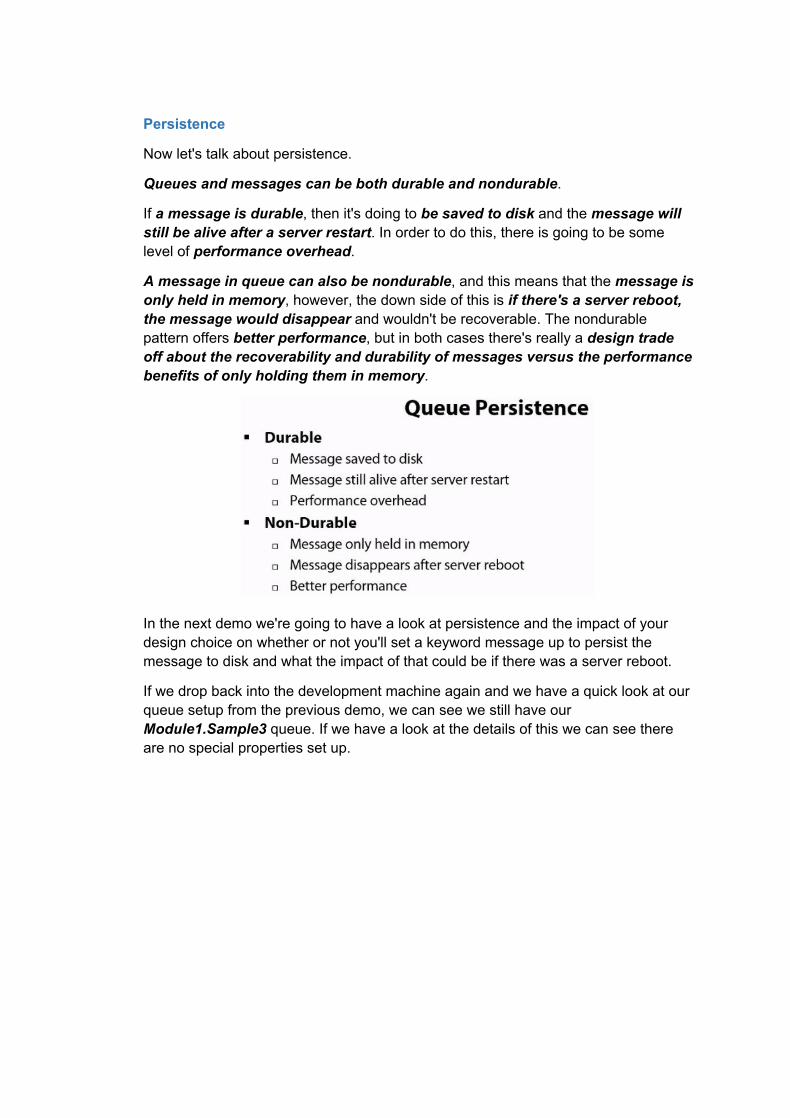
Queues and messages can be both durable and nondurable.
If a message is durable, then it's doing to be saved to disk and the message will still be alive after a server restart. In order to do this, there is going to be some level of performance overhead.
A message in queue can also be nondurable, and this means that the message is only held in memory, however, the down side of this is if there's a server reboot, the message would disappear and wouldn't be recoverable. The nondurable pattern offers better performance, but in both cases there's really a design trade off about the recoverability and durability of messages versus the performance benefits of only holding them in memory.
In the next demo we're going to have a look at persistence and the impact of your design choice on whether or not you'll set a keyword message up to persist the message to disk and what the impact of that could be if there was a server reboot.
If we drop back into the development machine again and we have a quick look at our queue setup from the previous demo, we can see we still have our Module1.Sample3 queue. If we have a look at the details of this we can see there are no special properties set up.
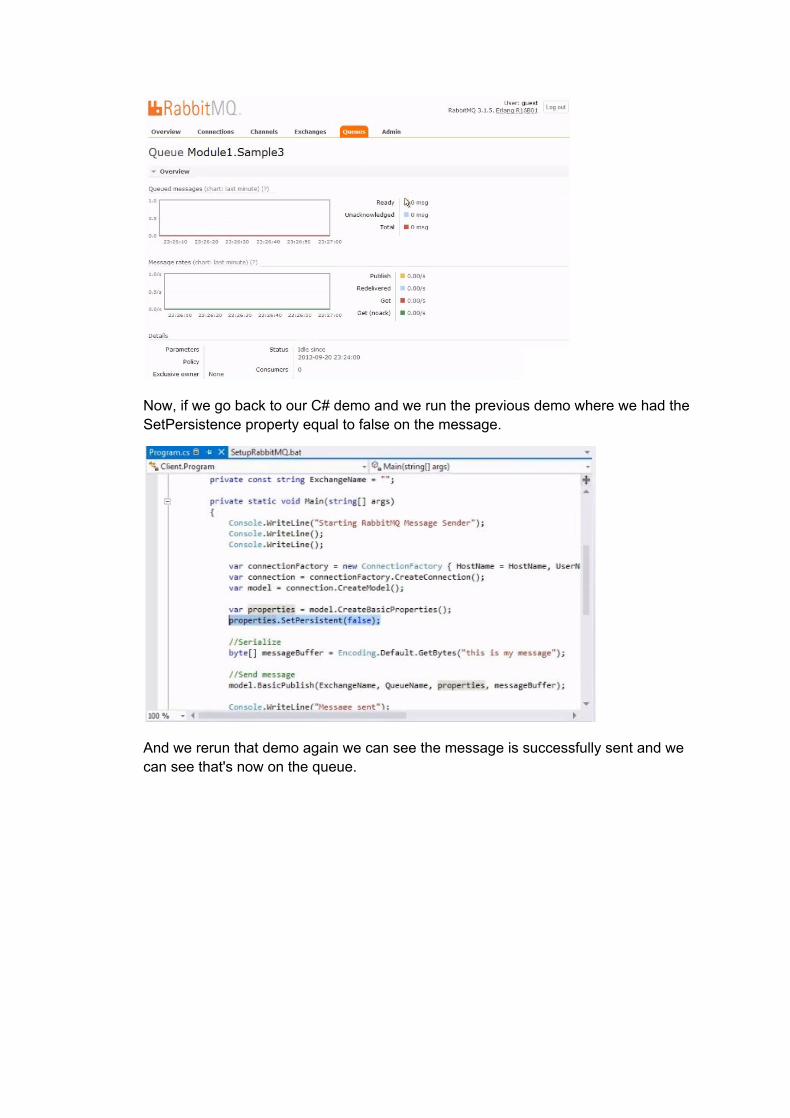
Now, if we go back to our C# demo and we run the previous demo where we had the SetPersistence property equal to false on the message.
And we rerun that demo again we can see the message is successfully sent and we can see that's now on the queue.
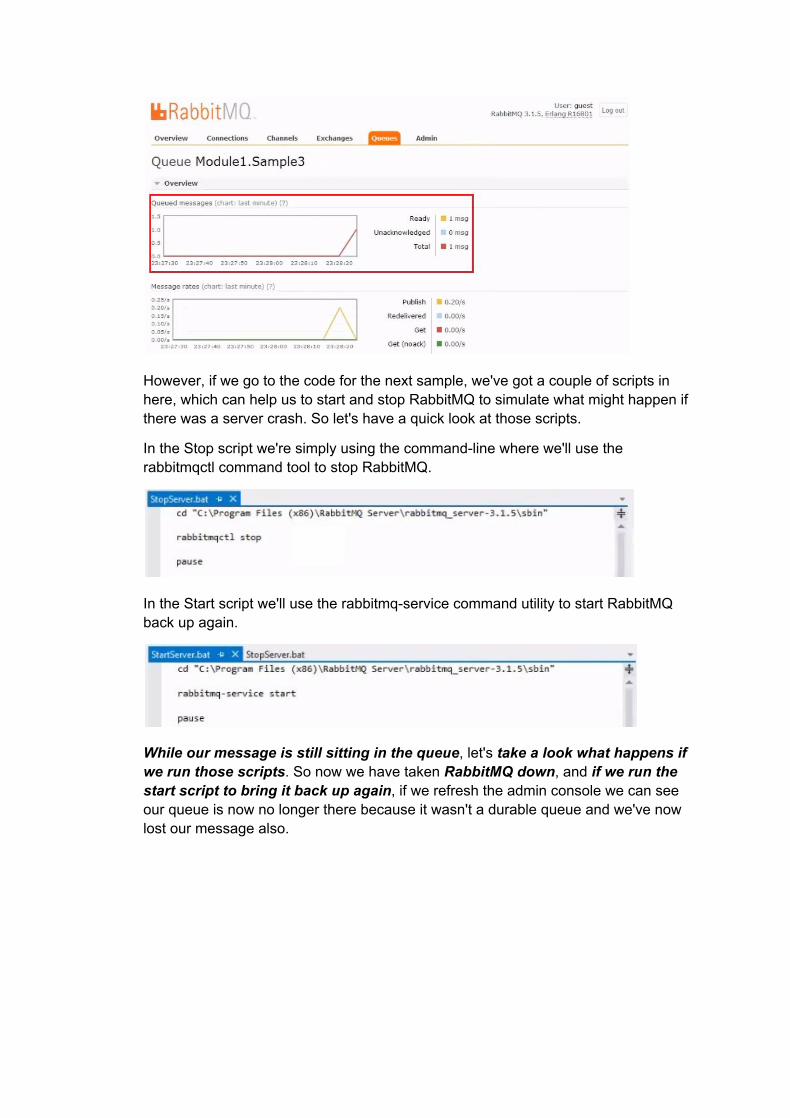
However, if we go to the code for the next sample, we've got a couple of scripts in here, which can help us to start and stop RabbitMQ to simulate what might happen if there was a server crash. So let's have a quick look at those scripts.
In the Stop script we're simply using the commandline where we'll use the rabbitmqctl command tool to stop RabbitMQ.
In the Start script we'll use the rabbitmqservice command utility to start RabbitMQ back up again.
While our message is still sitting in the queue, let's take a look what happens if we run those scripts. So now we have taken RabbitMQ down, and if we run the start script to bring it back up again, if we refresh the admin console we can see our queue is now no longer there because it wasn't a durable queue and we've now lost our message also.
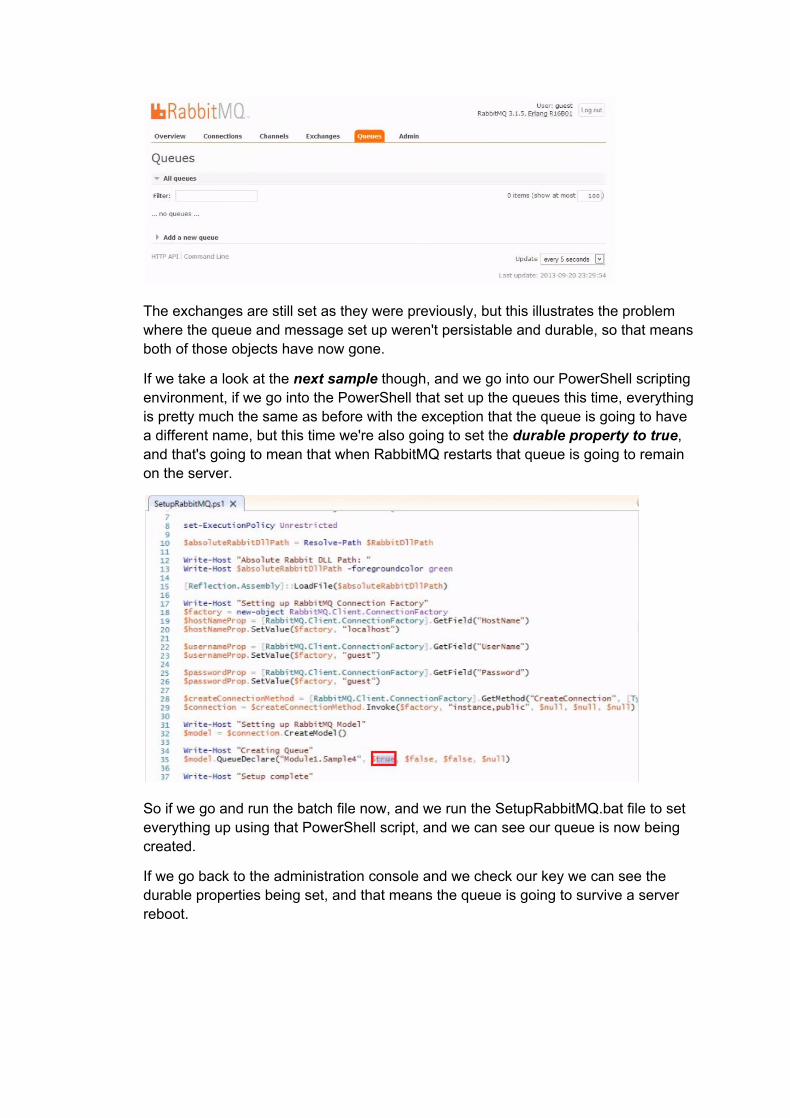
The exchanges are still set as they were previously, but this illustrates the problem where the queue and message set up weren't persistable and durable, so that means both of those objects have now gone.
If we take a look at the next sample though, and we go into our PowerShell scripting environment, if we go into the PowerShell that set up the queues this time, everything is pretty much the same as before with the exception that the queue is going to have a different name, but this time we're also going to set the durable property to true, and that's going to mean that when RabbitMQ restarts that queue is going to remain on the server.
So if we go and run the batch file now, and we run the SetupRabbitMQ.bat file to set everything up using that PowerShell script, and we can see our queue is now being created.
If we go back to the administration console and we check our key we can see the durable properties being set, and that means the queue is going to survive a server reboot.
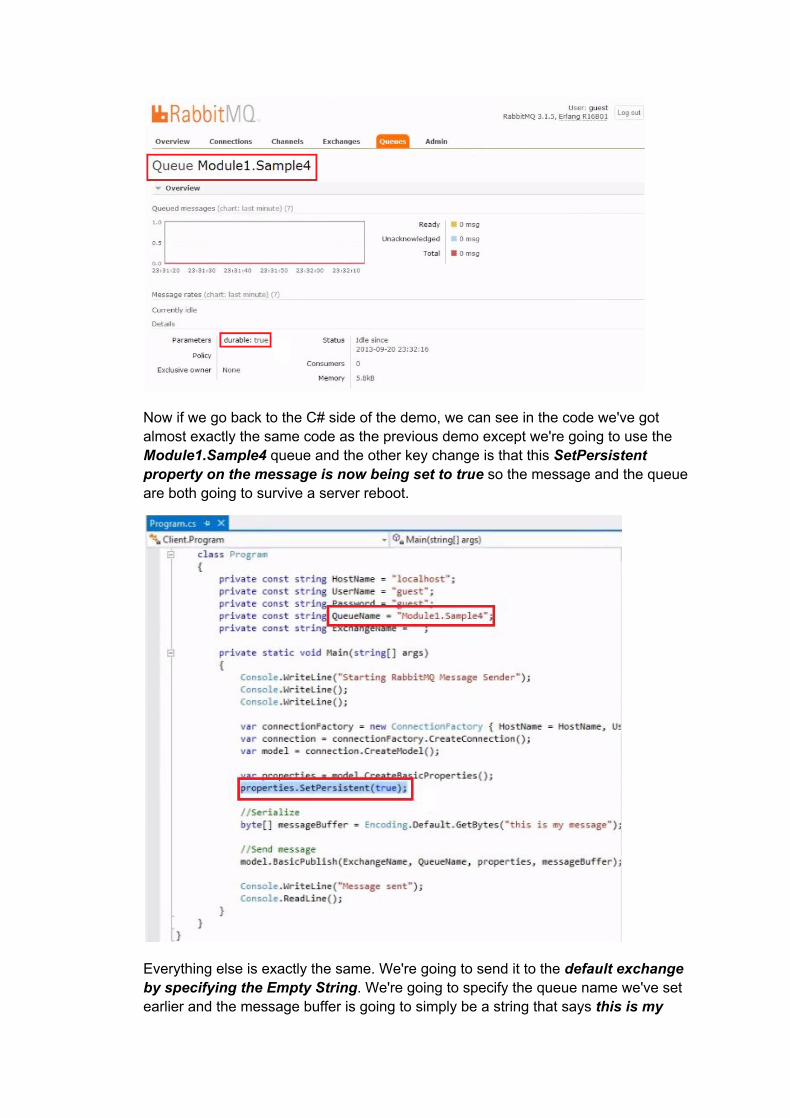
Now if we go back to the C# side of the demo, we can see in the code we've got almost exactly the same code as the previous demo except we're going to use the Module1.Sample4 queue and the other key change is that this SetPersistent property on the message is now being set to true so the message and the queue are both going to survive a server reboot.
Everything else is exactly the same. We're going to send it to the default exchange by specifying the Empty String. We're going to specify the queue name we've set earlier and the message buffer is going to simply be a string that says this is my
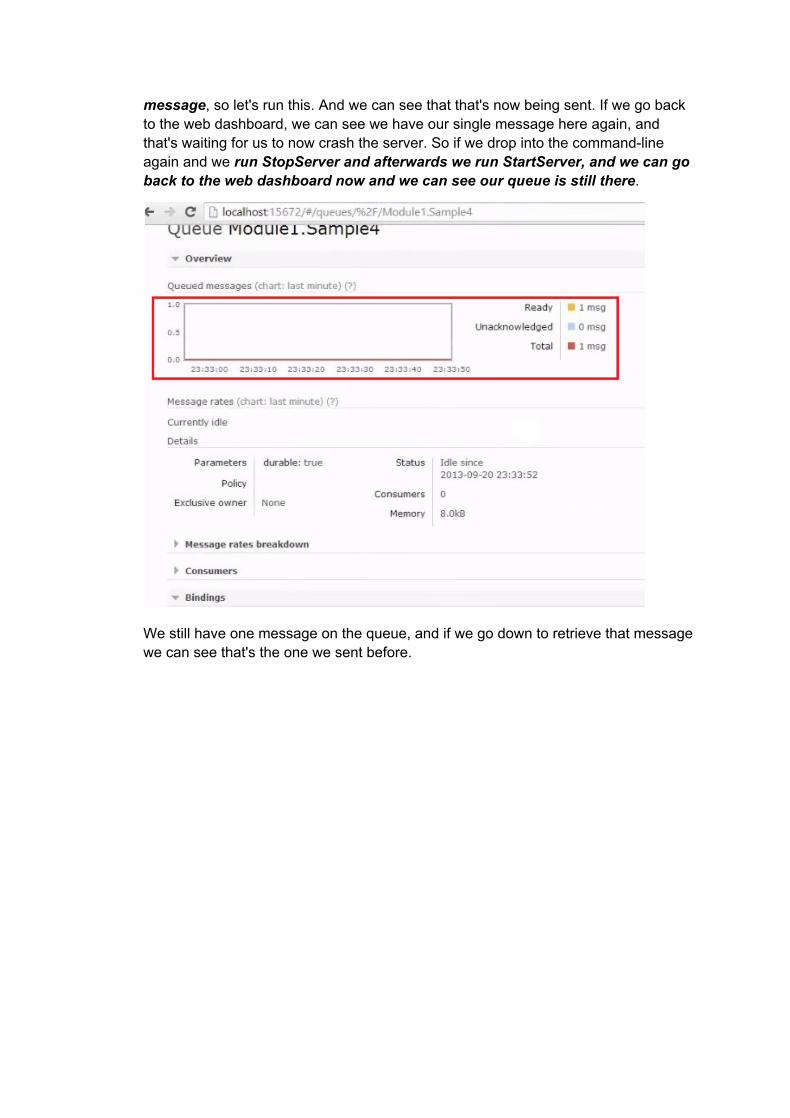
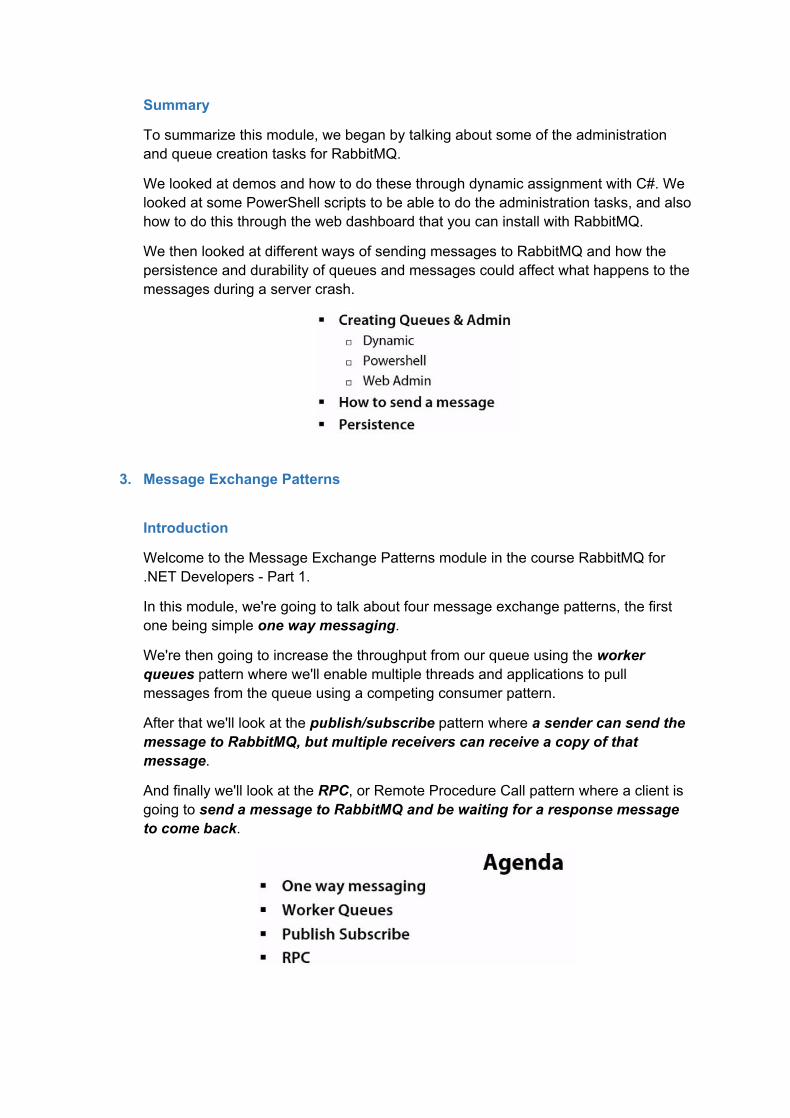
message, so let's run this. And we can see that that's now being sent. If we go back to the web dashboard, we can see we have our single message here again, and that's waiting for us to now crash the server. So if we drop into the commandline again and we run StopServer and afterwards we run StartServer, and we can go back to the web dashboard now and we can see our queue is still there.
We still have one message on the queue, and if we go down to retrieve that message we can see that's the one we sent before.
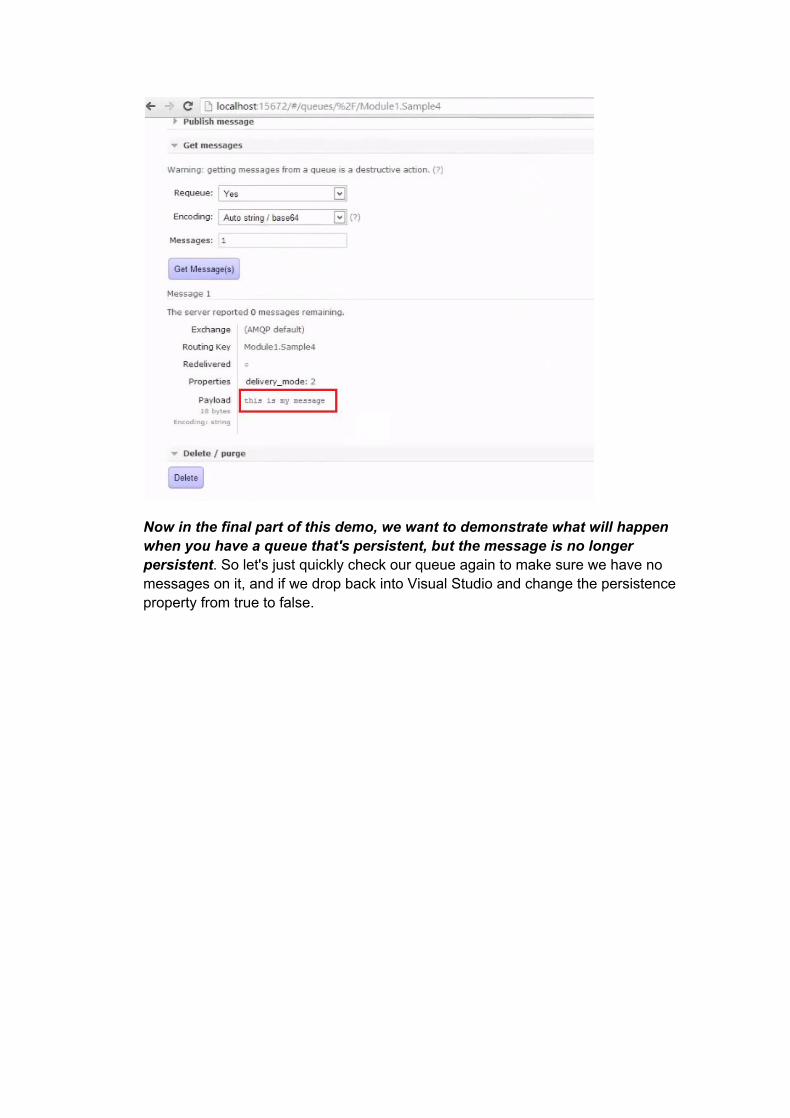
Now in the final part of this demo, we want to demonstrate what will happen when you have a queue that's persistent, but the message is no longer persistent. So let's just quickly check our queue again to make sure we have no messages on it, and if we drop back into Visual Studio and change the persistence property from true to false.
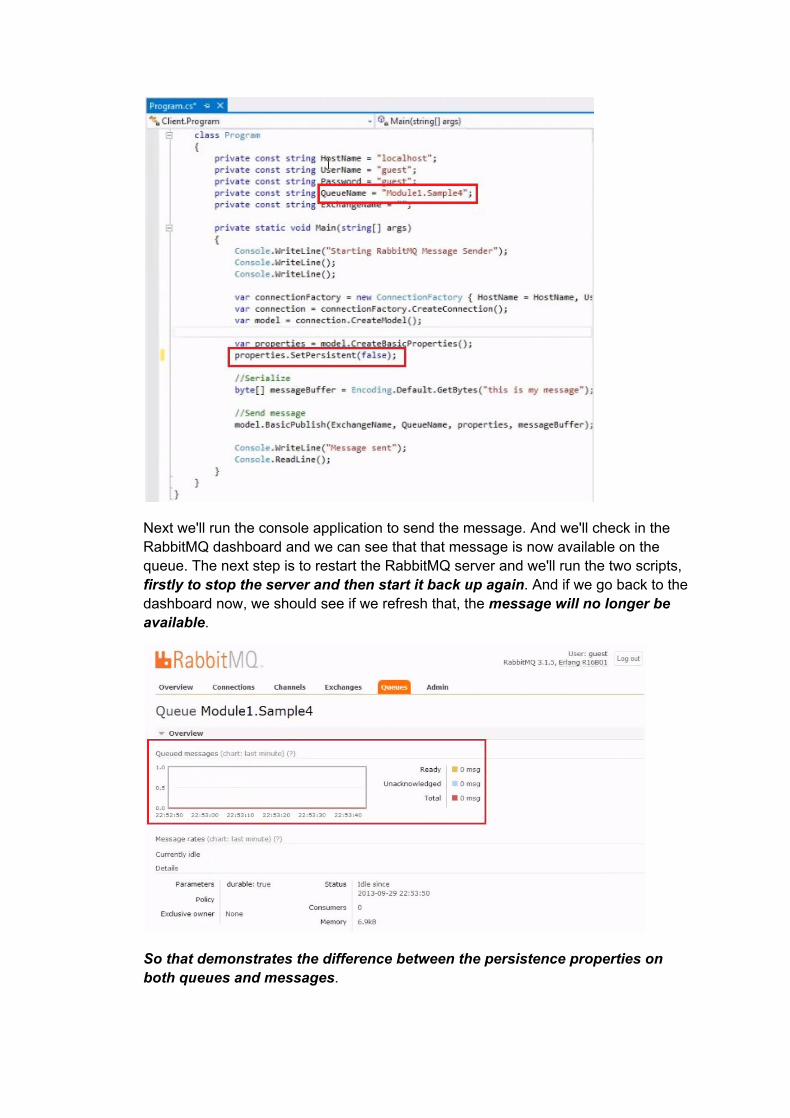
Next we'll run the console application to send the message. And we'll check in the RabbitMQ dashboard and we can see that that message is now available on the queue. The next step is to restart the RabbitMQ server and we'll run the two scripts, firstly to stop the server and then start it back up again. And if we go back to the dashboard now, we should see if we refresh that, the message will no longer be available.
So that demonstrates the difference between the persistence properties on both queues and messages.
Summary
To summarize this module, we began by talking about some of the administration and queue creation tasks for RabbitMQ.
We looked at demos and how to do these through dynamic assignment with C#. We looked at some PowerShell scripts to be able to do the administration tasks, and also how to do this through the web dashboard that you can install with RabbitMQ.
We then looked at different ways of sending messages to RabbitMQ and how the persistence and durability of queues and messages could affect what happens to the messages during a server crash.
3. Message Exchange Patterns
Introduction
Welcome to the Message Exchange Patterns module in the course RabbitMQ for .NET Developers Part 1.
In this module, we're going to talk about four message exchange patterns, the first one being simple one way messaging.
We're then going to increase the throughput from our queue using the worker queues pattern where we'll enable multiple threads and applications to pull messages from the queue using a competing consumer pattern.
After that we'll look at the publish/subscribe pattern where a sender can send the message to RabbitMQ, but multiple receivers can receive a copy of that message.
And finally we'll look at the RPC, or Remote Procedure Call pattern where a client is going to send a message to RabbitMQ and be waiting for a response message to come back.

One way Messaging
The first pattern we're going to look at in this module is called simple one way messaging.
In this pattern, a message will be sent by the sender to the RabbitMQ message broker. The message will then be received by a receiving application.
Some characteristics of this pattern are that we'll use the default exchange when we send a message to RabbitMQ, and also the routing key will be specified with the queue name that we want the message to be sent to.
If we take a look at this pattern in action, you can see here that the producer and the consumer of the message would both have connections to RabbitMQ. The producer would then send a message that would be routed to a queue and then collected by the consumer.
Now let's take a look at a demo of this pattern. In this demonstration we're going to aim to show you how a message can be sent from a consumer to RabbitMQ and then collected from another application.
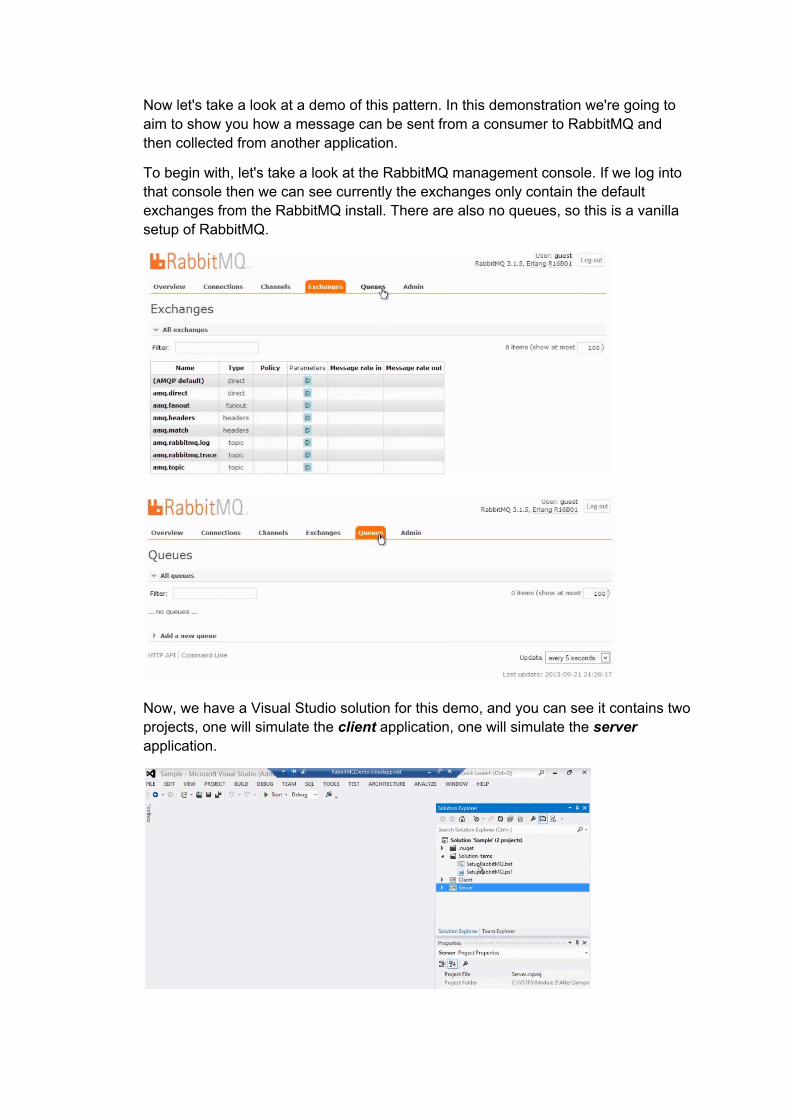
To begin with, let's take a look at the RabbitMQ management console. If we log into that console then we can see currently the exchanges only contain the default exchanges from the RabbitMQ install. There are also no queues, so this is a vanilla setup of RabbitMQ.
Now, we have a Visual Studio solution for this demo, and you can see it contains two projects, one will simulate the client application, one will simulate the server application.
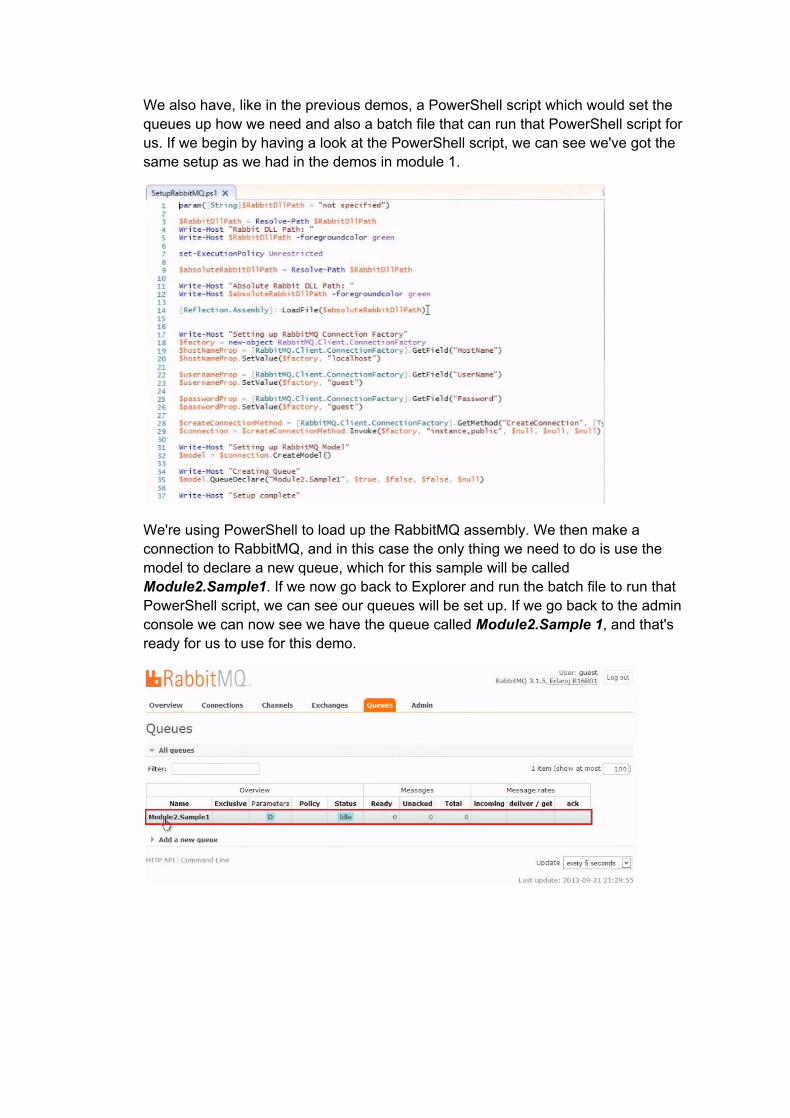
We also have, like in the previous demos, a PowerShell script which would set the queues up how we need and also a batch file that can run that PowerShell script for us. If we begin by having a look at the PowerShell script, we can see we've got the same setup as we had in the demos in module 1.
We're using PowerShell to load up the RabbitMQ assembly. We then make a connection to RabbitMQ, and in this case the only thing we need to do is use the model to declare a new queue, which for this sample will be called Module2.Sample1. If we now go back to Explorer and run the batch file to run that PowerShell script, we can see our queues will be set up. If we go back to the admin console we can now see we have the queue called Module2.Sample 1, and that's ready for us to use for this demo.
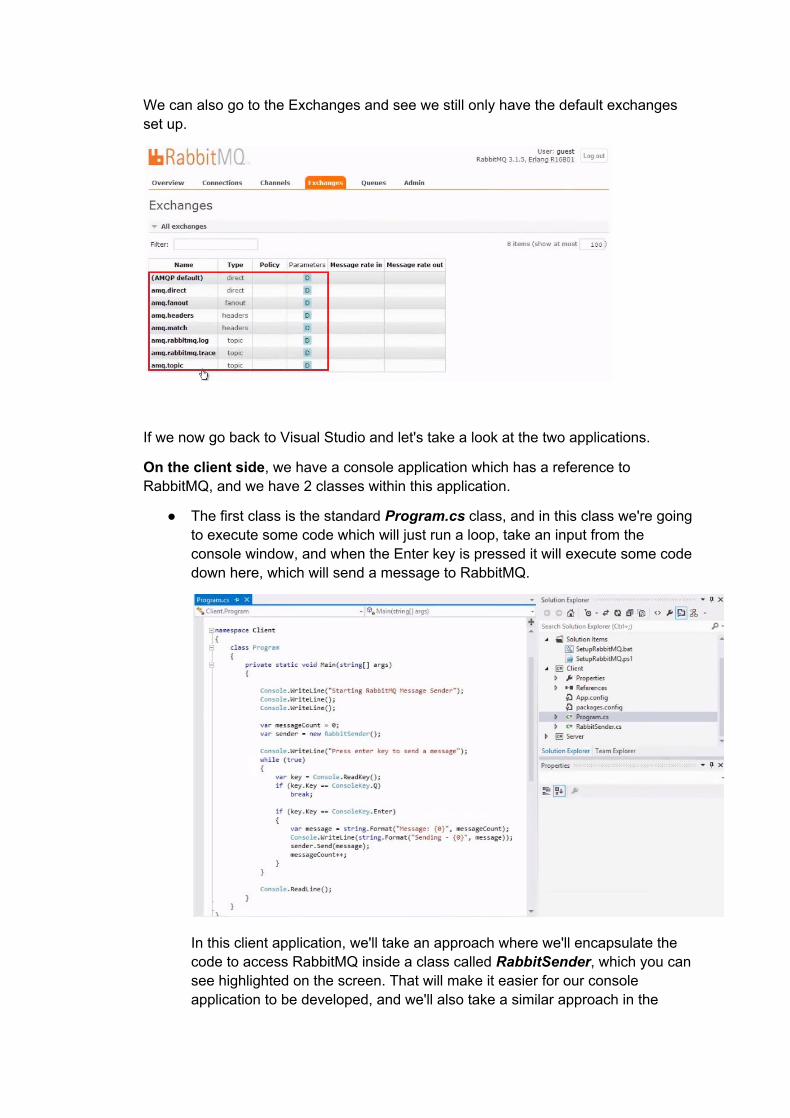
We can also go to the Exchanges and see we still only have the default exchanges set up.
If we now go back to Visual Studio and let's take a look at the two applications.
On the client side, we have a console application which has a reference to RabbitMQ, and we have 2 classes within this application.
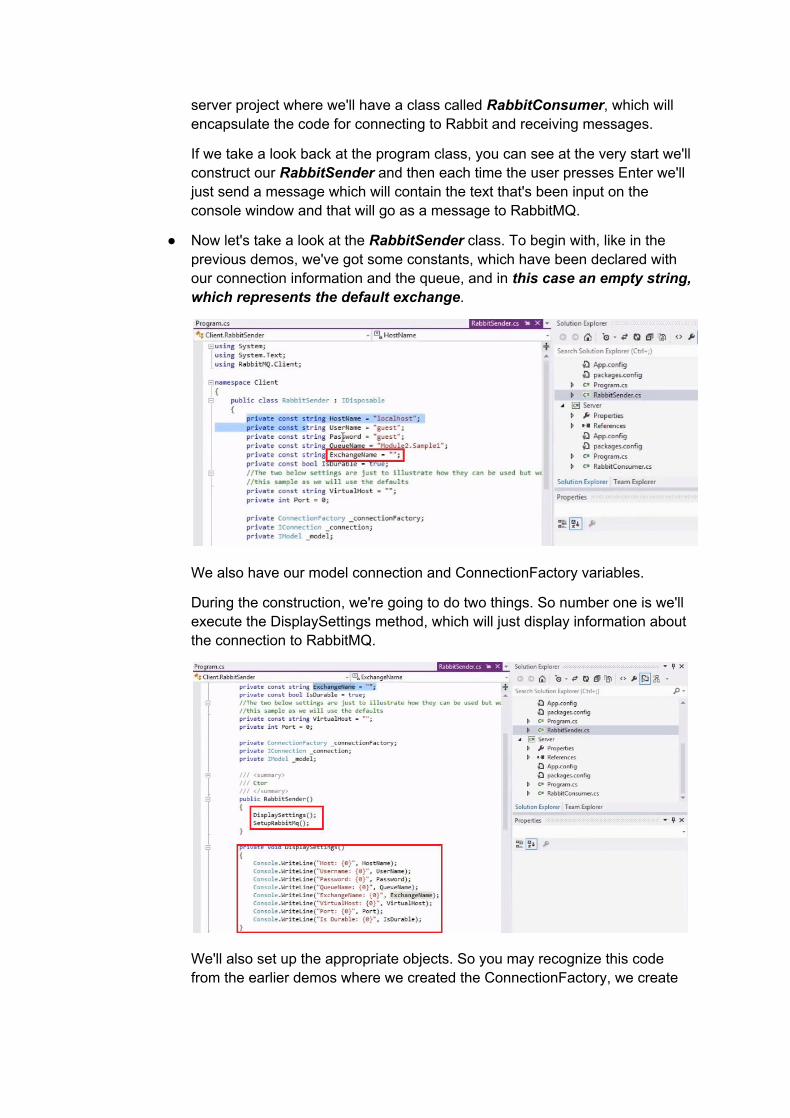
● The first class is the standard Program.cs class, and in this class we're going to execute some code which will just run a loop, take an input from the console window, and when the Enter key is pressed it will execute some code down here, which will send a message to RabbitMQ.
In this client application, we'll take an approach where we'll encapsulate the code to access RabbitMQ inside a class called RabbitSender, which you can see highlighted on the screen. That will make it easier for our console application to be developed, and we'll also take a similar approach in the
server project where we'll have a class called RabbitConsumer, which will encapsulate the code for connecting to Rabbit and receiving messages.
If we take a look back at the program class, you can see at the very start we'll construct our RabbitSender and then each time the user presses Enter we'll just send a message which will contain the text that's been input on the console window and that will go as a message to RabbitMQ.
● Now let's take a look at the RabbitSender class. To begin with, like in the previous demos, we've got some constants, which have been declared with our connection information and the queue, and in this case an empty string, which represents the default exchange.
We also have our model connection and ConnectionFactory variables.
During the construction, we're going to do two things. So number one is we'll execute the DisplaySettings method, which will just display information about the connection to RabbitMQ.
We'll also set up the appropriate objects. So you may recognize this code from the earlier demos where we created the ConnectionFactory, we create
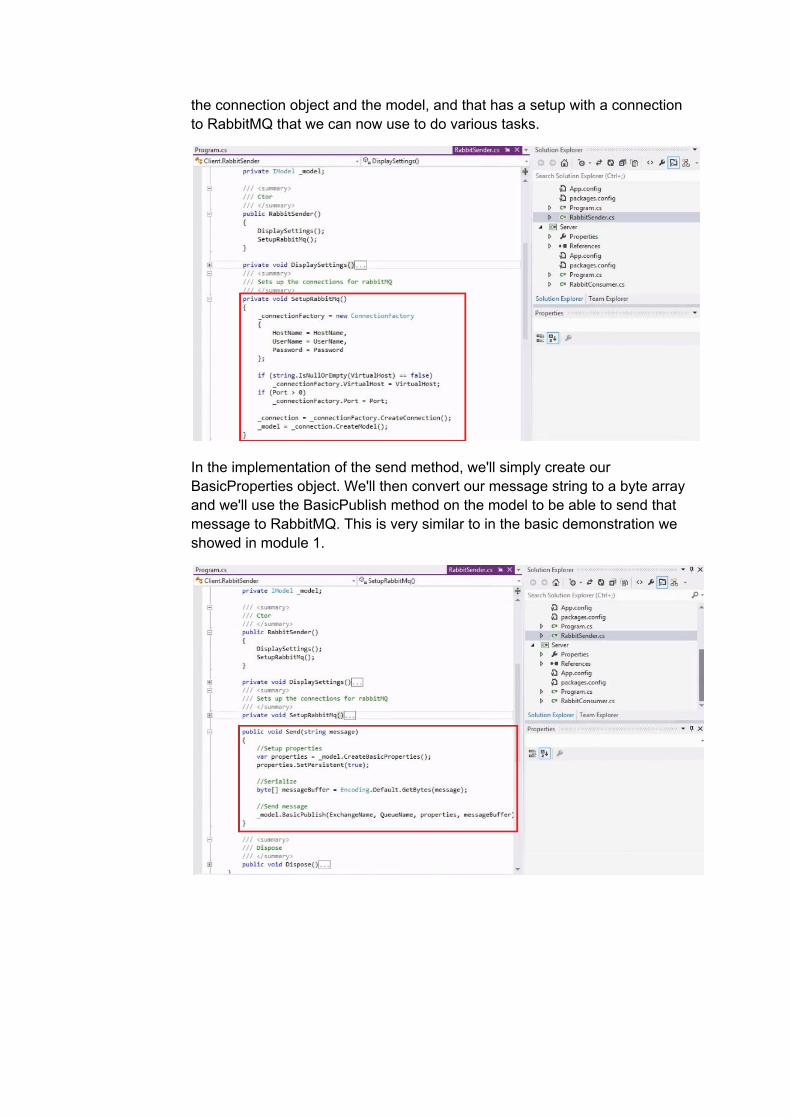
the connection object and the model, and that has a setup with a connection to RabbitMQ that we can now use to do various tasks.
In the implementation of the send method, we'll simply create our BasicProperties object. We'll then convert our message string to a byte array and we'll use the BasicPublish method on the model to be able to send that message to RabbitMQ. This is very similar to in the basic demonstration we showed in module 1.
In the server project we also have a reference to RabbitMQ.
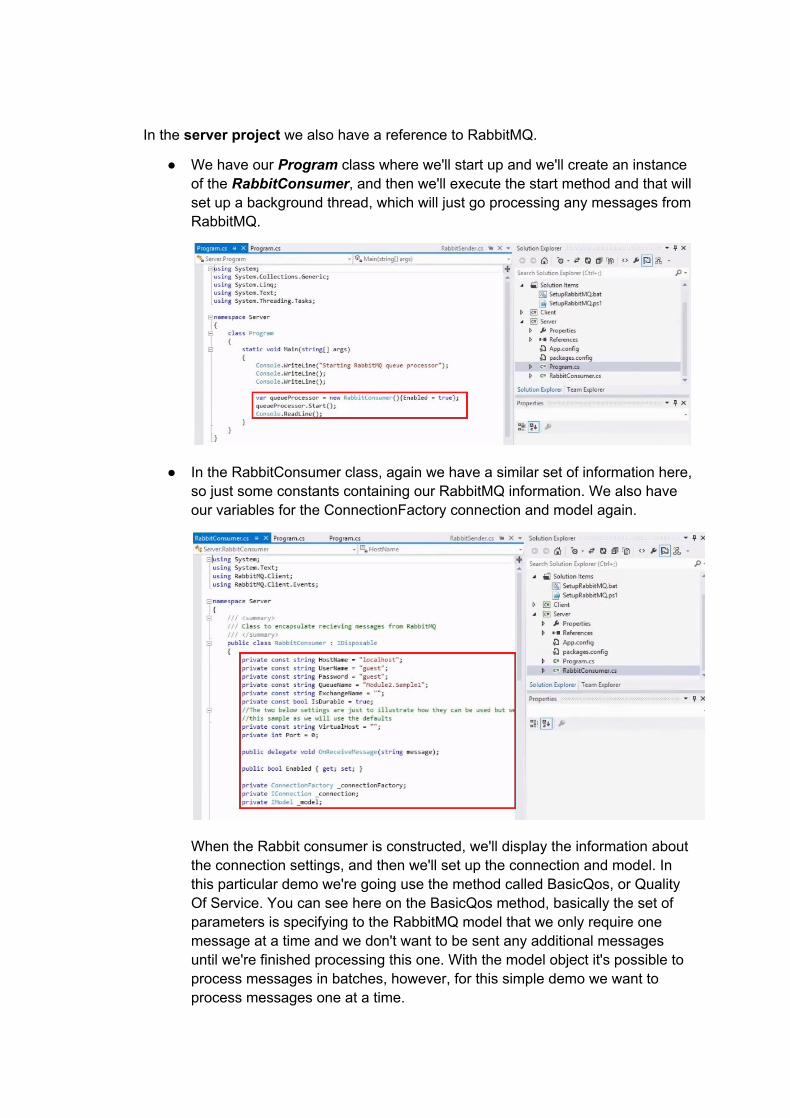
● We have our Program class where we'll start up and we'll create an instance of the RabbitConsumer, and then we'll execute the start method and that will set up a background thread, which will just go processing any messages from RabbitMQ.
● In the RabbitConsumer class, again we have a similar set of information here, so just some constants containing our RabbitMQ information. We also have our variables for the ConnectionFactory connection and model again.
When the Rabbit consumer is constructed, we'll display the information about the connection settings, and then we'll set up the connection and model. In this particular demo we're going use the method called BasicQos, or Quality Of Service. You can see here on the BasicQos method, basically the set of parameters is specifying to the RabbitMQ model that we only require one message at a time and we don't want to be sent any additional messages until we're finished processing this one. With the model object it's possible to process messages in batches, however, for this simple demo we want to process messages one at a time.
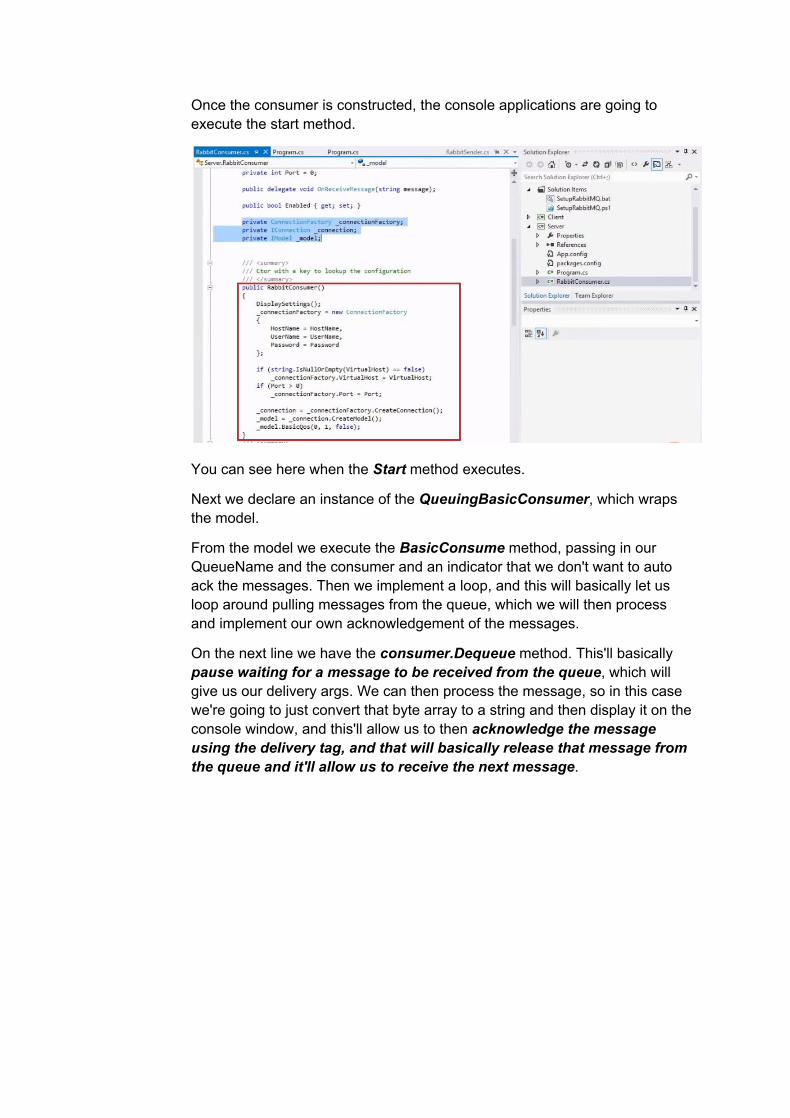
Once the consumer is constructed, the console applications are going to execute the start method.
You can see here when the Start method executes.
Next we declare an instance of the QueuingBasicConsumer, which wraps the model.
From the model we execute the BasicConsume method, passing in our QueueName and the consumer and an indicator that we don't want to auto ack the messages. Then we implement a loop, and this will basically let us loop around pulling messages from the queue, which we will then process and implement our own acknowledgement of the messages.
On the next line we have the consumer.Dequeue method. This'll basically pause waiting for a message to be received from the queue, which will give us our delivery args. We can then process the message, so in this case we're going to just convert that byte array to a string and then display it on the console window, and this'll allow us to then acknowledge the message using the delivery tag, and that will basically release that message from the queue and it'll allow us to receive the next message.
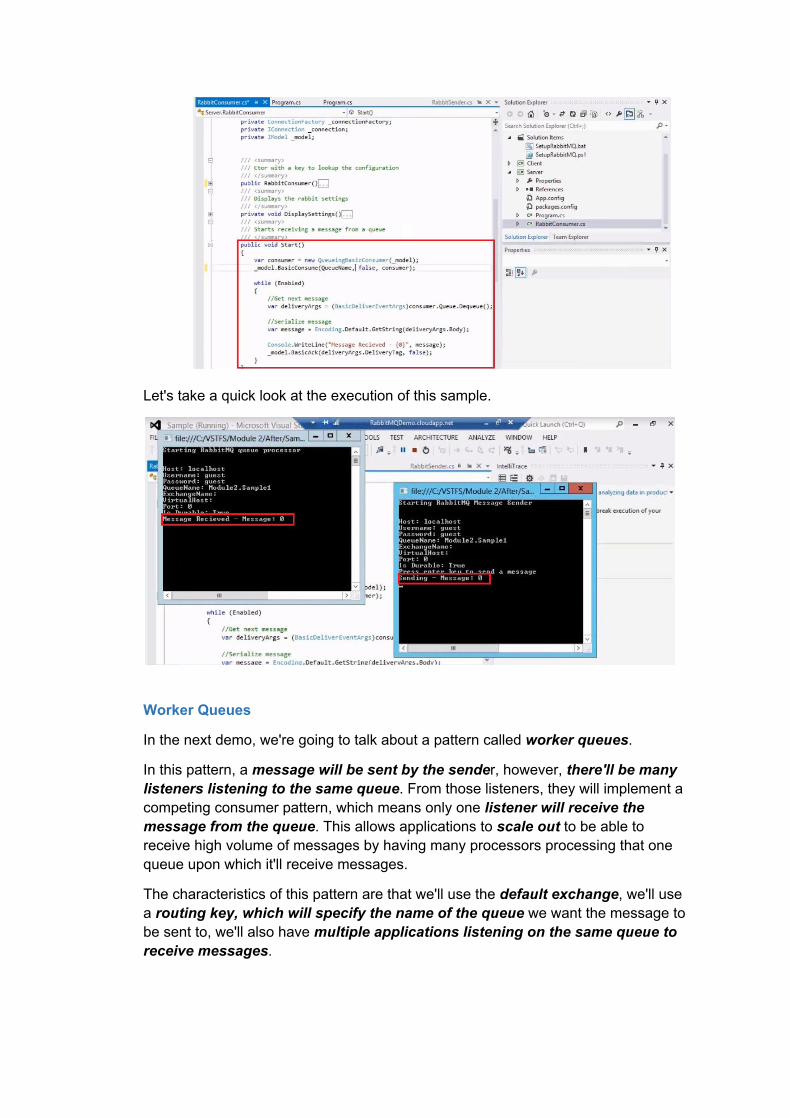
Let's take a quick look at the execution of this sample.
Worker Queues
In the next demo, we're going to talk about a pattern called worker queues.
In this pattern, a message will be sent by the sender, however, there'll be many listeners listening to the same queue. From those listeners, they will implement a competing consumer pattern, which means only one listener will receive the message from the queue. This allows applications to scale out to be able to receive high volume of messages by having many processors processing that one queue upon which it'll receive messages.
The characteristics of this pattern are that we'll use the default exchange, we'll use a routing key, which will specify the name of the queue we want the message to be sent to, we'll also have multiple applications listening on the same queue to receive messages.
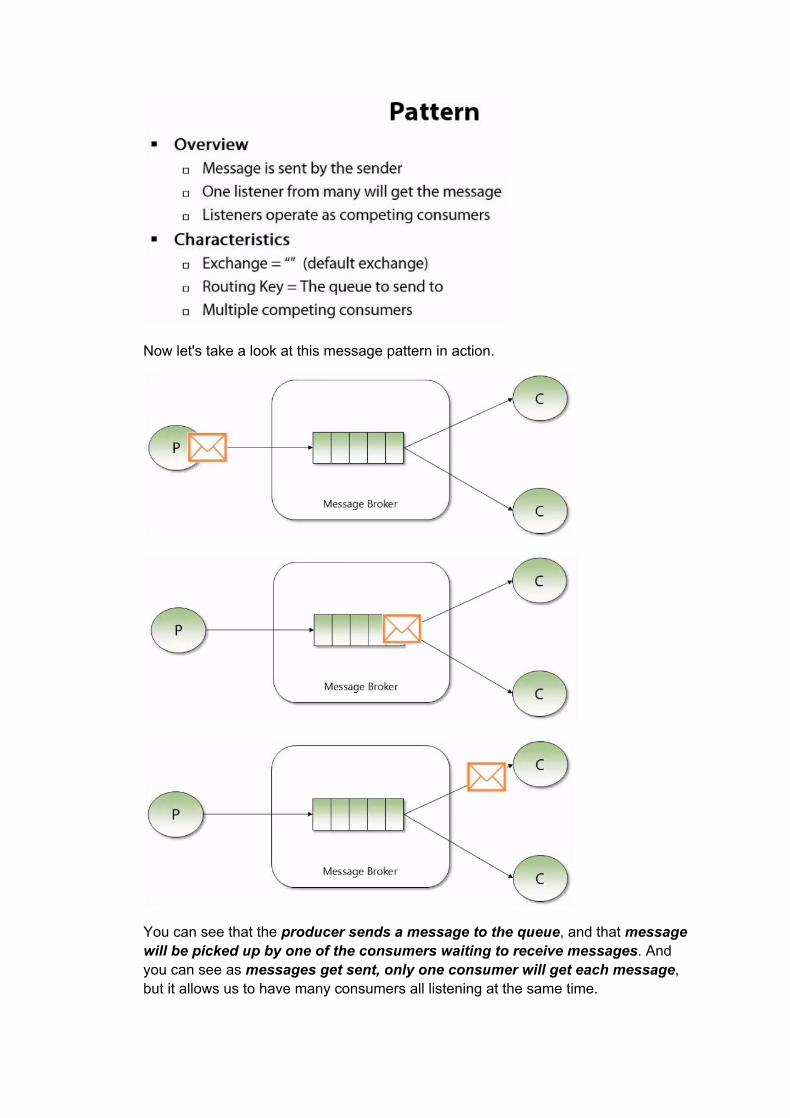
Now let's take a look at this message pattern in action.
You can see that the producer sends a message to the queue, and that message will be picked up by one of the consumers waiting to receive messages. And you can see as messages get sent, only one consumer will get each message, but it allows us to have many consumers all listening at the same time.
Now let's take a look at a demo of this pattern in action implemented with .NET
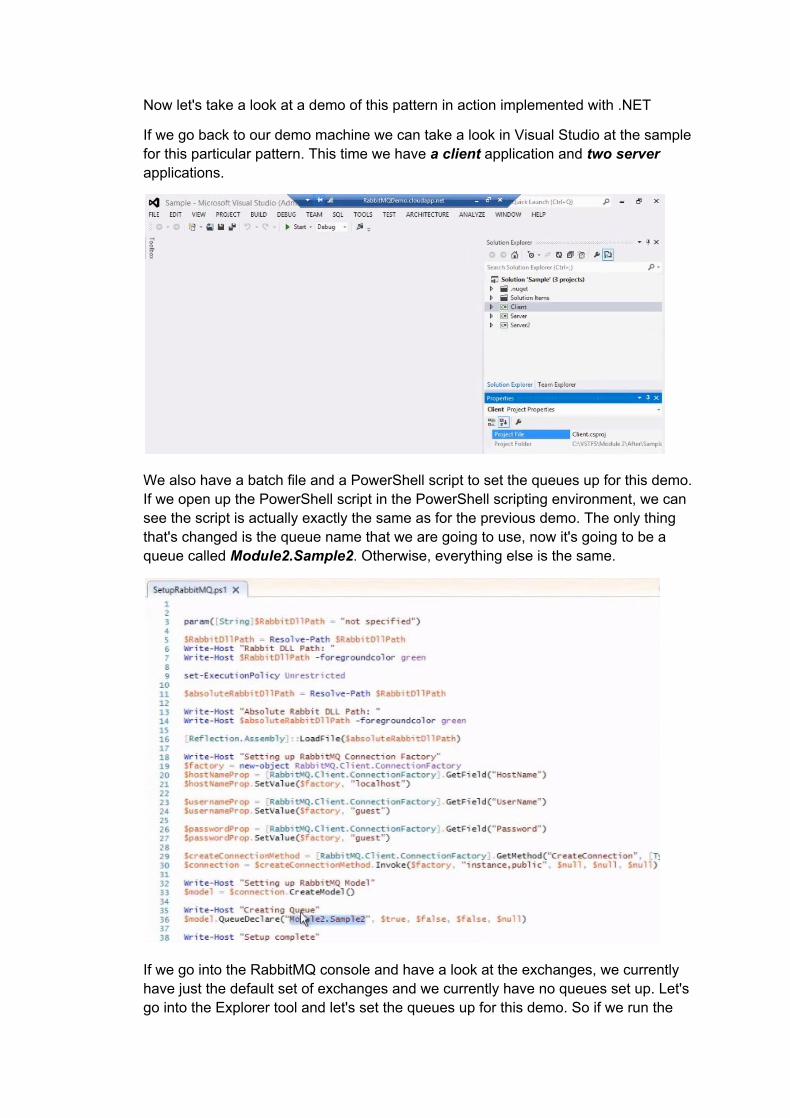
If we go back to our demo machine we can take a look in Visual Studio at the sample for this particular pattern. This time we have a client application and two server applications.
We also have a batch file and a PowerShell script to set the queues up for this demo. If we open up the PowerShell script in the PowerShell scripting environment, we can see the script is actually exactly the same as for the previous demo. The only thing that's changed is the queue name that we are going to use, now it's going to be a queue called Module2.Sample2. Otherwise, everything else is the same.
If we go into the RabbitMQ console and have a look at the exchanges, we currently have just the default set of exchanges and we currently have no queues set up. Let's go into the Explorer tool and let's set the queues up for this demo. So if we run the
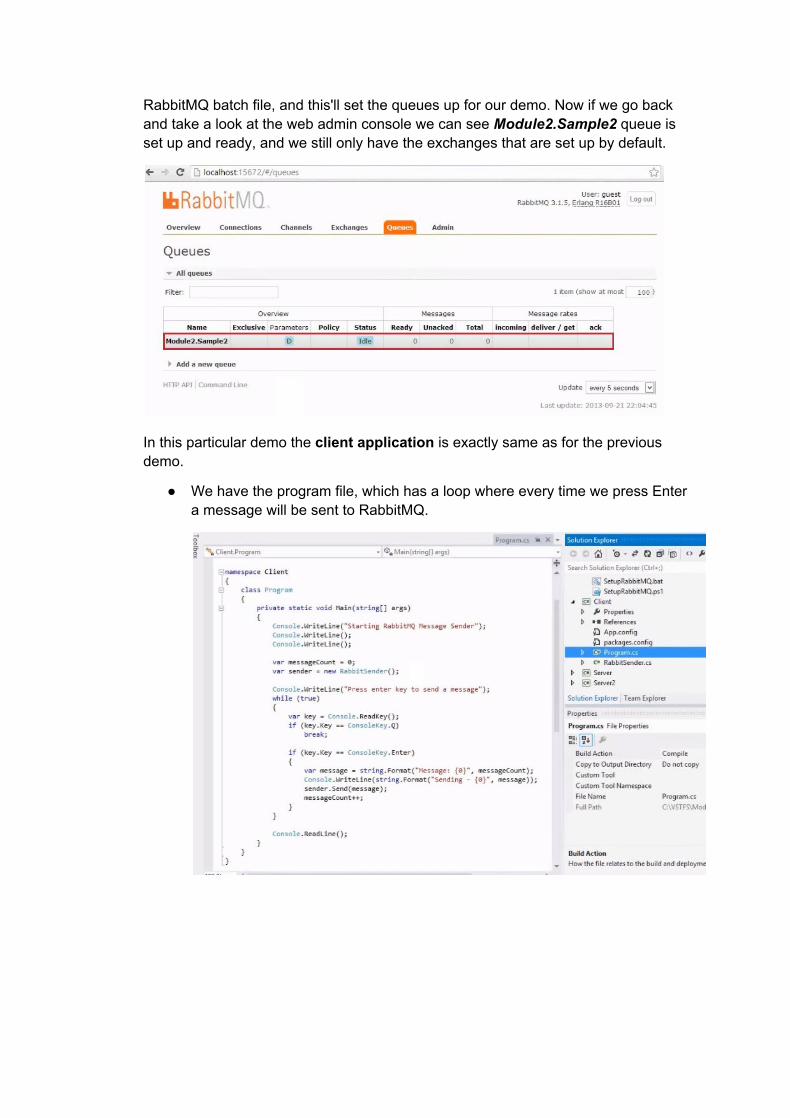
RabbitMQ batch file, and this'll set the queues up for our demo. Now if we go back and take a look at the web admin console we can see Module2.Sample2 queue is set up and ready, and we still only have the exchanges that are set up by default.
In this particular demo the client application is exactly same as for the previous demo.
● We have the program file, which has a loop where every time we press Enter a message will be sent to RabbitMQ.
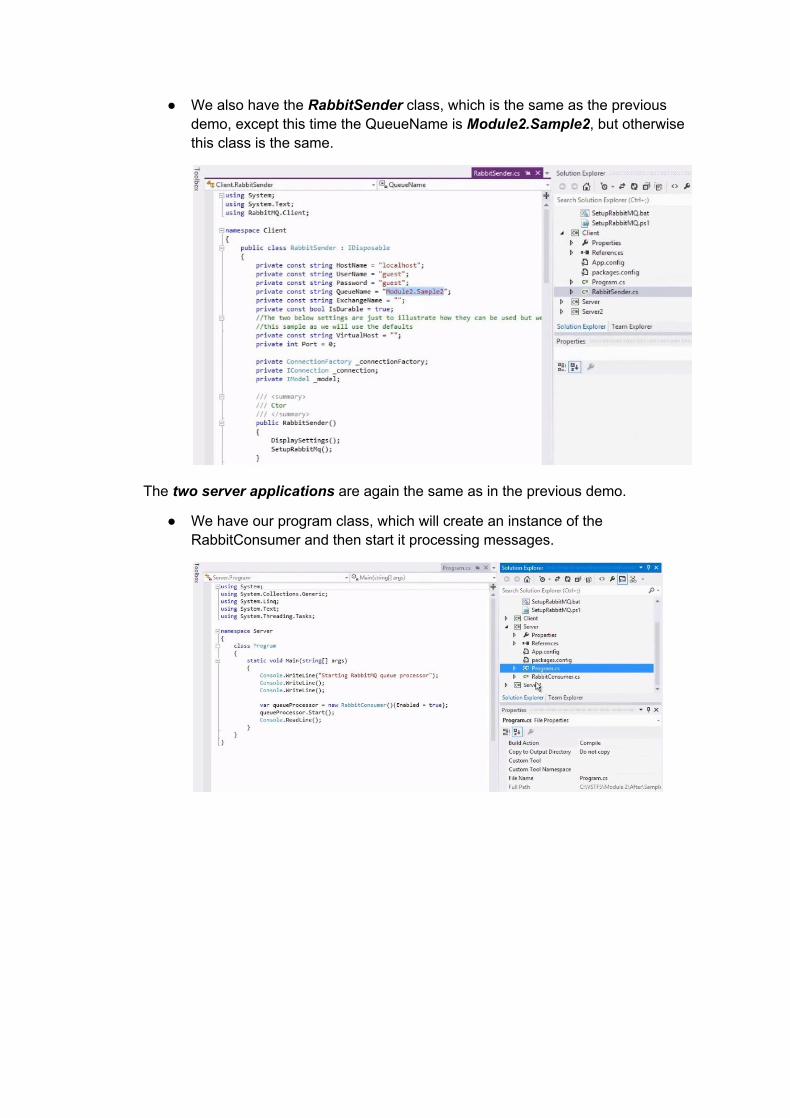
● We also have the RabbitSender class, which is the same as the previous demo, except this time the QueueName is Module2.Sample2, but otherwise this class is the same.
The two server applications are again the same as in the previous demo.
● We have our program class, which will create an instance of the RabbitConsumer and then start it processing messages.
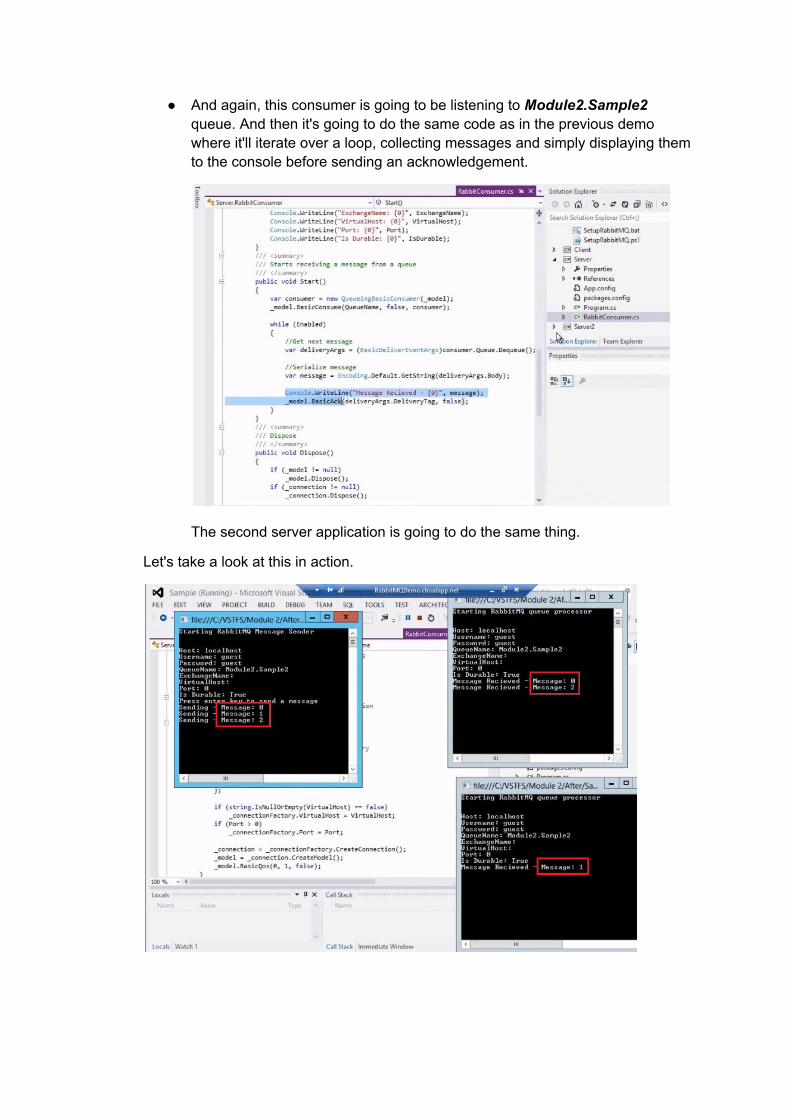
● And again, this consumer is going to be listening to Module2.Sample2 queue. And then it's going to do the same code as in the previous demo where it'll iterate over a loop, collecting messages and simply displaying them to the console before sending an acknowledgement.
The second server application is going to do the same thing.
Let's take a look at this in action.
Publish/Subscribe
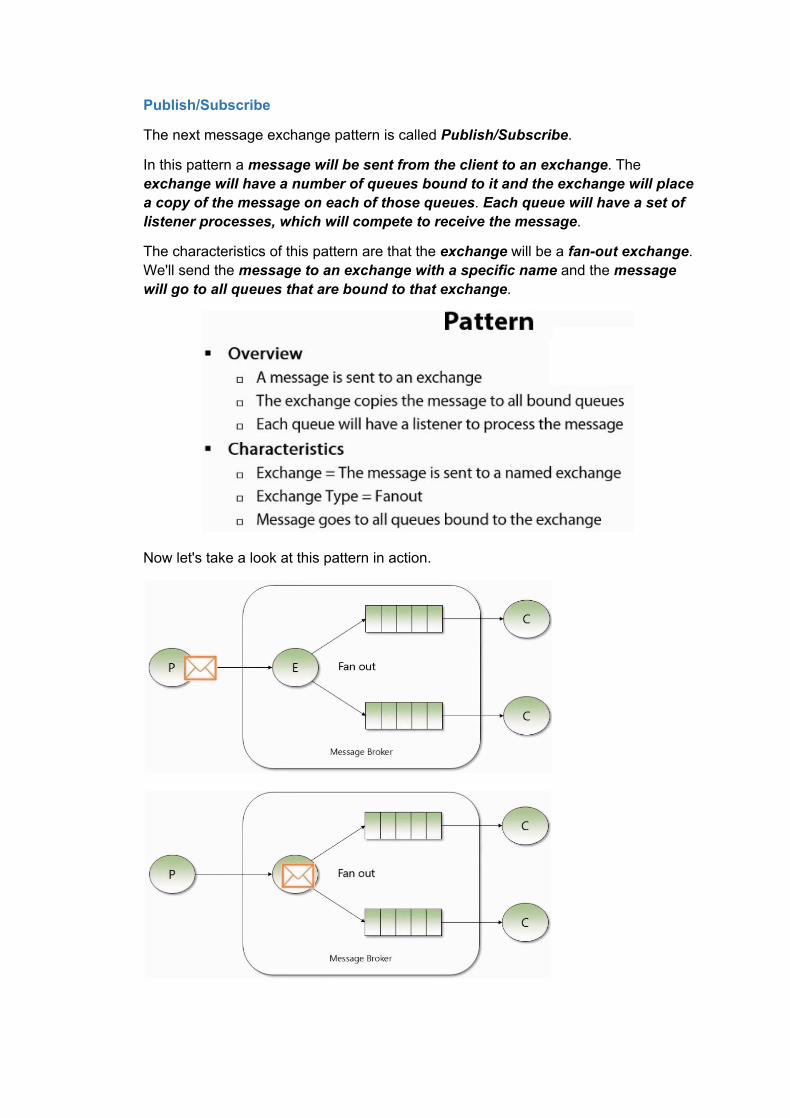
The next message exchange pattern is called Publish/Subscribe.
In this pattern a message will be sent from the client to an exchange. The exchange will have a number of queues bound to it and the exchange will place a copy of the message on each of those queues. Each queue will have a set of listener processes, which will compete to receive the message.
The characteristics of this pattern are that the exchange will be a fanout exchange. We'll send the message to an exchange with a specific name and the message will go to all queues that are bound to that exchange.
Now let's take a look at this pattern in action.
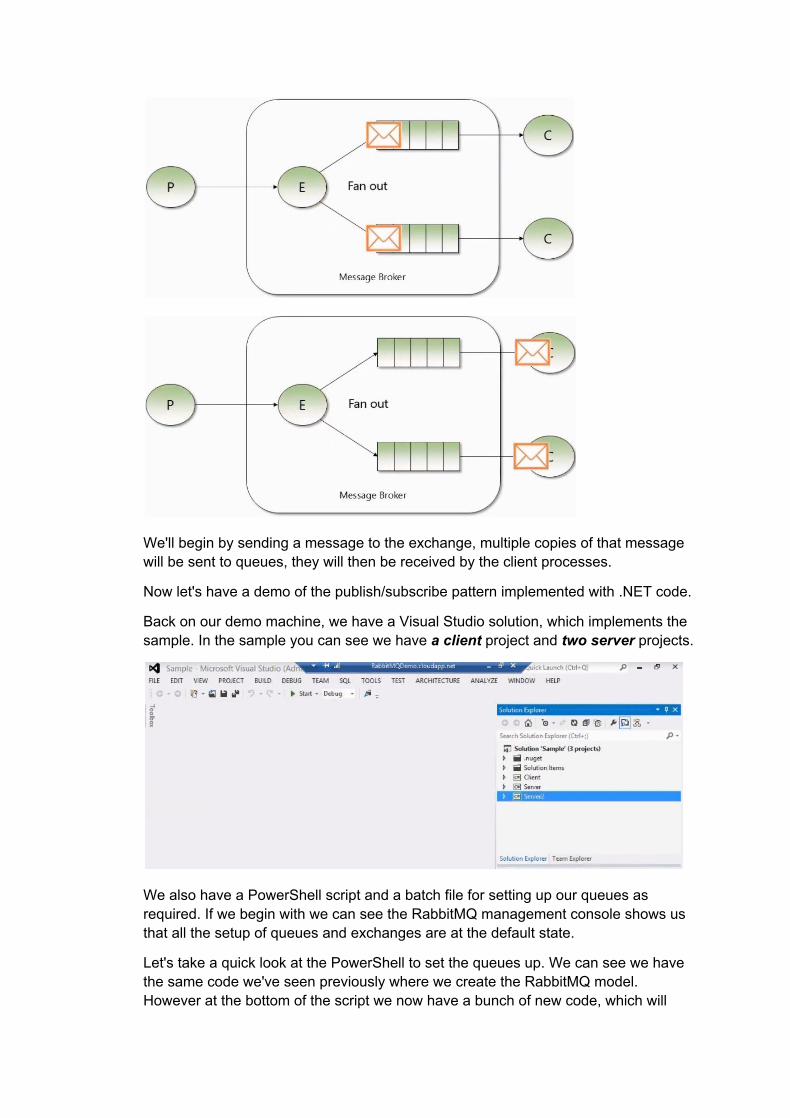
We'll begin by sending a message to the exchange, multiple copies of that message will be sent to queues, they will then be received by the client processes.
Now let's have a demo of the publish/subscribe pattern implemented with .NET code.
Back on our demo machine, we have a Visual Studio solution, which implements the sample. In the sample you can see we have a client project and two server projects.
We also have a PowerShell script and a batch file for setting up our queues as required. If we begin with we can see the RabbitMQ management console shows us that all the setup of queues and exchanges are at the default state.
Let's take a quick look at the PowerShell to set the queues up. We can see we have the same code we've seen previously where we create the RabbitMQ model. However at the bottom of the script we now have a bunch of new code, which will
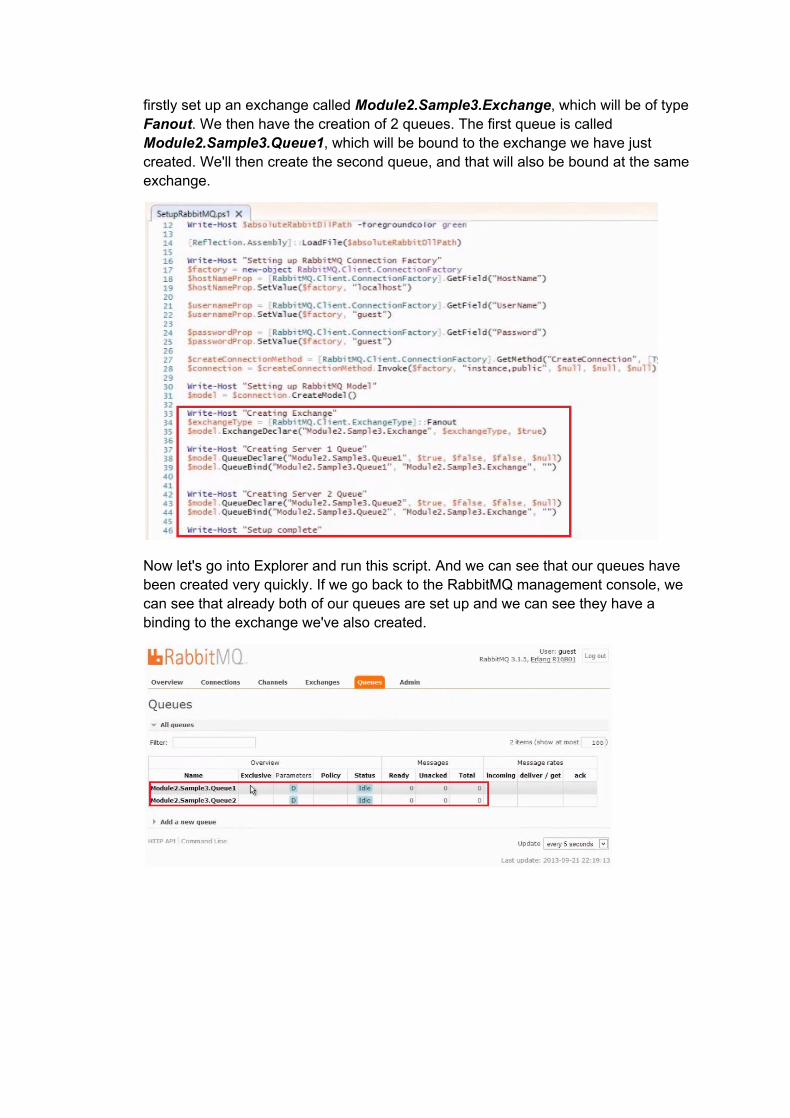
firstly set up an exchange called Module2.Sample3.Exchange, which will be of type Fanout. We then have the creation of 2 queues. The first queue is called Module2.Sample3.Queue1, which will be bound to the exchange we have just created. We'll then create the second queue, and that will also be bound at the same exchange.
Now let's go into Explorer and run this script. And we can see that our queues have been created very quickly. If we go back to the RabbitMQ management console, we can see that already both of our queues are set up and we can see they have a binding to the exchange we've also created.
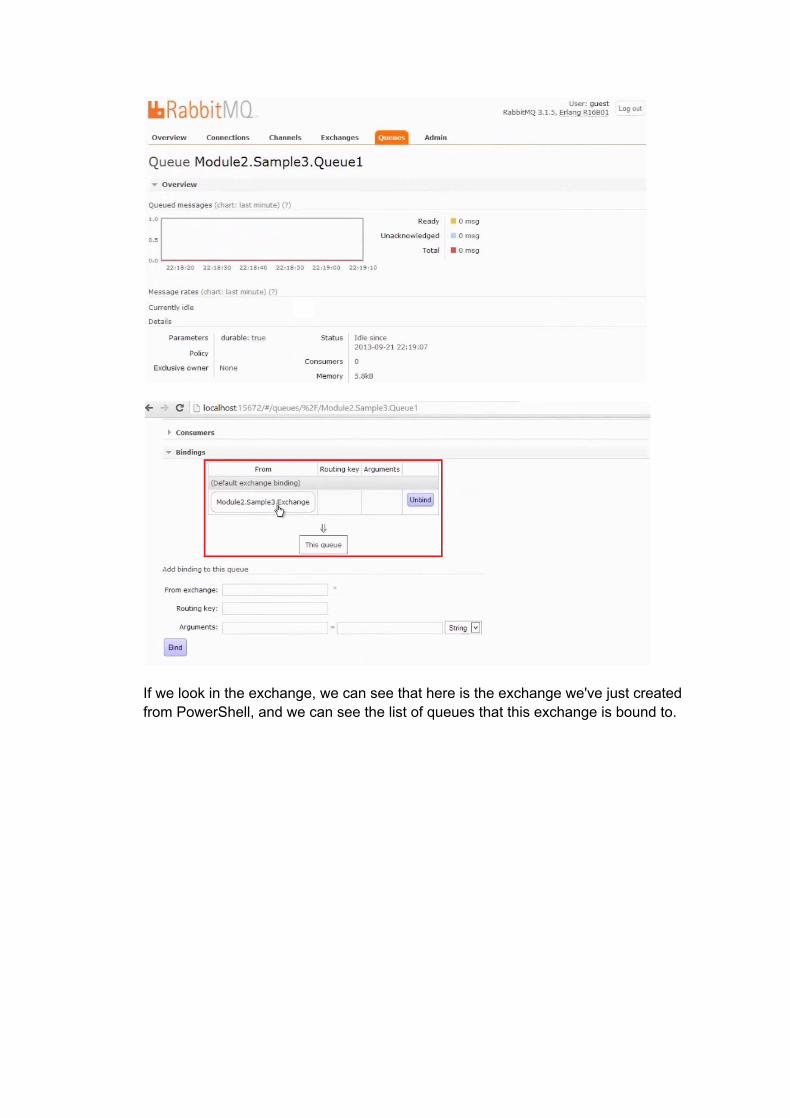
If we look in the exchange, we can see that here is the exchange we've just created from PowerShell, and we can see the list of queues that this exchange is bound to.
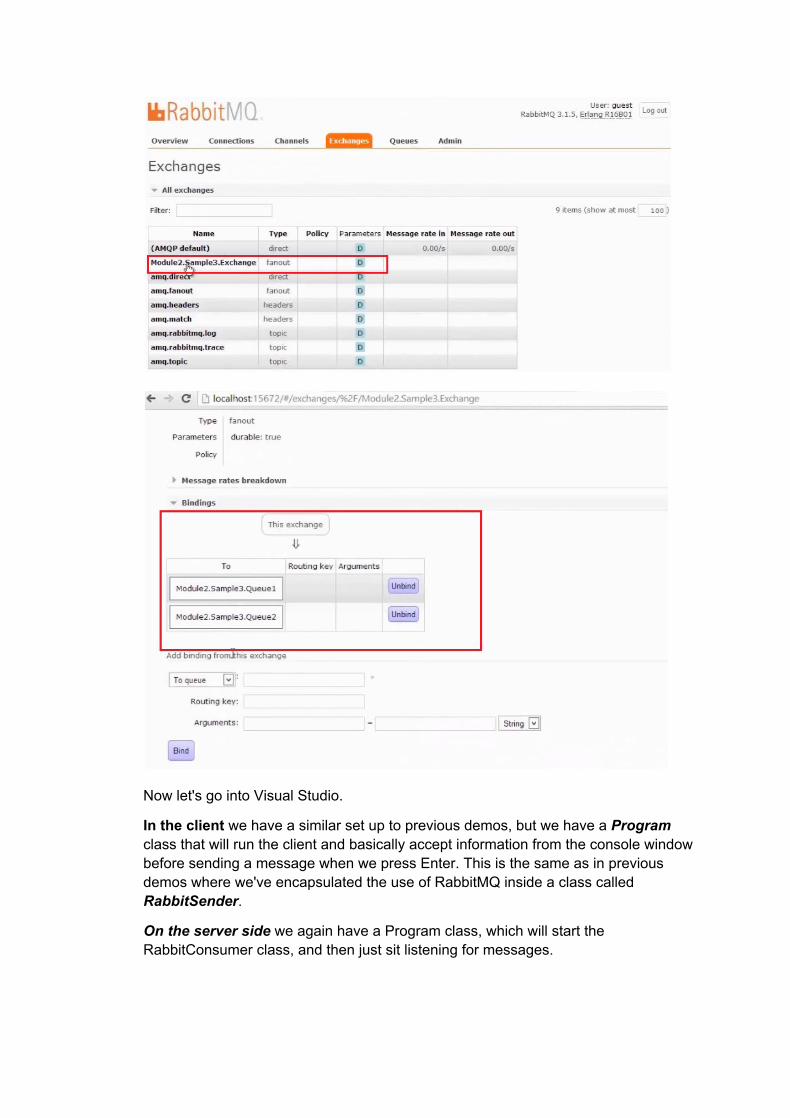
Now let's go into Visual Studio.
In the client we have a similar set up to previous demos, but we have a Program class that will run the client and basically accept information from the console window before sending a message when we press Enter. This is the same as in previous demos where we've encapsulated the use of RabbitMQ inside a class called RabbitSender.
On the server side we again have a Program class, which will start the RabbitConsumer class, and then just sit listening for messages.
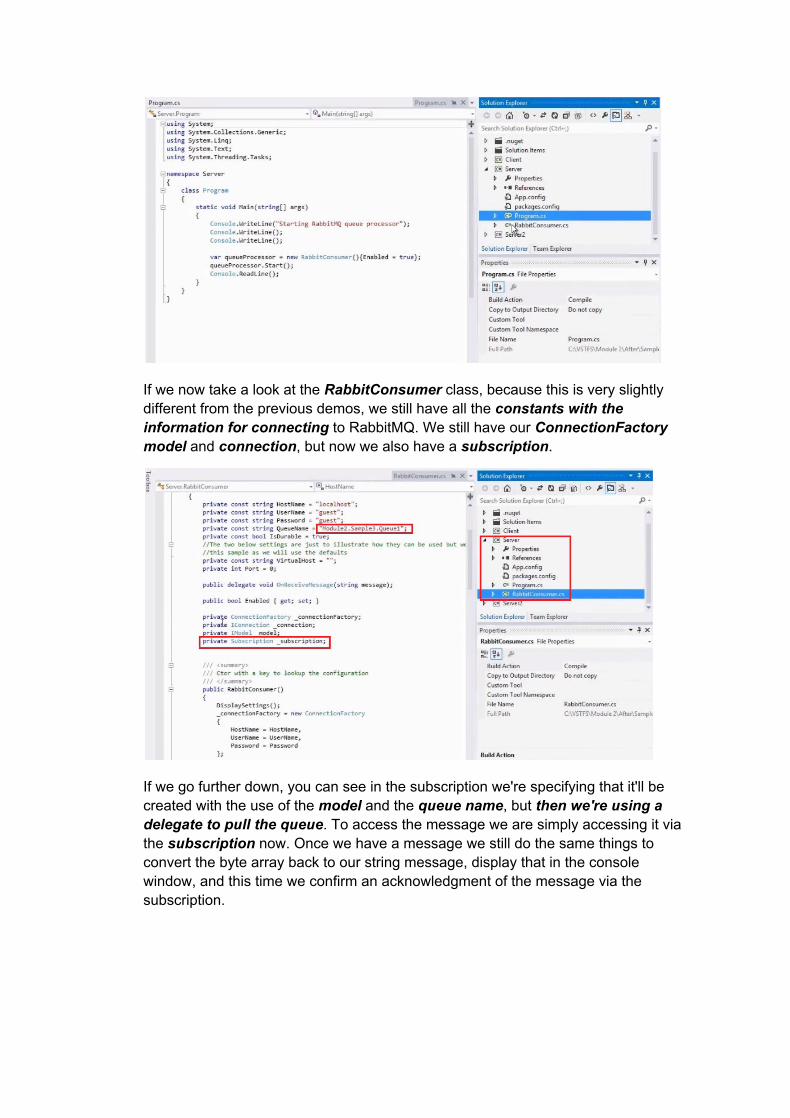
If we now take a look at the RabbitConsumer class, because this is very slightly different from the previous demos, we still have all the constants with the information for connecting to RabbitMQ. We still have our ConnectionFactory model and connection, but now we also have a subscription.
If we go further down, you can see in the subscription we're specifying that it'll be created with the use of the model and the queue name, but then we're using a delegate to pull the queue. To access the message we are simply accessing it via the subscription now. Once we have a message we still do the same things to convert the byte array back to our string message, display that in the console window, and this time we confirm an acknowledgment of the message via the subscription.
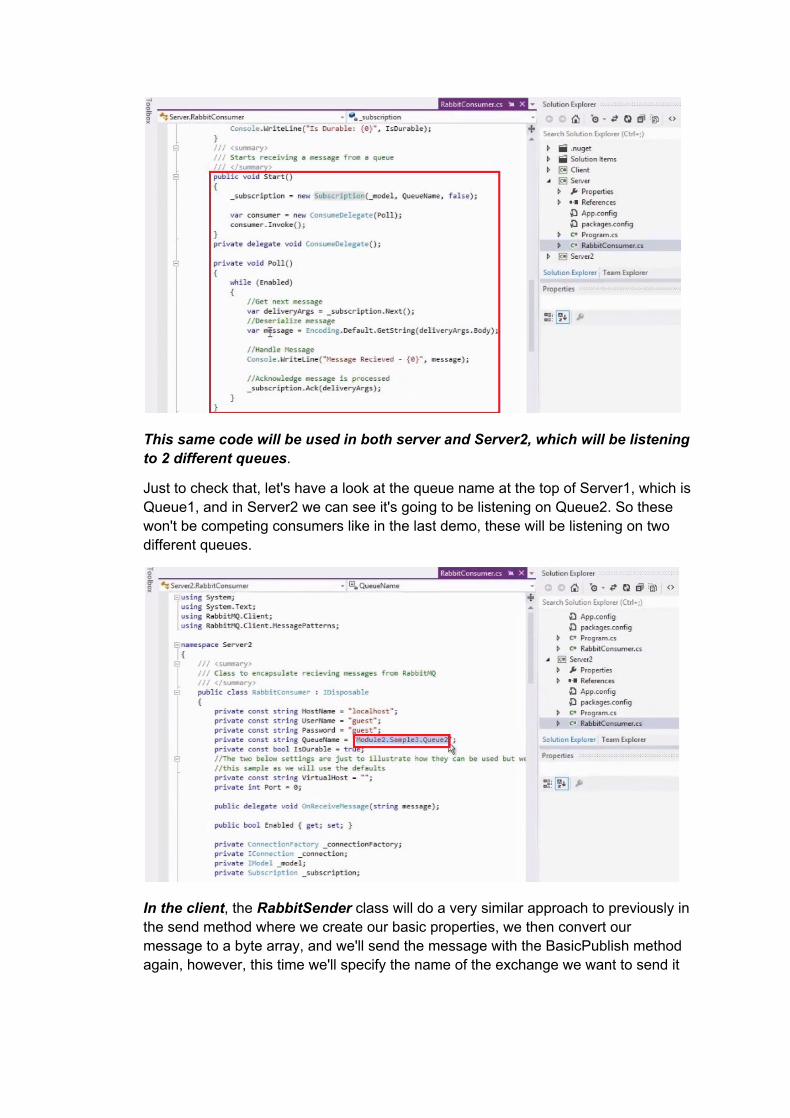
This same code will be used in both server and Server2, which will be listening to 2 different queues.
Just to check that, let's have a look at the queue name at the top of Server1, which is Queue1, and in Server2 we can see it's going to be listening on Queue2. So these won't be competing consumers like in the last demo, these will be listening on two different queues.
In the client, the RabbitSender class will do a very similar approach to previously in the send method where we create our basic properties, we then convert our message to a byte array, and we'll send the message with the BasicPublish method again, however, this time we'll specify the name of the exchange we want to send it
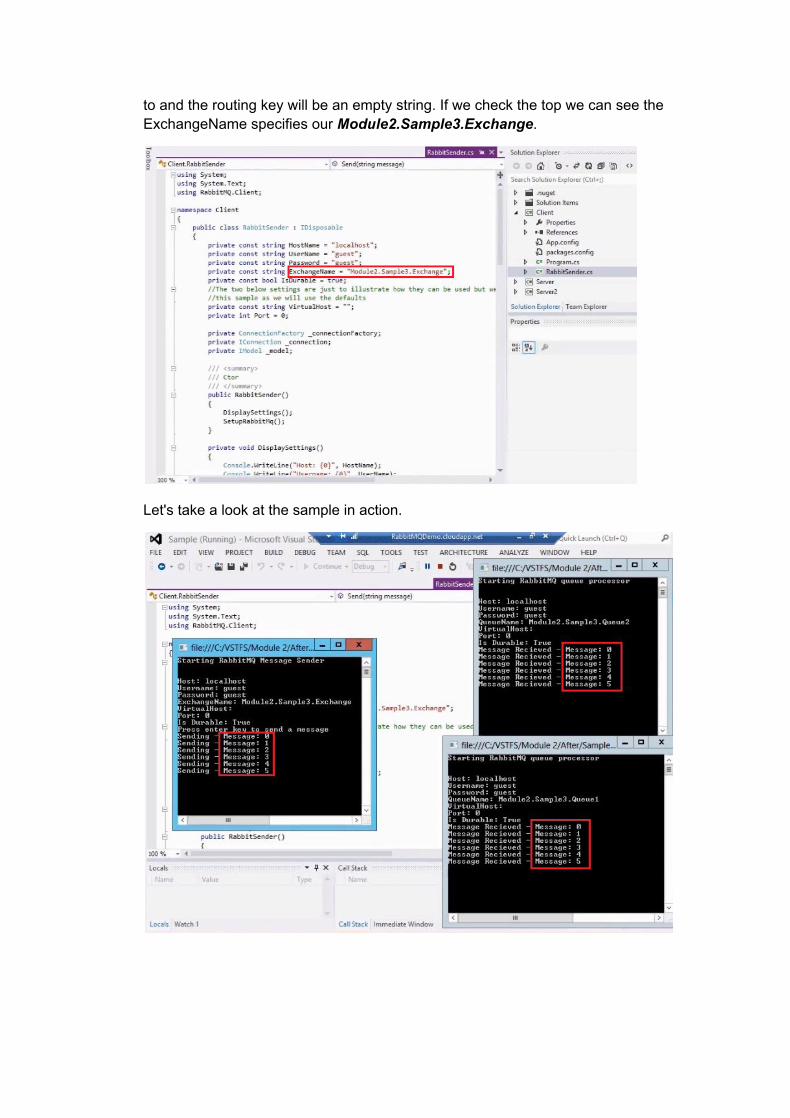
to and the routing key will be an empty string. If we check the top we can see the ExchangeName specifies our Module2.Sample3.Exchange.
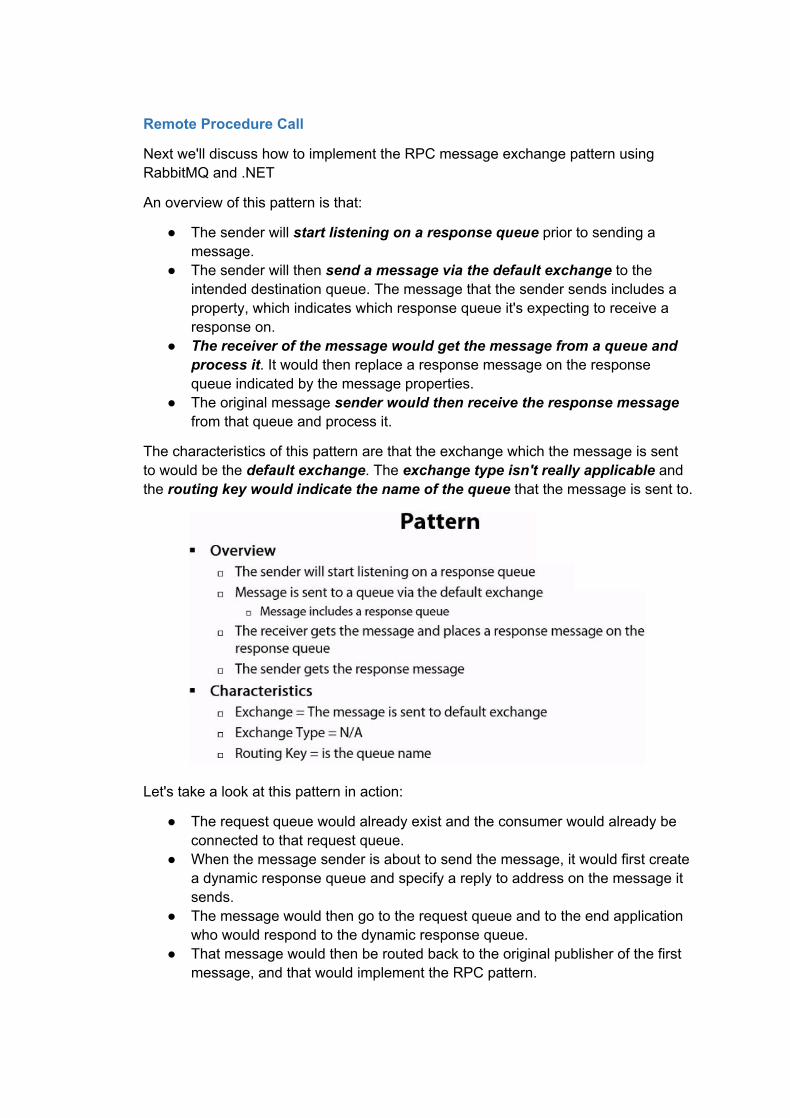
Let's take a look at the sample in action.
Remote Procedure Call
Next we'll discuss how to implement the RPC message exchange pattern using RabbitMQ and .NET
An overview of this pattern is that:
● The sender will start listening on a response queue prior to sending a message.
● The sender will then send a message via the default exchange to the intended destination queue. The message that the sender sends includes a property, which indicates which response queue it's expecting to receive a response on.
● The receiver of the message would get the message from a queue and process it. It would then replace a response message on the response queue indicated by the message properties.
● The original message sender would then receive the response message from that queue and process it.
The characteristics of this pattern are that the exchange which the message is sent to would be the default exchange. The exchange type isn't really applicable and the routing key would indicate the name of the queue that the message is sent to.
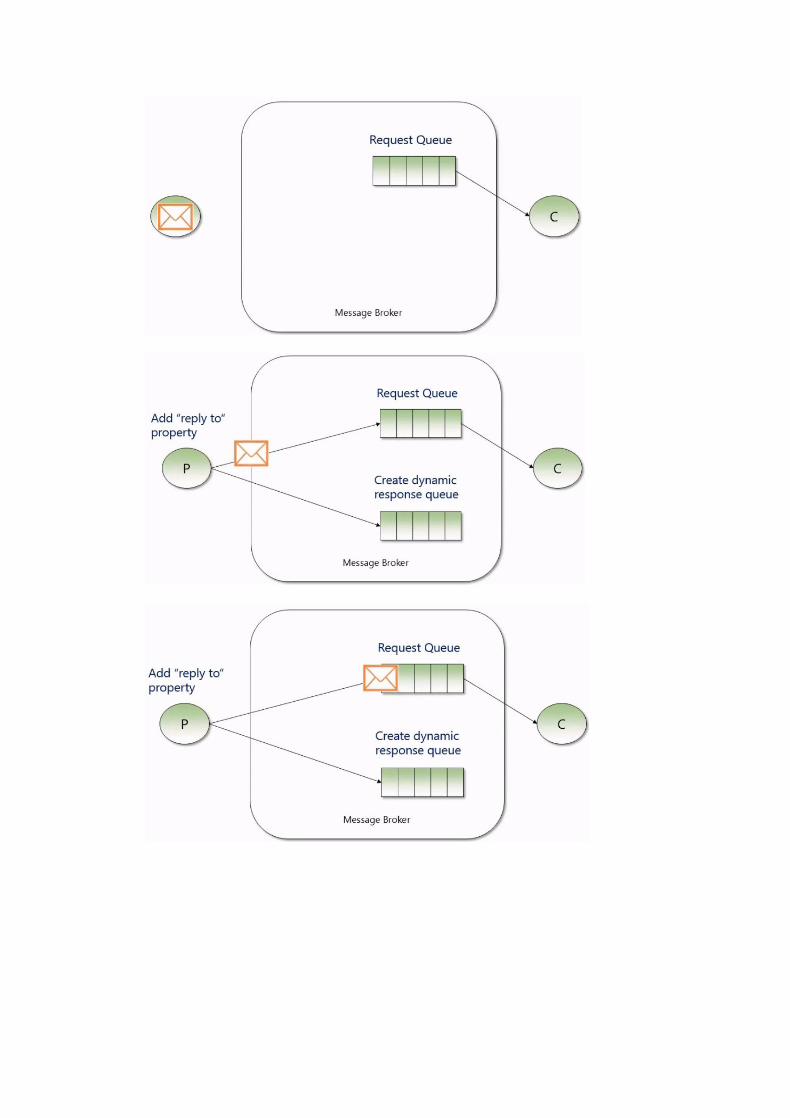
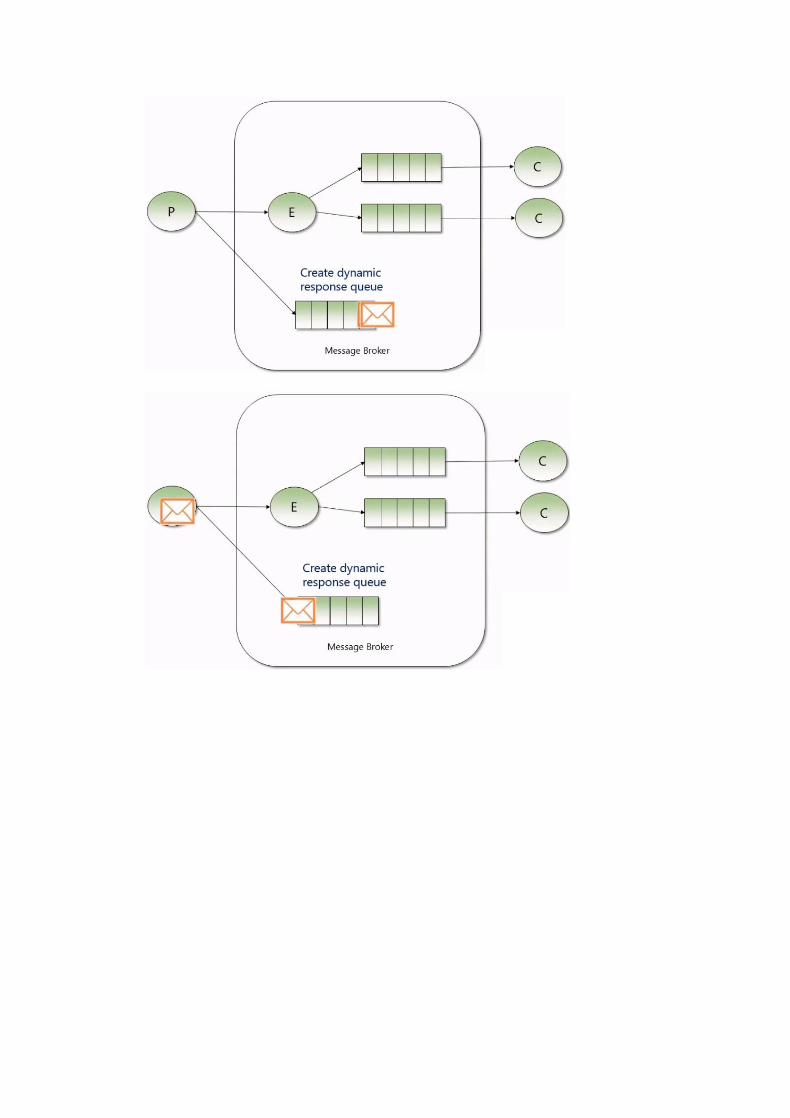
Let's take a look at this pattern in action:
● The request queue would already exist and the consumer would already be connected to that request queue.
● When the message sender is about to send the message, it would first create a dynamic response queue and specify a reply to address on the message it sends.
● The message would then go to the request queue and to the end application who would respond to the dynamic response queue.
● That message would then be routed back to the original publisher of the first message, and that would implement the RPC pattern.
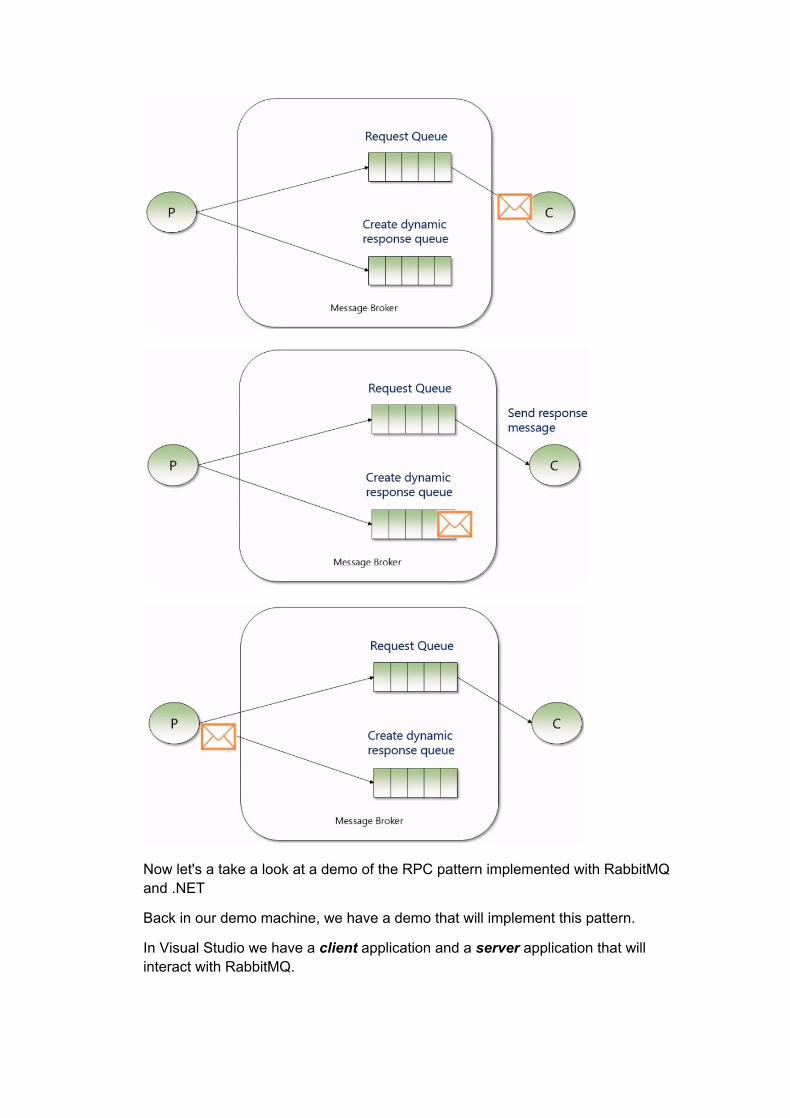
Now let's a take a look at a demo of the RPC pattern implemented with RabbitMQ and .NET
Back in our demo machine, we have a demo that will implement this pattern.
In Visual Studio we have a client application and a server application that will interact with RabbitMQ.
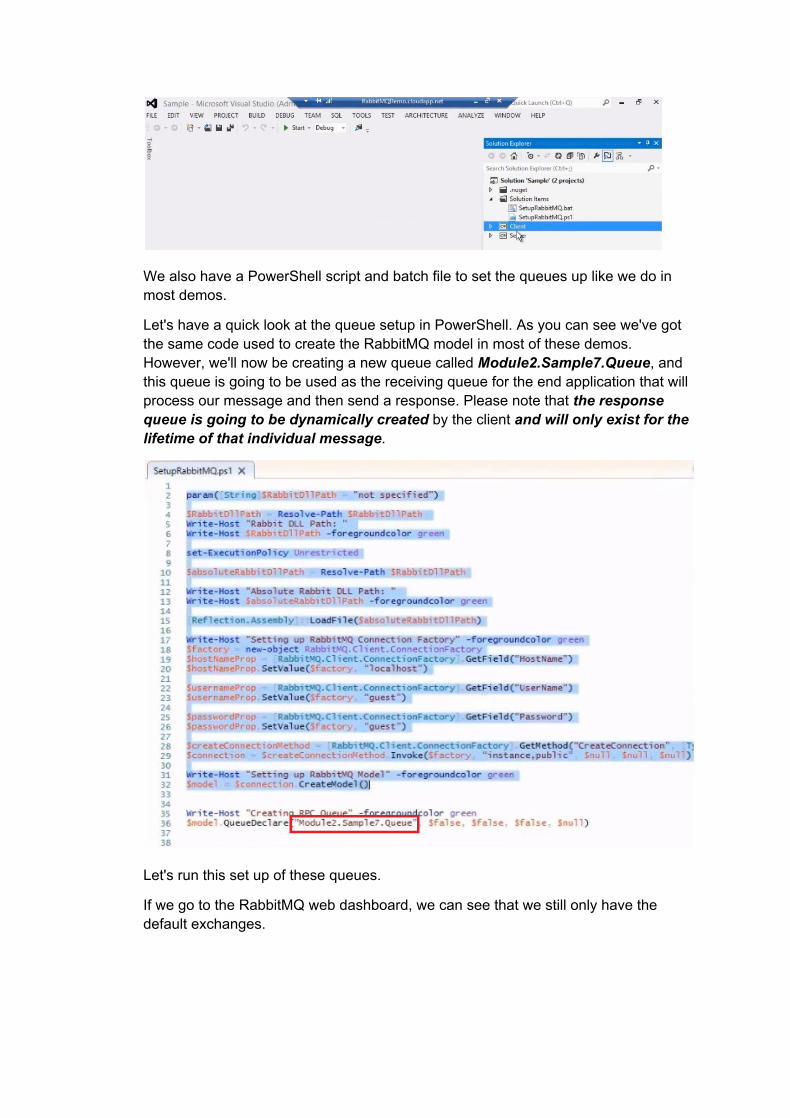
We also have a PowerShell script and batch file to set the queues up like we do in most demos.
Let's have a quick look at the queue setup in PowerShell. As you can see we've got the same code used to create the RabbitMQ model in most of these demos. However, we'll now be creating a new queue called Module2.Sample7.Queue, and this queue is going to be used as the receiving queue for the end application that will process our message and then send a response. Please note that the response queue is going to be dynamically created by the client and will only exist for the lifetime of that individual message.
Let's run this set up of these queues.
If we go to the RabbitMQ web dashboard, we can see that we still only have the default exchanges.
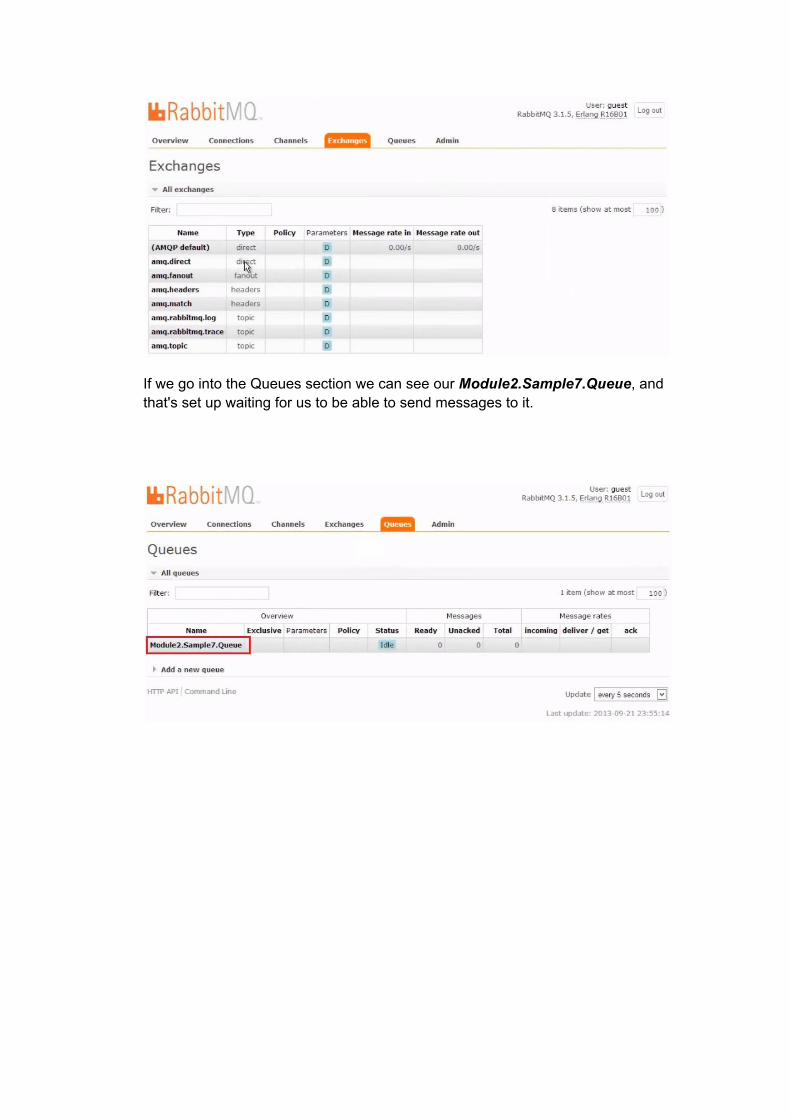
If we go into the Queues section we can see our Module2.Sample7.Queue, and that's set up waiting for us to be able to send messages to it.
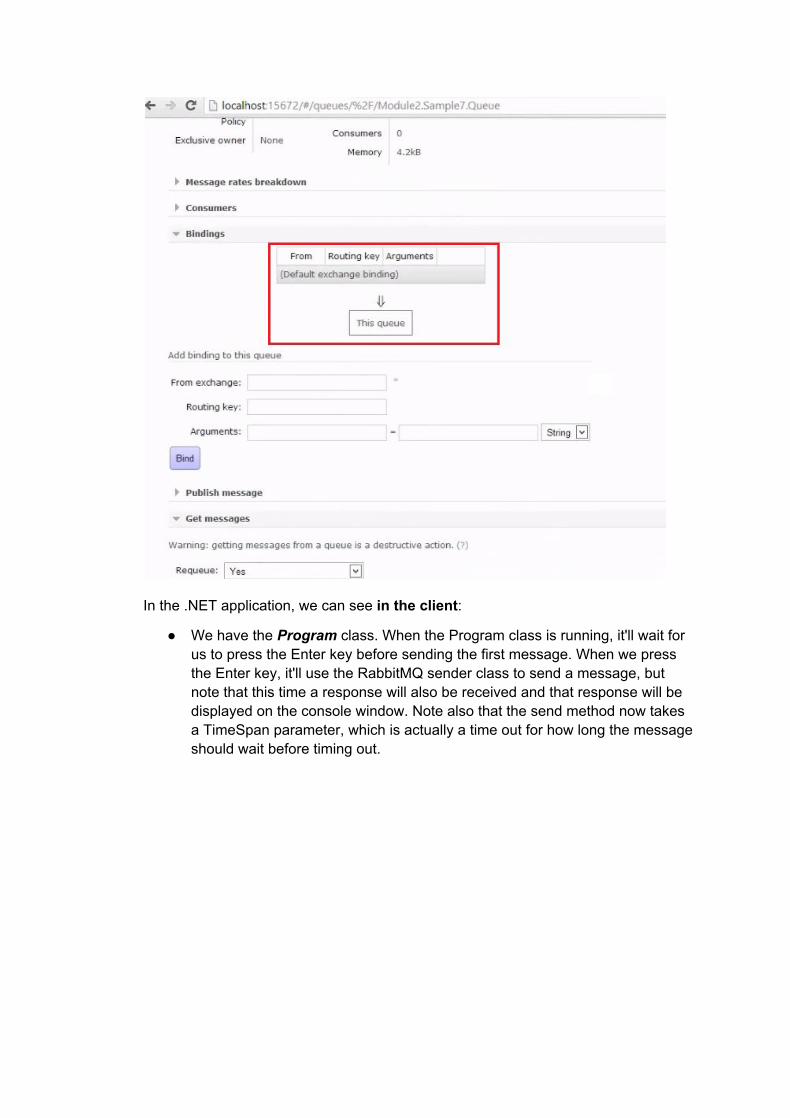
In the .NET application, we can see in the client:
● We have the Program class. When the Program class is running, it'll wait for us to press the Enter key before sending the first message. When we press the Enter key, it'll use the RabbitMQ sender class to send a message, but note that this time a response will also be received and that response will be displayed on the console window. Note also that the send method now takes a TimeSpan parameter, which is actually a time out for how long the message should wait before timing out.
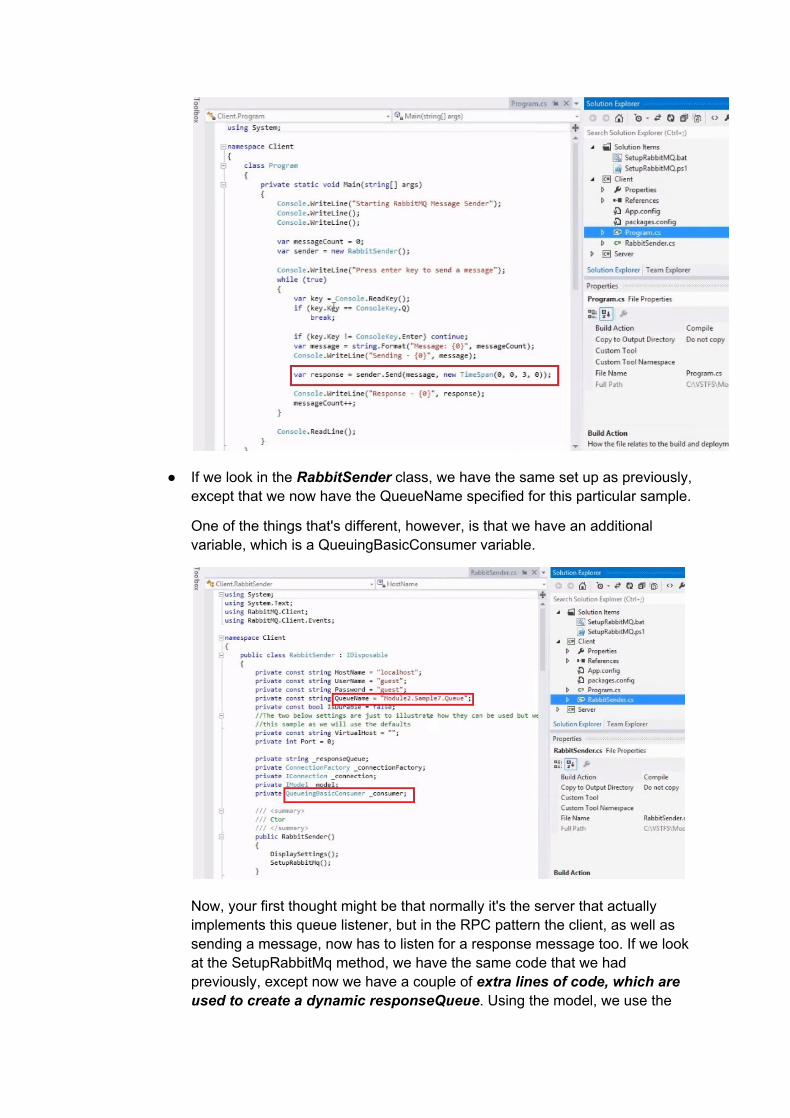
● If we look in the RabbitSender class, we have the same set up as previously, except that we now have the QueueName specified for this particular sample.
One of the things that's different, however, is that we have an additional variable, which is a QueuingBasicConsumer variable.
Now, your first thought might be that normally it's the server that actually implements this queue listener, but in the RPC pattern the client, as well as sending a message, now has to listen for a response message too. If we look at the SetupRabbitMq method, we have the same code that we had previously, except now we have a couple of extra lines of code, which are used to create a dynamic responseQueue. Using the model, we use the

declare queue method with no parameters, which will create a temporary response queue, and we'll save the name of that queue for use later. We then create the QueuingBasicConsumer object and specify that we listen on that temporary response queue.
In the Send method, we're going to start by creating the properties for our message. This time we're going to specify a ReplyTo property, which will be the response queue. We'll then create the byte array, which will be our messageBuffer, and then we'll send the message using the BasicPublish method of the RabbitMQ model. Note that because we're using the default exchange, we've specified an empty string. We also specify the QueueName that we want the message to route to, the properties which will contain our ReplyTo queue, and the message itself. Next we're going to implement a loop because we don't want to wait for the message forever because there may be an error on the server side and the response may never come. So this loop is going to wait for up to the length of time specified in our time span, and that will implement a sort of time out pattern. Inside this loop we'll wait for the basic consumer to give us a message. Once we get a message we'll check that it's the one we expected, and then we'll use the GetString method to convert the byte array of the body back to a response and return it.
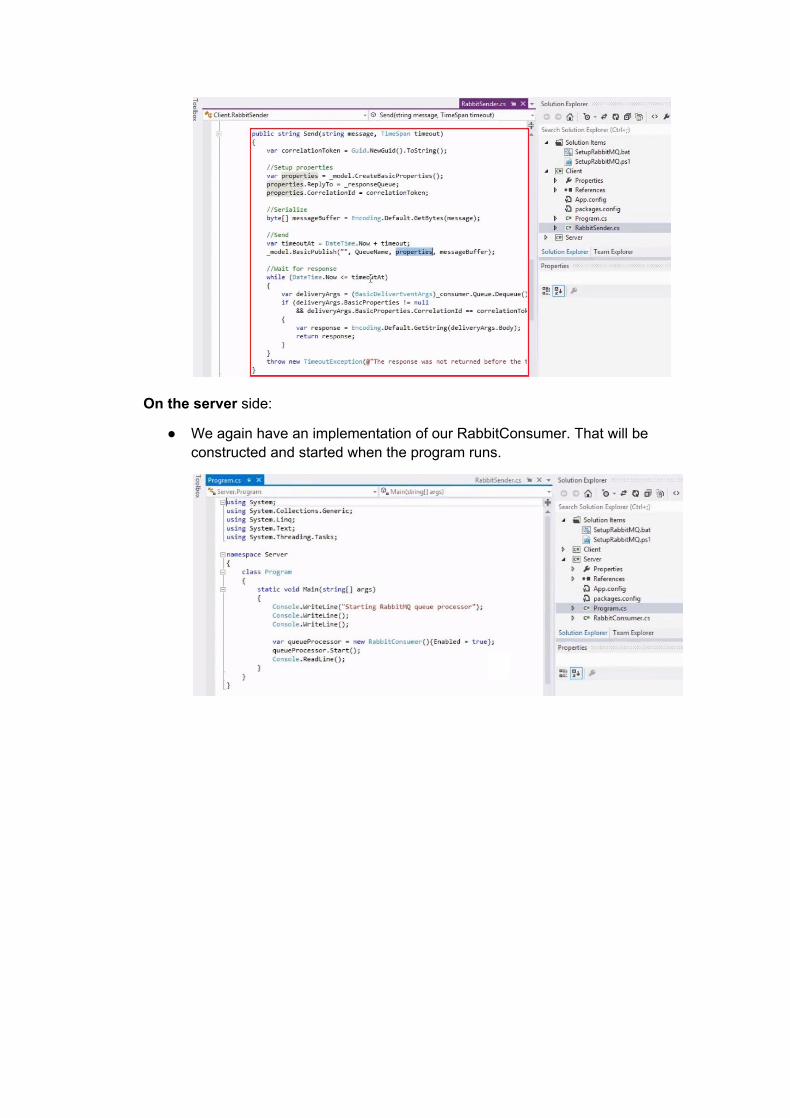
On the server side:
● We again have an implementation of our RabbitConsumer. That will be constructed and started when the program runs.
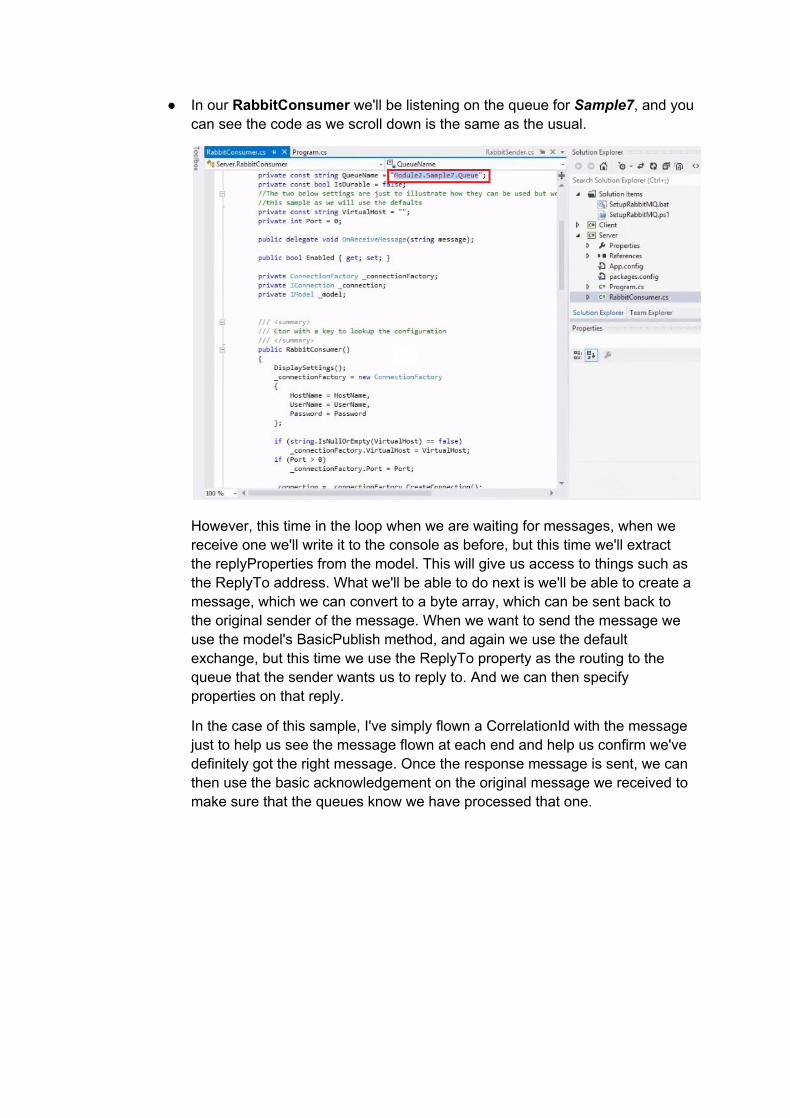
● In our RabbitConsumer we'll be listening on the queue for Sample7, and you can see the code as we scroll down is the same as the usual.
However, this time in the loop when we are waiting for messages, when we receive one we'll write it to the console as before, but this time we'll extract the replyProperties from the model. This will give us access to things such as the ReplyTo address. What we'll be able to do next is we'll be able to create a message, which we can convert to a byte array, which can be sent back to the original sender of the message. When we want to send the message we use the model's BasicPublish method, and again we use the default exchange, but this time we use the ReplyTo property as the routing to the queue that the sender wants us to reply to. And we can then specify properties on that reply.
In the case of this sample, I've simply flown a CorrelationId with the message just to help us see the message flown at each end and help us confirm we've definitely got the right message. Once the response message is sent, we can then use the basic acknowledgement on the original message we received to make sure that the queues know we have processed that one.
Let's take a look at this in action.
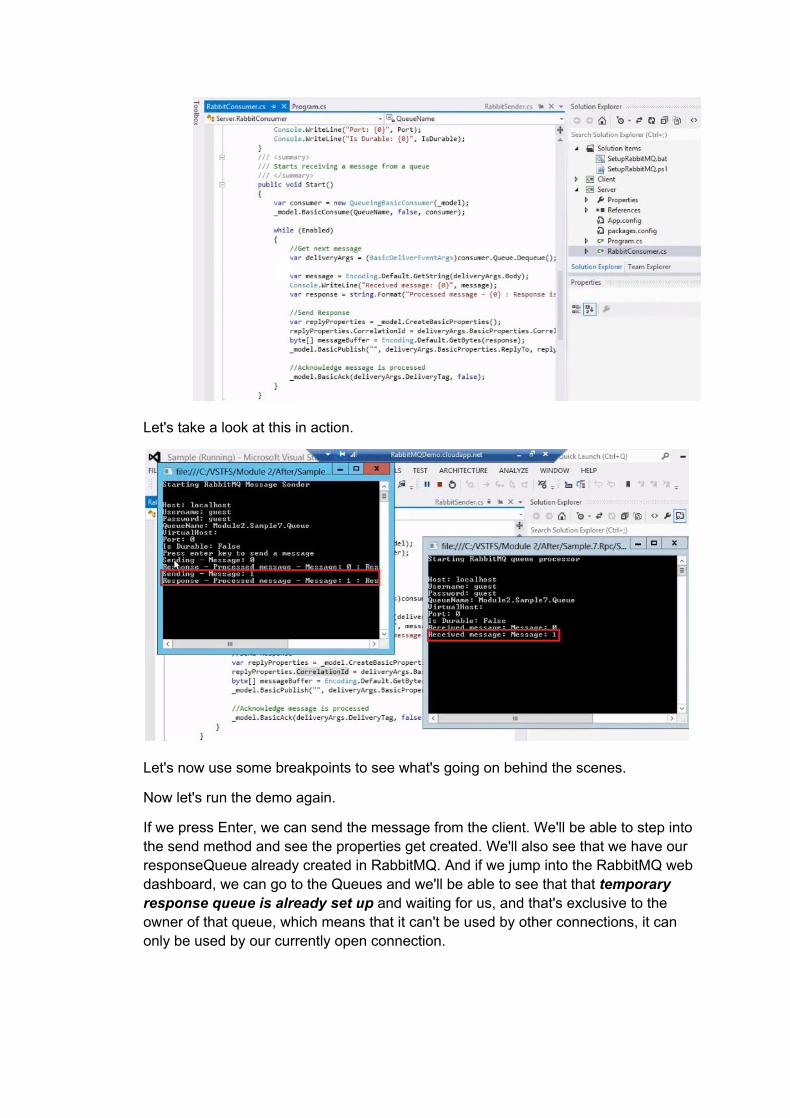
Let's now use some breakpoints to see what's going on behind the scenes.
Now let's run the demo again.
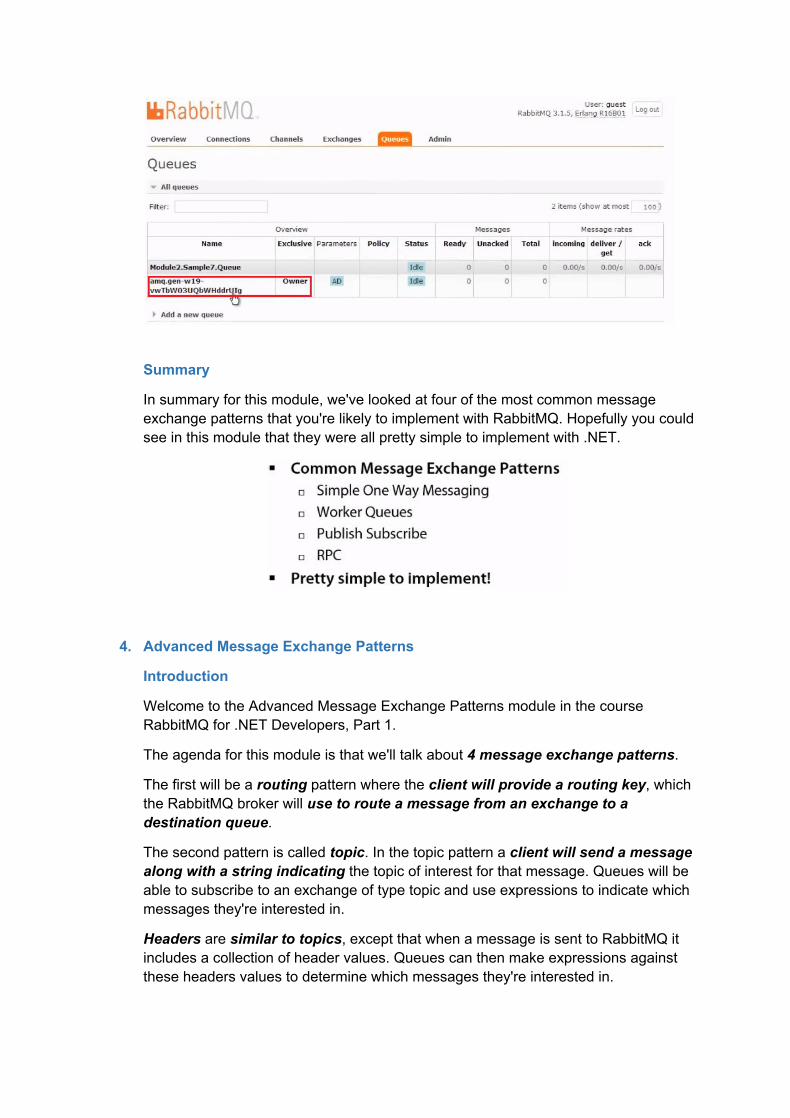
If we press Enter, we can send the message from the client. We'll be able to step into the send method and see the properties get created. We'll also see that we have our responseQueue already created in RabbitMQ. And if we jump into the RabbitMQ web dashboard, we can go to the Queues and we'll be able to see that that temporary response queue is already set up and waiting for us, and that's exclusive to the owner of that queue, which means that it can't be used by other connections, it can only be used by our currently open connection.
Summary
In summary for this module, we've looked at four of the most common message exchange patterns that you're likely to implement with RabbitMQ. Hopefully you could see in this module that they were all pretty simple to implement with .NET.
4. Advanced Message Exchange Patterns
Introduction
Welcome to the Advanced Message Exchange Patterns module in the course RabbitMQ for .NET Developers, Part 1.
The agenda for this module is that we'll talk about 4 message exchange patterns.
The first will be a routing pattern where the client will provide a routing key, which the RabbitMQ broker will use to route a message from an exchange to a destination queue.
The second pattern is called topic. In the topic pattern a client will send a message along with a string indicating the topic of interest for that message. Queues will be able to subscribe to an exchange of type topic and use expressions to indicate which messages they're interested in.
Headers are similar to topics, except that when a message is sent to RabbitMQ it includes a collection of header values. Queues can then make expressions against these headers values to determine which messages they're interested in.
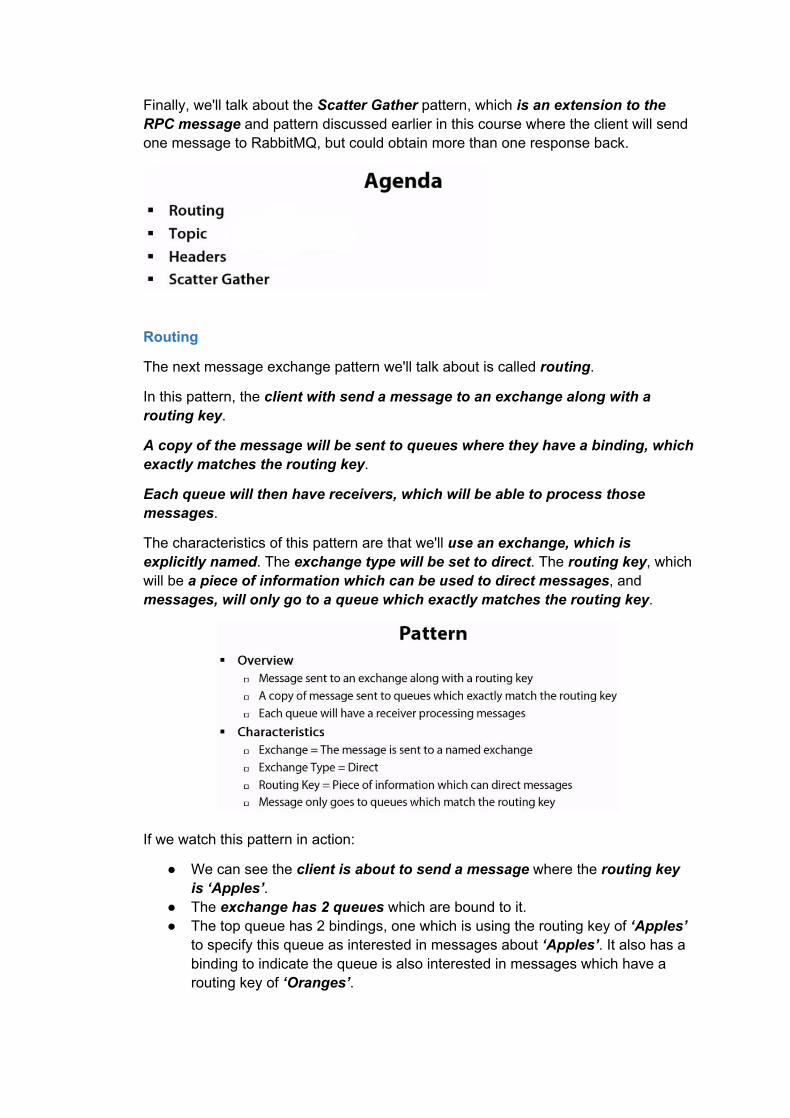
Finally, we'll talk about the Scatter Gather pattern, which is an extension to the RPC message and pattern discussed earlier in this course where the client will send one message to RabbitMQ, but could obtain more than one response back.
Routing
The next message exchange pattern we'll talk about is called routing.
In this pattern, the client with send a message to an exchange along with a routing key.
A copy of the message will be sent to queues where they have a binding, which exactly matches the routing key.
Each queue will then have receivers, which will be able to process those messages.
The characteristics of this pattern are that we'll use an exchange, which is explicitly named. The exchange type will be set to direct. The routing key, which will be a piece of information which can be used to direct messages, and messages, will only go to a queue which exactly matches the routing key.
If we watch this pattern in action:
● We can see the client is about to send a message where the routing key is ‘Apples’.
● The exchange has 2 queues which are bound to it. ● The top queue has 2 bindings, one which is using the routing key of ‘Apples’
to specify this queue as interested in messages about ‘Apples’. It also has a binding to indicate the queue is also interested in messages which have a routing key of ‘Oranges’.
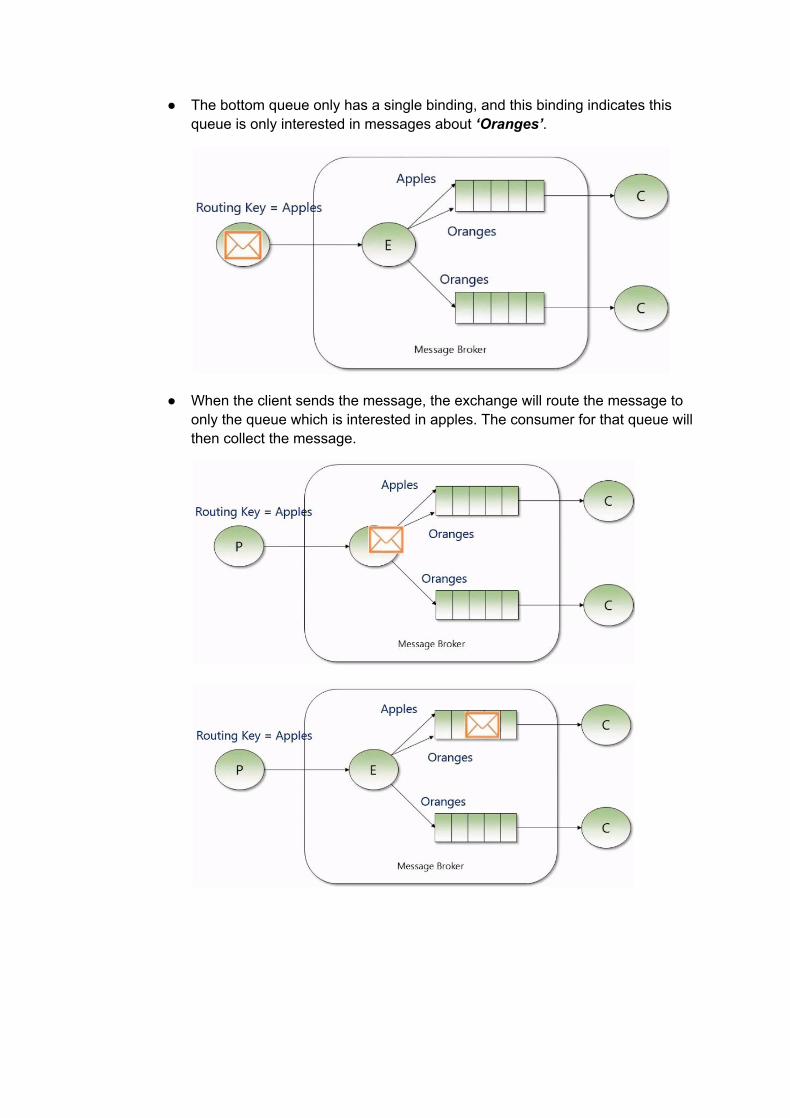
● The bottom queue only has a single binding, and this binding indicates this queue is only interested in messages about ‘Oranges’.
● When the client sends the message, the exchange will route the message to only the queue which is interested in apples. The consumer for that queue will then collect the message.
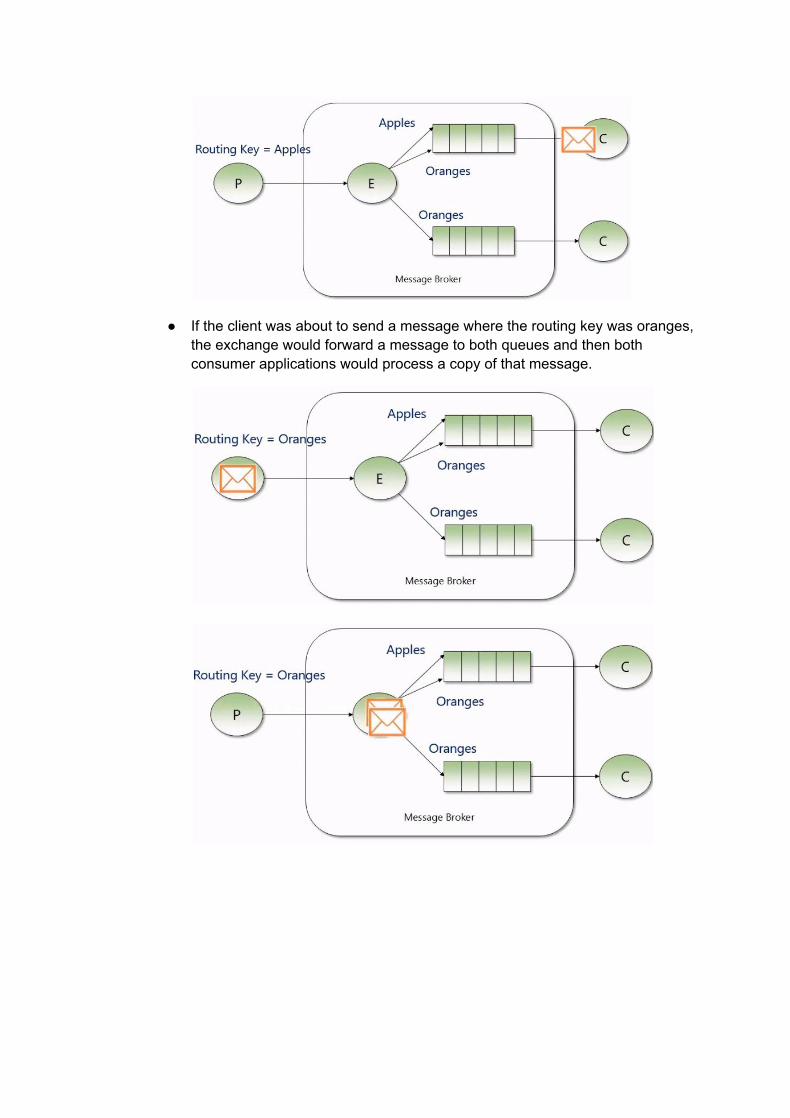
● If the client was about to send a message where the routing key was oranges, the exchange would forward a message to both queues and then both consumer applications would process a copy of that message.

Now let's take a look at a demo of the routing pattern implemented with RabbitMQ and .NET
PowerShell scripts
In the case of the demo, we're going to specify that Queue1 is interested in messages with a routing key of “1”, and Queue2 is interested in messages where the routing key is “2”.
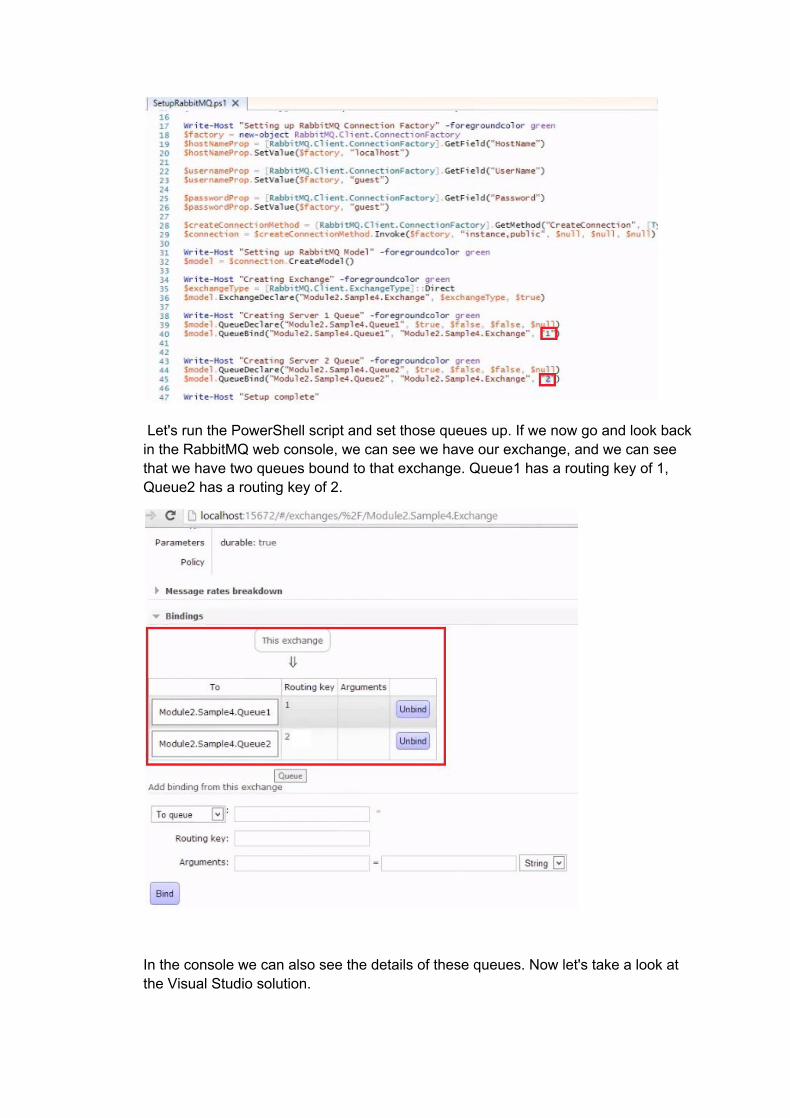
Let's run the PowerShell script and set those queues up. If we now go and look back in the RabbitMQ web console, we can see we have our exchange, and we can see that we have two queues bound to that exchange. Queue1 has a routing key of 1, Queue2 has a routing key of 2.
In the console we can also see the details of these queues. Now let's take a look at the Visual Studio solution.
In the client application:
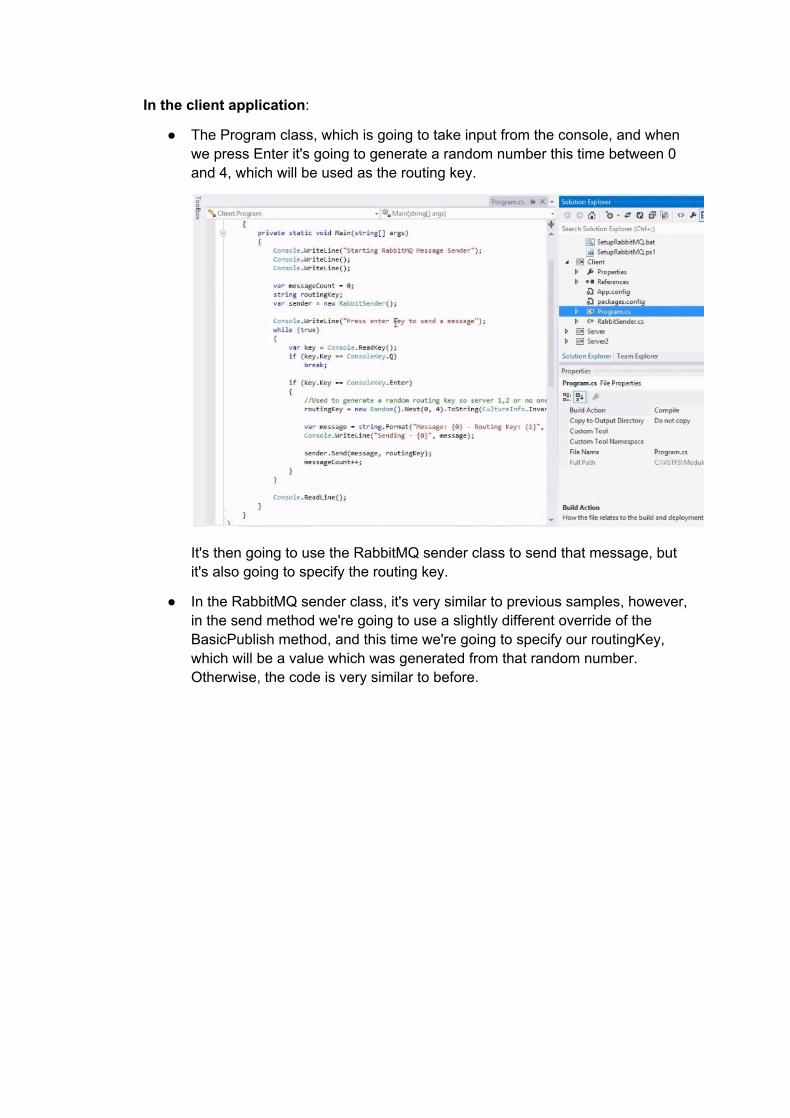
● The Program class, which is going to take input from the console, and when we press Enter it's going to generate a random number this time between 0 and 4, which will be used as the routing key.
It's then going to use the RabbitMQ sender class to send that message, but it's also going to specify the routing key.
● In the RabbitMQ sender class, it's very similar to previous samples, however, in the send method we're going to use a slightly different override of the BasicPublish method, and this time we're going to specify our routingKey, which will be a value which was generated from that random number. Otherwise, the code is very similar to before.
In the server side:
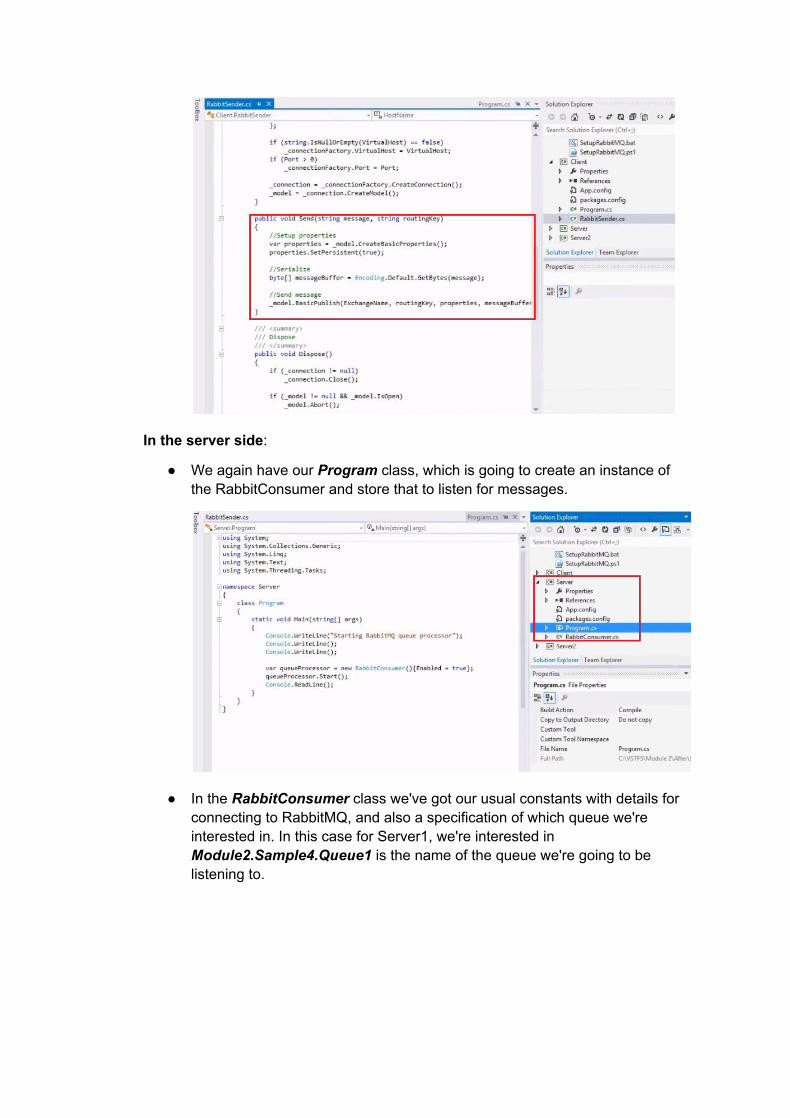
● We again have our Program class, which is going to create an instance of the RabbitConsumer and store that to listen for messages.
● In the RabbitConsumer class we've got our usual constants with details for connecting to RabbitMQ, and also a specification of which queue we're interested in. In this case for Server1, we're interested in Module2.Sample4.Queue1 is the name of the queue we're going to be listening to.
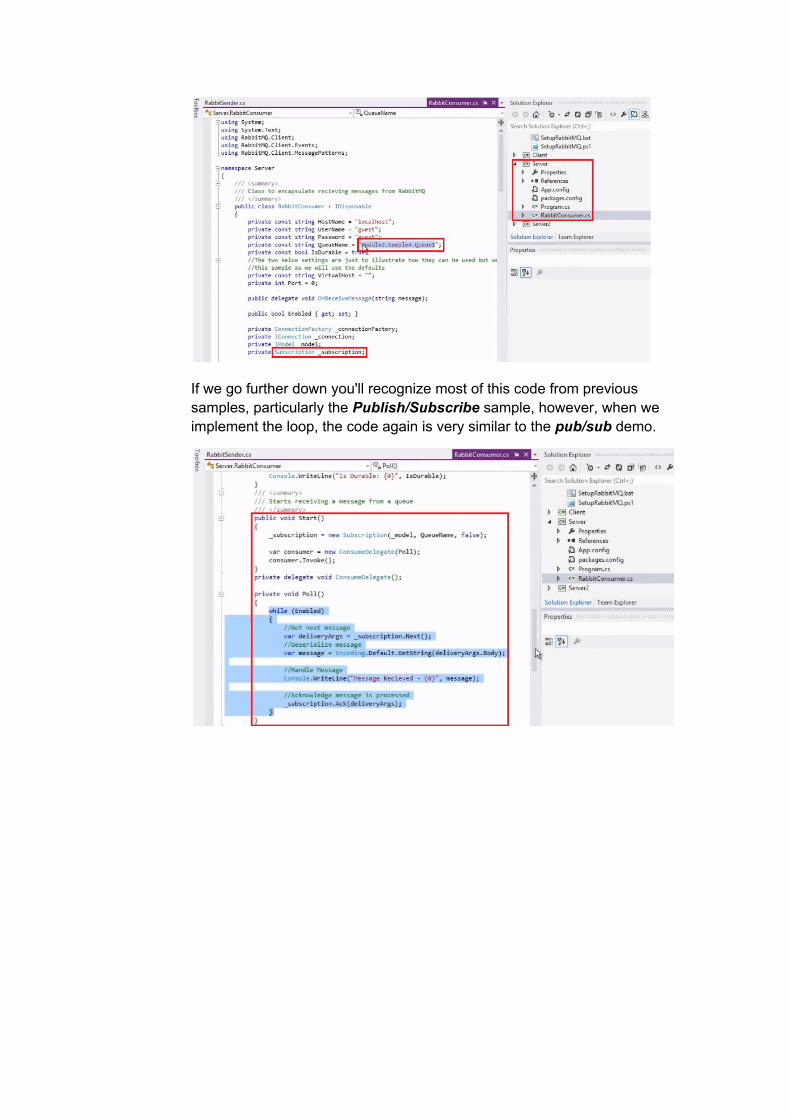
If we go further down you'll recognize most of this code from previous samples, particularly the Publish/Subscribe sample, however, when we implement the loop, the code again is very similar to the pub/sub demo.
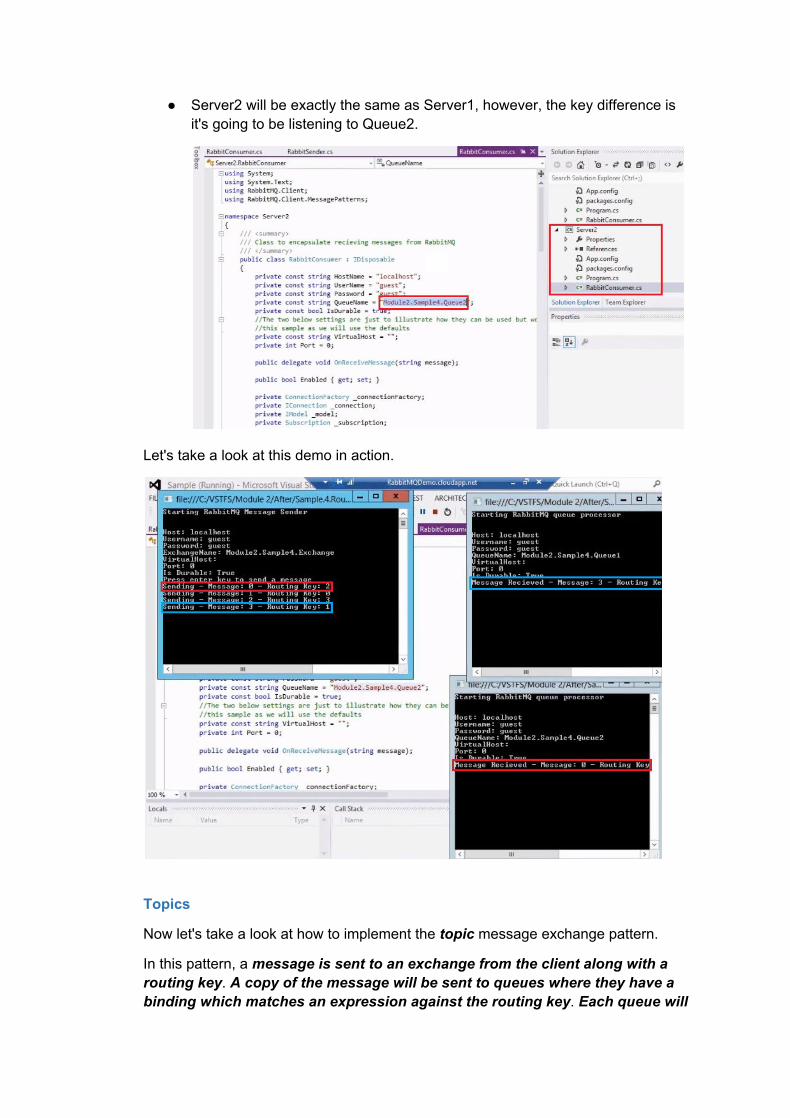
● Server2 will be exactly the same as Server1, however, the key difference is it's going to be listening to Queue2.
Let's take a look at this demo in action.
Topics
Now let's take a look at how to implement the topic message exchange pattern.
In this pattern, a message is sent to an exchange from the client along with a routing key. A copy of the message will be sent to queues where they have a binding which matches an expression against the routing key. Each queue will
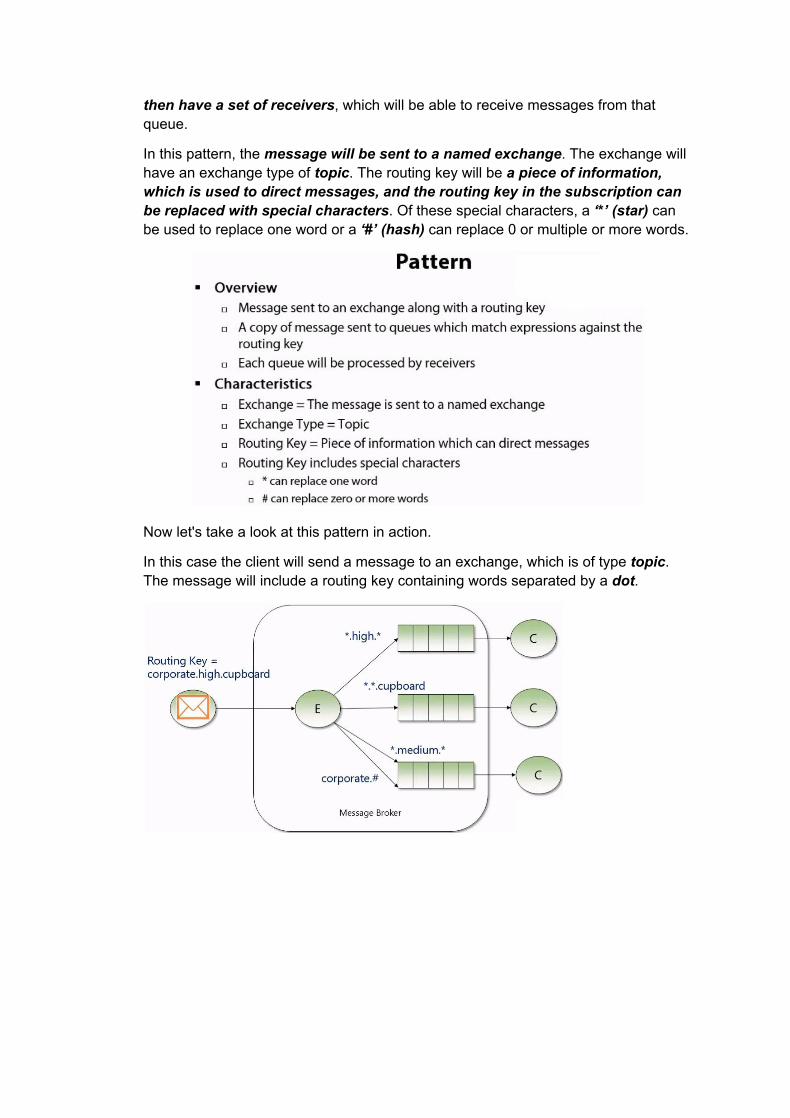
then have a set of receivers, which will be able to receive messages from that queue.
In this pattern, the message will be sent to a named exchange. The exchange will have an exchange type of topic. The routing key will be a piece of information, which is used to direct messages, and the routing key in the subscription can be replaced with special characters. Of these special characters, a ‘*’ (star) can be used to replace one word or a ‘#’ (hash) can replace 0 or multiple or more words.
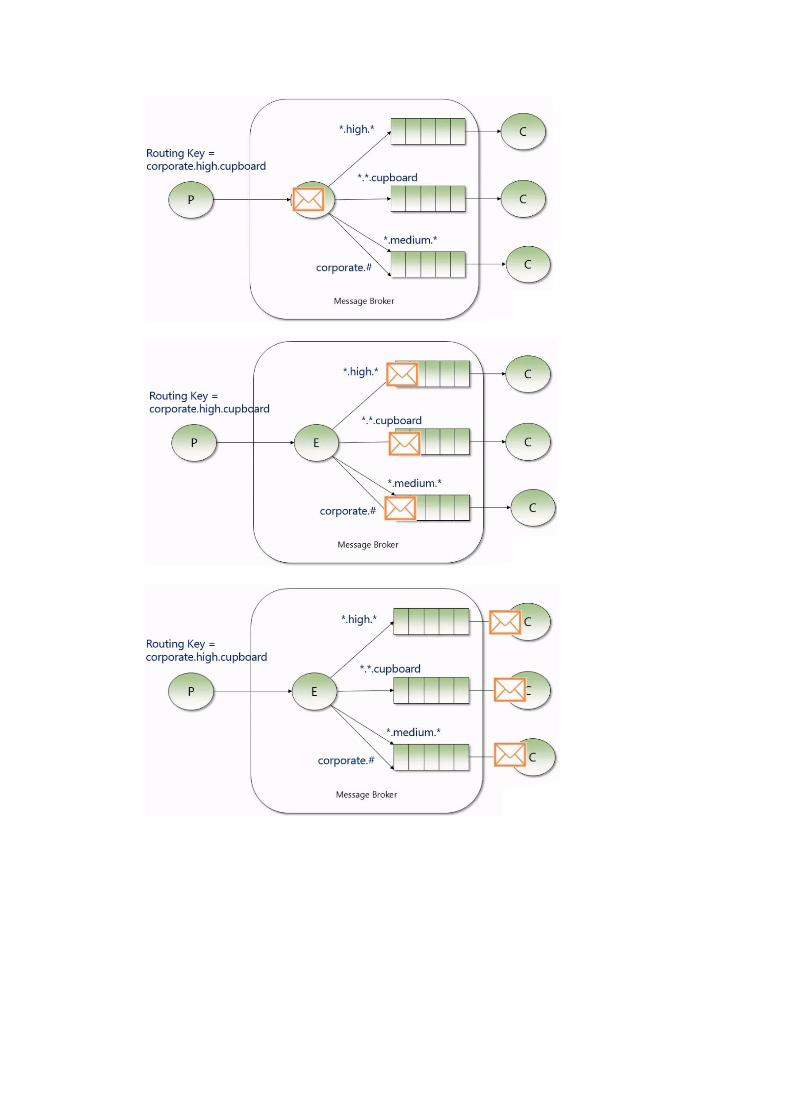
Now let's take a look at this pattern in action.
In this case the client will send a message to an exchange, which is of type topic. The message will include a routing key containing words separated by a dot.
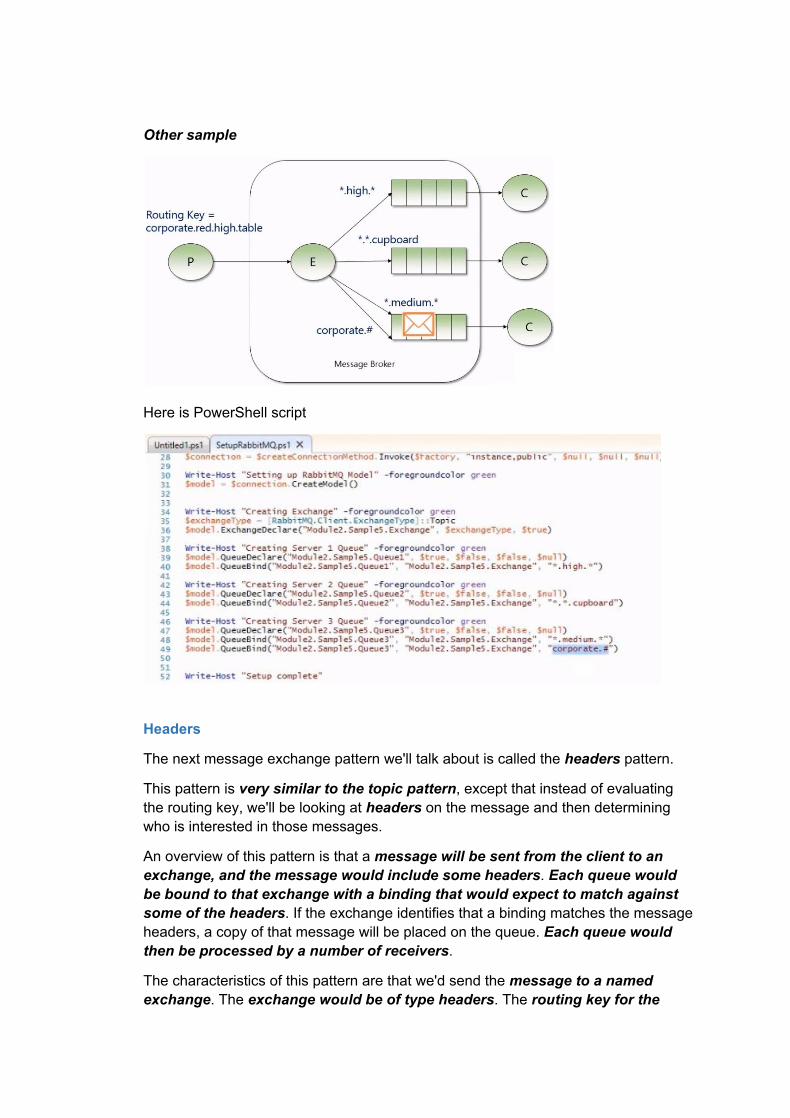
Other sample
Here is PowerShell script
Headers
The next message exchange pattern we'll talk about is called the headers pattern.
This pattern is very similar to the topic pattern, except that instead of evaluating the routing key, we'll be looking at headers on the message and then determining who is interested in those messages.
An overview of this pattern is that a message will be sent from the client to an exchange, and the message would include some headers. Each queue would be bound to that exchange with a binding that would expect to match against some of the headers. If the exchange identifies that a binding matches the message headers, a copy of that message will be placed on the queue. Each queue would then be processed by a number of receivers.
The characteristics of this pattern are that we'd send the message to a named exchange. The exchange would be of type headers. The routing key for the
message would not be set, but instead the message would have some properties specified in the message headers. There's also a match type used on the binding, which would specify if we'd be looking at the match against all headers or just one.
Let's take a look at an example of this.
In this case, we're using the xmatch property = any, and this means that we're looking for a binding to match any properties on the message.
● In this case, the client would publish a message with the property of Material = Wood and Customer Type = B2C.
We have 2 queues specified, which have a binding to that exchange.
The top queue has a binding where it's interested in Materials = Wood and Customer Type = B2B.
The bottom queue has a binding which is interested in property where the Materials = Metal and Customer Type = B2C.
In this case when the message is published, the exchange, because it's an xmatch = any type of evaluation, would identify that at least one property matched for both queues' bindings. In this case the message would be sent to both queues.
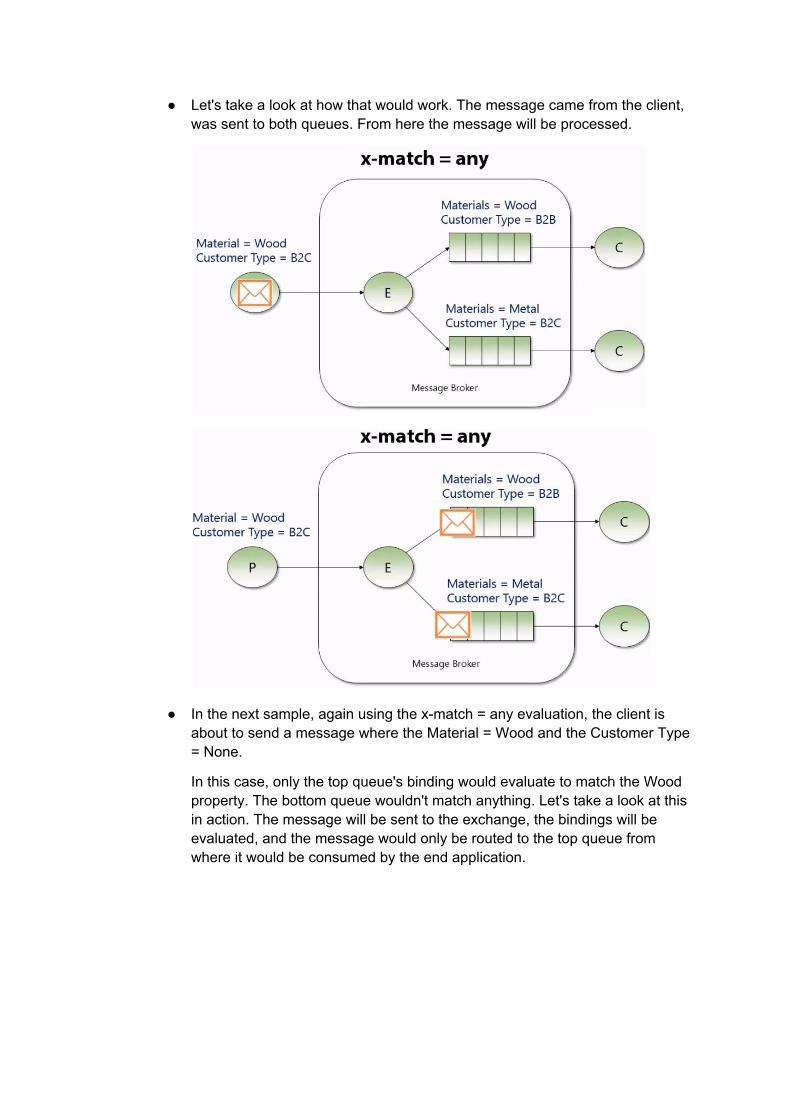
● Let's take a look at how that would work. The message came from the client, was sent to both queues. From here the message will be processed.
● In the next sample, again using the xmatch = any evaluation, the client is about to send a message where the Material = Wood and the Customer Type = None.
In this case, only the top queue's binding would evaluate to match the Wood property. The bottom queue wouldn't match anything. Let's take a look at this in action. The message will be sent to the exchange, the bindings will be evaluated, and the message would only be routed to the top queue from where it would be consumed by the end application.
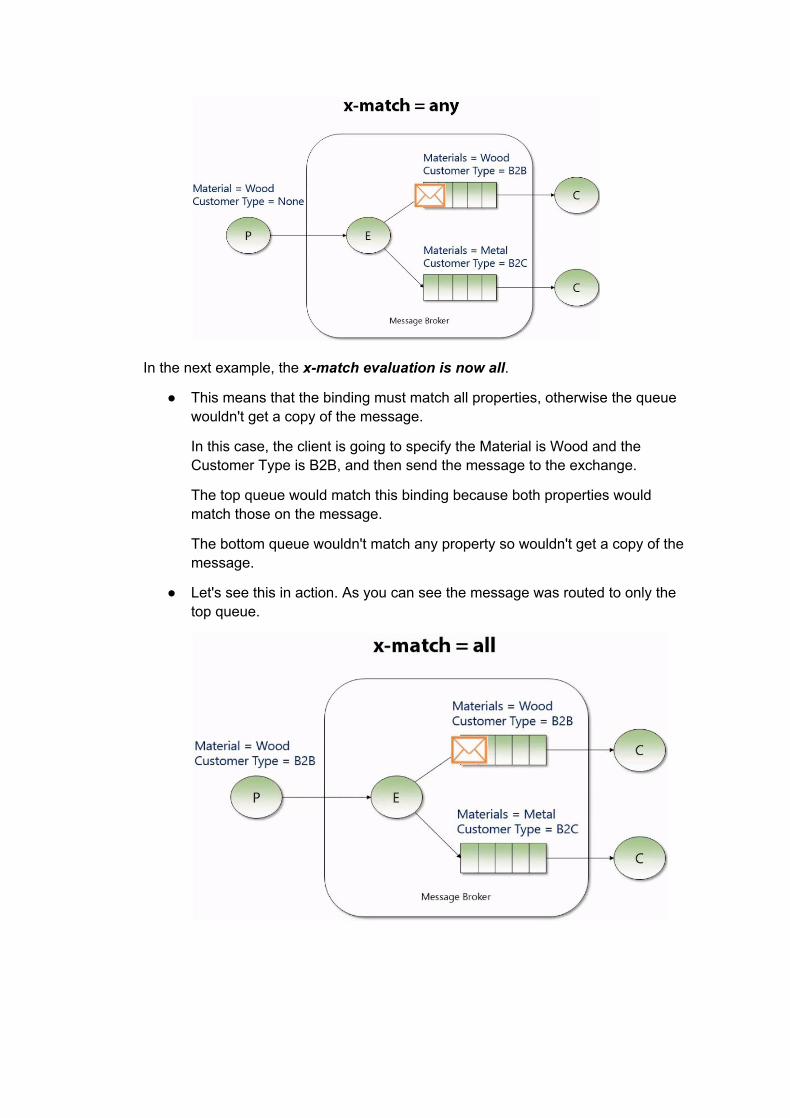
In the next example, the xmatch evaluation is now all.
● This means that the binding must match all properties, otherwise the queue wouldn't get a copy of the message.
In this case, the client is going to specify the Material is Wood and the Customer Type is B2B, and then send the message to the exchange.
The top queue would match this binding because both properties would match those on the message.
The bottom queue wouldn't match any property so wouldn't get a copy of the message.
● Let's see this in action. As you can see the message was routed to only the top queue.
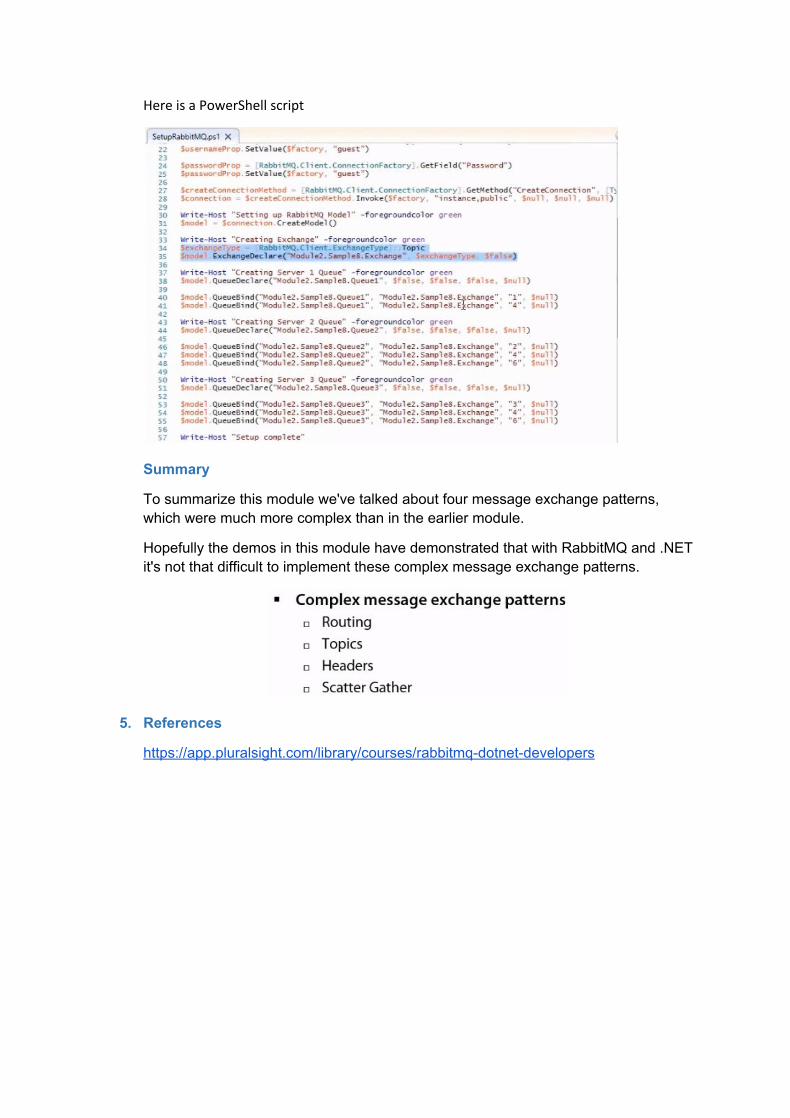
Here is a PowerShell script
Scatter Gather
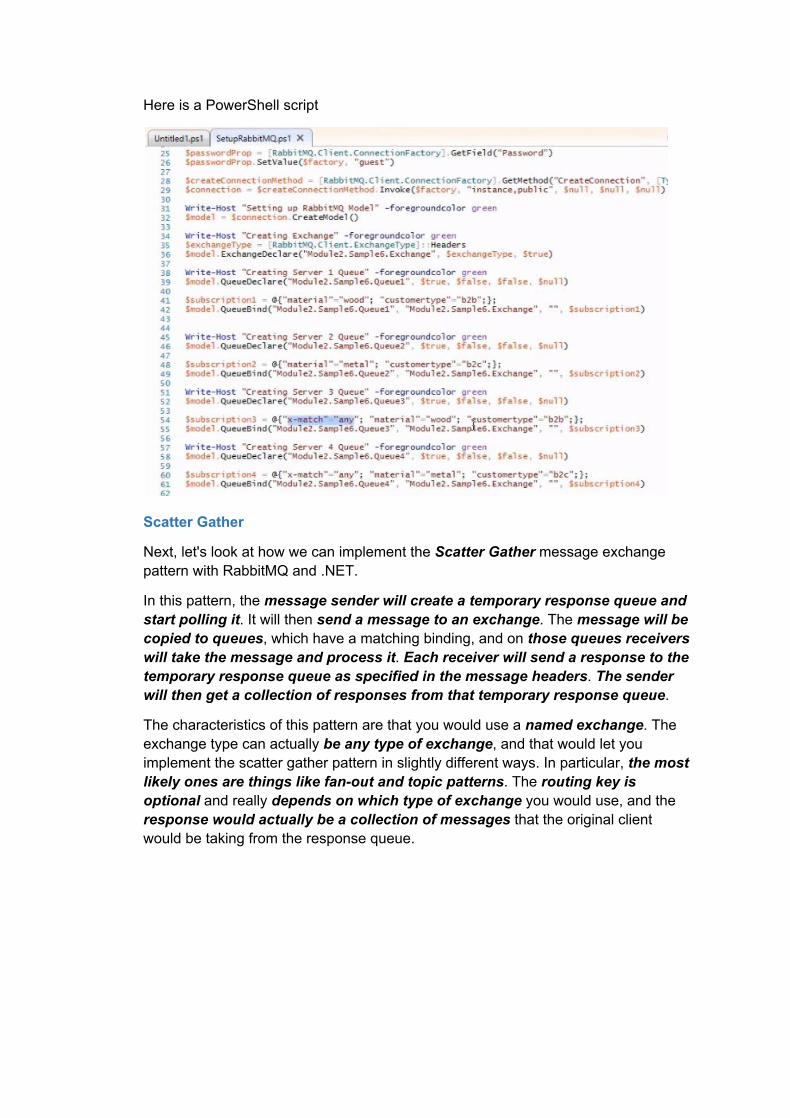
Next, let's look at how we can implement the Scatter Gather message exchange pattern with RabbitMQ and .NET.
In this pattern, the message sender will create a temporary response queue and start polling it. It will then send a message to an exchange. The message will be copied to queues, which have a matching binding, and on those queues receivers will take the message and process it. Each receiver will send a response to the temporary response queue as specified in the message headers. The sender will then get a collection of responses from that temporary response queue.
The characteristics of this pattern are that you would use a named exchange. The exchange type can actually be any type of exchange, and that would let you implement the scatter gather pattern in slightly different ways. In particular, the most likely ones are things like fanout and topic patterns. The routing key is optional and really depends on which type of exchange you would use, and the response would actually be a collection of messages that the original client would be taking from the response queue.
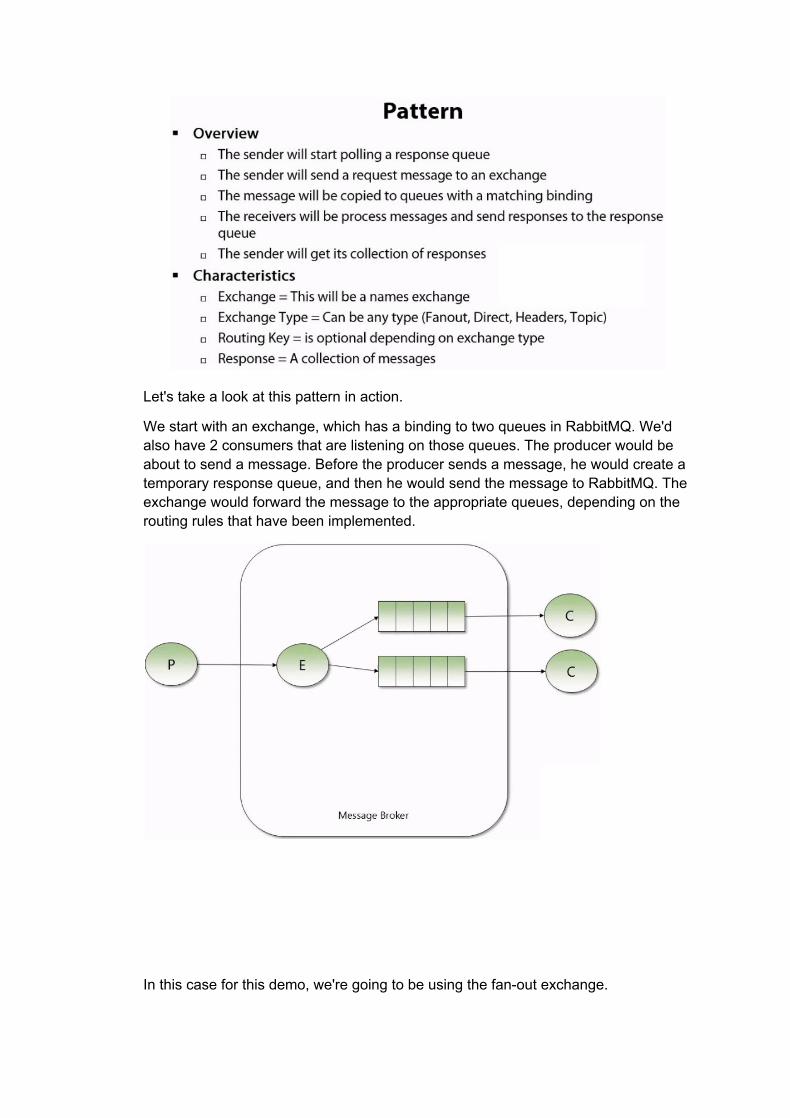
Let's take a look at this pattern in action.
We start with an exchange, which has a binding to two queues in RabbitMQ. We'd also have 2 consumers that are listening on those queues. The producer would be about to send a message. Before the producer sends a message, he would create a temporary response queue, and then he would send the message to RabbitMQ. The exchange would forward the message to the appropriate queues, depending on the routing rules that have been implemented.
In this case for this demo, we're going to be using the fanout exchange.
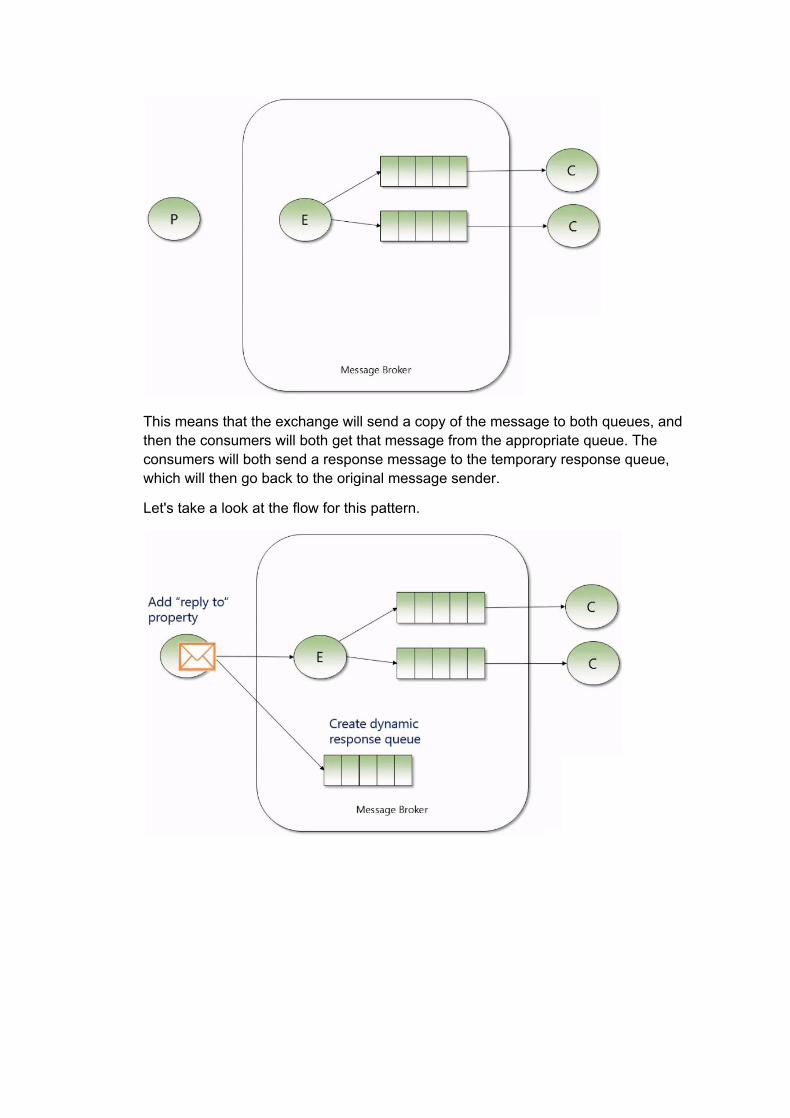
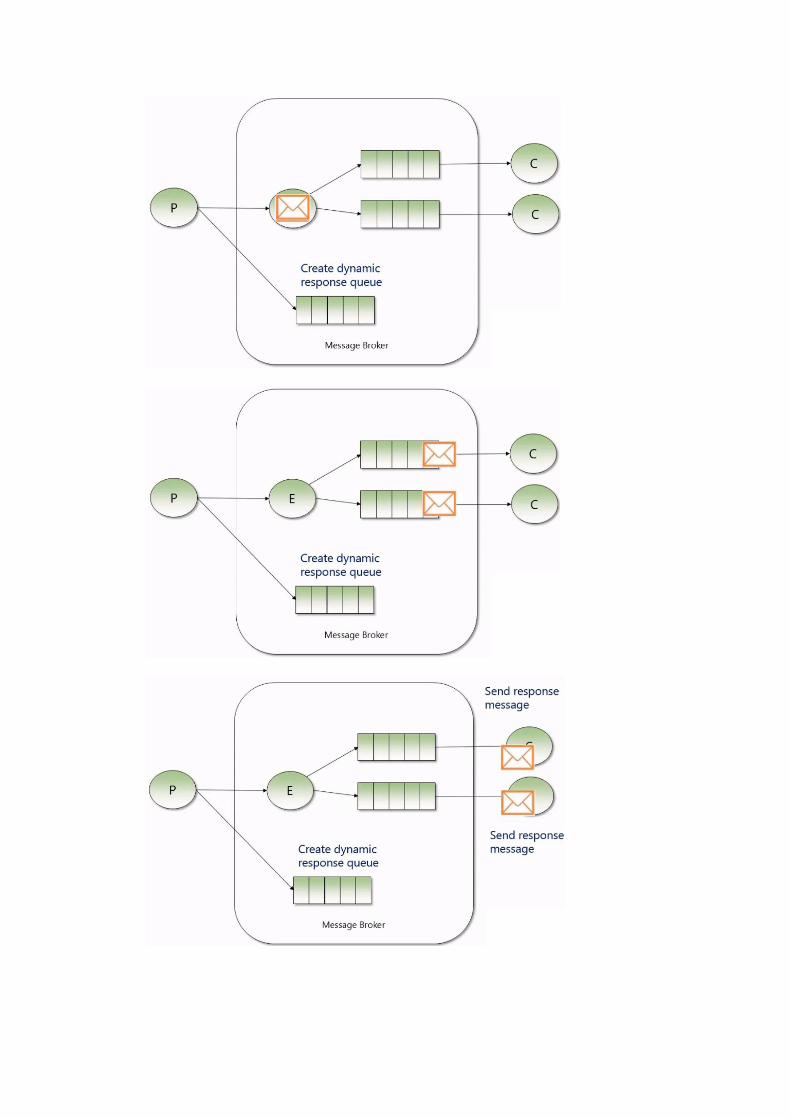
This means that the exchange will send a copy of the message to both queues, and then the consumers will both get that message from the appropriate queue. The consumers will both send a response message to the temporary response queue, which will then go back to the original message sender.
Let's take a look at the flow for this pattern.
Here is a PowerShell script
Summary
To summarize this module we've talked about four message exchange patterns, which were much more complex than in the earlier module.
Hopefully the demos in this module have demonstrated that with RabbitMQ and .NET it's not that difficult to implement these complex message exchange patterns.
5. References
https://app.pluralsight.com/library/courses/rabbitmqdotnetdevelopers