Quest On Demand Migration for Email - User...
95
Quest® On Demand Migration for Email User Guide
Transcript of Quest On Demand Migration for Email - User...

Quest® On Demand Migration for Email
User Guide

© 2018 Quest Software Inc. ALL RIGHTS RESERVED.This guide contains proprietary information protected by copyright. The software described in this guide is furnished under a software license or nondisclosure agreement. This software may be used or copied only in accordance with the terms of the applicable agreement. No part of this guide may be reproduced or transmitted in any form or by any means, electronic or mechanical, including photocopying and recording for any purpose other than the purchaser’s personal use without the written permission of Quest Software Inc.
The information in this document is provided in connection with Quest Software products. No license, express or implied, by estoppel or otherwise, to any intellectual property right is granted by this document or in connection with the sale of Quest Software products. EXCEPT AS SET FORTH IN THE TERMS AND CONDITIONS AS SPECIFIED IN THE LICENSE AGREEMENT FOR THIS PRODUCT, QUEST SOFTWARE ASSUMES NO LIABILITY WHATSOEVER AND DISCLAIMS ANY EXPRESS, IMPLIED OR STATUTORY WARRANTY RELATING TO ITS PRODUCTS INCLUDING, BUT NOT LIMITED TO, THE IMPLIED WARRANTY OF MERCHANTABILITY, FITNESS FOR A PARTICULAR PURPOSE, OR NON-INFRINGEMENT. IN NO EVENT SHALL QUEST SOFTWARE BE LIABLE FOR ANY DIRECT, INDIRECT, CONSEQUENTIAL, PUNITIVE, SPECIAL OR INCIDENTAL DAMAGES (INCLUDING, WITHOUT LIMITATION, DAMAGES FOR LOSS OF PROFITS, BUSINESS INTERRUPTION OR LOSS OF INFORMATION) ARISING OUT OF THE USE OR INABILITY TO USE THIS DOCUMENT, EVEN IF QUEST SOFTWARE HAS BEEN ADVISED OF THE POSSIBILITY OF SUCH DAMAGES. Quest Software makes no representations or warranties with respect to the accuracy or completeness of the contents of this document and reserves the right to make changes to specifications and product descriptions at any time without notice. Quest Software does not make any commitment to update the information contained in this document.
If you have any questions regarding your potential use of this material, contact:
Quest Software Inc.
Attn: LEGAL Dept
4 Polaris Way
Aliso Viejo, CA 92656
Refer to our Web site (https://www.quest.com) for regional and international office information.
PatentsQuest Software is proud of our advanced technology. Patents and pending patents may apply to this product. For the most current information about applicable patents for this product, please visit our website at https://www.quest.com/legal.
TrademarksQuest, the Quest logo, and Join the Innovation are trademarks and registered trademarks of Quest Software Inc. For a complete list of Quest marks, visit https://www.quest.com/legal/trademark-information.aspx. All other trademarks and registered trademarks are property of their respective owners.
LegendCAUTION: A CAUTION icon indicates potential damage to hardware or loss of data if instructions are not followed.
IMPORTANT, NOTE, TIP, MOBILE, or VIDEO: An information icon indicates supporting information.
On Demand Migration for Email User GuideUpdated - June, 2017

Contents
Introduction 7Welcome 7System Requirements 7Subscribing to the Service 9Creating a Quest Account 9Trial Subscription 9License Subscription 10Pay-As-You-Go Subscription 10
Getting Started for New Users 11Roles and Permissions 13Configure Active Directory Federation Services (AD FS) to Access ODME 14Using Azure AD Single Sign-On to Access ODME 15Overview of The Migration Process 16Preparing a Migration 19Configuring and Running a Migration 19Post Migration 19
Preparing Migrations 20Choosing a Migration Type 20Setting Up Mail Routing 20Deciding How to Configure Your Shared Address Space 20Source Email Service 20Exchange 2007/2010/2013/2016 21G Suite 21Office 365 (Cloud Relay) 26Zimbra 27GroupWise 28Notes/Domino 28Sun ONE/iPlanet 29
Initial Target Mail Hosts 29Office 365 29Exchange 2010/2013/2016 29
Creating Target Mailboxes 29Preparing Your Source Email Service for Migration 29G Suite 30Sun ONE/iPlanet 30Novell GroupWise 31Create the Trusted Application Key 31Configure SSL and the GroupWise Web Service (SOAP) 31Configure Cloud Access to the GroupWise Server 32
Microsoft Exchange 2007/2010/2013/2016 32
On Demand Migration for Email User Guide 3
Enabling Application Impersonation Rights 32Accessing the Mail Server 33Specifying Administrator Credentials 33Upgrade Throttling Policies (Microsoft Exchange 2010/2013/2016) 34
Microsoft Office 365 34Enabling Application Impersonation Rights 34Upgrade Throttling Policies 35
POP/Windows Live Hotmail 35IMAP 35Notes/Domino 36IIS 6 64bit Specific 36Service on Separate Web Server from Domino 39Service Configuration - Web.config 39Service Logging Configuration - Web.config 39Obtain and Install Web Services Certificates 40Troubleshooting 42
Zimbra 43Preparing Your Target Email Service for Migration 44Microsoft Office 365 44Enabling Application Impersonation Rights 44Provisioning 45Upgrade Throttling Policies 45Disable In-Place Hold and Litigation Hold 45
Microsoft Exchange 2010/2013/2016 46Enabling Application Impersonation Rights 46Accessing the Mail Server 46Provisioning 46Upgrade Throttling Policies 47Disable In-Place Hold and Litigation Hold 47
Test and Pilot Migrations 49
Configuring and Running Migrations 50Creating a Migration Plan 50Dashboard 50Copying Migration Plans 51Managing Migration Templates 51
Connecting to Email Services 52Connecting to the Source Email Service 52G Suite 52Sun ONE/iPlanet 54Novell GroupWise 54Microsoft Exchange 2007/2010/2013/2016 55Microsoft Office 365 56Windows Live Hotmail 56POP 56
On Demand Migration for Email User Guide 4

IMAP 57Notes/Domino 57Zimbra 57
Connecting to the Target Email Service 58Microsoft Office 365 58Microsoft Exchange 2010/2013/2016 59
Using Self-Signed SSL Certificates 59Validating Connections 60G Suite 60Sun ONE/iPlanet 61Novell GroupWise 62Microsoft Exchange 2007/2010/2013/2016 62Microsoft Office 365 63POP/Windows Live Hotmail 63IMAP 63Notes/Domino 64Zimbra 64
Adding Mailboxes 64Adding Mailboxes Manually 65Adding Mailboxes through a TSV File 66
Selecting Migration Options 68Selecting Items to Migrate 69Setting GroupWise 2014/2014 R2 Visibility 71Migrating Delegate Access Permissions 72Setting Up Mail Forwarding 73Managing Google Throttling 75Updating Outlook Client Profiles 76Limiting Concurrent Migrations 79Setting User Notifications 79
Known Issues and Limitations 80Known Limitations 80General 80Client Profile Updating Utility 80Microsoft Exchange 81GroupWise 82Office 365 82POP/Windows Live Hotmail 83IMAP 83Notes/Domino 84G Suite 84Zimbra 86
Known Issues 87Running Migration 87Migration Concurrency 88
Post Migration 90
On Demand Migration for Email User Guide 5

Viewing Migration Reports 90Executive Summary Report 90Migration Summary Report 91Billing Summary Report 91Migration Details Report 91Per Mailbox Statistics Report 92
Notify and Train Users 92
Glossary 93
About us 95Contacting Quest 95Technical support resources 95
On Demand Migration for Email User Guide 6
Introduction
WelcomeOn Demand Migration for Email (ODME) securely migrates data to Office 365 and on-premises Exchange or hosted Exchange email platforms without requiring organizations to install or maintain any software for the move. From a single console, you can migrate multiple mailboxes simultaneously, including data such as email, calendar, contacts, and tasks.
System RequirementsBefore using ODME, ensure that your system meets the following minimum software requirements:Table 1: System requirements
Requirement Details
Browser Internet Explorer 11, 10, and 9; Firefox (latest); Chrome (latest)
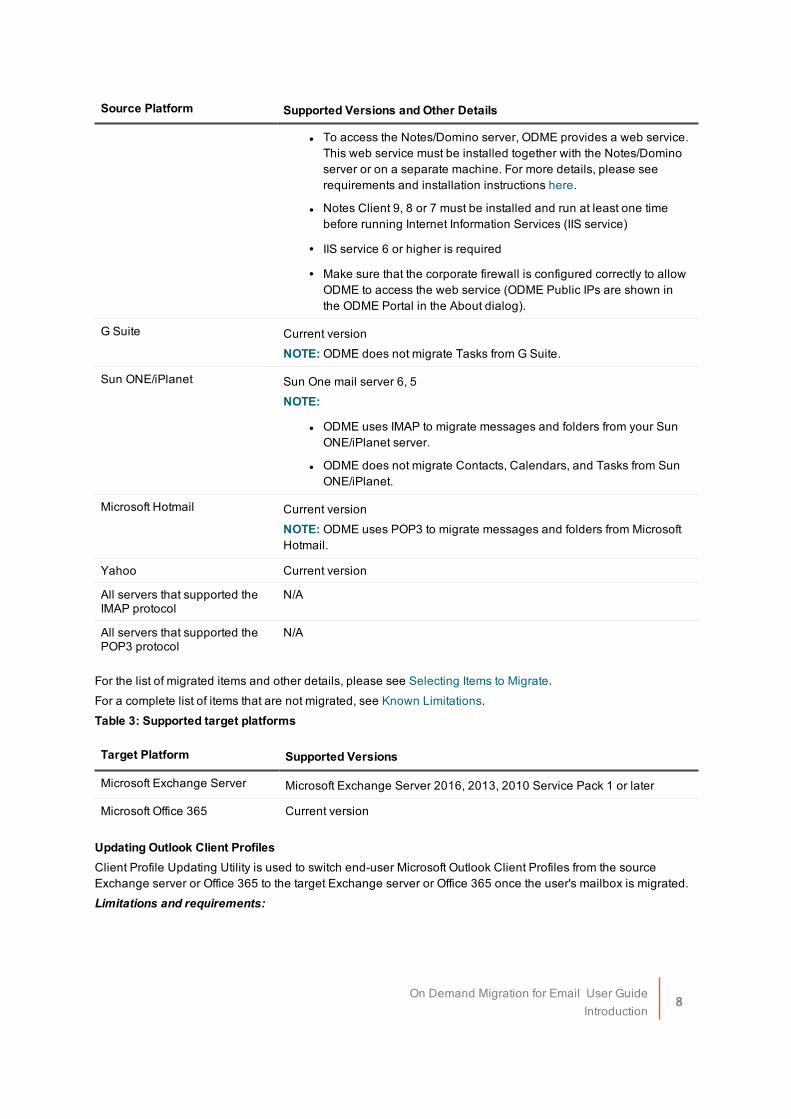
ODME securely migrates data to Office 365 and on-premises Exchange from the following source email platforms:Table 2: Supported source platforms
Source Platform Supported Versions and Other Details
Microsoft Exchange Server Microsoft Exchange Server 2016, 2013, 2010 Service Pack 1 or later, 2007 NOTE: Personal archives can be migrated only from Exchange Server 2010, 2013 and 2016.
Microsoft Office 365 Current version NOTE: ODME supports migration of personal archives from the source Office 365 to the target Office 365.
Novell GroupWise Novell GroupWise 2014 R2, 2014 SP2, 2012, 8, 7NOTE: ODME does not migrate Search folders and Task invites from GroupWise.
Zimbra Zimbra 8
IBM Notes and Domino ODME supports IBM Notes/Domino server 9, 8, 7
On Demand Migration for Email User GuideIntroduction
7
Source Platform Supported Versions and Other Details
l To access the Notes/Domino server, ODME provides a web service. This web service must be installed together with the Notes/Domino server or on a separate machine. For more details, please see requirements and installation instructions here.
l Notes Client 9, 8 or 7 must be installed and run at least one time before running Internet Information Services (IIS service)
l IIS service 6 or higher is required
l Make sure that the corporate firewall is configured correctly to allow ODME to access the web service (ODME Public IPs are shown in the ODME Portal in the About dialog).
G Suite Current versionNOTE: ODME does not migrate Tasks from G Suite.
Sun ONE/iPlanet Sun One mail server 6, 5NOTE:
l ODME uses IMAP to migrate messages and folders from your Sun ONE/iPlanet server.
l ODME does not migrate Contacts, Calendars, and Tasks from Sun ONE/iPlanet.
Microsoft Hotmail Current versionNOTE: ODME uses POP3 to migrate messages and folders from Microsoft Hotmail.
Yahoo Current version
All servers that supported the IMAP protocol
N/A
All servers that supported the POP3 protocol
N/A
For the list of migrated items and other details, please see Selecting Items to Migrate.For a complete list of items that are not migrated, see Known Limitations.Table 3: Supported target platforms
Target Platform Supported Versions
Microsoft Exchange Server Microsoft Exchange Server 2016, 2013, 2010 Service Pack 1 or later
Microsoft Office 365 Current version
Updating Outlook Client ProfilesClient Profile Updating Utility is used to switch end-user Microsoft Outlook Client Profiles from the source Exchange server or Office 365 to the target Exchange server or Office 365 once the user's mailbox is migrated. Limitations and requirements:
On Demand Migration for Email User GuideIntroduction
8

l Profile switch is not supported for Exchange Server 2010 as a target.
l Profile switch is not supported for Exchange Server 2016 as a target.
l To enable the CPUU integration feature on the source Exchange Server 2007, you should turn on and configure the WebDAV API access for your Exchange Server 2007.
For more details, please see Updating Outlook Client Profiles.
Subscribing to the Service l Creating a Quest Account
l Trial Subscription
l License Subscription
l Pay-As-You-Go Subscription
Creating a Quest AccountActive Quest Account is required to access Quest On Demand Services.
To register a Quest Account
1. Go to the Quest On Demand Services website: https://portal.ondemand.quest.com/
2. Click Try or Subscribe next to the Quest On Demand Migration for Email service. The Create a New Account screen opens.
3. Enter the company and user information required to set up your Quest Account. Follow the on-screen instructions.
4. We create your account and send you a confirmation by email. Follow the instructions in the email to activate your email address.
5. Then use this account to register for Quest On Demand Migration for Email.
Trial Subscription Your 30-day free trial subscription begins on the date that you activate your trial subscription to an Quest On Demand Migration for Email service. It doesn’t begin on the date that you requested the trial.
To get and activate a trial subscription
1. Go to the Quest On Demand Services website: https://portal.ondemand.quest.com/
2. Click Try next to the Quest On Demand Migration for Email service. The Create a New Account screen opens.
3. If you already have a Quest Account, click Sign In and enter your user name and password. Otherwise, you have to create a Quest Account.
On Demand Migration for Email User GuideIntroduction
9

4. On the Try On Demand Migration for Email screen, you have to specify the nearest data center to maximize the service performance.
5. Then, read and accept the terms and conditions of the Trial Agreement before continuing.
NOTE: Your migrations are limited in the trial version of the ODME service. You can migrate only 25 messages, 5 contacts, 25 appointments, 5 tasks, 5 notes and 50 recoverable items per mailbox. Number of mailboxes is limited to 5.
6. Click Open On Demand Migration for Email to activate your trial subscription.
License SubscriptionUse this option if you already have a license or a coupon code to access the Quest On Demand Migration for Email Service.
To access the ODME service using a license key or coupon code
1. Go to the Quest On Demand Services website: https://portal.ondemand.quest.com/
2. Click Subscribe next to the Quest On Demand Migration for Email service. The Create a New Account screen opens.
3. If you already have a Quest Account, click Sign In and enter your user name and password. Otherwise, you have to create a Quest Account.
4. If you already have a license key or coupon code, select Yes under Choose a Plan and enter your key on the Subscription Options. Then press Continue.
5. On the Activate Your Subscription screen, specify the nearest data center to maximize the service performance.
6. Then, read and accept the terms and conditions of the Services Agreement.
7. Press Activate Subscription.
Pay-As-You-Go SubscriptionThis option lets you pay for a number of mailboxes that were successfully migrated for the first time within a month period.Limitations:
l Each mailbox can be migrated 10 times
l The maximum extraction limit is 50 GB
To purchase a subscription to the ODME service
1. Go to the Quest On Demand Services website: https://portal.ondemand.quest.com/
2. Click Subscribe next to the Quest On Demand Migration for Email service. The Create a New Account screen opens.
3. If you already have a Quest Account, click Sign In and enter your user name and password. Otherwise, you have to create a Quest Account.
On Demand Migration for Email User GuideIntroduction
10

4. If you do not have a license key or coupon code, select No under Choose a Plan on the Subscription Options.
5. Provide user details on the Subscriber info screen.
6. Enter your credit card details on the Payment Method screen
7. Specify the nearest data center to maximize the service performance on the Data Center screen.
8. Read and accept the terms and conditions of the Services Agreement on the Confirmation screen.
9. Click Place Order.
Getting Started for New UsersThis section provides basic instructions on how to use On Demand Migration for Email.
1. Log in the ODME Portal. For more details about how to get the service subscription, refer Subscribing to the Service.
2. The Dashboard screen opens. Here you can create a migration plan. For that, press the New Plan button at the bottom of the screen. You can also create a migration plan from a template if available. To do this, select a template from the drop-down list in the dialog box where you create the migration plan.
3. Once an ODME Plan is created, there are four steps: Connections, Mailboxes, Options and Migrate:
l Connections On the first step, you need to specify Source and Target details so that ODME can connect to the both endpoints. Some fields may be not editable if your plan was created from a template.
On Demand Migration for Email User GuideIntroduction
11
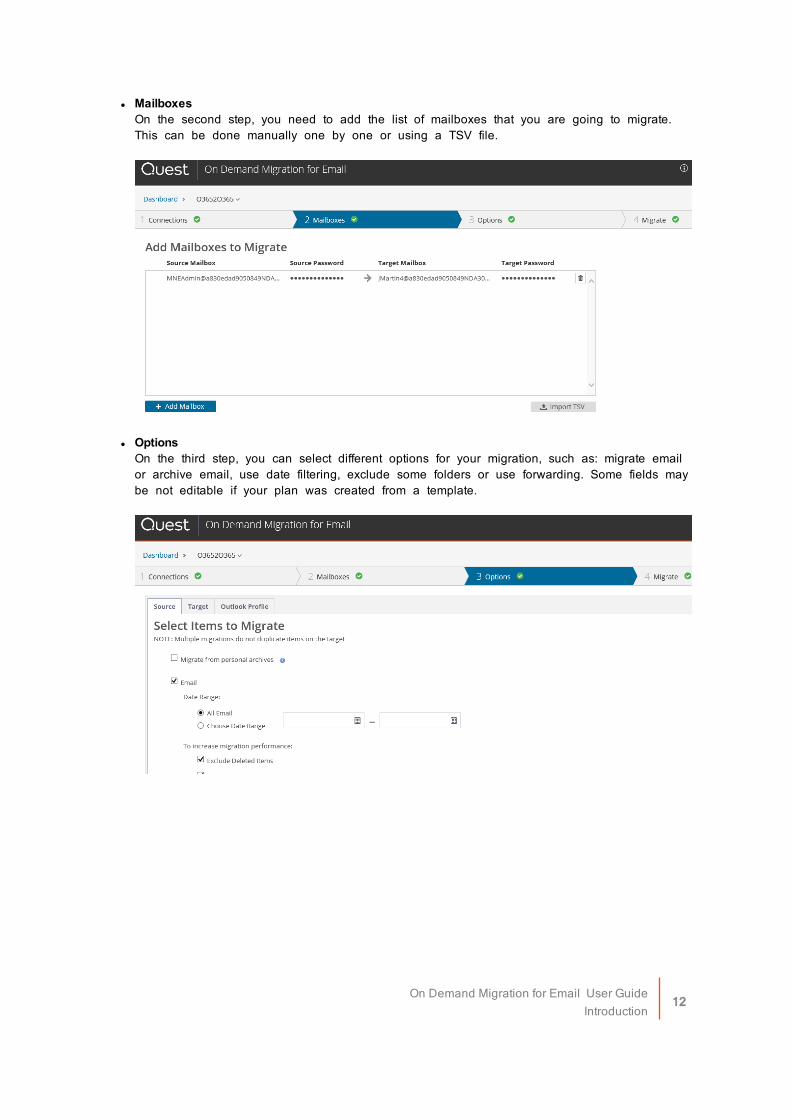
l Mailboxes On the second step, you need to add the list of mailboxes that you are going to migrate. This can be done manually one by one or using a TSV file.
l Options On the third step, you can select different options for your migration, such as: migrate email or archive email, use date filtering, exclude some folders or use forwarding. Some fields may be not editable if your plan was created from a template.
On Demand Migration for Email User GuideIntroduction
12

l Migrate Finally, you need to run the migration for all added mailboxes or select mailboxes that you want to migrate.
To get more detailed information on the migration process, see the following sections:
l Preparing Migrations
l Configuring and Running Migrations
l Post Migration
Roles and PermissionsOn Demand Migration for Email uses a role-based approach to manage user permissions in the Users and Roles tab. The following table describes the permissions for the default roles Full Administrator and Migration for Email Admin:
Permission Actions Full Administrator
Migration for Email Admin
Manage Migrations
l Create / Edit / Delete/ Copy / Rename/ Start / Stop / Restart a migration plan (including those created from a template).
l The actions defined by the permission Read.
Manage Templates
l Create / Edit / Delete a migrate template.
l Create migration plan from a template.
Table 4: Roles and Permissions
On Demand Migration for Email User GuideIntroduction
13
l The actions defined by the permission Read.
Read l View the existing migration plans (including those created from a template) and templates.
l Download and view audit logs for a migration template.
l Download and view all types of reports for a migration.
NOTE: Users without any permissions can still log in to ODME and will see a blank page after login, but they cannot work with the product until proper permissions assigned.
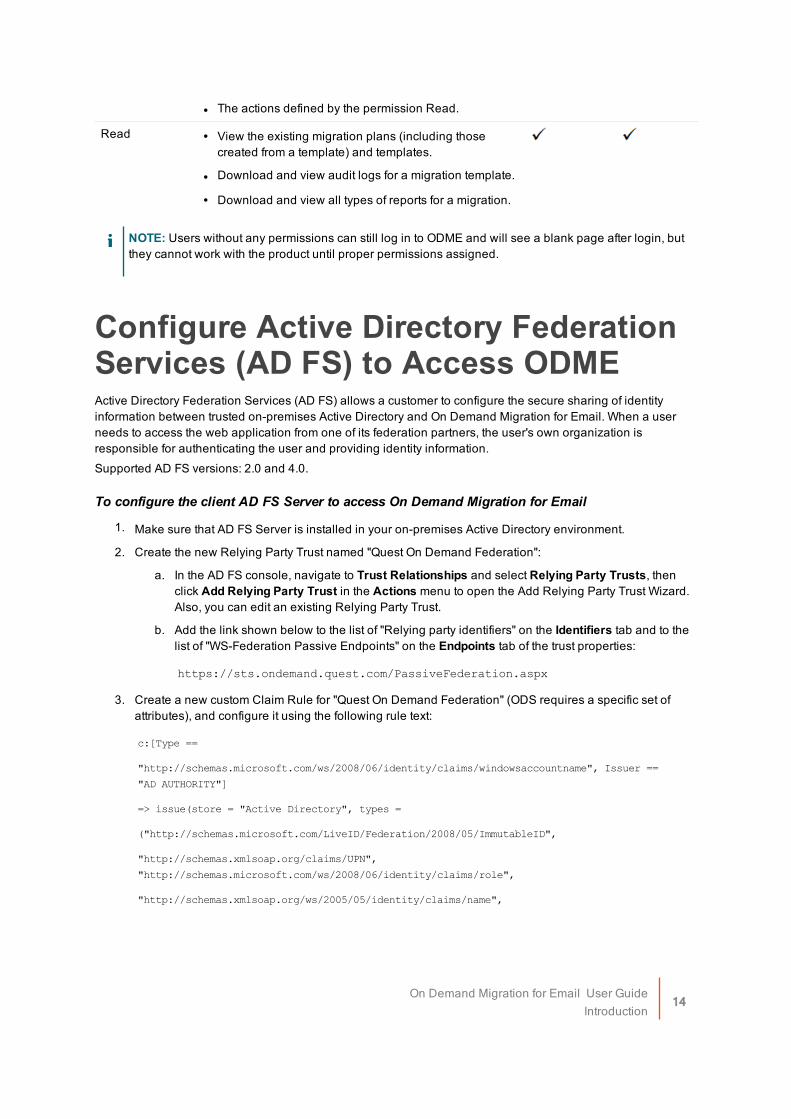
Configure Active Directory Federation Services (AD FS) to Access ODMEActive Directory Federation Services (AD FS) allows a customer to configure the secure sharing of identity information between trusted on-premises Active Directory and On Demand Migration for Email. When a user needs to access the web application from one of its federation partners, the user's own organization is responsible for authenticating the user and providing identity information.Supported AD FS versions: 2.0 and 4.0.
To configure the client AD FS Server to access On Demand Migration for Email
1. Make sure that AD FS Server is installed in your on-premises Active Directory environment.
2. Create the new Relying Party Trust named "Quest On Demand Federation":
a. In the AD FS console, navigate to Trust Relationships and select Relying Party Trusts, then click Add Relying Party Trust in the Actions menu to open the Add Relying Party Trust Wizard. Also, you can edit an existing Relying Party Trust.
b. Add the link shown below to the list of "Relying party identifiers" on the Identifiers tab and to the list of "WS-Federation Passive Endpoints" on the Endpoints tab of the trust properties:
https://sts.ondemand.quest.com/PassiveFederation.aspx
3. Create a new custom Claim Rule for "Quest On Demand Federation" (ODS requires a specific set of attributes), and configure it using the following rule text:
c:[Type ==
"http://schemas.microsoft.com/ws/2008/06/identity/claims/windowsaccountname", Issuer ==
"AD AUTHORITY"]
=> issue(store = "Active Directory", types =
("http://schemas.microsoft.com/LiveID/Federation/2008/05/ImmutableID",
"http://schemas.xmlsoap.org/claims/UPN",
"http://schemas.microsoft.com/ws/2008/06/identity/claims/role",
"http://schemas.xmlsoap.org/ws/2005/05/identity/claims/name",
On Demand Migration for Email User GuideIntroduction
14
"http://schemas.xmlsoap.org/ws/2005/05/identity/claims/givenname",
"http://schemas.xmlsoap.org/ws/2005/05/identity/claims/emailaddress",
"http://schemas.xmlsoap.org/claims/CommonName"), query = ";objectGuid,userPrincipalName,
tokenGroups(domainQualifiedName),sAMAccountName,givenName,mail,displayName;{0}", param =
c.Value);
4. Download the Federation Metadata XML document using this address:
https://<AD FS address>/FederationMetadata/2007-06/FederationMetadata.xml
5. Create the support request using https://support.quest.com/contact-support and provide the following files:
l FederationMetadata.xml
l File that contains the list of email domains which will be used to log in to ODME
6. When the ODME team reports back that they have configured the integration, log on to On Demand Migration for Email. You should see the redirection to your AD FS Server and then back at the ODME page (depending on your browser settings and the running context, it may ask you for your AD credentials).
NOTE: Note that if the AD FS Server re-creates its certificate automatically, or you replace the certificate after expiration, the integration will break. Please contact the ODME team, so that they can replace the certificate information in the database.
7. You can assign ODME roles to on-premises Active Directory security groups so that users in these groups would automatically gain access to the web application:
a. For that, go to Users and Roles tab in ODME, select the role needed and click Users.
b. Then, click the Add Group button.
c. In the dialog that opens, specify the group name in the following format: <domain name>\<group name> and the client realm.
Using Azure AD Single Sign-On to Access ODMEAzure Active Directory single sign-on (Azure AD SSO) enables users to access On Demand Migration for Email based on their single organizational account in Azure Active Directory. Single sign-on enables users to authenticate to the application using their single organizational account.
To configure access to On Demand Migration for Email via Azure AD SSO:
1. First, the administrator of your organization must grant On Demand Migration for Email access to your organization’s data. To do this, perform the following steps:
On Demand Migration for Email User GuideIntroduction
15
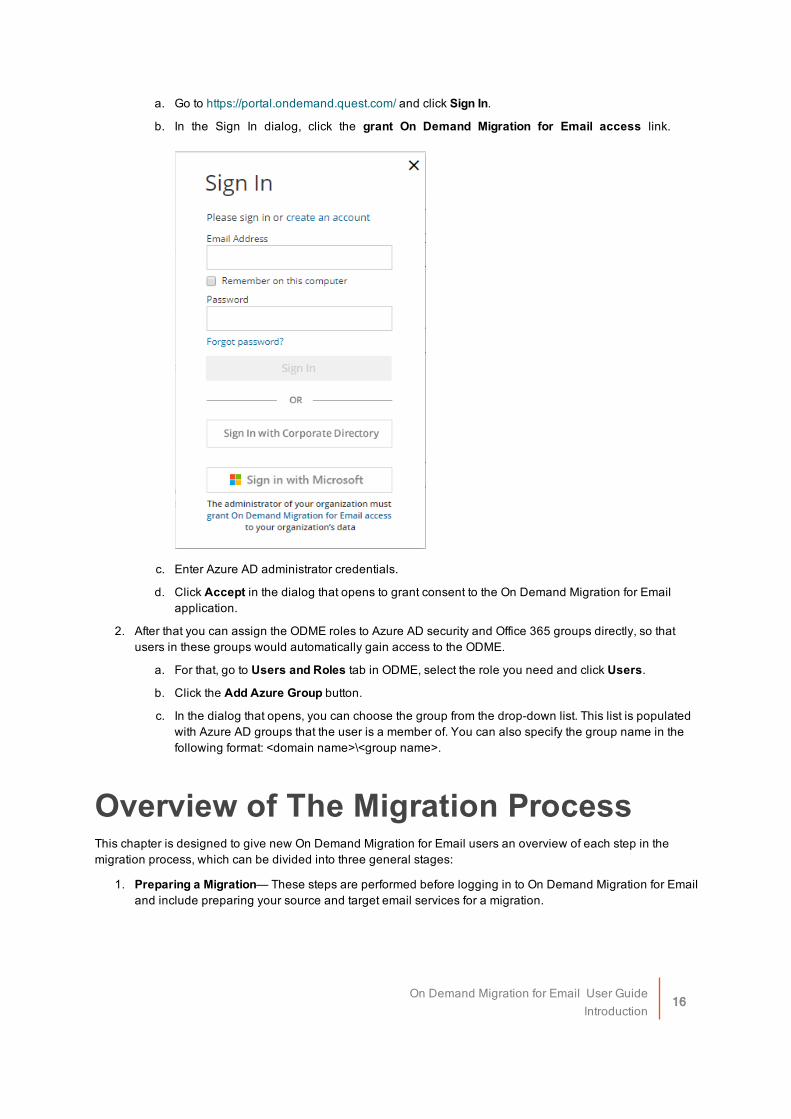
a. Go to https://portal.ondemand.quest.com/ and click Sign In.
b. In the Sign In dialog, click the grant On Demand Migration for Email access link.
c. Enter Azure AD administrator credentials.
d. Click Accept in the dialog that opens to grant consent to the On Demand Migration for Email application.
2. After that you can assign the ODME roles to Azure AD security and Office 365 groups directly, so that users in these groups would automatically gain access to the ODME.
a. For that, go to Users and Roles tab in ODME, select the role you need and click Users.
b. Click the Add Azure Group button.
c. In the dialog that opens, you can choose the group from the drop-down list. This list is populated with Azure AD groups that the user is a member of. You can also specify the group name in the following format: <domain name>\<group name>.
Overview of The Migration ProcessThis chapter is designed to give new On Demand Migration for Email users an overview of each step in the migration process, which can be divided into three general stages:
1. Preparing a Migration— These steps are performed before logging in to On Demand Migration for Email and include preparing your source and target email services for a migration.
On Demand Migration for Email User GuideIntroduction
16
2. Configuring and Running a Migration — These steps involve connecting to your source and target email services, importing mailboxes, selecting which items to migrate, and then running a migration.
3. Post-Migration — These steps are optional and are performed after a migration. They include viewing reports and training users on the new mail system.
NOTE:
l ODME does not synchronize source changes with the target. Sample usage scenario: If a message was migrated to the target, the customer delete it in source mailbox and then migrate it again, the migrated message is still in the target in the same folder.
l ODME does not update the Read/Unread status for email messages on the target if this status is changed on the source.
References:
l https://support.quest.com/on-demand-migration-for-email/kb/181739
l https://support.quest.com/on-demand-migration-for-email/kb/206785
The illustration below shows the stages of the migration process and the order in which each step should be performed.
On Demand Migration for Email User GuideIntroduction
17

On Demand Migration for Email User GuideIntroduction
18
Preparing a MigrationBefore running a migration with On Demand Migration for Email, you should consider carefully which migration strategy best suits your needs. Then, if you haven’t already done so, you should create the target mailboxes in the target email service and (optionally) implement a mail routing strategy. Lastly, you should configure your source and target email service to ensure that On Demand Migration for Email can connect to each one and execute a migration.
1. Choose a Migration Strategy — Depending on various factors, you can choose to perform either a one-time, “big bang” migration (cutover) or perform several staged migrations (co-existence). Choosing the right strategy will minimize migration errors and make it easier for users to transition into the new mail system.
2. Create Target Mailboxes — Create the target mailboxes in the target email service. On Demand Migration for Email does not create them for you.
3. Setup Mail Routing — Implement a mail routing strategy that will enable users to send and receive mail from both internal and external sources.
4. Prepare the Source and Target Email Service — Configure your source and target email services to allow On Demand Migration for Email to connect to them and run a migration.
Configuring and Running a MigrationAfter you have performed all the necessary preparatory steps, you are ready to login to On Demand Migration for Email and setup and run your migration.
1. Name the Migration Plan — Assign a name to the migrations plan under which you will configure and run the migration.
2. Connect to the Source and Target Email Service — Specify server locations and the administrator account credentials for both your source and target email services.
3. Add Mailboxes — Identify the mailboxes you want to migrate, either by entering each mailbox manually or by uploading a list.
4. Select Mailbox Items and Migration Filters — Specify which mailbox items you want to migrate and (optionally) any filter parameters.
5. Migrate — Initiate your migration and monitor it in the cloud.
Post MigrationAfter you run a migration, there remain additional activities you may perform.
1. Review Migration Reports — Review and correct any errors identified in the migration reports and re-migrate as needed.
2. Notify and Train Users — Notify users of the migration and provide information on how to access the new mail system. This step may include training users on the new system as needed.
On Demand Migration for Email User GuideIntroduction
19

Preparing Migrations
Choosing a Migration TypeTo ensure your migration runs as smoothly as possible, you should first decide which type of migration most suits your needs. You can perform either a one-time, “big bang” migration (cutover) OR several staged groups (co-existence). You may choose a cutover approach if you have a small number of users and you want to move everyone all at once to reduce the amount of administrative overhead. This is also a good option if your users are experienced and won’t require a lot of training on the new target domain client. Inform users that they may not have all their old email right away.The co-existence approach is a good option if you need to train your users on the new mail system. This minimizes the number of users calling the helpdesk. It also allows you to schedule training sessions and migrations together, managing expectations for both your IT staff and your end-users.
Setting Up Mail RoutingBefore migrating or creating mailboxes, you need to implement a mail routing strategy that will enable users to send and receive mail from both internal and external sources. There are different strategies to do this depending on how you want mail directed to and from the internet.
Deciding How to Configure Your Shared Address SpaceDuring the co-existence period of on-premises mail and hosted mail, you need to decide which system will initially receive the email traffic for your organization. To make the best decision for your organization, please review the Microsoft documentation associated with your target email service:
l For Exchange 2010, see https://technet.microsoft.com/en-us/library/bb676395(v=exchg.141).aspx.
l For Exchange 2013, see https://technet.microsoft.com/en-us/library/aa998825(v=exchg.150).aspx.
l For Exchange 2016, see https://technet.microsoft.com/en-us/library/aa998825(v=exchg.160).aspx.
l For Office 365, see http://social.technet.microsoft.com/wiki/contents/articles/30202.shared-address-space-office365-mail-routing.aspx.
Source Email ServiceRefer to the sections below for mail routing instructions specific to your source email service.
On Demand Migration for Email User GuidePreparing Migrations
20

l Exchange 2007/2010/2013/2016
l G Suite
l Office 365 (Cloud Relay)
l Zimbra
l GroupWise
l Notes/Domino
l Sun ONE/iPlanet
IMPORTANT: Mail routing is not supported by POP/Hotmail and IMAP source email services.
Exchange 2007/2010/2013/2016
NOTE: To enable the CPUU integration feature on the source Exchange Server 2007, you should turn on and configure the WebDAV API access for your Exchange Server 2007. For more details, please see Updating Outlook Client Profiles.
When migrating from on-premises Exchange server to Office 365, you can use the Microsoft directory synchronization solution together with ODME. For more details about how to convert mail-enabled users created by Microsoft directory synchronization tool to mailbox-enabled users, please see the following article https://msdn.microsoft.com/en-us/library/azure/hh967617.aspx.Your DNS MX records will already be set to deliver mail to your Exchange server. For Exchange to forward mail, set the targetAddress for the mailboxes that now reside on your new mail system to a subdomain that exists, and configure Exchange to route to target mail system. You can do this by using the Exchange PowerShell Set-Mailbox cmdlet. In the Exchange Management Shell, use the following command:Set-Mailbox -Identity SourceMailbox -TargetSmtpAddress TargetUsername@ForwardingSubDomain
Where:
l SourceMailbox is the user's SMTP address in the source system.
l TargetUsername is the user's Target userid.
l ForwardingSubDomain is a secondary domain that you have set up in the Target domain.
For the forwarded mail to get sent to your target system, create a new send connector to handle the forwarding domain. By using a send connector you do not need to expose this forwarding domain in your DNS. You can create a send connector in the Exchange Management Console, or you can use PowerShell in the Exchange Management Shell. To create the send connector with PowerShell, use the New-SendConnector cmdlet. The following is a simple usage of the send connector, your target system may require TLS or authentication to forward mail. You can change the Name parameter to something that better describes your connector.
New-SendConnector -Name ForwardToTarget -AddressSpaces ForwardingSubDomain -DNSRoutingEnabled $false
G SuiteTo forward mail from G Suite to Office 365, you must register your domain with both providers. You must register the domain you are using to forward mail from G Suite due to a restriction of the Google APIs used by ODME. The Google APIs will only allow forwarding addresses for registered domains or subdomains of the primary G
On Demand Migration for Email User GuidePreparing Migrations
21

Suite account. Adding a domain for mail destined for Office 365 may seem counter to normal migration practices, but is a required step. Please note that registering a domain with G Suite does not impact mail routing for the domain.After registering your domain, the procedure for setting up mail routing for G Suite is the same if Office 365 is the target email service, but slightly different if the target is Exchange 2010.For infomormation about setting up mail forwarding and available forwarding actions, see Setting Up Mail Forwarding.
Registering your Domain with Google Domains and Office 365To set forwarding from G Suite to Office 365, you need a domain that is registered with Google Domains and with Office 365. The Google APIs used by ODME require that the domain is registered with Google Domains. To receive mail for the forwarded messages from G Suite, you need email addresses with this domain for your Office 365 Exchange accounts. The following procedures walk you through registering your forwarding domain with Google Domains and registering your domain with Office 365.
To register your domain with Google Domains:
1. Log in to your Google Admin console (https://www.google.com/a/example.com/) and go to Domains > Add/remove domains page.
2. Click Add a domain or a domain alias.
3. Select the Add another domain option and enter the domain name.
4. Click CONTINUE AND VERIFY DOMAIN OWNERSHIP.
You are prompted to sign in to your domain name provider to verify your ownership of the domain. A helper app may be available, but we recommend completing the process manually by adding a TXT record.
5. Click Add a TXT record.
6. Complete the steps for creating a DNS record that proves to Google that you own the domain.
7. Return to the Google domain registration page and click Verify.
If you have entered all the information correctly you should receive a conformation message. The next step is to activate your domain.
8. Click Continue and go to the Domains > Add/remove domains page again.
You should see your domain listed with an exclamation mark,
9. Click Skip Google MX setup since you don't want mail to route to G Suite for this domain.
10. In the Route mail to another server box, click I use another mail server.
Next you need to register the domain with Office 365.
To register your domain with Office 365:
1. Go to https://portal.microsoftonline.com/ and login as an administrator to your Office 365 portal.
2. Select Admin > Office365 and then select Domains on the left hand navigation tree.
3. Select Add a domain and add the same domain to Office 365 that you added to G Suite.
This opens a wizard which prompts you to add another TXT record to verify ownership.
On Demand Migration for Email User GuidePreparing Migrations
22

4. After proving the domain name in the wizard, complete the remaining steps for verifying your ownership of the domain by creating another TXT record.
When finished, you should have two TXT records in my DNS, one for G Suite and one for Office 365.
5. Return to the Office 365 portal and click Done, verify now.
If you have entered all the information correctly you should receive a conformation message.
6. Click Finish.
The next step offered is Add users and assign licenses.
7. Click Start step 2.
8. Since this is a subdomain for mail routing, select I don't want to add users right now.
9. Click Next.
10. Click Start step 3.
This opens the “how do you want to use…” page.
11. Check the Exchange Online option since you just want to setup this domain for Exchange Online, and then click Next.
This opens the “add these dns records” page.
12. Follow the instructions for adding the TXT record.
13. Add the CNAME for autodiscover.
14. Click Done, go check.
If you have entered all the information correctly you should receive a conformation message.
NOTE: To add a subdomain to a domain that's set up for federated authentication, do the following:
1. Connect to Windows Azure Active Directory (Windows Azure AD) by using Windows PowerShell. Connect from ADFS Core Server.
2. Use the Connect-MSOLService cmdlet to connect to cloud with Global Administrator credential.
3. Use the New-MSOLFederatedDomain cmdlet.
4. The syntax to add a subdomain is as follows, where <subdomain> is the name of the subdomain that you want to add:
New-MSOLFederatedDomain -DomainName:<subdomain>"
Mail Routing between G Suite and Office 365To set up mail routing between G Suite and Office 365, you must configure per-mailbox forwarding in conjunction with subdomain forwarding. This prevents email duplication and subdomains appearing in the Reply Address on any message, either internal or external.
To set up mail routing between G Suite and Office 365:
1. Configure both G Suite and Office 365 to accept mail from the same domain, for example, “example.com.” For how to set up MX records for G Suite and Office 365, refer to https://support.google.com/a/answer/140034?hl=en and https://technet.microsoft.com/en-us/library/mt595791(v=exchg.150).aspx.
On Demand Migration for Email User GuidePreparing Migrations
23
In addition, MX records point to G Suite. Though MX can direct email at either system, it is best to have mail delivered to the server with the largest number of users. This means that at the start of the migration, MX points to G Suite, and at the halfway point of the migration, the MX records switch to point to Office 365. Note that the system receiving the mail must know about all users in both systems.
The first step is to create two subdomains used for routing.
2. Create an MX record for each domain, which allows each system to send mail to the other.
For example, the domain “O365.example.com” directs mail to Office 365, while the domain “gapps.example.com” directs mail to G Suite.
3. After you create the MX records, set up each system to accept mail for the new subdomains.
In Office 365, you add this domain as a new Accepted Domain. In G Suite, you add this as a new Domain Alias.By default, all users on G Suite will have aliases for this subdomain. However, with Office 365, you must configure each user with the routing domain, either manually or via a powershell script.
4. Create representative mailboxes in Office 365 for each user that is presently in G Suite.
This allows users who are migrated to Office 365 to see a GAL that is populated with all the users, as well as facilitate message forwarding for users still homed in G Suite.
5. After all the users have mailboxes in Office 365, set forwarding on them that will remain until the user is migrated.
The setting of forwarding can be done with the ODME per-user mail forwarding feature, as described in the section Setting Up Mail Forwarding.
On Demand Migration for Email User GuidePreparing Migrations
24
6. When migrating users, flip forwarding so that new mail is delivered to the Office 365 mailbox, and not the G Suite mailbox.
With the ODME per-user mail forwarding option, you now need to select to remove forwarding from the target as well as setting forwarding in the source. It is important to remove the target forwarding to prevent the creation of a mail loop.
Mail Routing between G Suite and Exchange 2010To set up mail routing between G Suite and Exchange 2010, you must configure per-mailbox forwarding in conjunction with subdomain forwarding. This prevents email duplication and subdomains appearing in the Reply Address on any message, either internal or external.
To set up mail routing between G Suite and Exchange 2010:
1. Configure both G Suite and Exchange 2010 to accept mail from the same domain, for example, “example.com.”
In addition, MX records point to G Suite. Though MX can direct email at either system, it is best to have mail delivered to the server with the largest number of users. This means that at the start of the migration, MX points to G Suite, and at the halfway point of the migration, the MX records switch to point to Exchange 2010. Note that the system receiving the mail must know about all users in both systems.
The first step is to create two subdomains used for routing.
2. Create an MX record for each domain, which allows each system to send mail to the other.
For example, the domain “ex2010.example.com” directs mail to Exchange 2010, while the domain “gapps.example.com” directs mail to G Suite.
On Demand Migration for Email User GuidePreparing Migrations
25

3. After you create the MX records, set up each system to accept mail for the new subdomains.
In Exchange 2010, you add this domain as a new Accepted Domain. In G Suite, you add this as a new Domain Alias.By default, all users on G Suite will have aliases for this subdomain. However, with Exchange 2010, you must go to the Exchange Management Console and configure the recipient policy to include this domain for all the users.
4. Create representative mailboxes in Exchange 2010 for each user that is presently in G Suite.
This allows users who are migrated to Exchange 2010 to see a GAL that is populated with all the users, as well as facilitate message forwarding for users still homed in G Suite.
5. After all the users have mailboxes in Exchange 2010, set forwarding on them that will remain until the user is migrated.
The setting of forwarding can be done with the ODME per-user mail forwarding feature, as described in the section Setting Up Mail Forwarding.At this point, mail routing is configured and operational between Exchange 2010 and G Suite.
6. When migrating users, flip forwarding so that new mail is delivered to the Exchange 2010 mailbox, and not the G Suite mailbox.
With the ODME per-user mail forwarding option, you now need to select to remove forwarding from the target as well as setting forwarding in the source. It is important to remove the target forwarding to prevent the creation of a mail loop.
Office 365 (Cloud Relay)CAUTION: The scenario described in this topic isn't supported in Microsoft Office 365 Beta for enterprises.
According to the current Microsoft documentation:Update your MX record so that all mail destined for your domain will be routed to your new mail server. The instructions from Microsoft found here (login required) talk about how to route mail to the cloud. You will need to just update the MX records to redirect SMTP traffic to your Edge transport server. You can learn more about the edge transport server on https://technet.microsoft.com/en-us/library/bb124701.aspxThe Office 365 mail routing page also provides instructions for different DNS providers.Since you have decided to route all mail to you new domain first, you also need to make sure your Primary domain is a “Shared Domain.” This will let any email addressed to mailboxes deleted from your Office 365 server to be routed to your new mail server.To forward any new mail to your new mail system that is routed to Office 365, use the ODME per-user mail forwarding feature as described in the section Setting Up Mail Forwarding. To use the mail forwarding feature, the administrator account must be assigned the “Recipient Management” role, for example:
Add-RoleGroupMember “Recipient Manager” -Member [email protected]
NOTE: When you configure mail forwarding for Office 365 in ODME, the settings will be accessible in the O365 user account page, but not in the Exchange Admin Center.
On Demand Migration for Email User GuidePreparing Migrations
26
ZimbraMail Routing between Zimbra and Office 365To set up mail routing between Zimbra and Office 365, you must configure per-mailbox forwarding in conjunction with subdomain forwarding. This prevents email duplication and subdomains appearing in the Reply Address on any message, either internal or external.
To set up mail routing between Zimbra and Office 365:
1. Configure both Zimbra and Office 365 to accept mail from the same domain, for example, “example.com”.
In addition, MX records point to Zimbra. Though MX can direct email at either system, it is best to have mail delivered to the server with the largest number of users. This means that at the start of the migration, MX points to Zimbra, and at the halfway point of the migration, the MX records switch to point to Office 365. Note that the system receiving the mail must know about all users in both systems.The first step is to create two subdomains used for routing.
2. Create an MX record for each domain, which allows each system to send mail to the other.
For example, the domain “O365.example.com” directs mail to Office 365, while the domain “zimbra.example.com” directs mail to Zimbra.
3. After you create the MX records, set up each system to accept mail for the new subdomains.
For Office 365, you add this domain as a new Accepted Domain. In Zimbra, you add this as a new Domain.For Zimbra, you must create aliases for this new subdomain under the Aliases section of Manage Accounts.For Office 365, you must configure each user with the routing domain, either manually or via a powershell script.
4. Create representative mailboxes in Office 365 for each user that is presently in Zimbra.
This allows users who are migrated to Office 365 to see a GAL that is populated with all the users, as well as facilitate message forwarding for users still homed in Zimbra.
5. After all the users have mailboxes in Office 365, set forwarding on them that will remain until the user is migrated.
The setting of forwarding can be done with the ODME per-user mail forwarding feature, as described in the section Setting Up Mail Forwarding.
6. When migrating users, flip forwarding so that new mail is delivered to the Office 365 mailbox, and not the Zimbra mailbox.
With the ODME per-user mail forwarding option, you now need to select to remove forwarding from the target as well as setting forwarding in the source. It is important to remove the target forwarding to prevent the creation of a mail loop
Mail Routing between Zimbra and Exchange 2010To set up mail routing between Zimbra and Exchange 2010, you must configure per-mailbox forwarding in conjunction with subdomain forwarding. This prevents email duplication and subdomains appearing in the
On Demand Migration for Email User GuidePreparing Migrations
27

Reply Address on any message, either internal or external.
To set up mail routing between Zimbra and Exchange 2010:
1. Configure both Zimbra and Exchange 2010 to accept mail from the same domain, for example, “example.com”.
In addition, MX records point to Zimbra. Though MX can direct email at either system, it is best to have mail delivered to the server with the largest number of users. This means that at the start of the migration, MX points to Zimbra, and at the halfway point of the migration, the MX records switch to point to Exchange 2010. Note that the system receiving the mail must know about all users in both systems.The first step is to create two subdomains used for routing.
2. Create an MX record for each domain, which allows each system to send mail to the other.
For example, the domain “ex2010.example.com” directs mail to Exchange 2010, while the domain “zimbra.example.com” directs mail to Zimbra.
3. After you create the MX records, set up each system to accept mail for the new subdomains.
For Exchange 2010, you add this domain as a new Accepted Domain. In Zimbra, you add this as a new Domain Alias.For Zimbra, you must create aliases for this new subdomain under the Aliases section of Manage Accounts.For Office 365, you must configure each user with the routing domain, either manually or via a powershell script.
4. Create representative mailboxes in Exchange 2010 for each user that is presently in Zimbra.
This allows users who are migrated to Exchange 2010 to see a GAL that is populated with all the users, as well as facilitate message forwarding for users still homed in Zimbra.
5. After all the users have mailboxes in Exchange 2010, set forwarding on them that will remain until the user is migrated.
The setting of forwarding can be done with the ODME per-user mail forwarding feature, as described in the section Setting Up Mail Forwarding.At this point, mail routing is configured and operational between Exchange 2010 and Zimbra.
6. When migrating users, flip forwarding so that new mail is delivered to the Exchange 2010 mailbox, and not the Zimbra mailbox.
With the ODME per-user mail forwarding option, you now need to remove forwarding from the target as well as setting forwarding in the source. It is important to remove the target forwarding to prevent the creation of a mail loop.
GroupWiseRefer to the documentation provided by GroupWise for information on setting up mail routing.
Notes/DominoRefer to the documentation provided by IBM Notes/Domino for information on setting up mail routing.
On Demand Migration for Email User GuidePreparing Migrations
28
Sun ONE/iPlanetRefer to the documentation provided by Sun ONE/iPlanet for information on setting up mail routing.
Initial Target Mail HostsRefer to the sections below for mail routing instructions specific to your target email service.
l Office 365
l Exchange 2010/2013/2016
Office 365For a local Office 365 (On-Premises Relay) system, you will need to prove domain ownership to enable your Office 365 service. Microsoft provides two options: one option is to create an MX record, which you should not choose, and the second option is to create the CNAME record as directed on http://help.outlook.com/en-US/140/cc188653.aspx.Next, create a subdomain to route mail to Office 365 so you can create users with forwarding addresses during the transition period. A subdomain is also known as an “Accepted Domain” and that needs to be created so mailboxes on the Office 365 server can have an alias that contains the subdomain address. Learn more about Accepted domains in Exchange Online documentation.More details and step-by-step instructions from Microsoft can be found in Exchange Online documentation.To forward mail to your previous mail system that is routed to Office 365, use the ODME per-user mail forwarding feature as described in the section Setting Up Mail Forwarding. To use the mail forwarding feature, the administrator account must be assigned the “Recipient Management” role, for example:Add-RoleGroupMember “Recipient Manager” -Member [email protected]
Exchange 2010/2013/2016For a local Exchange 2010/2013/2016 On-Premises Relay system, please review the information on https://technet.microsoft.com/en-us/library/aa998825.aspx.
Creating Target MailboxesThe next task in migrating mailboxes from a source email service is to create the target mailboxes they will be migrated to in the target email service. On Demand Migration for Email does not create them for you. The procedure for creating mailboxes varies between email systems, and you should refer to the documentation provided with your system for particular instructions.
Preparing Your Source Email Service for MigrationQuest On Demand Migration for Email currently supports migrating content from the following email services:
On Demand Migration for Email User GuidePreparing Migrations
29
l G Suite
l Sun ONE/iPlanet
l Novell GroupWise
l Microsoft Exchange 2007/2010/2013/2016
l Microsoft Office 365
l POP/Windows Live Hotmail
l IMAP
l Notes/Domino
l Zimbra
G Suite
NOTE: Make sure that the is no limit on the number of messages in an IMAP folder. For that, in Google Settings, click the Forwarding and POP/IMAP tab and check that the Do not limit the number of messages in an IMAP folder (default) option is selected. Otherwise, not all mail items will be migrated.
Connecting to a G Suite source email service from ODME is a two-stage process based on the OAuth 2 protocol. First, users sign in to G Suite directly from ODME with an super administrator account. Once this account has been verified, users then configure API settings in the Google Admin Console to grant ODME web client application access.For detailed instructions, see G Suite.
Sun ONE/iPlanetQuest On Demand Migration for Email uses IMAP to migrate messages and folders from your Sun ONE/iPlanet server to an Office 365 server. The migration engine connects to your on-premises or hosted Sun ONE/iPlanet server as the user you provide that can impersonate all the users in your organization using proxy authentication. To do this, the administrator account needs to be a member of the Domain Administrators group.Sun ONE/iPlanet uses an LDAP directory to hold the user information for the messaging server. Typically, the users for your domain are located in an organizational unit (OU) labeled People and Groups which should be a peer to the People OU. The Domain Administrators group should exist in the Groups OU. Verify that the user that you want to use is listed in the uniqueMember attribute. The value in this attribute will be the distinguished name of the user.Only email is migrated by On Demand Migration for Email from the Sun ONE/iPlanet Messaging Server. Folder structures are maintained including empty folders. Read and Unread flags for messages are maintained for the migration of each user. Because of throttling of Office 365, only 27 mailboxes can be migrated at a time per each administrative account configured for the Office 365 servers.
NOTE: The Sun ONE mail server has undergone several brand name changes. It may also be known as the following:
l iPlanet Messaging Server
l Sun ONE Messaging Server
l Sun Java System Messaging Server
l Oracle Communications Messaging Exchange Server
On Demand Migration for Email User GuidePreparing Migrations
30

Novell GroupWiseOn Demand Migration for Email supports migrations from Novell GroupWise 7.0.4, 8.0.3, 12.0.2, 2014 and 2014 R2.
NOTE: When preparing your Novell GroupWise source email service, the GroupWise Post Office Agent (POA) should be set to restart automatically.
Create the Trusted Application KeyTo migrate data from GroupWise, you need a Trusted Application Key. Options for obtaining this key include:
l Use an existing API Key
l Use Novell ConsoleOne to create the key
l Download the Trusted API key generation tool by clicking http://apolloprodutilities.blob.core.windows.net/apolloprodpubutils/TrustedApplicationKeyUI.Installer.msi.
If your organization is running GroupWise 7, you have to download the generation tool, as your version of Console One does not support creating Trusted API keys. To create a Trusted Application Key in ConsoleOne, complete the following instructions:
1. Select the GroupWise System node on the left-hand pane of ConsoleOne.
2. Go to the Tools menu and select GroupWise System Operations |Trusted Applications.
3. On the Configure Trusted Applications screen, click Create.
4. On the Edit Trusted Application screen, enter the following information:
l Name - The application name.
l Description - An explanation of the application name.
l Requires SSL - SSL is not required, but it is the recommended encryption protocol so that data transmitted over the internet is protected. Check the Requires SSL box to use SSL.
NOTE: ODME supports self-signed SSL certificates. For information on generating a properly formatted self-signed SSL certificate, see Using Self-Signed SSL Certificates.
l Location for key file - Path to the destination folder to hold the generated key.
l Name of key file - The filename of the key file without the directory path.
5. Click OK.
Note the location of this file as you will use the information later to configure your migration.
Configure SSL and the GroupWise Web Service (SOAP)GroupWise SOAP provides server-side access to Novell GroupWise data through a protocol. To use ConsoleOne to configure SSL settings for SOAP, please see the following article: How to configure SSL settings for SOAP in GroupWise Mobile server.
NOTE: There is a known bug in GroupWise 7.0.4 that results in (500) Internal Server Errors when trying to access SOAP. Additional information is outlined in Novell forums here. The fix is to install the following update: http://download.novell.com/Download?buildid=hJh0x5bhIIQ.
On Demand Migration for Email User GuidePreparing Migrations
31
Configure Cloud Access to the GroupWise ServerTo configure Cloud access to the GroupWise Server, complete the following steps:
1. Open the corporate firewall to allow the SOAP information through.
To obtain the current Cloud Service IP addresses, open the About box from the ODME home page:
l North America: https://migration.ondemand.quest.com
l EU: https://migrationeu.ondemand.quest.com
l APJ: https://migrationapj.ondemand.quest.com
2. Test the connection to GroupWise and test SOAP with a browser.
If the GroupWise page is displayed, it is working correctly.
Microsoft Exchange 2007/2010/2013/2016
NOTE: To enable the CPUU integration feature on the source Exchange Server 2007, you should turn on and configure the WebDAV API access for your Exchange Server 2007. For more details, please see Updating Outlook Client Profiles.
Enabling Application Impersonation RightsTo migrate data from Exchange 2007/2010/2013/2016 you need to enable Application Impersonation for the migration administrator account. This allows the migration administrator to impersonate all users on all your client access servers.There are two separate procedures for enabling Application Impersonation rights. For Exchange 2007, do the following:
1. Open the Exchange Management Console.
2. Run the Add-ADPermission cmdlet to add the impersonation permissions on the server for the identified user.
The following example shows you how to set the impersonation permissions on all Client Access servers in an Exchange organization.Get-ExchangeServer | where {$_.IsClientAccessServer -eq $TRUE} | ForEach-Object {Add-ADPermission -Identity $_.distinguishedname -User (Get-User -Identity User1 | select-object).identity -extendedRight ms-Exch-EPI-Impersonation}
NOTE: For more information, refer to the instructions provided by Microsoft on https://msdn.microsoft.com/en-us/library/bb204095(v=exchg.80).aspx.
For Exchange 2010/2013/2016, you will use role based access controls, and create a role group that has Application Impersonation rights.The instructions for Exchange 2010 can be found on https://msdn.microsoft.com/en-us/library/bb204095(v=exchg.140).aspx. For more details about how to configure impersonation in versions of Exchange starting from Exchange 2013, see https://msdn.microsoft.com/en-us/library/office/dn722376(v=exchg.150).aspx.To create a role group for impersonation, use the PowerShell cmdlets from the articles above. The following is a step by step guide for creating the impersonation role and assigning a user to that role.
On Demand Migration for Email User GuidePreparing Migrations
32

1. Logon to your Exchange server, or to a machine that has the Exchange Administration tools installed on it as an Exchange administrator.
2. Run Exchange Management Shell.
3. Run the cmdlet to create the management role group and assign the ApplicationImpersonation role to that group, and then assign the user you want to use as a migration administrator.
In the following example, we are using the user [email protected] -Name MigrationImpersonation -Roles ApplicationImpersonation -Members [email protected]
You can add multiple users using commas to separate each user.
Accessing the Mail ServerTo migrate data from Exchange 2007/2010/2013/2016, make sure that Outlook Web Access (OWA) is accessible from the internet. Quest On Demand Migration for Email uses Exchange Web Services (EWS) to access your mail server from the internet. The OWA server name can be used for accessing your Exchange server with EWS. If you are not using HTTPS for OWA, you will need to enter the full URL for your EWS service which follows the format http://servername/EWS/Exchange.asmx.You can find the URL for your EWS server using PowerShell. From the Exchange Management Shell, execute the following command:
Get-WebServicesVirtualDirectory | Select name, *url* | fl
The EWS server URL will be returned in the ExternalUrl value. To access the mailboxes slated for migration, the migrator needs to have an account with the ApplicationImpersonation role.
Specifying Administrator CredentialsWhen specifying the administrator credentials in the Migration settings screen, the Admin value is the account's UPN or Windows domain login (domain\samAccountName). Click https://technet.microsoft.com/en-us/library/cc756018(WS.10).aspx for more information about adding additional domains for UPNs.It is recommended that you use auto-discovery to obtain the server URL. During a migration, this option uses the specified UPN and password to retrieve the server URL that hosts EWS for the given mailbox. You can also enter the server URL manually.
NOTE: Your Exchange 2007/2010/2013/2016 server must be configured to support auto-discovery before you can use it to obtain the server URL. Click https://technet.microsoft.com/en-us/library/bb201695(EXCHG.80).aspx for more information on the autodiscover service in Exchange 2007. Click https://technet.microsoft.com/en-us/library/bb201695.aspx for information on Exchange 2010 or https://technet.microsoft.com/en-us/library/bb124251(v=exchg.150).aspx for information on Exchange 2013 and Exchange 2016.
If entering the server URL manually, enter the name of your Exchange 2007/2010/2013/2016 server in SSL format (e.g., exchange.example.com). If your server does not support SSL, enter the fully qualified URL for Exchange Web Services (e.g., http://exchange.example.com/EWS/Exchange.asmx).
NOTE: If your server does not support SSL, all mailbox data will be transmitted non-encrypted. Use SSL connections if possible to secure your data. ODME supports self-signed SSL certificates. For information on generating a properly formatted self-signed SSL certificate, seeUsing Self-Signed SSL Certificates.
On Demand Migration for Email User GuidePreparing Migrations
33
Upgrade Throttling Policies (Microsoft Exchange 2010/2013/2016)In order to minimize Exchange throttling impact to migration and to raise the overall migration throughput, we highly recommend to upgrade your throttling policies. Please raise the limits for the following throttling parameters to 'Unlimited':Microsoft Exchange 2013/2016
l EwsMaxConcurrency
l EwsMaxBurst
l EwsRechargeRate
l EwsCutoffBalance
Microsoft Exchange 2010
l EWSPercentTimeInMailboxRPC
l EWSPercentTimeInCAS
l EWSPercentTimeInAD
We recommend to create a custom throttling policy and assign it to all the admin accounts used for your migration.The upgrade can be done for the time of your migration only.
Microsoft Office 365
Enabling Application Impersonation Rights
NOTE: If you use end-user credentials for migration, you do not need to create an administrator account.
To migrate data from Office 365, your administrator account must have an Enterprise Office 365 license and must be assigned to a Role-Based Access Control group that has Application Impersonation rights. By default, no groups have Application Impersonation rights, which means the first step is to sign in as an organization Administrator to the Office 365 portal (http://portal.microsoftonline.com) and either add this right either to an existing role group or to a new role group that you create. See Exchange Online documentation for more information on creating role groups and assigning rights.It is recommended that you create a new role group named "Migration Impersonation" and add the Application Impersonation right to it.Role groups are created in the Role Groups page of the Office 365 portal. After logging in, go to the Options menu, select See All Options.... Then from the Options: Manage Myself menu, select My Organization. Lastly, select the Roles & Auditing item and click New.When connecting to your Office 365 server in the Migration Settings screen, it is recommended you select the auto-discovery option, which uses your login credentials to automatically obtain the server name during a migration. You can also enter the name of your Office 365 server manually as it appears in the address bar when you log in as an administrator to your account.
On Demand Migration for Email User GuidePreparing Migrations
34

NOTE: If using the auto-discovery option, you need to have the proper DNS settings in place. See Exchange Online documentation for more information.
Upgrade Throttling PoliciesIn order to minimize Office 365 throttling impact to migration and to raise the overall migration throughput, we highly recommend to upgrade your Office 365 tenant throttling policies. Please contact Microsoft support with the request to raise the limits for the following throttling parameters to 'Unlimited':
l EwsMaxBurst
l EwsRechargeRate
l EwsCutoffBalance
The upgrade can be done for the time of your migration only.
POP/Windows Live HotmailEnsure that the keep mail on the server option is set. On Windows Live Hotmail, go to Managing your account settings, select POP and deleting downloaded messages and then select the option Don't let another program delete messages from Hotmail. (If your other program is set to delete messages from the server, messages are moved to a special POP folder. They are not deleted.
IMAPEnsure IMAP support is enabled in mail server.
Dovecot Mail ServerTo exclude a specific folder from migration, you should specify the full path to this folder (mail location).By default Dovecot uses the Maildir++ directory layout. This means that all mailboxes are stored in a single directory and prefixed with a dot.Example:
The full path to grandfolder is "Inbox.childfolder2.grandfolder"
On Demand Migration for Email User GuidePreparing Migrations
35
If the file system (fs) layout is enabled in the server, the full path to grandfolder looks like "Inbox/childfolder2/grandfolder".To enable the file system layout, use the following string: mail_location = maildir:~/Maildir:LAYOUT=fs
For more details about the mail location, please see http://wiki2.dovecot.org/MailLocation/Maildir.
Notes/DominoODME provides a web service to access the Domino server. Download the Quest Domino Web Service installer on https://apolloprodutilities.blob.core.windows.net/apolloprodpubutils/DominoWebServiceInstaller.msi.The web service requires that you have IIS installed and Notes Client 7, 8 or 9, which must be run at least one time before running the IIS service that references the Notes CAPI.
NOTE:
l ODME cannot work if IIS uses the default port 443 or 80. Please change the default port to any other available port.
l If you are running an older version of the Quest Domino Web Service, you may receive a notification requiring you to install the latest version before running a migration.
After downloading the installer, run the file DominoWebServiceInstaller.msi. This installs the files to the Quest Software program files directory. It will also create the "Quest Domino Web Service Site" site and the "ODMEDominoWebService" virtual directory in IIS.The configuration of the Quest Domino Web Service is done through appSettings in the service's Web.config. Navigate to the web service's directory (C:\Program Files (x86)\Quest Software), and edit the Web.config. The appSettings are located near the top of the file.
IIS 6 64bit SpecificIf the system is 64bit and uses IIS 6, ODME cannot work by default. IIS 6 64bit can only run 64bit apps, and ODME needs to run as 32bit to access the 32bit Notes C API. The work around for this is to flip IIS to running app pools as 32bit. This will make the server unable to host 64bit apps. Do the following to make IIS run app pools as 32 bit:
NOTE: If you're using IIS 7+, skip this section.
1. Run adsutil.vbs to set the global flag making app pools run as 32bit.
One some machines it will be in %SystemDrive%\Inetpub\AdminScripts. In others it may be in other locations.
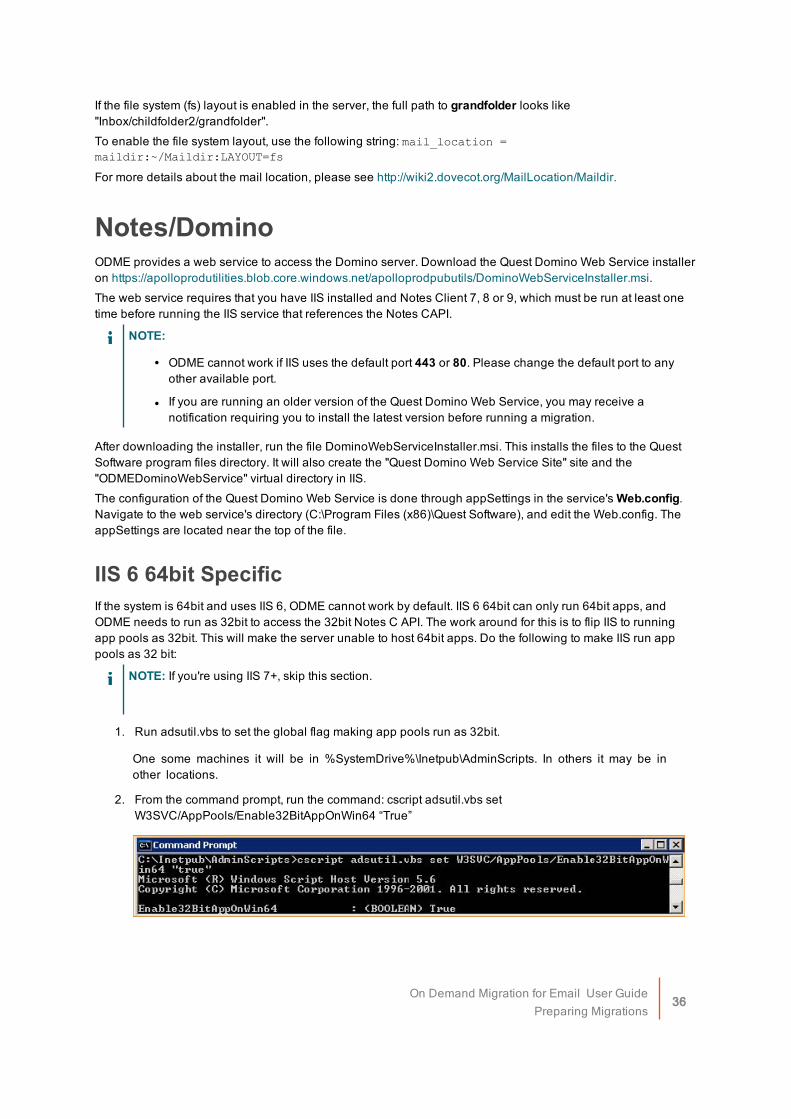
2. From the command prompt, run the command: cscript adsutil.vbs set W3SVC/AppPools/Enable32BitAppOnWin64 “True”
On Demand Migration for Email User GuidePreparing Migrations
36
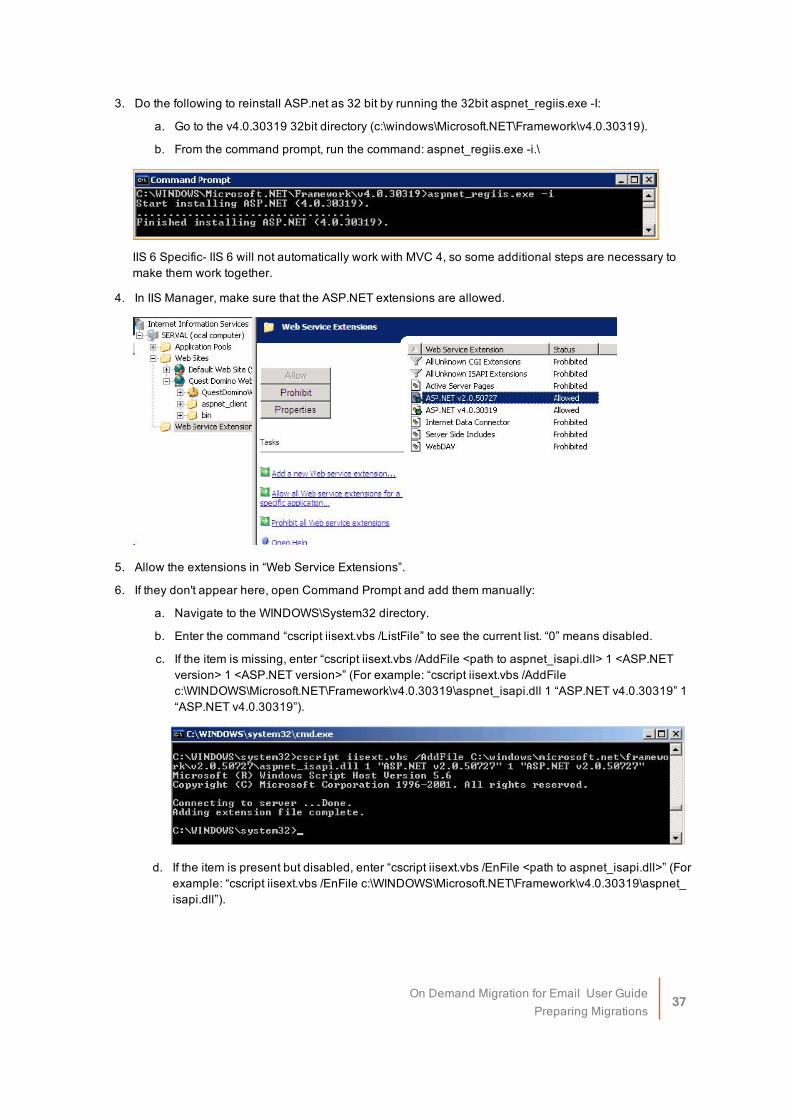
3. Do the following to reinstall ASP.net as 32 bit by running the 32bit aspnet_regiis.exe -I:
a. Go to the v4.0.30319 32bit directory (c:\windows\Microsoft.NET\Framework\v4.0.30319).
b. From the command prompt, run the command: aspnet_regiis.exe -i.\
IIS 6 Specific- IIS 6 will not automatically work with MVC 4, so some additional steps are necessary to make them work together.
4. In IIS Manager, make sure that the ASP.NET extensions are allowed.
5. Allow the extensions in “Web Service Extensions”.
6. If they don't appear here, open Command Prompt and add them manually:
a. Navigate to the WINDOWS\System32 directory.
b. Enter the command “cscript iisext.vbs /ListFile” to see the current list. “0” means disabled.
c. If the item is missing, enter “cscript iisext.vbs /AddFile <path to aspnet_isapi.dll> 1 <ASP.NET version> 1 <ASP.NET version>” (For example: “cscript iisext.vbs /AddFile c:\WINDOWS\Microsoft.NET\Framework\v4.0.30319\aspnet_isapi.dll 1 “ASP.NET v4.0.30319” 1 “ASP.NET v4.0.30319”).
d. If the item is present but disabled, enter “cscript iisext.vbs /EnFile <path to aspnet_isapi.dll>” (For example: “cscript iisext.vbs /EnFile c:\WINDOWS\Microsoft.NET\Framework\v4.0.30319\aspnet_isapi.dll”).
On Demand Migration for Email User GuidePreparing Migrations
37
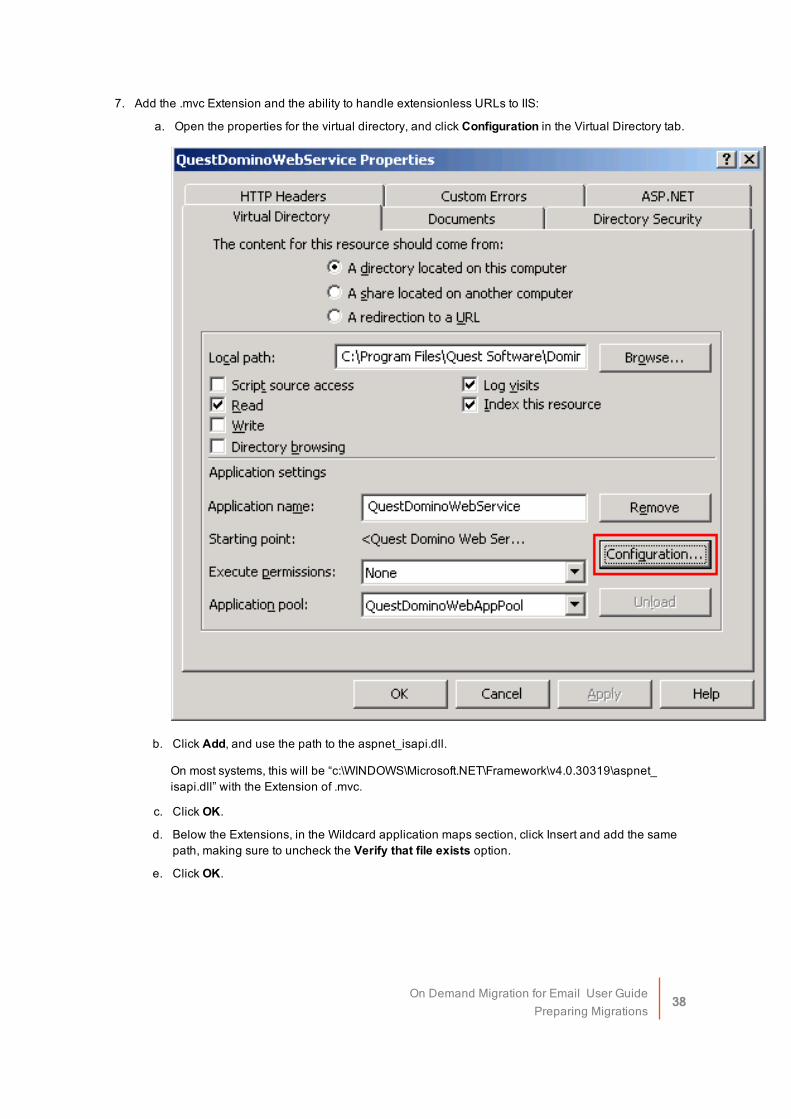
7. Add the .mvc Extension and the ability to handle extensionless URLs to IIS:
a. Open the properties for the virtual directory, and click Configuration in the Virtual Directory tab.
b. Click Add, and use the path to the aspnet_isapi.dll.
On most systems, this will be “c:\WINDOWS\Microsoft.NET\Framework\v4.0.30319\aspnet_isapi.dll” with the Extension of .mvc.
c. Click OK.
d. Below the Extensions, in the Wildcard application maps section, click Insert and add the same path, making sure to uncheck the Verify that file exists option.
e. Click OK.
On Demand Migration for Email User GuidePreparing Migrations
38
Service on Separate Web Server from Domino 1. Copy the Data\Domino\Icons directory from the Domino server's directory to the web server.
As described in the next step, be sure to set the “ImageDir” appSetting.
2. Copy the desired ID file to use for authentication to the web server.
NOTE: The ID file must reside on the same computer as the service. Also, as described in the next step, be sure to set the “IDFile” appSetting.
Service Configuration - Web.config 1. Set the “DominoServer” appSetting in the Web.config to be the name of the Domino server to connect to.
2. Set the “IDFile” appSetting to the path of the desired notes id file that the service should authenticate with.
3. Provide a path for retrieving Domino stock images.
If our service is not on the Domino server, set the “ImageDir” appSetting to the icons folder of the Domino server. If on the same server as the Domino server, this will be the Data\Domino\Icons directory. Otherwise it will be wherever that directory was copied to.Some systems will need to set the “StorageRootDir” appSetting. This tells the service where to store files used for Address Translation. By default it uses the “ProgramData” environment setting to choose a path. If the system does not have that environment variable set, it will require the “StorageRootDir” appSetting to be provided or will fail to complete address translation setup.
4. If desired, change the log4net settings to point to a different directory (defaults to %TEMP%).
5. If you do NOT want to migrate using the MIME method, add the following to the <appSettings> section and restart IIS:<add key="UseMimeMigration" value="false" />
6. To confirm the setup is working, navigate to http://localhost/ODMEDominoWebService/v1/api and if you haven't logged in yet, enter the password for the id file you pointed the service to.
You should see a short, JSON formatted response. This confirms that the service is responding. To ensure that you're getting data out of Notes, you can interact with the service from the browser. The format is <Path to service>/<Path to database>/api/data/collections.For example: http://10.4.160.117:8000/ODMEDominoWebService/v1/Wakko/wingra!!mail/nadminis.nsf/api/data/collections.To interact further with the service, just use the URLs (@href property) provided in the service JSON output.
Service Logging Configuration - Web.configThis section describes the configuration of Quest Domino Web Service using Apache log4net to archive the log files. The configuration of the service is set as shown below:
<appender name="RollingFileOnSize" type="log4net.Appender.RollingFileAppender">
<file type="log4net.Util.PatternString" value="${TEMP}\QuestODMENotesService.log"/>
<appendToFile value="true"/>
On Demand Migration for Email User GuidePreparing Migrations
39
<rollingStyle value="Size"/>
<maximumFileSize value="5000KB"/>
<maxSizeRollBackups value="1000"/>
<lockingModel type="log4net.Appender.FileAppender+MinimalLock"/>
<layout type="log4net.Layout.PatternLayout">
<conversionPattern value="%date [%thread] %level %logger - %message%n"/>
</layout>
</appender>
ParametersThe log is generated while the service is running. The log file is named "QuestODMENotesService.log".
l appendToFile - Appends the current log file to the last log if the parameter is set to "true". Otherwise, the current log will be saved as a new file.
l maximumFileSize - If the size of the log file reaches 5000 KB, the old 5000 KB will be saved as “QuestODMENotesService.log.1” and the new log file will be saved as "QuestODMENotesService.log".
l maxSizeRollBackups - Saves the last 1000 files. If the number of log files reaches 1000, the old files are overwritten. It means that only the least 1000 files are saved. Files are saved as XXX.log.1, XXX.log.2….XXX.log.1000. The newest file is “QuestODMENotesService.log"; the oldest file is "QuestODMENotesService.log.1000".
Only the last 1000 log files*5000 KB (almost 5 GB) are kept. If the size and number of the log files exceed the maximum values, some data will not be available. If you need to keep more logs, change the value of the maxSizeRollBackups parameter.For more details about the log4net configuration, please see http://logging.apache.org/log4net/release/config-examples.html.
Obtain and Install Web Services CertificatesQuest Domino Web Service traffic goes over unsecured HTTP. To secure the traffic, you must set up a secure binding in IIS using a valid certificate.You can obtain a certificate from a public CA, like Verisign or Microsoft Active Directory Certificate Services, if you are using Exchange in a hosted environment.
NOTE: You can request a certificate using Web enrollment pages. For more information, see http://support.microsoft.com/kb/931351. If you need a multi-domain certificate, see Requesting a Certificate from a Public CA.
When you receive the certificate, you must install it on the appropriate server, either directly on a Domino server or on a standalone server.
Requesting and Installing a Certificate Using IIS 7.0
To request a certificate using IIS 7.0:
1. From Internet Information Services, click Server Certificates.
2. From the Actions Pane, select Create Certificate Request.
On Demand Migration for Email User GuidePreparing Migrations
40
3. Enter autodiscover.<smtpdomain> or <smtpdomain> for the primary domain and all required subdomains. Then click Next.
4. Accept the defaults, and click Next.
5. Specify the file name, and click Finish.
Request a certificate using a public CA. For more information, see Requesting a Certificate from a Public CA.
Installing the certificate using IIS 7.0:
1. From Internet Information Services, click Server Certificates.
2. From the Actions Pane, select Complete Certificate Request.
3. Select the saved certificate file, and enter a friendly name for the certificate, then click OK.
4. To create an https binding for the web site using IIS 7.0, do the following:
a. From the Connection pane in IIS, select Default Web Sites.
b. From the Actions pane, select Bindings.
c. Select Add. Select https as the type for a secure site, and enter the IP address and port number.
d. Select the SSL certificate to pass the certificate into the computer account, and click View to view any certificate information.
Requesting and Installing a Certificate Using IIS 6.0
To request a certificate using IIS 6.0:
1. From Internet Information Services (IIS) Manager dialog box, right-click Default Web Site, and select Properties.
2. From the Directory Security tab, select Server Certificate to open the Web Server Certificate Wizard.
3. Click Next.
4. Select Create a new certificate request, and click Next.
5. Select Prepare the request now, but send it later, and click Next.
6. Accept the defaults. Ensure Select cryptographic service provider (CSP) for this certificate is checked, and click Next.
7. Select Microsoft RSA SChannel Cryptographic Provider, and click Next.
8. Select or enter your organization’s name and organizational unit, and click Next.
9. Enter autodiscover.<smtpdomain> —or— <smtpdomain> as the common name, for the primary domain and all required subdomains. Then click Next.
10. Enter the geographical information, and click Next.
11. Specify a file name to save the certificate request, and click Next.
12. Review the information, and click Next. Then click Finish.
13. Request a certificate using a public CA. For more information, see Requesting a Certificate from a Public CA.
On Demand Migration for Email User GuidePreparing Migrations
41
To install the certificate using IIS 6.0:
1. From Internet Information Services (IIS) Manager dialog box, right-click Default Web Site, and select Properties.
2. From the Directory Security tab, select Server Certificate to open the Web Server Certificate Wizard, and click Next.
3. Select Process the pending request and install the certificate, and click Next.
4. Browse to the location of the text file, and click Next.
5. Change the default port 443 or 80 to any other available port, and click Next. Otherwise, ODME cannot work properly.
6. Review the certificate summary. Click Next, then click Finish.
7. From Internet Information Services (IIS) Manager dialog box, right-click Default Web Site, and select Properties.
8. From the Directory Security tab, select Edit.
9. Select the Require secure channel check box, and click OK.
Requesting a Certificate from a Public CATo get a certificate from a public CA, go to the web site of the public CA, and follow their instructions to request a certificate.Now bind your certificate to the HTTPS protocol on the default first website:
1. On the CMN F/B computer, in IIS Manager: Select Default Web Site.
2. In the Actions pane on the right, select Bindings.
3. Select https and click Edit.
4. In the Edit Site Binding window, in the SSL certificate drop-down list:
l Select the certificate you just created.
l Click OK.
TroubleshootingWhen configuring an IIS 7.5 installation on Windows Server 2008 R2, you may receive certain HTTP 500 internal server errors.
Error: HTTP 421 - NOTES.INI not found in pathDo the following if you receive this error:
1. Verify you've run the Notes client at least once.
2. Verify that notes.ini exists in the Local notes client data folder.
3. If still not working, copy Notes.ini from a working client installation.
Error: HTTP 500.19 - Internal Server Error. The requested page cannot be accessed because the related configuration data for the page is invalid.Do the following if you receive this error:
On Demand Migration for Email User GuidePreparing Migrations
42

1. Go to %windir%\system32\inetsrv\config\applicationHost.config.
2. Find the line:
<section name="handlers" overrideModeDefault="Deny" />
And change it to:<section name="handlers" overrideModeDefault="Allow" />
3. Open the IIS manager GUI.
4. Click the top node of the tree on the left side (the one labelled with the machine name).
5. Double-click the item in the centre pane marked “Feature Delegation.”
6. Find the entry marked “Modules” and set the delegation to “Read/Write” using the action links on the right side of the dialog.
Error: HTTP 500.21 - Internal Server Error. Handler "ExtensionlessURHandler-4.0" has a bad module "ManagedPipelineHandler" in its module list.If you receive this error, you may need to re-register ASP.NET. To do this, open a command line and enter the following:
CD %WINDIR%\Microsoft.NET\Framework\v4.0.30319
aspnet_regiis -i
IISRESET
Error: Migrations for certain users from Domino source fail immediately with (500) Internal Server Error.Possible Solutions:
l Verify the admin account being used is a member of a group that has access to affected mailboxes
l If the mailbox(es) live on a different Domino server, ensure that connection documents exist between the servers. This issue can be tested for by attempting to open the affected mailbox on the Domino server that the Quest Domino Web Service is installed on.
Zimbra For Zimbra 8 source systems, make sure that the following configuration settings are enabled at the server level as well as for each user account:
Major Features l Mail
l Address Book
l Calendar
l Tasks
On Demand Migration for Email User GuidePreparing Migrations
43
Mail Features l IMAP Access
l External IMAP Access
ODME uses a combination of IMAP and Zimbra's SOAP API to migrate data. Generally, IMAP is enabled for every user by default, but if not it must be enabled. The default IMAP ports are same as any IMAP-based server (143 and 993 using SSL). The default ports for Zimbra are port 7071 for the admin connection and port 80 for the normal connection. The admin connection is only used to configure impersonation for the mailbox being migrated. Once the mailbox is successfully impersonated, ODME uses a regular SOAP connection on port 80 for the rest of the SOAP calls. You can change port numbers if needed. You can also enable SSL on each connection.
Preparing Your Target Email Service for MigrationBefore you do any migrations, you need to configure your target email service.On Demand Migration for Email currently supports migrating content to the following target email services:
l Microsoft Office 365
l Microsoft Exchange 2010/2013/2016
Microsoft Office 365
Enabling Application Impersonation Rights
NOTE: If you use end-user credentials for migration, you do not need to create an administrator account.
To migrate data to Office 365, your administrator account must have an Enterprise Office 365 license and must be assigned to a Role-Based Access Control group that has Application Impersonation rights. By default, no groups have Application Impersonation rights, which means the first step is to sign in as an organization administrator to the Office 365 portal (http://portal.microsoftonline.com) and either add it to an existing role group or to a new role group that you create. See Exchange Online documentation for more information on creating role groups and assigning rights.It is recommended that you create a new role group named "Migration Impersonation" and add the Application Impersonation right to it.Role groups are created in the Role Groups page of the Office 365 portal. After logging in, go to the Options menu, select See All Options.... Then from the Options: Manage Myself menu, select My Organization. Lastly, select the Roles & Auditing item and click New.When connecting to your Office 365 server in the Migration Settings screen, it is recommended you select the auto-discovery option, which uses your login credentials to automatically obtain the server name during a migration. You can also enter the name of your Office 365 server manually as it appears in the address bar when you log in as an administrator to your account.
On Demand Migration for Email User GuidePreparing Migrations
44
NOTE: If using the auto-discovery option, you need to have the proper DNS settings in place. See Exchange Online documentation for more information.
ProvisioningBefore creating new user accounts on your Office 365 server, consider how these new accounts should be managed in the future and what implications this will have on mail routing. Mail routing is discussed in the Mail Routing section of the help.Account that is used to migrate Office 365 F1 users must have Application Impersonation rights. If you have only end-user credentials, Migration of Office 365 F1 users is not supported.If you are migrating from on-premises Exchange server, you should consider using the directory synchronization tools that will push your local Active Directory users over to the Office 365 server. For more details about how to convert mail-enabled users created by Microsoft directory synchronization tool to mailbox-enabled users, please see the following article https://msdn.microsoft.com/en-us/library/azure/hh967617.aspx.If you are migrating from G Suite, you will need to create users manually using the bulk import in the Administrator control panel or use PowerShell cmdlets, for more help with PowerShell, See Exchange Online documentation.
Upgrade Throttling PoliciesIn order to minimize Office 365 throttling impact to migration and to raise the overall migration throughput, we highly recommend to upgrade your Office 365 tenant throttling policies. Please contact Microsoft support with the request to raise the limits for the following throttling parameters to 'Unlimited':
l EwsMaxBurst
l EwsRechargeRate
l EwsCutoffBalance
The upgrade can be done for the time of your migration only.
Disable In-Place Hold and Litigation HoldIn order to prevent the excessive growth of Recoverable Items folder which can lead to its size quota exceeding and consequent migration stop, we highly recommend to turn off In-Place Hold and Litigation Hold for every migrated mailbox for the time of migration.Why do I need to do it?If a user who is placed on In-Place Hold or Litigation Hold modifies specific properties of a mailbox item, a copy of the original mailbox item is created before the changed item is written. The original copy is saved in the Recoverable Items folder. This process is known as "copy-on-write" page protection. The "copy-on-write" page protection applies to items residing in any mailbox folder.Due to supported mail systems heterogeneity, ODME creates messages in a staged manner to ensure content fidelity. In case of a message with several attachments, the number of stages is not less than a number of attachments. First, the empty message is created, then the attachments are uploaded one by one. For each of this stage or action, the copy of a message is put into the Recoverable Items folder. It leads to excessive growth of the Recoverable Items folder as the automatic purging of this folder is disabled when a mailbox is in the In-Place Hold and Litigation Hold state.Please refer to Microsoft KB article for details: https://technet.microsoft.com/en-us/library/ee364755.aspx#hold.
On Demand Migration for Email User GuidePreparing Migrations
45
Microsoft Exchange 2010/2013/2016
Enabling Application Impersonation RightsTo migrate data to Exchange 2010/2013/2016, your administrator accounts must have Application Impersonation rights, which means that the accounts must be assigned to a Role-Based Access Control group that has Application Impersonation rights. Because no groups have Application Impersonation rights by default, you need to add Application Impersonation rights to an existing group or create a new group. You have to do this using the Exchange Management Shell with PowerShell cmdlets. The cmdlets to run can be found at https://msdn.microsoft.com/en-us/library/bb204095(v=exchg.140).aspx.To create a role group for impersonation, use the PowerShell cmdlets from the article above.To create the Impersonation role and assigning a user to that role, use the following procedure.
1. Logon to your Exchange server, or to a machine that has the Exchange Administration tools installed on it as an Exchange administrator.
2. Run Exchange Management Shell.
3. Run the cmdlet to create the management role group and assign the ApplicationImpersonation role to that group, and then assign the user you want to use as a migration administrator.
In the following example, we are using the user [email protected] -Name MigrationImpersonation -Roles ApplicationImpersonation -Members [email protected]
You can add multiple users using commas to separate each user.
Accessing the Mail ServerMake sure that Outlook Web Access (OWA) is accessible from the internet. Quest On Demand Migration for Email uses Exchange Web Services (EWS) to access your mail server from the internet. The OWA server name can be used for accessing your Exchange server with EWS. If you are not using HTTPS for OWA, you will need to enter the full URL for your EWS service which follows the format http://servername/EWS/Exchange.asmx.
You can find the URL for your EWS server using PowerShell. From the Exchange Management Shell, execute the following command:
Get-WebServicesVirtualDirectory | Select name, *url* | fl
The EWS server URL will be returned in the ExternalUrl value. To access the mailboxes slated for migration, the migrator needs to have an account with the ApplicationImpersonation role.
ProvisioningBefore creating new user accounts on your on-premises Exchange 2010/2013/2016 server, consider how these new accounts should be managed in the future and what implications this will have on mail routing. Mail routing is discussed in the Mail Routing section of the help.If you are migrating from an on-premises Exchange server, go to the Microsoft TechNet library located on https://technet.microsoft.com/en-us/library/aa995902.aspx and follow the upgrade instructions specific your version of Exchange under the "Planning and Deployment" section.If you are migrating from G Suite, you must create users manually either by using the bulk import in the Exchange Management Console or by using PowerShell cmdlets. For more help with bulk account creation, see
On Demand Migration for Email User GuidePreparing Migrations
46
the instructions for importing CSV files on https://technet.microsoft.com/en-us/library/dd347665.aspx, and how to add mailboxes on https://technet.microsoft.com/en-us/library/aa997663.aspx. To see how PowerShell cmdlets work together, go to https://social.technet.microsoft.com/Forums/exchange/en-US/480078a8-e017-44d1-8ce5-13c87e0a660b/exchange-2010-importcsv-to-create-new-users-and-include-their-passwords?forum=exchange2010.
Upgrade Throttling PoliciesIn order to minimize Exchange throttling impact to migration and to raise the overall migration throughput, we highly recommend to upgrade your throttling policies. Please raise the limits for the following throttling parameters to 'Unlimited' or to the highest possible values:Microsoft Exchange 2013/2016
l EwsMaxConcurrency
l EwsMaxBurst
l EwsRechargeRate
l EwsCutoffBalance
Microsoft Exchange 2010
l EWSPercentTimeInMailboxRPC
l EWSPercentTimeInCAS
l EWSPercentTimeInAD
We recommend to create a custom throttling policy and assign it to all the administrator accounts used for your migration.The upgrade can be done for the time of your migration only.
Disable In-Place Hold and Litigation HoldIn order to prevent the excessive growth of Recoverable Items folder which can lead to its size quota exceeding and consequent migration stop, we highly recommend to turn off In-Place Hold (not applicable to Exchange 2010) and Litigation Hold for every migrated mailbox for the time of migration.Why do I need to do it?If a user who is placed on In-Place Hold or Litigation Hold modifies specific properties of a mailbox item, a copy of the original mailbox item is created before the changed item is written. The original copy is saved in the Recoverable Items folder. This process is known as "copy-on-write" page protection. The "copy-on-write" page protection applies to items residing in any mailbox folder.Due to heterogeneity of mail systems, ODME creates messages in a staged manner to ensure content fidelity. In case of a message with several attachments, the number of stages is not less than a number of attachments. First, the empty message is created, then the attachments are uploaded one by one. For each of this stage or action, the copy of a message is put into the Recoverable Items folder. It leads to the excessive growth of the Recoverable Items folder as the automatic purging of this folder is disabled when a mailbox is in the In-Place Hold and Litigation Hold state.Please refer to the following Microsoft KB articles:
l For Exchange 2016: https://technet.microsoft.com/en-us/library/ee364755.aspx#hold
l For Exchange 2013: https://technet.microsoft.com/en-us/library/ee364755(v=exchg.150).aspx#hold
On Demand Migration for Email User GuidePreparing Migrations
47

l For Exchange 2010: https://technet.microsoft.com/en-us/library/ee364755(v=exchg.141).aspx
On Demand Migration for Email User GuidePreparing Migrations
48

Test and Pilot MigrationsAny full scale migration should be preceded by test and pilot migrations, to confirm that your migration processes and procedures will accommodate the organization requirements.
l A test migration uses real users and real data in a segregated test environment, or dummy users and dummy data in your live production environment.
l A pilot migration uses a small portion of real users and real data in the live production environment.
In either case - a test or pilot migration - the data to be migrated should be a representative sample of the production data, and the test or pilot migration should be run with the Quest applications set for the same configuration and process options that you intend to use for the production migration. it is recommended to select test or pilot users whose usage and data types make them representative of the total user population. Then run the migration for those users, just as you have defined the process in your migration planning. When the migration is completed, review application log file for errors and warnings, if any. See Viewing Migration Reports section for more information.Quest recommends that you use both test and pilot migrations:
1. Perform one or more test migrations in a separate test environment, migrating test copies of real users and their real data. The separate test environment ensures that no test process will affect the data or configurations of your production environment. If a test exposes any problems under migration, you can make amendments and then repeat the test by simply dumping the test environment and recreating it from scratch.
2. When you are confident that your test migrations have sufficiently refined your planned migration, perform a pilot migration for 20 or 30 users to verify if your planned migration is satisfactory for your "real world."
On Demand Migration for Email User GuideTest and Pilot Migrations
49
Configuring and Running Migrations
Creating a Migration PlanA migration plan saves in a reusable format all the configuration details of a migration, including its connection properties, source and target mailboxes, and optional parameters. When you first log in to On Demand Migration for Email, you are prompted to specify a name for your first migration plan.Instead of creating the migration plan from scratch, you can also create it from a template that specifies the connection properties and optional parameters for the migration. Once a migration plan is created from a template, you only need to add the mailboxes you want to migrate (you can also edit the target connection and the date filter, if necessary). For a step by step procedure to create a migration plan from scratch or using a template, see Getting Started for New Users. For more information about the migration template, see Managing Migration Templates.You can copy migration plans and then edit those copies to create other migration plans. This spares you the task of specifying the same set of values if you want to run multiple migrations that share certain configuration details and mailboxes. For example:
l If certain mailboxes fail to migrate when you first run a migration, you can quickly create a new migration plan which only includes the mailboxes that failed to migrate the first time.
l If you are planning to migrate a large number of mailboxes, you can divide the workload into more manageable segments or among different migrators.
l If you want to migrate more than 100 mailboxes concurrently, you can create multiple migration plans with different administrator accounts and run them simultaneously. For more information, review information in Connecting to Email Services.
DashboardMigration plans are viewed and managed in the Dashboard, which you open by clicking the Dashboard link in the breadcrumb bar.The Dashboard displays the configuration settings of each migration plan and includes links pointing to the Connections, Mailboxes, Options, and Migrate tabs. To edit a migration plan, click the appropriate link to open the tab you want, make your changes, and then save the migration plan.Migration plans that were created from a template, or copied from a plan that was previously created using a template, have a subtitle "Created from [template_name]" on the Dashboard page. To view the template details, click the template name. If the template has been deleted, you will see an alert dialog box.
On Demand Migration for Email User GuideConfiguring and Running Migrations
50

Copying Migration PlansTo copy a migration plan:
1. Do one of the following:
l Open the Dashboard and click Copy.
l Open the Migrate tab and click Copy Migration Plan.
2. Specify a name for the copied migration plan.
By default, all the configuration details and mailboxes of the original migration plan are selected to be copied.
3. De-select the configuration details you do not want to copy and de-select the migration status of any mailbox you do not want to include in the new migration plan.
For example, if you want to create a migration plan that only includes mailboxes that failed to migrate in the original migration plan, you would keep the same connection properties and options and de-select all the mailbox statuses except Failed.
If the source migration plan was created using a template, all the Connections and Options fields will be selected to copy by default and grayed out.
4. Click Copy.
5. Edit the new migration plan as needed.If the source migration plan was created using a template, the new plan will keep the connection properties and optional parameters specified by the template, as well as the same read only fields with the source plan.
Managing Migration TemplatesThe migration template facilitates the creation of migration plan by specifying the connection properties and optional parameters for the migration. The migration template can be only created from an existing migration plan:
1. On the Dashboard page, select a migration plan from which you want to create a template, and click Save as Template.
2. In the Save as Template dialog box, specify a name for the template.
3. (Optional) To copy the connections and options from the migration plan, select the corresponding check boxes.
4. Click Save.
To view all of your existing templates and manage them, click Manage Templates in the Dashboard page to open the Manage Templates page where you can edit, delete or create a plan from a template.On Demand Migration for Email provides an audit trail of these activities on the templates with audit logs:
l Creating, editing, deleting a template
l Creating a migration plan from a template
To view the audit log, click Download Audit Logs on the page to save it as a .csv file.
On Demand Migration for Email User GuideConfiguring and Running Migrations
51

NOTE: You must have the "Manage Templates" permissions to create, edit, delete a template and download audit logs. Without these rights, you can only view the template or create a plan from it.For existing customers: "Manage Templates" permission is not set by default. Use ODME administrative account to create a new role and assign this permission to users in the On Demand portal. Then you need to log out and log in again to apply the new permission.Editing or deleting a template will not affect any migration plans that were created from that template. Changes to the template affect only those migration plans that are created subsequent to the changes.
Connecting to Email ServicesTo set up a migration, you must specify the connection properties for your source email service and target email service. This is done in the Connections tab.When connecting to email services, be aware of the following:
l For all email services except G Suite and Sun ONE/iPlanet, you can connect to an email service either by specifying the login credentials of an administrator account, or you can select the option to migrate using the end-user credentials of each mailbox (source or target or both). If you select the Use end-user credentials option, you must specify the password for each mailbox when you add them to the migration plan, as described in the section, Adding Mailboxes.
NOTE: Connecting to POP and IMAP email services is always done through end-user credentials.
l Each mailbox in a source email service can be migrated successfully a total of 10 times with a maximum extraction limit of 50 GB across all migrations. This includes mailboxes that have 10 different date filters. This limit applies even if the 10 migrations do not migrate the same message more than once.
l For each Microsoft-based email service, a total number of mailboxes that can be migrated concurrently is limited per administrator (G Suite, Sun ONE/iPlanet, Notes/Domino, and GroupWise have no such limitation). For details, see topic below.
Connecting to the Source Email ServiceRefer to the sections below for instructions specific to your source email service.
G SuiteSun ONE/iPlanetNovell GroupWiseMicrosoft Exchange 2007/2010/2013/2016Microsoft Office 365Windows Live HotmailPOPIMAPNotes/DominoZimbra
G SuiteConnecting to a G Suite source email service from ODME is a two-stage process based on the OAuth 2 protocol:
On Demand Migration for Email User GuideConfiguring and Running Migrations
52

First, sign in with a super admin account so that ODME can verify your access.Once this account has been verified, configure API settings in the Google Admin Console to grant access to ODME's service account.
IMPORTANT: Be aware of the following:
l The OAuth 2 protocol used to connect to a G Suite email service replaces the OAuth Consumer Key and Consumer Secret method used in previous versions of ODME. Any connections to G Suite in migration plans created prior to ODME version 1.7 must be updated with the OAuth 2 connection procedure described below.
l IMAP must be enabled at the Organization level for ODME to connect to G Suite and run migrations.
Signing In
To sign in to G Suite:
1. In the System field, select Google G Suite.
NOTE: If running a migration plan created prior to ODME 1.7, the System Field displays Google G Suite (deprecated), meaning the connection properties used to connect to G Suite in previous versions of ODME no longer apply. Click Upgrade to update the connection properties.
2. Click Sign in to Google.
This opens the standard Google sign in UI.
3. Follow the Google prompts to sign in as a user with super admin rights and to grant ODME access permissions.
After completing the G Suite sign in process, ODME verifies that the user is a super admin (You will see a green success message once the sign-in process is complete). At this point you are redirected back to the ODME Connections tab, which now displays your super admin's username.
NOTE: The Change User link allows the user to sign in as a different super admin and migrate from another G Suite account.
Configuring API AccessODME connects to Google's APIs using an OAuth 2.0 service account. This account is identified by a client name shown on the Connections screen after you sign into G Suite. Below the client name is a set of URLs (called scopes) that represent the APIs ODME will access. You need to add the client name and scopes to the Google admin console to allow ODME to retrieve data using these APIs.
To Configure API Access:
1. In the Connections tab, use the Copy to Clipboard links to copy the values in the Client Name and API Scopes fields.
2. Click Manage Google API Client Access.
This opens the page in the Google Admin console.
NOTE: If the proper page is not displayed, from the admin console home page, go to the Security section (If not shown, its icon may be in the More Controls drawer at the bottom of the screen.) Click the Show More link and then select Advanced Settings. Finally, click the Manage API Client Access link.
On Demand Migration for Email User GuideConfiguring and Running Migrations
53

Paste the text copied from the Client Name and API Scopes fields in the Connections tab to their respective fields in the Google Admin console. Then click Authorize.
CAUTION: You may receive connection validation and migration errors if API scopes are not granted correctly and if certain mail item API are turned off at the domain level or for particular mailboxes. To resolve this, make sure that all the scopes have been granted and enable all mail item migrations for all mailboxes. However, if you want to turn off migrations for particular mail items, such as Calendars or Contacts, uncheck the mail item in its migration types, and ODME will no longer validate that API connection or migrate the item. If a mail item is turned off, you have several choices:
l Leave the mail item turned off (item will not migrate)
l If the mail item is disabled at the domain level, enable it for the entire domain
l If the mail item is disabled for particular users:
l Enable the item for those users
l Move those users into a new plan that has item turned off.
Sun ONE/iPlanetIMPORTANT: You cannot use end-user credentials to connect to a Sun ONE/iPlanet email service.
Specify the following values to connect to your Source ONE/iPlanet source email service:
l Server Name— Enter the location of the Sun ONE/iPlanet server as appears in the address bar when you log in as an administrator to your account.
l Port — Enter the Sun ONE/iPlanet server port number.
l Use SSL — If your server does not support SSL, all mailbox data will be transmitted non-encrypted. Use SSL connections if possible to secure your data. ODME supports self-signed SSL certificates.
NOTE: For information on generating a properly formatted self-signed SSL certificate, see Using Self-Signed SSL Certificates.
l Use end-user credentials — Select this option if you want to connect to the email service using the passwords for each mailbox instead of the credentials of the administrator account. If selected, you must specify the password for each source mailbox. For more information, see Adding Mailboxes.
l Admin User Name and Password — The name and password of the administrator account.
To migrate data from Sun ONE/iPlanet, your administrator account must have FullAccess rights to all mailboxes.
Novell GroupWise
NOTE: When connecting to your GroupWise source email service, be aware of the following:
l On Demand Migration for Email supports GroupWise 7.0.4, 8.0.3, 12.0.2, 2014 and 2014 R2.
l Certain mailbox items cannot be migrated or are migrated with limitations. For more information, see Known Issues and Limitations.
Specify the following values to connect to the GroupWise source email service:
On Demand Migration for Email User GuideConfiguring and Running Migrations
54

l Server Name — The name of the GroupWise Server running the Post Office Agent (POA) that hosts the SOAP services (in the format server.example.com). The mailboxes to be migrated must be reachable from this POA. If you are using SSL, select the Use SSL option.
l Port — The Web Service port number
l Use SSL —Select this option If you are using SSL and enter the name of your GroupWise server manually in SSL format (server.example.com). ODME supports self-signed SSL certificates.
NOTE: For information on generating a properly formatted self-signed SSL certificate, see Using Self-Signed SSL Certificates.
l Use end-user credentials — Select this option if you want to connect to the email service using the passwords for each mailbox instead of the App Name and API Key. If selected, you must specify the password for each source mailbox. For more information, see Adding Mailboxes.
l App Name — The value from the Name field that you specified when creating your trusted key in ConsoleOne. On Demand Migration for Email uses the GroupWise Trusted Key API to access the mailboxes that are migrated.
To grant ODME access to all your GroupWise mailboxes you need to create a Trusted API key using Console One, or by downloading the Trusted API key generation tool by clicking http://apolloprodutilities.blob.core.windows.net/apolloprodpubutils/TrustedApplicationKeyUI.Installer.msi. If your organization is running GroupWise 7, you have to download the generation tool, as your version of Console One does not support creating Trusted API keys. For information on creating a Trusted API key, see Create the Trusted Application Key.
l API Key — The value of the trusted key found in the file created when you generated the Trusted Application key using ConsoleOne.
Microsoft Exchange 2007/2010/2013/2016Specify the following values to connect to your Exchange 2007/2010/2013/2016 source email service:
l Server URL— You can enter the URL of the Exchange 2007/2010/2013/2016 server manually, or you can use the auto-discovery option.
If you are not using HTTPS for Outlook Web Access (OWA), enter the full URL for your EWS service, e.g., http://servername/EWS/Service.ASMX.
NOTE:For Exchange Server 2007 only: To enable the CPUU integration feature on the source Exchange Server 2007, you should turn on and configure WebDAV API access on your source Exchange Server 2007. For more details, see Updating Outlook Client Profiles.
If you are using SSL, enter the name of your Exchange 2007/2010/2013/2016 server manually (e.g., exchange.example.com).
NOTE: If your server does not support SSL, all mailbox data will be transmitted non-encrypted. Use SSL connections if possible to secure your data. ODME supports self-signed SSL certificates. For information on generating a properly formatted self-signed SSL certificate, see Using Self-Signed SSL Certificates.
l Use auto-discovery — Use auto-discovery to obtain the server URL. During a migration, this option uses the specified user name and password to retrieve the server URL that hosts your Exchange Web Services (EWS) server for the given mailbox.
If you are having problems with auto-discovery, you can test your external connectivity using a free tool from Microsoft. The following website can be used to validate if your services are working properly. Please go to https://www.testexchangeconnectivity.com to test your Exchange connectivity.
On Demand Migration for Email User GuideConfiguring and Running Migrations
55

l Use end-user credentials — Select this option if you want to connect to the email service using the passwords for each mailbox instead of the credentials of the administrator account. If selected, you must specify the password for each source mailbox. For more information, see Adding Mailboxes.
l Admin User Name and Password — The name and password of the administrator account.
The Admin User Name value is the account's UPN or domain credentials (e.g., domain\username). For more information about UPNs and how to determine which domain you are using for your users, please see Active Directory naming on the Microsoft Technet site.
Microsoft Office 365Specify the following values to connect to the Office 365 source email service:
l Server Name — You can enter the name of the Office 365 server as it appears in the address bar when you log in as an administrator to your account, or you can use the auto-discovery option.
l Use auto-discovery — It is recommended that you use auto-discovery to obtain the name of your Office 365 server.
Auto-discovery uses your login credentials to automatically obtain the server name during a migration. With auto-discovery, On Demand Migration for Email connects directly to the Office 365 auto-discovery endpoints, meaning that you don't have to configure your DNS to take advantage of auto-discovery. You do need to make sure that all your mailboxes exist in Office 365 before migrating data into them.
l Use end-user credentials — Select this option if you want to connect to the email service using the passwords for each mailbox instead of the credentials of the administrator account. If selected, you must specify the password for each source mailbox. For more information, see Adding Mailboxes.
l Admin User Name and Password — The name and password of the administrator account.
To migrate data to Office 365, your administrator account must have Application Impersonation rights, which means the account must be assigned to a Role-Based Access Control group that has Application Impersonation rights. For more information, see Preparing Your Source Email Service for Migration.
Windows Live HotmailThe values used to connect to the Windows Live Hotmail source email service are configured automatically by ODME.
POPSpecify the following values to connect to the POP source email service:
l Server Name — Enter the location of the POP server.
l Port — Enter the POP server port number
l Use SSL —If your server does not support SSL, all mailbox data will be transmitted non-encrypted. Use SSL connections if possible to secure your data. ODME supports self-signed SSL certificates.
NOTE: For information on generating a properly formatted self-signed SSL certificate, see Using Self-Signed SSL Certificates.
On Demand Migration for Email User GuideConfiguring and Running Migrations
56

IMAPSpecify the following values to connect to the IMAP source email service:
l Server Name — Enter the location of the IMAP server.
l Port — Enter the IMAP server port number
l Use SSL —If your server does not support SSL, all mailbox data will be transmitted non-encrypted. Use SSL connections if possible to secure your data. ODME supports self-signed SSL certificates.
NOTE: For information on generating a properly formatted self-signed SSL certificate, see Using Self-Signed SSL Certificates.
Notes/DominoSpecify the following values to connect to the Quest Domino Web Service:
l ODME Service URL — Enter the path to the web service, including version, i.e., “Server12/ODMEDominoWebService/v1/”.
To grant ODME access to all your Notes mailboxes, you need to install on your Domino server Quest Domino Web Service, found on https://apolloprodutilities.blob.core.windows.net/apolloprodpubutils/DominoWebServiceInstaller.msiFor installation instructions, refer to the documentation provided by IBM Notes.
l Port — Enter the web service port number.
If you leave :8080 off, then it defaults to port 80.
l Use end-user credentials — Select this option if you want to connect to the email service using the passwords for each mailbox instead of password of the ID file. If selected, you must specify the password for each source mailbox. For more information, see Adding Mailboxes.
NOTE: Be aware of the following:
l If selected, mail is migrated using IMAP. Contacts, calendars, and tasks are not migrated.
l The Quest Domino Web Service is not required for this option, meaning just the server URL/IP can be used (no WebService path)
l Password — The password that matches the specified ID file configured when installing in the ODME-provided web service.
ZimbraODME uses a combination of IMAP and Zimbra's SOAP API to migrate data. Specify the following values to connect to your Zimbra source email service.
IMAP Settings l Server Name — Enter the location of the IMAP server. Depending on your configuration, this may be the
same location as the SOAP API server but with different port numbers.
l Port — Enter the IMAP server port number. The default is 143 (993 using SSL).
On Demand Migration for Email User GuideConfiguring and Running Migrations
57

l Use SSL — If your server does not support SSL, all mailbox data will be transmitted non-encrypted. Use SSL connections if possible to secure your data. ODME supports self-signed SSL certificates.
NOTE: For information on generating a properly formatted self-signed SSL certificate, see Using Self-Signed SSL Certificates.
l Use end-user credentials — Select this option if you want to connect to the email service using the passwords for each mailbox instead of the credentials of the administrator account. If selected, you must specify the password for each source mailbox. For more information, see Adding Mailboxes.
l Admin User Name and Password — The name and password of the administrator account.
SOAP API Settings l Server Name — Enter the location of the SOAP API server. Depending on your configuration, this may
be the same location as the IMAP server but with different port numbers.
l Admin Port — Enter the port number for the admin connection to the SOAP API server. The admin connection is used for impersonation only. The default is 7071.
l Port — Enter the SOAP API server port number. The SOAP connection is used for all non-IMAP migrations. The default is 80.
l Use SSL — If your server does not support SSL, all mailbox data will be transmitted non-encrypted. Use SSL for both your admin connection and normal connection if possible to secure your data. ODME supports self-signed SSL certificates.
NOTE: For information on generating a properly formatted self-signed SSL certificate, see Using Self-Signed SSL Certificates.
l Admin User Name and Password — The name and password of the administrator account.
Connecting to the Target Email ServiceRefer to the sections below for instructions specific to your target server.
l Microsoft Office 365
l Microsoft Exchange 2010/2013/2016
l Using Self-Signed SSL Certificates
Microsoft Office 365Specify the following values to connect to the Office 365 target email service:
l Server Name — You can enter the name of the Office 365 server as it appears in the address bar when you log in as an administrator to your account, or you can use the auto-discovery option.
l Use auto-discovery — It is recommended that you use auto-discovery to obtain the name of your Office 365 server.
Auto-discovery uses your login credentials to automatically obtain the server name during a migration. With auto-discovery, On Demand Migration for Email connects directly to the Office 365 auto-discovery endpoints, meaning that you don't have to configure your DNS to take advantage of auto-discovery. You do need to make sure that all your mailboxes exist in Office 365 before migrating data into them.
On Demand Migration for Email User GuideConfiguring and Running Migrations
58
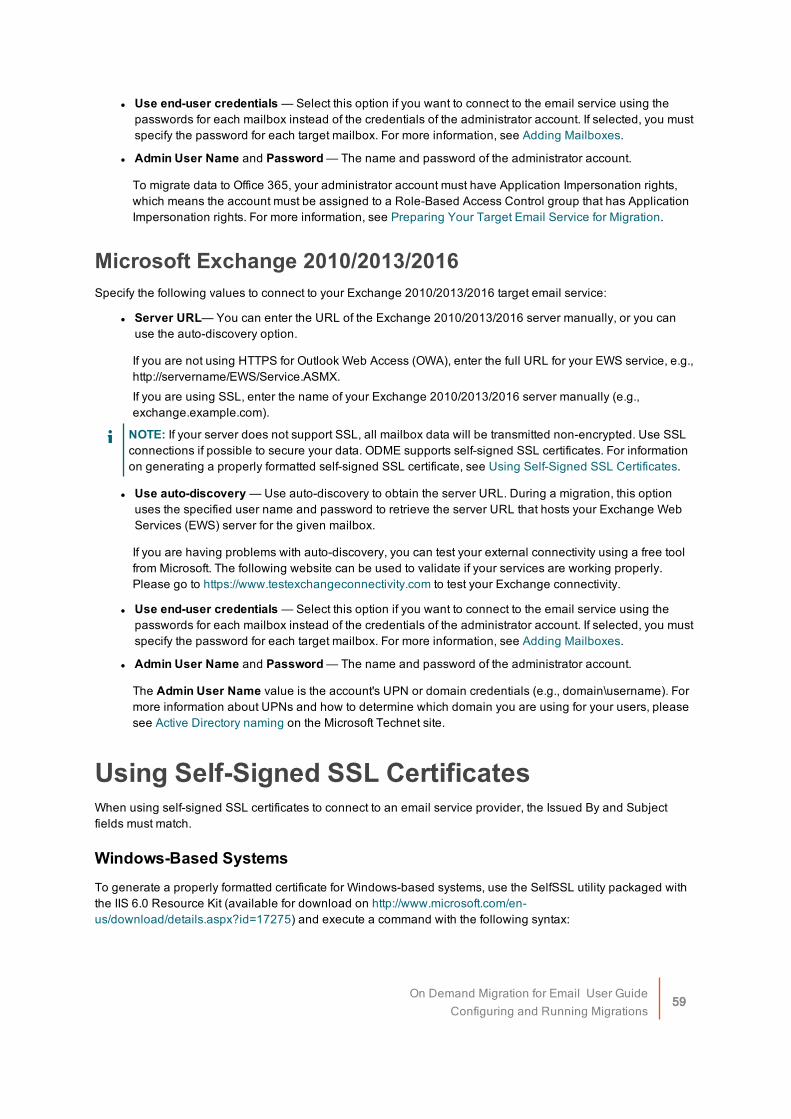
l Use end-user credentials — Select this option if you want to connect to the email service using the passwords for each mailbox instead of the credentials of the administrator account. If selected, you must specify the password for each target mailbox. For more information, see Adding Mailboxes.
l Admin User Name and Password — The name and password of the administrator account.
To migrate data to Office 365, your administrator account must have Application Impersonation rights, which means the account must be assigned to a Role-Based Access Control group that has Application Impersonation rights. For more information, see Preparing Your Target Email Service for Migration.
Microsoft Exchange 2010/2013/2016Specify the following values to connect to your Exchange 2010/2013/2016 target email service:
l Server URL— You can enter the URL of the Exchange 2010/2013/2016 server manually, or you can use the auto-discovery option.
If you are not using HTTPS for Outlook Web Access (OWA), enter the full URL for your EWS service, e.g., http://servername/EWS/Service.ASMX.If you are using SSL, enter the name of your Exchange 2010/2013/2016 server manually (e.g., exchange.example.com).
NOTE: If your server does not support SSL, all mailbox data will be transmitted non-encrypted. Use SSL connections if possible to secure your data. ODME supports self-signed SSL certificates. For information on generating a properly formatted self-signed SSL certificate, see Using Self-Signed SSL Certificates.
l Use auto-discovery — Use auto-discovery to obtain the server URL. During a migration, this option uses the specified user name and password to retrieve the server URL that hosts your Exchange Web Services (EWS) server for the given mailbox.
If you are having problems with auto-discovery, you can test your external connectivity using a free tool from Microsoft. The following website can be used to validate if your services are working properly. Please go to https://www.testexchangeconnectivity.com to test your Exchange connectivity.
l Use end-user credentials — Select this option if you want to connect to the email service using the passwords for each mailbox instead of the credentials of the administrator account. If selected, you must specify the password for each target mailbox. For more information, see Adding Mailboxes.
l Admin User Name and Password — The name and password of the administrator account.
The Admin User Name value is the account's UPN or domain credentials (e.g., domain\username). For more information about UPNs and how to determine which domain you are using for your users, please see Active Directory naming on the Microsoft Technet site.
Using Self-Signed SSL CertificatesWhen using self-signed SSL certificates to connect to an email service provider, the Issued By and Subject fields must match.
Windows-Based SystemsTo generate a properly formatted certificate for Windows-based systems, use the SelfSSL utility packaged with the IIS 6.0 Resource Kit (available for download on http://www.microsoft.com/en-us/download/details.aspx?id=17275) and execute a command with the following syntax:
On Demand Migration for Email User GuideConfiguring and Running Migrations
59
selfssl.exe /n:CN=autodiscover.domain.com /v:9999
Where /n: defines the Subject (which needs to match the issuer) and /v: is the number of days for which the cert is valid.
Linux-Based SystemsTo generate a properly formatted certificate for Linux-based systems, use the OpenSSL utility (available for download on http://www.openssl.org/) and execute the following commands:
KEY + REQUEST
openssl req -out domain.com.csr -new -newkey rsa:2048 -keyout domain.com.key
CERT
openssl x509 -req -days 2000 -text -in domain.com.csr -signkey domain.com.key -out domain.com.crt
CONVERT CRT KEY TO PFX
openssl pkcs12 -export -out domain.com.pfx -inkey domain.com.key -in domain.com.crt
Validating ConnectionsAfter entering the connection properties of a source or target email service, enter the name of a source or target mailbox (and corresponding password if you selected the User end-user credentials option). Then click Test Connection. On Demand Migration for Email uses the login credentials you specified to connect to that mailbox. Depending on your type of source and target email service, different connection errors may be reported.
NOTE: You need to configure your firewalls to accept the WebRole IP addresses that ODME uses to validate connections. To obtain the current IP addresses, open the About box from the ODME home page:
l North America: https://migration.ondemand.quest.com
l EU: https://migrationeu.ondemand.quest.com
l APJ: https://migrationapj.ondemand.quest.com
Refer to the sections below for validation errors specific to your email platform:
G SuiteSun ONE/iPlanetNovell GroupWiseMicrosoft Exchange 2007/2010/2013/2016Microsoft Office 365POP/Windows Live HotmailIMAPNotes/DominoZimbra
G SuiteOn Demand Migration for Email connects to the URL http://www.google.com/a/example.com (example.com is from the Google Domain setting above). If that page exists as a Google domain, the next step is to connect to the
On Demand Migration for Email User GuideConfiguring and Running Migrations
60
G Suite server using the OAuth 2 protocol.
Error Description/Resolution
Any message saying an exception occurred because of an “invalid grant”, “invalid request”, or “400 bad request error”.
Each scope URL gives ODME access to a different type of data. ODME checks that each scope has been granted when validating the connection. Note: All scopes need to be added for validation to succeed, even if the options to migrate certain item types are disabled. Make sure that the test mailbox used for validation exists. Confirm that the client name and API scopes have been set correctly in the Google Admin console. (The Connections screen shows instructions on doing this after you have signed into G Suite with a super admin account.)
Unable to connect to the Google Contacts API.
The test mailbox does not exist, the API scopes are not set correctly, or network issues are preventing ODME from reaching G Suite. Make sure that the test mailbox used for validation exists. Confirm that the client name and API scopes have been set correctly in the Google Admin console. (The Connections screen shows instructions on doing this after you have signed into G Suite with a super admin account.)
Unable to connect to the Google Calendar API.
The test mailbox does not exist, the API scopes are not set correctly, or network issues are preventing ODME from reaching GSuite. Make sure that the test mailbox used for validation exists. Confirm that the client name and API scopes have been set correctly in the Google Admin console. (The Connections screen shows instructions on doing this after you have signed into G Suite with a super admin account.)
Invalid Mailbox (Unable to retrieve folders)
The test mailbox does not exist or does not have IMAP access enabled, the API scopes are not set correctly, or network issues are preventing ODME from reaching G Suite. Make sure that the test mailbox used for validation exists and has IMAP access enabled. Confirm that the client name and API scopes have been set correctly in the Google Admin console.
Sun ONE/iPlanetError Description/Resolution
The test mailbox doesn't exist.
You may see the following error when you test the connection: There was a problem testing your connection. Please try again. Verify that the mailbox name does exist in SunONE/iPlanet and that you have spelled the name correctly.
Server name is incorrect, or firewall is blocking access.
You may see the following error when you test the connection:
Failed to connect sunone.example.com IMAP server.
Check that your server name is spelled correctly and that your firewall is open to the On Demand Email Migration for Email IP addresses to port 7191. To obtain the current IP addresses, open the About box from the ODME home page:
l North America: https://migration.ondemand.quest.com
l EU: https://migrationeu.ondemand.quest.com
l APJ: https://migrationapj.ondemand.quest.com
On Demand Migration for Email User GuideConfiguring and Running Migrations
61

Novell GroupWiseError Description/Resolution
The test mailbox doesn't exist.
You may see the following error when you test the connection:
Invalid Mailbox Name: test.mailbox Code= D101, Description= User not on post office.
Verify that the mailbox name does exist in GroupWise and that you have spelled the name correctly.
Server name is incorrect, or firewall is blocking access.
You may see the following error when you test the connection:
Cannot find server. Server:groupwise.example.com, Port:7191.
Check that your server name is spelled correctly and that your firewall is open to the On Demand Email Migration for Email IP addresses to port 7191. To obtain the current IP addresses, open the About box from the ODME home page:
l North America: https://migration.ondemand.quest.com
l EU: https://migrationeu.ondemand.quest.com
l APJ: https://migrationapj.ondemand.quest.com
Microsoft Exchange 2007/2010/2013/2016On Demand Migration for Email uses Exchange Web Services (EWS) to connect to your on premises server from the cloud. To validate your server settings, the application connects to your Exchange server using port 443 (https) or port 80 (http) and the administrator credentials you provided in the server configuration.If you enter a Server URL value that does contain http:// or https://, https:// will be prepended to the URL. It is recommended that you use the servername, but if you require http:// access, you should enter http://servername as the value for Server URL.After the validation routine has connected to your Exchange server it opens the mailbox that you specified.
Problem Description/Resolution
Firewall blocking access
Your firewall is blocking the On Demand Migration for Email application. To ensure your data can be migrated, open the appropriate port for the On Demand Migration for Email application to connect to your server. To obtain the current IP addresses, open the About box from the ODME home page:
l North America: https://migration.ondemand.quest.com
l EU: https://migrationeu.ondemand.quest.com
l APJ: https://migrationapj.ondemand.quest.com
Migration administrator account doesn't have sufficient rights, or test mailbox doesn't exist
You may see one of the following errors when you test the connection:
Invalid Mailbox (Unable to retrieve folders).
Invalid Mailbox (Unable to retrieve folders). The Autodiscover service returned an error.
When this happens make sure your administrator account has been configured as
On Demand Migration for Email User GuideConfiguring and Running Migrations
62

Problem Description/Resolution
described in the section, Microsoft Exchange 2007/2010/2013/2016. Also verify that your test mailbox exists, and your spelling is correct.
WebDAV API access is not configured on the source Exchange Server 2007
In this case, you may get the following error:
Cannot create a CPUU switch message. Reason: Cannot connect to the mailbox <mailbox name> using the Web Distributed Authoring and Versioning (WebDAV) protocol. Verify that WebDAV is configured and enabled on Exchange server.
If this error occurs, make sure that the WebDAV API access is turned on and properly configured on your source Exchange Server 2007. For more details, please refer the Updating Outlook Client Profiles section.
Microsoft Office 365When entering connection properties for Office 365, it is recommended that you select the Use auto-discovery option for your server. Entering the Server Name manually may cause errors when migrating many mailboxes.
Error Description/Resolution
Migration administrator account doesn't have sufficient rights, or test mailbox doesn't exist
You may see one of the following errors when you test the connection:
Invalid Mailbox (Unable to retrieve folders).
Invalid Mailbox (Unable to retrieve folders). The Autodiscover service returned an error.
When this happens make sure your administrator account has been configured as described in the section, Microsoft Office 365. Also verify that your test mailbox exists, and your spelling is correct.
POP/Windows Live HotmailError Description/Resolution
Invalid mailbox (Unable to retrieve folders): authentication failed.
Either the test mailbox you entered does not exist or you typed an incorrect password.
Invalid Mailbox (Unable to retrieve folders): The requested name is valid, but no data of the requested type was found.
The Server name and/or port number are incorrect.
IMAPNOTE: Error messages may vary depending on the IMAP server you are connecting to.
Error Description/Resolution
LOGIN Failure Invalid password
On Demand Migration for Email User GuideConfiguring and Running Migrations
63

Error Description/Resolution
Invalid login or password Invalid login or password
A connection attempt failed because the connected party did not properly respond after a period of time, or established connection failed because connected host has failed to respond.
Invalid Port Number
No Such Host Invalid server address
Notes/DominoError Description/Resolution
Invalid Mailbox (Unable to retrieve folders): Cannot process mailbox with smtp address “[email protected],” unable to translate address to notes database (mail file) path.
Either the test mailbox you entered does not exist or you typed an incorrect password.
ZimbraError Description/Resolution
Invalid Mailbox (Unable to retrieve folders): A connection attempt failed because the connected party did not properly respond after a period of time, or established connection failed because connected host has failed to respond 192.101.144.66:993
Incorrect IMAP address/port
Invalid Mailbox (Unable to retrieve folders): AUTHENTICATE failed Incorrect IMAP admin username/password
Invalid Mailbox (Unable to retrieve folders): Failed to connect to server 192.101.144.65 on admin port 7072 as user root. Unable to connect to the remote server
Incorrect SOAP address/admin port
Invalid Mailbox (Unable to retrieve folders): Unable to connect to the remote server Incorrect SOAP port
Invalid Mailbox (Unable to retrieve folders): Failed to connect to server 192.101.144.65 on admin port 7071 as user root2. Exception of type 'Zimbra.Client.ZimbraException' was thrown.
Incorrect SOAP username/password
Invalid Mailbox (Unable to retrieve folders): Failed to connect to server 192.101.144.65 on admin port 7071 as user root. The underlying connection was closed: An unexpected error occurred on a receive
Incorrect SOAP Admin or Port SSL setting
Invalid Mailbox (Unable to retrieve folders): Tried to read a line. Only '' received. Incorrect IMAP SSL setting
Adding MailboxesAfter connecting to your source and target email service, the next step is to list the mailboxes you want to migrate. This is done in the Mailboxes tab.
On Demand Migration for Email User GuideConfiguring and Running Migrations
64
NOTE: If you haven’t already done so, set up the mailbox accounts in the target email service. On Demand Migration for Email does not create target mailboxes during a migration. Also, you cannot add mailboxes until you have successfully connected to your source and target email service.
You can add the mailboxes you want to migrate manually, or in the case of a large migration, you can import a TSV file which lists each mailbox. If you selected the option Use end-user credentials when connecting to either the source or target email service, you must specify the passwords for each mailbox.Be aware that if you import TSV file, this will overwrite any mailboxes that have already been added, whether manually or through a previously imported TSV file.
Dealing with large mailboxesMailboxes that added to a migration plan are migrated in parallel as described in Connecting to Email Services. However, contents of each individual mailbox are migrated subsequently, item by item. That may cause decreased migration performance for large mailboxes.To make the migration faster for a large mailbox, you can split the mailbox's contents into several parts by time when message is created or received and then migrate each part in a separate migration plan.To do that, take the following steps:
1. Approximately estimate the time period of messages within the mailbox by finding the oldest message and the newest.
2. Split the estimated time period into several shorter time intervals. Note that each time interval must have a one-day overlap with the neighbor time intervals to avoid data loss.
3. For each time interval create a separate migration plan. Note that each migration plan should use its own pair of source and target administrative accounts.
4. Add the mailbox to all of these migration plans.
5. On the Options page of each migration plan under Date Range select Choose Date Range and specify the corresponding time interval.
IMPORTANT: In case of migration to Office 365, it is not recommended to have more than 4 migration plans processing the same mailbox in parallel due to Office 365 throttling limitations. Otherwise, the The server cannot service this request right now. Try again later. Waiting 5.00 minutes before resuming errors may repeatedly occur decreasing an overall migration speed.
Adding Mailboxes ManuallyIf you are migrating a relatively small number of mailboxes, you can add the mailboxes manually. If you selected the option Use end-user credentials when connecting to the source or target email service, you must also specify the password for each mailbox.For the source IMAP servers that support Simple Authentication and Security Layer (SASL), like the Dovecot IMAP server, ODME can use the Administrator credentials of the IMAP server to access the user accounts. To add a user mailbox in this scenario, enter [user account name]*[administrator account name] in the Source Mailbox field, and provide the Administrator account password in the Source Password field.
On Demand Migration for Email User GuideConfiguring and Running Migrations
65

To add mailboxes manually:
1. In the Source Mailbox field, enter the name of the source mailbox.
2. If you selected the option Use end-user credentials when connecting to the source email service, click in the Source Password field and enter the password for the source mailbox.
3. In the Target Mailbox field, enter the name of the target mailbox.
4. If you selected the option Use end-user credentials when connecting to the target email service, click in the Target Password field and enter the password for the target mailbox.
5. Click the Checkmark icon to add the mailbox.
6. Click Add Mailbox to activate a new row.
7. Repeat steps 1 through 6 for each mailbox you want to add.
8. When finished, click Save to stay on the Mailboxes tab, or click Save and Continue to move to the Options tab.
NOTE: If for any reason you want to undo the changes you made since the last time you saved, click Discard Changes.
Adding Mailboxes through a TSV FileBe aware that if you import TSV file, this will overwrite any mailboxes that have already been added, whether manually or through a previously imported TSV file.
To add mailboxes through a TSV file:
1. Create a text file which lists each mailbox to be migrated on a separate line beneath a “Source Mailbox” header.
For example:
Source Mailbox
NOTE: Be aware of the following:
l For IBM Notes, the source mailbox must be the value found in the “Internet Address” field of the person document for that user
l For GroupWise, mailbox names cannot be nicknames or full SMTP addresses. For example, “admin” is valid, but “[email protected]” is invalid.
l For G Suite, the full primary email address for each G Suite mailbox is required
If a source mailbox is being migrated to a target mailbox with a different name, add a second header named “Target Mailbox” and list each target mailbox that is named different than its corresponding source mailbox
On Demand Migration for Email User GuideConfiguring and Running Migrations
66

Source Mailbox Target Mailbox
[email protected] Patrick_Smith
# Paula_Smith source mailbox will be migrated to Paula_Smith on the target
[email protected] Bill_Jones
The format of each entry varies depending on the source or target server type, as shown in the following examples:Exchange 2007/2010/2013/2016 and Office 365 Source and TargetThe import file entry for an Exchange 2007/2010/2013/2016 and Office 365 source and target mailboxes should be the full SMTP address. If, however, the domain name for the SMTP address matches the domain name on the admin credential, then it can be omitted.
Source Mailbox Target Mailbox
[email protected] [email protected]
IMAP source and Office 365 TargetIf the MAP server supports the Simple Authentication and Security Layer (SASL), user can provide a single Administrator credentials with user mailboxes in a TSV file. ODME will use the Administrator credentials to migrate user mailboxes, if you select the Use end-user credential option in the target.
Source Mailbox Source Password
Target Mailbox Target Password
[email protected]*Admin user name
Admin Password1
[email protected] Password1
[email protected]*Admin user name
Admin Password2
[email protected] Password2
Specifying Mailbox PasswordsIf you selected the option Use end-user credentials when connecting to the source email service, you must specify the password for each mailbox beneath a header named “Source Password.”
Source Mailbox Target Password
[email protected] Password1
[email protected] Password2
On Demand Migration for Email User GuideConfiguring and Running Migrations
67

Likewise, if you selected the option Use end-user credentials when connecting to the target email service, you must specify the password for each mailbox beneath a header named “Target Password.” In this case, your TSV file might look like this (be sure to specify any target mailboxes with different names under the “Target Mailbox” header):
Source Mailbox Source Password Target Mailbox Target Password
[email protected] Password1 Password1
[email protected] Password2 Password2
[email protected] Password3 [email protected] Password3
2. Click the Mailboxes tab.
3. Click Import TSV.
4. In the dialog box, click Select TSV File. Then find and select the TSV file you want to upload.
5. Click Import.
On Demand Migration for Email imports the file and displays the list of source and target mailboxes. If any entries are improperly formatted, the file will not be imported and you must correct any errors identified. If you need to modify your migration plan, edit your source text file and then re-import. The entire list will be updated to the contents of your text file.
NOTE: For GroupWise, if you receive a “No returned session value Status code: 53507” error, check the import file make sure you are not using nicknames or full SMTP addresses. For example, “admin” is valid, but “[email protected]” is invalid.
CAUTION: If you plan on running two different migration plans simultaneously to the same target email service, migrating the same mailbox can result in duplicated data on the target.
6. When finished, click Save to stay on the Mailboxes tab, or click Save and Continue to move to the Options tab.
If for any reason you want to undo the changes you made since the last time you saved, click Discard Changes.
Selecting Migration OptionsIn the Options tab, you can configure the following:
l The mailbox items you want to exclude from the migration
l For GroupWise 2014/2014 R2, the visibility settings for migrated mail items in the GroupWise Address Book. This allows you to migrate mail items that you do not want available to all GroupWise users. You can make mailboxes visible to everyone or to no one at all, only to the members of a domain, or only to the members of a post office.
l For migrations form Exchange server and Office 365, the option to migrate delegate access permissions.
l For Notes/Domino, G Suite, Office 365, and GroupWise, the mail forwarding settings between the source and target email service on a per-user basis
On Demand Migration for Email User GuideConfiguring and Running Migrations
68
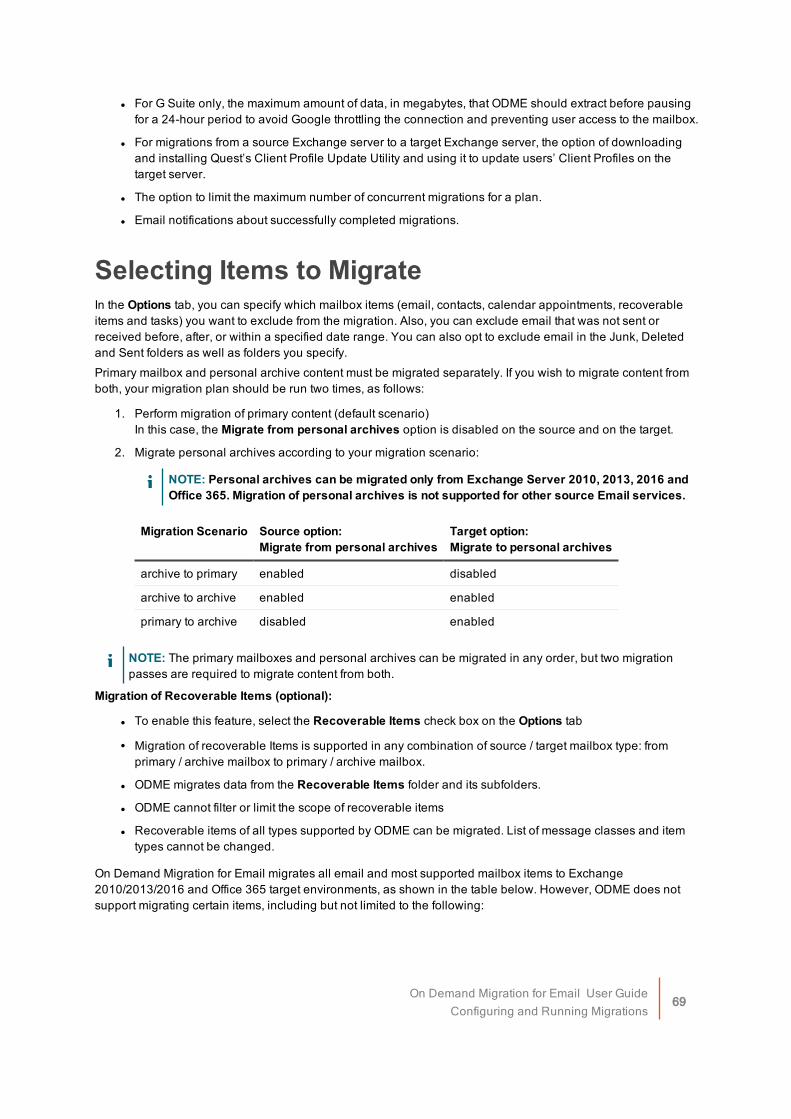
l For G Suite only, the maximum amount of data, in megabytes, that ODME should extract before pausing for a 24-hour period to avoid Google throttling the connection and preventing user access to the mailbox.
l For migrations from a source Exchange server to a target Exchange server, the option of downloading and installing Quest’s Client Profile Update Utility and using it to update users’ Client Profiles on the target server.
l The option to limit the maximum number of concurrent migrations for a plan.
l Email notifications about successfully completed migrations.
Selecting Items to MigrateIn the Options tab, you can specify which mailbox items (email, contacts, calendar appointments, recoverable items and tasks) you want to exclude from the migration. Also, you can exclude email that was not sent or received before, after, or within a specified date range. You can also opt to exclude email in the Junk, Deleted and Sent folders as well as folders you specify.Primary mailbox and personal archive content must be migrated separately. If you wish to migrate content from both, your migration plan should be run two times, as follows:
1. Perform migration of primary content (default scenario)In this case, the Migrate from personal archives option is disabled on the source and on the target.
2. Migrate personal archives according to your migration scenario:
NOTE: Personal archives can be migrated only from Exchange Server 2010, 2013, 2016 and Office 365. Migration of personal archives is not supported for other source Email services.
Migration Scenario Source option:Migrate from personal archives
Target option:Migrate to personal archives
archive to primary enabled disabled
archive to archive enabled enabled
primary to archive disabled enabled
NOTE: The primary mailboxes and personal archives can be migrated in any order, but two migration passes are required to migrate content from both.
Migration of Recoverable Items (optional):
l To enable this feature, select the Recoverable Items check box on the Options tab
l Migration of recoverable Items is supported in any combination of source / target mailbox type: from primary / archive mailbox to primary / archive mailbox.
l ODME migrates data from the Recoverable Items folder and its subfolders.
l ODME cannot filter or limit the scope of recoverable items
l Recoverable items of all types supported by ODME can be migrated. List of message classes and item types cannot be changed.
On Demand Migration for Email migrates all email and most supported mailbox items to Exchange 2010/2013/2016 and Office 365 target environments, as shown in the table below. However, ODME does not support migrating certain items, including but not limited to the following:
On Demand Migration for Email User GuideConfiguring and Running Migrations
69

l Tasks / Notes from G Suite
l Search folders and task invites from GroupWise
l Contacts, calendars, and tasks from Sun ONE/iPlanet
For a complete list of items that are not migrated, see Known Issues and Limitations.
Source Email Calendar Contacts Tasks / Notes
Groups / Personal Distribution Lists
Recoverable Items
G Suite
Exchange 2007/2010/2013/2016
Except Exchange 2007
Office 365
Sun ONE/iPlanet
Zimbra
GroupWise
Notes/Domino*
IMAP
POP/Hotmail**
* Using end user credentials only Email can be migrated** POP Migrations only move items from the Inbox
To select items to migrate:
1. Click the Options tab.
2. In the Select Items to Migrate section, de-select any type of mailbox item you want to exclude from the migration, including Email, Contacts, Calendar, or Tasks/Notes.
For G Suite, you can also opt to exclude contacts that are contained in the “Other Contacts” folder.
3. For users migrating email from G Suite only, specify how you want ODME to migrate labeled messages:
There are two options:
l ODME creates a folder on the target for each label and copies messages into the corresponding folders.
By default, messages with multiple labels are copied into multiple target folders. However, you can configure ODME to migrate messages labeled Inbox, Sent, or Draft only to the corresponding target folders and ignore any other labels these messages may have. You can also configure ODME to ignore the Important label, in which case messages labeled Important are migrated either to the Archive folder if no other labels have been applied, or to target folders corresponding to any other labels the messages may have.
On Demand Migration for Email User GuideConfiguring and Running Migrations
70
l ODME coverts labels to categories on the target and assigns migrated messages to each corresponding category.
Labels corresponding to system folders (Inbox, Sent, Deleted, Junk, etc.) are migrated to their matching folders on the target and categories are not assigned.
4. If you want to exclude email that was not sent or received before, after, or within specific dates, select the option(s) and use the Calendar tool to select the dates you want.
5. If you want to exclude email in Junk, Deleted and Sent folders, select those options.
CAUTION: Migrating Deleted Items and Junk Email could significantly increase migration time. Also, non-mail items are not migrated from the Deleted Items folder.
6. If you want to exclude email in specific folders, enter the fully qualified path for each folder you want to exclude with each folder specified on a separate line (e.g., “Inbox/Private”).
When you exclude a folder, any subfolders it contains are also excluded from the migration.
NOTE: For GroupWise, if you want to exclude the “View by...” folders, you need to add them to the Exclude Specific Folders field. These folders include:
l View by Tasklist options
l View by Panels options
l View by Discussion Threads options
l View by Details options
l View by Calendar options
Setting GroupWise 2014/2014 R2 VisibilityFor users migrating email from GroupWise 2014 or 2014 R2, you can modify the visibility settings for migrated mailboxes in the GroupWise Address Book. This allows you to migrate mailboxes that you do not want available to all GroupWise users. You can make mailboxes visible to everyone or to no one at all, only to the members of a domain, or only to the members of a post office. This eliminates the possibility of duplicate entries appearing in the GroupWise directory for migrated users after subsequent migrations.
To set GroupWise visibility:
1. Select the GroupWise Visibility option and in the drop-down list select the visibility setting you want. Options include:
l None: User is not visible anywhere, and the user account will not get synced to AD by ODME.
l System: User is visible to everyone.
l Domain: User is visible only to other users in the same domain.
l Post Office: User is visible only to other users in the same Post Office.
2. Enter the administrator user name and password for the GroupWise server.
These credentials are required to modify the visibility of the GroupWise objects.
3. In the GroupWise Rest Port field, enter the value of the REST port for the GroupWise server.
4. Optionally, select the SSL option if you want ODME to communicate to the GroupWise server using SSL.
On Demand Migration for Email User GuideConfiguring and Running Migrations
71
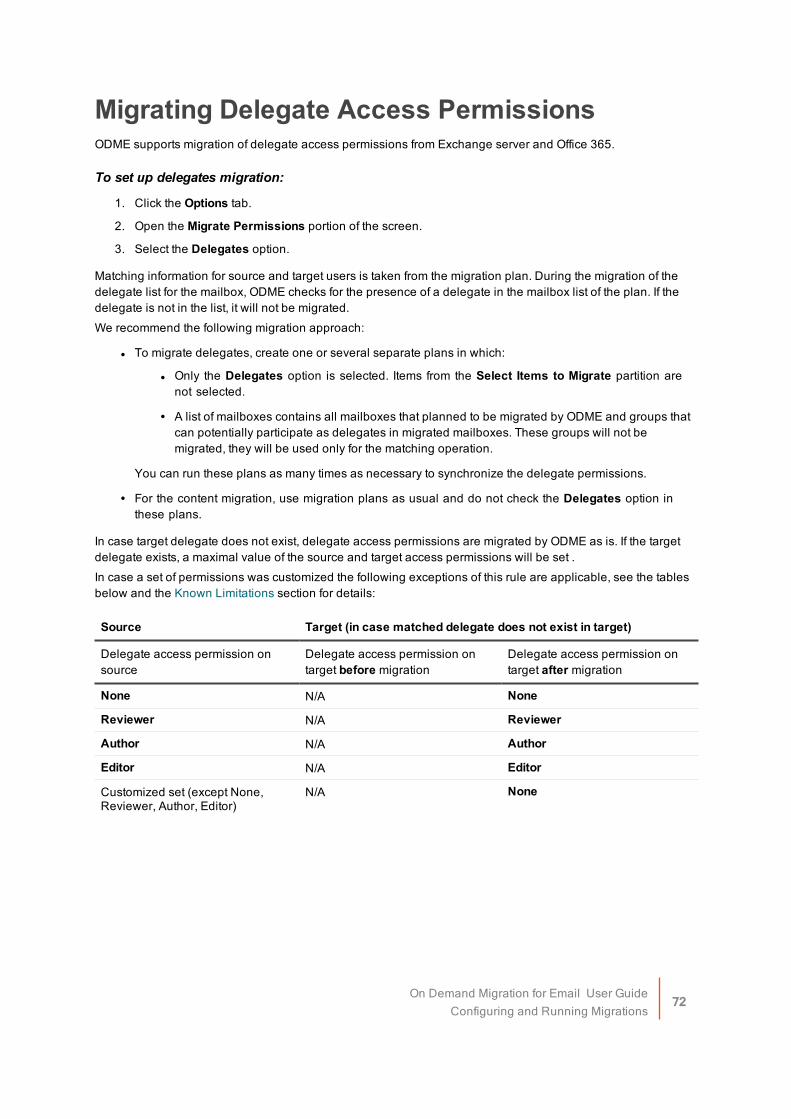
Migrating Delegate Access PermissionsODME supports migration of delegate access permissions from Exchange server and Office 365.
To set up delegates migration:
1. Click the Options tab.
2. Open the Migrate Permissions portion of the screen.
3. Select the Delegates option.
Matching information for source and target users is taken from the migration plan. During the migration of the delegate list for the mailbox, ODME checks for the presence of a delegate in the mailbox list of the plan. If the delegate is not in the list, it will not be migrated.We recommend the following migration approach:
l To migrate delegates, create one or several separate plans in which:
l Only the Delegates option is selected. Items from the Select Items to Migrate partition are not selected.
l A list of mailboxes contains all mailboxes that planned to be migrated by ODME and groups that can potentially participate as delegates in migrated mailboxes. These groups will not be migrated, they will be used only for the matching operation.
You can run these plans as many times as necessary to synchronize the delegate permissions.
l For the content migration, use migration plans as usual and do not check the Delegates option in these plans.
In case target delegate does not exist, delegate access permissions are migrated by ODME as is. If the target delegate exists, a maximal value of the source and target access permissions will be set .In case a set of permissions was customized the following exceptions of this rule are applicable, see the tables below and the Known Limitations section for details:
Source Target (in case matched delegate does not exist in target)
Delegate access permission on source
Delegate access permission on target before migration
Delegate access permission on target after migration
None N/A None
Reviewer N/A Reviewer
Author N/A Author
Editor N/A Editor
Customized set (except None, Reviewer, Author, Editor)
N/A None
On Demand Migration for Email User GuideConfiguring and Running Migrations
72
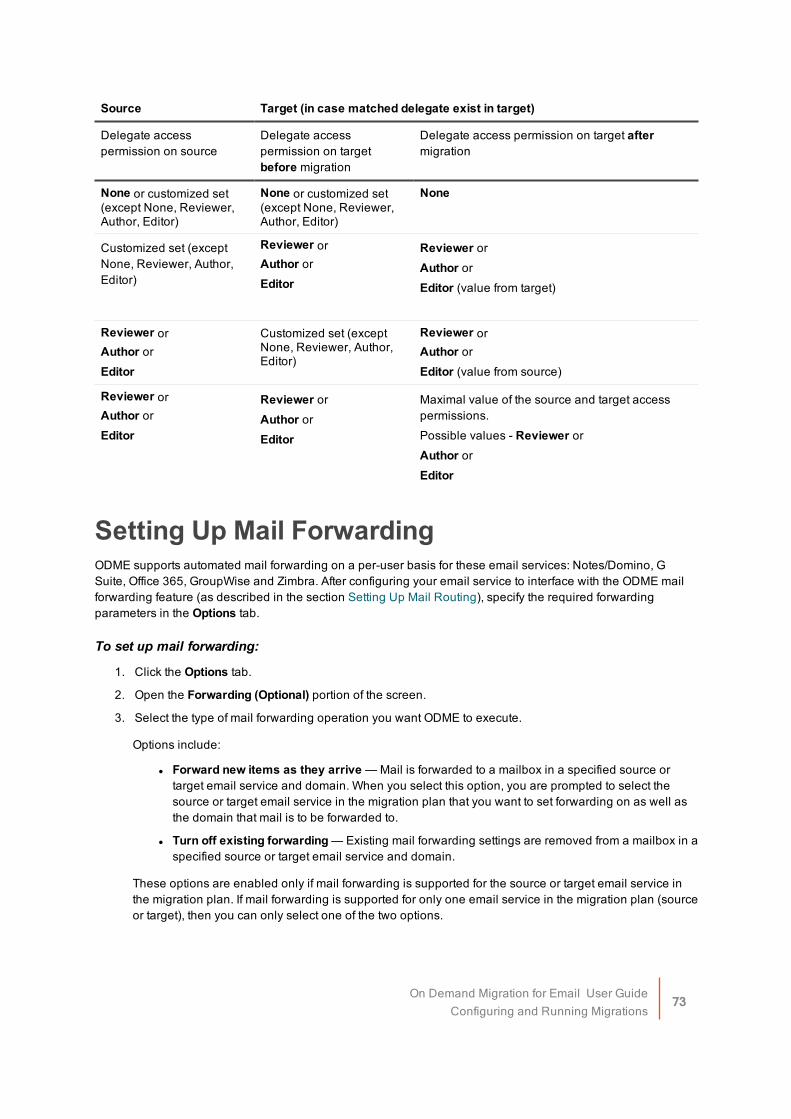
Source Target (in case matched delegate exist in target)
Delegate access permission on source
Delegate access permission on target before migration
Delegate access permission on target after migration
None or customized set (except None, Reviewer, Author, Editor)
None or customized set (except None, Reviewer, Author, Editor)
None
Customized set (except None, Reviewer, Author, Editor)
Reviewer orAuthor orEditor
Reviewer orAuthor orEditor (value from target)
Reviewer orAuthor orEditor
Customized set (except None, Reviewer, Author, Editor)
Reviewer orAuthor orEditor (value from source)
Reviewer orAuthor orEditor
Reviewer orAuthor orEditor
Maximal value of the source and target access permissions.Possible values - Reviewer orAuthor orEditor
Setting Up Mail ForwardingODME supports automated mail forwarding on a per-user basis for these email services: Notes/Domino, G Suite, Office 365, GroupWise and Zimbra. After configuring your email service to interface with the ODME mail forwarding feature (as described in the section Setting Up Mail Routing), specify the required forwarding parameters in the Options tab.
To set up mail forwarding:
1. Click the Options tab.
2. Open the Forwarding (Optional) portion of the screen.
3. Select the type of mail forwarding operation you want ODME to execute.
Options include:
l Forward new items as they arrive — Mail is forwarded to a mailbox in a specified source or target email service and domain. When you select this option, you are prompted to select the source or target email service in the migration plan that you want to set forwarding on as well as the domain that mail is to be forwarded to.
l Turn off existing forwarding — Existing mail forwarding settings are removed from a mailbox in a specified source or target email service and domain.
These options are enabled only if mail forwarding is supported for the source or target email service in the migration plan. If mail forwarding is supported for only one email service in the migration plan (source or target), then you can only select one of the two options.
On Demand Migration for Email User GuideConfiguring and Running Migrations
73

If mail forwarding is supported for both the source and target, then both options are enabled. In this case, when you select one option, the other option is automatically selected as well. This is designed to prevent messages from looping perpetually between two mailboxes in the event that mail forwarding is inadvertently set on both the source and the target email service. However, if you want to set or remove mail forwarding on only one of the two email services in the migration plan, you can de-select one of the automatically selected options.
4. If you selected the Forward new items as they arrive option, do the following:
a. In the Set forwarding address on: field, select the source or target email service that you want to set forwarding on.
The source email service specified in the migration plan is selected by default. Select the target email service if you want to set forwarding on that instead.When G Suite or GroupWise is selected as the source email service, these Forwarding Actions are available for you to decide what you want ODME to do when new mail items arrive:
l KEEP: When new mail items arrive, new item is delivered to source mailbox and kept in the Inbox as well as forwarded to target mailbox.
l DELETE:
l For G Suite: When new mail items arrive, new item is delivered to source mailbox and moved to the Trash folder as well as forwarded to target mailbox.
l For GroupWise: When new mail items arrive, new item is delivered to source mailbox and deleted from Inbox as well as forwarded to target mailbox.
l MARK AS READ: When new mail items arrive, new item is delivered to source mailbox and marked as read in the Inbox as well as forwarded to target mailbox.
l ARCHIVE (for G Suite only): When new mail items arrive, new item is delivered to source mailbox and archived (not visible in the Inbox) as well as forwarded to target mailbox.
NOTE: If mail forwarding is supported for both the source and target email services, when you set mail forwarding on one service (source or target), the option to turn off existing forwarding defaults to the other service automatically.
b. In the Forward to: field, enter the domain that mail is to be forwarded to.
Improperly formatted domain names result in an error message.The domain name part of the forwarding email address (<local_part>@<domain>) is specified by the domain you enter in the Forward to field. The local part depends on which email service you selected in step a: When the source email service is selected, the local part of the target email address will be used; And when the target email service is selected, the local part of the source email service will be applied.
c. For G Suite only, enter the name and password of the administrator account used for mail forwarding.
d. (Optional) For IBM Notes only, specify the following additional forwarding settings:
NOTE: If the fields are left blank, the values currently in the Domino server will not be changed.
l In the Notes Mail System field, select the mail system you want to include in mail forwarding. Options include Notes, Other Internet Mail, Other, and None.
On Demand Migration for Email User GuideConfiguring and Running Migrations
74
l In the Notes Mail Domain field, specify the Domino domain to set in the source person document.
l In the Notes Calendar Domain field, specify the calendar domain to set in the source person document.
e. Click Test.
This validates that the proper administrator credentials have been provided to perform mail forwarding. For Office 365, the administrator account must be assigned the “Recipient Management” role. See the section Setting Up Mail Routing for more information.
NOTE: The Test button is not enabled for IBM Notes.
5. If you selected the Turn off existing forwarding option, do the following:
a. In the Remove forwarding address from: field, select the source or target email service that you want to remove existing forwarding settings from.
NOTE: If mail forwarding is supported for both the source and target email service and you already set mail forwarding on one email service, this field defaults to the other service.
b. In the Forwarding to: field, enter the domain to which mail is currently forwarded.
Improperly formatted domain names result in an error message.
c. For G Suite only, enter the name and password of the administrator account used for the mail forwarding settings you want to remove.
d. (Optional) For IBM Notes only, specify the following additional forwarding settings:
NOTE: If the fields are left blank, the values currently in the Domino server will not be changed.
l In the Notes Mail System field, select the mail system you want to include in mail forwarding. Options include Notes, Other Internet Mail, Other, and None.
l In the Notes Mail Domain field, specify the Domino domain to set in the source person document.
l In the Notes Calendar Domain field, specify the calendar domain to set in the source person document.
e. Click Test.
This validates that the proper administrator credentials have been provided to perform mail forwarding. For Office 365, the administrator account must be assigned the “Recipient Management” role. See the section Setting Up Mail Routing for more information.
NOTE: The Test button is not enabled for Notes.
Managing Google ThrottlingGoogle traffic throttling imposes a daily limit on the amount of data you can extract from your G Suite source within 24 hours. When this limit is reached during a migration, G Suite throttles all connections to the affected mailboxes up to 24 hours, during this period users cannot access the mailboxes via web or mobile devices.You can control how much data On Demand Migration for Email will extract during this period to avoid the risk of Google mailbox throttling.
On Demand Migration for Email User GuideConfiguring and Running Migrations
75
NOTE: ODME currently does not coordinate data extraction from a mailbox across multiple migration plans or migrations within the same plan. For example, if two migration plans are migrating the same mailbox, ODME does not take into consideration the data downloaded from all the plans when determining when to pause a migration. Likewise, if a plan was migrated and finished, and then migrated again, the quota consumed from the first migration is taken into consideration when determining when to pause a migration. Additionally, if you stop and restart a plan, the quota consumed is not factored. Google, however, DOES record this information and could result in throttling taking effect.
To manage Google Throttling:
1. Click the Options tab.
If you migrating from a G Suite source, the Manage Data Extraction portion of the tab is displayed.
2. Specify the amount of data, in megabytes, that ODME will extract from Google before pausing for 24 hours.
Updating Outlook Client ProfilesDuring a migration, ODME moves mailboxes from the source Microsoft Exchange server to the target Microsoft Exchange server. Before users can start using their installation of Outlook with their new target mailboxes, their Microsoft Outlook Client Profiles must also be updated.Quest Client Profile Updating Utility (CPUU) allows these profiles to be updated automatically and transparently. The utility is used to switch end-user Microsoft Outlook Client Profiles from the source to the target Exchange server once the user's mailbox is migrated. The utility can also be used to roll back Client Profiles to their original setting. The Client Profile Updating Utility can be downloaded from https://support.quest.com/migration-manager-for-exchange/download-new-releases.The Client Profile Updating Utility looks for a special hidden message in a user's mailbox to determine if it should do a switch or rollback. These special hidden messages can be created by ODME during a migration.Some of the CPUU features are not supported or partially supported by ODME. For details about limitations and compatibility issues during profile update, see below. For the full list of CPUU features, refer to http://support.quest.com/technical-documents/client-profile-updating-utility/5.7.4/administration-guide/.
Migrating from one Office 365 tenant to another with domain name transfer scenario
CPUU supports Office 365 tenant to tenant migration including scenario with domain name transfer starting from the version 5.7.1. For more details, see the Tenant to tenant migration scenario with domain name transfer section in Client Profile Updating Utility Administrator Guide.
NOTE: None of the CPUU features are supported in this scenario.
Supported CPUU Features
l Switch Outlook profiles from the source to the target Exchange server (Existing Offline folders (OST files) are not preserved)
l Update Send/Receive Settings
On Demand Migration for Email User GuideConfiguring and Running Migrations
76
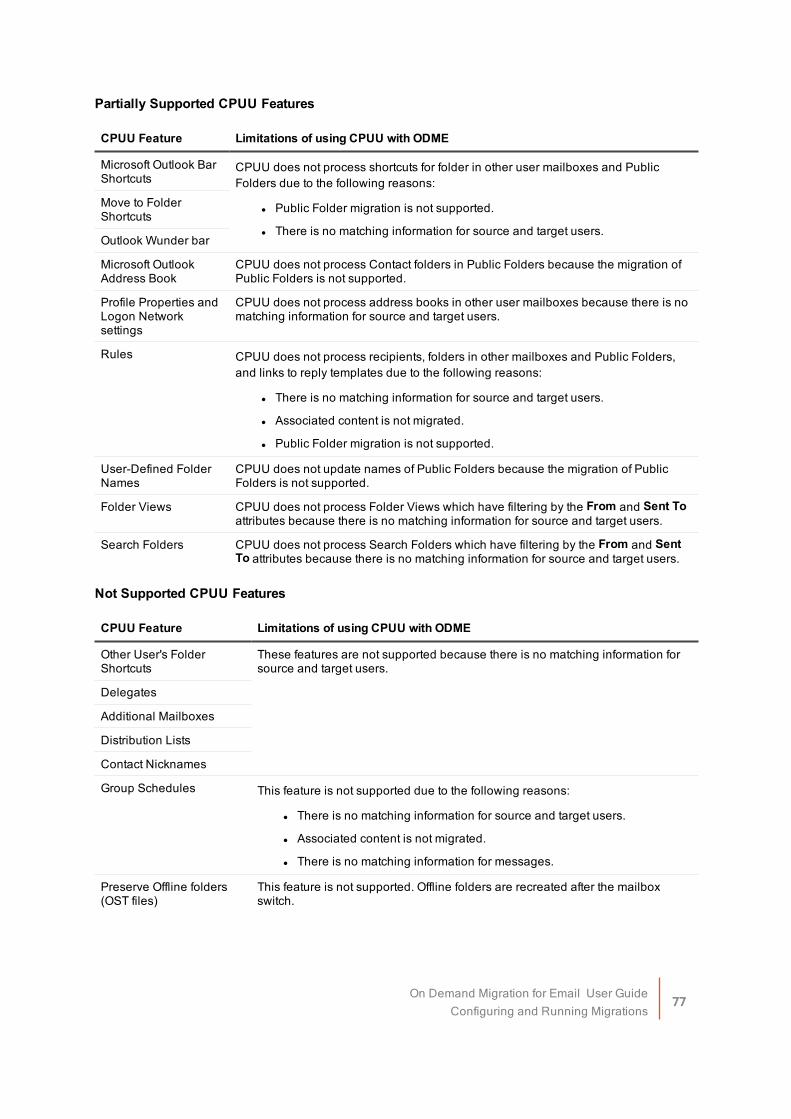
Partially Supported CPUU Features
CPUU Feature Limitations of using CPUU with ODME
Microsoft Outlook Bar Shortcuts
CPUU does not process shortcuts for folder in other user mailboxes and Public Folders due to the following reasons:
l Public Folder migration is not supported.
l There is no matching information for source and target users.
Move to Folder Shortcuts
Outlook Wunder bar
Microsoft Outlook Address Book
CPUU does not process Contact folders in Public Folders because the migration of Public Folders is not supported.
Profile Properties and Logon Network settings
CPUU does not process address books in other user mailboxes because there is no matching information for source and target users.
Rules CPUU does not process recipients, folders in other mailboxes and Public Folders, and links to reply templates due to the following reasons:
l There is no matching information for source and target users.
l Associated content is not migrated.
l Public Folder migration is not supported.
User-Defined Folder Names
CPUU does not update names of Public Folders because the migration of Public Folders is not supported.
Folder Views CPUU does not process Folder Views which have filtering by the From and Sent To attributes because there is no matching information for source and target users.
Search Folders CPUU does not process Search Folders which have filtering by the From and Sent To attributes because there is no matching information for source and target users.
Not Supported CPUU Features
CPUU Feature Limitations of using CPUU with ODME
Other User's Folder Shortcuts
These features are not supported because there is no matching information for source and target users.
Delegates
Additional Mailboxes
Distribution Lists
Contact Nicknames
Group Schedules This feature is not supported due to the following reasons:
l There is no matching information for source and target users.
l Associated content is not migrated.
l There is no matching information for messages.
Preserve Offline folders (OST files)
This feature is not supported. Offline folders are recreated after the mailbox switch.
On Demand Migration for Email User GuideConfiguring and Running Migrations
77

How to deal with non-supported and partially supported CPUU features:
l Option 1: Disable non-supported and partially supported CPUU features to increase the speed of profile processingYou can disable CPUU features on the Features step of the Quest Client Profile Updating Utility Configuration wizard. To do this, select the features you need (multiselect is allowed), click Change and then select the Skip option in the Select Processing Option dialog. If this option is chosen, the user should manually configure Microsoft Outlook features after profile processing.
l Option 2: Keep CPUU features and make some adjustments after profile processingIf something does not work in the profile after processing, you should repair it manually. For example, you can change incorrect links in Microsoft Outlook rules. For that, open the File tab in Microsoft Outlook, select Info and then press Manage Rules & Alerts. Links can be changed in the Rule description section of the Rules and Alerts dialog.
l Option 3: Configure matching between source and target users before processing Microsoft Outlook profiles This will allow you to fully support CPUU features that require matching information for source and target users. To configure user matching, add the legacyExchangeDN attribute value of the target user to the proxyAddress attribute of the source user as x500 address.
To configure ODME to work together with CPUU
1. Click the Options tab.
2. Click the Outlook Profile tab.
3. Select the option you want.
Options include:
l Do Not Modify Outlook Profiles
l Enable Outlook Profile Update
l Enable Outlook Profile Rollback
NOTE: Switching Exchange Server 2007 profiles To enable the CPUU integration feature on the source Exchange Server 2007, you should turn on and configure the WebDAV API access for your Exchange Server 2007.Configuration Requirements for WebDAV
l WebDAV must be available on the same Exchange server as the EWS service (link to the EWS service is specified on the ODME Connections page) and reside in the default Exchange virtual directory in Internet Information Services (IIS). For example, if the specified source Server URL is https://<Exchange server name>/EWS/Exchange.asmx, WebDAV must be available at the following link: https://<Exchange server name>/Exchange.
l Basic Authentication, Forms Based Authentication or both authentication methods must be enabled for the Exchange virtual directory in Internet Information Services (IIS) Manager.
l It is recommended to enable the Require SSL option on the SSL Settings page for the Exchange virtual directory in Internet Information Services (IIS) Manager.
On Demand Migration for Email User GuideConfiguring and Running Migrations
78
To update Microsoft Outlook profiles with CPUU
1. Download and install Client Profile Updating Utility.
2. Run the Quest Client Profile Updating Utility Configuration wizard. While running the wizard, change the following options:
l On the Credentials step, select the Use the following user account option and specify two user accounts to log on to the source and target mailboxes. It is recommended to use the same accounts that were specified as Source Connection and Target Connection administrative accounts in the Migration Plan.
l On the Network step, deselect the Check availability of Exchange servers with ping command option.
3. Go to the Client Profile Updating Utility installation folder and copy its content to any folder on a machine where Outlook profiles need to be processed.
4. Run the CPUU_Update.bat file and wait until the utility finishes updating the Outlook profiles. To roll back the changes made by CPUU, run CPUU_Rollback.bat.
If you need to process Outlook profiles on multiple machines, you should run Client Profile Updating Utility from Logon Script.For detailed instructions, including recommended usage and deployment options, see the following topic in the Client Profile Updating Utility Administration Guide: http://support.quest.com/technical-documents/client-profile-updating-utility/5.7.4/administration-guide/.
Limiting Concurrent MigrationsIn order to protect source and target mail systems from heavy loads from On Demand Migration for Email, you can use this option to limit the maximum number of mailboxes migrated simultaneously.
To limit concurrent migrations:
1. Click the Options tab.
2. Click the Advanced tab.
3. Specify the number of concurrent migrations for the migration plan or select the Unlimited option.
Setting User NotificationsYou can configure email notification settings to send notifications after the migration session is completed successfully to source or target user, or both. These settings are disabled by default.
To configure email notification settings:
1. Click the Options tab.
2. Click the Notification tab.
3. You can configure email notifications for source and target users separately. Select the Send notification to source mailbox option and /or Send notification to target mailbox option.The following fields can be configured:
On Demand Migration for Email User GuideConfiguring and Running Migrations
79
l From display name
l From e-mail address
l Subject
l Message body
Known Issues and LimitationsOn Demand Migration for Email is designed to provide a robust migration experience for a variety of source and target platforms. However, certain issues and limitations have been identified. Issues are items which are slated to be resolved in future releases of ODME. Limitations, on the other hand, are the result of inherent discrepancies between email service platforms and cannot be fixed.
Known Limitations
General l Recurring meetings within non-Exchange source platforms are typically generated and stored using very
different methodologies than the recurrence rules leveraged by Microsoft platforms. On Demand Migration for Email uses advanced technology in attempt to map recurring meetings to equivalent recurrence rules in Exchange. However, depending on the source environment and specific data, some dates of meeting invitations may be incorrectly represented in Outlook after migration
l Each mailbox in a source email service can be migrated successfully a total of 10 times and each migration cannot exceed 50 GB. These limits are in place to control the costs of migration. If an exception is required to facilitate your migration plan, please contact the Support Portal at https://support.quest.com/.
Client Profile Updating UtilityConsider the following limitations when using ODME together with Client Profile Updating Utility (CPUU):
l CPUU does not process shortcuts for folder in other user mailboxes and Public Folders due to the following reasons:
l Public Folder migration is not supported.
l There is no matching information for source and target users.
l CPUU does not process Contact folders in Public Folders because the migration of Public Folders is not supported.
l CPUU does not process address books in other user mailboxes because there is no matching information for source and target users.
On Demand Migration for Email User GuideConfiguring and Running Migrations
80
l CPUU does not process recipients, folders in other mailboxes and Public Folders, and links to reply templates due to the following reasons:
l There is no matching information for source and target users.
l Associated content is not migrated.
l Public Folder migration is not supported.
l CPUU does not update names of Public Folders because the migration of Public Folders is not supported.
l CPUU does not process Folder Views which have filtering by the From and Sent To attributes because there is no matching information for source and target users.
l CPUU does not process Search Folders which have filtering by the From and Sent To attributes because there is no matching information for source and target users.
l These following CPUU features are not supported because there is no matching information for source and target users: "Other User's Folder Shortcuts", "Delegates", "Additional Mailboxes", "Distribution Lists", "Contact Nicknames".
l This "Group Schedules" feature is not supported due to the following reasons:
l There is no matching information for source and target users.
l Associated content is not migrated.
l There is no matching information for messages.
l The "Preserve Offline folders (OST files)" feature is not supported. Offline folders are recreated after the mailbox switch.
l Profile switch is not supported for Exchange Server 2010 as a target.
l To enable the CPUU integration feature on the source Exchange Server 2007, you should turn on and configure the WebDAV API access for your Exchange Server 2007.
To configure ODME to work together with CPUU, please see http://documents.quest.com/on-demand-migration-for-email/user-guide/configuring-and-running-migrations/selecting-migration-options/updating-outlook-client-profiles.For the full list of CPUU features, refer to http://support.quest.com/technical-documents/client-profile-updating-utility/5.7.4/administration-guide/.
Microsoft Exchange l When viewing migrated data in OWA, there may be slight differences in the received time of emails when
comparing the source to the time recorded in the target. This affects all Exchange source environments and Exchange 2013/2016 target email services.
l When migrating from an Exchange server, any email addresses associated with existing users will be converted to SMTP addresses based on the source system. This means that X500 addresses will not be migrated for items, and the SMTP address on the migrated items will not be updated to the new SMTP address. In order to get Exchange to update to the new address the primary SMTP address on the source system should be an alias on the target system.
On Demand Migration for Email User GuideConfiguring and Running Migrations
81
l For appointments migrated from Exchange 2007 to Office 365, the acceptance date on the target will be the date/time of the migration. Also, appointment owners will see “invitation not sent” for appointments with multiple attendees.
l For Exchange-based targets, Groups are treated as Distribution Lists and cannot contain a contact with no email address. Because of this, any group members that do not have an email address on the source will not be migrated as a member of that group on an Exchange/O365 target. The contact will still migrate, it just cannot be a member of a group without an email address.
l InfoPath items are not migrated from Office 365 and Exchange server.
l Profile switch is not supported for Exchange Server 2010 as a target.
l For migrations from Exchange server and Office 365, migration of customized set of delegate permissions is currently not supported:
l Custom folder permissions are migrated as None (lack of any permissions) when the target delegate does not exist.
l In case when the target delegate exists, source and target delegate permissions are merged and the predefined Roles (Editor, Author, Reviewer and None) take precedence over any Custom permission set.
l In case when the target delegate exists and both source and target permissions are set to Custom, the target permissions will be set to None.
See Migrating Delegate Access Permissions for details.
GroupWise l In GroupWise 7, web page information and comments within contacts are not migrated. With all other
supported versions, contact comments are merged into Outlook contact notes.
l Task invites and items from the Search Folders do not migrate.
l GroupWise tasks do not always contain time zone information. ODME infers a time zone based on the migrated mail data, which allows most tasks to appear on the correct day and time. However, in rare instances, a task may appear one day earlier after migration.
l Outlook contacts only display three GroupWise contact email addresses. If there is a primary email address then it becomes the first email address listed.
l Outlook contacts only display one IM address for each GroupWise contact. If there is a primary IM address, it becomes the only IM address.
l Personalized subjects specified in the My Subject field of the GroupWise Personalize tab are not migrated.
l ODME does not migrate folders that have the ProxyFolder type with the following message in the log: "The type of the <folder_name> folder is ProxyFolder, it will be skipped".
Office 365 l For Office 365/Exchange 2010, or Office 365/Exchange 2013, or Office 365/Exchange 2016 hybrid
deployments, if your Office 365 configuration utilizes a shared domain configuration, On Demand Migration for Email will not able to locate your mailboxes.
l InfoPath items are not migrated from Office 365 and Exchange server.
On Demand Migration for Email User GuideConfiguring and Running Migrations
82

l ODME does not migrate retention policies and retention tags from one Office 365 tenant to another Office 365 tenant.
l For migrations from Exchange server and Office 365, migration of customized set of delegate permissions is currently not supported:
l Custom folder permissions are migrated as None (lack of any permissions) when the target delegate does not exist.
l In case when the target delegate exists, source and target delegate permissions are merged and the predefined Roles (Editor, Author, Reviewer and None) take precedence over any Custom permission set.
l In case when the target delegate exists and both source and target permissions are set to Custom, the target permissions will be set to None.
See Migrating Delegate Access Permissions for details.
l ODME does not migrate some Contact fields from G Suite to Office 365. Fields that are currently supported:
l Name
l Job title, Company
l Phone Numbers
l Picture
l Notes
l Email Address
l IM
l Birthday
l Relationship
Custom G Suite fields that cannot be migrated from G Suite to Office 365:
l Phonetic Last
l Phonetic First
l URL
l Internet Call
l Custom Fields
POP/Windows Live Hotmail l Only content located in the source inbox is accessible and migrated.
IMAP l Non-delivery reports migrated to exchange will not be as complete as if we they would be if they were
sent from exchange based client. For instance, a non-delivery report migrated from IMAP server cannot
On Demand Migration for Email User GuideConfiguring and Running Migrations
83

be resent by opening it and selecting Resend in Outlook.
l If an IMAP source has sent mail in a folder other than “sent items,” the target will have mail migrated to a folder of an identical name and not to the “sent items” folder in Exchange/Office 365. The user can move the mail from one folder to another after migration.
l The Follow Up flag is not migrated.
Notes/Domino l Unaccepted meeting requests appear in the Outlook calendar after migration.
l PABs stored on the local workstation. To be migrated, they must be synced to the server-based mail file.
l Notes actual appointment counts are likely to be higher than the estimates presented. Due to the available estimation methods, exceptions of recurring appointments are not counted as separate appointments during the estimation process. This is a direct result of the estimation methods available and will not impact the fidelity of the migrated data.
l The following items are not currently migrated:
l Pictures next to the To Field
l Items marked as private
l Conversational Threading
l Requests for responses at specific dates
l Certain types of mood stamps
l Domino Rules
l Stationery
G SuiteIMPORTANT: Now it is not required to enable IMAP for migrations from G Suite on the organization level unless you need 'Important' and 'Starred' target folders to have the same non-English localized names as the corresponding Gmail labels on the source.
l Tasks are not migrated.
l Cannot currently migrate attachments on Google Events.
l Currently, when migrating to Office 365, Google Labels do not show up by default in the user's Categories list.
To have migrated Google Labels appear in the Office 365 Categories list, in O365, open manage categories... from the categorize menu and select add new category. Then create a category that exactly matches a category that was applied to an O365 message during the migration. All messages marked with that category will take on the color applied (if any) and the category will remain on the user's list for future use.This can also be achieved in Outlook 2010. From the Home tab, click the Categorize button and then select All Categories. You will see your labels that are missing with (Not in Master Category List) next to the name. Select the category, click New, select a color, and click Save.
On Demand Migration for Email User GuideConfiguring and Running Migrations
84
l In G Suite to Exchange/Office 365 migrations, attachments that appeared normally on the source may show up on the target as a ‘winmail.dat’ file. These files are actually winmail.dat files on the source as well, but G Suite automatically interprets them as their original file type. To view them on the target, users will need to use a winmail.dat viewer.
l The Chats label is no longer supported due to Google Chat was officially shut down (https://support.google.com/chat/?hl=en).
l Currently, if a G Suite user has "Make changes AND manage sharing" permissions on a secondary shared calendar, this shared calendar will be migrated, but no sharing connection is maintained between the two mailboxes, which means the shared calendar on the target will not be updated when the owner updates their own calendar. If this behavior is not desired, users need either to manually remove the shared calendars on the target after migration, or follow the steps below prior to migration to change the Sharing Permission Settings.
NOTE: ODME does not migrate primary shared calendars.
If you want to allow the migration of secondary shared calendars, which will become independent (orphaned) calendars in the target:
On an individual user basis:
1. Log in to the account whose calendar is being shared.
2. Go to Calendar > Settings (gear icon) > Settings > Calendars.
3. Click on sharing for the desired calendar.
4. Under "Share with specific people", change the Permission Settings for the user(s) to the "Make changes AND manage sharing" permission.
5. Save.
If you want to prevent the migration of secondary shared calendars, so that they can be setup natively as shared calendars in the target:
On an individual user basis:
1. Log in to the account whose calendar is being shared.
2. Go to Calendar > Settings (gear icon) > Settings > Calendars.
3. Click on sharing for the desired calendar.
4. Under "Share with specific people", change the Permission Settings for the user(s) with the "Make changes AND manage sharing" permission to any other option you want.
5. Save.
On Demand Migration for Email User GuideConfiguring and Running Migrations
85
l ODME does not migrate some Contact fields from G Suite to Office 365. Fields that are currently supported:
l Name
l Job title, Company
l Phone Numbers
l Picture
l Notes
l Email Address
l IM
l Birthday
l Relationship
NOTE: When migrating contacts, ODME explicitly validates the Email Address property. If the property does not contain the correct e-mail address, it will not be migrated.
Custom G Suite fields that cannot be migrated from G Suite to Office 365:
l Phonetic Last
l Phonetic First
l URL
l Internet Call
l Custom Fields
Zimbra l Server-side content is not migrated.
l Migration of mailboxes from Zimbra 6 and 7 is not supported.
l Only the first IM address is migrated for each Zimbra contact. Additional IM addresses, if any, are not migrated.
l The "other" URL for Zimbra contacts is not migrated.
l Items contained Zimbra Briefcases are not migrated.
l ODME does not correctly map contact File-As field "Company (First Last)".
l Tags applied to mail, contacts, and tasks are not migrated.
l Certain mail items that can be defined in the Zimbra Outlook connector are not supported in the Zimbra UI and as a result cannot be migrated. These mail items include, but are not limited to, the recurrence information for tasks and completed date fields.
l ODME cannot migrate Zimbra item fields that do not exist on the target. For example, when migrating to O365, the location field on tasks will not migrate as there is no comparable field for tasks in O365.
On Demand Migration for Email User GuideConfiguring and Running Migrations
86

l ODME support migrating a total of 3 email addresses per contact to an Exchange target mailbox. Zimbra has fields for 5 addresses per contact.
l ODME cannot migrate to an Exchange target group members in Zimbra that do not have contacts with defined email addresses. This is because Exchange requires each member of a distribution list to have an email address, while group members in Zimbra are not required to have an email address.
l ODME does not migrate message tags.
l ODME does not support migration of excluded dates in recurring meetings. For example, if a meeting is scheduled for "every Friday, except 2015-05-01", then it will be migrated as recurring “every Friday” - the excluded date will not be migrated to the target server.
Known IssuesFor the list of known issues, please refer http://documents.quest.com/on-demand-migration-for-email/release-notes/known-issues.
Running MigrationAfter you have connected to your source and target email services, imported the mailboxes you want to migrate, and optionally, selected what mailbox items to exclude from the migration, you are ready to run the migration.
CAUTION: Before starting a migration, be aware of the following:
l Each mailbox in a source email service can be migrated successfully a total of 10 times with a maximum extraction limit of 50 GB across all migrations. This includes mailboxes that have 10 different date filters. This limit applies even if the 10 migrations do not migrate the same message more than once.
l Do not switch to the target domain until all the mailboxes in your migration plan have been migrated.Otherwise, if you switch your source domain and MX record to the target domain before the migration is completed, ODME cannot connect to the source mailboxes using old SMTP addresses, and so you need to add mailbox pairs with the new source SMTP addresses to the migration plan. In this case, an additional ODME license is consumed for each newly added mailbox pair.
To run a migration:
1. Open the Dashboard and select the migration plan you want to run.
2. Open the Migrate tab.
The Migrate tab lists all the mailboxes that have been imported (up to 5000).
3. Optionally, make any changes to the migration settings as summarized in the in Dashboard or in the Migration Checklist of the Migrate tab.
The migration plans in the Dashboard and the Migration Checklist in the Migrate tab display links pointing to the Connections, Mailboxes and Options tabs. Click a link to return to the tab and make the changes you want.
On Demand Migration for Email User GuideConfiguring and Running Migrations
87

NOTE: The Migration Checklist displays the IP addresses of the ODME web services used to run the migration (which are distinct from the web services used to validate connections to the source and target email services). The system administrator should verify that no firewall rules exist that will prevent the ODME web services identified by the IP addresses from running a migration.
4. Click Start Migration.
During the migration, each mailbox displays what percentage of the mailbox has been migrated. At the bottom a colored progress bar indicates the overall status of the migration.When the migration is complete, the number of mailboxes that were successfully migrated and the number that were interrupted or failed to migrate are displayed in the Migration Status sectionFor each mailbox, ODME also displays:
l The number of errors encountered during the migration
NOTE: The number of errors reported for a mailbox's migration displayed in the Migrate tab may be lower than the number of error messages reported in the mailbox's migration logs. This is because certain errors counted in a mailbox's migration may be the result of several related errors reported in the migration logs. For example, ODME may fail to migrate a mailbox item for a combination of reasons, each one resulting in a separate error reported in the migration log. For the mailbox's migration, however, this failure is counted as one error.
l The estimated number of items (messages, contacts, distribution lists, appointments, and tasks) the mailbox contains
l The total number of mailbox items that were successfully migrated as well as the percentage (a successful migration is where 90% or more of the items migrated)
NOTE: For migrations from a G Suite source, the Migration Status section indicates whether ODME has paused data extraction from Google due to hitting the data extraction limit or because Google throttled the connections. The Mailbox column shows when the migration will be restarted. There is also a tooltip to the right of the 'auto-resume' message explaining why the migration has been paused and that it will resume after 24 hours.
5. Optionally, to view migration log entries for a single mailbox, click the View Log link for that mailbox.
NOTE: For migrations from a G Suite source, log messages indicate whether ODME paused its data download from Google. The messages indicate why ODME is pausing, how many items (contacts, calendar and email) ODME has migrated so far, and when ODME will re-start the migration. The messages also indicate if ODME paused due to hitting the data extraction limit or because Google throttled the connections.
6. If some issues or unexpected errors occurred during the mailbox migration, the mailbox will be marked as "Interrupted" or "Failed". To restart the migration process for one or several "Interrupted" or "Failed" mailboxes, you can select the checkbox next to the mailbox and click the Restart Selected button.
Migration ConcurrencyThough the number of mailboxes that can be migrated by the product concurrently is virtually unlimited, during migration process you can encounter some limitations outside the product.In some cases, your source or target environment may not be able to keep up too many mailboxes being migrated simultaneously while still being responsive and available to their users. To avoid this problem you can
On Demand Migration for Email User GuideConfiguring and Running Migrations
88

limit the number of mailboxes migrated concurrently in a migration plan. Please see Limiting Concurrent Migrations for details.
Another limit you can hit is the maximum number of PowerShell connections. The product uses PowerShell to configure the forwarding options (Forwarding new items as they arrive and Turn off existing forwarding) for Exchange / Office 365. If a migration plan has one or more of these options enabled for Exchange / Office 365, when it starts, it opens a PowerShell connection to configure the enabled options. If you have too many plans configured under the same administrative account and they start approximately at the same time, you can hit the ‘PowerShellMaxConcurrency’ throttling limit for this account. In this case, the plan hit that limit will be rescheduled to start later, when a PowerShell connection is available, and the corresponding message will be displayed in the plan. Please consider to specify a different administrative account for paused plans if you need them to start immediately. Note that the connections under the same account may be done outside the product.
On Demand Migration for Email User GuideConfiguring and Running Migrations
89

Post Migration
Viewing Migration ReportsOn Demand Migration for Email provides the following reports:
l An Executive Summary report which shows migration statistics both at the organization level and mailbox level.
l A general Migration Summary report
l A Billing Summary report which shows the number of billable mailbox migrations in a particular date range
l A Migration Details report which includes the event log for each migration
l A Per Mailbox Statistics report which shows a list of executed migration plans and their statuses
These reports are accessed by clicking Reports in the lower right corner of the Dashboard.
NOTE: For all types of reports, the value of 'Tasks/Notes" shows the sum of migrated Task and Note items.
You can download the following migration reports in the CSV format directly from the Dashboard:
l A Per Plan Migration report which shows the same data as the Migrate tab. To generate this report, click Get Report next to the plan on the Dashboard.
l A Per Company Migration report aggregates the information from all the plans for the current company. To generate this report, click the All Plans Report button in the lower-right corner of the Dashboard.
Executive Summary ReportThe Executive Summary report shows migration statistics both at the migration plan level and the mailbox level. You can generate the report for individual migration plans or for all migration plans at once.The Overview tab shows a pie chart representing the migration status percentages for all the mailboxes in the selected plan or plans. The total number of mailboxes in each status is displayed beneath the chart.The Mailbox Details tab shows bar graphs representing the migration status of individual mailboxes. For each mailbox, the total number of successfully migrated items is coded green, while the total number of items that failed to migrate is coded red. By default, the Mailbox Details tab shows all the mailboxes in the selected plan or plans. To filter the results, select only the migration status options you want and click Filter.Migration statuses include:
l Migrated
l Migrated with Errors
On Demand Migration for Email User GuidePost Migration
90
l Pending
l In Process
Migration Summary ReportThe Migration Summary report displays the following information:
l The date of the first successful migration
l The total number of successfully migrated mailboxes
l The total amount of migrated data in MB
l The total number of migrated mailbox items (messages, contacts, distribution lists, appointments, and tasks/notes)
Billing Summary ReportThe Billing Summary report shows information regarding all the billable mailbox migrations in a particular date range (the last 30 days shown by default). Use the calendar controls to change the date range.The Billing Summary report includes the total number of billable migrations, and of these, the number billed to a “pay-as-you-go” plan and the number billed using pre-paid licenses (if any).
NOTE: If you purchased any pre-paid licenses, the total number of pre-paid licenses in use is shown in the top right corner of the report window, as well as the number of licenses remaining. If you have zero licenses remaining, click the Buy More link to purchase additional licenses.
For each billable migration, the Billing Summary shows:
l The migration plan
l The source mailbox
l The migration status
l Payment type (Pay-As-You-Go or Pre-Paid)
l Completion time
NOTE: The payment type “Unknown” is shown for migrations that were completed prior to ODME 1.6.2.
To download the report to a CSV file that can be opened in Excel, click Download CSV File in the bottom right corner.
Migration Details ReportThe Migration Details report displays information about each migration that completed during a particular month, including the completion date and time, the source and target mailbox, and the result (a successful migration is where 90% or more of the items migrated successfully).
To run a Migration Details report:
1. Select the Migration Details option.
2. Select the month in which the migrations you want to view completed.
On Demand Migration for Email User GuidePost Migration
91
For each migration, Migration Details reports also include a link to download the migration audit log entry to a text file.
3. Optionally, click the Download link for a particular migration to view the audit log.
Additional information about each migration in a Migration Details report is available as a downloadable csv file.
4. Optionally, click Download Additional Details to view additional information about each migration.
Per Mailbox Statistics ReportThe Per Mailbox Statistics report shows a list of migration plans that had been executed at least once and their final migration statuses:
l Stopped
l Stopped With Errors
l Completed
l Completed With Errors
Notify and Train UsersAfter successfully migrating mailboxes, you should notify users of the migration and provide information on how to access the new mail system. This step is performed outside of On Demand Migration for Email and may include training users on the new system as needed.
On Demand Migration for Email User GuidePost Migration
92
GlossaryThis glossary provides definitions of many of the terms commonly used in On Demand Migration for Email.
Admin Credentials
The login information (username/password) of an account that has the required rights to access all mailbox data. The rights assigned to this account will vary based on the Source Email Service or Target Email Service configured for the migration.
Email ServiceCollection of settings that define a mailbox store. This may include host name, port and protocol information, but in some cases it is only necessary to define the type of service (i.e. G Suite).Alternatives: Environment, Connection, Service, Migration Path
ItemAn object within a mailbox that may be migrated. This is typically one of an Email, Contact, Appointment, Distribution List.
MigrationA single pass through a Source Mailbox moving all the Items selected to migrate to the Target Mailbox.
Migration JobMapping between a Source Mailbox and a Target Mailbox.
Migration OptionsCollection of settings that define the data to be migrated. This includes item type (Email, Contacts, Calendar, Tasks), filters (migrate items received before or after specified date, exclude folders, etc.), and may be extended to cover additional settings like custom properties on mail items.Alternatives: Migration Items, Filters
Migration PlanA configuration, and collection of users, defining a migration.
Source Email ServiceThe email service platform from which mailbox items are migrated.
On Demand Migration for Email User GuideGlossary
93
Source MailboxMailbox that has been selected to migrate to the Target Email Service.
Successful MigrationAny Migration where 90% or more of the items are migrated successfully.
Target Email ServiceThe future location for mailboxes after they are migrated, either Office 365 or Exchange 2010.
Target MailboxMailbox that exists on the Target Email Service and will hold all of the data from the Source Mailbox after the migration is complete.
On Demand Migration for Email User GuideGlossary
94
About usAb o u t u s
We are more than just a nameWe are on a quest to make your information technology work harder for you. That is why we build community-driven software solutions that help you spend less time on IT administration and more time on business innovation. We help you modernize your data center, get you to the cloud quicker and provide the expertise, security and accessibility you need to grow your data-driven business. Combined with Quest’s invitation to the global community to be a part of its innovation, and our firm commitment to ensuring customer satisfaction, we continue to deliver solutions that have a real impact on our customers today and leave a legacy we are proud of. We are challenging the status quo by transforming into a new software company. And as your partner, we work tirelessly to make sure your information technology is designed for you and by you. This is our mission, and we are in this together. Welcome to a new Quest. You are invited to Join the Innovation™.
Our brand, our vision. Together.Our logo reflects our story: innovation, community and support. An important part of this story begins with the letter Q. It is a perfect circle, representing our commitment to technological precision and strength. The space in the Q itself symbolizes our need to add the missing piece — you — to the community, to the new Quest.
Contacting QuestFor sales or other inquiries, visit www.quest.com/contact.
Technical support resourcesTechnical support is available to Quest customers with a valid maintenance contract and customers who have trial versions. You can access the Quest Support Portal at https://support.quest.com.The Support Portal provides self-help tools you can use to solve problems quickly and independently, 24 hours a day, 365 days a year. The Support Portal enables you to:
l Submit and manage a Service Request
l View Knowledge Base articles
l Sign up for product notifications
l Download software and technical documentation
l View how-to-videos
l Engage in community discussions
l Chat with support engineers online
l View services to assist you with your product
On Demand Migration for Email User GuideAbout us
95


![Ch.3 Demand Forecasting. - IEMS연구센터 홈페이지. Demand Forecasting.pdf · - 2 - Demand Forecasting. [Other Resource] Definition. ․ An estimate of future demand. ․ A](https://static.fdocument.pub/doc/165x107/5a8a4f557f8b9a085a8bd6d2/ch3-demand-forecasting-iems-demand-2-demand-forecasting.jpg)