Prohibida la Reproducción y Distribución - Honda Motos Perú · Honda da Amazônia Ltda. se...
163
C R F 2 3 0 F Manual del Propietario Owner’s Manual ribución
Transcript of Prohibida la Reproducción y Distribución - Honda Motos Perú · Honda da Amazônia Ltda. se...
C R F 2 3 0 F
0714
D2203-MAN-0714
C R F 2 3 0 F
Manual del PropietarioOwner’s Manual
Prohibida
la Repro
ducción y
Distribu
ción
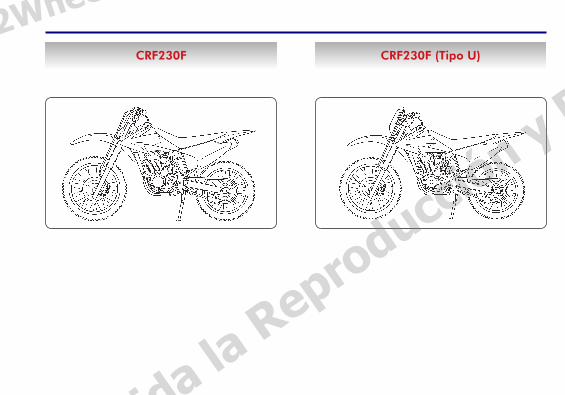
CRF230F CRF230F (Tipo U)
Prohibida la Reproducción y Distribución
2W-PE |
2Wheel
s - PE | F
REDDY F
IGUERO
A
2 CRF230F • CRF230F (Tipo U)
Información Importante
SOLAMENTE EL PILOTO, NINGÚN PASAJERO Esta motocicleta ha sido diseñada para transportar solamente al piloto. Las características del asiento no
permiten el transporte seguro de un pasajero. Nunca exceda la capacidad máxima de carga.
SOLAMENTE UTILIZACIÓN OFF-ROAD Esta motocicleta ha sido proyectada solamente para la utilización off-road.
LEA ATENTAMENTE ESTE MANUAL DEL PROPIETARIO Preste especial atención a los mensajes de seguridad que aparecen a lo largo del manual. Estos mensajes
se explican detalladamente en la sección ‘’Unas Pocas Palabras sobre Seguridad’’ (página 5).
Este manual debe ser considerado parte permanente de la motocicleta y debe acompañarla en caso de reventa.
Prohibida la Reproducción y Distribución
2W-PE | 2Wheels - PE | FREDDY FIGUEROA
3CRF230F • CRF230F (Tipo U)
Bienvenido
Su nueva motocicleta le brinda con una invitación a la aventura y al desafío de dominar la máquina. Su seguridad dependerá no solamente de sus reflejos y familiaridad con la motocicleta, pero también de la condición mecánica de la misma. Su motocicleta necesita una inspección antes del uso, bien como servicios de mantenimiento regulares.
Para enfrentar los retos con seguridad, y disfrutar plenamente de la aventura, usted deberá familiarizarse completamente con el contenido de este manual del propietario ANTES DE PILOTAR LA MOTOCICLETA.
Durante la lectura de este manual, usted encontrará informaciones precedidas del símbolo NOTA. Esas informaciones tienen por objetivo ayudarle a evitar daños a su motocicleta, a otras propiedades, o al medio ambiente.
Cuando necesite reparos y/o servicios de mantenimiento, diríjase a su distribuidor Honda que mejor conoce su motocicleta y dispone de técnicos calificados entrenados por la fábrica y de las herramientas necesarias para realizarlos.
¡Tenga un pilotaje agradable, y gracias por haber elegido una Honda!
Prohibida la Reproducción y Distribución
2W-PE | 2Wheels - PE | FREDDY FIGUEROA
4 CRF230F • CRF230F (Tipo U)
Todas las informaciones inclusas en esta publicación tienen como principio las informaciones más recientes disponibles sobre el producto en el momento de la autorización de la impresión. Moto Honda da Amazônia Ltda. se reserva el derecho de hacer cambios en cualquier momento y sin notificación previa, sin que por esto incurra en ninguna obligación. No se puede reproducir ninguna parte de este manual sin autorización por escrito.
Las especificaciones pueden cambiar de acuerdo con cada lugar.
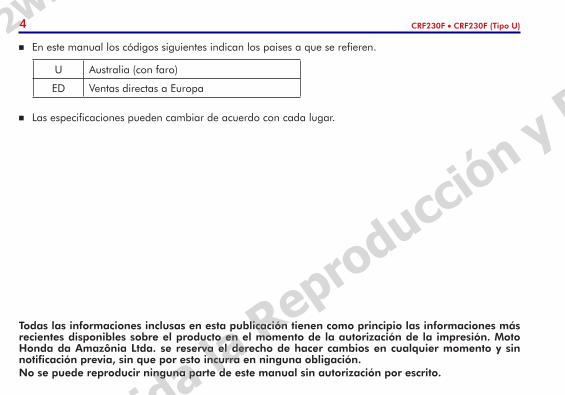
En este manual los códigos siguientes indican los paises a que se refieren.
U Australia (con faro)
ED Ventas directas a Europa
Prohibida la Reproducción y Distribución
2W-PE | 2Wheels - PE | FREDDY FIGUEROA
5CRF230F • CRF230F (Tipo U)
Unas Pocas Palabras sobre SeguridadSu seguridad, y la de otras personas, es muy importante. Y el pilotaje seguro de esta motocicleta es una responsabilidad importante.
Para ayudarle a tomar decisiones acertadas sobre seguridad, presentamos procedimientos de operación y otras informaciones en etiquetas y en este manual. Esas informaciones le alertan sobre peligros potenciales que podrían herir a usted o a otras personas.
Por supuesto, no es práctico o posible alertarle sobre todos los peligros asociados con la utilización o el mantenimiento de la motocicleta. Usted deberá tomar decisiones utilizando el buen sentido común.
Usted encontrará informaciones de seguridad importantes presentadas de diversas maneras, incluyendo:
Etiquetas de Seguridad — en la motocicleta.
Mensajes de Seguridad — precedidas por un símbolo de aviso de seguridad ! y una de las dos palabras de alerta: ADVERTENCIA o ATENCIÓN.
(Cont.)
Prohibida la Reproducción y Distribución
2W-PE | 2Wheels - PE | FREDDY FIGUEROA
6 CRF230F • CRF230F (Tipo U)
Estas palabras de alerta significan:
! AdvertenciA
Usted podrá ser muerto o seriamente herido en caso de que las instrucciones no sean seguidas.
! Atención
Usted podrá lesionarse en caso de que las instrucciones no sean seguidas.
Encabezamientos de Seguridad — tales como Notas Importantes de Seguridad o Precauciones Importantes de Seguridad.
Sección de Seguridad — tal como Seguridad de la Motocicleta.
Instrucciones — como utilizar esta motocicleta de forma correcta y segura.
Este manual contiene en su totalidad informaciones importantes de seguridad – léalo atentamente.
Prohibida la Reproducción y Distribución
2W-PE | 2Wheels - PE | FREDDY FIGUEROA
7CRF230F • CRF230F (Tipo U)
FUNCIONAMIENTO
SEGURIDAD DE LA MOTOCICLETA 09
Informaciones Importantes de Seguridad ..... 09 Aparatos de Protección ............................... 10 Límites de Carga y Directrices ..................... 11
UBICACIÓN DE LOS COMPONENTES 14
COMPONENTES PRINCIPALES 20
(Informaciones necesarias a la utilización de la motocicleta)
Frenos ....................................................... 20 Embrague .................................................. 23 Combustible .............................................. 24 Aceite del Motor ......................................... 27 Neumáticos ............................................... 28
COMPONENTES INDIVIDUALES ESENCIALES 31
Interruptor de Encendido ............................ 31 Interruptor de Arranque .............................. 32 Interruptor del Motor .................................. 32
EQUIPAMIENTOS 33
(No necesarios al funcionamiento)
Tapa Lateral Izquierda ................................ 33 Tapa Lateral Derecha ................................. 33
FUNCIONAMIENTO 34
Inspección Antes del Uso ............................ 34 Arranque del Motor .................................... 35 Ablande del Motor ..................................... 36 Pilotaje ...................................................... 37 Frenado ..................................................... 38 Estacionamiento ......................................... 39 Prevención de Robos .................................. 39
(Cont.)
Prohibida la Reproducción y Distribución
2W-PE | 2Wheels - PE | FREDDY FIGUEROA
8 CRF230F • CRF230F (Tipo U)
MANTENIMIENTO 40
La Importancia del Mantenimiento .............. 40 Seguridad en el Mantenimiento................... 41 Precauciones de Seguridad ......................... 42 Tabla de Mantenimiento ............................. 43 Inspección para Competición ...................... 46 Juego de Herramientas .............................. 48 Números de Serie ...................................... 48 Etiqueta de Color ....................................... 49 Filtro de Aire .............................................. 49 Respiradero del Motor ................................ 51 Aceite del Motor ......................................... 52 Bujía de Encendido .................................... 54 Ralentí ....................................................... 56 Funcionamiento del Acelerador ................... 57 Parachispas ............................................... 59 Cadena de Transmisión .............................. 60 Llantas y Rayos........................................... 64 Ruedas ...................................................... 65 Desgaste de las Pastillas del Freno .............. 67 Desgaste de las Zapatas del Freno .............. 68 Batería ....................................................... 68 Reemplazo de Fusibles ............................... 69
Suspensión Delantera ................................. 70 Suspensión Trasera ..................................... 71 Soporte Lateral ........................................... 72 Reemplazo de Lámparas (Solamente Tipo U) .. 73
LIMPIEZA 74
GUÍA PARA ALMACENAJE DE LA MOTOCICLETA 75
Almacenaje ................................................ 75 Activación de la Motocicleta ........................ 77
CÓMO ENFRENTAR LO INESPERADO 77
ESPECIFICACIONES 78
Prohibida la Reproducción y Distribución
2W-PE | 2Wheels - PE | FREDDY FIGUEROA
9CRF230F • CRF230F (Tipo U)
SEGURIDAD DE LA MOTOCICLETA
Informaciones Importantes de SeguridadSu motocicleta puede ofrecerle muchos años de funcionamiento y placer – en caso de que asuma la responsabilidad por su propia seguridad y esté consciente de los retos que podrá encontrar durante el pilotaje. Hay muchas cosas que usted puede hacer para prote-gerse al pilotar. A lo largo de este manual usted encon-trará muchas recomendaciones útiles. Las siguientes son algunas que consideramos más importantes.
Utilice Siempre un CascoEfectivamente el casco reduce de manera significativa el número y la gravedad de las lesiones en la cabeza. Por lo tanto, utilice siempre el casco aprobado para motocicletas. También es recomendable utilizar protección para los ojos, botas, guantes y ropas de protección (página 10).
Nunca Transporte un PasajeroEsta motocicleta ha sido diseñada para transportar solamente al piloto. Por esto, no está equipada con agarraderas, asiento, ni descansapies para otra persona – por lo tanto, nunca transporte un pasa-jero. Este podría perjudicar su aptitud en mantener el equilibrio, bien como el control de la motocicleta.
Pilote Solamente Off-RoadSu motocicleta ha sido diseñada y fabricada sola-mente para la utilización off-road. Los neumáticos no están hechos para el asfalto. La motocicleta no posee intermitentes y otros dispositivos esenciales a la utilización en carreteras. En caso de que sea necesario cruzar una carretera o autopista, bájese y conduzca manualmente la motocicleta.
Tómese el Tiempo Necesario para Aprender y PracticarEl aprendizaje de las técnicas del pilotaje off-road es un proceso gradual, paso a paso. Empiece practicando a baja velocidad en un local seguro y despacio vaya desarrollando sus habilidades. Las instrucciones de un piloto experto también pueden ser valiosas. Si usted necesita asistencia, solicite a su distribuidor informaciones sobre grupos que practiquen en su área.
Esté Alerta para los Riesgos del Off-RoadEl terreno puede presentar una serie de desafíos al pilotaje off-road. Manténgase atento a curvas inesperadas, peñas, piedras, surcos de carriles y otros riesgos. Mantenga la velocidad siempre baja el suficiente para que usted tenga tiempo de reaccionar en una situación de peligro.
(Cont.)
Prohibida la Reproducción y Distribución
2W-PE | 2Wheels - PE | FREDDY FIGUEROA
10 CRF230F • CRF230F (Tipo U)
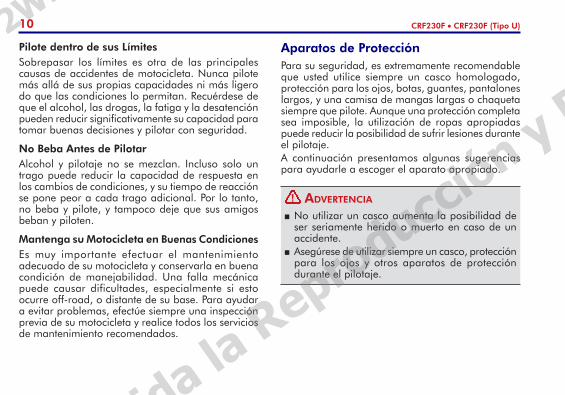
Aparatos de ProtecciónPara su seguridad, es extremamente recomendable que usted utilice siempre un casco homologado, protección para los ojos, botas, guantes, pantalones largos, y una camisa de mangas largas o chaqueta siempre que pilote. Aunque una protección completa sea imposible, la utilización de ropas apropiadas puede reducir la posibilidad de sufrir lesiones durante el pilotaje.A continuación presentamos algunas sugerencias para ayudarle a escoger el aparato apropiado.
Pilote dentro de sus LímitesSobrepasar los límites es otra de las principales causas de accidentes de motocicleta. Nunca pilote más allá de sus propias capacidades ni más ligero do que las condiciones lo permitan. Recuérdese de que el alcohol, las drogas, la fatiga y la desatención pueden reducir significativamente su capacidad para tomar buenas decisiones y pilotar con seguridad.
No Beba Antes de PilotarAlcohol y pilotaje no se mezclan. Incluso solo un trago puede reducir la capacidad de respuesta en los cambios de condiciones, y su tiempo de reacción se pone peor a cada trago adicional. Por lo tanto, no beba y pilote, y tampoco deje que sus amigos beban y piloten.
Mantenga su Motocicleta en Buenas CondicionesEs muy importante efectuar el mantenimiento adecuado de su motocicleta y conservarla en buena condición de manejabilidad. Una falla mecánica puede causar dificultades, especialmente si esto ocurre off-road, o distante de su base. Para ayudar a evitar problemas, efectúe siempre una inspección previa de su motocicleta y realice todos los servicios de mantenimiento recomendados.
No utilizar un casco aumenta la posibilidad de ser seriamente herido o muerto en caso de un accidente.
Asegúrese de utilizar siempre un casco, protección para los ojos y otros aparatos de protección durante el pilotaje.
AdvertenciA!
Prohibida la Reproducción y Distribución
2W-PE | 2Wheels - PE | FREDDY FIGUEROA
11CRF230F • CRF230F (Tipo U)
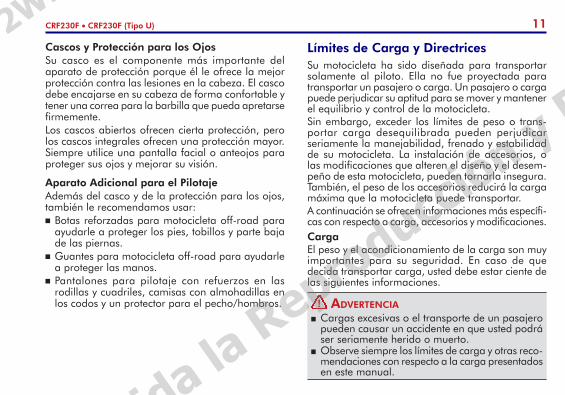
Cascos y Protección para los OjosSu casco es el componente más importante del aparato de protección porque él le ofrece la mejor protección contra las lesiones en la cabeza. El casco debe encajarse en su cabeza de forma confortable y tener una correa para la barbilla que pueda apretarse firmemente. Los cascos abiertos ofrecen cierta protección, pero los cascos integrales ofrecen una protección mayor. Siempre utilice una pantalla facial o anteojos para proteger sus ojos y mejorar su visión.
Aparato Adicional para el PilotajeAdemás del casco y de la protección para los ojos, también le recomendamos usar: Botas reforzadas para motocicleta off-road para
ayudarle a proteger los pies, tobillos y parte baja de las piernas.
Guantes para motocicleta off-road para ayudarle a proteger las manos.
Pantalones para pilotaje con refuerzos en las rodillas y cuadriles, camisas con almohadillas en los codos y un protector para el pecho/hombros.
Límites de Carga y DirectricesSu motocicleta ha sido diseñada para transportar solamente al piloto. Ella no fue proyectada para transportar un pasajero o carga. Un pasajero o carga puede perjudicar su aptitud para se mover y mantener el equilibrio y control de la motocicleta.Sin embargo, exceder los límites de peso o trans-portar carga desequilibrada pueden perjudicar seriamente la maneja bilidad, frenado y estabilidad de su motocicleta. La instalación de accesorios, o las modificaciones que alteren el diseño y el desem-peño de esta motocicleta, pueden tornarla insegura. También, el peso de los accesorios reducirá la carga máxima que la motocicleta puede transportar.A continuación se ofrecen informaciones más específi-cas con respecto a carga, accesorios y modificaciones.CargaEl peso y el acondicionamiento de la carga son muy importantes para su seguridad. En caso de que decida transportar carga, usted debe estar ciente de las siguientes informaciones.
(Cont.)
Cargas excesivas o el transporte de un pasajero pueden causar un accidente en que usted podrá ser seriamente herido o muerto.
Observe siempre los límites de carga y otras reco-mendaciones con respecto a la carga presentados en este manual.
AdvertenciA!
Prohibida la Reproducción y Distribución
2W-PE | 2Wheels - PE | FREDDY FIGUEROA
12 CRF230F • CRF230F (Tipo U)
Límites de CargaLos límites de carga para su motocicleta son los siguientes:Capacidad máxima de carga: 100 kg (220 lbs)
Eso incluye el peso del piloto y todos los accesorios.El peso de los accesorios adicionales disminuirá la ca-pacidad máxima de carga que se puede transportar.
Directrices sobre la CargaComo ya hemos mencionado anteriormente, nosotros recomendamos que usted no transporte cualquier tipo de carga en la motocicleta. Pero en caso de que usted decida transportar carga, pilote a velocidad reducida y siga estas directrices de sentido común: Mantenga mínimo el peso y el tamaño del equipaje.
Cerciórese de que él no pueda quedar fácilmente preso en las ramas u otros objetos, ni tampoco interfiera en su capacidad de cambiar de posición para mantener el equilibrio y la estabilidad.
Posicione el peso adicional lo más próximo posible del centro de la motocicleta.
No sujete objetos grandes o pesados (tales como saco de dormir o tienda de campaña) en el manubrio, en las horquillas o en el guardafangos delantero.
Cerciórese de que todo el equipaje esté firmemente sujetado.
Nunca sobrepase el límite de peso máximo. Compruebe si ambos los neumáticos están correc-
tamente inflados (página 28).
Accesorios y ModificacionesLa modificación de la motocicleta o la utilización de accesorios no originales Honda pueden tornar su motocicleta insegura. Antes de considerar la realización de cualquier modificación o la adición de un accesorio, asegúrese de leer las siguientes informaciones.
Los accesorios o modificaciones no apropiados pueden causar un accidente en que usted puede ser seriamente herido o muerto.
Siga todas las instrucciones con respecto a accesorios y modificaciones presentadas en este manual.
AdvertenciA!
Prohibida la Reproducción y Distribución
2W-PE | 2Wheels - PE | FREDDY FIGUEROA
13CRF230F • CRF230F (Tipo U)
AccesoriosRecomendamos expresamente que se utilicen solamente accesorios originales Honda que han sido diseñados y testados específicamente para esta motocicleta. Visto que Honda no puede testar todos los otros accesorios, recuérdese de que usted es el responsable por la elección, instalación y utilización correcta de accesorios no originales. Entre en contacto con su distribuidor Honda para asistencia y siga siempre las siguientes directrices: Asegúrese de que el accesorio no afecte la
visualización de las luces, no reduzca la distancia mínima del suelo ni el ángulo de inclinación de la motocicleta, la carrera de las suspensiones y de la dirección, no altere su posición de pilotaje, ni interfiera en el accionamiento de los mandos.
Asegúrese de que el equipamiento eléctrico no exceda la capacidad del sistema eléctrico de la motocicleta (página 80). Un fusible fundido puede ocasionar una pérdida de luz o de rendimiento del motor.
ModificacionesRecomendamos expresamente que no quite piezas del equipamiento original ni modifique la motocicleta de modo que se altere su diseño o funcionamiento. Tales mudanzas pueden perjudicar seriamente la manejabilidad, la estabilidad y el frenado de la motocicleta, lo que resulta en un pilotaje inseguro.Quitar o modificar el sistema de escape (como los parachispas o los silenciadores) u otros equipa-mientos también puede hacer que la motocicleta se vuelva ilegal.
Prohibida la Reproducción y Distribución
2W-PE | 2Wheels - PE | FREDDY FIGUEROA
14 CRF230F • CRF230F (Tipo U)
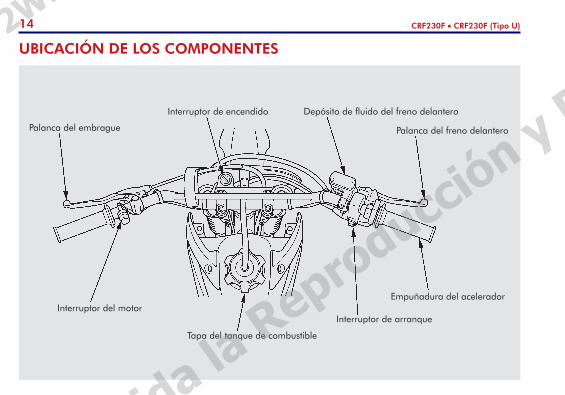
UBICACIÓN DE LOS COMPONENTES
Palanca del embrague
Interruptor del motor
Palanca del freno delantero
Empuñadura del acelerador
Interruptor de encendido Depósito de fluido del freno delantero
Tapa del tanque de combustible
Interruptor de arranque
Prohibida la Reproducción y Distribución
2W-PE | 2Wheels - PE | FREDDY FIGUEROA
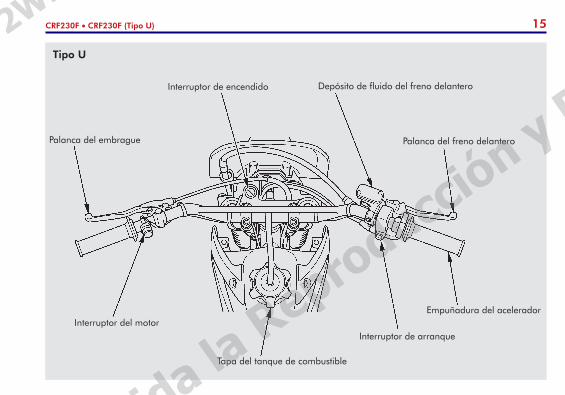
15CRF230F • CRF230F (Tipo U)
Palanca del embrague
Interruptor del motor
Palanca del freno delantero
Empuñadura del acelerador
Interruptor de encendido Depósito de fluido del freno delantero
Tapa del tanque de combustible
Interruptor de arranque
Tipo U
Prohibida la Reproducción y Distribución
2W-PE | 2Wheels - PE | FREDDY FIGUEROA
16 CRF230F • CRF230F (Tipo U)
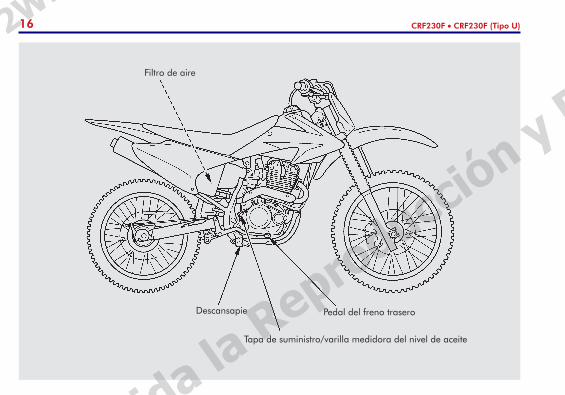
Tapa de suministro/varilla medidora del nivel de aceite
Descansapie Pedal del freno trasero
Filtro de aire
Prohibida la Reproducción y Distribución
2W-PE | 2Wheels - PE | FREDDY FIGUEROA
17CRF230F • CRF230F (Tipo U)
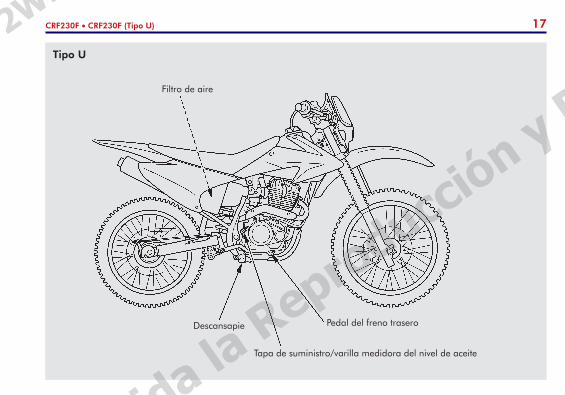
Tipo U
Filtro de aire
Tapa de suministro/varilla medidora del nivel de aceite
Descansapie Pedal del freno trasero
Prohibida la Reproducción y Distribución
2W-PE | 2Wheels - PE | FREDDY FIGUEROA
18 CRF230F • CRF230F (Tipo U)
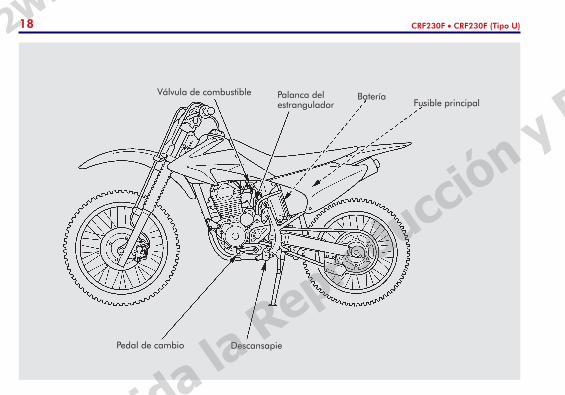
Válvula de combustible Palanca del estrangulador
Pedal de cambio Descansapie
Fusible principalBatería
Prohibida la Reproducción y Distribución
2W-PE | 2Wheels - PE | FREDDY FIGUEROA
19CRF230F • CRF230F (Tipo U)
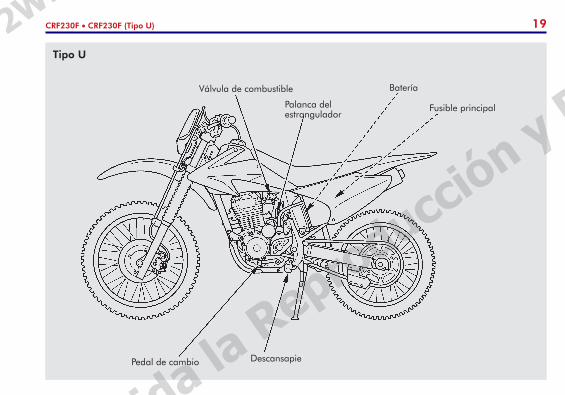
Válvula de combustible
Palanca del estrangulador
Pedal de cambio Descansapie
Batería
Fusible principal
Tipo U
Prohibida la Reproducción y Distribución
2W-PE | 2Wheels - PE | FREDDY FIGUEROA
20 CRF230F • CRF230F (Tipo U)
COMPONENTES PRINCIPALES
(Informaciones necesarias a la utilización de la motocicleta)
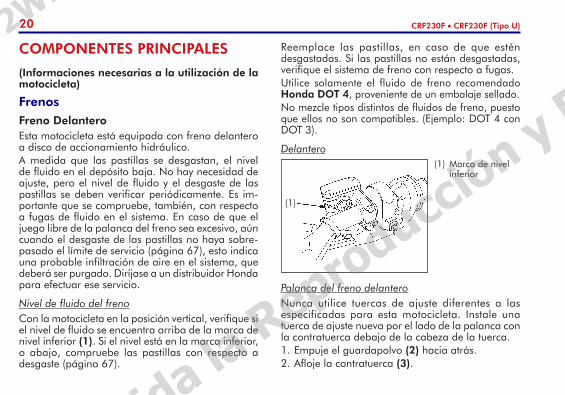
FrenosFreno DelanteroEsta motocicleta está equipada con freno delantero a disco de accionamiento hidráulico. A medida que las pastillas se desgastan, el nivel de fluido en el depósito baja. No hay necesidad de ajuste, pero el nivel de fluido y el desgaste de las pastillas se deben verificar periódicamente. Es im-portante que se compruebe, también, con respecto a fugas de fluido en el sistema. En caso de que el juego libre de la palanca del freno sea excesivo, aún cuando el desgaste de las pastillas no haya sobre-pasado el límite de servicio (página 67), esto indica una probable infiltración de aire en el sistema, que deberá ser purgado. Diríjase a un distribuidor Honda para efectuar ese servicio.
Nivel de fluido del frenoCon la motocicleta en la posición vertical, verifique si el nivel de fluido se encuentra arriba de la marca de nivel inferior (1). Si el nivel está en la marca inferior, o abajo, compruebe las pastillas con respecto a desgaste (página 67).
Reemplace las pastillas, en caso de que estén desgastadas. Si las pastillas no están desgastadas, verifique el sistema de freno con respecto a fugas.Utilice solamente el fluido de freno recomendado Honda DOT 4, proveniente de un embalaje sellado.No mezcle tipos distintos de fluidos de freno, puesto que ellos no son compatibles. (Ejemplo: DOT 4 con DOT 3).
Delantero
Palanca del freno delanteroNunca utilice tuercas de ajuste diferentes a las especificadas para esta motocicleta. Instale una tuerca de ajuste nueva por el lado de la palanca con la contratuerca debajo de la cabeza de la tuerca.1. Empuje el guardapolvo (2) hacia atrás.2. Afloje la contratuerca (3).
(1) Marca de nivel inferior
(1)
Prohibida la Reproducción y Distribución
2W-PE | 2Wheels - PE | FREDDY FIGUEROA
21CRF230F • CRF230F (Tipo U)
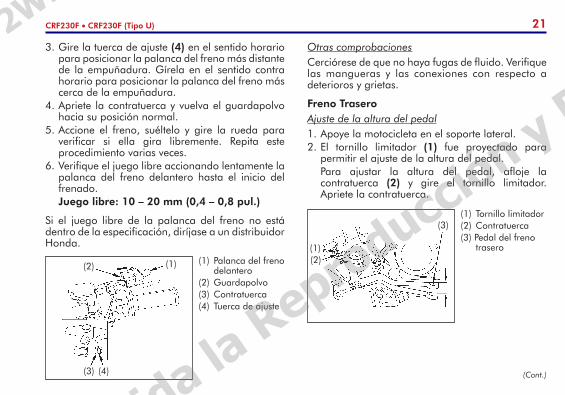
3. Gire la tuerca de ajuste (4) en el sentido horario para posicionar la palanca del freno más distante de la empuñadura. Gírela en el sentido contra horario para posicionar la palanca del freno más cerca de la empuñadura.
4. Apriete la contratuerca y vuelva el guardapolvo hacia su posición normal.
5. Accione el freno, suéltelo y gire la rueda para verificar si ella gira libremente. Repita este procedimiento varias veces.
6. Verifique el juego libre accionando lentamente la palanca del freno delantero hasta el inicio del frenado.
Juego libre: 10 – 20 mm (0,4 – 0,8 pul.)
Si el juego libre de la palanca del freno no está dentro de la especificación, diríjase a un distribuidor Honda.
Otras comprobacionesCerciórese de que no haya fugas de fluido. Verifique las mangueras y las conexiones con respecto a deterioros y grietas.
Freno TraseroAjuste de la altura del pedal1. Apoye la motocicleta en el soporte lateral.2. El tornillo limitador (1) fue proyectado para
permitir el ajuste de la altura del pedal. Para ajustar la altura del pedal, afloje la
contratuerca (2) y gire el tornillo limitador. Apriete la contratuerca.
(1) Palanca del freno delantero
(2) Guardapolvo(3) Contratuerca (4) Tuerca de ajuste
(2) (1)
(4)(3)
(1) Tornillo limitador(2) Contratuerca(3) Pedal del freno
trasero
(3)
(2)(1)
(Cont.)
Prohibida la Reproducción y Distribución
2W-PE | 2Wheels - PE | FREDDY FIGUEROA
22 CRF230F • CRF230F (Tipo U)
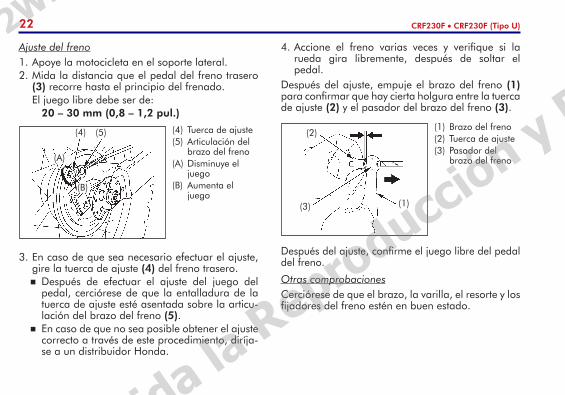
3. En caso de que sea necesario efectuar el ajuste, gire la tuerca de ajuste (4) del freno trasero. Después de efectuar el ajuste del juego del
pedal, cerciórese de que la entalladura de la tuerca de ajuste esté asentada sobre la articu-lación del brazo del freno (5).
En caso de que no sea posible obtener el ajuste correcto a través de este procedimiento, diríja-se a un distribuidor Honda.
Después del ajuste, confirme el juego libre del pedal del freno.
Otras comprobacionesCerciórese de que el brazo, la varilla, el resorte y los fijadores del freno estén en buen estado.
(1) Brazo del freno(2) Tuerca de ajuste(3) Pasador del
brazo del freno
(2)
(1)(3)
4. Accione el freno varias veces y verifique si la rueda gira libremente, después de soltar el pedal.
Después del ajuste, empuje el brazo del freno (1) para confirmar que hay cierta holgura entre la tuerca de ajuste (2) y el pasador del brazo del freno (3).
(4) (4) Tuerca de ajuste(5) Articulación del
brazo del freno(A) Disminuye el
juego(B) Aumenta el
juego
(5)
(A)
(B)
Ajuste del freno1. Apoye la motocicleta en el soporte lateral.2. Mida la distancia que el pedal del freno trasero
(3) recorre hasta el principio del frenado. El juego libre debe ser de: 20 – 30 mm (0,8 – 1,2 pul.)
Prohibida la Reproducción y Distribución
2W-PE | 2Wheels - PE | FREDDY FIGUEROA
23CRF230F • CRF230F (Tipo U)
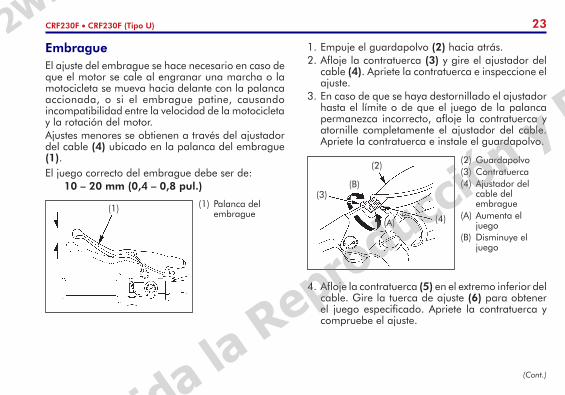
1. Empuje el guardapolvo (2) hacia atrás.2. Afloje la contratuerca (3) y gire el ajustador del
cable (4). Apriete la contratuerca e inspeccione el ajuste.
3. En caso de que se haya destornillado el ajustador hasta el límite o de que el juego de la palanca permanezca incorrecto, afloje la contratuerca y atornille completamente el ajustador del cable. Apriete la contratuerca e instale el guardapolvo.
EmbragueEl ajuste del embrague se hace necesario en caso de que el motor se cale al engranar una marcha o la motocicleta se mueva hacia delante con la palanca accionada, o si el embrague patine, causando incompatibilidad entre la velocidad de la motocicleta y la rotación del motor. Ajustes menores se obtienen a través del ajustador del cable (4) ubicado en la palanca del embrague (1).El juego correcto del embrague debe ser de: 10 – 20 mm (0,4 – 0,8 pul.)
(2) Guardapolvo(3) Contratuerca(4) Ajustador del
cable del embrague
(A) Aumenta el juego
(B) Disminuye el juego
(4)
(2)
(3)(B)
(A)
(1) Palanca del embrague (1)
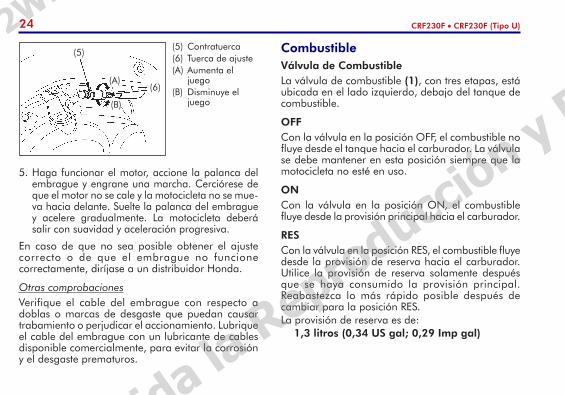
4. Afloje la contratuerca (5) en el extremo inferior del cable. Gire la tuerca de ajuste (6) para obtener el juego especificado. Apriete la contratuerca y compruebe el ajuste.
(Cont.)
Prohibida la Reproducción y Distribución
2W-PE | 2Wheels - PE | FREDDY FIGUEROA
24 CRF230F • CRF230F (Tipo U)
5. Haga funcionar el motor, accione la palanca del embrague y engrane una marcha. Cerciórese de que el motor no se cale y la motocicleta no se mue-va hacia delante. Suelte la palanca del embrague y acelere gradualmente. La motocicleta deberá salir con suavidad y aceleración progresiva.
En caso de que no sea posible obtener el ajuste correcto o de que el embrague no funcione correctamente, diríjase a un distribuidor Honda.
Otras comprobacionesVerifique el cable del embrague con respecto a doblas o marcas de desgaste que puedan causar trabamiento o perjudicar el accionamiento. Lubrique el cable del embrague con un lubricante de cables disponible comercialmente, para evitar la corrosión y el desgaste prematuros.
(5) Contratuerca(6) Tuerca de ajuste(A) Aumenta el
juego(B) Disminuye el
juego
(6)
(5)
(A)
(B)
CombustibleVálvula de CombustibleLa válvula de combustible (1), con tres etapas, está ubicada en el lado izquierdo, debajo del tanque de combustible.
OFFCon la válvula en la posición OFF, el combustible no fluye desde el tanque hacia el carburador. La válvula se debe mantener en esta posición siempre que la motocicleta no esté en uso.
ONCon la válvula en la posición ON, el combustible fluye desde la provisión principal hacia el carburador.
RESCon la válvula en la posición RES, el combustible fluye desde la provisión de reserva hacia el carburador. Utilice la provisión de reserva solamente después que se haya consumido la provisión principal. Reabastezca lo más rápido posible después de cambiar para la posición RES.La provisión de reserva es de: 1,3 litros (0,34 US gal; 0,29 Imp gal)
Prohibida la Reproducción y Distribución
2W-PE | 2Wheels - PE | FREDDY FIGUEROA
25CRF230F • CRF230F (Tipo U)
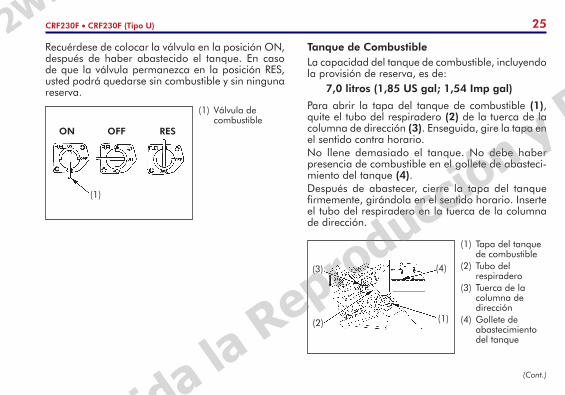
Tanque de CombustibleLa capacidad del tanque de combustible, incluyendo la provisión de reserva, es de: 7,0 litros (1,85 US gal; 1,54 Imp gal)
Para abrir la tapa del tanque de combustible (1), quite el tubo del respiradero (2) de la tuerca de la columna de dirección (3). Enseguida, gire la tapa en el sentido contra horario.No llene demasiado el tanque. No debe haber presencia de combustible en el gollete de abasteci-miento del tanque (4).Después de abastecer, cierre la tapa del tanque firmemente, girándola en el sentido horario. Inserte el tubo del respiradero en la tuerca de la columna de dirección.
Recuérdese de colocar la válvula en la posición ON, después de haber abastecido el tanque. En caso de que la válvula permanezca en la posición RES, usted podrá quedarse sin combustible y sin ninguna reserva.
(1) Tapa del tanque de combustible
(2) Tubo del respiradero
(3) Tuerca de la columna de dirección
(4) Gollete de abastecimiento del tanque
(2)
(4)
(1)
(3)
(1) Válvula de combustible
ON
(1)
OFF RES
(Cont.)
Prohibida la Reproducción y Distribución
2W-PE | 2Wheels - PE | FREDDY FIGUEROA
26 CRF230F • CRF230F (Tipo U)
Utilice gasolina (nafta) sin plomo de 95 octanos o más.
La gasolina (nafta) es altamente inflamable y ex-plosiva. Usted podrá se quemar o ser seriamente herido al manosear el combustible. Apague el motor y mantenga lejanas las fuentes
de calor, chispas y llamas. Abastezca siempre al aire libre. Limpie y seque derramamientos inmediatamente.
AdvertenciA
NOTAEn caso de que ocurra “cascabeleo” o “detonación”, con el motor en velocidad constante y carga normal, utilice gasolina (nafta) de otra marca. Si esos problemas persisten, diríjase a un distribuidor Honda. Al contrario, esto lo consideraremos como una mala utilización, y los daños causados por una mala utilización no están cubiertos por la garantía limitada Honda.
Gasolina (Nafta) Conteniendo AlcoholEn caso de que usted decida utilizar gasolina (nafta) que contenga alcohol (gasohol), cerciórese de que la razón de octanaje sea más alta do que la recomendada por Honda. Existen dos tipos de “gasohol”: el que contiene etanol y el que contiene metanol. No utilice gasolina (nafta) que contenga más de 10% de etanol. No utilice gasolina (nafta) con metanol (alcohol metílico o vegetal), que no contenga co-disolventes y anticorrosivos. Nunca utilice gasolina (nafta) que contenga más de 5% de metanol, aún que contenga co-disolventes y anticorrosivos.Cualquier daño causado al sistema de combustible o al desempeño del motor debido a la utilización de gasolina (nafta) que contenga alcohol no será cubierto por la garantía. Honda no recomienda el uso de combustibles con metanol, ya que su eficacia aún no ha sido totalmente comprobada.Antes de abastecer el tanque en locales con los cuales usted no esté familiarizado, intente cerciorarse de la calidad de la gasolina (nafta). En caso de que esta contenga alcohol, asegúrese del tipo y porcentaje del alcohol utilizado. En caso de que note alguna deficiencia en el funcionamiento de la motocicleta después de abastecer con gasolina (nafta) conteniendo alcohol, o que se suponga que lo contenga, cambie la gasolina (nafta) por una que comprobadamente no contenga alcohol.
!
Prohibida la Reproducción y Distribución
2W-PE | 2Wheels - PE | FREDDY FIGUEROA
27CRF230F • CRF230F (Tipo U)
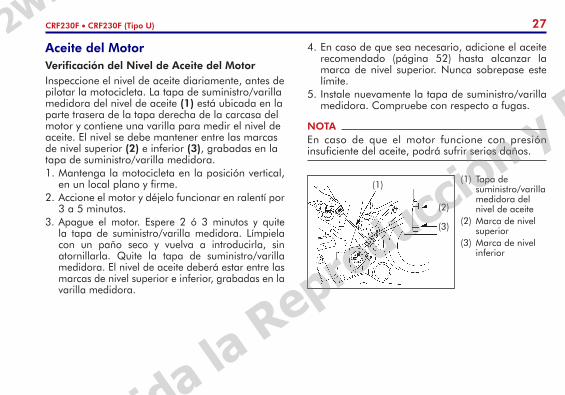
NOTAEn caso de que el motor funcione con presión insuficiente del aceite, podrá sufrir serios daños.
(1) Tapa de suministro/varilla medidora del nivel de aceite
(2) Marca de nivel superior
(3) Marca de nivel inferior
(2)
(3)
(1)
Aceite del MotorVerificación del Nivel de Aceite del MotorInspeccione el nivel de aceite diariamente, antes de pilotar la motocicleta. La tapa de suministro/varilla medidora del nivel de aceite (1) está ubicada en la parte trasera de la tapa derecha de la carcasa del motor y contiene una varilla para medir el nivel de aceite. El nivel se debe mantener entre las marcas de nivel superior (2) e inferior (3), grabadas en la tapa de suministro/varilla medidora.1. Mantenga la motocicleta en la posición vertical,
en un local plano y firme.2. Accione el motor y déjelo funcionar en ralentí por
3 a 5 minutos.3. Apague el motor. Espere 2 ó 3 minutos y quite
la tapa de suministro/varilla medidora. Límpiela con un paño seco y vuelva a introducirla, sin atornillarla. Quite la tapa de suministro/varilla medidora. El nivel de aceite deberá estar entre las marcas de nivel superior e inferior, grabadas en la varilla medidora.
4. En caso de que sea necesario, adicione el aceite recomendado (página 52) hasta alcanzar la marca de nivel superior. Nunca sobrepase este límite.
5. Instale nuevamente la tapa de suministro/varilla medidora. Compruebe con respecto a fugas.
Prohibida la Reproducción y Distribución
2W-PE | 2Wheels - PE | FREDDY FIGUEROA
28 CRF230F • CRF230F (Tipo U)
Cerciórese de que las tapas de los vástagos de las válvulas estén correctamente fijadas. Instale nuevas tapas en caso de que sea necesario.Siempre verifique la presión con los neumáticos “fríos”. Si usted verifica la presión con los neumáticos “calientes” – aún que haya pilotado la motocicleta solamente por algunos kilómetros – la lectura presentará índices más altos do que los normales. Si usted desinflar los neumáticos calentados con el objeto de obtener la presión correcta a los neumáticos “fríos”, los neumáticos presentarán presión insuficiente.La presión recomendada para neumáticos “fríos” es:
Presión de los neumáticos fríos kPa (kgf/cm2; psi)
Delantero Trasero
100 (1,0; 15)
100 (1,0; 15)
NeumáticosPara utilizar la motocicleta de forma segura, los neumáticos deberán ser del tipo (off-road) y tamaño apropiados, estar en buenas condiciones con las bandas adecuadas, y correctamente inflados.
Presión del AireLa presión correcta de los neumáticos otorga la mejor combinación de manejabilidad, durabilidad de la banda de rodaje y confort en el pilotaje. Generalmente, neumáticos con presión incorrecta sufren un desgaste anormal, lo que perjudica la manejabilidad, más allá de presentar una mayor probabilidad de falla debido al recalentamiento excesivo. Neumáticos con presión insuficiente pueden causar daños a las ruedas, sobretodo en terrenos pedregosos. Por otro lado, neumáticos con presión excesiva tornan el pilotaje inconfortable, son más vulnerables a daños y sufren desgaste anormal.
El uso de neumáticos excesivamente desgastados o con presión incorrecta puede causar un accidente, en lo cual usted puede ser seriamente herido o muerto.
Obedezca a todas las instrucciones contenidas en este manual, con respecto a la presión y mantenimiento de los neumáticos.
AdvertenciA!
Prohibida la Reproducción y Distribución
2W-PE | 2Wheels - PE | FREDDY FIGUEROA
29CRF230F • CRF230F (Tipo U)
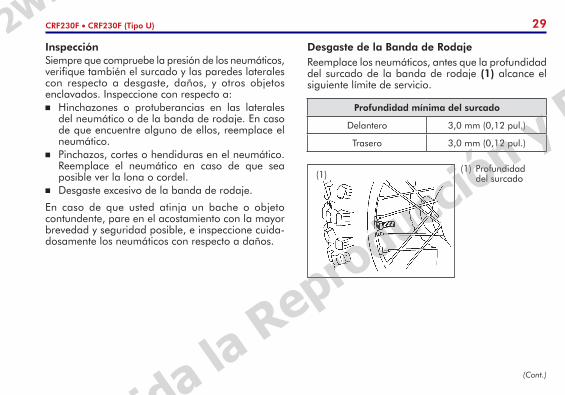
Desgaste de la Banda de RodajeReemplace los neumáticos, antes que la profundidad del surcado de la banda de rodaje (1) alcance el siguiente límite de servicio.
Profundidad mínima del surcado
Delantero 3,0 mm (0,12 pul.)
Trasero 3,0 mm (0,12 pul.)
InspecciónSiempre que compruebe la presión de los neumáticos, verifique también el surcado y las paredes laterales con respecto a desgaste, daños, y otros objetos enclavados. Inspeccione con respecto a: Hinchazones o protuberancias en las laterales
del neumático o de la banda de rodaje. En caso de que encuentre alguno de ellos, reemplace el neumático.
Pinchazos, cortes o hendiduras en el neumático. Reemplace el neumático en caso de que sea posible ver la lona o cordel.
Desgaste excesivo de la banda de rodaje.
En caso de que usted atinja un bache o objeto contundente, pare en el acostamiento con la mayor brevedad y seguridad posible, e inspeccione cuida-dosamente los neumáticos con respecto a daños.
(1) Profundidad del surcado (1)
(Cont.)
Prohibida la Reproducción y Distribución
2W-PE | 2Wheels - PE | FREDDY FIGUEROA
30 CRF230F • CRF230F (Tipo U)
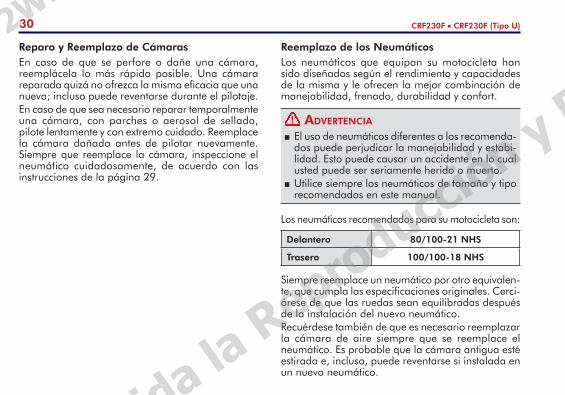
Reemplazo de los NeumáticosLos neumáticos que equipan su motocicleta han sido diseñados según el rendimiento y capacidades de la misma y le ofrecen la mejor combinación de manejabilidad, frenado, durabilidad y confort.
Los neumáticos recomendados para su motocicleta son:
Delantero 80/100-21 NHS
Trasero 100/100-18 NHS
Siempre reemplace un neumático por otro equivalen-te, que cumpla las especificaciones originales. Cerci-órese de que las ruedas sean equilibradas después de la instalación del nuevo neumático.Recuérdese también de que es necesario reemplazar la cámara de aire siempre que se reemplace el neumático. Es probable que la cámara antigua esté estirada e, incluso, puede reventarse si instalada en un nuevo neumático.
Reparo y Reemplazo de CámarasEn caso de que se perfore o dañe una cámara, reemplácela lo más rápido posible. Una cámara reparada quizá no ofrezca la misma eficacia que una nueva; incluso puede reventarse durante el pilotaje.En caso de que sea necesario reparar temporalmente una cámara, con parches o aerosol de sellado, pilote lentamente y con extremo cuidado. Reemplace la cámara dañada antes de pilotar nuevamente. Siempre que reemplace la cámara, inspeccione el neumático cuidadosamente, de acuerdo con las instrucciones de la página 29.
El uso de neumáticos diferentes a los recomenda-dos puede perjudicar la manejabilidad y estabi-lidad. Esto puede causar un accidente en lo cual usted puede ser seriamente herido o muerto.
Utilice siempre los neumáticos de tamaño y tipo recomendados en este manual.
AdvertenciA!
Prohibida la Reproducción y Distribución
2W-PE | 2Wheels - PE | FREDDY FIGUEROA
31CRF230F • CRF230F (Tipo U)
COMPONENTES INDIVIDUALES ESENCIALES
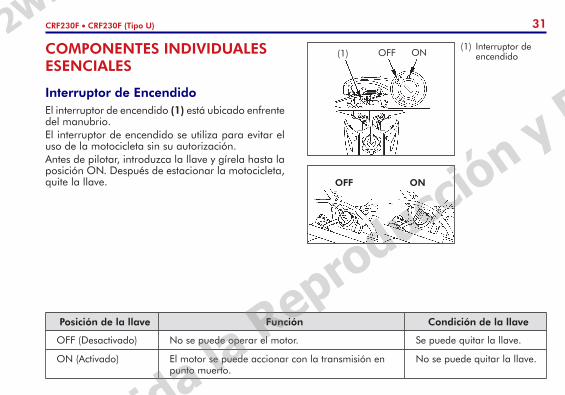
Interruptor de EncendidoEl interruptor de encendido (1) está ubicado enfrente del manubrio. El interruptor de encendido se utiliza para evitar el uso de la motocicleta sin su autorización.Antes de pilotar, introduzca la llave y gírela hasta la posición ON. Después de estacionar la motocicleta, quite la llave.
Posición de la llave Función Condición de la llave
OFF (Desactivado) No se puede operar el motor. Se puede quitar la llave.
ON (Activado) El motor se puede accionar con la transmisión en punto muerto.
No se puede quitar la llave.
(1) Interruptor de encendidoOFF ON(1)
OFF ON
Prohibida la Reproducción y Distribución
2W-PE | 2Wheels - PE | FREDDY FIGUEROA
32 CRF230F • CRF230F (Tipo U)
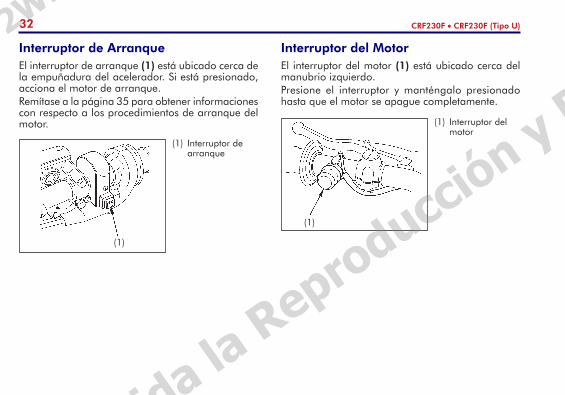
Interruptor de Arranque El interruptor de arranque (1) está ubicado cerca de la empuñadura del acelerador. Si está presionado, acciona el motor de arranque. Remítase a la página 35 para obtener informaciones con respecto a los procedimientos de arranque del motor.
Interruptor del Motor El interruptor del motor (1) está ubicado cerca del manubrio izquierdo. Presione el interruptor y manténgalo presionado hasta que el motor se apague completamente.
(1) Interruptor del motor
(1)
(1) Interruptor de arranque
(1)
Prohibida la Reproducción y Distribución
2W-PE | 2Wheels - PE | FREDDY FIGUEROA
33CRF230F • CRF230F (Tipo U)
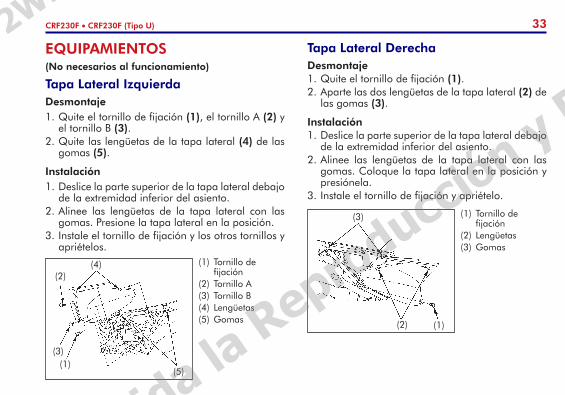
Tapa Lateral DerechaDesmontaje1. Quite el tornillo de fijación (1).2. Aparte las dos lengüetas de la tapa lateral (2) de
las gomas (3).
Instalación1. Deslice la parte superior de la tapa lateral debajo
de la extremidad inferior del asiento.2. Alinee las lengüetas de la tapa lateral con las
gomas. Coloque la tapa lateral en la posición y presiónela.
3. Instale el tornillo de fijación y apriételo.
EQUIPAMIENTOS(No necesarios al funcionamiento)
Tapa Lateral IzquierdaDesmontaje1. Quite el tornillo de fijación (1), el tornillo A (2) y
el tornillo B (3).2. Quite las lengüetas de la tapa lateral (4) de las
gomas (5).
Instalación1. Deslice la parte superior de la tapa lateral debajo
de la extremidad inferior del asiento.2. Alinee las lengüetas de la tapa lateral con las
gomas. Presione la tapa lateral en la posición.3. Instale el tornillo de fijación y los otros tornillos y
apriételos.(1) Tornillo de
fijación(2) Tornillo A(3) Tornillo B(4) Lengüetas(5) Gomas
(3)
(2)
(1)
(4)
(5)
(1) Tornillo de fijación
(2) Lengüetas(3) Gomas
(2)
(3)
(1)
Prohibida la Reproducción y Distribución
2W-PE | 2Wheels - PE | FREDDY FIGUEROA
34 CRF230F • CRF230F (Tipo U)
FUNCIONAMIENTO
Inspección Antes del UsoPara su seguridad, es muy importante despender algunos minutos antes de pilotar, e inspeccionar su motocicleta. En caso de que verifique algún problema, no deje de corregirlo, o diríjase a un distribuidor Honda, en caso de que no sea posible solucionarlo.
1. Nivel de aceite del motor – complete el nivel, en caso de que sea necesario (página 27). Compruebe con respecto a fugas.
2. Nivel de combustible – abastezca el tanque, en caso de que sea necesario (página 25). Compruebe con respecto a fugas.
3. Frenos delantero y trasero – verifique el funcionamiento y cerciórese de que no haya fugas de fluido. Ajuste el juego libre, en caso de que sea necesario (páginas 20 a 22).
4. Neumáticos – verifique la condición y la presión de los neumáticos (páginas 28 a 30).
5. Rayos y trabas de las llantas – verifique y apriete, en caso de que sea necesario (página 64).
6. Cadena de transmisión – verifique la condición y la holgura (página 60). Ajuste y lubrique, en caso de que sea necesario.
7. Corredera de la cadena de transmisión – compruebe la corredera con respecto a desgaste (página 61).
8. Acelerador – compruebe si se abre suavemente y si se cierra por completo en todas las posiciones del manubrio. Ajuste el juego libre, en caso de que sea necesario (página 62).
9. Embrague – verifique el funcionamiento y ajústela, en caso de que sea necesario (páginas 23 y 24).
10. Luces – verifique el funcionamiento correcto del faro (solamente tipo U).
11. Bujía de encendido y cable– verifique si están flojos.
12. Interruptor del motor – compruebe el funcionamiento (página 32).
13. Tuercas, tornillos y fijadores – verifique la rueda delantera y compruebe si la tuerca del eje y las tuercas del soporte del eje están bien apretadas. Compruebe la seguridad de todas las otras tuercas, tornillos y fijadores.
El mantenimiento incorrecto de esta motocicleta, o la falla en corregir un problema antes de pilotarla, puede causar un accidente en lo cual usted puede ser seriamente herido o muerto.
Siempre efectúe una inspección antes del uso y corrija todos los problemas.
AdvertenciA!
Prohibida la Reproducción y Distribución
2W-PE | 2Wheels - PE | FREDDY FIGUEROA
35CRF230F • CRF230F (Tipo U)
Arranque del MotorSiga siempre los procedimientos de arranque descritos abajo.El motor de esta motocicleta se puede accionar con la transmisión engranada accionando la palanca del embrague antes del interruptor de arranque.Los gases del escape de su motocicleta contienen monóxido de carbono, que es venenoso. Altos tenores de monóxido de carbono pueden acumularse rápidamente en áreas cerradas, tal como un garaje. No accione el motor con la puerta del garaje cerrada. Aún con la puerta abierta, haga funcionar el motor solamente el tiempo necesario para remover la motocicleta hacia fuera.No use el arranque eléctrico por más de cinco segundos cada vez. Suelte el interruptor de arranque y espere aproximadamente diez segundos antes de presionarlo nuevamente.
Procedimientos de ArranquePara accionar un motor caliente, siga los procedi-mientos indicados para “Temperatura Alta”.Temperatura normal: 10° – 35°C (50° – 95°F)
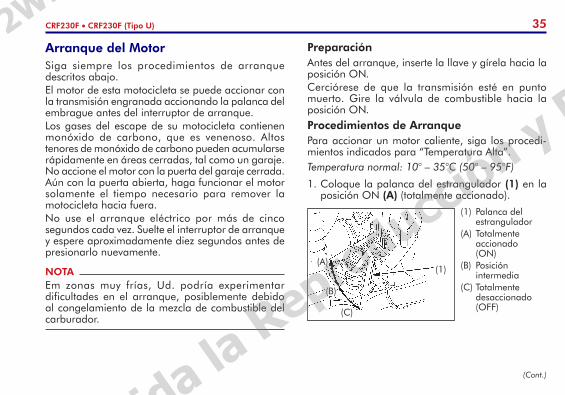
1. Coloque la palanca del estrangulador (1) en la posición ON (A) (totalmente accionado).
NOTAEm zonas muy frías, Ud. podría experimentar dificultades en el arranque, posiblemente debido al congelamiento de la mezcla de combustible del carburador.
PreparaciónAntes del arranque, inserte la llave y gírela hacia la posición ON.Cerciórese de que la transmisión esté en punto muerto. Gire la válvula de combustible hacia la posición ON.
(1) Palanca del estrangulador
(A) Totalmente accionado (ON)
(B) Posición intermedia
(C) Totalmente desaccionado (OFF)
(A)
(B)
(C)
(1)
(Cont.)
Prohibida la Reproducción y Distribución
2W-PE | 2Wheels - PE | FREDDY FIGUEROA
36 CRF230F • CRF230F (Tipo U)
Ablande del MotorAyude a garantizar la fiabilidad y rendimiento futuros de su motocicleta prestando atención especial a la forma en que pilota durante el primer día de pilotaje o 25 km (15 millas).Durante ese periodo evite arrancar con el acelerador totalmente abierto y aceleraciones muy rápidas.
Motor AhogadoEn caso de que el motor no funcione después de varios intentos, puede ser que esté ahogado con exceso de combustible. Para desahogar el motor mueva la palanca del estrangulador hacia la posición OFF (C) (totalmente desaccionado). Abra totalmente el acelerador y presione el interruptor de arranque por 5 segundos, mientras presiona el interruptor del motor. Suelte el interruptor del motor y siga los procedimientos de arranque del ítem “Temperatura Alta”.
4. Caliente el motor abriendo y cerrando el acelerador lentamente.
5. Cerca de 30 segundos después que el motor esté en funcionamiento, ubique la palanca del estrangulador hacia abajo, en la posición OFF (C) (totalmente desaccionado).
6. En caso de que el ralentí esté inestable, acelere suavemente.
Temperatura alta: 35°C (95°F) o más1. No utilice el estrangulador.2. Arranque el motor siguiendo el procedimiento de
arranque 2 de “Temperatura Normal”.
Temperatura baja: 10°C (50°F) o menos1. Siga los procedimientos de arranque 1 y 3 de
“Temperatura Normal”.2. Caliente el motor abriendo y cerrando el
acelerador lentamente.
NOTALa utilización continua del estrangulador podrá ocasionar una lubricación deficiente del pistón y cilindro, dañando el motor.
NOTALa utilización continua del estrangulador podrá ocasionar una lubricación deficiente del pistón y cilindro, dañando el motor.
2. Con el acelerador cerrado, presione el interruptor de arranque.
3. Inmediatamente después del arranque del motor, haga retornar la palanca del estrangulador hacia la posición intermedia (B).
3. Siga calentando el motor hasta que el ralentí se estabilice con la palanca del estrangulador en la posición OFF (C) (totalmente desaccionado).
Prohibida la Reproducción y Distribución
2W-PE | 2Wheels - PE | FREDDY FIGUEROA
37CRF230F • CRF230F (Tipo U)
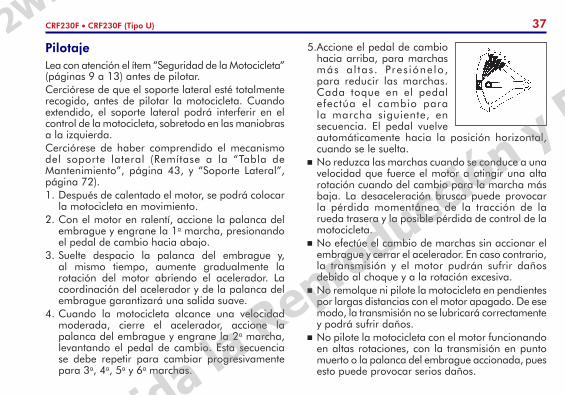
5. Accione el pedal de cambio hacia arriba, para marchas más a l tas . Pres ióne lo, para reducir las marchas. Cada toque en el pedal efectúa el cambio para la marcha siguiente, en secuencia. El pedal vuelve automáticamente hacia la posición horizontal, cuando se le suelta.
No reduzca las marchas cuando se conduce a una velocidad que fuerce el motor a atingir una alta rotación cuando del cambio para la marcha más baja. La desaceleración brusca puede provocar la pérdida momentánea de la tracción de la rueda trasera y la posible pérdida de control de la motocicleta.
No efectúe el cambio de marchas sin accionar el embrague y cerrar el acelerador. En caso contrario, la transmisión y el motor pudrán sufrir daños debido al choque y a la rotación excesiva.
No remolque ni pilote la motocicleta en pendientes por largas distancias con el motor apagado. De ese modo, la transmisión no se lubricará correctamente y podrá sufrir daños.
No pilote la motocicleta con el motor funcionando en altas rotaciones, con la transmisión en punto muerto o la palanca del embrague accionada, pues esto puede provocar serios daños.
PilotajeLea con atención el ítem “Seguridad de la Motocicleta” (páginas 9 a 13) antes de pilotar.Cerciórese de que el soporte lateral esté totalmente recogido, antes de pilotar la motocicleta. Cuando extendido, el soporte lateral podrá interferir en el control de la motocicleta, sobretodo en las maniobras a la izquierda. Cerciórese de haber comprendido el mecanismo del soporte lateral (Remítase a la “Tabla de Mantenimiento”, página 43, y “Soporte Lateral”, página 72).1. Después de calentado el motor, se podrá colocar
la motocicleta en movimiento.2. Con el motor en ralentí, accione la palanca del
embrague y engrane la 1a marcha, presionando el pedal de cambio hacia abajo.
3. Suelte despacio la palanca del embrague y, al mismo tiempo, aumente gradualmente la rotación del motor abriendo el acelerador. La coordinación del acelerador y de la palanca del embrague garantizará una salida suave.
4. Cuando la motocicleta alcance una velocidad moderada, cierre el acelerador, accione la palanca del embrague y engrane la 2a marcha, levantando el pedal de cambio. Esta secuencia se debe repetir para cambiar progresivamente para 3a, 4a, 5a y 6a marchas.
Prohibida la Reproducción y Distribución
2W-PE | 2Wheels - PE | FREDDY FIGUEROA
38 CRF230F • CRF230F (Tipo U)
FrenadoPara frenar normalmente, accione los frenos delante-ro y trasero de manera gradual y, al mismo tiempo, reduzca las marchas. Para una desaceleración máxima, cierre completa-mente el acelerador y accione los frenos delantero y trasero con más fuerza. Accione la palanca del embrague antes que la motocicleta se detenga total-mente. Esto evitará que el motor se apague.
Notas importantes de seguridad El uso independiente del freno delantero o del freno
trasero reduce la eficiencia del frenado. Un frenado extremo puede provocar el trabamiento
de las ruedas y dificultar el control de la motocicleta. Siempre que sea posible, reduzca la velocidad
y frene antes de tomar la curva. Cerrar el acelerador o frenar a media curva puede causar el resbalamiento, lo que dificulta el control de la motocicleta.
Si se pilota en pistas mojadas, bajo lluvia, o en pistas de arena o tierra, la seguridad para maniobrar o parar se reduce. En tales condiciones, todos los movimientos de la motocicleta deberán ser uniformes y seguros. Una aceleración, un frenado o una maniobra rápida pueden causar la pérdida de control. Para su seguridad, tenga mucho cuidado al frenar, acelerar y tomar la curva.
Al enfrentar un pendiente acentuado, utilice el freno-motor, reduciendo las marchas y aplicando intermitentemente los frenos delantero y trasero. El accionamiento continuo de los frenos puede recalentarlos y disminuir su eficacia.
Prohibida la Reproducción y Distribución
2W-PE | 2Wheels - PE | FREDDY FIGUEROA
39CRF230F • CRF230F (Tipo U)
Prevención de Robos1. Cerciórese de que la información del registro de
la motocicleta esté en orden y al día.2. Estacione su motocicleta en locales cerrados,
siempre que sea posible.3. Utilice dispositivos antirrobo adicionales de
buena calidad.4. Rellene abajo su nombre, dirección y número te-
lefónico. Mantenga este Manual del Propietario en su motocicleta. Muchas veces, las motocicletas robadas se identifican por medio de las informa-ciones contenidas en el Manual del Propietario que aún permanece en la misma.
Nombre
Dirección
Teléfono
Estacionamiento1. Después de detener la motocicleta, coloque la
transmisión en punto muerto y cierre la válvula de combustible (posición OFF). Presione el interruptor del motor y manténgalo presionado hasta que el motor se apague completamente.
2. Utilice el soporte lateral para apoyar la motocicleta mientras esté estacionada.
Estacione la motocicleta en un local plano y firme, para evitar caídas.Al estacionar la motocicleta en locales inclinados, posicione la delantera de la motocicleta hacia el lado más alto para evitar una caída causada por el recogimiento espontáneo del soporte lateral.
3. Desactive el interruptor de encendido y quite la llave.
Prohibida la Reproducción y Distribución
2W-PE | 2Wheels - PE | FREDDY FIGUEROA
40 CRF230F • CRF230F (Tipo U)
MANTENIMIENTO
La Importancia del MantenimientoEl mantenimiento correcto de la motocicleta es esencial para garantizar un pilotaje seguro, económico y sin problemas. Además, ayuda a reducir el nivel de polución del aire. Esta motocicleta ha sido diseñada para el pilotaje off-road en terrenos irregulares. Por esto, una inspección cuidadosa antes del uso, bien como un mantenimiento adecuado, son especialmente importantes. Para ayudarle a cuidar debidamente de su motoci-cleta, esta sección del manual le ofrece una Tabla de Mantenimiento. Los intervalos de servicio indi-cados en la tabla están basados en condiciones de pilotaje promedias. Si usted expone la motocicleta a condiciones severas (como competiciones) o la pilota en áreas demasiado húmedas o polvorientas, necesitará dispensarle un servicio más frecuente. La realización de servicios de mantenimiento frecuen-tes del filtro de aire es muy importante para ayudarle a evitar reparos posiblemente costosos del motor.
El mantenimiento incorrecto de esta motocicleta, o la falla en corregir un problema antes de pilotarla, puede causar un accidente en lo cual usted puede ser seriamente herido o muerto.
Siga siempre las recomendaciones y los progra-mas de inspección y mantenimiento indicados en este manual del propietario.
AdvertenciA
En caso de que su motocicleta se volquee o sufra una colisión, diríjase a un distribuidor Honda para inspeccionar los componentes principales – aún que usted sea capaz de efectuar algunos reparos.
!
Prohibida la Reproducción y Distribución
2W-PE | 2Wheels - PE | FREDDY FIGUEROA
41CRF230F • CRF230F (Tipo U)
Seguridad en el MantenimientoEsta sección incluye instrucciones sobre algunos servicios de mantenimiento importantes. Con las herramientas provistas usted podrá realizar algunos de estos servicios – si tiene conocimientos mecánicos básicos.Los servicios más difíciles y que requieren herramientas especiales son mejor ejecutados por profesionales. El desmontaje de las ruedas deberá ser realizado por un técnico Honda u otro mecánico cualificado. Las instrucciones están inclusas en este manual solamente para ayudarle en caso de emergencia.A continuación se ofrecen algunas de las más importantes precauciones de seguridad. Sin embargo, es imposible alertarle de todos los riesgos concebibles que puedan surgir al realizar el mantenimiento. Solamente usted podrá decidir si deberá o no realizar un determinado servicio.
Cumplir las instrucciones de mantenimiento y precauciones de modo incorrecto puede causar un accidente en lo cual usted puede ser seriamente herido o muerto.
Siga siempre los procedimientos y precauciones indicados en este manual del propietario.
AdvertenciA!
Prohibida la Reproducción y Distribución
2W-PE | 2Wheels - PE | FREDDY FIGUEROA
42 CRF230F • CRF230F (Tipo U)
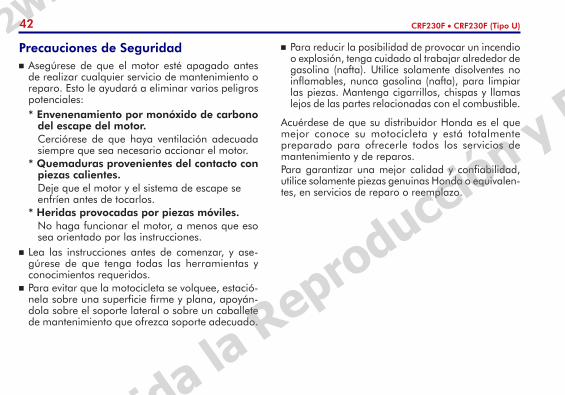
Precauciones de Seguridad Asegúrese de que el motor esté apagado antes
de realizar cualquier servicio de mantenimiento o reparo. Esto le ayudará a eliminar varios peligros potenciales:* Envenenamiento por monóxido de carbono
del escape del motor. Cerciórese de que haya ventilación adecuada
siempre que sea necesario accionar el motor.* Quemaduras provenientes del contacto con
piezas calientes. Deje que el motor y el sistema de escape se
enfríen antes de tocarlos.* Heridas provocadas por piezas móviles. No haga funcionar el motor, a menos que eso
sea orientado por las instrucciones. Lea las instrucciones antes de comenzar, y ase-
gúrese de que tenga todas las herramientas y conocimientos requeridos.
Para evitar que la motocicleta se volquee, estació-nela sobre una superficie firme y plana, apoyán-dola sobre el soporte lateral o sobre un caballete de mantenimiento que ofrezca soporte adecuado.
Para reducir la posibilidad de provocar un incendio o explosión, tenga cuidado al trabajar alrededor de gasolina (nafta). Utilice solamente disolventes no inflamables, nunca gasolina (nafta), para limpiar las piezas. Mantenga cigarrillos, chispas y llamas lejos de las partes relacionadas con el combustible.
Acuérdese de que su distribuidor Honda es el que mejor conoce su motocicleta y está totalmente preparado para ofrecerle todos los servicios de mantenimiento y de reparos.Para garantizar una mejor calidad y confiabilidad, utilice solamente piezas genuinas Honda o equivalen-tes, en servicios de reparo o reemplazo.
Prohibida la Reproducción y Distribución
2W-PE | 2Wheels - PE | FREDDY FIGUEROA
43CRF230F • CRF230F (Tipo U)
Tabla de MantenimientoEfectúe la Inspección Antes del Uso (página 34) a cada intervalo especificado en la Tabla de Mantenimiento.
I: INSPECCIONAR Y LIMPIAR, AJUSTAR, LUBRICAR O REEMPLAZAR, SI NECESARIO.C: LIMPIAR R: REEMPLAZAR A: AJUSTAR L: LUBRICAR
La Tabla de Mantenimiento especifica todos los puntos de mantenimiento requeridos para conservar su motocicleta en las mejores condiciones de funcionamiento. El servicio de mantenimiento debe ser efectuado por técnicos adecuadamente entrenados y equipados de acuerdo con las normas y especificaciones Honda. Su distribuidor Honda reúne todos estos requisitos.
Procedimientos que deben ser efectuados por un distribuidor Honda, a menos que el propietario dispon-ga de las herramientas apropiadas e informaciones de servicio, y sea mecánicamente calificado.
Por razones de seguridad, recomendamos que todos los servicios presentados en esta tabla se realicen en un distribuidor Honda.
Recomendamos también que su distribuidor Honda efectúe una prueba de rodaje después de cada servicio de mantenimiento especificado en la tabla.
NOTA1. Efectúe el servicio con más frecuencia cuando utilice la motocicleta bajo condiciones demasiado
polvorientas o con excesiva humedad.2. Cambie cada 2 años. El cambio requiere habilidad mecánica.3. Solo tipo para Australia.
Prohibida la Reproducción y Distribución
2W-PE | 2Wheels - PE | FREDDY FIGUEROA
44 CRF230F • CRF230F (Tipo U)
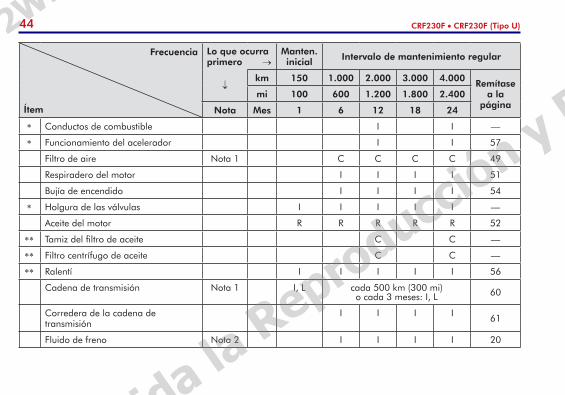
Frecuencia
Ítem
Lo que ocurra primero →
Manten. inicial Intervalo de mantenimiento regular
↓km 150 1.000 2.000 3.000 4.000 Remítase
a la página
mi 100 600 1.200 1.800 2.400
Nota Mes 1 6 12 18 24
* Conductos de combustible I I —
* Funcionamiento del acelerador I I 57
Filtro de aire Nota 1 C C C C 49
Respiradero del motor I I I I 51
Bujía de encendido I I I I 54
* Holgura de las válvulas I I I I I —
Aceite del motor R R R R R 52
** Tamiz del filtro de aceite C C —
** Filtro centrífugo de aceite C C —
** Ralentí I I I I I 56
Cadena de transmisión Nota 1 I, L cada 500 km (300 mi) o cada 3 meses: I, L 60
Corredera de la cadena de transmisión
I I I I 61
Fluido de freno Nota 2 I I I I 20
Prohibida la Reproducción y Distribución
2W-PE | 2Wheels - PE | FREDDY FIGUEROA

45CRF230F • CRF230F (Tipo U)
Frecuencia
Ítem
Lo que ocurra primero →
Manten. inicial Intervalo de mantenimiento regular
↓km 150 1.000 2.000 3.000 4.000 Remítase
a la página
mi 100 600 1.200 1.800 2.400
Nota Mes 1 6 12 18 24
Desgaste de las pastillas/zapatas del freno
I I I I 67, 68
Sistema de freno I I I I I 20, 67
* Haz del faro Nota 3 I I —
Sistema del embrague I I I I I 23
Soporte lateral I I 72
* Suspensión I I 70, 71
* Parachispas cada 1.600 km (1.000 mi) o cada 100 horas de pilotaje: C 59
* Tuercas, tornillos y fijadores I I I —
** Ruedas/neumáticos I I I I I 28, 65
** Cojinetes de la columna de dirección I I I —
Prohibida la Reproducción y Distribución
2W-PE | 2Wheels - PE | FREDDY FIGUEROA
46 CRF230F • CRF230F (Tipo U)
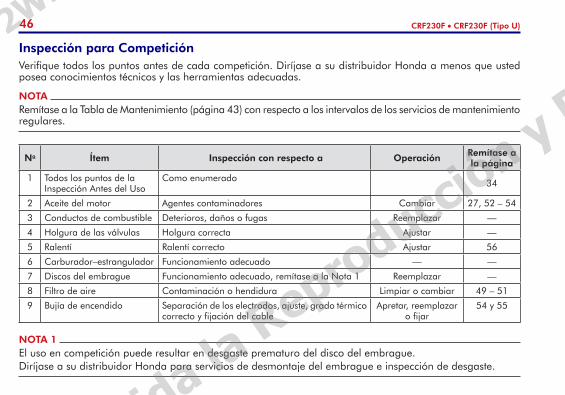
No Ítem Inspección con respecto a Operación Remítase a la página
1 Todos los puntos de la Inspección Antes del Uso
Como enumerado 34
2 Aceite del motor Agentes contaminadores Cambiar 27, 52 – 54
3 Conductos de combustible Deterioros, daños o fugas Reemplazar —
4 Holgura de las válvulas Holgura correcta Ajustar —
5 Ralentí Ralentí correcto Ajustar 56
6 Carburador–estrangulador Funcionamiento adecuado — —
7 Discos del embrague Funcionamiento adecuado, remítase a la Nota 1 Reemplazar —
8 Filtro de aire Contaminación o hendidura Limpiar o cambiar 49 – 51
9 Bujía de encendido Separación de los electrodos, ajuste, grado térmico correcto y fijación del cable
Apretar, reemplazar o fijar
54 y 55
Inspección para Competición Verifique todos los puntos antes de cada competición. Diríjase a su distribuidor Honda a menos que usted posea conocimientos técnicos y las herramientas adecuadas.
NOTA 1El uso en competición puede resultar en desgaste prematuro del disco del embrague. Diríjase a su distribuidor Honda para servicios de desmontaje del embrague e inspección de desgaste.
NOTARemítase a la Tabla de Mantenimiento (página 43) con respecto a los intervalos de los servicios de mantenimiento regulares.
Prohibida la Reproducción y Distribución
2W-PE | 2Wheels - PE | FREDDY FIGUEROA
47CRF230F • CRF230F (Tipo U)
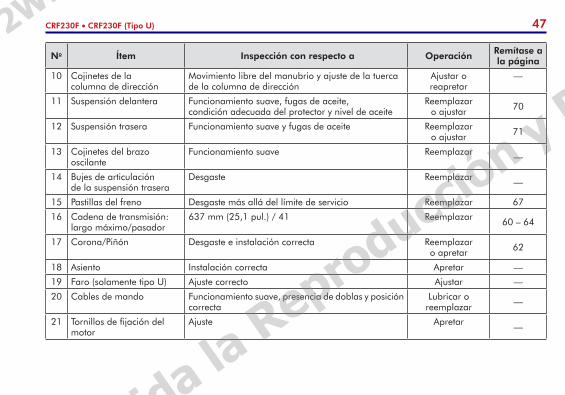
No Ítem Inspección con respecto a Operación Remítase a la página
10 Cojinetes de la columna de dirección
Movimiento libre del manubrio y ajuste de la tuerca de la columna de dirección
Ajustar o reapretar
—
11 Suspensión delantera Funcionamiento suave, fugas de aceite, condición adecuada del protector y nivel de aceite
Reemplazar o ajustar 70
12 Suspensión trasera Funcionamiento suave y fugas de aceite Reemplazar o ajustar 71
13 Cojinetes del brazo oscilante
Funcionamiento suave Reemplazar —
14 Bujes de articulación de la suspensión trasera
Desgaste Reemplazar —
15 Pastillas del freno Desgaste más allá del límite de servicio Reemplazar 67
16 Cadena de transmisión: largo máximo/pasador
637 mm (25,1 pul.) / 41 Reemplazar 60 – 64
17 Corona/Piñón Desgaste e instalación correcta Reemplazar o apretar 62
18 Asiento Instalación correcta Apretar —
19 Faro (solamente tipo U) Ajuste correcto Ajustar —
20 Cables de mando Funcionamiento suave, presencia de doblas y posición correcta
Lubricar o reemplazar —
21 Tornillos de fijación del motor
Ajuste Apretar —
Prohibida la Reproducción y Distribución
2W-PE | 2Wheels - PE | FREDDY FIGUEROA
48 CRF230F • CRF230F (Tipo U)
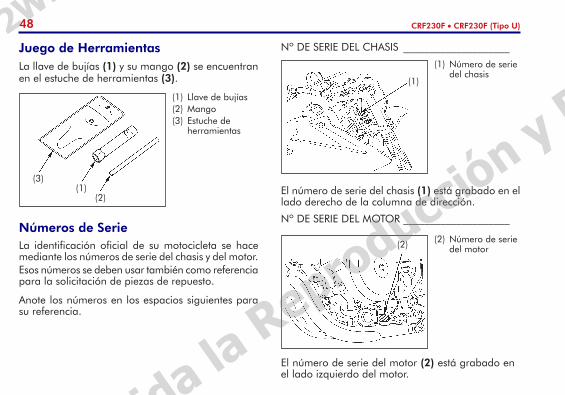
Juego de HerramientasLa llave de bujías (1) y su mango (2) se encuentran en el estuche de herramientas (3).
Números de SerieLa identificación oficial de su motocicleta se hace mediante los números de serie del chasis y del motor.Esos números se deben usar también como referencia para la solicitación de piezas de repuesto.
Anote los números en los espacios siguientes para su referencia.
El número de serie del chasis (1) está grabado en el lado derecho de la columna de dirección.
Nº DE SERIE DEL MOTOR ____________________
El número de serie del motor (2) está grabado en el lado izquierdo del motor.
(1) Llave de bujías(2) Mango(3) Estuche de
herramientas
(2)
(3)(1)
(1) Número de serie del chasis
(1)
(2) Número de serie del motor(2)
Nº DE SERIE DEL CHASIS ____________________
Prohibida la Reproducción y Distribución
2W-PE | 2Wheels - PE | FREDDY FIGUEROA
49CRF230F • CRF230F (Tipo U)
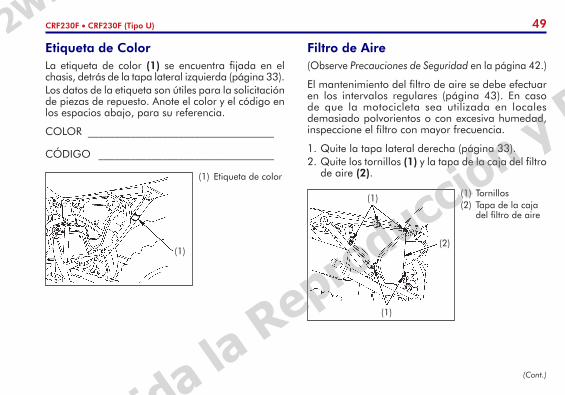
Filtro de Aire(Observe Precauciones de Seguridad en la página 42.)
El mantenimiento del filtro de aire se debe efectuar en los intervalos regulares (página 43). En caso de que la motocicleta sea utilizada en locales demasiado polvorientos o con excesiva humedad, inspeccione el filtro con mayor frecuencia.
1. Quite la tapa lateral derecha (página 33).2. Quite los tornillos (1) y la tapa de la caja del filtro
de aire (2).
Etiqueta de ColorLa etiqueta de color (1) se encuentra fijada en el chasis, detrás de la tapa lateral izquierda (página 33).Los datos de la etiqueta son útiles para la solicitación de piezas de repuesto. Anote el color y el código en los espacios abajo, para su referencia.
COLOR ___________________________________
CÓDIGO _________________________________
(1) Etiqueta de color
(1)
(1) Tornillos(2) Tapa de la caja
del filtro de aire
(2)
(1)
(1)
(Cont.)
Prohibida la Reproducción y Distribución
2W-PE | 2Wheels - PE | FREDDY FIGUEROA
50 CRF230F • CRF230F (Tipo U)
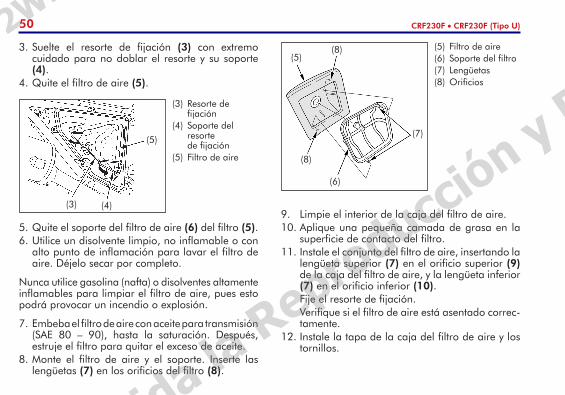
3. Suelte el resorte de fijación (3) con extremo cuidado para no doblar el resorte y su soporte (4).
4. Quite el filtro de aire (5).
(5)
(3) Resorte de fijación
(4) Soporte del resorte de fijación
(5) Filtro de aire
(4)(3)
5. Quite el soporte del filtro de aire (6) del filtro (5).6. Utilice un disolvente limpio, no inflamable o con
alto punto de inflamación para lavar el filtro de aire. Déjelo secar por completo.
Nunca utilice gasolina (nafta) o disolventes altamente inflamables para limpiar el filtro de aire, pues esto podrá provocar un incendio o explosión.
7. Embeba el filtro de aire con aceite para transmisión (SAE 80 – 90), hasta la saturación. Después, estruje el filtro para quitar el exceso de aceite.
8. Monte el filtro de aire y el soporte. Inserte las lengüetas (7) en los orificios del filtro (8).
(5) Filtro de aire(6) Soporte del filtro(7) Lengüetas(8) Orificios
(5)(8)
(7)
(6)
(8)
9. Limpie el interior de la caja del filtro de aire.10. Aplique una pequeña camada de grasa en la
superficie de contacto del filtro.11. Instale el conjunto del filtro de aire, insertando la
lengüeta superior (7) en el orificio superior (9) de la caja del filtro de aire, y la lengüeta inferior (7) en el orificio inferior (10).
Fije el resorte de fijación. Verifique si el filtro de aire está asentado correc-
tamente.12. Instale la tapa de la caja del filtro de aire y los
tornillos.
Prohibida la Reproducción y Distribución
2W-PE | 2Wheels - PE | FREDDY FIGUEROA
51CRF230F • CRF230F (Tipo U)
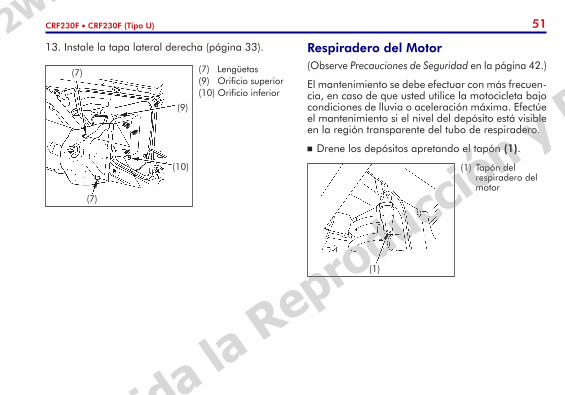
Respiradero del Motor (Observe Precauciones de Seguridad en la página 42.)
El mantenimiento se debe efectuar con más frecuen-cia, en caso de que usted utilice la motocicleta bajo condiciones de lluvia o aceleración máxima. Efectúe el mantenimiento si el nivel del depósito está visible en la región transparente del tubo de respiradero.
Drene los depósitos apretando el tapón (1).
13. Instale la tapa lateral derecha (página 33).
(7) Lengüetas(9) Orificio superior(10) Orificio inferior
(7)
(9)
(7)
(10) (1) Tapón del respiradero del motor
(1)
Prohibida la Reproducción y Distribución
2W-PE | 2Wheels - PE | FREDDY FIGUEROA
52 CRF230F • CRF230F (Tipo U)
Aceite del Motor(Observe Precauciones de Seguridad en la página 42.)
Aceite Recomendado
Clasificación API SG o superior, excepto aceites etique tados como conservación de energía en etiqueta redonda de servicio API
Viscosidad (peso) 10W30
JASO T 903 estándar MA
Aceite propuesto Aceite recomendado por Honda
Su motocicleta no necesita de aditivos para aceite. Utilice el aceite recomendado.
No utilice aceites con aditivos de molibdeno o grafito. Estos pueden afectar adversamente el funcionamiento del embrague.
No utilice aceites API SH o superiores con la etiqueta redonda de servicio API “conservación de energía” en el recipiente. Estos pueden afectar la lubricación y el desempeño del embrague.
NO RECOMENDADO OK
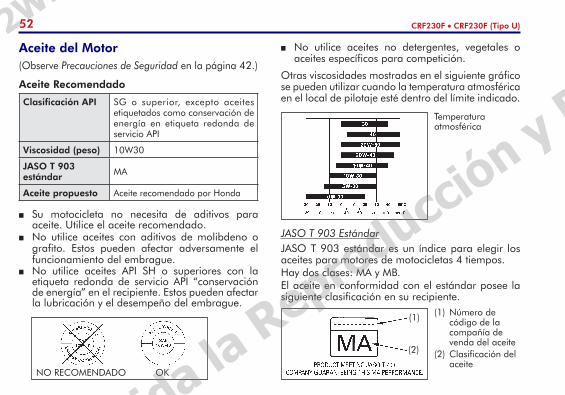
JASO T 903 EstándarJASO T 903 estándar es un índice para elegir los aceites para motores de motocicletas 4 tiempos.Hay dos clases: MA y MB.El aceite en conformidad con el estándar posee la siguiente clasificación en su recipiente.
(1)
(2)
(1) Número de código de la compañía de venda del aceite
(2) Clasificación del aceite
Temperatura atmosférica
No utilice aceites no detergentes, vegetales o aceites específicos para competición.
Otras viscosidades mostradas en el siguiente gráfico se pueden utilizar cuando la temperatura atmosférica en el local de pilotaje esté dentro del límite indicado.
Prohibida la Reproducción y Distribución
2W-PE | 2Wheels - PE | FREDDY FIGUEROA
53CRF230F • CRF230F (Tipo U)
Aceite del MotorLa calidad del aceite es el factor que más afecta la vida útil del motor. Cambie el aceite del motor a cada intervalo especificado en la Tabla de Mantenimiento (página 43).En caso de que usted utilice la motocicleta en regiones demasiado polvorientas, cambie el aceite con más frecuencia de lo que se recomienda en la Tabla de Mantenimiento.Al descartar el aceite usado, respete las reglas de preservación del medio ambiente. Nosotros le sugerimos que el aceite usado sea colocado en un recipiente cerrado y que lo lleve al centro de reciclaje más cercano. Nunca descarte el aceite usado en alcantarillas o en el suelo.El aceite del motor usado puede causar cáncer de piel, en caso de que permanezca en contacto con la misma por períodos prolongados. Sin embargo, ese peligro sólo existe en caso de que el aceite se manipule diariamente. Aun así, aconsejamos lavarse las manos con agua y jabón lo más rápido posible, después de manipularlo.Para cambiar el aceite es necesario una llave dinamométrica. En caso de que usted no posea las nociones mecánicas necesarias para efectuar el servicio, diríjase a un distribuidor Honda.En caso de que no se utilice una llave dinamométrica en la instalación, diríjase a un distribuidor Honda, tan luego sea posible, para verificar el armado.
Cambie el aceite mientras el motor esté en la temperatura normal de funcionamiento, con la motocicleta apoyada en el soporte lateral para garantizar un drenaje rápido y completo.1. Quite la tapa de suministro/varilla medidora del
nivel de aceite de la tapa derecha de la carcasa del motor.
2. Coloque un recipiente debajo de la carcasa del motor para recoger el aceite.
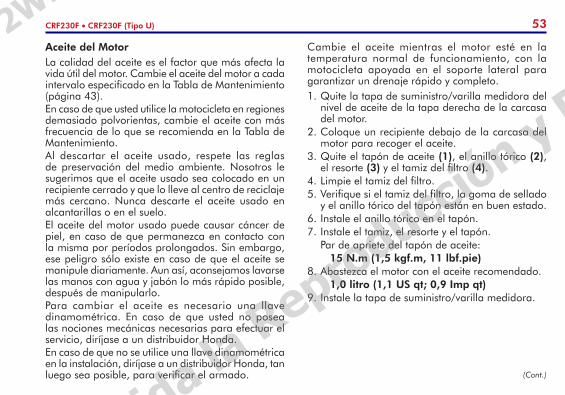
3. Quite el tapón de aceite (1), el anillo tórico (2), el resorte (3) y el tamiz del filtro (4).
4. Limpie el tamiz del filtro.5. Verifique si el tamiz del filtro, la goma de sellado
y el anillo tórico del tapón están en buen estado.6. Instale el anillo tórico en el tapón.7. Instale el tamiz, el resorte y el tapón. Par de apriete del tapón de aceite: 15 N.m (1,5 kgf.m, 11 lbf.pie)8. Abastezca el motor con el aceite recomendado. 1,0 litro (1,1 US qt; 0,9 Imp qt)9. Instale la tapa de suministro/varilla medidora.
(Cont.)
Prohibida la Reproducción y Distribución
2W-PE | 2Wheels - PE | FREDDY FIGUEROA
54 CRF230F • CRF230F (Tipo U)
Bujía de Encendido(Observe Precauciones de Seguridad en la página 42.)
Bujías de encendido recomendadas: Estándar: DPR8EA – 9 (NGK) o X24EPR – U9 (DENSO) Para climas fríos: (menos de 5°C, 41°F) DPR7EA – 9 (NGK) o X22EPR – U9 (DENSO)
NOTAEn caso de que el motor funcione con presión insuficiente del aceite, podrá sufrir serios daños.
NOTANunca utilice bujías de encendido de grado térmico inadecuado, pues esto podrá provocar serios daños al motor.
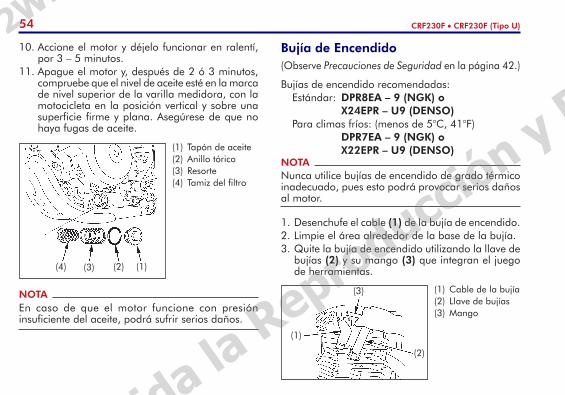
1. Desenchufe el cable (1) de la bujía de encendido.2. Limpie el área alrededor de la base de la bujía.3. Quite la bujía de encendido utilizando la llave de
bujías (2) y su mango (3) que integran el juego de herramientas.
(1) Cable de la bujía(2) Llave de bujías(3) Mango
(3)
(2)
(1)
10. Accione el motor y déjelo funcionar en ralentí, por 3 – 5 minutos.
11. Apague el motor y, después de 2 ó 3 minutos, compruebe que el nivel de aceite esté en la marca de nivel superior de la varilla medidora, con la motocicleta en la posición vertical y sobre una superficie firme y plana. Asegúrese de que no haya fugas de aceite.
(1) Tapón de aceite(2) Anillo tórico(3) Resorte(4) Tamiz del filtro
(2)(3)(4) (1)
Prohibida la Reproducción y Distribución
2W-PE | 2Wheels - PE | FREDDY FIGUEROA
55CRF230F • CRF230F (Tipo U)
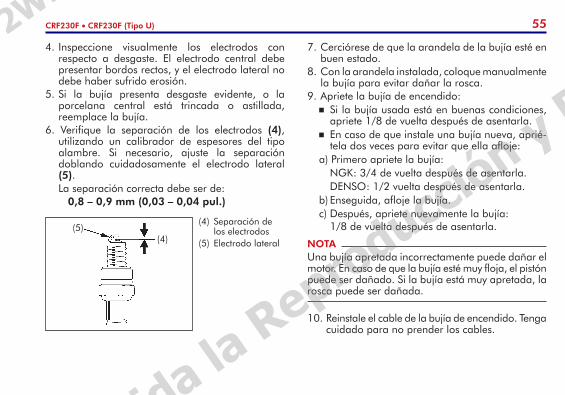
4. Inspeccione visualmente los electrodos con respecto a desgaste. El electrodo central debe presentar bordos rectos, y el electrodo lateral no debe haber sufrido erosión.
5. Si la bujía presenta desgaste evidente, o la porcelana central está trincada o astillada, reemplace la bujía.
6. Verifique la separación de los electrodos (4), utilizando un calibrador de espesores del tipo alambre. Si necesario, ajuste la separación doblando cuidadosamente el electrodo lateral (5).
La separación correcta debe ser de: 0,8 – 0,9 mm (0,03 – 0,04 pul.)
NOTAUna bujía apretada incorrectamente puede dañar el motor. En caso de que la bujía esté muy floja, el pistón puede ser dañado. Si la bujía está muy apretada, la rosca puede ser dañada.
7. Cerciórese de que la arandela de la bujía esté en buen estado.
8. Con la arandela instalada, coloque manualmente la bujía para evitar dañar la rosca.
9. Apriete la bujía de encendido: Si la bujía usada está en buenas condiciones,
apriete 1/8 de vuelta después de asentarla. En caso de que instale una bujía nueva, aprié-
tela dos veces para evitar que ella afloje:a) Primero apriete la bujía: NGK: 3/4 de vuelta después de asentarla.
DENSO: 1/2 vuelta después de asentarla.b) Enseguida, afloje la bujía.c) Después, apriete nuevamente la bujía: 1/8 de vuelta después de asentarla.
(4)(5)
(4) Separación de los electrodos
(5) Electrodo lateral
10. Reinstale el cable de la bujía de encendido. Tenga cuidado para no prender los cables.
Prohibida la Reproducción y Distribución
2W-PE | 2Wheels - PE | FREDDY FIGUEROA
56 CRF230F • CRF230F (Tipo U)
Ralentí(Observe Precauciones de Seguridad en la página 42.)
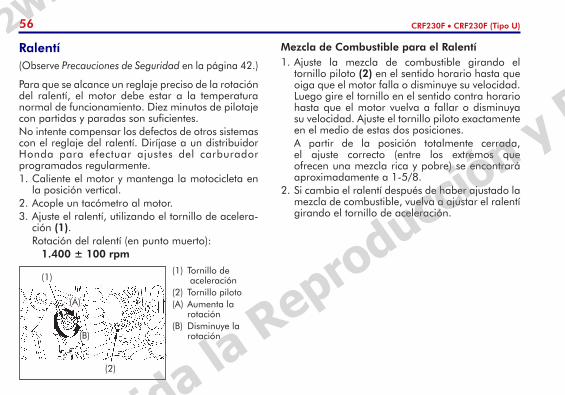
Para que se alcance un reglaje preciso de la rotación del ralentí, el motor debe estar a la temperatura normal de funcionamiento. Diez minutos de pilotaje con partidas y paradas son suficientes.No intente compensar los defectos de otros sistemas con el reglaje del ralentí. Diríjase a un distribuidor Honda para efectuar ajustes del carburador programados regularmente.1. Caliente el motor y mantenga la motocicleta en
la posición vertical.2. Acople un tacómetro al motor.3. Ajuste el ralentí, utilizando el tornillo de acelera-
ción (1). Rotación del ralentí (en punto muerto): 1.400 ± 100 rpm
(1) Tornillo de aceleración
(2) Tornillo piloto(A) Aumenta la
rotación(B) Disminuye la
rotación
(2)
(1)
(B)
(A)
Mezcla de Combustible para el Ralentí1. Ajuste la mezcla de combustible girando el
tornillo piloto (2) en el sentido horario hasta que oiga que el motor falla o disminuye su velocidad. Luego gire el tornillo en el sentido contra horario hasta que el motor vuelva a fallar o disminuya su velocidad. Ajuste el tornillo piloto exactamente en el medio de estas dos posiciones.
A partir de la posición totalmente cerrada, el ajuste correcto (entre los extremos que ofrecen una mezcla rica y pobre) se encontrará aproximadamente a 1-5/8.
2. Si cambia el ralentí después de haber ajustado la mezcla de combustible, vuelva a ajustar el ralentí girando el tornillo de aceleración.
Prohibida la Reproducción y Distribución
2W-PE | 2Wheels - PE | FREDDY FIGUEROA
57CRF230F • CRF230F (Tipo U)
Funcionamiento del Acelerador(Observe Precauciones de Seguridad en la página 42.)
Inspección de los Cables1. Verifique si la empuñadura del acelerador funciona
suavemente, desde la posición totalmente abierta hasta la posición totalmente cerrada, en ambas las posiciones extremas del manubrio.
2. Inspeccione las condiciones de los cables del ace-lerador (1), desde la empuñadura hasta el carbu-rador. En caso de que los cables estén doblados, desgastados o pasados de modo incorrecto, debe-rán ser reemplazados o pasados correctamente.
3. Verifique la tensión de los cables del acelerador en todas las posiciones del manubrio. Lubríquelos con lubricante de cables de buena calidad para evitar el desgaste prematuro y la corrosión.
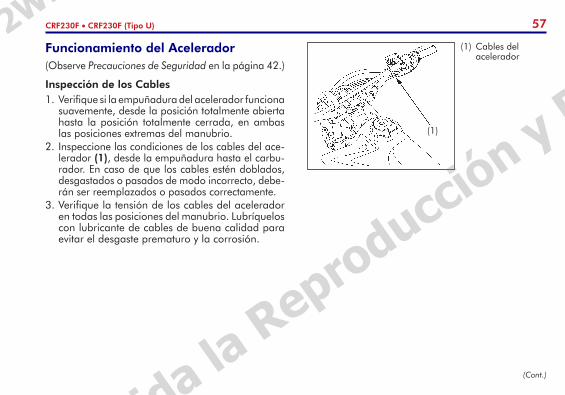
(1) Cables del acelerador
(1)
(Cont.)
Prohibida la Reproducción y Distribución
2W-PE | 2Wheels - PE | FREDDY FIGUEROA
58 CRF230F • CRF230F (Tipo U)
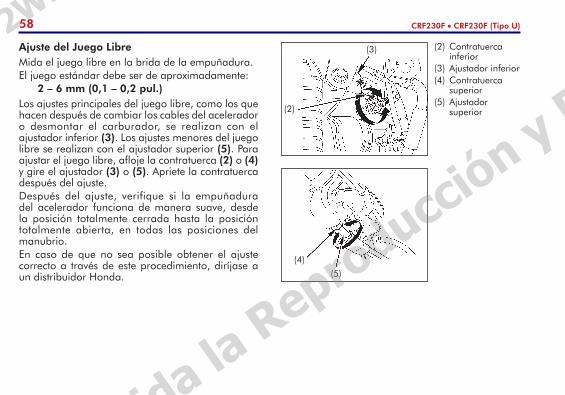
(2) Contratuerca inferior
(3) Ajustador inferior(4) Contratuerca
superior(5) Ajustador
superior(2)
(3)
(4)
(5)
Ajuste del Juego LibreMida el juego libre en la brida de la empuñadura.El juego estándar debe ser de aproximadamente: 2 – 6 mm (0,1 – 0,2 pul.)Los ajustes principales del juego libre, como los que hacen después de cambiar los cables del acelerador o desmontar el carburador, se realizan con el ajustador inferior (3). Los ajustes menores del juego libre se realizan con el ajustador superior (5). Para ajustar el juego libre, afloje la contratuerca (2) o (4) y gire el ajustador (3) o (5). Apriete la contratuerca después del ajuste. Después del ajuste, verifique si la empuñadura del acelerador funciona de manera suave, desde la posición totalmente cerrada hasta la posición totalmente abierta, en todas las posiciones del manubrio.En caso de que no sea posible obtener el ajuste correcto a través de este procedimiento, diríjase a un distribuidor Honda.
Prohibida la Reproducción y Distribución
2W-PE | 2Wheels - PE | FREDDY FIGUEROA
59CRF230F • CRF230F (Tipo U)
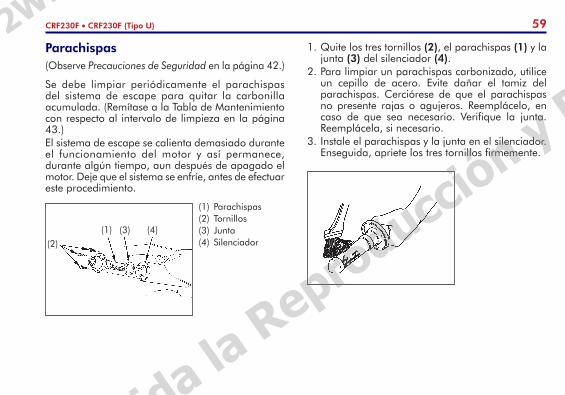
Parachispas (Observe Precauciones de Seguridad en la página 42.)
Se debe limpiar periódicamente el parachispas del sistema de escape para quitar la carbonilla acumulada. (Remítase a la Tabla de Mantenimiento con respecto al intervalo de limpieza en la página 43.)El sistema de escape se calienta demasiado durante el funcionamiento del motor y así permanece, durante algún tiempo, aun después de apagado el motor. Deje que el sistema se enfríe, antes de efectuar este procedimiento.
(1) Parachispas(2) Tornillos(3) Junta(4) Silenciador(2)
(3)(1) (4)
1. Quite los tres tornillos (2), el parachispas (1) y la junta (3) del silenciador (4).
2. Para limpiar un parachispas carbonizado, utilice un cepillo de acero. Evite dañar el tamiz del parachispas. Cerciórese de que el parachispas no presente rajas o agujeros. Reemplácelo, en caso de que sea necesario. Verifique la junta. Reemplácela, si necesario.
3. Instale el parachispas y la junta en el silenciador. Enseguida, apriete los tres tornillos firmemente.
Prohibida la Reproducción y Distribución
2W-PE | 2Wheels - PE | FREDDY FIGUEROA
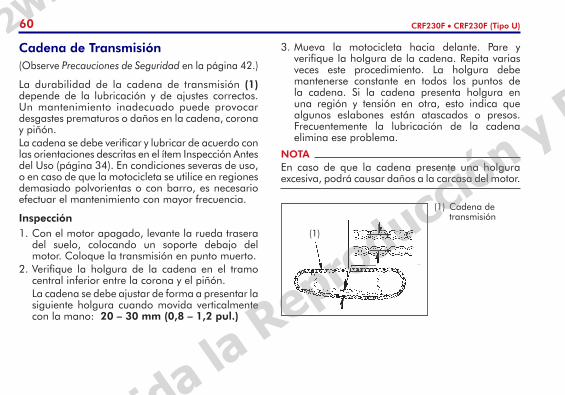
60 CRF230F • CRF230F (Tipo U)
Cadena de Transmisión(Observe Precauciones de Seguridad en la página 42.)
La durabilidad de la cadena de transmisión (1) depende de la lubricación y de ajustes correctos. Un mantenimiento inadecuado puede provocar desgastes prematuros o daños en la cadena, corona y piñón.La cadena se debe verificar y lubricar de acuerdo con las orientaciones descritas en el ítem Inspección Antes del Uso (página 34). En condiciones severas de uso, o en caso de que la motocicleta se utilice en regiones demasiado polvorientas o con barro, es necesario efectuar el mantenimiento con mayor frecuencia.
Inspección1. Con el motor apagado, levante la rueda trasera
del suelo, colocando un soporte debajo del motor. Coloque la transmisión en punto muerto.
2. Verifique la holgura de la cadena en el tramo central inferior entre la corona y el piñón.
La cadena se debe ajustar de forma a presentar la siguiente holgura cuando movida verticalmente con la mano: 20 – 30 mm (0,8 – 1,2 pul.)
NOTAEn caso de que la cadena presente una holgura excesiva, podrá causar daños a la carcasa del motor.
(1) Cadena de transmisión
(1)
3. Mueva la motocicleta hacia delante. Pare y verifique la holgura de la cadena. Repita varias veces este procedimiento. La holgura debe mantenerse constante en todos los puntos de la cadena. Si la cadena presenta holgura en una región y tensión en otra, esto indica que algunos eslabones están atascados o presos. Frecuentemente la lubricación de la cadena elimina ese problema.
Prohibida la Reproducción y Distribución
2W-PE | 2Wheels - PE | FREDDY FIGUEROA
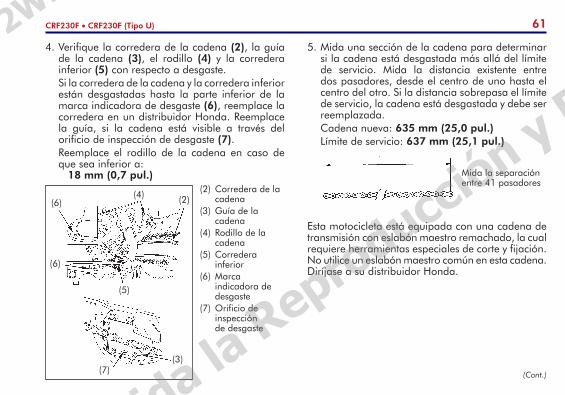
61CRF230F • CRF230F (Tipo U)
(2) Corredera de la cadena
(3) Guía de la cadena
(4) Rodillo de la cadena
(5) Corredera inferior
(6) Marca indicadora de desgaste
(7) Orificio de inspección de desgaste
(5)
(2)(6)(4)
(6)
(3)(7)
5. Mida una sección de la cadena para determinar si la cadena está desgastada más allá del límite de servicio. Mida la distancia existente entre dos pasadores, desde el centro de uno hasta el centro del otro. Si la distancia sobrepasa el límite de servicio, la cadena está desgastada y debe ser reemplazada.
Cadena nueva: 635 mm (25,0 pul.) Límite de servicio: 637 mm (25,1 pul.)
Esta motocicleta está equipada con una cadena de transmisión con eslabón maestro remachado, la cual requiere herramientas especiales de corte y fijación. No utilice un eslabón maestro común en esta cadena. Diríjase a su distribuidor Honda.
Mida la separación entre 41 pasadores
4. Verifique la corredera de la cadena (2), la guía de la cadena (3), el rodillo (4) y la corredera inferior (5) con respecto a desgaste.
Si la corredera de la cadena y la corredera inferior están desgastadas hasta la parte inferior de la marca indicadora de desgaste (6), reemplace la corredera en un distribuidor Honda. Reemplace la guía, si la cadena está visible a través del orificio de inspección de desgaste (7).
Reemplace el rodillo de la cadena en caso de que sea inferior a:
18 mm (0,7 pul.)
(Cont.)
Prohibida la Reproducción y Distribución
2W-PE | 2Wheels - PE | FREDDY FIGUEROA
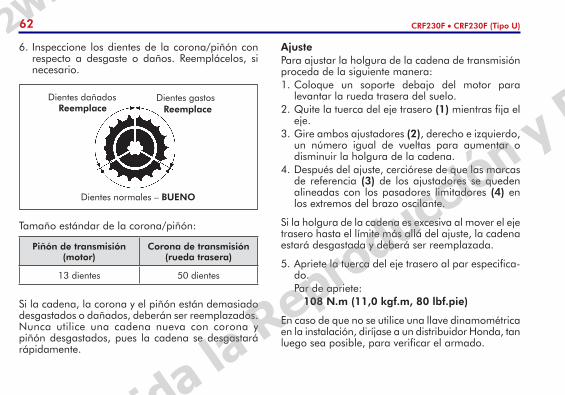
62 CRF230F • CRF230F (Tipo U)
Tamaño estándar de la corona/piñón:
Piñón de transmisión (motor)
Corona de transmisión (rueda trasera)
13 dientes 50 dientes
Si la cadena, la corona y el piñón están demasiado desgastados o dañados, deberán ser reemplazados. Nunca utilice una cadena nueva con corona y piñón desgastados, pues la cadena se desgastará rápidamente.
Dientes dañados Dientes gastosReemplace Reemplace
Dientes normales – BUENO
AjustePara ajustar la holgura de la cadena de transmisión proceda de la siguiente manera:1. Coloque un soporte debajo del motor para
levantar la rueda trasera del suelo.2. Quite la tuerca del eje trasero (1) mientras fija el
eje.3. Gire ambos ajustadores (2), derecho e izquierdo,
un número igual de vueltas para aumentar o disminuir la holgura de la cadena.
4. Después del ajuste, cerciórese de que las marcas de referencia (3) de los ajustadores se queden alineadas con los pasadores limitadores (4) en los extremos del brazo oscilante.
Si la holgura de la cadena es excesiva al mover el eje trasero hasta el límite más allá del ajuste, la cadena estará desgastada y deberá ser reemplazada.
5. Apriete la tuerca del eje trasero al par especifica-do.
Par de apriete: 108 N.m (11,0 kgf.m, 80 lbf.pie)
En caso de que no se utilice una llave dinamométrica en la instalación, diríjase a un distribuidor Honda, tan luego sea posible, para verificar el armado.
6. Inspeccione los dientes de la corona/piñón con respecto a desgaste o daños. Reemplácelos, si necesario.
Prohibida la Reproducción y Distribución
2W-PE | 2Wheels - PE | FREDDY FIGUEROA
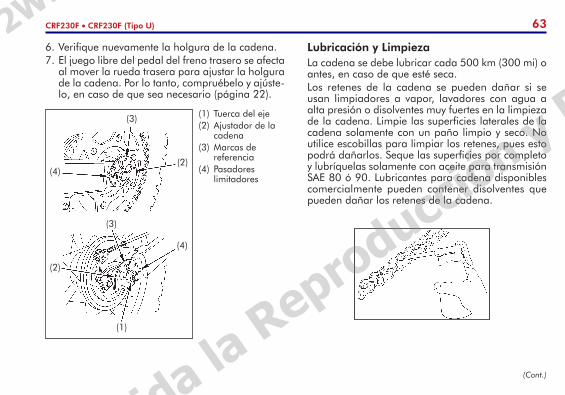
63CRF230F • CRF230F (Tipo U)
6. Verifique nuevamente la holgura de la cadena.7. El juego libre del pedal del freno trasero se afecta
al mover la rueda trasera para ajustar la holgura de la cadena. Por lo tanto, compruébelo y ajúste-lo, en caso de que sea necesario (página 22).
(1) Tuerca del eje(2) Ajustador de la
cadena(3) Marcas de
referencia(4) Pasadores
limitadores
(2)
(3)
(4)
(4)
(1)
(3)
(2)
Lubricación y LimpiezaLa cadena se debe lubricar cada 500 km (300 mi) o antes, en caso de que esté seca.Los retenes de la cadena se pueden dañar si se usan limpiadores a vapor, lavadores con agua a alta presión o disolventes muy fuertes en la limpieza de la cadena. Limpie las superficies laterales de la cadena solamente con un paño limpio y seco. No utilice escobillas para limpiar los retenes, pues esto podrá dañarlos. Seque las superficies por completo y lubríquelas solamente con aceite para transmisión SAE 80 ó 90. Lubricantes para cadena disponibles comercialmente pueden contener disolventes que pueden dañar los retenes de la cadena.
(Cont.)
Prohibida la Reproducción y Distribución
2W-PE | 2Wheels - PE | FREDDY FIGUEROA
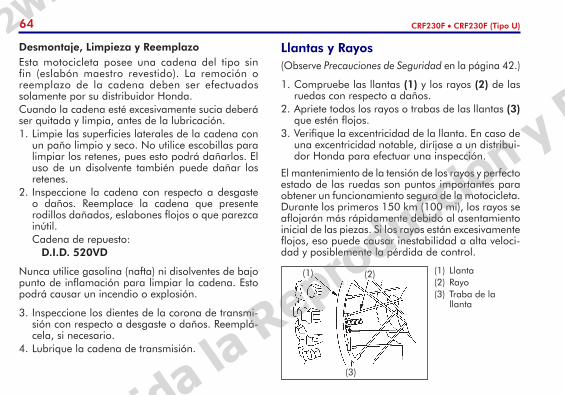
64 CRF230F • CRF230F (Tipo U)
Desmontaje, Limpieza y ReemplazoEsta motocicleta posee una cadena del tipo sin fin (eslabón maestro revestido). La remoción o reemplazo de la cadena deben ser efectuados solamente por su distribuidor Honda.Cuando la cadena esté excesivamente sucia deberá ser quitada y limpia, antes de la lubricación.1. Limpie las superficies laterales de la cadena con
un paño limpio y seco. No utilice escobillas para limpiar los retenes, pues esto podrá dañarlos. El uso de un disolvente también puede dañar los retenes.
2. Inspeccione la cadena con respecto a desgaste o daños. Reemplace la cadena que presente rodillos dañados, eslabones flojos o que parezca inútil.
Cadena de repuesto: D.I.D. 520VD
Nunca utilice gasolina (nafta) ni disolventes de bajo punto de inflamación para limpiar la cadena. Esto podrá causar un incendio o explosión.
3. Inspeccione los dientes de la corona de transmi-sión con respecto a desgaste o daños. Reemplá-cela, si necesario.
4. Lubrique la cadena de transmisión.
Llantas y Rayos (Observe Precauciones de Seguridad en la página 42.)
1. Compruebe las llantas (1) y los rayos (2) de las ruedas con respecto a daños.
2. Apriete todos los rayos o trabas de las llantas (3) que estén flojos.
3. Verifique la excentricidad de la llanta. En caso de una excentricidad notable, diríjase a un distribui-dor Honda para efectuar una inspección.
El mantenimiento de la tensión de los rayos y perfecto estado de las ruedas son puntos importantes para obtener un funcionamiento seguro de la motocicleta. Durante los primeros 150 km (100 mi), los rayos se aflojarán más rápidamente debido al asentamiento inicial de las piezas. Si los rayos están excesivamente flojos, eso puede causar inestabilidad a alta veloci-dad y posiblemente la pérdida de control.
(1) Llanta(2) Rayo(3) Traba de la
llanta
(1) (2)
(3)
Prohibida la Reproducción y Distribución
2W-PE | 2Wheels - PE | FREDDY FIGUEROA
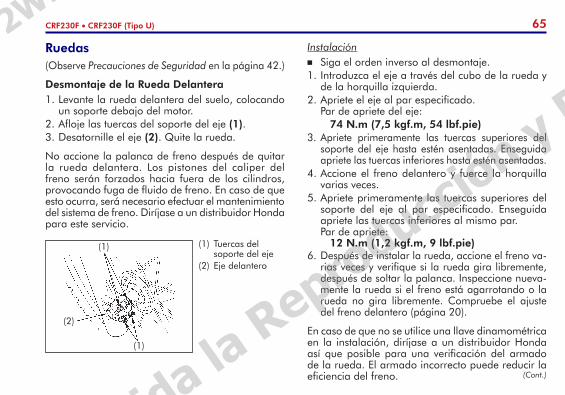
65CRF230F • CRF230F (Tipo U)
Ruedas(Observe Precauciones de Seguridad en la página 42.)
Desmontaje de la Rueda Delantera1. Levante la rueda delantera del suelo, colocando
un soporte debajo del motor.2. Afloje las tuercas del soporte del eje (1).3. Desatornille el eje (2). Quite la rueda.
No accione la palanca de freno después de quitar la rueda delantera. Los pistones del caliper del freno serán forzados hacia fuera de los cilindros, provocando fuga de fluido de freno. En caso de que esto ocurra, será necesario efectuar el mantenimiento del sistema de freno. Diríjase a un distribuidor Honda para este servicio.
(1) Tuercas del soporte del eje
(2) Eje delantero
(2)
(1)
(1)
Instalación Siga el orden inverso al desmontaje. 1. Introduzca el eje a través del cubo de la rueda y
de la horquilla izquierda.2. Apriete el eje al par especificado. Par de apriete del eje: 74 N.m (7,5 kgf.m, 54 lbf.pie)3. Apriete primeramente las tuercas superiores del
soporte del eje hasta estén asentadas. Enseguida apriete las tuercas inferiores hasta estén asentadas.
4. Accione el freno delantero y fuerce la horquilla varias veces.
5. Apriete primeramente las tuercas superiores del soporte del eje al par especificado. Enseguida apriete las tuercas inferiores al mismo par.
Par de apriete: 12 N.m (1,2 kgf.m, 9 lbf.pie)6. Después de instalar la rueda, accione el freno va-
rias veces y verifique si la rueda gira libremente, después de soltar la palanca. Inspeccione nueva-mente la rueda si el freno está agarrotando o la rueda no gira libremente. Compruebe el ajuste del freno delantero (página 20).
En caso de que no se utilice una llave dinamométrica en la instalación, diríjase a un distribuidor Honda así que posible para una verificación del armado de la rueda. El armado incorrecto puede reducir la eficiencia del freno. (Cont.)
Prohibida la Reproducción y Distribución
2W-PE | 2Wheels - PE | FREDDY FIGUEROA
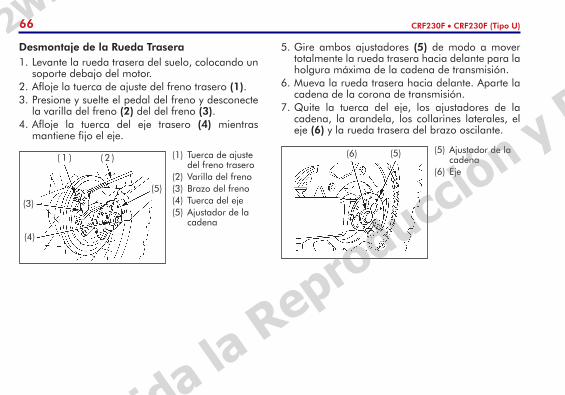
66 CRF230F • CRF230F (Tipo U)
Desmontaje de la Rueda Trasera1. Levante la rueda trasera del suelo, colocando un
soporte debajo del motor.2. Afloje la tuerca de ajuste del freno trasero (1).3. Presione y suelte el pedal del freno y desconecte
la varilla del freno (2) del del freno (3).4. Afloje la tuerca del eje trasero (4) mientras
mantiene fijo el eje.
(1) Tuerca de ajuste del freno trasero
(2) Varilla del freno(3) Brazo del freno(4) Tuerca del eje(5) Ajustador de la
cadena
( 2 )( 1 )
(5)
(4)
(3)
5. Gire ambos ajustadores (5) de modo a mover totalmente la rueda trasera hacia delante para la holgura máxima de la cadena de transmisión.
6. Mueva la rueda trasera hacia delante. Aparte la cadena de la corona de transmisión.
7. Quite la tuerca del eje, los ajustadores de la cadena, la arandela, los collarines laterales, el eje (6) y la rueda trasera del brazo oscilante.
(5) Ajustador de la cadena
(6) Eje
(5)(6)
Prohibida la Reproducción y Distribución
2W-PE | 2Wheels - PE | FREDDY FIGUEROA
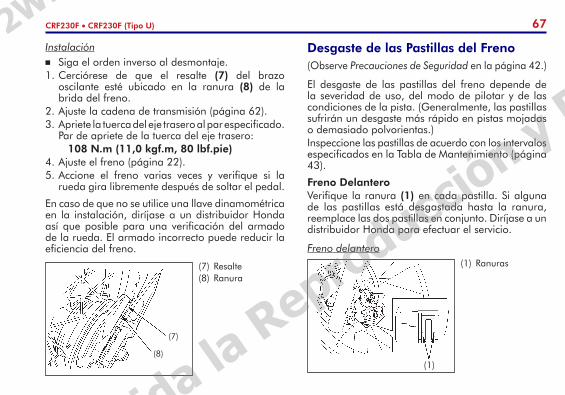
67CRF230F • CRF230F (Tipo U)
Instalación Siga el orden inverso al desmontaje. 1. Cerciórese de que el resalte (7) del brazo
oscilante esté ubicado en la ranura (8) de la brida del freno.
2. Ajuste la cadena de transmisión (página 62).3. Apriete la tuerca del eje trasero al par especificado.
Par de apriete de la tuerca del eje trasero: 108 N.m (11,0 kgf.m, 80 lbf.pie)4. Ajuste el freno (página 22).5. Accione el freno varias veces y verifique si la
rueda gira libremente después de soltar el pedal.
En caso de que no se utilice una llave dinamométrica en la instalación, diríjase a un distribuidor Honda así que posible para una verificación del armado de la rueda. El armado incorrecto puede reducir la eficiencia del freno.
(7) Resalte (8) Ranura
(8)
(7)
Desgaste de las Pastillas del Freno(Observe Precauciones de Seguridad en la página 42.)
El desgaste de las pastillas del freno depende de la severidad de uso, del modo de pilotar y de las condiciones de la pista. (Generalmente, las pastillas sufrirán un desgaste más rápido en pistas mojadas o demasiado polvorientas.)Inspeccione las pastillas de acuerdo con los intervalos especificados en la Tabla de Mantenimiento (página 43).
Freno DelanteroVerifique la ranura (1) en cada pastilla. Si alguna de las pastillas está desgastada hasta la ranura, reemplace las dos pastillas en conjunto. Diríjase a un distribuidor Honda para efectuar el servicio.
Freno delantero(1) Ranuras
(1)
Prohibida la Reproducción y Distribución
2W-PE | 2Wheels - PE | FREDDY FIGUEROA
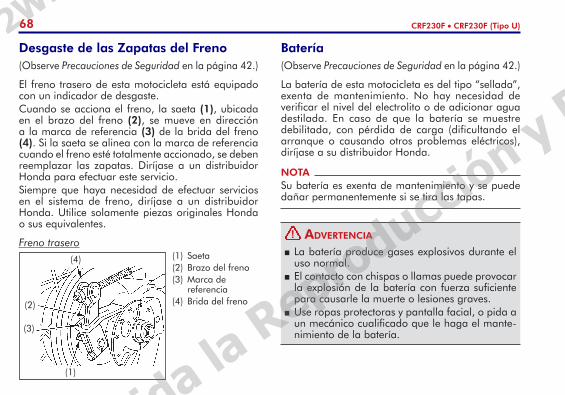
68 CRF230F • CRF230F (Tipo U)
Desgaste de las Zapatas del Freno(Observe Precauciones de Seguridad en la página 42.)
El freno trasero de esta motocicleta está equipado con un indicador de desgaste.Cuando se acciona el freno, la saeta (1), ubicada en el brazo del freno (2), se mueve en dirección a la marca de referencia (3) de la brida del freno (4). Si la saeta se alinea con la marca de referencia cuando el freno esté totalmente accionado, se deben reemplazar las zapatas. Diríjase a un distribuidor Honda para efectuar este servicio.Siempre que haya necesidad de efectuar servicios en el sistema de freno, diríjase a un distribuidor Honda. Utilice solamente piezas originales Honda o sus equivalentes.
Freno trasero(1) Saeta(2) Brazo del freno(3) Marca de
referencia(4) Brida del freno
(1)
(2)
(4)
(3)
Batería(Observe Precauciones de Seguridad en la página 42.)
La batería de esta motocicleta es del tipo “sellada”, exenta de mantenimiento. No hay necesidad de verificar el nivel del electrolito o de adicionar agua destilada. En caso de que la batería se muestre debilitada, con pérdida de carga (dificultando el arranque o causando otros problemas eléctricos), diríjase a su distribuidor Honda.
NOTASu batería es exenta de mantenimiento y se puede dañar permanentemente si se tira las tapas.
La batería produce gases explosivos durante el uso normal.
El contacto con chispas o llamas puede provocar la explosión de la batería con fuerza suficiente para causarle la muerte o lesiones graves.
Use ropas protectoras y pantalla facial, o pida a un mecánico cualificado que le haga el mante-nimiento de la batería.
AdvertenciA!
Prohibida la Reproducción y Distribución
2W-PE | 2Wheels - PE | FREDDY FIGUEROA

69CRF230F • CRF230F (Tipo U)
(1) Soporte de la batería
(2) Terminal negativo (–)
(3) Terminal positivo (+)
(4) Batería
(3)
(4)
(2)
(1)
DesmontajeLa batería se encuentra en un compartimiento detrás de la tapa lateral izquierda.1. Cerciórese de que el interruptor de encendido
esté desactivado (posición OFF).2. Quite la tapa lateral izquierda (página 33).3. Quite el soporte de la batería (1).4. Desconecte primero el cable del terminal negativo
(–) (2) de la batería y, enseguida, el cable del terminal positivo (+) (3).
5. Retire la batería (4) de su compartimiento.
Instalación1. Siga el orden inverso al desmontaje. Cerciórese
de conectar primero el cable del terminal positivo (+) de la batería y, enseguida, el cable del terminal negativo (–).
2. Verifique si todos los tornillos y elementos de fijación están apretados correctamente.
Reemplazo de Fusibles(Observe Precauciones de Seguridad en la página 42.)
Generalmente la quema frecuente de fusibles indica cortocircuito o sobrecarga en el sistema eléctrico. Diríjase a un distribuidor Honda para efectuar los reparos necesarios.
NOTANunca utilice fusibles con capacidad diferente a la especificada. Esto podrá causar serios daños al sistema eléctrico o incendio, provocando falta de iluminación o pérdida de potencia del motor.
Fusible quemado
(Cont.)
Prohibida la Reproducción y Distribución
2W-PE | 2Wheels - PE | FREDDY FIGUEROA
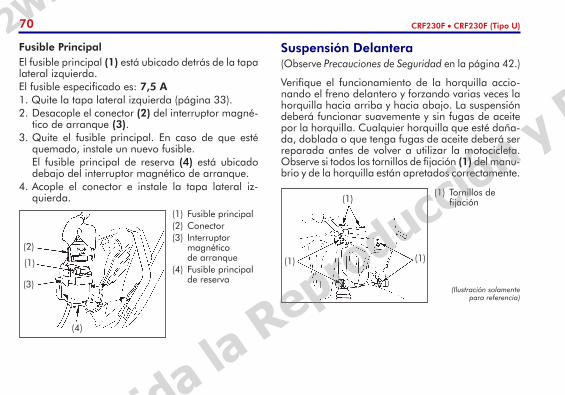
70 CRF230F • CRF230F (Tipo U)
Fusible PrincipalEl fusible principal (1) está ubicado detrás de la tapa lateral izquierda.El fusible especificado es: 7,5 A1. Quite la tapa lateral izquierda (página 33).2. Desacople el conector (2) del interruptor magné-
tico de arranque (3).3. Quite el fusible principal. En caso de que esté
quemado, instale un nuevo fusible. El fusible principal de reserva (4) está ubicado
debajo del interruptor magnético de arranque.4. Acople el conector e instale la tapa lateral iz-
quierda.(1) Fusible principal(2) Conector(3) Interruptor
magnético de arranque
(4) Fusible principal de reserva
(1)
(2)
(3)
(4)
Suspensión Delantera (Observe Precauciones de Seguridad en la página 42.)
Verifique el funcionamiento de la horquilla accio-nando el freno delantero y forzando varias veces la horquilla hacia arriba y hacia abajo. La suspensión deberá funcionar suavemente y sin fugas de aceite por la horquilla. Cualquier horquilla que esté daña-da, doblada o que tenga fugas de aceite deberá ser reparada antes de volver a utilizar la motocicleta. Observe si todos los tornillos de fijación (1) del manu-brio y de la horquilla están apretados correctamente.
(Ilustración solamente para referencia)
(1)
(1)
(1)
(1) Tornillos de fijación
Prohibida la Reproducción y Distribución
2W-PE | 2Wheels - PE | FREDDY FIGUEROA
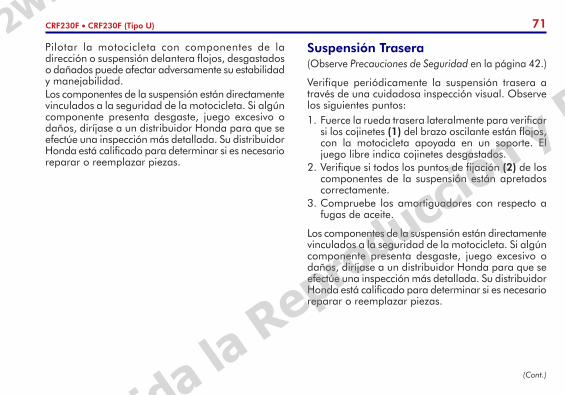
71CRF230F • CRF230F (Tipo U)
Pilotar la motocicleta con componentes de la dirección o suspensión delantera flojos, desgastados o dañados puede afectar adversamente su estabilidad y manejabilidad. Los componentes de la suspensión están directamente vinculados a la seguridad de la motocicleta. Si algún componente presenta desgaste, juego excesivo o daños, diríjase a un distribuidor Honda para que se efectúe una inspección más detallada. Su distribuidor Honda está calificado para determinar si es necesario reparar o reemplazar piezas.
Suspensión Trasera (Observe Precauciones de Seguridad en la página 42.)
Verifique periódicamente la suspensión trasera a través de una cuidadosa inspección visual. Observe los siguientes puntos:1. Fuerce la rueda trasera lateralmente para verificar
si los cojinetes (1) del brazo oscilante están flojos, con la motocicleta apoyada en un soporte. El juego libre indica cojinetes desgastados.
2. Verifique si todos los puntos de fijación (2) de los componentes de la suspensión están apretados correctamente.
3. Compruebe los amortiguadores con respecto a fugas de aceite.
Los componentes de la suspensión están directamente vinculados a la seguridad de la motocicleta. Si algún componente presenta desgaste, juego excesivo o daños, diríjase a un distribuidor Honda para que se efectúe una inspección más detallada. Su distribuidor Honda está calificado para determinar si es necesario reparar o reemplazar piezas.
(Cont.)
Prohibida la Reproducción y Distribución
2W-PE | 2Wheels - PE | FREDDY FIGUEROA
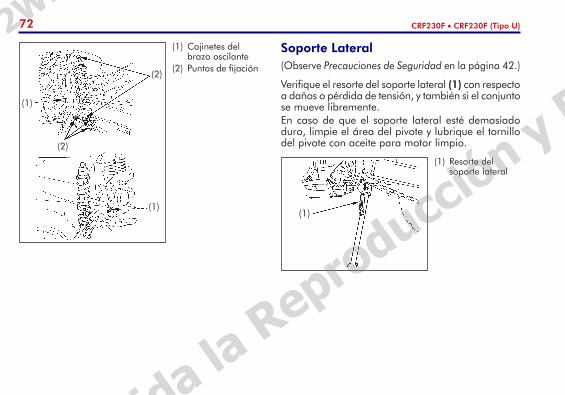
72 CRF230F • CRF230F (Tipo U)
Soporte Lateral(Observe Precauciones de Seguridad en la página 42.)
Verifique el resorte del soporte lateral (1) con respecto a daños o pérdida de tensión, y también si el conjunto se mueve libremente.En caso de que el soporte lateral esté demasiado duro, limpie el área del pivote y lubrique el tornillo del pivote con aceite para motor limpio.
(1) Cojinetes del brazo oscilante
(2) Puntos de fijación (2)
(1)
(2)
(1)
(1) Resorte del soporte lateral
(1)
Prohibida la Reproducción y Distribución
2W-PE | 2Wheels - PE | FREDDY FIGUEROA

73CRF230F • CRF230F (Tipo U)
Reemplazo de Lámparas (Solamente Tipo U)(Observe Precauciones de Seguridad en la página 42.)
La lámpara del faro se calienta demasiado y así permanece, por algún tiempo, aún después de desactivada. Déjela enfriar antes de efectuar el reemplazo. El equipo de iluminación no es legal para ser utilizado en carreteras. No utilice esta motocicleta en calles, caminos o carreteras públicas. Cerciórese de que el interruptor de encendido esté
desactivado (posición OFF) antes de reemplazar la lámpara.
No utilice lámparas diferentes a las especificadas. Después de instalar una nueva lámpara, comprue-
be el funcionamiento de la luz.
Lámpara del Faro1. Quite las tuercas (1), los tornillos (2) y el faro (3).
2. Empuje la capa de goma (4) hacia atrás.3. Presione un poco el soquete (5) y gírelo en
sentido contra horario. Quite la lámpara (6).4. Instale una nueva lámpara en el orden inverso al
desmontaje.
Al instalar la lámpara, alinee la lengüeta de la lámpara con la ranura del faro.
(2)
(1) Tuercas(2) Tornillos(3) Faro
(3)
(1)
(5)
(4) Capa de goma(5) Soquete(6) Lámpara del faro
(6)
(4)
Prohibida la Reproducción y Distribución
2W-PE | 2Wheels - PE | FREDDY FIGUEROA
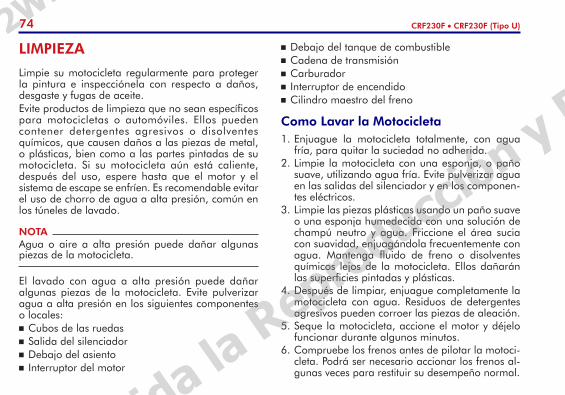
74 CRF230F • CRF230F (Tipo U)
LIMPIEZA
Limpie su motocicleta regularmente para proteger la pintura e inspecciónela con respecto a daños, desgaste y fugas de aceite.Evite productos de limpieza que no sean específicos para motocicletas o automóviles. Ellos pueden contener detergentes agresivos o disolventes químicos, que causen daños a las piezas de metal, o plásticas, bien como a las partes pintadas de su motocicleta. Si su motocicleta aún está caliente, después del uso, espere hasta que el motor y el sistema de escape se enfríen. Es recomendable evitar el uso de chorro de agua a alta presión, común en los túneles de lavado.
El lavado con agua a alta presión puede dañar algunas piezas de la motocicleta. Evite pulverizar agua a alta presión en los siguientes componentes o locales: Cubos de las ruedas Salida del silenciador Debajo del asiento Interruptor del motor
NOTAAgua o aire a alta presión puede dañar algunas piezas de la motocicleta.
Debajo del tanque de combustible Cadena de transmisión Carburador Interruptor de encendido Cilindro maestro del freno
Como Lavar la Motocicleta1. Enjuague la motocicleta totalmente, con agua
fría, para quitar la suciedad no adherida.2. Limpie la motocicleta con una esponja, o paño
suave, utilizando agua fría. Evite pulverizar agua en las salidas del silenciador y en los componen-tes eléctricos.
3. Limpie las piezas plásticas usando un paño suave o una esponja humedecida con una solución de champú neutro y agua. Friccione el área sucia con suavidad, enjuagándola frecuentemente con agua. Mantenga fluido de freno o disolventes químicos lejos de la motocicleta. Ellos dañarán las superficies pintadas y plásticas.
4. Después de limpiar, enjuague completamente la motocicleta con agua. Residuos de detergentes agresivos pueden corroer las piezas de aleación.
5. Seque la motocicleta, accione el motor y déjelo funcionar durante algunos minutos.
6. Compruebe los frenos antes de pilotar la motoci-cleta. Podrá ser necesario accionar los frenos al-gunas veces para restituir su desempeño normal.
Prohibida la Reproducción y Distribución
2W-PE | 2Wheels - PE | FREDDY FIGUEROA
75CRF230F • CRF230F (Tipo U)
7. Lubrique la cadena de transmisión inmediata-mente después de lavar y secar la motocicleta.
La eficiencia de los frenos puede ser afectada tempo-ralmente después del lavado. Accione los frenos con mayor anticipación para evitar un posible accidente.
Retoques FinalesDespués del lavado, utilice un producto para limpie-za o pulidor en spray, o cera en pasta o liquida de buena calidad, disponibles comercialmente, para finalizar el servicio. Utilice solamente ceras o puli-dores no abrasivos, específicos para motocicletas y automóviles. Aplique el producto de acuerdo con las instrucciones del embalaje.
Limpieza de la Superficie Pintada del Mat (Negro Mate)Utilizando agua en abundancia, limpie la superficie pintada del mat con un trapo o esponja suaves. Seque con un trapo limpio y suave.Use champú neutro para limpiar la superficie pintada del mat.No use productos que contengan cera.
GUÍA PARA ALMACENAJE DE LA MOTOCICLETA
En caso de que mantenga la motocicleta inactiva durante un largo período, durante el invierno por ejemplo, se deben observar ciertos cuidados para reducir los efectos de deterioro causados por la inactividad de la motocicleta. Además, ANTES de colocar la motocicleta en inactividad, efectúe todos los reparos que sean necesarios. Al contrario, esos reparos pueden ser olvidados cuando se vuelva a utilizar la motocicleta.
Almacenaje1. Cambie el aceite del motor y limpie el tamiz del
filtro de aceite.2. Drene el tanque de combustible y el carburador en
un recipiente para gasolina (nafta) homologado. Reinstale la tapa del tanque de combustible.
En caso de que la motocicleta vaya a permanecer inactiva por más de un mes, es muy importante drenar el carburador para garantizar el funcionamiento perfecto del motor, cuando la motocicleta vuelva a ser utilizada.
(Cont.)
Prohibida la Reproducción y Distribución
2W-PE | 2Wheels - PE | FREDDY FIGUEROA

76 CRF230F • CRF230F (Tipo U)
3. Para impedir la oxidación en el interior del cilindro, efectúe los siguientes procedimientos: Quite los cables de las bujías de encendido.
Utilice un cordón o cinta para amarrar los cables a algún componente plástico del carenado, lejos de las bujías de encendido.
Quite las bujías del motor y guardélas en un local seguro. No enchufe las bujías a los cables.
Vierta una cuchara de sopa (15 – 20 cm3) de aceite nuevo para motor en el cilindro y cubra el orificio de la bujía con un paño limpio.
Accione el motor varias veces para distribuir el aceite.
Reinstale las bujías de encendido y los cables.
4. Quite la batería. Guárdela en un local protegido, que no sea expuesto a temperaturas demasiado bajas, ni a la acción directa de los rayos del sol.
Cargue la batería una vez al mes.5. Lave y seque la motocicleta. Aplique una camada
de cera en todas las superficies pintadas. Aplique aceite antioxidante en las superficies cromadas.
6. Lubrique la cadena de transmisión (página 63).7. Calibre los neumáticos de acuerdo con las
presiones recomendadas. Apoye la motocicleta sobre caballetes, de modo que los neumáticos no toquen el suelo.
8. Cubra la motocicleta con una capa apropiada (no utilice plásticos u otros materiales imperme-ables) y guárdela en un local fresco y seco, con alteraciones mínimas de temperatura. No la deje expuesta al sol.
La gasolina (nafta) es altamente inflamable y ex-plosiva. Usted podrá quemarse o ser seriamente herido al manosear el combustible. Apague el motor y mantenga lejanas las fuentes
de calor, chispas y llamas. Abastezca siempre al aire libre. Limpie y seque derramamientos inmediatamente.
AdvertenciA!
Prohibida la Reproducción y Distribución
2W-PE | 2Wheels - PE | FREDDY FIGUEROA
77CRF230F • CRF230F (Tipo U)
Activación de la Motocicleta1. Quite la capa protectora y lave completamente la
motocicleta.2. Cambie el aceite del motor, en caso de que la
motocicleta haya quedado inactiva por más de cuatro meses.
3. Si necesario, cargue la batería e instálela.4. Abastezca el tanque de combustible con gasolina
(nafta) nueva.5. Efectúe la Inspección Antes del Uso (página 34).6. Efectúe una prueba, pilotando la motocicleta a
baja velocidad en un local seguro y apartado del tráfico.
CÓMO ENFRENTAR LO INESPERADO
En Caso de AccidenteSu seguridad personal es prioridad en caso de accidente. Si usted o otra persona está herido, evalúe la severidad de las heridas y si es seguro continuar pilontando. Si necesario, solicite ayuda. Además obedezca las leyes pertinentes cuando otra persona o vehículo está implicada en el accidente.Si usted cree que es capaz de pilotar con seguridad, evalúe primero la condición de la motocicleta. En caso de que el motor aún esté funcionando, apáguelo y examínelo cuidadosamente. Inspeccione con respecto a fugas de fluido, verifique si las tuercas y tornillos principales están aprietados correctamente y fije el manubrio, las palancas de mando, los frenos y las ruedas.En caso de pequeños daños, o si está inseguro con respecto a posibles daños, pilote lentamente y con cautela. A veces los daños ocasionados por un accidente no son aparentes, por lo tanto su motocicleta se debe inspeccionar totalmente, tan luego sea posible, por un centro de servicio especializado. Además, después de un grave accidente, diríjase a un distribuidor Honda, para inspeccionar el chasis y la suspensión.
Prohibida la Reproducción y Distribución
2W-PE | 2Wheels - PE | FREDDY FIGUEROA
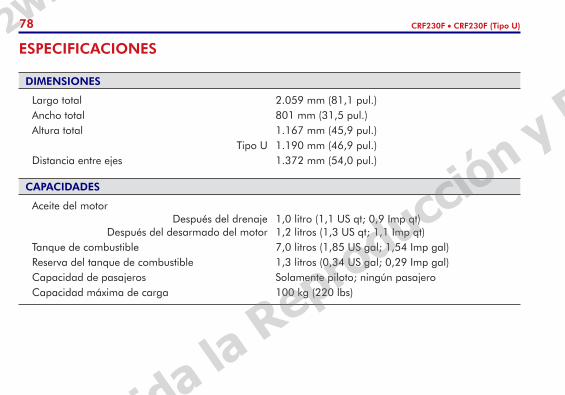
78 CRF230F • CRF230F (Tipo U)
ESPECIFICACIONES
DIMENSIONES
Largo total 2.059 mm (81,1 pul.) Ancho total 801 mm (31,5 pul.) Altura total 1.167 mm (45,9 pul.) Tipo U 1.190 mm (46,9 pul.) Distancia entre ejes 1.372 mm (54,0 pul.)
CAPACIDADES
Aceite del motor Después del drenaje 1,0 litro (1,1 US qt; 0,9 Imp qt) Después del desarmado del motor 1,2 litros (1,3 US qt; 1,1 Imp qt) Tanque de combustible 7,0 litros (1,85 US gal; 1,54 Imp gal) Reserva del tanque de combustible 1,3 litros (0,34 US gal; 0,29 Imp gal) Capacidad de pasajeros Solamente piloto; ningún pasajero Capacidad máxima de carga 100 kg (220 lbs)
Prohibida la Reproducción y Distribución
2W-PE | 2Wheels - PE | FREDDY FIGUEROA
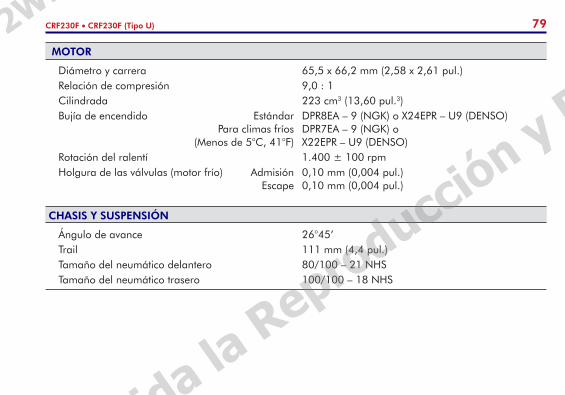
79CRF230F • CRF230F (Tipo U)
MOTOR
Diámetro y carrera 65,5 x 66,2 mm (2,58 x 2,61 pul.) Relación de compresión 9,0 : 1 Cilindrada 223 cm3 (13,60 pul.3) Bujía de encendido Estándar DPR8EA – 9 (NGK) o X24EPR – U9 (DENSO) Para climas fríos DPR7EA – 9 (NGK) o (Menos de 5°C, 41°F) X22EPR – U9 (DENSO) Rotación del ralentí 1.400 ± 100 rpm Holgura de las válvulas (motor frío) Admisión 0,10 mm (0,004 pul.) Escape 0,10 mm (0,004 pul.)
CHASIS Y SUSPENSIÓN
Ángulo de avance 26°45’ Trail 111 mm (4,4 pul.) Tamaño del neumático delantero 80/100 – 21 NHS Tamaño del neumático trasero 100/100 – 18 NHS
Prohibida la Reproducción y Distribución
2W-PE | 2Wheels - PE | FREDDY FIGUEROA
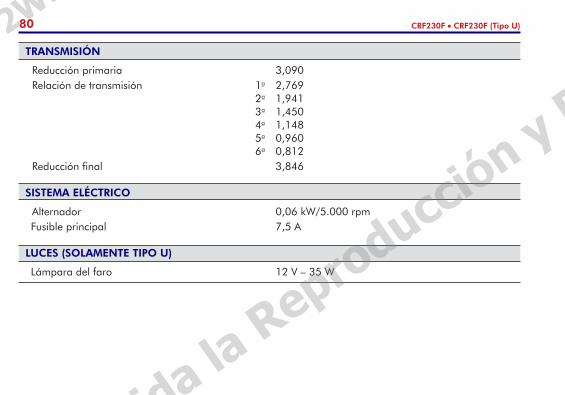
80 CRF230F • CRF230F (Tipo U)
TRANSMISIÓN
Reducción primaria 3,090 Relación de transmisión 1a 2,769 2a 1,941 3a 1,450 4a 1,148 5a 0,960 6a 0,812 Reducción final 3,846
SISTEMA ELÉCTRICO
Alternador 0,06 kW/5.000 rpm Fusible principal 7,5 A
LUCES (SOLAMENTE TIPO U)
Lámpara del faro 12 V – 35 W
Prohibida la Reproducción y Distribución
2W-PE | 2Wheels - PE | FREDDY FIGUEROA
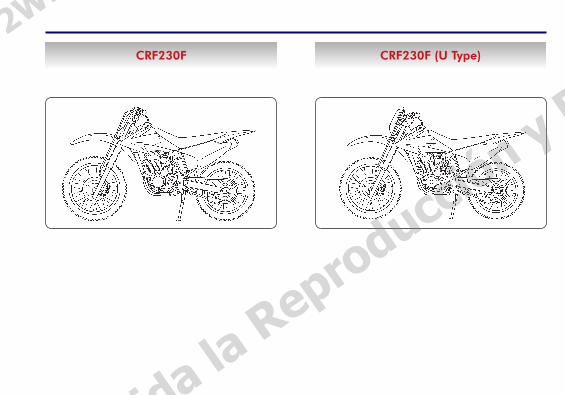
CRF230F CRF230F (U Type)
Prohibida la Reproducción y Distribución
2W-PE | 2Wheels - PE | FREDDY FIGUEROA
2 CRF230F • CRF230F (U Type)
Important Information
OPERATOR ONLY. NO PASSENGER This motorcycle is designed and constructed as an operator-only model. The seating configuration does
not safely permit the carrying of a passenger. Do not exceed the maximum weight capacity.
FOR OFF-ROAD USE ONLY This motorcycle is designed and manufactured for off-road use only.
READ THIS OWNER’S MANUAL CAREFULLY Pay special attention to the safety messages that appear throughout the manual. These messages are fully
explained in the “A Few Words About Safety” section (page 5).
This manual should be considered a permanent part of the motorcycle and should remain with the motorcycle when resold.
Prohibida la Reproducción y Distribución
2W-PE | 2Wheels - PE | FREDDY FIGUEROA
3CRF230F • CRF230F (U Type)
Welcome
Your new motorcycle presents you with an invitation to adventure and a challenge to master the machine. Your safety depends not only on your own alertness and familiarity with the motorcycle, but also the motorcycle’s mechanical condition. A pre-ride inspection before every outing and regular maintenance are essential.
To help meet the challenges safely and enjoy the adventure fully, become thoroughly familiar with this Owner’s Manual BEFORE YOU RIDE THE MOTORCYCLE.
As you read this manual, you will find information that is preceded by a NOTICE symbol. This information is intended to help you avoid damage to your motorcycle, other property, or the environment.
When service is required, see your Honda dealer that knows your motorcycle best and have skilled technicians trained by the factory and tools to perform high quality services.
Pleasant riding, and thank you for choosing a Honda!
Prohibida la Reproducción y Distribución
2W-PE | 2Wheels - PE | FREDDY FIGUEROA
4 CRF230F • CRF230F (U Type)
U Australia (with headlight)
ED European direct sales
All information in this publication is based on the latest production information available at the time of approval for printing. Moto Honda da Amazônia Ltda. reserves the right to make changes at any time without notice and without incurring any obligation. No part of this publication may be reproduced without written permission.
The specifications may vary with each locale.
The following codes in this manual indicate each country.
Prohibida la Reproducción y Distribución
2W-PE | 2Wheels - PE | FREDDY FIGUEROA
5CRF230F • CRF230F (U Type)
(Cont.)
A Few Words About SafetyYour safety, and the safety of others, is very important. And operating this motorcycle safely is an important responsibility.
To help you make informed decisions about safety, we have provided operating procedures and other information on labels and in this manual. This information alerts you to potential hazards that could hurt you or others.
Of course, it is not practical or possible to warn you about all hazards associated with operating or maintaining a motorcycle. You must use your own good judgment.
You will find important safety information in a variety of forms, including:
Safety Labels — on the motorcycle.
Safety Messages — preceded by a safety alert symbol ! and one of two signal words: WARNING or CAUTION.
Prohibida la Reproducción y Distribución
2W-PE | 2Wheels - PE | FREDDY FIGUEROA
6 CRF230F • CRF230F (U Type)
These signal words mean:
! Warning
You can be killed or seriously hurt if you don’t follow instructions.
! Caution
You can be hurt if you don’t follow instructions.
Safety Headings — such as Important Safety Reminders or Important Safety Precautions.
Safety Section — such as Motorcycle Safety.
Instructions — how to use this motorcycle correctly and safely.
This entire manual is filled with important safety information — please read it carefully.
Prohibida la Reproducción y Distribución
2W-PE | 2Wheels - PE | FREDDY FIGUEROA
7CRF230F • CRF230F (U Type)
OPERATION
MOTORCYCLE SAFETY 09
Important Safety Information ....................... 09 Protective Apparel ...................................... 10 Load Limits and Guidelines ......................... 11
PARTS LOCATION 14
MAJOR COMPONENTS 20
(Information you need to operate this motorcycle)
Brakes ....................................................... 20 Clutch........................................................ 23 Fuel ........................................................... 24 Engine Oil ................................................. 27 Tyres .......................................................... 28
ESSENTIAL INDIVIDUAL COMPONENTS 31
Ignition Switch ............................................ 31 Start Button ............................................... 32 Engine Stop Button ..................................... 32
FEATURES 33
(Not required for operation)
Left Side Cover ........................................... 33 Right Side Cover......................................... 33
OPERATION 34
Pre-ride Inspection ..................................... 34 Starting the Engine ..................................... 35 Running-in ................................................. 36 Riding ........................................................ 37 Braking ...................................................... 38 Parking ...................................................... 39 Anti-theft Tips ............................................. 39
(Cont.)
Prohibida la Reproducción y Distribución
2W-PE | 2Wheels - PE | FREDDY FIGUEROA
8 CRF230F • CRF230F (U Type)
MAINTENANCE 40
The Importance of Maintenance .................. 40 Maintenance Safety .................................... 41 Safety Precautions ...................................... 42 Maintenance Schedule ................................ 43 Competition Inspection ............................... 46 Tool Kit ...................................................... 48 Serial Numbers .......................................... 48 Colour Label ............................................. 49 Air Cleaner ................................................ 49 Crankcase Breather .................................... 51 Engine Oil ................................................. 52 Spark Plug ................................................. 54 Idle Speed ................................................. 56 Throttle Operation ...................................... 57 Spark Arrester ............................................ 59 Drive Chain ............................................... 60 Wheel Rims and Spokes .............................. 64 Wheels ...................................................... 65 Brake Pad Wear ......................................... 67 Brake Shoe Wear ....................................... 68 Battery ....................................................... 68 Fuse Replacement ...................................... 69
Front Suspension ........................................ 70 Rear Suspension ......................................... 71 Side Stand ................................................. 72 Bulb Replacement (Only for U Type) ............. 73
CLEANING 74
STORAGE GUIDE 75
Storage ..................................................... 75 Removal from Storage ................................ 77
TAKING CARE OF THE UNEXPECTED 77
SPECIFICATIONS 78
Prohibida la Reproducción y Distribución
2W-PE | 2Wheels - PE | FREDDY FIGUEROA
9CRF230F • CRF230F (U Type)
MOTORCYCLE SAFETY
Important Safety InformationYour motorcycle can provide many years of service and pleasure – if you take responsibility for your own safety and understand the challenges you can meet while riding.There is much that you can do to protect yourself when you ride. You’ll find many helpful recommendations throughout this manual. Following are a few that we consider to be most important.
Always Wear a HelmetIt’s a proven fact: helmets significantly reduce the number and severity of head injuries. So always wear an approved motorcycle helmet. We also recommend that you wear eye protection, sturdy boots, gloves and other protective gear (page 10).
Never Carry a PassengerYour motorcycle is designed for one person only. There are no handholds, footrests, or seat for a second person – so never carry a passenger. A passenger could interfere with your ability to move around to maintain your balance and control of the motorcycle.
Ride Off-Road OnlyYour motorcycle is designed and manufactured for off-road use only. The tyres are not made for pavement, and the motorcycle does not have turn signals and other features required for use on public roads. If you need to cross a paved or public road, get off and walk your motorcycle across.
Take Time to Learn and PracticeDeveloping off-road riding skills is a gradual, step-by-step process. Start by practicing at low speeds in a safe area and slowly build your skills. Personal instruction from an experienced rider can also be valuable. If you need assistance, ask your dealer about riding groups in your area.
Be Alert for Off-Road Hazards The terrain can present a variety of challenges when you ride off-road. Continually ‘‘read’’ the terrain for unexpected turns, drop-offs, rocks, ruts, and other hazards. Always keep your speed low enough to allow time to see and react to hazards.
(Cont.)
Prohibida la Reproducción y Distribución
2W-PE | 2Wheels - PE | FREDDY FIGUEROA

10 CRF230F • CRF230F (U Type)
Ride Within Your LimitsPushing the limits is another major cause of motorcycle accidents. Never ride beyond your personal abilities or faster than conditions warrant. Remember that alcohol, drugs, fatigue and inattention can significantly reduce your ability to make good judgements and ride safely.
Don’t Drink and RideAlcohol and riding don’t mix. Even one drink can reduce your ability to respond to changing conditions, and your reaction time gets worse with every additional drink. So don’t drink and ride, and don’t let your friends drink and ride either.
Keep Your Bike in Safe ConditionIt’s important to keep your motorcycle properly maintained and in safe riding condition. Having a breakdown can be difficult, especially if you are stranded off-road far from your base. To help avoid problems, inspect your motorcycle before every ride and perform all recommended maintenance.
Protective Apparel For your safety, we strongly recommend that you always wear an approved motorcycle helmet, eye protection, boots, gloves, long pants, and a long-sleeved jersey, shirt or jacket whenever you ride. Although complete protection is not possible, wearing proper gear can reduce the chance of injury when you ride.Following are suggestions to help you choose proper gear.
Not wearing a helmet increases the chance of serious injury or death in a crash.
Be sure you always wear a helmet, eye protection and other protective apparel when you ride.
Warning!
Prohibida la Reproducción y Distribución
2W-PE | 2Wheels - PE | FREDDY FIGUEROA
11CRF230F • CRF230F (U Type)
Helmets and Eye ProtectionYour helmet is your most important piece of riding gear because it offers the best protection against head injuries. A helmet should fit your head comfortably and have a chin strap that can be tightened securely.An open-face helmet offers some protection, but a full-face helmet offers more. Always wear a face shield or goggles to protect your eyes and help your vision.
Additional Riding GearIn addition to a helmet and eye protection, we also recommend: Sturdy off-road motorcycle boots to help protect
your feet, ankles, and lower legs. Off-road motorcycle gloves to help protect your
hands. Riding pants with knee and hip pads, a riding
jersey with padded elbows, and a chest/shoulder protector.
Load Limits and GuidelinesYour Honda was designed as a rider-only motorcycle. It was not designed to carry a passenger or cargo. A passenger or cargo could interfere with your ability to move around to maintain your balance and control of the motorcycle.In addition, exceeding the weight limits or carrying an unbalanced load can seriously affect your motorcycle’s handling, braking, and stability. Adding accessories or making modifications that change this motorcycle’s design and performance can also make it unsafe. Also, the weight of any accessories will reduce the maximum load the motorcycle can carry.The following pages give more specific information on loading, accessories and modifications.
LoadingHow much weight you put on your motorcycle, and how you load it, are important to your safety. If you decide to carry cargo, you should be aware of the following information.
(Cont.)
Overloading or carrying a passenger can cause a crash and you can be seriously hurt or killed.
Follow all load limits and other loading guidelines in this manual.
Warning!
Prohibida la Reproducción y Distribución
2W-PE | 2Wheels - PE | FREDDY FIGUEROA
12 CRF230F • CRF230F (U Type)
Load LimitsFollowing are the load limits for your motorcycle:
Maximum weight capacity: 100 kg (220 lbs)Includes the weight of the rider and any accessories.The weight of added accessories will reduce the maximum cargo weight you can carry.
Loading GuidelinesAs previously discussed, we recommend that you do not carry any cargo on this motorcycle. However, if you decide to carry cargo, ride at reduced speeds and follow these common-sense guidelines: Keep cargo small and light. Make sure it cannot
easily be caught on brush or other objects, and that it does not interfere with your ability to shift position to maintain balance and stability.
Place weight as close to the center of the motorcycle as possible.
Do not attach large or heavy items (such as a sleeping bag or tent) to the handlebar, fork, or front fender.
Make sure that all cargo is tied down securely. Never exceed the maximum weight limit. Check that both tyres are inflated properly (page
28).
Accessories and ModificationsModifying your motorcycle or using non-Honda accessories can make your motorcycle unsafe. Before you consider making any modifications or adding an accessory, be sure to read the following information.
Improper accessories or modifications can cause a crash in which you can be seriously hurt or killed.
Follow all instructions in this owner’s manual regarding accessories and modifications.
Warning!
Prohibida la Reproducción y Distribución
2W-PE | 2Wheels - PE | FREDDY FIGUEROA
13CRF230F • CRF230F (U Type)
AccessoriesWe strongly recommend that you use only Honda genuine accessories that have been specifically designed and tested for your motorcycle. Because Honda cannot test all other accessories, you must be personally responsible for proper selection, installation and use of non-Honda accessories. Check with your dealer for assistance and always follow these guidelines: Make sure the accessory does not obscure any
lights, reduce ground clearance and banking angle, limit suspension travel or steering travel, alter your riding position, or interfere with operating any controls.
Be sure electrical equipment does not exceed the motorcycle’s electrical system capacity (page 80). A blown fuse can cause a loss of lights or engine power.
ModificationsWe strongly advise you not to remove any original equipment or modify your motorcycle in any way that would change its design or operation. Such changes could seriously impair your motorcycle’s handling, stability and braking, making it unsafe to ride.Removing or modifying your exhaust system (such as the spark arresters or mufflers) or other equipment can also make your motorcycle illegal.
Prohibida la Reproducción y Distribución
2W-PE | 2Wheels - PE | FREDDY FIGUEROA

14 CRF230F • CRF230F (U Type)
PARTS LOCATION
Clutch lever
Engine stop button
Front brake lever
Throttle grip
Ignition switch Front brake fluid reservoir
Fuel fill cap
Start button
Prohibida la Reproducción y Distribución
2W-PE | 2Wheels - PE | FREDDY FIGUEROA
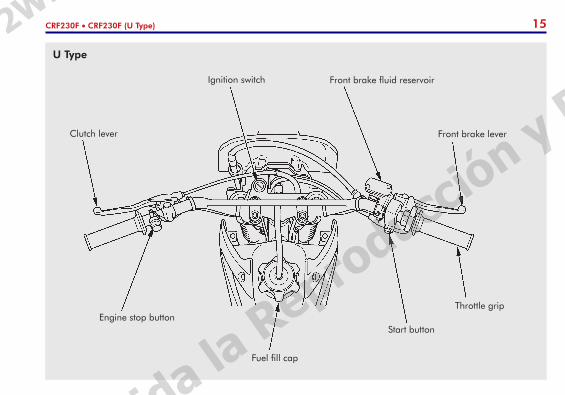
15CRF230F • CRF230F (U Type)
U Type
Clutch lever
Engine stop button
Front brake lever
Throttle grip
Ignition switch Front brake fluid reservoir
Fuel fill cap
Start button
Prohibida la Reproducción y Distribución
2W-PE | 2Wheels - PE | FREDDY FIGUEROA
16 CRF230F • CRF230F (U Type)
Oil filler cap/dipstick
Footpeg Rear brake pedal
Air cleaner
Prohibida la Reproducción y Distribución
2W-PE | 2Wheels - PE | FREDDY FIGUEROA
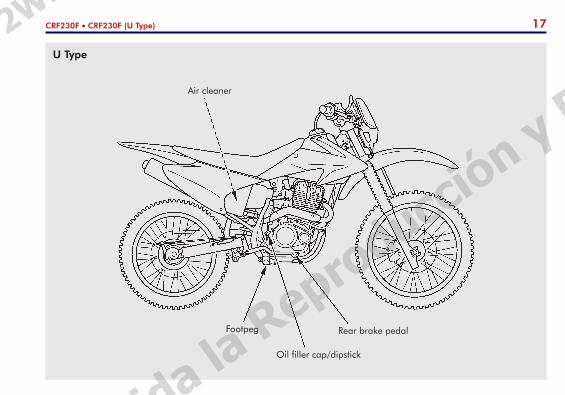
17CRF230F • CRF230F (U Type)
U Type
Air cleaner
Oil filler cap/dipstick
Footpeg Rear brake pedal
Prohibida la Reproducción y Distribución
2W-PE | 2Wheels - PE | FREDDY FIGUEROA
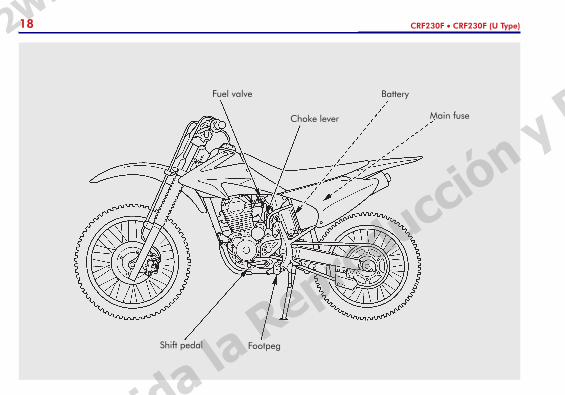
18 CRF230F • CRF230F (U Type)
Fuel valve
Choke lever
Shift pedal Footpeg
Battery
Main fuse
Prohibida la Reproducción y Distribución
2W-PE | 2Wheels - PE | FREDDY FIGUEROA
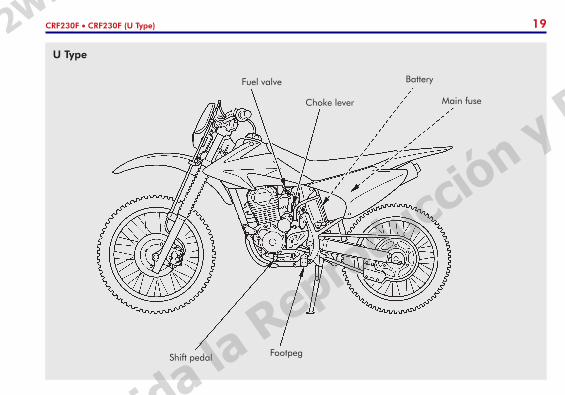
19CRF230F • CRF230F (U Type)
U Type
Fuel valve
Choke lever
Shift pedal Footpeg
Battery
Main fuse
Prohibida la Reproducción y Distribución
2W-PE | 2Wheels - PE | FREDDY FIGUEROA
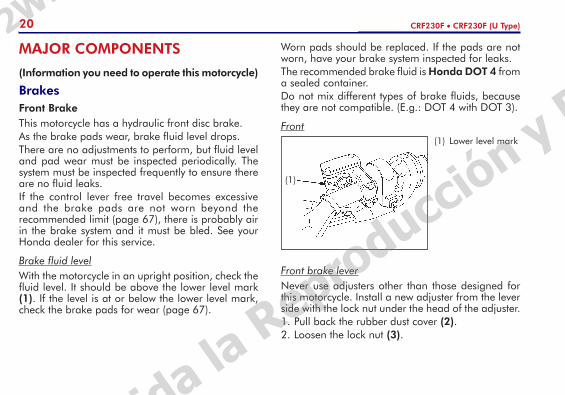
20 CRF230F • CRF230F (U Type)
(1) Lower level mark
(1)
MAJOR COMPONENTS
(Information you need to operate this motorcycle)
Brakes Front BrakeThis motorcycle has a hydraulic front disc brake.As the brake pads wear, brake fluid level drops.There are no adjustments to perform, but fluid level and pad wear must be inspected periodically. The system must be inspected frequently to ensure there are no fluid leaks. If the control lever free travel becomes excessive and the brake pads are not worn beyond the recommended limit (page 67), there is probably air in the brake system and it must be bled. See your Honda dealer for this service.
Brake fluid levelWith the motorcycle in an upright position, check the fluid level. It should be above the lower level mark (1). If the level is at or below the lower level mark, check the brake pads for wear (page 67).
Worn pads should be replaced. If the pads are not worn, have your brake system inspected for leaks. The recommended brake fluid is Honda DOT 4 from a sealed container.Do not mix different types of brake fluids, because they are not compatible. (E.g.: DOT 4 with DOT 3).
Front
Front brake leverNever use adjusters other than those designed for this motorcycle. Install a new adjuster from the lever side with the lock nut under the head of the adjuster.1. Pull back the rubber dust cover (2). 2. Loosen the lock nut (3).
Prohibida la Reproducción y Distribución
2W-PE | 2Wheels - PE | FREDDY FIGUEROA
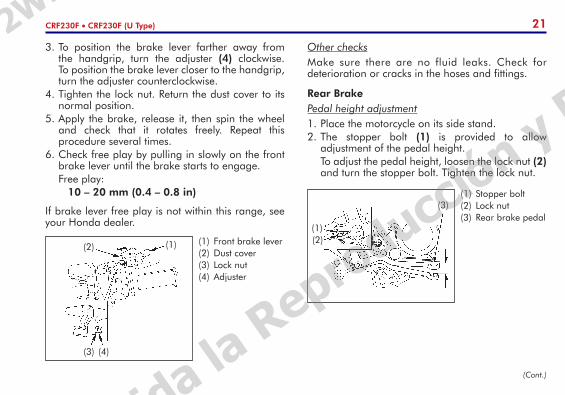
21CRF230F • CRF230F (U Type)
(1) Stopper bolt(2) Lock nut(3) Rear brake pedal
(3)
(2)(1)
3. To position the brake lever farther away from the handgrip, turn the adjuster (4) clockwise. To position the brake lever closer to the handgrip, turn the adjuster counterclockwise.
4. Tighten the lock nut. Return the dust cover to its normal position.
5. Apply the brake, release it, then spin the wheel and check that it rotates freely. Repeat this procedure several times.
6. Check free play by pulling in slowly on the front brake lever until the brake starts to engage.
Free play: 10 – 20 mm (0.4 – 0.8 in)
If brake lever free play is not within this range, see your Honda dealer.
Other checksMake sure there are no fluid leaks. Check for deterioration or cracks in the hoses and fittings.
Rear BrakePedal height adjustment1. Place the motorcycle on its side stand.2. The stopper bolt (1) is provided to allow
adjustment of the pedal height. To adjust the pedal height, loosen the lock nut (2)
and turn the stopper bolt. Tighten the lock nut.
(1) Front brake lever(2) Dust cover(3) Lock nut(4) Adjuster
(1)
(4)(3)
(2)
(Cont.)
Prohibida la Reproducción y Distribución
2W-PE | 2Wheels - PE | FREDDY FIGUEROA

22 CRF230F • CRF230F (U Type)
3. If adjustment is necessary, turn the rear brake adjusting nut (4). Make sure the cut-out on the adjusting nut is
seated on the brake arm pin (5) after making final free play adjustment.
If proper adjustment cannot be obtained by this method, see your Honda dealer.
(1) Brake arm(2) Adjusting nut(3) Brake arm pin
(2)
(1)(3)
4. Apply the brake several times and check for free wheel rotation after the brake pedal is released.
After adjustment, push the brake arm (1) to confirm that there is a gap between the adjusting nut (2) and the brake arm pin (3).
(4) (4) Adjusting nut(5) Arm pin(A) Decrease free
play(B) Increase free
play
(5)
(A)
(B)
Brake adjustment1. Place the motorcycle on its side stand.2. Measure the distance the rear brake pedal (3)
moves before the brake starts to take hold. Free play should be: 20 – 30 mm (0.8 – 1.2 in)
After adjustment, confirm the free play of the brake pedal.
Other checksMake sure the brake rod, brake arm, spring and fasteners are in good condition.
Prohibida la Reproducción y Distribución
2W-PE | 2Wheels - PE | FREDDY FIGUEROA
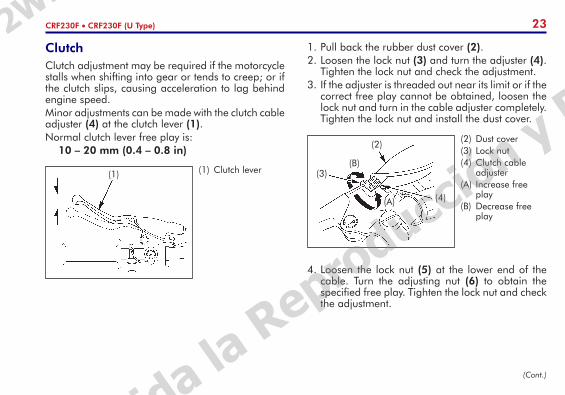
23CRF230F • CRF230F (U Type)
1. Pull back the rubber dust cover (2).2. Loosen the lock nut (3) and turn the adjuster (4).
Tighten the lock nut and check the adjustment.3. If the adjuster is threaded out near its limit or if the
correct free play cannot be obtained, loosen the lock nut and turn in the cable adjuster completely. Tighten the lock nut and install the dust cover.
Clutch Clutch adjustment may be required if the motorcycle stalls when shifting into gear or tends to creep; or if the clutch slips, causing acceleration to lag behind engine speed. Minor adjustments can be made with the clutch cable adjuster (4) at the clutch lever (1).Normal clutch lever free play is: 10 – 20 mm (0.4 – 0.8 in)
(2) Dust cover(3) Lock nut(4) Clutch cable
adjuster(A) Increase free
play(B) Decrease free
play
(4)
(2)
(3)(B)
(A)
(1) Clutch lever(1)
4. Loosen the lock nut (5) at the lower end of the cable. Turn the adjusting nut (6) to obtain the specified free play. Tighten the lock nut and check the adjustment.
(Cont.)
Prohibida la Reproducción y Distribución
2W-PE | 2Wheels - PE | FREDDY FIGUEROA
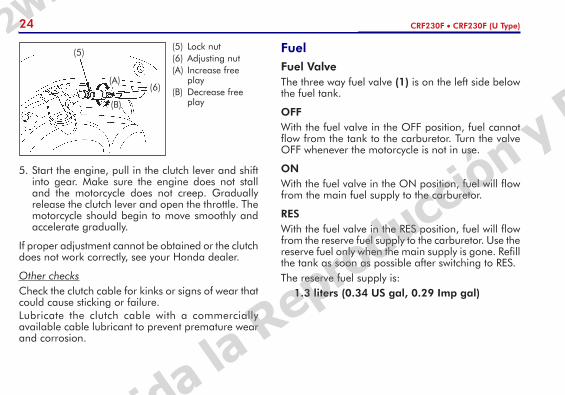
24 CRF230F • CRF230F (U Type)
(5) Lock nut(6) Adjusting nut(A) Increase free
play(B) Decrease free
play
(6)
(5)
(A)
(B)
FuelFuel ValveThe three way fuel valve (1) is on the left side below the fuel tank.
OFFWith the fuel valve in the OFF position, fuel cannot flow from the tank to the carburetor. Turn the valve OFF whenever the motorcycle is not in use.
ONWith the fuel valve in the ON position, fuel will flow from the main fuel supply to the carburetor.
RESWith the fuel valve in the RES position, fuel will flow from the reserve fuel supply to the carburetor. Use the reserve fuel only when the main supply is gone. Refill the tank as soon as possible after switching to RES.The reserve fuel supply is: 1.3 liters (0.34 US gal, 0.29 Imp gal)
5. Start the engine, pull in the clutch lever and shift into gear. Make sure the engine does not stall and the motorcycle does not creep. Gradually release the clutch lever and open the throttle. The motorcycle should begin to move smoothly and accelerate gradually.
If proper adjustment cannot be obtained or the clutch does not work correctly, see your Honda dealer.
Other checksCheck the clutch cable for kinks or signs of wear that could cause sticking or failure. Lubricate the clutch cable with a commercially available cable lubricant to prevent premature wear and corrosion.
Prohibida la Reproducción y Distribución
2W-PE | 2Wheels - PE | FREDDY FIGUEROA
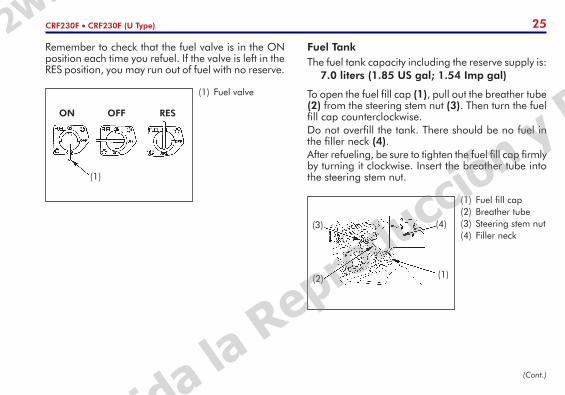
25CRF230F • CRF230F (U Type)
Remember to check that the fuel valve is in the ON position each time you refuel. If the valve is left in the RES position, you may run out of fuel with no reserve.
(1) Fuel fill cap(2) Breather tube(3) Steering stem nut(4) Filler neck
(2)
(4)
(1)
(3)
(1) Fuel valve
ON
(1)
OFF RES
Fuel TankThe fuel tank capacity including the reserve supply is: 7.0 liters (1.85 US gal; 1.54 Imp gal)
To open the fuel fill cap (1), pull out the breather tube (2) from the steering stem nut (3). Then turn the fuel fill cap counterclockwise.Do not overfill the tank. There should be no fuel in the filler neck (4).After refueling, be sure to tighten the fuel fill cap firmly by turning it clockwise. Insert the breather tube into the steering stem nut.
(Cont.)
Prohibida la Reproducción y Distribución
2W-PE | 2Wheels - PE | FREDDY FIGUEROA
26 CRF230F • CRF230F (U Type)
Use unleaded petrol with a research octane number of 95 or higher.
Petrol Containing AlcoholIf you decide to use a petrol containing alcohol (gasohol), be sure it’s octane rating is at least as high as that recommended by Honda. There are two types of “gasohol”: one containing ethanol, and the other containing methanol. Do not use petrol that contains more than 10 % ethanol. Do not use petrol containing methanol (methyl or wood alcohol) that does not also contain cosolvents and corrosion inhibitors for methanol. Never use petrol containing more than 5 % methanol, even if it has cosolvents and corrosion inhibitors. Fuel system damage or engine performance problems resulting from the use of fuels that contain alcohol is not covered under the warranty. Honda cannot endorse the use of fuels containing methanol since evidence of their suitability is as yet incomplete.Before buying fuel from an unfamiliar station, try to find out if the fuel contains alcohol. If it does, confirm the type and percentage of alcohol used. If you notice any undesirable operating symptoms while using a petrol that contains alcohol, or one that you think contains alcohol, switch to a petrol that you know does not contain alcohol.
NOTICEIf “spark knock” or “pinking” occurs at a steady engine speed under normal load, change brands of petrol. If spark knock or pinking persists, consult your Honda dealer. Failure to do so is considered misuse, and damage caused by misuse is not covered by Honda’s Limited Warranty.
Petrol is highly flammable and explosive. You can be burned or seriously injured when handling fuel. Stop the engine and keep heat, sparks, and flame
away. Refuel only outdoors. Wipe up spills immediately.
Warning!
Prohibida la Reproducción y Distribución
2W-PE | 2Wheels - PE | FREDDY FIGUEROA
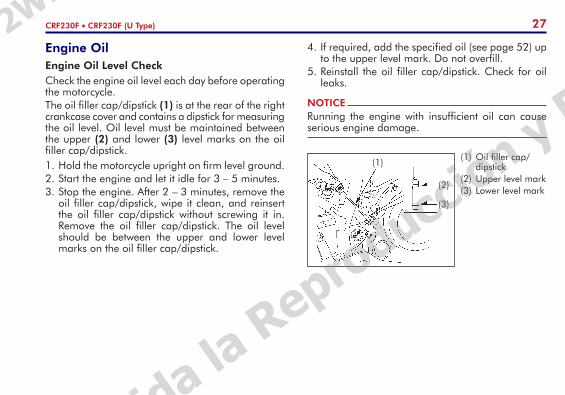
27CRF230F • CRF230F (U Type)
(1) Oil filler cap/dipstick
(2) Upper level mark(3) Lower level mark
(2)
(3)
(1)
Engine OilEngine Oil Level CheckCheck the engine oil level each day before operating the motorcycle.The oil filler cap/dipstick (1) is at the rear of the right crankcase cover and contains a dipstick for measuring the oil level. Oil level must be maintained between the upper (2) and lower (3) level marks on the oil filler cap/dipstick.1. Hold the motorcycle upright on firm level ground.2. Start the engine and let it idle for 3 – 5 minutes.3. Stop the engine. After 2 – 3 minutes, remove the
oil filler cap/dipstick, wipe it clean, and reinsert the oil filler cap/dipstick without screwing it in. Remove the oil filler cap/dipstick. The oil level should be between the upper and lower level marks on the oil filler cap/dipstick.
NOTICERunning the engine with insufficient oil can cause serious engine damage.
4. If required, add the specified oil (see page 52) up to the upper level mark. Do not overfill.
5. Reinstall the oil filler cap/dipstick. Check for oil leaks.
Prohibida la Reproducción y Distribución
2W-PE | 2Wheels - PE | FREDDY FIGUEROA
28 CRF230F • CRF230F (U Type)
Make sure the valve stem caps are secure. If necessary, install new caps.Always check air pressure when your tyres are “cold.” If you check air pressure when your tyres are “warm” – even if your motorcycle has only been ridden for a few miles – the readings will be higher. If you let air out of warm tyres to match the recommended cold pressures, the tyres will be underinflated.The recommended “cold” tyre pressures are:
Cold tyre pressures kPa (kgf/cm2; psi)
Front Rear
100 (1.0; 15)
100 (1.0; 15)
Air PressureProperly inflated tyres provide the best combination of handling, tread life, and riding comfort. Generally, underinflated tyres wear unevenly, adversely affect handling, and are more likely to fail from being overheated. Underinflated tyres can also cause wheel damage in rocky terrain. Overinflated tyres make your motorcycle ride harshly, are more prone to damage from surface hazards, and wear unevenly.
TyresTo safely operate your motorcycle, the tyres must be the proper type (off-road) and size, in good condition with adequate tread, and correctly inflated.
Using tyres that are excessively worn or improperly inflated can cause a crash in which you can be seriously hurt or killed.
Follow all instructions in this owner’s manual regarding tyre inflation and maintenance.
Warning!
Prohibida la Reproducción y Distribución
2W-PE | 2Wheels - PE | FREDDY FIGUEROA
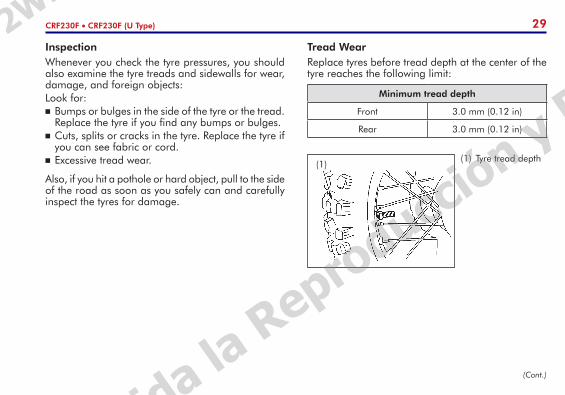
29CRF230F • CRF230F (U Type)
Tread WearReplace tyres before tread depth at the center of the tyre reaches the following limit:
Minimum tread depth
Front 3.0 mm (0.12 in)
Rear 3.0 mm (0.12 in)
(1) Tyre tread depth(1)
InspectionWhenever you check the tyre pressures, you should also examine the tyre treads and sidewalls for wear, damage, and foreign objects:Look for: Bumps or bulges in the side of the tyre or the tread.
Replace the tyre if you find any bumps or bulges. Cuts, splits or cracks in the tyre. Replace the tyre if
you can see fabric or cord. Excessive tread wear.
Also, if you hit a pothole or hard object, pull to the side of the road as soon as you safely can and carefully inspect the tyres for damage.
(Cont.)
Prohibida la Reproducción y Distribución
2W-PE | 2Wheels - PE | FREDDY FIGUEROA
30 CRF230F • CRF230F (U Type)
Tyre ReplacementThe tyres that came on your motorcycle were designed to match the performance capabilities of your motorcycle and provide the best combination of handling, braking, durability and comfort.
The recommended tyres for your motorcycle are:
Front 80/100-21 NHS
Rear 100/100-18 NHS
Whenever you replace a tyre, use one that is equivalent to the original and be sure the wheel is balanced after the new tyre is installed.Also remember to replace the inner tube whenever you replace a tyre. The old tube will probably be stretched, and if installed in a new tyre, it could fail.
Tube Repair and ReplacementIf a tube is punctured or damaged, you should replace it as soon as possible. A tube that is repaired may not have the same reliability as a new one, and it may fail while you are riding.If you need to make a temporary repair by patching a tube or using an aerosol sealant, ride cautiously at reduced speed and have the tube replaced before you ride again. Any time a tube is replaced, the tyre should be carefully inspected as described on page 29.
Installing improper tyres on your motorcycle can affect handling and stability. This can cause a crash in which you can be seriously hurt or killed.
Always use the size and type of tyres recommended in this owner’s manual.
Warning!
Prohibida la Reproducción y Distribución
2W-PE | 2Wheels - PE | FREDDY FIGUEROA
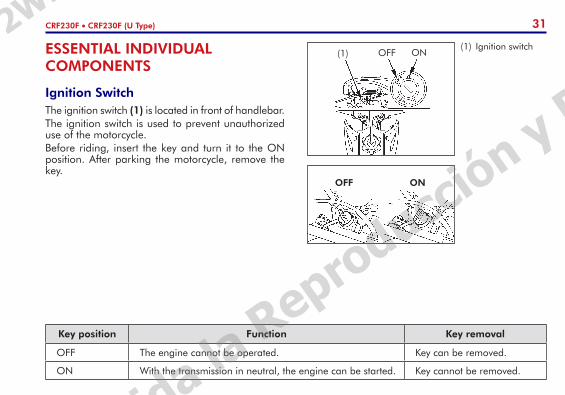
31CRF230F • CRF230F (U Type)
Key position Function Key removal
OFF The engine cannot be operated. Key can be removed.
ON With the transmission in neutral, the engine can be started. Key cannot be removed.
(1) Ignition switchOFF ON(1)
OFF ON
ESSENTIAL INDIVIDUAL COMPONENTS
Ignition SwitchThe ignition switch (1) is located in front of handlebar.The ignition switch is used to prevent unauthorized use of the motorcycle. Before riding, insert the key and turn it to the ON position. After parking the motorcycle, remove the key.
Prohibida la Reproducción y Distribución
2W-PE | 2Wheels - PE | FREDDY FIGUEROA
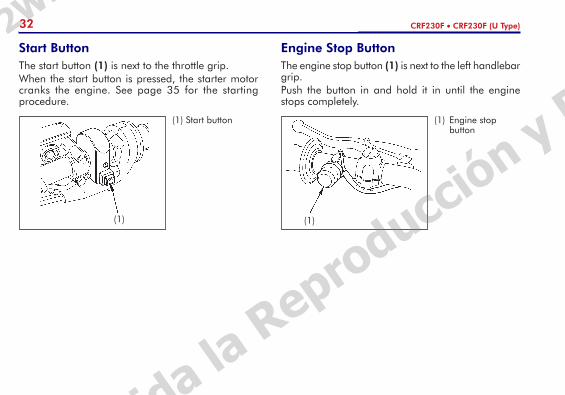
32 CRF230F • CRF230F (U Type)
(1) Engine stop button
(1)
(1) Start button
(1)
Start Button The start button (1) is next to the throttle grip.When the start button is pressed, the starter motor cranks the engine. See page 35 for the starting procedure.
Engine Stop ButtonThe engine stop button (1) is next to the left handlebar grip.Push the button in and hold it in until the engine stops completely.
Prohibida la Reproducción y Distribución
2W-PE | 2Wheels - PE | FREDDY FIGUEROA
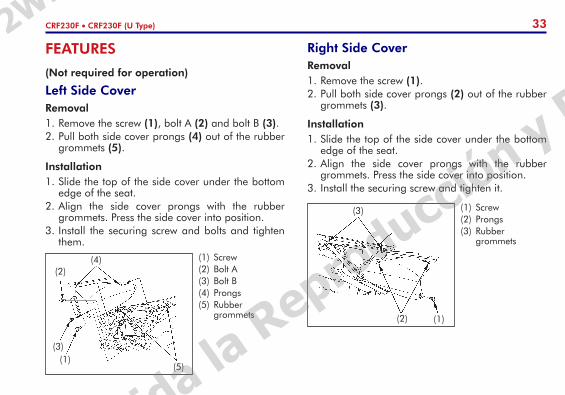
33CRF230F • CRF230F (U Type)
(1) Screw(2) Bolt A(3) Bolt B(4) Prongs(5) Rubber
grommets
(3)
(2)
(1)
(4)
(5)
(1) Screw(2) Prongs(3) Rubber
grommets
(2)
(3)
(1)
Right Side CoverRemoval1. Remove the screw (1).2. Pull both side cover prongs (2) out of the rubber
grommets (3).
Installation1. Slide the top of the side cover under the bottom
edge of the seat.2. Align the side cover prongs with the rubber
grommets. Press the side cover into position.3. Install the securing screw and tighten it.
FEATURES
(Not required for operation)
Left Side CoverRemoval1. Remove the screw (1), bolt A (2) and bolt B (3). 2. Pull both side cover prongs (4) out of the rubber
grommets (5).
Installation1. Slide the top of the side cover under the bottom
edge of the seat.2. Align the side cover prongs with the rubber
grommets. Press the side cover into position.3. Install the securing screw and bolts and tighten
them.
Prohibida la Reproducción y Distribución
2W-PE | 2Wheels - PE | FREDDY FIGUEROA

34 CRF230F • CRF230F (U Type)
1. Engine oil level – add engine oil if required (page 27). Check for leaks.
2. Fuel level – fill fuel tank when necessary (page 25). Check for leaks.
3. Front and rear brakes – check operation; make sure there is no brake fluid leakage. Adjust free play if necessary (pages 20 – 22).
4. Tyres – check condition and pressure (pages 28 to 30).
5. Spokes and rim locks – check and tighten if necessary (page 64).
6. Drive chain – check condition and slack (page 60). Adjust and lubricate if necessary.
7. Chain slider – check slider wear (page 61).8. Throttle – check for smooth opening and full
closing in all steering positions. Adjust free play if necessary (page 62).
9. Clutch – check operation, and adjust if necessary (pages 23 and 24).
10. Lights – check that headlight function properly (only for U type).
11. Spark plug and high tension terminal – check for looseness.
12. Engine stop button – check for proper function (page 32).
13. Nuts, bolts, fasteners – check the front wheel to see that the axle nut and axle holder nuts are tightened securely. Check security of all other nuts, bolts, and fasteners.
OPERATION
Pre-ride InspectionFor your safety, it is very important to take a few moments before each ride to walk around your motorcycle and check its condition. If you detect any problem, be sure you take care of it, or have it corrected by your Honda dealer.
Improperly maintaining this motorcycle or failing to correct a problem before riding can cause a crash in which you can be seriously hurt or killed.
Always perform a pre-ride inspection before every ride and correct any problems.
Warning!
Prohibida la Reproducción y Distribución
2W-PE | 2Wheels - PE | FREDDY FIGUEROA
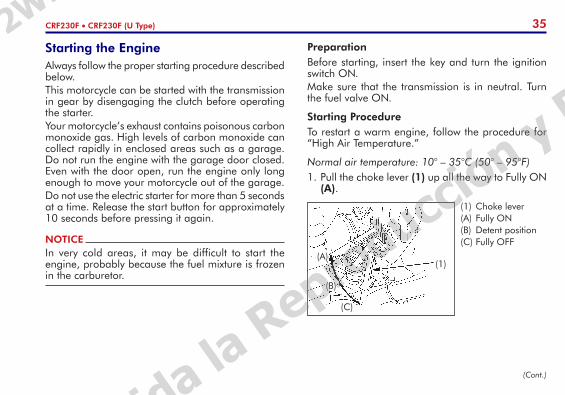
35CRF230F • CRF230F (U Type)
(1) Choke lever (A) Fully ON(B) Detent position(C) Fully OFF
(A)
(B)
(C)
(1)
NOTICEIn very cold areas, it may be difficult to start the engine, probably because the fuel mixture is frozen in the carburetor.
Starting the EngineAlways follow the proper starting procedure described below.This motorcycle can be started with the transmission in gear by disengaging the clutch before operating the starter. Your motorcycle’s exhaust contains poisonous carbon monoxide gas. High levels of carbon monoxide can collect rapidly in enclosed areas such as a garage. Do not run the engine with the garage door closed. Even with the door open, run the engine only long enough to move your motorcycle out of the garage.Do not use the electric starter for more than 5 seconds at a time. Release the start button for approximately 10 seconds before pressing it again.
PreparationBefore starting, insert the key and turn the ignition switch ON. Make sure that the transmission is in neutral. Turn the fuel valve ON.
Starting ProcedureTo restart a warm engine, follow the procedure for “High Air Temperature.”
Normal air temperature: 10° – 35°C (50° – 95°F) 1. Pull the choke lever (1) up all the way to Fully ON
(A).
(Cont.)
Prohibida la Reproducción y Distribución
2W-PE | 2Wheels - PE | FREDDY FIGUEROA
36 CRF230F • CRF230F (U Type)
4. Warm up the engine by opening and closing the throttle slightly.
5. About a half minute after the engine starts, push the choke lever down all the way to Fully OFF (C).
6. If idling is unstable, open the throttle slightly.
High air temperature: 35°C (95°F) or above1. Do not use the choke.2. Start the engine following step 2 under “Normal
Air Temperature.”
Low air temperature: 10°C (50°F) or below1. Follow steps 1 – 3 under “Normal Air Temperature”.2. Warm up the engine by opening and closing the
throttle slightly.
2. With the throttle closed, press the start button. 3. Immediately after the engine starts, push the
choke lever down to the Detent Position (B).
3. Continue warming up the engine until it will idle smoothly with the choke lever pushed down all the way to Fully OFF (C).
NOTICEExtended use of the choke may impair piston and cylinder wall lubrication and damage the engine.
NOTICEExtended use of the choke may impair piston and cylinder wall lubrication and damage the engine.
Flooded EngineIf the engine fails to start after repeated attempts, it may be flooded with excess fuel. To clear a flooded engine, push the choke lever down to Fully OFF (C). Open the throttle fully and press the start button for 5 seconds while pushing the engine stop button. Release the engine stop button and follow the “High Air Temperature” Starting Procedure.
Running-in Help assure your motorcycle’s future reliability and performance by paying extra attention to how you ride during the first operating day or 25 km (15 miles).During this period, avoid full-throttle starts and rapid acceleration.
Prohibida la Reproducción y Distribución
2W-PE | 2Wheels - PE | FREDDY FIGUEROA
37CRF230F • CRF230F (U Type)
Riding Review Motorcycle Safety (pages 9 – 13) before you ride.Make sure the side stand is fully retracted before riding the motorcycle. If the stand is extended, it may interfere with control during a left turn.Make sure you understand the function of the side stand mechanism. (See “Maintenance Schedule” on page 43 and explanation for “Side Stand” on page 72).1. After the engine has been warmed up, the
motorcycle is ready for riding.2. While the engine is idling, pull in the clutch lever
and depress the shift pedal to shift into 1st (low) gear.
3. Slowly release the clutch lever and at the same time gradually increase engine speed by opening the throttle. Coordination of the throttle and clutch lever will assure a smooth positive start.
4. When the motorcycle attains a moderate speed, close the throttle, pull in the clutch lever and shift to 2nd gear by raising the shift pedal.
This sequence is repeated to progressively shift to 3rd, 4th, 5th and 6th (top) gear.
5. Raise the shift pedal to shift to a higher gear and depress the shift pedal to shift to a lower gear. Each stroke of the shift pedal engages the next gear in sequence. The shift pedal automatically returns to the horizontal position when released. Do not downshift when traveling at a speed that
would force the engine to overrev in the next lower gear; the rear wheel may lose traction, resulting in a possible loss of vehicle control.
Do not shift gears without disengaging the clutch and closing the throttle. The engine and drive train could be damaged by overspeed and shock.
Do not tow the motorcycle or coast for long distances while the engine is off. The transmission will not be properly lubricated and damage may result.
Do not run the engine at high rpm with the transmission in neutral or the clutch lever pulled in. Serious engine damage may result.
Prohibida la Reproducción y Distribución
2W-PE | 2Wheels - PE | FREDDY FIGUEROA
38 CRF230F • CRF230F (U Type)
Braking For normal braking, gradually apply both the front and rear brakes while downshifting to suit your road speed.For maximum deceleration, close the throttle and apply the front and rear brakes firmly. Pull in the clutch lever before coming to a complete stop to prevent stalling the engine.
Important safety reminders Independent operation of only the brake lever or
brake pedal reduces stopping performance. Extreme application of the brake controls may cause
wheel lock, reducing control of the motorcycle. When possible, reduce speed or brake before
entering a turn; closing the throttle or braking in mid-turn may cause wheel slip. Wheel slip will reduce control of the motorcycle.
When riding in wet or rainy conditions, or on loose surfaces, the ability to maneuver and stop will be reduced. All of your actions should be smooth under these conditions. Rapid acceleration, braking or turning may cause loss of control. For your safety, exercise extreme caution when braking, accelerating or turning.
When descending a long, steep grade, use engine compression braking by down-shifting, with intermittent use of both brakes.
Continuous brake application can overheat the brakes and reduce their effectiveness.
Prohibida la Reproducción y Distribución
2W-PE | 2Wheels - PE | FREDDY FIGUEROA
39CRF230F • CRF230F (U Type)
Anti-theft Tips1. Be sure the registration information for your
motorcycle is accurate and current.2. Park your motorcycle in a locked garage
whenever possible.3. Use an additional anti-theft device of good
quality.4. Put your name, address and phone number in this
Owner’s Manual and keep it on your motorcycle at all times. Many times stolen motorcycles are identified by information in the Owner’s Manuals which are still with them.
Name
Address
Phone No.
Parking 1. After stopping the motorcycle, shift the
transmission into neutral and turn the fuel valve OFF. Push the engine stop button in and hold it in until the engine stops completely.
2. Use the side stand to support the motorcycle while parked.
Park the motorcycle on firm, level ground to prevent it from falling over.If you must park on a slight incline, aim the front of the motorcycle uphill to reduce the possibility of rolling off the side stand or overturning.
3. Turn the ignition switch OFF and remove the key.
Prohibida la Reproducción y Distribución
2W-PE | 2Wheels - PE | FREDDY FIGUEROA
40 CRF230F • CRF230F (U Type)
MAINTENANCE
The Importance of Maintenance A well-maintained motorcycle is essential for safe, economical, and trouble-free riding. It will also help reduce air pollution. Careful pre-ride inspections and good maintenance are especially important because your motorcycle is designed to be ridden over rough off-road terrain.To help you properly care for your motorcycle, this section of the manual provides a Maintenance Schedule. The service intervals in this schedule are based on average riding conditions. More frequent service is needed if you subject your motorcycle to severe use (such as competition) or ride in unusually wet or dusty areas.Frequent servicing of the air cleaner is especially important to help you avoid a possible costly engine repair.
If your motorcycle overturns or becomes involved in a crash, be sure your Honda dealer inspects all major parts, even if you are able to make some repairs.
Improperly maintaining this motorcycle or failing to correct a problem before you ride can cause a crash in which you can be seriously hurt or killed.
Always follow the inspection and maintenance recommendations and schedules in this owner’s manual.
Warning!
Prohibida la Reproducción y Distribución
2W-PE | 2Wheels - PE | FREDDY FIGUEROA
41CRF230F • CRF230F (U Type)
Maintenance SafetyThis section includes instructions on some important maintenance tasks. You can perform some of these tasks with the tools provided – if you have basic mechanical skills.Other tasks that are more difficult and require special tools are best performed by professionals. Wheel removal should normally be handled only by a Honda technician or other qualified mechanic; instructions are included in this manual only to assist in emergency service. Some of the most important safety precautions follow. However, we cannot warn you of every conceivable hazard that can arise in performing maintenance. Only you can decide whether or not you should perform a given task.
Failure to properly follow maintenance instructions and precautions can cause you to be seriously hurt or killed.
Always follow the procedures and precautions in this owner’s manual.
Warning!
Prohibida la Reproducción y Distribución
2W-PE | 2Wheels - PE | FREDDY FIGUEROA
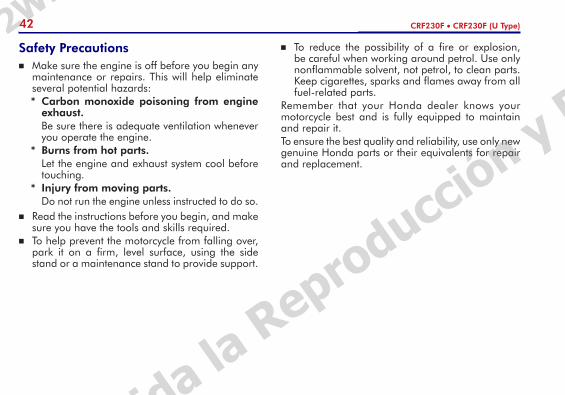
42 CRF230F • CRF230F (U Type)
Safety Precautions Make sure the engine is off before you begin any
maintenance or repairs. This will help eliminate several potential hazards:* Carbon monoxide poisoning from engine
exhaust. Be sure there is adequate ventilation whenever
you operate the engine.* Burns from hot parts. Let the engine and exhaust system cool before
touching.* Injury from moving parts.
Do not run the engine unless instructed to do so. Read the instructions before you begin, and make
sure you have the tools and skills required. To help prevent the motorcycle from falling over,
park it on a firm, level surface, using the side stand or a maintenance stand to provide support.
To reduce the possibility of a fire or explosion, be careful when working around petrol. Use only nonflammable solvent, not petrol, to clean parts. Keep cigarettes, sparks and flames away from all fuel-related parts.
Remember that your Honda dealer knows your motorcycle best and is fully equipped to maintain and repair it.To ensure the best quality and reliability, use only new genuine Honda parts or their equivalents for repair and replacement.
Prohibida la Reproducción y Distribución
2W-PE | 2Wheels - PE | FREDDY FIGUEROA
43CRF230F • CRF230F (U Type)
NOTICE1. Service more frequently when ridden in wet or dusty conditions.2. Replace every 2 years. Replacement requires mechanical skill.3. Australia type only.
Maintenance Schedule Perform the Pre-ride Inspection (page 34) at each scheduled maintenance period.
I: INSPECT AND CLEAN, ADJUST, LUBRICATE OR REPLACE IF NECESSARYC: CLEAN R: REPLACE A: ADJUST L: LUBRICATE
The following Maintenance Schedule specifies all maintenance required to keep your motorcycle in peak operating condition. Maintenance work should be performed in accordance with standards and specifications of Honda by properly trained and equipped technicians. Your Honda dealer meets all of these requirements.
Should be serviced by your Honda dealer, unless the owner has proper tools and service data and is mechanically qualified.
In the interest of safety, we recommend these items be serviced only by your Honda dealer.
Honda recommends that your Honda dealer should road test your motorcycle after each periodic maintenance is carried out.
Prohibida la Reproducción y Distribución
2W-PE | 2Wheels - PE | FREDDY FIGUEROA
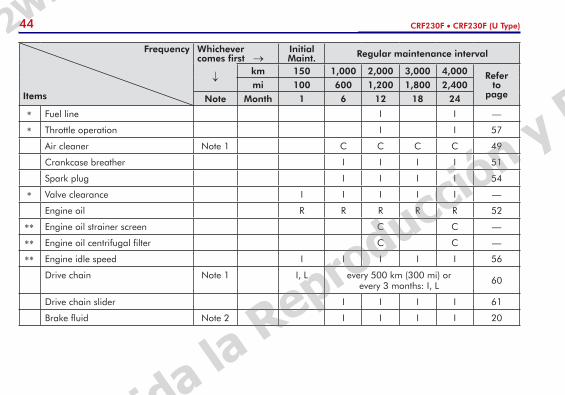
44 CRF230F • CRF230F (U Type)
Frequency
Items
Whichever comes first →
Initial Maint. Regular maintenance interval
↓km 150 1,000 2,000 3,000 4,000 Refer
to page
mi 100 600 1,200 1,800 2,400Note Month 1 6 12 18 24
* Fuel line I I —
* Throttle operation I I 57
Air cleaner Note 1 C C C C 49
Crankcase breather I I I I 51
Spark plug I I I I 54
* Valve clearance I I I I I —
Engine oil R R R R R 52
** Engine oil strainer screen C C —
** Engine oil centrifugal filter C C —
** Engine idle speed I I I I I 56
Drive chain Note 1 I, L every 500 km (300 mi) or every 3 months: I, L 60
Drive chain slider I I I I 61
Brake fluid Note 2 I I I I 20
Prohibida la Reproducción y Distribución
2W-PE | 2Wheels - PE | FREDDY FIGUEROA
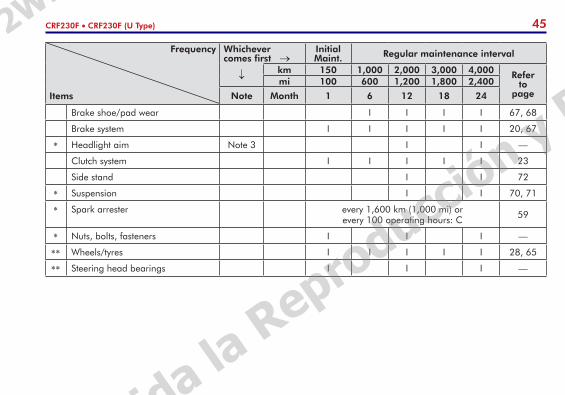
45CRF230F • CRF230F (U Type)
Frequency
Items
Whichever comes first →
Initial Maint. Regular maintenance interval
↓ km 150 1,000 2,000 3,000 4,000 Refer to
pagemi 100 600 1,200 1,800 2,400
Note Month 1 6 12 18 24
Brake shoe/pad wear I I I I 67, 68
Brake system I I I I I 20, 67
* Headlight aim Note 3 I I —
Clutch system I I I I I 23
Side stand I I 72
* Suspension I I 70, 71
* Spark arrester every 1,600 km (1,000 mi) or every 100 operating hours: C 59
* Nuts, bolts, fasteners I I I —
** Wheels/tyres I I I I I 28, 65
** Steering head bearings I I I —
Prohibida la Reproducción y Distribución
2W-PE | 2Wheels - PE | FREDDY FIGUEROA
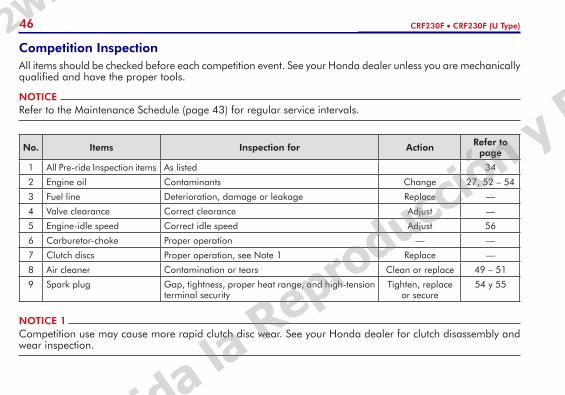
46 CRF230F • CRF230F (U Type)
No. Items Inspection for Action Refer to page
1 All Pre-ride Inspection items As listed 34
2 Engine oil Contaminants Change 27, 52 – 54
3 Fuel line Deterioration, damage or leakage Replace —
4 Valve clearance Correct clearance Adjust —
5 Engine-idle speed Correct idle speed Adjust 56
6 Carburetor-choke Proper operation — —
7 Clutch discs Proper operation, see Note 1 Replace —
8 Air cleaner Contamination or tears Clean or replace 49 – 51
9 Spark plug Gap, tightness, proper heat range, and high-tension terminal security
Tighten, replace or secure
54 y 55
Competition Inspection All items should be checked before each competition event. See your Honda dealer unless you are mechanically qualified and have the proper tools.
NOTICERefer to the Maintenance Schedule (page 43) for regular service intervals.
NOTICE 1Competition use may cause more rapid clutch disc wear. See your Honda dealer for clutch disassembly and wear inspection.
Prohibida la Reproducción y Distribución
2W-PE | 2Wheels - PE | FREDDY FIGUEROA
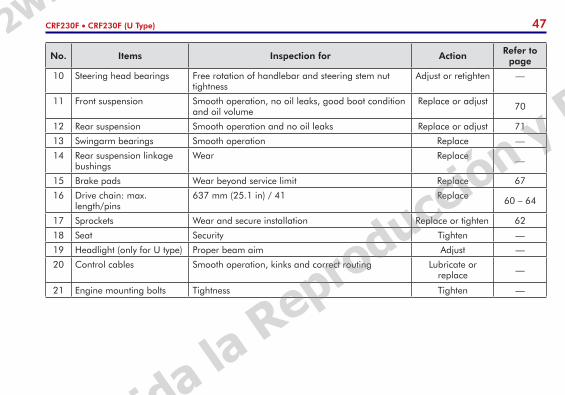
47CRF230F • CRF230F (U Type)
No. Items Inspection for Action Refer to page
10 Steering head bearings Free rotation of handlebar and steering stem nut tightness
Adjust or retighten —
11 Front suspension Smooth operation, no oil leaks, good boot condition and oil volume
Replace or adjust 70
12 Rear suspension Smooth operation and no oil leaks Replace or adjust 71
13 Swingarm bearings Smooth operation Replace —
14 Rear suspension linkage bushings
Wear Replace —
15 Brake pads Wear beyond service limit Replace 67
16 Drive chain: max. length/pins
637 mm (25.1 in) / 41 Replace 60 – 64
17 Sprockets Wear and secure installation Replace or tighten 62
18 Seat Security Tighten —
19 Headlight (only for U type) Proper beam aim Adjust —
20 Control cables Smooth operation, kinks and correct routing Lubricate or replace —
21 Engine mounting bolts Tightness Tighten —
Prohibida la Reproducción y Distribución
2W-PE | 2Wheels - PE | FREDDY FIGUEROA
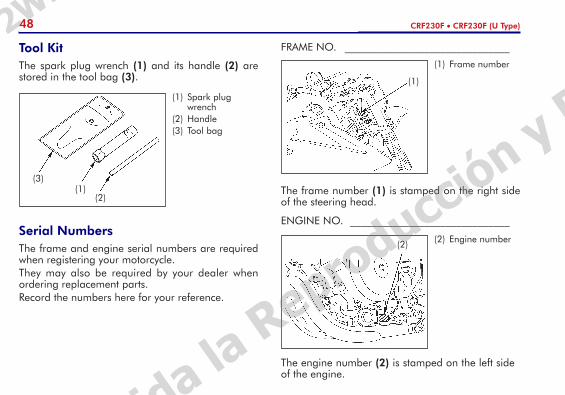
48 CRF230F • CRF230F (U Type)
Tool KitThe spark plug wrench (1) and its handle (2) are stored in the tool bag (3).
The frame number (1) is stamped on the right side of the steering head.
ENGINE NO. ______________________________
The engine number (2) is stamped on the left side of the engine.
(1) Spark plug wrench
(2) Handle(3) Tool bag
(2)
(3)(1)
(1) Frame number
(1)
(2) Engine number(2)Serial NumbersThe frame and engine serial numbers are required when registering your motorcycle.They may also be required by your dealer when ordering replacement parts. Record the numbers here for your reference.
FRAME NO. _______________________________
Prohibida la Reproducción y Distribución
2W-PE | 2Wheels - PE | FREDDY FIGUEROA

49CRF230F • CRF230F (U Type)
Air Cleaner(Refer to the Safety Precautions on page 42.)
The air cleaner should be serviced at regular intervals (page 43). Service more frequently when riding in unusually wet or dusty areas.1. Remove the right side cover (page 33). 2. Remove the screws (1) and air cleaner housing
cover (2).
Colour LabelThe colour label (1) is attached to the frame behind the left side cover (page 33).It is helpful when ordering replacement parts. Record the colour and code here for your reference.
COLOUR __________________________________
CODE ____________________________________
(1) Colour label
(1)
(1) Screws(2) Air cleaner
housing cover
(2)
(1)
(1)
(Cont.)
Prohibida la Reproducción y Distribución
2W-PE | 2Wheels - PE | FREDDY FIGUEROA
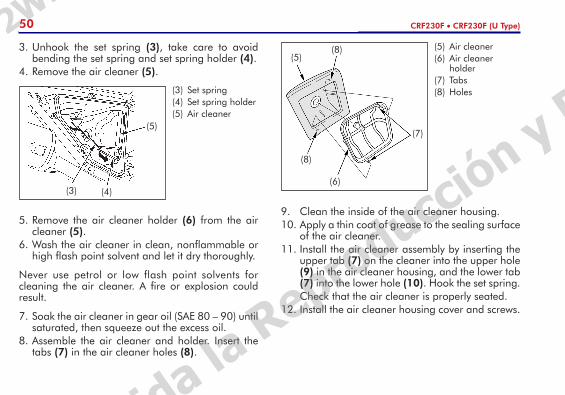
50 CRF230F • CRF230F (U Type)
(5)
(3) Set spring(4) Set spring holder(5) Air cleaner
(4)(3)
(5) Air cleaner(6) Air cleaner
holder(7) Tabs(8) Holes
(5)(8)
(7)
(6)
(8)
9. Clean the inside of the air cleaner housing.10. Apply a thin coat of grease to the sealing surface
of the air cleaner.11. Install the air cleaner assembly by inserting the
upper tab (7) on the cleaner into the upper hole (9) in the air cleaner housing, and the lower tab (7) into the lower hole (10). Hook the set spring.
Check that the air cleaner is properly seated.12. Install the air cleaner housing cover and screws.
3. Unhook the set spring (3), take care to avoid bending the set spring and set spring holder (4).
4. Remove the air cleaner (5).
5. Remove the air cleaner holder (6) from the air cleaner (5).
6. Wash the air cleaner in clean, nonflammable or high flash point solvent and let it dry thoroughly.
Never use petrol or low flash point solvents for cleaning the air cleaner. A fire or explosion could result.
7. Soak the air cleaner in gear oil (SAE 80 – 90) until saturated, then squeeze out the excess oil.
8. Assemble the air cleaner and holder. Insert the tabs (7) in the air cleaner holes (8).
Prohibida la Reproducción y Distribución
2W-PE | 2Wheels - PE | FREDDY FIGUEROA
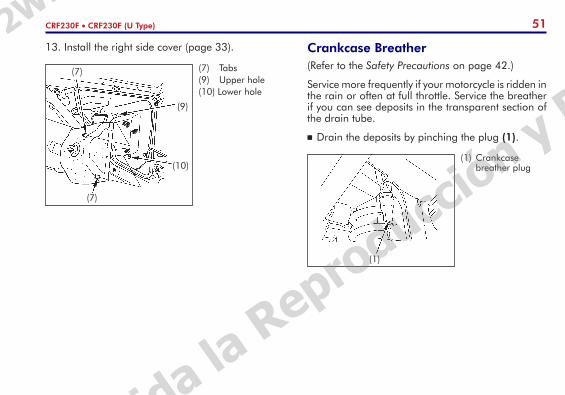
51CRF230F • CRF230F (U Type)
Crankcase Breather (Refer to the Safety Precautions on page 42.)
Service more frequently if your motorcycle is ridden in the rain or often at full throttle. Service the breather if you can see deposits in the transparent section of the drain tube.
Drain the deposits by pinching the plug (1).
13. Install the right side cover (page 33).
(7) Tabs(9) Upper hole(10) Lower hole
(7)
(9)
(7)
(10)(1) Crankcase
breather plug
(1)
Prohibida la Reproducción y Distribución
2W-PE | 2Wheels - PE | FREDDY FIGUEROA
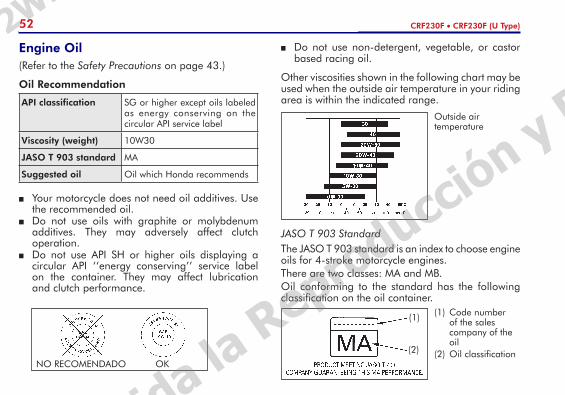
52 CRF230F • CRF230F (U Type)
Engine Oil(Refer to the Safety Precautions on page 43.)
Oil Recommendation
API classification SG or higher except oils labeled as energy conserving on the circular API service label
Viscosity (weight) 10W30
JASO T 903 standard MA
Suggested oil Oil which Honda recommends
Your motorcycle does not need oil additives. Use the recommended oil.
Do not use oils with graphite or molybdenum additives. They may adversely affect clutch operation.
Do not use API SH or higher oils displaying a circular API ‘‘energy conserving’’ service label on the container. They may affect lubrication and clutch performance.
NO RECOMENDADO OK
Do not use non-detergent, vegetable, or castor based racing oil.
Other viscosities shown in the following chart may be used when the outside air temperature in your riding area is within the indicated range.
(1)
(2)
(1) Code number of the sales company of the oil
(2) Oil classification
Outside air temperature
JASO T 903 StandardThe JASO T 903 standard is an index to choose engine oils for 4-stroke motorcycle engines.There are two classes: MA and MB.Oil conforming to the standard has the following classification on the oil container.
Prohibida la Reproducción y Distribución
2W-PE | 2Wheels - PE | FREDDY FIGUEROA
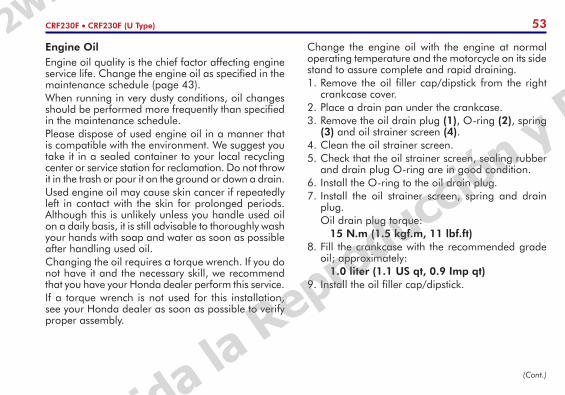
53CRF230F • CRF230F (U Type)
Engine Oil Engine oil quality is the chief factor affecting engine service life. Change the engine oil as specified in the maintenance schedule (page 43).When running in very dusty conditions, oil changes should be performed more frequently than specified in the maintenance schedule.Please dispose of used engine oil in a manner that is compatible with the environment. We suggest you take it in a sealed container to your local recycling center or service station for reclamation. Do not throw it in the trash or pour it on the ground or down a drain.Used engine oil may cause skin cancer if repeatedly left in contact with the skin for prolonged periods. Although this is unlikely unless you handle used oil on a daily basis, it is still advisable to thoroughly wash your hands with soap and water as soon as possible after handling used oil.Changing the oil requires a torque wrench. If you do not have it and the necessary skill, we recommend that you have your Honda dealer perform this service.If a torque wrench is not used for this installation, see your Honda dealer as soon as possible to verify proper assembly.
Change the engine oil with the engine at normal operating temperature and the motorcycle on its side stand to assure complete and rapid draining.1. Remove the oil filler cap/dipstick from the right
crankcase cover.2. Place a drain pan under the crankcase.3. Remove the oil drain plug (1), O-ring (2), spring
(3) and oil strainer screen (4).4. Clean the oil strainer screen.5. Check that the oil strainer screen, sealing rubber
and drain plug O-ring are in good condition.6. Install the O-ring to the oil drain plug.7. Install the oil strainer screen, spring and drain
plug. Oil drain plug torque: 15 N.m (1.5 kgf.m, 11 lbf.ft)8. Fill the crankcase with the recommended grade
oil; approximately: 1.0 liter (1.1 US qt, 0.9 Imp qt)9. Install the oil filler cap/dipstick.
(Cont.)
Prohibida la Reproducción y Distribución
2W-PE | 2Wheels - PE | FREDDY FIGUEROA
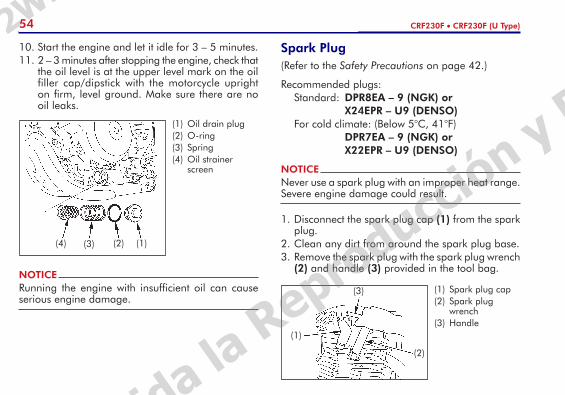
54 CRF230F • CRF230F (U Type)
Spark Plug(Refer to the Safety Precautions on page 42.)
Recommended plugs:Standard: DPR8EA – 9 (NGK) or X24EPR – U9 (DENSO)For cold climate: (Below 5°C, 41°F) DPR7EA – 9 (NGK) or X22EPR – U9 (DENSO)
1. Disconnect the spark plug cap (1) from the spark plug.
2. Clean any dirt from around the spark plug base.3. Remove the spark plug with the spark plug wrench
(2) and handle (3) provided in the tool bag.
(1) Spark plug cap(2) Spark plug
wrench(3) Handle
(3)
(2)
(1)
10. Start the engine and let it idle for 3 – 5 minutes.11. 2 – 3 minutes after stopping the engine, check that
the oil level is at the upper level mark on the oil filler cap/dipstick with the motorcycle upright on firm, level ground. Make sure there are no oil leaks.
(1) Oil drain plug(2) O-ring(3) Spring(4) Oil strainer
screen
(2)(3)(4) (1)
NOTICENever use a spark plug with an improper heat range. Severe engine damage could result.
NOTICERunning the engine with insufficient oil can cause serious engine damage.
Prohibida la Reproducción y Distribución
2W-PE | 2Wheels - PE | FREDDY FIGUEROA
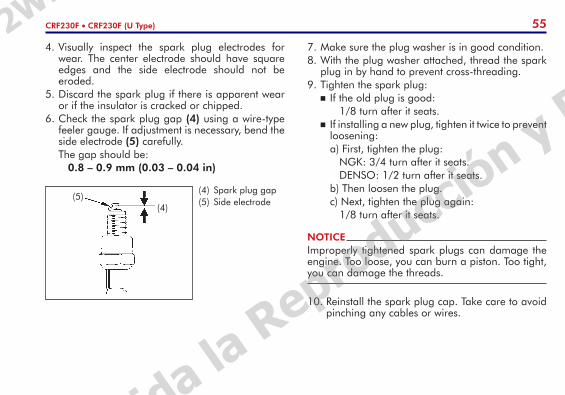
55CRF230F • CRF230F (U Type)
(4)(5)
(4) Spark plug gap(5) Side electrode
NOTICEImproperly tightened spark plugs can damage the engine. Too loose, you can burn a piston. Too tight, you can damage the threads.
4. Visually inspect the spark plug electrodes for wear. The center electrode should have square edges and the side electrode should not be eroded.
5. Discard the spark plug if there is apparent wear or if the insulator is cracked or chipped.
6. Check the spark plug gap (4) using a wire-type feeler gauge. If adjustment is necessary, bend the side electrode (5) carefully.
The gap should be: 0.8 – 0.9 mm (0.03 – 0.04 in)
7. Make sure the plug washer is in good condition.8. With the plug washer attached, thread the spark
plug in by hand to prevent cross-threading.9. Tighten the spark plug: If the old plug is good: 1/8 turn after it seats. If installing a new plug, tighten it twice to prevent
loosening: a) First, tighten the plug: NGK: 3/4 turn after it seats. DENSO: 1/2 turn after it seats. b) Then loosen the plug. c) Next, tighten the plug again: 1/8 turn after it seats.
10. Reinstall the spark plug cap. Take care to avoid pinching any cables or wires.
Prohibida la Reproducción y Distribución
2W-PE | 2Wheels - PE | FREDDY FIGUEROA
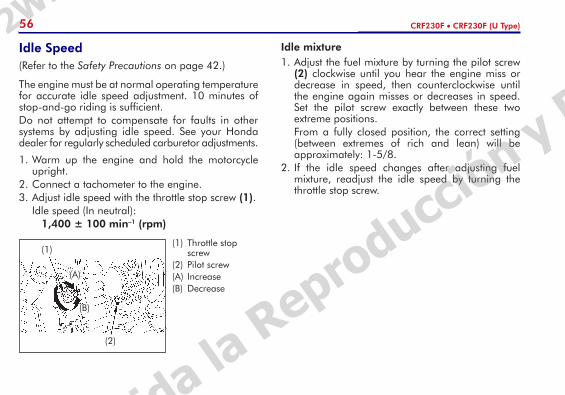
56 CRF230F • CRF230F (U Type)
Idle Speed(Refer to the Safety Precautions on page 42.)
The engine must be at normal operating temperature for accurate idle speed adjustment. 10 minutes of stop-and-go riding is sufficient.Do not attempt to compensate for faults in other systems by adjusting idle speed. See your Honda dealer for regularly scheduled carburetor adjustments.
1. Warm up the engine and hold the motorcycle upright.
2. Connect a tachometer to the engine.3. Adjust idle speed with the throttle stop screw (1). Idle speed (In neutral): 1,400 ± 100 min–1 (rpm)
(1) Throttle stop screw
(2) Pilot screw(A) Increase(B) Decrease
(2)
(1)
(B)
(A)
Idle mixture1. Adjust the fuel mixture by turning the pilot screw
(2) clockwise until you hear the engine miss or decrease in speed, then counterclockwise until the engine again misses or decreases in speed. Set the pilot screw exactly between these two extreme positions.
From a fully closed position, the correct setting (between extremes of rich and lean) will be approximately: 1-5/8.
2. If the idle speed changes after adjusting fuel mixture, readjust the idle speed by turning the throttle stop screw.
Prohibida la Reproducción y Distribución
2W-PE | 2Wheels - PE | FREDDY FIGUEROA
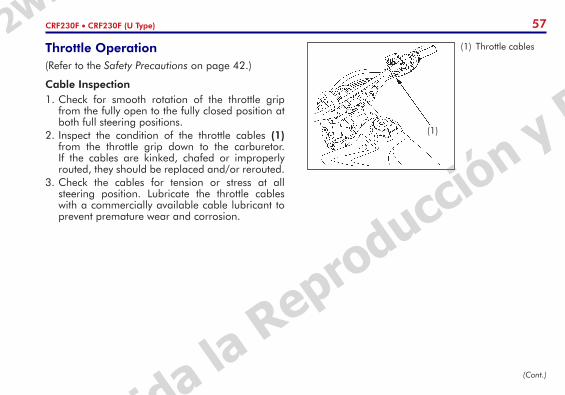
57CRF230F • CRF230F (U Type)
Throttle Operation(Refer to the Safety Precautions on page 42.)
Cable Inspection1. Check for smooth rotation of the throttle grip
from the fully open to the fully closed position at both full steering positions.
2. Inspect the condition of the throttle cables (1) from the throttle grip down to the carburetor. If the cables are kinked, chafed or improperly routed, they should be replaced and/or rerouted.
3. Check the cables for tension or stress at all steering position. Lubricate the throttle cables with a commercially available cable lubricant to prevent premature wear and corrosion.
(1) Throttle cables
(1)
(Cont.)
Prohibida la Reproducción y Distribución
2W-PE | 2Wheels - PE | FREDDY FIGUEROA
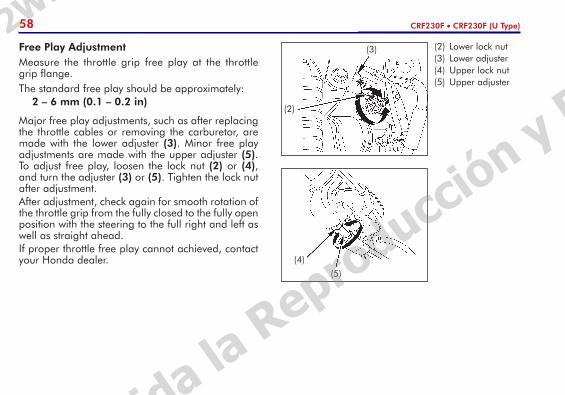
58 CRF230F • CRF230F (U Type)
(2) Lower lock nut(3) Lower adjuster(4) Upper lock nut(5) Upper adjuster
(2)
(3)
(4)
(5)
Free Play AdjustmentMeasure the throttle grip free play at the throttle grip flange.The standard free play should be approximately: 2 – 6 mm (0.1 – 0.2 in)
Major free play adjustments, such as after replacing the throttle cables or removing the carburetor, are made with the lower adjuster (3). Minor free play adjustments are made with the upper adjuster (5). To adjust free play, loosen the lock nut (2) or (4), and turn the adjuster (3) or (5). Tighten the lock nut after adjustment.After adjustment, check again for smooth rotation of the throttle grip from the fully closed to the fully open position with the steering to the full right and left as well as straight ahead.If proper throttle free play cannot achieved, contact your Honda dealer.
Prohibida la Reproducción y Distribución
2W-PE | 2Wheels - PE | FREDDY FIGUEROA
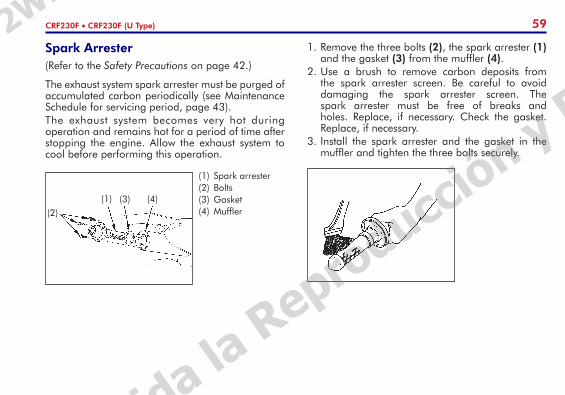
59CRF230F • CRF230F (U Type)
Spark Arrester (Refer to the Safety Precautions on page 42.)
The exhaust system spark arrester must be purged of accumulated carbon periodically (see Maintenance Schedule for servicing period, page 43).The exhaust system becomes very hot during operation and remains hot for a period of time after stopping the engine. Allow the exhaust system to cool before performing this operation.
(1) Spark arrester(2) Bolts(3) Gasket(4) Muffler(2)
(3)(1) (4)
1. Remove the three bolts (2), the spark arrester (1) and the gasket (3) from the muffler (4).
2. Use a brush to remove carbon deposits from the spark arrester screen. Be careful to avoid damaging the spark arrester screen. The spark arrester must be free of breaks and holes. Replace, if necessary. Check the gasket. Replace, if necessary.
3. Install the spark arrester and the gasket in the muffler and tighten the three bolts securely.
Prohibida la Reproducción y Distribución
2W-PE | 2Wheels - PE | FREDDY FIGUEROA
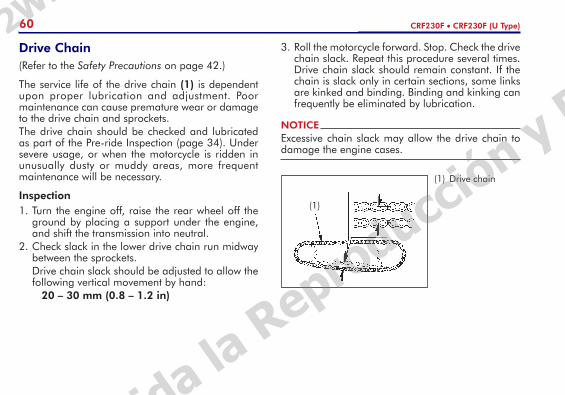
60 CRF230F • CRF230F (U Type)
Drive Chain(Refer to the Safety Precautions on page 42.)
The service life of the drive chain (1) is dependent upon proper lubrication and adjustment. Poor maintenance can cause premature wear or damage to the drive chain and sprockets.The drive chain should be checked and lubricated as part of the Pre-ride Inspection (page 34). Under severe usage, or when the motorcycle is ridden in unusually dusty or muddy areas, more frequent maintenance will be necessary.
Inspection1. Turn the engine off, raise the rear wheel off the
ground by placing a support under the engine, and shift the transmission into neutral.
2. Check slack in the lower drive chain run midway between the sprockets.
Drive chain slack should be adjusted to allow the following vertical movement by hand:
20 – 30 mm (0.8 – 1.2 in)
(1) Drive chain
(1)
3. Roll the motorcycle forward. Stop. Check the drive chain slack. Repeat this procedure several times. Drive chain slack should remain constant. If the chain is slack only in certain sections, some links are kinked and binding. Binding and kinking can frequently be eliminated by lubrication.
NOTICEExcessive chain slack may allow the drive chain to damage the engine cases.
Prohibida la Reproducción y Distribución
2W-PE | 2Wheels - PE | FREDDY FIGUEROA
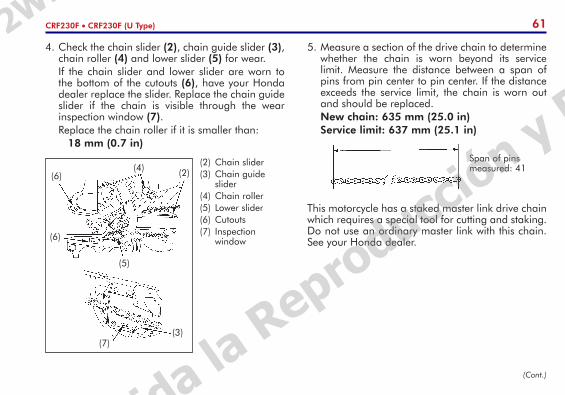
61CRF230F • CRF230F (U Type)
(2) Chain slider(3) Chain guide
slider(4) Chain roller(5) Lower slider(6) Cutouts(7) Inspection
window
(5)
(2)(6)(4)
(6)
(3)(7)
This motorcycle has a staked master link drive chain which requires a special tool for cutting and staking. Do not use an ordinary master link with this chain. See your Honda dealer.
Span of pins measured: 41
4. Check the chain slider (2), chain guide slider (3), chain roller (4) and lower slider (5) for wear.
If the chain slider and lower slider are worn to the bottom of the cutouts (6), have your Honda dealer replace the slider. Replace the chain guide slider if the chain is visible through the wear inspection window (7).
Replace the chain roller if it is smaller than: 18 mm (0.7 in)
5. Measure a section of the drive chain to determine whether the chain is worn beyond its service limit. Measure the distance between a span of pins from pin center to pin center. If the distance exceeds the service limit, the chain is worn out and should be replaced.
New chain: 635 mm (25.0 in) Service limit: 637 mm (25.1 in)
(Cont.)
Prohibida la Reproducción y Distribución
2W-PE | 2Wheels - PE | FREDDY FIGUEROA
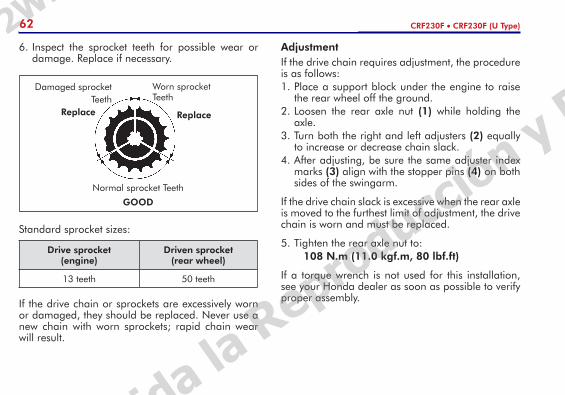
62 CRF230F • CRF230F (U Type)
Standard sprocket sizes:
Drive sprocket (engine)
Driven sprocket (rear wheel)
13 teeth 50 teeth
If the drive chain or sprockets are excessively worn or damaged, they should be replaced. Never use a new chain with worn sprockets; rapid chain wear will result.
Damaged sprocketTeeth
Worn sprocket Teeth
Replace Replace
Normal sprocket Teeth
GOOD
AdjustmentIf the drive chain requires adjustment, the procedure is as follows:1. Place a support block under the engine to raise
the rear wheel off the ground.2. Loosen the rear axle nut (1) while holding the
axle.3. Turn both the right and left adjusters (2) equally
to increase or decrease chain slack.4. After adjusting, be sure the same adjuster index
marks (3) align with the stopper pins (4) on both sides of the swingarm.
If the drive chain slack is excessive when the rear axle is moved to the furthest limit of adjustment, the drive chain is worn and must be replaced.
5. Tighten the rear axle nut to: 108 N.m (11.0 kgf.m, 80 lbf.ft)
If a torque wrench is not used for this installation, see your Honda dealer as soon as possible to verify proper assembly.
6. Inspect the sprocket teeth for possible wear or damage. Replace if necessary.
Prohibida la Reproducción y Distribución
2W-PE | 2Wheels - PE | FREDDY FIGUEROA
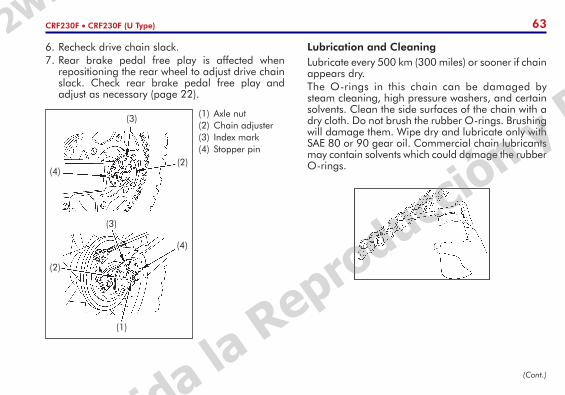
63CRF230F • CRF230F (U Type)
6. Recheck drive chain slack.7. Rear brake pedal free play is affected when
repositioning the rear wheel to adjust drive chain slack. Check rear brake pedal free play and adjust as necessary (page 22).
Lubrication and CleaningLubricate every 500 km (300 miles) or sooner if chain appears dry. The O-rings in this chain can be damaged by steam cleaning, high pressure washers, and certain solvents. Clean the side surfaces of the chain with a dry cloth. Do not brush the rubber O-rings. Brushing will damage them. Wipe dry and lubricate only with SAE 80 or 90 gear oil. Commercial chain lubricants may contain solvents which could damage the rubber O-rings.
(1) Axle nut(2) Chain adjuster(3) Index mark(4) Stopper pin
(2)
(3)
(4)
(4)
(1)
(3)
(2)
(Cont.)
Prohibida la Reproducción y Distribución
2W-PE | 2Wheels - PE | FREDDY FIGUEROA
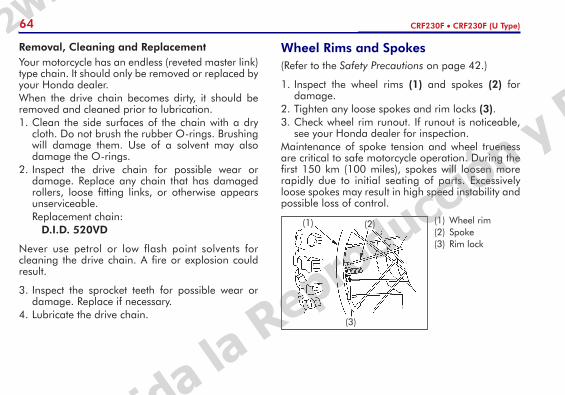
64 CRF230F • CRF230F (U Type)
(1) Wheel rim(2) Spoke(3) Rim lock
(1) (2)
(3)
Removal, Cleaning and ReplacementYour motorcycle has an endless (reveted master link) type chain. It should only be removed or replaced by your Honda dealer.When the drive chain becomes dirty, it should be removed and cleaned prior to lubrication.1. Clean the side surfaces of the chain with a dry
cloth. Do not brush the rubber O-rings. Brushing will damage them. Use of a solvent may also damage the O-rings.
2. Inspect the drive chain for possible wear or damage. Replace any chain that has damaged rollers, loose fitting links, or otherwise appears unserviceable.
Replacement chain: D.I.D. 520VD
Never use petrol or low flash point solvents for cleaning the drive chain. A fire or explosion could result.
3. Inspect the sprocket teeth for possible wear or damage. Replace if necessary.
4. Lubricate the drive chain.
Wheel Rims and Spokes(Refer to the Safety Precautions on page 42.)
1. Inspect the wheel rims (1) and spokes (2) for damage.
2. Tighten any loose spokes and rim locks (3).3. Check wheel rim runout. If runout is noticeable,
see your Honda dealer for inspection.Maintenance of spoke tension and wheel trueness are critical to safe motorcycle operation. During the first 150 km (100 miles), spokes will loosen more rapidly due to initial seating of parts. Excessively loose spokes may result in high speed instability and possible loss of control.
Prohibida la Reproducción y Distribución
2W-PE | 2Wheels - PE | FREDDY FIGUEROA
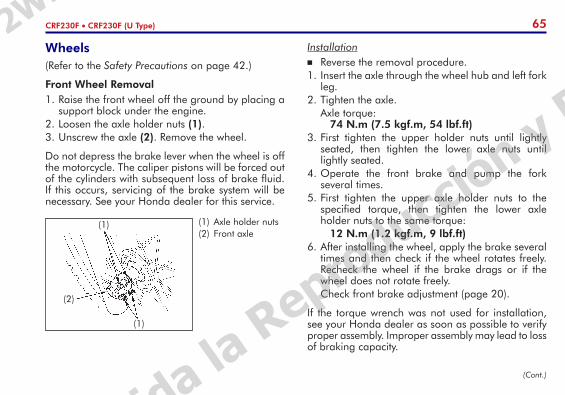
65CRF230F • CRF230F (U Type)
Wheels(Refer to the Safety Precautions on page 42.)
Front Wheel Removal1. Raise the front wheel off the ground by placing a
support block under the engine.2. Loosen the axle holder nuts (1).3. Unscrew the axle (2). Remove the wheel.
Do not depress the brake lever when the wheel is off the motorcycle. The caliper pistons will be forced out of the cylinders with subsequent loss of brake fluid. If this occurs, servicing of the brake system will be necessary. See your Honda dealer for this service.
(1) Axle holder nuts(2) Front axle
(2)
(1)
(1)
Installation Reverse the removal procedure. 1. Insert the axle through the wheel hub and left fork
leg.2. Tighten the axle. Axle torque:
74 N.m (7.5 kgf.m, 54 lbf.ft)3. First tighten the upper holder nuts until lightly
seated, then tighten the lower axle nuts until lightly seated.
4. Operate the front brake and pump the fork several times.
5. First tighten the upper axle holder nuts to the specified torque, then tighten the lower axle holder nuts to the same torque:
12 N.m (1.2 kgf.m, 9 lbf.ft)6. After installing the wheel, apply the brake several
times and then check if the wheel rotates freely. Recheck the wheel if the brake drags or if the wheel does not rotate freely.
Check front brake adjustment (page 20).
If the torque wrench was not used for installation, see your Honda dealer as soon as possible to verify proper assembly. Improper assembly may lead to loss of braking capacity.
(Cont.)
Prohibida la Reproducción y Distribución
2W-PE | 2Wheels - PE | FREDDY FIGUEROA

66 CRF230F • CRF230F (U Type)
Rear Wheel Removal1. Raise the rear wheel off the ground by placing a
support block under the engine.2. Unscrew the rear brake adjuster (1).3. Press and release the rear brake pedal and
disconnect the brake rod (2) from the brake arm (3).
4. Loosen the rear axle nut (4) while holding the axle.
(1) Adjuster(2) Brake rod(3) Brake arm(4) Axle nut(5) Chain adjusters
( 2 )( 1 )
(5)
(4)
(3)
5. Turn both adjusters (5) so the rear wheel can be moved all the way forward for maximum drive chain slack.
6. Move the rear wheel forward. Derail the drive chain from the driven sprocket.
7. Remove the axle nut, chain adjusters, washer, side collar, axle (6) and rear wheel from the swingarm.
(5) Chain adjusters(6) Axle
(5)(6)
Prohibida la Reproducción y Distribución
2W-PE | 2Wheels - PE | FREDDY FIGUEROA
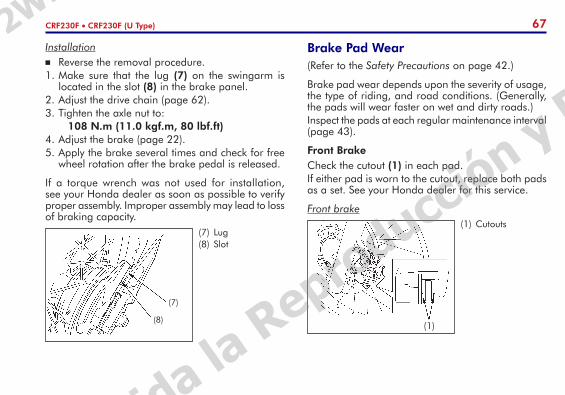
67CRF230F • CRF230F (U Type)
(7) Lug (8) Slot
(8)
(7)
Brake Pad Wear(Refer to the Safety Precautions on page 42.)
Brake pad wear depends upon the severity of usage, the type of riding, and road conditions. (Generally, the pads will wear faster on wet and dirty roads.)Inspect the pads at each regular maintenance interval (page 43).
Front BrakeCheck the cutout (1) in each pad. If either pad is worn to the cutout, replace both pads as a set. See your Honda dealer for this service.
Front brake(1) Cutouts
(1)
Installation Reverse the removal procedure. 1. Make sure that the lug (7) on the swingarm is
located in the slot (8) in the brake panel.2. Adjust the drive chain (page 62).3. Tighten the axle nut to: 108 N.m (11.0 kgf.m, 80 lbf.ft)4. Adjust the brake (page 22).5. Apply the brake several times and check for free
wheel rotation after the brake pedal is released.
If a torque wrench was not used for installation, see your Honda dealer as soon as possible to verify proper assembly. Improper assembly may lead to loss of braking capacity.
Prohibida la Reproducción y Distribución
2W-PE | 2Wheels - PE | FREDDY FIGUEROA
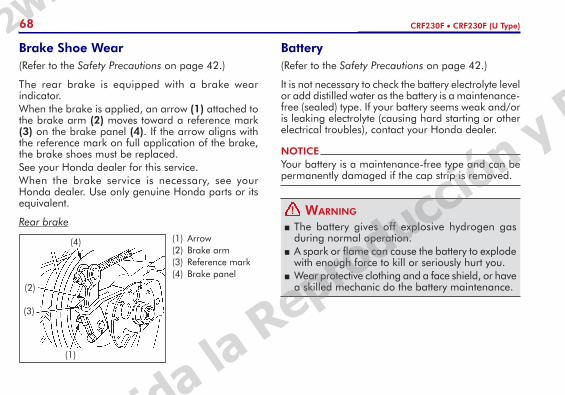
68 CRF230F • CRF230F (U Type)
Brake Shoe Wear(Refer to the Safety Precautions on page 42.)
The rear brake is equipped with a brake wear indicator.When the brake is applied, an arrow (1) attached to the brake arm (2) moves toward a reference mark (3) on the brake panel (4). If the arrow aligns with the reference mark on full application of the brake, the brake shoes must be replaced.See your Honda dealer for this service.When the brake service is necessary, see your Honda dealer. Use only genuine Honda parts or its equivalent.
Rear brake
(1) Arrow(2) Brake arm(3) Reference mark(4) Brake panel
(1)
(2)
(4)
(3)
Battery(Refer to the Safety Precautions on page 42.)
It is not necessary to check the battery electrolyte level or add distilled water as the battery is a maintenance-free (sealed) type. If your battery seems weak and/or is leaking electrolyte (causing hard starting or other electrical troubles), contact your Honda dealer.
NOTICEYour battery is a maintenance-free type and can be permanently damaged if the cap strip is removed.
The battery gives off explosive hydrogen gas during normal operation.
A spark or flame can cause the battery to explode with enough force to kill or seriously hurt you.
Wear protective clothing and a face shield, or have a skilled mechanic do the battery maintenance.
Warning!
Prohibida la Reproducción y Distribución
2W-PE | 2Wheels - PE | FREDDY FIGUEROA
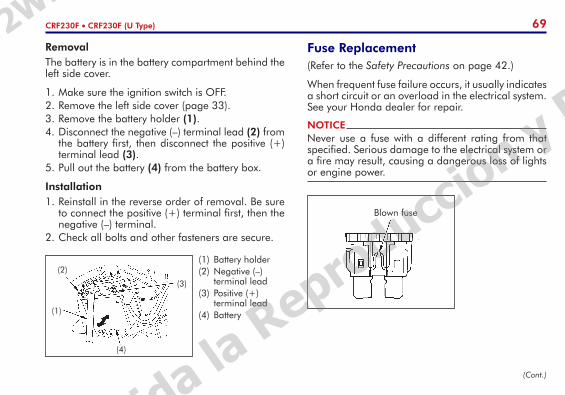
69CRF230F • CRF230F (U Type)
(1) Battery holder(2) Negative (–)
terminal lead(3) Positive (+)
terminal lead(4) Battery
(3)
(4)
(2)
(1)
Fuse Replacement(Refer to the Safety Precautions on page 42.)
When frequent fuse failure occurs, it usually indicates a short circuit or an overload in the electrical system. See your Honda dealer for repair.
Blown fuse
NOTICENever use a fuse with a different rating from that specified. Serious damage to the electrical system or a fire may result, causing a dangerous loss of lights or engine power.
RemovalThe battery is in the battery compartment behind the left side cover.
1. Make sure the ignition switch is OFF.2. Remove the left side cover (page 33).3. Remove the battery holder (1).4. Disconnect the negative (–) terminal lead (2) from
the battery first, then disconnect the positive (+) terminal lead (3).
5. Pull out the battery (4) from the battery box.
Installation1. Reinstall in the reverse order of removal. Be sure
to connect the positive (+) terminal first, then the negative (–) terminal.
2. Check all bolts and other fasteners are secure.
(Cont.)
Prohibida la Reproducción y Distribución
2W-PE | 2Wheels - PE | FREDDY FIGUEROA
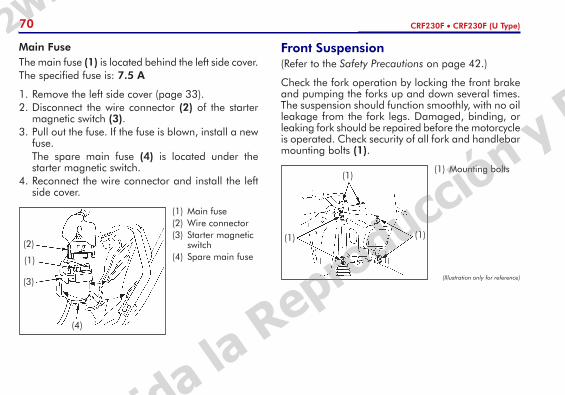
70 CRF230F • CRF230F (U Type)
Main FuseThe main fuse (1) is located behind the left side cover.The specified fuse is: 7.5 A
1. Remove the left side cover (page 33).2. Disconnect the wire connector (2) of the starter
magnetic switch (3).3. Pull out the fuse. If the fuse is blown, install a new
fuse. The spare main fuse (4) is located under the
starter magnetic switch.4. Reconnect the wire connector and install the left
side cover.
(1) Main fuse(2) Wire connector(3) Starter magnetic
switch(4) Spare main fuse(1)
(2)
(3)
(4)
Front Suspension (Refer to the Safety Precautions on page 42.)
Check the fork operation by locking the front brake and pumping the forks up and down several times. The suspension should function smoothly, with no oil leakage from the fork legs. Damaged, binding, or leaking fork should be repaired before the motorcycle is operated. Check security of all fork and handlebar mounting bolts (1).
(Illustration only for reference)
(1)
(1)
(1)
(1) Mounting bolts
Prohibida la Reproducción y Distribución
2W-PE | 2Wheels - PE | FREDDY FIGUEROA
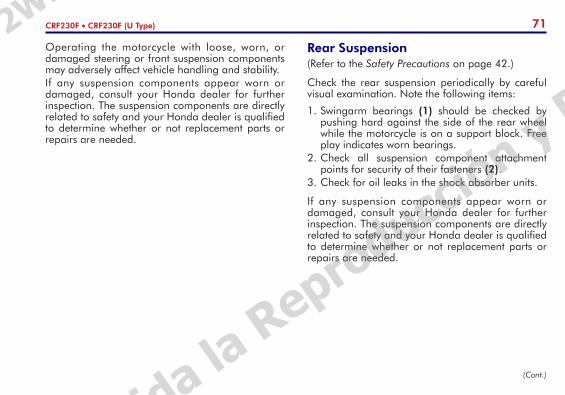
71CRF230F • CRF230F (U Type)
Operating the motorcycle with loose, worn, or damaged steering or front suspension components may adversely affect vehicle handling and stability.If any suspension components appear worn or damaged, consult your Honda dealer for further inspection. The suspension components are directly related to safety and your Honda dealer is qualified to determine whether or not replacement parts or repairs are needed.
Rear Suspension (Refer to the Safety Precautions on page 42.)
Check the rear suspension periodically by careful visual examination. Note the following items:
1. Swingarm bearings (1) should be checked by pushing hard against the side of the rear wheel while the motorcycle is on a support block. Free play indicates worn bearings.
2. Check all suspension component attachment points for security of their fasteners (2).
3. Check for oil leaks in the shock absorber units.
If any suspension components appear worn or damaged, consult your Honda dealer for further inspection. The suspension components are directly related to safety and your Honda dealer is qualified to determine whether or not replacement parts or repairs are needed.
(Cont.)
Prohibida la Reproducción y Distribución
2W-PE | 2Wheels - PE | FREDDY FIGUEROA
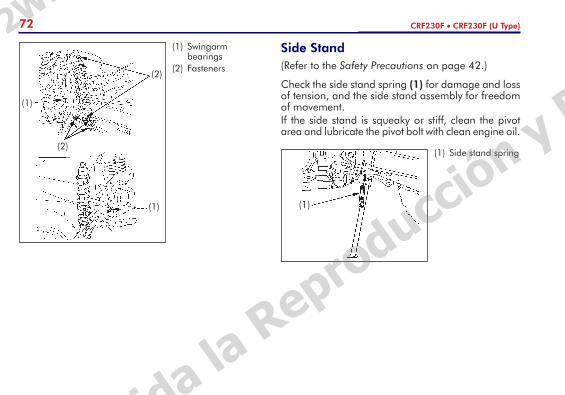
72 CRF230F • CRF230F (U Type)
Side Stand(Refer to the Safety Precautions on page 42.)
Check the side stand spring (1) for damage and loss of tension, and the side stand assembly for freedom of movement.If the side stand is squeaky or stiff, clean the pivot area and lubricate the pivot bolt with clean engine oil.
(1) Side stand spring
(1)
(1) Swingarm bearings
(2) Fasteners (2)
(1)
(2)
(1)
Prohibida la Reproducción y Distribución
2W-PE | 2Wheels - PE | FREDDY FIGUEROA
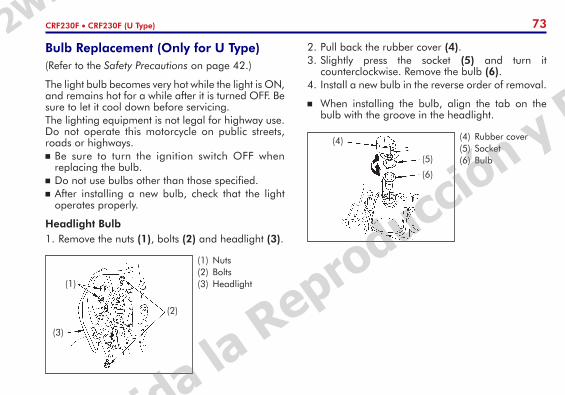
73CRF230F • CRF230F (U Type)
Bulb Replacement (Only for U Type)(Refer to the Safety Precautions on page 42.)
The light bulb becomes very hot while the light is ON, and remains hot for a while after it is turned OFF. Be sure to let it cool down before servicing.The lighting equipment is not legal for highway use. Do not operate this motorcycle on public streets, roads or highways. Be sure to turn the ignition switch OFF when
replacing the bulb. Do not use bulbs other than those specified. After installing a new bulb, check that the light
operates properly.
Headlight Bulb1. Remove the nuts (1), bolts (2) and headlight (3).
2. Pull back the rubber cover (4).3. Slightly press the socket (5) and turn it
counterclockwise. Remove the bulb (6).4. Install a new bulb in the reverse order of removal.
When installing the bulb, align the tab on the bulb with the groove in the headlight.
(1) Nuts(2) Bolts(3) Headlight
(2)
(3)
(1)
(5)
(4) Rubber cover(5) Socket(6) Bulb
(6)
(4)
Prohibida la Reproducción y Distribución
2W-PE | 2Wheels - PE | FREDDY FIGUEROA
74 CRF230F • CRF230F (U Type)
CLEANING
Clean your motorcycle regularly to protect the surface finishes and inspect for damage, wear and oil leakage.Avoid cleaning products that are not specifically designed for motorcycle or automobile surfaces.They may contain harsh detergents or chemical solvents that could damage the metal, paint, and plastic on your motorcycle.If your motorcycle is still warm from recent operation, give the engine and exhaust system time to cool off.We recommend avoiding the use of high pressure water spray (typical in coin-operated car washes).
High pressure washer spray can damage certain parts of your motorcycle. If you use a high pressure washer, avoid spraying the following areas: Wheel hubs Muffler outlet Under seat Engine stop button
Under fuel tank Drive chain Carburetor Ignition switch Brake master cylinders
Washing the Motorcycle1. Rinse the motorcycle thoroughly with cool water
to remove loose dirt. 2. Clean the motorcycle with a sponge or soft cloth
using cool water. Avoid directing water to muffler outlets and
electrical parts.3. Clean the plastic parts using a cloth or sponge
dampened with a solution of mild detergent and water. Rub the soiled area gently rinsing it frequently with fresh water. Take care to keep brake fluid or chemical solvents off the motorcycle.
They will damage the plastic and painted surfaces.4. After cleaning, rinse the motorcycle thoroughly
with plenty of clean water. Strong detergent residue can corrode alloy parts.
5. Dry the motorcycle, start the engine, and let it run for several minutes.
6. Test the brakes before riding the motorcycle. Several applications may be necessary to restore normal braking performance.
NOTICEHigh pressure water (or air) can damage certain parts of the motorcycle.
Prohibida la Reproducción y Distribución
2W-PE | 2Wheels - PE | FREDDY FIGUEROA
75CRF230F • CRF230F (U Type)
7. Lubricate the drive chain immediately after washing and drying the motorcycle.
Braking efficiency may be temporarily impaired immediately after washing the motorcycle. Anticipate longer stopping distance to avoid a possible accident.
Finishing TouchesAfter washing your motorcycle, consider using a commercially-available spray cleaner/polish or quality liquid or paste wax to finish the job. Use only a non-abrasive polish or wax made specifically for motorcycles or automobiles. Apply the polish or wax according to the instructions on the container.
Clean the Mat Painted SurfaceUsing plenty of water, clean the mat painted surface with a soft cloth or sponge. Dry with a soft, clean cloth.Use neutral detergent to clean mat painted surface.Do not use waxes containing compounds.
STORAGE GUIDE
Extended storage, such as for winter, requires that you take certain steps to reduce the effects of deterioration from non-use of the motorcycle. In addition, necessary repairs should be made BEFORE storing the motorcycle; otherwise, these repairs may be forgotten by the time the motorcycle is removed from storage.
Storage 1. Change the engine oil and clean the filter screen.2. Drain the fuel tank and carburetor into an
approved petrol container. Reinstall the fuel fill cap on the tank.
To assure proper performance after storage lasting more than one month, it is important to drain the carburetor.
(Cont.)
Prohibida la Reproducción y Distribución
2W-PE | 2Wheels - PE | FREDDY FIGUEROA

76 CRF230F • CRF230F (U Type)
3. To prevent rusting in the cylinder, perform the following: Remove the spark plug cap from the spark
plug. Using tape or string, secure the cap to any convenient plastic body part so that it is positioned away from the spark plug.
Remove the spark plug from the engine and store it in a safe place. Do not connect the spark plug to the spark plug cap.
Pour a tablespoon (15 – 20 cm3) of clean engine oil into the cylinder and cover the spark plug hole with a piece of cloth.
Crank the engine several times to distribute the oil.
Reinstall the spark plug and spark plug cap.
4. Remove the battery. Store in an area protected from freezing temperatures and direct sunlight. Slow charge the battery once a month.
5. Wash and dry the motorcycle. Wax all painted surfaces. Coat chrome with rustinhibiting oil.
6. Lubricate the drive chain (page 63).7. Inflate the tyres to their recommended pressures.
Place the motorcycle on blocks to raise both tyres off the ground.
8. Cover the motorcycle (don’t use plastic or other coated materials) and store in an unheated area, free of dampness with a minimum of daily temperature variation. Do not store the motorcycle in direct sunlight.
Petrol is highly flammable and explosive. You can be burned or seriously injured when handling fuel. Stop the engine and keep heat, sparks, and flame
away. Refuel only outdoors. Wipe up spills immediately.
Warning!
Prohibida la Reproducción y Distribución
2W-PE | 2Wheels - PE | FREDDY FIGUEROA
77CRF230F • CRF230F (U Type)
Removal from Storage1. Uncover and clean the motorcycle.2. Change the engine oil if more than 4 months
have passed since the start of storage.3. Charge the battery as required. Install the battery.4. Fill the fuel tank with fresh petrol.5. Perform all Pre-ride Inspection checks (page 34).6. Test ride the motorcycle at low speeds in a safe
riding area away from traffic.
TAKING CARE OF THE UNEXPECTED
If You CrashPersonal safety is your first priority after a crash. If you or anyone else has been injured, take time to assess the severity of the injuries and whether it is safe to continue riding. Call for emergency assistance if needed. Also follow applicable laws and regulations if another person or vehicle is involved in the crash.If you decide that you are capable of riding safely, first evaluate the condition of your motorcycle. If the engine is still running, turn it off and look it over carefully; inspect it for fluid leaks, check the tightness of critical nuts and bolts, and secure such parts as the handlebar, control levers, brakes, and wheels.If there is minor damage, or you are unsure about possible damage, ride slowly and cautiously. Sometimes, crash damage is hidden or not immediately apparent, so you should have your motorcycle thoroughly checked at a qualified service facility as soon as possible. Also, be sure to have your Honda dealer check the frame and suspension after any serious crash.
Prohibida la Reproducción y Distribución
2W-PE | 2Wheels - PE | FREDDY FIGUEROA

78 CRF230F • CRF230F (U Type)
SPECIFICATIONS
DIMENSIONS
Overall length 2,059 mm (81.1 in) Overall width 801 mm (31.5 in) Overall height 1,167 mm (45.9 in) U type 1,190 mm (46.9 in) Wheelbase 1,372 mm (54.0 in)
CAPACITIES
Engine oil After draining 1.0 liter (1.1 US qt, 0.9 Imp qt) After disassembly 1.2 liters (1.3 US qt, 1.1 Imp qt) Fuel tank 7.0 liters (1.85 US gal, 1.54 Imp gal) Fuel reserve 1.3 liters (0.34 US gal, 0.29 Imp gal) Passenger capacity Operator only; no passenger Maximum weight capacity 100 kg (220 lbs)
Prohibida la Reproducción y Distribución
2W-PE | 2Wheels - PE | FREDDY FIGUEROA
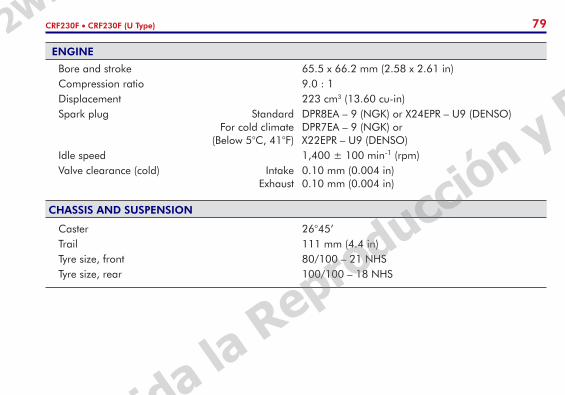
79CRF230F • CRF230F (U Type)
ENGINE
Bore and stroke 65.5 x 66.2 mm (2.58 x 2.61 in) Compression ratio 9.0 : 1 Displacement 223 cm3 (13.60 cu-in) Spark plug Standard DPR8EA – 9 (NGK) or X24EPR – U9 (DENSO) For cold climate DPR7EA – 9 (NGK) or (Below 5°C, 41°F) X22EPR – U9 (DENSO) Idle speed 1,400 ± 100 min-1 (rpm) Valve clearance (cold) Intake 0.10 mm (0.004 in) Exhaust 0.10 mm (0.004 in)
CHASSIS AND SUSPENSION
Caster 26°45’ Trail 111 mm (4.4 in) Tyre size, front 80/100 – 21 NHS Tyre size, rear 100/100 – 18 NHS
Prohibida la Reproducción y Distribución
2W-PE | 2Wheels - PE | FREDDY FIGUEROA
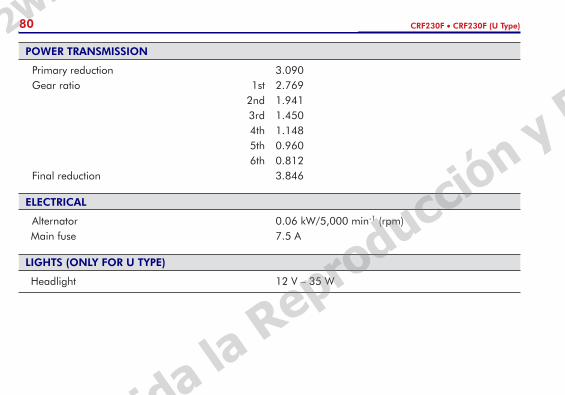
80 CRF230F • CRF230F (U Type)
POWER TRANSMISSION
Primary reduction 3.090 Gear ratio 1st 2.769 2nd 1.941 3rd 1.450 4th 1.148 5th 0.960 6th 0.812 Final reduction 3.846
ELECTRICAL
Alternator 0.06 kW/5,000 min-1 (rpm) Main fuse 7.5 A
LIGHTS (ONLY FOR U TYPE)
Headlight 12 V – 35 W
Prohibida la Reproducción y Distribución
2W-PE | 2Wheels - PE | FREDDY FIGUEROA
C R F 2 3 0 F
0772
D2203-MAN-0772
C R F 2 3 0 F
Manual del PropietarioOwner’s Manual
Prohibida
la Repro
ducción y
Distribu
ción
2W-PE | 2Wheels - PE | FREDDY FIGUEROA

2W-PE |
2Wheel
s - PE | F
REDDY F
IGUERO
A