PowerSurvey User Guide - Microsoft Dynamics CRM · The first task to tackle in creating any survey...
22
USER GUIDE PowerSurvey
Transcript of PowerSurvey User Guide - Microsoft Dynamics CRM · The first task to tackle in creating any survey...

USER GUIDE
PowerSurvey

USER GUIDE | PowerSurvey
Contents
Creating Questions
Question Types
Creating PowerSurveys
Survey Fields
Adding Questions to a Survey
Sending PowerSurveys
Group – via Template
Sending to a Marketing List
Group – via Workflow
Individual – via Email Activity
Individual – via Survey Activity
“Fill out Survey” Button on Contact/Lead Record
Anonymous PowerSurveys
Viewing Survey Responses
On the Record in CRM
Reports
PowerSurvey Report
PowerSurvey Report Filtered by Contact
USER GUIDE | PowerSurvey
Creating Questions
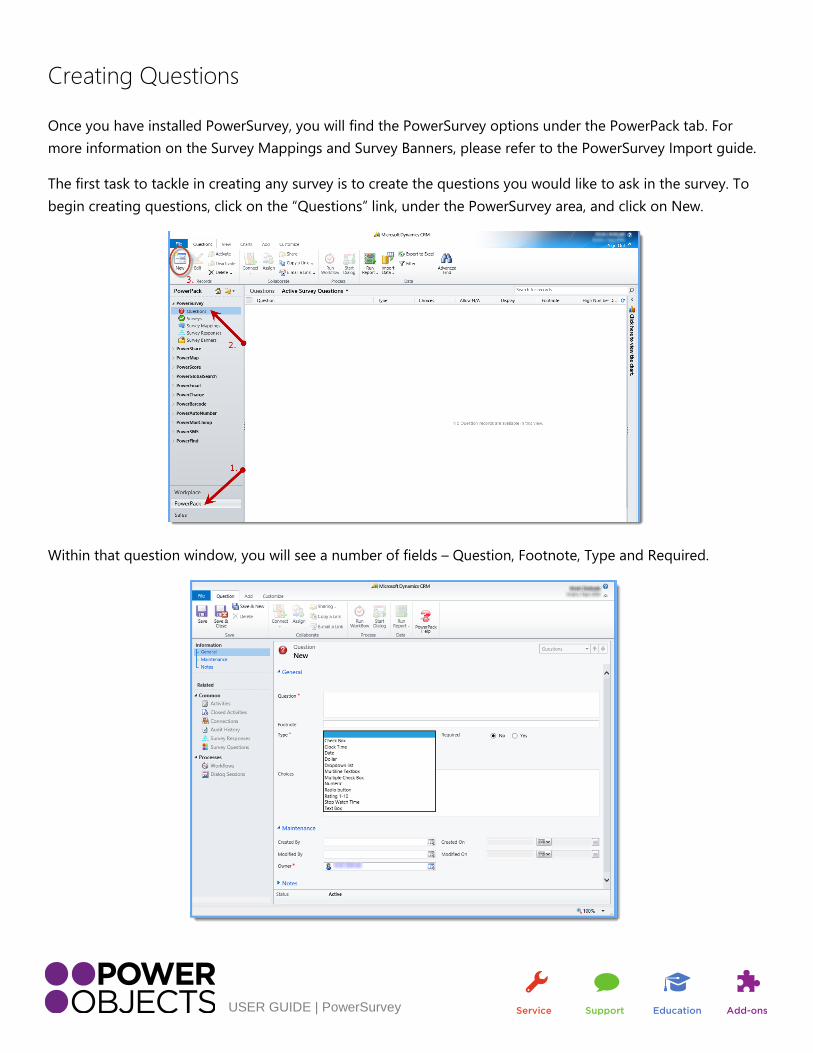
Once you have installed PowerSurvey, you will find the PowerSurvey options under the PowerPack tab. For
more information on the Survey Mappings and Survey Banners, please refer to the PowerSurvey Import guide.
The first task to tackle in creating any survey is to create the questions you would like to ask in the survey. To
begin creating questions, click on the “Questions” link, under the PowerSurvey area, and click on New.
Within that question window, you will see a number of fields – Question, Footnote, Type and Required.

USER GUIDE | PowerSurvey
Question Types
Rating 1 – 10
This type of question should be used when you want to return a numerical answer with a value of 1-10. The
item that you want to make sure you add is the Low and High description – this will minimize confusion on
what a 1 means, and what a 10 means when people answer your question.
Note: PowerSurvey Rating 1-10 questions cannot be changed to 1-7 or 1-5. 1-10 is the only rating question type
available within PowerSurvey.
Radio Button
A radio button question is used when you have multiple answers but only 1 answer can be chosen. List your
options in the Choices text box that appears - one answer per line.
Check Box
A checkbox is used when you have a question where people can check the box or not. You cannot make this
question required because it will always starts with the “unchecked” value by default.
Clock Time
A Clock time question would be used when you’re looking for an answer in a.m. or p.m. in hours and minutes.
The clock time question is displayed in a 12 hour format, not a 24 hour format.
Date
A date question would be used when you’re looking for an answer that requires the entry of a particular day.
Dollar
A dollar question would be used when you’re looking for an answer in dollars and cents. This question is, by
default, asking for US dollars (Example: $34.54).
Numeric
A numeric question would be used if you’re looking for an answer with a numeric value.
Stop Watch
The stop watch time question would be used when you are looking for an answer in hours, minutes and
seconds. (Similar to the display of a stop watch.)
Multi-line Text Box

USER GUIDE | PowerSurvey
Multiline textboxes are used when you are looking for an answer that would allow the respondent to type free
form text of typically a sentence or more. If you choose a multiline textbox as your question type, respondents
will have the ability to input up to 4,000 characters.
Multiple Check Box
Multiple check box question types are used when you have multiple answers and the respondent can choose
more than one. Just like in the radio button question, you will list your choices one per line.
Text Box
You would use a text box when you are looking for a short answer to a question.
Drop-down List
Dropdown lists are used when you have multiple choices and the respondent can only choose one. Enter one
answer choice per line.
Creating PowerSurveys
In this section we will go through the steps necessary to create your survey. At any time during the creation of
your survey, you can click on the “preview” button on the top ribbon to launch a preview of the survey, and see
what your users will see when they go to fill out your survey.
First, navigate to the Survey section of the PowerSurvey area, and click on New.

USER GUIDE | PowerSurvey
Survey Fields
Name
This is a required field and is the actual name of the survey in your Microsoft Dynamics CRM system. This
should be a somewhat logical name as you will most likely need to come back and reference it in the future. It
should also not be too complex as you will use it to programmatically call this survey. The name of the survey
will also be displayed at the top of the actual survey itself.
Image
This is where you pick the banner you have uploaded in the Survey Banners area, to customize the top portion
of your survey.
Greeting
This will be what is displayed at the top of the survey, welcoming survey takers to the survey. If you would like
to insert the survey taker’s name in the greeting, simply add the {name} token to the greeting. For example, if
you put “Hello {name}!” in the header, it would say “Hello Joe CRM!” when Joe CRM went to take the survey.

USER GUIDE | PowerSurvey
Header
If you would like a header on your survey, you can input some text in this field. This will then be displayed in
large font at the top of the survey, under the greeting.
Sub-Header
This can be used for an additional title below the header – the font will render slightly smaller than the header
font.
Paragraph
This can be used for any lengthy text you want to add at the top of the Survey. You may need to add
instructions at the beginning of the survey if necessary. The paragraph field would be a good place to put
these instructions.
Footer
This is any text that you would like to display at the bottom of the survey.
Campaign
If you would like a campaign response to be created each time someone fills out a survey, you can choose to
associate a campaign in this field.
Questions per Page
If you leave this blank, you will, by default, have 10 questions on each page. If you enter a number here, it will
limit the number of questions on each page of that survey to the number you enter.
Style Sheet (CSS)
In this section, you will choose a style sheet for your survey. This will help make your survey look beautiful and
professional. PowerObjects gives you 5 different style sheets to choose from, and the style sheets are either
fixed width, or resizable, depending on the size of the screen the survey is being taken on.
Survey Link
This is the text that will be hyperlinked to the survey page in the emails that get sent to respondents to take
the survey. This is pre-populated from your configuration of the solution, but can be changed on a per survey
basis.
Survey Completed
This is the text that is displayed when a survey is successfully submitted. This is pre-populated from your
configuration of the solution, but can be changed on a per survey basis.

USER GUIDE | PowerSurvey
Link to Website
The URL that will be hyperlinked under the survey completed text. This is pre-populated from your
configuration of the solution, but can be changed on a per survey basis.
Link to Text
The text that will be displayed in place of the URL you have in the Link to Website field. This is pre-populated
from your configuration of the solution, but can be changed on a per survey basis.
Email Submitted Survey To
If you would like the survey responses sent to a specific email when they are received, enter email addresses in
this field. The email you receive will look like this:
Note: You need to have an email router configured in CRM in order for the survey response emails to be sent out.
Navigation Text
If you have more than one page to your survey, a Next and Prior button will be displayed. All surveys will have
a Submit button. By entering text in this field, you can decide what text you’d like these buttons to display. If
these fields are left blank, they will default to the works “Prior”, “Next” and “Submit.”

USER GUIDE | PowerSurvey
CSS
If you’d like to upload your own CSS, or override parts of the default CSS that you’ve selected a little further up
on the form, you can upload that CSS here. This will allow you to customize your survey, to make it look and
feel exactly the way you’d like.
Once you have entered all this information for your survey, be sure to save the form in the top tool bar. You
can also preview at any time to see how the survey webpage will be rendered.
Adding Questions to a Survey
Once we have the basic survey information setup, we can now start adding survey questions! On the general
survey form, you will see Survey Questions right below the Link to Text. You will see the grid either blank or
with the existing questions currently in the survey – see below.
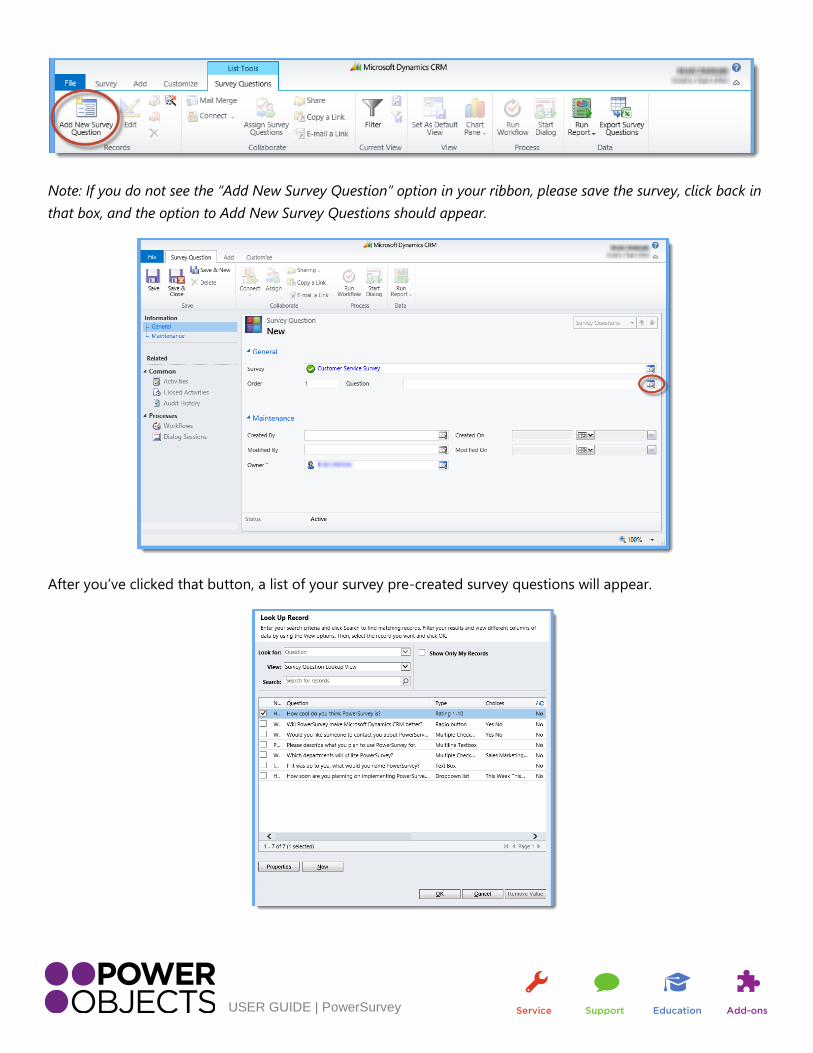
When you click in this grid, your top ribbon toolbar will change to look like this. Click “Add New Survey
Question” to start adding questions you previously created to your survey.
USER GUIDE | PowerSurvey
Note: If you do not see the “Add New Survey Question” option in your ribbon, please save the survey, click back in
that box, and the option to Add New Survey Questions should appear.
After you’ve clicked that button, a list of your survey pre-created survey questions will appear.

USER GUIDE | PowerSurvey
From here, find the question you want to add and select OK. You will be brought back to the previous window
with the selected question. Now, enter the order number, which decides in what order your list of questions will
display on the survey. If you don’t order your questions, they will still be there but in a random order. If you
are adding multiple questions, a good tip is to use the “Save & New” button to keep adding questions to the
same survey.
After you have added all of your questions, return to the main survey window and click on Preview to see the
survey you have created!

USER GUIDE | PowerSurvey
Sending PowerSurveys
PowerObjects has attempted to make PowerSurvey as robust as possible to accommodate all possible
scenarios for sending surveys. Typically you will either be sending a survey to one individual at a time, you will
be sending to a group, or you will be filling out the survey for someone on the phone. We will discuss the
various options in the next section.
Group – via Template
If you want to be able to send to a number of people at once, you will need to create a template. When you
use a template you need to specify a token so the system knows which survey to use. The syntax and spelling
in the token is very important. Below you will see an example of an email template.
The token can be in any of the following formats
powersurvey=[Exact Name of Survey]
powersurvey=(Exact Name of Survey)
powersurvey=“Exact Name of Survey”
powersurvey=|Exact Name of Survey|
Note: The spelling and case are important when you type in the exact name of survey.
USER GUIDE | PowerSurvey
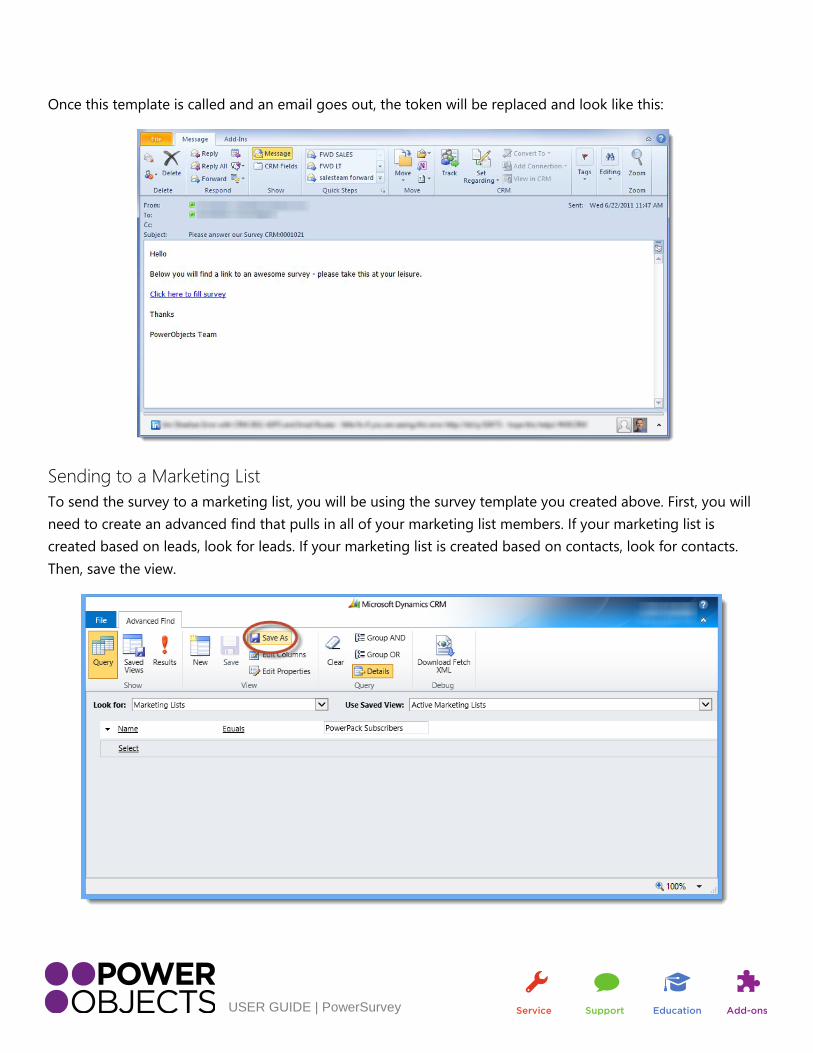
Once this template is called and an email goes out, the token will be replaced and look like this:
Sending to a Marketing List
To send the survey to a marketing list, you will be using the survey template you created above. First, you will
need to create an advanced find that pulls in all of your marketing list members. If your marketing list is
created based on leads, look for leads. If your marketing list is created based on contacts, look for contacts.
Then, save the view.
USER GUIDE | PowerSurvey
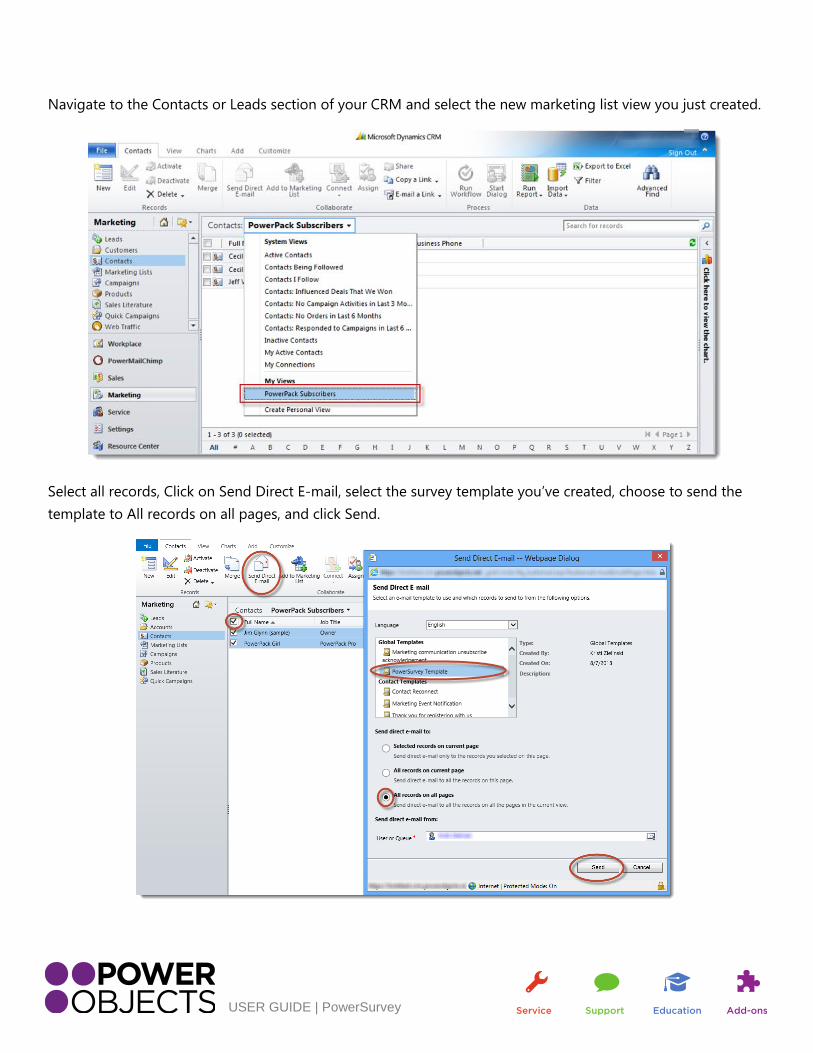
Navigate to the Contacts or Leads section of your CRM and select the new marketing list view you just created.
Select all records, Click on Send Direct E-mail, select the survey template you’ve created, choose to send the
template to All records on all pages, and click Send.

USER GUIDE | PowerSurvey
Note: If you send the survey to the marketing list by creating a quick campaign, the survey activities will be set
regarding the quick campaign instead of the individual you sent it to, so you won’t know what answers belong to
what person.
Group – via Workflow
You can also choose to send a survey to a group through a workflow. Set your workflow up to run the way you
intend it to. Then, when you create the “E-mail” step, choose the survey you want to send, and type
|powersurvey| where you want to insert the link for the survey.
When the email is sent, the |powersurvey| token will be replaced by a clickable link.
Note: Make sure the “Regarding” field of the email is set to an entity that has a survey mapping created for it. If
the regarding is not set, the survey link will not be inserted.
Individual – via Email Activity
If you are just sending a survey to an individual, one of the ways to do this is to create an email activity. When
you are in the record you would click on the “Add” tab and then click on “E-Mail” to add the activity.

USER GUIDE | PowerSurvey
Once you click “E-Mail” the below window will load to create the email to send. You will notice a new field on
the form from PowerSurvey that lets you link a survey to the email. You would simply search for the survey to
use and select it from your list of surveys.
Note: The link to the survey will be inserted at the very end of the email by default. If you would like the link to be
somewhere else in the body of the email, you can place the token |powersurvey| where you would like the
hyperlink to be placed.
Individual – via Survey Activity
You can also send a survey from a record by adding a survey activity. Go to the add tab and choose “other
activities” and then click “Survey Activity.”

USER GUIDE | PowerSurvey
This will bring up a window much like the email activity, but it will pull in the mapped fields for Name and
Email. You will need to choose a survey and type in your Subject line, as well as the body of what will be sent
in the email. When you save the activity it will send the email with the link at the bottom of the email. Again
you can choose where to place the link by placing the token |powersurvey| in the body of the email where you
would like the link to appear.
“Fill out Survey” Button on Contact/Lead Record
Another option for filling out a survey would be to open a contact or lead record and click on “Fill out Survey”
in the ribbon. This will allow you to generate a survey, and fill out the survey for that contact or lead on the
spot, instead of having to email it to them. This may be useful in a situation where someone is on the phone,
and you’d like to fill out a survey for them. Once you’ve generated a survey by clicking on this button, a survey
activity is created and appended to that person’s record, along with their responses (just as it would be if you
were to send them an email with a survey link in it).

USER GUIDE | PowerSurvey
Anonymous PowerSurveys
Some users may find it useful to have the ability to post surveys to a webpage, for visitors to fill out
anonymously. To post an anonymous survey, navigate to the survey you would like to post, open it, and click
on “Copy Anonymous Link” in the ribbon.
You will now have the URL of the anonymous survey copied to your clipboard. Now, navigate to your web page
and insert that link wherever you would like. You can associate the anonymous survey with an image or text, by
adjusting the html around the link.
Every time someone clicks on the link, an anonymous survey activity will be created. If they fill out the survey,
you will see a completed date. If they do no fill out the survey, and simply leave the page, you will not see a
completed date. These anonymous survey activities can be viewed under the “Survey Activities” of the survey
itself.

USER GUIDE | PowerSurvey
Viewing Survey Responses
Survey responses can be found in a few different places.
On the Record in CRM
Once you have sent out a survey to someone, you will see a survey activity associated with their record in CRM.
If you set the survey regarding a contact, you will see the survey activity on the contact record. If you set the
survey regarding a case, you will see the survey activity on the case record.
If someone has completed the survey, you will see the survey responses on the survey activity, and the status of
the survey activity will be completed. If the survey was sent but not completed, the survey activity will remain
open, and no responses will be listed within the survey activity.

USER GUIDE | PowerSurvey
Reports
There are two reports that are imported into your CRM when you import the PowerSurvey solution.
PowerSurvey Report
This report will give you a summary of how your survey responses were answered. The type of graph displayed
will depend on the type of survey question. To run the report, open the survey record, and click on Reports >
PowerSurvey report. You can change the date range of the reponses the report is pulling at the top of the
report.

USER GUIDE | PowerSurvey

USER GUIDE | PowerSurvey
PowerSurvey Report Filtered by Contact
The other report that’s automatically imported into your CRM when you import PowerSurvey, lets you filter
survey responses by a specific contact in CRM. Run the report, and choose the contact you would like to see
survey responses for.
Note: This report will only work if you are sending surveys to a contact in your CRM (where the regarding of the
survey activity is set to the contact).
Thanks for your interest in PowerSurvey. Should you have any questions, contact us at 612-339-3355 or email
[email protected]. Remember, your trial will expire 30 days from the date of installation. If you
are interested in subscribing, go back to the configuration screen and change “try” to “subscribe” and enter
your credit card information – you will be charged $2/CRM user/month.
Interested in more CRM tips and tricks? Check out blog or subscribe to our newsletter.