OBSIDIAN SERIES 250D Mini ITX PC CASE - … · GUIDA ALL’INSTALLAZIONE n Guía de instalación n...
14
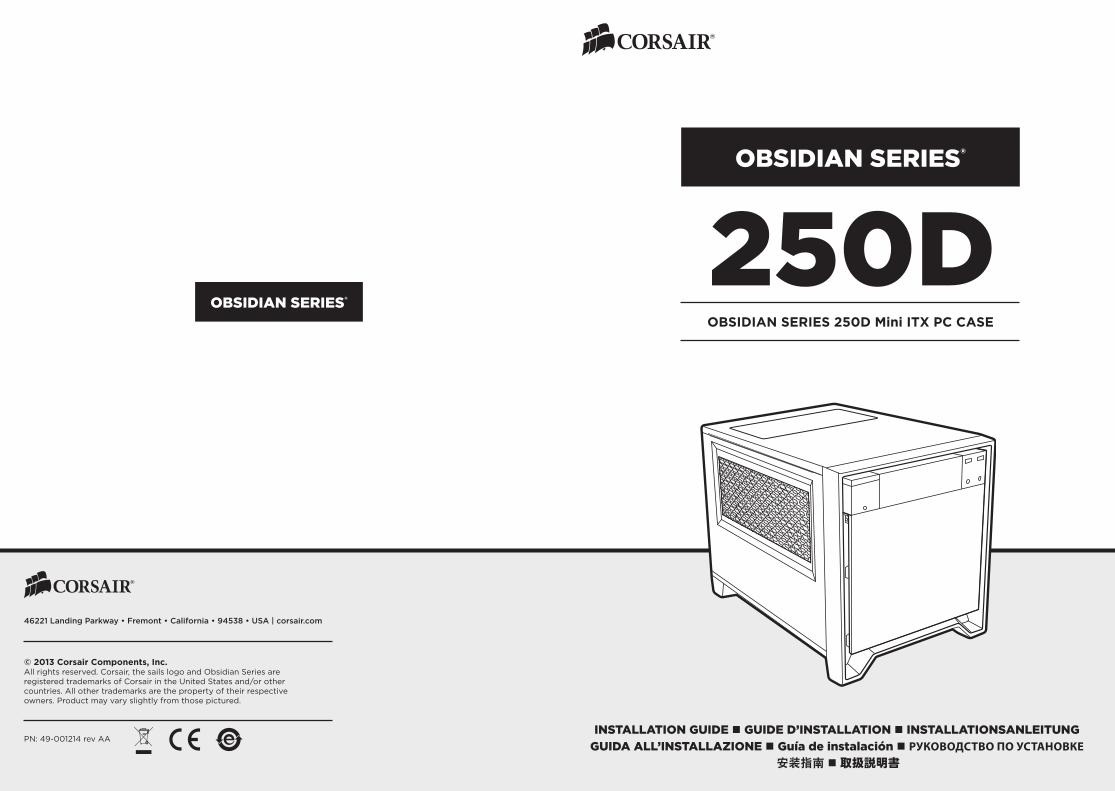
OBSIDIAN SERIES ® OBSIDIAN SERIES ® INSTALLATION GUIDE n GUIDE D’INSTALLATION n INSTALLATIONSANLEITUNG GUIDA ALL’INSTALLAZIONE n Guía de instalación n РУКОВОДСТВО ПО УСТАНОВКЕ 安装指南 n 取扱説明書 OBSIDIAN SERIES 250D Mini ITX PC CASE 46221 Landing Parkway • Fremont • California • 94538 • USA | corsair.com © 2013 Corsair Components, Inc. All rights reserved. Corsair, the sails logo and Obsidian Series are registered trademarks of Corsair in the United States and/or other countries. All other trademarks are the property of their respective owners. Product may vary slightly from those pictured. PN: 49-001214 rev AA 250D
Transcript of OBSIDIAN SERIES 250D Mini ITX PC CASE - … · GUIDA ALL’INSTALLAZIONE n Guía de instalación n...
OBSIDIAN SERIES®
OBSIDIAN SERIES®
INSTALLATION GUIDE n GUIDE D’INSTALLATION n INSTALLATIONSANLEITUNG GUIDA ALL’INSTALLAZIONE n Guía de instalación n РУКОВОДСТВО ПО УСТАНОВКЕ
安装指南 n 取扱説明書
OBSIDIAN SERIES 250D Mini ITX PC CASE
46221 Landing Parkway • Fremont • California • 94538 • USA | corsair.com
© 2013 Corsair Components, Inc.All rights reserved. Corsair, the sails logo and Obsidian Series are registered trademarks of Corsair in the United States and/or other countries. All other trademarks are the property of their respective owners. Product may vary slightly from those pictured.
PN: 49-001214 rev AA
250D
HERZLICHEN GLÜCKWUNSCH! n CONGRATULAZIONE!
Wenn Sie ein Mini-ITX-System bauen möchten, ohne dabei in puncto Erweiterbarkeit, Flexibilität oder Performance Kompromisse einzugehen, dann ist die Obsidian Series 250D genau das Richtige für Sie. Trotz seiner geringen Außenmaße bietet das 250D-Gehäuse Platz für Standardkomponenten wie ein normalgroßes optisches 5,25-Zoll-Laufwerk, eine normallange GPU, einen 240-mm-Radiator und sogar ein normalgroßes ATX-Netzgerät.
Die elegante Aluminiumverkleidung auf der Vorderseite zeichnet sich durch das markante, doch subtile Design aus, für das die Gehäuse der Obsidian Series bekannt sind. Durch das Fenster auf der Oberseite können Sie Ihre Hochleistungskomponenten aus der Nähe sehen. Das 250D ist eine hervorragende Wahl, wenn Sie Performance voller Größe in einem kleinen Gehäuse wollen.
Obsidian Series 250D è la risposta giusta per chi vuole creare un sistema Mini ITX senza compromettere l’espansione, la flessibilità o le prestazioni. Esternamente compatto, il 250D è sufficientemente capiente da accogliere i componenti standard come un’unità ottica da 5,25 pollici, una GPU completa, un radiatore da 240 mm e un alimentatore ATX.
L’elegante frontale in alluminio assicura l’eccellente e sottile design tipico dei case Obsidian Series, mentre una finestra superiore offre una vista ravvicinata dei componenti ad alte prestazioni. Obsidian 250D è ideale per le massime prestazioni in uno spazio ridotto.
2
CONGRATULATIONS! n FÉLICITATIONS!!
If you want to build a Mini ITX system without compromising expansion, flexibility, or performance, the Obsidian Series 250D is your answer. Though it’s small on the outside, the 250D has room for standard components like a full-size 5.25" optical drive, a full-length GPU, a 240mm radiator, and even a full-size ATX power supply.
The sleek, aluminum front fascia provides the striking yet subtle design that Obsidian Series cases are known for, and a top window gives you a close-up view of your high-performance components. The 250D is a great choice if you want full size performance in a small space.
Si vous souhaitez construire un système Mini ITX sans compromettre l’extension, la souplesse ou les performances, le modèle 250D de la gamme Obsidian constitue la solution. Bien qu’il soit de petite taille, le modèle 250D comporte suffisamment d’espace pour accueillir des composants standard, notamment un lecteur optique 5,25 pouces, une carte graphique de taille standard, un radiateur 240 mm et même un bloc d’alimentation ATX de taille standard.
L’élégant tableau frontal en aluminium assure une conception tout aussi moderne que subtile qui a fait la réputation des boîtiers de la gamme Obsidian. La lucarne située sur la partie supérieure du boîtier vous permet de voir de près vos composants haute performance. Le modèle 250D est un excellent choix si vous recherchez un boîtier de taille standard, dans un petit espace.
1
Thank you for purchasing an Obsidian Series® 250D Mini ITX PC case.
Nous vous remercions d’avoir choisi un boîtier PC Mini ITX Obsidian® 250D.
Vielen Dank, dass Sie sich für ein Obsidian Series® 250D Mini-ITX-PC-Gehäuse entschieden haben.
Grazie per aver acquistato un case Obsidian Series® 250D Mini ITX.
43
恭喜您! n お客様へ
如果您要组装一个 Mini ITX 系统而不影响扩
展性、灵活性或性能,则 Obsidian Series 250D 正是的答案。尽管它从外面看起来小,
但是 250D 具有容纳全尺寸 5.25" 光驱、全长
GPU、一个 240mm 散热器甚至一个全尺寸
ATX 电源等标准组件的空间。
纤细的铝质前面板提供 Obsidian 系列机箱因此
而出名的惹人注目但又微妙的设计,并且一个顶
部窗口让您能够近距离察看您的高性能组件。如
果您想在一个小空间中获得完全性能,则 250D
是一个极好的选择。
ミニITXシステムを拡張性、柔軟性、性能に支
障をきたさずに構築したい場合は、Obsidian
シリーズ 250Dがその答えです。外見は小型で
すが、250Dにはフルサイズの5.25インチ光学
ドライブ、標準長のGPU、240mmのラジエ
ータなどの標準コンポーネント、またさらにフ
ルサイズATX電源ユニットのようなコンポー
ネントでさえも収納できるルームスペースがあ
ります。
滑らかなアルミニウム製のフロントフェイシャ
は、Obsidianシリーズのケースでは周知の形
状で、印象的でかつ繊細にデザインされてい
て、トップウィンドウからは使用する高性能部
品を間近に見ることができます。 250Dは、小
さなスペースでフルサイズの性能を得たい場合
の最高の選択です。
ENHORABUENA! n ПОЗДРАВЛЯЕМ!
Si desea ensamblar un sistema Mini ITX sin comprometer la ampliación, flexibilidad o rendimiento, Obsidian Series 250D es lo que necesita. Aunque su exterior es pequeño, el chasis 250D dispone de espacio suficiente para alojar componentes estándar, como un disco óptico de 5,25", una GPU de longitud completa, un radiador de 240mm e incluso una fuente de alimentación ATX de tamaño completo.
Su elegante frontal de aluminio aporta ese diseño sorprendente aunque sutil por el que son conocidos los chasis de la serie Obsidian, y su ventana superior le proporciona un primer plano de sus componentes de elevado rendimiento. El chasis 250D es una excelente opción si desea un rendimiento completo en un pequeño espacio.
Если хотите создать систему Mini ITX без дальнейших проблем с расширением, гибкостью или производительностью, корпус Obsidian Series 250D — это ваш выбор. Несмотря на компактный внешний вид, модель 250D обладает достаточным пространством для установки стандартных компонентов, например, полноразмерного 5,25-дюймового оптического привода, полноразмерного графического процессора, 240-мм радиатора и даже полноразмерного источника питания ATX.
Элегантная алюминиевая передняя панель обеспечивает яркий и утонченный дизайн, свойственный всем корпусам Obsidian Series, а окно на верхней панели позволяет визуально контролировать высокопроизводительные компоненты. Корпус 250D — отличный выбор, если необходима полномасштабная производительность в небольшом пространстве.
Le agradecemos que haya adquirido el chasis para PC Obsidian Series® 250D Mini ITX.
Благодарим за покупку корпуса Obsidian Series® 250D формата Mini ITX для ПК.
感谢您购买 Obsidian Series® 250D Mini ITX 电脑机箱。
Obsidian シリーズ 250D-ミニ-ITX ケースをお買い求めいただき有難うございます。
!
CONTENIDO n КОМПЛЕКТАЦИЯ n 交付内容 n 同梱物
6
NTENTS n CONTENU n LIEFERUMFANG n CONTENUTO
5
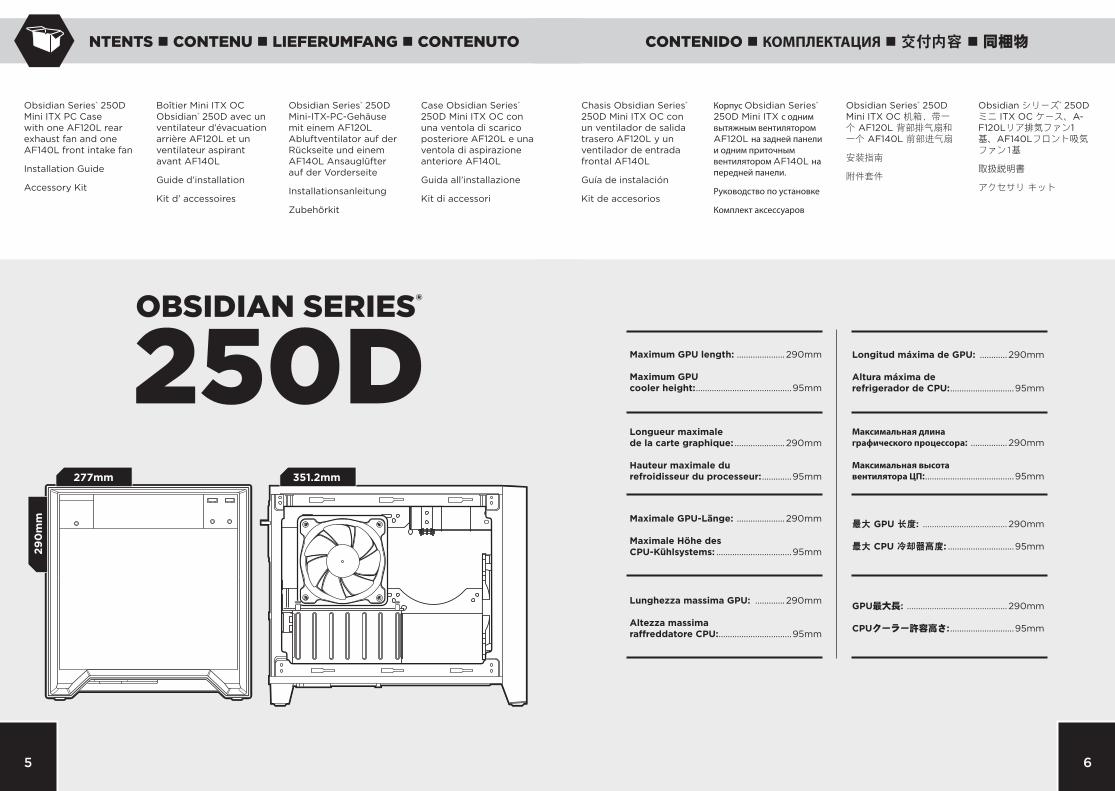
Obsidian Series® 250D Mini ITX PC Case with one AF120L rear exhaust fan and one AF140L front intake fan
Installation Guide
Accessory Kit
Chasis Obsidian Series® 250D Mini ITX OC con un ventilador de salida trasero AF120L y un ventilador de entrada frontal AF140L
Guía de instalación
Kit de accesorios
Boîtier Mini ITX OC Obsidian® 250D avec un ventilateur d’évacuation arrière AF120L et un ventilateur aspirant avant AF140L
Guide d’installation
Kit d’ accessoires
Корпус Obsidian Series® 250D Mini ITX с одним вытяжным вентилятором AF120L на задней панели и одним приточным вентилятором AF140L на передней панели.
Руководство по установке
Комплект аксессуаров
Obsidian Series® 250D Mini-ITX-PC-Gehäuse mit einem AF120L Abluftventilator auf der Rückseite und einem AF140L Ansauglüfter auf der Vorderseite
Installationsanleitung
Zubehörkit
Obsidian Series® 250D Mini ITX OC 机箱,带一个 AF120L 背部排气扇和一个 AF140L 前部进气扇
安装指南
附件套件
Case Obsidian Series® 250D Mini ITX OC con una ventola di scarico posteriore AF120L e una ventola di aspirazione anteriore AF140L
Guida all’installazione
Kit di accessori
Obsidian シリーズ® 250D ミニ ITX OC ケース、A-F120Lリア排気ファン1基、AF140Lフロント吸気ファン1基
取扱説明書
アクセサリ キット
OBSIDIAN SERIES®
250D277mm 351.2mm
290
mm
Maximum GPU length: ..................... 290mm
Maximum GPU cooler height: ..........................................95mm
Longitud máxima de GPU: ............ 290mm
Altura máxima de refrigerador de CPU: ............................95mm
Maximale GPU-Länge: ..................... 290mm
Maximale Höhe des CPU-Kühlsystems: .................................95mm
最大 GPU 长度: ..................................... 290mm
最大 CPU 冷却器高度: .............................95mm
Longueur maximale de la carte graphique: ...................... 290mm
Hauteur maximale du refroidisseur du processeur: .............95mm
Максимальная длина графического процессора: ................ 290mm
Максимальная высота вентилятора ЦП: .......................................95mm
Lunghezza massima GPU: ............. 290mm
Altezza massima raffreddatore CPU: ................................95mm
GPU最大長: ............................................ 290mm
CPUクーラー許容高さ: ............................95mm
87
CONTENIDO n КОМПЛЕКТАЦИЯ n 包装内零组件 n パッケージの内容 CONTENTS n CONTENU n LIEFERUMFANG n CONTENUTO
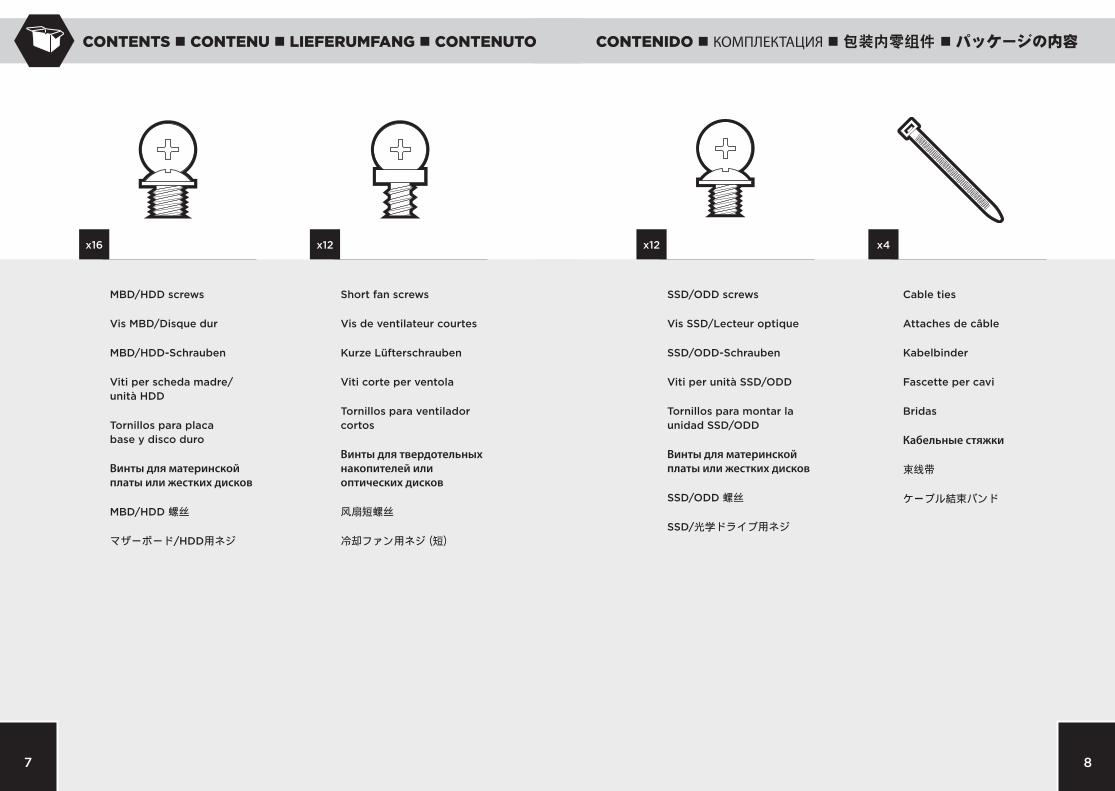
MBD/HDD screws
Vis MBD/Disque dur
MBD/HDD -Schrauben
Viti per scheda madre/unità HDD
Tornillos para placa base y disco duro
Винты для материнской платы или жестких дисков
MBD/HDD 螺丝
マザーボード/HDD用ネジ
Short fan screws
Vis de ventilateur courtes
Kurze Lüfterschrauben
Viti corte per ventola
Tornillos para ventilador cortos
Винты для твердотельных накопителей или оптических дисков
风扇短螺丝
冷却ファン用ネジ (短)
SSD/ODD screws
Vis SSD/Lecteur optique
SSD/ODD -Schrauben
Viti per unità SSD/ODD
Tornillos para montar la unidad SSD/ODD
Винты для материнской платы или жестких дисков
SSD/ODD 螺丝
SSD/光学ドライブ用ネジ
Cable ties
Attaches de câble
Kabelbinder
Fascette per cavi
Bridas
Кабельные стяжки
束线带
ケーブル結束バンド
x16 x12x12 x4
OBSIDIAN SERIES® 250D Mini ITX PC CASE
10
OBSIDIAN SERIES® 250D Mini ITX PC CASE
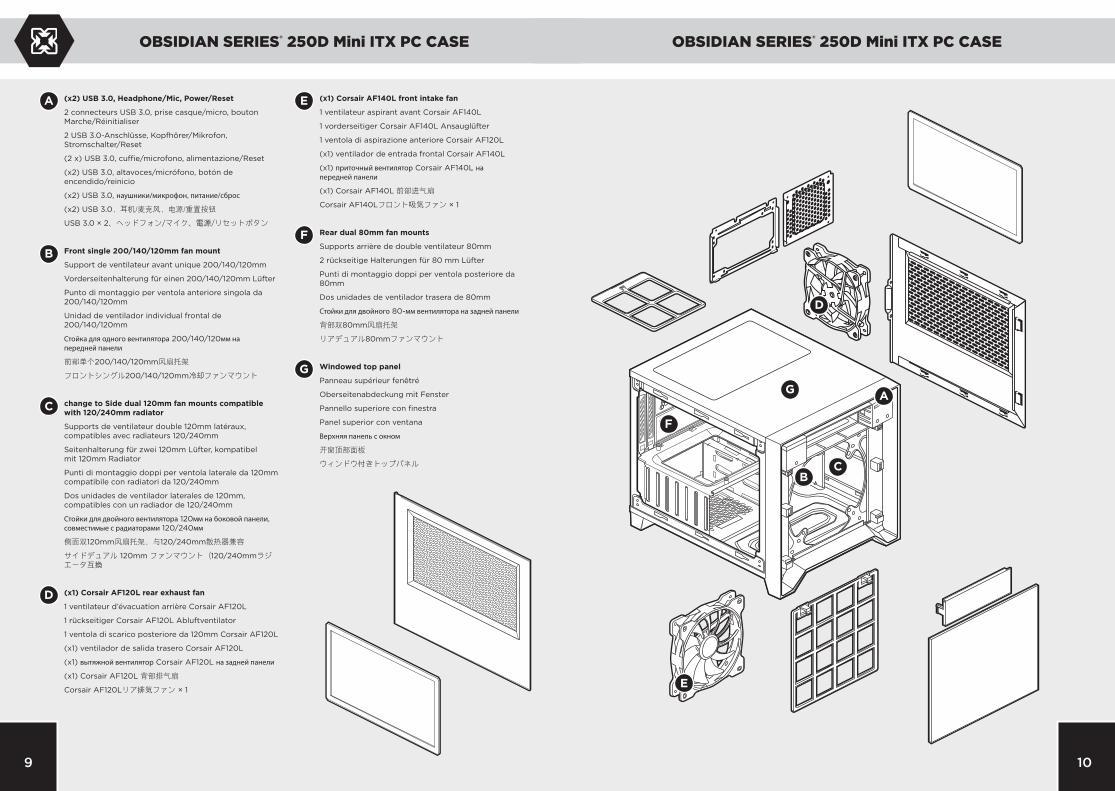
(x2) USB 3.0, Headphone/Mic, Power/Reset
2 connecteurs USB 3.0, prise casque/micro, bouton Marche/Réinitialiser
2 USB 3.0-Anschlüsse, Kopfhörer/Mikrofon, Stromschalter/Reset
(2 x) USB 3.0, cuffie/microfono, alimentazione/Reset
(x2) USB 3.0, altavoces/micrófono, botón de encendido/reinicio
(x2) USB 3.0, наушники/микрофон, питание/сброс
(x2) USB 3.0,耳机/麦克风,电源/重置按钮
USB 3.0 × 2、ヘッドフォン/マイク、電源/リセットボタン
Front single 200/140/120mm fan mount
Support de ventilateur avant unique 200/140/120mm
Vorderseitenhalterung für einen 200/140/120mm Lüfter
Punto di montaggio per ventola anteriore singola da 200/140/120mm
Unidad de ventilador individual frontal de 200/140/120mm
Стойка для одного вентилятора 200/140/120мм на передней панели
前部单个200/140/120mm风扇托架
フロントシングル200/140/120mm冷却ファンマウント
change to Side dual 120mm fan mounts compatible with 120/240mm radiator
Supports de ventilateur double 120mm latéraux, compatibles avec radiateurs 120/240mm
Seitenhalterung für zwei 120mm Lüfter, kompatibel mit 120mm Radiator
Punti di montaggio doppi per ventola laterale da 120mm compatibile con radiatori da 120/240mm
Dos unidades de ventilador laterales de 120mm, compatibles con un radiador de 120/240mm
Стойки для двойного вентилятора 120мм на боковой панели, совместимые с радиаторами 120/240мм
侧面双120mm风扇托架,与120/240mm散热器兼容
サイドデュアル 120mm ファンマウント(120/240mmラジエータ互換
(x1) Corsair AF120L rear exhaust fan
1 ventilateur d’évacuation arrière Corsair AF120L
1 rückseitiger Corsair AF120L Abluftventilator
1 ventola di scarico posteriore da 120mm Corsair AF120L
(x1) ventilador de salida trasero Corsair AF120L
(x1) вытяжной вентилятор Corsair AF120L на задней панели
(x1) Corsair AF120L 背部排气扇
Corsair AF120Lリア排気ファン × 1
(x1) Corsair AF140L front intake fan
1 ventilateur aspirant avant Corsair AF140L
1 vorderseitiger Corsair AF140L Ansauglüfter
1 ventola di aspirazione anteriore Corsair AF120L
(x1) ventilador de entrada frontal Corsair AF140L
(x1) приточный вентилятор Corsair AF140L на передней панели
(x1) Corsair AF140L 前部进气扇
Corsair AF140Lフロント吸気ファン × 1
Rear dual 80mm fan mounts
Supports arrière de double ventilateur 80mm
2 rückseitige Halterungen für 80 mm Lüfter
Punti di montaggio doppi per ventola posteriore da 80mm
Dos unidades de ventilador trasera de 80mm
Стойки для двойного 80-мм вентилятора на задней панели
背部双80mm风扇托架
リアデュアル80mmファンマウント
Windowed top panel
Panneau supérieur fenêtré
Oberseitenabdeckung mit Fenster
Pannello superiore con finestra
Panel superior con ventana
Верхняя панель с окном
开窗顶部面板
ウィンドウ付きトップパネル
9
F
B
D
AG
C
E
B
D
A
C
F
G
E
1211
OBSIDIAN SERIES® 250D Mini ITX PC CASEOBSIDIAN SERIES® 250D Mini ITX PC CASE
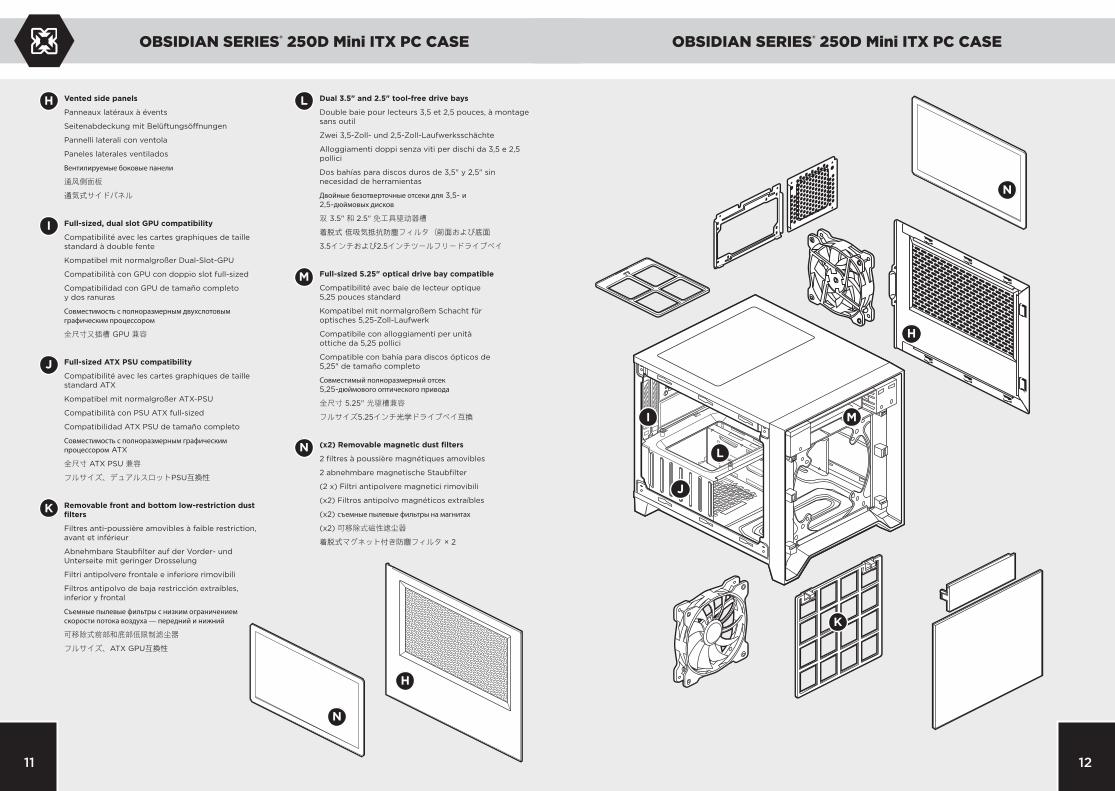
Vented side panels
Panneaux latéraux à évents
Seitenabdeckung mit Belüftungsöffnungen
Pannelli laterali con ventola
Paneles laterales ventilados
Вентилируемые боковые панели
通风侧面板
通気式サイドパネル
Full-sized, dual slot GPU compatibility
Compatibilité avec les cartes graphiques de taille standard à double fente
Kompatibel mit normalgroßer Dual-Slot-GPU
Compatibilità con GPU con doppio slot full-sized
Compatibilidad con GPU de tamaño completo y dos ranuras
Совместимость с полноразмерным двухслотовым графическим процессором
全尺寸又插槽 GPU 兼容
Full-sized ATX PSU compatibility
Compatibilité avec les cartes graphiques de taille standard ATX
Kompatibel mit normalgroßer ATX-PSU
Compatibilità con PSU ATX full-sized
Compatibilidad ATX PSU de tamaño completo
Совместимость с полноразмерным графическим процессором ATX
全尺寸 ATX PSU 兼容
フルサイズ、デュアルスロットPSU互換性
Removable front and bottom low-restriction dust filters
Filtres anti-poussière amovibles à faible restriction, avant et inférieur
Abnehmbare Staubfilter auf der Vorder- und Unterseite mit geringer Drosselung
Filtri antipolvere frontale e inferiore rimovibili
Filtros antipolvo de baja restricción extraíbles, inferior y frontal
Съемные пылевые фильтры с низким ограничением скорости потока воздуха — передний и нижний
可移除式前部和底部低限制滤尘器
フルサイズ、ATX GPU互換性
Dual 3.5" and 2.5" tool-free drive bays
Double baie pour lecteurs 3,5 et 2,5 pouces, à montage sans outil
Zwei 3,5-Zoll- und 2,5-Zoll-Laufwerksschächte
Alloggiamenti doppi senza viti per dischi da 3,5 e 2,5 pollici
Dos bahías para discos duros de 3,5" y 2,5" sin necesidad de herramientas
Двойные безотверточные отсеки для 3,5- и 2,5-дюймовых дисков
双 3.5" 和 2.5" 免工具驱动器槽
着脱式 低吸気抵抗防塵フィルタ(前面および底面
3.5インチおよび2.5インチツールフリードライブベイ
Full-sized 5.25" optical drive bay compatible
Compatibilité avec baie de lecteur optique 5,25 pouces standard
Kompatibel mit normalgroßem Schacht für optisches 5,25-Zoll-Laufwerk
Compatibile con alloggiamenti per unità ottiche da 5,25 pollici
Compatible con bahía para discos ópticos de 5,25" de tamaño completo
Совместимый полноразмерный отсек 5,25-дюймового оптического привода
全尺寸 5.25" 光驱槽兼容
フルサイズ5.25インチ光学ドライブベイ互換
(x2) Removable magnetic dust filters
2 filtres à poussière magnétiques amovibles
2 abnehmbare magnetische Staubfilter
(2 x) Filtri antipolvere magnetici rimovibili
(x2) Filtros antipolvo magnéticos extraíbles
(x2) съемные пылевые фильтры на магнитах
(x2) 可移除式磁性滤尘器
着脱式マグネット付き防塵フィルタ × 2
H
H
J
I
K
M
L
N
N
H L
I
K
J
M
N
3
1
2
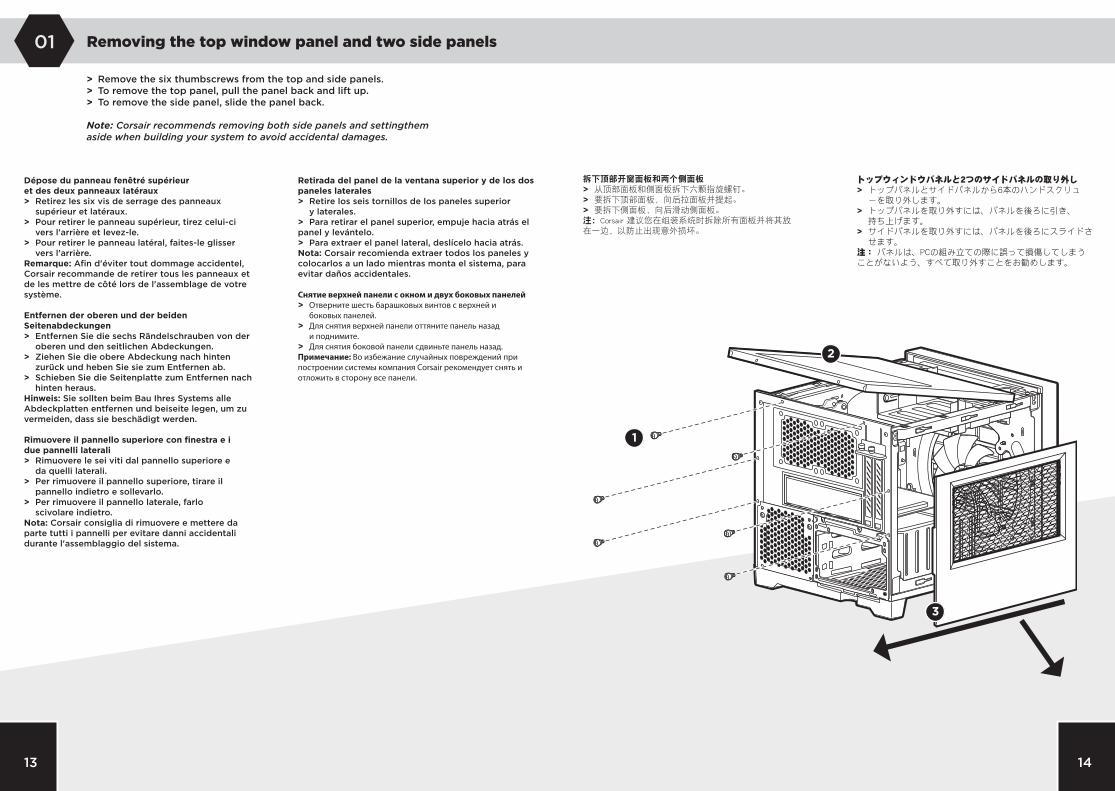
> Remove the six thumbscrews from the top and side panels.> To remove the top panel, pull the panel back and lift up.> To remove the side panel, slide the panel back.
Note: Corsair recommends removing both side panels and setting them aside when building your system to avoid accidental damages.
Dépose du panneau fenêtré supérieur et des deux panneaux latéraux> Retirez les six vis de serrage des panneaux supérieur et latéraux.> Pour retirer le panneau supérieur, tirez celui-ci vers l'arrière et levez-le.> Pour retirer le panneau latéral, faites-le glisser vers l'arrière. Remarque: Afin d'éviter tout dommage accidentel, Corsair recommande de retirer tous les panneaux et de les mettre de côté lors de l'assemblage de votre système.
Entfernen der oberen und der beiden Seitenabdeckungen> Entfernen Sie die sechs Rändelschrauben von der oberen und den seitlichen Abdeckungen.> Ziehen Sie die obere Abdeckung nach hinten zurück und heben Sie sie zum Entfernen ab.> Schieben Sie die Seitenplatte zum Entfernen nach hinten heraus. Hinweis: Sie sollten beim Bau Ihres Systems alle Abdeckplatten entfernen und beiseite legen, um zu vermeiden, dass sie beschädigt werden.
Rimuovere il pannello superiore con finestra e i due pannelli laterali> Rimuovere le sei viti dal pannello superiore e da quelli laterali.> Per rimuovere il pannello superiore, tirare il pannello indietro e sollevarlo.> Per rimuovere il pannello laterale, farlo scivolare indietro. Nota: Corsair consiglia di rimuovere e mettere da parte tutti i pannelli per evitare danni accidentali durante l'assemblaggio del sistema.
拆下顶部开窗面板和两个侧面板> 从顶部面板和侧面板拆下六颗指旋螺钉。> 要拆下顶部面板,向后拉面板并提起。> 要拆下侧面板,向后滑动侧面板。 注:Corsair 建议您在组装系统时拆除所有面板并将其放 在一边,以防止出现意外损坏。
Retirada del panel de la ventana superior y de los dos paneles laterales> Retire los seis tornillos de los paneles superior y laterales.> Para retirar el panel superior, empuje hacia atrás el panel y levántelo.> Para extraer el panel lateral, deslícelo hacia atrás. Nota: Corsair recomienda extraer todos los paneles y colocarlos a un lado mientras monta el sistema, para evitar daños accidentales.
Снятие верхней панели с окном и двух боковых панелей> Отверните шесть барашковых винтов с верхней и боковых панелей.> Для снятия верхней панели оттяните панель назад и поднимите.> Для снятия боковой панели сдвиньте панель назад. Примечание: Во избежание случайных повреждений при построении системы компания Corsair рекомендует снять и отложить в сторону все панели.
トップウィンドウパネルと2つのサイドパネルの取り外し > トップパネルとサイドパネルから6本のハンドスクリュ ーを取り外します。> トップパネルを取り外すには、パネルを後ろに引き、 持ち上げます。> サイドパネルを取り外すには、パネルを後ろにスライドさ せます。 注: パネルは、PCの組み立ての際に誤って損傷してしまうことがないよう、すべて取り外すことをお勧めします。
14
Removing the top window panel and two side panels01
13

1
2
1
Installing the power supply (PSU)03
16
> Unscrew and remove the PSU mounting back plate. > Slide in the PSU from the back of the case.> Mount the PSU back plate onto the case.> Align the holes and secure the PSU to the back plate with screws.
Note: PSU must be installed fan side facing down.
Installation du bloc d'alimentation > Dévissez et retirez le panneau arrière de fixation du bloc d'alimentation. > Faites glisser le bloc d'alimentation à l'intérieur depuis l'arrière du boîtier.> Réinstallez le panneau arrière du bloc d'alimentation.> Alignez les trous et fixez le bloc sur le panneau arrière en resserrant les vis. Remarque: Le bloc d'alimentation doit être installé avec le côté ventilateur orienté vers le bas.
Installation des Netzgerätes (PSU)> Entfernen Sie die Schauben und die rückwärtige Montageplatte des Netzgerätes. > Schieben Sie das Netzgerät auf der Rückseite des Gehäuses hinein.> Befestigen Sie rückwärtige Montageplatte wieder am Gehäuse.> Richten Sie die Schraublöcher aus und befestigen Sie das Netzgerät mit Schrauben an der rückwärtigen Montageplatte. Hinweis: Der Lüfter des Netzgerätes muss nach der Installation nach unten weisen.
Installazione dell'alimentatore (PSU)> Svitare e rimuovere la piastra posteriore di montaggio PSU. > Fare scivolare nel PSU da retro del case.> Montare la piastra posteriore PSU nel case.> Allineare i fori e fissare il PSU alla piastra posteriore con le viti. Nota: il PSU deve essere installato con la parte laterale della ventola rivolta verso il basso.
Installing the motherboard02
15
> Install your motherboard’s I/O shield (see your motherboard’s manual for guidance). > Align the motherboard with the standoffs in the case.> Secure with the included screws (MBD/HDD screws).
Installation de la carte mère> Installez la plaque de protection des E/S de votre carte mère (pour plus d'informations, consultez le manuel d'instructions de la carte mère).> Alignez la carte mère sur les picots du boîtier.> Fixez-la en resserrant les vis fournies (MBD/Disque dur).
Installation des Motherboards> Installieren Sie die I/O-Blende des Motherboards (befolgen Sie die Anleitung des Motherboard-Herstellers).> Richten Sie das Motherboard mit den Abstandsbolzen im Gehäuse aus.> Befestigen Sie es mit den mitgelieferten Schrauben (MBD/HDD-Schrauben).
Installazione della scheda madre> Installare l'I/O shield della scheda madre. Per istruzioni, vedere il manuale della scheda madre.> Allineare la scheda madre ai distanziatori nel case.> Fissare con le viti in dotazione (viti per scheda madre/unità HDD).
Instalación de la placa base> Instale el protector de la placa base (consulte el manual de la placa base para obtener instrucciones).> Alinee la placa base con los separadores de la caja.> Fíjela con los tornillos incluidos (tornillo para placa base/HDD).
Установка материнской платы> Установите заглушку тыловых портов корпуса для материнской платы (информацию см. в руководстве по материнской плате). > Выровняйте материнскую плату с опорными изолирующими винтами на корпусе.> Закрепите материнскую плату с помощью винтов, входящих в комплект поставки (винты для материнской платы или жестких дисков).
安装母板> 安装母板的 I/O 防护罩 (请参阅母板手册的 相关说明)。> 将母板与机箱中的压铆螺柱相对齐。> 用随附的螺丝 (MBD/HDD 螺丝) 进行固定。
マザーボードを取り付ける> マザーボードのI/Oパネルを取り付けます(詳細はマザーボードのマニュアルを参照してください)。> マザーボードをケースの絶縁ネジ穴に合わせます。> 付属のネジで固定します (マザーボード/HDD用ネジ)。
2
3
1
2
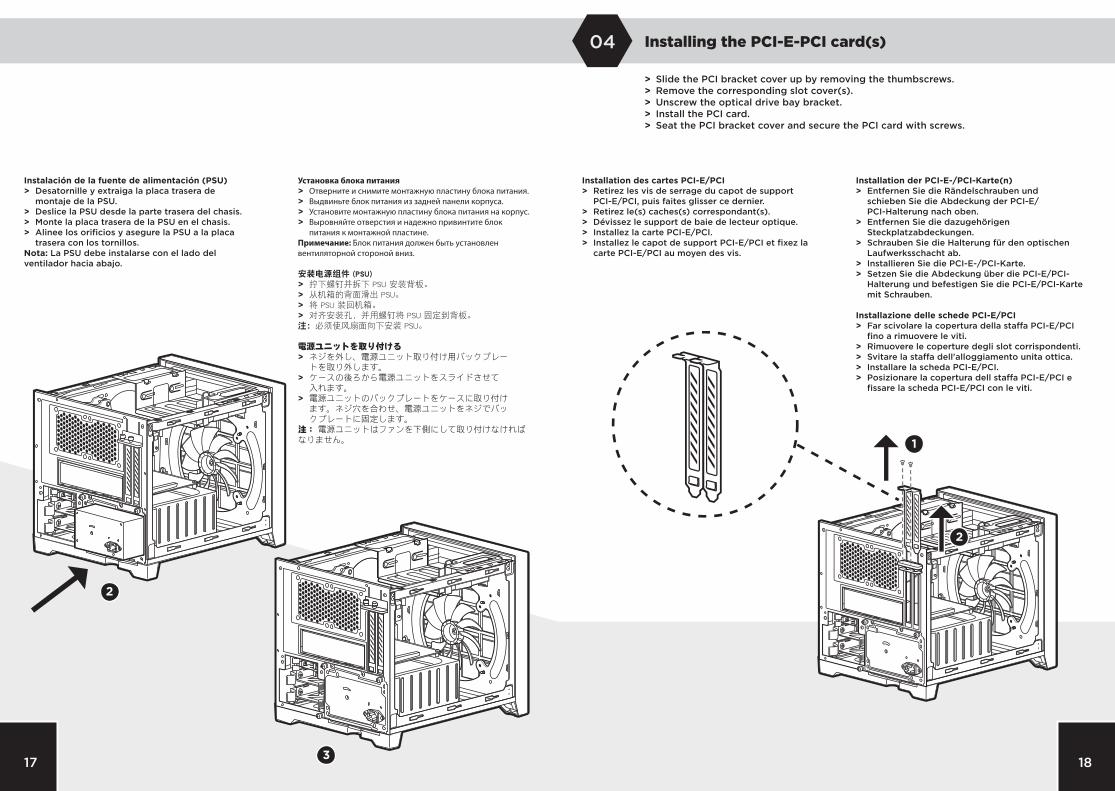
Installing the PCI-E-PCI card(s)04
18
> Slide the PCI bracket cover up by removing the thumbscrews. > Remove the corresponding slot cover(s).> Unscrew the optical drive bay bracket.> Install the PCI card.> Seat the PCI bracket cover and secure the PCI card with screws.
Installation des cartes PCI-E/PCI > Retirez les vis de serrage du capot de support PCI-E/PCI, puis faites glisser ce dernier. > Retirez le(s) caches(s) correspondant(s).> Dévissez le support de baie de lecteur optique. > Installez la carte PCI-E/PCI. > Installez le capot de support PCI-E/PCI et fixez la carte PCI-E/PCI au moyen des vis.
Installation der PCI-E-/PCI-Karte(n)> Entfernen Sie die Rändelschrauben und schieben Sie die Abdeckung der PCI-E/ PCI-Halterung nach oben. > Entfernen Sie die dazugehörigen Steckplatzabdeckungen.> Schrauben Sie die Halterung für den optischen Laufwerksschacht ab. > Installieren Sie die PCI-E-/PCI-Karte. > Setzen Sie die Abdeckung über die PCI-E/PCI- Halterung und befestigen Sie die PCI-E/PCI-Karte mit Schrauben.
Installazione delle schede PCI-E/PCI> Far scivolare la copertura della staffa PCI-E/PCI fino a rimuovere le viti. > Rimuovere le coperture degli slot corrispondenti.> Svitare la staffa dell'alloggiamento unita ottica. > Installare la scheda PCI-E/PCI. > Posizionare la copertura dell staffa PCI-E/PCI e fissare la scheda PCI-E/PCI con le viti.
17
Instalación de la fuente de alimentación (PSU) > Desatornille y extraiga la placa trasera de montaje de la PSU. > Deslice la PSU desde la parte trasera del chasis.> Monte la placa trasera de la PSU en el chasis.> Alinee los orificios y asegure la PSU a la placa trasera con los tornillos. Nota: La PSU debe instalarse con el lado del ventilador hacia abajo.
Установка блока питания> Отверните и снимите монтажную пластину блока питания. > Выдвиньте блок питания из задней панели корпуса.> Установите монтажную пластину блока питания на корпус.> Выровняйте отверстия и надежно привинтите блок питания к монтажной пластине. Примечание: Блок питания должен быть установлен вентиляторной стороной вниз.
安装电源组件 (PSU)> 拧下螺钉并拆下 PSU 安装背板。 > 从机箱的背面滑出 PSU。> 将 PSU 装回机箱。> 对齐安装孔,并用螺钉将 PSU 固定到背板。 注:必须使风扇面向下安装 PSU。
電源ユニットを取り付ける> ネジを外し、電源ユニット取り付け用バックプレー トを取り外します。 > ケースの後ろから電源ユニットをスライドさせて 入れます。> 電源ユニットのバックプレートをケースに取り付け ます。ネジ穴を合わせ、電源ユニットをネジでバッ クプレートに固定します。 注: 電源ユニットはファンを下側にして取り付けなければなりません。
3
1
2
4
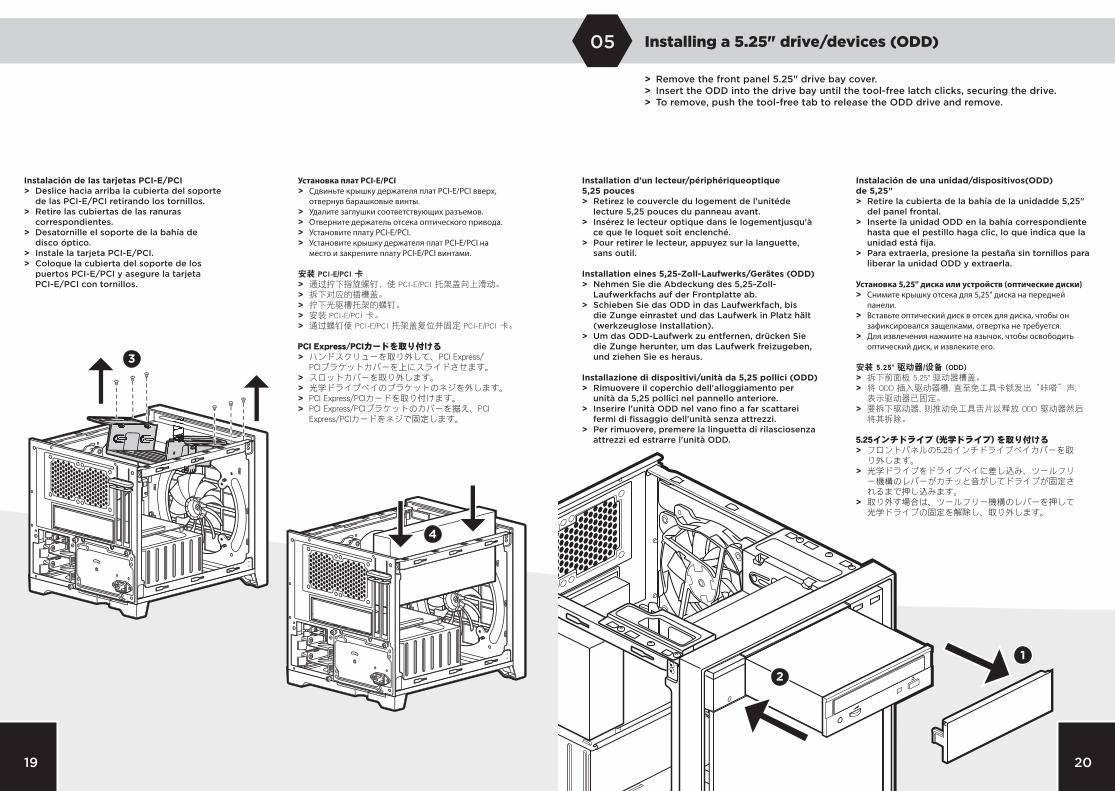
Installing a 5.25" drive/devices (ODD)05
20
> Remove the front panel 5.25" drive bay cover.> Insert the ODD into the drive bay until the tool-free latch clicks, securing the drive.> To remove, push the tool-free tab to release the ODD drive and remove.
Installation d'un lecteur/périphérique optique 5,25 pouces> Retirez le couvercle du logement de l'unité de lecture 5,25 pouces du panneau avant.> Insérez le lecteur optique dans le logement jusqu'à ce que le loquet soit enclenché. > Pour retirer le lecteur, appuyez sur la languette, sans outil.
Installation eines 5,25-Zoll-Laufwerks/Gerätes (ODD)> Nehmen Sie die Abdeckung des 5,25-Zoll- Laufwerkfachs auf der Frontplatte ab.> Schieben Sie das ODD in das Laufwerkfach, bis die Zunge einrastet und das Laufwerk in Platz hält (werkzeuglose Installation). > Um das ODD-Laufwerk zu entfernen, drücken Sie die Zunge herunter, um das Laufwerk freizugeben, und ziehen Sie es heraus.
Installazione di dispositivi/unità da 5,25 pollici (ODD)> Rimuovere il coperchio dell'alloggiamento per unità da 5,25 pollici nel pannello anteriore.> Inserire l'unità ODD nel vano fino a far scattare i fermi di fissaggio dell'unità senza attrezzi. > Per rimuovere, premere la linguetta di rilascio senza attrezzi ed estrarre l'unità ODD.
Instalación de una unidad/dispositivos (ODD) de 5,25"> Retire la cubierta de la bahía de la unidad de 5,25" del panel frontal.> Inserte la unidad ODD en la bahía correspondiente hasta que el pestillo haga clic, lo que indica que la unidad está fija. > Para extraerla, presione la pestaña sin tornillos para liberar la unidad ODD y extraerla.
Установка 5,25" диска или устройств (оптические диски)> Снимите крышку отсека для 5,25" диска на передней панели.> Вставьте оптический диск в отсек для диска, чтобы он зафиксировался защелками, отвертка не требуется. > Для извлечения нажмите на язычок, чтобы освободить оптический диск, и извлеките его.
安装 5.25" 驱动器/设备 (ODD)> 拆下前面板 5.25" 驱动器槽盖。> 将 ODD 插入驱动器槽, 直至免工具卡锁发出“咔嗒”声, 表示驱动器已固定。 > 要拆下驱动器, 则推动免工具舌片以释放 ODD 驱动器然后 将其拆除。
5.25インチドライブ (光学ドライブ) を取り付ける> フロントパネルの5.25インチドライブベイカバーを取 り外します。> 光学ドライブをドライブベイに差し込み、ツールフリ ー機構のレバーがカチッと音がしてドライブが固定さ れるまで押し込みます。 > 取り外す場合は、ツールフリー機構のレバーを押して 光学ドライブの固定を解除し、取り外します。
19
Instalación de las tarjetas PCI-E/PCI> Deslice hacia arriba la cubierta del soporte de las PCI-E/PCI retirando los tornillos. > Retire las cubiertas de las ranuras correspondientes.> Desatornille el soporte de la bahía de disco óptico. > Instale la tarjeta PCI-E/PCI. > Coloque la cubierta del soporte de los puertos PCI-E/PCI y asegure la tarjeta PCI-E/PCI con tornillos.
Установка плат PCI-E/PCI> Сдвиньте крышку держателя плат PCI-E/PCI вверх, отвернув барашковые винты. > Удалите заглушки соответствующих разъемов.> Отверните держатель отсека оптического привода. > Установите плату PCI-E/PCI. > Установите крышку держателя плат PCI-E/PCI на место и закрепите плату PCI-E/PCI винтами.
安装 PCI-E/PCI 卡> 通过拧下指旋螺钉,使 PCI-E/PCI 托架盖向上滑动。 > 拆下对应的插槽盖。> 拧下光驱槽托架的螺钉。 > 安装 PCI-E/PCI 卡。 > 通过螺钉使 PCI-E/PCI 托架盖复位并固定 PCI-E/PCI 卡。
PCI Express/PCIカードを取り付ける > ハンドスクリューを取り外して、PCI Express/ PCIブラケットカバーを上にスライドさせます。 > スロットカバーを取り外します。> 光学ドライブベイのブラケットのネジを外します。 > PCI Express/PCIカードを取り付けます。 > PCI Express/PCIブラケットのカバーを据え、PCI Express/PCIカードをネジで固定します。

1
2
3
22
Installing a 3.5" HDD/ 2.5" SSD06
21
> Remove the HDD/SSD backplate from the back of the case. > Remove the tool-free 3.5" HDD or 2.5" SSD tray from the drive cage. > Insert the HDD into the HDD tray or SSD into the SSD tray. > Align the HDD/SSD holes with tray pins to secure. > Insert the drive tray back into the cage.
Installation d'un disque HDD 3,5 pouces/ disque SDD 2,5 pouces> Retirez le panneau arrière HDD/SSD de l'arrière du boîtier. > Retirez le plateau pour disque HDD 3,5 pouces ou SSD 2,5 pouces de la cage pour lecteurs. > Insérez le disque sur le plateau HDD ou SSD. > Alignez les trous du lecteur HDD/SSD sur les broches du plateau pour le fixer.> Réinsérez le plateau de lecteur dans la cage.
Installation eines 3,5-Zoll-HDD-/ 2,5-Zoll-SSD-Laufwerks> Entfernen Sie die rückwärtige HDD-/SSD- Abdeckung von der Rückseite des Gehäuses. > Nehmen Sie den werkzeuglosen 3,5-Zoll-HDD- bzw. 2,5-Zoll-SSD-Einschub aus dem Käfig. > Setzen Sie das HDD-Laufwerk in den HDD-Einschub bzw. das SSD-Laufwerk in den SSD-Einschub. > Richten Sie die Löcher des HDD-/SSD-Laufwerks mit den Einschubstiften aus, um das Laufwerk daran zu befestigen. > Schieben Sie den Einschub wieder in den Käfig.
Installazione di un'unità HDD 3,5 pollici/ SSD 2,5 pollici> Rimuovere la piastra posteriore HDD/SSD dal retro del case. > Rimuovere il vassoio HDD 3,5 pollici o 2,5 pollici senza attrezzi dal vano per dischi. > Inserire l'unità HDD nel vassoio HDD o l'unità SSD nel vassoio SSD. > Allineare i fori dell'unità HDD/SSD ai perni del vassoio per fissare. > Reinserire il vassoio dell'unità nel vano.
Instalación de una unidad HDD de 3,5" o SSD de 2,5"> Retire la placa trasera de HDD/SSD de la parte trasera del chasis. > Retire la bandeja de HDD de 3,5" o SSD de 2,5" del bastidor, sin precisar de herramientas. > Inserte la unidad HDD en la bandeja HDD o la SSD en la bandeja SSD. > Alinee los orificios del HDD/SSD con las patillas de la bandeja para asegurarlos. > Vuelva a colocar la bandeja de la unidad en el bastidor.
Установка 3,5-дюймового жесткого диска или 2,5-дюймового твердотельного диска> Удалите заднюю пластину жесткого или твердотельного диска с задней панели корпуса. > Удалите лоток для 3,5-дюймового жесткого диска или 2,5-дюймового твердотельного диска из отсека для дисков. > Вставьте жесткий диск в лоток для жесткого диска или твердотельный диск в лоток для твердотельного диска. > Чтобы закрепить устройство, выровняйте отверстия на диске со штырями лотка. > Вставьте дисковый лоток в отсек для дисков.
安装 3.5" HDD/ 2.5" SSD> 从机箱背部拆下 HDD/SSD 背板。 > 从驱动器盒拆下免工具 3.5" HDD 或 2.5" SSD 托架。 > 将 HDD 插入 HDD 托架,或将 SSD 插入 SSD 托架。 > 将 HDD/SSD 孔对齐托架销键进行固定。 > 将驱动器托架装回驱动器盒。
3.5インチHDD/2.5インチSDDを取り付ける> HDD/SSDバックプレートをケースの後ろから取り 外します。 > ツールフリー3.5インチHDDまたは2.5インチSDD トレイをドライブケージから取り外します。 > HDDをHDDトレイに差し込むか、SDDをSDDトレ イに差し込みます。 > HDD/SSDのネジ穴とトレイのピンを合わせて固定します。 > ドライブトレイをケージに差し込んで戻します。
2
3
41
24
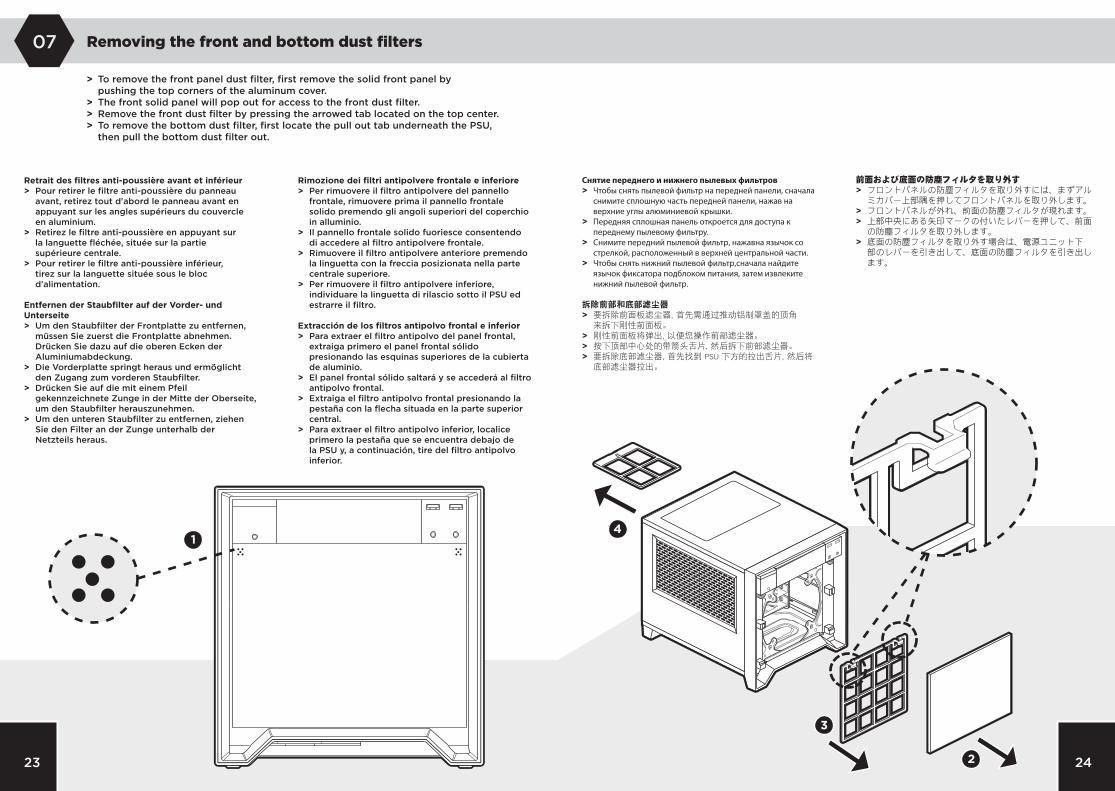
Removing the front and bottom dust filters07
23
> To remove the front panel dust filter, first remove the solid front panel by pushing the top corners of the aluminum cover.> The front solid panel will pop out for access to the front dust filter.> Remove the front dust filter by pressing the arrowed tab located on the top center.> To remove the bottom dust filter, first locate the pull out tab underneath the PSU, then pull the bottom dust filter out.
Retrait des filtres anti-poussière avant et inférieur > Pour retirer le filtre anti-poussière du panneau avant, retirez tout d'abord le panneau avant en appuyant sur les angles supérieurs du couvercle en aluminium.> Retirez le filtre anti-poussière en appuyant sur la languette fléchée, située sur la partie supérieure centrale.> Pour retirer le filtre anti-poussière inférieur, tirez sur la languette située sous le bloc d'alimentation.
Entfernen der Staubfilter auf der Vorder- und Unterseite> Um den Staubfilter der Frontplatte zu entfernen, müssen Sie zuerst die Frontplatte abnehmen. Drücken Sie dazu auf die oberen Ecken der Aluminiumabdeckung.> Die Vorderplatte springt heraus und ermöglicht den Zugang zum vorderen Staubfilter. > Drücken Sie auf die mit einem Pfeil gekennzeichnete Zunge in der Mitte der Oberseite, um den Staubfilter herauszunehmen. > Um den unteren Staubfilter zu entfernen, ziehen Sie den Filter an der Zunge unterhalb der Netzteils heraus.
Rimozione dei filtri antipolvere frontale e inferiore> Per rimuovere il filtro antipolvere del pannello frontale, rimuovere prima il pannello frontale solido premendo gli angoli superiori del coperchio in alluminio.> Il pannello frontale solido fuoriesce consentendo di accedere al filtro antipolvere frontale. > Rimuovere il filtro antipolvere anteriore premendo la linguetta con la freccia posizionata nella parte centrale superiore. > Per rimuovere il filtro antipolvere inferiore, individuare la linguetta di rilascio sotto il PSU ed estrarre il filtro.
Extracción de los filtros antipolvo frontal e inferior > Para extraer el filtro antipolvo del panel frontal, extraiga primero el panel frontal sólido presionando las esquinas superiores de la cubierta de aluminio.> El panel frontal sólido saltará y se accederá al filtro antipolvo frontal. > Extraiga el filtro antipolvo frontal presionando la pestaña con la flecha situada en la parte superior central. > Para extraer el filtro antipolvo inferior, localice primero la pestaña que se encuentra debajo de la PSU y, a continuación, tire del filtro antipolvo inferior.
Снятие переднего и нижнего пылевых фильтров > Чтобы снять пылевой фильтр на передней панели, сначала снимите сплошную часть передней панели, нажав на верхние углы алюминиевой крышки.> Передняя сплошная панель откроется для доступа к переднему пылевому фильтру. > Снимите передний пылевой фильтр, нажав на язычок со стрелкой, расположенный в верхней центральной части. > Чтобы снять нижний пылевой фильтр, сначала найдите язычок фиксатора под блоком питания, затем извлеките нижний пылевой фильтр.
拆除前部和底部滤尘器> 要拆除前面板滤尘器, 首先需通过推动铝制罩盖的顶角 来拆下刚性前面板。> 刚性前面板将弹出, 以便您操作前部滤尘器。 > 按下顶部中心处的带箭头舌片, 然后拆下前部滤尘器。 > 要拆除底部滤尘器, 首先找到 PSU 下方的拉出舌片, 然后将 底部滤尘器拉出。
前面および底面の防塵フィルタを取り外す > フロントパネルの防塵フィルタを取り外すには、まずアル ミカバー上部隅を押してフロントパネルを取り外します。> フロントパネルが外れ、前面の防塵フィルタが現れます。 > 上部中央にある矢印マークの付いたレバーを押して、前面 の防塵フィルタを取り外します。 > 底面の防塵フィルタを取り外す場合は、電源ユニット下 部のレバーを引き出して、底面の防塵フィルタを引き出し ます。
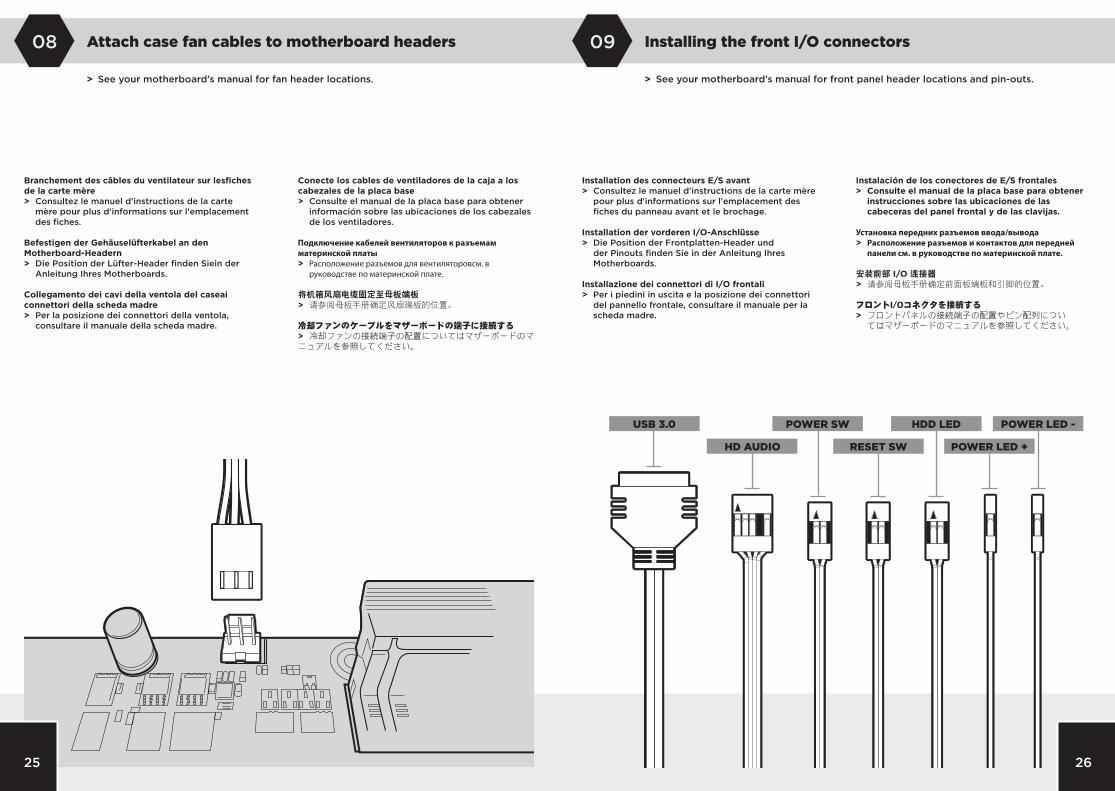
USB 3.0
HD AUDIO
POWER SW
RESET SW POWER LED +
HDD LED POWER LED -
Installing the front I/O connectors09
26
> See your motherboard’s manual for front panel header locations and pin-outs.
Installation des connecteurs E/S avant> Consultez le manuel d'instructions de la carte mère pour plus d'informations sur l'emplacement des fiches du panneau avant et le brochage.
Installation der vorderen I/O-Anschlüsse> Die Position der Frontplatten-Header und der Pinouts finden Sie in der Anleitung Ihres Motherboards.
Installazione dei connettori di I/O frontali> Per i piedini in uscita e la posizione dei connettori del pannello frontale, consultare il manuale per la scheda madre.
Instalación de los conectores de E/S frontales> Consulte el manual de la placa base para obtener instrucciones sobre las ubicaciones de las cabeceras del panel frontal y de las clavijas.
Установка передних разъемов ввода/вывода> Расположение разъемов и контактов для передней панели см. в руководстве по материнской плате.
安装前部 I/O 连接器> 请参阅母板手册确定前面板端板和引脚的位置。
フロントI/Oコネクタを接続する> フロントパネルの接続端子の配置やピン配列につ い てはマザーボードのマニュアルを参照してください。
Attach case fan cables to motherboard headers08
25
> See your motherboard’s manual for fan header locations.
Branchement des câbles du ventilateur sur les fiches de la carte mère> Consultez le manuel d'instructions de la carte mère pour plus d'informations sur l'emplacement des fiches.
Befestigen der Gehäuselüfterkabel an den Motherboard-Headern> Die Position der Lüfter-Header finden Sie in der Anleitung Ihres Motherboards.
Collegamento dei cavi della ventola del case ai connettori della scheda madre> Per la posizione dei connettori della ventola, consultare il manuale della scheda madre.
Conecte los cables de ventiladores de la caja a los cabezales de la placa base> Consulte el manual de la placa base para obtener información sobre las ubicaciones de los cabezales de los ventiladores.
Подключение кабелей вентиляторов к разъемам материнской платы> Расположение разъемов для вентиляторов см. в руководстве по материнской плате.
将机箱风扇电缆固定至母板端板> 请参阅母板手册确定风扇端板的位置。
冷却ファンのケーブルをマザーボードの端子に接続する> 冷却ファンの接続端子の配置についてはマザーボー ドのマニュアルを参照してください。