nu647-2 fra G6 - Avantime Owners · QX BIUDB* T[G 3DJH AVANTIME D66 nu647-2...
190
Transcript of nu647-2 fra G6 - Avantime Owners · QX BIUDB* T[G 3DJH AVANTIME D66 nu647-2...

AVANTIME D66 nu647-2 C:\Documentum\Checkout\nu647-2_eng_T1.WIN 3/4/2002 12:59 - page 1

AVANTIME D66 nu647-2 C:\Documentum\Checkout\nu647-2_eng_T1.WIN 3/4/2002 12:59 - page 2
RENAULTrecommends
For all petrol engines,LPG and multi-valve only.
ENGINE
MANUAL GEARBOX
POWER STEERING
BRAKE FLUID
ELITE Premier Plus 5W30Fuel economy and protecting the environment.
Other types of lubricant approved by RENAULTmay be used in petrol or diesel engines:
ULTIMATE 5W40
ELITE Premier Plus 10W40
Consult your Renault Dealer
RENAULTMATIC D2
FRELUB 650
All uses(recommended for 1.9 dCi)
Standard use
All types
All types
All types
ACEA : A3/B3/B4
ACEA : A3/B3
DEXRON II
DOT 4
ACEA : A1/B1(Performance)A3/B3/B4
ELF recommends its lubricants as approved by RENAULT. For more information, go to www.elf-lub.com

AVANTIME D66 nu647-2 C:\Documentum\Checkout\nu647-2_eng_T1.WIN 3/4/2002 12:59 - page 3
0.01
Welcome to your new Renault
This driver’s handbook contains the information necessary:• to enable you to get to know your Renault, to use it to the best advantage and to benefit from all the latest technicaldevelopments it incorporates.• to ensure that it is always running well by following the simple - but strict - advice concerning regular maintenance.• to enable you to deal quickly with minor faults not requiring specialist attention.
The few minutes you spend reading this handbook will be amply rewarded by the information which it provides and thetechnical innovations it will bring to your attention. If certain points are still unclear, the technicians in our Network will beonly too pleased to provide you with any additional information you require.
The following symbol will help you when reading this handbook:
To indicate a hazard, danger or safety advice.
The description of the models given in this handbook is based on the technical specifications at the time of writing. Thishandbook covers all equipment (both standard and optional) available for these models but whether or not this is fittedto the vehicle depends on the version, options selected and the country in which the vehicle is sold.This handbook may also contain information about items of equipment to be introduced later in the year.This handbook is not to be considered a type specification for all models in this range.
Enjoy driving your new Renault.
Copying or translation, in part or in full, is forbidden unless prior written permission has been obtained from Renault, 92100 Billancourt 2002.

AVANTIME D66 nu647-2 C:\Documentum\Checkout\nu647-2_eng_T1.WIN 3/4/2002 12:59 - page 4
0.02
Brief overview
• Tyre pressures ........................................................................................................ 0.04
• Adjusting the seats and driving position .............................................. 1.09 1.12
• Child restraint devices ............................................................................ 1.22 1.31
• Warning and indicator lights .................................................................. 1.34 1.45
• De-icing/demisting .............................................................. 1.51 - 3.04 - 3.05 - 3.10
• Audible and visual signals ..................................................................... 1.55 1.57
• Running in, driving ................................................................................. 2.02 2.19
• Heating/air conditioning ......................................................................... 3.02 3.17
• Levels (engine oil, screen washer, etc.) ................................................. 4.03 4.10
• Emergency spare wheel ........................................................................... 5.02 5.05
• Practical advice (changing the bulbs, fuses) ......................................... 5.10 5.22

AVANTIME D66 nu647-2 C:\Documentum\Checkout\nu647-2_eng_T1.WIN 3/4/2002 12:59 - page 5
0.03
C O N T E N T SSections
1
2
3
4
5
6
7
Getting to know your car .....................................................................
Driving ...............................................................................................................
Your comfort .................................................................................................
Maintenance ..................................................................................................
Practical advice ...........................................................................................
Technical specifications ........................................................................
Alphabetical index ....................................................................................

AVANTIME D66 nu647-2 C:\Documentum\Checkout\nu647-2_eng_T1.WIN 3/4/2002 12:59 - page 6
0.04
SAFETY - TYRE PRESSURESSafetyThe design of your vehicleincorporates a certain number oftechnical features which providemaximum active and passive safety.
For example, your vehicle includesthe following features as standard:- ABS brakes,- side door impact bars,- structural reinforcement,- driver and passenger air bags,- side air bags (head and chest),- front seat belt pretensioners,- force limiters on all side seat belts
Furthermore, certain versions arefitted with the electronic stabilityprogram as standard.
Tyre pressures (in bar or kg/cm² when cold)
Versions(depending on country)
Petrol Petrol Diesel2.0 16V V6 2.2
Vehicle type(see vehicle identification plate)
DE0U06 DE0T06 DE0K06DE0U02 DE0T02
Normal use• Front 2.4 2.4 2.5 2.4 2.5 2.4• Rear 2.2 2.2 2.3 2.2 2.3 2.2
Fully laden (1) or motorway• Front 2.5 2.6 2.8 2.7 2.6 2.5• Rear 2.3 2.4 2.5 2.4 2.4 2.3
Tyre sizes 225/55R16
235/50R17
225/55R16
235/50R17
225/55R16
235/50R17
Wheel sizes 7 J 16 - 7.5 J 17
Spare wheel(for temporary use) 3.2
Tyre size 175/70 R16 98P
(1) For vehicle with trailer, refer to the information on Weights in section 6.
Refer to the label affixed to the driver's door pillar.
Consult a Renault Dealer should you wish to fit tyres of dimensions other than those listed above.Tyre safety, spare wheel and use of snow chains.Refer to section five.

AVANTIME D66 nu647-2 C:\Documentum\Checkout\nu647-2_eng_T1.WIN 3/4/2002 12:59 - page 7
1.01
Section 1: Getting to know your car
Keys - Remote control unit .............................................................................................................................. 1.02Doors ..................................................................................................................................................... 1.03 1.05Engine immobiliser ........................................................................................................................................... 1.06Head restraints - Seats ......................................................................................................................... 1.07 1.10Front seat belts ....................................................................................................................................... 1.11 - 1.12Methods of restraint in addition to front seat belts ......................................................................... 1.13 1.18Rear seat belts ...................................................................................................................................... 1.19 1.21Child safety ........................................................................................................................................... 1.22 1.31Driver's layout, left-hand drive ............................................................................................................. 1.32 - 1.33Driver's layout, right-hand drive .......................................................................................................... 1.34 - 1.35Instrument panel .................................................................................................................................. 1.36 1.45On-board computer .............................................................................................................................. 1.46 1.48Rear-view mirrors ............................................................................................................................................. 1.49Steering wheel .................................................................................................................................................. 1.50De-icing/Demisting ........................................................................................................................................... 1.51Windscreen wash/wipe ....................................................................................................................... 1.52 1.54Lighting and external signals .............................................................................................................. 1.55 1.56Warning lights and horn .................................................................................................................................. 1.57Fuel tank ........................................................................................................................................................... 1.58Fuel cut-out in event of impact ...................................................................................................................... 1.59

1 2
3
AVANTIME D66 nu647-2 C:\Documentum\Checkout\nu647-2_eng_T1.WIN 3/4/2002 12:59 - page 8
1.02
KEYS/RADIO FREQUENCY REMOTE CONTROL
1 Remote control locking andunlocking, coded key for ignitionswitch, doors, tailgate and fuelfiller flap.
Only the radio frequency remotecontrol device ensures centrallocking or unlocking of thedoors, the tailgate and the fuelfiller flap.
To close without using theremote control unit, refer to thefollowing page.
The remote control unit 1 issupplied by batteries which shouldbe replaced when the indicator light2 no longer lights up (see theRemote control: batteries section)
InterferenceInterference may be caused to theoperation of the remote control byfactors in the immediate vicinity(external installations or the use ofequipment operating on the samefrequency as the remote control).
Never leave your vehiclewith the key in theignition if there is a child(or animal) in the
vehicle, he or she could start upthe engine or operate electricalequipment such as the electricwindows and there is a risk thatthe child may be injured (bytrapping his or her neck, arm,hand, etc.). Risk of serious injury.
Each remote control transmitter -receiver set has its own individualcode.• Remember to make a note of the
number for your key and yourremote control 3 (indicated in theremote control batterycompartment).
• If you lose your keys or needanother set of keys or a remotecontrol, contact your RenaultDealer.
• To replace a remote control, it willbe necessary to take the vehicle toyour Renault Dealer because boththe vehicle and the remotecontrol are needed to initialise thesystem.
• It is not possible to use more thantwo remote control units for onecar.
• Make sure the batteries are alwaysin good condition; they have aservice life of approximately twoyears.

1
AVANTIME D66 nu647-2 C:\Documentum\Checkout\nu647-2_eng_T1.WIN 3/4/2002 12:59 - page 9
1.03
OPENING AND CLOSING THE DOORSLocking and unlocking thedoorsPress the remote control forapproximately one second to lockor unlock the doors. (Indicatorlight 2 on the key will light up.)
The hazard warning lights flashtwice to indicate that the doors havebeen locked. The hazard warninglights flash once to indicate that thedoors have been unlocked.
Remote control operating rangeThis varies according to theenvironment: therefore take carewhen handling the remote controlthat you do not inadvertently lockor unlock the doors.
Indicator light to indicate theengine immobiliser is operating
This indicator light willlight up on the instrumentpanel.
- permanently if the vehicle waslocked by the switch 1;
- for one minute if the vehicle waslocked using the remote control.
Electric central lockingThis allows you to control the locksfor the doors, the tailgate and thefuel filler flap from inside thevehicle.
Lock the vehicle by pressing on thered spot on switch 1 (padlock side).
Unlock the vehicle by pressing onthe switch 1 (side opposite thepadlock).
Opening a locked door from insidethe car automatically overrideslocking.
Locking, unlocking the doorsmanuallyFront doors:Use the key to lock or unlock thedoor.
Tailgate:To lock, use the central lockingcontrol 1 and lock the front doorwith a key.
Check that a door is properly lockedafter using the key.
Automatic relockingIf you unlock the vehicleaccidentally, the doors will relockautomatically after a few seconds ifthe opening handle has not beenoperated.

1
AVANTIME D66 nu647-2 C:\Documentum\Checkout\nu647-2_eng_T1.WIN 3/4/2002 12:59 - page 10
1.04
AUTOMATIC DOOR LOCKING WHEN DRIVINGYou can decide to activate thisfunction if you wish.
To activate itWith the ignition on, press thecentral door locking button 1 on thelocking side (padlock side) for about5 seconds, until you hear the beep.
To deactivate itWith the ignition on, press thecentral door locking button 1 on theunlocking side (opposite thepadlock) for approximately 5seconds, until you hear the beep.
If you decide to keep thedoors locked when youare driving, rememberthat it may be more
difficult for those assisting youto gain access to your car in theevent of an emergency.
Operating principleWhen the vehicle moves off, thesystem automatically locks thedoors as soon as a speed of 6 mph (8km/h) is reached.
The indicator lamp on theinstrument panel and that
on button 1 light up; you will hearthe sound of the doors locking at thesame time.
The door is unlocked- if a door is opened,- by pressing the door unlocking
button 1.
FaultsIf you note a fault (no automaticlocking, indicator lightincorporated in the button 1 doesnot light up when the doors arelocked...), first check that that allthe doors are properly closed. Ifthey are closed correctly, consultyour Renault Dealer.
Also make sure that locking has notbeen inadvertently deactivated. Ifthis is the case, switch the ignitionoff and on again and reactivate it asdescribed above.
Note:When the ignition is off the functionremains active, only intentionaldeactivation will ensure that thesystem is inhibited.

3
1
2
AVANTIME D66 nu647-2 C:\Documentum\Checkout\nu647-2_eng_T1.WIN 3/4/2002 12:59 - page 11
1.05
OPENING AND CLOSING THE DOORS
Opening the doors from theoutsideUnlock using the remote control orthe key (the key must be pushedinto the lock 1 as far as it can go).
Place your hand behind handle 2and pull it towards you.
Note: when you pull handle 2 thewindow in the door lowers slightlyso that you can open the doorwithout effort and thenautomatically rises again when thedoor is closed.
Opening the doors from insideMove handle 3.
Lights on warning buzzerA warning buzzer will sound whenone of the front doors is opened ifyou have left the lights switched onafter switching off the ignition (thiswill prevent a drain on the battery).

1
AVANTIME D66 nu647-2 C:\Documentum\Checkout\nu647-2_eng_T1.WIN 3/4/2002 12:59 - page 12
1.06
ENGINE IMMOBILISERThis prevents the car being drivenby anyone not in possession of thecar's coded ignition key.
Operating principleThe car is automatically protecteda few seconds after the key isremoved from the ignition.When the ignition is switched on,indicator light 1 comes on for a fewseconds and then goes out.
The vehicle has recognised the codeand the engine can be started.
If the vehicle does not recognise thecode of the ignition key, warninglight 1 flashes continuously and theengine cannot be started.
Indicator light to indicate theengine immobiliser is operatingIndicator light 1 lights up for threeseconds when the ignition is turnedon and then goes out.
You can then start the engine.
Vehicle protection indicatorlightA few seconds after the ignition hasbeen switched off, indicator light 1will flash continuously.
The vehicle will not be protecteduntil the key has been taken out ofthe ignition.
Operating fault warning lightIf warning light 1 continues to flashor remains lit after the ignition isswitched on, it indicates that thesystem is not operating correctly.
If the fault in fuel injection messagealternates with the service messagewhile driving, decelerating or atidle speed
there is an operating fault in thesystem.
- If the coded key is faulty, use thesecond key (supplied with thevehicle). If you do not have accessto this, it is essential to call aRenault Dealer because onlydealers in the Renault network arequalified to repair the engineimmobiliser.
Any work or modificationto the engine immobilisersystem (computers, wiring,etc.) may be dangerous. It
must be carried out by trainedRenault Network personnel.

1
A
AVANTIME D66 nu647-2 C:\Documentum\Checkout\nu647-2_eng_T1.WIN 3/4/2002 12:59 - page 13
1.07
FRONT HEAD RESTRAINT
To raise or lower the head restraintPull the head restraint towards you(i.e. towards the front of the vehicle)and slide it up or down at the sametime.
To removeFirst incline the seatback towardsthe rear.
Raise the head restraint until it is atthe highest possible setting. Lift uptab 1 and then pull the headrestraint upwards until it isreleased.
To refit the head restraintInsert the rods into the sleeves, withthe notches facing the front.
Lower the head restraint until itlocks in position.
To adjust the angle of the headrestraintThe angle of the head restraint canbe adjusted. To do this, move thefront section A of the head restraintforwards or backwards until it feelscomfortable.
The head restraint isimportant for safety. Ensurethat it is in place and in thecorrect position. The
distance between your head andthe head restraint should be assmall as possible. The top of thehead should be in line with the topof the head restraint.

1 1
AVANTIME D66 nu647-2 C:\Documentum\Checkout\nu647-2_eng_T1.WIN 3/4/2002 12:59 - page 14
1.08
REAR HEAD RESTRAINT
Side head restraint
To raise it:Simply slide it upwards (only oneposition possible).
To remove it:Press tabs 1 on the head restraintguides.
To replace it:Insert the rods into the sleeves, withthe notches to the front, and lowerthe head restraint.
Centre head restraint
To raise it:Simply slide it upwards (only oneposition possible).
To remove it:Press tabs 1 on the head restraintguides.
To replace it:Insert the rods into the sleeves, withthe notches to the front, press tabs 1and lower the head restraint.
The head restraint isimportant for safety. Ensurethat it is in place and in thecorrect position. The
distance between your head andthe head restraint should be assmall as possible. The top of yourhead should be in line with the topof the head restraint.

3
2
41
AVANTIME D66 nu647-2 C:\Documentum\Checkout\nu647-2_eng_T1.WIN 3/4/2002 12:59 - page 15
1.09
FRONT SEATS
To move forwards or backwards:Pull lever 1 up to unlock the seat.
Release the lever in the requiredposition and ensure that the seat islocked in place.
To incline the seatback:Pull up unlocking lever 2 which ison the seatback. Lean against theseatback and release the lever whenthe seatback is in the requiredposition.
To raise or lower the driver's seat:Use button 3.
To adjust the lumbar support:Use button 4.
For safety reasons, onlyadjust the seats when thecar is stationary.
For information on the use ofseat belts, refer to the Seat beltssection.

312
AVANTIME D66 nu647-2 C:\Documentum\Checkout\nu647-2_eng_T1.WIN 3/4/2002 12:59 - page 16
1.10
FRONT SEATS (continued)
Access to the rear seatsPull lever 1 towards you and tip theseat forwards.
The seat has a memory whichallows it to relock the seat in itsinitial position when it is pushedback as far as its stored stop.
Ensure that the runnersand seatback are lockedin place correctly.
From the rear, pull the lever 3 to tipthe seat forwards.
Heated seats(Initiale version)With the ignition on, press switch 2;the corresponding indicator light onthe instrument panel will light up.
Even if the indicator lightis lit up, the system is notnecessarily activated.The system has a
thermostat and only operateswhen the passenger compartmenttemperature is less than 12°C(with a tolerance of + or –4°C).

1
2
AVANTIME D66 nu647-2 C:\Documentum\Checkout\nu647-2_eng_T1.WIN 3/4/2002 12:59 - page 17
1.11
FRONT SEAT BELTSAlways wear your seat belt whentravelling in your car. Comply withthe local legislation in the particularcountry you are in.
Before driving off:- First ensure that your driving
position is correct.- Then adjust your seat belt as
described below to providemaximum protection.
Incorrectly adjusted seatbelts may cause injuriesin the event of anaccident.
Even pregnant women shouldwear a seat belt. In this case,ensure that the lap belt is notexerting too much pressure onthe abdomen.
Adjusting your driving position• Sit with your back firmly against
the seatback.This is essential to ensure thatyour spinal cord is in the correctposition.
• Adjust the distance between theseat and the pedals.Your seat should be as far back aspossible while still allowing youto depress the clutch pedal fully.The seatback should be adjustedso that your arms are slightly bentwhen you hold the steeringwheel.
• Adjust the position of your headrestraint.For maximum safety your headshould be as near as possible tothe head restraint.
• Adjust the height of the seat.This adjustment allows you toselect the seat position whichoffers you the best possiblevision.
• Adjust the position of the steeringwheel.
Adjusting the seat belts.Sit with your back firmly against theseatback.
The shoulder strap 1 fits itselfautomatically across the chest.
The lap strap 2 should be heldfirmly over the thighs and againstthe pelvis.
The belt should be worn so that it isas close to the body as possible, i.e.avoid wearing heavy clothing orhaving bulky objects under thebelts.

1
43
5
4
AVANTIME D66 nu647-2 C:\Documentum\Checkout\nu647-2_eng_T1.WIN 3/4/2002 12:59 - page 18
1.12
FRONT SEATBELTS (continued)
Locking:- Unroll the belt 1 slowly and
smoothly and make sure that thebuckle 3 clicks into the housing 4(check that the belt is locked bypulling on the buckle 3).
If the belt jams, allow it to returnbefore attempting to unwind itagain.
Locking (continued)If your belt becomes completelyjammed:- pull slowly but firmly until
around 3 cm of belt has beenreleased; then let the belt rewinditself;
- unwind it again.- if the problem persists, consult
your Renault Dealer.
Unlocking:- Press the button 5, the belt is
rewound onto the inertia reel.- Guide the buckle to help the
operation.

1
2
AVANTIME D66 nu647-2 C:\Documentum\Checkout\nu647-2_eng_T1.WIN 3/4/2002 12:59 - page 19
1.13
METHODS OF RESTRAINT IN ADDITION TO THE FRONT SEAT BELTSThese are:
Seat belt pretensioners.
Force limiter.
Driver and front passenger airbags.
These systems are provided to actindependently or together when thecar is subjected to a frontal impact.
Depending on the force of theimpact the system may engage:- the seat belt;- the buckle pretensioner (which
engages to correct seat belt play);- pretensioners 1 and 2, the front air
bag and the force limiter. • PretensionersWith the ignition switched on, ifthere is a severe frontal impact anddepending on the force of theimpact, the system may engage:- buckle 1 which instantly tightens
the seat belt;- piston 2 on the seat which pulls
the belt back against the chest.
The pretensioners hold the seatbelt tight against the body andthus increase its efficiency.
• Have the entire restraintsystem checked followingan accident.
• No operations whatsoever arepermitted on any part of thesystem (electronic units,wiring...) nor is reuse on anyother vehicle, even if identical.
• Only qualified Renault Networkpersonnel may work on thepretensioner system; otherwisethe system may triggeraccidentally and cause injury.
• Testing of the electric triggersystem may only be carried outby a specially trained technicianusing special equipment.
• When the vehicle is to bescrapped, contact your RenaultDealer for disposal of thepretensioner and air bag gasgenerators.

AVANTIME D66 nu647-2 C:\Documentum\Checkout\nu647-2_eng_T1.WIN 3/4/2002 12:59 - page 20
1.14
METHODS OF RESTRAINT IN ADDITION TO THE FRONT SEAT BELTS (continued)
• Force limiterIn the event of a frontal impactabove a certain severity, thismechanism is used to limit the forceof the belt against the body so that itis at an acceptable level.
Warning relating to theservice life of air bagsand pretensioners
The pyrotechnic systems in airbags and pretensioners have alimited service life. Thesesystems must be replaced eachtime they are activated and at thelatest after they have been inservice for 10 years. This workmust always be undertaken by aRenault Dealer.
The seat belt pretensioners andthe air bag operate together. Ifone of the systems has passed thedate when it is due for renewal, itwill alter the overall safetyprotection provided.
Air bags fordriver and front passengerAn air bag may be provided for boththe driver and the front passenger.
Air bag inscriptions on the steeringwheel, dashboard and frontseatbacks, and two labels on thelower part of the windscreen and onthe door box section indicate thatthe vehicle is equipped with an airbag.
Each air bag system consists of:- An air bag and gas generator fitted
on the steering wheel for thedriver and in the dashboard for thefront passenger;
- A computer for both systems,which includes the impactdetector and a monitor controllingthe electrical trigger system for thegas generator;
- A single warning light on theinstrument panel.

AVANTIME D66 nu647-2 C:\Documentum\Checkout\nu647-2_eng_T1.WIN 3/4/2002 12:59 - page 21
1.15
METHODS OF RESTRAINT IN ADDITION TO THE FRONT SEAT BELTS (continued)
OperationThis system is only operationalwhen the ignition is switched on.
If a severe frontal impact occurs, theair bag(s) inflate(s) rapidly,cushioning the impact of thedriver's head and chest against thesteering wheel and the frontpassenger's head against thedashboard. The air bag then deflatesimmediately so that the passengersare not impeded in any way whenthey get out of the vehicle.
FaultsIf there is a system fault, themultifunction warning light will bedisplayed with the airbag messagealternating with the Servicemessage.
Consult your Renault Dealer as soonas possible. Your protection will bereduced until this problem isrectified.
The air bag system uses apyrotechnic principle. Thisexplains why, when the airbag inflates, it will generate
heat, produce smoke (this does notmean that a fire is about to start)and make an explosive noise. In asituation where an air bag isrequired, it must inflateimmediately and this may causesome minor, superficial grazing tothe skin.

AVANTIME D66 nu647-2 C:\Documentum\Checkout\nu647-2_eng_T1.WIN 3/4/2002 13:00 - page 22
1.16
METHODS OF RESTRAINT IN ADDITION TO THE FRONT SEAT BELTS (continued)All the warnings below are given so that, if the air bag is activated, it is not obstructed in any way and also to prevent therisk of serious injuries caused by items which may be dislodged when the air bag inflates.
The air bag is designed to complement the operation of the seat belt. The air bag and seat belt are inseparablecomponents of the same protection system. It is therefore essential to wear the seat belt at all times. If seat beltsare not worn, it exposes the occupants to the risk of serious injury in the event of an accident. It may alsoincrease the risk of minor superficial injuries occurring when the air bag is deployed, although such minorinjuries are always possible with air bags.
The air bag does not offer protection against minor and moderately serious frontal impacts, side or rear impacts or if thevehicle turns over.
• No work or modification whatsoever may be performed on any part of the driver and passenger air bag system(computer, wiring, etc.) except by qualified Renault network personnel.
• To ensure that the system is in good working order and to avoid accidental triggering of the system which may causeinjury, only qualified Renault Network personnel may work on the air bag system.
• As a safety precaution, have the air bag system checked if your vehicle has been involved in an accident, is stolen orbroken into.
• When selling or lending the vehicle, inform the user of these points and hand over this handbook with the vehicle.
• When scrapping your vehicle, contact your Renault Dealer for disposal of the gas generator(s).

1
AVANTIME D66 nu647-2 C:\Documentum\Checkout\nu647-2_eng_T1.WIN 3/4/2002 13:00 - page 23
1.17
METHODS OF RESTRAINT IN ADDITION TO THE FRONT SEAT BELTS (continued)
All the warnings below are given sothat, if the air bag(s) is(are)activated, it is (they are) notobstructed in any way and also toprevent the risk of injuries causedby items which may be dislodgedwhen the air bag inflate(s).
Warnings concerning the driver’s air bag• Do not modify either the steering wheel or the steering wheel boss.
• Do not cover the steering wheel boss.
• Do not attach any objects (pin, logo, clock, etc.) to the steering wheel boss.
• The steering wheel boss must not be removed (except by authorisedRenault Network personnel).
• Do not sit too close to the steering wheel. If you sit with your arms slightlybent (see the information on adjusting your driving position in section 1), itwill ensure that there is sufficient space for the air bag to inflate properlyand to be fully effective.
Warnings concerning the passenger air bag: location 1• Do not attach or affix with adhesive any objects (pin, logo, clock, etc.) on
the dashboard near where the air bag is located.
• Do not place anything between the dashboard and the passenger (animal,umbrella, walking stick, parcels, etc.).
• The passenger must not put his or her feet on the dashboard or seat as thereis a risk that serious injuries may be sustained. As a general rule, keep allparts of the body (knees, hands, head, etc.) well away from the dashboard.
IT IS FORBIDDEN TO FIT A REAR FACING CHILD SEATON THE FRONT PASSENGER SEAT.

0004
1M
1 1
A
B
A
B
AVANTIME D66 nu647-2 C:\Documentum\Checkout\nu647-2_eng_T1.WIN 3/4/2002 13:00 - page 24
1.18
METHODS OF RESTRAINT IN ADDITION TO THE FRONT SEAT BELTS (continued)
Side air bags AThis air bag may be fitted to thefront seats and is activated at thesides of the seats (door side) toprotect the occupants in the event ofa severe side impact.
The air bag operatesthrough the slits in theseatbacks (door side):never put any objects inthe slits.
Curtain air bags BThese are air bags fitted along thesides of the vehicle in the ceilingand deploy along the front and rearside windows to protect thepassengers in case of a violent sideimpact.
The markings 1 on the windscreenwill remind you of the presence ofthis equipment.
Warnings concerning theside air bag• Fitting seat covers: Seats
equipped with an air bagrequire special coversspecifically designed for yourvehicle. Consult your RenaultDealer to find out if these coversmay be purchased from Renaultoutlets. The use of any coversother than those designed foryour vehicle (and includingthose designed for anothervehicle) may affect the operationof these air bags and reduce yourprotection.
• Do not place any accessories,objects or even animals betweenthe seat back and the door. Thismay prevent the air bag fromoperating correctly or causeinjury if the air bag is deployed.
• No work or modificationwhatsoever may be performed onthe seat except by qualifiedRenault network personnel.

1
3
42
5
AVANTIME D66 nu647-2 C:\Documentum\Checkout\nu647-2_eng_T1.WIN 3/4/2002 13:00 - page 25
1.19
REAR SEAT BELTS
Rear side seat beltsThe belts are locked, unlocked andadjusted in the same way as thefront belts.
Make sure that the rearseat is locked in positionproperly so that the seatbelts will operateefficiently.
Refer to the information on therear seat in section 3.
Rear centre beltFasteningUnwind the belt slowly from itshousing 1 until the black bucklelocks into the catch 4.
The positioning of the seat belt mustthen be checked as described below.
The right-hand head restraint mustbe fitted and must be in the highestposition.
The strap must pass through theside of the head rest.
Clip the black buckle into the blackunlocking catch 4 and then fit thelast sliding buckle 2 into the catch 5.
Note: Label 3 will remind you ofthese instructions.
ReleasingFirst press the red button on catch 5and then press the red button oncatch 4 if necessary.
Force limiterThe rear seat belts are fitted withforce limiters.
Above a certain severity of impact,this mechanism is used to limit theforce of the belt against the body sothat it is at an acceptable level.

2
3 1
4
AVANTIME D66 nu647-2 C:\Documentum\Checkout\nu647-2_eng_T1.WIN 3/4/2002 13:00 - page 26
1.20
REAR SEAT BELTS (continued)
If you have to fold down the part ofthe rear seat behind the frontleft-hand seat:- lift the seat base 2 against the front
seat.- remove the head rest;- lower the seatback 3 while
holding catch 1 so that it remainsvisible when the seatback isfolded down.
Before replacing the rearbench seat, check that theseat belts are correctlypositioned in the belt
guides 4 to avoid any damage to orlocking of the seat belts.

AVANTIME D66 nu647-2 C:\Documentum\Checkout\nu647-2_eng_T1.WIN 3/4/2002 13:00 - page 27
1.21
SEAT BELTSThe following information applies to both the vehicle's front and rear seat belts.
• No modification may be made to the component parts of the restraint system (belts and seats and theirmountings) fitted originally.
For special applications (e.g. fitting a child seat) consult your Renault Dealer.
• Do not use any devices which give any play in the belts (clothes pegs, clips, for example).
• Never wear the shoulder strap under your arm or behind your back.
• Never use the same belt for more than one person and never hold a baby or child on your lap with your seat beltaround them.
• The belt should never be twisted.
• The seat belts in use at the time of a serious accident must be replaced. Likewise, have your seat belts replaced as soonas they show any signs of wear.
• When refitting the rear bench seat, take care that the seat belts are correctly positioned so that they can be usedproperly.
• If necessary, readjust the position and tension the belt.

AVANTIME D66 nu647-2 C:\Documentum\Checkout\nu647-2_eng_T1.WIN 3/4/2002 13:00 - page 28
1.22
CHILD SAFETYIn all countries there are regulationsgoverning the use of restraintsystems for children and babies.
In Europe children under 12 yearsof age or smaller than 1.50 m(1) mustbe seated in an approved safetydevice which is suitable for theweight and size of the child.
The driver is responsible forensuring that this equipment isused correctly.
Remember that a collision at 30mph (50 km/h) is the same asfalling from a height of10 metres. Expressed in otherterms, transporting a childwithout a restraint is theequivalent of allowing him orher to play on a third-floorbalcony which does not have anyrailings.
(1) Always comply with the laws of thecountry in which you are travelling.They may be different to theguidelines in this handbook.
Under no circumstancesshould babies or childrenbe allowed to travel sittingon the lap of another
passenger in the car.
If a head-on collision occurs at 30mph (50 km/h) a child weighing30 kg (66 lbs) will be transformedinto a missile equivalent to onetonne: you will find it impossibleto hold the child, even if youyourself are wearing a belt.
It is particularly dangerous to putthe belt round your child when heor she is sitting on your lap. Neveruse the belt for more than oneperson at the same time.
Child restraints for which approvalwas obtained after January 1992offer a much higher level of safetythan those approved before thatdate.
It is therefore advisable to select achild restraint that complies withEuropean regulation ECE 44R03.
Restraints that comply with thislegislation must be marked with anorange label bearing the letter Efollowed by a number (whichstands for the country where it istype approved) and the year inwhich the type approval wasgranted.
According to the standard, childrestraints fall into 4 categories:- under 10 kg or 22 lb
(0 - 9 months)- under 13 kg or 28 lb
(0 - 24 months)- from 9 to 18 kg or 20 to 40 lb
(9 - 48 months)- from 15 to 36 kg or 33 to 80 lb
(4 - 12 years)

AVANTIME D66 nu647-2 C:\Documentum\Checkout\nu647-2_eng_T1.WIN 3/4/2002 13:00 - page 29
1.23
CHILD SAFETY (continued)
AGE GROUP
< 10 kg or 22 lb(0-9 months)
< 13 kg or 28 lb(9-24 months)
9-18 kg or 20-40 lb(9-48 months)
15-36 kg or 33-80 lb(4-12 years)
SEATS
At the front,passenger's side
At the rear,right side seat
At the rear,centre seat
At the rear,left side seat
X U - L X U - L
X U - L X U - L
UF U - L X U - L
UF U X U
Key to symbols in the table below
U : Restraint devices in the “Universal” category that have been approved for this weight.
UF: Front facing restraint devices in the “Universal” category that have been approved for this weight.
L : ISOFIX child restraint devices. These restraint devices belong to one of the following categories: “Specific to adetermined vehicle type”, “Restraint” or “Semi-universal”.
B : Integrated restraint devices that have been approved for this weight.
X : Seats not appropriate for children in this weight category.

1
AVANTIME D66 nu647-2 C:\Documentum\Checkout\nu647-2_eng_T1.WIN 3/4/2002 13:00 - page 30
1.24
CHILD SAFETY (continued)
The right choiceThe safety of your children is alsoyour responsibility.
To ensure that your child has themaximum possible protection, werecommend that you use seatsobtained from a Renault Dealer.
If your vehicle is fitted with anIsofix system you should use anIsofix seat (see the Isofix child seatattachment system information insection 1).
Restraint systems for all thecategories are available. Thesesystems have been developed inconsultation with themanufacturers and have been testedin Renault vehicles.
Consult your Renault Dealer andask him to help you install it.
Category:- under 10 kg or 22 lb
(0 - 9 months)
A child's neck is very susceptible toinjury up to the age of two. In afront-facing seat there is a risk thatthe child will sustain neck injuriesin the event of a frontal collision.Renault therefore recommends arear-facing seat with a harness thatgives all-round protection (figure 1).

2 3
AVANTIME D66 nu647-2 C:\Documentum\Checkout\nu647-2_eng_T1.WIN 3/4/2002 13:00 - page 31
1.25
CHILD SAFETY (continued)
Category:- under 13 kg or 28 lb
(9 - 24 months)
Between the ages of 2 and 4, achild's pelvis is not fully developed.Restraints using the car'sthree-point belts are not adequateand there is a risk that the child willsustain abdominal injuries in theevent of a frontal collision. It istherefore advisable to userear-facing seats (figure 1),bucket-type seats (figure 2) or seatswith harnesses.
Place the head restraint at the topposition to allow you to press theseat back of the child seat firmlyagainst the vehicle seat back.
Category:- from 9 to 18 kg or 20 to 40 lb
(9 - 48 months)
The type of restraint most suitablefor the pelvis of a child agedbetween 4 and 7 is one that can becombined with a three-point seatbelt. This is a booster seat (figure 3)with belt guides to ensure that thebelt will be worn flat over the thighsof the child.

4
AVANTIME D66 nu647-2 C:\Documentum\Checkout\nu647-2_eng_T1.WIN 3/4/2002 13:00 - page 32
1.26
CHILD SAFETY (continued)
Category:- from 15 to 36 kg or 33 to 80 lb
(4 - 12 years)
For children aged over seven, abooster seat with belt guides isrecommended to ensure that thecar's three-point seat belt will beworn flat over the child's thighs.
A booster seat with aheight-adjustable seatback and abelt guide are recommended as thiswill allow the belt to be worn asclose to the base of the neck aspossible but not on it. It is alsopossible to use a bucket seat(figure 4).
Place the head restraint at the topposition to allow you to press theseat back of the child seat firmlyagainst the vehicle seat back.
If a booster seat without a seatbackis used (figure 4), the car's headrestraint must be adjusted to suit thechild's stature; the upper edge of thehead restraint must be at the sameheight as the top of the child's headand should never be lower than thelevel of the child's eyes.

AVANTIME D66 nu647-2 C:\Documentum\Checkout\nu647-2_eng_T1.WIN 3/4/2002 13:00 - page 33
1.27
CHILD SAFETY (continued)
• No modifications may be made to the component parts of the restraint system (belts and seats and theirmountings) fitted originally.
• Follow carefully the fitting instructions provided by the manufacturer of the restraint system.
• Always avoid dressing the child in bulky garments and do not place any objects between the child and the restraintsystem.
• The seat belt in the vehicle must be taut so that the child's seat is held in position securely. Check the tensionregularly.
• Never wear the belt under the arm or behind the back.
• The harness or belt should be taut and fitted to suit the child's stature.
• Never allow your child to stand up or kneel on the seats while the vehicle is moving.
• Check that the child is in the correct position for the entire journey, particularly when he or she is asleep.
• Use the seat belts to hold the seat in position, even if it is not occupied. Otherwise, if an accident were to occur, it maybecome dislodged and pose a risk to other vehicle occupants.
• Following a serious accident have the seat belts and restraint systems in use at the time checked.
• Never leave a child unsupervised in a vehicle, even if he/she is in a restraint device.
• Make sure the child does not get out of the vehicle at the side where there is traffic.
• Set your children a good example - always wear your seat belt.

5 6
AVANTIME D66 nu647-2 C:\Documentum\Checkout\nu647-2_eng_T1.WIN 3/4/2002 13:00 - page 34
1.28
CHILD SAFETY (continued)
DANGERA rear-facing child/baby seat must not be fitted to the frontpassenger seat.
The child may suffer very serious injuries if the air bag inflates.
Label 5 (on the front passenger door frame) and label 6 (beneath the sunvisors) will remind you of these instructions.

1
AVANTIME D66 nu647-2 C:\Documentum\Checkout\nu647-2_eng_T1.WIN 3/4/2002 13:00 - page 35
1.29
CHILD SAFETY (continued)
Isofix mounting system for childseatsThis is new equipment for installinga child seat. This system is fitted tothe side seats in the vehicle.
It consists of the followingcomponents:- Two anchoring rings 1 per seat
located between the seat theseatback.
- A special Renault child seat fittedwith two catches which hook ontothe two rings.
Only the specific Renault seat istype approved for this vehicle.Please contact your Renault Dealerto purchase this seat.This seat is used as a rear-facingseat for children up to the age ofapproximately 18 months and thenas a front-facing seat up to the ageof four. It is equipped with tworetractable catches which can besecured with the Isofixattachments provided for Renaultvehicles. It can also be fittedconventionally in other vehiclesusing a three-point seat belt.
• Make sure that there isnothing obstructing theseat mounting mechanismat the anchorage points
(gravel, rags, toys, etc.).
• Always remember to fasten theseat belts on child seats for alljourneys.

2
1
3
AVANTIME D66 nu647-2 C:\Documentum\Checkout\nu647-2_eng_T1.WIN 3/4/2002 13:00 - page 36
1.30
CHILD SAFETY (continued)
Installation principleFront-facing Isofix seatWhen a front-facing child seat isinstalled, the front seat must not bemoved back beyond the halfwaypoint on the seat runners and theseatback must be in an uprightposition.
Rear-facing Isofix seatWhen a rear-facing child seat isinstalled, the front seat must not bemoved forward beyond the halfwaypoint on the seat runners.
The seat back must be close to ortouching the shell of the child seat.
Fitting a child seat- Before fitting and using the seat,
read the instructions providedcarefully;
- Insert the belt guides 1 (deliveredwith the seat) into the slotsprovided between the seatbackand the seat;
- Offer up the seat catches 3opposite the two rings 2 fitted inthe rear side seats.

4 5
6
AVANTIME D66 nu647-2 C:\Documentum\Checkout\nu647-2_eng_T1.WIN 3/4/2002 13:00 - page 37
1.31
CHILD SAFETY (continued)
Fitting a child seat (continued)- Latch the catches 4 onto the rings
and make sure that the seat islocked properly by moving itforwards and backwards and fromright to left;
- Push on the base of the seat firmlyto bring it into contact with theseatback and make sure it issecurely in position.
Mounting the seatEach of the rear side seats is fittedwith two rings for mounting thebase of the child seat.
To access the rings when first fittingthe seat, contact your RenaultDealer for details.
For the mounting ring on arear-facing seat, use belt 5delivered with the seat- Attach the belt catch to the ring 6.

1 2 3 4 5 6 7 5 8 9 10 11 12 13 14 15
29 28 27 26 25 24 20 19 18 17
23 22 21
30 16
31
32
AVANTIME D66 nu647-2 C:\Documentum\Checkout\nu647-2_eng_T1.WIN 3/4/2002 13:00 - page 38
1.32
DRIVER’S LAYOUT, LEFT-HAND DRIVE

AVANTIME D66 nu647-2 C:\Documentum\Checkout\nu647-2_eng_T1.WIN 3/4/2002 13:00 - page 39
1.33
DRIVER’S LAYOUT, LEFT-HAND DRIVE (continued)The equipment fitted, described below, depends on the version, option and country.
1 Driver's control for heating,ventilation, air conditioning
2 Speaker
3 Stalk for:• Direction indicators• Horn• External lighting• Front fog lights• Rear fog lights
4 Left-hand side vent
5 Horn buttons
6 Driver's air bag
7 Rev counter
8 • Switch for windscreen andrear screen wash/wipe
• On-board computer andinstrument panel informationreadout control
9 Centre air vents
10 Gear lever
11 Control instruments
12 Switches:• De-icing/demisting for rear
screen, rear-view mirrors andwindscreen
• hazard warning lights• rear electric window locking
13 Right-hand side vent
14 Speaker
15 Passenger temperature control
16 Lever to open passenger door
17 Speaker
18 Passenger electric windowswitch
19 Location for passenger air bag
20 Glove box
21 Rear-view mirror electricaladjustmentCentral door lockingAutomatic door locking whendrivingE.S.P.
22 Accessories socket
23 Handbrake
24 Upper glove boxCup holder and small changetray
25 Ignition switch
26 Steering wheel height adjuster
27 Cruise control and speedlimiter control keys
28 Cruise control and speedlimiter switchesInstrument panel lightingdimmer
29 Bonnet release
30 Speaker
31 Control switches for:• front electric windows• rear electric windows
32 Lever to open driver's door

1 2 3 4 5 6 7 8 9 10 11 12 13 14 15 16 17
30 29 28 24 23 22 21 20 19
27 26 25
31 18
32
AVANTIME D66 nu647-2 C:\Documentum\Checkout\nu647-2_eng_T1.WIN 3/4/2002 13:00 - page 40
1.34
DRIVER’S LAYOUT, RIGHT-HAND DRIVE
AVANTIME D66 nu647-2 C:\Documentum\Checkout\nu647-2_eng_T1.WIN 3/4/2002 13:00 - page 41
1.35
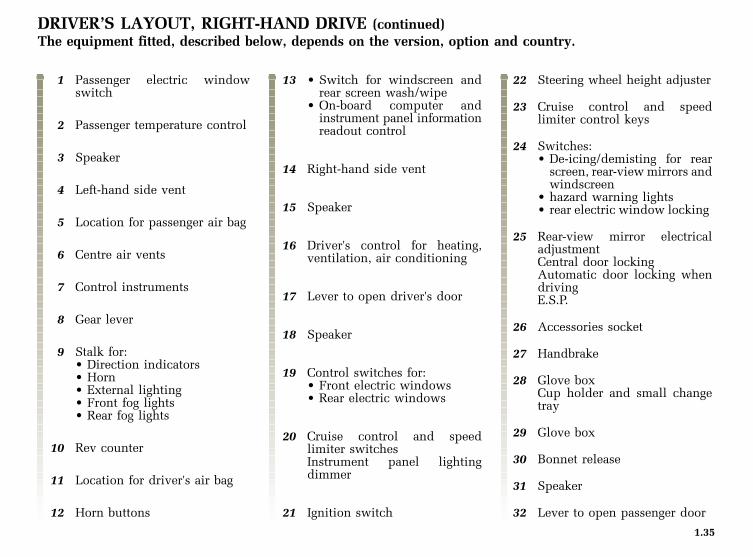
DRIVER’S LAYOUT, RIGHT-HAND DRIVE (continued)The equipment fitted, described below, depends on the version, option and country.
1 Passenger electric windowswitch
2 Passenger temperature control
3 Speaker
4 Left-hand side vent
5 Location for passenger air bag
6 Centre air vents
7 Control instruments
8 Gear lever
9 Stalk for:• Direction indicators• Horn• External lighting• Front fog lights• Rear fog lights
10 Rev counter
11 Location for driver's air bag
12 Horn buttons
13 • Switch for windscreen andrear screen wash/wipe
• On-board computer andinstrument panel informationreadout control
14 Right-hand side vent
15 Speaker
16 Driver's control for heating,ventilation, air conditioning
17 Lever to open driver's door
18 Speaker
19 Control switches for:• Front electric windows• Rear electric windows
20 Cruise control and speedlimiter switchesInstrument panel lightingdimmer
21 Ignition switch
22 Steering wheel height adjuster
23 Cruise control and speedlimiter control keys
24 Switches:• De-icing/demisting for rear
screen, rear-view mirrors andwindscreen
• hazard warning lights• rear electric window locking
25 Rear-view mirror electricaladjustmentCentral door lockingAutomatic door locking whendrivingE.S.P.
26 Accessories socket
27 Handbrake
28 Glove boxCup holder and small changetray
29 Glove box
30 Bonnet release
31 Speaker
32 Lever to open passenger door

B
AVANTIME D66 nu647-2 C:\Documentum\Checkout\nu647-2_eng_T1.WIN 3/4/2002 13:00 - page 42
1.36
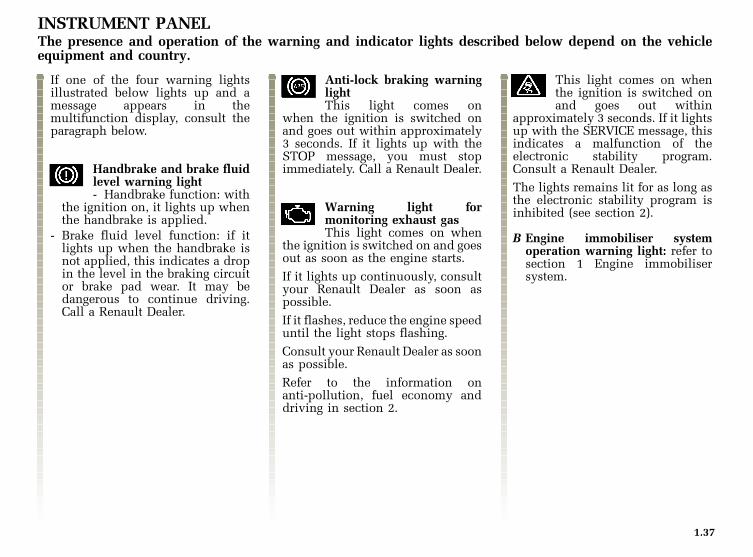
INSTRUMENT PANEL
If these warning lights light up,you must stop as soon as traffic conditions allow:
+
AVANTIME D66 nu647-2 C:\Documentum\Checkout\nu647-2_eng_T1.WIN 3/4/2002 13:00 - page 43
1.37
INSTRUMENT PANELThe presence and operation of the warning and indicator lights described below depend on the vehicleequipment and country.
If one of the four warning lightsillustrated below lights up and amessage appears in themultifunction display, consult theparagraph below.
Handbrake and brake fluidlevel warning light- Handbrake function: with
the ignition on, it lights up whenthe handbrake is applied.
- Brake fluid level function: if itlights up when the handbrake isnot applied, this indicates a dropin the level in the braking circuitor brake pad wear. It may bedangerous to continue driving.Call a Renault Dealer.
Anti-lock braking warninglightThis light comes on
when the ignition is switched onand goes out within approximately3 seconds. If it lights up with theSTOP message, you must stopimmediately. Call a Renault Dealer.
Warning light formonitoring exhaust gasThis light comes on when
the ignition is switched on and goesout as soon as the engine starts.
If it lights up continuously, consultyour Renault Dealer as soon aspossible.
If it flashes, reduce the engine speeduntil the light stops flashing.
Consult your Renault Dealer as soonas possible.
Refer to the information onanti-pollution, fuel economy anddriving in section 2.
This light comes on whenthe ignition is switched onand goes out within
approximately 3 seconds. If it lightsup with the SERVICE message, thisindicates a malfunction of theelectronic stability program.Consult a Renault Dealer.
The lights remains lit for as long asthe electronic stability program isinhibited (see section 2).
B Engine immobiliser systemoperation warning light: refer tosection 1 Engine immobilisersystem.

AVANTIME D66 nu647-2 C:\Documentum\Checkout\nu647-2_eng_T1.WIN 3/4/2002 13:00 - page 44
1.38
INSTRUMENT PANEL
If these warning lights light up,you must stop as soon as traffic conditions allow:
+

AVANTIME D66 nu647-2 C:\Documentum\Checkout\nu647-2_eng_T1.WIN 3/4/2002 13:01 - page 45
1.39
INSTRUMENT PANELThe presence and operation of the warning and indicator lights described below depend on the vehicleequipment and country.
Headlight main beamindicator light
Headlight dipped beamindicator light
Side light indicator light
Front fog lights indicatorlight
Rear fog light indicatorlight
Driver's seat belt notfastened warning lightIt lights up after the ignition
is switched on to remind the driverto fasten his/her seat belt and doesnot go out until the belt is fastened.
Door closure indicator lightIt lights up after the ignitionis switched on to remind the
driver that a door is not closedcorrectly and does not go out untilthe door is closed correctly.
Heated seat indicator light
Hazard warning lights
Right-hand directionindicators indicator light
Left-hand directionindicators indicator light
Air bag warning lightThis light come on when theignition is switched on and
goes out within approximately 3seconds. If it lights up at any othertime, it indicates a fault in thesystem. Consult a Renault Dealer assoon as possible.
Cruise control/speed limiterindicator lightGreen for cruise controlYellow for the speed limiter
Central door lockingwarning lightThe light comes on when
the doors are locked:- permanently if the vehicle was
locked by the switch;- for one minute if the vehicle was
locked using the remote control.
INSTRUMENT PANEL -RECOMMENDATIONSDo not touch the display withyour fingers or press on the glassover the display.
Use a soft cloth to clean it. If thisdoes not clean the glasssufficiently, you can wipe it witha small amount of soapy water.Cleaning products containingalcohol may not be used underany circumstances.
or

BH M A
AVANTIME D66 nu647-2 C:\Documentum\Checkout\nu647-2_eng_T1.WIN 3/4/2002 13:01 - page 46
1.40
INSTRUMENT PANEL
If these warning lights light up,you must stop as soon as traffic conditions allow:
+

AVANTIME D66 nu647-2 C:\Documentum\Checkout\nu647-2_eng_T1.WIN 3/4/2002 13:01 - page 47
1.41
INSTRUMENT PANELThe presence and operation of the warning and indicator lights described below depend on the vehicleequipment and country.
MULTIFUNCTION indicatorlight AThis shows several types ofinformation:- the clock and external
temperature,- the warning and service messages
and symbols,- some radio information,- the OK and diesel preheating
symbol.
There is priority managementbetween the various types ofinformation.
1 - Clock and temperatureWith the ignition key in theaccessories position:- adjust the hours by pressing
button H,- adjust the minutes by pressing
button M.
The time and temperature aredisplayed when there is no messageor symbol (except when the ignitionkey is in the STOP position).
2 - Starting the engineWith the ignition on.Electronic self-test:
Petrol versionYou can start the engine once theOK message is displayed.
Diesel version
The message appears for
approximately one second, then thepreheating symbol is displayed for afew seconds. When the “OK”message appears, you can start theengine.
Engine stalling symbol
If the electrical supply is cut(battery disconnected) the clockwill have to be reset and theelectric windows will have to bereinitialised with the vehicle ata halt (see section 3).
3 - STOP warning messageThese symbols or warning lightsmay be displayed after the ignitionis switched on (replacing the OKmessage) or while you are driving.
If the STOP message lights up, it isessential to stop as soon as trafficconditions allow.
Call a Renault Dealer.
STOP message with symbol:
After a beep, the following symbolswill be displayed in turn with theSTOP message.

AVANTIME D66 nu647-2 C:\Documentum\Checkout\nu647-2_eng_T1.WIN 3/4/2002 13:01 - page 48
1.42
INSTRUMENT PANEL (continued)
Battery charging fault symbol
Indicates that the circuit isovercharging or discharging. Call aRenault Dealer.
Oil pressure symbol
Switch off the ignition and checkthe oil level. Consult a RenaultDealer if this is normal (see section4).
Coolant temperature warningsymbol
Stop the vehicle. stop the engine butleave the ignition on for one or twominutes. The engine cooling fanshould continue to run. Thetemperature should drop. If it doesnot, check the coolant level (havinglet the engine cool down). Call forthe assistance of a Renault Dealer ifnecessary.
Engine fault warning symbol(2.2 dCi diesel version)
If the injection cuts out within10 seconds of the symbol lightingup, it indicates a serious injectionsystem fault. Stop as soon as trafficconditions allow, switch off theignition and contact a RENAULTDealer.
STOP message with warninglightAfter a beep, the STOP message willbe displayed continuously with thecorresponding warning light.
ABS fault warning
Brake fluid level warning light
If the warning disappears,the message will onlycontinue being displayedfor the brake fluid level
warning.Always consult your RenaultDealer.

AVANTIME D66 nu647-2 C:\Documentum\Checkout\nu647-2_eng_T1.WIN 3/4/2002 13:01 - page 49
1.43
INSTRUMENT PANEL (continued)
4 - SERVICE warning
After a beep, the symbols orwarning light will appear followedby the SERVICE message.
These symbols or warning may bedisplayed after the ignition isswitched on (replacing the OKmessage) or while you are driving.
The SERVICE message is arecommendation that you shouldvisit a Renault Dealer as soon aspossible.
Electronic fault symbol
Indicates a fault in the injection,engine immobiliser and/orautomatic gearbox electronicsystems.
Battery charging fault symbol
Indicates a fault in the system forchecking the battery charge circuit.
Oil level warning symbol
Stop, switch off the ignition andcheck the oil level.
Oil pressure symbol
Indicates a fault on the system forchecking the oil pressure circuit.
ESP warning symbol
Indicates a fault in the electronicstability program system.
Warning light for checking thedipped headlight beam height
Indicates a fault in the system forchecking the dipped headlightbeam height according to the load inthe vehicle.
5 - Low fuel level warning light
A beep warns you that the fuel tankis about to reach minimum level(approximately 8.5 litres dependingon reserve levels).
Fill up with fuel as soon as soon aspossible.
DH M E C F
1
AVANTIME D66 nu647-2 C:\Documentum\Checkout\nu647-2_eng_T1.WIN 3/4/2002 13:01 - page 50
1.44
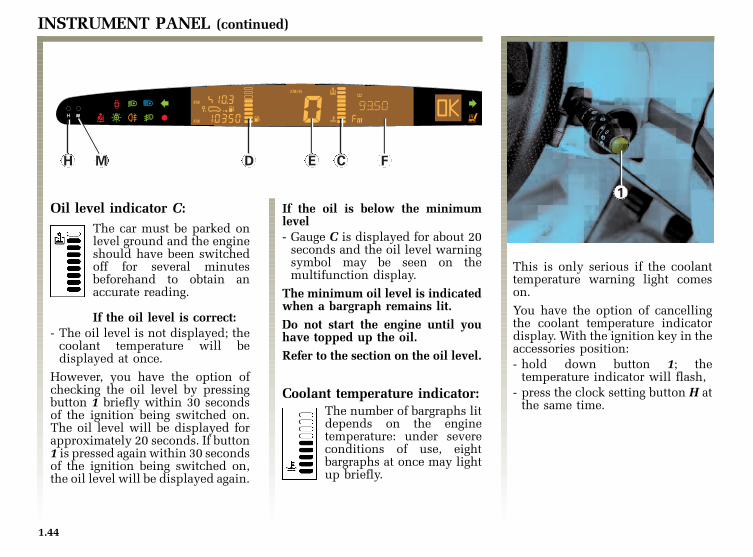
INSTRUMENT PANEL (continued)
Oil level indicator C:The car must be parked onlevel ground and the engineshould have been switchedoff for several minutesbeforehand to obtain anaccurate reading.
If the oil level is correct:- The oil level is not displayed; the
coolant temperature will bedisplayed at once.
However, you have the option ofchecking the oil level by pressingbutton 1 briefly within 30 secondsof the ignition being switched on.The oil level will be displayed forapproximately 20 seconds. If button1 is pressed again within 30 secondsof the ignition being switched on,the oil level will be displayed again.
If the oil is below the minimumlevel- Gauge C is displayed for about 20
seconds and the oil level warningsymbol may be seen on themultifunction display.
The minimum oil level is indicatedwhen a bargraph remains lit.Do not start the engine until youhave topped up the oil.Refer to the section on the oil level.
Coolant temperature indicator:The number of bargraphs litdepends on the enginetemperature: under severeconditions of use, eightbargraphs at once may lightup briefly.
This is only serious if the coolanttemperature warning light comeson.
You have the option of cancellingthe coolant temperature indicatordisplay. With the ignition key in theaccessories position:- hold down button 1; the
temperature indicator will flash,- press the clock setting button H at
the same time.

AVANTIME D66 nu647-2 C:\Documentum\Checkout\nu647-2_eng_T1.WIN 3/4/2002 13:01 - page 51
1.45
INSTRUMENT PANEL (continued)
Fuel level information DWhen the level is almost atminimum (about 8.5 litres of reservefuel left), one or two bargraphs lightup and a low fuel warning isdisplayed.
Fill up with fuel as soon as soon aspossible.
Speedometer ETo obtain the speed in MPH, turnthe ignition key to the accessoriesposition:- press and hold button 1, the unit
of speed indicator will flash,- press button M at the same time to
adjust the minutes.
6 - Radio informationWhen there is a change in radioconditions, the correspondingmessage will appear on themultifunction display for a fewseconds.
The following messages can bedisplayed: SCAN, SEEK, BAT andTRAFFIC. Refer to the instructionsfor your radio for more information.
These messages are not displayedwhen the STOP message is alreadypresent.
Radio display FThis display is directly connectedwith the operation of the audiosystem. Refer to the instructions foryour radio.
G
2
AVANTIME D66 nu647-2 C:\Documentum\Checkout\nu647-2_eng_T1.WIN 3/4/2002 13:01 - page 52
1.46
ON-BOARD COMPUTER
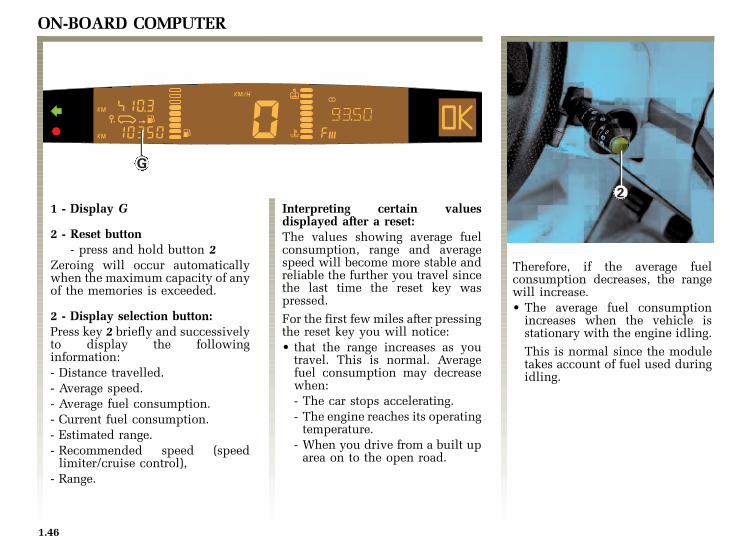
1 - Display G
2 - Reset button- press and hold button 2
Zeroing will occur automaticallywhen the maximum capacity of anyof the memories is exceeded.
2 - Display selection button:Press key 2 briefly and successivelyto display the followinginformation:- Distance travelled.- Average speed.- Average fuel consumption.- Current fuel consumption.- Estimated range.- Recommended speed (speed
limiter/cruise control),- Range.
Interpreting certain valuesdisplayed after a reset:The values showing average fuelconsumption, range and averagespeed will become more stable andreliable the further you travel sincethe last time the reset key waspressed.
For the first few miles after pressingthe reset key you will notice:• that the range increases as you
travel. This is normal. Averagefuel consumption may decreasewhen:- The car stops accelerating.- The engine reaches its operating
temperature.- When you drive from a built up
area on to the open road.
Therefore, if the average fuelconsumption decreases, the rangewill increase.• The average fuel consumption
increases when the vehicle isstationary with the engine idling.
This is normal since the moduletakes account of fuel used duringidling.

AVANTIME D66 nu647-2 C:\Documentum\Checkout\nu647-2_eng_T1.WIN 3/4/2002 13:01 - page 53
1.47
ON-BOARD COMPUTER (continued)
Examples of displaysselected by successivepresses of button 2
Interpreting the display
1 - Distance travelled (in km or miles) since the last reset:
2 - Average speed (in KM/H or MPH) since the last reset:(Value displayed after 400 metres or 0.2 miles have been covered.)
3 - Average fuel consumption (in litres per 100 km or mpg) since the last reset:- The value is displayed after the vehicle has driven 400 metres or 0.2 miles
and takes into consideration the distance travelled, the time passed andthe fuel used since the last reset.
4 - Current consumption (in l/100km):- The value is displayed once a speed of 15 mph (25 km/h) is reached.
This value cannot exceed 29.9 litres/100 km.
5 - Estimated range with the remaining fuel (in km or miles):- This range takes into consideration the average fuel consumption since
the last time the reset button was pressed. (Value displayed after 400metres or 0.2 miles have been covered.)

1687
416
874
AVANTIME D66 nu647-2 C:\Documentum\Checkout\nu647-2_eng_T1.WIN 3/4/2002 13:01 - page 54
1.48
ON-BOARD COMPUTER (continued)
Examples of displaysselected by successivepresses of button 2
Interpreting the display
6 - Cruise control or speed limiter recommended speedSee the Speed limiter and Cruise control information in section 2.
7 - Mileage before oil changeDisplay of the distance left before the next service.There are several cases:• range less than 1 500 km or next service date planned in two months
The symbol flashes (for 30 seconds if the display is not set tomileagebefore oil change, otherwise mileage before oil change is displayed allthe time).
• mileage equal to 0 km or date of service reached.
The symbol flashes constantly regardless of the informationdisplayed.
Reinstalling the display after servicing: consult your Renault Dealer tointialise your display after servicing.

2
1
A
1
B
C
AVANTIME D66 nu647-2 C:\Documentum\Checkout\nu647-2_eng_T1.WIN 3/4/2002 13:01 - page 55
1.49
REAR-VIEW MIRRORS
Interior rear-view mirrorThis is adjustable.
Lower the small lever 2 locatedbehind the rear-view mirror whendriving at night to avoid beingdazzled by the headlights of the carbehind.
Autodimming rear-view mirrorIf the headlights of the vehiclebehind shine on to the mirror, itdims slightly to prevent dazzling.Press button 1 to switch on thesystem; the green warning lightcomes on.
Do not interrupt the foldin or fold out of the doormirrors before they havestopped.
Electrically adjusted doormirrorsTurn button 1 to:- Position A to adjust the left-hand
door mirror.- Position B to adjust the right-hand
door mirror.
De-icing the door mirrorsThe door mirrors are de-iced whenrear screen demisting is switchedon.
Retracting the door mirrorsTurn button 1 to position C to foldthe external door mirrors backagainst the door.

1
AVANTIME D66 nu647-2 C:\Documentum\Checkout\nu647-2_eng_T1.WIN 3/4/2002 13:01 - page 56
1.50
STEERING WHEEL
Adjusting the steering wheelThe position of the steering wheel isadjustable.
Lower lever 1 and place the steeringwheel in the required position: liftthe lever to lock the steering wheelin place.
For safety reasons, onlyadjust the steering wheelwhen the vehicle isstationary.
Never switch off the ignition whilstdriving. Braking assistance andpower steering only function whilethe engine is running.

1
AVANTIME D66 nu647-2 C:\Documentum\Checkout\nu647-2_eng_T1.WIN 3/4/2002 13:02 - page 57
1.51
DEMISTING - DE-ICING
Heated rear screenWith the engine running, pressbutton 1. (The indicator light in thebutton lights up.)
This function de-ices and demiststhe rear screen and switches on theheated electric rear-view mirrors.
The demist function is stopped intwo ways:- automatically after 12 minutes'
operation.- by pressing button 1. (The
indicator light goes out.)
Electric windscreen de-icingThis function is activated at thesame time as rear screen de-icing.
De-icing switches off automatically.The timed period varies as afunction of atmospheric conditionsbut is never longer than 12 minutes.
The rear screen, rear-viewmirrors and windscreen de-icingfacility is automaticallyactivated when you select theSee clear button on the driver'sheating control.

2
A
B
C
D
1
AVANTIME D66 nu647-2 C:\Documentum\Checkout\nu647-2_eng_T1.WIN 3/4/2002 13:02 - page 58
1.52
WINDSCREEN WIPER/WASHER
Windscreen wiperWith the ignition on, move the stalkhandle 1:
• A Off
• B Intermittent wipingThe wipers will pause forseveral seconds betweensweeps. It is possible to changethe time between sweeps byturning the central ring 2 on thestalk switch 1:
• C Normal wiping speed
• D Fast wiping speed
Vehicle fitted with windscreenwiper with rain sensorWith the ignition on, move the stalkhandle 1.
• A Off.
• B Rain sensor positionWhen this position is selected,the system detects the presenceof water on the windscreen andtriggers wiping at a suitablewiping speed.
• C Normal wiping speed
• D continuous fast wiping
If the ignition has been switchedoff for more than 20 minutes,you must return to the offposition A before returning tothe rain sensor position.
Automatic selection of wipingspeedThe wiping speed you select whileyou are driving is reduced to a lowerspeed when the vehicle stops:- from fast wiping speed, the speed
will change to normal wipingspeed;
- from normal wiping speed, thespeed will change to intermittentwiping.
As soon as the vehicle moves off,wiping will return to the speedoriginally selected.
When the vehicle is stationary: Ifstalk switch 1 is operated, itoverrides and cancels automaticoperation.

1
AVANTIME D66 nu647-2 C:\Documentum\Checkout\nu647-2_eng_T1.WIN 3/4/2002 13:02 - page 59
1.53
WINDSCREEN WASHER/WIPER (continued)
Windscreen washer, headlightwasherWith the ignition on, pull the stalk 1towards you.
- Headlights off:The windscreen washer will beactivated.
- Headlights on:The headlight washers will beactivated at the same time.
In frosty weather, make sure thewiper blades do not ice over (risk ofmotors overheating).
Check the condition of the wiperblades. They must be changed assoon as they become less efficient(approximately every year).
If you switch off the ignition beforeswitching off the windscreen wiper(position A) the blades will stop ata random position on thewindscreen.

2
1
2
1
AVANTIME D66 nu647-2 C:\Documentum\Checkout\nu647-2_eng_T1.WIN 3/4/2002 13:02 - page 60
1.54
REAR SCREEN WASH/WIPE
Rear screen wiper withtimer
With the ignition on, move the endof stalk 1 to align with mark 2opposite the symbol.
The rear wiper speed isproportional to the front wiperspeed.
Rear screen wash/wipe
With the ignition on, move the endof stalk 1 to align with mark 2opposite the symbol.
When you release the stalk, itreturns to the rear wiper position.
Special noteThe rear screen is wipedintermittently if reverse gear isselected when the windscreenwipers are in operation.
In frosty weather, makesure that the wiper bladesdo not ice over (risk ofmotor overheating).
Check the condition of the wiperblades. They must be changed assoon as they become lessefficient (approximately everyyear).

3
1
1
2
AVANTIME D66 nu647-2 C:\Documentum\Checkout\nu647-2_eng_T1.WIN 3/4/2002 13:02 - page 61
1.55
EXTERIOR LIGHTING AND SIGNALS
Side lightsTurn the end of the stalk 1 so
that the symbol is lined up withmark 3.
The instrument panel will light upand its brightness may be adjustedby turning tumblewheel 2.
Headlight dipped beamsTurn the end of the stalk 1 so
that the symbol is lined up withmark 3.
The relevant indicator light willlight up on the instrument panel.
Headlight main beamWith stalk 1 in the dipped
beam position, pull the stalktowards you.
When the main beam headlights arelit up, an indicator light lights up onthe instrument panel.
To return to the dipped headlightposition, pull the stalk towards you.
Switching off the lightsTurn the end of stalk 1
back to its original position.
Lights on warning buzzerA warning buzzer will sound whena front door is opened and the lightsare left switched on after theignition has been switched off (toprevent discharge of the battery).
The headlamp beam height isautomatically adjusted inrelation to the vehicle load whenthe ignition is switched on.
Before driving at night:check that the electricalequipment is in goodcondition.

5
4
1
4
AVANTIME D66 nu647-2 C:\Documentum\Checkout\nu647-2_eng_T1.WIN 3/4/2002 13:02 - page 62
1.56
EXTERIOR LIGHTING AND SIGNALS (continued)
Front fog lightsMove the central ring 4 of
stalk 1 to align the symbol oppositethe mark 5. The relevant indicatorlight will light up on the instrumentpanel.
Operation of the front fog lightsdepends on the external lightingselected, and an indicator light willlight up on the instrument panel.
Rear fog lightsTurn the central ring 4
on the stalk to align the symbol withmark 5.
Operation of the rear fog lightsdepends on the external lightingselected, and an indicator light willlight up on the instrument panel.
Remember to switch off the rear foglight when it is no longer needed toavoid inconveniencing other roadusers.
The front and rear fog lights will beswitched off when the exteriorlights are switched off.

2
0
1
1
A
AVANTIME D66 nu647-2 C:\Documentum\Checkout\nu647-2_eng_T1.WIN 3/4/2002 13:02 - page 63
1.57
HORN AND SIGNALS
HornPress the end of stalk 1 or pressfirmly on either point A on thesteering wheel spokes.
Headlight flasherPull stalk 1 towards you to flash theheadlights, even if the lights are notin use.
Hazard warning lightsPress switch 2.
This switch lights up all fourdirection indicators simultaneously.
It is used to warn other road users ifyou- are obliged to stop for any reason
beyond your control in an unusuallocation,
- are obliged to drive in difficultconditions.
Direction indicatorsMove stalk 1 parallel to the steeringwheel and in the direction you aregoing to turn.
When driving on the motorway, thesteering wheel is not often turnedenough to return the stalkautomatically to position 0. There isan intermediate position in whichthe stalk may be held whenchanging lanes.
It will return automatically to 0when released.

2
1
AVANTIME D66 nu647-2 C:\Documentum\Checkout\nu647-2_eng_T1.WIN 3/4/2002 13:02 - page 64
1.58
FUEL TANK
Useful capacity of tank: 77 litres(17 gallons) approx.
Use notch 1 to open the flap.
The flap is electrically locked at thesame time as the doors and tailgatewhen operating the remote controlunit.
During filling, hang the cap on hook2.
Fuel gradePetrol versionUse unleaded petrol only.
Using leaded petrol will damage theanti-pollution devices and may leadto a loss of warranty.
To ensure the fuel tank is not filledwith leaded petrol, the fuel tankfiller neck contains a restrictorfitted with a valve which onlyallows unleaded petrol nozzles tobe used (at the pump).
Diesel versionUse diesel engine fuel (DERV) only.Make sure that no wateraccidentally enters the fuel tankduring filling. The fuel filler capand neck must be clean anddust-free. The diesel fuel must behigh grade.
In the event of the fuel tank runningdry, refer to the Repriming thediesel fuel circuits section.
Filling with fuel- Insert the nozzle into the filler
neck up to the second notch andstart the automatic filling facility.
- A maximum of two fillingoperations may be made after thefuel feed has switched offautomatically for the first time.The fuel tank is designed to allowroom for expansion and this mustbe retained.
Fuel filler cap: this is of aspecial type. If you haveto replace it, make surethe new cap is of the
same type. Consult your RenaultDealer.
Never handle the cap near asource of heat or flame.

1
AVANTIME D66 nu647-2 C:\Documentum\Checkout\nu647-2_eng_T1.WIN 3/4/2002 13:02 - page 65
1.59
FUEL TANK (continued)
System for cutting off fuelsupply in the event of a severeimpactYour car is equipped with a systemfor cutting off the fuel supply in theevent of a severe impact.
This system is intended to disableand thus isolate the fuel supplysystem if a severe impact occurs.
Initialising the systemIf the conditions for restarting thefuel supply system are met (see boxmarked IMPORTANT), it is onlynecessary to press button 1 toenable the system.
Following an impact, thesystem can be enabled butonly after it has beeninspected by a qualified
person from the Renault Networkwho must ensure that:- the vehicle is roadworthy,- that there is no smell of fuel,- and that the fuel system is not
leaking.

AVANTIME D66 nu647-2 C:\Documentum\Checkout\nu647-2_eng_T1.WIN 3/4/2002 13:02 - page 66
1.60

AVANTIME D66 nu647-2 C:\Documentum\Checkout\nu647-2_eng_T2.WIN 3/4/2002 13:05 - page 1
2.01
Section 2: Driving(Advice on use relating to fuel economy and the environment)
Running in ........................................................................................................................................................ 2.02Ignition switch - Starting the engine/Stopping the engine ................................................................ 2.03 - 2.04Special features: petrol versions ..................................................................................................................... 2.05
diesel versions ..................................................................................................................... 2.06Advice on anti-pollution, how to economise on fuel, driving ........................................................ 2.07 2.09Environment ...................................................................................................................................................... 2.10Gear lever .......................................................................................................................................................... 2.11Handbrake - Power assisted steering .............................................................................................................. 2.12Anti-lock braking system (ABS) ...................................................................................................................... 2.13Cruise control ....................................................................................................................................... 2.14 2.16Speed limiter ........................................................................................................................................ 2.17 2.19Electronic stability program .................................................................................................................. 2.20 - 2.21Traction control system ......................................................................................................................... 2.22 - 2.23Using the automatic gearbox .............................................................................................................. 2.24 2.26Parking assistance ............................................................................................................................................. 2.27

AVANTIME D66 nu647-2 C:\Documentum\Checkout\nu647-2_eng_T2.WIN 3/4/2002 13:05 - page 2
2.02
RUNNING INPetrol versionsFor the first 625 miles (1000 km)do not exceed 70 mph (130 km/h)in the highest gear, or 3 000 to3 500 rpm.
On completion of 625 miles (1000km), you may use your vehiclenormally. However, it is only after1500 miles (3000 km) have beencovered that you may reasonablyexpect full performance.
Service intervals: refer to thevehicle's Servicing booklet.
Diesel versionFor the first 750 miles (1500 km), donot exceed 70 mph (110 km/h) in5th gear and do not let the enginerev in the lower gears.
On completion of this mileage, youmay drive faster. However, the carwill only provide top performanceafter approximately 3750 or 4000miles (6000 or 6500 km).
During the running in period, donot accelerate hard whilst theengine is still cold and do not let theengine rev in the lower gears.
Service intervals: refer to thevehicle's Servicing booklet.

AVANTIME D66 nu647-2 C:\Documentum\Checkout\nu647-2_eng_T2.WIN 3/4/2002 13:05 - page 3
2.03
IGNITION SWITCH / STARTING AND STOPPING THE ENGINE
- Stop and steering lock position(St)To lock: remove the key and turn thesteering wheel slightly until thelatch engages in the steeringcolumn.
To unlock: turn the key and thesteering wheel slightly.
- Accessories position AThe ignition is switched off. Anyaccessories (radio etc.) willcontinue to operate.
- “Ignition on” position MThe ignition is switched on:• Petrol version: the engine may be
started.
• Diesel version: engine ispre-heating.
- “Start” position DIf the engine fails to start at the firstattempt, the key must be turnedback before the starter can beactivated again. Release the key assoon as the engine starts.
TURBO engines requirecertain precautionsduring use to ensure thatthe turbo will be
properly lubricated:- On starting the engine, allow it
to idle for a few seconds beforeincreasing engine speed.
- To stop the engine, wait until itis idling before switching offthe ignition.
Starting the engineIn the case of an automatic gearboxRefer to the information onautomatic gearboxes in section 2.
Petrol injectionEngine warm or cold:- Turn the key to the start
position without depressingthe accelerator.
- Release the key as soon as theengine starts.
Stopping the engineWith the engine idling, turn the keyback to the stop position.

AVANTIME D66 nu647-2 C:\Documentum\Checkout\nu647-2_eng_T2.WIN 3/4/2002 13:05 - page 4
2.04
STARTING/STOPPING THE ENGINE (continued)
Diesel injectionCold or warm engineTurn the ignition key to theignition-preheating position andhold it there until the preheatingwarning light goes out and the “OK”message appears. The colder theengine, the longer the preheatingtime.
Turn the key to the starter positionand hold it there for a maximum of10 seconds at a time until the enginestarts.
Let the engine run withoutoverrevving for several seconds.
In cold weather(Below –15°C)Depress the clutch pedal andactivate the starter.
Let the engine idle for a few secondsbefore gradually talking your footoff the clutch.
Warm engineTurn the key immediately to thestarter position. In the event that theengine does not start at the firstattempt, repeat the operation usingpreheating.
Let the engine run withoutoverrevving for several seconds.
Never leave the carunattended with the key inthe ignition if there is achild (or animal) in the car.
With the key in the ignition, thechild could start the engine oroperate electrical equipment suchas the electric windows and thusrisk injury (by trapping its neck,arm, hand, etc.). Risk of seriousinjury.
Never switch off the ignition beforethe vehicle has stoppedcompletely. (Once the vehicle hasstopped, the power steering, brakeservo and the passive safetydevices such as air bags andpretensioners will no longeroperate).
The steering will lock when the keyis removed.

AVANTIME D66 nu647-2 C:\Documentum\Checkout\nu647-2_eng_T2.WIN 3/4/2002 13:05 - page 5
2.05
SPECIAL FEATURES OF PETROL VERSIONSThe following operating conditions:• Driving for a long time with the
low fuel level warning light lit.• Using leaded petrol.• Using lubrication additives or
fuel which is not approved byRenault.
• Excess engine oil.
Or faults such as:• Faulty ignition or disconnected
spark plug indicated by theengine misfiring or snatchingwhen driving.
• Loss of power.
may cause the catalytic converter tooverheat and thus reduce itsefficiency or even destroy it andcause heat damage to the car.
If you note any of the above faults,have the necessary repairs carriedout as soon as possible by yourRenault Dealer.
These faults may be avoided bytaking your car regularly to yourRenault Dealer at the intervalsspecified in your Warranty andServicing booklet.
Starting problemsTo avoid damaging the catalyticconverter, do not keep trying to startthe engine (using the ignition key, orby pushing or towing the vehicle)without having identified andcorrected the starting fault.If the fault cannot be identified, donot persist in attempting to start theengine and call a Renault Dealer.
Do not park the car or run theengine in locations wherecombustible substances ormaterials such as grass or
leaves could come into contactwith a hot exhaust system.

AVANTIME D66 nu647-2 C:\Documentum\Checkout\nu647-2_eng_T2.WIN 3/4/2002 13:05 - page 6
2.06
SPECIAL FEATURES OF DIESEL VERSIONSDiesel engine speedDiesel engines are fitted withinjection equipment whichprevents overrevving of the engineirrespective of the gear in use. Thereis thus no point in continuing toaccelerate - you should change gearinstead.
Running out of fuelYou may start the engine normallyafter refilling the fuel tank if it hademptied completely and providedthat the battery is well-charged.
However, if after a few seconds andseveral attempts the engine fails tostart, air must be bled from thecircuits to reprime them (seeBleeding method).
Precautions to be taken inwinterTo avoid any problems in icyconditions:- ensure that the battery is always
fully charged;- to avoid condensation forming in
the fuel tank and accumulating atthe bottom, do not allow the levelof fuel to become too low.

AVANTIME D66 nu647-2 C:\Documentum\Checkout\nu647-2_eng_T2.WIN 3/4/2002 13:05 - page 7
2.07
ADVICE ON ANTI-POLLUTION, HOW TO ECONOMISE ON FUEL, DRIVINGRENAULT is actively participatingin the reduction of pollutantexhaust gas emissions and in savingenergy.
By virtue of its design, moderatefuel consumption and initialsettings, your Renault conforms tocurrent anti-pollution standards.Technical design, however, cannotachieve all. The fuel consumptionof your car and the level of pollutantexhaust gas emissions are verymuch within your control. Makesure that your vehicle is maintainedcorrectly, use it carefully and watchyour driving style.
MaintenanceIt is important to remember thatfailure to respect anti-pollutionstandards could lead to legal actionagainst the car owner. In addition,the replacement of parts of theengine, fuel supply and exhaustsystem electronic management byparts other than thoserecommended by the manufacturerwill modify the conformity of yourvehicle such that it no longercomplies with anti-pollutionstandards.
Have your vehicle checked andadjusted by your Renault Dealer inaccordance with the instructions inthe vehicle’s Servicing booklet.
Your Renault Dealer has all theequipment necessary for ensuringyour vehicle is maintained in itsoriginal standard.
Always remember that the emissionof pollutant fumes is directly linkedto fuel consumption.
Engine adjustments• Ignition: this does not require
adjustment.
• Spark plugs: optimum conditionsof use, performance and outputdemand that the specificationslaid down by our design office berigorously adhered to.
If the spark plugs have to bechanged, use the make, type andgap specified for your vehicle'sengine. Consult your RenaultDealer for this information.
• Idling speed: this does not requireadjustment.
• Air filter: a blocked cartridgereduces output and must bechanged.

AVANTIME D66 nu647-2 C:\Documentum\Checkout\nu647-2_eng_T2.WIN 3/4/2002 13:05 - page 8
2.08
ADVICE ON ANTIPOLLUTION AND HOW TO ECONOMISE ON FUEL, DRIVING (continued)
Tyres- Pressures which are too low may
increase fuel consumption.- The use of non-recommended
tyres may increase fuelconsumption.
Driving• Drive carefully for the first few
miles until the engine reaches itsnormal operating temperature,rather than let it warm up whilethe car is stationary.
• Speed is expensive.
• “Sporty” driving uses a lot of fuel:drive with a “light right foot”.
• Use your brakes as little aspossible. If you look ahead youwill only need to lift off theaccelerator to slow down.
• Avoid fierce acceleration.
• Do not overrev the engine in theintermediate gears.Always use the highest ratiopossible without labouring theengine.
• Do not try to maintain the samespeed up a hill; accelerate nomore than you would on the level.Keep your foot in the sameposition on the accelerator pedal.
• Double declutching and revvingthe engine before switching it offare superfluous actions inmodern cars.
Bad weather,flooded roadsDo not drive through
floods if the depth of water isabove the lower edge of thewheel rims.

AVANTIME D66 nu647-2 C:\Documentum\Checkout\nu647-2_eng_T2.WIN 3/4/2002 13:05 - page 9
2.09
ADVICE ON ANTIPOLLUTION AND HOW TO ECONOMISE ON FUEL, DRIVING (continued)
General hints• Electricity is a “fuel”, so switch
off all electrical equipment whichis not required.
However (with safety always inmind), keep your lights on whenthe visibility is bad (see and beseen).
• Use the air vents at moderatespeeds. Driving with thewindows open will increase fuelconsumption by 4%.
• For vehicles with airconditioning, the extra fuelconsumed in the urban cycle canbe as much as 2 litres per 100 km:switch the system off when it isnot needed.
• Never fill the fuel tank right to thebrim as this is wasteful.
• Do not leave an empty roof rack inposition.
• It is better to fit a trailer for bulkyobjects.
• Avoid using the car fordoor-to-door calls (short journeyswith long waits in between)because the engine never reachesits normal operating temperature.Try to group your calls.

AVANTIME D66 nu647-2 C:\Documentum\Checkout\nu647-2_eng_T2.WIN 3/4/2002 13:05 - page 10
2.10
ENVIRONMENTYour vehicle has been designedwith the aim of caring for theenvironment.• All versions are equipped with a
depollution system including acatalytic converter, an lambdasensor and an activated charcoalfilter. (The activated charcoalfilter prevents vapour from thepetrol tank being released into theopen air.)
These vehicles operate withunleaded fuel only.
• The majority of components inyour vehicle can be recycled andyour vehicle already containsrecycled materials.
• 95% of the plastic components inyour vehicle are marked with asymbol which allows theprincipal component material tobe identified. These markingsmean that parts removed can besorted more easily, thusoptimising the recycling of eachof them.
In addition to this, your vehiclemeets the requirements laid downin European legislation relating toenvironmental protection.
Make your contribution towardsprotection of the environment too!When disposing of parts replacedduring routine maintenance(battery, oil filter, air filter, etc.) andoil containers (whether empty orfull of used oil, etc.), do not includethem with household waste.
Dispose of them through specialistorganisations. In all cases, complywith local legislation.

1
AVANTIME D66 nu647-2 C:\Documentum\Checkout\nu647-2_eng_T2.WIN 3/4/2002 13:05 - page 11
2.11
GEAR LEVER
To change gearMake sure you engage the gear leverin the positions marked on the leverknob.
To select reverse gearWith the vehicle stationary, lift ring1 to bring it into contact with thegear lever knob and then selectreverse gear.
The reversing lights will light up assoon as reverse gear is selected(ignition on).
Vehicles fitted with parkingassistance- Refer to the Parking assistance
section for more details.

2
AVANTIME D66 nu647-2 C:\Documentum\Checkout\nu647-2_eng_T2.WIN 3/4/2002 13:05 - page 12
2.12
HANDBRAKE POWER STEERING
To releasePull the lever up slightly, pressbutton 2, then lower the lever to thefloor.
The red warning light on theinstrument panel will light up ifyou are driving with an incorrectlyreleased handbrake.
To applyPull the lever up.
The lever should travel about10 notches to hold the vehicle. Yourvehicle is fitted with self-adjustingrear brake shoes and the handbrakeshould only be adjusted during abrake overhaul.
Make sure that thehandbrake is appliedproperly when thevehicle is stationary to
ensure that the vehicle does notmove unintentionally.
Make sure the handbrake isproperly released when driving,otherwise overheating mayoccur.
Never leave the steering wheel onfull lock when the car is parked ifyou have power-assisted steeringfitted, as this may damage thepump.
Variable power assisted steeringThe variable power-assistedsteering system is equipped with anelectronic control system whichalters the level of assistance to suitthe vehicle speed.
Steering is easier during parkingmanoeuvres (for added comfort)whilst the effort required risesprogressively as speed increases (forenhanced safety at high speeds).
Never switch off theignition when travellingdownhill, and avoiddoing so when driving in
general (power steering andbrake servo will not function).

AVANTIME D66 nu647-2 C:\Documentum\Checkout\nu647-2_eng_T2.WIN 3/4/2002 13:05 - page 13
2.13
ANTI-LOCK BRAKING SYSTEM (ABS) (depending on version or option)
When braking sharply, the two mainaims are to reduce the stoppingdistance and to keep your car undercontrol. However, there is a risk thatroad holding and directionalcontrol may be lost and the wheelsmay lock when braking, dependingon the nature of the ground, weatherconditions and your reactions. Theanti-lock braking system (ABS) hasbeen designed to combat thisdanger.
The safety enhancement is that thebrake control system prevents thewheels from locking, even if thebrakes are applied too sharply, andallows the vehicle to be steered andthus its direction to be controlled.Under these circumstances it isquite possible for the driver to steerthe vehicle to avoid an obstaclewhilst at the same time applying thebrake.
Also, this system allows you tooptimise stopping distances whenthe adhesion of one or more wheelsbecomes uncertain (wet roads,slippery or varying road surfaces).
Although this system allows you tomake maximum use of stoppingdistances, even with the ABS youstill have to take into account theactual condition of the road surface.It is still essential to follow the rulesof good driving practice (such asdriving at a safe distance from thevehicle in front). The fact that thevehicle’s safety has been increasedshould not encourage you to takerisks.
The braking controlprovided by the anti-lockbraking system isindependent of the effort
applied to the brake pedal. In anemergency, therefore, applycontinuous, heavy pressure tothe brake pedal. There is no needto pump it repeatedly.
Whenever the system is in use, youwill feel a varying degree of pulsingthrough the brake pedal. Theseperceptible signs will warn you thatthe adhesion between the tyres andthe ground has reached its limit andenable you to adapt your drivingstyle to suit the road conditions.
When the ignition is switched on,the ABS warning light will light upfor approximately 3 seconds andthen go out.
If there is a fault in one ofthe components in thesystem, this warning light
will light up on its own (dependingon the version) or simultaneouslywith the STOP message and a beep.
If this Stop warning lightcomes on, it is essentialthat you stop as soon astraffic conditions allow.
Contact a Renault Dealer.

1
4
2 3
AVANTIME D66 nu647-2 C:\Documentum\Checkout\nu647-2_eng_T2.WIN 3/4/2002 13:05 - page 14
2.14
CRUISE CONTROL
When road conditions permit (fluidor motorway traffic), cruise controlallows you to take your foot off theaccelerator while your carcontinues to cruise at the speed youhave selected. This is called thecruising speed.
This cruising speed may be set atany speed at speeds of 20 mph (30km/h) and above.
Controls1 - Cruise control main “On/Off”
switch.
2 - Cruising speed storage switchand cruising speed control.
3 - Cancel cruise control or recallstored cruising speed.
Note:Do not leave your foot on theclutch pedal.
Indicator lightsThis green indicator lightlights up on the instrumentpanel to indicate that the
cruising function is in operation.
Stored speed information appearson the instrument panel from theon-board computer 4.

AVANTIME D66 nu647-2 C:\Documentum\Checkout\nu647-2_eng_T2.WIN 3/4/2002 13:05 - page 15
2.15
CRUISE CONTROL (continued)
Switching onMove the switch 1 upwards; thegreen light lights up on theinstrument panel.
Activating cruise controlAt a stable speed (greater than 30km/h (20 mph)) and in the correctgear, press switch 2 to the right or tothe left.• The cruise control speed is stored
and automatically displayed afterthe SET symbol.
DrivingOnce a cruising speed is stored youmay take your foot off theaccelerator pedal.
Changing the cruise controlspeedYou may change the cruising speedof your car at any time by pressing 2(pressing it briefly several times orpressing and holding it):- towards “–” to reduce the cruising
speed,- towards “+” to increase the
cruising speed.
The cruise control issimply a driving aid. Thedriver remains fullyresponsible for observing
the speed restrictions laid downunder current local regulationsand/or governed by the trafficconditions in the course of ajourney.
Exceeding the cruise controlspeedIn the event of an emergencyThe cruising speed may beexceeded at any time by pressingthe accelerator pedal. The SET xxxsymbol on the instrument panelflashes to inform you that thecruising speed is being exceeded.
When the emergency is over, thevehicle will return to its set cruisingspeed as soon as you lift your footoff the pedal.
Unable to operate at the speedselectedIf the system is unable to maintainthe limited speed (for examplewhen driving down a steep hill), theSET xxx symbol on the instrumentpanel will flash to inform you of thissituation.

1
2 3
AVANTIME D66 nu647-2 C:\Documentum\Checkout\nu647-2_eng_T2.WIN 3/4/2002 13:05 - page 16
2.16
CRUISE CONTROL (continued)
Switching the function offCruise control is deactivated when:- the brake pedal is depressed,- the clutch is depressed- the O on key 3 is pressed (the
cruising speed is stored),- key 1 is pressed (the cruising
speed is not stored).and when the electronic stabilityprogram is switched on.
Recalling the cruising speedIf the speed is stored, it can berecalled by pressing R on key 3 onthe condition that the speed isabove 20 mph (30 km/h).
Switching off the ignitionThe cruising speed will be lost frommemory when the ignition isswitched off.

1
4
2 3
AVANTIME D66 nu647-2 C:\Documentum\Checkout\nu647-2_eng_T2.WIN 3/4/2002 13:05 - page 17
2.17
SPEED LIMITER
The speed limiter function allowsyou to decide on a maximumdriving speed.
This may be useful, for example, intown driving or in areas with speedrestriction (roadworks), etc.
The system operates above a drivingspeed of approximately 30 km/h(20 mph).
Controls1 Speed limiter main “On/Off”
switch
2 Limit speed storage and control
3 Cancel speed limiter and recallstored limited speed.
Indicator lightThis orange indicator lightlights up on the instrumentpanel to indicate that the
limiter function is in operation.
Stored speed information appearson the instrument panel at theon-board computer 4.

1
2
AVANTIME D66 nu647-2 C:\Documentum\Checkout\nu647-2_eng_T2.WIN 3/4/2002 13:05 - page 18
2.18
SPEED LIMITER (continued)
Switching onMove the switch 1 upwards; theorange light lights up on theinstrument panel.
Limiting the speedAt a steady speed (above 20mph (30 km/h)) and in theright gear.
Press switch 1 and the cruisecontrol speed is stored andautomatically displayed after theSET symbol.
DrivingWhen a limited speed is stored,press on the accelerator pedal untilyou reach the limited speed.
From this point, no effort on theaccelerator pedal will allow you toexceed the programmed speedexcept in an emergency (seeinformation on exceeding thelimited speed).
The speed limiter issimply a driving aid.The driver remains fullyresponsible for observing
the speed restrictions laid downunder current local regulationsand/or governed by the trafficconditions in the courseof a journey.
Changing the limited speedYou may change the limited speedof your car at any time by pressing 2(pressing it briefly several times orpressing and holding it):- towards “–” to reduce the limit
speed,- towards “+” to increase the limit
speed.

1
3
AVANTIME D66 nu647-2 C:\Documentum\Checkout\nu647-2_eng_T2.WIN 3/4/2002 13:06 - page 19
2.19
SPEED LIMITER (continued)
Exceeding the limited speedIn the event of an emergencyIt is possible to exceed the limitedspeed at any time. To do this:depress the accelerator pedalfirmly and fully (beyond the pointof resistance). The SET xxx symbolon the instrument panel flashes toinform you that the cruising speedis being exceeded.
When the emergency has passed,release the accelerator pedal: thespeed limiter function will return assoon as you reach a speed lowerthan the limited speed before theemergency.
Switching the function offThe speed limiter function isinterrupted when you press:- the O on key 3 (the limited speed
is stored),- key 1 (the limited speed is not
stored).
Note: a beep will indicate thatcruise control has been deactivated.
Return to limited speed.If the speed is stored, it can berecalled by pressing R on key 3 onthe condition that the speed isabove 20 mph (30 km/h).
Switching off the ignitionThe speed limiter function will belost from memory when the ignitionis switched off.

1
AVANTIME D66 nu647-2 C:\Documentum\Checkout\nu647-2_eng_T2.WIN 3/4/2002 13:06 - page 20
2.20
ELECTRONIC STABILITY PROGRAM: E.S.P.This system helps you to keepcontrol of the vehicle in “critical”driving conditions (avoiding anobstacle, loss of grip in a bend, etc.).
This function is anadditional aid in case ofcritical driving conditionsto allow the vehicle
behaviour to be modified inaccordance with the drivingsituation requested.
Caution, however, as thefunction does not take the placeof the driver. It does not increasethe vehicle's limits and shouldnot encourage you to drive morequickly.It can thus, under nocircumstances replace thevigilance or responsibility of thedriver when manoeuvring thevehicle (the driver must alwaysbe aware of sudden incidentswhich may occur when driving).
Operating principleA sensor in the steering wheeldetects the path selected by thedriver.
Other sensors throughout thevehicle measure the actualdirection.
The system compares the directionselected by the driver with theactual direction of the vehicle andcorrects this as required by applyingthe brakes selectively and/or actingon the engine power.
When the function is in operation,indicator light 1 flashes.

132
AVANTIME D66 nu647-2 C:\Documentum\Checkout\nu647-2_eng_T2.WIN 3/4/2002 13:06 - page 21
2.21
ELECTRONIC STABILITY PROGRAM: E.S.P. (continued)
Disabling the functionThe function is deactivatedby pressing switch 2,warning light 1 will light up
to confirm this.
This action also deactivates thetraction control mechanism: see theinformation on the traction controlsystem in section 2.
As the E.S.P. offers additional safety,it is recommended that you do notdrive with the function disabled.Correct this as soon as possible bypressing switch 2 again.
Note: E.S.P. is automaticallyreactivated when the ignition isswitched on.
FaultsIf the system detects an operatingfault, warning light 1 lights up onthe instrument panel together withthe SERVICE message on themultifunction warning light 3. Go toyour nearest Renault Dealer.

1
AVANTIME D66 nu647-2 C:\Documentum\Checkout\nu647-2_eng_T2.WIN 3/4/2002 13:06 - page 22
2.22
TRACTION CONTROL SYSTEMThis system helps to limit skiddingon drive wheels and to control thevehicle when pulling away oraccelerating.
This function is anadditional aid in case ofcritical driving conditionsto allow the vehicle
behaviour to be modified inaccordance with the drivingsituation requested.
Caution, however, as thefunction does not take the placeof the driver. It does not increasethe vehicle's limits and shouldnot encourage you to drive morequickly.It can thus, under nocircumstances replace thevigilance or responsibility of thedriver when manoeuvring thevehicle (the driver must alwaysbe aware of sudden incidentswhich may occur when driving).
Operating principleUsing the wheel sensors, the systemmeasures and compares the speedof the drive wheel at all times andslows down their over-rotation.
If a wheel is tending to skid, thesystem brakes automatically untilthe drive delivered becomescompatible with the level of grip.
The system also adjusts the enginespeed to the grip available under thewheels, independently of the actionexerted on the accelerator pedal.
When the function is in operation,indicator light 1 flashes.

132
AVANTIME D66 nu647-2 C:\Documentum\Checkout\nu647-2_eng_T2.WIN 3/4/2002 13:06 - page 23
2.23
TRACTION CONTROL SYSTEM (continued)
Disabling the functionIn some situations (driving on verywet ground: snow, mud, etc., ordriving with chained wheels), thesystem may reduce the enginepower to limit skidding. If this is notrequired, it is possible to deactivatethe function by pressing switch 2.
Indicator light 1 comes on.
Disabling the traction controlfunction also deactivates the E.S.P.function: refer to the information onthe E.S.P. path control in section 2.
Correct this as soon as possible bypressing switch 2 again.
Note: traction control isautomatically reactivated when theignition is switched on.
FaultsIf the system detects an operatingfault, warning light 1 lights up onthe instrument panel together withthe SERVICE message on themultifunction warning light 3. Go toyour nearest Renault Dealer.

12
AVANTIME D66 nu647-2 C:\Documentum\Checkout\nu647-2_eng_T2.WIN 3/4/2002 13:06 - page 24
2.24
AUTOMATIC GEARBOX
P R N Dor
M-1-2-3-4-5(depending on the position
of the lever)
A
Gear lever 1Indicator strip A (under the revcounter) shows the position of lever1.
P : ParkR : ReverseN : NeutralD : Automatic modeM: Manual mode1-2-3-4-5: gear selected in manualmode display.
DrivingWith the gear lever in position P orN, switch on the ignition.
Move the lever from position P withyour foot on the brake pedal.
The lever must only be engaged inD or R when the vehicle isstationary. With the brake pedaldepressed and accelerator pedalreleased.
For safety reasons, you must applythe brake before pressing unlockbutton 2 to move out of position P.
Driving in automatic modeSelect position D.
In the majority of traffic situations,you will not have to touch the gearlever again; the gear will changeautomatically at the right time andat the most suitable engine speed,because the system takes intoaccount the vehicle load and roadcontours and the particular drivingstyle you have chosen.

1
AVANTIME D66 nu647-2 C:\Documentum\Checkout\nu647-2_eng_T2.WIN 3/4/2002 13:06 - page 25
2.25
AUTOMATIC GEARBOX (continued)
Accelerating and overtakingQuickly depress the acceleratorpedal completely (until you passthe point of resistance).
This will activate the “kickdown”switch allowing you todownchange to the optimum gear.
Driving in manual modeWith gear lever 1 in position D,move the lever to the left: indicatorlight M and the gear selected lightup on the instrument panel.
Shifting lever 1 repeatedly allowsyou to change gears manually.- To move down through the gears,
push the lever backwards.- To move up through the gears,
push the lever forwards.
Driving in townYou can stop without changingdown. The automatic gearbox willselect first to restart.
The gears selected are displayed onindicator strip A located beneaththe rev counter.
A
M-1-2-3-4-5
Special casesIn certain driving conditions (e.g.:engine protection, operation of theelectronic stability program: E.S.P.,etc.) the automated system maychange the gear automatically.
Likewise, to prevent incorrectmanoeuvres, the gear change maybe refused by the system: in thiscase the gear display flashes for afew seconds as a warning.
How to drive economicallyLeave the selector in position D(drive) on the open road. Press theaccelerator pedal lightly to ensureautomatic gear changes atcomparatively low engine speeds.

12
3
P
N
AVANTIME D66 nu647-2 C:\Documentum\Checkout\nu647-2_eng_T2.WIN 3/4/2002 13:06 - page 26
2.26
AUTOMATIC GEARBOX (continued)
Special circumstances- If the bends and hills on the road
do not allow you to stay inautomatic mode (e.g.: in themountains), we recommend thatyou change to manual mode.This will prevent the automaticgearbox changing gearssuccessively when climbing, andpermit engine braking on longdescents.
- In cold weather, start the engineand wait a few seconds beforemoving the selector lever fromposition P or N and engaging it inD or R to prevent the enginestalling..
Stopping the vehicleWhen the vehicle is stationary,move the lever to position P whilekeeping your foot on the brakepedal: the gearbox is in neutral andthe drive wheels are mechanicallylocked by the transmission.
Apply the handbrake.
Faults
When driving, if this warning lightcomes on (on the multi-functionwarning light), it indicates a fault.Consult a RENAULT Dealer as soonas possible.
Towing a vehicle with anautomatic gearbox: specialinformationEngine switched off: The gearbox isno longer lubricated. It is preferableto tow this type of vehicle on atrailer or tow it with the frontwheels off the ground.
In exceptional cases, you can towthe vehicle with all four wheels onthe ground for a maximum distanceof 30 miles (50 km).
The gear selector levermust be in neutral(position N).If lever 1 becomes jammed
in position P, while you arepressing the brake pedal, the levercan be released manually.
To do this, simultaneously pressbutton 3 (using a small thinscrewdriver) and unlock button 2to move the lever into position P.

AVANTIME D66 nu647-2 C:\Documentum\Checkout\nu647-2_eng_T2.WIN 3/4/2002 13:06 - page 27
2.27
PARKING ASSISTANCEOperating principleUltrasound detectors located in therear bumper “measure” the distancebetween the vehicle and an obstaclewhen the vehicle is reversing.
This measurement is indicated bybeeps which become more frequentthe closer you come to the obstacle,until they become a continuousbeep when the vehicle isapproximately 25 centimetres fromthe obstacle.
Note: Make sure that the ultrasonicdetectors do not become covered(dirt, mud, snow, various kinds ofbicycle holder-type accessories,etc.).
Towing a trailer or caravan: Thedetection system is automaticallydisabled as soon as the towing hitchis connected.
FaultsWhen the system detects a fault, abeep sounds for 5 seconds as awarning when reverse gear isselected.
Consult your Renault Dealer.
This function is anadditional aid whichindicates the distancebetween the vehicle and an
obstacle when the vehicle isreversing by means of soundsignals.
It can, therefore, under nocircumstances replace vigilanceand responsibility on the part ofthe driver when reversing.
The driver should always payattention to sudden occurrencesduring driving: always ensure thatthere are no moving obstacles (suchas a child, animal, pram orbicycle...) or small, narrow objectssuch as stones or posts in your pathwhen manoeuvring.

AVANTIME D66 nu647-2 C:\Documentum\Checkout\nu647-2_eng_T2.WIN 3/4/2002 13:06 - page 28
2.28

AVANTIME D66 nu647-2 C:\Documentum\Checkout\nu647-2_eng_T3.WIN 3/4/2002 13:10 - page 1
3.01
Section 3: Your comfort
Heating and ventilation: design and features ............................................................................................... 3.02air vents ...................................................................................................... 3.02 - 3.03heating and air conditioning ................................................................... 3.04 3.07automatic air conditioning ...................................................................... 3.11 3.17passenger heating control .......................................................................... 3.06 - 3.13advice on use ............................................................................................ 3.08 3.10
Interior lights ...................................................................................................................................... 3.18 3.20Electric windows .................................................................................................................................. 3.21 - 3.22Windscreen/Sun visor ..................................................................................................................................... 3.23Sunroof ............................................................................................................................................................. 3.24Sunroof blinds ................................................................................................................................................. 3.25Passenger compartment storage ......................................................................................................... 3.26 3.28Ashtrays/Cigarette lighter ............................................................................................................................... 3.28Rear parcel shelf .............................................................................................................................................. 3.29Rear bench seat ................................................................................................................................................ 3.30Luggage compartment ..................................................................................................................................... 3.31Transporting objects in the luggage compartment ........................................................................................ 3.32

3 4 5 6 7 8 7 6 5 3
2 2 9
1 1
AVANTIME D66 nu647-2 C:\Documentum\Checkout\nu647-2_eng_T3.WIN 3/4/2002 13:10 - page 2
3.02
HEATING - VENTILATION

AVANTIME D66 nu647-2 C:\Documentum\Checkout\nu647-2_eng_T3.WIN 3/4/2002 13:10 - page 3
3.03
HEATING - VENTILATION (continued)
Design and featuresAir from the outside enters thepassenger compartment via thevents located above the lenses andthrough the grilles which must notbe allowed to become blocked(snow, dead leaves, etc.).
The outside air is filtered by twofilters which need to be kept cleanand in good condition if they are toremain efficient before it is blowninto the passenger compartment.Provision is made to change these aspart of your vehicle's servicingschedule.
The air thus filtered and cleaned(pollen and particles, etc. removed)actively contributes to the comfortand well-being of the vehicle'soccupants since it limits the dustdeposits in the passengercompartment.
The heating system consists of tworadiators located on either side ofthe dashboard. The driver cancontrol the temperature of thepassenger and driver radiators. Thefront passenger can only control theone on his or her side.
Air vents (air outlets)1 Air diffusers for rear seats
2 Air diffusers for front footwells
3 Windscreen de-icing - demistingoutlets
4 Driver's control unit
5 Deflector de-icing - demistingoutlets
6 Adjustable side vents
7 Windscreen de-icing - demistingoutlets
8 Adjustable centre air vents forunheated air
9 Passenger's control unit
Instrument panel air ventsIn order to provide individualventilation, side vents 6 and centrevents 8 are controlled manually:adjustment of the volume of air flowand direction of flow.
Once you have selected thedistribution of the air supply, youshould adjust the flow.
- The centre air vents 8 supply theair at ambient temperature(outside or recirculated air) or at acooler temperature if the airconditioning is in operation.

9
8
7
6
1a 1b
2
3
4
5
AVANTIME D66 nu647-2 C:\Documentum\Checkout\nu647-2_eng_T3.WIN 3/4/2002 13:10 - page 4
3.04
HEATING - VENTILATION (continued) manual air conditioning versionControls1a-1b - De-icing: “See clear” button
2 - Air conditioning
3 - Air distribution control
4 - Air distribution control
5 - Air adjustment
6 - Indicator light
7 - Adjustment of volume of airdelivered
8 - Air distribution control
9 - Isolation of the passengercompartment (air recirculation).
5 - Adjusting the airtemperature.
To raise the temperature, turn thebutton to the right and in the reversedirection to lower it.
This button regulates thetemperature on the driver andpassenger sides (indicator light 6lights up) or only on the driver side(indicator light 6 goes out) if thepassenger temperature control isactivated.
You can turn off the passengertemperature control by pressing oneof the air supply buttons 3 - 4 or 8for a couple of seconds.
In addition, when button 1 isselected, the passenger control isautomatically turned off.

AVANTIME D66 nu647-2 C:\Documentum\Checkout\nu647-2_eng_T3.WIN 3/4/2002 13:10 - page 5
3.05
HEATING - VENTILATION (continued) manual air conditioning version (continued)
3-4-8 - Distribution of blown airWe advise the following positions:
3 - “Summer comfort”The air flow is directed onlytowards the side vents andcentre vents.
4 - “Winter, mid-seasoncomfort with demisting”The air flow is distributedbetween the demisting/de-icingvents and the front and rearfootwells.
8 - “Winter, mid-seasoncomfort”The air flow is directed towardsthe front and rear footwells witha light flow to the demisting/de-icing vents.
7 - Air flowMove the button to the right toincrease the speed of ventilation.
Position 0: no ventilation (orminimum air flow if the airconditioning is operating).
Position 8: maximum ventilation.We would advise you for comfort toallow a minimum flow.
D - De-icing “See clear” button1a - Pressing the button onceactivates the demisting/de-icingfunction. The air flow is directedwholly towards the demisting/de-icing vents for the windscreen,deflectors and front door windows.
1b - Pressing the button a secondtime activates the “See clear”function for 15 minutes. This buttonstarts all the air conditioningfunctions automatically, thusproviding the best possibledemisting”de-icing.
Demisting of the rear screen andrear-view mirrors is also activated.
After 15 minutes the functionreverts to demisting/de-icing.
To interrupt this function, press thisbutton again (you will return to 1a)or select one of the air distributionbuttons 3-4 or 8.
When this function is active, theRecycled air and Air conditioningbuttons cannot be selected. The airflow and temperature can still beadjusted for comfort using thedriver control.
- Remember to close thedashboard vents to increase theair flow to the diffusers andvents (position 3 or 4)
- The indicator light for eachfunction lights up when it isselected (1b for the See clearfunction).

1
AVANTIME D66 nu647-2 C:\Documentum\Checkout\nu647-2_eng_T3.WIN 3/4/2002 13:10 - page 6
3.06
HEATING - VENTILATION (continued) passenger heating controlWhen in the passenger seat, you canadjust the heating temperature onyour side.
To do so:- Activate the control by pressing
button 1, the indicator light willcome on.
- To raise the temperature, turn thebutton to the right; turn it the otherway to lower the temperature.
Press button 1 again to turn off thisfunction. The indicator light will goout.
When the control is turned off, thetemperature setting is controlled bythe driver who can adjust thetemperature for the whole vehicle.
The control is overridden when theSee clear function is selected.
The control is automatically turnedoff by the driver when he or she:- selects the demisting/de-icing
button,- holds down (for approximately
two seconds) one of the “winter,mid-season comfort”, “winter,mid-season comfort withdemisting” or “summer comfort”air distribution buttons.

1a 1b
9
8
7
6
2
3
4
5
AVANTIME D66 nu647-2 C:\Documentum\Checkout\nu647-2_eng_T3.WIN 3/4/2002 13:10 - page 7
3.07
HEATING - VENTILATION (continued) air conditioning2 - Air conditioningAir conditioning must be used withthe windows closed for it to beeffective.
Air conditioning is useful forspeeding up the demisting process.Do not be afraid to mix it with warmair in the winter.
9 - Isolation of the passengercompartmentThe air is drawn from the passengercompartment and recirculatedwithout admitting air from outside.This position allows you to isolateyourself from the atmosphereoutside (when driving in pollutedareas or accelerated cooling of thevehicle by means of airconditioning).
This position should only be usedfor a short time to ensure that the airin the passenger compartment isrenewed and to prevent thewindows misting up.
Close the centre dashboard ventsto increase the efficiency offunctions 1a or 1b (if the outsidetemperature is below 20°).
The indicator light for eachfunction lights up when it isselected.

AVANTIME D66 nu647-2 C:\Documentum\Checkout\nu647-2_eng_T3.WIN 3/4/2002 13:10 - page 8
3.08
HEATING - VENTILATION (continued) advice on useTo cool your vehicle (after it hasbeen parked in the sun)Lower the windows and start theengine to disperse the hot air . Openthe dashboard vents then activate:- the “summer comfort” air supply,- the air conditioning,- maximum air flow for a few
minutes,- the coldest air temperature.
Wait a few seconds before closingthe windows. Then adjust theventilation speed to suit whilstallowing an adequate air flow forthe comfort of rear seat passengers.
You can lower the temperaturemore quickly by using recirculatedair for a few minutes.
Do not open the refrigerantcircuit: the fluid isdangerous to the eyes andskin.

AVANTIME D66 nu647-2 C:\Documentum\Checkout\nu647-2_eng_T3.WIN 3/4/2002 13:10 - page 9
3.09
HEATING - VENTILATION (continued) advice on use (continued)
To heat your vehicle in coldweatherClose the dashboard vents thenactivate:- the “winter, mid-season comfort”
air supply,- the temperature in the maximum
heat position,- maximum air flow for a few
minutes once the engine hasbegun to warm up.
When the temperature is right foryou, reduce the ventilation speed ortemperature.
For the comfort of rear seatpassengers, allow an adequate airflow to heat the rear of the vehicle.
If demisting is inadequate, changeover to the “Winter, mid-seasoncomfort with demisting” airdistribution setting, having madesure that the dashboard vents areclosed.

83
4
1a 1b
AVANTIME D66 nu647-2 C:\Documentum\Checkout\nu647-2_eng_T3.WIN 3/4/2002 13:10 - page 10
3.10
HEATING - VENTILATION (continued) advice on use (continued)
Demisting/de-icing your field ofvisionClose the dashboard vents thenactivate the See clear function (1b,two indicator lights come on).
As soon as your field of vision isclear, change to one of the airdistribution buttons 1a-3-4 or 8 tosuit you.

9
8
7
2
3
4
5
6
11
10
1a 1b
AVANTIME D66 nu647-2 C:\Documentum\Checkout\nu647-2_eng_T3.WIN 3/4/2002 13:10 - page 11
3.11
AUTOMATIC AIR CONDITIONING
Controls1a - De-icing/demisting
1b - De-icing: “See clear” button
2 - Switching on the airconditioning
3 - Air distribution
4 - Display
5 - Adjusting the passengercompartment temperature (+)
6 - Switching on automatic mode
7 - Adjusting the ventilation speed
8 - Adjusting the passengercompartment temperature (–)
9 - 10 - Air distribution
11 - Isolating the passengercompartment (air recirculation)
Ambient temperature(automatic mode)Automatic air conditioning is asystem which will ensure that thetemperature in the passengercompartment is maintained at acomfortable level (except inextreme weather conditions).
This system allows:The temperature in the passengercompartment to be maintained at acomfortable level above a certaintemperature setting, irrespective ofweather conditions.
Separate settings on the driver andpassenger sides.
To adjust the temperature selectedas a function of various sensors(located on the upper console, theinstrument panel and in the ceilingtrim).
NOTE: When the system is inautomatic mode (button 6)remember to close the centredashboard air vents if the outsidetemperature is below thetemperature setting in thepassenger compartment.

9
8
7
2
3
4
5
6
10
1
AVANTIME D66 nu647-2 C:\Documentum\Checkout\nu647-2_eng_T3.WIN 3/4/2002 13:10 - page 12
3.12
AUTOMATIC AIR CONDITIONING (continued)
Starting automatic mode.- Press button 6. The indicator light
in the button lights up.- Select the temperature setting
using buttons 5 and 8
Maximum automatic setting: 28°
Minimum automatic setting: 16°
If you attempt to select a temperatureabove 28°C, the display 4 willindicate HI (high). The system willthen operate at the maximumtemperature setting. Automaticcontrol will no longer be active.
If you attempt to select atemperature below 16°C, thedisplay will indicate LO (low). Thesystem will then operate at thecoldest possible setting. Automaticcontrol will no longer be active.
To obtain and conserve the selectedtemperature setting, the system willcontrol the following parameters:- ventilation speed- air distribution- air recirculation management- switching air conditioning on or
off
With the exception of certaincircumstances, it will not benecessary to deselect automaticmode by operating buttons 1, 2, 3, 7,9, and 10.
In cold weather, the automatic airconditioning system will not startimmediately at maximum powerbut will increase progressively untilthe engine temperature is warmenough to heat the passengercompartment air. This may takebetween 30 seconds and severalminutes.
The figure on the display is thetemperature setting.When the vehicle is started in coldor hot weather, increasing ordecreasing the values displayeddoes not mean that the comfortlevel is reached more quickly (thesystem optimises the temperatureincrease or decrease whatever theair temperature indicated).The instrument panel side ventsmay remain open, irrespective ofweather conditions. However, it isadvisable to keep the vents closedin cold weather.The centre air vents (cold air only)must be kept closed for outsidetemperatures below about 20° toensure that the regulation systemoperates as efficiently as possible.Above 20° they must be open toensure that the air conditioningperforms as efficiently as possible.

12 13
AVANTIME D66 nu647-2 C:\Documentum\Checkout\nu647-2_eng_T3.WIN 3/4/2002 13:10 - page 13
3.13
AUTOMATIC AIR CONDITIONING (continued)
Passenger controlThe passenger can adjust thetemperature setting for thepassenger side.
To do so:- Select an air temperature setting
between 16 and 28° using keys 12or 13.
- When the passenger control is notactivated, the temperature settingis controlled by the driver, whosets the temperature for the entirevehicle.
- When the passenger control hasbeen activated, the driver can takecontrol of the whole of thepassenger compartment bypressing the “auto” button (6) ofthe driver's control for more thanthree seconds. The temperaturelevel is set to that on the driver’sside. This operation is automatic ifthe ignition has been switched offfor more than 15 minutes.
The control is overridden when theSee clear function is selected.

9
310
6
1a 1b
AVANTIME D66 nu647-2 C:\Documentum\Checkout\nu647-2_eng_T3.WIN 3/4/2002 13:10 - page 14
3.14
AUTOMATIC AIR CONDITIONING (continued)
De-icing/demisting (“See clear”button)- Pressing button 1 once activates
the demisting/de-icing mode. Theindicator light in the button willlight up. The indicator light inbutton 6 will go out. The airconditioning system is no longeroperating in automatic airdistribution mode.
Pressing the button a second timeactivates the See clear function (twoindicator lights come on). It allowsfast demisting and de-icing of thewindscreen and front sidewindows. The temperature displaygoes out.
This button starts all the airconditioning functions automatically,thus providing the best possibledemisting/de-icing. However, itprohibits the use of air recirculation.
De-icing of the rear screen, thewindscreen and the electricrear-view mirrors is also activated.
The best possible flow of air is thendirected towards the windscreenand front window air outlets.
After a few minutes, operationreverts to demisting/de-icing.
To deselect this mode, press thebutton again (you will return to 1a)or select one of the distributionbuttons 3, 9, or 10.
Press button 6 to return to automaticmode.
Electrical de-icing of thewindscreen and the rear screenPress button 1b: the indicator lightin it will light up.
This function demists and de-icesthe windscreen, the rear-viewmirrors and the rear window veryquickly.
There are two ways to switch thisfunction off:• it stops automatically after
operating for around:- a maximum of 12 minutes for
the windscreen (time variesaccording to the conditions)
- 12 minutes for the rear screenand the rear-view mirrors
• it stops when you press the key onthe instrument panel.
The operation indicator light goesout.

9
7
310
6
AVANTIME D66 nu647-2 C:\Documentum\Checkout\nu647-2_eng_T3.WIN 3/4/2002 13:10 - page 15
3.15
AUTOMATIC AIR CONDITIONING (continued)
Personalised operationSelection of air flow distributionThe system normally operates inautomatic mode but you can changethe settings determined by thesystem (quantity of air, etc.).
Automatic mode is switched off bypressing one of the followingbuttons.
The indicator light in button 6 willgo out.- Button 3: The air flow is
distributed to the side vents andthe centre vents only.
- Button 9: The air flow isdistributed between thedemisting/de-icing vents and thefront and rear footwells.
- Button 10: The air flow isdistributed to the front and rearfootwells, with a light flow of airto the demisting/de-icing vents.
The other parameters remain underautomatic control.
Varying the blower speedIn automatic mode, the system usesthe most suitable amount of air toreach and maintain the desiredtemperature.
Automatic mode is switched off bypressing button 7.The indicator light in button 6 willgo out.
These buttons increase or decreasethe amount of air blown into thepassenger compartment.
The other parameters remain underautomatic control.
Stopping the systemPress button 7 (–) until all theindicator lights go out.
The system can be switched back onmanually by pressing one of thedriver's control keys, orautomatically after the ignition hasbeen switched off for more than 15minutes.

211
6
AVANTIME D66 nu647-2 C:\Documentum\Checkout\nu647-2_eng_T3.WIN 3/4/2002 13:11 - page 16
3.16
AUTOMATIC AIR CONDITIONING (continued)
Switching the air conditioningon or offIn automatic mode, the systemswitches the air conditioningsystem on or off, depending on theexternal climatic conditions.
The automatic mode is switched offby pressing button 2; the indicatorlight in button 6 will go out.
Button 2 allows you to switch theair conditioning system on or off.
Selecting the See clear function orrecirculation automatically activatesthe air conditioning.
Air recirculation mode- Press button 11, the operating
indicator light will come on.
In this position, air is taken from thepassenger compartment and isrecirculated without air being takenin from the outside.
Recirculation of air allows theexternal atmosphere to be isolated(driving in polluted areas).
Prolonged use of the airrecirculation mode may cause thewindows to mist up or lead toodours, as the air is not replaced.
We therefore advise you to return tonormal mode (external air) bypressing button 11 as soon as airrecirculation is no longer required.

AVANTIME D66 nu647-2 C:\Documentum\Checkout\nu647-2_eng_T3.WIN 3/4/2002 13:11 - page 17
3.17
AUTOMATIC AIR CONDITIONING (continued)
Difference in temperaturesselected- If, for example, there is too great a
difference between the airtemperature selected by theright-hand side occupant and thatselected by the left-hand-sideoccupant, the person in theleft-hand seat may feel a change inthe air temperature. This can beadjusted using buttons 5 and 8 ofthe driver's control unit until therequired comfort level is obtained.The system will ensure that thislevel is maintained.
- It is not advisable to selectMINIMUM on one side andMAXIMUM on the other at thesame time.
Storing dataIf the ignition has been switched offfor less than 15 minutes, the systemretains the same setting as was inuse before the ignition wasswitched off when the ignition isswitched on again.
If the ignition has been switched offfor more than 15 minutes, thesystem will adopt the comfort levelselected by the driver for both sidesof the vehicle.
Fuel consumptionYou will normally notice anincrease in fuel consumption(especially in the urban cycle) whenthe air conditioning is operating.
Use air conditioning occasionally inwinter to maintain the system incorrect working order.
Do not worry about any waterwhich may appear fromunderneath the vehicle as thisresults from condensation.
No cool airCheck that the controls are setcorrectly and that the fuses are ingood condition. If both these pointsare correct, switch off the systemand consult a Renault Dealer.
Do not open therefrigerant circuit: thismay cause injuries to theeyes or skin.
BatteryAvoid using the rear screen de-icerand/or the electric windscreende-icer when the engine is switchedoff. As with all electricalconsumers, this discharges thebattery unnecessarily.
FaultsIn general, if you notice thatde-icing, demisting or airconditioning has become lesseffective, this may be caused by aclogged particle filter element.Consult your Renault Dealer.

1
3
2 4
AVANTIME D66 nu647-2 C:\Documentum\Checkout\nu647-2_eng_T3.WIN 3/4/2002 13:11 - page 18
3.18
INTERIOR LIGHTING
Courtesy light 1 and mapreading light 2Use switch 3 to select between- permanent lighting,- lighting that comes on when a
door opens. The light only goesout when the doors are closedcorrectly,
- the map reading light 2.
Map reading light 2Adjust the light to suit yourrequirements.
Light beneath the sun visorLower the sun visor.
Press switch 4.
Automatic operation of theinterior lights (in controlledlighting position)- The interior lighting is switched
on for approximately 15 secondsif the doors are unlockedremotely.
- The interior lighting is switchedoff immediately if the doors arelocked remotely.
- If the door is open (or is notproperly closed), the lighting isswitched on for a period ofapproximately 15 minutes.
- If all the doors are closed whenthe ignition is switched on, theinterior lights dim gradually.

5
76
AVANTIME D66 nu647-2 C:\Documentum\Checkout\nu647-2_eng_T3.WIN 3/4/2002 13:11 - page 19
3.19
INTERIOR LIGHTING (continued)
Rear courtesy light 5 and mapreading light 6Use switch 7 to select between:- permanent lighting,- lighting that comes on when a
door is opened. The light onlygoes out when the doors are closedcorrectly,
- the map reading light.
Map reading light 2Adjust the light to suit yourrequirements.
Automatic operation of theinterior lights (in controlledlighting position)- The interior lighting is switched
on for approximately 15 secondsif the doors are unlocked byremote control.
- The interior lighting is switchedoff immediately if the doors arelocked by remote control.
- If the door is open (or is notproperly closed), the lighting isswitched on for a period ofapproximately 15 minutes.
- If all the doors are closed whenthe ignition is switched on, theinterior lights dim gradually.

2
3
1
AVANTIME D66 nu647-2 C:\Documentum\Checkout\nu647-2_eng_T3.WIN 3/4/2002 13:11 - page 20
3.20
INTERIOR LIGHTS (continued)
Footwell lighting- Lighting 1 is controlled by one of
the doors opening.Refer to the Automatic operationof interior lighting paragraph.
Floor lighting- A light 2 located in the lower
section of each door lights up theground when the door is opened.
Luggage compartment light- The light 3 is controlled by the
tailgate opening.
The light goes out automatically ifthe tailgate is left open for morethan 15 minutes.

1
53
2
4
AVANTIME D66 nu647-2 C:\Documentum\Checkout\nu647-2_eng_T3.WIN 3/4/2002 13:11 - page 21
3.21
FRONT ELECTRIC WINDOWS
Front electric windowOperationPress or pull briefly on the switch (1driver's side and 2 passenger's side)to raise or lower the window fully.
Pressing switch 1 during thisoperation will stop the windowmoving.
Note:The electric windows still operatefor 30 seconds after the ignition hasbeen switched off, or if the key isleft in the auxiliaries position.
The window lowers slightly whenthe door is opened.
ReinitialisingIn the event of a power failure(e.g.: battery flat or disconnected,power supply lead broken, fusesblown ...)
Once the fault has been remedied:- open the door- switch on the ignition- lower the window- close the door- lift the switch controlling closure
of the window- when the window has been
lowered completely, keep theswitch lifted for at least threeseconds to allow it to store theposition
- repeat these operations for thesecond door.
- check that the function is in goodworking order.
Child safetySwitch 5 prevents operation of the rear windows using theswitches in the rear of the vehicle.
Never leave the key in the ignition when a child (or animal) is alone in thevehicle.With the key in the ignition it would be possible to operate the electricwindows and there is a risk that the child may be seriously injured (bytrapping his or her neck, arm, hand, etc.).

56
AVANTIME D66 nu647-2 C:\Documentum\Checkout\nu647-2_eng_T3.WIN 3/4/2002 13:11 - page 22
3.22
REAR ELECTRIC WINDOWS
Rear electric windowsTo lowerPress switch 6 briefly to lower thewindow completely.
Pressing the switch during thisoperation will stop the windowmoving.
To raise:Press and hold switch 6.
Switches 3 and 4 (as illustrated onthe previous page) control the rearwindows from the driver's seat.
Child safetySwitch 5 preventsoperation of the rearwindows using the
switches in the rear of thevehicle.
Never leave the key in theignition when a child (or animal)is alone in the vehicle.With the key in the ignition itwould be possible to operate theelectric windows and there is arisk that the child may beseriously injured (by trappinghis or her neck, arm, hand, etc.).

1
2
AVANTIME D66 nu647-2 C:\Documentum\Checkout\nu647-2_eng_T3.WIN 3/4/2002 13:11 - page 23
3.23
WINDSCREEN/SUN VISOR
Windscreen with reflectivelayersThis windscreen reflects the sunand, in particular, limits theinfrared rays entering the passengercompartment.
An area 1 is provided for affixingpasses to the windscreen (e.g.motorway permits, car park seasontickets, etc.).
Vanity mirrorLift the cover 2 on the sun visor.
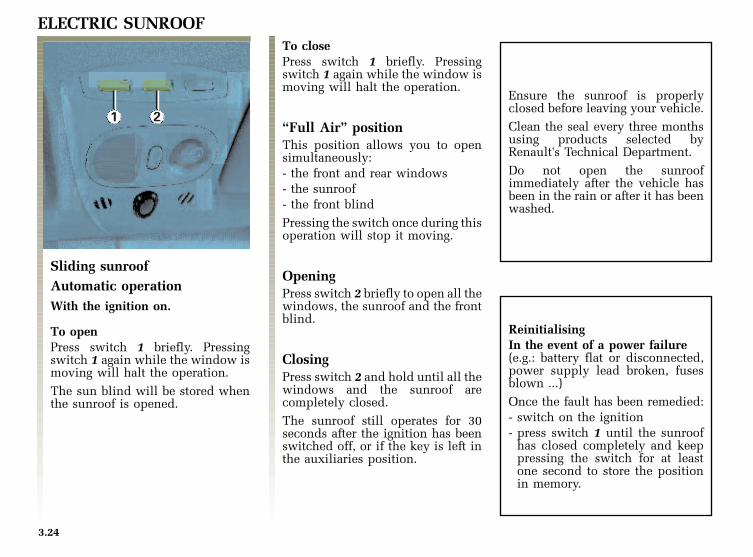
1 2
AVANTIME D66 nu647-2 C:\Documentum\Checkout\nu647-2_eng_T3.WIN 3/4/2002 13:11 - page 24
3.24
ELECTRIC SUNROOF
Sliding sunroofAutomatic operationWith the ignition on.
To openPress switch 1 briefly. Pressingswitch 1 again while the window ismoving will halt the operation.
The sun blind will be stored whenthe sunroof is opened.
To closePress switch 1 briefly. Pressingswitch 1 again while the window ismoving will halt the operation.
“Full Air” positionThis position allows you to opensimultaneously:- the front and rear windows- the sunroof- the front blind
Pressing the switch once during thisoperation will stop it moving.
OpeningPress switch 2 briefly to open all thewindows, the sunroof and the frontblind.
ClosingPress switch 2 and hold until all thewindows and the sunroof arecompletely closed.
The sunroof still operates for 30seconds after the ignition has beenswitched off, or if the key is left inthe auxiliaries position.
Ensure the sunroof is properlyclosed before leaving your vehicle.
Clean the seal every three monthsusing products selected byRenault's Technical Department.
Do not open the sunroofimmediately after the vehicle hasbeen in the rain or after it has beenwashed.
ReinitialisingIn the event of a power failure(e.g.: battery flat or disconnected,power supply lead broken, fusesblown ...)
Once the fault has been remedied:- switch on the ignition- press switch 1 until the sunroof
has closed completely and keeppressing the switch for at leastone second to store the positionin memory.

3
4
AVANTIME D66 nu647-2 C:\Documentum\Checkout\nu647-2_eng_T3.WIN 3/4/2002 13:11 - page 25
3.25
SUNROOF BLIND
Ensure that closing thesunroof will not pose a riskto the passengers.
Never leave the vehicleunattended with the key in theignition if there is a child (oranimal) in the vehicle.With the key in the ignition itwould be possible to operate theelectric sunroof and there is a riskthat the child may be seriouslyinjured (by trapping his or herneck, arm, hand, etc.).
Front sunroof blind
With the ignition on:To roll upPress switch 3 briefly.
To roll downPress and hold switch 3 until theblind is unrolled to the desiredposition.
Rear sunroof blindLift up the handle 4 to unlock androll up the blind.
You are strongly recommendednot to extend the front blindwhen the vehicle is travelling athigh speed with the sunroofopen.

23
4
1
AVANTIME D66 nu647-2 C:\Documentum\Checkout\nu647-2_eng_T3.WIN 3/4/2002 13:11 - page 26
3.26
PASSENGER COMPARTMENT STORAGE
Centre console compartmentLift cover 1 to open thecompartment.
The storage compartment lights upas soon as it is opened.
The compartment can be lockedwith its key 2.
DrawerPress 3 and release to open thedrawer.
Push the drawer in to close it.
Passenger side glove boxPress on the cover 4 to open.
There is a clip to hold a pen insidethe cover.
On vehicles fitted with a navigationsystem, the glove box is replaced bythe CD-ROM reader.
No objects should be placed on the floor (area in front of driver) as such objects may slide under the pedalduring braking manoeuvres, thus obstructing its use.The centre console compartment must be closed when the vehicle is being driven.

2
3
1
AVANTIME D66 nu647-2 C:\Documentum\Checkout\nu647-2_eng_T3.WIN 3/4/2002 13:11 - page 27
3.27
PASSENGER COMPARTMENT STORAGE (continued)
Front central arm rest blockLift cover 1.
Slide the armrest to adjust it to theposition of the front seat.
Door pockets 2 Rear pockets 3

2
4
1
3
AVANTIME D66 nu647-2 C:\Documentum\Checkout\nu647-2_eng_T3.WIN 3/4/2002 13:11 - page 28
3.28
STORAGE COMPARTMENTS/ASHTRAY/CIGARETTE LIGHTER
Seatback pouchThe pouch 1 will hold slimdocuments.
Ashtray in front consoleTo open, press the centre of thecover 2 downwards. Thecompartment opens automatically.
To empty the ashtray, press thebottom of the open cover. Thisejects the ashtray.
Cigarette lighterWith the ignition on, push in thecigarette lighter 3.
It will spring back with a click whenit is ready. Pull it out to use.
After use, replace it withoutpushing it all the way in.
Accessories socket(cigarette lighter type)With the ignition switched on, raisetab 4 and connect the accessory.
The accessories socket should onlybe used for equipment consumingup to 120 watts.
It only operates when the ignition ison or the key is turned to theauxiliaries position.

1
2
AVANTIME D66 nu647-2 C:\Documentum\Checkout\nu647-2_eng_T3.WIN 3/4/2002 13:11 - page 29
3.29
REAR PARCEL SHELF
Rear parcel shelf 1To remove, unhook the two straps 2from the tailgate.
Lift the rear parcel shelf slightly andpull it towards you.
Proceed in reverse order to refit theshelf.
Flat floor functionYou can store the parcel shelf flat inthe luggage compartment by turningit over, thus obtaining a flat floorwhen the bench seat is foldeddown.
Do not place objects,especially heavy ones, onthe parcel shelf when it israised, these are likely to
constitute a hazard to theoccupants of the vehicle in theevent of sudden braking or anaccident.

3
1
2
AVANTIME D66 nu647-2 C:\Documentum\Checkout\nu647-2_eng_T3.WIN 3/4/2002 13:11 - page 30
3.30
REAR BENCH SEAT
The seat and the seatback may befolded down in one or two parts toallow bulky objects to be carried.
To fold away the seatRaise the seat 1, and place itvertically against the front seats.
To fold down the seatbackRemove the rear head restraints.
Press button 2 and lower theseatback.
When returning the seatback to its normal position, make sure that it is properly locked at the top. Where seatcovers are fitted, make sure these do not prevent the seatback latch from locking.When moving the rear bench seat, ensure that the seat belt buckles are positioned correctly before folding theseat away.
Once the bench seat has been returned to its normal position, check that the seat belts are correctly positioned in thebelt guides 3.

1
3
AVANTIME D66 nu647-2 C:\Documentum\Checkout\nu647-2_eng_T3.WIN 3/4/2002 13:11 - page 31
3.31
LUGGAGE COMPARTMENT
The luggage compartment lid locksand unlocks at the same time as thedoors when the remote control isactivated.
To open the tailgate window:Place your hand level with thecut-out in the bumper 1 and presson the switch, pull towards you, theremainder of the opening operationwill be completed automatically.
To close the tailgate:Lower the tailgate using handle 3inside the tailgate to help you.
When the luggage compartment lidis at shoulder height, releasehandle 3 and push down on the lidfrom the outside; it will closeautomatically.

AVANTIME D66 nu647-2 C:\Documentum\Checkout\nu647-2_eng_T3.WIN 3/4/2002 13:11 - page 32
3.32
TRANSPORTING ITEMS IN THE LUGGAGE COMPARTMENTAlways position the objectstransported so that the largestsurface is against:
- The back of the rear bench seat, fornormal loading.
- The folded down seat, formaximum loading.
Always position theheaviest items directly onthe floor.
Use the lashing points on theluggage compartment floor (if theseare fitted to the vehicle) to fix theretaining net. The luggage shouldbe loaded in such a way that noitem will be thrown forward andstrike the occupants if the driverhas to brake suddenly.
Fasten the rear seat belts, even ifthe seats are not occupied.

nu647-2_fra_G4.qxd 26/02/02 16:48 Page 4.01
AVANTIME D66 nu647-2 C:\Documentum\Checkout\nu647-2_eng_T4.WIN 3/4/2002 13:13 - page 1
4.01
Section 4: Maintenance
Bonnet .............................................................................................................................................................. 4.02Engine oil level ..................................................................................................................................... 4.03 - 4.04Oil changes: Engine ........................................................................................................................................ 4.05Engine oil grade .................................................................................................................................... 4.06 - 4.07Levels: Brake fluid .......................................................................................................................................... 4.08
Coolant ................................................................................................................................................ 4.09Power assisted steering pump ........................................................................................................... 4.10Battery ................................................................................................................................................. 4.10Screen washer reservoir ..................................................................................................................... 4.11
Air filter ........................................................................................................................................................... 4.12Bodywork maintenance ....................................................................................................................... 4.13 - 4.14Interior maintenance ....................................................................................................................................... 4.15

1
4
5
3
2
nu647-2_fra_G4.qxd 26/02/02 16:48 Page 4.02
AVANTIME D66 nu647-2 C:\Documentum\Checkout\nu647-2_eng_T4.WIN 3/4/2002 13:14 - page 2
4.02
BONNET
Opening the bonnetTo open the bonnet, pull the handle 1.
Bonnet security lockTo unlock, pull the tab 2 at the pointof the bonnet.
Lift the bonnet, release the stay 3from its holder 4 and, for your ownsafety, place it in its retainer 5.
Closing the bonnetTo close the bonnet, replace stay 3in its holder 4, grip the bonnet in themiddle and follow it down to 8inches (20 cm) above the closedposition, then release it. It will lockautomatically under its own weight.
Before closing the bonnet, check tomake sure that nothing has been leftin the engine compartment.
Make sure that the bonnetis properly locked.
Take care when workingunder the bonnet as theengine cooling fan maystart up at any moment.

A
B
nu647-2_fra_G4.qxd 26/02/02 16:48 Page 4.03
AVANTIME D66 nu647-2 C:\Documentum\Checkout\nu647-2_eng_T4.WIN 3/4/2002 13:14 - page 3
4.03
ENGINE OIL LEVELIt is normal for an engine to use oilfor lubrication and cooling ofmoving parts and it is sometimesnecessary to top up the oil levelbetween oil changes. However, ifmore than 1 litre is used every 625miles (1000 km) after the running inperiod, consult your Renault Dealer.
Oil change frequency: Check the oillevel approximately every 625miles (1000 km) and certainlybefore any long journey, to avoidthe risk of damaging your engine.
Level:The car must be parked on levelground and the engine should havebeen switched off for severalminutes beforehand to obtain anaccurate reading.
Never run the engine inan enclosed space asexhaust fumes arepoisonous.
Reading the level on theinstrument panelWait for at least one minute beforeswitching on the ignition to read theinstrument panel level.
When the ignition is switched on:- If the oil level is correct, no
display appears on the instrumentpanel. (The temperature isdisplayed - refer to section 1.)
- If the oil level is below theminimum level, it will bedisplayed for approximately20 seconds and the oil levelwarning symbol will appear onthe multifunction display.Measurement of the oil level isprompted by opening the driver'sdoor.
The oil must be topped up, usingthe dipstick to measure the level.
Reading the level using the dipstickIt should never be allowed to fallbelow the minimum mark (B) orexceed the maximum mark (A).

21
1
2
V6 L7X 2l F4R
A
B
2.2 dCi
1
2
nu647-2_fra_G4.qxd 26/02/02 16:48 Page 4.04
AVANTIME D66 nu647-2 C:\Documentum\Checkout\nu647-2_eng_T4.WIN 3/4/2002 13:14 - page 4
4.04
ENGINE OIL LEVEL (continued)
Topping up - fillingTop up by the filler cap 1.
Check the level using the gauge 2,do not exceed the “maximum” mark(B) and do not forget to replace thecap.
Volume of oil: (for guidance) thedifference between the minimumand the maximum is an average of1.5 to 2 litres
Oil grade: refer to the followingpages
Take care when topping upthe oil that no oil drips ontoengine components: risk offire.
Do not forget to refit the capsecurely as there is a risk of fire ifoil splashes onto hot enginecomponents.

11
V6 L7X 2l F4R
1
nu647-2_fra_G4.qxd 26/02/02 16:48 Page 4.05
AVANTIME D66 nu647-2 C:\Documentum\Checkout\nu647-2_eng_T4.WIN 3/4/2002 13:14 - page 5
4.05
ENGINE OIL CHANGE
Plug 1 - (remove the protective plateto reach it).
Change the oil more often if thevehicle is subject to severe use.
If you change the oilwhen the engine is hot,be careful to avoidscalding yourself as theoil flows out.
Average capacities of oil change(for information)V6 L7X engine : 4.9 litres2l F4R engine : 5 litres2.2 dCi G9T engine: 8.3 litresOil filter included.
Oil filter:It should be replaced at each service(refer to your vehicle's Servicingbooklet).
When the engine is started, afterthe oil has been changed and theoil filter replaced, it is normal forthe oil pressure warning symbol tobe displayed on the instrumentpanel while the lubrication circuitis being primed.
Switch off the ignition then startthe engine again to reinitialise theoil pressure monitoring system.

-30°C -20°C -15°C
ACEA A2/A3 15W40-15W50
ACEA A1*/A2/A3 10W30-10W40-10W50
ACEA A1*/A2/A3 0W30-5W30
ACEA A1*/A2/A3 0W40-5W40-5W50
API SH/SJ 15W40-15W50
API SH/SJ 10W40-10W50
API SH/SJ 10W30
API SH/SJ 5W30
API SH/SJ 5W40-5W50
-10°C 0°C +10°C +20°C +25°C +30°C
-30°C -20°C -15°C -10°C 0°C +10°C +20°C +25°C +30°C
nu647-2_fra_G4.qxd 26/02/02 16:48 Page 4.06
AVANTIME D66 nu647-2 C:\Documentum\Checkout\nu647-2_eng_T4.WIN 3/4/2002 13:14 - page 6
4.06
ENGINE OIL GRADE - PETROL ENGINE
Externaltemperature
EU countries
* Oil for fuel economy
Externaltemperature
Othercountries
Oil for fuel economy: Standard API SJ.ILSAC GF2.

-30°C -20°C -15°C
ACEA B2/B3 15W40-15W50
ACEA B2/B3 10W40-10W50
ACEA B2/B3 5W30
ACEA B2/B3 5W40-5W50
API CF 15W40-15W50
API CF 10W40-10W50
API CF 10W30
API CF 5W40-5W50
-10°C 0°C +10°C +20°C +25°C +30°C
-30°C -20°C -15°C -10°C 0°C +10°C +15°C +20°C +30°C
nu647-2_fra_G4.qxd 26/02/02 16:48 Page 4.07
AVANTIME D66 nu647-2 C:\Documentum\Checkout\nu647-2_eng_T4.WIN 3/4/2002 13:14 - page 7
4.07
DIESEL ENGINE OIL GRADE
Externaltemperature
EU countries
* Oil for fuel economy
Externaltemperature
Othercountries
Oil for fuel economy: Standard API SJ.ILSAC GF2.

1
nu647-2_fra_G4.qxd 26/02/02 16:48 Page 4.08
AVANTIME D66 nu647-2 C:\Documentum\Checkout\nu647-2_eng_T4.WIN 3/4/2002 13:14 - page 8
4.08
LEVELS
Brake fluid levelThis should be checked frequently,especially if you notice even theslightest loss in braking efficiency.
Level 1The level normally drops in linewith brake pad wear but it shouldnever fall below the “Min” line.
FillingAfter any operation on thehydraulic circuit, a specialist mustreplace the brake fluid.
Use only fluids approved byRenault’s Technical Departmentand which have been taken from asealed container.
Take care when workingunder the bonnet as theengine cooling fan maystart up at any moment.

1
nu647-2_fra_G4.qxd 26/02/02 16:48 Page 4.09
AVANTIME D66 nu647-2 C:\Documentum\Checkout\nu647-2_eng_T4.WIN 3/4/2002 13:14 - page 9
4.09
LEVELS (continued)
Engine coolant level
Checking intervals:Check your engine coolant levelregularly. (Damage is likely to becaused to the engine if there isinsufficient coolant.)
If topping up is required, only useproducts approved by Renault'sTechnical Department. This coolantwill provide:- Anti-freeze protection- Anti-corrosion protection of the
cooling system.
No operations may becarried out on thecooling circuit when theengine is hot.
Danger of burns.
LevelThe level when cold should bebetween the “MIN” and “MAX”marks on the expansion bottle 1.
Top this level up when cold before itreaches the MIN mark.
Average capacities of oil change(for information)approximately 10 litres
Extreme conditions of usewhich affect the engine coolingsystem(Towing a caravan or driving onmountainous roads, steep gradients,etc.)
Your vehicle is fitted with anelectric engine cooling fan. Do notchange down to a lower gear just tohelp engine cooling by making theengine rev faster; the engine coolingfan is electrically controlled andonly operates when required tostabilise the coolant temperature.
Take care when working inthe engine compartment asthe engine cooling fan maystart up at any moment.

1
2
nu647-2_fra_G4.qxd 26/02/02 16:48 Page 4.10
AVANTIME D66 nu647-2 C:\Documentum\Checkout\nu647-2_eng_T4.WIN 3/4/2002 13:14 - page 10
4.10
LEVELS (continued)
Power-assisted steering pump
Checking intervals:Refer to your vehicle's Warranty andServicing booklet.
Level:The correct level when cold shouldbe visible between the Min and Maxlevels marked on the reservoir 1.
For topping up or refilling with oil,use products approved by Renault'sTechnical Department.
Battery 2The battery does not require anymaintenance.
Note: using electrical consumers forlong periods with the engineswitched off leads to excessivedischarge of the battery, which canprevent the engine from starting.
Take care when moving thebattery since it containssulphuric acid which mustnot come into contact with
the eyes or skin. If it should, washthe affected area with plenty ofcold water.
Keep all flames, red-hot objects andsparks away from the battery asthere is a risk of explosion.
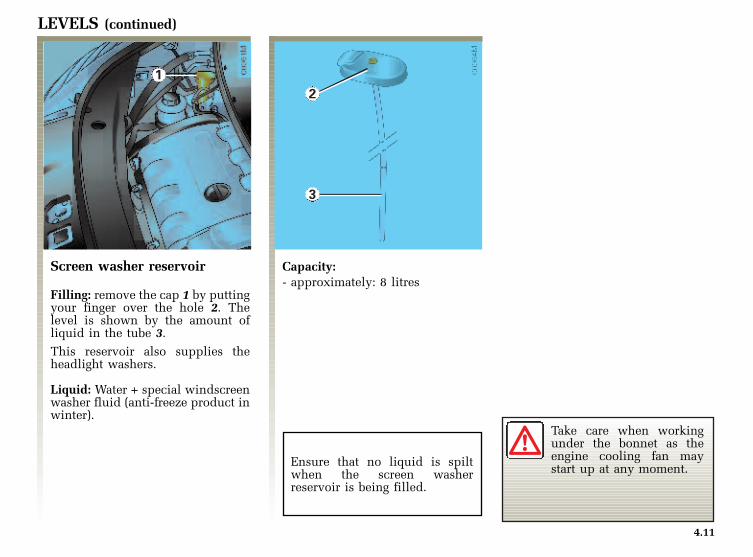
1
2
3
nu647-2_fra_G4.qxd 26/02/02 16:48 Page 4.11
AVANTIME D66 nu647-2 C:\Documentum\Checkout\nu647-2_eng_T4.WIN 3/4/2002 13:14 - page 11
4.11
LEVELS (continued)
Screen washer reservoir
Filling: remove the cap 1 by puttingyour finger over the hole 2. Thelevel is shown by the amount ofliquid in the tube 3.
This reservoir also supplies theheadlight washers.
Liquid: Water + special windscreenwasher fluid (anti-freeze product inwinter).
Capacity:- approximately: 8 litres
Ensure that no liquid is spiltwhen the screen washerreservoir is being filled.
Take care when workingunder the bonnet as theengine cooling fan maystart up at any moment.

1
G9T-V6-L7X
nu647-2_fra_G4.qxd 26/02/02 16:48 Page 4.12
AVANTIME D66 nu647-2 C:\Documentum\Checkout\nu647-2_eng_T4.WIN 3/4/2002 13:14 - page 12
4.12
AIR FILTER
Remove the three mounting bolts 1,and tilt the cover towards the frontof the vehicle. Change the filterelement and then refit the cover.
V6 and L7X enginesWe advise you to consult yourRenault Dealer.
Frequency of changeRefer to the Servicing booklet foryour vehicle.
Take care when workingunder the bonnet as theengine cooling fan maystart up at any moment.
Particle filterFrequency with which the filterelement needs to be replaced: Referto the Servicing booklet for yourvehicle.
Replacement: You are advised toconsult your Renault Dealer.

nu647-2_fra_G4.qxd 26/02/02 16:48 Page 4.13
AVANTIME D66 nu647-2 C:\Documentum\Checkout\nu647-2_eng_T4.WIN 3/4/2002 13:14 - page 13
4.13
BODYWORK MAINTENANCEProtection against the action ofcorrosive agentsAlthough your car has been treatedwith very effective anti-corrosionproducts, it nevertheless remainssubject to the action of:
• Corrosives in the atmosphere- Atmospheric pollution (built-up
and industrial areas).- Saline atmosphere (near the sea,
particularly in hot weather).- Seasonal and humid climatic
conditions, especially road saltin winter.
• Abrasives- Wind-carried dust and sand,
mud, road grit thrown up byother vehicles.
• Minor impacts
A minimum amount of protection isnecessary to guard your car againstsuch risks so as not to lose thebenefit of these developments.
Do not• Wash the vehicle in bright
sunlight or freezing temperatures.
• Scrape off mud or dirt withoutpre-wetting.
• Allow external dirt toaccumulate.
• Allow rust to form followingminor impacts.
• Use solvents not approved byRenault's Technical Departmentto remove spots as this coulddamage the paintwork.
• Drive frequently in snow ormuddy conditions withoutperiodically washing the car,particularly under the wheelarches and body.
• Allow polish to get onto thealuminium parts of the vehicle.
• Degrease or clean mechanicalcomponents (e.g. enginecompartment), underneath thebodywork, parts with hinges (e.g.inside the fuel tank flap) andpainted external plastic fittings(e.g. bumpers) using pressurecleaning apparatus or using sprayproducts not approved byRenault's Technical Department.If adequate precautions are nottaken, this could give rise tocorrosion or incorrect operation.

nu647-2_fra_G4.qxd 26/02/02 16:48 Page 4.14
AVANTIME D66 nu647-2 C:\Documentum\Checkout\nu647-2_eng_T4.WIN 3/4/2002 13:14 - page 14
4.14
BODYWORK MAINTENANCE (continued)
Do• Wash your vehicle frequently,
preferably using our recommendedcleaning products and use ahigh-pressure jet to rinse off theunderside of the vehicle and thewheel arches in particular to getrid of:- Spots of tree resin and industrial
grime.- Bird droppings which contain
chemicals which rapidlydiscolour paintwork and mayeven cause the paint to peel off:
The vehicle must be washedimmediately to remove thesemarks since it is impossible toremove them by polishing.- Salt deposited in the wheel
arches and underneath the bodyafter driving in areas where theroads are chemically treated.
- Mud in the wheel arches andunder the body which formsdamp patches.
• Keep well away from the vehiclein front when driving on freshlylaid surfaces to prevent paintdamage.
• Repair, or have repaired quicklypatches where the paint has beendamaged to prevent corrosionspreading bonnet).
• Remember to visit the body shopperiodically if your vehicle isprotected by the Renaultanti-corrosion warranty. Consultthe anti-corrosion booklet.
• Respect local regulations aboutwashing vehicles (e.g. do notwash your vehicle on a publichighway).
• Check the fixing of externalaccessories, additional drivinglights, exterior rear view mirrors,etc. and fix the windscreen wiperarms with adhesive tape beforeentering a revolving brush type*car wash.
• Protect mechanical components,if they have to be cleaned, byreapplying spray-on productsapproved by Renault's TechnicalDepartment.
* NOTE: we recommend that youclean your vehicle using a highpressure cleaner to obtain the bestresults.
We have selected special careproducts for your vehicle andyou can obtain these fromRenault accessory outlets.

nu647-2_fra_G4.qxd 26/02/02 16:48 Page 4.15
AVANTIME D66 nu647-2 C:\Documentum\Checkout\nu647-2_eng_T4.WIN 3/4/2002 13:14 - page 15
4.15
INTERIOR TRIM MAINTENANCEWhatever type of stain is on thetrim, use soapy water (if necessary,with warm water) based on:• natural soap,• washing up liquid (with one part
of washing up liquid to 200 partsof water).
Rinse off with a soft, damp cloth.
Special instructions• Glass instrument panel (e.g.
instrument display, clock, airconditioning display).
Use a soft cloth (or cotton wool).
If this does not clean themproperly, use a soft cloth or cottonwool slightly moistened withsoapy water and then wipe cleanwith a soft damp cloth.
Finally, carefully dry off with asoft dry cloth.
Cleaning products containingalcohol must not be used underany circumstances.
• Seat beltsThese must be kept clean.
Use products selected byRenault's Technical Department(or Renault accessory outlets) orwarm soapy water. Clean with asponge and dry off with a drycloth.
Do not use cleaning agents ordyes.
We have selected specialproducts to care for your vehicleand you can obtain these fromRenault accessory outlets.

nu647-2_fra_G4.qxd 26/02/02 16:48 Page 4.16
AVANTIME D66 nu647-2 C:\Documentum\Checkout\nu647-2_eng_T4.WIN 3/4/2002 13:14 - page 16
4.16
AVANTIME D66 nu647-2 C:\Documentum\Checkout\nu647-2_eng_T5.WIN 3/4/2002 13:17 - page 1
5.01
Section 5: Practical advice
Jack - Wheelbrace - Hubcap ............................................................................................................................ 5.02Changing a wheel ................................................................................................................................ 5.03 5.05Tyres (tyre safety, wheels, winter use) ............................................................................................... 5.06 5.08Wipers (replacing blades) ................................................................................................................................. 5.09Headlight bulbs .................................................................................................................................... 5.10 5.13Rear light bulbs ...................................................................................................................................... 5.14 - 5.15Interior light bulbs ............................................................................................................................... 5.16 5.18Plugs - Central locking remote control (batteries) ......................................................................................... 5.19Fuses ..................................................................................................................................................... 5.20 5.22Loudspeakers ..................................................................................................................................................... 5.23Telephone pre-equipment ................................................................................................................................ 5.24Accessories ........................................................................................................................................................ 5.25Roof bars ............................................................................................................................................................ 5.26Battery ................................................................................................................................................... 5.27 5.29Towing .................................................................................................................................................... 5.30 - 5.31Diesel fuel filter (diesel version) ..................................................................................................................... 5.32

1
2
AVANTIME D66 nu647-2 C:\Documentum\Checkout\nu647-2_eng_T5.WIN 3/4/2002 13:17 - page 2
5.02
JACK - WHEELBRACE - HUBCAP
Jack - WheelbraceThese are located underneath therear bench seat.
To remove:Fold the bench seat forwards (1/3section).
Remove the belt 1.
Remove the wheelbrace and the jackto remove the wheels.
The belt must be returned to itsposition when the jack is replaced.
HubcapRemove it using the hook suppliedwith your vehicle.
To refit the hubcap, clip it back inplace, taking care to align it withvalve 2.
The jack is designed forwheel changing purposesonly. Under nocircumstancesshould it be used for
carrying out repairs or to gainaccess under the vehicle.

R 1 3
2 4 6
5
0008
2M
1
AVANTIME D66 nu647-2 C:\Documentum\Checkout\nu647-2_eng_T5.WIN 3/4/2002 13:17 - page 3
5.03
CHANGING A WHEEL
Park your vehicle on firm, levelground (if necessary, place a solidsupport under the jack).- Switch on the hazard warning
lights.
Apply the handbrake and engagefirst gear.- Ask all the passengers to get out of
the vehicle and keep them awayfrom moving traffic.
Use the spanner to slacken off thewheel bolts slightly. Fit it so thatyou press down rather than pullupwards.
For your safety, makesure your car is properlyparked whilst you arechanging the wheel.
Fitting the jack:Offer up the jack horizontally, withthe jack head against the centringdowel 1. Turn it a few times to liftthe wheel off the ground.

3
2
3
1
AVANTIME D66 nu647-2 C:\Documentum\Checkout\nu647-2_eng_T5.WIN 3/4/2002 13:17 - page 4
5.04
CHANGING A WHEEL (continued)
Spare wheelThe spare wheel is located underthe vehicle.
To gain access to the spare wheel:- Lift off the cover 1.- Remove cover 2.- Unscrew it fully using the
wheelbrace 3.
Pull the wheel towards you and tiltit slightly, press on the support asindicated above to disengage thesupport from the rim.
To replace the spare wheel:Proceed in reverse order to removal,placing the wheel valve side down.
Check that the support is correctlycentred so that the wheel isproperly positioned in its housing.
Undo the bolts and take the wheeloff.
Fit the spare wheel in place on thecentre hub and turn it so that themounting holes for the wheel andthe hub are aligned.
Tighten the bolts using thewheelbrace and lower the jack.
If you have a puncture,replace the wheel as soonas possible.A tyre which has been
punctured should always beinspected (and repaired ifpossible) by a specialist.Put the flat tyre in the boot. Donot attach it to the underbody.If the spare wheel has beenstored for several years, have itchecked by your Dealer to ensurethat it is safe to use.
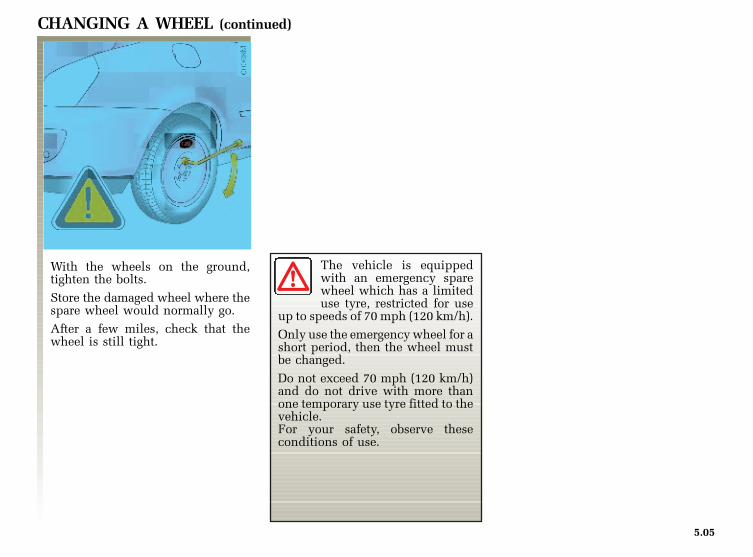
AVANTIME D66 nu647-2 C:\Documentum\Checkout\nu647-2_eng_T5.WIN 3/4/2002 13:17 - page 5
5.05
CHANGING A WHEEL (continued)
With the wheels on the ground,tighten the bolts.
Store the damaged wheel where thespare wheel would normally go.
After a few miles, check that thewheel is still tight.
The vehicle is equippedwith an emergency sparewheel which has a limiteduse tyre, restricted for use
up to speeds of 70 mph (120 km/h).
Only use the emergency wheel for ashort period, then the wheel mustbe changed.
Do not exceed 70 mph (120 km/h)and do not drive with more thanone temporary use tyre fitted to thevehicle.For your safety, observe theseconditions of use.

1
2
AVANTIME D66 nu647-2 C:\Documentum\Checkout\nu647-2_eng_T5.WIN 3/4/2002 13:17 - page 6
5.06
TYRESTyre safety - road wheelsThe tyres are the only contactbetween the car and the road.
It is essential to keep them in goodcondition.
You must make sure that your tyresconform to local road regulations.
When they need to be replaced,only tyres of the same make,dimension, type and profile shouldbe used.
Tyres fitted to the vehicle shouldeither be identical to those fittedoriginally or conform to thoserecommended by your RenaultDealer. Maintaining the tyres
The tyres must be in good conditionand the tread form must havesufficient depth: the tyres approvedby Renault's Technical Departmenthave wear warning strips 1 whichare indicator risers moulded intothe tread.
When the tread has worn down tothe level of these indicator risers,they become visible 2: the tyresconcerned must be replaced now asonly 1.6 mm of tread remains andthis is not sufficient to maintaingood grip on wet roads.Incidents which occur whendriving, such as striking the kerb,may damage the tyres and couldlead to misalignment of the frontaxle geometry.
An overloaded car, long journeys bymotorway, particularly in very hotweather, or continual driving onpoorly surfaced minor roads willlead to more rapid tyre wear andaffect safety.

AVANTIME D66 nu647-2 C:\Documentum\Checkout\nu647-2_eng_T5.WIN 3/4/2002 13:17 - page 7
5.07
TYRES (continued)
Tyre pressuresTyre pressures must be adhered to.(Remember to check the sparewheel at the same time.) Pressuresmust be checked at least once amonth and always before a longjourney. (Refer to the section onTyre pressures.)
Incorrect tyre pressureslead to abnormal tyrewear and unusually hotrunning, factors which
may seriously affect safety andlead to:- poor roadholding- the risk of blow-outs or of
throwing a tread at high speed.
Tyre pressures depend on theload and the driving speed.Adjust the pressures accordingto the conditions of use. (Refer tothe section on tyre pressures.)
Pressures should be checked whenthe tyres are cold; ignore higherpressures which may be reached inhot weather or following a journeyat higher speeds.
If tyre pressures cannot be checkedwhen the tyres are cold, assume anincrease of 0.2 to 0.3 bar.
Never deflate a hot tyre.
Note: a label affixed to the driver'sdoor frame gives the recommendedtyre pressures.
Fitting new tyres
For safety reasons, thisoperation must only becarried out by aspecialist.
Fitting different tyres maychange your vehicle as follows:- It may mean that your vehicle
no longer conforms to currentregulations.
- It may change the way ithandles when cornering.
- It may cause the steering to beheavy.
- It may cause tyre noise.- It may affect the use of chains.
RimsOnly use rims approved for yourvehicle. Consult your RenaultDealer.
Changing wheels aroundThis practice is not recommended.
Spare wheelThe use of this wheel is subject torestrictive conditions. See theinformation on the Spare wheel.

AVANTIME D66 nu647-2 C:\Documentum\Checkout\nu647-2_eng_T5.WIN 3/4/2002 13:17 - page 8
5.08
TYRES (continued)
Use in winter• Chains:
For safety reasons, fitting chainsto the rear axle is strictlyforbidden.Fitting tyres larger than thoseoriginally fitted to the car makesit impossible to fit chains.
In all cases, we wouldrecommend that you consultyour Renault Dealer who will beable to advise you on the choiceof equipment which is mostsuitable for your vehicle.
Chains may only be fittedto tyres of the same size asthose originally fitted toyour vehicle
but chains may not be fitted to thefollowing:- tyre sizes: 235/50/17- the limited use emergency wheel.
If one of the front wheels ispunctured and chains are fitted, itis therefore essential to fit one ofthe rear wheels to replace thepunctured wheel and to fit theemergency spare wheel in place ofthe rear wheel.
• “Snow” or winter tyresWe would recommend that thesebe fitted to all four wheels toensure that your vehicle retainsmaximum road holding.
Note: We would point out thatthese tyres may sometimes have:- A specific direction of rotation.- A maximum speed which may
be lower than the maximumspeed of your vehicle.
• Studded tyresThis type of equipment may onlybe used for a limited period andas laid down by local legislation.
It is necessary to keep to the speedspecified by current legislation.
As a minimum, these tyres may befitted to the two front axle wheels.

12
3
AVANTIME D66 nu647-2 C:\Documentum\Checkout\nu647-2_eng_T5.WIN 3/4/2002 13:17 - page 9
5.09
SCREEN WIPERS
Replacing windscreen wiperblades 1:- Lift the windscreen wiper arm.- Disconnect the screen washer
tube.- Turn the wiper blade until it is
horizontal.- Press tab 1 and lower the blade
gently.- Pull tab 2 and slide the blade
down to release it from hook 3.- Remove the blade.- Shift the blade then raise it to
release it.
Refitting a windscreen wiperbladeTo refit the wiper blade, proceed inreverse order to removal. Make surethat the blade is correctly locked inposition.
Replacing the rear screen wiperblade- Lift the wiper arm.- Turn the wiper blade until it is
horizontal.- Release it by pulling on it.
- In frosty weather, make sure the wiper blades are not stuck to thewindow by ice (risk of motor overheating).
- Monitor the condition of the wiper blades. Change the wiperblades as soon as they become less efficient (approximately once a year).

1
2
3
AVANTIME D66 nu647-2 C:\Documentum\Checkout\nu647-2_eng_T5.WIN 3/4/2002 13:17 - page 10
5.10
FRONT LIGHTS: changing the bulbs
Changing a dipped headlightdischarge bulbThey are marked by a label 1 on thelens unit.
The headlight bulb must bechanged by a Renault Dealer.
Changing a main beamheadlight bulbRemove the plastic cover by turningit through 90°.- Remove the bulb connector.- Unclip spring 2 and take out the
bulb.
Type of halogen bulb: H7.
Do not touch the glass of thehalogen bulb. Hold it by its base.
Front side lights- Take out the bulb holder 3 by
turning it through 90° to reach thebulb.
- Replace the bulb.
Bulb type: W 5 W.
Take care when workingunder the bonnet as theengine cooling fan maystart up at any moment.

A
1
2
5
43
AVANTIME D66 nu647-2 C:\Documentum\Checkout\nu647-2_eng_T5.WIN 3/4/2002 13:18 - page 11
5.11
FRONT LIGHTS: changing the bulbs (continued)
Direction indicator lightsTo remove:- Unclip the lug A by pressing down
as shown by the arrows 1 and 2with one hand, and push down onthe outside of the indicator withthe other, as shown by arrow 3.
- Take out the front indicator.- Turn the bulb holder and take out
the bulb.
Bulb type: orange pear-shaped,bayonet type bulb 21W
To refit:- Place the lug 4 into its guide.- Position the lugs on the side of the
indicator in the headlightguides 3.
- Push the indicator back in untilthe lug clips into place.
Cleaning the headlightsSince the headlights are protectedby “polycarbonate glass” with aself-polishing layer, use a soft clothor cotton wool, lightly moistenedwith soapy water and then rinse off.
Finally, carefully dry off with a softdry cloth.
Consult your Renault Dealer aboutthe removal of deeper scratches.
Cleaning products containingalcohol are not to be used.
Traces of condensation in the lights:This is not a defect. The presence of traces of condensation in lightsis a natural phenomenon linked to the variations in temperature.These traces will disappear rapidly once the lights are switched on.

AVANTIME D66 nu647-2 C:\Documentum\Checkout\nu647-2_eng_T5.WIN 3/4/2002 13:18 - page 12
5.12
FRONT FOG LIGHTS: changing the bulbs
Please consult your Renault Dealerfor information on replacing bulbsand adjusting your headlights.
Any work on the electricalcircuit of the vehicle mustbe carried out by Renaultnetwork engineers, because
if the system is connectedincorrectly, it may result in damagebeing caused to the electricalinstallation (wiring, components,and especially the alternator). Inaddition, your Dealer has all therequired parts available.
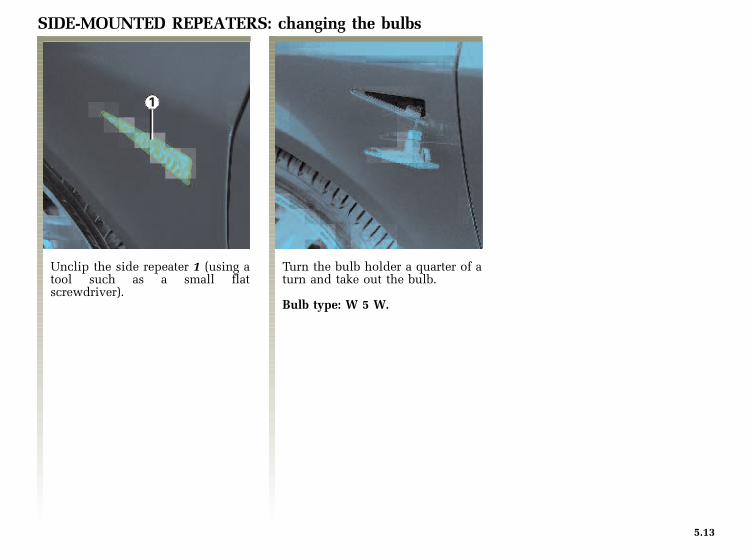
1
AVANTIME D66 nu647-2 C:\Documentum\Checkout\nu647-2_eng_T5.WIN 3/4/2002 13:18 - page 13
5.13
SIDE-MOUNTED REPEATERS: changing the bulbs
Unclip the side repeater 1 (using atool such as a small flatscrewdriver).
Turn the bulb holder a quarter of aturn and take out the bulb.
Bulb type: W 5 W.

1
2
AVANTIME D66 nu647-2 C:\Documentum\Checkout\nu647-2_eng_T5.WIN 3/4/2002 13:18 - page 14
5.14
REAR LIGHTS: replacing bulbs
Third brake lightOpen the tailgate- Remove the light by undoing both
bolts 1 (using the spanner in thevehicle document pouch).
Replace the faulty bulb.
Bulb type: W 5 W.
Number plate light- Unclip the light (using a tool such
as a flat screwdriver) in notch 2.- Unclip the bulb holder and
remove the bulb.
Bulb type: W 5 W.

1
B
A
C
E
D
AVANTIME D66 nu647-2 C:\Documentum\Checkout\nu647-2_eng_T5.WIN 3/4/2002 13:18 - page 15
5.15
REAR LIGHTS: replacing bulbs (continued)
- Remove the light by undoing bothbolts 1 (using the spanner in thevehicle document pouch).
- Turn the bulb holder through 90°and remove the bulbs.
A Direction indicators.Orange P 21 W pear-shaped,bayonet type.
B Fog light.P 21 W pear-shaped, bayonet typebulb.
C Reversing lights.P 21 W pear-shaped, bayonet typebulb.
D Side lights.P 5 W pear-shaped, bayonet typebulb.
E Side and brake lights.P 21/5 W pear-shaped, bayonettype bulb with 2 filaments.

12
AVANTIME D66 nu647-2 C:\Documentum\Checkout\nu647-2_eng_T5.WIN 3/4/2002 13:18 - page 16
5.16
INTERIOR LIGHTING: changing the bulbs
Luggage compartment light- Unclip the light (using a tool such
as a flat screwdriver) in notch 1.- Turn the bulb holder a quarter of a
turn and take out the bulb.
Bulb type: W 5 W.
Footwell lighting- Unclip the light (using a tool such
as a flat screwdriver) in notch 2.- Turn the bulb holder a quarter of a
turn and take out the bulb.
Bulb type: W 5 W.
Ground lightingConsult your Renault Dealer aboutthe replacement of this bulb.
Bulb type: W 5 W.

1
2
3 4 5
AVANTIME D66 nu647-2 C:\Documentum\Checkout\nu647-2_eng_T5.WIN 3/4/2002 13:18 - page 17
5.17
INTERIOR LIGHTING: changing the bulbs (continued)
Front courtesy lightUnclip at notch 1 (using a tool suchas a flat-blade screwdriver).
- Turn the bulb holder 2 or 3through 90° to reach the bulb.
Bulb type: W 5 W.
Rear courtesy lightUnclip the light (using a tool such asa flat-blade screwdriver).- Turn the bulb holder 4 or 5
through 90° to reach the bulb.
Bulb type: W 5 W.

1
1
AVANTIME D66 nu647-2 C:\Documentum\Checkout\nu647-2_eng_T5.WIN 3/4/2002 13:18 - page 18
5.18
INTERIOR LIGHTING: changing the bulbs (continued)
Glove compartment light- Unclip the light (using a tool such
as a flat screwdriver) in notch 1.- Turn the bulb holder a quarter of a
turn and take out the bulb.
Bulb type: W 5 W.
Light beneath the sun visor- Unclip the light (using a tool such
as a flat-blade screwdriver).- Turn the bulb through 90° to
remove it.
Bulb type: W 5 W bayonet type.

2
1
AVANTIME D66 nu647-2 C:\Documentum\Checkout\nu647-2_eng_T5.WIN 3/4/2002 13:18 - page 19
5.19
SPARK PLUGS - ELECTRIC REMOTE CONTROL DOOR LOCKINGSpark plugsOnly use plugs specified for yourvehicle's engine. Their type isindicated on the label attached tothe cylinder head cover. If this is notthe case, consult your RenaultDealer.
Fitting plugs which are not tospecification may damage yourengine and catalytic converter.
Remote control door lockingReplacing the batteries: Removescrew 1, open the key and replacethe two batteries 2, according to thepolarity marked on the cover.
Replacing a remote control unit:If you wish to replace a remotecontrol unit (due to loss or fault),you must take the vehicle and theother remote control unit to yourRenault Dealer to have the assemblyprogrammed ready for use.
Use CR 2016 3 V batteries,available from your Renault Dealer.These batteries should last forapproximately two years.
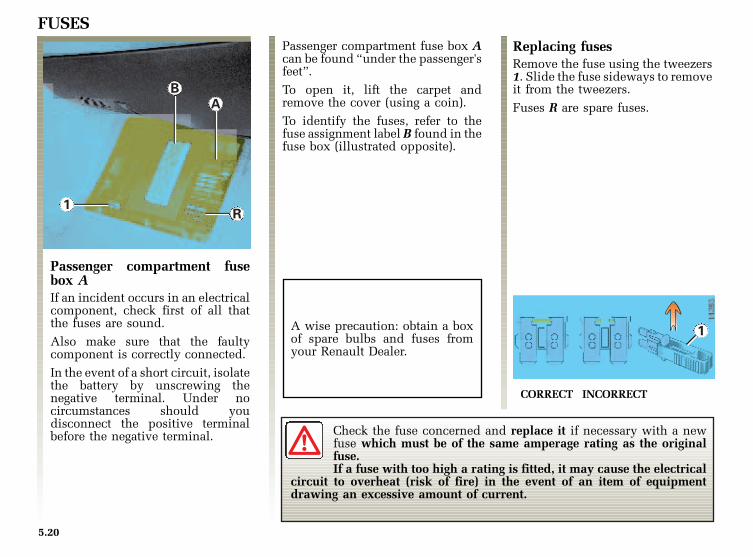
1
B
1
A
R
AVANTIME D66 nu647-2 C:\Documentum\Checkout\nu647-2_eng_T5.WIN 3/4/2002 13:18 - page 20
5.20
FUSES
Passenger compartment fusebox AIf an incident occurs in an electricalcomponent, check first of all thatthe fuses are sound.
Also make sure that the faultycomponent is correctly connected.
In the event of a short circuit, isolatethe battery by unscrewing thenegative terminal. Under nocircumstances should youdisconnect the positive terminalbefore the negative terminal.
Passenger compartment fuse box Acan be found “under the passenger'sfeet”.
To open it, lift the carpet andremove the cover (using a coin).
To identify the fuses, refer to thefuse assignment label B found in thefuse box (illustrated opposite).
A wise precaution: obtain a boxof spare bulbs and fuses fromyour Renault Dealer.
Replacing fusesRemove the fuse using the tweezers1. Slide the fuse sideways to removeit from the tweezers.
Fuses R are spare fuses.
CORRECT INCORRECT
Check the fuse concerned and replace it if necessary with a newfuse which must be of the same amperage rating as the originalfuse.If a fuse with too high a rating is fitted, it may cause the electrical
circuit to overheat (risk of fire) in the event of an item of equipmentdrawing an excessive amount of current.

AVANTIME D66 nu647-2 C:\Documentum\Checkout\nu647-2_eng_T5.WIN 3/4/2002 13:18 - page 21
5.21
FUSES (continued)Allocation of fuses (depending on the equipment level) (Label B)
Symbol Allocation
Front fog lights
Combined managementPassenger compartmentmanagement
Rear wiper
Windscreen wiper
Front electric windowsFittings for radio - carphone
Radio-CD changerFittings for alarm
Interior lighting
Controlled airconditioningNavigationExternal rear-view mirror
Symbol Allocation
A.B.S. - E.S.P.
Air bag
Front and rear windowwashersPassenger compartmentmanagement
STOP lightFittings for alarm(CAD)
RadioRadio/air conditioningaerial
Accessories socket
De-icing rear-view mirror
Horn
Side light, L
Side light, R
Symbol Allocation
Headlights
Navigation/RadioRev counterInter E.S.P.
Rear right and left electricwindows
Cigarette lighter
Lighting controlHorn control
Rear fog lights

B
C
AVANTIME D66 nu647-2 C:\Documentum\Checkout\nu647-2_eng_T5.WIN 3/4/2002 13:18 - page 22
5.22
FUSES (continued)
Passenger compartment fusebox BRaise the rear bench seat asdescribed in section 3 to access thisfuse box.
Symbol Allocation
Shunt or parkingassistance
+ after ignition feedCar phone pre-equipmentChild safety relayHeated rear screen relayElectro-chrome rear-viewmirror
Heated rear screen
Heated seats
Sliding sunroofFront blindRear electric windows
Electric passenger seat
Electric driver's seat
Engine compartment fuse box CHeavy-duty fusesThe fuses for the front lights arelocated in this unit. The fuses notmentioned are high amperage fuseswhich must be fitted by yourRenault Dealer.

1
AVANTIME D66 nu647-2 C:\Documentum\Checkout\nu647-2_eng_T5.WIN 3/4/2002 13:18 - page 23
5.23
LOUDSPEAKERS
Instrument panel speakers(tweeters)Unclip grille 1 by pulling it at thetop to reach the speaker connector.
Door speakersTurn the grille a quarter of a turn asshown above.
Rear speakersTurn the grille a quarter of a turn asshown above.
- It is very important always to follow the manufacturer's instructions carefully.- The specifications of the brackets and cabling (available from Renault accessory outlets) vary depending on
the type of radio you have.
Consult your Renault Dealer to find out the correct reference number.- No work may be carried out on the electrical or radio circuits, except by Renault network engineers: an incorrectly
connected system may result in damage being caused to the electrical system and/or the components connected toit.

3
4
AVANTIME D66 nu647-2 C:\Documentum\Checkout\nu647-2_eng_T5.WIN 3/4/2002 13:18 - page 24
5.24
CAR PHONE PRE-EQUIPMENT
Fittings for car phone- An FME aerial connector;- A supply connector (+ permanent
+ auxiliaries, earth, mute radio)located in the compartment 3beneath the front central armrest.
Consult your Renault Dealer whenfitting a car phone.
Microphone locationUnclip grille 4 and fit themicrophone from the Hands-freekit.

AVANTIME D66 nu647-2 C:\Documentum\Checkout\nu647-2_eng_T5.WIN 3/4/2002 13:18 - page 25
5.25
ACCESSORIES
Using mobile phones andCB equipment.Mobile phones and CBequipment with integrated
aerials may cause interference tothe original electronic systemsfitted to the vehicle: it is advisableonly to use equipment with anexternal aerial.Also, for your own safety, wewould advise you always to takeaccount of traffic conditions andnot to use this type of equipmentwhen you are driving.
After-sales installation ofelectrical or electronicequipment.• Any work on the
electrical circuit of the vehiclemust be carried out by Renaultnetwork engineers: if the systemis connected incorrectly, it mayresult in damage being caused tothe electrical installation and/orthe units connected to it.
• If the vehicle is retrofitted withany electrical equipment, makesure that the unit is correctlyprotected by a fuse. Ask forinformation on the rating andposition of this fuse.
Aftermarketing fitting ofnon-electrical accessories (roofbars, towing attachments, etc.)Accessories approved by Renaultare designed to strict specificationsand are regularly tested. We wouldrecommend that you use approvedaccessories (particularly wherethese affect safety) because they areparticularly reliable andappropriate for your car.
Note: The accessories socket (seesection 3) allows the connection ofapparatus drawing no more than120 W and is only operationalwhen the ignition is on or in theauxiliaries position.
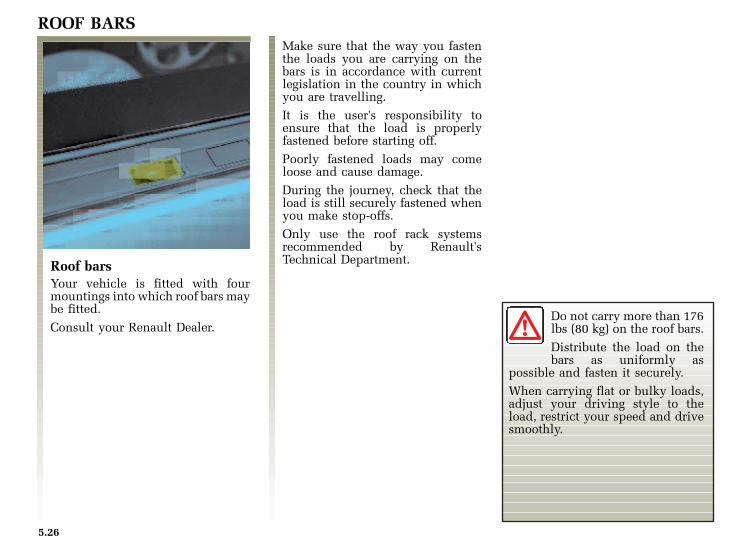
AVANTIME D66 nu647-2 C:\Documentum\Checkout\nu647-2_eng_T5.WIN 3/4/2002 13:18 - page 26
5.26
ROOF BARS
Roof barsYour vehicle is fitted with fourmountings into which roof bars maybe fitted.
Consult your Renault Dealer.
Make sure that the way you fastenthe loads you are carrying on thebars is in accordance with currentlegislation in the country in whichyou are travelling.
It is the user's responsibility toensure that the load is properlyfastened before starting off.
Poorly fastened loads may comeloose and cause damage.
During the journey, check that theload is still securely fastened whenyou make stop-offs.
Only use the roof rack systemsrecommended by Renault'sTechnical Department.
Do not carry more than 176lbs (80 kg) on the roof bars.
Distribute the load on thebars as uniformly as
possible and fasten it securely.
When carrying flat or bulky loads,adjust your driving style to theload, restrict your speed and drivesmoothly.

AVANTIME D66 nu647-2 C:\Documentum\Checkout\nu647-2_eng_T5.WIN 3/4/2002 13:18 - page 27
5.27
BATTERY: breakdownIn the event of a fault:Isolate the battery by unscrewingthe negative terminal.
Disconnect the batterySwitch off the ignition and wait forthe red diode of the navigationCD-ROM drive to go out.
To avoid all risk of sparks:- Ensure that any consumers are
switched off before disconnectingor reconnecting the battery.
- When charging, stop the chargerbefore connecting or disconnectingthe battery.
- Do not place metal objects on thebattery to avoid creating a shortcircuit between the terminals.
Take care when moving thebattery since it containssulphuric acid which mustnot come into contact with
the eyes or skin. If it should, washthe affected area with plenty ofcold water.
Keep all flames, red-hot objects andsparks away from the battery asthere is a risk of explosion.
Take care when working in theengine compartment as the enginecooling fan may start up at anymoment.

AVANTIME D66 nu647-2 C:\Documentum\Checkout\nu647-2_eng_T5.WIN 3/4/2002 13:18 - page 28
5.28
BATTERY: breakdown (continued)
Connecting a battery charger:Switch the engine off and thendisconnect both battery leadsstarting with the negative terminal.
Do not disconnect the battery whenthe engine is running. Follow theinstructions for use given by themanufacturer of the battery chargeryou are using.Only a well-charged andwell-maintained battery will have along and useful life and enable youto start the vehicle’s enginenormally.
The battery must be kept clean anddry.
Have the battery's charge statuschecked regularly.- especially if you use your vehicle
for short journeys or for frequentdriving in town.
- When the external temperaturedrops (in winter), the chargedeclines. In winter, only use thoseelectrical components which arereally necessary.If an abnormal amount ofelectrolyte is consumed.
Finally, you should understand thatthe charge decreases naturally as aresult of certain permanentconsumers such as: the clock, aftersales accessories...
When a large number of accessoriesare fitted to the vehicle, have themconnected to + after ignition. In thiscase, it is advisable to have yourvehicle fitted with a battery whichhas an increased nominal capacity.Consult your Renault Dealer.
If your vehicle is to be left stationaryfor a relatively long time,disconnect the battery or have itrecharged regularly, in particularduring cold weather. Theequipment with a memory, radioand trip computer will then have tobe reprogrammed. The battery mustbe stored in a cool dry place,protected from frost.
Specific procedures maybe required to chargesome batteries. Consultyour Renault Dealer.
Avoid all risk of sparks whichmay cause an immediateexplosion and charge the batteryin a well-ventilated area. Risk ofserious injury.

1
A
2
3
B
4
AVANTIME D66 nu647-2 C:\Documentum\Checkout\nu647-2_eng_T5.WIN 3/4/2002 13:18 - page 29
5.29
BATTERY: breakdown (continued)
Starting the vehicle using thebattery from another vehicleProceed as follows when startingyour vehicle from another vehicle'sbattery:
Obtain suitable jump leads (with alarge cross section) from a RenaultDealer or, if you already have jumpleads, ensure that they are in perfectcondition.
The two batteries must have anidentical nominal voltage: 12 volts.
The battery supplying the currentshould have a capacity (amp-hours,Ah) which is at least the same asthat of the discharged battery.
An iced-up battery must be thawedout before current is supplied to it.
Ensure that there is no risk ofcontact between the two vehicles(risk of short circuiting when thepositive terminals are connected)and that the discharged battery isproperly connected.
Switch off your vehicle ignition.
Start the engine of the vehiclesupplying the current and run it atan average speed.
Secure the positive cable (+) A tothe (+) terminal 1 of the dischargedbattery, then to the (+) terminal 2 ofthe battery supplying the current.
Secure the negative cable (–) B tothe (–) terminal 3 of the batterysupplying the current and then tothe (–) terminal 4 of the dischargedbattery.
Check that there is no contactbetween cables A and B and thatcable A (+) is not touching anymetal parts on the vehiclesupplying the current.
Start the engine as you wouldnormally. As soon as it starts,disconnect cables A and B inreverse order (4-3-2-1).
Reinitialise:- the front electric windows- the sunroof(refer to section 3).

1 2 A
B
AVANTIME D66 nu647-2 C:\Documentum\Checkout\nu647-2_eng_T5.WIN 3/4/2002 13:18 - page 30
5.30
TOWING: breakdown
The steering wheel must beunlocked and the ignition key mustbe in position M (ignition on) toprovide stop lights and directionindicators on the towed car. Thetowed vehicle's lights must beswitched on at night.
You must observe the towingregulations which apply in thecountry in which you are driving:do not exceed the towing weight foryour car. Consult your RenaultDealer.
Front towing point AUnclip the cover 1 (using a tool suchas a flat-bladed screwdriver) by thenotch 2.
Workshop jackingequipment:Only use the jackingpoints designed by ourTechnical Department.
Rear towing point BUnclip the cover by releasing itthrough the underside of thebumper.
Only use the front A and rear Btowing points (never use thedriveshafts). These towing pointsmay only be used for traction: neveruse them for lifting the vehicledirectly or indirectly.

AVANTIME D66 nu647-2 C:\Documentum\Checkout\nu647-2_eng_T5.WIN 3/4/2002 13:18 - page 31
5.31
TOWING: breakdown (continued)
Renault specifies the use ofa rigid towing bar. If a ropeor cable is used (where thelaw allows this), the
vehicle being towed must be able tobrake.
A vehicle must not be towed if it isnot fit to be driven.
Do not accelerate or brakesuddenly when towing, as this mayresult in damage being caused tothe vehicle.
When towing a vehicle, it isadvisable not to exceed 15 mph(25 km/h).

4
A B
AVANTIME D66 nu647-2 C:\Documentum\Checkout\nu647-2_eng_T5.WIN 3/4/2002 13:19 - page 32
5.32
DIESEL FUEL FILTER (diesel version)
dCi versionRunning out of fuelVehicles equipped with a cut-offdevice 4 located under the bonnet:- Put some diesel in the tank (a
minimum of 5 litres ).- Close cut-off device 4.- Start up the engine.- It is essential to open the cut-off
device again 4 (boss B oppositemark A);
- Close the bonnet.- Fill up with fuel as soon as
possible.
Precautions to be taken in winterTo avoid any problems in icyconditions:• Ensure that the battery is always
fully charged.
• Do not allow the level of fuel inthe tank to become too low, inorder to prevent watercondensation forming in the tank.
All diesel versions are fitted with adiesel fuel filter.This equipment enables diesel fuelto be used without an additivedown to –18°C or, if the vehicle isused regularly for short journeys(cold engine), down to –5°C.
ADVICEUnder no circumstances shouldyou interfere with the fuelsystem: all operations must becarried out with the greatestpossible care and should beentrusted to a RENAULT Dealer.The alternator, starter and enginemountings must be protectedagainst splashes of fuel duringthese operations.
Persistent fuel odourAs with all modern vehicles, yourvehicle has a pressurised fuelsupply circuit. If you notice apersistent fuel odour you should:
- stop the vehicle when trafficconditions permit and switch offthe ignition;
- switch on the hazard warninglights and ask your passengers toleave the vehicle and stay clear ofthe traffic;
- do not try and inspect the vehicleand do not restart the engine untilthe vehicle has been inspected byqualified RENAULT Networkpersonnel.
No operations whatsoever arepermitted on any part of the fuelsupply system (computers, wiring,fuel circuit, injector, protectioncovers, etc.) as this may bedangerous (such work must beundertaken by qualified RENAULTNetwork personnel).

AVANTIME D66 nu647-2 C:\Documentum\Checkout\nu647-2_eng_T6.WIN 29/3/2002 13:55 - page 1
6.01
Section 6: Technical specifications
Weights and towing/caravan weights ................................................................................................. 6.02 - 6.03Engine specification ........................................................................................................................................ 6.04Dimensions ...................................................................................................................................................... 6.05Vehicle identification plates .............................................................................................................. 6.06 6.08Replacement parts and repairs ....................................................................................................................... 6.09

AVANTIME D66 nu647-2 C:\Documentum\Checkout\nu647-2_eng_T6.WIN 29/3/2002 13:55 - page 2
6.02
WEIGHTS AND TOWING WEIGHTSWEIGHT (in kg) - Basic vehicle and without options, likely to change in the course of the model year:
Consult your Renault Dealer.
Versions(versions marketed depend on country) 2.0 16V 2.2 dCi V6 V6
Vehicle type(see vehicle identification plate)
DEOU06 DEOK06 DEOT06 DEOT02DEOU02
Kerb weightExcluding driver
TotalFrontRear
1 641 1 753 1 741 1 7611 026 1 124 1 124 1 124
615 629 617 629
Maximum permissibleaxle weight
FrontRear
1 230 1 320 1 310 1 3201 060 1 250 1 060 1 060
Maximum permissible all-up weight (A) 2 220 2 510 2 300 2 310
Maximum permissible towing weight unbraked 750 750 750 750
Maximum permissible towing weight braked on 12% gradientMaximum towing weightTotal train weight
2 000 2 000 2 000 2 0003 830 3 940 3 890 3 910
Maximum permissible load on roof rack 80
Maximum permissible nose weight whentowing a trailer (B) 85

979 350 >
420 (
1)
AVANTIME D66 nu647-2 C:\Documentum\Checkout\nu647-2_eng_T6.WIN 29/3/2002 13:55 - page 3
6.03
WEIGHTS AND TOWING WEIGHTS (continued)/TOWING A CARAVANConsult your Renault Dealer for anymodification to towing equipmentand its electrical connections.
Towing weight (towing a caravan,boat, etc.):- It is important to comply with the
towing weights, governed by locallegislation in each country and, inparticular, laid down in the RoadTraffic Regulations.
- Vehicle with trailer: when themaximum permissible weight onthe rear axle is between (A) and (B)and/or when the maximumpermissible all-up weight (A) isexceeded by a value not greaterthan the maximum value on thetowing point (B), the maximumspeed of the vehicle + trailer isrestricted to 60 mph (100 km/h).
- The engine output and climbingcapability are reduced withaltitude. We recommend that themaximum load be reduced by10% at an altitude of 1000 metresand by an additional 10% for each1000 metres thereafter.
(1) According to load.

AVANTIME D66 nu647-2 C:\Documentum\Checkout\nu647-2_eng_T6.WIN 29/3/2002 13:55 - page 4
6.04
ENGINE SPECIFICATIONS
Versions 2.0 16V V6 2.2 dCi
Vehicle type(see vehicle identification plate)
DEOU06 DEOT06 DEOOK06DEOU02 DEOT02
Engine type F4R L7X G9T
Bore × stroke (mm) 82.7×93 87×82.6 87×92
Cubic capacity (cc) 1 998 2 946 2 188
Compression ratio 10: 1 10.5: 1 18: 1
Injection Multipoint Diesel
Catalytic converter Yes
Type of fuel Unleaded 95 or 98 Diesel fuel
Idling speed (rpm) Not adjustable
Plugs *(1) –
Firing order 1-3-4-2 1-6-3-5-2-4 1-3-4-2
*(1) Only use the type specified for your vehicle's engine. The type should be marked on a label affixed to the enginecompartment. If it is not then contact your Renault Dealer. Fitting spark plugs which are not to specification maydamage the engine.

4,642 1,550
1,835 (2)
1,556
1,6
27 (
1)
AVANTIME D66 nu647-2 C:\Documentum\Checkout\nu647-2_eng_T6.WIN 29/3/2002 13:55 - page 5
6.05
DIMENSIONS (in metres)
Turning circle• between walls: 11.7 m
(1) with roof bars: add approximately 4 inches (11,1 mm)(2) with rear-view mirrors: add approximately 10 inches (25.8 cm)

A
1
6
8
7
2 3
5 4
9 10
1112
A
AVANTIME D66 nu647-2 C:\Documentum\Checkout\nu647-2_eng_T6.WIN 29/3/2002 13:55 - page 6
6.06
VEHICLE IDENTIFICATION PLATES
Quote the information on vehicleidentification plate A and theengine plate when writing orordering parts.
1 Identification number withinseries type
2 Maximum permissible all-upweight
3 Maximum permissible total trainweight (+ vehicle loaded andtowing a trailer)
4 Maximum permissible front axleweight
5 Maximum permissible rear axleweight
6 Vehicle type
7 Equipment level
8 Vehicle paint reference
9 Fabrication number
10 Limited edition and equipmentlevel
11 Seat upholstery code
12 Interior trim code

AVANTIME D66 nu647-2 C:\Documentum\Checkout\nu647-2_eng_T6.WIN 29/3/2002 13:55 - page 7
6.07
VEHICLE IDENTIFICATION PLATES (continued)
Chassis marking Repeat of:Vehicle Identification Number.

B
B
L7X F4R
12 3
B
G9T
B
AVANTIME D66 nu647-2 C:\Documentum\Checkout\nu647-2_eng_T6.WIN 29/3/2002 13:55 - page 8
6.08
VEHICLE IDENTIFICATION PLATES (continued)
Quote the information on thevehicle identification plate and theengine plate in all letters and whenordering parts.
Engine plate B(Location varies depending onengine)1 Engine type2 Engine suffix3 Engine number

AVANTIME D66 nu647-2 C:\Documentum\Checkout\nu647-2_eng_T6.WIN 29/3/2002 13:55 - page 9
6.09
REPLACEMENT PARTS AND REPAIRSReplacement parts and repairsOriginal Renault parts are designedto strict specifications and areregularly tested. Therefore, they areof at least the same level of qualityas the originally fitted part.
If you always fit Renault genuineparts to your vehicle, you willensure that it performs well. Repairscarried out using original parts inthe Renault network are guaranteedfor one year.
Accessories approved by Renaultare based on a strict specificationand are regularly tested. We wouldrecommend that you use approvedaccessories (particularly wherethese affect safety) because they areparticularly reliable andappropriate for your vehicle.

AVANTIME D66 nu647-2 C:\Documentum\Checkout\nu647-2_eng_T6.WIN 29/3/2002 13:55 - page 10
6.10
NOTES

AVANTIME D66 nu647-2 C:\Documentum\Checkout\nu647-2_eng_T6.WIN 29/3/2002 13:55 - page 11
ALPHABETICAL INDEXA Accessories ................................................................ 5.25
Air bag .......................................................... 1.13 1.18Air conditioning .......................................... 3.04 3.17Air filter .................................................................... 4.12Air vents ........................................................ 3.02 - 3.03Anti-lock braking system (ABS) .............................. 2.13Anti-pollution ................................................ 2.07 - 2.09Ashtrays .................................................................... 3.28Automatic gearbox ....................................... 2.24 2.26
B Battery ................................................. 4.10 - 5.27 - 5.29Bonnet ....................................................................... 4.02Brake fluid ................................................................ 4.07Brief overview .......................................................... 0.02Bulbs ............................................................. 5.10 5.18
C Catalytic converter ................................................... 2.04Central storage compartment lighting .................... 3.26Changing a bulb ........................................... 5.10 5.18Changing a wheel ........................................ 5.03 5.05Child safety .................................................. 1.22 1.31Cigarette lighter ........................................................ 3.28Clock .......................................................................... 1.41Coolant ...................................................................... 4.09Courtesy lights ............................................... 3.18 - 3.19Courtesy mirrors ....................................................... 3.23Cruise control ............................................... 2.14 2.16
D Demisting the rear screen ........................................ 1.51Demisting the windscreen ....... 1.51.- 3.04 - 3.05 - 3.10Diesel fuel filter ........................................................ 5.32Dimensions ............................................................... 6.05Direction indicator lights .............................. 1.39 - 1.57Door locking ................................................. 1.02 1.04
D Doors ............................................................. 1.03 1.05Driver's position ........................................... 1.32 1.35
E Electric locking .............................................. 1.02 - 1.04Electronic stability program ......................... 2.20 - 2.21Emergency spare wheel .............................. 5.02 5.08Engine (technical specifications) ............................ 6.04Engine immobiliser .................................................. 1.06Engine oil ....................................................... 4.03 - 4.06Engine oil dipstick ............................. 1.44 - 4.03 - 4.04Engine specifications ............................................... 6.04Environment ............................................................. 2.10
F Front seat belts .............................................. 1.11 - 1.12Fuel ................................................................. 1.58 - 6.04Fuel cut-off in event of impact ............................... 1.48Fuel economy ................................................ 2.07 - 2.09Fuel filler flap .......................................................... 1.58Fuel grade ................................................................. 1.58Fuel levels ...................................................... 1.43 - 1.45Fuel tank cap ............................................................ 1.58Fuses ............................................................. 5.20 5.22
G Gear lever .................................................................. 2.11Glove box .................................................................. 3.26
H Handbrake ................................................................. 2.10Head restraints ............................................... 1.07 - 1.08Headlight washers .................................................... 1.53Heating ......................................................... 3.02 3.10Heating and ventilation .............................. 3.04 3.17Horn ........................................................................... 1.57Hubcaps ..................................................................... 5.02

AVANTIME D66 nu647-2 C:\Documentum\Checkout\nu647-2_eng_T6.WIN 29/3/2002 13:55 - page 12
ALPHABETICAL INDEXI Ignition switch ............................................... 2.02 - 2.03
Instrument panel ......................................... 1.36 1.45Instrument panel lighting (adjustment) .................. 1.55Instruments .................................................. 1.36 1.45Interior lighting .................... 3.18 3.20 - 5.16 5.18
J Jack ............................................................................ 5.02
K Keys ........................................................................... 1.02
L Levels ...................................... 4.03 - 4.04 - 4.07 4.10Lighting signals ............................................ 1.55 1.57Lights: Dipped beam headlights .................. 1.55 - 5.10
Direction indicators ............... 1.57 - 5.11 - 5.15Fog lights .............................. 1.56 - 5.12 5.15Hazard warning lights ................................. 1.57Main beam headlight ........................ 1.55 - 5.10Side lights ............................... 1.55 - 5.10 - 5.15Stop lights ......................................... 5.14 - 5.15
Luggage compartment (tailgate) .............................. 3.31
M Maintenance: Bodywork ............................... 4.13 - 4.14Interior trim ...................................... 4.15
Mechanical ................................................... 4.03 4.11Map reading light .......................................... 3.18 - 3.19
O Oil changes ............................................................... 4.05Oil filter .................................................................... 4.05Oil grade ........................................................ 4.06 - 4.07On-board computer ..................................... 1.46 1.48
P Paintwork (reference) ............................................... 6.06Parking assistance .................................................... 2.27
P Passenger heating control ........................... 3.06 3.13Power assisted steering ................................. 2.12 - 4.10Pretensioners ............................................................. 1.13
R Radio information .................................................... 1.45Rear bench seat ........................................................ 3.30Rear parcel shelf ....................................................... 3.29Rear seat belts .............................................. 1.19 1.21Rear-view mirrors ..................................................... 1.49Remote control: Battery (changing) ........................ 5.19
Electric door locking .................... 1.02Roof bars ................................................................... 5.26Roof rack ................................................................... 5.26Running in ................................................................ 2.02
S Screen washers ................................... 1.52 - 1.54 - 4.11Seats: adjustment ......................................... 1.09 1.10Snow chains ............................................................. 5.08Spark plugs ............................................................... 5.19Speakers .................................................................... 5.23Special features of diesel versions ......................... 2.06Special features of petrol versions ......................... 2.04Speed limiter ............................................... 2.17 2.19Starting the engine ........................................ 2.03 - 2.04Starting the engine ........................................ 1.06 - 2.03Steering wheel .......................................................... 1.50Storage compartments ................................. 3.26 3.28Sun visor ................................................................... 3.23Sunroof ...................................................................... 3.24Sunroof blinds .......................................................... 3.25Supplementary restraint systems ............... 1.13 1.18
T Tailgate ...................................................................... 3.31Tanks and reservoirs: Coolant ................................. 4.08
Fuel (capacity) ..................... 1.58Windscreen washer ............. 4.10

AVANTIME D66 nu647-2 C:\Documentum\Checkout\nu647-2_eng_T6.WIN 29/3/2002 13:55 - page 13
ALPHABETICAL INDEXT Telephone (pre-equipment) ...................................... 5.24
Towing (breakdown) ...................................... 5.30 - 5.31Towing (towing a caravan) ....................................... 6.03Towing weights .............................................. 6.02 - 6.03Traction control system ................................. 2.22 - 2.23Transporting objects in the luggage compartment . 3.32Turning circle ............................................................ 6.05Tyre pressures ..................................... 0.04 - 2.06 - 5.07Tyres ................................................... 0.04 - 5.06 5.08
V Vehicle identification ................................... 6.06 6.08Ventilation and heating ............................... 3.02 3.17
W Warning lights ............................................. 1.36 1.40Washing .................................................................... 4.12Weights ..................................................................... 6.02Wheelbrace ............................................................... 5.02Window winder ............................................ 3.21 - 3.22Windows, rear .......................................................... 3.22Windscreen ............................................................... 3.23Winter equipment .................................................... 5.08Wiper blades ............................................................. 5.09Wipers ............................................................ 1.52 - 5.09

AVANTIME D66 nu647-2 C:\Documentum\Checkout\nu647-2_eng_T6.WIN 29/3/2002 13:55 - page 14

AVANTIME D66 nu647-2 C:\Documentum\Checkout\nu647-2_eng_T6.WIN 29/3/2002 13:55 - page 15

AVANTIME D66 nu647-2 C:\Documentum\Checkout\nu647-2_eng_T6.WIN 29/3/2002 13:55 - page 16
The driver's handbook - 60 25 411 369 – NU 647-2 – January 2002 – Édition anglaise
C R É A T E U R D ' A U T O M O B I L E S