Nidek YC-1600 Service Manual
111
NIDEK OPHTHALMIC YAG LASER SYSTEM Model YC-1600 SERVICE MANUAL XYC14*RDA001E/E Total pages: 105 2005. 3.3
description
Nidek YC-1600 Service Manual for Ophtalmic Laser
Transcript of Nidek YC-1600 Service Manual

NIDEK
OPHTHALMIC YAG LASER SYSTEM
Model YC-1600
SERVICE MANUAL
XYC14*RDA001E/ETotal pages: 105
2005. 3.3

HEAD OFFICE : 34-14, Maehama, Hiroishi-cho, Gamagori, Aichi 443-0038, JapanTelephone: (0533) 67-6611Facsimile: (0533) 67-6610
TOKYO OFFICE : 6th Floor, Takahashi Bldg., No.2, 3-chome, Kanda-jinboucho(International Div.) Chiyoda-ku, Tokyo 101-0051, Japan
Telephone: (03) 3288-0571Facsimile: (03) 3288-0570Telex: 2226647 NIDEK J
NIDEK INCORPORATED : 47651 Westinghouse Drive Fremont, California 94539, U. S. A.Telephone: (510) 226-5700Facsimile: (510) 226-5750
NIDEK SOCIETE ANONYME : Europarc 13, rue Auguste Perret, 94042 CRETEIL, France(Représentant Autorisé) Telephone: (01) 49 80 97 97
Facsimile: (01) 49 80 32 08Printed in JAPAN

Table of Contents
§1 INTRODUCTIONS ...................................................................................................... 1-11.1 Before using this manual .............................................................................................. 1-11.2 Before repairing.......................................................................................................... 1-11.3 Handling and repairing of the laser head ...................................................................... 1-11.4 Handling and repairing of the board and wiring ............................................................ 1-1
§2 CAUTIONS ................................................................................................................... 2-12.1 Cautions in laser emission ........................................................................................ 2-12.2 Handling of the laser head ........................................................................................ 2-12.3 Boards for repair ....................................................................................................... 2-12.4 Cautions in checking connectors .............................................................................. 2-12.5 Cautions in disconnecting cords ............................................................................... 2-22.6 Cautions in soldering cords ...................................................................................... 2-22.7 Cautions in using the energy meter for the YAG laser ............................................. 2-2
§3 TROUBLESHOOTING .............................................................................................. 3-1
§4 SUB TROUBLESHOOTING...................................................................................... 4-14.1 The pilot lamp does not light.................................................................................... 4-14.2 Both fixation lamp and backlight of the control panel do not light ......................... 4-24.3 Only fixation lamp does not light ............................................................................. 4-34.4 Only backlight of the control panel does not light ................................................... 4-34.5 The error display appears ......................................................................................... 4-4
4.5.1 Error 1 appears ................................................................................................ 4-44.5.2 Error 4 appears ................................................................................................ 4-44.5.3 Error 5 appears ................................................................................................ 4-54.5.4 Error 7 appears ................................................................................................ 4-64.5.5 Error 10 appears .............................................................................................. 4-84.5.6 Error 12 appears .............................................................................................. 4-94.5.7 Error 13 appears .............................................................................................. 4-94.5.8 Error 14 appears ............................................................................................ 4-104.5.9 Error 15 appears ............................................................................................ 4-114.5.10 Error 30 appears .......................................................................................... 4-124.5.11 Error 31 appears .......................................................................................... 4-134.5.12 Error 50 appears .......................................................................................... 4-144.5.13 Error 51 appears .......................................................................................... 4-144.5.14 Error 52 appears .......................................................................................... 4-154.5.15 Error 53 appears .......................................................................................... 4-154.5.16 Error 54 appears .......................................................................................... 4-164.5.17 Error 90 appears .......................................................................................... 4-16
4.6 The illumination light is not projected ......................................................................... 4-17

4.7 The focusing rod looks like shifting when the PD is adjusted ...................................... 4-184.8 The illumination light is shifted from the center of
Microscopic visual field when the magnification is 10× ...................................... 4-184.9 The focusing rod cannot be seen clearly ................................................................ 4-184.10 There are some spots in the illumination light ..................................................... 4-194.11 The illumination light is not focused on the focusing rod .................................... 4-194.12 The position of illumination light on the focusing rod is not normal .................. 4-194.13 The illumination light does not go out even if the Brightness
control is turned fully counterclockwise ............................................................. 4-194.14 The slit image tilts when turning it to the vertical position .................................. 4-204.15 The slit does not fully close or open..................................................................... 4-204.16 The position where the slit closes is shifted from the center ............................... 4-204.17 Coarse movement to back and forth is not smooth .............................................. 4-214.18 Coarse movement to right and left is not smooth................................................. 4-214.19 Fine movement to back and forth, and to right and left is not smooth ................. 4-224.20 Vertical movement is not smooth ......................................................................... 4-224.21 Aiming beam is not emitted ................................................................................. 4-234.22 The STATUS indicator for READY mode does not light .................................... 4-234.23 The position of burnt pattern is not same to the projected position
of the aiming beam ............................................................................................. 4-234.24 There is an unevenness in the burnt pattern ......................................................... 4-244.25 Setting of the number of pulses cannot be changed ............................................. 4-254.26 Counter display cannot be reset to “0” ................................................................. 4-254.27 The measured energy of YAG laser beam is not normal ...................................... 4-264.28 The system does not stop with the Emergency stop switch ................................. 4-26
§5 REPAIR ......................................................................................................................... 5-15.1 Removing covers ...................................................................................................... 5-1
5.1.1 Right cover ..................................................................................................... 5-15.1.2 Left cover ......................................................................................................... 5-25.1.3 Bottom cover of the microscope arm ................................................................. 5-25.1.4 Cover of the microscope arm ............................................................................ 5-25.1.5 Front cover ...................................................................................................... 5-35.1.6 SL cover B ....................................................................................................... 5-35.1.7 SL cover A ....................................................................................................... 5-35.1.8 Switch box ....................................................................................................... 5-45.1.9 Right cover of the lamp housing ......................................................................... 5-45.1.10 Left cover of the lamp housing ......................................................................... 5-55.1.11 Cover of the aiming adjustment part ................................................................. 5-5
5.2 Check and replacement of fuses .................................................................................. 5-55.3 Voltage check for wall outlet ....................................................................................... 5-65.4 Replacement of key control switch .............................................................................. 5-65.5 Replacement of the pilot lamp ..................................................................................... 5-65.6 Replacement of the Emergency stop switch ................................................................. 5-75.7 Replacement of the fixation lamp ASSY ...................................................................... 5-75.8 Replacement of the switching power supply ................................................................. 5-85.9 Replacement of the master board ................................................................................ 5-85.10 Replacement of the focus ASSY ............................................................................... 5-9
5.11 Replacement of the display board ASSY ................................................................. 5-105.12 Replacement of the YAG laser unit .......................................................................... 5-105.13 Replacement of the energy monitor ASSY............................................................... 5-125.14 Replacement of the rack ......................................................................................... 5-125.15 Replacement of the wheel shaft ............................................................................... 5-135.16 Replacement of the plate ......................................................................................... 5-135.17 Replacement of the YAG shutter ASSY................................................................... 5-145.18 Replacement of the aiming shutter ASSY................................................................. 5-145.19 Replacement of the YL cable ASSY........................................................................ 5-155.20 Replacement of the YL power supply board ............................................................ 5-155.21 Replacement of the illumination ASSY..................................................................... 5-165.22 Replacement of the vertical driving axel of the chin support ...................................... 5-17
§6 VERIFICATION AND ADJUSTMENT ........................................................................ 6-16.1 Adjustment of the microscope and binocular tube ........................................................ 6-1
6.1.1 Check of the optical axis of microscope ............................................................ 6-16.1.2 Adjustment of the optical axis with the binocular tube ......................................... 6-16.1.3 Adjustment of the prism holder position ............................................................. 6-26.1.4 Adjustment of the optical axis with the microscope head .................................... 6-3
6.2 Adjustment of the illumination part ............................................................................... 6-46.2.1 Cleaning of the optical system for illumination ..................................................... 6-46.2.2 Cleaning of the filters ......................................................................................... 6-56.2.3 Cleaning of the slit ............................................................................................. 6-56.2.4 Adjustment of the focus of illumination ............................................................... 6-66.2.5 Illumination focus adjustment for the prism head without tilting mechanism .............................................................................. 6-76.2.6 Illumination focus adjustment for the prism head with tilting mechanism .................................................................................... 6-76.2.7 Check of the optical axis of illumination........................................................ 6-96.2.8 Adjustment of the optical axis of illumination (horizontal) ........................... 6-96.2.9 Adjustment of the optical axis for prism head with tilting mechanism (vertical) .......................................................................... 6-96.2.10 Adjustment of the optical axis for prism head with tilting mechanism (vertical) ...................................................................... 6-106.2.11 Adjustment of the vertical position of slit ........................................................ 6-116.2.12 Adjustment of the closing of slit ..................................................................... 6-126.2.13 Check and adjustment of the horizontal slit image ........................................... 6-136.2.14 Check and adjustment of the vertical slit image .............................................. 6-156.2.15 Adjustment of the slit shutter position (horizontal) ........................................... 6-156.2.16 Adjustment of the slit shutter position (vertical) ............................................... 6-16
6.3 Adjustment of the aiming beam.................................................................................. 6-176.3.1 Fixing the aiming shutter plate .......................................................................... 6-176.3.2 Check of the sensor for aiming shutter ............................................................. 6-186.3.3 Adjustment of the optical axis of aiming beam .................................................. 6-196.3.4 Focus adjustment of the aiming beam .............................................................. 6-196.3.5 Adjustment of the optical axis of two-point aiming beams ................................. 6-196.3.6 Adjustment of the aiming energy ...................................................................... 6-206.3.7 Adjustment of the maximum energy ................................................................. 6-216.3.8 Adjustment of the minimum energy .................................................................. 6-21

6.4 Adjustment of the YAG laser ..................................................................................... 6-226.4.1 Adjustment of the YAG shutter ........................................................................ 6-226.4.2 Check of the sensor for YAG shutter ............................................................... 6-236.4.3 Adjustment of the indicated and measured values of PFN voltage ..................... 6-236.4.4 Adjustment of the PFN voltage ....................................................................... 6-256.4.5 Adjustment of the mirror holder 3 and optical axis of YAG laser head .............................................................................................. 6-276.4.6 Adjustment of the focus ASSY ........................................................................ 6-276.4.7 Adjustment of the D mirror ASSY (aligning the YAG laser beam to the aiming beam) ............................................ 6-286.4.8 Adjustment of the focus of YAG laser .............................................................. 6-286.4.9 Adjustment of the focus shift ............................................................................ 6-296.4.10 Adjustment of the YAG laser energy .............................................................. 6-30
6.5 Other adjustments .................................................................................................... 6-356.5.1 Adjustment of the smoothness of vertical movement ......................................... 6-35
6.6 Adjustment of indicated energy from outside of the device and settable function .......... 6-366.6.1 Adjustment of indicated energy of YAG laser ................................................... 6-36
6.6.1.1 Gain adjustment ................................................................................. 6-366.6.1.2 Offset adjsutment ............................................................................... 6-36
6.6.2 Adjustment of aiming energy .................................................................................. 6-366.6.2.1 Aiming gain adjsutment ....................................................................... 6-366.6.2.2 Aiming offset adjustment ..................................................................... 6-36
6.6.3 Release of tilting lens-barrel (option) control .................................................... 6-37§7 WIRING DIAGRAM ................................................................................................... 7-1
§8 ERROR CODE LIST ................................................................................................... 8-18.1 Error code list ............................................................................................................ 8-18.2 Dip switch list ............................................................................................................. 8-28.3 Other indications ........................................................................................................ 8-3
§9 SYSTEM PARAMETER LIST .................................................................................... 9-19.1 Changing and setting of the parameters ........................................................................ 9-19.2 Original setting of the system parameters ..................................................................... 9-29.3 Contents of parameters ............................................................................................... 9-3
§10 LIST OF PARTS TO BE REPLACED ...................................................................... 10-110.1 Consumables ........................................................................................................ 10-110.2 Parts to be repaired and replaced .......................................................................... 10-1
§11 TOOLS, MEASUREMENT DEVICE, SOLVENT AND JIGS ............................... 11-111.1 Tools ...................................................................................................................... 11-111.2 Measurement device ............................................................................................... 11-111.3 Solvent ................................................................................................................... 11-111.4 Jigs ......................................................................................................................... 11-111.5 Others .................................................................................................................... 11-1

XYC14*RDA001E/E
§1 INTRODUCTION
1 - 1
1.1 Before using this manual
• This service manual is for the OPHTHALMIC YAG LASER SYSTEM YC-1600.
• Be sure to use this manual after understanding the operator’s manual for the OPHTHALMICYAG LASER SYSTEM YC-1600 thoroughly.
• This manual is subject to change without notice for improvement. Since the Technical Bulletinwill be released every time significant changes are made to the system, refer to the TechnicalBulletin together with this manual.
1.2 Before repairing
• Be sure not to lose or drop the removed screws inside the system.
• Apply a threadlocker to the screws which have been loosened and tightened again.
• Refer to the wiring diagram of the YC-1600 when repairing (see 7.1).
1.3 Handling and repairing of the laser head
• Be sure to turn OFF the power of the system when handling the laser head.
• Be sure to return the laser head to NIDEK for repair. Never disassemble, adjust and repair thelaser head.NIDEK assumes no responsibility if the laser head is disassembled, adjusted and repaired.
1.4 Handling and repairing of the board and wiring
• Be sure to turn OFF the power of the system when handling and repairing the board andwiring.
[WARNING]Since Nd:YAG laser is an invisible infrared ray, it may cause the hazardous exposure toradiation if the system is improperly handled and operated.
[CAUTION]Be sure not to expose yourself to the laser beam at a place where the laser beam passesthrough or is emitted when handling and repairing.
[CAUTION]Be sure to use the safety goggles for the Nd:YAG laser.

XYC14*RDA001E/E
1 - 2
[CAUTION]Never look straight at the Nd:YAG laser even if the safety goggles are used.
[CAUTION]Never touch the optical parts such as mirrors and lens directly.
[CAUTION]Never emit the laser beam to the skin.
[CAUTION]Pay attention not to get an electric shock when unavoidably opening covers to check or repairthe electrical parts.

XYC14*RDA001E/E
§2 CAUTIONS
2 - 1
2.1 Cautions in laser emission
• Never emit the laser beam to personnel or things.
• Never touch the high voltage part (shown with mark) when emitting the laser beam sincethere is a fear of an electric shock.
• Be sure not to drop metallic parts such as tools and screws into the laser system.
2.2 Handling of the laser head
• Never disassemble or repair the laser head.Return the laser head to NIDEK if the repair is necessary.
2.3 Boards for repair
• The IC8 (EEPROM) on the MASTER BOARD which is supplied by NIDEK has already beenplaced in the initial state. The setting values memorized in each EEPROM become optimumfor each system’s performance. As a result, the setting values may be varied according to eachsystem.If using a new board, remove the IC8 (EEPROM) from the old one and attach it to a new one.
2.4 Cautions in checking connectors
• Visually check the connecting condition of connectors.If the connector is almost disconnected, securely reconnect it.
• Verify the conditions of the contact pins and contacts.• Cleaning of the contact pins
Clean the contacts with a spray which restores electrical continuity to them when dust oroil makes them dirty.
• Verify the condition of the contact pins and contacts.Disconnect the connectors and verify each cord by pulling a cord with the force approx. 1kgf.If the contact pin is removed, raise the hook of the pin using the precise screwdriver, andinsert it into the connector.
XYC14*RDA001E/E
2 - 2
2.5 Cautions in disconnecting cords
• If the heat-shrinkable tube covers the cord, remove it using nippers or knife.
• Use the soldering iron to remove the soldered parts.
• Remove the old solder adhered to the cord or terminal with the soldering iron.
2.6 Cautions in soldering cords
• If the cord was covered by the heat-shrinkable tube, run the cord through the tube.
• Solder the cords to bundle them before soldering the cord.
• Put the heat-shrinkable tube on the soldered part and constrict it using a heat gun.
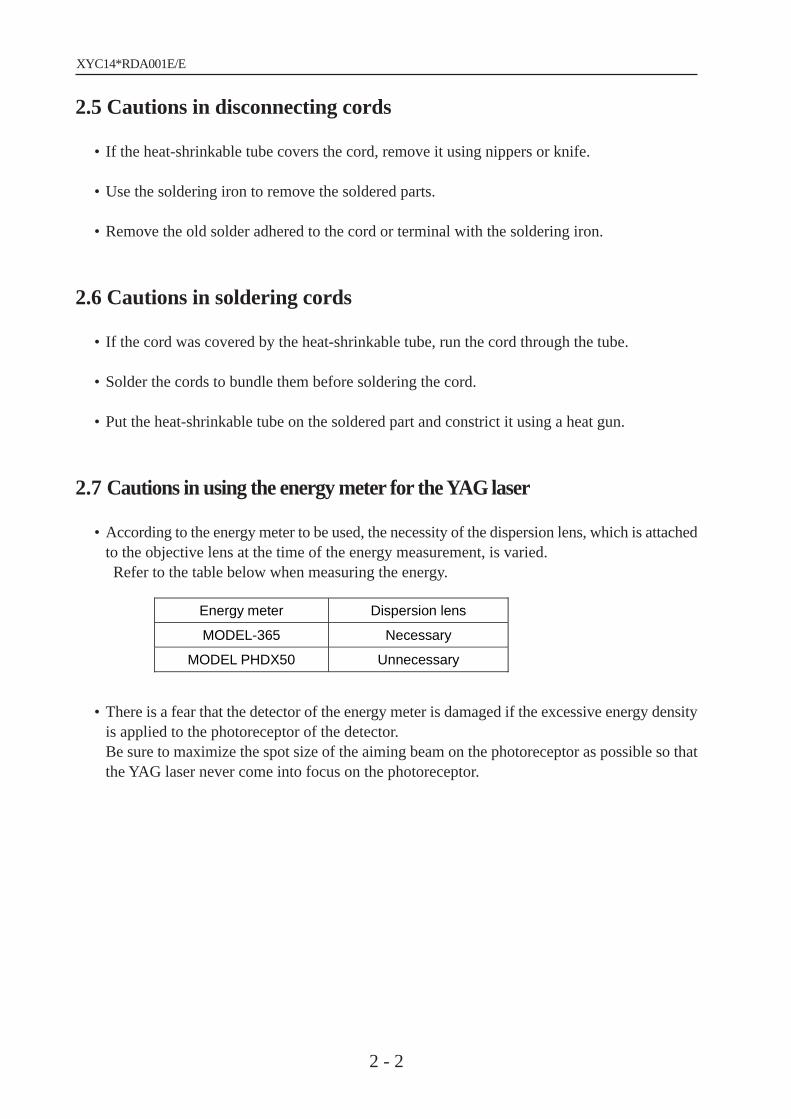
2.7 Cautions in using the energy meter for the YAG laser
• According to the energy meter to be used, the necessity of the dispersion lens, which is attachedto the objective lens at the time of the energy measurement, is varied.Refer to the table below when measuring the energy.
• There is a fear that the detector of the energy meter is damaged if the excessive energy densityis applied to the photoreceptor of the detector.Be sure to maximize the spot size of the aiming beam on the photoreceptor as possible so thatthe YAG laser never come into focus on the photoreceptor.
Energy meter Dispersion lens
MODEL-365 Necessary
MODEL PHDX50 Unnecessary
XYC14*RDA001E/E
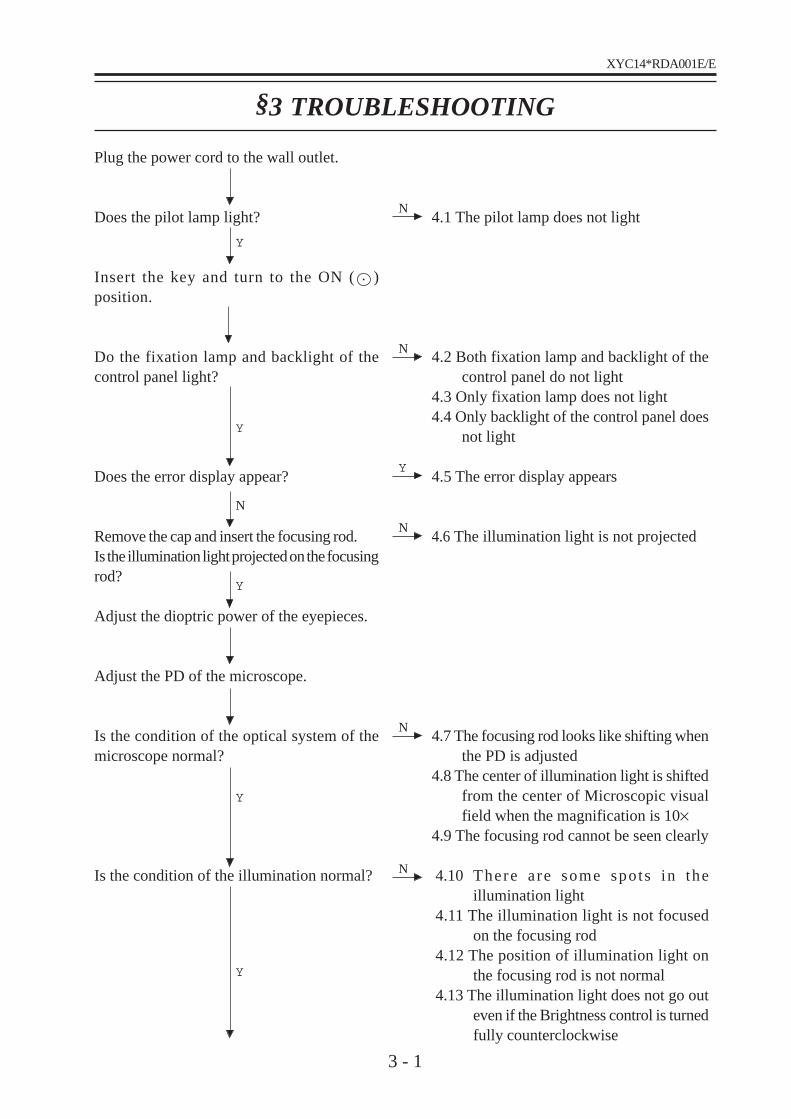
§3 TROUBLESHOOTING
3 - 1
Plug the power cord to the wall outlet.
Does the pilot lamp light?
Insert the key and turn to the ON ( )position.
Do the fixation lamp and backlight of thecontrol panel light?
Does the error display appear?
Remove the cap and insert the focusing rod.Is the illumination light projected on the focusingrod?
Adjust the dioptric power of the eyepieces.
Adjust the PD of the microscope.
Is the condition of the optical system of themicroscope normal?
Is the condition of the illumination normal?
4.1 The pilot lamp does not light
4.2 Both fixation lamp and backlight of thecontrol panel do not light
4.3 Only fixation lamp does not light4.4 Only backlight of the control panel does
not light
4.5 The error display appears
4.6 The illumination light is not projected
4.7 The focusing rod looks like shifting whenthe PD is adjusted
4.8 The center of illumination light is shiftedfrom the center of Microscopic visualfield when the magnification is 10×
4.9 The focusing rod cannot be seen clearly
4.10 There a re some spots in theillumination light
4.11 The illumination light is not focusedon the focusing rod
4.12 The position of illumination light onthe focusing rod is not normal
4.13 The illumination light does not go outeven if the Brightness control is turnedfully counterclockwise
Y
N
N
Y
N
N
Y
Y
N
Y
N
Y

XYC14*RDA001E/E
3 - 2
Is the condition of the slit normal?
Is the movement of the slit lamp normal?
Reduce the light amount of the slit lamp.
Can the aiming beam be seen?
Remove the focusing rod and attach thecap.
Stick the burn paper to the head rest.
Turn the Energy control to set the outputenergy to minimum.
Turn the YAG Focus shift control to “0”position.
Do the STATUS indicator for STANDBYmode go off and the one for READY modelight when the STATUS switch is pressed?
Is the YAG laser beam emitted normally whenthe trigger switch is pressed?
4.14 The slit image tilts when turning it tothe vertical position
4.15 The slit does not fully close or open4.16 The position where the slit closes shifts
from the center
4.17 Coarse movement to back and forth isnot smooth
4.18 Coarse movement to right and left isnot smooth
4.19 Fine movement to back and forth, andto right and left is not smooth
4.20 Vertical movement is not smooth
4.21 Aiming beam is not emitted
4.22 The STATUS indicator for READYmode does not light
4.5 The error display appears4.23 The position of burnt pattern is not
same to the projected position of theaiming beam
4.24 There is an unevenness in the burntpattern
N
Y
Y
Y
Y
Y
N
N
N
N

XYC14*RDA001E/E
3 - 3
Can the setting of the number of pulsesbe changed when the Burst switch ispressed?
Is the counter reset to “0” when the Resetswitch is pressed?
Is the energy of the emitted YAG laser beamnormal?
Does the system stop when the Emergencystop switch is pressed?
Turn the key switch to OFF ( ) position andpull out the key.
End
4.25 Setting of the number of pulses can notbe changed
4.26 Counter display cannot be reset to “0”
4.27 The measured energy of YAG laserbeam is not normal
4.28 The system does not stop with theEmergency stop switch
Y
N
Y
Y
Y
N
N
N

XYC14*RDA001E/E
3 - 4

XYC14*RDA001E/E
§4 SUB TROUBLESHOOTING
4 - 1
4.1 The pilot lamp does not light
This trouble may be caused by the break of fuses in the switch box, failure of the switchingpower supply, and connection failure of connectors.
Is there continuity in F1 and F2 fuses in theswitch box?(See 5.2.)
Is the required voltage applied to the walloutlet?(See 5.3.)
Is the voltage between 1(-) and 2 (+) ofP2 in the switching power supply DC+12V?
Is the voltage between 1 (+) and 2 (-) of P501on the key switch board DC +12V?
Is the voltage between 5 (+) and 6 (-) of P502on the key switch board DC +12V?
Failure of the pilot lamp.Replace it with a new one.(See 5.5.)
Replace fuses.(See 5.2.)
Secure the required voltage.(See 5.3.)
Replace the switching power supply.(See 5.8.)
Connection failure of the cable of P501 orconnector. Check the continuity and repairthe failed part.
Connection failure inside the key switchboard.Replace the key switch board with a new one.(See 5.4.)
Y
N
Y
N
N
Y
N
N
Y
Y

XYC14*RDA001E/E
4 - 2
4.2 Both fixation lamp and backlight of the control panel do not light
This trouble may be caused by the connection failure of connectors.
Is there no continuity between 2nd and 4th/5th pin on the key switch when the key switchis turned OFF?Is there continuity between 2nd and 4th/5thpin on the key switch when the key switch isturned ON?
Is the Emergency stop switch normal?
Disconnect P3 of the remote connector.Is there continuity between 3rd and 4th pin ofP3?
Reconnect connectors P501, P502, and P503on the key switch board and P3 of the remoteconnector.
Failure of the key switch.Replace the key switch board with a new one.(See 5.4.)
Replace the Emergency stop switch with anew one.(See 5.6.)
Connection failure between 3rd and 4th pinsof P3 of the remote connector.Repair the failed part.
Y
N
Y
N
N
Y

XYC14*RDA001E/E
4 - 3
4.3 Only fixation lamp does not light
This trouble may be caused by the connection failure of connectors.
Is the voltage between 1 (+) and 2 (-) of P503on the key switch board DC +12V?
Remove the fixation lamp ASSY.Is the voltage between 1 (+) and 2 (-) ofP1 DC +12V?
Replace the fixation lamp ASSY.(See 5.7.)
Connection failure inside the key switchboard.Replace the key switch board with a new one.(See 5.4.)
Connection failure of the cable between P503and J13, between P13 and P1, or connectors.Check the continuity and repair the failedpart.
N
Y
N
4.4 Only backlight of the control panel does not light
This trouble may be caused by the connection failure of connectors or failure of the masterboard.
Are the following connections proper?• P113 and P106 on the master board• J201 on the display board, P501 on the
key switch board• J5 of the external connector
Is the voltage between 1 (+) and 3 (-) of P113on the master board DC +12V?
Is the voltage between 1 (+) and 2 (-) of P110on the master board DC +5V?
Replace the display board ASSY with a newone.(See 5.11.)
Reconnect the connectors.
Break in the cable or connection failurebetween PJ5 on the key switch board andPJ113 on the master board.Check the continuity and repair the failedpart.
Replace the master board with a new one.(See 5.9.)
Y
N
N
Y
N
Y
Y

XYC14*RDA001E/E
4 - 4
4.5 The error display appears
4.5.1 Error 1 appears
Error 1 appears when the temperature inside the YAG laser head becomes 45 ºC or more.
Turn the key switch to the OFF position andremove the right and left covers.Set it aside for 30 minutes for cooling.
Is the resistance across TS1 on the masterboard infinity?
Replace the master board with a new one.(See 5.9.)
Failure of TS1.Replace the master board with a new one.(See 5.9.)
Y
N
4.5.2 Error 4 appears
Error 4 appears when the malfunction occurs to the contents of EEPROM.
Initialize the EEPROM.(See 9.2.)
Reset the followings;• Aiming energy• PFN voltage• Focus of the YAG laser• YAG laser energy
(See 6.3.6, 6.4.3, 6.4.6, 6.4.10.)

XYC14*RDA001E/E
4 - 5
4.5.3 Error 5 appears
Error 5 appears when the YAG shutter does not open or close automatically.The cause may be the failure of the detection sensor of the YAG shutter.
Does the YAG shutter open when the systemis in the READY state and close in theSTANDBY state?
Is the YAG shutter caught in cables?
Are the voltage between 5 (+) and 7 (-) ofP102 on the master board DC +5V, andbetween 6 (+) and 7 (-) DC +0V when theshutter close?
Is the detection sensor (photo-interrupter)normal?(See 6.4.1.)
Failure of the rotary solenoid.Replace the YAG shutter ASSY with a newone.(See 5.17.)
Repair the part where the YAG shutter plateis caught in.
Failure of the IC1 on the master board.Replace the master board with a new one.(See 5.9.)
Failure of the detection sensor.Replace the YAG shutter ASSY with a newone.(See 5.17.)
Fix the rotary solenoid.(Refer to 5.17.)
Is the rotary solenoid fixed firmly?
Adjust the YAG shutter ASSY.(See 6.4.1.)
N
Y
Y
N
N
Y
N
Y
Y
N

XYC14*RDA001E/E
4 - 6
4.5.4 Error 7 appears
Error 7 appears in the case where the aiming shutter does not open automatically when theaiming laser is ON or it does not close when the aiming laser is OFF.The cause may be the failure of the detection sensor of the aiming shutter or the solenoid for theaiming shutter.
• The aiming shutter does not open automatically when the aiming laser is ON.
Is the aiming shutter plate placed in the openposition?
Is the voltage between 4 (+) and 7 (-) of P103on the master board DC 0V?
Failure of the IC1 on the master board.Replace the master board with a new one.(Refer 5.9.)
Is the voltage between 1 (+) and 2 (-) ofP103 on the master board DC +10V ormore?
Failure of the IC2 on the masterboard.Replace the master board with anew one.(See 5.9.)
Failure of the solenoid.Replace the aiming shutter ASSY with a newone.(See 5.18.)
Adjust the position of the detection sensor(photo-interrupter).(See 6.3.1.)
N
Y
N
N
Y
Y

XYC14*RDA001E/E
4 - 7
• The aiming shutter does not close automatically when the aiming laser is OFF.
Is the aiming shutter plate placed in the closeposition?
Is the voltage between 4 (+) and 7 (-) of P103on the master board DC +5V?
Failure of the IC1 on the master board.Replace the master board with a new one.(Refer 5.9.)
Is the voltage between 1 (+) and 2 (-) ofP103 on the master board DC 0V ormore?
Failure of the IC2 on the masterboard.Replace the master board with anew one.(See 5.9.)
Failure of the rotary solenoid.Replace the aiming shutter ASSY with a newone.(See 5.18.)
Adjust the position of the detection sensor(photo-interrupter).(See 6.3.1.)
N
Y
N
N
Y
Y

XYC14*RDA001E/E
4 - 8
4.5.5 Error 10 appears
Error 10 appears when the number of emitted YAG laser beams is less than the set number ofpulses.The cause may be that the PFN voltage is too low.
Set 7 of the SW1 on display board ASSY toOFF (upper position). The number of pulsesappears on the counter display.
Emit the YAG laser 10 shots.
Is “4” (number of pulses) displayed onthe pulse number display more than 8times?
Adjust the PFN voltage.(See 6.4.3.)
Does Error 10 appear?
End
Failure of the master board.Replace the master board with a new one.(See 5.9.)
If “4” is not displayed more than 8 times in10 times even though the PFN voltage israised to 440V (max.), the YAG laser headfails.Replace the YAG laser unit with a new one.(See 5.12.)
Y
N
Y
N

XYC14*RDA001E/E
4 - 9
4.5.6 Error 12 appears
Error 12 appears when the number of pulses of the YAG laser is over the intended number.
Replace the YL power supply board with a new one.(See 5.20.)
4.5.7 Error 13 appears
Error 13 appears when the YAG laser is emitted even though the trigger switch is not pressed.
The cause may be the malfunction by the noise.Use the system away from the devices which may cause the noise.

XYC14*RDA001E/E
4 - 10
4.5.8 Error 14 appears
Error 14 appears when the flash lamp does not light.
Remove the covers.Does the flash lamp light when the triggerswitch is ON or at the time of the test fire?
Is the PFN voltage proper?(See 6.4.3.)
Check the signal of TP3 (TRIG OUT) on theYL board at the time of the trigger.
Failure of the master board.Replace the master board with a new one.(See 5.9.)
Adjust the PFN voltage.(See 6.4.3.)
10 sec
12V
Signal at the time of the trigger is ON.
Is the signal of TP3 (TRIGOUT) normal?
Failure of the YAG laserunit.Replace the YAG laserunit with a new one.(See 5.12.)
Is the problem solved?
Failure of the YL powersupply board.Replace the YL power supplyboard with a new one.(See 5.20.)
Is the wiring between 4thpin of P1 on the YL boardand 4th pin of P112 on themaster board proper?
Failure of the master board.Replace the master boardwith a new one.(See 5.9.)
End
Repair the wiring.
Y
N
Y
N
NN
Y
N
YY
N

XYC14*RDA001E/E
4 - 11
4.5.9 Error 15 appears
Error 15 appears when the output energy of the YAG laser beam is not within ±20 % of therating.
Measure the output energy of the YAGlaser beam.Is the variability within ±20 % of therating?
Measure the master board TP9 with theoscilloscope. Is the ratio between thevoltage of TP9 and the energy indication1V : 2.5mJ?
Are the wirings of 4th pin of P110 on themaster board and that of the sample boardproper?
Repair the wiring.
Failure of the YAG laser unit.Replace the YAG laser unit with a new one.(See 5.12.)
Failure of the master board.Replace the master board with a new one.(See 5.9.)
TP9 VOLTAGE VALUE
Failure of the sample board.Replace the energy monitor ASSY with anew one.(See 5.13.)
Y
N
Y
Y
N
10 sec
5V: 12.5mJ(1V: 2.5mJ)
Gain the output energy from this length.
N

XYC14*RDA001E/E
4 - 12
4.5.10 Error 30 appears
Error 30 appears when the power supply for the laser head is faulty.
Does the voltage of TP5 on theYL board change from LOWto HIGH when the triggerswitch is pressed?
Does the voltage of TP4 on theYL power supply boardchange from LOW to HIGHwhen the trigger switch ispressed?
Failure of the YL power sup-ply board.Replace the YL power supplyboard with a new one.(See 5.20.)
Is the wiring between 6 pin ofJ1 and 6th pin of P112 on theYL board proper?
Repair the wiring.
Is the wiring between 5thpin of J1 and 5th pin ofP 11 2 o n t h e Y L b o a r dproper?
Repair the wiring.
Failure of the master board.Replace the master board witha new one.(See 5.9.)
Failure of the master board.Replace the master board witha new one.(See 5.9.)
N
N
N
N
Y Y
Y
Y
20 µsec
TP4
20 µsec
TP5
Waveform of TP4 and 5 when the trigger is ON.
5 V
5 V

XYC14*RDA001E/E
4 - 13
4.5.11 Error 31 appears
Error 31 appears when the PFN voltage is faulty.
Compare the setting valueof the PFN voltage at pa-rameter 10 with that of thePFN voltage (between 1st(+) and 5th (-) pins of J2 onthe YL board).Is the difference within20V?(See 6.4.3)[CAUTION] Pay attentionto the handling since thevoltage becomes 440V±10Vat maximum.
Is the wiring between 8th pinof J1 on the YL board and 8thpin of P112 on the masterboard proper?
Failure of the YL power sup-ply board.Replace the YL power supplyboard with a new one.(See 6.4.3.)
Is the wiring between the YLpower supply board and mas-ter board proper?
Repair the wiring.
Repair the wiring.
Failure of the master board.Replace the master board witha new one.(See 5.9.)
Y
N
Y
N
Y
N

XYC14*RDA001E/E
4 - 14
4.5.12 Error 50 appears
Error 50 appears when the signal from the photodiode is faulty.
Check TP9 on the master board with theoscilloscope.Is the ratio between the voltage of TP9and indication on the energy display is 1V: 2.5mJ?
Is the wiring between 4th pin of P110 on themaster board and 4th land on the sample boardproper?
Failure of the sample board.Replace the energy monitor ASSY with a newone.(See 5.13.)
Failure of the master board.Replace the master board with a new one.(See 5.9.)
Repair the wiring.
N
Y
N
Y
4.5.13 Error 51 appears
Error 51 appears when the signal from the potentiometer for adjusting the output energy (VR2)is faulty.
Is the voltage of TP8 on the master boardbetween approx. 0.2V (min.) and 4.5V (max.)when the energy control is turned from min.to max.?
Failure of the VR2 inside the energy monitorASSY.Replace the energy monitor ASSY with a newone.(See 5.13.)
Failure of the master board.Replace the master board with a new one.(See 5.9.)
N
Y
XYC14*RDA001E/E
4 - 15
4.5.14 Error 52 appears
Error 52 appears when the signal from the potentiometer for focus shift (VR3) is faulty.
Is the voltage of TP7 on the master boardbetween approx. 0.5V (ANT500) and 4.5V(POST500) when the YAG focus shift controlis turned?
Failure of the VR3 inside the focus ASSY.Replace the focus ASSY with a new one.(See 5.10.)
Failure of the master board.Replace the master board with a new one.(See 5.9.)
N
Y
4.5.15 Error 53 appears
Error 53 appears when only one microswitch in the trigger switch is turned ON.
• Hand switchIs the voltage of 1-3 and 2-3 of J115 on themaster board changed from HIGH (5V) toLOW (0V) when the hand sw is pressed?
Repair the wiring inside the HAND SWASSY.
• Foot switchCheck the voltage between 8th and 10th and9th and 10th of J113 on the master board usingthe multimeter.Is the output voltage DC12V?
Disconnect connector P4 of the footswitch.Is the output voltage between 8th and10th and 9th and 10th of J113 on themaster board still DC12V?
Wiring failure between P113 and J4 in the YC-1600 main body.It is necessary to repair.
Failure of the master board.Replace the master board with a new one.(See 5.9.)
Failure of the master board.Replace the master board with a new one.(See 5.9.)
Wiring failure inside the foot switch.It is necessary to repair.
N
Y
N
N
Y
Y

XYC14*RDA001E/E
4 - 16
4.5.16 Error 54 appears
Error 54 appears when the input signal of the number of pulses is faulty.
Check the signals of 3rd pin of J110 on themaster board and the signal of TP1 on thesample board.
Is the signal of 3rd pin of J110 outputproperly?
Is the waveform of TP1 output properly?
Is the wiring between the land 3 on the sampleboard and 7th pin of P110 on the master boardproper?
Repair the wiring.
Failure of the sample board.Replace the energy monitor ASSY with anew one.(See 5.13.)
Failure of the sample board.Replace the energy monitor ASSY with anew one.(See 5.13.)
Failure of the master board.Replace the master board with a new one.(See 5.9.)
J110-3
TP1
Waveform of TP1 and J110-3
N
Y
N
N
Y
Y
4.5.17 Error 90 appears
Error 90 appears when the program is faulty.
Replace the IC1 on the master board.

XYC14*RDA001E/E
4 - 17
4.6 The illumination light is not projected
This trouble may occur when the power goes off or in the event of a contact failure of connectors.
Is the illumination light projected when thebrightness control is turned clockwise?
Is the illumination light projected when theslit width is spread?
Is the filament of the illumination lampburnt?
Is the voltage between J8 and J9 terminals DC+10 to 12V when the brightness control is fullyturned clockwise?
Is the voltage between A1 and A2 on theillumination board DC +10 to +12V?
Is the voltage between 3rd (+) and 14th (-)pins of P113 on the master board DC 10 to12V?
Contact failure of the connector P113 on themaster board or cables.Check the continuity and repair the failed part.
End
End
Replace the illumination lamp with a newone.(Refer to the operator’s manual of the YC-1600.)
Failure of the VR1 inside the illuminationASSY.Replace the illumination ASSY with a newone.(See 5.21.)
Failure of the illumination board.Replace the illumination ASSY with a newone.(See 5.21.)
Failure of the master board.Replace the master board with a new one.(See 5.9.)
Y
N
Y
Y
N
N
N
Y
Y
N
N
Y
XYC14*RDA001E/E
4 - 18
4.7 The focusing rod looks like shifting when the PD is adjusted
Adjust the optical axis with the binocular tube if the illumination light shifts from the center ofthe visual field through the eyepieces when the pupil distance is changed by looking through thebinocular tube for each eye. (See 6.1.3.)
4.8 The illumination light is shifted from the center of Microscopic visual
field when the magnification is 10×××××
Does the illumination light shift to the samedirection if the binocular tube is attachedupside-down.
Adjust the optical axis by turning themicroscope head.(See 6.1.4.)
Adjust the optical axis by the binocular tube.(See 6.1.3.)
4.9 The focusing rod cannot be seen clearly
This trouble may occur when the dioptric power is not properly adjusted.
Is it possible to adjust the focus for each eyeby turning the visual power control ofeyepieces?
Replace to the new eyepieces.
Wipe the objective lens and eyepiece lenswith the mixed solvent of alcohol.
N
Y
Y
N

XYC14*RDA001E/E
4 - 19
4.10 There are some spots in the illumination light
This trouble may occur when there is dirt on the optical path of the illumination light.
Does the spot disappear by turning the filterdisk?
Dismount the focusing rod.
Move the black paper back and forth alongthe illumination light.Does the spot come into focus before the slitcome into focus?
Blow the dirt on the prism of the binoculartube.
Remove the dirt on the filter.(See 6.2.2.)
Clean the optical system of the illuminationlight.(See 6.2.1.)
N
Y
Y
N
4.11 The illumination light is not focused on the focusing rod
This trouble may occur when the focus adjustment of the illumination is not performed well.Adjust the focus of the illumination light. (See 6.2.5 and 6.2.6.)
4.12 The position of illumination light on the focusing rod is not normal
This trouble may occur when the optical axis adjustment of the illumination light is not performedwell. Adjust the optical axis of the illumination light. (See 6.2.7.)
4.13 The illumination light does not go out even if the Brightness control is
turned fully counterclockwise
This trouble may occur when the variable resister for the brightness of the illumination light(VR1 inside the illumination board) is faulty. Replace the variable resister with a new one. (See5.21.)

XYC14*RDA001E/E
4 - 20
4.14 The slit image tilts when turning it to the vertical position
Adjust the vertical position of the slit image. (See 6.2.11.)
4.15 The slit does not fully close or open
Adjust the closing and opening of the slit. (See 6.2.12 - 6.2.14.)
4.16 The position where the slit closes is shifted from the center
Adjust the position of the slit shutter. (See 6.2.15 and 6.2.16.)

XYC14*RDA001E/E
4 - 21
4.17 Coarse movement to back and forth is not smooth
This trouble may occur when the foreign substance adheres to the pinion (axle) or rack (rail).
Remove the cover of the wheel.
Are the tooth of the pinion and racknormal?
Does the foreign substance adhere to thepinion and rack?
Are the pinion and rack parallel?
Are the positions of the racks whichengage with the pinions the same in rightand left?
Adjust the racks so that they become parallel.
Replace the failed pinion or rack with a newone.(See 5.14 and 5.15.)
Remove the foreign substance.
Replace the wheel shaft with a new one.(See 5.15.)
Adjust the right and left positions of theracks which engage with the pinons so thatthey become the same.
Y
N
N
N
Y
N
Y
Y
4.18 Coarse movement to right and left is not smooth
This trouble may occur when the foreign substance adheres to the wheel shaft.
Is there a nick on the wheel shaft?
Does foreign substance adhere to the wheelshaft?
Replace the wheel shaft with a new one.(See 5.15.)
Replace the wheel shaft with a new one.(See 5.15.)
Remove the foreign substance.
Y
N
Y
N

XYC14*RDA001E/E
4 - 22
4.19 Fine movement to back and forth, and to right and left is not smooth
Replace the plate with a new one. (See 5.16.)
4.20 Vertical movement is not smooth
Adjust the support for the vertical movement. (See 6.24.)
XYC14*RDA001E/E
4 - 23
4.21 Aiming beam is not emitted
Does the Aiming OFF indicator light?
Failure of the aiming laser (laser diode).
Press the aiming switches so that the aimingbeam is turned ON.
Y
N
4.22 The STATUS indicator for READY mode does not light
Does the Aiming OFF indicator light?
Wipe the side without the blue mark of theflexible cable (between J106 and J201) withthe alcohol.
Does the STATUS indicator for the READYmode light?
Replace the display board ASSY with a newone.(See 5.11.)
Does the STATUS indicator for READY modelight?
End
Press the aiming switches so that the aimingbeam is turned ON.
End
Failure of the master board.Replace the master board with a new one.(See 5.9.)
Y
N
N
Y
Y
N
4.23 The position of burnt pattern is not same to the projected position
of the aiming beam
Adjust the optical axis of the YAG laser beam. (See 6.4.5.)

XYC14*RDA001E/E
4 - 24
4.24 There is an unevenness in the burnt pattern
This trouble may occur when there is dirt on the optical system of the YAG laser beam.[CAUTION] Be sure to use the tape on the surface of the burn paper to prevent soot fromadhering to the optical system when checking the burnt pattern of the YAG laser beam inside thesystem.
Is there an unevenness on the burnt pattern atthe front of the beam expander (expanderASSY) (“D” in the fig. below)?
Is there an unevenness on the burnt pattern atthe front of the dichroic mirror (D mirrorASSY) (“C” in the fig. below)?
Is there an unevenness on the burnt pattern atthe front of the mirror (mirror holder 3) (“B”in the fig. below)?
Is there an unevenness on the burntpattern between the YAG laser head andenergy control ASSY (“A” in the fig.below)?
Failure of the YAG laser head.Replace the YAG laser head and YAG powersupply board with new ones.(See 5.12 and 5.20.)
Remove dirt on the beam expander with theblower.
Remove dirt on the dichroic mirror with theblower.
Remove dirt on the mirror with the blower.
Remove dirt on the energy control ASSYwith the blower.
N
Y
N
N
N
Y
Y
Y
Nd:YAG Laser
Mirror holder 3
Mirror
ShutterD mirror ASSY
Dichroic mirror
Energy control ASSY
Expander ASSY

XYC14*RDA001E/E
4 - 25
4.25 Setting of the number of pulses cannot be changed
Wipe the side without the blue mark, of theflexible cable (between J106 and J201) withthe alcohol.
Can the number of pulses be set?
Replace the display board ASSY with a newone.(See 5.11.)
Can the number of pulses be set?
End
End
Failure of the master board.Replace the master board with a new one.(See 5.9.)
Y
N
Y
N
4.26 Counter display cannot be reset to “0”
Wipe the side without the blue mark of theflexible cable (between J106 and J201) withthe alcohol.
Can the counter display be reset to “0”?
Replace the display board ASSY with a newone.(See 5.11.)
Can the counter display be reset to “0”?
End
End
Failure of the master board.Replace the master board with a new one.(See 5.9.)
Y
N
Y
N
XYC14*RDA001E/E
4 - 26
4.27 The measured energy of YAG laser beam is not normal
This trouble may caused by the misadjustment of the indication on the energy display ormalfunction of the YAG laser head.
Adjust the energy of the YAG laser.(See 6.4.10.)
Is the problem solved?
End
Failure of the YAG laser head.Replace the YAG laser unit and YL powersupply board with new ones.(See 5.12 and 5.20.)
N
Y
4.28 The system does not stop with the Emergency stop switch
Is the Emergency stop switch normal?(See 5.6.)
Repair the contacts of 1st and 2nd pins ofP502.
Replace the Emergency stop switch with anew one.(See 5.6.)
N
Y

XYC14*RDA001E/E
§5 REPAIR
5 - 1
5.1 Removing covers
Removing procedure of exterior covers of the YC-1600 is as follows.* The attachment procedures of each cover are the reverse order of each procedures described
here.
5.1.1 Right cover
1) Loosen SB3 ××××× 6 on the bottom of the cover.
2) Remove the front cover by pulling frontward.
3) Remove caps from the controls using the pre-cise flatblade screwdriver.
4) Loosen nuts in the controls to remove them.
5) Unscrew SB3 ××××× 6 and remove the right cover.
Front cover
Controls
Right cover
SB3 x 6
SB3 x 6

XYC14*RDA001E/E
5 - 2
5.1.2 Left cover
1) Remove the left cover in the same manner as5.1.1.
5.1.3 Bottom cover of the microscope arm
1) Swing the microscope arm to right or left.
2) Unscrew PC2.6 ××××× 4 (n=2) and remove the bottomcover of the microscope arm.
5.1.4 Cover of the microscope arm
1) Swing the lamp housing more than 45º to right orleft.
2) Unscrew TC3 ××××× 6 and remove the cover of themicroscope arm.
Left cover
Bottom cover of the
microscope arm
PC2.6 x 4 (n=2)
Lamp housing
TC3 x 6
Cover of the microscope arm
XYC14*RDA001E/E
5 - 3
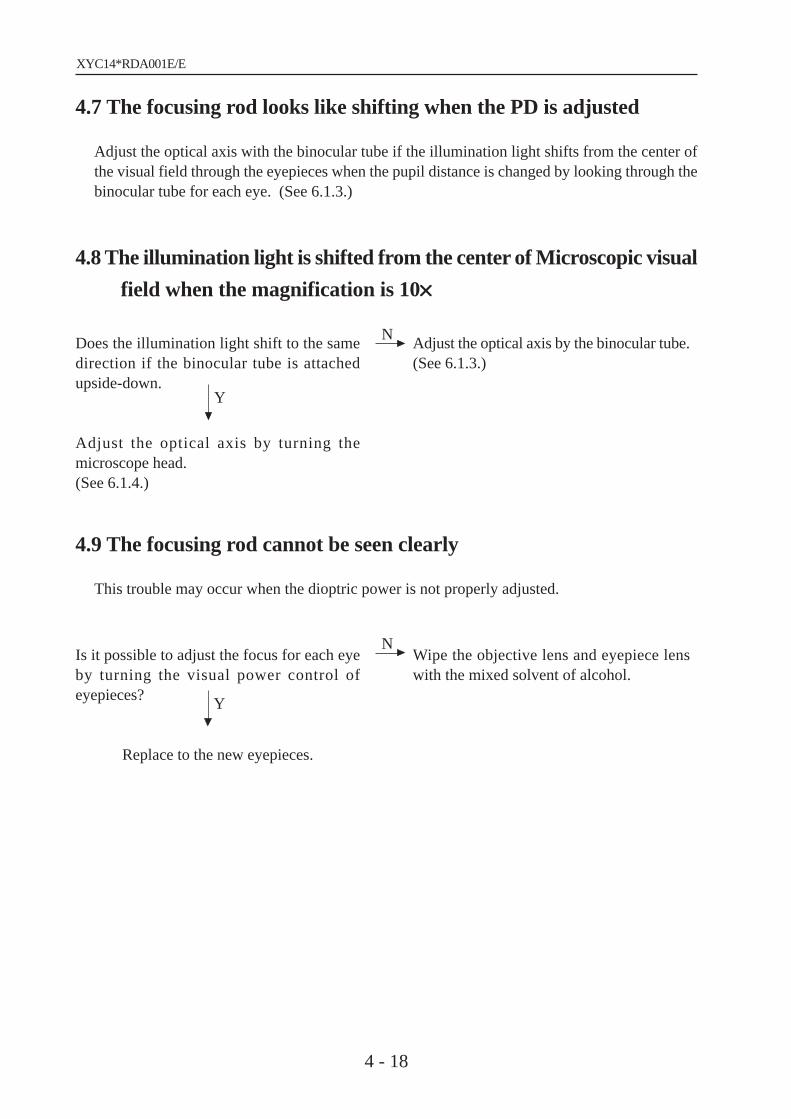
5.1.5 Front cover
1) Loosen SB3 ××××× 6 and remove the front cover bypulling frontward.
5.1.6 SL cover B
1) Remove cap from the control using the preciseflatblade screwdriver.
2) Loosen nut in the control to remove it.
3) Remove the blind cover for the screw on the SLcover B, and unscrew PC2.6 ××××× 6 (n=3) to removethe SL cover B.
5.1.7 SL cover A
1) Remove the SL cover B.See 5.1.6.
2) Unscrew SB3 ××××× 6 (n=2).
3) Move the microscope to the highest position us-ing the joystick.
Control
PC2.6 x 6 (n=3)
SL cover B
SB3 x 6 (n=2)
Front cover
SB3 x 6

XYC14*RDA001E/E
5 - 4
4) Remove the blind cover, and unscrew TC2.6 ××××× 6.Then lift up the SL cover A to remove.
5.1.8 Switch box
1) Unscrew SB3 ××××× 6 (n=2) on the back side of thebase and remove the switch box.
5.1.9 Right cover of the lamp housing
1) Remove caps from controls (4 parts) using theprecise flatblade screwdriver.
2) Loosen nuts in the controls to remove them.
3) Unscrew FC2 ××××× 4 and remove the lever.
4) Unscrew PC3 ××××× 6 (n=2) and remove the rightcover of the lamp housing.
SL cover A
TC2.6 x 6
SB3 x 6
(n=2)
Switch box
Lamp cover
PC3×6 n=2
XYC14*RDA001E/E
5 - 5
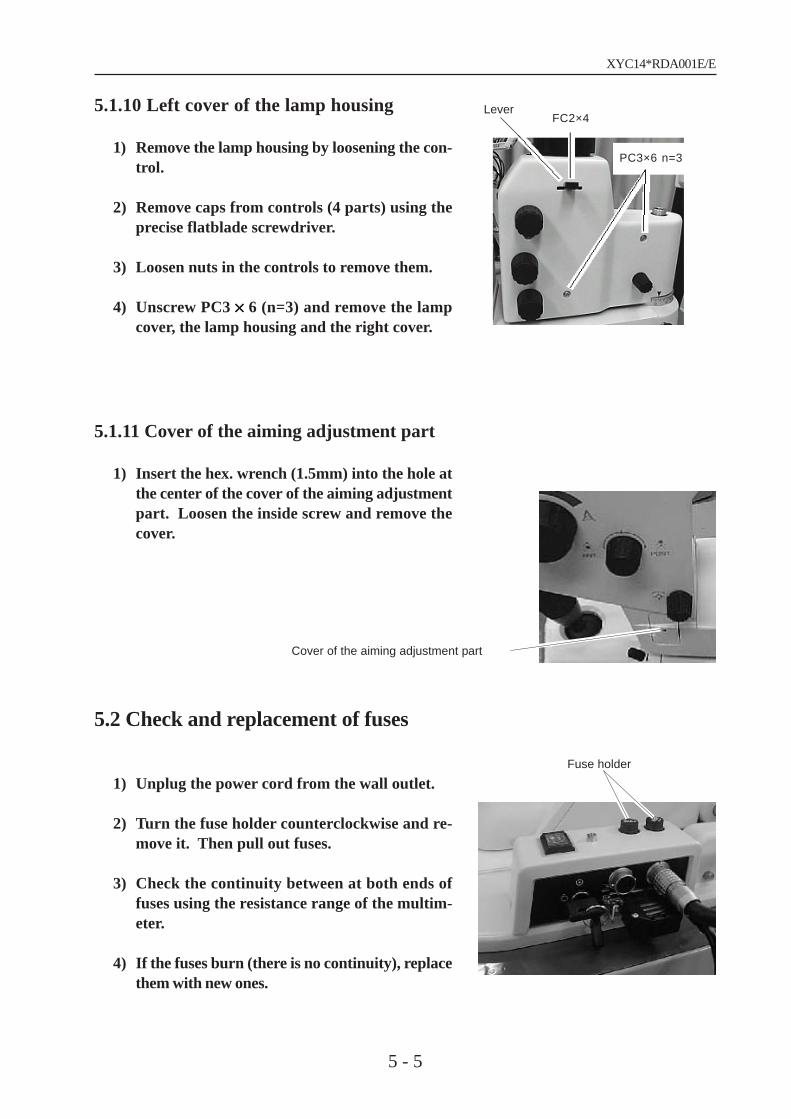
5.1.10 Left cover of the lamp housing
1) Remove the lamp housing by loosening the con-trol.
2) Remove caps from controls (4 parts) using theprecise flatblade screwdriver.
3) Loosen nuts in the controls to remove them.
4) Unscrew PC3 ××××× 6 (n=3) and remove the lampcover, the lamp housing and the right cover.
5.1.11 Cover of the aiming adjustment part
1) Insert the hex. wrench (1.5mm) into the hole atthe center of the cover of the aiming adjustmentpart. Loosen the inside screw and remove thecover.
5.2 Check and replacement of fuses
1) Unplug the power cord from the wall outlet.
2) Turn the fuse holder counterclockwise and re-move it. Then pull out fuses.
3) Check the continuity between at both ends offuses using the resistance range of the multim-eter.
4) If the fuses burn (there is no continuity), replacethem with new ones.
Cover of the aiming adjustment part
Fuse holder
LeverFC2×4
PC3×6 n=3

XYC14*RDA001E/E
5 - 6
5.3 Voltage check for wall outlet
1) Check the voltage between both polarities of the wall outlet using the AC range of themultimeter.[CAUTION] Pay attention not to get an electric shock.If the proper voltage (nominal voltage ±10%) is not supplied, the system cannot be used. Usethe voltage regulator to supply the proper voltage.
5.4 Replacement of key control switch
1) Verify that the key switch is in the OFF posi-tion.
2) Remove the switch box.See 5.1.8.
3) Unscrew TC3 ××××× 6 (n=3) and remove the coverof the switch box.
4) Disconnect P501, P502 and P503 from the keyswitch board.
5) Unscrew PC3 ××××× 6 (n=2) and remove the key switchboard.
6) Attach a new key switch board in the reverseorder.
5.5 Replacement of the pilot lamp
1) Verify that the key switch is in the OFF posi-tion.
2) Remove the switch box.See 5.1.8.
3) Unsolder the cord, which has been soldered to
Cover of the switch box
PC3 x 6 (n=2)
Key switch board

XYC14*RDA001E/E
5 - 7
the pilot lamp, using the soldering iron.
4) Remove the nut and washer, then remove the pi-lot lamp.
5) Attach a new pilot lamp in the reverse order.
5.6 Replacement of the Emergency stop switch
1) Verify that the key switch is in the OFF position.
2) Remove the switch box.See 5.1.8.
3) Check the continuity between 1st and 2nd pin of P502 using the resistance range of themultimeter.If there is no continuity under the condition that the emergency stop switch is not pressed, andif there is continuity under condition that the emergency stop switch is not pressed, there is noproblem. If not, replace the emergency stop switch in the following procedures.
4) Unsolder the cord, which has been soldered tothe emergency stop switch, using the solderingiron.
5) Remove the emergency stop switch.
6) Attach a new emergency stop switch in the re-verse order.
5.7 Replacement of the fixation lamp ASSY
1) Loosen the ring at the joint of the fixation lampand remove the fixation lamp ASSY.
2) Assemble a new fixation lamp ASSY.
Pilot lamp
Emergency stop switch
Ring

XYC14*RDA001E/E
5 - 8
5.8 Replacement of the switching power supply
1) Disconnect P2 and remove the PS ASSY.
2) Connect P2 of the new PS ASSY to J2 connec-tor.
5.9 Replacement of the master board
1) Remove the left cover.See 5.1.2.
2) Remove all connectors on the master board.
3) Loosen PC3 ××××× 10 (n=3) and remove the controlboard ASSY.[CAUTION] Do not unscrew PC3 × 10 (n=3) com-pletely but loosen until the master board can be re-moved to prevent washer on the back of the boardfrom dropping.
4) Assemble the new master board in the reverseorder.
5) Replace 1 chip CPU (IC1) and EEPROM (IC8).
6) Readjust the aiming power MAX and the aim-ing power MIN.See 6.3.7. and 6.3.8.
7) Check the focus shift.See 6.4.9.
8) Verify that the actual output energy and indi-cated output energy are the same.See 6.4.10.
P2
1chip CPU (IC1)
PC3 x 10 (n=3)
Master board
EEPROM (IC8)

XYC14*RDA001E/E
5 - 9
5.10 Replacement of the focus ASSY
1) Remove the right cover.See 5.1.1.
2) Remove the left cover.See 5.1.2.
3) Remove the control board ASSY.See 5.9.
4) Loosen SB3 ××××× 4 (n=3) and remove the focus ASSY.[CAUTION] Hold the focus ASSY with hand to prevent scratches on the glass parts whenremoving the focus ASSY.
5) Assemble the new focus ASSY in the reverse order.
6) Verify the optical axis of the YAG laser beam.See 6.4.6.
Focus ASSY
SB3 x 4 (n=3)
XYC14*RDA001E/E
5 - 10
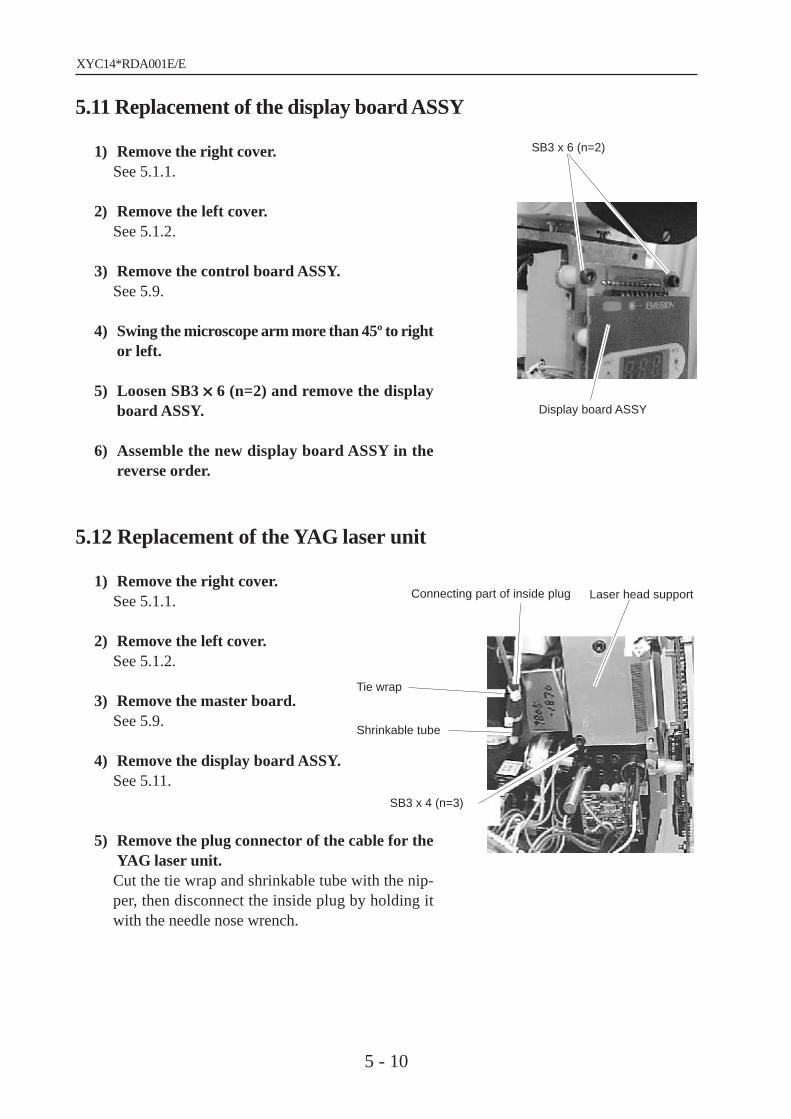
5.11 Replacement of the display board ASSY
1) Remove the right cover.See 5.1.1.
2) Remove the left cover.See 5.1.2.
3) Remove the control board ASSY.See 5.9.
4) Swing the microscope arm more than 45º to rightor left.
5) Loosen SB3 ××××× 6 (n=2) and remove the displayboard ASSY.
6) Assemble the new display board ASSY in thereverse order.
5.12 Replacement of the YAG laser unit
1) Remove the right cover.See 5.1.1.
2) Remove the left cover.See 5.1.2.
3) Remove the master board.See 5.9.
4) Remove the display board ASSY.See 5.11.
5) Remove the plug connector of the cable for theYAG laser unit.Cut the tie wrap and shrinkable tube with the nip-per, then disconnect the inside plug by holding itwith the needle nose wrench.
SB3 x 6 (n=2)
Display board ASSY
Connecting part of inside plug
Tie wrap
Shrinkable tube
SB3 x 4 (n=3)
Laser head support

XYC14*RDA001E/E
5 - 11
6) Loosen PC3 ××××× 4 and remove the GND cablesfrom the YAG laser unit.
7) Loosen SB3 ××××× 6 (n=3) and remove the YAG la-ser unit from the laser head support.
8) Assemble the new YAG laser unit in the reverseorder.
9) Adjust the PFN voltage.See 6.4.3.
10) Verify the optical axis of the YAG laser beamand adjust it.See 6.4.5.
11) Adjust the energy of the YAG laser beam.See 6.4.10.
12) Assemble the removed parts in the reverse or-der.
YAG laser unit
GND cables form the
YAG laser unit
XYC14*RDA001E/E
5 - 12
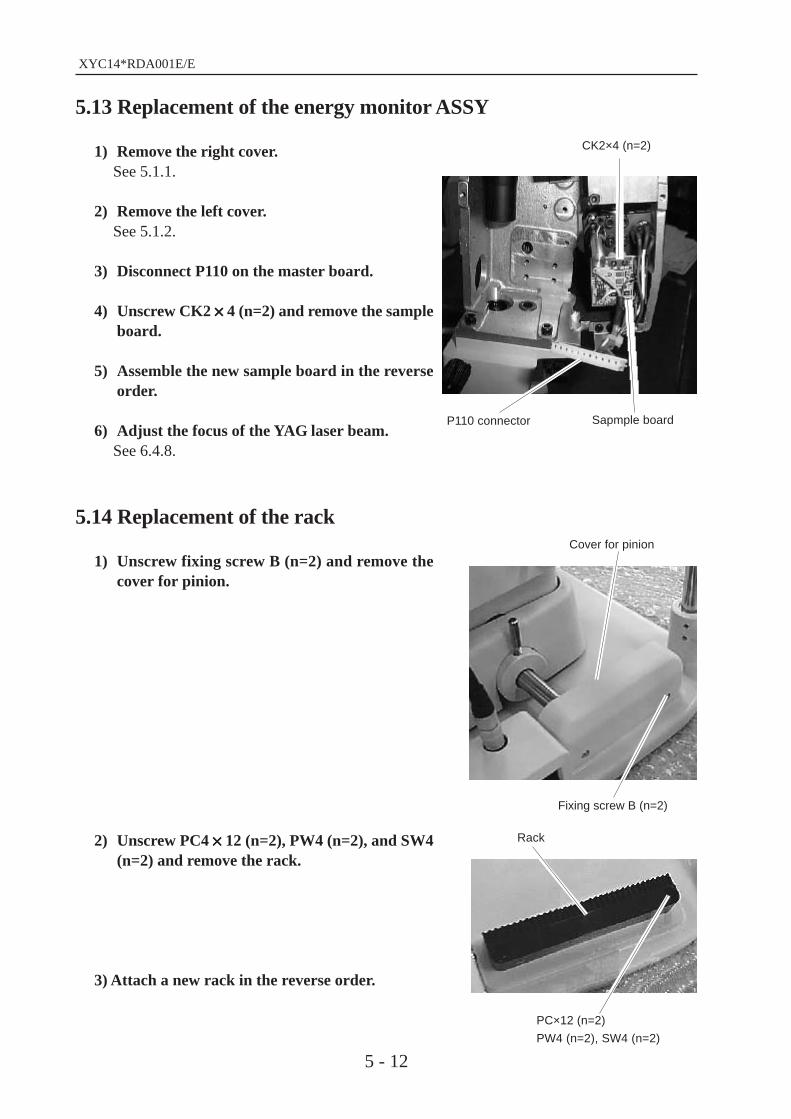
5.13 Replacement of the energy monitor ASSY
1) Remove the right cover.See 5.1.1.
2) Remove the left cover.See 5.1.2.
3) Disconnect P110 on the master board.
4) Unscrew CK2 ××××× 4 (n=2) and remove the sampleboard.
5) Assemble the new sample board in the reverseorder.
6) Adjust the focus of the YAG laser beam.See 6.4.8.
5.14 Replacement of the rack
1) Unscrew fixing screw B (n=2) and remove thecover for pinion.
2) Unscrew PC4 ××××× 12 (n=2), PW4 (n=2), and SW4(n=2) and remove the rack.
3) Attach a new rack in the reverse order.
CK2×4 (n=2)
P110 connector Sapmple board
Cover for pinion
Fixing screw B (n=2)
Rack
PC×12 (n=2)
PW4 (n=2), SW4 (n=2)

XYC14*RDA001E/E
5 - 13
5.15 Replacement of the wheel shaft
1) Remove the cover for pinion.See 5.14.
2) Remove the pinions by unscrewing screws whichfix them.See 5.15.
3) Remove the right and left spacers by unscrew-ing FK2 ××××× 4 (n=2) which fix them.
4) Loosen the fixing screw and remove the wheelshaft.
5) Attach a new wheel shaft in the reverse order.
5.16 Replacement of the plate
1) Unscrew FC2 ××××× 4 (n=2) and remove the plate.
2) Attach a new plate in the reverse order.
spacer Pinion
Axle FK2×4 (n=2)
XYC14*RDA001E/E
5 - 14
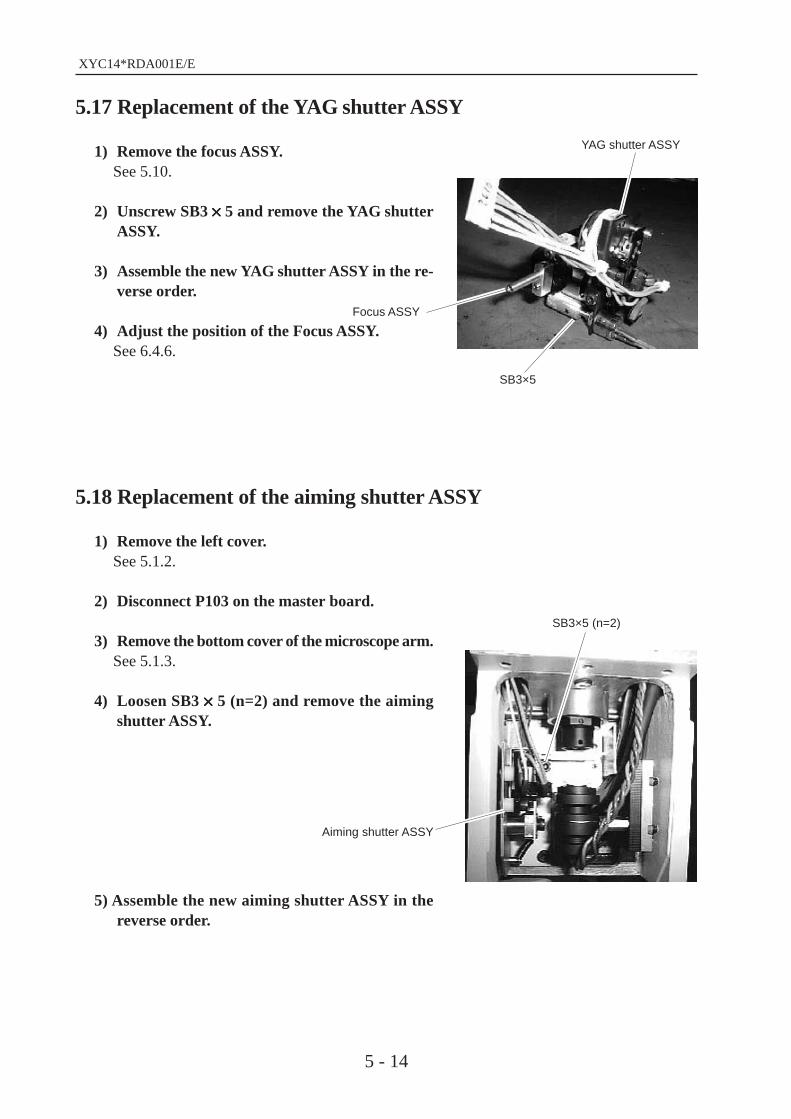
5.17 Replacement of the YAG shutter ASSY
1) Remove the focus ASSY.See 5.10.
2) Unscrew SB3 ××××× 5 and remove the YAG shutterASSY.
3) Assemble the new YAG shutter ASSY in the re-verse order.
4) Adjust the position of the Focus ASSY.See 6.4.6.
5.18 Replacement of the aiming shutter ASSY
1) Remove the left cover.See 5.1.2.
2) Disconnect P103 on the master board.
3) Remove the bottom cover of the microscope arm.See 5.1.3.
4) Loosen SB3 ××××× 5 (n=2) and remove the aimingshutter ASSY.
5) Assemble the new aiming shutter ASSY in thereverse order.
YAG shutter ASSY
Focus ASSY
SB3×5
SB3×5 (n=2)
Aiming shutter ASSY

XYC14*RDA001E/E
5 - 15
5.19 Replacement of the YL cable ASSY
1) Remove the left cover.See 5.1.2.
2) Disconnect P112 on the master board.
3) Remove the cover of the microscope arm.See 5.1.4.
4) Disconnect P1 on the YL power supply board.
5) Remove the YL cable ASSY (P1-P112 cable).[CAUTION] Pay attention not to get an electricshock since the high voltage is applied in the YLpower supply board.
6) Assemble the new YL cable ASSY in the reverseorder.
5.20 Replacement of the YL power supply board
1) Remove the cover of the microscope arm.See 5.1.4.
2) Disconnect P1 and P2 on the YL power supplyboard.
3) Loosen PC3 ××××× 6 and remove the fixing plate ofthe condenser.
4) Loosen PC3 ××××× 6 (n=4) and remove the YL powersupply board.[CAUTION] Pay attention not to get an electricshock since the high voltage is applied in the YLpower supply board.
YL power supply board
YL cable ASSY P1 connector PC3×6 (n=4)
Sensor YL power supply board
Plate PC3×6 (n=4)

XYC14*RDA001E/E
5 - 16
5) Unscrew PC3 ××××× 6 (n=4) and remove the sensorwhich detects the position of the lamp housing.
6) Assemble the new YL power supply board inthe reverse order.
7) Adjust the PFN voltage.See 6.4.3.
5.21 Replacement of the illumination ASSY
1) Remove the SL cover A.See 5.1.7.
2) Loosen SB3 ××××× 5 (n=2) and remove the illumina-tion board.
3) Remove the variable resister (VR1) by unscrew-ing the screw for it.
4) Unscrew SB3 ××××× 6 and remove the transistor(TR1).
5) Unsolder the cable.
6) Assemble the new illumination ASSY in the re-verse order.
TR1 SB3×6
Illumination board SB3×6
(n=2)
VR1 screw Soldered part

XYC14*RDA001E/E
5 - 17
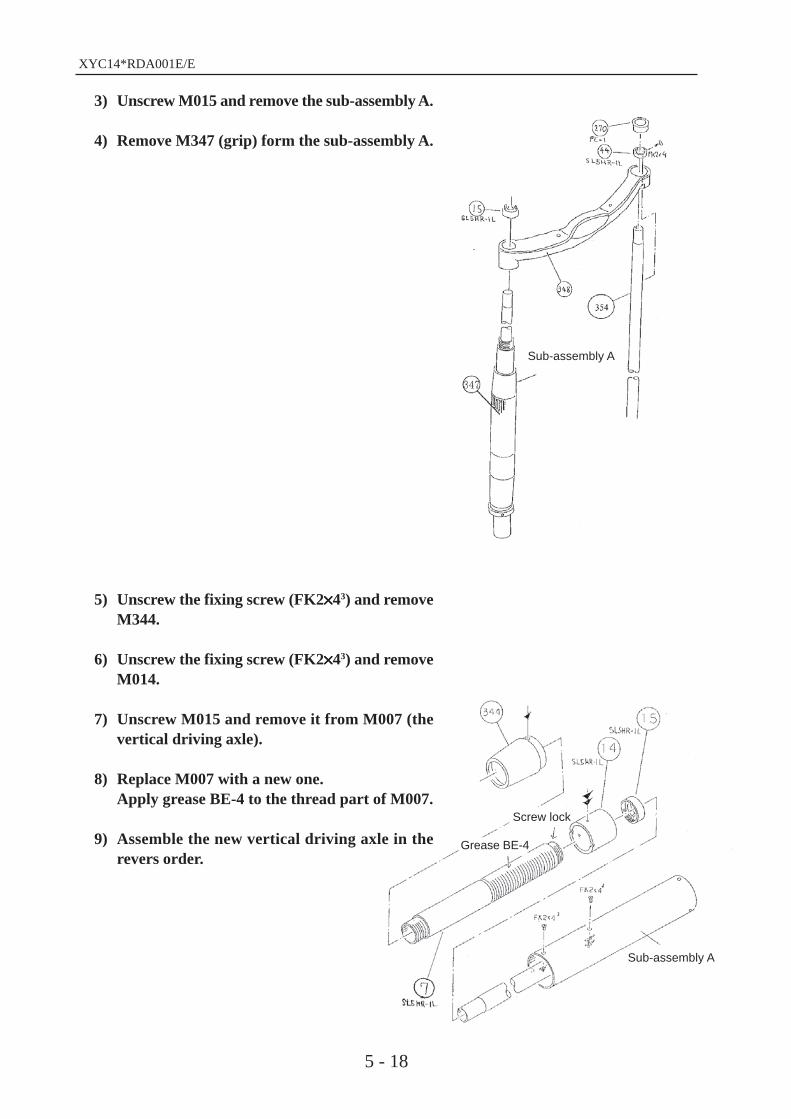
5.22 Replacement of the vertical driving axle of the chin support
* If the chin support goes down during use,replace SL5HR-1L M007 (the verticaldriving axle).1) Unscrew PC3 ××××× 104, HH4 ××××× 64 and PC4 ××××× 62
and remove the head rest AS.
2) Unscrew the screws in A and B in the rightfigure.
Head rest AS
A
B
XYC14*RDA001E/E
5 - 18
3) Unscrew M015 and remove the sub-assembly A.
4) Remove M347 (grip) form the sub-assembly A.
5) Unscrew the fixing screw (FK2×××××43) and removeM344.
6) Unscrew the fixing screw (FK2×××××43) and removeM014.
7) Unscrew M015 and remove it from M007 (thevertical driving axle).
8) Replace M007 with a new one.Apply grease BE-4 to the thread part of M007.
9) Assemble the new vertical driving axle in therevers order.
Sub-assembly A
Sub-assembly A
Grease BE-4
Screw lock

XYC14*RDA001E/E
§6 CHECK AND ADJUSTMENT
6 - 1
6.1 Adjustment of the microscope and binocular tube
6.1.1 Check of the optical axis of microscope
1) Set the magnification of the microscope to 10××××× and the slit length to maximum.
2) Verify the position of the slit image on the focusing rod by looking through the micro-scope with each eye respectively.
3) Remove the binocular tube and attach it changing its up-and-down direction.
4) Verify the opposite side of the binocular tube of the step 2).
6.1.2 Adjustment of the optical axis with the binocular tube
1) Remove the binocular tube.
2) Adjust the screws (HH3 ××××× 4) on the right/leftside to move the visual field.(If the adjustment is not completed with HH3 × 4,tighten SB3 × 6 again.)[CAUTION] The screws do not have any loose-ness.
3) Attach the binocular tube and verify the optical axis of the microscope.See 6.1.1.
4) Repeat steps 1) to 3) for the fine adjustment.
5) After adjustment, apply the threadlocker to HH3 ××××× 4 and SB3 ××××× 6.
HH3 x 4 (n=8)
SB3 x 6 (n=4)

XYC14*RDA001E/E
6 - 2
6.1.3 Adjustment of the prism holder position
If the slit image shifts in the visual field when the PD is changed, follow the procedure below foradjustment.
1) Unscrew FK2 ××××× 4 (n=4) and remove the cover ofthe binocular tube.
2) Set the magnification of the microscope to 16×××××and the illumination spot to φφφφφ14.
3) Move the right/left prism holder from the mini-mum to maximum position.Check the spot image position on the visual fieldthrough the eyepiece.
4) Slightly loosen the fixing screw (n=3) of the eye-piece holder.
5) Move the eyepiece lens from the position whereis checked in the step 3) to the opposide side ofthe center of arc drawn by the center of the spotimage.cf. If the spot image moves as shown in the figure on the upper right, move the eyepieceholder in the direction shown by the arrow.
FK2 x 4
Center of the arc
Eyepiece holder
Fixing screw
Move to the arrow direction.
XYC14*RDA001E/E
6 - 3
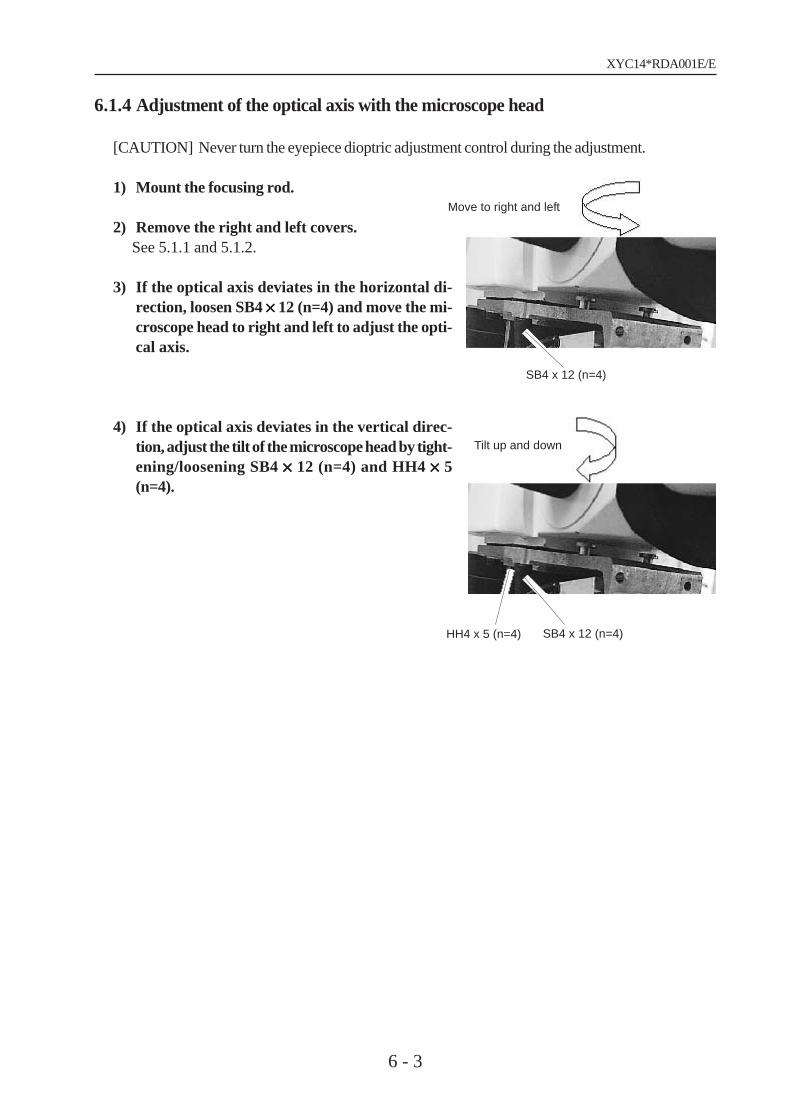
6.1.4 Adjustment of the optical axis with the microscope head
[CAUTION] Never turn the eyepiece dioptric adjustment control during the adjustment.
1) Mount the focusing rod.
2) Remove the right and left covers.See 5.1.1 and 5.1.2.
3) If the optical axis deviates in the horizontal di-rection, loosen SB4 ××××× 12 (n=4) and move the mi-croscope head to right and left to adjust the opti-cal axis.
4) If the optical axis deviates in the vertical direc-tion, adjust the tilt of the microscope head by tight-ening/loosening SB4 ××××× 12 (n=4) and HH4 ××××× 5(n=4).
Move to right and left
SB4 x 12 (n=4)
Tilt up and down
HH4 x 5 (n=4) SB4 x 12 (n=4)
XYC14*RDA001E/E
6 - 4
6.2 Adjustment of the illumination part
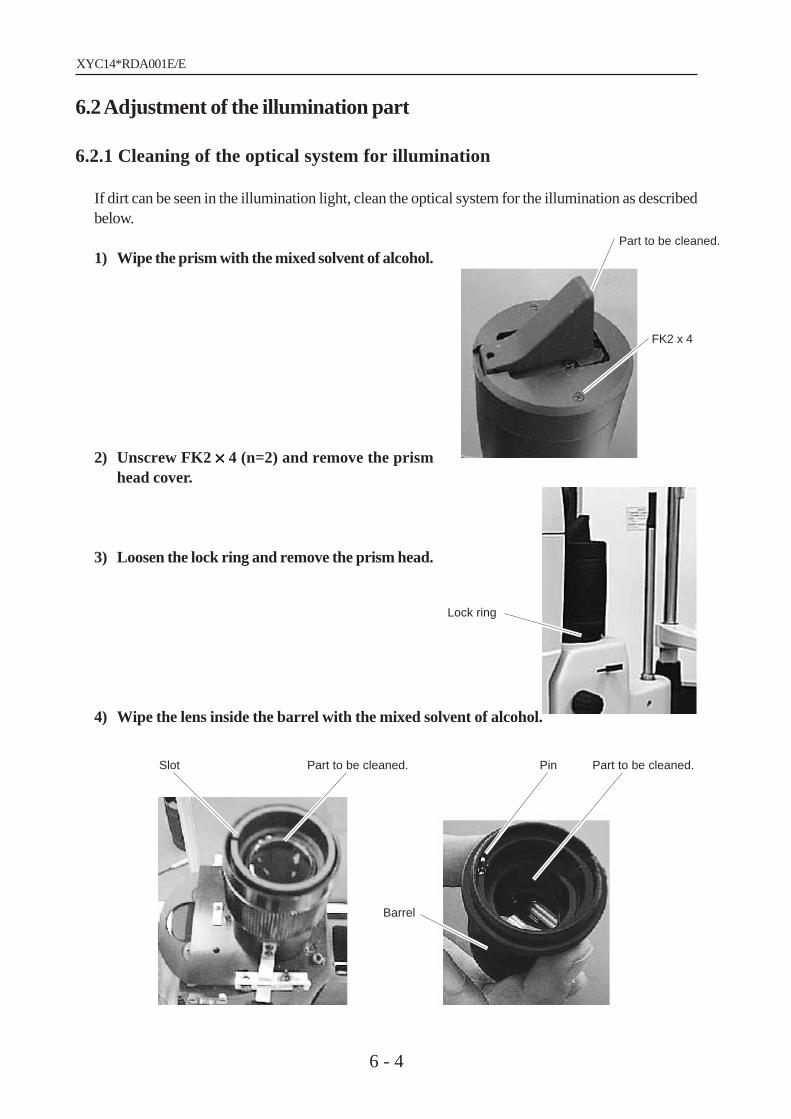
6.2.1 Cleaning of the optical system for illumination
If dirt can be seen in the illumination light, clean the optical system for the illumination as describedbelow.
1) Wipe the prism with the mixed solvent of alcohol.
2) Unscrew FK2 ××××× 4 (n=2) and remove the prismhead cover.
3) Loosen the lock ring and remove the prism head.
4) Wipe the lens inside the barrel with the mixed solvent of alcohol.
Part to be cleaned.
Lock ring
Slot Part to be cleaned.
Barrel
Part to be cleaned.Pin
FK2 x 4

XYC14*RDA001E/E
6 - 5
5) Assemble the barrel.[CAUTION] Be sure to slide the pin into the slot.
6.2.2 Cleaning of the filters
1) Remove the right and left covers of the lamphousing.See 5.1.9 and 5.1.10.
2) Remove dirt on the filter using the blower andwipe it with the mixed solvent of alcohol.
6.2.3 Cleaning of the slit
1) Remove the right and left covers of the lamp housing.See 5.1.9 and 5.1.10.
2) Set the slit width to maximum.
3) Remove dirt on the knife edge using the blower and wipe it with the mixed solvent ofalcohol.
Filter

XYC14*RDA001E/E
6 - 6
6.2.4 Adjustment of the focus of illumination
1) Make the slit image horizontal and thin.
2) Slightly rotate the focusing rod to right and left.
3) Judge the focus of the illumination from the condition of the slit image at this time.The figure below shows the condition of the slit image and the inclination of the focusing rod.The thinnest point of the projected slit image is the focusing point.
Case 1: The focusing point of the illumination is anterior.Case 2: The focusing point of the illumination is posterior.Case 3: The illumination comes into a focus.
4) If the prism head has no tilting mechanism (13704-4000), perform the adjustment follow-ing 6.2.5.If the prism head has the tilting mechanism (34373-M6934), perform the adjustmentfollowing 6.2.6.
Inclinationof the focusing rod
Case 1
Case 2
Case 3

XYC14*RDA001E/E
6 - 7
6.2.5 Illumination focus adjustment for the prism head without tilting mechanism
1) Remove the prism head cover. (Refer to 5.6.2 of the operator’s manual.)
2) Loosen TG2 ××××× 4 which fixes the projection lens holder inside the prism head.
3) Turn the focus adjustment ring on the side of the prism head, and tighten TG2 ××××× 4.
4) Attach the removed part.
5) Check the focus.
6) Repeat steps 2) to 5) for fine adjustment.
6.2.6 Illumination focus adjustment for the prism head with tilting mechanism
1) Loosen the ring clockwise and lift up the prismhead.
2) Apply a thinner to the threadlocker on the stopring of the prism head.
TG2 × 4
Focus adjustment ring
Prism head
Ring
XYC14*RDA001E/E
6 - 8
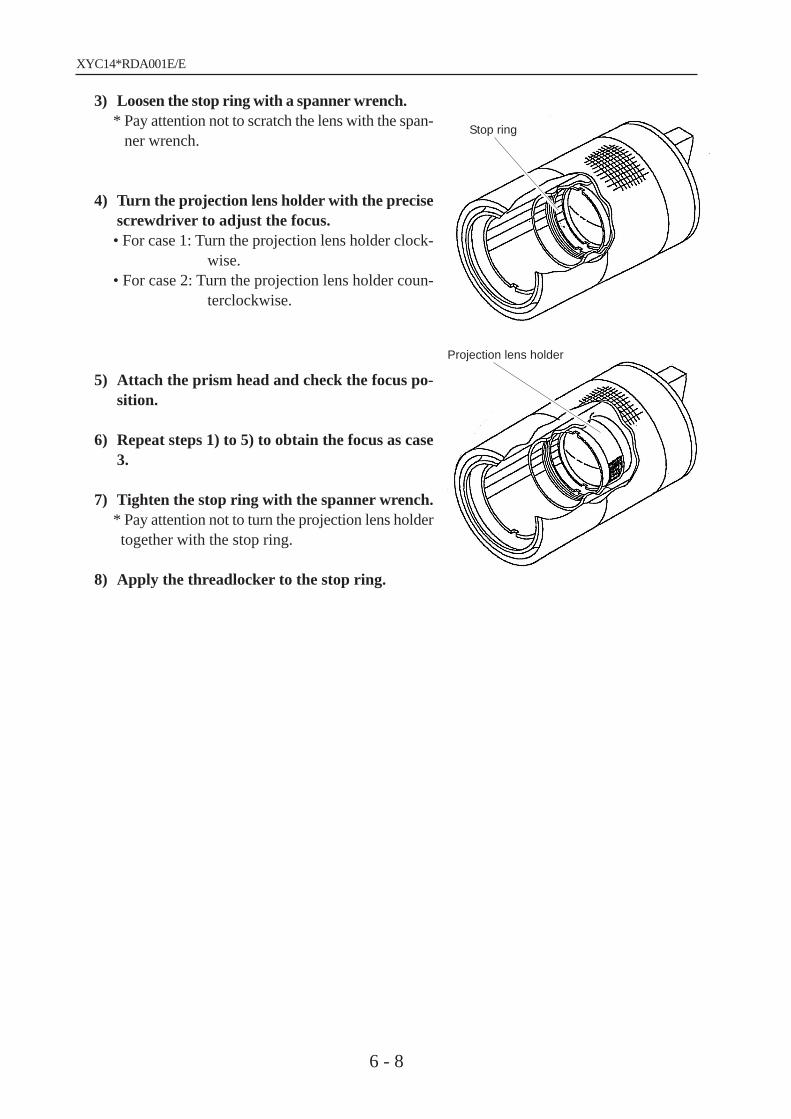
3) Loosen the stop ring with a spanner wrench.* Pay attention not to scratch the lens with the span-
ner wrench.
4) Turn the projection lens holder with the precisescrewdriver to adjust the focus.• For case 1: Turn the projection lens holder clock-
wise.• For case 2: Turn the projection lens holder coun-
terclockwise.
5) Attach the prism head and check the focus po-sition.
6) Repeat steps 1) to 5) to obtain the focus as case3.
7) Tighten the stop ring with the spanner wrench.* Pay attention not to turn the projection lens holdertogether with the stop ring.
8) Apply the threadlocker to the stop ring.
Stop ring
Projection lens holder
XYC14*RDA001E/E
6 - 9
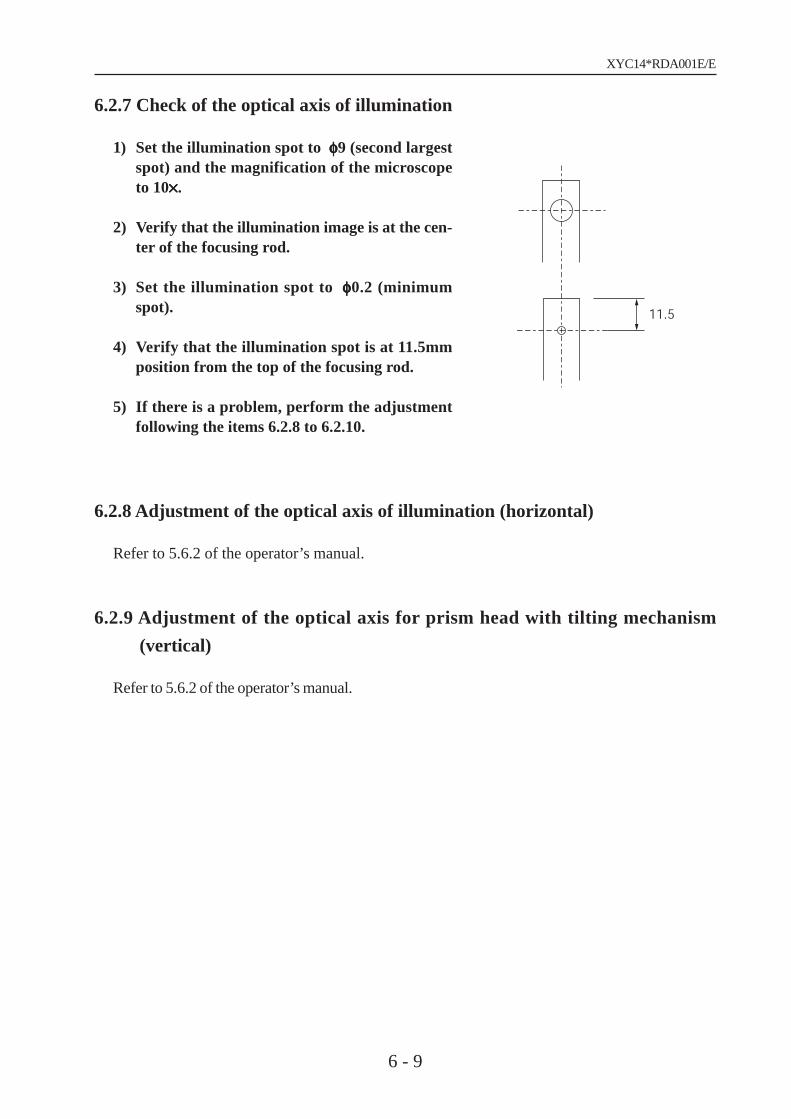
6.2.7 Check of the optical axis of illumination
1) Set the illumination spot to φφφφφ9 (second largestspot) and the magnification of the microscopeto 10×××××.
2) Verify that the illumination image is at the cen-ter of the focusing rod.
3) Set the illumination spot to φφφφφ0.2 (minimumspot).
4) Verify that the illumination spot is at 11.5mmposition from the top of the focusing rod.
5) If there is a problem, perform the adjustmentfollowing the items 6.2.8 to 6.2.10.
6.2.8 Adjustment of the optical axis of illumination (horizontal)
Refer to 5.6.2 of the operator’s manual.
6.2.9 Adjustment of the optical axis for prism head with tilting mechanism
(vertical)
Refer to 5.6.2 of the operator’s manual.
11.5
XYC14*RDA001E/E
6 - 10
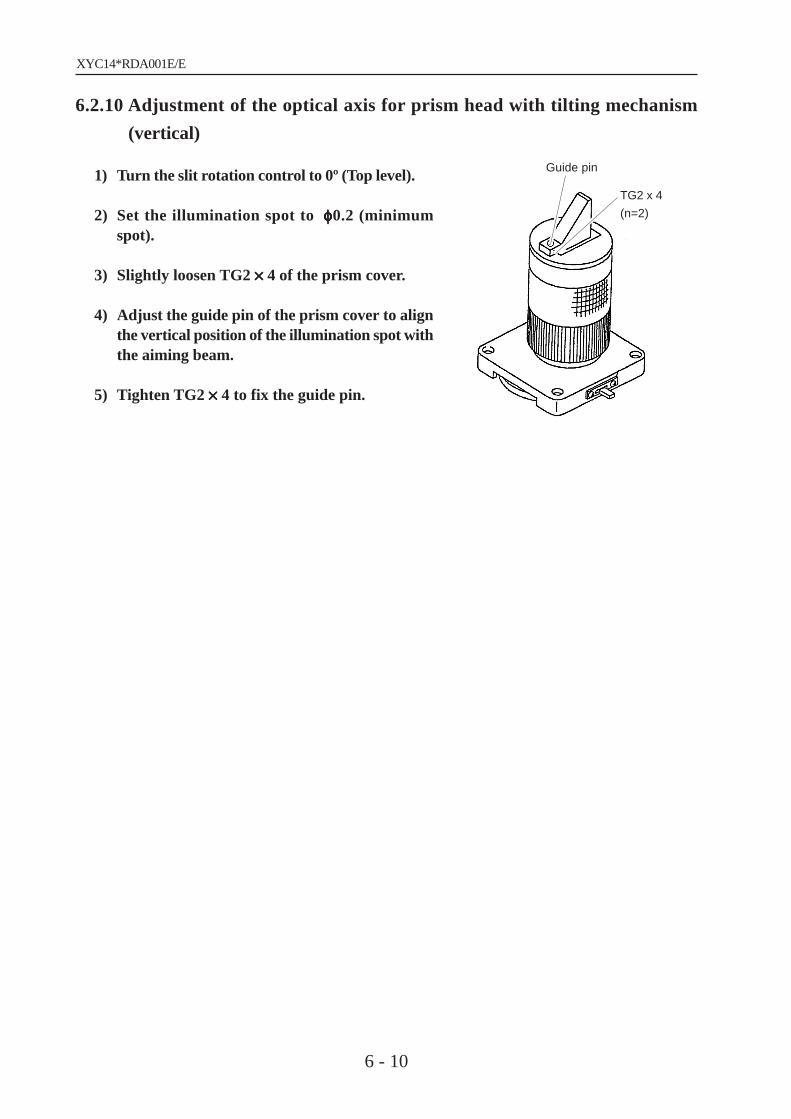
6.2.10 Adjustment of the optical axis for prism head with tilting mechanism
(vertical)
1) Turn the slit rotation control to 0º (Top level).
2) Set the illumination spot to φφφφφ0.2 (minimumspot).
3) Slightly loosen TG2 ××××× 4 of the prism cover.
4) Adjust the guide pin of the prism cover to alignthe vertical position of the illumination spot withthe aiming beam.
5) Tighten TG2 ××××× 4 to fix the guide pin.
Guide pin
TG2 x 4
(n=2)
XYC14*RDA001E/E
6 - 11
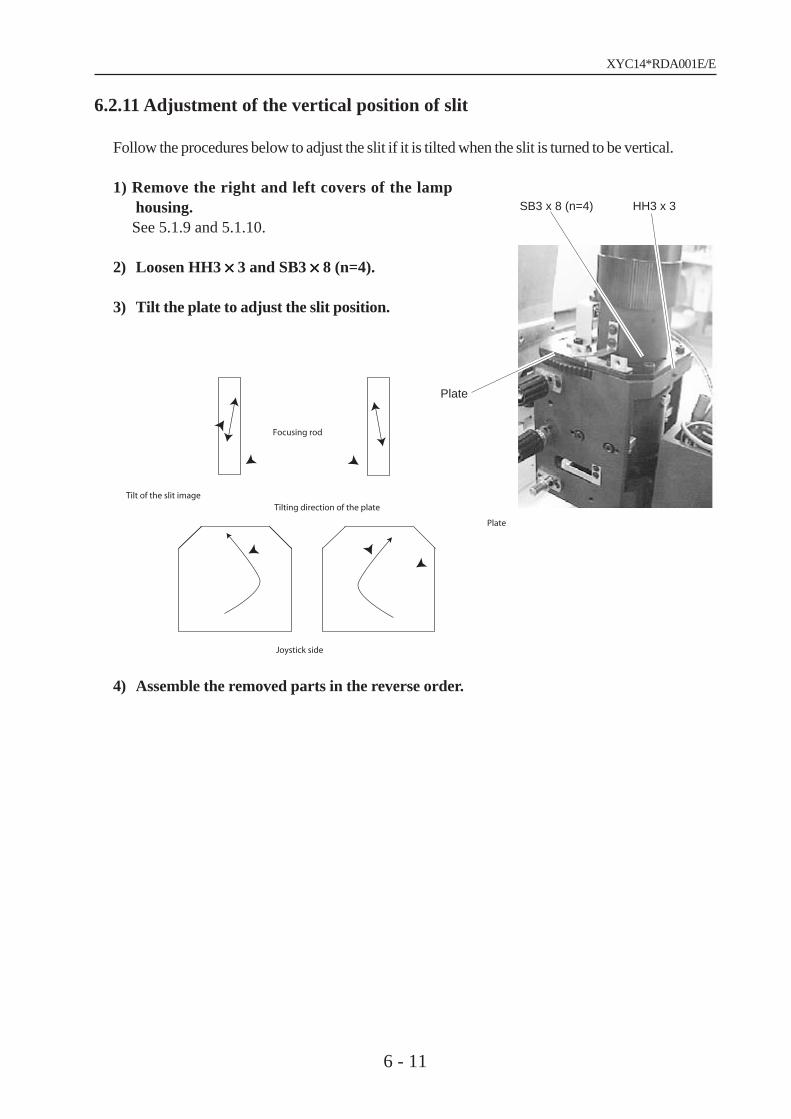
6.2.11 Adjustment of the vertical position of slit
Follow the procedures below to adjust the slit if it is tilted when the slit is turned to be vertical.
1) Remove the right and left covers of the lamphousing.See 5.1.9 and 5.1.10.
2) Loosen HH3 ××××× 3 and SB3 ××××× 8 (n=4).
3) Tilt the plate to adjust the slit position.
4) Assemble the removed parts in the reverse order.
Focusing rod
Tilt of the slit imageTilting direction of the plate
Plate
Joystick side
HH3 x 3SB3 x 8 (n=4)
Plate

XYC14*RDA001E/E
6 - 12
6.2.12 Adjustment of the closing of slit
1) Remove the right and left covers of the lamphousing.See 5.1.9 and 5.1.10.
2) Turn the adjustment screw on the lower side ofthe lever while the diameter of cam is in theminimum position (the slit is fully closed) toadjust the position where the slit starts to beclosed.* Carefully tighten the screws so that the right andleft sides become uniform.
When the knife edges start to be opened, slightlyloosen the screws to close the knife edges.
3) Adjust the position where the diameter of thecam becomes maximum (the slit is fully open/variable according to the stopper position), andcheck how the slit opens (guide: 13mm).
Cam
Adjustment screw
Lamp house BOTTOM
Use this stopper to adjust the positionwhere the slit is fully open.

XYC14*RDA001E/E
6 - 13
4) Adjust the stopper position where the slit is fullyclosed.
5) Go to 6.2.13.
6.2.13 Check and adjustment of the horizontal slit image
1) Mount the focusing rod and set the magnifica-tion of microscope to 10×××××.
2) Make the slit image horizontal and long.
3) If the knife edges of the slit are not parallel,adjust with HH3 ××××× 6.
4) Verify the position where the slit starts to beclosed.
5) Turn the slit image 180º and verify that the slitimage position coincides with the position de-scribed in the step 4).
Use this stopper to adjust the positionwhere the slit is fully closed.
HH3×6

XYC14*RDA001E/E
6 - 14
6) If the slit image position does not coincides with the position described in the step 4),adjust with the adjustment screw.
Turn the screw of the adjustment part with forcepsto adjust the position of two knife edges of the slit.
• Open the knife edges by tightening the adjustment screw on A side.• Loosen the adjustment screw on B side for fine adjustment to close the knife edges.• After adjustment, verify that the slit starts to be opened from the center.
Adjustment part
Adjustment screw

XYC14*RDA001E/E
6 - 15
6.2.14 Check and adjustment of the vertical slit image
1) Make the slit image vertical and long on the fo-cusing rod, and verify that the slit image posi-tion coincides with the position where the hori-zontal slit image starts to be closed.
2) If the slit image position does not coincides withthe position where the horizontal slit imagestarts to be closed, loosen CK2 ××××× 3.Adjust the aperture click position while strik-ing a balance between the positions of illumina-tion spot and knife edge so that the vertical andhorizontal slit image positions where the slitstarts to be closed become the same.
6.2.15 Adjustment of the slit shutter position (horizontal)
Follow the procedure below if the shutter position for spot size is φ1 or φ3 deviates from thecenter.
1) Remove the right and left covers of the lamphousing.See 5.1.9 and 5.1.10.
2) Slightly loosen CK2 ××××× 3 (n=2).
3) Move the aperture click to the position where thepositions of spot and shutter become the same,and tighten CK2 ××××× 3 (n=2) to fix the aperture click.
Aperture click
CK2 x 3 (n=2)
Aperture click
CK2 x 3 (n=2)

XYC14*RDA001E/E
6 - 16
6.2.16 Adjustment of the slit shutter position (vertical)
1) Remove the right and left covers of the lamphousing.See 5.1.9 and 5.1.10.
2) Loosen SB3 ××××× 6 (n=4) and move the aperture diskto the position where the rotation centers of theslit and knife edge become the same, and tightenSB3 ××××× 6 (n=4).
SB3x 6 (n=4)
Aperture disk

XYC14*RDA001E/E
6 - 17
6.3 Adjustment of the aiming beam
6.3.1 Fixing the aiming shutter plate
1) Remove the aiming shutter ASSY.See 5.18.
2) The following illustrations are the attachment position of the spring (M059) and the springhook (M161).
3) Move M161 and adjust the solenoid operation.(M161 can be tilted, but do not get out of M123)Adjust the position of the solenoid and thephotointerrupterfor the following conditions. (In the order of 1 to 4.)
Shatter base(M123)
Approach the spring hook(M161)
to the shatter base(M123)
Attach the spring vertically
Spring(M059)
Spring hook(M161)
2.
Do not put the steel plate on the
photointerrupter.
Photointerrupter
Shade the hole
Solenoid : ON by the steel plate.
Do not shade the hole
by the steel plate.
Photointerrupter
Solenoid : OFF
3. Get back the steel plate by the spring
surely when the solenoid is off.
4. Working distance: 20-21mm
(If fulfill the conditions of 1.to 3.,
working distance can be over 21mm.
Under 20mm is unacceptable.)
Power is on.
1.
M161 should not put on
the following line-leaning.

XYC14*RDA001E/E
6 - 18
4) Apply the threadlocker around the steel plate of SB3x82 , PC2x34 , SB3x5, and M161after adjusting. Do not apply the threadlocker to the screw head of SB3x15. Apply thethreadlocker to the outstanding side of M123.
5) Assemble the aiming shutter ASSY.
6.3.2 Check of the sensor for aiming shutter
1) Remove the aiming shutter ASSY.See 5.18.
2) Connect the disconnected connector and turn ON the key switch.
3) Verify that 4th pin of J103 on the master board becomes as shown in the table below whenthe detection light is interrupted by inserting a board or metal plate into the slot of thesensor for the aiming shutter (1 position; PI3).
Apply the threadlocker around
the steel plate of M161.
PI3 Interrupted Not interrupted
4th pin of J103 High (DC5V) Low (0V)

XYC14*RDA001E/E
6 - 19
6.3.3 Adjustment of the optical axis of aiming beam
Refer to 5.6.3 of the operator’s manual.
6.3.4 Focus adjustment of the aiming beam
1) Put two aiming beam together on the focusingrod.
2) Loosen FG2 ××××× 2 and turn the lens holder of theBeam aperture ASSY to obtain the focus.
3) After adjustment, tighten FG2 ××××× 2.
6.3.5 Adjustment of the optical axis of two-point aiming beams
1) Turn the knob so that the two-point aiming beamsbecome vertical.
2) Adjust the optical axis of the aiming beam.• Horizontal direction:
Tightening/loosening SB3 × 8 and HH3× 6.
• Vertical direction:Turning the lower decentering shaft.
• Turn the upper decentering shaft to bring thebrightness of two points into balance.
Decentering shaft
HH3 x 6
SB3 x 8
View B
Lens holder FG2×2
View B

XYC14*RDA001E/E
6 - 20
6.3.6 Adjustment of the aiming energy
1) Attach the power meter to the head rest supportand set the detector of the power meter so thatthe aiming beam enters the detector.
2) Adjust the aiming energy.See 6.3.7 and 6.3.8.
Counter display
Reset switch
Aiming switches
Status switch
Energy display
Aiming level indicator

XYC14*RDA001E/E
6 - 21
6.3.7 Adjustment of the maximum energy
1) Adjust the VR1 on the control board ASSY so thatthe aiming energy becomes 25 ±5 µW when thebar graph of the aiming level indicator showsmaximum by pressing the aiming switches.(The energy increases by turning the VR1 clock-wise, and it decreases by turning the VR1 counter-clockwise.)
• Be sure to make the aiming beam vertical at the time of the measurement.
Laser power meterRange at the time of the maximum energy adjustmentSUPPRESSION RANGE -100 µWMETER RANGE -100 µW × 1
2) Go to 6.3.8.
6.3.8 Adjustment of the minimum energy
1) Check the energy at the time when the bar graph of the aiming level indicator showsminimum by pressing the aiming switches. If the energy is not 0.5 ±0.3 µW, performfollowings.
Laser power meterRange at the time of the maximum energy adjustmentSUPPRESSION RANGE -10 µWMETER RANGE -10 µW × 1
2) Set No. 6 of SW1 on the display board ASSY to OFF (upper) position.
3) Set the address indicated on the counter display to “19” with the aiming switches.
4) Press the status switch so that the indications on the counter display blink.
5) Adjust the energy (starts from 100) by pressing the aiming switches (as the numeric valuerises, the energy increases).After changing the numeric value, press the reset switch.Make the aiming beam vertical at the time of the measurement.
6) Set No. 6 of SW1 on the display board ASSY to ON (lower) position.
* When the aiming power is maximum, check the voltage between TP-12 and GND of the control boardASSY is in under 0.9V with the taster. However if the voltage between 0.8 to 0.9V, check the dirt ofoptical system and the L.D.which is not vignetted.
Aiming beam
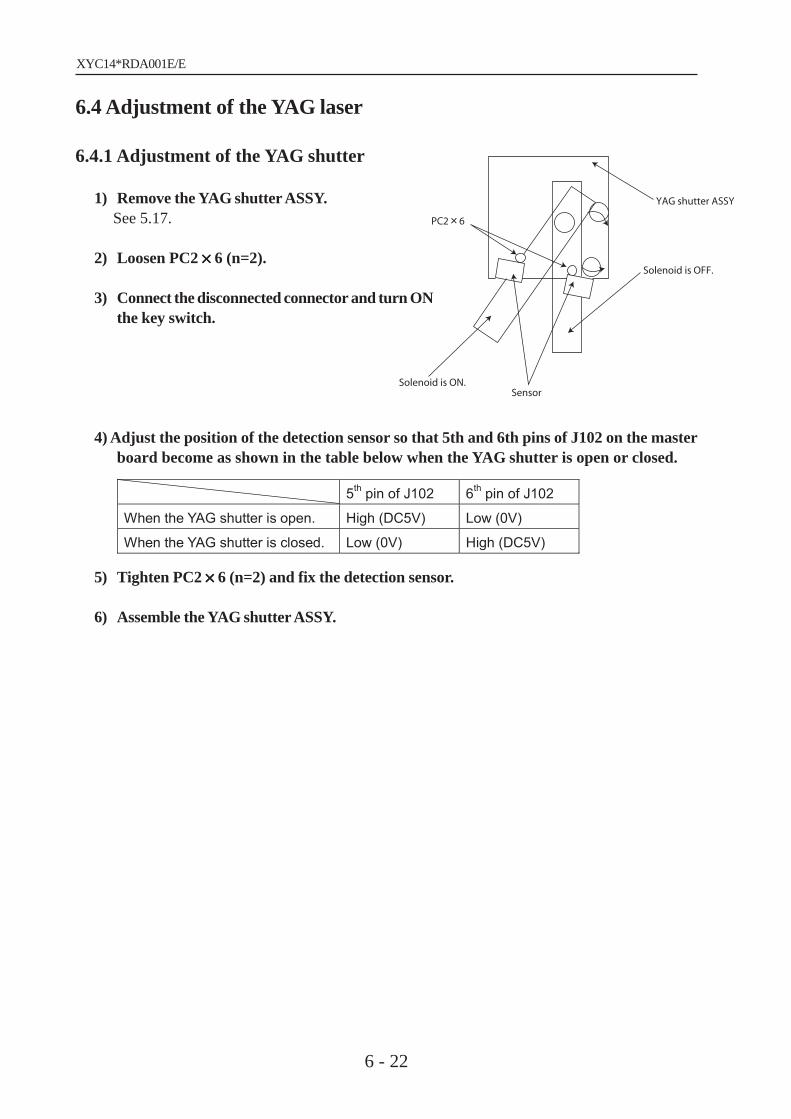
XYC14*RDA001E/E
6 - 22
PC2 6
Solenoid is ON.Sensor
Solenoid is OFF.
YAG shutter ASSY
6.4 Adjustment of the YAG laser
6.4.1 Adjustment of the YAG shutter
1) Remove the YAG shutter ASSY.See 5.17.
2) Loosen PC2 ××××× 6 (n=2).
3) Connect the disconnected connector and turn ONthe key switch.
4) Adjust the position of the detection sensor so that 5th and 6th pins of J102 on the masterboard become as shown in the table below when the YAG shutter is open or closed.
5) Tighten PC2 ××××× 6 (n=2) and fix the detection sensor.
6) Assemble the YAG shutter ASSY.
5th pin of J102 6
th pin of J102
When the YAG shutter is open. High (DC5V) Low (0V)
When the YAG shutter is closed. Low (0V) High (DC5V)

XYC14*RDA001E/E
6 - 23
6.4.2 Check of the sensor for YAG shutter
1) Remove the YAG shutter ASSY.See 5.17.
2) Connect the disconnected connector and turn ON the key switch.
3) Verify that 5th and 6th pins of J102 on the master board become as shown in the tablesbelow when the detecting light is interrupted by inserting a board or metal plate into theslot of the sensor for the YAG shutter (2 positions; PI1 and PI2).
6.4.3 Adjustment of the indicated and measured values of PFN voltage
Perform the adjustment of the indicated and actual values of the PFN voltage when the YLPOWER SUPPLY board is replaced.
1) Remove the front cover.See 5.1.1.
2) Remove the microscope arm cover.See 5.1.4.
3) Turn the VR1 on the YL power supply board counterclockwise ten turns or more.
4) Turn ON the key switch.
5) Set No. 1 and 6 of SW1 on the display board ASSY to OFF (upper) position.
6) Set No. 1 of SW1 on the display board ASSY to ON(lower) position, and then check theactual PFN voltage is 350 ± 10V.
PI1
Interrupted Not interrupted
6th pin of J102 High (DC5V) Low (0V)
PI2
Interrupted Not interrupted
5th pin of J102 High (DC5V) Low (0V)

XYC14*RDA001E/E
6 - 24
7) Set the address indicated on the counter display to “10” by pressing the aiming switches.[Setting of the system parameter]
8) Press the status switch to blink the indications on the energy display.
9) Set the indications on the energy display to “440” by pressing the aiming switches.
10) Press the reset switch.
11) Set No. 1 and 6 of SW1 on the display board ASSY to ON (lower) position.
12) Set No. 7 of DIP SW1 to OFF (upper) position. The PFN voltage (monitored value) is indicated.
13) Connect the digital multi meter between 1st (+) and 5th (-) pins of P2 on the YL power supply board.
14) Turn the VR1 on the power supply board to set the actual PFN voltage to 440V±10V. The volt age is raised by turning it clockwise.
15) Go to 6.4.4.
Reset switch
Aiming switches
Status switch
Energy display
Address Contents Initial setting
10 PFN voltage 350
XYC14*RDA001E/E
6 - 25
6.4.4 Adjustment of the PFN voltage
1) Set No. 1 and 6 of SW1 on the display board ASSY to OFF (upper) position.
2) Set the address indicated on the counter display to “10” by pressing the aiming switches.
3) Press the status switch to blink the indications on the energy display.
4) Set the numeric value indicated on the energy display to “350” by pressing the aimingswitches.
5) Press the reset switch.
6) Set No. 1 of SW1 on the display board ASSY toON (lower) position and then check the actual PFNvoltage is 350 ± 10V.
7) Set the address indicated on the counter displayto “11” by pressing the aiming switches.
8) Press the status switch to blink the indications onthe energy display.
9) Set the numeric value indicated on the energydisplay to “02” by pressing the aiming switches.
10) Press the reset switch.
11) Set No. 1 and 6 of SW1 on the display board ASSY to ON (lower) position.
12) “C. A. L” is indicated on the focus shift display and the PFN voltage is automaticallyadjusted.At this time, the PFN voltage is indicated on the energy display, and the actual number ofpulses is indicated on the counter display. The PFN voltage adjustment is automaticallyperformed until the number of pulses becomes 4 in 8 shots or more out of 10 shots.
13) “C. A. L” indication on the focus shift display disappears and the PFN voltage adjustmentis finished.
Aiming switches
Status switch
Energy display
Reset switch

XYC14*RDA001E/E
6 - 26
14) Set No. 6 of SW1 on the display board ASSY to OFF (upper) position.
15) Set the address indicated on the counter display to “10” by pressing the aiming switches.
16) Press the status switch to blink the indications on the energy display.
17) Correct the numeric value indicated on the energy display with the aiming switches follow-ing the standard below.[Standard]
When the room temperature is 25ºC or more:The automatic setting PFN voltage + 5
When the room temperature is 20ºC or less:The automatic setting PFN voltage - 5
When the room temperature is more than 20ºC and less than 25ºC:No additional adjustment
18) Press the status switch to blink the indications on the counter display.
19) Set the address indicated on the counter display to “11” by pressing the aiming switches.
20) Press the status switch to blink the indications on the energy display.
21) Set the numeric value indicated on the energy display to “00” by pressing the aimingswitches.
22) Press the reset switch.
23) Set No. 6 of SW1 on the display board ASSY to OFF (upper) position.

XYC14*RDA001E/E
6 - 27
6.4.5 Adjustment of the mirror holder 3 and optical axis of YAG laser head
1) Stick the burn paper on the head rest and manipulate the joystick so that the aiming beamis brought into focus on the burn paper.
2) Adjust the decentering shaft (n=2) and SB2 ××××× 8 (n=2) and HH3 ××××× 8 of mirror holder 3 sothat the spot where the aiming beam is emitted on the burn paper burns when the YAGlaser beam is emitted.* To adjust the decentering shaft, slightly loosen
SB3 × 6 (n=3) which fix the YAG laser unit first.* The decentering shaft moves the YAG laser beam
horizontally, and SB2 × 8 (n=2) and HH3 × 8 movethe YAG laser beam vertically.
3) Go to 6.4.6.
6.4.6 Adjustment of the focus ASSY
1) Stick the burn paper on the head rest and manipulate the joystick so that the aiming beamis brought into focus on the burn paper.
2) Adjust followings so that the spot where the aiming beam is emitted on the burn paperburns when the YAG laser beam is emitted. Vertical direction: Adjust the attachment position of the focus ASSY. Horizontal direction: Turn the decentering shaft (n=2) and adjust the direction of the laser head.
* To adjust the decentering shaft, slightly loosen SB3 × 6 (n=3) which fix the YAG laser unit first.
3) Go to 6.4.7.
Decentering shaft (n=2)
SB2×8 (n=2)
HH3×6
XYC14*RDA001E/E
6 - 28
6.4.7 Adjustment of the D mirror ASSY (aligning the YAG laser beam to the
aiming beam)
Refer to 5.6.4 of the operator’s manual.
6.4.8 Adjustment of the focus of YAG laser
Perform this procedure after the adjustment of the optical axis of YAG laser head (6.4.5).
• Alignment of 0µm1) Set the numeric value indicated on the focus shift
display to “0”.
2) Bring the aiming beam into focus on the burnpaper.
3) Turn the click so that the burnt pattern becomesminimum when the YAG laser beam is emitted.
4) Loosen HH3 × × × × × 3 paying attention not to movethe shaft, and tighten HH3 ××××× 3 while the click isin a downward position.
5) Go to 6.4.9.
0 µm125125
250250
375375
500500
ANT POST
Click
Click
HH3×3
Shaft
Focus ASSY

XYC14*RDA001E/E
6 - 29
6.4.9 Adjustment of the focus shift
Perform this procedure after Alignment of 0µm.1) Turn the click to 0µm position.
2) a. Set No.1 and 6 of SW1 on the display boardASSY to OFF (upper) position and the param-eter adress to any one of the numbers from 40to 48.
b. Loosen HH3 ××××× 3 and turn the shaft so that thevalue of energy becomes 130 ±10 while thefocus shift is set to 0 position.
c. After adjustment, tighten HH3 ××××× 3.
3) Turn the click to ANT 500 position.
4) Set the address indicated on the counter display to “40” by pressing the aiming switches.
5) Press the reset switch.
6) Determine the position of the focus shift between ANT375 and POST 500 with the follow-ing adresses and press the reset switch.
7) When all settings are completed, set No. 1 and 6 of SW1 on the display board ASSY to ON(lower) position.
0 µm125125
250250
375375
500500
ANT POST
Click
Click Shaft
HH3×3
P107 (EA13)
Potentiometer
VR3
Focus shift
ANT 500
375
250
125
0
125
250
375
POST 500
Set address
40 41 42 43 44 45 46 47 48

XYC14*RDA001E/E
6 - 30
Maximum adjustment screw
N3 HH3 12
Minimum adjustment screw
N3 HH3 12
1110
6.4.10 Adjustment of the YAG laser energy
Perform this procedure after the adjustment of the optical axis of YAG laser head (see 6.4.5) andadjustment of the focus of YAG laser (see 6.4.8).
• Adjustment of the actual energy (maximum)1) Set the detector in order that the aiming beam shall go into it.
<Note> If the energy that the acceptance surface of the detector recieves is too dense,the detector might be damaged. Keep the aiming beam as big as possible in order that theYAG laser beam shall not focus on the acceptance suface.
2) Loosen the right nut (N3) and adjust HH3×××××12 inorder that the actual energy measured with en-ergy meter shall be about 11mJ when the energyamount of the YAG laser is maximum.
3) Tighten the nut (N3). Be careful not to tightenHH3×××××12.
• Adjustment of the actual energy (minimum)1) Loosen the left nut (N3) and adjust HH3×××××12 in
order that the actual energy measured with theenergy meter shall be about 0.2mJ when the en-ergy amount of the YAG laser is minimum.
2) Tighten the nut (N3). Be careful not to tighen theHH3×××××12.
• Adjustment of the YAG laser indicated energy 10mJ
1) Attach the detector of the energy meter to the chinrest.CAUTION) When using the energy meter MODEL-365, attach a dispersion lens in front ofthe objective lens.
2) Adjust the chinrest and manipulate the joystick so that the aiming beam comes into thedetector.
3) Emit the YAG laser beam and turn the energy control so that the actual energy becomes10mJ.
4) Turn the VR1 on the sample board so that the indicated energy shows 10mJ under thecondition of the step 3).[Specification]
Difference between the actual energy and indicated energy (10mJ):Within ±15% of the indicated energy

XYC14*RDA001E/E
6 - 31
• Adjustment of the YAG laser indicated energy 1mJ
1) Attach the detector of the energy meter to the chinrest.CAUTION) When using the energy meter MODEL-365, attach a dispersion lens in front of theobjective lens.
2) Adjust the chinrest and manipulate the joystick so that the aiming beam comes into thedetector.
3) Emit the YAG laser beam and turn the energy control so that the actual energy becomes1mJ.
4) Set No. 1 and 6 of SW1 on the display board ASSY to OFF (lower) position under thecondition of the step 3).
5) Set the address indicated on the counter display to “20” by pressing the aiming switches.
6) Press the status switch to blink the indications on the energy display.
7) Adjust the parameter indicated on the energy display within the following standard withthe aiming switches.[Specification]
Difference between the actual energy and indicated energy (1mJ):within ±15 % ±0.1mJ of indicated energy
• If the actual energy is larger than the indicated energy, increase the set value, and decrease theset value if the actual energy is smaller than the indicated energy.
8) Press the reset switch.
9) Set No. 1 and 6 of SW1 on the display board ASSY to ON (lower) position.
• Setting of preset data
1) Set No. 1 and 6 of SW1 on the display board ASSY to OFF (upper) position.
2) Turn the energy control to Min. position.
3) Turn ON the key switch while the status switch is pressed.
4) Emit 10 shots of the YAG laser beam while the energy is set to Min.
5) Press the reset switch.
6) Perform the adjustment for the energy, 1, 3, 5, 7.5, and Max. in a like manner.
7) Turn OFF the key switch.

XYC14*RDA001E/E
6 - 32
8) Set No. 1 and 6 of SW1 on the display board ASSY to ON (lower) position.
9) Turn ON the key switch again.
10) Turn the energy control to Max. position.
11) Emit 10 shots of the YAG laser beam in SINGLE mode and press the reset switch.
12) Emit 10 shots of the YAG laser beam in DOUBLE mode and press the reset switch.
13) Emit 10 shots of the YAG laser beam in TRIPLE mode and press the reset switch.
14) Turn OFF the power.
15) Turn ON the power again.
16) Turn the energy control to Min. position.
17) Attach the detector of the energy meter to the chinrest.
18) Adjust the chinrest and manipulate the joystick so that the aiming beam comes into thedetector.
19) Emit 10 shots of the YAG laser beam and verify that the difference between the actualenergy and indicated energy for the 10th shot is within the following specifications. (Mea-sure the energy in SINGLE, DOUBLE, and TRIPLE mode.)
XYC14*RDA001E/E
6 - 33
If the measured result is out of the spec, go to the next step.Perform this verification for the energy, 1, 3, 5, 7.5, and Max.
• Specifications of variability between the indicated energy and actual energy
Less than 1.5mJ → ±15% of 0.1mJ 1.5mJ or more → ±15%
20) Set No. 1 and 6 of SW1 on the display board to OFF (upper) position.
21) Set the address indicated on the counter display as described in the following table bypressing the aiming switches.
22) Press the status switch to blink the indications on the energy display.
Counter display
Reset switch
Aiming switches
Status switch
Energy display
Aiming level indicator
XYC14*RDA001E/E
6 - 34
Address Contents Initial setting
30 Preset potential Min. 35
31 Preset potential 1mJ 50
32 Preset potential 3mJ 70
33 Preset potential 5mJ 85
34 Preset potential 7.5mJ 100
35 Preset potential Max. 125
23) Change the system parameter so that the difference between the actual energy and indi-cated energy meets the specifications as described above.
[System parameter setting]
24) Repeat steps 18) to 23) until the actual energy becomes the same as the indicated energy.
25) Press the reset switch.
26) Set No. 1 and 6 of SW1 on the display board to ON (lower) position.

XYC14*RDA001E/E
6 - 35
HH3×6
SB4×25
PC2.6×6 (n=4)
6.5 Other adjustments
6.5.1 Adjustment of the smoothness of vertical movement
1) Loosen PC2.6 ××××× 6 (n=4) and verify that the vertical movement becomes smooth.
2) If the movement is smooth, tighten PC2.6 ××××× 6 (n=4). If not, tighten PC2.6 ××××× 6 (n=4) and goto step 3).
3) Dismount the slit lamp from the base plate and loosen HH3 ××××× 6 which is for the preventionof runout.
4) Loosen SB4 ××××× 25 approx. one-fourth turn.
5) Tighten HH3 ××××× 6.

XYC14*RDA001E/E
6 - 36
6.6 Adjustment of indicated energy from outside of the device and settable function
6.6.1 Adjustment of indicated energy of YAG laser
6.6.1.1 Gain adjustment
e.g.) If the actual energy is 11mJ and indicated energy is 10mJ, increase the indicated value 10%. In thiscase, set the parameter value to set energy × 110. (If the set value is “100”, reset it to “110”. Todecrease 10%, reset it to “90”.)
1) Turn on the key switch while pressing “Aiming ∆∇∆∇∆∇∆∇∆∇ ” and “READY”.
2) After starting the device, set the adress to 18 (y H) and adjust the set energy.
3) Restart the device and check the actual energy.
6.6.1.2 Offset adjustment
e.g.) If the actual energy is 1.0mJ and indicated energy is 0.8mJ, increase the indicated energy 0.2mJ. Inthis case, reset the parameter to set energy +2. (If the set value is “10”, reset it to “12”. Todecrease 0.2mJ, reset it to “8”.
1) Turn on the key switch while pressing “Aiming ∆∇∆∇∆∇∆∇∆∇ ” and “READY”.
2) After starting the device, set the adress to 20 (y H) and adjust the set energy.
3) Restart the device and check the actual energy.
6.6.2 Adjustment of aiming energy
6.6.2.1 Aiming gain adjustment
e.g.) If the maximum actual energy of aming is nonstandard (standard:25 µW±5µW), change theparameter value and adjust the actual energy of the aiming laser.(If the actual energy is higher thanthe standard, decrease the parameter value. If lower, increase it.)
1) Turn on the key switch while pressing “Aiming ∆∇∆∇∆∇∆∇∆∇ ” and “READY”.
2) After starting the device, set the adress to 17 (A H) and adjust the set energy.
3) Restart the device and check the actual energy.
6.6.2.2 Aiming offset adjustment
e.g.) If the minimum actual energy of aimning is nonstandard (standard:0.5 µW±0.3µW), change theparameter value and set the actual energy of the aming laser. (If the actual energy is higher than thestandard, decrease the parameter value. If lower, increase it.)

XYC14*RDA001E/E
6 - 37
1) Turn on the key switch while pressing “Aiming ∆∇∆∇∆∇∆∇∆∇ ” and “READY”.
2) After starting the device, set the adress to 19 (A L) and adjust the set energy.
3) Restart the device and check the actual energy.
6.6.3 Release of tilting lens-barrel (option) control
If the tilting lens-barrel is set in front of the laser output with the barrel lifted, YAG laser strikes thelighting lens-barrel, which may cuase a difference between indicated energy and actual energy. So asYC-1300/1400, the safty function that controls YAG laser emission at the point where laser beamstrikes is equiped. This control can be released by following the procedures below.
<Note> In this case, enough warning shall be given to the user before use because whenthe lens-barrel is move, the actual energy may change considerably even without chang-ing the setting.This function is not memorized and when the device is restarted, the safty function willwork again.
1) Turn on the key switch while pressing “RESET”.

XYC14*RDA001E/E
6 - 38

XYC14*RDA001E/E
§7 WIRING DIAGRAM
7 - 1

XYC14*RDA001E/E
7 - 2

XYC14*RDA001E/E
§8 ERROR CODE LIST
8 - 1
Error code and dip switch of the YC-1600 are as follows.
8.1 Error code list
Error No. Symptom Cause
1 The internal structures of the system
have been overheated. The inside temperature is 45°C or more.
4 The EEPROM is faulty. Failure of the EEPROM
5 The safety shutter does not work. Failure of the safety shutter or sensor.
7 The aiming shutter does not work. Failure of the aiming shutter or sensor
10 The number of pulse is insufficient. Failure of the YAG laser or detection
circuit
12 The number of pulse is over the
intended number.
Failure of the YAG laser or detection
circuit
13 The laser beam is accidentally emitted
through the trigger switch is not pressed. Failure of the YAG laser or trigger circuit
14 The laser head is faulty. Failure of the YAG laser or trigger circuit
15 The output energy of the laser beam is
unstable.
Failure of the YAG laser or detection
circuit
30 The power supply for the laser is faulty. Failure of the power supply for YAG
laser
31 The PFN voltage is faulty. Failure of the power supply for the YAG
laser
50 Signal from the photodiode is faulty. Break of failure of the photodiode for
detecting the YAG laser output energy
51 The potentiometer for adjusting the
output energy is broken.
Break or failure in the potentiometer for
adjusting the YAG laser output energy
52 The potentiometer for adjusting the
focus shift is broken.
Break or failure in the potentiometer for
adjusting the focus shift
53 The trigger switch inputting signal is
faulty
Failure of the trigger switch inputting
signal circuit
54 The pulse number setting signal is faulty. Failure of the pulse number setting
signal circuit
90 The program is faulty. The contents of ROM are overwritten.
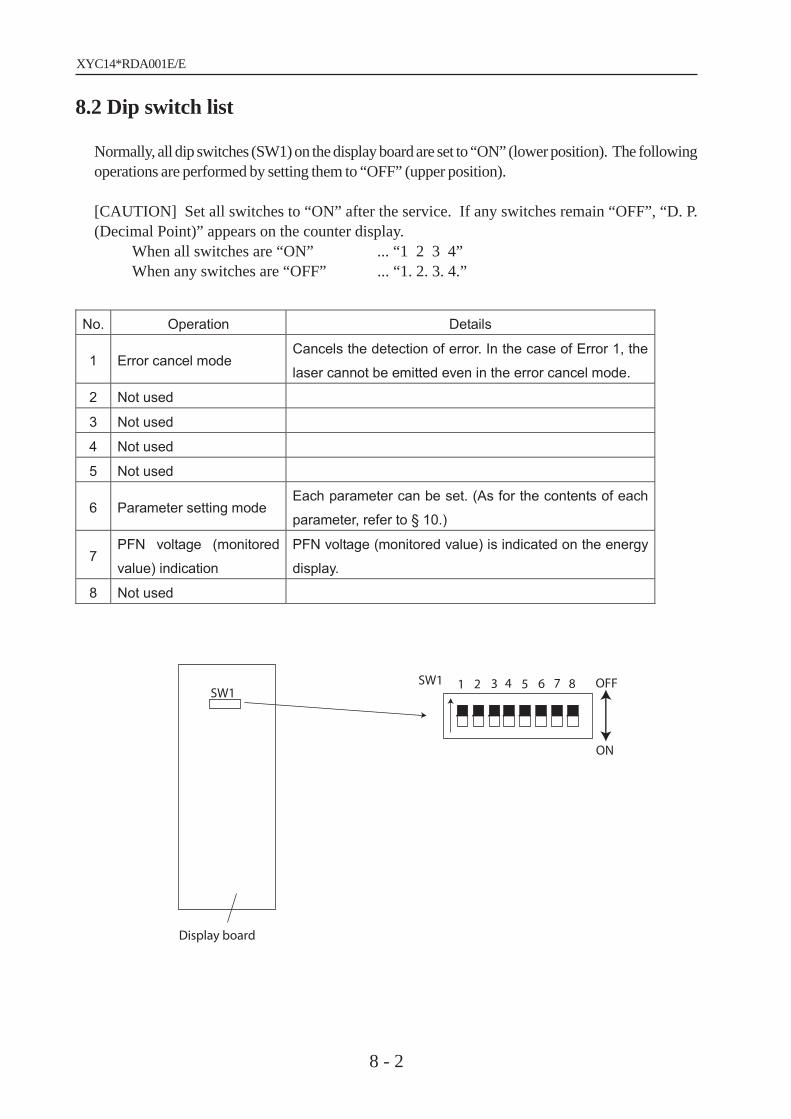
XYC14*RDA001E/E
8 - 2
8.2 Dip switch list
Normally, all dip switches (SW1) on the display board are set to “ON” (lower position). The followingoperations are performed by setting them to “OFF” (upper position).
[CAUTION] Set all switches to “ON” after the service. If any switches remain “OFF”, “D. P.(Decimal Point)” appears on the counter display.
When all switches are “ON” ... “1 2 3 4”When any switches are “OFF” ... “1. 2. 3. 4.”
SW1
Display board
SW1 1 2 3 4 5 6 7 8 OFF
ON
No. Operation Details
1 Error cancel mode Cancels the detection of error. In the case of Error 1, the
laser cannot be emitted even in the error cancel mode.
2 Not used
3 Not used
4 Not used
5 Not used
6 Parameter setting mode Each parameter can be set. (As for the contents of each
parameter, refer to § 10.)
7 PFN voltage (monitored
value) indication
PFN voltage (monitored value) is indicated on the energy
display.
8 Not used

XYC14*RDA001E/E
8 - 3
8.3 Other indications
If any problem occurs when handling each switch, the following abbreviations are indicated onthe focus shift display.
“A. P.”.......appears when the status switch is pressed though the aiming beam is set to OFF.Set the aiming beam to ON.
“S. S.” .......appears when the foot switch is pressed though the status indicator for STANDBYmode lights.Press the status switch.
“S. L.” .......appears when the position of the illumination tube is improper or the YAG laserbeam is interrupted.Set the position of the illumination tube so that the YAG laser beam can be emit-ted.
“H. S.” ......appears when it is neccessary to select the hand switch.
“F. S.” .......appears when it is neccesary to select the foot switch.

XYC14*RDA001E/E
8 - 4

XYC14*RDA001E/E
§9 SYSTEM PARAMETER LIST
9 - 1
This section describes the system parameters of the YC-1600.
The EEPROM is built in the YC-1600 to store data at the time of the adjustment.By changing the data (hereafter called parameter), for example, it is possible to change the laseroutput energy, timing of opening/closing of each shutter and various settings.
9.1 Changing and setting of the parameters
1) Remove the front cover.See 5.1.1.
2) Turn ON the key switch.
3) Set No. 6 of SW1 on the display board to OFF (upper) position.Each data appear on the following display when No. 6 is set to OFF.
Counter display on the control panel: Address of parameterFocus shift display on the control panel: Abbreviation of parameterEnergy display on the control panel: Setting value of parameter
4) Press the aiming switches to indicate the address of parameter (on the counter display) tobe changed.
5) Press the status switch to blink the setting value of parameter (on the energy display).
6) Press the aiming switches to change the setting value of parameter (on the energy dis-play).
7) Press the reset switch (at this time, verify that the beep sound can be heard.).
8) Set No. 6 of SW1 on the display board to ON (lower) position.[CAUTION] It is necessary to turn the key switch to the ON position again except when the laseroutput energy and timing of opening/closing each shutter are changed.
Dip switch
Reset switch
Aiming switches
Status switch
Focus shift display
(Parameter indication)
Counter display
(Parameter address)
Energy display
(Parameter set value)

XYC14*RDA001E/E
9 - 2
9.2 Original setting of the system parameters
Caution) It is necessary to set the necessary data because all data is initialized.1 Remove the front cover.
See 5.1.1.
2) Turn ON the key switch.
3) Turn OFF (upper position) No. 6 of the SW 1 on the display board ASSY.
4) Set the address indicated on the counter display to “99” by pressing the aiming switches.
5) Press the status switch so that the indications on the counter display blink.
6) Set the address indicated on the counter display to “999” by pressing the aiming switches.
7) Press the Reset switch to determine the setting of address. (At this time, the beep soundis heard.)
8) Turn ON (lower position) No. 6 of the SW 1, and turn OFF the key switch.
Counter display
Reset switch
Aiming switches
Status switch
Energy display

XYC14*RDA001E/E
9 - 3
9.3 Contents of parameters
Address Abbreviation Initial setting Details
1 AdJ 00 Control of the adjustment mode 0: Normal mode
1: Adjustment mode
2 AL 00 Control of the sound of the laser shot
0: Sound 1: No sound
3 dEL 00 Not used
4 cnt 10 Countdown timer (Not used at present)
5 toc 00 Total counter operation stop
0: Operation 1: Stop
6 n-A 00 Not used
7 rdy 02 Automatic OFF of READY mode
0: OFF 1-: Value ¥minute
8 Ccl 01 Memory of the counter
0: Memory 1: Clear
9 Acl 0 Memory of the aiming beam
0: Memory 1: Clear
10 PFn 350 PFN voltage
11 CAL 00 Adjustment mode of the PFN voltage
0: OFF 1: After Err 10 2: Forced
12 FSc 00
Checking the focus shift at the time of starting
0: OFF 1: ON (with beep sound)
2: ON (without beep sound)
13 trS 01
Prohibition of switching the trigger switch form
outside
0: Prohibited 1: Permitted
14 HF 00 Switching of the trigger switch
0: HAND SW 1: FOOT SW
15 tr2 01 Input switch of the trigger switch
0: 2 circuits 1: 1 circuit
16 2dl 00 Not used
17 A-H 100 Gain of the software for aiming
18 YH 100 Gain of the software for energy
19 AL 100 Offset of the aiming
20 YL 10 Offset of the energy 10=± 0mJ
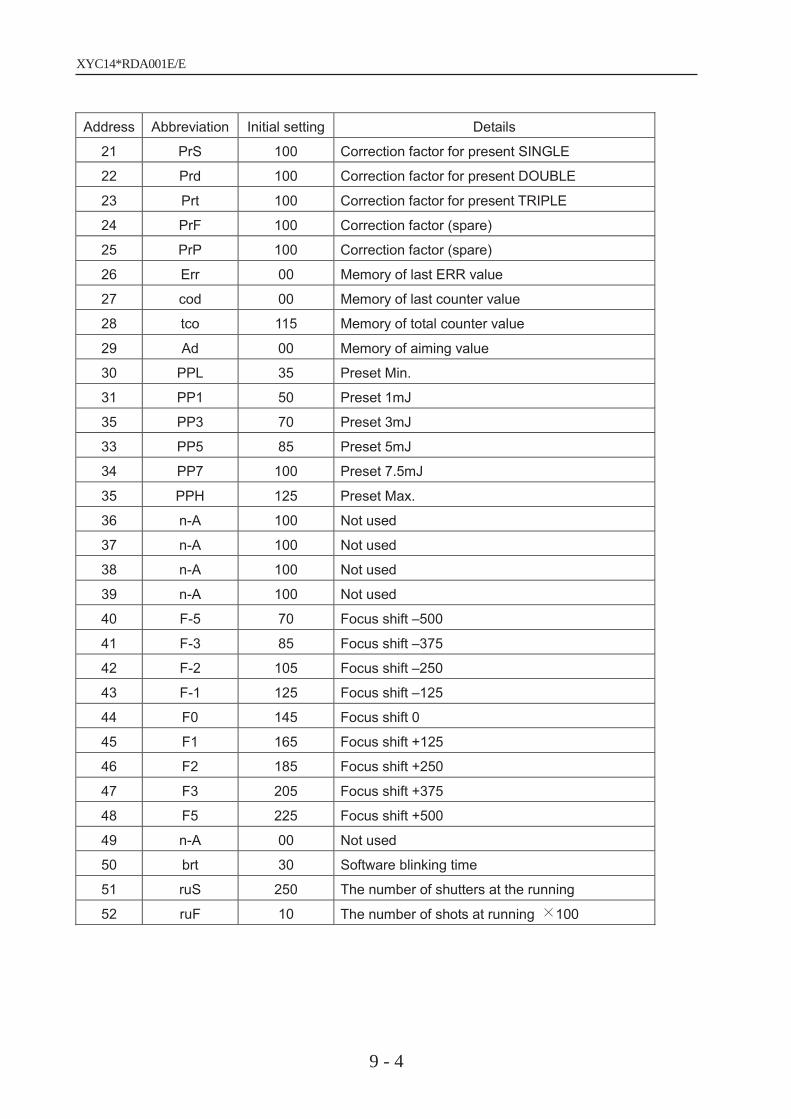
XYC14*RDA001E/E
9 - 4
Address Abbreviation Initial setting Details
21 PrS 100 Correction factor for present SINGLE
22 Prd 100 Correction factor for present DOUBLE
23 Prt 100 Correction factor for present TRIPLE
24 PrF 100 Correction factor (spare)
25 PrP 100 Correction factor (spare)
26 Err 00 Memory of last ERR value
27 cod 00 Memory of last counter value
28 tco 115 Memory of total counter value
29 Ad 00 Memory of aiming value
30 PPL 35 Preset Min.
31 PP1 50 Preset 1mJ
35 PP3 70 Preset 3mJ
33 PP5 85 Preset 5mJ
34 PP7 100 Preset 7.5mJ
35 PPH 125 Preset Max.
36 n-A 100 Not used
37 n-A 100 Not used
38 n-A 100 Not used
39 n-A 100 Not used
40 F-5 70 Focus shift –500
41 F-3 85 Focus shift –375
42 F-2 105 Focus shift –250
43 F-1 125 Focus shift –125
44 F0 145 Focus shift 0
45 F1 165 Focus shift +125
46 F2 185 Focus shift +250
47 F3 205 Focus shift +375
48 F5 225 Focus shift +500
49 n-A 00 Not used
50 brt 30 Software blinking time
51 ruS 250 The number of shutters at the running
52 ruF 10 The number of shots at running 100

XYC14*RDA001E/E
9 - 5
Address Abbreviation Initial setting Details
53 n-A 00 Not used
54 n-A 00 Not used
55 n-A 100 Not used
56 n-A 100 Not used
57 n-A 100 Not used
58 n-A 100 Not used
59 n-A 100 Not used
60 PEL 02 Present ENERGY DATA Min.
61 PE1 10 Present ENERGY DATA 1mJ
62 PE3 30 Present ENERGY DATA 3mJ
63 PE5 50 Present ENERGY DATA 5mJ
64 PE7 75 Present ENERGY DATA 7.5mJ
65 PEH 110 Present ENERGY DATA Max.
66 n-A 00 Not used
67 n-A 00 Not used
68 n-A 00 Not used
69 n-A 00 Not used
70 PF 00 Return time of the protective filter
(Not used at present)
71 SSt 50 Waiting time for the safety shutter value
(10msec)
72 Ast 50 Waiting time for the aiming shutter value
(10msec)
73 n-A 10 Not used
74 n-A 10 Not used
75 n-A 00 Not used
76 n-A 00 Not used
77 n-A 00 Not used
78 n-A 00 Not used
79 n-A 00 Not used
80 n-A 100 Not used
81 n-A 100 Not used
82 n-A 100 Not used
83 n-A 100 Not used
84 n-A 100 Not used
85 n-A 100 Not used

XYC14*RDA001E/E
9 - 6
Address Abbreviation Initial setting Details
86 n-A 100 Not used
87 n-A 100 Not used
88 n-A 100 Not used
89 n-A 100 Not used
90 PuL 00 The number of pulses at automatic PFN
adjustment (0: 4 pulses 1: 5 pulse)
91 Run 00 Not used
92 n-A 00 Not used
93 cnt 00 Setting for destination
(Not used at present)
94 bSt 00 Burst (spare)
95 bno 03 Burst (spare)
96 bSP 250 Not used
97 n-A 00 Not used
98 PuP 00 Update of ROM
99 EEP 0 Initial setting of EEPROM 999: initial setting

XYC14*RDA001E/E
§10 LIST OF PARTS TO BE PEPLACED
10 - 1
This section describes the list of parts to be replaced.
10.1 Consumables
10.2 Parts to be repaired and replaced
Part No. Name Specifications
80402-02044 Fuse 6.3A 250V 5 20MM
80426-00015 Lamp 12V 30W
Part No. Name
13704-BA01 MASTER BOARD
13704-BA02 DISPLAY BOARD
13704-BA20 ILLUMINATION BOARD
13739-0000 MYLA Laser head
13739-E005 Trigger transformer
13733-BA01 POWER SUPPLY BOARD
13704-M037 Pinion
34348-M009 Rack
13704-M373 Plate
34135-M036 Shaft
34405-0000 Fixation lamp
80428-00003 Pilot lamp
80180-00034 Variable resister with switch (VR1)
13704-E020 SW power supply
13704-E111 Emergency stop switch
13704-1130 Focus ASSY
13704-1120 YAG shutter ASSY
13704-1220 Aiming shutter ASSY
13704-1300 Control board ASSY
13704-1400 Display board ASSY
13704-EA05 MASTER BOARD ASSY
13704-EA15 YL CABLE ASSY
13704-EA20 ILLUMI ASSY

XYC14*RDA001E/E
10 - 2

XYC14*RDA001E/E
§11 TOOLS, MEASUREMENT TOOLS, SOLVENT AND JIGS
11 - 1
11.1 Tools
(1) Phillips screwdriver set (9) Forceps(2) Flatblade screwdriver set (10) Soldering iron(3) Precise screwdriver set (11) Solder removal(4) Hex. wrench set (mm) (12) Cleaner for iron(5) Hex. wrench set (inch) (13) Blower brush(6) Hexagon socket screw key set (14) Scissors(7) Needle nose wrench(8) Nipper
11.2 Measurement device
(1) Energy meter MODEL-365, MODEL PHDX50, Vector S 200 (For YAG laser)(2) Power meter COHERENT MODEL212 (For aiming beam)(3) Digital multi meter FLUKE 79(4) Oscilloscope
11.3 Solvent
(1) Mixed solvent of alcohol (Methanol 50% + Ether 50%)
11.4 Jigs
Jig for adjustment of the LD optical axis YCMJ-11 M029, M030Power supply for SL adjustment SL5CT-1L, M7177Dioptric telescope LIJ-4 G20Disk plate SL-1 J1, SLIJ-1 M011Reticle SLMJ-9 1000Standard eyepiece SL4EP-10DArm for aiming beam YCMJ-4Jig for the YAG optical axis YCMJ-11 M024, M025, M026Jig for focal point YCZ-30 M001, M002, M003Dispersion lens YCZ-30 G001Jig for aging 80452-01013Goggle for the YAG laser YL-300Digital printer DPU-411Conductive wrist band 2314Stand for the YC energy meter YCMJ-3 2000
11.5 Others
Lens cleaning paper