Nicholas Ch07 Soft Tissue
84
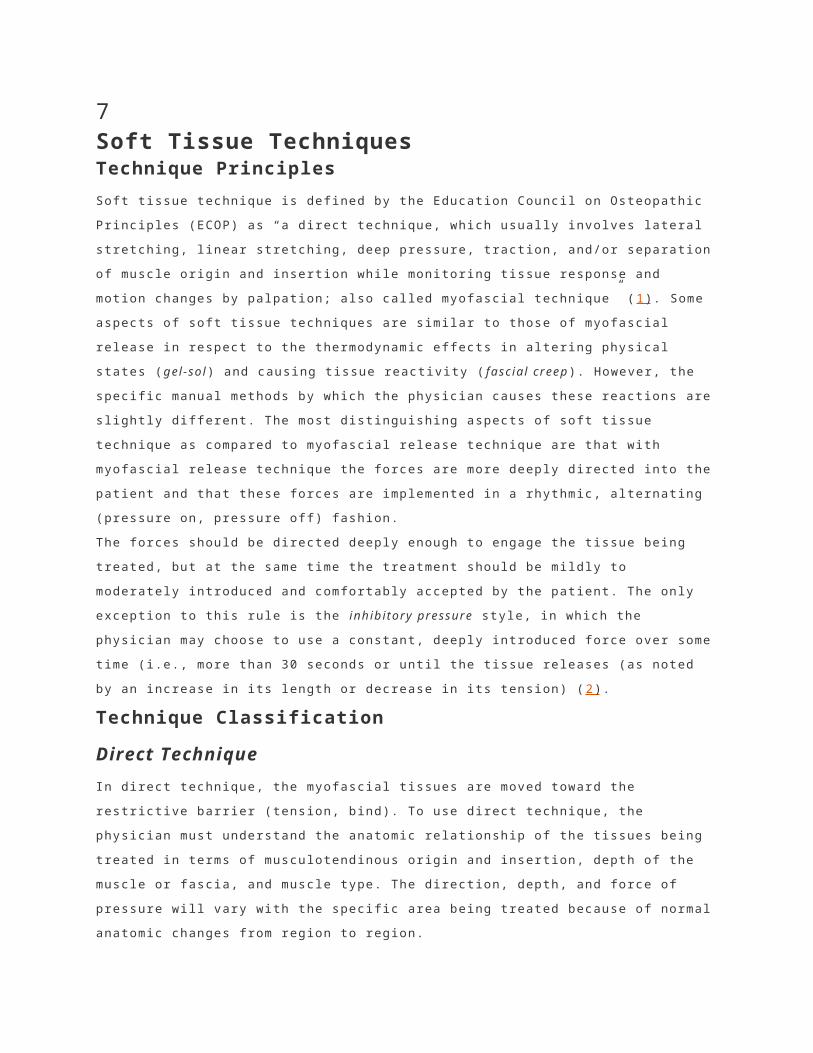
7 Soft Tissue Techniques Technique Principles Soft tissue technique is defined by the Education Council on Osteopathic Principles (ECOP) as “a direct technique, which usually involves lateral stretching, linear stretching, deep pressure, traction, and/or separation of muscle origin and insertion while monitoring tissue response and motion changes by palpation; also called myofascial technique” ( 1 ). Some aspects of soft tissue techniques are similar to those of myofascial release in respect to the thermodynamic effects in altering physical states ( gel-sol ) and causing tissue reactivity ( fascial creep ). However, the specific manual methods by which the physician causes these reactions are slightly different. The most distinguishing aspects of soft tissue technique as compared to myofascial release technique are that with myofascial release technique the forces are more deeply directed into the patient and that these forces are implemented in a rhythmic, alternating (pressure on, pressure off) fashion. The forces should be directed deeply enough to engage the tissue being treated, but at the same time the treatment should be mildly to moderately introduced and comfortably accepted by the patient. The only exception to this rule is the inhibitory pressure style, in which the physician may choose to use a constant, deeply introduced force over some time (i.e., more than 30 seconds or until the tissue releases (as noted by an increase in its length or decrease in its tension) ( 2 ). Technique Classification Direct Technique In direct technique, the myofascial tissues are moved toward the restrictive barrier (tension, bind). To use direct technique, the physician must understand the anatomic relationship of the tissues being treated in terms of musculotendinous origin and insertion, depth of the muscle or fascia, and muscle type. The direction, depth, and force of pressure will vary with the specific area being treated because of normal anatomic changes from region to region.
-
Upload
andy-ursache -
Category
Documents
-
view
214 -
download
0
Transcript of Nicholas Ch07 Soft Tissue
7Soft Tissue TechniquesTechnique PrinciplesSoft t issue technique is def ined by the Educat ion Counci l on Osteopathic Pr inc ip les (ECOP) as
“a d irect technique, which usual ly invo lves lateral s tre tching, l inear st re tching, deep pressure,
t ract ion, and/or separat ion of muscle or ig in and inser t ion whi le moni tor ing t issue response and
mot ion changes by palpat ion; also cal led myofasc ia l technique” ( 1 ) . Some aspects of sof t
t issue techniques are simi lar to those of myofasc ia l re lease in respect to the thermodynamic
ef fects in al ter ing phys ical s ta tes ( gel-so l ) and causing t issue react iv i ty ( fasc ia l creep ) .
However , the speci f ic manual methods by which the phys ic ian causes these react ions are
sl ight ly d i f ferent. The most d is t inguish ing aspects of sof t t issue technique as compared to
myofascia l re lease technique are that wi th myofascia l re lease technique the forces are more
deeply di rected in to the pat ient and that these forces are implemented in a rhythmic,
al ternat ing (pressure on, pressure of f ) fashion.
The forces should be d irected deeply enough to engage the t issue being treated, but at the
same t ime the t reatment should be mi ld ly to moderate ly int roduced and comfor tably accepted
by the pat ient . The only except ion to th is ru le is the inhib i tory pressure s ty le , in which the
phys ic ian may choose to use a constant, deeply int roduced force over some t ime ( i .e. , more
than 30 seconds or unt i l the t issue releases (as noted by an increase in i ts length or decrease
in i ts tens ion) (2 ) .
Technique ClassificationDirect TechniqueIn d irect technique, the myofasc ia l t issues are moved toward the rest r ict ive barr ier ( tens ion,
bind) . To use d irect technique, the physic ian must understand the anatomic relat ionship of the
t issues being t reated in terms of musculotendinous or ig in and inser t ion, depth of the muscle or
fasc ia , and muscle type. The d irect ion, depth, and force of pressure wi l l vary wi th the speci f ic
area being treated because of normal anatomic changes f rom region to reg ion.
Technique StylesParallel TractionIn para l le l t ract ion, the myofascial s tructure being treated is contacted at i ts or ig in and
insert ion, and the t reatment force is d irected paral le l to the musculotendinous ax is , caus ing an
overa l l increase in length of the s tructure. This may be done by di rect ing a force with the hand
that is proximal to the or ig in , the hand that is proximal to the insert ion, or both hands moving
opposi te each other at the same t ime. Each of these wi l l cause a re la t ive increase in length of
the myofasc ia l t issue being treated.
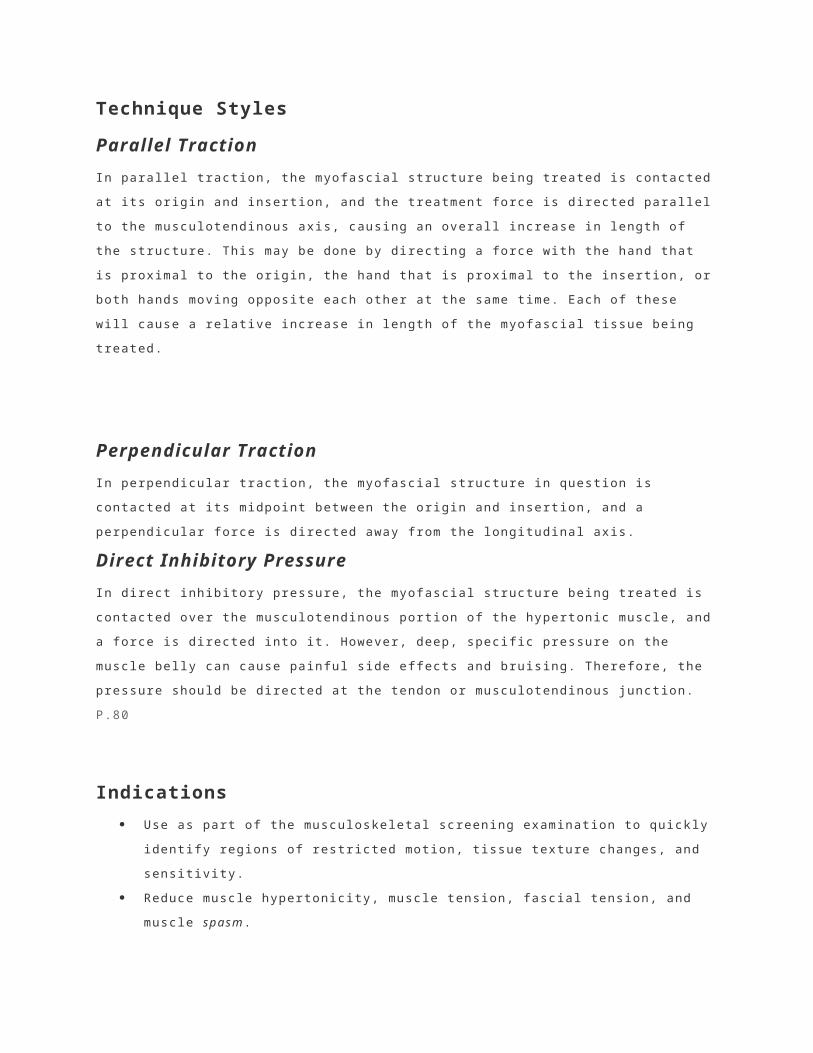
Perpendicular TractionIn perpendicu lar t ract ion, the myofascial s tructure in quest ion is contacted at i ts midpoint
between the or ig in and insert ion, and a perpendicular force is di rected away f rom the
longi tudina l ax is .
Direct Inhibitory PressureIn d irect inh ib i tory pressure, the myofascial s tructure being treated is contacted over the
musculotendinous por t ion of the hyper ton ic muscle, and a force is d irected into i t . However,
deep, speci f ic pressure on the muscle bel ly can cause painfu l s ide ef fects and bru is ing.
Therefore, the pressure should be d irected at the tendon or musculotendinous junct ion.
P.80
Indications Use as part o f the musculoskeletal screening examinat ion to qu ick ly ident i fy regions of
rest r icted mot ion, t issue texture changes, and sensi t iv i ty .
Reduce muscle hyperton ic i ty, muscle tension, fasc ia l tension, and muscle spasm .
Stretch and increase e last ic i ty of shortened, ine last ic, and/or f ibrot ic myofascial
st ructures to improve reg ional and/or intersegmental ranges of mot ion.
Improve c ircu la t ion to the speci f ic region being treated by loca l physica l and
thermodynamic ef fects or by re f lex phenomena to improve ci rculat ion in a distal area
(e.g. , through somat ic-somat ic or somatov iscera l re f lexes).
Increase venous and lymphat ic dra inage to decrease local and/or d istal swel l ing and
edema and potent ia l ly improve the overa l l immune response.
St imulate the s tretch ref lex in hypotonic muscles.
Promote pat ient relaxat ion.
Reduce pat ient guard ing dur ing implementat ion of other osteopath ic manipulat ive
techniques or addi t ional medica l t reatment.
Potent iate the ef fect of o ther osteopathic techniques.
Improve the physic ian-pat ient re la t ionship, as th is technique typ ical ly impar ts a
pleasant sensat ion to the pat ient .
ContraindicationsRelative Contraindications
Use wi th caut ion, as common medica l sense is the ru le . For example, in an e lder ly osteoporot ic
pat ient , the sof t t issue prone pressure technique may be cont ra indicated over the
thoracocostal and pelv ic reg ions, but the la tera l recumbent methods can be more safely
appl ied. Also, contact and s tretch ing over an acutely st ra ined or sprained myofasc ia l ,
l igamentous, or capsular s tructure may exacerbate the condi t ion. Therefore, in these s i tuat ions
caut ion should prevai l , and the sof t t issue technique may be wi thheld unt i l t issue d isrupt ion
and inf lammat ion have stab i l ized.
Other precaut ions in the use of sof t t issue technique:
Acute sprain or s train.
Fracture or d is locat ion.
Neuro logic or vascular compromise.
Osteoporosis and osteopenia.
Malignancy. Most rest r ict ions are for t reatment in the af fected area of mal ignancy;
however , care should be taken in other dista l areas depending on type of mal ignancy
and/or lymphat ic invo lvement .
In fect ion (e.g. , osteomyel i t is ) .
Absolute ContraindicationsNone, as the phys ic ian may work prox imal to the problem above or be low the af fected area and
may al ter the pat ient 's posi t ion or technique to achieve some benef ic ia l e f fect .
General Considerations and Rules The pat ient should be comfor tab le and re laxed.
The physic ian should be in a posi t ion of comfort so as to minimize energy expenditure
and whenever possible should use body weight instead of upper extremity st rength and
energy.
In i t ia l ly, forces must be of low intensi ty and appl ied slowly and rhythmical ly. As heat
develops and the t issues begin to react , the pressure may be increased i f c l in ical ly
indicated and wel l to lerated; however , the cadence should remain slowly rhythmical .
The appl ied forces should always be comfortab le and not cause pain. A comfor table and
pleasant exper ience is the intended ef fect .
Never d irect forces d irect ly in to bone, and l imit pressure into the muscle be l ly.
As this is not a massage or f r ic t ion technique, never rub or i r r i tate the pat ient 's sk in by
the f r ic t ion of your hands. The physic ian 's hand should carry the skin wi th i t and not
s l ide across i t when apply ing the d irected force.
Determine how you would l ike to employ the force:

o pushing or pu l l ing perpendicu lar to cause tract ion to the long ax is o f the
musculotendinous s tructure
o By applying t ract ion in a para l le l d i rect ion to the long axis, increasing the
distance between the or ig in and inser t ion of the muscle f ibers
P.81
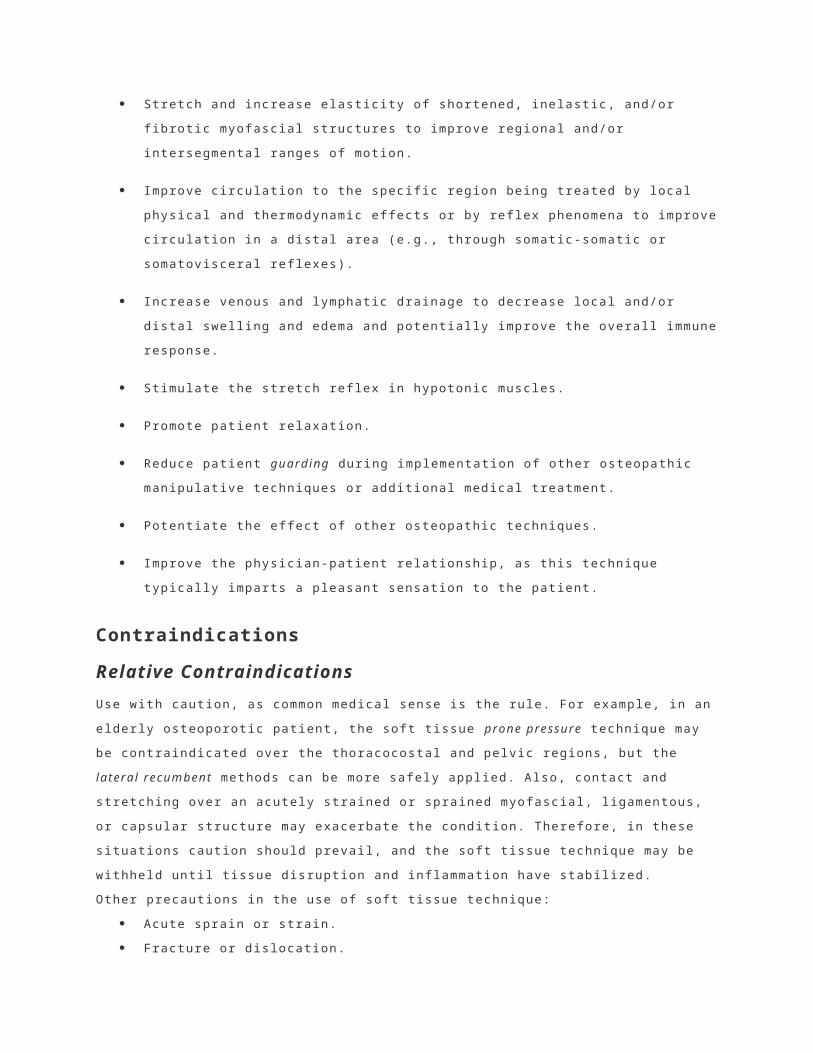
Cervical Region: Traction, Supine
1. The patient lies supine on the treatment table.
2. The physician sits or stands at the head of the table.
3. The physician's one hand gently cradles the occiput between the thumb and index finger. The physician's other hand lies across the patient's forehead or grasps under the chin (Figs. 7.1 and 7.2). (Use caution in patients with temporomandibular joint [TMJ] dysfunctions.)
4. The physician exerts cephalad traction with both hands with the head and neck in a neutral to slightly flexed position to avoid extension. The cradling hand must not squeeze the occiput, or the occipitomastoid suture will be compressed (Fig. 7.3).
5. This tractional force is applied and released slowly. It may be increased
Figure 7.1. Step 3, skeleton.
Figure 7.2. Step 3, patient.
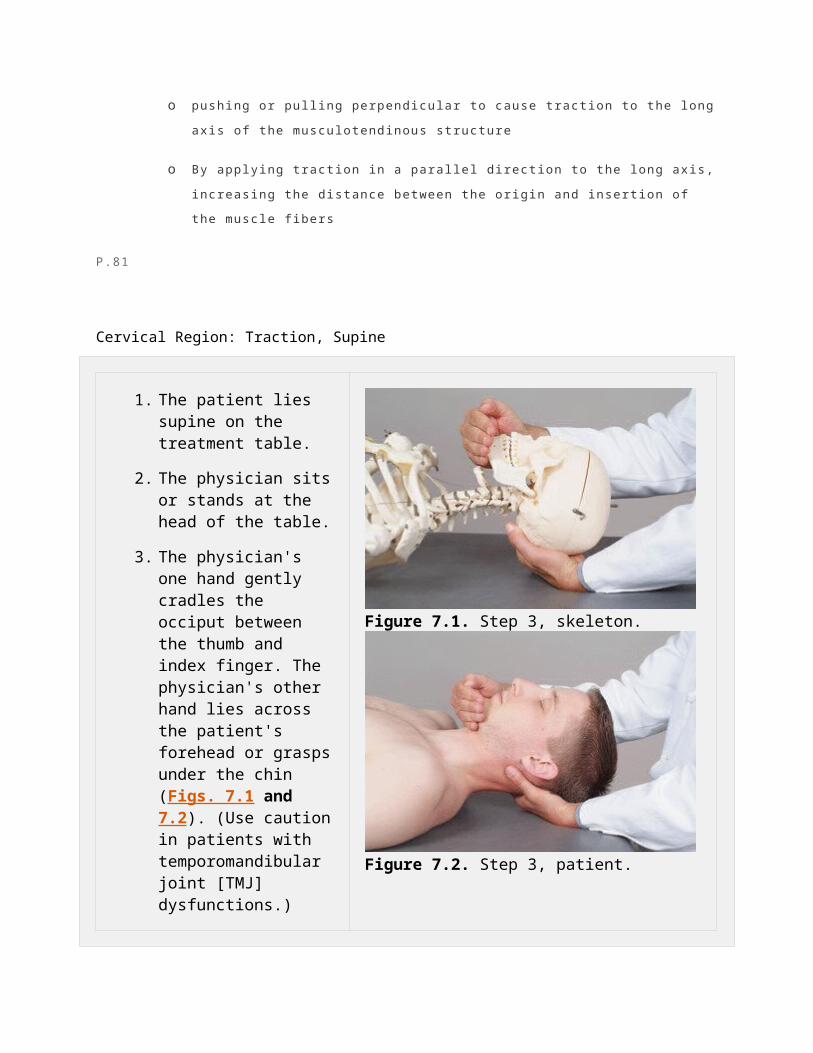
in amplitude as per patient tolerance.
6. This technique may also be performed using sustained traction.
7. This technique may be performed for 2 to 5 minutes to achieve the desired effects. It may be especially helpful in patients with degenerative disk disease.
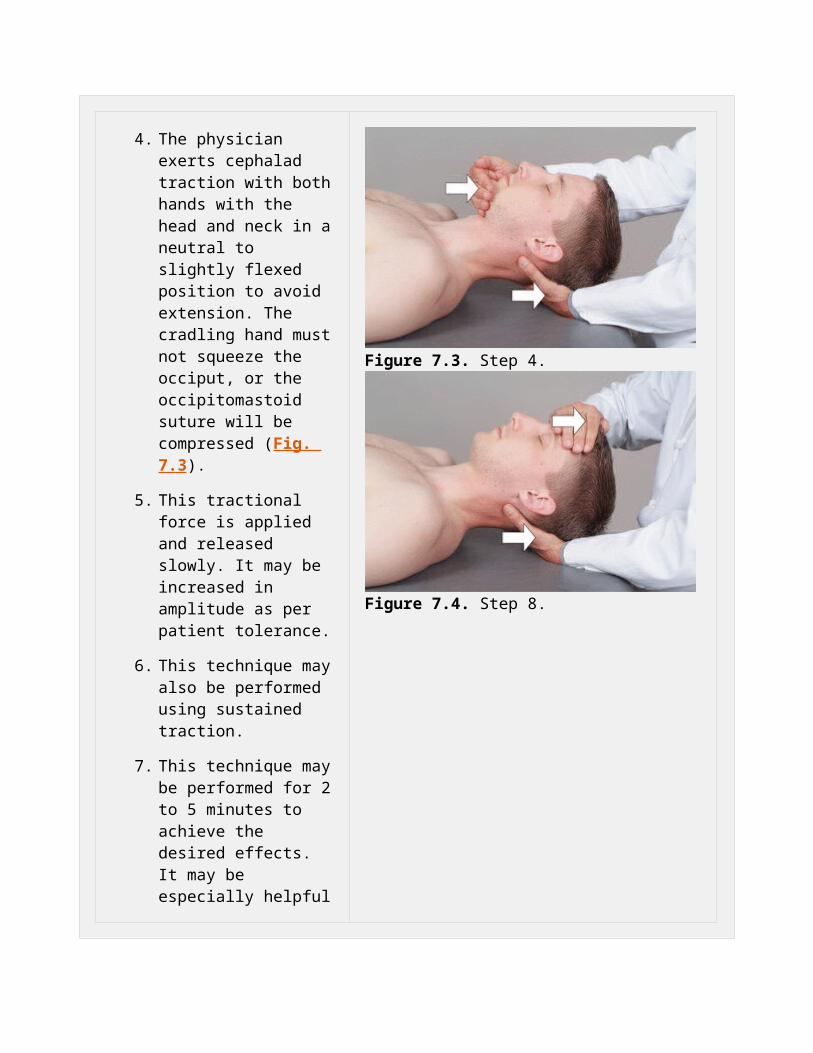
8. In patients with TMJ dysfunction, it may be modified by placing the one hand on the forehead instead of the mandible (Fig. 7.4).
9. Tissue tension is reevaluated to assess the effectiveness of the technique.
Figure 7.3. Step 4.
Figure 7.4. Step 8.
P.82
Cervical Region: Forward Bending (Forearm Fulcrum), Supine
1. The patient lies supine on the treatment table.
2. The physician is seated at the head of the table.
3. The physician gently flexes the patient's neck with one hand while sliding the other hand palm down under the patient's neck and opposite shoulder (Fig. 7.5).
4. The physician gently rotates the patient's head along the physician's forearm toward the elbow, producing a unilateral stretch of the cervical paravertebral musculature (Fig. 7.6).
5. This stretch can be repeated as many times as necessary to achieve the desired effect, usually 2 to 3 minutes.
6. This procedure is reversed to treat the opposite side of the patient's neck; or the physician's hand that was on the table can be lifted onto the patient's shoulder (Fig. 7.7) and steps 4 and 5 can be repeated in the opposite direction (Fig. 7.8).
7. Tissue tension is reevaluated to assess the effectiveness of the technique.
Figure 7.5. Step 3.
Figure 7.6. Step 4, rotation right.
Figure 7.7. Step 6, neutral.
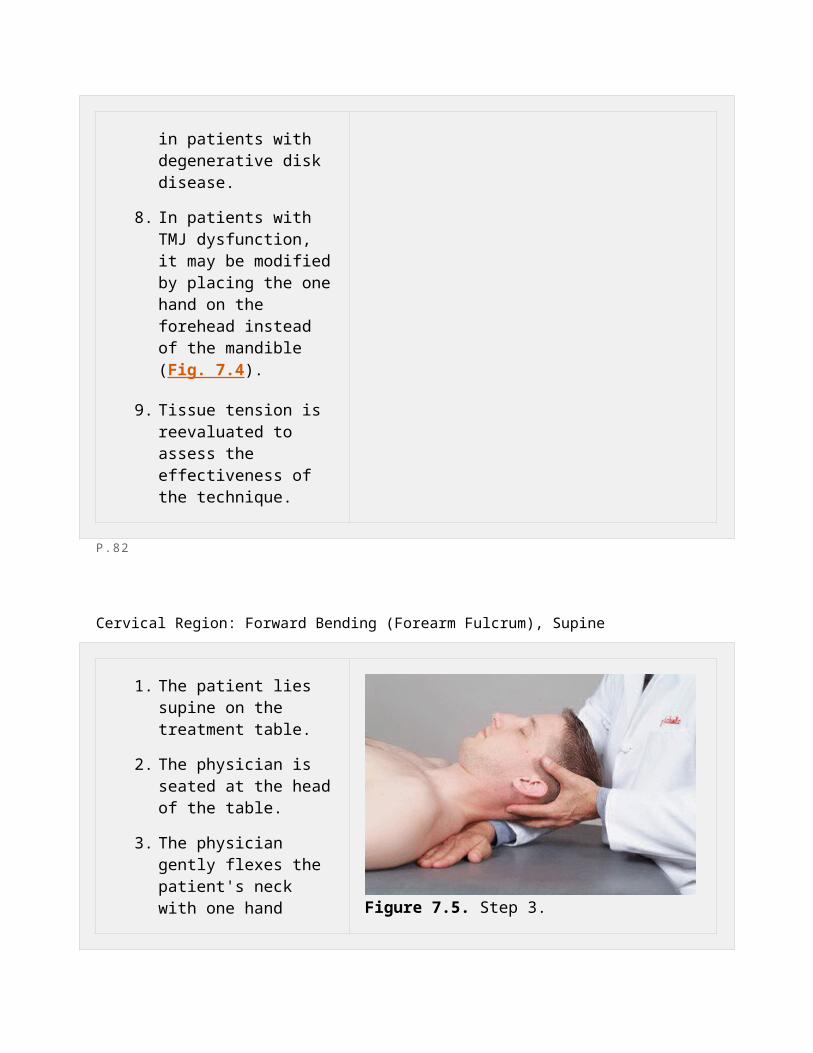
Figure 7.8. Step 6, rotation left.
P.83
Cervical Region: Forward Bending (Bilateral Fulcrum), Supine
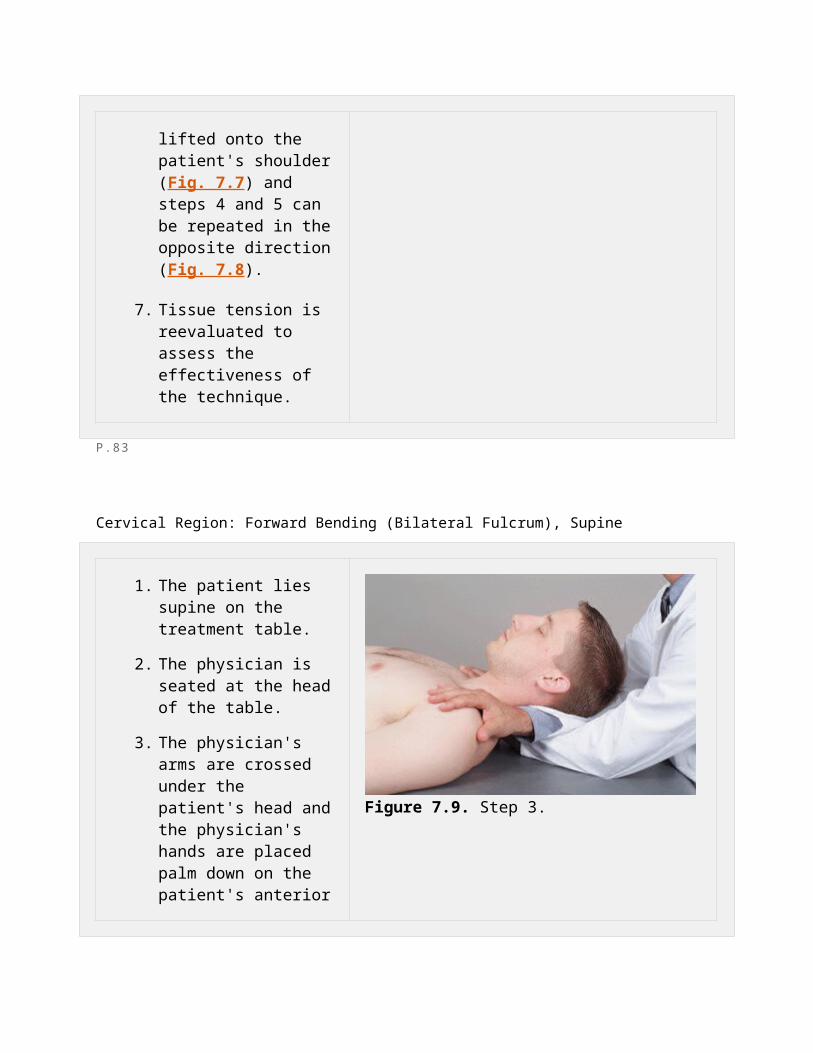
1. The patient lies supine on the treatment table.
2. The physician is seated at the head of the table.
3. The physician's arms are crossed under the patient's head and the physician's hands are placed palm down on the patient's anterior shoulder region (Fig. 7.9).
4. The physician's forearms gently flex the patient's neck, producing a longitudinal stretch of the cervical paravertebral musculature (Fig. 7.10).
5. This technique may be performed in a gentle,
Figure 7.9. Step 3.

rhythmic fashion or in a sustained manner.
6. Tissue tension is reevaluated to assess the effectiveness of the technique.
Figure 7.10. Step 4.
P.84
Cervical Region: Contralateral Traction, Supine
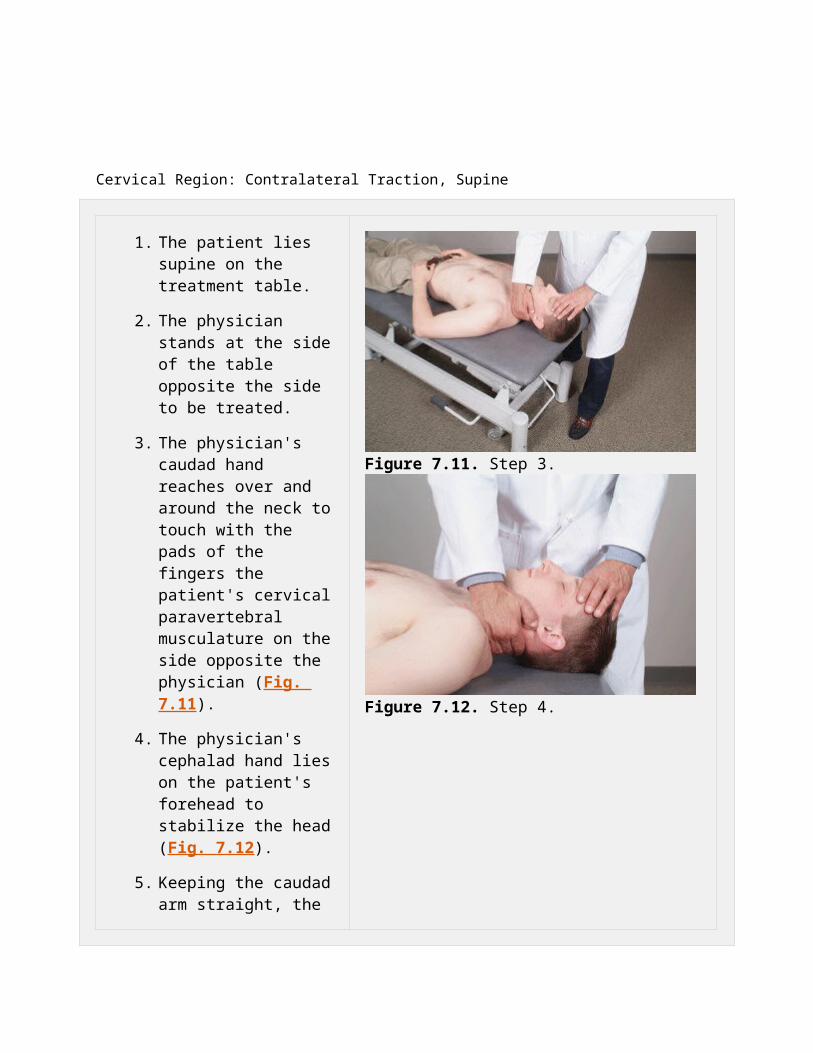
1. The patient lies supine on the treatment table.
2. The physician stands at the side of the table opposite the side to be treated.
3. The physician's caudad hand reaches over and around the neck to touch with the pads of the fingers the patient's cervical paravertebral musculature on the side opposite the physician (Fig. 7.11).
4. The physician's cephalad hand lies on the patient's forehead to stabilize the head (Fig. 7.12).
5. Keeping the caudad arm straight, the physician gently draws the paravertebral muscles ventrally (white arrow, Fig. 7.13), producing minimal extension of the cervical spine.
6. This technique may be performed in a gentle, rhythmic, and kneading fashion or in a sustained manner.
7. Tissue tension is reevaluated to assess the effectiveness of the technique.
Figure 7.11. Step 3.
Figure 7.12. Step 4.
Figure 7.13. Step 5.
P.85

Cervical Region: Cradling with Traction, Supine
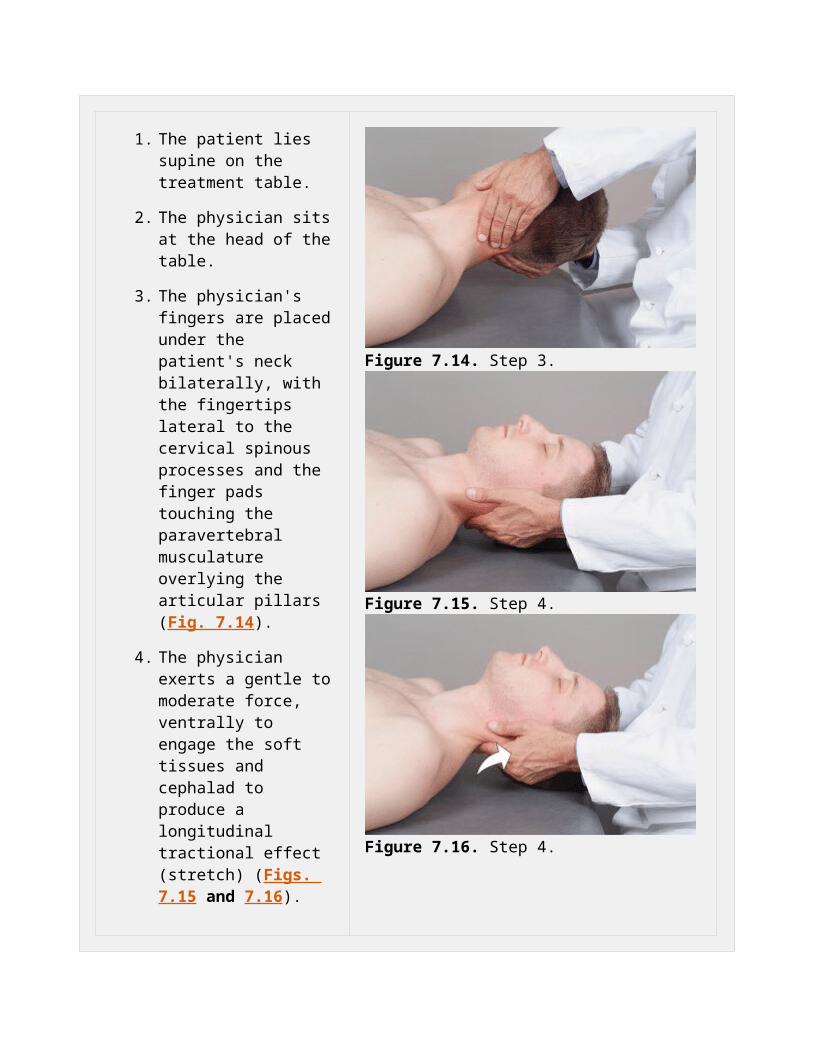
1. The patient lies supine on the treatment table.
2. The physician sits at the head of the table.
3. The physician's fingers are placed under the patient's neck bilaterally, with the fingertips lateral to the cervical spinous processes and the finger pads touching the paravertebral musculature overlying the articular pillars (Fig. 7.14).
4. The physician exerts a gentle to moderate force, ventrally to engage the soft tissues and cephalad to produce a longitudinal tractional effect (stretch) (Figs. 7.15 and 7.16).
5. This traction on the cervical musculature is slowly released.
6. The physician's hands are repositioned to contact different levels of the cervical spine, and steps 4 and 5 are performed to stretch various portions of the cervical paravertebral musculature.
7. This technique may be performed in a gentle rhythmic and kneading fashion or in a sustained manner.
Figure 7.14. Step 3.
Figure 7.15. Step 4.
Figure 7.16. Step 4.
8. Tissue tension is reevaluated to assess the effectiveness of the technique.
P.86
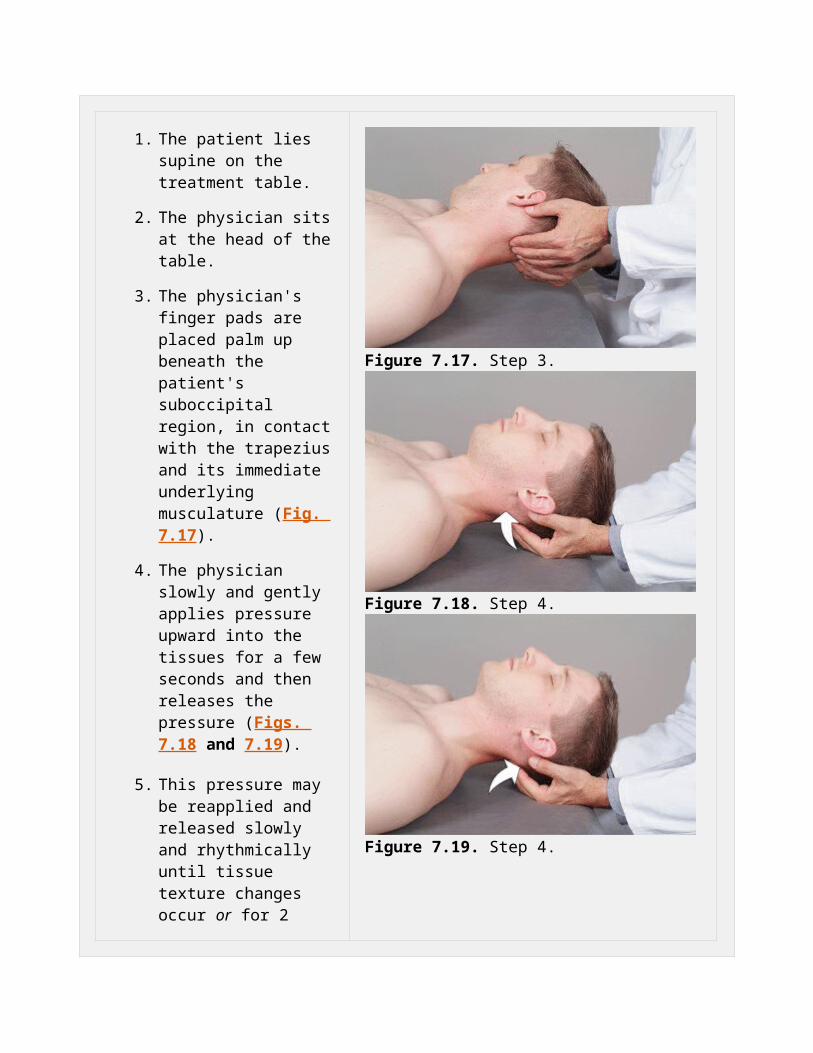
Cervical Region: Suboccipital Release, Supine
1. The patient lies supine on the treatment table.
2. The physician sits at the head of the table.
3. The physician's finger pads are placed palm up beneath the patient's suboccipital region, in contact with the trapezius and its immediate underlying musculature (Fig. 7.17).
4. The physician slowly and gently applies pressure upward into the tissues for a few seconds and then releases the pressure (Figs. 7.18 and 7.19).
5. This pressure may be reapplied and released slowly and rhythmically until tissue texture changes occur or for 2 minutes. The pressure may also be continued in a more constant inhibitory style for 30 seconds to 1 minute.
Figure 7.17. Step 3.
Figure 7.18. Step 4.

Figure 7.19. Step 4.
P.87
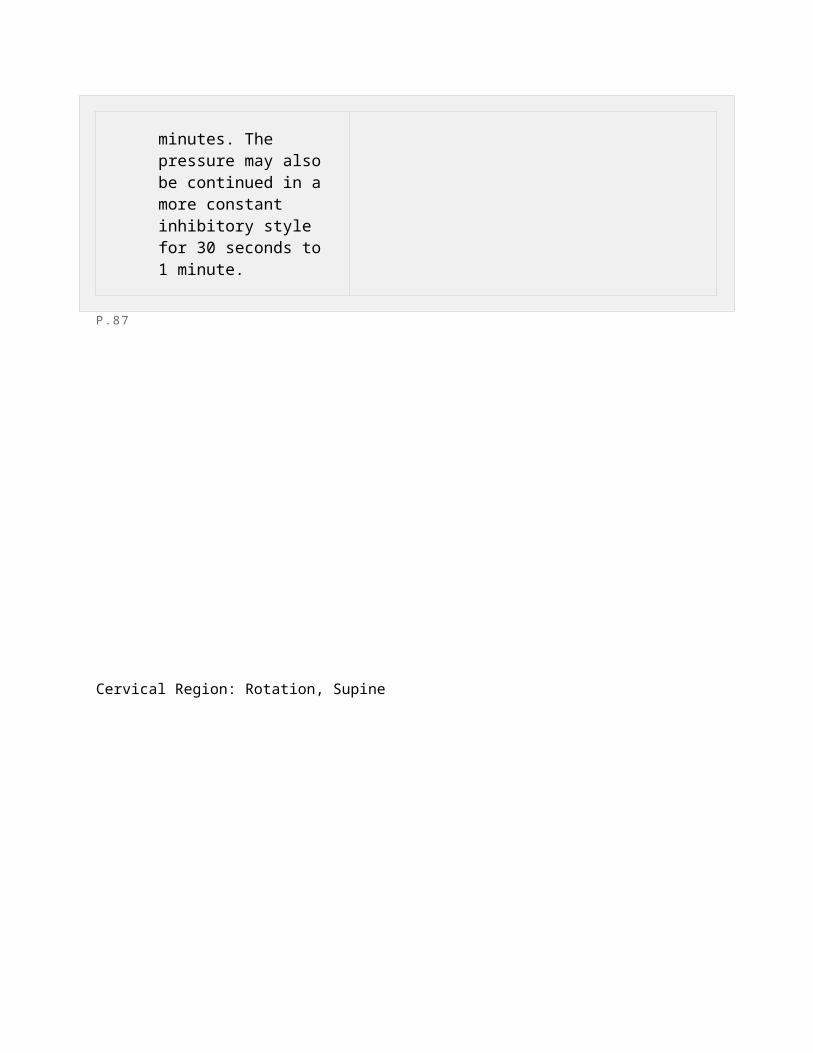
Cervical Region: Rotation, Supine
1. The patient lies supine on the treatment table.
2. The physician sits at the head of the table.
3. The physician's cupped hands (palmar aspect) are placed to each side of the patient's temporomandibular region, making sure to not compress over the external acoustic meatus (Fig. 7.20).
4. The physician gently and slowly axially rotates the patient's head to the left to the restrictive barrier at its passive tolerable elastic limit and holds this position for 3 to 5 seconds (Fig. 7.21).
5. The physician then slowly rotates the head to the right restrictive barrier at its passive tolerable elastic limit and holds this position for 3 to 5 seconds (Fig. 7.22).
6. This is repeated to each side until release of tissue tension and/or improvement of range of motion.
Figure 7.20. Step 3.
Figure 7.21. Step 4.
Figure 7.22. Step 5.
P.88
Cervical Region: Supine, Forefingers Cradling
1. The patient lies supine on the treatment table.
2. The physician sits or stands at the head of the table.
3. The physician's hands cradle the temporal regions (avoiding pressure over the ears) with the fingers over the cervical paraspinal tissues, proximal to the articular processes (Fig. 7.23).
4. The patient's head is bent slightly backward (extended) and taken through a progression of side bending and rotation to one side and then the other with continuing pressure from the finger pads on the posterior cervical tissues (Figs. 7.24 and 7.25).
5. This is repeated in a slow, rhythmic manner until release of tissue tension and/or improvement of range of motion. Normally, this takes between 2 and 3 minutes.
Figure 7.23. Step 3.
Figure 7.24. Step 4.
Figure 7.25. Step 4.
P.89
Cervical Region: Thumb Rest, Supine
1. The patient lies supine on the treatment table with or without a pillow under the head.
2. The physician sits or stands at the head of the table.
3. The thumb and forefinger of one of the physician's hands cups the posterior cervical area palm up (Fig. 7.26).
4. The physician's other hand is placed over the temporal and frontal regions of the patient's head and gently brings the head into slight backward bending (extension) and rotation against the thumb (Figs. 7.27 and 7.28).
5. The motion is very slight.
6. Tension (pressure) is relaxed slowly and reapplied slowly.
7. The pressure may be reversed to the other side.
Figure 7.26. Step 3.
Figure 7.27. Step 4.
Figure 7.28. Step 4.
P.90
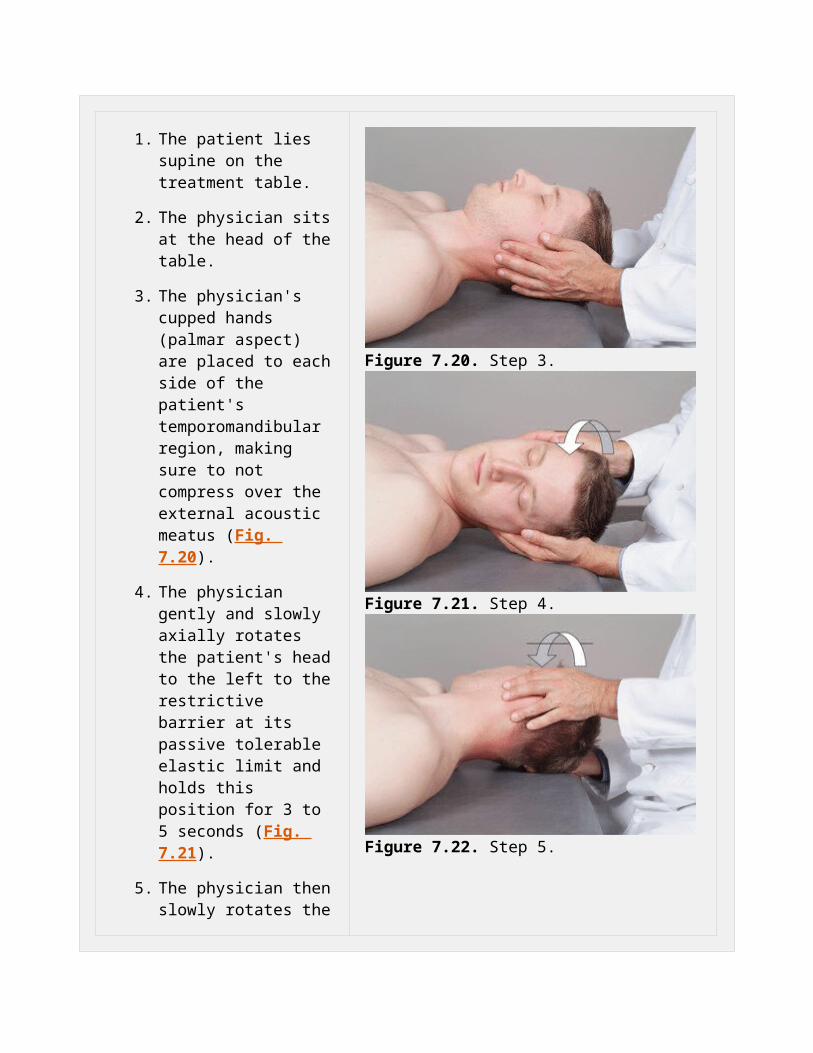
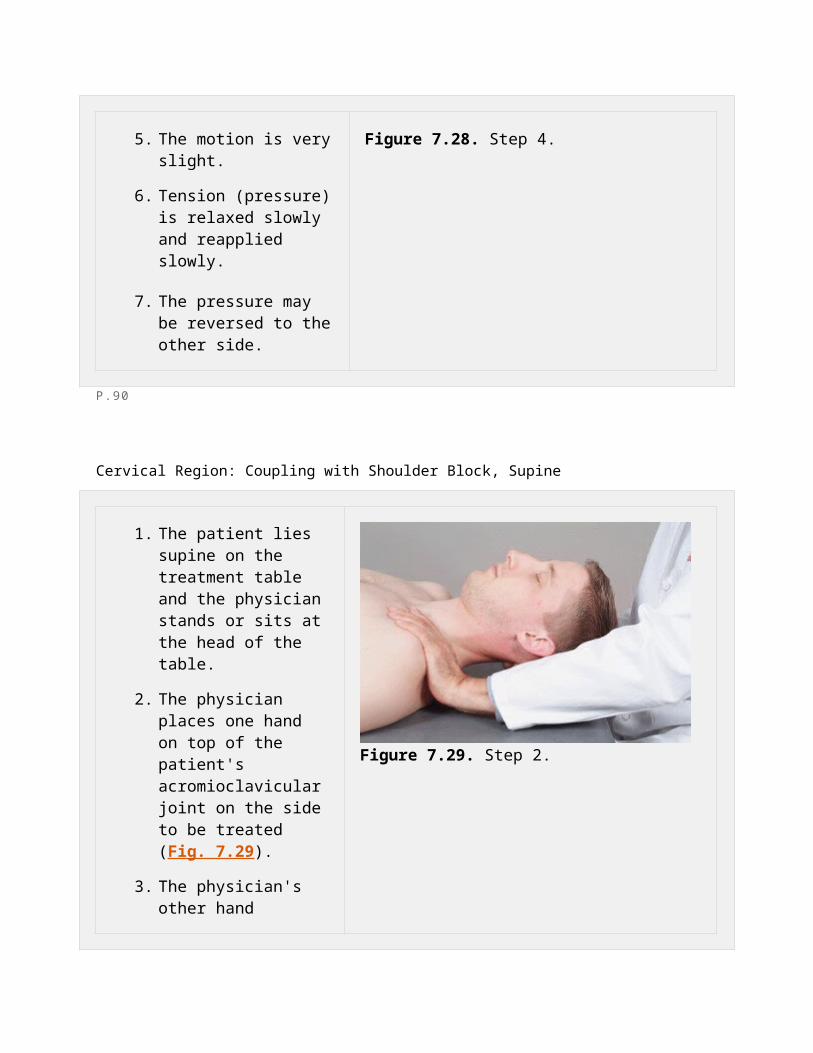
Cervical Region: Coupling with Shoulder Block, Supine
1. The patient lies supine on the treatment table and the physician stands or sits at the head of the table.
2. The physician places one hand on top of the patient's acromioclavicular joint on the side to be treated (Fig. 7.29).
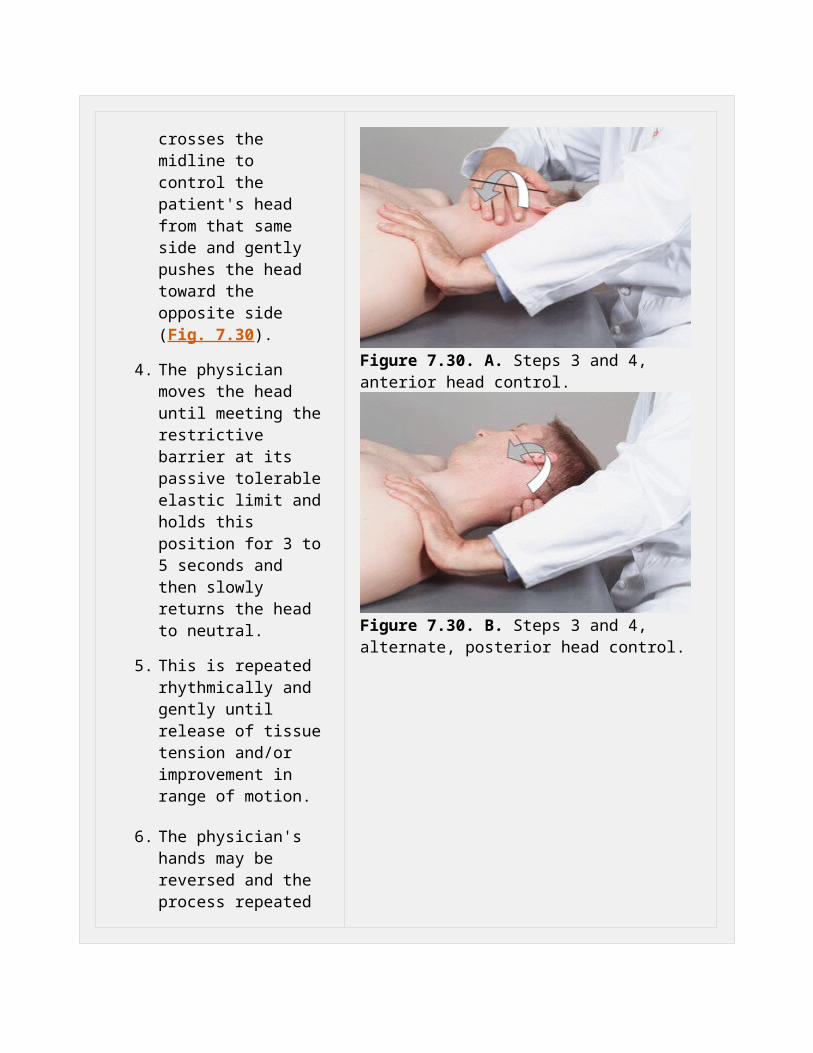
3. The physician's other hand crosses the midline to control the patient's head from that same side and gently pushes the head toward the opposite side (Fig. 7.30).
4. The physician moves the head until meeting the restrictive barrier at its passive tolerable elastic limit and holds this position for 3 to 5 seconds and then slowly returns the head to neutral.
5. This is repeated rhythmically and gently until release of tissue tension and/or improvement in range of motion.
6. The physician's hands may be reversed and the process repeated on the
Figure 7.29. Step 2.
Figure 7.30. A. Steps 3 and 4, anterior head control.
opposite side. Figure 7.30. B. Steps 3 and 4, alternate, posterior head control.
P.91
Cervical Region: Lateral Traction, Seated (Example: Left Cervical Paravertebral Muscle Hypertonicity,
Fascial Inelasticity, and Others)
1. The patient is seated on the treatment table.
2. The physician stands behind and to the right side of the patient with the patient resting comfortably against the physician's chest.
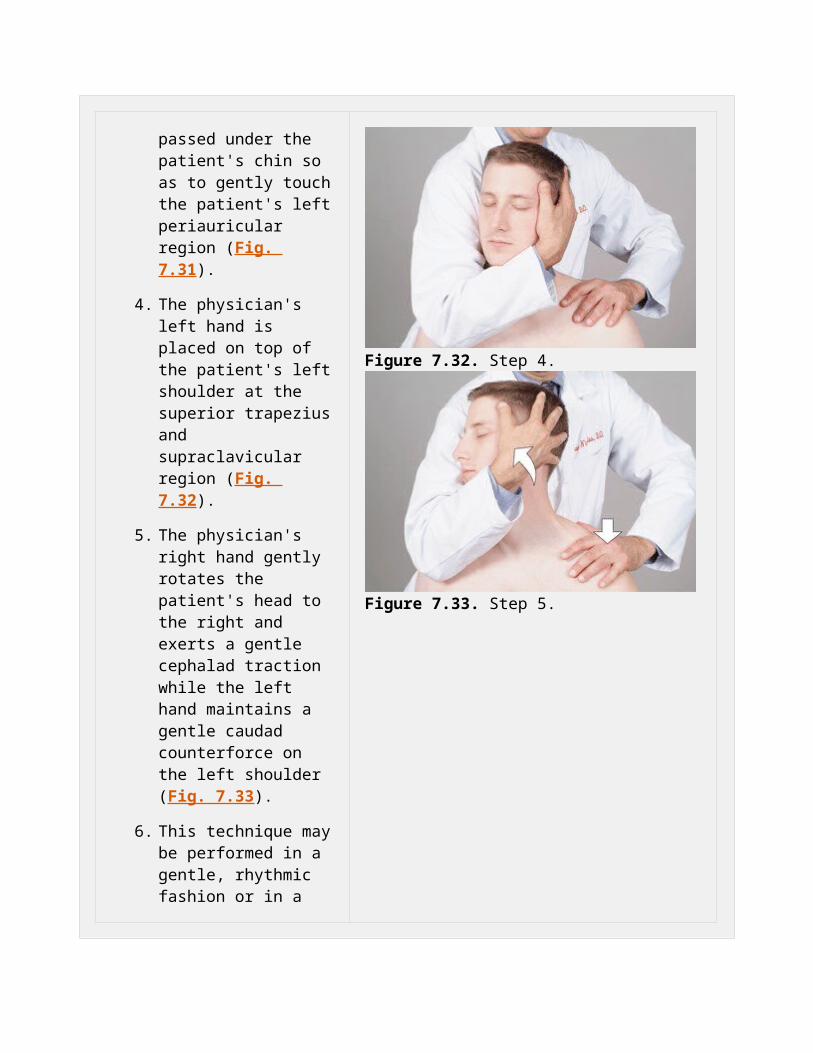
3. The physician's right cupped hand and forearm are passed under the patient's chin so as to gently touch the patient's left periauricular region (Fig. 7.31).
4. The physician's left hand is placed on top of the patient's left shoulder at the superior trapezius and supraclavicular region
Figure 7.31. Step 3.

(Fig. 7.32).
5. The physician's right hand gently rotates the patient's head to the right and exerts a gentle cephalad traction while the left hand maintains a gentle caudad counterforce on the left shoulder (Fig. 7.33).
6. This technique may be performed in a gentle, rhythmic fashion or in a sustained manner.
7. If indicated, the technique may be reversed to treat the opposite side.
8. Tissue tension is reevaluated to assess the effectiveness of the technique.
Figure 7.32. Step 4.
Figure 7.33. Step 5.
P.92
Cervical Region: Sitting Traction (Example, Using Right Knee)

1. The patient is seated on the treatment table.
2. The physician stands behind and to the left of the patient.
3. The physician's right foot is placed on the table with the right knee and hip flexed.
4. The physician's right elbow is placed on the right thigh.
5. The physician's right hand cradles the occiput with the thumb and index finger while the left hand holds the patient's forehead (Figs. 7.34 and 7.35).
6. The physician slowly elevates the right thigh and knee by lifting the heel of the right foot (plantar-flexing foot), thereby producing cervical traction (Fig. 7.36).
7. The traction is released when the physician slowly returns the right heel to its original position (Fig. 7.37).
8. This technique may be performed in a gentle, rhythmic fashion or in a sustained manner.
9. Tissue tension is reevaluated to assess the effectiveness of the technique.
Figure 7.34. Step 5.
Figure 7.35. Step 5, alternative hand position.
Figure 7.36. Step 6.

Figure 7.37. Step 7.
P.93
Cervical Region: Head and Chest Position, Seated
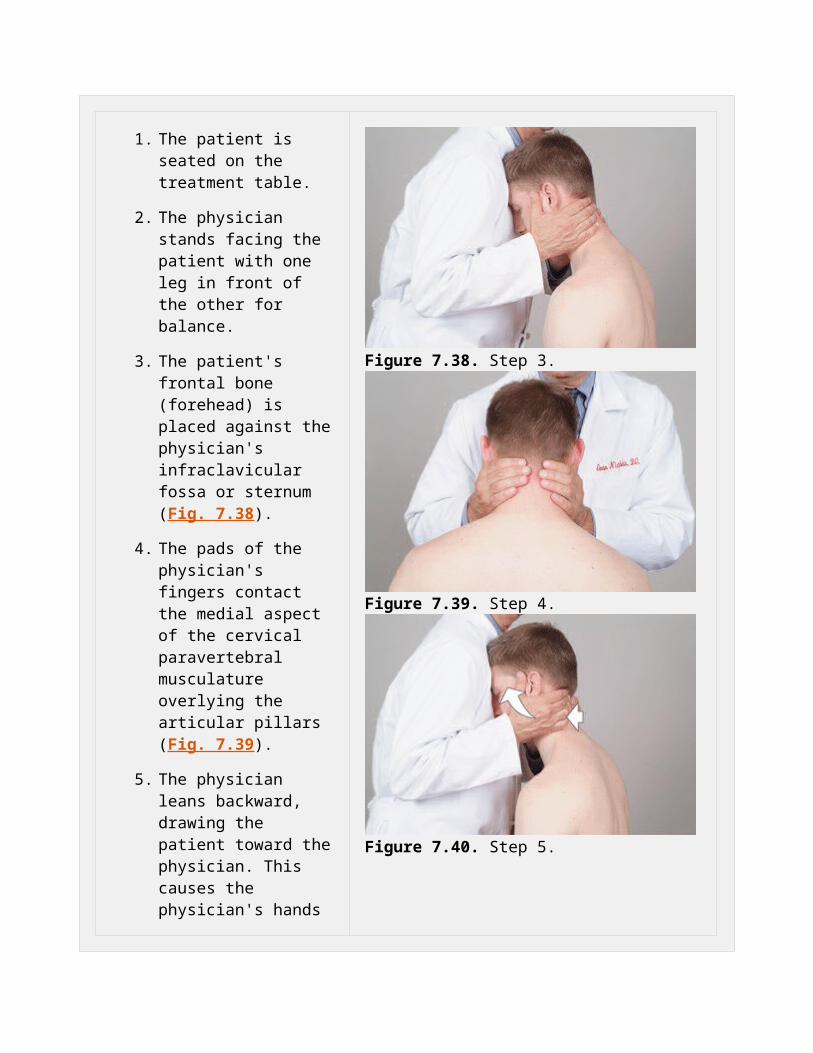
1. The patient is seated on the treatment table.
2. The physician stands facing the patient with one leg in front of the other for balance.
3. The patient's frontal bone (forehead) is placed against the physician's infraclavicular fossa or sternum (Fig. 7.38).
4. The pads of the physician's fingers contact the medial aspect of the cervical paravertebral musculature overlying the articular pillars (Fig. 7.39).
5. The physician leans backward, drawing the patient toward the physician. This causes the physician's hands to engage the soft tissues, exerting a gentle ventral force with concomitant cephalad traction. This produces a longitudinal tractional effect (stretch) (Fig. 7.40).
6. This technique may be performed in a gentle, rhythmic, and kneading fashion or in a sustained manner.
7. Tissue tension is reevaluated to assess the effectiveness of the technique.
Figure 7.38. Step 3.
Figure 7.39. Step 4.
Figure 7.40. Step 5.
P.94
Thoracic Region: Prone Pressure
1. The patient is prone, preferably with the head turned toward the physician. (If the table has a face hole, the head may be kept in neutral.)
2. The physician stands at the side of the table opposite the side to be treated.
3. The physician places the thumb and thenar eminence of one hand on the medial aspect of the patient's thoracic paravertebral musculature overlying the transverse processes on the side opposite the physician (Fig. 7.41).
4. The physician places the thenar eminence of the other hand on top of the abducted thumb of the bottom hand or over the hand itself (Fig. 7.42).
5. Keeping the elbows straight and using body weight, the physician exerts a gentle force ventrally (downward) to engage the soft tissues, and then laterally, perpendicular to the thoracic paravertebral musculature (Fig. 7.43).
6. This force is held for a few
Figure 7.41. Step 3.
Figure 7.42. Step 4.
Figure 7.43. Step 5.

seconds and is slowly released.
7. Steps 5 and 6 can be repeated several times in a gentle, rhythmic, and kneading fashion.
8. The physician's hands are repositioned to contact different levels of the thoracic spine, and steps 5 to 7 are performed to stretch various portions of the thoracic paravertebral musculature.
9. This technique may also be performed using deep, sustained pressure.
10. Tissue tension is reevaluated to assess the effectiveness of the technique.
P.95
Thoracic Region: Prone Pressure With Two Hands (Catwalk)
1. The patient is prone on the treatment table, preferably with the head turned toward the physician. (If the table has a face hole, the head may be kept in neutral).
2. The physician stands at the side of the table, opposite the side to be treated.
3. The physician's hands are placed palm down side by side on the medial aspect of the patient's thoracic paravertebral musculature overlying the transverse processes on the side opposite the physician (Fig. 7.44).
4. The physician adds enough downward pressure to engage the underlying fascia and musculature with the caudal hand (Fig. 7.45).
5. The physician adds lateral pressure, taking the myo-fascial structures to their comfortable elastic limit (Fig. 7.46).
6. This force is held for several seconds and then slowly released.
7. As the pressure is being released with the caudal hand, the physician's cephalad hand begins to add a downward lateral
Figure 7.44. Step 3.
Figure 7.45. Step 4.
Figure 7.46. Step 5.

force (Fig. 7.47).
8. The combination of downward and lateral forces and the release of this pressure is alternately applied between the two hands.
9. The downward and lateral pressure directed by each hand should be rhythmically applied for several seconds.
Figure 7.47. Step 7.
P.96
Thoracic Region: Prone Pressure with Counterpressure
1. The patient lies prone on the treatment table, preferably with the head turned toward the physician. (If the table has a face hole, the head may be kept in neutral.)
2. The physician stands at either side of the table.
3. The physician places the thumb and thenar eminence of the caudad hand on the medial aspect of the patient's thoracic paravertebral musculature overlying the transverse processes on the side opposite the physician with the fingers pointing
Figure 7.48. Step 4.

cephalad.
4. The physician places the hypothenar eminence of the cephalad hand on the medial aspect of the patient's paravertebral musculature overlying the thoracic transverse processes, ipsilateral to the side on which the physician is standing, with the fingers pointing caudad (Figs. 7.48 and 7.49).
5. The physician exerts a gentle force with both hands, ventrally to engage the soft tissues and then in the direction the fingers of each hand are pointing, creating a separation and distraction effect (Fig. 7.50).
6. The degree of ventral force and longitudinal stretch exerted varies according to the patient's condition (e.g., severe osteoporosis), as rib cage trauma can occur.
7. This technique may be performed in a gentle, rhythmic, and kneading fashion or using a deep, sustained pressure.
8. The physician's hands may be lifted and repositioned at remaining levels of dysfunction and the cephalad and caudad
Figure 7.49. Step 4.
Figure 7.50. Step 5.

positions may be reversed.
9. Tissue tension is reevaluated to assess the effectiveness of the technique.
P.97
Thoracic Region: Side Leverage, Lateral Recumbent
1. The patient lies in the lateral recumbent (side lying) position, treatment side down.
2. The physician is seated on the side of the table, facing the patient.
3. The physician reaches over the patient's shoulder with the caudad hand and places
the thumb and thenar eminence on the medial aspect of the para-vertebral muscles overlying the upper thoracic transverse processes at the side on which the patient is lying (Fig. 7.51).
4. The physician reaches under the patient's face with the cephalad hand and contacts the periauricular region, cradling the head (Fig. 7.52).
5. The physician's caudad hand exerts a gentle force ventrally and laterally to engage the soft tissues while the cephalad hand gently lifts the head to produce cervical and upper thoracic side bending. The physician may add slight flexion until meeting the comfortable elastic limit of the tissues (Fig. 7.53).
6. Step 5 can be repeated several times in a gentle, rhythmic, and kneading fashion or using deep, sustained pressure.
7. The physician's caudad hand is repositioned to contact different levels of the upper thoracic spine and steps 5 and 6 are performed to stretch various portions of the upper thoracic paravertebral musculature
Figure 7.51. Step 3.
Figure 7.52. Step 4.
Figure 7.53. Step 5.
Figure 7.54. Step 7.

(Fig. 7.54).
P.98
Thoracic Region: Bilateral Thumb Pressure, Prone
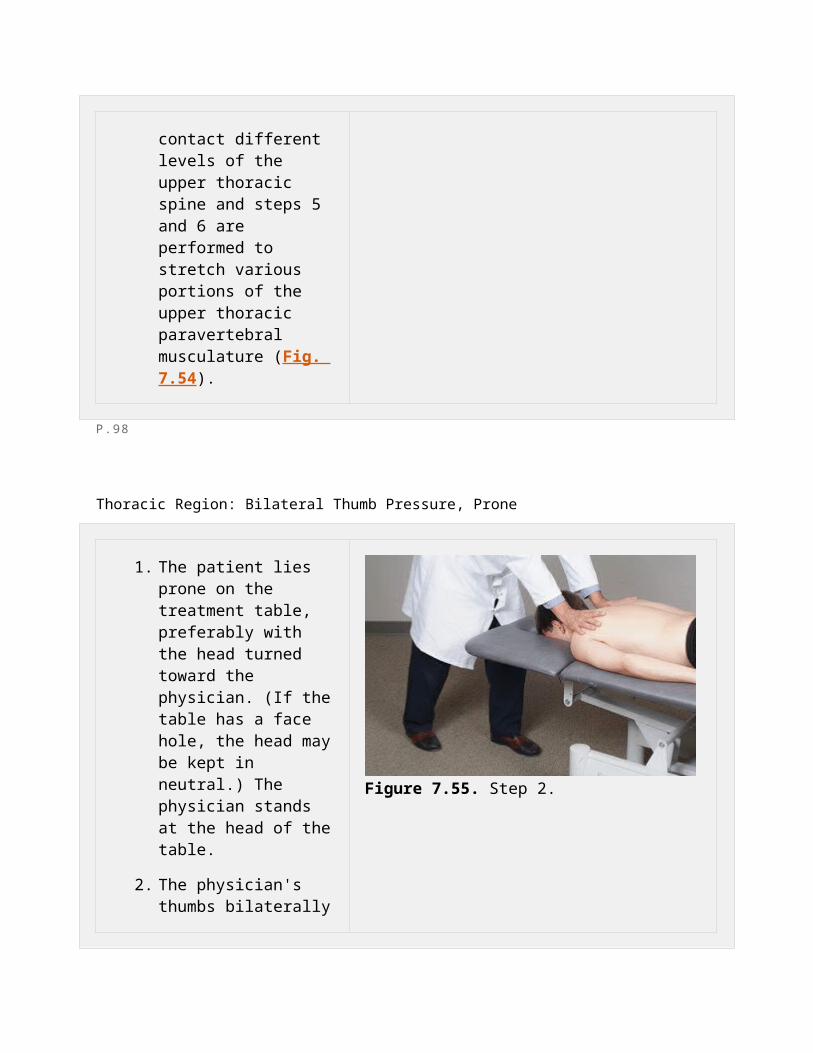
1. The patient lies prone on the treatment table, preferably with the head turned toward the physician. (If the table has a face hole, the head may be kept in neutral.) The physician stands at the head of the table.
2. The physician's thumbs bilaterally contact the paravertebral musculature overlying the transverse processes of T1 with the fingers fanned out laterally (Fig. 7.55).
3. The physician's thumbs exert a gentle ventral force to engage the soft tissues and add a caudal and slightly lateral force until meeting the comfortable elastic limits of the tissues (Fig. 7.56). Do not rub the skin, as it may be irritated.
4. This stretch is held for several seconds, then slowly released. Repeat in a gentle, rhythmic, and kneading fashion.
5. The thumbs are
Figure 7.55. Step 2.
Figure 7.56. Step 3.

repositioned over the transverse processes of each thoracic segment (T2, T3, and so on to T12) continuing this rhythmic kneading procedure to the apex of the thoracic kyphosis (usually T7-T8).
6. The physician then moves to the level of the patient's pelvis and faces the patient's head. The physician's thumbs are placed paraspinally over the transverse processes of T12 pointing cephalad with the fingers fanned out laterally (Fig. 7.57).
7. The physician repeats the kneading procedure from T12 to T1 or uses deep sustained pressure (Fig. 7.58).
8. The tissue tension is reevaluated to assess the effectiveness of the technique.
Figure 7.57. Step 6.
Figure 7.58. Step 7.
P.99
Thoracic Region: Trapezius, Inhibitory Pressure, Supine

1. The patient lies supine on the treatment table.
2. The physician sits at the head of the table.
3. The physician's hands are placed on each trapezius so that the thumbs (pads up) lie approximately two thumb's-breadths inferior to the posterior border of the trapezius and the index and third digits (pads down) rest on the anterior border of the trapezius two finger's-breadths inferiorly (Fig. 7.59). The thumbs and finger pads may be reversed in position if this is more comfortable for the physician (Fig. 7.60).
4. The physician slowly adds a squeezing force on the trapezius between the thumbs and fingers (Fig. 7.61).
5. This pressure is held until tissue texture changes are palpated or for 1 to 2 minutes.
Figure 7.59. Step 3.
Figure 7.60. Step 3, alternative position.
Figure 7.61. Step 4.
P.100
Thoracic Region: Upper Thoracic with Shoulder Block, Lateral Recumbent
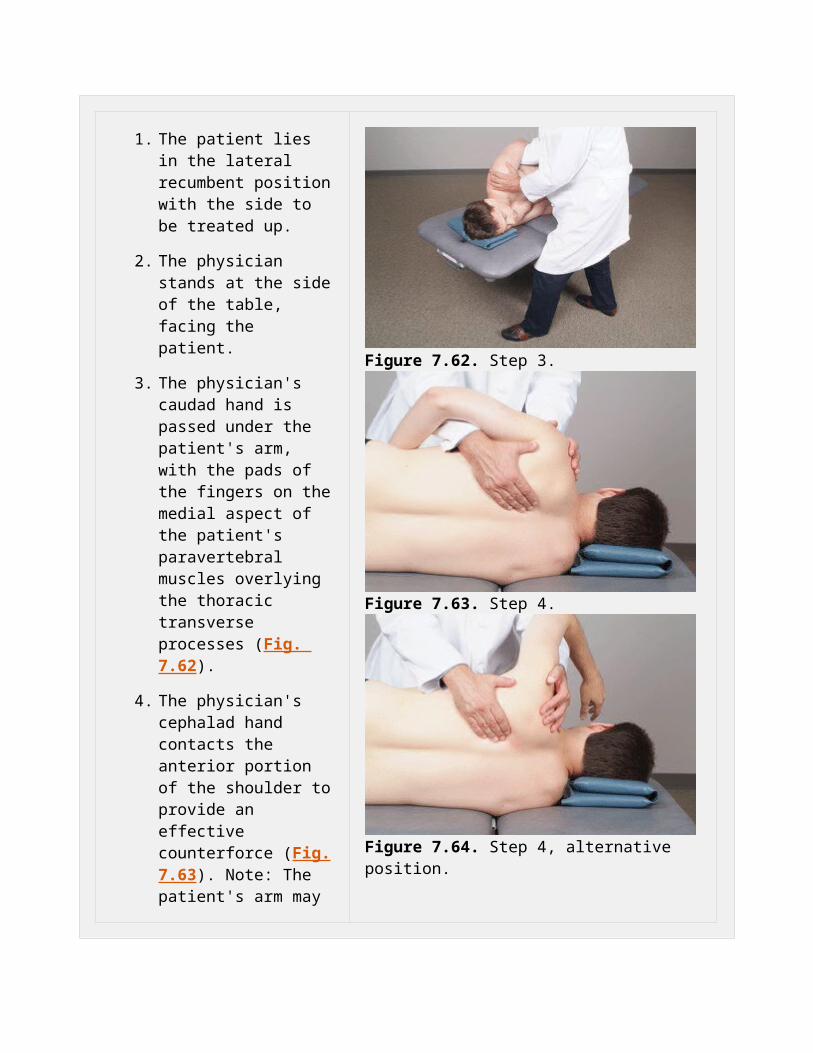
1. The patient lies in the lateral recumbent position with the side to be treated up.
2. The physician stands at the side of the table, facing the patient.
3. The physician's caudad hand is passed under the patient's arm, with the pads of the fingers on the medial aspect of the patient's paravertebral muscles overlying the thoracic transverse processes (Fig. 7.62).
4. The physician's cephalad hand contacts the anterior portion of the shoulder to provide an effective counterforce (Fig. 7.63). Note: The patient's arm may be flexed approximately 120 degrees and draped over the physician's shoulder-contacting arm as needed (Fig. 7.64).
5. The physician's caudad hand exerts a gentle force, ventrally to engage the soft tissues and laterally to create a perpendicular stretch of the thoracic para-vertebral musculature (Fig. 7.65).
6. This stretch is held for a few seconds and is then
Figure 7.62. Step 3.
Figure 7.63. Step 4.
Figure 7.64. Step 4, alternative position.

slowly released.
7. Steps 5 and 6 are repeated in a gentle, rhythmic, and kneading fashion.
8. The physician's caudad hand is repositioned to another affected level of the thoracic spine and steps 5 to 7 are performed at each affected level.
9. This technique may also be performed using deep, sustained pressure.
10. Tissue tension is reevaluated to assess the effectiveness of the technique.
Figure 7.65. Step 5.
P.101
Thoracic Region: Lower Thoracics Under the Shoulder, Lateral Recumbent

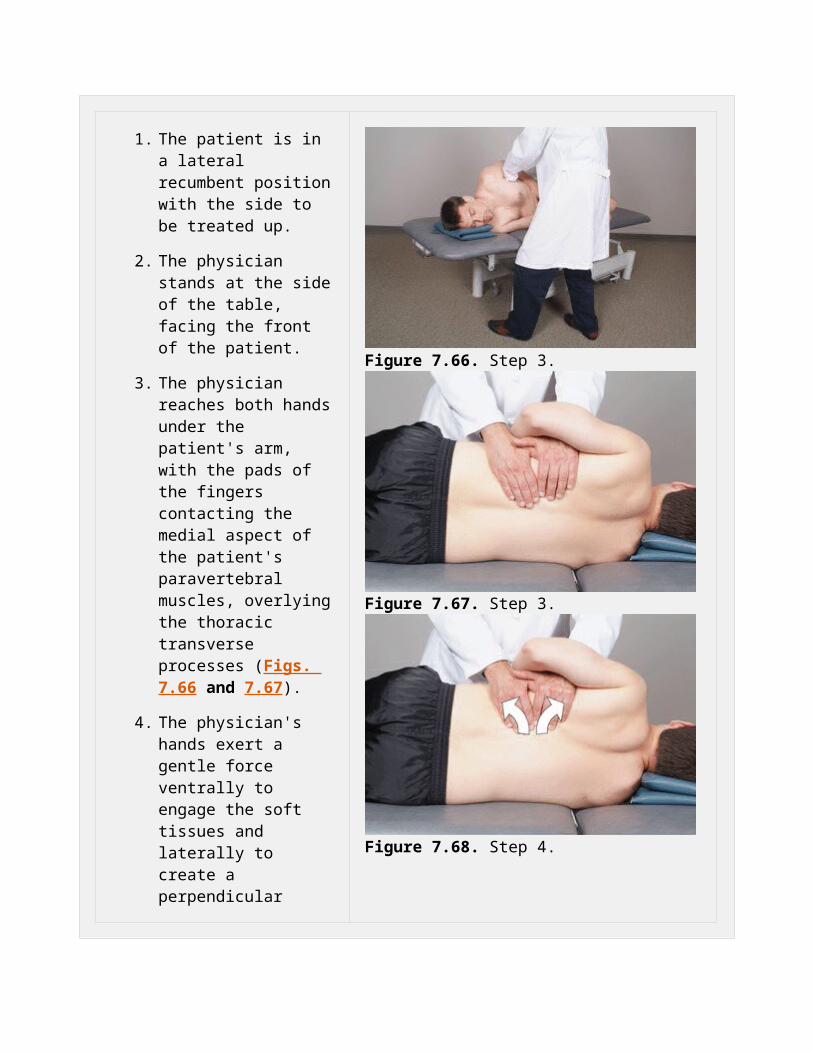
1. The patient is in a lateral recumbent position with the side to be treated up.
2. The physician stands at the side of the table, facing the front of the patient.
3. The physician reaches both hands under the patient's arm, with the pads of the fingers contacting the medial aspect of the patient's paravertebral muscles, overlying the thoracic transverse processes (Figs. 7.66 and 7.67).
4. The physician's hands exert a gentle force ventrally to engage the soft tissues and laterally to create a perpendicular stretch of the thoracic paravertebral musculature (Fig. 7.68).
5. This stretch is held for a few seconds and is slowly released.
6. Steps 4 and 5 are repeated in a gentle, rhythmic, and kneading fashion.
7. The physician's hands are repositioned to another affected level of the thoracic spine and steps 4 to 6 are performed to stretch various portions of the thoracic paravertebral musculature.
8. This technique may also be
Figure 7.66. Step 3.
Figure 7.67. Step 3.
Figure 7.68. Step 4.

performed using deep, sustained pressure.
9. Tissue tension is reevaluated to assess the effectiveness of the technique.
P.102
Thoracic Region: Over and Under Technique, Seated
1. The patient is seated with the arms crossed and the thumbs hooked into the antecubital fossae (Fig. 7.69).
2. The physician stands facing the patient.
3. The physician's hands reach under the patient's forearms and over the patient's shoulders, allowing the patient's forehead to rest on the forearms.
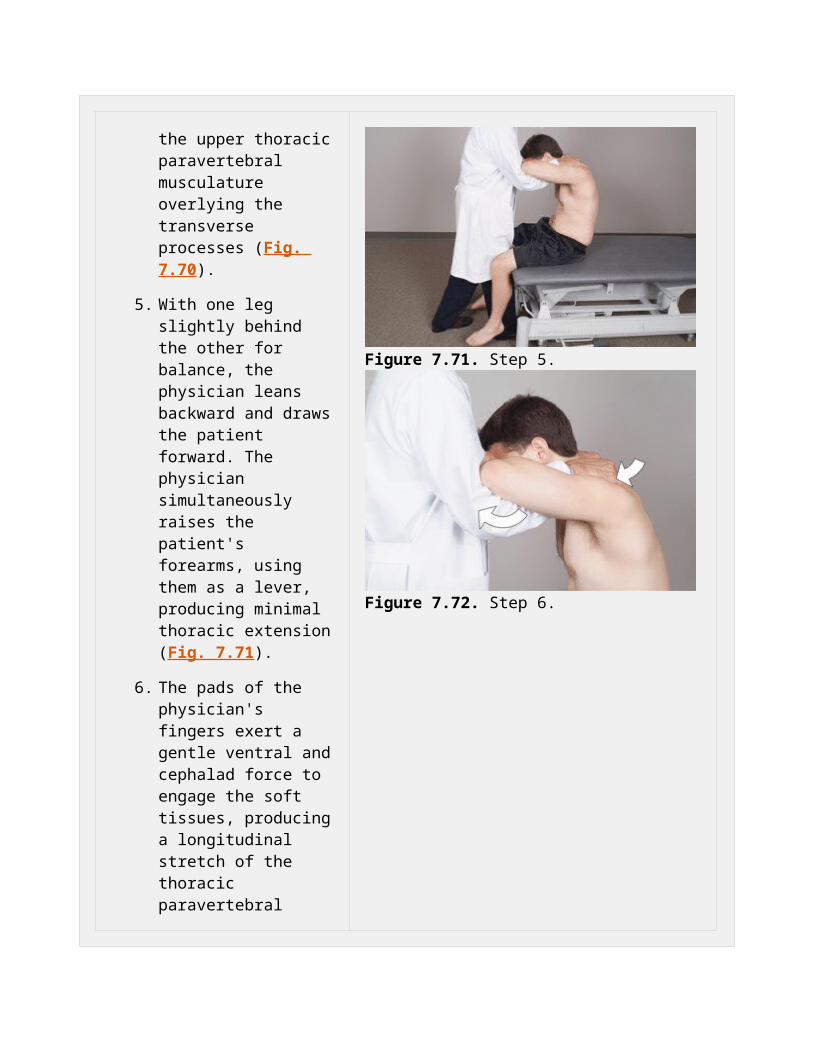
4. The pads of the physician's fingers contact the upper thoracic paravertebral musculature overlying the transverse processes (Fig. 7.70).
5. With one leg slightly behind the other for balance, the physician leans backward and draws the patient forward. The
Figure 7.69. Step 1.
Figure 7.70. Step 4.

physician simultaneously raises the patient's forearms, using them as a lever, producing minimal thoracic extension (Fig. 7.71).
6. The pads of the physician's fingers exert a gentle ventral and cephalad force to engage the soft tissues, producing a longitudinal stretch of the thoracic paravertebral musculature (Fig. 7.72).
7. Steps 5 and 6 may be repeated several times in a gentle, rhythmic, and kneading fashion or using deep, sustained pressure.
8. Tissue tension is reevaluated to assess the effectiveness of the technique.
Figure 7.71. Step 5.
Figure 7.72. Step 6.
P.103
Thoracic Region: Midthoracic Extension, Seated
1. The patient is seated on the end of the table with the hands clasped behind the neck.
2. The physician stands at the side of the patient.
3. The physician reaches under the patient's upper arms and grasps the patient's far elbow. The patient's other elbow rests on the physician's forearm near the antecubital fossa.
4. With the fingers pointing cephalad, the physician's other hand is cupped over the thoracic spinous processes, contacting the paravertebral musculature of one side with the thenar eminence and the other side with the hypothenar eminence (Figs. 7.73 and 7.74).
5. The physician exerts a gentle force ventrally and cephalad, engaging the soft tissues to produce a longitudinal stretch while the other hand elevates the patient's elbows to produce minimal thoracic extension (Fig. 7.75). CAUTION: DO NOT push directly down on the spinous processes or hyperextend the thoracic spine.
6. This technique may be performed in a gentle,
Figure 7.73. Step 4.
Figure 7.74. Step 4.
Figure 7.75. Step 5.

rhythmic fashion or with deep, sustained pressure.
7. The physician's dorsal hand is repositioned at different levels of the thoracic spine and steps 5 and 6 are performed to stretch various portions of the thoracic paravertebral musculature.
8. Tissue tension is reevaluated to assess the effectiveness of the technique.
P.104
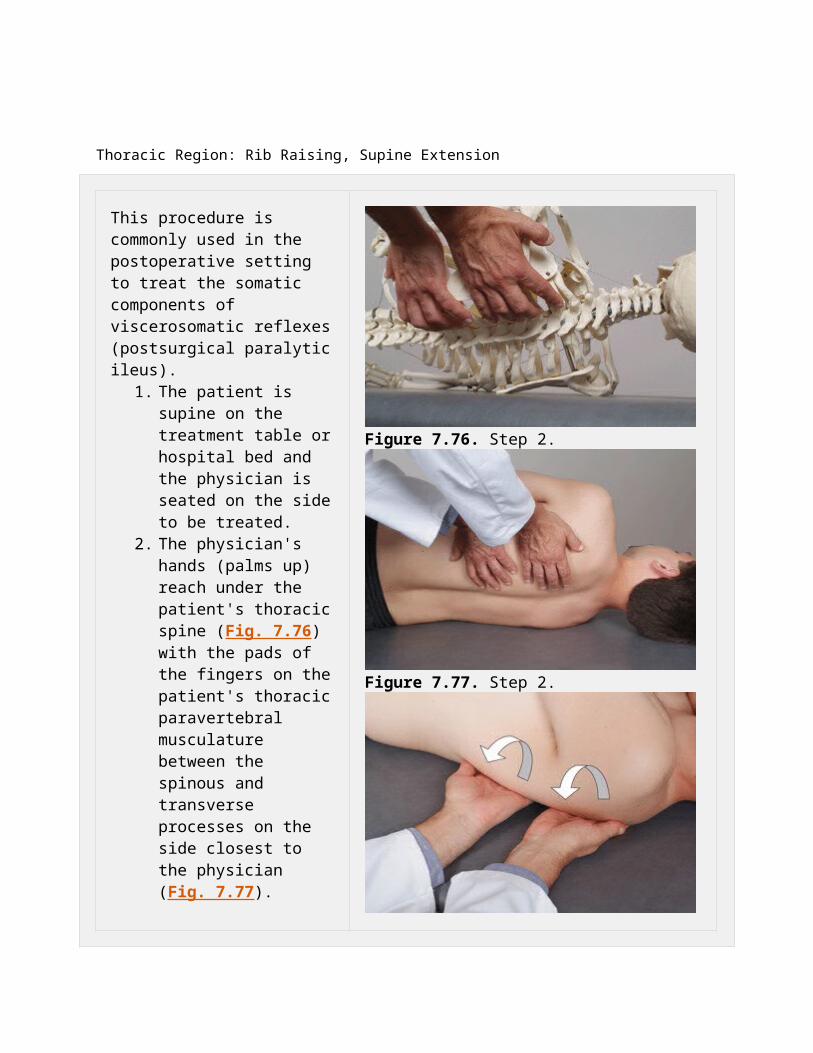
Thoracic Region: Rib Raising, Supine Extension
This procedure is commonly used in the postoperative setting to treat the somatic components of viscerosomatic reflexes (postsurgical paralytic ileus).
1. The patient is supine on the treatment table or hospital bed and the physician is seated on the side to be treated.
2. The physician's hands (palms up) reach under the patient's thoracic spine (Fig. 7.76) with the pads of the fingers on the patient's thoracic paravertebral musculature between the spinous and transverse processes on the side
Figure 7.76. Step 2.

closest to the physician (Fig. 7.77).
3. The physician exerts a gentle force ventrally to engage the soft tissues and laterally perpendicular to the thoracic paravertebral musculature. This is facilitated by a downward pressure through the elbows on the table, creating a fulcrum to produce a ventral lever action at the wrists and hands, engaging the soft tissues. The fingers are simultaneously drawn toward the physician, producing a lateral stretch perpendicular to the thoracic paravertebral musculature (Fig. 7.78).
4. This stretch is held for several seconds and is slowly released.
5. Steps 3 and 4 are repeated several times in a gentle, rhythmic, and kneading fashion.
6. The physician's hands are repositioned to contact the different levels of the thoracic spine and steps 3 to 6 are performed to stretch various portions of the thoracic paravertebral musculature.
7. This technique may also be performed using deep,
Figure 7.77. Step 2.
Figure 7.78. Step 3.

sustained pressure.
8. Tissue tension is reevaluated to assess the effectiveness of the technique.
P.105
Lumbar Region: Prone Pressure
1. The patient is prone, with the head turned toward the physician. (If the table has a face hole, keep the head in neutral.)
2. The physician stands at the side of the table opposite the side to be treated (Fig. 7.79).
3. The physician places the thumb and thenar eminence of one hand on the medial aspect of the patient's lumbar paravertebral musculature overlying the transverse processes on the side opposite the physician (Fig. 7.80).
4. The physician places the thenar eminence of the other hand on the abducted thumb of the bottom hand (Fig. 7.81).
5. Keeping the elbows straight and using body
Figure 7.79. Step 2.
Figure 7.80. Step 3.
weight, the physician exerts a gentle force ventrally to engage the soft tissues and laterally perpendicular to the lumbar paravertebral musculature (Fig. 7.82).
6. This force is held for several seconds and is slowly released.
7. Steps 5 and 6 can be repeated several times in a gentle, rhythmic, and kneading fashion.
8. The physician's hands are repositioned to contact different levels of the lumbar spine, and steps 5 to 7 are performed to stretch various portions of the lumbar paravertebral musculature.
9. This technique may also be performed using deep, sustained pressure.
10. Tissue tension is reevaluated to assess the effectiveness of the technique.
Figure 7.81. Step 4.
Figure 7.82. Step 5.
P.106
Lumbar Region: Prone Traction

1. The patient is prone with the head turned toward the physician. (If the table has a face hole, keep the head in neutral.)
2. The physician stands at the side of the table at the level of the patient's pelvis.
3. The heel of the physician's cephalad hand is placed over the base of the patient's sacrum with the fingers pointing toward the coccyx (Fig. 7.83).
4. The physician does one or both of the following:
a. The physician's caudad hand is placed over the lumbar spinous processes with the fingers pointing cephalad, contacting the paravertebral soft tissues with the thenar and hypothenar eminences (Fig. 7.84)
b. The hand may be placed to one side of the spine, contacting the paravertebral soft tissues on the far side of the lumbar spine with the thenar eminence or
Figure 7.83. Step 3.
Figure 7.84. Step 4a.
Figure 7.85. Step 5.
the near side with the hypothenar eminence.
5. The physician exerts a gentle force with both hands ventrally to engage the soft tissues and to create a separation and distraction effect in the direction the fingers of each hand are pointing (Fig. 7.85). Do not push directly down on the spinous processes.
6. This technique may be applied in a gentle, rhythmic, and kneading fashion or using deep, sustained pressure.
7. The physician's caudad hand is repositioned at other levels of the lumbar spine and steps 4 to 6 are repeated.
8. Tissue tension is reevaluated to assess the effectiveness of the technique.
P.107

Lumbar Region: Bilateral Thumb Pressure, Prone
1. The patient is prone, with the head turned toward the physician. (If the table has a face hole, keep the head in neutral.)
2. The physician stands at the side of the table at the level of the patient's thighs or knees.
3. The physician's thumbs are placed on both sides of the spine, contacting the paravertebral muscles overlying the transverse processes of L5 with the fingers fanned out laterally (Fig. 7.86).
4. The physician's thumbs exert a gentle force ventrally to engage the soft tissues cephalad, and laterally until the barrier or limit of tissue motion is reached (Fig. 7.87). Note: Do not rub the skin with your thumbs, as this will irritate or chafe it.
5. This stretch is held for several seconds, is slowly released, and is then repeated in a gentle, rhythmic, and kneading fashion.
6. The physician's thumbs are repositioned over the
Figure 7.86. Step 4.
Figure 7.87. Step 4.

transverse processes of each lumbar segment (L4, L3, L2, then L1) and steps 4 and 5 are repeated to stretch the various portions of the lumbar paravertebral musculature.
7. This technique may also be performed using deep, sustained pressure.
8. Tissue tension is reevaluated to assess the effectiveness of the technique.
P.108
Lumbar Region: Scissors Technique, Prone
1. The patient is prone, with the head turned toward the physician. (If the table has a face hole, keep the head in neutral.)
2. The physician stands at the side of the table opposite the side to be treated (Fig. 7.88).
3. On the side to be treated, the physician's caudad hand reaches over to grasp the patient's leg proximal to the knee or at the tibial tuberosity (Fig. 7.89).
4. The physician lifts the patient's leg, extending the
Figure 7.88. Step 4.
hip and adducting it toward the other leg to produce a scissors effect (Fig. 7.90).
5. The physician's caudad hand may be placed under the far leg and then over the proximal leg so that the patient's leg can support the physician's forearm.
6. The physician places the thumb and thenar eminence of the cephalad hand on the patient's para-vertebral musculature overlying the lumbar trans-verse processes to direct a gentle force ventrally and laterally to engage the soft tissues while simultaneously increasing the amount of hip extension and adduction (Fig. 7.91).
7. This force is held for several seconds and is slowly released.
8. Steps 6 and 7 are repeated several times in a slow, rhythmic, and kneading fashion.
9. The physician's cephalad hand is then repositioned to contact other levels of the lumbar spine and steps 6 to 8 are performed to stretch the various portions of the lumbar paravertebral musculature.
10. This technique may also be
Figure 7.89. Step 4.
Figure 7.90. Step 5.
Figure 7.91. Step 5.

performed using deep, sustained pressure.
11. Tissue tension is reevaluated to assess the effectiveness of the technique.
P.109
Lumbar Region: Prone Pressure with Counterleverage
1. The patient is prone with the head turned toward the physician. (If the table has a face hole, keep the head in neutral.)
2. The physician stands at the side of the table opposite the side to be treated (Fig. 7.92).
3. The physician places the thumb and thenar eminences of the cephalad hand on the medial aspect of the paravertebral muscles overlying the lumbar transverse processes on the side opposite the physician.
4. The physician's caudad hand contacts the patient's anterior superior iliac spine on the side to be treated and gently lifts toward the ceiling (Fig. 7.93).
5. To engage the soft tissues,
Figure 7.92. Step 2.
Figure 7.93. Step 4.
the physician's cephalad hand exerts a gentle force ventrally and laterally, perpendicular to the lumbar paravertebral musculature (Fig. 7.94).
6. This force is held for several seconds and is slowly released.
7. Steps 4 to 6 are repeated several times in a slow, rhythmic, and kneading fashion.
8. The physician's cephalad hand is then repositioned to contact different levels of the lumbar spine and steps 4 to 6 are performed to stretch various portions of the lumbar paravertebral musculature.
9. This technique may also be performed using deep, sustained pressure.
10. Tissue tension is reevaluated to assess the effectiveness of the technique.
Figure 7.94. Step 5.
P.110
Lumbar Region: Lateral Recumbent Position
1. The patient lies in the lateral recumbent position with the treatment side up.
2. The physician stands at the side of the table, facing the front of the patient.
3. The patient's knees and hips are flexed, and the physician's thigh is placed against the patient's infrapatellar region (Fig. 7.95).
4. The physician reaches over the patient's back and places the pads of the fingers on the medial aspect of the patient's paravertebral muscles overlying the lumbar transverse processes (Fig. 7.96).
5. To engage the soft tissues, the physician exerts a gentle force ventrally and laterally to create a perpendicular stretch of the lumbar paravertebral musculature (Fig. 7.97).
6. While the physician's thigh against the patient's knees may simply be used for bracing, it may also be flexed to provide a combined bowstring and longitudinal traction force on the paravertebral musculature. This technique may be applied in a gentle rhythmic and
Figure 7.95. Step 3.
Figure 7.96. Step 4.
Figure 7.97. Step 5.

kneading fashion or with deep, sustained pressure.
7. This technique may be modified by bracing the anterior superior iliac spine with the caudad hand while drawing the paravertebral muscles ventrally with the cephalad hand (Fig. 7.98).
8. The physician's hands are repositioned to contact different levels of the lumbar spine and steps 4 to 6 are performed to stretch various portions of the lumbar paravertebral musculature.
9. Tissue tension is reevaluated to assess the effectiveness of the technique.
Figure 7.98. Step 7.
P.111
Lumbar Region: Supine Extension

1. The patient is supine. (The patient's hips and knees may be flexed for comfort.)
2. The physician is seated at the side to be treated.
3. The physician's hands (palms up) reach under the patient's lumbar spine, with the pads of the physician's fingers on the patient's lumbar paravertebral musculature between the spinous and transverse processes on the side closest the physician (Figs. 7.99 and 7.100).
4. To engage the soft tissues, the physician exerts a gentle ventral and lateral force perpendicular to the thoracic paravertebral musculature. This is facilitated by downward pressure through the elbows on the table, creating a fulcrum to produce a ventral lever action at the wrists and hands (Fig. 7.101).
5. The fingers are simultaneously drawn toward the physician, producing a lateral stretch perpendicular to the thoracic paravertebral musculature.
6. This stretch is held for several seconds and is
Figure 7.99. Step 4.
Figure 7.100. Step 4.
Figure 7.101. Step 5.
slowly released.
7. Steps 4 to 6 are repeated several times in a gentle, rhythmic, and kneading fashion.
8. The physician's hands are repositioned to contact the different levels of the lumbar spine and steps 4 to 6 are performed to stretch various portions of the lumbar paravertebral musculature.
9. This technique may also be performed using deep, sustained pressure.
10. Tissue tension is reevaluated to assess the effectiveness of the technique.
P.112
Lumbar Region: Long-Lever Counterlateral with Knees, Supine

1. The patient lies supine on the treatment table.
2. The physician's caudad hand flexes the patient's hips and knees to approximately 90 degrees each (Fig. 7.102).
3. The physician's cephalad hand reaches over the patient and under the patient's lumbar region in the area of the dysfunction.
4. The physician controls the patient's lower extremities bilaterally at the tibial tuberosities and slowly moves the knees laterally away from the physician (Fig. 7.103).
5. As the patient's knees are moved away from the physician, the physician monitors the tension directed into the paravertebral lumbar tissues.
6. The physician then gently but firmly pulls upward (anteriorly) into the patient's paraspinal tissues until the comfortable elastic limits of the tissues are met (Fig. 7.104).
7. The physician next moves the patient's knees slightly farther away, holds this position for several seconds, and then slowly releases the pressure (Fig.
Figure 7.102. Step 2.
Figure 7.103. Step 4.
Figure 7.104. Step 6.

7.105).
8. This is repeated in a rhythmic, alternating pressure and release fashion until the tissue tension is released or up to 2 minutes.
Figure 7.105. Step 7.
P.113
Lumbar Region: Left, Lumbar Paravertebral Muscle Spasm, Myofascial Hypertonicity, Seated
1. The patient is seated on the end of the table with the physician standing behind the patient and to the right side, opposite the dysfunction.
2. The patient is instructed to place the left hand behind the neck and grasp the left elbow with the right hand. The physician's right hand reaches under the patient's right axilla and grasps the patient's left upper arm (Fig. 7.106).
3. The physician's left thumb and thenar eminence are placed on the medial aspect of the patient's left paravertebral musculature
Figure 7.106. Step 2.

overlying the lumbar transverse processes (Fig. 7.107).
4. The patient is instructed to lean forward and relax, allowing the body weight to rest onto the physician's right arm.
5. To engage the soft tissues, the physician's left hand directs a gentle ventral and lateral force to create a perpendicular stretch while rotating the patient to the right with the physician's right arm and hand (Fig. 7.108).
6. This stretch is held for several seconds and is slowly released.
7. Steps 5 and 6 are repeated several times in a gentle, rhythmic, and kneading fashion.
8. The physician's left hand is repositioned to contact remaining dysfunctional levels of the lumbar spine and steps 5 to 7 are repeated.
9. This technique may also be performed using deep, sustained pressure.
10. Tissue tension is reevaluated to assess the effectiveness of the technique.
Figure 7.107. Step 3.
Figure 7.108. Step 5.
P.114