朱文光 教授 學歷 國立台灣大學中文學士( 1994 ) 國立中興大學文學碩士( 1997 ) 國立中正大學文學博士( 2002 ) 經歷 國立中正大學中國文學系講師(
date post
19-Dec-2015Category
view
316download
10
Linux 系統安全
講師:施勢帆 博士

2
老師簡介
姓名:施勢帆學歷:國立台灣科技大學電機工程研究所博士 經歷 :亞東技術學院電機系專任副教授曾任:亞東技術學院電子計算機中心主任 專長:寬頻網路、開放原始碼軟體系統 網站: http://oss.oit.edu.tw
E-mail : [email protected]
Phone : (02)77384258-16

3
課程內容
1) Linux 安全性概論。2) 駭客攻擊及駭客工具。3) 最少套件安裝。4) SSL_Webmin + SSH 。5) 網路管理 + Ntop 。6) PGP/GPG 。7) 防火牆 + NAT 。8) 安全工具9) 郵件管理10) 入侵偵測 -NIDS 。11) 記錄與稽核追蹤。12) 備份

4
課程練習1.System Installation with Minimal required packages.2.Autoupdate3.Webmin with SSL4.Network Management and ntop5.GPG6.NAT7.iptables8.Security Tools9.OpenWebmail10.MailScanner11.NIDS12.backup

系統安全概論TCSEC – 電腦系統安全評估準則
身分識別自主式存取控制強制式存取控制系統稽核安全策略安全保證
入侵原因排行 入侵種類
駭客入侵電腦病毒入侵內賊入侵
網路攻擊手法Vulnerabilities

入侵原因排行 ( From NAI)
1.Hosts running unnecessary services; e.g. ftp, sendmail2.Unpatched, outdated application software and hardware firmw
are3.Information leakage through services such as: gopher, finger, t
elnet, SNMP, SMTP, netstat, etc.4.Misappropriated trust relationships; e.g. rsh, rlogin, rexec5.Misconfigured firewalls or router ACL's (Access Control List
s)6.Weak passwords7.Misconfigured web servers8.Improperly imported file systems9.Misconfigured or unpatched NT systems10.Unsecured remote access points; e.g. remote access servers,
modems pools, etc.

RedHatVulnerabilities
2000-06-09: 3R Soft MailStudio 2000 Multiple Vulnerabilities
2000-06-07: Multiple Linux Vendor restore Buffer Overflow Vulnerability
2000-06-05: BRU BRUEXECLOG Environmental Variable Vulnerability
2000-05-29: Xlockmore 4.16 Buffer Overflow Vulnerability
2000-05-24: HP Web JetAdmin Directory Traversal Vulnerability
2000-05-24: HP Web JetAdmin 6.0 Printing DoS Vulnerability
2000-05-24: MDBMS Buffer Overflow Vulnerability
2000-05-18: Lotus Domino Server ESMTP Buffer Overflow Vulnerability
2000-05-18: XFree86 Xserver Denial of Service Vulnerability
2000-05-16: Multiple Vendor Kerberos 5/Kerberos 4 Compatibility krb_rd_req() Buffer Overflow Vulnerability
Etc.

網路攻擊手法
Ping of DeathOut of Bound DataMail BombingEmail SpammingFloodTeardropSYN FloodLANDDenial of ServiceDDOS
…Etc.
9
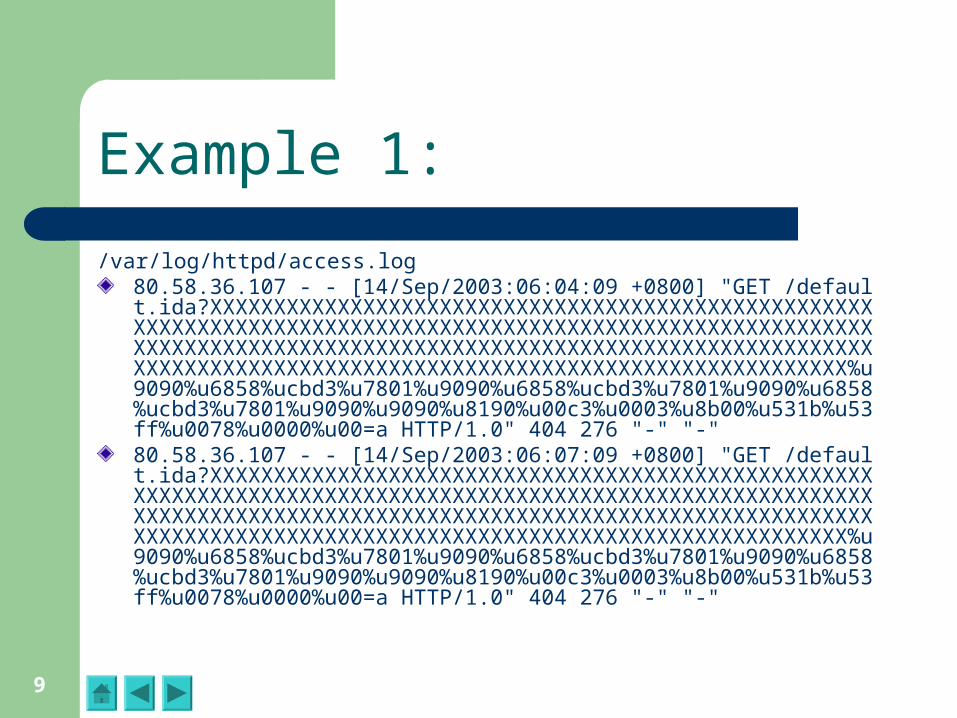
Example 1:
/var/log/httpd/access.log80.58.36.107 - - [14/Sep/2003:06:04:09 +0800] "GET /default.ida?XXXXXXXXXXXXXXXXXXXXXXXXXXXXXXXXXXXXXXXXXXXXXXXXXXXXXXXXXXXXXXXXXXXXXXXXXXXXXXXXXXXXXXXXXXXXXXXXXXXXXXXXXXXXXXXXXXXXXXXXXXXXXXXXXXXXXXXXXXXXXXXXXXXXXXXXXXXXXXXXXXXXXXXXXXXXXXXXXXXXXXXXXXXXXXXXXXXXXXXXXXXXXXXXXXXXXXXXXXXXXXXX%u9090%u6858%ucbd3%u7801%u9090%u6858%ucbd3%u7801%u9090%u6858%ucbd3%u7801%u9090%u9090%u8190%u00c3%u0003%u8b00%u531b%u53ff%u0078%u0000%u00=a HTTP/1.0" 404 276 "-" "-"80.58.36.107 - - [14/Sep/2003:06:07:09 +0800] "GET /default.ida?XXXXXXXXXXXXXXXXXXXXXXXXXXXXXXXXXXXXXXXXXXXXXXXXXXXXXXXXXXXXXXXXXXXXXXXXXXXXXXXXXXXXXXXXXXXXXXXXXXXXXXXXXXXXXXXXXXXXXXXXXXXXXXXXXXXXXXXXXXXXXXXXXXXXXXXXXXXXXXXXXXXXXXXXXXXXXXXXXXXXXXXXXXXXXXXXXXXXXXXXXXXXXXXXXXXXXXXXXXXXXXXX%u9090%u6858%ucbd3%u7801%u9090%u6858%ucbd3%u7801%u9090%u6858%ucbd3%u7801%u9090%u9090%u8190%u00c3%u0003%u8b00%u531b%u53ff%u0078%u0000%u00=a HTTP/1.0" 404 276 "-" "-"

10
Example 2: 駭客光碟工具片

11
Ethernet 接收端如何處理封包

IP 表頭內容

TCP 建立連線 ( Handshaking ) 3 步驟

TCP 中止連線 4 步驟

安全系統安裝選擇高品質的伺服器系統安裝套件的要求
SecurityAvailabilityCommercially SupportedPerformance and TuningSimplicity
安裝過程注意事項Do not Connect to the NetworkInstallation Type - Custom Disk Partitioning and FormattingInstalling LILO User Account ConfigurationAuthentication on ConfigurationPackage Selection and the InstallGetting and Installing Patches

安裝後的安全設定
Securing Services
Securing LILOlinux init=/bin/sh ? password chmod 640 /etc/lilo.conf
File Permissions Securing and Managing suid root binaries
find / -type f -perm +6000 -exec ls -l {} \; > suidfiles.txt chmod -s programname
Other Necessary Steps/etc/passwd /etc/securetty /etc/security/
Bastille LinuxSubscribe mail list

安全網路服務
SSH / SNP / PAMTCP-Wrappers Using Passive Fingerprinting (TTL, Window Size, DF, TOS)Stunnel
/usr/sbin/stunnel –p /etc/ssl/certs/server.pem –d spop3 –l /usr/sbin/ipop3d
Apache-SSLChrootPGP/GPG Key Server

安全稽核機制
/etc/syslog.confFacilitySyslog levelAction
tcplogdicmpinfologcheckTripwire
Intrusion DetectionDamage Asseccment and RecoveryPolicy ComplianceSoftware VerificationForensics
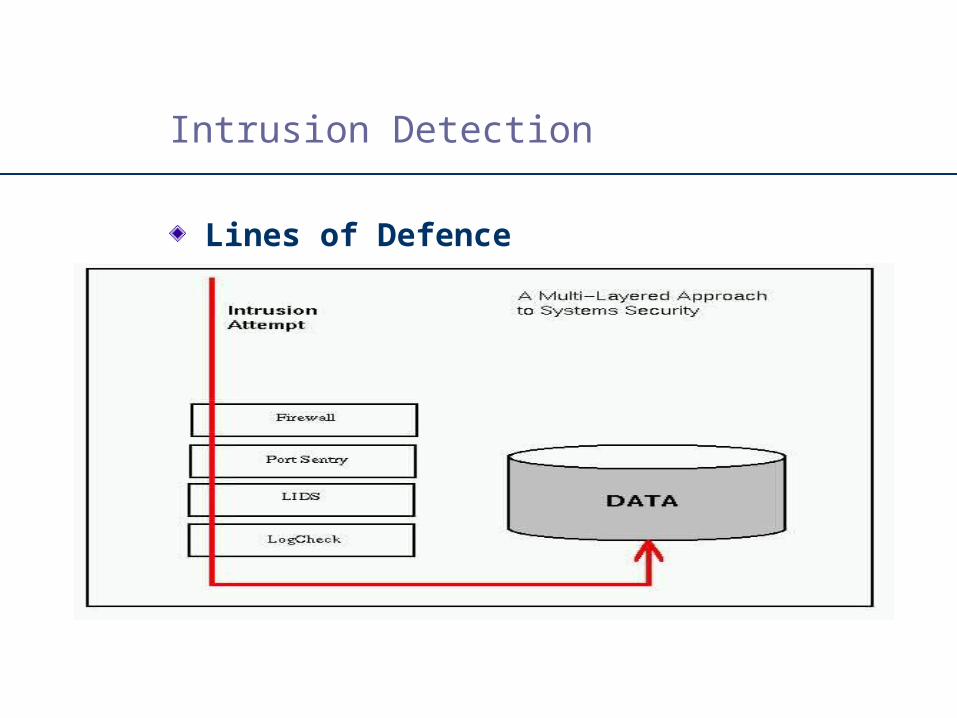
Intrusion Detection
Lines of Defence

Firewalling
Firewalls offer the outermost layer of protection for a network, providing a basic barrier and restricting points of access.

LIDS
LIDS is an intrusion detection and prevention system that resides within the Linux kernel.
LIDS' protection is aimed at preventing the root user (who would normally have access to the entire system) from tampering with important parts of the system. LIDS' most important features include increased file system protection, protection against direct port access or direct memory access, protection against raw disk access, and protection of log files. LIDS also prevents certain system actions, such as installing a packet sniffer or changing firewall rules.

22
Securing-Optimizing-Linux-The-Ultimate-Solution
1-10
23-24
52
63-101
175-268
302-361
395-415
632-659
769-787 (pages)

23
自動更新
安裝rpm -ivh autoupdate-x.x.x-x.noarch.rpmrpm -ivh autoupdate-cfg-redhat-x.x.x-x.noarch.rpm
組態vi /etc/autoupdate.d/redhat.dld
Host=ftp.redhat.comDir=/pub/redhat/linux/updates/#DistVersion#/#DistLang#/os//
為Host=linux.sinica.edu.tw
Dir=/redhat/updates/#DistVersion#/#DistLang#/os//

24
自動更新 (cont)
執行autodldcd /var/spool/autoupdaterpm -Uvh kernel-2.4.x-x.x.i686.rpm
自動執行cd /etc/cron.dailyvi autodld
#!/bin/sh/usr/sbin/autodld
chmod 755 autodld
25
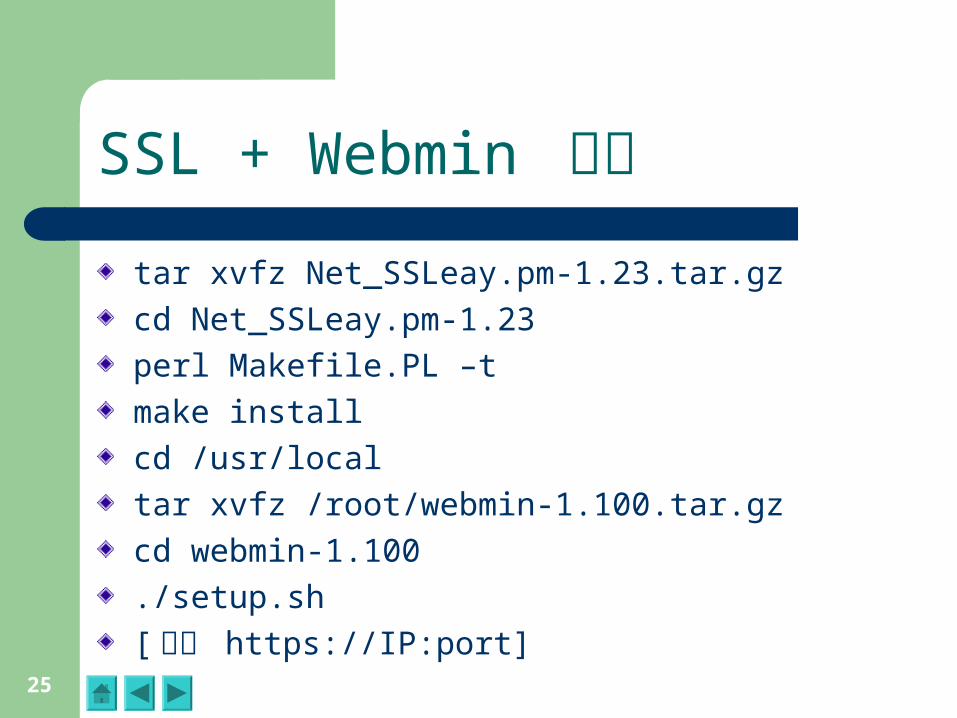
SSL + Webmin 安裝
tar xvfz Net_SSLeay.pm-1.23.tar.gz
cd Net_SSLeay.pm-1.23
perl Makefile.PL –t
make install
cd /usr/local
tar xvfz /root/webmin-1.100.tar.gz
cd webmin-1.100
./setup.sh
[ 測試 https://IP:port]

26
TCPWRAPPER
1) 關閉所有 : # echo "ALL: ALL" >> /etc/hosts.deny
2) 視個別開放 : # vi /etc/hosts.allow
ALL: 127.0.0.1, localhostsshd: ALLin.ftpd: ALLsendmail: ALLipop3d: 192.168.
* 註 : 這樣的設計並不對外提供 pop 服務。如果 pop 主機不是和內部網路直接相連接﹐同時內部網路透過 NAT 連線至 pop 主機的話﹐請將 192.168. 改為 NAT 主機的外部 IP 。

27
Ntop
安 裝tar xvfz Net-SNMP-4.1.2.tar.gzcd Net-SNMP-4.1.2perl Makefile.PLmake installrpm -ivh --nodeps rrdtool-1.0.41-1.8.0.ntop.i386.rpmrpm -ivh --nodeps ntop-2.2-0.i386.rpmln -sf /lib/libssl.so.0.9.7a /lib/libssl.so.2ln -sf /lib/libcrypto.so.0.9.7a /lib/libcrypto.so.2mkdir /var/ntopman ntop
執行ntop -d

28
Ntop (cont)
29
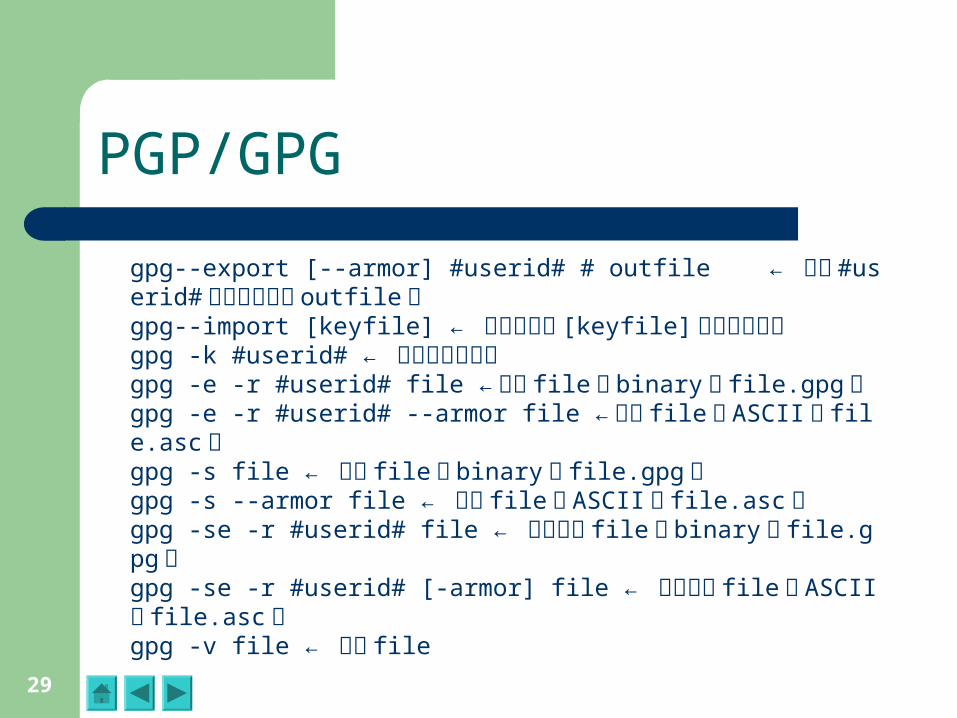
PGP/GPG
gpg--export [--armor] #userid# # outfile ← 取出 #userid# 的公開鑰匙至 outfile 中gpg--import [keyfile] ← 將公開鑰匙 [keyfile] 加入鑰匙環中gpg -k #userid# ← 列印出公開鑰匙gpg -e -r #userid# file ← 加密 file 至 binary 檔 file.gpg 中gpg -e -r #userid# --armor file ← 加密 file 至 ASCII 檔 file.asc 中gpg -s file ← 加簽 file 至 binary 檔 file.gpg 中gpg -s --armor file ← 加簽 file 至 ASCII 檔 file.asc 中gpg -se -r #userid# file ← 加密加簽 file 至 binary 檔 file.gpg 中gpg -se -r #userid# [-armor] file ← 加密加簽 file 至 ASCII 檔 file.asc 中gpg -v file ← 解密 file

30
iptables – IP 封包過濾管理

31
iptables – IP 封包過濾管理 (cont)
-j MASQUERADE
用於 tablesc 中的 nat 的 POSTROUTING 規則鏈中,告訴 KERNEL 去偽裝封包,用來做 ip 偽裝 (NAT)
範例:iptables –t nat –A POSTROUTING -s 192.168.1.0/24 -j MASQUERADE
說明:將來源 192.168.1.X 這個網段做 ip 偽裝,對外轉址。

32
Monitoring & system Integrity Tools
sXid
Logcheck
PortSentry
Tripwire
logwatch

33
tripwire
rpm -ivh /mnt/cdrom/RedHat/RPMS/tripwire-2.3.x-x.i386.rpm
cd /etc/tripwire/
./twinstall.sh
tripwire --init

34
Twipwire (cont)
1) 需要的時候﹐執行如下命令檢查﹕ /usr/sbin/tripwire –check
2) 並定期檢查 root 的信箱﹐以確定 tripwire 資訊被正確的關注。
3) 如果您對檔案進行過更新﹐可以從上兩個步驟中獲得資訊。 假如您確定報告所列的修改是必須且安全的﹐而不希望再次收到其報告﹐ 那可以先在 /var/lib/tripwire/report/ 目錄內﹐找到關於本機的最新報告﹐ 例如﹕

35
Twipwire (cont)
/var/lib/tripwire/report/your.machine.name-20020326-040526.twr 執行如下命令來編輯這個檔
(預設是 vi 模式 ) ﹕/usr/sbin/tripwire -m u -r \ /var/lib/tripwire/report/your.machi
ne.name-20020326-040526.twr
退出 vi 模式並輸入密碼就能更新資料庫了。

36
Openwebmail
安裝tar xvfz CGI.pm-2.74.tar.gzcd CGI.pm-2.74perl Makefile.PLmake installcd ..tar xvfz MIME-Base64-2.12.tar.gzcd MIME-Base64-2.12perl Makefile.PLmake installcd ..

37
Openwebmail (cont)
tar xvfz Text-Iconv-1.2.tar.gz
cd Text-Iconv-1.2
perl Makefile.PL
make install
cd ..
rpm -ivh perl-suidperl-5.8.0-88.i386.rpm
rpm -ivh openwebmail-2.10-1.i386.rpm

38
Openwebmail (cont)
cd /var/www/cgi-bin/openwebmail/vi etc/openwebmail.conffrom dbm_ext .db dbmopen_ext none dbmopen_haslock no
default_iconset Cool3D.Englishto dbm_ext .db dbmopen_ext %dbm_ext% dbmopen_haslock yes
default_language zh_TW.Big5default_iconset Cool3D.Chinese.Traditional
./openwebmail-tool.pl --init'

39
Openwebmail (cont)
vi /etc/httpd/conf/httpd.conf
修改AddDefaultCharset ISO-8859-1
為AddDefaultCharset zh_TW.Big5
cp save_user.cgi /usr/local/webmin-1.100/useradmin/save_user.cgi
/etc/rc.d/init.d/httpd restart
http://IP/cgi-bin/openwebmail/openwebmail.pl
<meta http-equiv="refresh" content="0; url=/cgi-bin/openwebmail/openwebmail.pl >]

40
Openwebmail (cont)

41
MailScanner + Sophos
tar xvfz MailScanner-x.xx-x.rpm.tar.gzcd MailScanner-x.xx-x./Update-MakeMaker.sh./install.shcd ..tar xvf linux.intel.libc6.tarcd sav-install/useradd -M -s /bin/true sweep./install.shcd ..cd idecp * /usr/local/sav/icheckd –d

42
MailScanner + Sophos (cont)
vi /etc/MailScanner/MailScanner.conf修改
Virus Scanners = none為
Virus Scanners = sophos
vi virus.scanners.conf修改僅剩
sophos /usr/lib/MailScanner/sophos-wrapper /usr/local
vi /usr/lib/MailScanner/sophos-wrapperSAV_IDE=/usr/local/savLD_LIBRARY_PATH=/usr/local/lib

43
MailScanner + Sophos (cont)
vi /etc/aliases修改
#root: marc 為
root: adminnewaliasesvi /etc/mail/sendmail.cf修改
O DaemonPortOptions=Port=smtp,Addr=127.0.0.1, Name=MTA為
# O DaemonPortOptions=Port=smtp,Addr=127.0.0.1, Name=MTAcd /etc/mailrm -rf *.dbmake all/etc/rc.d/init.d/sendmail stop

44
MailScanner + Sophos (cont)
The following e-mail messages were found to have viruses in them:
Sender: [email protected] Address: 61.66.36.199 Recipient: [email protected] Subject: your account errezcaz MessageID: h8H5EkJ29096 report: Sophos: >>> Virus 'W32/Mimail-A' found in file ./h8H5EkJ29096/message.zip/message.html Sophos: >>> Virus 'W32/Mimail-A' found in file ./h8H5EkJ29096/message.zip
-- MailScannerEmail Virus Scannerwww.mailscanner.info

45
MailScanner + Sophos (cont)
The following e-mail messages were found to have viruses in them:
Sender: [email protected] Address: 210.201.64.73Recipient: [email protected]: =?Big5?B?p0u2T6/BqPotLbftpWqo5a21vNa5SqRXsnulTrdSsaEoNaT5Q0Qp?=MessageID: h8H1WsJ27456report: MailScanner: foundform
-- MailScannerEmail Virus Scannerwww.mailscanner.info

46
NIDS -- Snort
1.) *** Make sure you have libpcap installed!!! ***
2.) ./configure
3.) make
4.) make install
5.) Create a sample rules file (if you want to use rules, check out the
included snort.conf file)
6.) snort -?
7.) If you've used previous versions of Snort, you may need to rewrite your rules to make them compliant to the rules format. See SnortUsersManual.pdf or http://www.snort.org for more information.
47
NIDS – Snort (cont)
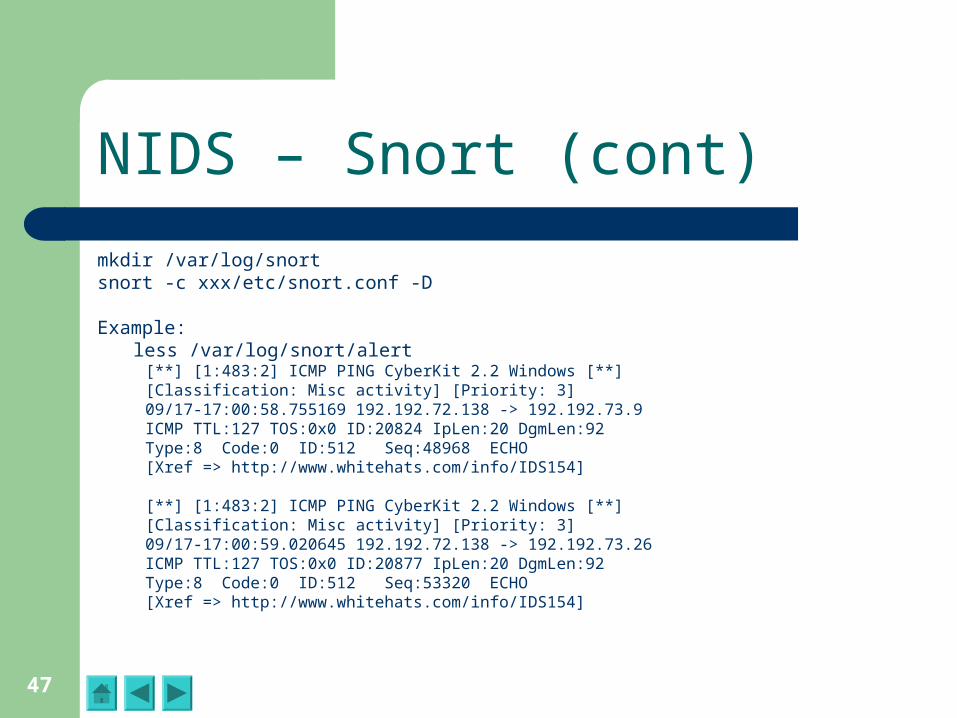
mkdir /var/log/snortsnort -c xxx/etc/snort.conf -D
Example:less /var/log/snort/alert
[**] [1:483:2] ICMP PING CyberKit 2.2 Windows [**][Classification: Misc activity] [Priority: 3]09/17-17:00:58.755169 192.192.72.138 -> 192.192.73.9ICMP TTL:127 TOS:0x0 ID:20824 IpLen:20 DgmLen:92Type:8 Code:0 ID:512 Seq:48968 ECHO[Xref => http://www.whitehats.com/info/IDS154]
[**] [1:483:2] ICMP PING CyberKit 2.2 Windows [**][Classification: Misc activity] [Priority: 3]09/17-17:00:59.020645 192.192.72.138 -> 192.192.73.26ICMP TTL:127 TOS:0x0 ID:20877 IpLen:20 DgmLen:92Type:8 Code:0 ID:512 Seq:53320 ECHO[Xref => http://www.whitehats.com/info/IDS154]

48
VPN
測試環境 (假設 ): remote 端 (g1):
real: 201.0.1.1 vpn: 192.168.1.254local 端 (g2):
real: 202.0.2.2 vpn: 192.168.2.254設定步驟 : 1) 在 201.0.1.1 上設定 SSH
# mkdir /etc/skel/.ssh# useradd -m vpn1
2) 在 202.0.2.2 上執行 : # ssh-keygen -t rsa# 按三下 Enter 不設定密碼
3) 轉回 201.0.1.1 上面執行 : # cd ~vpn1/.ssh# scp 202.0.2.2:/root/.ssh/id_rsa.pub ./# cat id_rsa.pub >> authorized_keys# chown -R vpn1.vpn1 ~vpn1/.ssh# chmod 711 ~vpn1/.ssh# chmod 644 ~vpn1/.ssh/authorized_keys
4) 再到 202.0.2.2 上面測試 ssh 的 RSA 連線﹐確定無需密碼 : # ssh -l vpn1 201.0.1.1

49
VPN(cont)
設定 remote 端
1) 在 201.0.1.1 上執行 visudo ﹐增加如下數行 : User_Alias VPNUSER=root,vpn1Cmnd_Alias VPN=/usr/sbin/pppd,/sbin/routeVPNUSER ALL=(ALL) NOPASSWD: VPN
2) 在 /usr/local/sbin 裡面建立一個可執行的 script ﹐取名為 vpn-ppp : #!/bin/bashexec sudo /usr/sbin/pppd
** 注意 : 請記得執行 : chmod +x /usr/local/sbin/vpn-ppp3) 修改 vpn1 的 shell :
usermod -s /usr/local/sbin/vpn-ppp vpn1

50
VPN(cont)
* 設定 local 端
1) 下載 pty-redir-0.1.tgz 到 202.0.2.2 機器﹐並將檔案解至 /usr/local 內 : # wget http://www.study-area.org/linux/src/pty-redir-0.1.tgz# tar zxvf pty-redir-0.1.tgz # mv pty-redir-0.1 /usr/local# cd /usr/local/pty-redir-0.1# make# cp pty-redir /usr/local/sbin
2)複製 vpnd 至 init.d 目錄 : # cp vpnd /etc/rc.d/init.d

51
VPN(cont)
3) 修改其中的內容 :
LOCALIP=192.168.2.254
LOCALNET=192.168.2.0/24
REMOTEIP=192.168.1.254
REMOTENET=192.168.1.0/24
SSHSERVER=201.0.1.1
$REDIR $SSH -q -t -l $SSHACC $SSHSERVER > $DEVNAME
ps -ax | grep "ssh -q -t -l $SSHACC " | grep -v grep \
# ** 註 : 最後兩行只是將其中的 -1 拿掉而已﹐請務必注意。

52
VPN(cont)
4) 進行連線 : # /etc/rc.d/init.d/vpnd start
如果需要開機就啟動 vpnd 的話﹐請執行如下命令﹐否則略 : chkconfig --add vpndchkconfig vpnd on
斷線則輸入 : # /etc/rc.d/init.d/vpnd stop
5) 設路由 : 當連線建立好之後﹐在 201.0.1.1 上面執行 :
# route add -net 192.168.2.0/24 dev ppp0在 202.0.2.2 上面執行 :
# route add -net 192.168.1.0/24 dev ppp0

53
CHKROOTKIT
1) 下載 chkrootkit: # cd /root# wget http://www.study-area.org/linux/src/chkrootkit.tar.gz
2) 安裝 chkrootkit:# tar zxvf chkrootkit.tar.gz# cd chkrootkit-0.35# make sense
3) 設定 chkrootkit:# vi /etc/cron.daily/chkrootkit
#!/bin/bashechoecho "checking rootkit..."/root/chkrootkit-0.35/chkrootkitechoecho
# chmod +x /etc/cron.daily/chkrootkit# /etc/cron.daily/chkrootkit

54
Backup
#!/bin/sh
tar cvf /home/admin/backup.tar --exclude /home/admin/backup.tar --exclude /home/admin/backup.tar.bz2 --exclude=/home/admin/backup.iso /etc/ /home/ /var/named/ /var/ftp/ /var/www/ /var/lib/mysql/
rm -rf /home/admin/backup.tar.bz2bzip2 -9 /home/admin/backup.tarchown admin.users /home/admin/backup.tar.bz2chown 644 /home/admin/backup.tar.bz2mkisofs -R -o /home/admin/backup.iso /home/admin/backup.tar.bz
2

55
Backup (cont)
umount /mnt/cdrom
cdrecord -load dev=0,0,0
cdrecord blank=fast dev=0,0,0
cdrecord -v speed=4 dev=0,0,0 -isosize /home/admin/backup.iso
cdrecord -eject dev=0,0,0
rm -rf /home/admin/backup.iso