

INTRODUCTION - American Musical Supply RG2228... · 1 日本語 ENGLISH INTRODUCTION Thank you for...
31
-
Upload
duongthuan -
Category
Documents
-
view
216 -
download
0
Transcript of INTRODUCTION - American Musical Supply RG2228... · 1 日本語 ENGLISH INTRODUCTION Thank you for...

1
日本語 ENGLISH
INTRODUCTIONThank you for purchasing an Ibanez guitar. In order to keep your guitar in the best possible condition, please read this manual for information on care and adjustment.
メンテナンスマニュアル
安全にお使いいただくために.............................................5
本体各部の名称 .........................................................................7
付属品 .............................................................................................8
弦の交換 ........................................................................................8
チューニング ................................................................................9
弦高 ..................................................................................................9
ネック調整 ..................................................................................10
弦長(イントネーション) ......................................................10
お手入れ .....................................................................................11
AUTO-TRIMペグ ......................................................................12
コレットノブ ...............................................................................12
調整マニュアル
Edge/Lo-Pro Edgeトレモロ・ブリッジ ..........................13
Edge-Proトレモロ・ブリッジ ..............................................17
Edge-Zero / ZR-2トレモロ・ブリッジ .............................21
FX Edge III/FX Edge III-8ブリッジ ..................................25
SynchroniZR(シンクロナイザー) ...................................27
Tight-Endブリッジ/Tight-End Rブリッジ
(6弦用/7弦用) ..........................................................................
フルチューン IIブリッジ .......................................................31
フルアコースティック・ギター・ブリッジ ......................32
フルアコースティック・ギター・
テールピース(GB10) ...........................................................32
フルアコースティック・ギター・ストラップボタン.....32
PICKUPS ................................................................................... 191
CONTROLS .............................................................................. 192
Maintenance Manual
GUITAR PART IDENTIFICATION ........................ 35
ATTACHMENTS .................................................. 36
STRING REPLACEMENT ................................... 36
TUNING .............................................................. 37
STRING HEIGHT ................................................ 37
NECK ADJUSTMENT ......................................... 38
INTONATION ...................................................... 38
CLEANING ......................................................... 39
AUTO-TRIM peg ................................................ 40
COLLET KNOB .................................................. 40
Adjustment Manual
Edge/Lo-Pro Edge tremolo bridge ..................... 41
Edge-Pro tremolo bridge.................................... 45
Edge-Zero / ZR-2 tremolo bridge ....................... 49
FX Edge III/FX Edge III-8 bridge ........................ 53
SynchroniZR ....................................................... 55
Tight-End bridge / Tight-End R bridge
(for 6-string and 7-string) ................................... 58
Full Tune II bridge .............................................. 59
Full acoustic guitar bridge ................................. 60
Full acoustic guitar tailpiece (GB10) .................. 60
Full acoustic guitar strap button ........................ 60
PICKUPS .......................................................... 191
CONTROLS ...................................................... 192
Table of Contents
30
35➤➤
Maintenance M
anual
EN
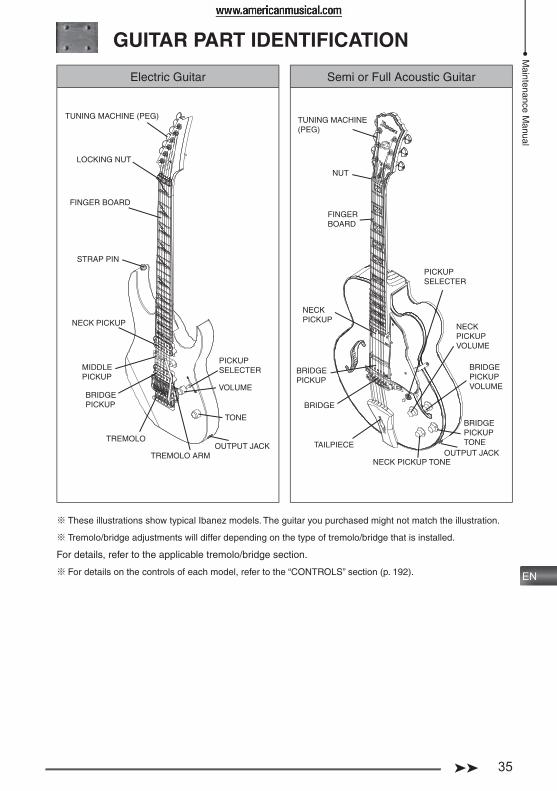
GUITAR PART IDENTIFICATION
Electric Guitar Semi or Full Acoustic Guitar
TUNING MACHINE (PEG)
LOCKING NUT
FINGER BOARD
STRAP PIN
NECK PICKUP
MIDDLE PICKUP
BRIDGE PICKUP
TREMOLO
TREMOLO ARM
PICKUP SELECTER
VOLUME
TONE
OUTPUT JACK
TUNING MACHINE (PEG)
NUT
FINGER BOARD
PICKUP SELECTER
NECK PICKUP VOLUME
BRIDGE PICKUP VOLUME
BRIDGE PICKUP TONE
NECK PICKUP
BRIDGE PICKUP
BRIDGE
TAILPIECEOUTPUT JACK
NECK PICKUP TONE
These illustrations show typical Ibanez models. The guitar you purchased might not match the illustration. ※
Tremolo/bridge adjustments will differ depending on the type of tremolo/bridge that is installed. ※
For details, refer to the applicable tremolo/bridge section.
For details on the controls of each model, refer to the “CONTROLS” section (p. 192). ※
Maintenance Manual
36 ➤➤
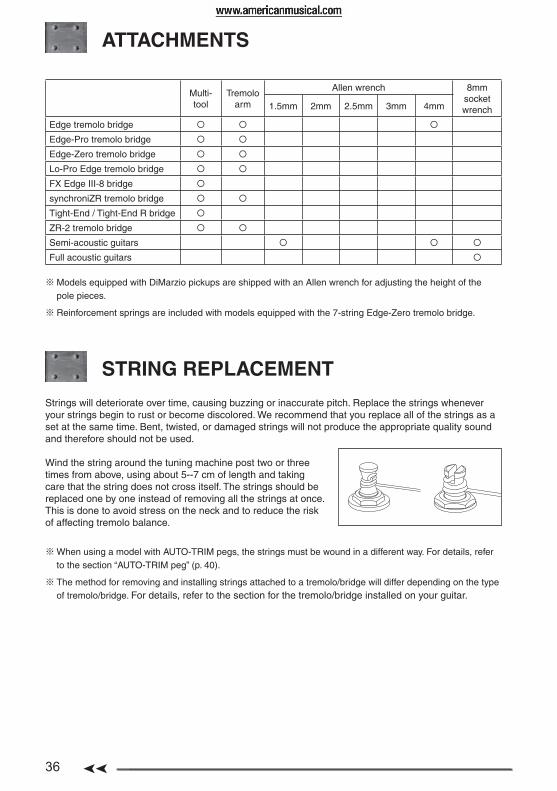
ATTACHMENTS
Multi-tool
Tremolo arm
Allen wrench 8mm socket wrench1.5mm 2mm 2.5mm 3mm 4mm
Edge tremolo bridge
Edge-Pro tremolo bridge
Edge-Zero tremolo bridge
Lo-Pro Edge tremolo bridge
FX Edge III-8 bridge
synchroniZR tremolo bridge
Tight-End / Tight-End R bridge
ZR-2 tremolo bridge
Semi-acoustic guitars
Full acoustic guitars
Models equipped with DiMarzio pickups are shipped with an Allen wrench for adjusting the height of the ※pole pieces.
Reinforcement springs are included with models equipped with the 7-string Edge-Zero tremolo bridge. ※
STRING REPLACEMENT
Strings will deteriorate over time, causing buzzing or inaccurate pitch. Replace the strings whenever your strings begin to rust or become discolored. We recommend that you replace all of the strings as a set at the same time. Bent, twisted, or damaged strings will not produce the appropriate quality sound and therefore should not be used.
Wind the string around the tuning machine post two or three times from above, using about 5--7 cm of length and taking care that the string does not cross itself. The strings should be replaced one by one instead of removing all the strings at once. This is done to avoid stress on the neck and to reduce the risk of affecting tremolo balance.
When using a model with AUTO-TRIM pegs, the strings must be wound in a different way. For details, refer ※to the section “AUTO-TRIM peg” (p. 40).
The method for removing and installing strings attached to a tremolo/bridge will differ depending on the type ※of tremolo/bridge. For details, refer to the section for the tremolo/bridge installed on your guitar.

37➤➤
Maintenance M
anual
EN
TUNING
When shipped from the factory, Ibanez guitars are set up using the following tunings.
1st 2nd 3rd 4th 5th 6th 7th
6-strings E4 B3 G3 D3 A2 E2 -
7-strings E4 B3 G3 D3 A2 E2 B1
Note that following models are set up differently.
RGD, APEX1
1st 2nd 3rd 4th 5th 6th 7th
6-strings D4 A3 F3 C3 G2 D2 -
7-strings D4 A3 F3 C3 G2 D2 A1
RG2228, M8M
1st 2nd 3rd 4th 5th 6th 7th 8th
D#4 A#3 F#3 C#3 G#2 D#2 A#1 F1
Use a tuner or tuning fork to tune up the sound of each open string to the above frequencies. If the pitch is higher than the above frequency, loosen the string to lower the pitch, and wind the string in small increments to tune it up. This is an easy way to stabilize your tuning. You may need to adjust the neck or the intonation if you tune your guitar to pitches other than those shown in these tables, or if you use strings of other than standard gauge.For details on adjusting the neck or the intonation, refer to the sections “NECK ADJUSTMENT” (p. 38) or “INTONATION” (p. 38).
Memo
Please note that extreme tuning or use of strings not intended for electric guitar may cause parts to •
break, and may cause unexpected injury.
STRING HEIGHT
Action refers to the distance between the frets and the string.
To measure the action, tune the guitar accurately; then place a ruler at the 14th fret and measure the distance from the top of the fret to the bottom of the string.In general, this distance should be 1.5--1.7 mm for the fi rst string, and 2.0 mm--2.2 mm for the sixth string.For a seven-string guitar, the seventh string should be at 2.2 mm--2.4 mm. For an eight-string guitar, the eighth string should be at 2.4 mm--2.6 mm.
For strings other than those listed above, adjust the action so that the distance gradually increases from the fi rst string toward the lowest string.If the action is too high, the instrument will be diffi cult to play. If the action is too low, you may experience string buzz, muted notes, or poor sustain.If you experience string buzz or muted notes even when the action is adjusted correctly, you might need to adjust the neck bow.For details, refer to “NECK ADJUSTMENT” (p. 38).
The method of adjusting the action will depend on the type of tremolo/bridge with which your guitar is ※equipped. For details, refer to the appropriate tremolo/bridge section.
38 ➤➤
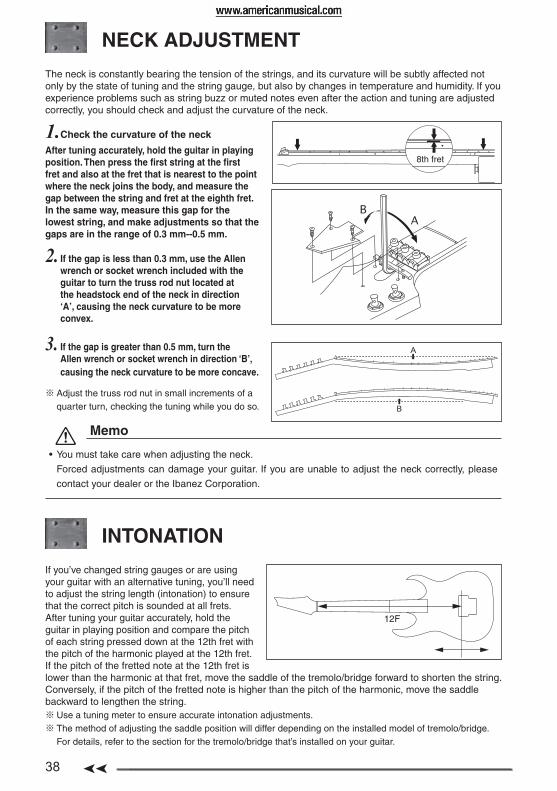
NECK ADJUSTMENT
The neck is constantly bearing the tension of the strings, and its curvature will be subtly affected not only by the state of tuning and the string gauge, but also by changes in temperature and humidity. If you experience problems such as string buzz or muted notes even after the action and tuning are adjusted correctly, you should check and adjust the curvature of the neck.
Check the curvature of the neck1. After tuning accurately, hold the guitar in playing position. Then press the fi rst string at the fi rst fret and also at the fret that is nearest to the point where the neck joins the body, and measure the gap between the string and fret at the eighth fret.In the same way, measure this gap for the lowest string, and make adjustments so that the gaps are in the range of 0.3 mm--0.5 mm.
If the gap is less than 0.3 mm, use the Allen 2. wrench or socket wrench included with the guitar to turn the truss rod nut located at the headstock end of the neck in direction ‘A’, causing the neck curvature to be more convex.
If the gap is greater than 0.5 mm, turn the 3. Allen wrench or socket wrench in direction ‘B’, causing the neck curvature to be more concave.
Adjust the truss rod nut in small increments of a ※quarter turn, checking the tuning while you do so.
Memo
You must take care when adjusting the neck.•
Forced adjustments can damage your guitar. If you are unable to adjust the neck correctly, please
contact your dealer or the Ibanez Corporation.
INTONATION
If you’ve changed string gauges or are using your guitar with an alternative tuning, you’ll need to adjust the string length (intonation) to ensure that the correct pitch is sounded at all frets.After tuning your guitar accurately, hold the guitar in playing position and compare the pitch of each string pressed down at the 12th fret with the pitch of the harmonic played at the 12th fret.If the pitch of the fretted note at the 12th fret is lower than the harmonic at that fret, move the saddle of the tremolo/bridge forward to shorten the string. Conversely, if the pitch of the fretted note is higher than the pitch of the harmonic, move the saddle backward to lengthen the string.
Use a tuning meter to ensure accurate intonation adjustments. ※The method of adjusting the saddle position will differ depending on the installed model of tremolo/bridge. ※For details, refer to the section for the tremolo/bridge that’s installed on your guitar.
8th fret
12F
39➤➤
Maintenance M
anual
EN
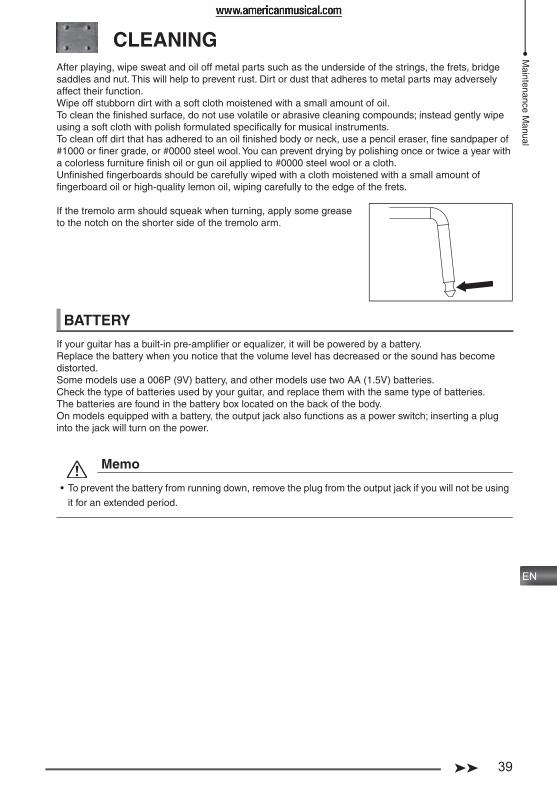
CLEANINGAfter playing, wipe sweat and oil off metal parts such as the underside of the strings, the frets, bridge saddles and nut. This will help to prevent rust. Dirt or dust that adheres to metal parts may adversely affect their function. Wipe off stubborn dirt with a soft cloth moistened with a small amount of oil.To clean the fi nished surface, do not use volatile or abrasive cleaning compounds; instead gently wipe using a soft cloth with polish formulated specifi cally for musical instruments.To clean off dirt that has adhered to an oil fi nished body or neck, use a pencil eraser, fi ne sandpaper of #1000 or fi ner grade, or #0000 steel wool. You can prevent drying by polishing once or twice a year with a colorless furniture fi nish oil or gun oil applied to #0000 steel wool or a cloth. Unfi nished fi ngerboards should be carefully wiped with a cloth moistened with a small amount of fi ngerboard oil or high-quality lemon oil, wiping carefully to the edge of the frets.
If the tremolo arm should squeak when turning, apply some grease to the notch on the shorter side of the tremolo arm.
BATTERY
If your guitar has a built-in pre-amplifi er or equalizer, it will be powered by a battery. Replace the battery when you notice that the volume level has decreased or the sound has become distorted.Some models use a 006P (9V) battery, and other models use two AA (1.5V) batteries.Check the type of batteries used by your guitar, and replace them with the same type of batteries.The batteries are found in the battery box located on the back of the body.On models equipped with a battery, the output jack also functions as a power switch; inserting a plug into the jack will turn on the power.
Memo
To prevent the battery from running down, remove the plug from the output jack if you will not be using •
it for an extended period.
40 ➤➤
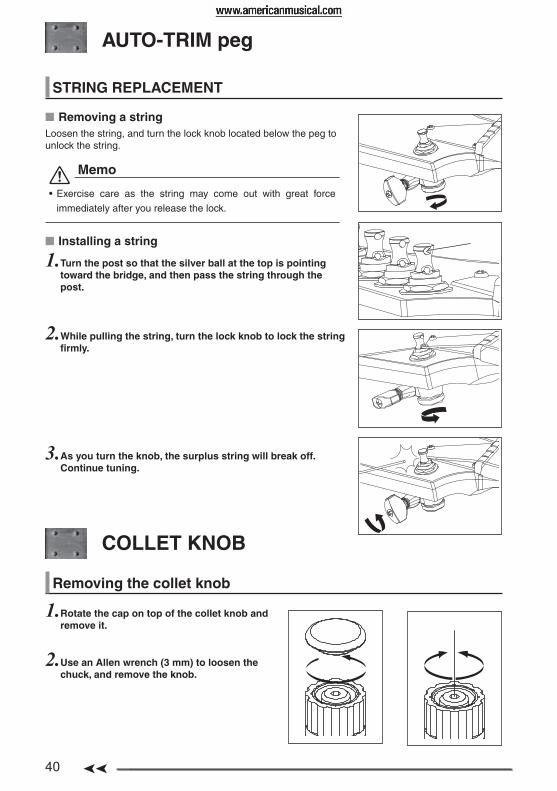
AUTO-TRIM peg
STRING REPLACEMENT
Removing a string ■
Loosen the string, and turn the lock knob located below the peg to unlock the string.
Memo
Exercise care as the string may come out with great force •
immediately after you release the lock.
Installing a string ■
Turn the post so that the silver ball at the top is pointing 1. toward the bridge, and then pass the string through the post.
While pulling the string, turn the lock knob to lock the string 2. fi rmly.
As you turn the knob, the surplus string will break off. 3. Continue tuning.
COLLET KNOB
Removing the collet knob
Rotate the cap on top of the collet knob and 1. remove it.
Use an Allen wrench (3 mm) to loosen the 2. chuck, and remove the knob.

41➤➤
Adjustm
ent Manual
EN
Edge/Lo-Pro Edge tremolo bridge
Edge ■ Lo-Pro Edge ■
23
45 6
1
1
23
456
1
1
Rear ■
7 8
1Knife edge2Saddle lock bolt3String holder block4Tremolo arm socket5String stopper bolt6Fine tuning bolt7Tremolo spring8Spring lock
Attaching the tremolo arm
The tremolo arm employs a snap-in/snap-out design. 1. Hold the corner of the tremolo arm, and press it fi rmly into the arm socket of the base plate.
Adjustment Manual
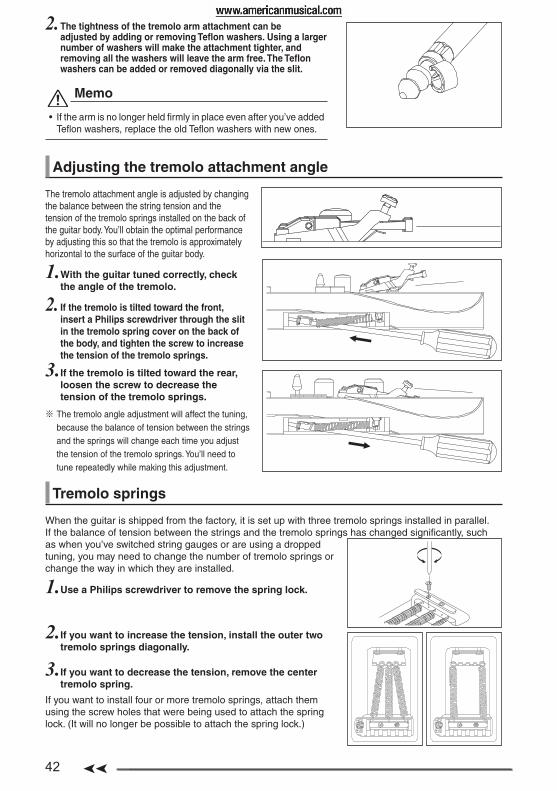
42 ➤➤2. The tightness of the tremolo arm attachment can be
adjusted by adding or removing Tefl on washers. Using a larger number of washers will make the attachment tighter, and removing all the washers will leave the arm free. The Tefl on washers can be added or removed diagonally via the slit.
Memo
If the arm is no longer held fi rmly in place even after you’ve added • Tefl on washers, replace the old Tefl on washers with new ones.
Adjusting the tremolo attachment angle
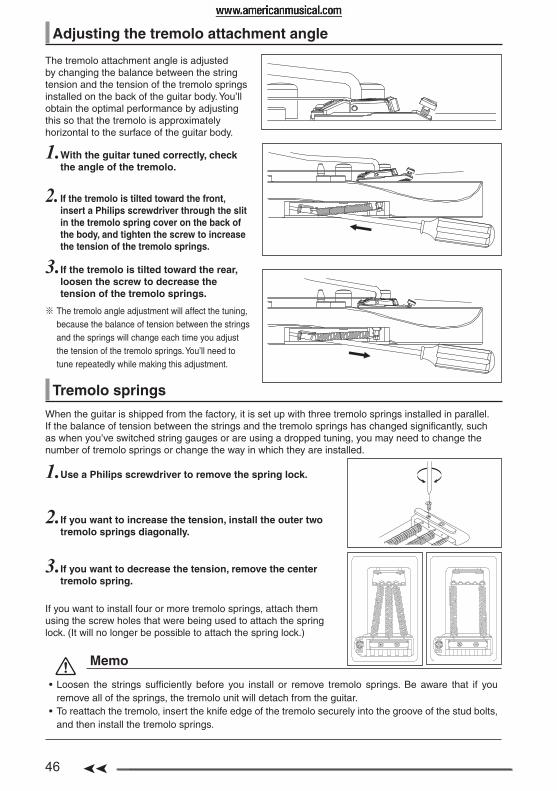
The tremolo attachment angle is adjusted by changing the balance between the string tension and the tension of the tremolo springs installed on the back of the guitar body. You’ll obtain the optimal performance by adjusting this so that the tremolo is approximately horizontal to the surface of the guitar body.
With the guitar tuned correctly, check 1. the angle of the tremolo.
If the tremolo is tilted toward the front, 2. insert a Philips screwdriver through the slit in the tremolo spring cover on the back of the body, and tighten the screw to increase the tension of the tremolo springs.
If the tremolo is tilted toward the rear, 3. loosen the screw to decrease the tension of the tremolo springs.
The tremolo angle adjustment will affect the tuning, ※because the balance of tension between the strings and the springs will change each time you adjust the tension of the tremolo springs. You’ll need to tune repeatedly while making this adjustment.
Tremolo springs
When the guitar is shipped from the factory, it is set up with three tremolo springs installed in parallel. If the balance of tension between the strings and the tremolo springs has changed signifi cantly, such as when you’ve switched string gauges or are using a dropped tuning, you may need to change the number of tremolo springs or change the way in which they are installed.
Use a Philips screwdriver to remove the spring lock.1.
If you want to increase the tension, install the outer two 2. tremolo springs diagonally.
If you want to decrease the tension, remove the center 3. tremolo spring.
If you want to install four or more tremolo springs, attach them using the screw holes that were being used to attach the spring lock. (It will no longer be possible to attach the spring lock.)
43➤➤
Adjustm
ent Manual
EN
Memo
Loosen the strings suffi ciently before you install or remove tremolo springs. Be aware that if you •
remove all of the springs, the tremolo unit will detach from the guitar.
To reattach the tremolo, insert the knife edge of the tremolo securely into the groove of the stud bolts, •
and then install the tremolo springs.
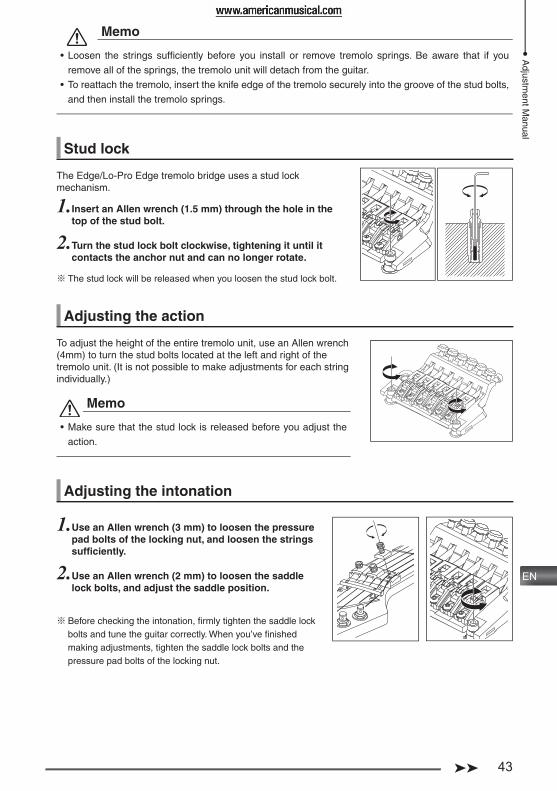
Stud lock
The Edge/Lo-Pro Edge tremolo bridge uses a stud lock mechanism.
Insert an Allen wrench (1.5 mm) through the hole in the 1. top of the stud bolt.
Turn the stud lock bolt clockwise, tightening it until it 2. contacts the anchor nut and can no longer rotate.
The stud lock will be released when you loosen the stud lock bolt. ※
Adjusting the action
To adjust the height of the entire tremolo unit, use an Allen wrench (4mm) to turn the stud bolts located at the left and right of the tremolo unit. (It is not possible to make adjustments for each string individually.)
Memo
Make sure that the stud lock is released before you adjust the •
action.
Adjusting the intonation
Use an Allen wrench (3 mm) to loosen the pressure 1. pad bolts of the locking nut, and loosen the strings suffi ciently.
Use an Allen wrench (2 mm) to loosen the saddle 2. lock bolts, and adjust the saddle position.
Before checking the intonation, fi rmly tighten the saddle lock ※bolts and tune the guitar correctly. When you’ve fi nished making adjustments, tighten the saddle lock bolts and the pressure pad bolts of the locking nut.
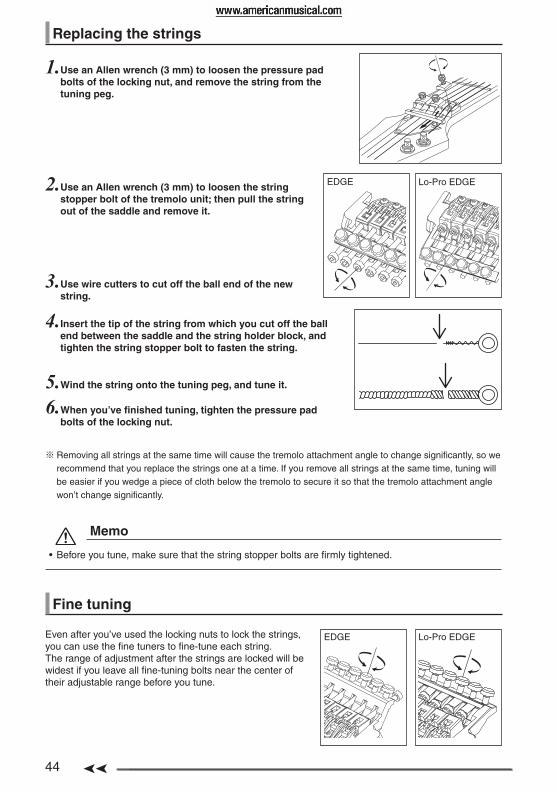
44 ➤➤Replacing the strings
Use an Allen wrench (3 mm) to loosen the pressure pad 1. bolts of the locking nut, and remove the string from the tuning peg.
Use an Allen wrench (3 mm) to loosen the string 2. stopper bolt of the tremolo unit; then pull the string out of the saddle and remove it.
3. Use wire cutters to cut off the ball end of the new string.
Insert the tip of the string from which you cut off the ball 4. end between the saddle and the string holder block, and tighten the string stopper bolt to fasten the string.
Wind the string onto the tuning peg, and tune it.5. When you’ve fi nished tuning, tighten the pressure pad 6. bolts of the locking nut.
Removing all strings at the same time will cause the tremolo attachment angle to change signifi cantly, so we ※recommend that you replace the strings one at a time. If you remove all strings at the same time, tuning will be easier if you wedge a piece of cloth below the tremolo to secure it so that the tremolo attachment angle won’t change signifi cantly.
Memo
Before you tune, make sure that the string stopper bolts are fi rmly tightened.•
Fine tuning
Even after you’ve used the locking nuts to lock the strings, you can use the fi ne tuners to fi ne-tune each string.The range of adjustment after the strings are locked will be widest if you leave all fi ne-tuning bolts near the center of their adjustable range before you tune.
EDGE Lo-Pro EDGE
EDGE Lo-Pro EDGE

45➤➤
Adjustm
ent Manual
EN
Edge-Pro tremolo bridge
Overview ■ Rear ■
6
5
4
1
2
31
7 8
1Knife edge2Saddle lock bolt3String holder block4Tremolo arm socket5String stopper bolt6Fine tuning bolt
7Tremolo spring8Spring lock
Attaching the tremolo arm
The tremolo arm employs a snap-in/snap-out design. 1. Holding the corner of the tremolo arm, press it fi rmly into the arm socket of the base plate until the Tefl on washers are completely hidden.
The tightness of the tremolo arm can be adjusted by 2. adding or removing Tefl on washers. Adding washers will make the arm tighter, and removing all of the washers will leave the arm free. Insert or remove the washers diagonally through the slit.
Memo
If the arm is no longer held fi rmly in place even after you’ve •
added Tefl on washers, replace the old Tefl on washers with
new ones.
46 ➤➤Adjusting the tremolo attachment angle
The tremolo attachment angle is adjusted by changing the balance between the string tension and the tension of the tremolo springs installed on the back of the guitar body. You’ll obtain the optimal performance by adjusting this so that the tremolo is approximately horizontal to the surface of the guitar body.
With the guitar tuned correctly, check 1. the angle of the tremolo.
If the tremolo is tilted toward the front, 2. insert a Philips screwdriver through the slit in the tremolo spring cover on the back of the body, and tighten the screw to increase the tension of the tremolo springs.
If the tremolo is tilted toward the rear, 3. loosen the screw to decrease the tension of the tremolo springs.
The tremolo angle adjustment will affect the tuning, ※because the balance of tension between the strings and the springs will change each time you adjust the tension of the tremolo springs. You’ll need to tune repeatedly while making this adjustment.
Tremolo springs
When the guitar is shipped from the factory, it is set up with three tremolo springs installed in parallel.If the balance of tension between the strings and the tremolo springs has changed signifi cantly, such as when you’ve switched string gauges or are using a dropped tuning, you may need to change the number of tremolo springs or change the way in which they are installed.
Use a Philips screwdriver to remove the spring lock.1.
If you want to increase the tension, install the outer two 2. tremolo springs diagonally.
If you want to decrease the tension, remove the center 3. tremolo spring.
If you want to install four or more tremolo springs, attach them using the screw holes that were being used to attach the spring lock. (It will no longer be possible to attach the spring lock.)
Memo
Loosen the strings suffi ciently before you install or remove tremolo springs. Be aware that if you • remove all of the springs, the tremolo unit will detach from the guitar.To reattach the tremolo, insert the knife edge of the tremolo securely into the groove of the stud bolts, • and then install the tremolo springs.

47➤➤
Adjustm
ent Manual
EN
Adjusting the action
To adjust the height of the entire tremolo unit, use an Allen wrench (4 mm) to turn the stud bolts located at the left and right of the tremolo unit. (It is not possible to make adjustments for each string individually.)
Adjusting the intonation
Use an Allen wrench (3 mm) to loosen the pressure 1. pad bolts of the locking nut, and loosen the strings suffi ciently.
Use an Allen wrench (2 mm) to loosen the saddle 2. lock bolts, and adjust the saddle position.
Before checking the intonation, fi rmly tighten the saddle lock ※bolts and tune the guitar correctly. When you’ve fi nished making adjustments, tighten the saddle lock bolts and the pressure pad bolts of the locking nut.
Replacing the strings
Use an Allen wrench (3 mm) to loosen the pressure pad 1. bolts of the locking nut, and remove the string from the tuning peg.
Use an Allen wrench (3 mm) to loosen the string stopper 2. bolt of the tremolo unit; then pull the string out of the saddle and remove it.
Use wire cutters to cut off the ball end of the new string.3. Insert the tip of the string from which you cut off the ball end 4. between the saddle and the string holder block, and tighten the string stopper bolt to fasten the string.
Wind the string onto the tuning peg, and tune it.5. When you’ve fi nished tuning, tighten the pressure pad bolts 6. of the locking nut.

48 ➤➤ ※You can also insert the strings with the ball ends cut off, as on a conventional locking tremolo.
Removing all strings at the same time will cause the tremolo ※attachment angle to change signifi cantly, so we recommend that you replace the strings one at a time. If you remove all strings at the same time, tuning will be easier if you wedge a piece of cloth below the tremolo to secure it so that the tremolo attachment angle won’t change signifi cantly.
Memo
Before you tune, make sure that the string stopper bolts are fi rmly tightened.•
Fine tuning
Even after you’ve used the locking nuts to lock the strings, you can use the fi ne tuners to fi ne-tune each string.The range of adjustment after the strings are locked will be widest if you leave all fi ne-tuning bolts near the center of their adjustable range before you tune.

49➤➤
Adjustm
ent Manual
EN
Edge-Zero / ZR-2 tremolo bridge
Edge-Zero ■ ZR2 ■
1
5 46
32 1
7 7 23
56 4
Rear ■
8
8
99:
AB
C
1Knife edge2Saddle lock bolt3String holder block4Tremolo arm socket5String stopper bolt6Fine tuning bolt7Intonation adjustment bolt8Main spring9Sub spring0StopperAStop rodBTremolo blockCSpring adjustment knob
Attaching the tremolo arm
The tremolo arm employs a snap-in/snap-out design. 1. Hold the corner of the tremolo arm, and press it fi rmly into the arm socket of the base plate.
Use the torque adjustment cap to adjust the tightness of 2. the tremolo arm. Turning the cap clockwise will make it tighter, and turning the cap counterclockwise will make it looser.

50 ➤➤Tremolo angle adjustment / Zero point system adjustment
The tremolo attachment angle is adjusted by changing the balance between the string tension and the tension of the zero point system installed on the back of the guitar body.The Edge-Zero/ZR2 tremolo bridge is designed so that the tremolo will be approximately parallel with the surface of the guitar body when the zero point system is adjusted correctly, and will perform optimally in this state.When the zero point system is correctly adjusted, the stop rod will be in fi rm contact with the tremolo block and the stop rod will be touching the stopper.
With the guitar tuned correctly, check the zero point 1. system.
If the stop rod is not touching the stopper (i.e., if the 2. tremolo block is pushing up the stop rod), turn the spring adjustment knob located on the back of the body toward the “plus” direction to tighten the main spring.
If the tremolo block is not in fi rm contact with the stop rod 3. (i.e., if the tremolo is tilted toward the rear), turn the spring adjustment knob toward the “minus” direction to loosen the main spring.
Disabling the zero point system (Using the unit as a conventional fl oating tremolo)
By disabling the zero point system you can also use the unit as a conventional fl oating tremolo bridge.When the zero point system is disabled, the angle at which the tremolo is attached will be adjusted by the balance between the tension of the strings and the tension of the main springs attached to the tremolo block.For optimal performance, adjust the tremolo so that it is approximately parallel with the surface of the guitar body.
While holding the arm in the upward position (i.e., with 1. the tremolo block away from the stop rod), remove the stop rod and the sub-spring.
With the guitar tuned correctly, check the angle of the 2. tremolo.
If the tremolo is tilted toward the front, turn the spring 3. adjustment knob toward the “plus” direction to tighten the main spring.
If the tremolo is tilted toward the rear, turn the spring 4. adjustment knob toward the “minus” direction to loosen the main spring.
The tuning will be affected when you adjust the tremolo angle with ※the zero point system disabled, because the balance between the tension of the strings and the springs will change each time you adjust the tension of the tremolo springs. You’ll need to tune repeatedly while making this adjustment.
51➤➤
Adjustm
ent Manual
EN
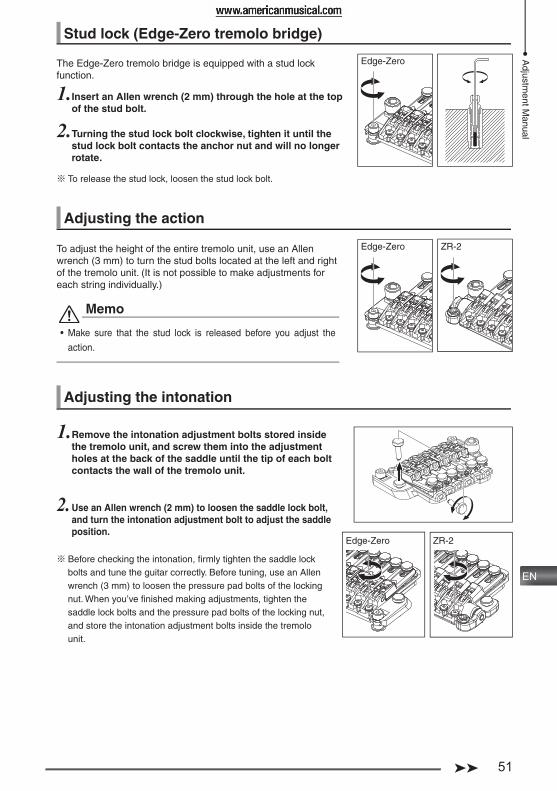
Stud lock (Edge-Zero tremolo bridge)
The Edge-Zero tremolo bridge is equipped with a stud lock function.
Insert an Allen wrench (2 mm) through the hole at the top 1. of the stud bolt.
Turning the stud lock bolt clockwise, tighten it until the 2. stud lock bolt contacts the anchor nut and will no longer rotate.
To release the stud lock, loosen the stud lock bolt. ※
Adjusting the action
To adjust the height of the entire tremolo unit, use an Allen wrench (3 mm) to turn the stud bolts located at the left and right of the tremolo unit. (It is not possible to make adjustments for each string individually.)
Memo
Make sure that the stud lock is released before you adjust the •
action.
Adjusting the intonation
Remove the intonation adjustment bolts stored inside 1. the tremolo unit, and screw them into the adjustment holes at the back of the saddle until the tip of each bolt contacts the wall of the tremolo unit.
Use an Allen wrench (2 mm) to loosen the saddle lock bolt, 2. and turn the intonation adjustment bolt to adjust the saddle position.
Before checking the intonation, fi rmly tighten the saddle lock ※bolts and tune the guitar correctly. Before tuning, use an Allen wrench (3 mm) to loosen the pressure pad bolts of the locking nut. When you’ve fi nished making adjustments, tighten the saddle lock bolts and the pressure pad bolts of the locking nut, and store the intonation adjustment bolts inside the tremolo unit.
Edge-Zero
ZR-2Edge-Zero
ZR-2Edge-Zero
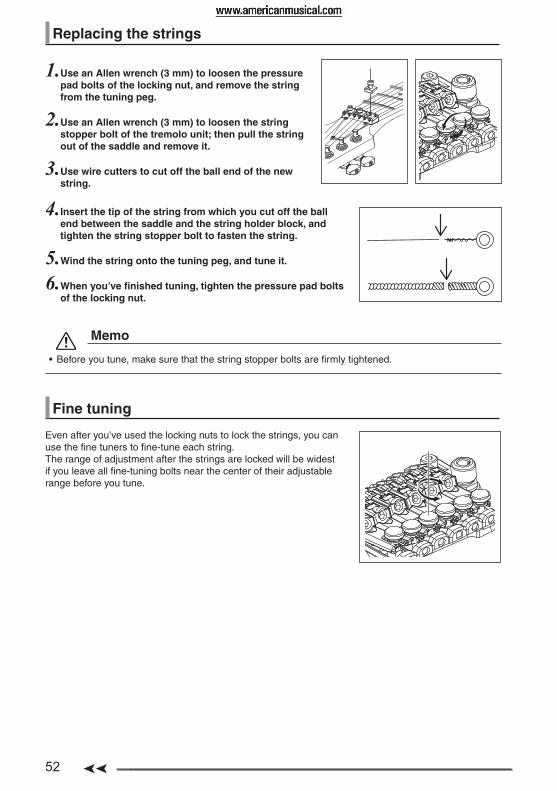
52 ➤➤Replacing the strings
Use an Allen wrench (3 mm) to loosen the pressure 1. pad bolts of the locking nut, and remove the string from the tuning peg.
Use an Allen wrench (3 mm) to loosen the string 2. stopper bolt of the tremolo unit; then pull the string out of the saddle and remove it.
Use wire cutters to cut off the ball end of the new 3. string.
Insert the tip of the string from which you cut off the ball 4. end between the saddle and the string holder block, and tighten the string stopper bolt to fasten the string.
Wind the string onto the tuning peg, and tune it.5. When you’ve fi nished tuning, tighten the pressure pad bolts 6. of the locking nut.
Memo
Before you tune, make sure that the string stopper bolts are fi rmly tightened.•
Fine tuning
Even after you’ve used the locking nuts to lock the strings, you can use the fi ne tuners to fi ne-tune each string.The range of adjustment after the strings are locked will be widest if you leave all fi ne-tuning bolts near the center of their adjustable range before you tune.

53➤➤
Adjustm
ent Manual
EN
FX Edge III/FX Edge III-8 bridge
FX Edge III ■
11
23
456
1Main stud2Saddle lock bolt3String holder block4String stopper bolt5Rear stud6Fine tuning bolt
Adjusting the action
To adjust the string height, use a slotted screwdriver to 1. turn the main studs at the left and right of the bridge unit to adjust the height of the entire tremolo unit. (It is not possible to adjust the height of individual strings.)
Use an Allen wrench (3 mm) to turn the rear studs, adjusting 2. them so that the bridge is approximately parallel with the surface of the guitar body.
As the action will change when you adjust the rear studs, it is recommended that you check the fi nal action ※after you’ve adjusted the rear studs.To prevent the screw holes from being damaged, loosen the strings suffi ciently before you adjust the main studs so that you will not have to use excessive force when turning the studs.
Adjusting the intonation
Use an Allen wrench (3 mm) to loosen the pressure 1. pad bolts of the locking nut, and loosen the strings suffi ciently.
Use an Allen wrench (2 mm) to loosen the saddle 2. lock bolt, and adjust the saddle position.
Before checking the intonation, fi rmly tighten the saddle lock ※bolts and tune the guitar correctly. When you’ve fi nished making adjustments, tighten the saddle lock bolts and the pressure pad bolts of the locking nut.

54 ➤➤Replacing the strings
Use an Allen wrench (3 mm) to loosen the pressure pad 1. bolts of the locking nut, and remove the string from the tuning peg.
Use an Allen wrench (3 mm) to loosen the string stopper 2. bolt of the bridge unit; then pull the string out of the saddle and remove it.
3. Use wire cutters to cut off the ball end of the new string.
Insert the tip of the string from which you cut off the ball 4. end between the saddle and the string holder block, and tighten the string stopper bolt to fasten the string.
Wind the string onto the tuning peg, and tune it.5. When you’ve fi nished tuning, tighten the pressure pad bolts 6. of the locking nut.
Memo
Before you tune, make sure that the string stopper bolts are fi rmly tightened.•
Fine tuning
Even after you’ve used the locking nuts to lock the strings, you can use the fi ne tuners to fi ne-tune each string.The range of adjustment after the strings are locked will be widest if you leave all fi ne-tuning bolts near the center of their adjustable range before you tune.
55➤➤
Adjustm
ent Manual
EN
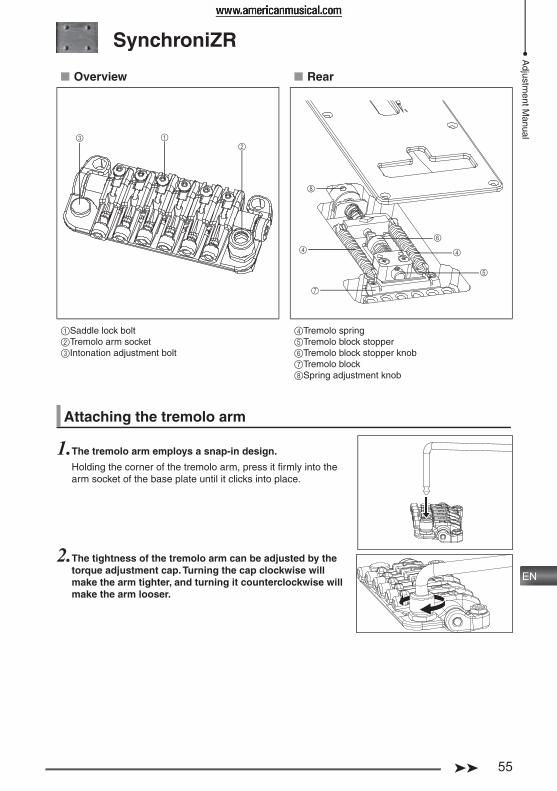
SynchroniZR
Overview ■ Rear ■
12
3
8
4 4
7
6
5
1Saddle lock bolt2Tremolo arm socket3Intonation adjustment bolt
4Tremolo spring5Tremolo block stopper 6Tremolo block stopper knob7Tremolo block8Spring adjustment knob
Attaching the tremolo arm
The tremolo arm employs a snap-in design.1. Holding the corner of the tremolo arm, press it fi rmly into the arm socket of the base plate until it clicks into place.
The tightness of the tremolo arm can be adjusted by the 2. torque adjustment cap. Turning the cap clockwise will make the arm tighter, and turning it counterclockwise will make the arm looser.

56 ➤➤Adjusting the tremolo attachment angle
The angle at which the tremolo is attached is adjusted by the balance between the tension of the strings and the tension of the tremolo springs installed in the back of the guitar body.The tremolo will perform optimally when adjusted so that it is approximately parallel with the surface of the guitar body.
1. With the guitar tuned correctly, check the angle of the tremolo.
2. If the tremolo is tilted forward, turn the spring adjustment knob located on the back of the body toward the “plus” direction to tighten the tremolo springs.
If the tremolo is tilted toward the rear, turn the spring 3. adjustment knob toward the “minus” direction to loosen the tremolo springs.
Because the balance of tension between the strings and the springs will ※change each time you adjust the tension of the tremolo springs, adjusting the tremolo angle in the fl oating state will affect the tuning. You’ll need to tune the guitar repeatedly while performing this adjustment.
Arm-up stopper
The SynchroniZR has an arm-up stopper feature. This feature disables the fl oating state by locking the arm-up range of movement.
Make sure that the tremolo is adjusted so that it is approximately parallel with the surface of 1. the guitar body.
Remove the tremolo spring cover, and turn the arm-2. up stopper knob so that the tip of the arm-up stopper contacts the tremolo block.
Once again make sure that that the tremolo is 3. approximately parallel with the surface of the guitar body, and turn the spring adjustment knob several times in the “plus” direction.
If the tremolo spring tension is too weak, the tremolo block will be ※pulled by the strings, possibly causing the tuning to be unstable. If you experience this problem while tuning, turn the spring adjustment knob even farther in the “plus” direction.
String height adjustment
To adjust the string height, adjust the height of the entire tremolo unit by using an Allen wrench (3 mm) to turn the stud bolts located at the left and right of the tremolo unit. (It is not possible to individually adjust the height of each string.)
57➤➤
Adjustm
ent Manual
EN
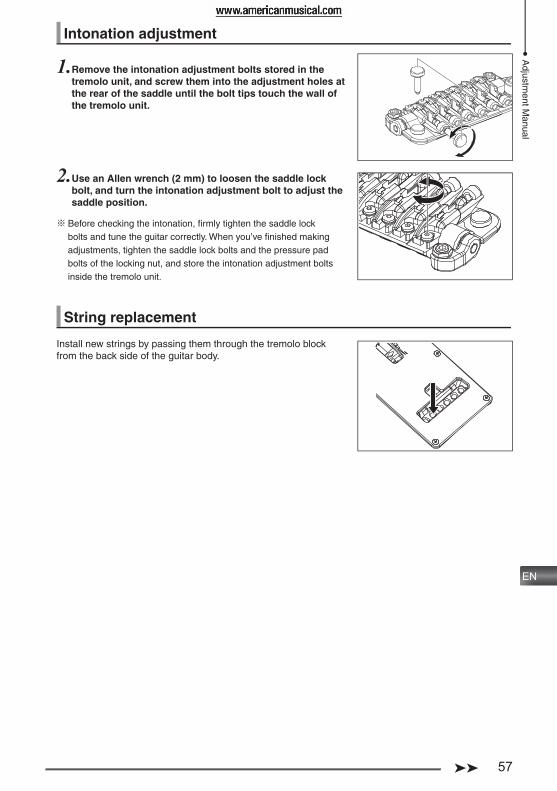
Intonation adjustment
Remove the intonation adjustment bolts stored in the 1. tremolo unit, and screw them into the adjustment holes at the rear of the saddle until the bolt tips touch the wall of the tremolo unit.
Use an Allen wrench (2 mm) to loosen the saddle lock 2. bolt, and turn the intonation adjustment bolt to adjust the saddle position.
Before checking the intonation, fi rmly tighten the saddle lock ※bolts and tune the guitar correctly. When you’ve fi nished making adjustments, tighten the saddle lock bolts and the pressure pad bolts of the locking nut, and store the intonation adjustment bolts inside the tremolo unit.
String replacement
Install new strings by passing them through the tremolo block from the back side of the guitar body.
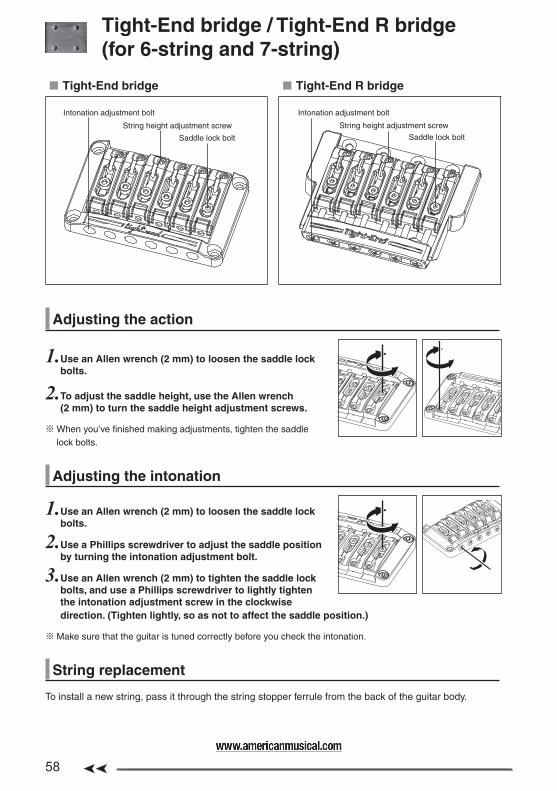
58 ➤➤ Tight-End bridge / Tight-End R bridge
(for 6-string and 7-string)
Tight-End bridge ■ Tight-End R bridge ■
Intonation adjustment bolt
Saddle lock bolt
String height adjustment screw
Intonation adjustment bolt
Saddle lock bolt
String height adjustment screw
Adjusting the action
Use an Allen wrench (2 mm) to loosen the saddle lock 1. bolts.
To adjust the saddle height, use the Allen wrench 2. (2 mm) to turn the saddle height adjustment screws.
When you’ve fi nished making adjustments, tighten the saddle ※lock bolts.
Adjusting the intonation
Use an Allen wrench (2 mm) to loosen the saddle lock 1. bolts.
Use a Phillips screwdriver to adjust the saddle position 2. by turning the intonation adjustment bolt.
Use an Allen wrench (2 mm) to tighten the saddle lock 3. bolts, and use a Phillips screwdriver to lightly tighten the intonation adjustment screw in the clockwise direction. (Tighten lightly, so as not to affect the saddle position.)
Make sure that the guitar is tuned correctly before you check the intonation. ※
String replacement
To install a new string, pass it through the string stopper ferrule from the back of the guitar body.
59➤➤
Adjustm
ent Manual
EN
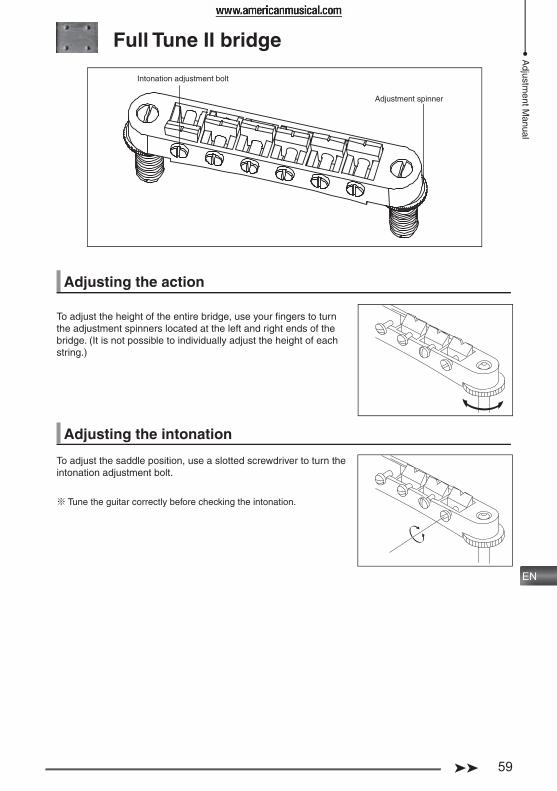
Full Tune II bridge
Intonation adjustment bolt
Adjustment spinner
Adjusting the action
To adjust the height of the entire bridge, use your fi ngers to turn the adjustment spinners located at the left and right ends of the bridge. (It is not possible to individually adjust the height of each string.)
Adjusting the intonation
To adjust the saddle position, use a slotted screwdriver to turn the intonation adjustment bolt.
Tune the guitar correctly before checking the intonation. ※
60 ➤➤
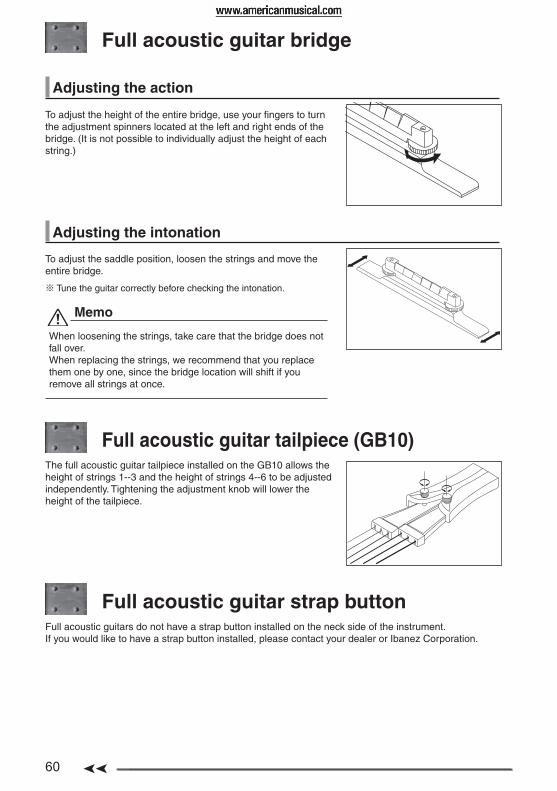
Full acoustic guitar bridge
Adjusting the action
To adjust the height of the entire bridge, use your fi ngers to turn the adjustment spinners located at the left and right ends of the bridge. (It is not possible to individually adjust the height of each string.)
Adjusting the intonation
To adjust the saddle position, loosen the strings and move the entire bridge.
Tune the guitar correctly before checking the intonation. ※
Memo
When loosening the strings, take care that the bridge does not fall over.When replacing the strings, we recommend that you replace them one by one, since the bridge location will shift if you remove all strings at once.
Full acoustic guitar tailpiece (GB10)The full acoustic guitar tailpiece installed on the GB10 allows the height of strings 1--3 and the height of strings 4--6 to be adjusted independently. Tightening the adjustment knob will lower the height of the tailpiece.
Full acoustic guitar strap buttonFull acoustic guitars do not have a strap button installed on the neck side of the instrument.If you would like to have a strap button installed, please contact your dealer or Ibanez Corporation.
191➤➤
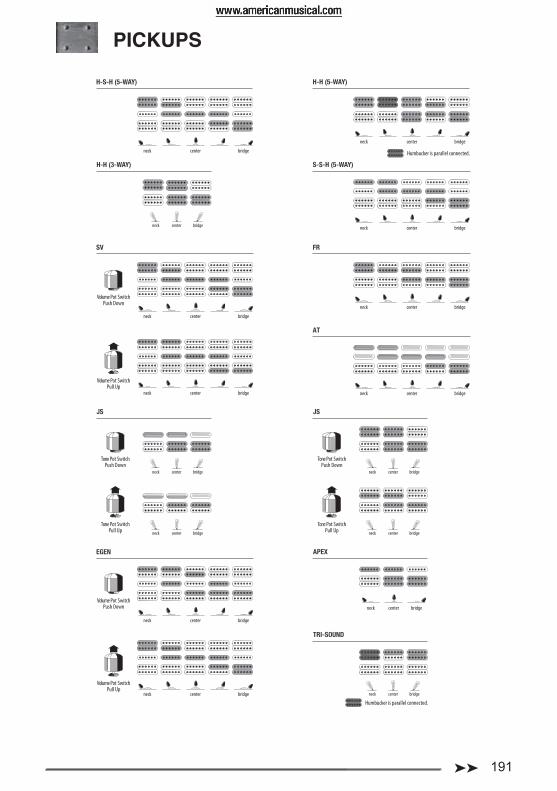
PICKUPS
H-H (3-WAY)
TRI-SOUND
Humbucker is parallel connected.
H-S-H (5-WAY)
Humbucker is parallel connected.
H-H (5-WAY)
SV
Volume Pot SwitchPush Down
Volume Pot SwitchPull Up
S-S-H (5-WAY)
EGEN
Volume Pot SwitchPush Down
Volume Pot SwitchPull Up
FR
AT
JS
Tone Pot SwitchPull Up
Tone Pot SwitchPush Down
JS
Tone Pot SwitchPull Up
Tone Pot SwitchPush Down
APEX

192 ➤➤
CONTROLS
NECK MIDDLE TONE
BRIDGE TONE
3 WAY P.U. SELECTOR
VOLUME
TONE
VOLUME
5 WAY P.U. SELECTOR
VOLUME
VOLUME
TONE
3 OR 5 WAY P.U. SELECTOR
1-V, 1-T
1-V, 2-T
1-V
1-V, 1-T
VOLUME W/PUSH PULL SW.
TONE
5 WAY P.U. SELECTOR
1-V, 1-T
1-V, 1-T
VOLUME
3 WAY P.U. SELECTOR
1-V
2-V, 2-T 2-V, 2-T
P.U. SELECTORP.U. SELECTOR
2-V, 1-T 2-V, 2-T
VOLUME W/HIGH PASS FILTER SW.
TONE W/ COIL TAP SW.
NECK TONE
NECK VOLUME
NECK TONE
MASTER TONETRI-SOUND NECK P.U. (AS, ASF)
3 WAY P.U. SELECTOR
NECK VOLUMENECK TONE
P.U. SELECTOR
NECK VOLUME
BRIDGE VOLUME
NECK VOLUME
3 WAY P.U. SELECTOR
1-V, 1-T
VOLUME
TONE
BRIDGE VOLUME
BRIDGE TONE
BRIDGE VOLUMEBRIDGE TONE
BRIDGEVOLUME
BRIDGE TONE

2012 Printed in Japan SEP12917Ibanez
The followings complies with the requirements of the EMC Directive2004/108/EC of the European Union.
No.22, 3-CHOME, SHUMOKU-CHO, HIGASHI-KU, NAGOYA, 461-8717, JAPAN
AUTHORIZED REPRESENTATIVE :J.N.WAGENAARWEG 9, 1422 AK UITHOORN, NETHERLANDS