倘若你感到疲乏 Chang ruo ni gan dao pi fa Whenever you feel weary 回到主的身旁 Hui dao zhu de sheng pang
EWF14113
User ManualWashing MachineEN
TH เครื่องซักผา คูมือการใชงาน 34
2
2 www.electrolux.com
CONTENTS
1.1 Conditions Of Use1.2 Child Safety1.3 Child Safety Device (Door Block Button)1.4 General Safety1.5 Installation1.6 Use
1. SAFETY INFORMATION........................................................................................................ 4
.................................................................................................................. 4..................................................................... 5
............................................................................................................. 5.................................................................................................................... 6
.............................................................................................................................. 6
2.1 Parts2.2 Product Feature2.3 Accessories
2. PRODUCT DESCRIPTION............................................................................................................................ 7
.......................................................................................................... 8................................................................................................................. 9
3.1 Control Panel Description3.2 Display3.3 Program Chart3.4 Program Options Compatibility3.5 Options3.6 Settings3.7 Start/Pause ( ) and Add Clothes ( ) Touchpad
3. CONTROL PANEL........................................................................................... 10
......................................................................................................................... 10............................................................................................................. 11
..................................................................................... 12........................................................................................................................ 12........................................................................................................................ 14
.................................................... 14
4. BEFORE FIRST USE....................................................................................................... 15
Visit our website to:
Warning / Caution-Safety information. General information and tipsEnvironmental information.
Subject to change without notice.
WE’RE THINKING OF YOU
CUSTOMER CARE AND SERVICE
Thank you for purchasing an Electrolux appliance. You’ve chosen a product that brings with it decades of professional experience and innovation. Ingenious and stylish, it has been designed with you in mind. So whenever you use it, you can be safe in the knowledge that you’ll get great results every time. Welcome to Electrolux.
We recommend the use of original spare parts.When contacting Service, ensure that you have the following data available. The information can be found on the rating plate. Model, PNC, Serial Number.
Get usage advice, brochures, trouble shooter, service information, buy accessories & spare parts, online product registration : www.electrolux.com
3ENGLISH
CONTENTS
5.1 Loading The Laundry5.2 Using Detergent And Additives5.3 Options Setting5.4 Starting A Cycle5.5 Interruption Of A Program5.6 Changing A Program5.7 Changing The Options5.8 Opening The Door5.9 At The End Of The Program5.10 When The Washing Program Is Completed, But There Is Water In The Drum5.11 AUTO Off Mode
5. DAILY USE .................................................................................................... 15
.................................................................................... 16............................................................................................................ 17............................................................................................................ 17
............................................................................................ 17................................................................................................... 17
................................................................................................ 17........................................................................................................ 17
........................................................................................ 18......... 18
......................................................................................................... 18
6.1 Sorting The Laundry6.2 Temperatures6.3 Before Loading The Laundry6.4 Maximum Loads6.5 Removing Stains6.6 Detergents Type And Quantity Of Detergent
6. WASHING HINTS.................................................................................................... 19
............................................................................................................... 19........................................................................................ 19
........................................................................................................... 19.......................................................................................................... 19
............................................................... 20
8.1 External Cleaning8.2 Descaling8.3 After Each Wash8.4 Maintenance Wash With “Tub Clean” Program8.5 Cleaning The Dispenser Drawer8.6 Cleaning The Drawer Recess8.7 Cleaning The Pump8.8 Cleaning The Water Inlet Filter8.9 Frost Precautions
8. CARE AND CLEANING........................................................................................................ 21
..................................................................................................................... 21.......................................................................................................... 21
........................................................... 22.................................................................................. 22
...................................................................................... 22...................................................................................................... 22
.................................................................................... 24......................................................................................................... 25
9.1 Possible Failures9.2 Emergency Door Opening
9. TROUBLESHOOTING........................................................................................................ 26
........................................................................................... 28
7. INTERNATIONAL WASH CODE SYMBOLS ................................................................ 21
10. TECHNICAL DATA .......................................................................................................... 29
11.1 Unpacking11.2 Positioning11.3 Water Inlet11.4 Water Drainage11.5 Electrical Connection
................................................................................................................ 30
................................................................................................................ 31................................................................................................................. 32
......................................................................................................... 32................................................................................................. 33
11. INSTALLATION
12.1 Packaging Materials12.2 Old Machine12.3 Ecological Hints
.................................................................................................. 33............................................................................................................... 33
......................................................................................................... 33
12. ENVIRONMENT CONCERNS
4 www.electrolux.com
SAFETY INFORMATION
In the interest of your safety and to ensure the correct use, before installing and first using the appliance, read this user manual carefully, including its hints and warnings.
This appliance is intended to be used in household and similar applications such as:
Farm housesBy clients in serviced apartments, holiday apartments and residential type environments.
1.1 Conditions Of Use
To avoid unnecessary mistakes and accidents, it is important to ensure that all people using the appliance are thoroughly familiar with its operation and safety features. Save these instructions and make sure that they remain with the appliance if it is moved or sold, so that everyone using it through its life will be properly informed on appliance use and safety.
1.
●
●
●
●
●
●
This washing machine is not intended for use by young children or infirm persons without supervision. Young children should be supervised to ensure that they do not play with the appliance.The packaging components (e.g. plastic film, polystyrene) can be dangerous to children - danger of suffocation! Keep them out of children’s reach.Keep all detergents in a safe place out of children’s reach.
1.2 Child Safety
5ENGLISH
1.4 General SafetyIt is dangerous to alter the specifica-tions or attempt to modify this product in any way.During high temperature wash program the door glass may get hot. Do not touch it!
Make sure that small pets do not climb into the drum. To avoid this, please check inside the drum before using the appliance.
Any objects such as coins, safety pins, nails, screws, stones or any other hard, sharp material can cause extensive damage and must not be placed into the machine.
Only use manufacturer’s recommended quantities of fabric softener and detergent. Damage to the fabric or appliance can occur if you exceed the recommended amount.
Wash small items such as socks, laces, washable belts etc in a washing bag or pillow case as it is possible for such items to slip down between the tub and the inner drum.
Do not use your washing machine to wash articles with whalebones, material without hems or torn material.
Make sure that children or pets do not climb into the drum.
When you activate this device, you cannot close the door. This prevents children or pets being locked in the drum.
To disable this device and restore the possibility of closing the door, rotate the button counter-clockwise until the groove is vertical.
1.3 Child Safety Device (Door Block Button)
This machine is provided with child safety lock option ( ) to prevent children playing with the control panel. (see page 14)
●
●
●
●
●
●
●
●
●
●
●
To activate this device, rotate the button (WITHOUT pressing it) inside the door clockwise until it stops. If necessary use a coin.
6 www.electrolux.com
Never use the washing machine if the power supply cable, the control panel, the working surface or the base are damaged so that the inside of the washing machine is acces-sible.
This appliance is not intended for use by persons (including children) with reduced physical, sensory or mental capabilities, or lack of experience and knowledge, unless they have been given supervision or instruction concerning use of the appliance by a person responsible for their safety.
This appliance is heavy. Care should be taken when moving it.
When unpacking the appliance, check that it is not damaged. If in doubt, do not use it and contact the Service Centre.
All packing and transit bolts must be removed before use. Serious damage can occur to the product and to property if this is not adhered to. See relevant section in the user manual.
Under no circumstances should you attempt to repair the machine yourself. Repairs carried out by inexperienced persons may cause injury or serious malfunctioning. Contact your local Service Centre. Always insist on genuine spare parts.
1.5 Installation
After having installed the appliance, check that it is not standing on the inlet and drain hose and the worktop is not pressing the electrical supply cable.If the appliance is installed on a carpeted floor, please adjust the feet in order to allow air to circulate freely.
Always be sure, that there is no water leakage from hoses and their connections after the installation.
Any plumbing work required to install this appliance should be carried out by a qualified plumber.
Any electrical work required to install this appliance should be carried out by a qualified electrician.
This appliance is designed for domestic use. It must not be used for purposes other than those for which it was designed.Only wash fabrics which are designed to be machine washed. Follow the instructions on each garment label.Do not overload the appliance. See the relevant section in the user manual.Before washing, ensure that all pockets are empty and buttons and zips are fastened. Avoid washing frayed or torn articles and treat stains such as paint, ink, rust, and grass before washing.Garments which have been in contact with volatile petroleum products should not be machine washed. If volatile cleaning fluids are used, care should be taken to ensure that the fluid is removed from the garment before placing in the machine. Never pull the power supply cable to remove the plug from the socket; always take hold of the plug itself.
1.6 Use
Always unplug the appliance and turn off the water supply after use, clean and maintenance.
●
●
●
●
●
●
●
●
●
●
●
●
●
●
●
●
●
●
May cause electric shock! if the machine is not connected to an earthed/ground system. DO NOT touch the wet clothes and metal parts.
7ENGLISH
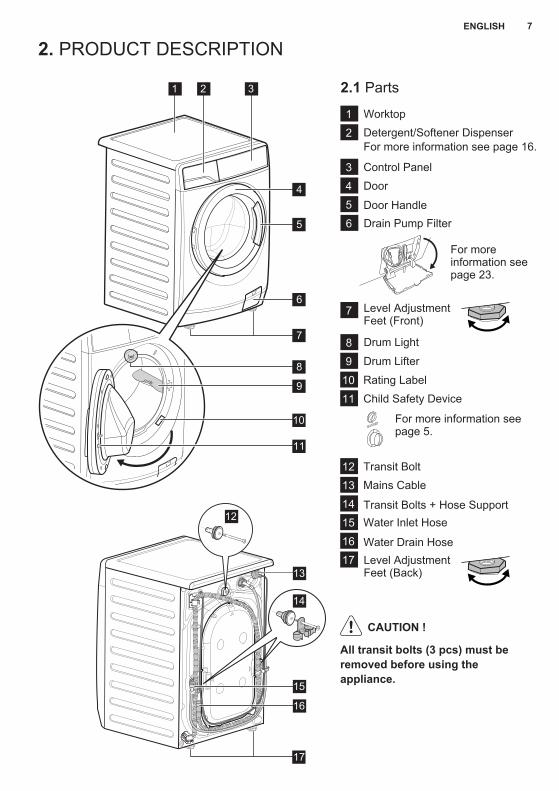
2.1 Parts
PRODUCT DESCRIPTION2.
1 Worktop
2 Detergent/Softener Dispenser
3 Control Panel
4 Door
5 Door Handle
7
Drum Light8
10
6 Drain Pump Filter
11
Rating Label
12
Child Safety Device
13
Transit Bolt
14
Mains Cable
15 Water Inlet HoseTransit Bolts + Hose Support
1617
Water Drain Hose
9 Drum Lifter
All transit bolts (3 pcs) must be removed before using the appliance.
CAUTION !
2 3
4
6
7
5
1
13
16
15
17
For more information see page 23.
For more information see page 16.
For more information see page 5.
10
9
11
8
14
12
Level Adjustment Feet (Front)
Level Adjustment Feet (Back)
8 www.electrolux.com
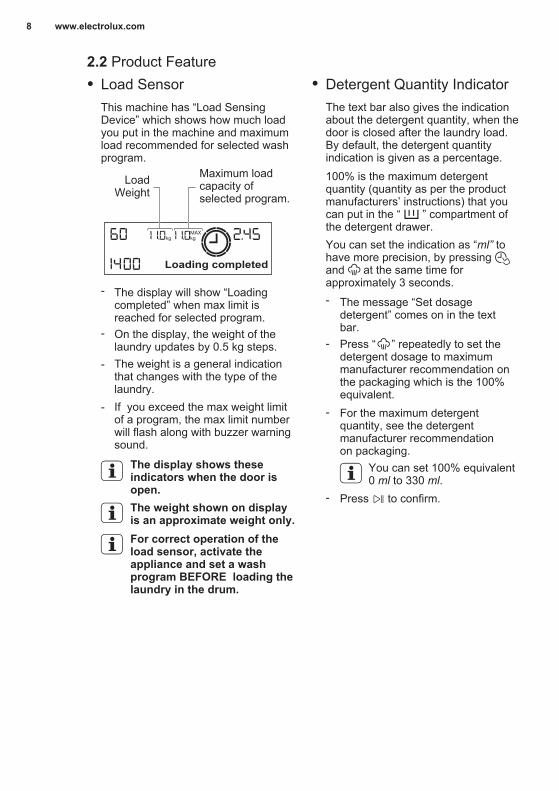
2.2 Product FeatureLoad Sensor●
This machine has “Load Sensing Device” which shows how much load you put in the machine and maximum load recommended for selected wash program.
The display will show “Loading completed” when max limit is reached for selected program.On the display, the weight of the laundry updates by 0.5 kg steps. The weight is a general indication that changes with the type of the laundry.
The weight shown on display is an approximate weight only.For correct operation of the load sensor, activate the appliance and set a wash program BEFORE loading the laundry in the drum.
The display shows these indicators when the door is open.
Maximum load capacity of selected program.
Load Weight
-
-
-
If you exceed the max weight limit of a program, the max limit number will flash along with buzzer warning sound.
-
●
The message “Set dosage detergent” comes on in the text bar.Press “ ” repeatedly to set the detergent dosage to maximum manufacturer recommendation on the packaging which is the 100% equivalent.For the maximum detergent quantity, see the detergent manufacturer recommendation on packaging.
You can set 100% equivalent 0 ml to 330 ml.
Press to confirm.
The text bar also gives the indication about the detergent quantity, when the door is closed after the laundry load. By default, the detergent quantity indication is given as a percentage. 100% is the maximum detergent quantity (quantity as per the product manufacturers’ instructions) that you can put in the “ ” compartment of the detergent drawer.
Detergent Quantity Indicator
You can set the indication as “ml” to have more precision, by pressing and at the same time for approximately 3 seconds.-
-
-
-
9ENGLISH
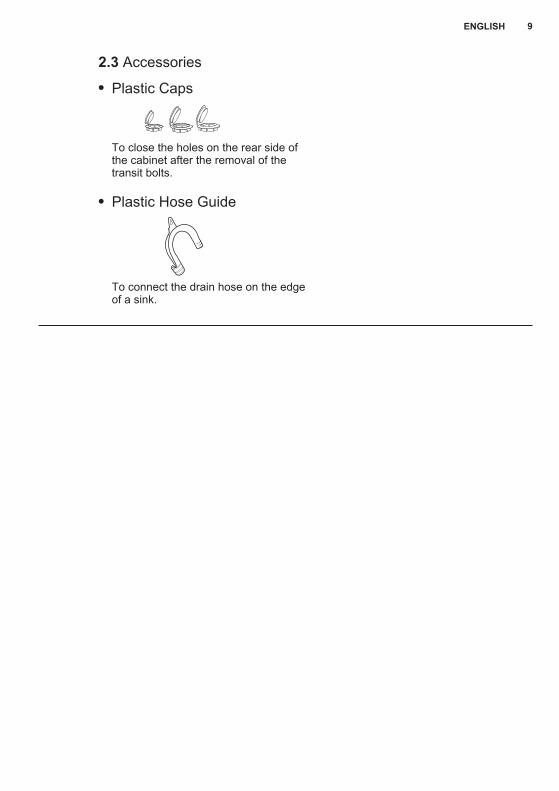
2.3 Accessories
To connect the drain hose on the edge of a sink.
Plastic Caps
To close the holes on the rear side of the cabinet after the removal of the transit bolts.
Plastic Hose Guide
●
●
10 www.electrolux.com
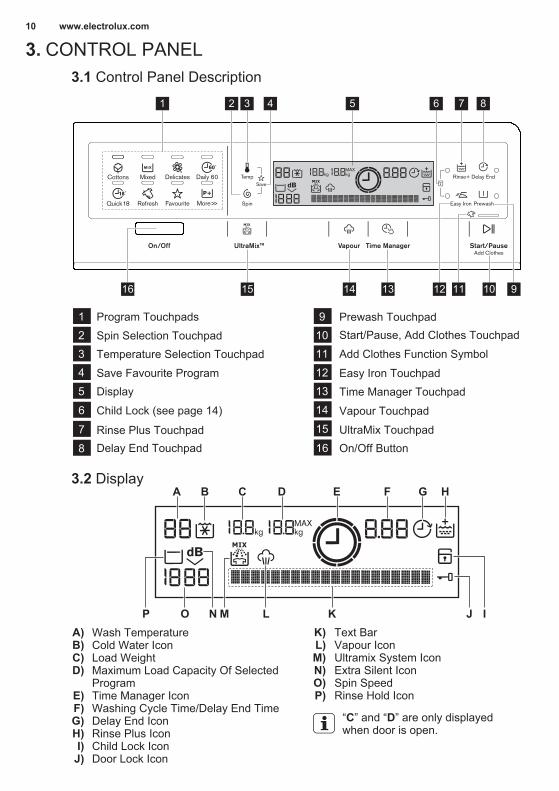
12345
7
8
6
9101112
CONTROL PANEL3.
Program Touchpads
Save Favourite Program
Temperature Selection TouchpadSpin Selection Touchpad
Easy Iron Touchpad
Delay End Touchpad
Display
Rinse Plus Touchpad
Prewash Touchpad
Add Clothes Function Symbol
1314
16
15
On/Off Button
Time Manager Touchpad
Vapour Touchpad
UltraMix Touchpad
Start/Pause, Add Clothes Touchpad
Child Lock (see page 14)
Wash TemperatureCold Water IconLoad WeightMaximum Load Capacity Of SelectedProgramTime Manager IconWashing Cycle Time/Delay End TimeDelay End IconRinse Plus IconChild Lock IconDoor Lock Icon
A)B)C)D)
E)F)G)H)I)J)
Text BarVapour IconUltramix System IconExtra Silent IconSpin SpeedRinse Hold Icon
K)L)M)N)O)P)
3.2 Display
3.1 Control Panel Description
“C” and “D” are only displayed when door is open.
A B C D E F G H
KO LMNP J I
1 2 3 5 7 8
910111213141516
64
11ENGLISH
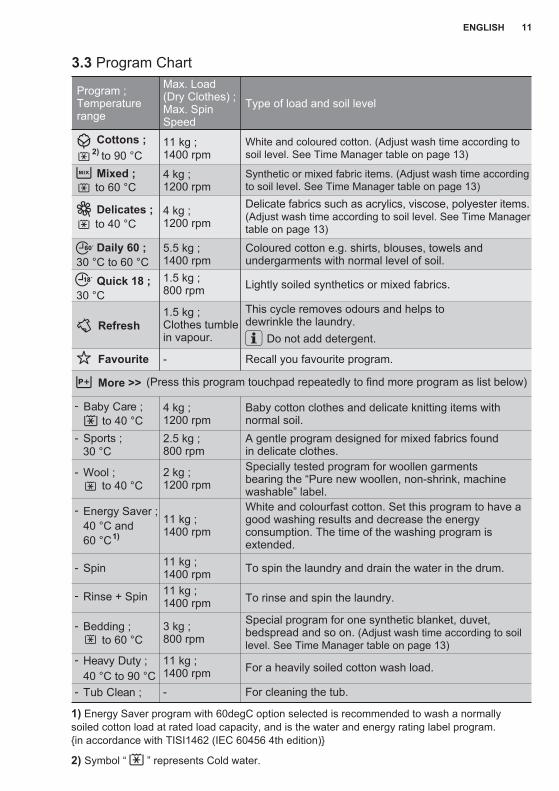
3.3 Program Chart
Program ;Temperaturerange
2) to 90 °C 11 kg ;1400 rpm
4 kg ;1200 rpm
4 kg ;1200 rpm
1.5 kg ;800 rpm
1.5 kg ; Clothes tumble in vapour.
-
2 kg ;1200 rpm
3 kg ;800 rpm
11 kg ;1400 rpm
11 kg ;1400 rpm11 kg ;1400 rpm
Type of load and soil level
Max. Load (Dry Clothes) ;Max. Spin Speed
30 °C
Refresh
Lightly soiled synthetics or mixed fabrics.
This cycle removes odours and helps to dewrinkle the laundry.
to 60 °C
to 40 °C
to 40 °C
to 60 °C
30 °C to 60 °C
Specially tested program for woollen garments bearing the “Pure new woollen, non-shrink, machine washable” label.
More >>
Bedding ; Special program for one synthetic blanket, duvet, bedspread and so on. (Adjust wash time according to soil level. See Time Manager table on page 13)
Rinse + Spin To rinse and spin the laundry.
Spin To spin the laundry and drain the water in the drum.
Energy Saver ;40 °C and 60 °C 1)
White and colourfast cotton. Set this program to have a good washing results and decrease the energy consumption. The time of the washing program is extended.
Coloured cotton e.g. shirts, blouses, towels and undergarments with normal level of soil.
A gentle program designed for mixed fabrics found in delicate clothes.
Cottons ;
Mixed ;
Delicates ;
5.5 kg ;1400 rpm
Daily 60 ;
Quick 18 ;
Wool ;
4 kg ;1200 rpm
Baby cotton clothes and delicate knitting items with normal soil.
30 °C 2.5 kg ;800 rpm
Sports ;
Favourite Recall you favourite program.
40 °C to 90 °C 11 kg ;1400 rpm-
Heavy Duty ;
Tub Clean ;
For a heavily soiled cotton wash load.
For cleaning the tub.
Do not add detergent.
White and coloured cotton. (Adjust wash time according to soil level. See Time Manager table on page 13)
Synthetic or mixed fabric items. (Adjust wash time according to soil level. See Time Manager table on page 13)Delicate fabrics such as acrylics, viscose, polyester items. (Adjust wash time according to soil level. See Time Manager table on page 13)
(Press this program touchpad repeatedly to find more program as list below)
to 40 °C Baby Care ;-
-
-
-
-
-
-
-
-
2) Symbol “ ” represents Cold water.
1) Energy Saver program with 60degC option selected is recommended to wash a normally soiled cotton load at rated load capacity, and is the water and energy rating label program. {in accordance with TISI1462 (IEC 60456 4th edition)}
12 www.electrolux.com
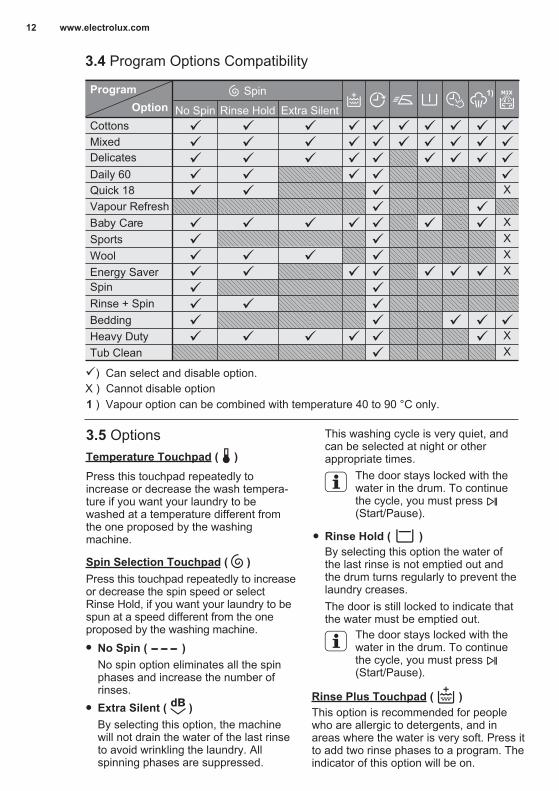
3.4 Program Options Compatibility
ProgramOption
CottonsMixedDelicatesDaily 60Quick 18Vapour RefreshBaby CareSportsWoolEnergy SaverSpinRinse + SpinBeddingHeavy DutyTub Clean
No Spin Rinse Hold
Spin
Extra Silent
X
XXXX
XX
1)
1 ) Vapour option can be combined with temperature 40 to 90 °C only.
) Can select and disable option.X ) Cannot disable option
The door stays locked with the water in the drum. To continue the cycle, you must press (Start/Pause).
Rinse Plus Touchpad ( )This option is recommended for people who are allergic to detergents, and in areas where the water is very soft. Press it to add two rinse phases to a program. The indicator of this option will be on.
Temperature Touchpad ( )Press this touchpad repeatedly to increase or decrease the wash tempera-ture if you want your laundry to be washed at a temperature different from the one proposed by the washing machine.
Spin Selection Touchpad ( )
●
●
●
Press this touchpad repeatedly to increase or decrease the spin speed or select Rinse Hold, if you want your laundry to be spun at a speed different from the one proposed by the washing machine.
No spin option eliminates all the spin phases and increase the number of rinses.
No Spin ( )
By selecting this option, the machine will not drain the water of the last rinse to avoid wrinkling the laundry. All spinning phases are suppressed.
This washing cycle is very quiet, and can be selected at night or other appropriate times.
Extra Silent ( )
By selecting this option the water of the last rinse is not emptied out and the drum turns regularly to prevent the laundry creases.
The door stays locked with the water in the drum. To continue the cycle, you must press (Start/Pause).
The door is still locked to indicate that the water must be emptied out.
Rinse Hold ( )
3.5 Options
13ENGLISH
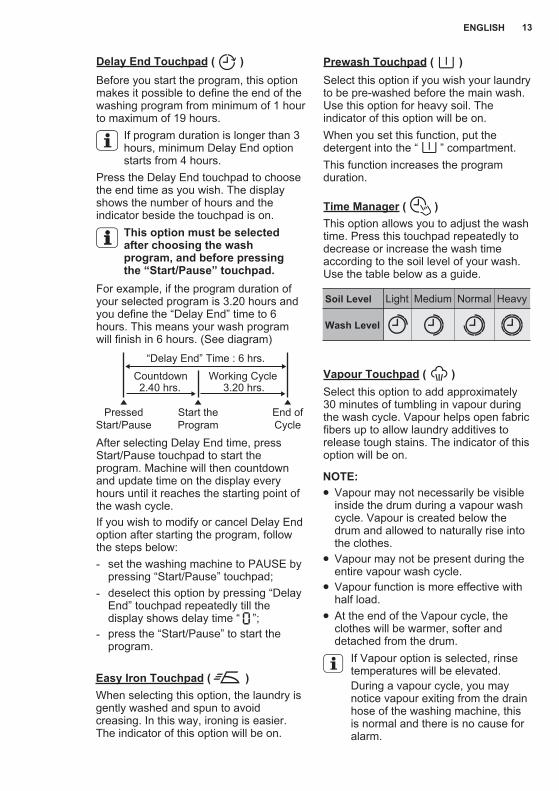
Delay End Touchpad ( )
Time Manager ( )This option allows you to adjust the wash time. Press this touchpad repeatedly to decrease or increase the wash time according to the soil level of your wash. Use the table below as a guide.
Prewash Touchpad ( )Select this option if you wish your laundry to be pre-washed before the main wash. Use this option for heavy soil. The indicator of this option will be on.
When selecting this option, the laundry is gently washed and spun to avoid creasing. In this way, ironing is easier. The indicator of this option will be on.
Easy Iron Touchpad ( )
Select this option to add approximately 30 minutes of tumbling in vapour during the wash cycle. Vapour helps open fabric fibers up to allow laundry additives to release tough stains. The indicator of this option will be on.
Vapour Touchpad ( )
Vapour may not necessarily be visible inside the drum during a vapour wash cycle. Vapour is created below the drum and allowed to naturally rise into the clothes.
At the end of the Vapour cycle, the clothes will be warmer, softer and detached from the drum.
If Vapour option is selected, rinse temperatures will be elevated.During a vapour cycle, you may notice vapour exiting from the drain hose of the washing machine, this is normal and there is no cause for alarm.
Vapour may not be present during the entire vapour wash cycle.Vapour function is more effective with half load.
NOTE:
When you set this function, put the detergent into the “ ” compartment. This function increases the program duration.
●
●
●
●
Before you start the program, this option makes it possible to define the end of the washing program from minimum of 1 hour to maximum of 19 hours.
If program duration is longer than 3 hours, minimum Delay End option starts from 4 hours.
After selecting Delay End time, press Start/Pause touchpad to start the program. Machine will then countdown and update time on the display every hours until it reaches the starting point of the wash cycle.
Press the Delay End touchpad to choose the end time as you wish. The display shows the number of hours and the indicator beside the touchpad is on.
For example, if the program duration of your selected program is 3.20 hours and you define the “Delay End” time to 6 hours. This means your wash program will finish in 6 hours. (See diagram)
3.20 hrs.2.40 hrs.Working Cycle
“Delay End” Time : 6 hrs.
Pressed Start/Pause
End of Cycle
Start the Program
Countdown
This option must be selected after choosing the wash program, and before pressing the “Start/Pause” touchpad.
If you wish to modify or cancel Delay End option after starting the program, follow the steps below:
set the washing machine to PAUSE by pressing “Start/Pause” touchpad;
-
deselect this option by pressing “DelayEnd” touchpad repeatedly till the display shows delay time “ ”;
-
press the “Start/Pause” to start the program.
-
Soil Level Light Medium Normal Heavy
Wash Level

14 www.electrolux.com
When you select this option, the detergent is blended and dissolved in water within a “pre-mixing technology” chamber. This will activate the active ingredients of the detergent before circulating the water onto the clothes.
UltraMix ( )
Save Favourite Program ( )Program settings that are frequently used can be saved (e.g. Cotton, 60°C, 1200 rpm, with Prewash and Rinse Plus).
To recall the favourite wash program, press “Favourite ( )” program.You will get acknowledgement on the screen when the Favourite program is loaded. You can recall a favourite wash program ONLY when the washing machine is in the program selection mode. Otherwise touching Favourite will have no effect.
To program/re-program Favourite with your own selections and save them, proceed as follows:1. Put machine in Stand-By mode.2. Select your desired wash settings.3. To save favourite program, press
“Temp” and “Spin” touchpads at the same time until the display shows the wording “Program Saved”.
3.6 Settings
3.7 Start/Pause ( ) and Add Clothes ( ) Touchpad
Child Safety Lock Option ( )Your appliance is provided with CHILD SAFETY LOCK which permits you to leave the appliance unsupervised with the door closed without having to worry that children might be injured by or cause damage to the appliance.
Set this option after pressing the Start/Pause touchpad.
To activate the function, press “Rinse + ( ) and Easy Iron ( )” touchpads at the same time until the display shows the symbol .
To set “Child Lock” option:
This setting permits you to either enableor disable the buzzer at the end of the program. As an example, you might wish to disable this buzzer when you start a wash when going to bed, so that when the wash finished approximately 1 hour later, it will not disturb you through the night.
Error warning beeps such as critical faults are not disabled.
Enabling/Disabling End-Of-Wash Buzzer
To deactivate the function, press“Rinse + ( ) and Easy Iron ( )” touchpads at the same time until the symbol “ ” goes off.
This function remains enabled even after the appliance is switched off.
The touchpads are locked (except for the On/Off button).
●
●
This touchpad has 2 functions:
This option is strongly recommended for Cold wash.As “UltraMix ( )” feature enhances the detergent activation. Please reduce the detergent dosage if you see foam covering the glass door completely.
NOTE:
To disable the buzzer sound, press “Easy Iron ( ) and Prewash ( )” touchpads at the same time for 3 seconds, and listen for “BEEP, BEEP”.To return to default configuration press these 2 touchpads at the same time for 3 seconds, and listen for “BEEP”.
● Start/Pause ( )
To interrupt a program which is running, press this touchpad to pause the machine, the Start/Pause pilot light flashes.
After you have selected the desired program and options, press this touchpad to start the machine. The Start/Pause pilot light will stop flashing and remain lit until the water level is above the bottom edge of the door then pilot light goes OFF. If you have selected a “Delay End” option, the countdown will begin and will be shown in the display.
15ENGLISH
BEFORE FIRST USE4.
Ensure that the electrical and water connections comply with the installation instructions.
Put 2 litres of water in the detergent compartment for washing phase. This activates the drain system.
1.
2.
3. Select a Cottons cycle at 90 °C, without any laundry in the machine, to remove any manufacturing residue from the drum and tub then start the machine.
DAILY USE5.
Press the On/Off button to turn on the washing machine. Touch one of the Program Icons to choose the wash program you require.
For correct operation of the load sensor, activate the appliance and set a wash program BEFORE loading the laundry in the drum. (see page 8)
Check and remove objects (if there are any) that could be trapped in the fold.
1.2.
5.1 Loading The Laundry
Connect the main plug to the main socket.
Turn the water tap on.
3.
Place the laundry in the drum, one item at a time, shaking them out as much as possible. (Refer to page 19 “WASHING HINTS”)
5.
Close the door.
CAUTION
6.
4. Make sure that no laundry remains between the seal and the door.
To restart the program from the point at which it was interrupted, press this touchpad again, the Start/Pause pilot light will stop flashing.
● Add Clothes ( )
While running a program, you may add clothes by:
Pressing the “Start/Pause” touchpad to pause the program.
You can only add clothes if “Start/Pause” pilot light is lit.
1.
Wait for the machine to come to a complete stop before opening the door.
2.
Resume the program by pressing “Start/Pause” touchpad again.
4.Add clothing and close the door.3.
During installation or before first use you may observe some water in the machine. This is a residual water left in the machine after a full functional test in the factory to ensure the machine is delivered to customers in perfect working order and is no cause for concern.
16 www.electrolux.com
Measure out the amount of detergent required, pour it into the main wash compartment.
5.2
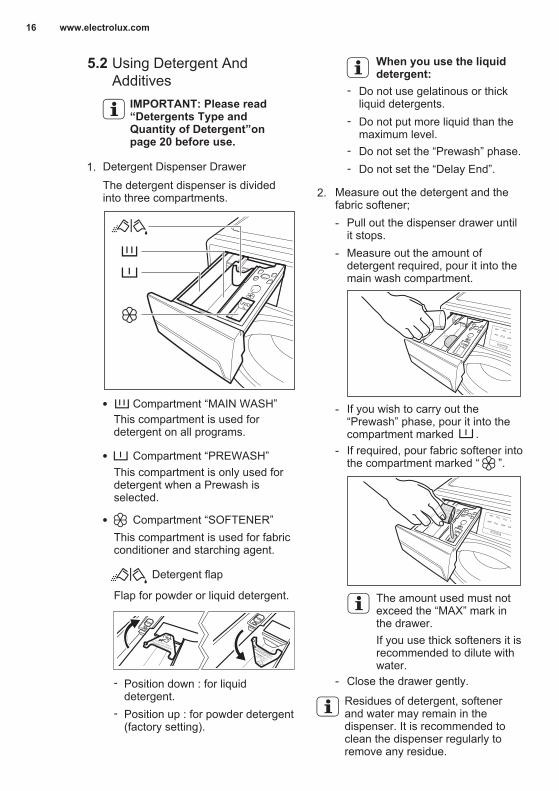
Detergent Dispenser Drawer1. The detergent dispenser is divided into three compartments.
Using Detergent And Additives
IMPORTANT: Please read “Detergents Type and Quantity of Detergent”on page 20 before use.
Do not use gelatinous or thick liquid detergents.
-
Do not put more liquid than the maximum level.
-
Do not set the “Delay End”.-Do not set the “Prewash” phase.-
When you use the liquid detergent:
Pull out the dispenser drawer until it stops.
-
-
Measure out the detergent and the fabric softener;
2.
Compartment “SOFTENER”
Compartment “PREWASH”
This compartment is used for fabric conditioner and starching agent.
This compartment is only used for detergent when a Prewash is selected.
Compartment “MAIN WASH”This compartment is used for detergent on all programs.
If you wish to carry out the “Prewash” phase, pour it into the compartment marked . If required, pour fabric softener into the compartment marked “ ”.
-
Close the drawer gently.-
-
Residues of detergent, softener and water may remain in the dispenser. It is recommended to clean the dispenser regularly to remove any residue.
The amount used must not exceed the “MAX” mark in the drawer.If you use thick softeners it is recommended to dilute with water.
Detergent flap
Flap for powder or liquid detergent.
Position down : for liquid detergent.Position up : for powder detergent (factory setting).
-
-
POSITION USING
POWDER DETERGENT
17ENGLISH
If you want your laundry to be spun or use temperature different from the one proposed by the washing machine, pess the Spin “ ” and the temperature “ ” touchpads repeatedly to change the spin speed and temperature.Press the option touchpads, if you want your laundry to be washed with special functions.
Different functions can be combined which is dependent on the program selected.If an option is not compatible with the wash program selected, the message “Not Available” will flash on display along with buzzer sound.
If you want to adjust washing time, press the “Time Manager ( )” touchpad repeatedly to increase or decrease washing time. See Time Manager guide on page 13.If you want to define the end of the washing program, press the “Delay End ( )” touchpad repeatedly to choose your washing machine working time.
5.3 Options Setting
The appliance will automatically adjust the selected program duration according to the type and size of the load.
-
The display will show adjusted program duration.
-
To start a program, press the Start/Pause touchpad. The corresponding pilot light will stop flashing and a default program duration will be displayed on the screen.
5.4 Starting A Cycle ( )
After approx. 15 minutes from the start of a program:
If you press any touchpad while a program is operating, the message “Not Available” will flash on display along with buzzer sound. (except Start/Pause touchpad and On/Off button)
To pause, press Start/ Pause. The indicator will start flashing.
-
Press the Start/Pause again. The program will continue.
-
Changing a running program is possible only by switching off the appliance.
Press the “On/Off” button to cancel the program and to turn off the appliance.
-
-
-
-
5.5 Interruption Of A Program
5.6 Changing A Program
It may be possible to change some of the options after a wash program has started.
Press the “On/Off” button again to start the appliance.
-
5.7 Changing The Options
Press the touchpad Start/Pause. The indicator will start flashing.
1.
If available change the options that you wish.
2.
Press Start/Pause again. The program will continue.
3.
1.
2.
While a program or the Delay End is operating, the appliance door is locked and the display shows the indicator “ ”. First, set the machine to PAUSE by pressing the “Start/Pause” touchpad. Wait until the door lock indicator “ ” goes off, then the door can be opened. If the door lock indicator “ ” does not disappear, this means that the machine is already heating and the water level is above the bottom edge of the door or the drum is turning. In this case the door CAN NOT be opened. If you need to open it, you must drain the water to open the door.
In case of emergency please refer to “Emergency door opening” on page 28.
5.8 Opening The Door
NOTE
NOTE
Now you can set a new wash program and change any available options. Press Start/Pause to start the new program.
The appliance will not drain the water (except programs; Refresh, Spin, Rinse + Spin, Tub Clean).
18 www.electrolux.com
When the program is completed and the door lock indicator “ ” goes off, you can open the door.
When The Washing Program Is Completed, But There Is Water In The Drum
The drum turns regularly to prevent the creases in the laundry.
(Option “Rinse Hold” or “Extra Silent” is used)
You must drain the water to open the door.
The indicator “Start/Pause” flashes to remind you to drain the water.
-
-
-
5.10
The appliance stops automatically.The acoustic signal will operate.The display will show “ ”.The indicator of the touchpad Start/Pause goes off.
----
--
-
-
The door lock indicator “ ” goes off.Remove the laundry from the appliance. Make sure that the drum is empty.Keep the door partly open, to prevent the mildew and odours.Turn off the water tap.
5.9 At The End Of The Program
At the end of the program, the time remaining can suddenly decrease from 7 minutes or less to 0 due to the overestimated total program time during the load sensing phase. In some cases (with perfectly balanced load) the program time can be shorter than the time estimated after the load sensing phase is completed. This is a normal behavior of the machine and not a cause for concern as it does not compromise its performance.
AUTO Off Mode5.11The AUTO Off mode automatically deactivates the appliance to decrease the energy consumption when:
You do not press any buttons for 5 minutes before you press “Start/Pause”.
Press the “On/Off” button to activate the appliance again.
After 5 minutes from the end of the washing program.
Press the “On/Off” button to reactivate the appliance. Display will show the end of the last wash.
-
Press any touchpad again to show the last wash program.
-
Touch the program touchpad to set a new wash program.
-
NOTE:
The door lock indicator “ ” is on. The door stays locked.
1.To drain the water:
Press the “Start/Pause ” touchpad. The appliance drains the water and spins with the maximum spin speed for selected program.Alternatively, before pressing the “Start/Pause” touchpad, you can press the “Spin ” touchpad to change the spin speed. You can select “No Spin”, if you want the machine to only drain the water.
2.
Press the “On/Off” button to deactivate the appliance.
3.
After approximately 18 hours, if you do not press Start/Pause touchpad, the appliance will drain and spin automati-cally (except for “Wool” program) .
19ENGLISH
WASHING HINTS6.
Follow the wash code symbols on each garment label and the manufacturer’s washing instructions. Sort the laundry as follows: whites, coloureds, synthetics, delicates, woollens.
6.1 Sorting The Laundry
6.2 Temperatures
90°C
60°C50°C
40°C30°CCold
For normally soiled, colourfast garments (e.g. shirts, night dresses, pajamas....) in linen, cotton or synthetic fibres and for lightly soiled white cotton (e.g.underwear).
For delicate items (e.g. net curtains), mixed laundry including synthetic fibres and woollens bearing the label pure new wool, machine washable, non-shrink.
For normally soiled white cottons and linen (e.g. teacloths, towels, tablecloths, sheets...).
Never wash whites and coloureds together. Whites may lose their “whiteness” in the wash.New coloured items may run in the first wash; they should therefore be washed separately the first time.
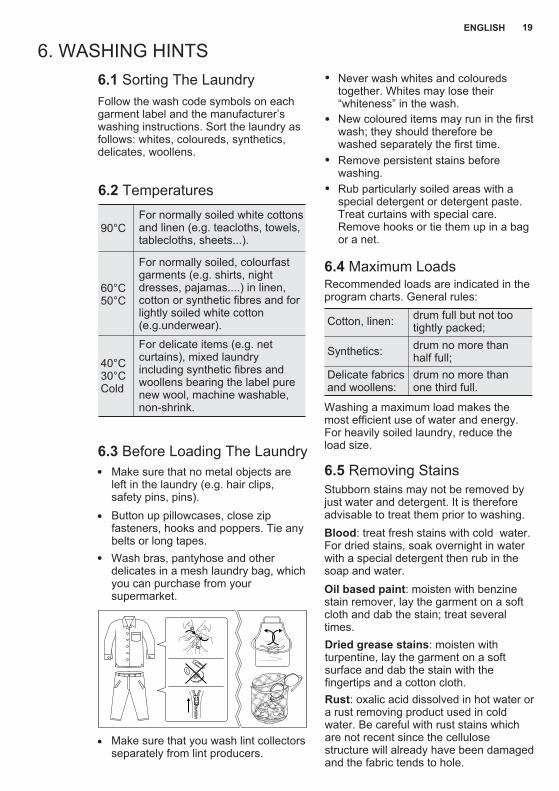
Button up pillowcases, close zip fasteners, hooks and poppers. Tie any belts or long tapes.
Remove persistent stains before washing. Rub particularly soiled areas with a special detergent or detergent paste. Treat curtains with special care. Remove hooks or tie them up in a bag or a net.
Make sure that no metal objects are left in the laundry (e.g. hair clips, safety pins, pins).
6.3 Before Loading The Laundry
Recommended loads are indicated in the program charts. General rules:
Washing a maximum load makes the most efficient use of water and energy. For heavily soiled laundry, reduce the load size.
Cotton, linen: drum full but not too tightly packed;
Synthetics: drum no more than half full;
Delicate fabrics and woollens:
drum no more than one third full.
6.4 Maximum Loads
Blood: treat fresh stains with cold water. For dried stains, soak overnight in water with a special detergent then rub in the soap and water.Oil based paint: moisten with benzine stain remover, lay the garment on a soft cloth and dab the stain; treat several times.Dried grease stains: moisten with turpentine, lay the garment on a soft surface and dab the stain with the fingertips and a cotton cloth.
Stubborn stains may not be removed by just water and detergent. It is therefore advisable to treat them prior to washing.
6.5 Removing Stains
Rust: oxalic acid dissolved in hot water or a rust removing product used in cold water. Be careful with rust stains which are not recent since the cellulose structure will already have been damaged and the fabric tends to hole.
Wash bras, pantyhose and other delicates in a mesh laundry bag, which you can purchase from your supermarket.
Make sure that you wash lint collectors separately from lint producers.
20 www.electrolux.com
Mould stains: treat with bleach, rinse well (whites and fast coloureds only).Grass: soap lightly and treat with bleach (whites and fast coloureds only).Ball point pen and glue: moisten with acetone (*), lay the garment on a soft cloth and dab the stain.Lipstick: moisten with acetone (*) as above, then treat stains with methylated spirits. Remove any residual marks from white fabrics with bleach.Red wine: soak in water and detergent, rinse and treat with acetic or citric acid, then rinse. Treat any residual marks with bleach.Ink: depending on the type of ink, moisten the fabric first with acetone (*), then with acetic acid; treat any residual marks on white fabrics with bleach and then rinse thoroughly.Tar stains: first treat with stain remover, methylated spirits or benzine, then rub with detergent paste. (*) do not use acetone on artificial silk.
Low sudsing detergent is required for this washing machine to prevent oversudsing problems, unsatisfied washing result and harm to the machine. Low sudsing detergents designed for front load washing machines are labelled “Front Loading”, “high efficiency”, “HE”, such as Cold Power for Front Loaders or “Matic”.
Detergents Type And Quantity Of Detergent
Do not use wrong types of detergent, such as Top Loading, Handwash detergent or Soap-Based products in your frontload washing machine. This can result in excessive suds, longer cycle time, low spin speeds, poor rinsing and overloading of the motor.
6.6
The choice and quantity of detergent will depend on ;
type of fabric (delicates, woollens, cottons, etc.) ;
degree of soil ;size of the load ;
wash temperature ; andhardness of the water used.
the colour of clothes ;
Information on hardness of the water in your area can be obtained from the relevant water supply company, or from your local authority.You may have to try using the detergent quantity as per manufacturers’ instructions then compare the wash result to the list below and adjust the amount of detergent for your future washes accordingly.
Water hardness is classified by so-called “degrees” of hardness.
The choice of detergent and use of correct quantities not only affects your wash performance, but also helps to avoid waste and protect the environment. Although biodegradable, detergents contain substances which in large quantities can upset the delicate balance of nature.
Quantity of detergent to be used
the washload to turn grey,greasy clothes.
sudsing,
inadequate rinsing.reduced washing effect,
Not enough washing powder causes:
Too much washing powder causes:
you are washing a small load,
large amounts of foam during washing.the laundry is lightly soiled,
Use less detergent if:
21ENGLISH
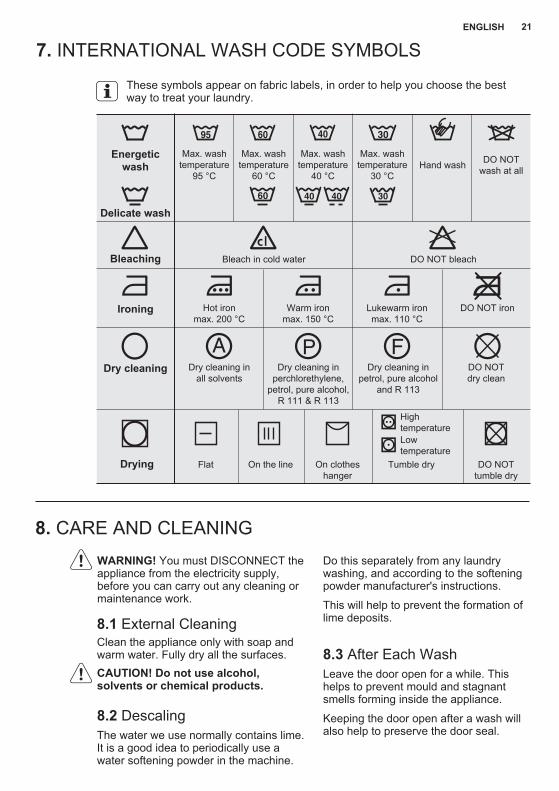
INTERNATIONAL WASH CODE SYMBOLS7.
CARE AND CLEANING8.WARNING! You must DISCONNECT the appliance from the electricity supply, before you can carry out any cleaning or maintenance work.
The water we use normally contains lime. It is a good idea to periodically use a water softening powder in the machine.
Clean the appliance only with soap and warm water. Fully dry all the surfaces.CAUTION! Do not use alcohol, solvents or chemical products.
Do this separately from any laundry washing, and according to the softening powder manufacturer's instructions.
This will help to prevent the formation of lime deposits.
8.2 Descaling
8.1 External Cleaning
These symbols appear on fabric labels, in order to help you choose the best way to treat your laundry.
Bleach in cold water DO NOT bleachBleaching
Hand washMax. wash
temperature 95 °C
Hot ironmax. 200 °C
Dry cleaning in all solvents
Dry cleaning in perchlorethylene,
petrol, pure alcohol, R 111 & R 113
Dry cleaning in petrol, pure alcohol
and R 113
DO NOT dry clean
Warm ironmax. 150 °C
Lukewarm ironmax. 110 °C
DO NOT iron
Max. wash temperature
60 °C
Max. wash temperature
40 °C
Max. wash temperature
30 °C
DO NOT wash at all
Ironing
Dry cleaning
Drying Flat Tumble dry DO NOTtumble dry
HightemperatureLowtemperature
On clotheshanger
On the line
Energetic wash
Delicate wash
Leave the door open for a while. This helps to prevent mould and stagnant smells forming inside the appliance.
Keeping the door open after a wash will also help to preserve the door seal.
8.3 After Each Wash
22 www.electrolux.com
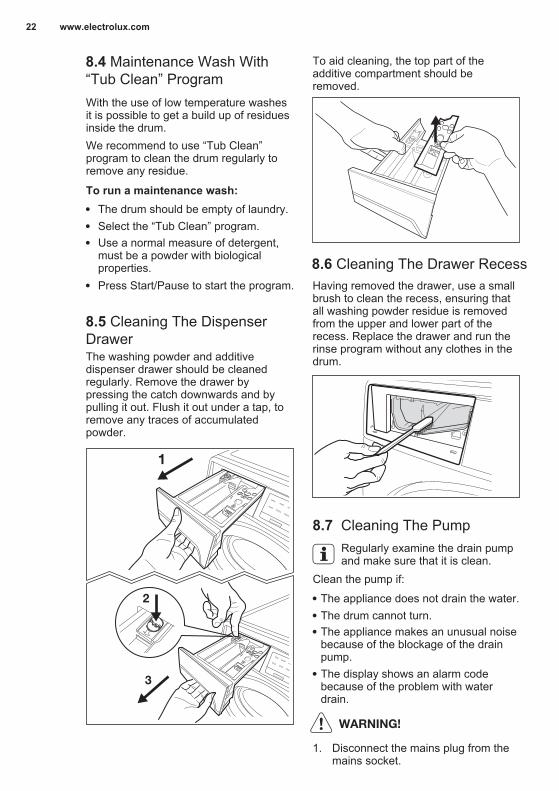
The washing powder and additive dispenser drawer should be cleaned regularly. Remove the drawer by pressing the catch downwards and by pulling it out. Flush it out under a tap, to remove any traces of accumulated powder.
8.5 Cleaning The Dispenser Drawer
8.4 Maintenance Wash With“Tub Clean” Program
To aid cleaning, the top part of the additive compartment should be removed.
Having removed the drawer, use a small brush to clean the recess, ensuring that all washing powder residue is removed from the upper and lower part of the recess. Replace the drawer and run the rinse program without any clothes in the drum.
8.6 Cleaning The Drawer Recess
8.7 Cleaning The Pump
The appliance does not drain the water.The drum cannot turn.The appliance makes an unusual noise because of the blockage of the drain pump.The display shows an alarm code because of the problem with water drain.
Regularly examine the drain pump and make sure that it is clean.
Clean the pump if:
1. Disconnect the mains plug from the mains socket.
WARNING!
3
1
2
With the use of low temperature washes it is possible to get a build up of residues inside the drum.We recommend to use “Tub Clean” program to clean the drum regularly to remove any residue.
The drum should be empty of laundry.
Press Start/Pause to start the program.
Select the “Tub Clean” program.Use a normal measure of detergent, must be a powder with biological properties.
To run a maintenance wash:
23ENGLISH
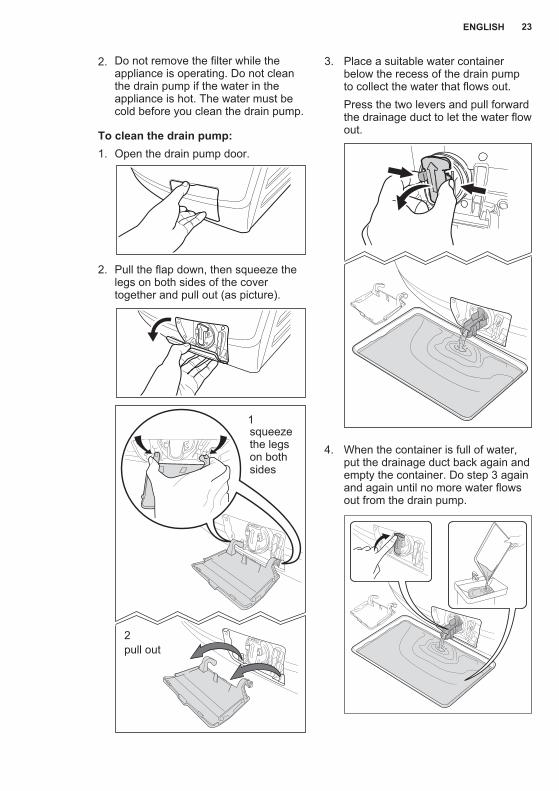
2. Do not remove the filter while the appliance is operating. Do not clean the drain pump if the water in the appliance is hot. The water must be cold before you clean the drain pump.
To clean the drain pump:1. Open the drain pump door.
2. Pull the flap down, then squeeze the legs on both sides of the cover together and pull out (as picture).
3. Place a suitable water container below the recess of the drain pump to collect the water that flows out.Press the two levers and pull forward the drainage duct to let the water flow out.
squeeze the legs on both sides
pull out
1
2
4. When the container is full of water, put the drainage duct back again and empty the container. Do step 3 again and again until no more water flows out from the drain pump.
24 www.electrolux.com
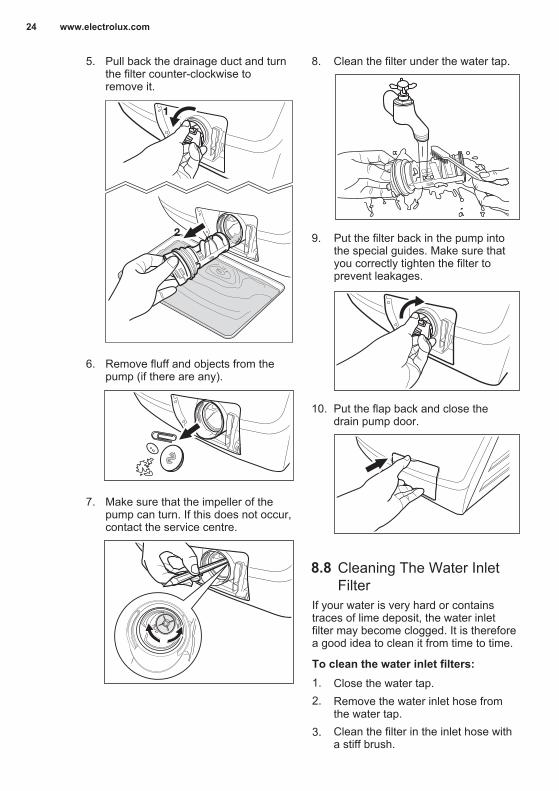
6. Remove fluff and objects from the pump (if there are any).
7. Make sure that the impeller of the pump can turn. If this does not occur, contact the service centre.
8. Clean the filter under the water tap.
9. Put the filter back in the pump into the special guides. Make sure that you correctly tighten the filter to prevent leakages.
10. Put the flap back and close the drain pump door.
Remove the water inlet hose from the water tap. Clean the filter in the inlet hose with a stiff brush.
5. Pull back the drainage duct and turn the filter counter-clockwise to remove it.
1
2
If your water is very hard or contains traces of lime deposit, the water inlet filter may become clogged. It is therefore a good idea to clean it from time to time.
Cleaning The Water Inlet Filter
8.8
To clean the water inlet filters:1. Close the water tap.2.
3.
25ENGLISH
4.
5.
6.
7. Open the water tap.
45°
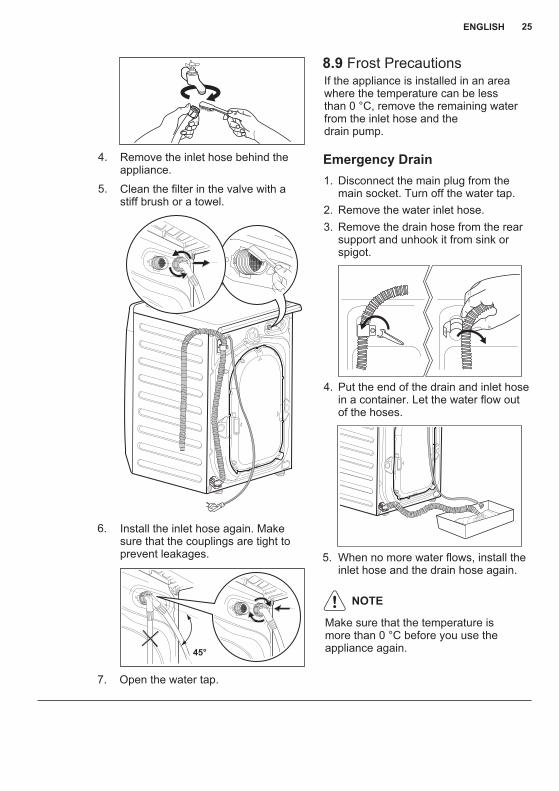
Remove the inlet hose behind the appliance.
Clean the filter in the valve with a stiff brush or a towel.
Install the inlet hose again. Make sure that the couplings are tight to prevent leakages.
If the appliance is installed in an area where the temperature can be less than 0 °C, remove the remaining water from the inlet hose and thedrain pump.
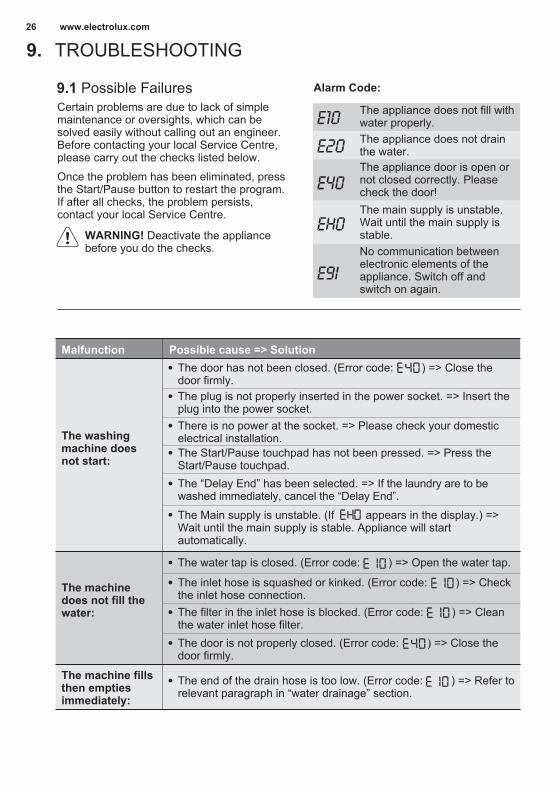
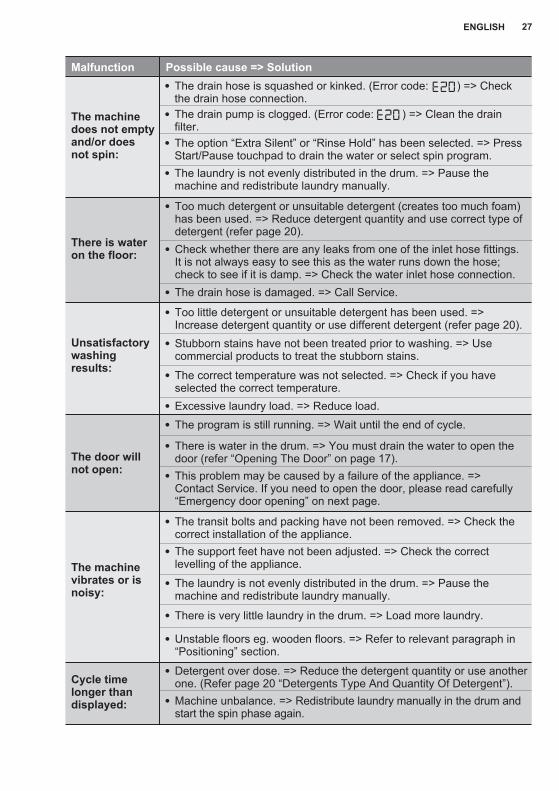
Emergency Drain
8.9 Frost Precautions
Disconnect the main plug from the main socket. Turn off the water tap.
1.
2. Remove the water inlet hose.3. Remove the drain hose from the rear
support and unhook it from sink or spigot.
Put the end of the drain and inlet hose in a container. Let the water flow out of the hoses.
4.
5. When no more water flows, install the inlet hose and the drain hose again.
Make sure that the temperature is more than 0 °C before you use the appliance again.
NOTE
26 www.electrolux.com
9.1 Possible Failures
TROUBLESHOOTING9.
The door has not been closed. (Error code: ) => Close the door firmly.The plug is not properly inserted in the power socket. => Insert the plug into the power socket.There is no power at the socket. => Please check your domestic electrical installation.The Start/Pause touchpad has not been pressed. => Press the Start/Pause touchpad.The “Delay End” has been selected. => If the laundry are to be washed immediately, cancel the “Delay End”.
The Main supply is unstable. (If appears in the display.) => Wait until the main supply is stable. Appliance will start automatically.
The inlet hose is squashed or kinked. (Error code: ) => Check the inlet hose connection.
The end of the drain hose is too low. (Error code: ) => Refer to relevant paragraph in “water drainage” section.
The filter in the inlet hose is blocked. (Error code: ) => Clean the water inlet hose filter.The door is not properly closed. (Error code: ) => Close the door firmly.
The water tap is closed. (Error code: ) => Open the water tap.
Certain problems are due to lack of simple maintenance or oversights, which can be solved easily without calling out an engineer. Before contacting your local Service Centre, please carry out the checks listed below.
Once the problem has been eliminated, press the Start/Pause button to restart the program. If after all checks, the problem persists, contact your local Service Centre.
The washing machine does not start:
The machine does not fill the water:
The machine fills then empties immediately:
Malfunction Possible cause => Solution
The appliance does not fill with water properly.
The appliance door is open or not closed correctly. Please check the door!
The appliance does not drain the water.
The main supply is unstable. Wait until the main supply is stable.No communication between electronic elements of the appliance. Switch off and switch on again.
WARNING! Deactivate the appliance before you do the checks.
Alarm Code:
27ENGLISH
Malfunction Possible cause => Solution
Too much detergent or unsuitable detergent (creates too much foam) has been used. => Reduce detergent quantity and use correct type of detergent (refer page 20).Check whether there are any leaks from one of the inlet hose fittings. It is not always easy to see this as the water runs down the hose; check to see if it is damp. => Check the water inlet hose connection.
Too little detergent or unsuitable detergent has been used. => Increase detergent quantity or use different detergent (refer page 20).
The program is still running. => Wait until the end of cycle.
The transit bolts and packing have not been removed. => Check the correct installation of the appliance.
Detergent over dose. => Reduce the detergent quantity or use another one. (Refer page 20 “Detergents Type And Quantity Of Detergent”).Machine unbalance. => Redistribute laundry manually in the drum and start the spin phase again.
The support feet have not been adjusted. => Check the correct levelling of the appliance.
The laundry is not evenly distributed in the drum. => Pause the machine and redistribute laundry manually.
There is very little laundry in the drum. => Load more laundry.
Unstable floors eg. wooden floors. => Refer to relevant paragraph in “Positioning” section.
There is water in the drum. => You must drain the water to open the door (refer “Opening The Door” on page 17).This problem may be caused by a failure of the appliance. => Contact Service. If you need to open the door, please read carefully “Emergency door opening” on next page.
Stubborn stains have not been treated prior to washing. => Use commercial products to treat the stubborn stains.
The correct temperature was not selected. => Check if you have selected the correct temperature.Excessive laundry load. => Reduce load.
The drain hose is damaged. => Call Service.
There is water on the floor:
Unsatisfactory washing results:
The door will not open:
The machine vibrates or is noisy:
Cycle time longer than displayed:
The drain hose is squashed or kinked. (Error code: ) => Check the drain hose connection.The drain pump is clogged. (Error code: ) => Clean the drain filter.
The machine does not empty and/or does not spin:
The option “Extra Silent” or “Rinse Hold” has been selected. => Press Start/Pause touchpad to drain the water or select spin program.The laundry is not evenly distributed in the drum. => Pause the machine and redistribute laundry manually.
28 www.electrolux.com
In case of power failure or appliance failure, the appliance door remains locked. The wash program continues when power is restored. If the door remains locked in case of failure, it is possible to open it using the emergency unlock feature.
Before opening the door:
9.2 Emergency Door Opening
Malfunction Possible cause => Solution
The electronic unbalance detection device has cut in because the laundry is not evenly distributed in the drum. The laundry is redistributed by reverse rotation of the drum. This may happen several times before the unbalance disappears and normal spinning can resume. If, after 10 minutes, the laundry is still not evenly distributed in the drum, the machine will not spin. In this case, redistribute the load manually and select the spin program.=> Pause the machine and redistribute laundry manually.
Machine not installed properly. => Make sure the levelling of the appliance is correct. Refer to “Installation”.
Transit bolts or packaging not removed. => Make sure that the packaging and/or the transit bolts are removed. Refer to “Unpacking”.
The load may be too small. => Add more laundry in the drum.
Machines based on modern technology operate very economically using very little water without affecting performance.
Spinning starts late or the machine does not spin:
The machine makes an unusual noise:
No water is visible in the drum:
Make sure that the water temperature and the laundry are not hot. Wait until they cool down if necessary.
WARNING!
Make sure that the drum is not rotating. Wait until the drum stops rotating if necessary.
WARNING!
Make sure that the water level inside the drum is not too high. If necessary, perform an Emergency Drain (see page 25).
WARNING!
The appliance calculated a new time according to the laundry load. The cycle is shorter than the time displayed.
29ENGLISH
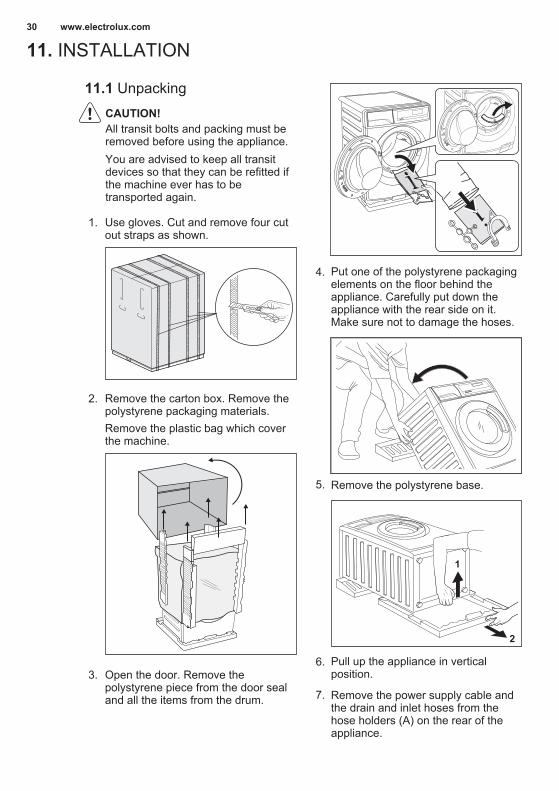
TECHNICAL DATA10.
Dimensions (Height / Width / Depth)
Maximum dryclothes capacity
Spin speed (Maximum / Minimum) 1400 rpm / 400 rpm
CottonsMixedDelicatesDaily 60Quick 18RefreshBaby CareSportsWoolEnergy SaverSpinRinse + SpinBeddingHeavy Duty
11 Kg4 Kg4 Kg
5.5 Kg1.5 Kg1.5 Kg
4 Kg2.5 Kg
2 Kg11 Kg11 Kg11 Kg
3 Kg11 Kg
85 X 60 X 66.9 cm
Power supply (Voltage / Frequency)
Total power absorbed
Water supply pressure (Maximum / Minimum) 0.8 MPa / 0.05 MPa
220-240 V / 50 Hz
2100 W
Minimum fuse protection 10 A
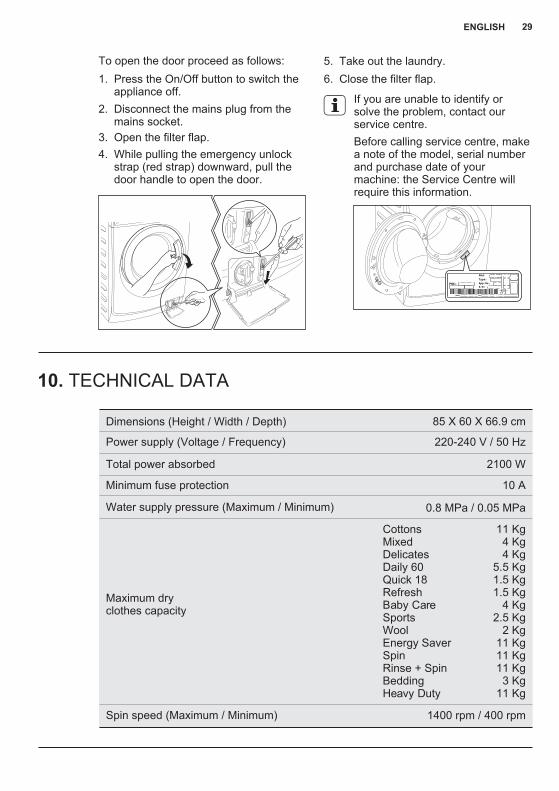
To open the door proceed as follows:
If you are unable to identify or solve the problem, contact our service centre. Before calling service centre, make a note of the model, serial number and purchase date of your machine: the Service Centre will require this information.
1. Press the On/Off button to switch the appliance off.
2. Disconnect the mains plug from the mains socket.
3. Open the filter flap.4. While pulling the emergency unlock
strap (red strap) downward, pull the door handle to open the door.
5. Take out the laundry.6. Close the filter flap.
30 www.electrolux.com
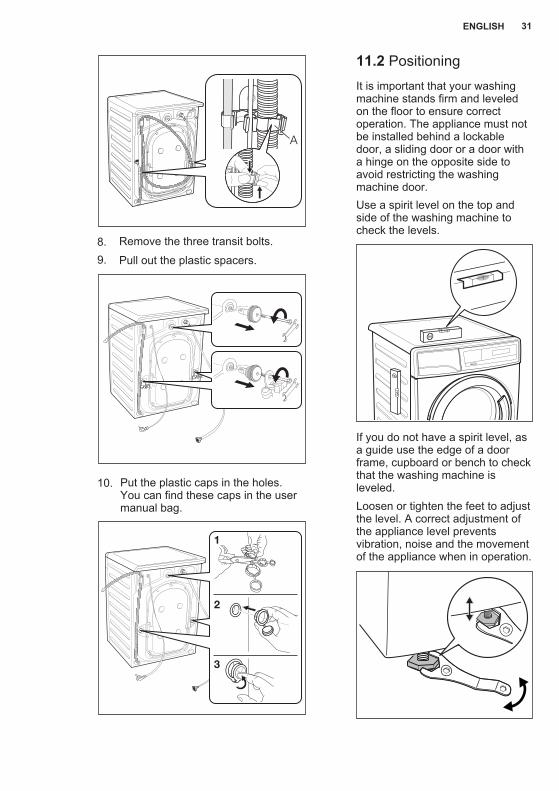
INSTALLATION11.
4.
5. Remove the polystyrene base.
6.
Put one of the polystyrene packaging elements on the floor behind the appliance. Carefully put down the appliance with the rear side on it. Make sure not to damage the hoses.
Pull up the appliance in vertical position.
11.1 Unpacking
Use gloves. Cut and remove four cut out straps as shown.
1.
Remove the carton box. Remove the polystyrene packaging materials. Remove the plastic bag which cover the machine.
2.
Open the door. Remove the polystyrene piece from the door seal and all the items from the drum.
3.
7. Remove the power supply cable and the drain and inlet hoses from the hose holders (A) on the rear of the appliance.
1
2
You are advised to keep all transit devices so that they can be refitted if the machine ever has to be transported again.
All transit bolts and packing must be removed before using the appliance.
CAUTION!
31ENGLISH
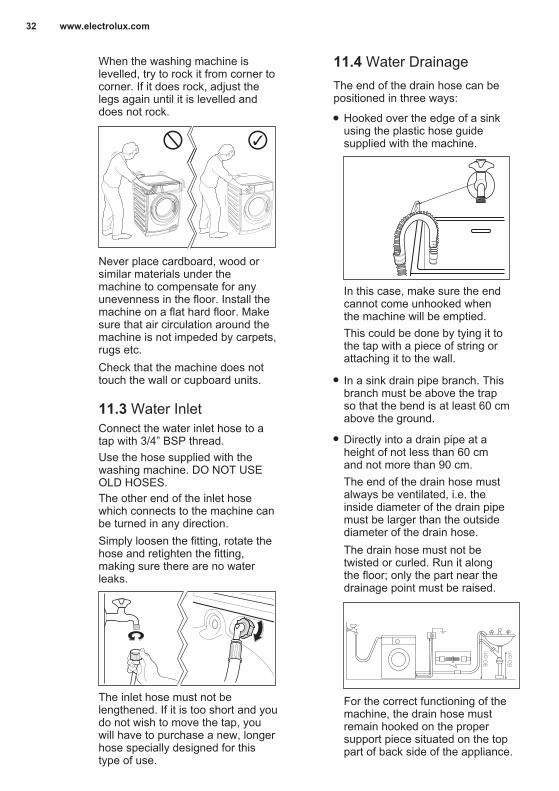
8.9. Pull out the plastic spacers.
10. Put the plastic caps in the holes. You can find these caps in the user manual bag.
Remove the three transit bolts.
A
1
2
3
Loosen or tighten the feet to adjust the level. A correct adjustment of the appliance level prevents vibration, noise and the movement of the appliance when in operation.
11.2 Positioning
Use a spirit level on the top and side of the washing machine to check the levels.
If you do not have a spirit level, as a guide use the edge of a door frame, cupboard or bench to check that the washing machine is leveled.
It is important that your washing machine stands firm and leveled on the floor to ensure correct operation. The appliance must not be installed behind a lockable door, a sliding door or a door with a hinge on the opposite side to avoid restricting the washing machine door.
32 www.electrolux.com
Never place cardboard, wood or similar materials under the machine to compensate for any unevenness in the floor. Install the machine on a flat hard floor. Make sure that air circulation around the machine is not impeded by carpets, rugs etc.
When the washing machine is levelled, try to rock it from corner to corner. If it does rock, adjust the legs again until it is levelled and does not rock.
Connect the water inlet hose to a tap with 3/4” BSP thread.Use the hose supplied with the washing machine. DO NOT USE OLD HOSES.The other end of the inlet hose which connects to the machine can be turned in any direction. Simply loosen the fitting, rotate the hose and retighten the fitting, making sure there are no water leaks.
11.3 Water Inlet
Check that the machine does not touch the wall or cupboard units.
The inlet hose must not be lengthened. If it is too short and you do not wish to move the tap, you will have to purchase a new, longer hose specially designed for this type of use.
This could be done by tying it to the tap with a piece of string or attaching it to the wall.
In a sink drain pipe branch. This branch must be above the trap so that the bend is at least 60 cm above the ground.
Directly into a drain pipe at a height of not less than 60 cm and not more than 90 cm.The end of the drain hose must always be ventilated, i.e. the inside diameter of the drain pipe must be larger than the outside diameter of the drain hose.The drain hose must not be twisted or curled. Run it along the floor; only the part near the drainage point must be raised.
The end of the drain hose can be positioned in three ways:
Hooked over the edge of a sink using the plastic hose guide supplied with the machine.
In this case, make sure the end cannot come unhooked when the machine will be emptied.
11.4 Water Drainage
For the correct functioning of the machine, the drain hose must remain hooked on the proper support piece situated on the top part of back side of the appliance.
90 c
m
60 c
m
33ENGLISH
This machine is designed to operate on a 220-240 V, single-phase, 50 Hz supply.
11.5 Electrical Connection
“An incorrect power supply may void your warranty.”Check that your domestic electrical installation can take the maximum load required (2.1 kW), also taking into account any other appliances in use.
The manufacturer declines any responsibility for damage or injury through failure to comply with the above safety precaution. Should the appliance power supply cable need to be replaced, this shall be carried out by our Service Centre.When the appliance is installed, the power supply cable must be easily accessible. If this appliance is supplied from a cord extension set or electrical portable outlet device, the cord extension set or electrical portable device must be positioned so that it is not subject to splashing or ingress of moisture.
Connect the machine to an earthed socket outlet.
CAUTION!
The materials marked with the symbol are recyclable.
>PE<=polyethylene>PS<=polystyrene>PP<=polypropyleneThis means that they can be recycled by disposing them properly in appropriate collection containers.
To save water, energy and to help protect the environment, we recommend that you follow these tips:
Use authorized disposal sites for your old appliance. Help to keep your country tidy!
The symbol on the product or on its packaging indicates that this product may not be treated as household waste. Instead it shall be handed over to the applicable collection point for the recycling of electrical and electronic equipment.By ensuring this product is disposed of correctly, you will help prevent potential negative consequences for the environment and human health, which could otherwise be caused by inappropriate waste handling of this product.
For more detailed information about recycling of this product, please contact your local city office, your household waste disposal service or the shop where you purchased the product.
12.1 Packaging Materials
12.3 Ecological Hints
12.2 Old Machine
ENVIRONMENT CONCERNS12.
Normally soiled laundry may be washed without prewashing in order to save detergent, water and time (the environment is protected too!).The machine works more economically if it is fully loaded.With adequate pre-treatment, stains and limited soiling can be removed; the laundry can then be washed at a lower temperature.Measure out detergent according to the water hardness, the degree of soiling and the quantity of laundry being washed.
เยี่ยมชมเว็บไซตของเราไดที่ รับคำแนะนำในการใชงาน, เอกสารแผนพับ, ขอมูลการแกไขปญหา, ขอมูลการใหบริการ, ซื้ออุปกรณเสริม
และอะไหล, การลงทะเบียนผลิตภัณฑผานระบบอินเตอรเนต ไดที่ : www.electrolux.com
ขอมูลอาจมีการเปลี่ยนแปลงโดยไมตองแจงใหทราบ
34 www.electrolux.com
เราคิดถึงคุณเสมอ
ฝายใหบริการและดูแลลูกคา
ขอบพระคุณที่ซื้อเครื่องใชไฟฟาจาก อีเลคโทรลักซ คุณไดเลือกผลิตภัณฑที่ผลิตขึ้นโดยผูผลิตที่มีความ
เชี่ยวชาญและโดดเดนดานนวัตกรรมมานับหลายทศวรรษ ผลิตภัณฑของเรามีความโดดเดนและมีสไตล
ออกแบบมาโดยคำนึงถึงผูใชโดยเฉพาะ ไมวาคุณจะใชผลิตภัณฑเมื่อใดคุณจึงมั่นใจไดวาจะไดรับ
ประสิทธิภาพในการทำงานตามที่คาดหวังทุกครั้ง
ยินดีตอนรับสู อีเลคโทรลักซ
แนะนำใหใชอะไหลแทและขณะติดตอขอรับบริการกรุณาจัดเตรียมขอมูลตอไปนี้ใหพรอม ไดแก ชื่อรุน, PNC,
และหมายเลขเครื่อง คุณสามารถตรวจสอบขอมูลไดจากแผนปายขอมูลบริเวณมุมดานลางของประตูเครื่อง
สารบัญ
1.1 เงื่อนไขการใชงาน1.2 ความปลอดภัยสำหรับเด็ก1.3 อุปกรณความปลอดภัยสำหรับเด็ก (ปุมล็อคปองกันการปดประตูเครื่อง)1.4 ความปลอดภัยทั่วไป1.5 การติดตั้ง1.6 การใชงาน
1. ขอมูลดานความปลอดภัย........................................................................................................... 36
................................................................................................ 36.................................... 37
....................................................................................................... 37...................................................................................................................... 38..................................................................................................................... 38
2.1 ชิ้นสวนของเครื่อง2.2 คุณสมบัติพิเศษของเครื่อง2.3 อุปกรณเสริม
2. รายละเอียดของผลิตภัณฑ........................................................................................................... 39
................................................................................................ 40.................................................................................................................. 40
3.1 รายละเอียดแผงควบคุม3.2 จอแสดงผล3.3 ตารางโปรแกรม3.4 ตัวเลือกเสริมที่สามารถใชรวมกับโปรแกรมได3.5 การใชงานตัวเลือกเสริม3.6 การตั้งคาการทำงาน3.7 ปุม เริ่ม/หยุด ( ) และ เพิ่มผา ( ) (ระบบสัมผัส)
3. แผงควบคุมการทำงาน................................................................................................... 41
.................................................................................................................... 41.............................................................................................................. 42
....................................................................... 43.................................................................................................... 43
....................................................................................................... 45...................................................... 46
4. กอนการใชงานครั้งแรก .................................................................................................... 46
คำเตือน / ขอมูลดานความปลอดภัย
ขอควรระวังขอมูลและคำแนะนำทั่วไป
ขอมูลดานสิ่งแวดลอม
35ภาษาไทย
สารบัญ
5.1 การบรรจุผาลงถังซัก5.2 การใชสารซักฟอกและน้ำยาปรับสภาพ5.3 การตั้งคาตัวเลือกเสริม5.4 เริ่มการทำงานของโปรแกรม5.5 หยุดการทำงานของโปรแกรม5.6 การเปลี่ยนโปรแกรมการทำงาน5.7 การเปลี่ยนตัวเลือกเสริม5.8 การเปดประตูเครื่องซักผา5.9 หลังจากจบการทำงานของโปรแกรม5.10 ขณะโปรแกรมการซักเสร็จสิ้นแตมีน้ำคางอยูในถัง5.11 โหมดลดการใชพลังงานโดยอัตโนมัติ
5. การใชงานประจำวัน......................................................................................................... 47
................................................................................. 47...................................................................................................... 48
............................................................................................... 48............................................................................................. 49
.......................................................................................... 49.................................................................................................... 49.................................................................................................. 49
.................................................................................... 49................................................................ 50
.................................................................................. 50
6.1 การแยกประเภทผาที่จะซัก6.2 อุณหภูมิ6.3 กอนบรรจุผาในถังซัก6.4 ปริมาณผาที่บรรจุสูงสุด6.5 การขจัดคราบ6.6 ชนิดของผงซักฟอกและปริมาณการใชงาน
6. คำแนะนำในการซัก................................................................................................ 51
......................................................................................................................... 51........................................................................................................ 51
..................................................................................................... 51.................................................................................................................. 51
............................................................................ 52
8.1 การทำความสะอาดภายนอก8.2 การขจัดตะกรัน8.3 หลังการซักแตละรอบ8.4 การซักเพื่อดูแลรักษาเครื่องดวยโปรแกรม “Tub Clean (ลางถังซัก)”8.5 การทำความสะอาดถาดจายสารซักฟอกและน้ำยาปรับผานุม8.6 การทำความสะอาดชองใสถาดจายสารซักฟอก8.7 การทำความสะอาดปมระบายน้ำ8.8 การทำความสะอาดตัวกรองทอน้ำเขา8.9 อันตรายจากการเยือกแข็ง
8. การดูแลรักษาและทำความสะอาด.............................................................................................. 54
............................................................................................................... 54........................................................................................................ 54
........................................ 54.................................................... 54
....................................................................... 55......................................................................................... 55
................................................................................... 57................................................................................................. 58
9.1 ปญหาที่อาจเกิดขึ้น9.2 การเปดประตูกรณีฉุกเฉิน
9. การแกไขปญหา.......................................................................................................... 58
.................................................................................................. 61
7. สัญลักษณสากลสำหรับงานซัก ......................................................................................... 53
10. ขอมูลทางเทคนิค .............................................................................................................. 62
11.1 การแกะบรรจุภัณฑ11.2 พื้นที่การติดตัง11.3 การตอน้ำเขา11.4 ระบบระบายน้ำ11.5 การเชื่อมตอทางไฟฟา
........................................................................................................ 62.............................................................................................................. 64
................................................................................................................ 64.............................................................................................................. 65
.................................................................................................... 65
11. การติดตั้ง
12.1 วัสดุบรรจุภัณฑ12.2 เครื่องเกา12.3 คำแนะนำดานระบบนิเวศน
............................................................................................................. 66..................................................................................................................... 66
.............................................................................................. 66
12. ขอมูลเพื่อการรักษาสิ่งแวดลอม
36 www.electrolux.com
ขอมูลดานความปลอดภัย
เพื่อความปลอดภัยและการใชงานอยางถูกตอง กอนติดตั้งและใชงานเครื่อง
เปนครั้งแรก ขอใหอานคูมือการใชงานเลมนี้ รวมถึงเคล็ดวิธีการใชงาน และ
คำเตือนตางๆ อยางละเอียด.
เครื่องซักผานี้ผลิตขึ้นสำหรับใชในครัวเรือน หรือ ในลักษณะใกลเคียง เชนในบานในอพารทเมนท, คอนโดมิเนียมและที่อยูอาศัยที่ลักษณะคลายกันนี้
1.1 เงื่อนไขการใชงาน
เพื่อปองกันความผิดพลาดและอุบัติเหตุที่พึงหลีกเลี่ยงได ผูใชควรศึกษา
ขอมูลเกี่ยวกับการทำงานและคุณสมบัติดานความปลอดภัยของเครื่อง
อยางละเอียด
โปรดเก็บรักษาคูมือเลมนี้ไวกับเครื่อง หากมีการเคลื่อนยายหรือเปลี่ยนมือ
เพื่อใหผูใชทราบถึงวิธีใชงาน และระบบความปลอดภัยที่ถูกตองตลอดอายุ
การใชงานของเครื่อง
1.
●
●
●
●
●
●
เครื่องซักผานี้ไมไดรับการออกแบบมาใหเด็กหรือผูพิการใชงาน โดยที่
ไมมีผูดูแลอยางใกลชิด
เด็กเล็กควรมีผูดูแลในการใชงาน เพื่อใหแนใจวาจะไมเลนกับเครื่อง
ชิ้นสวนของบรรจุภัณฑ (เชน แผนพลาสติกใส โพลีสไตลีน) อาจเปน
อันตรายกับเด็ก โดยเด็กอาจนำไปเลนจนพลาสติกเขาไปขัดขวางระบบ
การหายใจ ทำใหหายใจไมออกได! ดังนั้นจึงควรเก็บใหพนมือเด็ก
● กอนการใชเครื่อง โปรดดูใหแนใจวาเด็กๆ หรือสัตวเลี้ยง ไมไดปน
เขาไปในถังซัก
● เครื่องนี้มีตัวเลือกล็อคปุมปองกันเด็ก ( ) ที่ชวยปองกันไมใหเด็ก
เลนกับแผงควบคุมของเครื่องได (ดูรายละเอียดในหนา 45)
เก็บผงซักฟอกทั้งหมดในที่ปลอดภัย ใหพนมือเด็ก
1.2 ความปลอดภัยสำหรับเด็ก
37ภาษาไทย
1.4 ความปลอดภัยทั่วไป
การแกไขรายการในขอมูลจำเพาะ หรือ
พยายามดัดแปลงเครื่องดวยวิธีใดก็ตาม อาจ
กอใหเกิดอันตรายขึ้นได
ระหวางการซักดวยโปรแกรมที่ใชอุณหภูมิสูง
ประตูกระจกอาจมีอุณหภูมิสูง ระวังอยาสัมผัส
กับประตู !
ดูใหแนใจวาไมมีสัตวเลี้ยงปนปายเขาไปในถัง
เพื่อปองกันปญหาดังกลาว กอนใชงาน โปรด
ตรวจดูในถังซักกอนทุกครั้ง
วัตถุอยางเหรียญ เข็มกลัดซอนปลาย ตะปู
สกรู หิน หรือวัตถุที่มีความแข็งและคม อาจ
กอใหเกิดความเสียหายตอเครื่องและผาได
ควรคัดแยกออกกอนนำผาเขาเครื่องซักผา
ใชน้ำยาปรับผานุมและผงซักฟอกในปริมาณ
ที่เหมาะสมเทานั้น หากเติมน้ำยามากเกินไป
อาจทำใหเกิดความเสียหายตอผาหรือเครื่อง
ซักผาได โปรดดูปริมาณที่แนะนำของบริษัท
ผูผลิตไดที่บรรจุภัณฑ
หามใชเครื่องซักผาเพื่อซักผาเสริมโครงลวด
วัสดุที่ไมเย็บขอบหรือขาด
ไมควรซอมเครื่องดวยตนเอง การซอมโดย
ผูที่ไมมีประสบการณ อาจทำใหเกิดการ
บาดเจ็บหรือเครื่องทำงานผิดปกติอยางรุนแรง
โปรดติดตอศูนยบริการใกลบานทาน และควร
ใชชิ้นสวนที่เปนของแททุกครั้ง
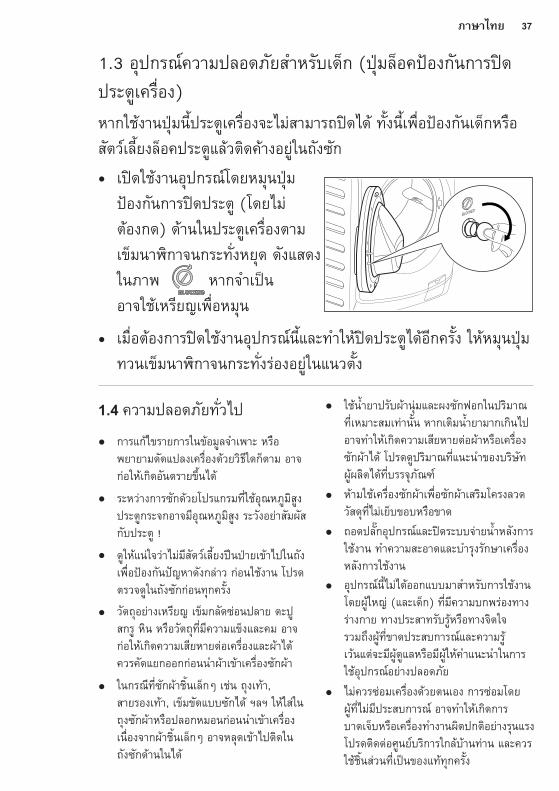
เปดใชงานอุปกรณโดยหมุนปุม
ปองกันการปดประตู (โดยไม
ตองกด) ดานในประตูเครื่องตาม
เข็มนาิกาจนกระทั่งหยุด ดังแสดง
ในภาพ หากจำเปน
อาจใชเหรียญเพื่อหมุน
หากใชงานปุมนี้ประตูเครื่องจะไมสามารถปดได ทั้งนี้เพื่อปองกันเด็กหรือ
สัตวเลี้ยงล็อคประตูแลวติดคางอยูในถังซัก
เมื่อตองการปดใชงานอุปกรณนี้และทำใหปดประตูไดอีกครั้ง ใหหมุนปุม
ทวนเข็มนาิกาจนกระทั่งรองอยูในแนวตั้ง
1.3 อุปกรณความปลอดภัยสำหรับเด็ก (ปุมล็อคปองกันการปด
ประตูเครื่อง)
●
●
●
●
●
●
ถอดปลั๊กอุปกรณและปดระบบจายน้ำหลังการ
ใชงาน ทำความสะอาดและบำรุงรักษาเครื่อง
หลังการใชงาน
●
อุปกรณนี้ไมไดออกแบบมาสำหรับการใชงาน
โดยผูใหญ (และเด็ก) ที่มีความบกพรองทาง
รางกาย ทางประสาทรับรูหรือทางจิตใจ
รวมถึงผูที่ขาดประสบการณและความรู
เวนแตจะมีผูดูแลหรือมีผูใหคำแนะนำในการ
ใชอุปกรณอยางปลอดภัย
●
●
●
●
ในกรณีที่ซักผาชิ้นเล็กๆ เชน ถุงเทา,
สายรองเทา, เข็มขัดแบบซักได ฯลฯ ใหใสใน
ถุงซักผาหรือปลอกหมอนกอนนำเขาเครื่อง
เนื่องจากผาชิ้นเล็กๆ อาจหลุดเขาไปติดใน
ถังซักดานในได
●
38 www.electrolux.com
เครื่องมีน้ำหนักมากจึงควรระมัดระวังในการ
เคลื่อนยายเครื่อง
เมื่อนำเครื่องออกจากบรรจุภัณฑ ใหตรวจวา
ไมมีความเสียหายใดๆ เกิดขึ้นกับเครื่อง
หากไมแนใจอยาใชงานเครื่องและใหติดตอ
ศูนยบริการอีเลคโทรลักซทันที
โปรดนำบรรจุภัณฑและสลักยึดเครื่องปองกัน
กระเทือนขณะขนสงออกจากเครื่องใหหมด
กอนที่จะใชงาน หากไมปฏิบัติตามอาจทำให
เครื่องและทรัพยสินเสียหายอยางรายแรงได
ดูรายละเอียดสวนท่ีเก่ียวของในคูมือการใชงาน
1.5 การติดตั้ง
หลังการติดตั้งอุปกรณ กรุณาตรวจสอบวา
อุปกรณไมขวางทางจายและระบายน้ำ และ
สวนบนของเครื่องไมสัมผัสกับสายไฟ
ในกรณีที่วางเครื่องไวบนพรม กรุณาปรับฐาน
เครื่องเพื่อใหอากาศถายเทไดสะดวก
ตรวจสอบใหแนใจเสมอวาไมมีน้ำรั่วไหลตาม
ทอหรือจุดเชื่อมตอตางๆ หลังการติดตั้ง
งานประปาที่จำเปนในการติดตั้งเครื่องตองทำ
โดยชางประปาที่ผานการอบรมแลว
งานไฟฟาที่จำเปนในการติดตั้งเครื่องตองทำ
โดยชางไฟฟาผูเชี่ยวชาญเทานั้น
เครื่องซักผานี้ออกแบบมาสำหรับใชงานใน
บานเทานั้น ไมควรนำไปใชเพื่อวัตถุประสงค
อื่นนอกเหนือจากที่ออกแบบไว
ซักแตผาที่สามารถซักดวยเครื่องไดเทานั้น
โปรดปฏิบัติตามคำแนะนำบนเสื้อผาแตละชิ้น
อยาบรรจุผาเกินปริมาณที่กำหนด โปรดดู
รายละเอียดสวนที่เกี่ยวของในคูมือการใชงาน
กอนการซัก ตรวจสอบวากระเปาตางๆ ไมมี
สิ่งของตกคาง ใหติดกระดุมและรูดซิปให
เรียบรอย และพยายามอยาซักผาที่ขอบลุย
หรือขาด ขจัดคราบติดคาง เชน สี หมึก สนิม
และหญากอนซัก หามซักเสื้อชั้นในเสริมโครง
ลวด โดยที่ไมใสในถุงซัก
ไมควรซักเสื้อผาที่เปอนผลิตภัณฑ ประเภท
ปโตรเคมีที่มีสมบัติในการระเหย กับเครื่อง-
ซักผานี้ ถาใชน้ำยาทำความสะอาดแบบปะทุ
งาย ควรตรวจสอบใหแนใจวาน้ำยานั้นระเหย
ออกจากเนื้อผาแลว กอนนำมาใสในเครื่อง
1.6 การใชงาน●
●
●
●
●
หามดึงสายไฟเพื่อถอดปลั๊กออกจากเตารับ
ใหจับหัวปลั๊กไฟทุกครั้งเมื่อถอดปลั๊ก●
หามใชเครื่องซักผาหากสายไฟ แผงควบคุม
พื้นผิวที่มีการทำงานหรือฐานเสียหาย
จนทำใหพื้นที่ดานในของเครื่องซักผาเปดโลง
●
●
●
●
●
●
●
●
●
ระวังไฟดูด! หากทานไมไดเชื่อมตอระบบ
สายดิน/กราวด หรือเชื่อมตอไมถูกตอง
“อยาสัมผัสผาท่ีเปยกและช้ินสวนโลหะ”
ขอควรระวัง
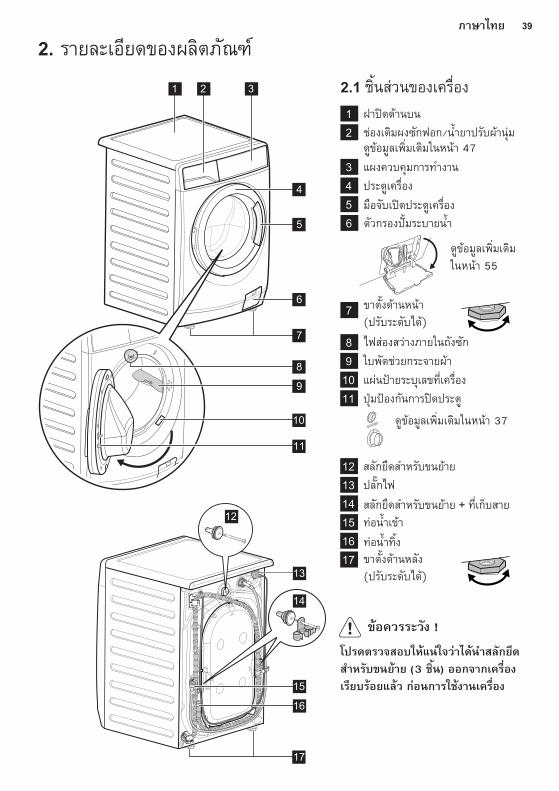
39ภาษาไทย
2.1 ชิ้นสวนของเครื่อง
รายละเอียดของผลิตภัณฑ2.
1 ฝาปดดานบน
2 ชองเติมผงซักฟอก/น้ำยาปรับผานุม
3 แผงควบคุมการทำงาน
4 ประตูเครื่อง
5 มือจับเปดประตูเครื่อง
7
ไฟสองสวางภายในถังซัก8
10
6 ตัวกรองปมระบายน้ำ
11
แผนปายระบุเลขที่เครื่อง
12
ปุมปองกันการปดประตู
13สลักยึดสำหรับขนยาย
14
ปลั๊กไฟ
15 ทอน้ำเขา
สลักยึดสำหรับขนยาย + ที่เก็บสาย
1617
ทอน้ำทิ้ง
9 ใบพัดชวยกระจายผา
โปรดตรวจสอบใหแนใจวาไดนำสลักยึด
สำหรับขนยาย (3 ชิ้น) ออกจากเครื่อง
เรียบรอยแลว กอนการใชงานเครื่อง
ขอควรระวัง !
2 3
4
6
7
5
1
13
16
15
17
ดูขอมูลเพิ่มเติม
ในหนา 55
ดูขอมูลเพิ่มเติมในหนา 47
ดูขอมูลเพิ่มเติมในหนา 3710
9
11
8
14
12
ขาตั้งดานหนา
(ปรับระดับได)
ขาตั้งดานหลัง
(ปรับระดับได)
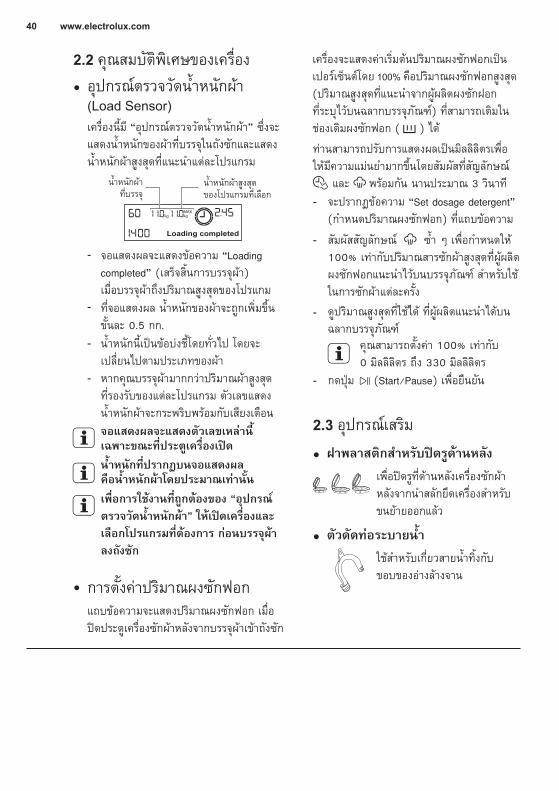
สัมผัสสัญลักษณ ซ้ำ ๆ เพื่อกำหนดให
100% เทากับปริมาณสารซักผาสูงสุดที่ผูผลิต
ผงซักฟอกแนะนำไวบนบรรจุภัณฑ สำหรับใช
ในการซักผาแตละครั้ง
40 www.electrolux.com
2.3 อุปกรณเสริม
2.2 คุณสมบัติพิเศษของเครื่อง
ใชสำหรับเกี่ยวสายน้ำทิ้งกับ
ขอบของอางลางจาน
ฝาพลาสติกสำหรับปดรูดานหลัง
เพื่อปดรูที่ดานหลังเครื่องซักผา
หลังจากนำสลักยึดเครื่องสำหรับ
ขนยายออกแลว
ตัวดัดทอระบายน้ำ
●
อุปกรณตรวจวัดน้ำหนักผา●
การตั้งคาปริมาณผงซักฟอก●
●
เครื่องนี้มี “อุปกรณตรวจวัดน้ำหนักผา” ซึ่งจะ
แสดงน้ำหนักของผาที่บรรจุในถังซักและแสดง
น้ำหนักผาสูงสุดที่แนะนำแตละโปรแกรม
แถบขอความจะแสดงปริมาณผงซักฟอก เมื่อ
ปดประตูเครื่องซักผาหลังจากบรรจุผาเขาถังซัก
จอแสดงผลจะแสดงขอความ “Loading
completed” (เสร็จสิ้นการบรรจุผา)
เมื่อบรรจุผาถึงปริมาณสูงสุดของโปรแกม
ที่จอแสดงผล น้ำหนักของผาจะถูกเพิ่มขึ้น
ขั้นละ 0.5 กก.
น้ำหนักนี้เปนขอบงชี้โดยทั่วไป โดยจะ
เปลี่ยนไปตามประเภทของผา
น้ำหนักที่ปรากฏบนจอแสดงผล คือน้ำหนักผาโดยประมาณเทานั้น
เพื่อการใชงานที่ถูกตองของ “อุปกรณ
ตรวจวัดน้ำหนักผา” ใหเปดเครื่องและ
เลือกโปรแกรมที่ตองการ กอนบรรจุผา
ลงถังซัก
จอแสดงผลจะแสดงตัวเลขเหลานี้เฉพาะขณะที่ประตูเครื่องเปด
น้ำหนักผาสูงสุด ของโปรแกรมที่เลือก
น้ำหนักผา ที่บรรจุ
ดูปริมาณสูงสุดที่ใชได ที่ผูผลิตแนะนำไดบน
ฉลากบรรจุภัณฑคุณสามารถตั้งคา 100% เทากับ
0 มิลลิลิตร ถึง 330 มิลลิลิตร
กดปุม (Start/Pause) เพื่อยืนยัน
-
-
-
-
-
-หากคุณบรรจุผามากกวาปริมาณผาสูงสุด
ที่รองรับของแตละโปรแกรม ตัวเลขแสดง
น้ำหนักผาจะกระพริบพรอมกับเสียงเตือน
-
(Load Sensor)
จะปรากฏขอความ “Set dosage detergent”
(กำหนดปริมาณผงซักฟอก) ที่แถบขอความ
ทานสามารถปรับการแสดงผลเปนมิลลิลิตรเพื่อ
ใหมีความแมนยำมากขึ้นโดยสัมผัสที่สัญลักษณ
และ พรอมกัน นานประมาณ 3 วินาที
-
เครื่องจะแสดงคาเริ่มตนปริมาณผงซักฟอกเปน
เปอรเซ็นตโดย 100% คือปริมาณผงซักฟอกสูงสุด
(ปริมาณสูงสุดที่แนะนำจากผูผลิตผงซักฝอก
ที่ระบุไวบนฉลากบรรจุภัณฑ) ที่สามารถเติมใน
ชองเติมผงซักฟอก ( ) ได
41ภาษาไทย
12345
7
8
6
9101112
แผงควบคุมการทำงาน3.
เลือกโปรแกรม (ระบบสัมผัส)
ตัวเลือก บันทึกโปรแกรมที่ซักเปนประจำ
ตัวเลือก อุณหภูมิ (ระบบสัมผัส)
ตัวเลือก รอบปน (ระบบสัมผัส)
สัญลักษ ฟงกชันเพิ่มผา
ตัวเลือก หนวงเวลา (ระบบสัมผัส)
จอแสดงผล
ตัวเลือก ลางน้ำเพิ่ม (ระบบสัมผัส)
ตัวเลือก รีดงาย (ระบบสัมผัส)
เริ่ม/หยุด, เพิ่มผา (ระบบสัมผัส)
1314
16
15
ปุมกด เปด/ปด เครื่อง
ตัวเลือก ปรับเวลา (ระบบสัมผัส)
ตัวเลือก ไอน้ำ (ระบบสัมผัส)
ตัวเลือก อัลตรามิกซ (ระบบสัมผัส)
ตัวเลือก เพิ่มรอบซัก (ระบบสัมผัส)
ตัวเลือก ระบบล็อคปองกันเด็ก (ดูในหนา 45)
อุณหภูมิน้ำที่ซักสัญลักษณน้ำเย็น (น้ำ ณ อุณหภูมิหอง)น้ำหนักผาที่บรรจุน้ำหนักผาสูงสุดสำหรับโปรแกรมที่เลือกสัญลักษณการปรับเปลี่ยนเวลาระยะเวลาในการซัก/ระยะเวลาหนวงเวลาจบสัญลักษณหนวงเวลาจบการทำงานสัญลักษณ เพิ่มรอบลางน้ำสัญลักษณ ล็อคปองกันเด็ก
A)B)C)D)E)F)G)H)I)
สัญลักษณ ล็อคประตูเครื่องแถบขอความสัญลักษณ ไอน้ำสัญลักษณ ระบบ UltraMixสัญลักษณ เงียบพิเศษรอบปนหมาดสัญลักษณ ไมระบายน้ำลางผา
J)K)L)M)N)O)P)
3.2 จอแสดงผล
3.1 รายละเอียดแผงควบคุม
จอแสดงผลจะแสดงตัวเลขในขอ “C” และ “D” เฉพาะขณะที่ประตูเครื่องเปด
A B C D E F G H
KO LMNP J I
1 2 3 5 7 8
910111213141516
64
42 www.electrolux.com
3.3 ตารางโปรแกรม
โปรแกรม ;อุณหภูมิท่ีเลือกได
ถึง 90 °C ผาฝายขาวหรือสี (ปรับเวลาซักใหเหมาะสมกับระดับความสกปรก, ดูตาราง “ปรับเปลี่ยนเวลาการซัก” หนา 44)
11 กิโลกรัม;1400 รอบตอนาที
4 กิโลกรัม;1200 รอบตอนาที
4 กิโลกรัม;1200 รอบตอนาที
4 กิโลกรัม;1200 รอบตอนาที
2 กิโลกรัม;1200 รอบตอนาที
11 กิโลกรัม;1400 รอบตอนาที
11 กิโลกรัม;1400 รอบตอนาที11 กิโลกรัม;1400 รอบตอนาที
3 กิโลกรัม;800 รอบตอนาที
11 กิโลกรัม;1400 รอบตอนาที
2.5 กิโลกรัม;800 รอบตอนาที
1.5 กิโลกรัม;800 รอบตอนาที
1.5 กิโลกรัม; ผาถูกซักดวยไอน้ำ
-
-
ประเภทของผาและระดับความสกปรกน้ำหนักผาสูงสุด (ผาแหง);รอบปนหมาดสูงสุดท่ีสามารถเลือกได
ผาสังเคราะหหรือรวมทุกเนื้อผา (ปรับเวลาซักใหเหมาะสมกับระดับความสกปรก, ดูตาราง “ปรับเปลี่ยนเวลาการซัก” หนา 44)
30 °Cผาใยสังเคราะหหรือรวมทุกเนื้อผาที่สกปรกนอยๆ
รอบการซักนี้ชวยในการกำจัดกลิ่นที่ไมพึงประสงคและชวยในการลดรอยยับ
ถึง 60 °C
ถึง 40 °C
ถึง 40 °C
ถึง 40 °C
ถึง 60 °C
30 °C ถึง 60 °C
โปรแกรมพิเศษสำหรับผาขนสัตวที่ติดฉลาก “ผาขนสัตวที่สามารถซักดวยเครื่องไดไมหด”
Bedding (เครื่องนอน); โปรแกรมพิเศษสำหรับผาหมใยสังเคราะห, ผานวม, ผาปูเตียง ฯลฯ (ปรับเวลาซักใหเหมาะสมกับระดับความสกปรก, ดูตาราง “ปรับเปลี่ยนเวลาการซัก” หนา 44)
Rinse + Spin(ลาง + ปน)
ลางน้ำและปนหมาด
Spin (ปนหมาด) ถายน้ำทิ้งและปนหมาด
Energy Saver (ซักประหยัด);40 °C และ 60 °C 1)
ผาขาวและผาสีไมตก เลือกโปรแกรมนี้เพื่อใหไดผลการซักที่ดีและลดการใชพลังงาน ซึ่งเวลาของโปรแกรมการซักจะเพิ่มขึ้น
ผาเนื้อบาง เชน อะคริลิค, วิสโคสและโพลิเอสเตอร(ปรับเวลาซักใหเหมาะสมกับระดับความสกปรก, ดูตาราง “ปรับเปลี่ยนเวลาการซัก” หนา 44)
ผาฝายสี เชน เสื้อเชิ้ต, เสื้อเชิ้ตสตรี, ผาขนหนูและชุดชั้นใน ที่สกปรกปานกลาง
โปรแกรมซักที่ออนโยนสำหรับผาผสมที่มีผาเนื้อบาง
Cottons (ผาฝาย);
Mixed (ผาผสม);
Delicates (ผาเนื้อบาง);
5.5 กิโลกรัม;1400 รอบตอนาที
Daily 60 (ซัก 60 นาที);
Quick 18 (ซัก 18 นาที);
Wool (ผาขนสัตว);
ผาฝายสำหรับเด็กและผาถักที่บอบบางที่สกปรกไมมาก
Baby Care (เสื้อผาเด็ก);
30 °C Sports (ชุดกีฬา);
Favourite (ซักประจำ)
More (โปรแกรมอื่นๆ) >>
เรียกใชชุดโปรแกรมที่บันทึกไว
(กดปุมนี้ซ้ำๆ เพื่อเลือกโปรแกรมตามรายการดานลางนี้)
โปรแกรมนี้ไมตองเติมผงซักฟอก
40 °C ถึง 90 °C Heavy Duty (ผาสกปรกมาก);
Tub Clean (ลางถังซัก)
โปรแกรมสำหรับผาฝายที่สกปรกมาก
โปรแกรมสำหรับทำความสะอาดถังซัก
Refresh (ลดรอยยับ)
2) สัญลักษณ “ ” แสดงถึงน้ำเย็น (น้ำ ณ อุณหภูมิหอง)
2)
1) โปรแกรม Energy Saver (ซักแบบประหยัดพลังงาน) ที่อุณหภูมิ 60 องศาเซลเซียส สำหรับซักผาไมสกปรกมากที่น้ำหนักสูงสุดที่รองรับ ถือเปนโปรแกรมที่แนะนำในแผนปายวาประหยัดน้ำและพลังงาน {ตามมาตรฐาน มอก. 1462 (IEC 60456 ฉบับแกไขเพิ่มเติมครั้งที่ 4)}
-
-
-
-
-
-
-
-
-
43ภาษาไทย
เลือกอุณหภูมิ (ระบบสัมผัส)
สัมผัสสัญลักษณเลือกอุณหภูมิซ้ำๆ เพื่อเพิ่มหรือ
ลดอุณหภูมิการซัก หากตองการใหซักผาในชวง
อุณหภูมิอื่นนอกเหนือจากที่เครื่องซักผากำหนด
สามารถเปดและปดการใชงานตัวเลือกได
ไมสามารถปดการใชงานตัวเลือกได
เลือกรอบปนหมาด (ระบบสัมผัส)
●
●
●
สัมผัสสัญลักษณเลือกรอบปนหมาดซ้ำๆ เพื่อเพิ่ม
หรือลดความเร็วในการปนหมาด หากตองการให
ปนหมาดที่ชวงความเร็วอื่นนอกเหนือจากที่เครื่อง
ซักผากำหนดไว
ตัวเลือกไมปนหมาดจะเปนการยกเลิกรอบ
การปนหมาดทั้งหมดและเพิ่มจำนวนลางน้ำ
ไมปนหมาด (No Spin)
หลังจากเลือกตัวเลือกนี้ เครื่องจะไมระบายน้ำ
จากการลางน้ำรอบสุดทายเพื่อปองกันผายับ
และรอบปนหมาดทั้งหมดจะถูกยกเลิก
รอบการซักนี้จะเงียบมากและสามารถเลือก
ไดในเวลากลางคืนหรือเวลาอื่นที่เหมาะสม
เงียบพิเศษ (Extra Silent)
หลังจากเลือกตัวเลือกนี้ น้ำจากการลางน้ำ
รอบสุดทายจะไมถูกระบายออก และถังซัก
จะหมุนตามปกติเพื่อปองกันผาเกิดรอยยับ
หลังจากสิ้นสุดการทำงาน ประตูจะถูก
ล็อคไว เนื่องจากมีน้ำอยูในถังซัก
หากตองการใหเครื่องทำงานตอ
(ระบายน้ำออก) ใหกดปุม “เริ่ม/หยุด”
หลังสิ้นสุดโปรแกรม ประตูเครื่องยังคงล็อคอยู
เพื่อแจงวาจะตองระบายน้ำออก
ไมระบายน้ำลางผา (Rinse Hold)
หลังจากสิ้นสุดการทำงาน ประตูจะถูก
ล็อคไว เนื่องจากมีน้ำอยูในถังซัก
หากตองการใหเครื่องทำงานตอ
(ระบายน้ำออก) ใหกดปุม “เริ่ม/หยุด”
3.4 ตัวเลือกเสริมที่สามารถใชรวมกับโปรแกรมได
3.5 การใชงานตัวเลือกเสริม
โปรแกรม
ตัวเลือก
CottonsMixedDelicatesDaily 60Quick 18Vapour RefreshBaby CareSportsWoolEnergy SaverSpinRinse + SpinBeddingHeavy DutyTub Clean
(ไมปนหมาด) (ไมระบายน้ำลาง) (เงียบพิเศษ)
Spin (รอบปน)
X
XXXX
XX
1) สามารถเลือกตัวเลือก “Vapour (ไอน้ำ)” ไดกับอุณหภูมิ 40 ถึง 90 องศาเซลเซียสเทานั้น
1)
X

44 www.electrolux.com
ปรับเวลา (ปรับเปลี่ยนเวลาการซัก)(ระบบสัมผัส)
ตัวเลือกนี้ชวยใหสามารถปรับระยะเวลาในการ
ทำงานของโปรแกรมได สัมผัสสัญลักษณนี้ซ้ำๆ
เพื่อปรับเปลี่ยนเวลาการทำงานที่ตองการ โดย
ใหเหมาะสมกับระดับความสกปรกของผา
ดังตารางดานลางนี้
สัมผัสสัญลักษณนี้เพื่อเพิ่มรอบการลางน้ำสองรอบใน
โปรแกรมการซัก ไฟแอลอีดีที่สัญลักษณตัวเลือกนี้
จะติดสวางเพื่อแสดงวาตัวเลือกไดถูกเลือกแลว
หนวงเวลา (เวลาจบการทำงาน)(ระบบสัมผัส)
กอนที่คุณจะเริ่มตนการทำงานของโปรแกรม
ตัวเลือกนี้ชวยใหคุณสามารถกำหนดเวลาจบของ
การทำงานได โดยคุณสามารถกำหนดไดตั้งแต
1 ชั่วโมง ไปจนถึง 19 ชั่วโมง (ขึ้นอยูกับ
โปรแกรมที่เลือก)
ขอชี้แนะ: ถาหากระยะเวลาการทำงาน
ของโปรแกรมที่เลือกมีระยะเวลานานกวา
3 ชม. เวลาที่เลือกไดของฟงกชั่นนี้
จะเลือกไดจาก 4 ชม. ขึ้นไป
ใหเลือกตัวเลือกนี้หลังจากที่คุณทำการ
เลือกโปรแกรมการทำงานเสร็จสิ้นแลว
และกอนสัมผัสปุม Start/Pause
ยกตัวอยางเชนหากระยะเวลาการทำงานของ
โปรแกรมที่เลือกเทากับ 3.20 ชม. และคุณเลือก
หนวงเวลาจบการทำงาน (Delay End) เปน
6 ชม. ซึ่งหมายความวาเครื่องจะทำงานเสร็จสิ้น
ภายในระยะเวลา 6 ชม. (ดังอธิบายในแผนภาพ)
หลังจากเลือกระยะเวลาของหนวงเวลาจบการ
ทำงาน (Delay End) ใหกดปุม Start/Pause เพื่อ
เริ่มการทำงาน เครื่องจะเริ่มนับเวลาถอยหลังและ
อับเดตเวลาบนจอแสดงผลในแตละชั่วโมงจนกวา
จะถึงเวลาเริ่มตนของโปรแกรมที่เลือก
สัมผัสปุม “Delay End” เลือกระยะเวลาที่ตองการ
จอแสดงผลจะแสดงเวลาที่คุณเลือกเปนชั่วโมงและ
ไฟแอลอีดีที่เกี่ยวของจะสวาง
ระยะเวลาการทำงาน 3.20 ชม.
เวลา “Delay End” เทากับ 6 ชม.
กดปุมStart/Pause
เสร็จสิ้นการทำงาน
โปรแกรมเริ่มทำงาน
นับเวลาถอยหลังเขาสูการทำงาน
2.40 ชม.
หยุดการทำงานเครื่องชั่วคราว โดยสัมผัสปุม Start/Pause
-
ยกเลิกหนวงเวลา โดยสัมผัสที่ปุม Delay End
ซ้ำๆ จนกระทั้งเวลาเปลี่ยนเปน “ ”
-
สัมผัสปุม Start/Pause เพื่อใหเครื่องทำงานตอ-
รีดงาย (ระบบสัมผัส)
ไฟแอลอีดีที่สัญลักษณตัวเลือกนี้จะติดสวาง เพื่อ
แสดงวาตัวเลือกไดถูกเลือกแลว
เมื่อเลือกตัวเลือกนี้ ผาจะถูกซักและปนหมาด
อยางนุมนวลเพื่อปองกันผายับยน ทั้งนี้เพื่อให
สามารถรีดผาไดงายยิ่งขึ้น
เพิ่มรอบซัก (ระบบสัมผัส)
เลือกตัวเลือกนี้หากคุณตองการใหเพิ่มรอบการซัก
ผากอนรอบการซักหลัก ใชตัวเลือกนี้ในกรณีที่ผา
สกปรกมาก ไฟแอลอีดีที่สัญลักษณตัวเลือกนี้จะ
ติดสวางเพื่อแสดงวาตัวเลือกไดถูกเลือกแลว
หลังจากตั้งคาตัวเลือกนี้ ใหเติมผงซักฟอกในชอง
“ ” ตัวเลือกนี้จะเพิ่มระยะเวลาการทำงาน
ของโปรแกรมการซัก
ระยะเวลาในการซักดวยระบบไอน้ำจะเพิ่มเวลา
การทำงานประมาณ 30 นาที ไอน้ำจะชวยเปด
เสนใยของผา เพื่อชวยใหสิ่งสกปรกหลุดออกจาก
ใยผาไดดียิ่งขึ้น ไฟแอลอีดีที่สัญลักษณตัวเลือกนี้
จะติดสวาง เพื่อแสดงวาตัวเลือกไดถูกเลือกแลว
ไอน้ำ (ระบบสัมผัส)
หากคุณไดเริ่มหนวงเวลาไปแลว (สัมผัสปุม
Start/Pause แลว) และคุณตองการที่จะยกเลิก
การหนวงเวลาจบการทำงาน ใหปฏิบัติดังนี้ :
ลางน้ำเพิ่ม (ระบบสัมผัส)
สำหรับผูท่ีมีอาการแพผงซักฟอก หรือในบริเวณท่ีมี
ระดับความกระดางของน้ำออนควรเลือกตัวเลือกน้ี
ระดับความสกปรก นอย ปานกลาง มากปกติ
ระยะเวลาการทำงาน
45ภาษาไทย
●
●
●
●
3.6 การตั้งคาการทำงาน
เมื่อเลือกตัวเลือกนี้ ผงซักฟอกจะถูกปนและละลาย
กับน้ำภายในชอง “เทคโนโลยีการผสมผสาน”
ที่ถูกออกแบบมาโดยเฉพาะ ซึ่งจะชวยเพิ่ม
ประสิทธิภาพใหกับผงซักฟอกในขั้นตอนการซัก
เสื้อผาของคุณ
อัลตรามิกซ (ระบบสัมผัส)
อาจมองไมเห็นไอน้ำในถังระหวางรอบการซัก
ดวยไอน้ำ ไอน้ำจะเกิดขึ้นดานลางของถัง และ
จะลอยขึ้นเขาไปสัมผัสเนื้อผาตามธรรมชาติ
ในตอนทายของรอบไอน้ำ ผาจะอุนและนุม
และจะแยกตัวไมติดกับถังซัก
●
●
●
ขอแนะนำใหใชตัวเลือกนี้รวมกับ “น้ำเย็น”
(น้ำ ณ อุณหภูมิหอง)
● ระบบ “อัลตรามิกซ (UltraMix )” จะชวย
กระตุนกระบวนการการทำงานของผงซักฟอก
ขอแนะนำใหคุณลดปริมาณผงซักฟอกลง
จากปริมาณที่เคยใช หากพบวาเกิดฟอง
ปกคลุมกระจกประตูเครื่องอยางหนาแนน
หากเลือกตัวเลือกไอน้ำ อุณหภูมิการ
ลางน้ำจะถูกเพิ่มขึ้น
ระหวางรอบการซักดวยไอน้ำ ทานจะ
สังเกตเห็นไอน้ำออกมาจากสายน้ำทิ้ง
ของเครื่องซักผาซึ่งถือเปนเรื่องปกติ
ไอน้ำอาจไมปรากฏใหเห็นระหวางรอบการซัก
ดวยไอน้ำทั้งหมด
ฟงกชั่นไอน้ำจะมีประสิทธิภาพมากกวา หาก
บรรจุผาเพียงครึ่งเดียวของน้ำหนักรองรับ
สูงสุดของแตละโปรแกรม
หมายเหตุ:
ขอแนะนำ
การบันทึกโปรแกรมที่ซักเปนประจำ
เคร่ืองซักผาน้ีสามารถบันทึกโปรแกรมท่ีคุณใชงาน
เปนประจำได (เชน ผาฝาย 60°C, 1200 rpm,
เพิ่มรอบการซักและเพิ่มรอบการลางน้ำ)
ทานสามารถเรียกใชโปรแกรมที่บันทึกไว โดย
เลือกที่โปรแกรม “Favourite ” ที่จอจะแสดงผล
จะแสดงรายละเอียดโปรแกรมที่บันทึกไวใหทราบ
วาโปรแกรมถูกเรียกใชแลว
ทานสามารถเรียกใชโปรแกรมที่บันทึกไวไดเฉพาะ
ในกรณีที่เครื่องอยูในโหมดเลือกโปรแกรม หากอยู
ในกรณีอื่นเครื่องจะไมตอบสนองใดๆ
หากตองการบันทึกโปรแกรมที่ซักเปนประจำ
ใหปฏิบัติตามขั้นตอนตอไปนี้
เปดเครื่องในโหมดสแตนดบาย
ตั้งคาโปรแกรมซักตามที่ตองการ
บันทึกโปรแกรมที่ตองการซักเปนประจำ
โดยสัมผัสที่ปุม “Temp” และ “Spin”
พรอมกันคางไว จนกวาที่จอแสดงผลจะแสดง
ขอความ “Program Saved” (โปรแกรมถูก
บันทึก)
1.
2.
3.
ระบบล็อคปองกันเด็ก
เครื่องมีระบบล็อคปองกันเด็ก เพื่อปองกันขณะที่
ไมไดใชเครื่อง โดยคุณไมตองคอยกังวลวาเด็กอาจ
ไดรับบาดเจ็บหรือทำใหเกิดความเสียหายจากการ
เลนกับเครื่อง
เปดใชงานฟงกชั่นนี้ โดยกดปุมสัมผัสสองปุม
“Rinse + ( )” และ “Easy Iron ( )” พรอมกันจนกระทั่งจอแสดงผลแสดง
สัญลักษณ “ ”
ปดใชฟงกชั่นนี้โดยกดปุมสัมผัสสองปุม
“Rinse + ( )” และ “Easy Iron ( )” พรอมกัน จนกระทั่งสัญลักษณ “ ” ที่จอ
แสดงผลหายไป
ปฏิบัติตามขั้นตอนดังตอไปนี้ :
การตั้งคาฟงกชั่นนี้จะยังคงอยู แมวา
จะมีการปดเครื่องและเปดใชงานเครื่อง
อีกครั้งก็ตาม
ใหตั้งคาตัวเลือกนี้หลังจากกดปุม “ ”
(เริิ่ม/หยุด)
ปุมทั้งหมดจะถูกล็อค ยกเวนปุม
On/Off (เปด/ปด เครื่อง)
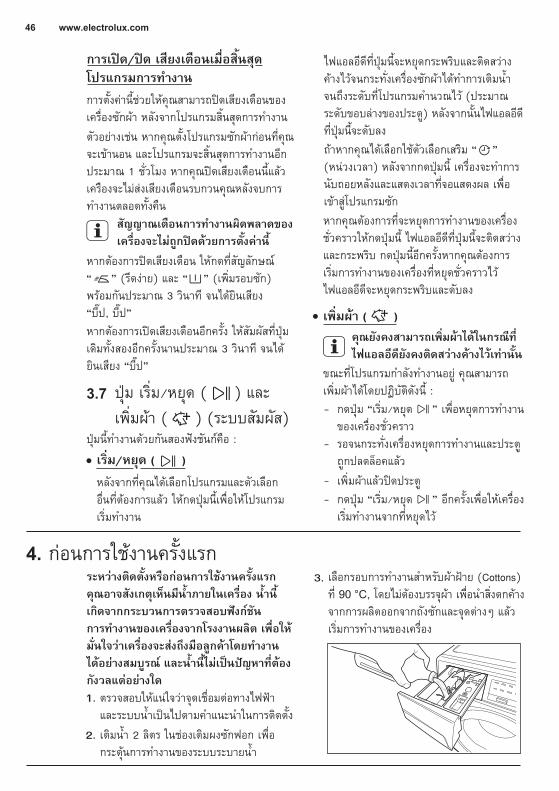
46 www.electrolux.com
3.7
การเปด/ปด เสียงเตือนเมื่อสิ้นสุดโปรแกรมการทำงาน
● เริ่ม/หยุด ( )
● เพิ่มผา ( )
หากตองการปดเสียงเตือน ใหกดที่สัญลักษณ
“ ” (รีดงาย) และ “ ” (เพิ่มรอบซัก)
พรอมกันประมาณ 3 วินาที จนไดยินเสียง
“บี๊ป, บี๊ป”
การตั้งคานี้ชวยใหคุณสามารถปดเสียงเตือนของ
เครื่องซักผา หลังจากโปรแกรมสิ้นสุดการทำงาน
ตัวอยางเชน หากคุณตั้งโปรแกรมซักผากอนที่คุณ
จะเขานอน และโปรแกรมจะสิ้นสุดการทำงานอีก
ประมาณ 1 ชั่วโมง หากคุณปดเสียงเตือนนี้แลว
เครืองจะไมสงเสียงเตือนรบกวนคุณหลังจบการ
ทำงานตลอดทั้งคืน
กดปุม “เริ่ม/หยุด ” เพื่อหยุดการทำงาน
ของเครื่องชั่วคราว
หลังจากที่คุณไดเลือกโปรแกรมและตัวเลือก
อื่นที่ตองการแลว ใหกดปุมนี้เพื่อใหโปรแกรม
เริ่มทำงาน
ถาหากคุณไดเลือกใชตัวเลือกเสริม “ ”
(หนวงเวลา) หลังจากกดปุมนี้ เครื่องจะทำการ
นับถอยหลังและแสดงเวลาที่จอแสดงผล เพื่อ
เขาสูโปรแกรมซัก
ไฟแอลอีดีที่ปุมนี้จะหยุดกระพริบและติดสวาง
คางไวจนกระทั่งเครื่องซักผาไดทำการเติมน้ำ
จนถึงระดับที่โปรแกรมคำนวณไว (ประมาณ
ระดับขอบลางของประตู) หลังจากนั้นไฟแอลอีดี
ที่ปุมนี้จะดับลง
ขณะที่โปรแกรมกำลังทำงานอยู คุณสามารถ
เพิ่มผาไดโดยปฏิบัติดังนี้ :
หากคุณตองการที่จะหยุดการทำงานของเครื่อง
ชั่วคราวใหกดปุมนี้ ไฟแอลอีดีที่ปุมนี้จะติดสวาง
และกระพริบ กดปุมนี้อีกครั้งหากคุณตองการ
เริ่มการทำงานของเครื่องที่หยุดชั่วคราวไว
ไฟแอลอีดีจะหยุดกระพริบและดับลง
คุณยังคงสามารถเพิ่มผาไดในกรณีที่
ไฟแอลอีดียังคงติดสวางคางไวเทานั้น
หากตองการเปดเสียงเตือนอีกครั้ง ใหสัมผัสที่ปุม
เดิมทั้งสองอีกครั้งนานประมาณ 3 วินาที จนได
ยินเสียง “บี๊ป”
ปุมนี้ทำงานดวยกันสองฟงชันกคือ :
ปุม เริ่ม/หยุด ( ) และ
เพิ่มผา ( ) (ระบบสัมผัส)
สัญญาณเตือนการทำงานผิดพลาดของ
เครื่องจะไมถูกปดดวยการตั้งคานี้
-
รอจนกระทั่งเครื่องหยุดการทำงานและประตู
ถูกปลดล็อคแลว
-
กดปุม “เริ่ม/หยุด ” อีกครั้งเพื่อใหเครื่อง
เริ่มทำงานจากที่หยุดไว
-
เพิ่มผาแลวปดประตู-
กอนการใชงานครั้งแรก4.
ตรวจสอบใหแนใจวาจุดเชื่อมตอทางไฟฟา
และระบบน้ำเปนไปตามคำแนะนำในการติดตั้ง
เติมน้ำ 2 ลิตร ในชองเติมผงซักฟอก เพื่อ
กระตุนการทำงานของระบบระบายน้ำ
1.
2.
3. เลือกรอบการทำงานสำหรับผาฝาย (Cottons)
ท่ี 90 °C, โดยไมตองบรรจุผา เพ่ือนำส่ิงตกคาง
จากการผลิตออกจากถังซักและจุดตางๆ แลว
เริ่มการทำงานของเครื่อง
ระหวางติดตั้งหรือกอนการใชงานครั้งแรก
คุณอาจสังเกตุเห็นมีน้ำภายในเครื่อง น้ำนี้
เกิดจากกระบวนการตรวจสอบฟงกชัน
การทำงานของเครื่องจากโรงงานผลิต เพื่อให
มั่นใจวาเครื่องจะสงถึงมือลูกคาโดยทำงาน
ไดอยางสมบูรณ และน้ำนี้ไมเปนปญหาที่ตอง
กังวลแตอยางใด
47ภาษาไทย
5.1 การบรรจุผาลงถังซัก 5.2เปดกอกน้ำ
POSITION USING
POWDER DETERGENT
1.
เสียบปลั๊กเขากับเตารับไฟฟา2.
กดปุม “เปด/ปด” เพื่อเปดใชงานเครื่อง
สัมผัสที่สัญลักษณโปรแกรม เพื่อเลือก
โปรแกรมที่ตองการ
เพื่อการใชงานที่ถูกตองของ
“อุปกรณตรวจวัดน้ำหนักผา”
ใหเปดเครื่องและเลือกโปรแกรม
ที่ตองการกอนบรรจุผาลงถังซัก
(ดูรายละเอียดหนา 40)
3.
4.
บรรจุผาลงในถังซักทีละชิ้น คลี่ใหกระจาย
ออกมากที่สุดเทาที่ทำได (โปรดศึกษาราย
ละเอียดในหัวขอ “คำแนะนำในการซัก”
หนา 51)
5.
ปดประตูเครื่อง
ขอควรระวัง
6.
ขอสำคัญ: โปรดศึกษารายละเอียดและ
ขอกำหนดของชนิดและปริมาณของ
ผงซักฟอก ในหนา 52 กอนการซัก
อยาใหมีผาหลงเหลือระหวางยางรอง
ขอบประตูและประตูเครื่อง
●
การใชงานประจำวัน5.
ตรวจสอบและนำสิ่งแปลกปลอมออก (ถามี)
เนื่องจากอาจมีการตกคางบริเวณรองยางรอง
ขอบประตู
การใชสารซักฟอกและน้ำยาปรับสภาพ
ลิ้นชักเติมสารซักฟอก1.
ลิ้นชักเติมสารซักฟอกแบงออกเปน 3 ชอง
ดังนี้:
ชองนี้ใชสำหรับเติมผงซักฟอกในกรณี
ที่เลือกตัวเลือก “เพิ่มรอบซัก” (Prewash)
ชอง “การซักหลัก”
● ชอง “เพิ่มรอบการซัก”
● ชอง “น้ำยาปรับผานุม”
ชองนี้ใชสำหรับเติมสารซักฟอกสำหรับทุกๆ
โปรแกรม
ชองดังกลาวนี้ใชสำหรับเติมน้ำยาปรับผานุม
และน้ำยาอัดกลีบ
ผงซักผาหรือน้ำยาซักผา:
บานพับเลือกประเภทสารซักฟอก
พับลง: สำหรับน้ำยาซักผา
พับขึ้น: สำหรับผงซักฟอก (ตำแหนง
เดิมจากโรงงาน)
-
-
48 www.electrolux.com
5.3 การตั้งคาตัวเลือกเสริม
5.4 เริ่มการทำงานของโปรแกรม
ตวงปริมาณของสารซักผาที่ตองการ
จากนั้นเติมลงในชองการซักหลัก ( )
อยาใชน้ำยาซักผาท่ีเปนเจลหรือเหนียวขน-อยาเติมมากกวาระดับสูงสุดที่กำหนด-
-
อยาตั้งคาหนวงเวลาจบการทำงาน
“Delay End”
-
อยาเลือกตัวเลือกเสริม “Prewash”-
หากคุณใชน้ำยาซักผา ใหปฏิบัติดังนี้:
หลังจบการทำงาน อาจมีผงซักฟอก,
น้ำยาปรับผานุมและน้ำตกคางอยูใน
ลิ้นชักใสสารซักผา แนะนำใหทำความ
สะอาดทุกคร้ังหลังการใชงาน เพื่อชำระ
สิ่งตกคางออก
ดึงชองจายออกมาจนสุด-
-
หากเลือก “เพิ่มรอบซัก” (Prewash) ใหเติม
ผงซักฟอกในชองที่มีเครื่องหมาย “ ”
-
ถาตองการเติมน้ำยาปรับผานุม ใหเติมลง
ในชองน้ำยาปรับผานุมที่มีเครื่องหมาย
-
เลื่อนชองเติมสารซักฟอกปดเบาๆ-
-
-
ตวงสารซักผาและน้ำยาปรับผานุม2.
หากตองการใหปนหมาดหรือใชอุณหภูมิอื่น
นอกเหนือจากที่เครื่องกำหนดไว สัมผัสที่
สัญลักษณปนหมาด “ ” และ อุณหภูมิ “ ”
ซ้ำๆ จนกระทั่งความเร็วปนหมาดและอุณหภูมิ
เปลี่ยนแปลงไปยังคาที่ตองการ
หากตองการลดเวลาในการทำงาน ใหสัมผัส
สัญลักษณ “ปรับเวลา ” ซ้ำๆ เพื่อเลือก
ระยะเวลาที่ตองการ (ดูตาราง “ปรับเปลี่ยน
เวลาการซัก” หนา 44)
สัมผัสสัญลักษณตัวเลือกเสริม หากตองการ
ใหซักผาโดยใชฟงกชั่นพิเศษ
1.
2.
หากคุณใชน้ำยาปรับผานุมชนิด
เขมขนแนะนำใหเจือจางดวยน้ำ
กอนเติม
ปริมาณที่ใชตองไมเกินขีด “MAX”
ตัวเลือกเสริมแตละฟงกชั่นที่เลือกได
จะขึ้นอยูกับโปรแกรมที่เลือก
- ถาตัวเลือกไหนไมสามารถเลือกรวม
กับโปรแกรมที่เลือกได จอแสดงผล
จะแสดงขอความ “Not Available”
พรอมเสียงบี๊ป
หากตองการหนวงเวลาจบการทำงานของ
โปรแกรมที่เลือก ใหสัมผัสสัญลักษณ “
หนวงเวลา” ซ้ำๆ เพื่อเลือกระยะเวลาจบการ
ทำงานของโปรแกรม
เครื่องจะปรับเวลาในการทำงานของ
โปรแกรมที่เลือกอีกครั้งตามชนิด
ของผาและปริมาณผาที่บรรจุ
เริ่มโปรแกรมโดยกดปุม Start/Pause ( ),
ไฟแสดงการทำงานที่เกี่ยวของจะหยุดกะพริบ
และเวลาการทำงานเบื้องตนของโปรแกรมจะ
แสดงที่หนาจอแสดงผล
หลังจากโปรแกรมเริ่มตนทำงาน
ประมาณ 15 นาที
ขอชี้แนะ: ถาคุณกดปุมใดๆ ในขณะที่
เครื่องซักผากำลังทำงาน จอแสดงผล
จะแสดงขอความ “Not Available”
พรอมเสียงบี๊ป (ยกเวนปุม “เปด/ปด”
และ ปุม “เริ่ม/หยุด”)
-
จอแสดงผลจะแสดงระยะเวลาการ
ทำงานใหมอีกครั้ง
-
49ภาษาไทย
5.6 การเปลี่ยนโปรแกรมการทำงาน
5.7 การเปลี่ยนตัวเลือกเสริม
5.5 หยุดการทำงานของโปรแกรม- หยุดการทำงานของโปรแกรม กด
(“เริ่ม/หยุด”) ไฟแอลอีดีจะกระพริบ
- กดปุม “ เริ่ม/หยุด” อีกครั้ง โปรแกรมจะกลับ
มาทำงาน
สามารถเปลี่ยนโปรแกรมไดก็ตอเมื่อปดการทำงาน
ของเครื่องแลวเทานั้น
กดปุม “On/Off” เพื่อยกเลิกการทำงานของ
โปรแกรมและปดเครื่อง
ตอนนี้คุณสามารถเลือกโปรแกรมใหมและเลือก
ตัวเลือกเสริมใหมที่ตองการไดแลว, หลังจากนั้น
กดปุม Start/Pause เพื่อเริ่มโปรแกรมใหม
กดปุม “On/Off” อีกครั้งเพื่อเปดเครื่อง
หากมีน้ำในถังซักเครื่องจะยังไมทำการ
ระบายน้ำ (ยกเวนโปรแกรมดังนี้ Refresh,
Spin, Rinse + Spin, Tub Clean)
-
-
สามารถเปลี่ยนตัวเลือกไดบางสวนเทานั้น
หลังจากเริ่มตนโปรแกรมการทำงานแลว
5.8 การเปดประตูเครื่องซักผา
5.9 หลังจากจบการทำงานของโปรแกรม
ขณะโปรแกรมหรือ Delay End กำลังทำงาน
ประตูเครื่องจะล็อคและจอแสดงผลจะแสดง “ ”
เริ่มจากตั้งคาหยุดการทำงานของเครื่องชั่วคราว
โดยการกดปุม “Start/Pause” รอใหสัญลักษณ
แจงการล็อคประตู “ ” หายไปจากจอแสดงผล
จากนั้นจะสามารถเปดประตูเครื่องได
หากสัญลักษณแจงการล็อคประตูเครื่อง “ ”
ไมหายไป แสดงวาเครื่องกำลังทำความรอน และ
ระดับน้ำอยูเกินกวาขอบดานลางของประตู หรือ
ถังซักกำลังหมุนอยู ในกรณีนี้จะไมสามารถเปด
ประตูเครื่องได
กดปุม “เริ่ม/หยุด” เพื่อหยุดการทำงาน
ชั่วคราว, ไฟแอลอีดีจะกระพริบ
1.
เปลี่ยนตัวเลือกเสริมที่สามารถเลือกได2.กด “เริ่ม/หยุด” อีกครั้ง โปรแกรม
จะกลับมาทำงาน
3.
หากคุณตองการที่จะเปดประตูเครื่อง คุณตอง
ทำการระบายน้ำออกจากเครื่องกอน
หากเปนกรณีฉุกเฉินหรือเรงดวนที่ตอง
การเปดประตูเครื่องโดยทันที,
ใหศึกษารายละเอียดที่หัวขอ
“การเปดประตูกรณีฉุกเฉิน” หนา 61
เครื่องหยุดทำงาน โดยอัตโนมัติ
สัญญาณเสียงจะดังขึ้น
จอแสดงผลจะแจงเวลาเปน “ ”
ไฟแอลอีดีที่ปุม Start/Pause จะดับลง
-
-
-
-
-
-
-
-
สัญลักษณล็อคประตู “ ” จะหายไป
นำผาออกจากเครื่อง ตรวจสอบใหแนใจวา
นำผาออกหมดแลว
เปดประตูทิ้งไวสักครู เพื่อปองกันราหรือกลิ่น
ปดกอกน้ำ
ในชวงสุดทายของการทำงานของโปรแกรม
เวลาคงเหลือสามารถเปนไปไดตั้งแต
7 นาที หรือนอยกวาจนถึง 0 นาที เนื่อง
จากการคำนวณเวลาการทำงานที่มากเกิน
จริงในชวงการตรวจสอบปริมาณผา
ในบางกรณี (กรณีที่ผาในถังซักอยูใน
ลักษณะสมดุลยตลอดเวลาขณะโปรแกรม
ทำงาน) เวลาที่ใชในการทำงานสามารถ
นอยกวาเวลาที่เครื่องซักผาคำนวณไว
หลังจากที่เครื่องตรวจสอบปริมาณผาที่
บรรจุเสร็จสิ้น กรณีดังกลาวถือเปนเรื่อง
ปกติของเครื่องซักผาและไมเปนสาเหตุให
ประสิทธิภาพการทำงานของเครื่องซักผา
ลดลงแตอยางใด
ขอชี้แนะ:

อีกทางเลือกหนึ่ง, กอนสัมผัสสัญลักษณ “ ”
คุณยังสามารถกดปุม “ปนหมาด” ( ) เพื่อ
เลือกความเร็วรอบและคุณสามารถเลือก
ตัวเลือก “No Spin ” เพื่อใหเครื่อง
ดำเนินการระบายน้ำเพียงอยางเดียวก็ได
จากนั้นสัมผัสสัญลักษณ “ ” เพื่อใหเครื่อง
ทำงานตามที่เลือกไว
50 www.electrolux.com
5.10 ขณะโปรแกรมการซักเสร็จสิ้นแตมีน้ำคางอยูในถัง
5.11 โหมดลดการใชพลังงานโดยอัตโนมัติ
- ถังจะหมุนตามปกติเพื่อปองกันรอยยับ
(กรณีตัวเลือก “เงียบพิเศษ (Extra Silent)” หรือ “ไมระบายน้ำลางผา (Rinse Hold)”ถูกใชงาน)
- สัญลักษณ “ล็อคประตู” ( ) ยังแสดงที่
จอแสดงผล เพื่อบอกใหทราบวาประตูเครื่อง
ยังคงล็อคอยู
- ไฟแอลอีดีที่ปุม “Start/Pause” จะกระพริบ
เพื่อบอกใหทราบวาตองทำการระบายน้ำออก
หลังจากโปรแกรมทำงานเสร็จสิ้น และ
สัญลักษณล็อคประตู ( ) ดับลง คุณจะ
สามารถเปดประตูเครื่องได
1.
คุณจะตองทำการระบายน้ำออก เพื่อเปด
ประตูเครื่อง
ทำการระบายน้ำโดย :
สัมผัสสัญลักษณ “Start/Pause” เครื่องจะ
ดำเนินการระบายน้ำออกจากถังซัก พรอมกับ
ปนหมาดที่ความเร็วรอบสูงสุดของโปรแกรมซัก
ที่คุณเลือกไว
2.
กดปุม “On/Off” เพื่อปดการทำงานของ
เครื่องซักผา3.
หลังจากเวลาประมาณ 18 ชั่วโมง หาก
คุณไมไดกดปุมสัมผัส “Start/Pause”
เครื่องจะดำเนินการระบายน้ำออกและ
ปนหมาดโดยอัตโนมัติ
(ยกเวนโปรแกรม Wool)
โหมดนี้จะปดการทำงานของเครื่องลงโดยอัตโนมัติ
เพื่อลดการใชพลังงานไฟฟาในกรณีตอไปนี้ :
เมื่อไมไดกดปุมใดๆ เปนเวลา 5 นาที กอน
กดปุม “เริ่ม/หยุด”
กดปุม “เปด/ปด” อีกครั้ง เพื่อเปดเครื่อง
-
-
จอแสดงผลจะแสดงสถานะสิ้นสุดการทำงาน
ของโปรแกรมสุดทายกอนที่เครื่องจะเขาสู
โหมดลดการใชพลังงาน
●
หลังจากสิ้นสุดโปรแกรมการซัก 5 นาที●
กดปุม “เปด/ปด” อีกครั้ง เพื่อเปดเครื่อง
สัมผัสปุมใดๆ จอแสดงผลจะแสดงการตั้งคา
ของโปรแกรมและตัวเลือกสุดทายกอนที่
เครื่องจะเขาสูโหมดลดการใชพลังงาน
-
สัมผัสปุมโปรแกรมอีกครั้ง เพื่อเลือกรอบการ
ทำงานใหม-

51ภาษาไทย
●
●
●
●
●
●
●
คำแนะนำในการซัก6.
ปฏิบัติตามสัญลักษณการซัก บนฉลากผาแตละชิ้น
และคำแนะนำการซักจากผูผลิต แยกชนิดของผา
ดังนี้: ผาขาว, ผาสี, ผาใยสังเคราะห, ผาเนื้อบาง,
ผาขนสัตว เปนตน
6.1 การแยกประเภทผาที่จะซัก
6.2 อุณหภูมิ
สำหรับผาสีจำพวกผาลินิน ผาฝาย
หรือผาใยสังเคราะห ที่สกปรกปานกลาง
(เชน เสื้อเชิ้ต ชุดราตรี ชุดนอน....)
และผาฝายขาวที่สกปรกเล็กนอย (เชน
ชุดชั้นใน)
สำหรับผาเนื้อบาง (เชน ตาขาย)
ผาคละประเภท รวมทั้งผาใยสังเคราะห
หรือผาขนสัตวที่มีปายระบุ ขนสัตวใหม
แท ซักเครื่องไดและไมหด
สำหรับผาฝายและผาลินินขาว ที่สกปรก
ปานกลาง (เชน ผาชุดรองน้ำชา
ผาขนหนู ผาปูโตะ ผาปูที่นอน...)
หามซักผาขาวรวมกับผาสี เนื่องจากผาขาว
อาจสูญเสีย “ความขาว” จากการซัก
ผาสีตัวใหมอาจสีตกในการซักครั้งแรก ดังนั้น
ใหแยกซักตางหาก
กลัดกระดุมปลอกหมอน, รูดซิป, ติดตะขอ,
รัดเข็มขัดหรือแถบผาที่มีความยาว
ขจัดคราบสกปรกฝงแนนกอนการซัก
ถูบริเวณที่สกปรกดวยผงซักฟอกหรือใชผง
ขจัดคราบเฉพาะ, สำหรับผามานใหระวังเปน
พิเศษ, ถอดตะขอออกหรือมัดใสในถุงหรือ
ตาขาย
ตรวจสอบใหแนใจวา ไมมีโลหะใดๆ ติดคาง
อยูในเสื้อผา (เชน กิ๊บติดผม, เข็มกลัดซอน
ปลาย, เข็มหมุด)
6.3 กอนบรรจุผาในถังซัก
90°C
60°C50°C
40°C30°Cน้ำเย็น
การซักชุดชั้นใน, ถุงนองและผาเนื้อบาง ใหใส
ในถุงซัก ซึ่งสามารถหาซื้อไดตามรานคาหรือ
หางสรรพสินคาชั้นนำทั่วไป
● แยกผาที่ติดขุยงายออกจากผาที่มีขุย
อยาซักพรอมกัน !
ปริมาณบรรจุที่แนะนำถูกแสดงไวในตาราง
โปรแกรมการทำงานหรือใชหลักเกณฑทั่วไปดังนี้:
ดวยปริมาณบรรจุสูงสุดจะทำใหใชน้ำและพลังงาน
ไดอยางเต็มประสิทธิภาพ สำหรับผาที่สกปรกมาก
ใหลดปริมาณการบรรจุลง
ผาฝาย, ผาลินิน:เต็มถังแตไมควรแนน
จนเกินไป
ผาใยสังเคราะห: ไมเกินครึ่งถัง
ผาเนื้อบอบบาง
และผาขนสัตว:
ไมเกินหนึ่งในสาม
ของถัง
6.4 ปริมาณผาที่บรรจุสูงสุด
เลือด: รอยเปอนใหมๆ ใหลางดวยน้ำเย็น สำหรับ
คราบเลือดที่แหงแลว ใหแชในน้ำผสมผงซักฟอก
ชนิดพิเศษคางคืนไว แลวขัดดวยสบูและน้ำ
สีน้ำมัน: ทารอยเปอนดวยน้ำยาขจัดคราบที่มี
สวนผสมของเบนซิน วางผาลงบนผานุมๆ แลวซับ
รอยเปอนเบาๆ หลายๆ ครั้ง
รอยน้ำมันที่แหงแลว: ทารอยเปอนดวยน้ำมันสน
วางผาลงบนพื้นผิวนุมแลวซับรอยเปอนดวยผาฝาย
โดยใชปลายนิ้วมือ
รอยเปอนฝงแนนอาจไมสามารถขจัดออกได
ดวยน้ำและผงซักฟอกเพียงอยางเดียว ดังนั้นจึง
แนะนำใหกำจัดรอยเปอนกอนการซัก
6.5 การขจัดคราบ
52 www.electrolux.com
●
●
●●
●
6.6 ชนิดของผงซักฟอกและปริมาณการใชงาน
สนิมเหล็ก: ใชกรดออกซาลิกละลายในน้ำรอน
หรือใชผลิตภัณฑกำจัดคราบสนิมเหล็กที่ใชกับ
น้ำเย็น ระวังรอยสนิมที่ติดแนนมานาน เพราะ
โครงสรางเซลลูโลสถูกทำลายไปแลว และผาอาจ
เปนรูได
คราบเชื้อรา: ใชน้ำยาฟอกขาวแลวลางออก
ใหหมด (ใชกับผาขาวและผาที่สีไมตก เทานั้น)
หญา: ถูดวยสบูเล็กนอย และใชน้ำยาฟอกขาว
(ใชกับผาขาวและผาที่สีไมตกเทานั้น)
ปากกาลูกลื่นและกาว: ทาดวยอะซิโตน (*)
วางผาลงบนผานุมๆ แลวซับรอยเปอน
ลิปสติก: ทาดวยอะซิโตน (*) แลวถูรอยเปอน
ดวยเหลา แลวขจัดรอยเปอนตกคางบนผาขาว
ดวยน้ำยาฟอกขาว
ไวนแดง: แชในน้ำผสมผงซักฟอก ลางดวย
น้ำเปลาและทาดวยกรดอะซิติก หรือกรด ซิตริก
แลวลางออกดวยน้ำ ขจัดรอยเปอนที่ยังคงตกคาง
ดวยน้ำยาฟอกขาว
หมึก: ขึ้นอยูกับประเภทของหมึก ใหชุบหมาดผา
ดวยอะซิโตน (*) แลวตามดวย กรดอะเซติค
ขจัดคราบตกคางบนผาขาว โดยใชน้ำยาฟอกขาว
จากนั้นลางน้ำออกใหัทั่ว
คราบเปอนน้ำมันดิน: ขั้นแรกใหทาดวยน้ำยา
ขจัดคราบ เหลาหรือเบนซิน แลวถูดวยน้ำผสม
ผงซักฟอก
(*) อยาใชอะซิโตนกับผาไหมเทียม
เครื่องซักผาเครื่องนี้ สามารถใชงานรวมกับ
ผงซักฟอกชนิดฟองนอยเทานั้นเพื่อปองกันปญหา
ฟองลน อันเปนสาเหตุที่ทำใหผลการซักไมเปน
ที่นาพอใจและอาจทำใหเครื่องเสียหายได
อยาใชผงซักฟอกผิดประเภท เชนผงซักฟอก
สำหรับเครื่องฝาบนหรือผงซักฟอกสำหรับซัก
ดวยมือหรือผงซักฟอกประเภทที่ทำจากสบู
กับเครื่องซักผาฝาหนาเครื่องนี้ เพราะจะทำให
เกิดฟองมากเกินไป อันเปนสาเหตุทำใหระยะ
เวลาการซักของเครื่องนานมากกวาเดิม,
การปนผาไมมีประสิทธิภาพ, การลางผาไมมี
ประสิทธิภาพ และมอรเตอรทำงานหนัก
ผงซักฟอกชนิดฟองนอยถูกออกแบบมาเพื่อใช
สำหรับเครื่องซักผาฝาหนาโดยเฉพาะ ซึ่งที่ฉลาก
บรรจุภัณฑจะระบุขอความไววา “สำหรับเครื่อง
ฝาหนา” หรือ “ผงซักฟอกประสิทธิภาพสูง” หรือ
“ผงซักฟอกสูตรเขมขนสำหรับซักดวยเครื่อง”
เปนตน
ชนิดและปริมาณของผงซักฟอกที่ใชจะขึ้นอยูกับ :
ชนิดของผา (เชน ผาเนื้อบาง, ผาขนสัตว,
ผาฝาย)
ความกระดางของน้ำ
อุณหภูมิที่ใชในการซัก
ระดับความสกปรก
สีของผา● ประมาณผาที่บรรจุ
ขอมูลความกระดางของน้ำในพื้นที่ สามารถสอบ
ถามไดจากหนวยงานที่จายน้ำให หรือหนวยงาน
ราชการในพื้นที่
คุณอาจตองใชปริมาณของผงซักฟอกตามที่ผูผลิต
ไดแนะนำไวที่บรรจุภัณฑกอน จากนั้นสังเกตุผล
การซักที่ได เปนที่นาพอใจหรือไม
ความกระดางของน้ำแบงออกเปน “ระดับ” ของ
ความกระดาง
ปริมาณผงซักฟอกที่ใช
ผลการซักที่ดี ขึ้นอยูกับการเลือกผงซักฟอกและใช
ในปริมาณที่เหมาะสม เพื่อหลีกเลี่ยงความสิ้นเปลือง
และชวยปกปองสิ่งแวดลอม
แมวาผงซักฟอกจะยอยสลายทางชีวภาพได แต
ผงซักฟอกมีสวนประกอบที่หากใชในปริมาณมาก
จะรบกวนสมดุลธรรมชาติที่เปราะบางได
หากผลการซักยังไมเปนที่นาพอใจหรือพบปญหา
เรื่องฟองในระหวางซัก ใหเปรียบเทียบผลการซัก
กับรายการดานลางนี้ แลวทำการปรับเปลี่ยนชนิด
หรือปริมาณของผงซักฟอกใหเหมาะสมในการซัก
ครั้งตอไป
53ภาษาไทย
54 www.electrolux.com
3
1
2
●
●●
การดูแลรักษาและทำความสะอาด8.
คำเตือน ! ตองถอดปลั๊กไฟออกทุกครั้ง
กอนทำความสะอาดหรือดูแลรักษา
น้ำที่เราใชอยูนั้นปกติจะมีหินปูนผสมอยู ดังนั้น
จึงควรใชสารทำใหน้ำออนในเครื่องซักผาเปน
ครั้งคราว
ทำความสะอาดเครื่องดวยสบูและน้ำอุนเทานั้น
เช็ดพื้นผิวทั้งหมดใหแหง
ขอควรระวัง ! หามใชแอลกอฮอล สาร
ละลายหรือสารเคมี ทำความสะอาดเครื่อง
โดยแยกทำตางหากจากการซักผาและปฏิบัติ
ตามคำแนะนำของผูผลิตสารทำใหน้ำออน วิธีนี้
จะชวยปองกันการเกิดคราบหินปูนตกคางในเคร่ือง
8.2 การขจัดตะกรัน
8.1 การทำความสะอาดภายนอก ควรลางทำความสะอาดถาดจายเติมสารซักฟอก
และสารใสเพิ่มเติมตางๆ เปนประจำ
ถอดถาดจายเติมสารซักฟอกออก ดวยการกดตัว
ยึดลงแลวดึงออก
เปดกอกน้ำลางทำความสะอาดคราบตกคาง ของ
สารซักฟอกออกใหหมด
8.5 การทำความสะอาดถาดจายสารซักฟอกและน้ำยาปรับผานุม
เปดประตูเครื่องทิ้งไวชั่วครู ทั้งนี้เพื่อชวยปองกัน
ไมใหเกิดเชื้อราและกลิ่นอับเหม็น ภายในตัวเครื่อง
การเปดประตูทิ้งไวหลังจากซักเสร็จ จะชวยถนอม
รักษายางขอบประตูดวย
8.3 หลังการซักแตละรอบ
การซักผาที่ระดับอุณหภูมิต่ำ อาจทำใหเกิดสาร
ตกคางภายในถังซัก
ขอแนะนำใหใชโปรแกรม “Tub Clean (ลางถัง
ซัก)” เปนประจำเพื่อทำความสะอาดคราบที่อาจ
ตกคางภายในเครื่องซักผา
8.4 การซักเพื่อดูแลรักษาเครื่องดวยโปรแกรม “Tub Clean (ลางถังซัก)”
ไมควรบรรจุผาในถังซัก
เลือกโปรแกรม “Tub Clean (ลางถังซัก)”
ตวงสารซักฟอกในปริมาณปกติ ตองใช
ผงซักฟอกชีวภาพเทานั้น● กดปุม Start/Pause เพื่อเริ่มโปรแกรม
การซักเพื่อบำรุงรักษาเครื่อง :
เพื่อใหทำความสะอาดไดดียิ่งขึ้น ควรถอดสวนบน
ของถาดจายน้ำยาอื่นๆ ออก
55ภาษาไทย
●●
●
●
หลังจากนำถาดจายออก ใหใชแปรงเล็กๆ เพื่อทำ
ความสะอาดชองดานใน โดยใหแนใจวาผงซักฟอก
ทั้งหมดไมเหลือเปนคราบตกคางที่ดานบนและ
ที่ดานลางของชอง
ติดตั้งถาดกลับเขาที่ จากนั้นเปดใชงานโปรแกรม
ลางผาโดยไมตองบรรจุผาในถังซัก
8.6 การทำความสะอาดชองเก็บถาดจายสารซักฟอก
8.7 การทำความสะอาดปมระบายน้ำ
เครื่องจะไมระบายน้ำออก
ถังซักไมสามารถหมุนได
เครื่องอาจเกิดเสียงผิดปกติเนื่องจากปมระบาย
น้ำอุดตัน
จอแสดงผลจะแจงรหัสเตือน เนื่องจากมีปญหา
กับระบบระบายน้ำ
ตรวจสอบปมระบายน้ำเปนประจำและ
ดูแลใหสะอาดอยูเสมอ
ทำความสะอาดปมระบายน้ำหาก:
1.
2.
ถอดปลั๊กไฟเครื่องซักผา ออกจากเตาจาย
ไฟฟาทุกครั้ง
อยานำที่กรองออกขณะเครื่องทำงาน อยาทำ
ความสะอาดปมระบายหากน้ำในเครื่องรอนอยู
น้ำจะตองเย็นกอนทำความสะอาดปมระบายน้ำ
คำเตือน !
การทำความสะอาดปมระบายน้ำ:
1. เปดฝาครอบปมระบายน้ำ
2. ดึงฝาปดลงจากนั้นบีบขาทั้งสองดานของ
ฝาปดเขาหากันเพื่อนำฝาปดออก (ดังภาพ)
บีบขาทั้ง
สองดาน
เขาหากัน
ดึงออก
1.
2.
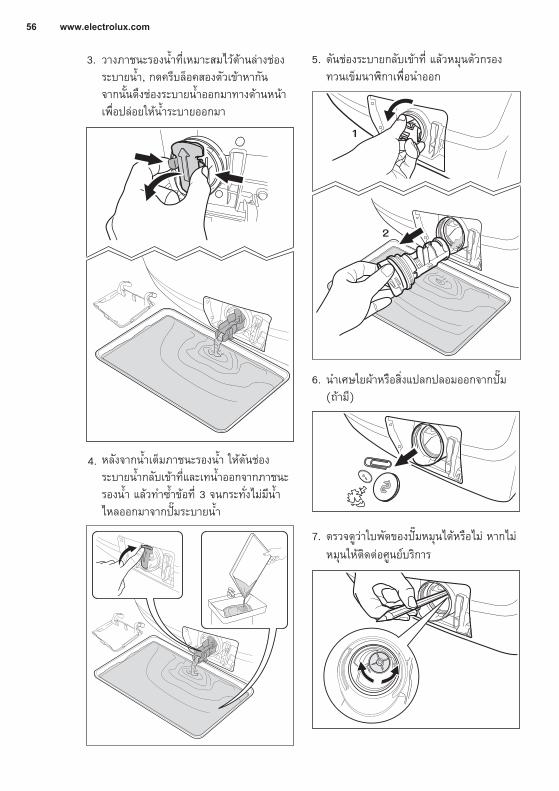
56 www.electrolux.com
1
2
3. วางภาชนะรองน้ำที่เหมาะสมไวดานลางชอง
ระบายน้ำ, กดครีบล็อคสองตัวเขาหากัน
จากนั้นดึงชองระบายน้ำออกมาทางดานหนา
เพื่อปลอยใหน้ำระบายออกมา
6. นำเศษใยผาหรือสิ่งแปลกปลอมออกจากปม
(ถามี)
4. หลังจากน้ำเต็มภาชนะรองน้ำ ใหดันชอง
ระบายน้ำกลับเขาที่และเทน้ำออกจากภาชนะ
รองน้ำ แลวทำซ้ำขอที่ 3 จนกระทั่งไมมีน้ำ
ไหลออกมาจากปมระบายน้ำ
5. ดันชองระบายกลับเขาที่ แลวหมุนตัวกรอง
ทวนเข็มนาิกาเพื่อนำออก
7. ตรวจดูวาใบพัดของปมหมุนไดหรือไม หากไม
หมุนใหติดตอศูนยบริการ
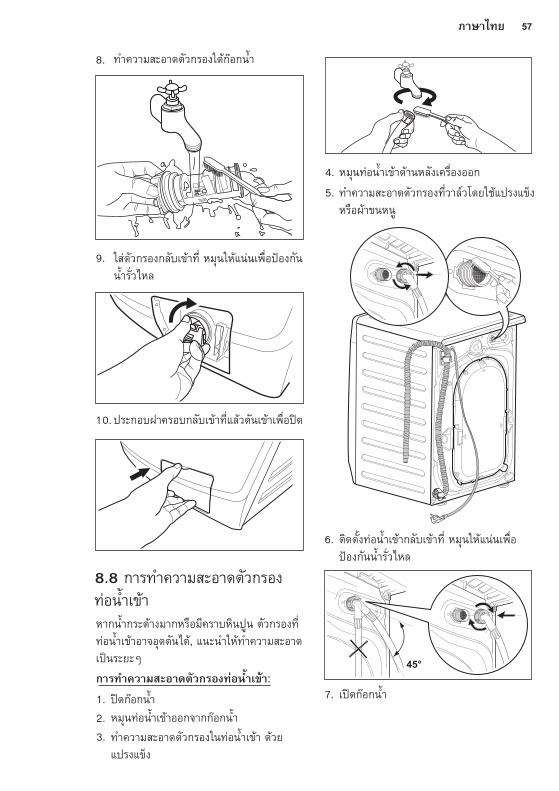
57ภาษาไทย
45°
8. ทำความสะอาดตัวกรองใตกอกน้ำ
9. ใสตัวกรองกลับเขาที่ หมุนใหแนนเพื่อปองกัน
น้ำรั่วไหล
10. ประกอบฝาครอบกลับเขาที่แลวดันเขาเพื่อปด
หากน้ำกระดางมากหรือมีคราบหินปูน ตัวกรองที่
ทอน้ำเขาอาจอุดตันได, แนะนำใหทำความสะอาด
เปนระยะๆ
8.8 การทำความสะอาดตัวกรองทอน้ำเขา
การทำความสะอาดตัวกรองทอน้ำเขา:
1. ปดกอกน้ำ
2. หมุนทอน้ำเขาออกจากกอกน้ำ
3. ทำความสะอาดตัวกรองในทอน้ำเขา ดวย
แปรงแข็ง
4. หมุนทอน้ำเขาดานหลังเครื่องออก
5. ทำความสะอาดตัวกรองที่วาลวโดยใชแปรงแข็ง
หรือผาขนหนู
6. ติดตั้งทอน้ำเขากลับเขาที่ หมุนใหแนนเพื่อ
ปองกันน้ำรั่วไหล
7. เปดกอกน้ำ
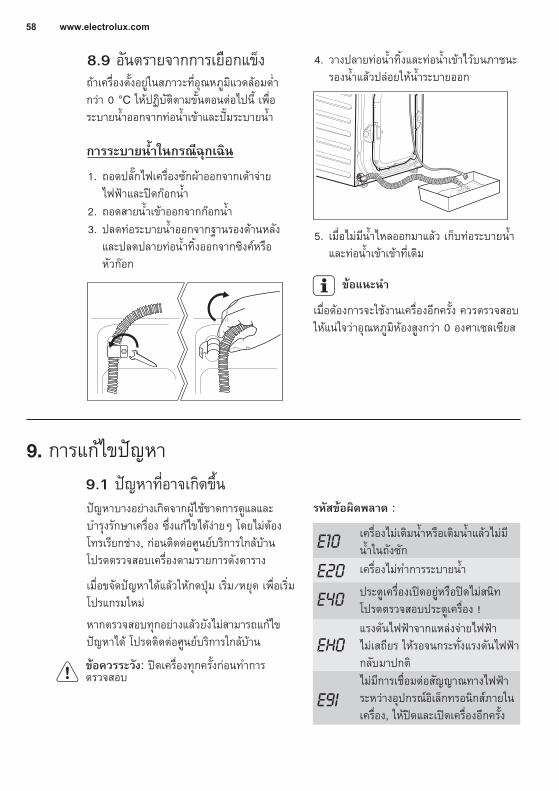
58 www.electrolux.com
เครื่องไมเติมน้ำหรือเติมน้ำแลวไมมี
น้ำในถังซัก
ประตูเครื่องเปดอยูหรือปดไมสนิท
โปรดตรวจสอบประตูเครื่อง !
เครื่องไมทำการระบายน้ำ
แรงดันไฟฟาจากแหลงจายไฟฟา
ไมเสถียร ใหรอจนกระทั่งแรงดันไฟฟา
กลับมาปกติ
ไมมีการเชื่อมตอสัญญาณทางไฟฟา
ระหวางอุปกรณอิเล็กทรอนิกสภายใน
เครื่อง, ใหปดและเปดเครื่องอีกครั้ง
รหัสขอผิดพลาด :
ถาเครื่องตั้งอยูในสภาวะที่อุณหภูมิแวดลอมต่ำ
กวา 0 °C ใหปฏิบัติตามขั้นตอนตอไปนี้ เพื่อ
ระบายน้ำออกจากทอน้ำเขาและปมระบายน้ำ
8.9 อันตรายจากการเยือกแข็ง
9.1 ปญหาท่ีอาจเกิดข้ึน
ถอดสายน้ำเขาออกจากกอกน้ำ2.
1. ถอดปลั๊กไฟเครื่องซักผาออกจากเตาจาย
ไฟฟาและปดกอกน้ำ
3. ปลดทอระบายน้ำออกจากฐานรองดานหลัง
และปลดปลายทอน้ำทิ้งออกจากซิงคหรือ
หัวกอก
วางปลายทอน้ำทิ้งและทอน้ำเขาไวบนภาชนะ
รองน้ำแลวปลอยใหน้ำระบายออก
4.
5. เมื่อไมมีน้ำไหลออกมาแลว เก็บทอระบายน้ำ
และทอน้ำเขาเขาที่เดิม
เมื่อตองการจะใชงานเครื่องอีกครั้ง ควรตรวจสอบ
ใหแนใจวาอุณหภูมิหองสูงกวา 0 องศาเซลเซียส
ขอแนะนำ
การระบายน้ำในกรณีฉุกเฉิน
การแกไขปญหา9.
ปญหาบางอยางเกิดจากผูใชขาดการดูแลและ
บำรุงรักษาเครื่อง ซึ่งแกไขไดงายๆ โดยไมตอง
โทรเรียกชาง, กอนติดตอศูนยบริการใกลบาน
โปรดตรวจสอบเครื่องตามรายการดังตาราง
เมื่อขจัดปญหาไดแลวใหกดปุม เริ่ม/หยุด เพื่อเริ่ม
โปรแกรมใหม
หากตรวจสอบทุกอยางแลวยังไมสามารถแกไข
ปญหาได โปรดติดตอศูนยบริการใกลบาน
ขอควรระวัง: ปดเครื่องทุกครั้งกอนทำการตรวจสอบ

59ภาษาไทย
ยังไมไดปดประตูเครื่อง (รหัสขอผิดพลาด: ) => ปดประตูใหสนิท
ยังไมไดเสียบปลั๊กไฟหรือเสียบปลั๊กไมสนิท => เสียบปลั๊กไฟหรือเสียบปลั๊กใหแนน
ไมมีกระแสไฟที่เตาเสียบ => โปรดตรวจสอบการติดตั้งระบบไฟในบาน
ยังไมกดปุม Start/Pause => กดปุม Start/Pause
โปรแกรม Delay End ทำงานอยู => หากตองการดำเนินการซักทันที ใหทำการยกเลิกโปรแกรม Delay End
แรงดันไฟฟาผิดปกติ (ถารหัส ปรากฏขึ้นที่หนาจอ) => กรุณารอจนกระทั่งแรงดันไฟฟาปกติ เครื่องจะเริ่มทำงานอัตโนมัติ
ทอน้ำเขาตันหรือหักงอ (รหัสขอผิดพลาด: ) => ตรวจสอบการตอทอน้ำเขา
ปลายทอระบายน้ำอยูต่ำเกินไป (รหัสขอผิดพลาด: ) => ใหดูขอมูลอางอิงในหัวขอ “การระบายน้ำ”
ทอระบายน้ำ ตันหรือหักงอ (รหัสขอผิดพลาด: ) => ตรวจสอบการตอทอระบายน้ำ
ปมระบายน้ำอุดตัน (รหัสขอผิดพลาด: ) => ทำความสะอาดตัวกรอง ปมระบายน้ำ
ตัวกรองทอน้ำเขาอุดตัน (รหัสขอผิดพลาด: ) => ทำความสะอาดตัวกรองทอน้ำเขา
ประตูเครื่องปดไมสนิท (รหัสขอผิดพลาด: ) => ปดประตูใหสนิท
กอกน้ำปดอยู (รหัสขอผิดพลาด: ) => เปดกอกน้ำ
เครื่องซักผา
ไมทำงาน:
น้ำไมเขาเครื่อง
ซักผา:
น้ำเขาเครื่องซักผา
และระบายออกทันที:
เครื่องซักผาไม
ระบายน้ำทิ้งและ/
หรือไมปนหมาด:ตัวเลือกเสริม “Rinse Hold” หรือ “Extra Silent” ถูกใชงาน => กดปุม Start/Pause เพื่อระบายน้ำ หรือเลือก Spin โปรแกรม
ผาไมไดกระจายตัวอยูในถังซักอยางทั่วถึง => หยุดเครื่องชั่วคราว รอประตูเครื่องคลายล็อค จากนั้นเปดประตูเครื่องแลวทำการกระจายผาออกใหทั่วถัง
ความผิดปกติที่เกิด สาเหตุที่เปนไปได => แนวทางแกไข
ใสผงซักฟอกมากเกินไปหรือใชผงซักฟอกไมเหมาะสม (เกิดฟองมากเกินไปจนฟองลน) => ลดปริมาณสารซักฟอกหรือใชสารซักฟอกอื่น (ดูหนา 52)
ตรวจสอบวามีรอยรั่วที่จุดใดในการตอทอน้ำเขาหรือไม ใหทำการระบายน้ำออกจากถังซักใหหมด แลวตรวจดูถังซักยังเปยกหรือมีน้ำอยูหรือเปลา => ตรวจสอบการตอทอน้ำเขา
ทอระบายน้ำชำรุด => เปลี่ยนทอระบายน้ำใหม (โปรดติดตอศูนยบริการ)
มีน้ำเปยกที่พื้น:
ใชสารซักฟอกนอยเกินไปหรือใชสารซักฟอกที่ไมเหมาะสม => เพิ่มปริมาณสารซักฟอกหรือใชสารซักฟอกอื่น (ดูหนา 52)
มีคราบสกปรกฝงแนนที่ไมไดขจัดกอนซัก => ใชผลิตภัณฑที่มีจำหนายทั่วไป ในการขจัดคราบติดแนนเลือกอุณหภูมิสำหรับการซักไมถูกตอง => ตรวจสอบวาเลือกอุณหภูมิถูกตอง หรือไมบรรจุผามากเกินไป => ลดปริมาณผา
ผลการซักไมนาพอใจ:
ติดตั้งเครื่องไมถูกตอง => เครื่องตองติดตั้งไดระดับสมดุล, ดูในหัวขอ “การติดตั้ง”
สลักยึดสำหรับขนยายหรือบรรจุภัณฑไมไดนำออก => บรรจุภัณฑและ/หรือสลักยึดสำหรับขนยายจะตองนำออก ดูในหัวขอ “การแกะบรรจุภัณฑ”
ปริมาณผานอยเกินไป => เพิ่มผาลงในถัง
เครื่องซักผาเครื่องนี้ผลิตขึ้นดวยเทคโนโลยีสมัยใหม ชวยใหเครื่องทำงานไดอยางประหยัด ใชน้ำในปริมาณนอยโดยไมกระทบตอประสิทธิภาพในการทำงาน
เครื่องสงเสียง
ดังผิดปกติ:
ไมเห็นน้ำใน
ถังซัก:
60 www.electrolux.com
ความผิดปกติที่เกิด สาเหตุที่เปนไปได => แนวทางแกไข
โปรแกรมยังทำงานอยู => รอจนสิ้นสุดโปรแกรม
ตองนำสลักยึดปองกันระหวางการขนสงและบรรจุภัณฑออกกอนใชเครื่อง => ตรวจสอบวาติดตั้งเครื่องถูกตองหรือไม
ผง/น้ำยาซักผามากเกินไป => ลดปริมาณสารซักฟอกหรือใชสารซักฟอกอื่น (ดูหนา 52)
เครื่องไมไดสมดุล => หยุดเครื่องชั่วคราว จากนั้นทำการกระจายผาออกใหทั่วถัง และเริ่มการปนหมาดอีกครั้ง
ยังไมไดปรับระดับขาตั้ง => ตรวจสอบวาตั้งเครื่องในแนวระนาบถูกตองหรือไม
ผาไมไดกระจายตัวอยูในถังซักอยางทั่วถึง => หยุดเครื่องชั่วคราว รอประตูเครื่องคลายล็อค จากนั้นเปดประตูเครื่องแลวทำการกระจายผาออกใหทั่วถัง
อาจมีผาในถังซักนอยมาก => บรรจุผาเพิ่ม
พื้นไมมั่นคง เชน พื้นไม => ดูในหัวขอ “พื้นที่การติดตั้ง”
มีน้ำคางอยูในถังซัก => ตองทำการระบายน้ำออกจากถังซัก เพื่อใหประตูคลายล็อค (ศึกษารายละเอียดที่หัวขอ “การเปดประตูเครื่องซักผา” หนา 49)
ปญหานี้อาจเกิดจากขอผิดพลาดของเครื่องเอง => กรุณาติดตอศูนยบริการ และหากตองการเปดประตูเครื่องซักผา กรุณาอานหัวขอ “การเปดประตูกรณีฉุกเฉิน” ในหนาถัดไปโดยละเอียด
ไมสามารถเปด
ประตูเครื่องได:
เครื่องสั่นหรือ
สงเสียงดัง:
เวลาการทำงาน
ที่ใชจริง นานกวา
ที่แสดงไว:
เครื่องไดทำการคำนวณเวลาการทำงานใหม โดยอางอิงกับปริมาณผาที่บรรจุ
ระยะเวลาการ
ทำงานสั้นกวา
เวลาที่แสดง
อุปกรณตรวจสอบความสมดุลทางอิเล็กทรอนิกสทำงานคลาดเคลื่อน เนื่องจากผาไมกระจายตัวอยูในถังซักอยางทั่วถึง เครื่องจะทำการกระจายผาโดยการหมุนกลับไปกลับมา
ขั้นตอนเชนนี้อาจทำงานหลายครั้งจนกวาผาจะกระจายตัวอยูในถังซักอยางทั่วถึง จากนั้นจึงจะเขาสูขั้นตอนการปนตามปกติ
หลังจากที่อุปกรณตรวจสอบไดทำงานแลวเปนเวลา 10 นาทีผานไป หากผายังกระจายตัวอยูในถังซักไมทั่วถึง เครื่องจะไมปนหมาด ในกรณีนี้ใหใชมือกระจายผาในถังซักกอนแลวจึงเลือกโปรแกรมปนหมาด
=> หยุดเครื่องชั่วคราว จากนั้นทำการกระจายผาออกใหทั่วถัง
การปนหมาดเริ่ม
ทำงานชา หรือ
เครื่องไมปนหมาด:
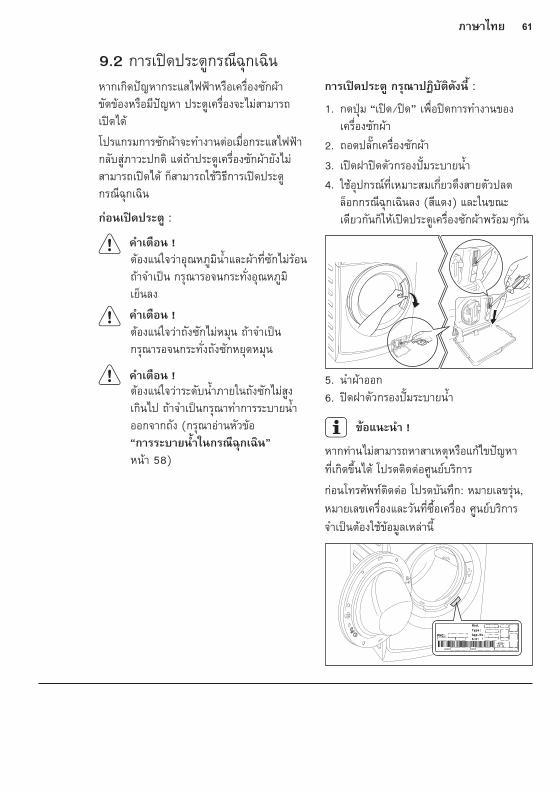
61ภาษาไทย
หากทานไมสามารถหาสาเหตุหรือแกไขปญหา
ที่เกิดขึ้นได โปรดติดตอศูนยบริการ
กอนโทรศัพทติดตอ โปรดบันทึก: หมายเลขรุน,
หมายเลขเครื่องและวันที่ซื้อเครื่อง ศูนยบริการ
จำเปนตองใชขอมูลเหลานี้
หากเกิดปญหากระแสไฟฟาหรือเครื่องซักผา
ขัดของหรือมีปญหา ประตูเครื่องจะไมสามารถ
เปดได
โปรแกรมการซักผาจะทำงานตอเมื่อกระแสไฟฟา
กลับสูภาวะปกติ แตถาประตูเครื่องซักผายังไม
สามารถเปดได ก็สามารถใชวิธีการเปดประตู
กรณีฉุกเฉิน
กอนเปดประตู :
ตองแนใจวาอุณหภูมิน้ำและผาที่ซักไมรอน
ถาจำเปน กรุณารอจนกระทั่งอุณหภูมิ
เย็นลง
คำเตือน !
ตองแนใจวาถังซักไมหมุน ถาจำเปน
กรุณารอจนกระทั่งถังซักหยุดหมุน
คำเตือน !
ตองแนใจวาระดับน้ำภายในถังซักไมสูง
เกินไป ถาจำเปนกรุณาทำการระบายน้ำ
ออกจากถัง (กรุณาอานหัวขอ
“การระบายน้ำในกรณีฉุกเฉิน”
หนา 58)
คำเตือน !
ขอแนะนำ !
การเปดประตู กรุณาปฏิบัติดังนี้ :
1. กดปุม “เปด/ปด” เพื่อปดการทำงานของ
เครื่องซักผา
2. ถอดปลั๊กเครื่องซักผา
3. เปดฝาปดตัวกรองปมระบายน้ำ
4. ใชอุปกรณที่เหมาะสมเกี่ยวดึงสายตัวปลด
ล็อกกรณีฉุกเฉินลง (สีแดง) และในขณะ
เดียวกันก็ใหเปดประตูเครื่องซักผาพรอมๆกัน
5. นำผาออก
6. ปดฝาตัวกรองปมระบายน้ำ
9.2 การเปดประตูกรณีฉุกเฉิน
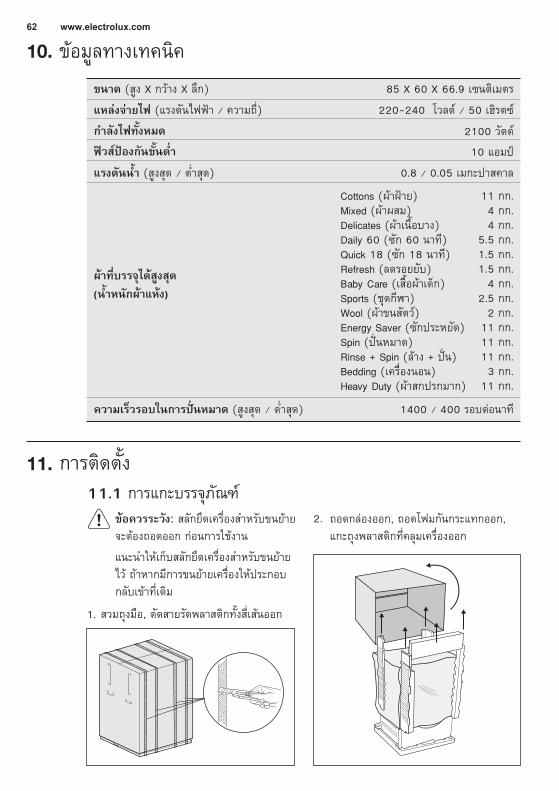
62 www.electrolux.com
สวมถุงมือ, ตัดสายรัดพลาสติกทั้งสี่เสนออก1.
ถอดกลองออก, ถอดโฟมกันกระแทกออก,
แกะถุงพลาสติกที่คลุมเครื่องออก
2.
ขอมูลทางเทคนิค10.
ขนาด (สูง X กวาง X ลึก)
ผาที่บรรจุไดสูงสุด
(น้ำหนักผาแหง)
ความเร็วรอบในการปนหมาด (สูงสุด / ต่ำสุด) 1400 / 400 รอบตอนาที
85 X 60 X 66.9 เซนติเมตร
แหลงจายไฟ (แรงดันไฟฟา / ความถี่)
กำลังไฟทั้งหมด
แรงดันน้ำ (สูงสุด / ต่ำสุด) 0.8 / 0.05 เมกะปาสคาล
220-240 โวลต / 50 เฮิรตซ
2100 วัตต
ฟวสปองกันขั้นต่ำ 10 แอมป
Cottons (ผาฝาย)Mixed (ผาผสม)Delicates (ผาเนื้อบาง)Daily 60 (ซัก 60 นาที)Quick 18 (ซัก 18 นาที)Refresh (ลดรอยยับ)Baby Care (เสื้อผาเด็ก)Sports (ชุดกีฬา)Wool (ผาขนสัตว)Energy Saver (ซักประหยัด)Spin (ปนหมาด)Rinse + Spin (ลาง + ปน)Bedding (เครื่องนอน)Heavy Duty (ผาสกปรกมาก)
11 กก.4 กก.4 กก.
5.5 กก.1.5 กก.1.5 กก.
4 กก.2.5 กก.
2 กก.11 กก.11 กก.11 กก.3 กก.
11 กก.
การติดตั้ง11.
ขอควรระวัง: สลักยึดเครื่องสำหรับขนยาย
จะตองถอดออก กอนการใชงาน
แนะนำใหเก็บสลักยึดเครื่องสำหรับขนยาย
ไว ถาหากมีการขนยายเครื่องใหประกอบ
กลับเขาที่เดิม
11.1 การแกะบรรจุภัณฑ

63ภาษาไทย
4.
5. นำโฟมรองฐานเครื่องออก
6.
วางชิ้นสวนโฟมไวดานหลังเครื่องซักผา
จากนั้นเอนเครื่องนอนลงที่โฟมและระมัดระวัง
อยาใหเครื่องทับสายน้ำทางดานหลังจนพับ
หักงอ ดังภาพ
ดันเครื่องใหอยูตำแหนงตั้งตามเดิม
เปดประตูเครื่อง นำสิ่งของดานในทั้งหมด
ออกมาดังภาพ3.
7.
8.
9. ดึงที่เก็บทอพลาสติกออก
10. ปดรูดวยหมวกพลาสติกที่มาพรอมกับเครื่อง
ซึ่งสามารถหาไดจากในถุงบรรจุคูมือการ
ใชงาน
นำสายไฟ, ทอระบายน้ำและทอน้ำเขาออก
จากที่เก็บทอ (A) ทางดานหลังเครื่อง
ดังภาพ
หมุนสลักเกลียวสามตัวออก
1
2
A
1
2
3
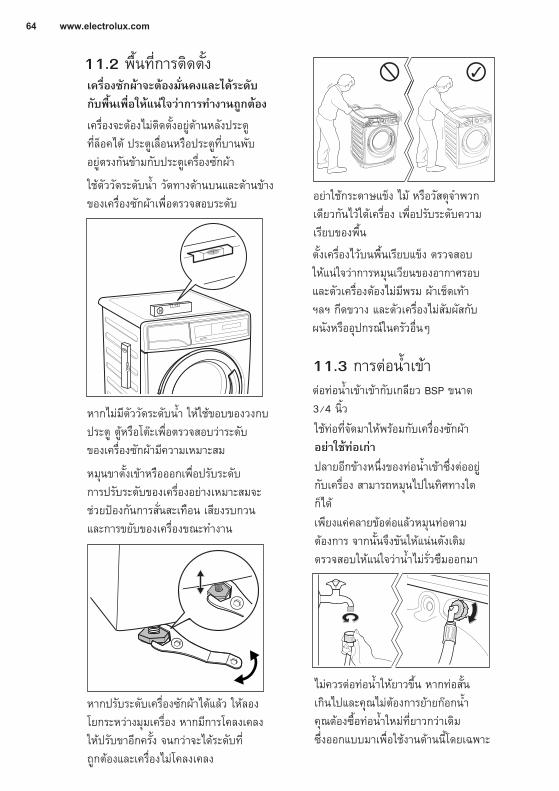
64 www.electrolux.com
อยาใชกระดาษแข็ง ไม หรือวัสดุจำพวก
เดียวกันไวใตเครื่อง เพื่อปรับระดับความ
เรียบของพื้น
หมุนขาตั้งเขาหรือออกเพื่อปรับระดับ
การปรับระดับของเครื่องอยางเหมาะสมจะ
ชวยปองกันการสั่นสะเทือน เสียงรบกวน
และการขยับของเครื่องขณะทำงาน
หากปรับระดับเครื่องซักผาไดแลว ใหลอง
โยกระหวางมุมเครื่อง หากมีการโคลงเคลง
ใหปรับขาอีกครั้ง จนกวาจะไดระดับที่
ถูกตองและเครื่องไมโคลงเคลง
11.2 พื้นที่การติดตั้ง
ใชตัววัดระดับน้ำ วัดทางดานบนและดานขาง
ของเครื่องซักผาเพื่อตรวจสอบระดับ
หากไมมีตัววัดระดับน้ำ ใหใชขอบของวงกบ
ประตู ตูหรือโตะเพื่อตรวจสอบวาระดับ
ของเครื่องซักผามีความเหมาะสม
เครื่องซักผาจะตองมั่นคงและไดระดับ
กับพื้นเพื่อใหแนใจวาการทำงานถูกตอง
เครื่องจะตองไมติดตั้งอยูดานหลังประตู
ที่ล็อคได ประตูเลื่อนหรือประตูที่บานพับ
อยูตรงกันขามกับประตูเครื่องซักผา
ตอทอน้ำเขาเขากับเกลียว BSP ขนาด
3/4 นิ้ว
ใชทอที่จัดมาใหพรอมกับเครื่องซักผา
อยาใชทอเกา
ปลายอีกขางหนึ่งของทอน้ำเขาซึ่งตออยู
กับเครื่อง สามารถหมุนไปในทิศทางใด
ก็ได
เพียงแคคลายขอตอแลวหมุนทอตาม
ตองการ จากนั้นจึงขันใหแนนดังเดิม
ตรวจสอบใหแนใจวาน้ำไมรั่วซึมออกมา
11.3 การตอน้ำเขา
ตั้งเครื่องไวบนพื้นเรียบแข็ง ตรวจสอบ
ใหแนใจวาการหมุนเวียนของอากาศรอบ
และตัวเครื่องตองไมมีพรม ผาเช็ดเทา
ฯลฯ กีดขวาง และตัวเครื่องไมสัมผัสกับ
ผนังหรืออุปกรณในครัวอื่นๆ
ไมควรตอทอน้ำใหยาวขึ้น หากทอสั้น
เกินไปและคุณไมตองการยายกอกน้ำ
คุณตองซื้อทอน้ำใหมที่ยาวกวาเดิม
ซึ่งออกแบบมาเพื่อใชงานดานนี้โดยเฉพาะ
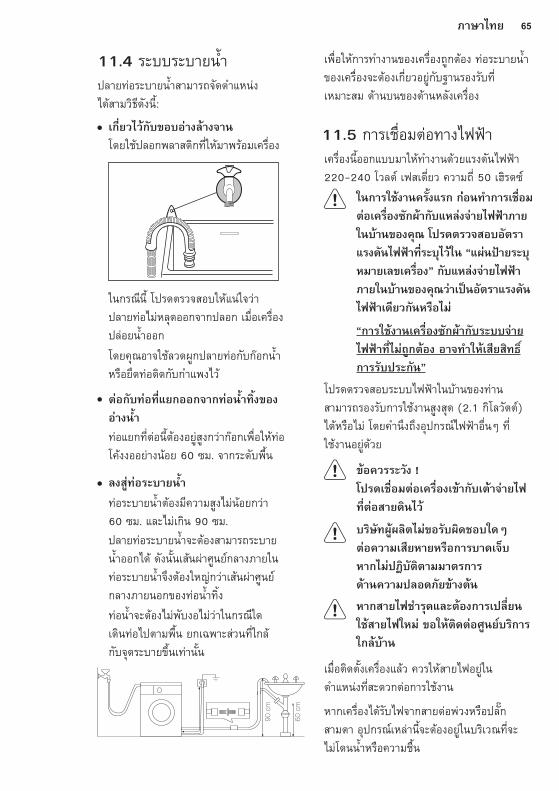
65ภาษาไทย
เพื่อใหการทำงานของเครื่องถูกตอง ทอระบายน้ำ
ของเครื่องจะตองเกี่ยวอยูกับฐานรองรับที่
เหมาะสม ดานบนของดานหลังเครื่อง
90 c
m
60 c
m
โปรดตรวจสอบระบบไฟฟาในบานของทาน
สามารถรองรับการใชงานสูงสุด (2.1 กิโลวัตต)
ไดหรือไม โดยคำนึงถึงอุปกรณไฟฟาอื่นๆ ที่
ใชงานอยูดวย
บริษัทผูผลิตไมขอรับผิดชอบใดๆ
ตอความเสียหายหรือการบาดเจ็บ
หากไมปฏิบัติตามมาตรการ
ดานความปลอดภัยขางตน
เครื่องนี้ออกแบบมาใหทำงานดวยแรงดันไฟฟา
220-240 โวลต เฟสเดี่ยว ความถี่ 50 เฮิรตซ
11.5 การเชื่อมตอทางไฟฟา
“การใชงานเครื่องซักผากับระบบจาย
ไฟฟาที่ไมถูกตอง อาจทำใหเสียสิทธิ์
การรับประกัน”
ในการใชงานคร้ังแรก กอนทำการเช่ือม
ตอเคร่ืองซักผากับแหลงจายไฟฟาภาย
ในบานของคุณ โปรดตรวจสอบอัตรา
แรงดันไฟฟาท่ีระบุไวใน “แผนปายระบุ
หมายเลขเคร่ือง” กับแหลงจายไฟฟา
ภายในบานของคุณวาเปนอัตราแรงดัน
ไฟฟาเดียวกันหรือไม
ขอควรระวัง !
โปรดเชื่อมตอเครื่องเขากับเตาจายไฟ
ที่ตอสายดินไว
โดยคุณอาจใชลวดผูกปลายทอกับกอกน้ำ
หรือยึดทอติดกับกำแพงไว
ลงสูทอระบายน้ำ
ปลายทอระบายน้ำจะตองสามารถระบาย
น้ำออกได ดังนั้นเสนผาศูนยกลางภายใน
ทอระบายน้ำจึงตองใหญกวาเสนผาศูนย
กลางภายนอกของทอน้ำทิ้ง
ทอระบายน้ำตองมีความสูงไมนอยกวา
60 ซม. และไมเกิน 90 ซม.
ทอแยกที่ตอนี้ตองอยูสูงกวากอกเพื่อใหทอ
โคงงออยางนอย 60 ซม. จากระดับพื้น
ทอน้ำจะตองไมพับงอไมวาในกรณีใด
เดินทอไปตามพื้น ยกเฉพาะสวนที่ใกล
กับจุดระบายขึ้นเทานั้น
ในกรณีนี้ โปรดตรวจสอบใหแนใจวา
ปลายทอไมหลุดออกจากปลอก เมื่อเครื่อง
ปลอยน้ำออก
ตอกับทอที่แยกออกจากทอน้ำทิ้งของ
อางน้ำ
ปลายทอระบายน้ำสามารถจัดตำแหนง
ไดสามวิธีดังนี้:
เกี่ยวไวกับขอบอางลางจาน
โดยใชปลอกพลาสติกที่ใหมาพรอมเครื่อง
11.4 ระบบระบายน้ำ
เมื่อติดตั้งเครื่องแลว ควรใหสายไฟอยูใน
ตำแหนงที่สะดวกตอการใชงาน
หากเครื่องไดรับไฟจากสายตอพวงหรือปลั๊ก
สามตา อุปกรณเหลานี้จะตองอยูในบริเวณที่จะ
ไมโดนน้ำหรือความชื้น
หากสายไฟชำรุดและตองการเปลี่ยน
ใชสายไฟใหม ขอใหติดตอศูนยบริการ
ใกลบาน
66 www.electrolux.com
วัสดุที่มีเครื่องหมาย สามารถ
นำกลับมาใชไดอีก
>PE<=โพลีเอทิลีน
>PS<=โพลีสไตรีน
>PP<=โพลีโพรพิลีน
สัญลักษณนี้หมายความวา วัสดุนี้สามารถ
นำมารีไซเคิลได โดยตองทิ้งในภาชนะ
ที่เหมาะสม
เพื่อประหยัดน้ำ พลังงาน และชวยปกปอง
สิ่งแวดลอม ขอแนะนำใหทานปฏิบัติ
ตามคำแนะนำตอไปนี้:โปรดทิ้งเครื่องซักผาเครื่องเกาของทาน
ในสถานที่ที่ไดรับอนุญาต เพื่อชวยรักษา
ความเปนระเบียบเรียบรอยในบานเมือง !
สัญลักษณ ที่ตัวผลิตภัณฑ หรือ
บรรจุภัณฑใชเพื่อแจงวาหามทิ้งแบบขยะ
ในครัวเรือนตามปกติ
โดยใหนำไปจำหนายทิ้ง ณ จุดจัดเก็บที่
เหมาะสมเพื่อทำการรีไซเคิลสวนประกอบ
ทางไฟฟาและอุปกรณอิเล็กทรอนิกส
การทิ้งผลิตภัณฑนี้อยางถูกตอง จะชวยลด
ผลกระทบที่มีตอสภาพแวดลอม และ
สุขอนามัย
หากทานทิ้งผลิตภัณฑนี้อยางไมถูกตอง
เหมาะสม จะกอใหเกิดผลเสียตอสภาพ
แวดลอมและสุขอนามัย
สอบถามขอมูลเพิ่มเติมเกี่ยวกับการรีไซเคิล
ผลิตภัณฑไดจากหนวยงานในพื้นที่ ผูให
บริการจัดเก็บขยะประจำพื้นที่ของคุณ หรือ
รานที่จำหนายผลิตภัณฑนี้
12.1 วัสดุบรรจุภัณฑ
12.3 คำแนะนำดานระบบนิเวศน
12.2 เครื่องเกา
ขอมูลเพื่อการรักษาสิ่งแวดลอม12.
ผาที่สกปรกธรรมดาอาจซัก โดยไมจำ
เปนตองแชผากอนซัก ทั้งนี้เพื่อประหยัด
สารซักฟอก น้ำ และเวลา (รวมถึง
ปกปองสิ่งแวดลอมดวย!)
เครื่องซักผาจะทำงาน ไดอยางประหยัด
มากขึ้น หากบรรจุผาในอัตราสูงสุด
หากมีการใชน้ำยาขจัดคราบอยาง
เหมาะสม จะสามารถขจัดคราบและ
เหงื่อไคลกอนซักผาไดที่อุณหภูมิต่ำ
ตวงสารซักฟอกใหเหมาะสม กับความ
กระดางของน้ำ ระดับความสกปรก
ของผา และปริมาณผาที่จะซัก

www.electrolux.com
G00
1169
3-00
2-A
0097
3007