Driver Setting Guide - エレコム株式会社 | ELECOM … Gaming Mouse M-DUX70BK Driver Setting...
24
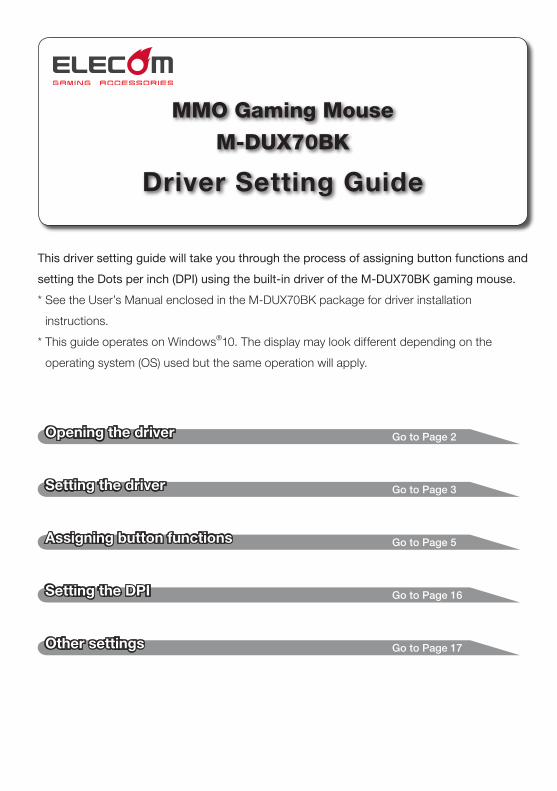
MMO Gaming Mouse M-DUX70BK Driver Setting Guide This driver setting guide will take you through the process of assigning button functions and setting the Dots per inch (DPI) using the built-in driver of the M-DUX70BK gaming mouse. * See the User’s Manual enclosed in the M-DUX70BK package for driver installation instructions. * This guide operates on Windows ® 10. The display may look different depending on the operating system (OS) used but the same operation will apply. Opening the driver Go to Page 2 Setting the driver Go to Page 3 Assigning button functions Go to Page 5 Setting the DPI Go to Page 16 Other settings Go to Page 17
Transcript of Driver Setting Guide - エレコム株式会社 | ELECOM … Gaming Mouse M-DUX70BK Driver Setting...
MMO Gaming Mouse
M-DUX70BK
Driver Setting Guide
This driver setting guide will take you through the process of assigning button functions and
setting the Dots per inch (DPI) using the built-in driver of the M-DUX70BK gaming mouse.
* See the User’s Manual enclosed in the M-DUX70BK package for driver installation
instructions.
* This guide operates on Windows®10. The display may look different depending on the
operating system (OS) used but the same operation will apply.
Opening the driver Go to Page 2
Setting the driver Go to Page 3
Assigning button functions Go to Page 5
Setting the DPI Go to Page 16
Other settings Go to Page 17
Opening the driverSetting the driverAssigning button functionsSelecting a profileAssigning button functionsButton SettingsSetting the DPIOther settingsReport RateLift-off settingMouse managementOther settings

2
Opening the driver
Click in the task tray or notification area and click ‘Settings’.
• When is shown in the notification area on Windows10, Windows8.1/8 and Windows7, first click , then right click and click ‘Launch setting’.
The driver setup screen is displayed.
When the driver is launched for the first time after connecting the gaming mouse,
the default settings saved on the mouse are read into.
When the driver is opened without connecting the gaming mouse, a ‘No device!!’ message will appear.Make sure to connect the gaming mouse before launching the driver.
3
Setting the driver
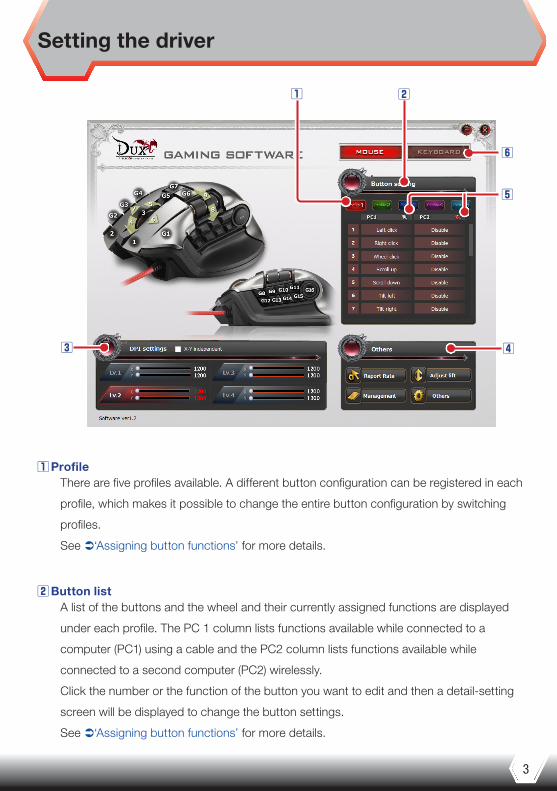
ProfileThere are five profiles available. A different button configuration can be registered in each
profile, which makes it possible to change the entire button configuration by switching
profiles.
See ‘Assigning button functions’ for more details.
Button listA list of the buttons and the wheel and their currently assigned functions are displayed
under each profile. The PC 1 column lists functions available while connected to a
computer (PC1) using a cable and the PC2 column lists functions available while
connected to a second computer (PC2) wirelessly.
Click the number or the function of the button you want to edit and then a detail-setting
screen will be displayed to change the button settings.
See ‘Assigning button functions’ for more details.
4
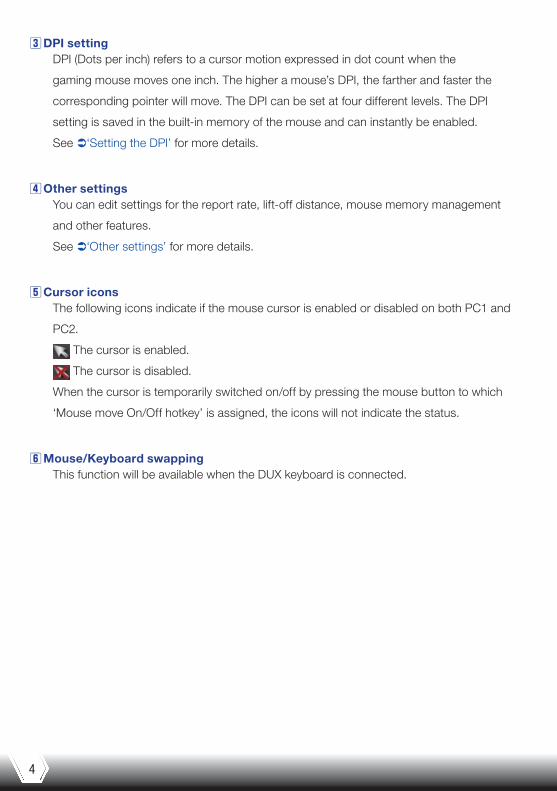
DPI settingDPI (Dots per inch) refers to a cursor motion expressed in dot count when the
gaming mouse moves one inch. The higher a mouse’s DPI, the farther and faster the
corresponding pointer will move. The DPI can be set at four different levels. The DPI
setting is saved in the built-in memory of the mouse and can instantly be enabled.
See ‘Setting the DPI’ for more details.
Other settingsYou can edit settings for the report rate, lift-off distance, mouse memory management
and other features.
See ‘Other settings’ for more details.
Cursor iconsThe following icons indicate if the mouse cursor is enabled or disabled on both PC1 and
PC2.
The cursor is enabled.
The cursor is disabled.
When the cursor is temporarily switched on/off by pressing the mouse button to which
‘Mouse move On/Off hotkey’ is assigned, the icons will not indicate the status.
Mouse/Keyboard swappingThis function will be available when the DUX keyboard is connected.
5
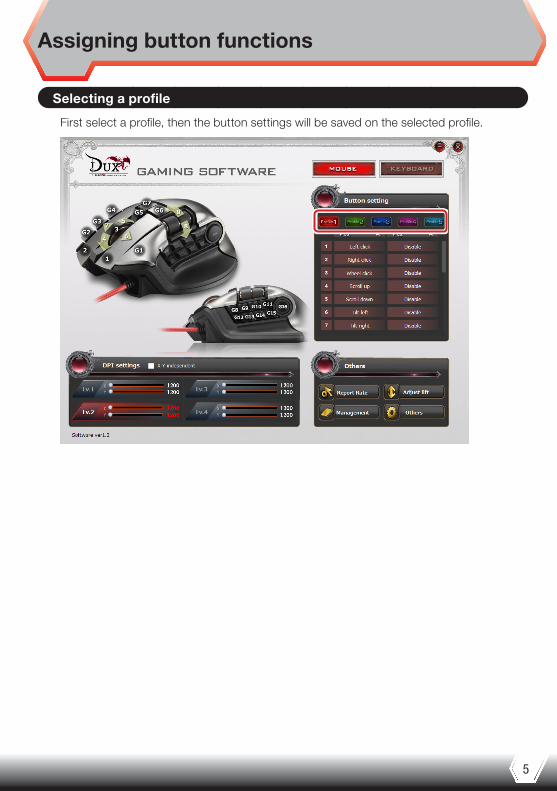
Assigning button functions
Selecting a profile
First select a profile, then the button settings will be saved on the selected profile.
6
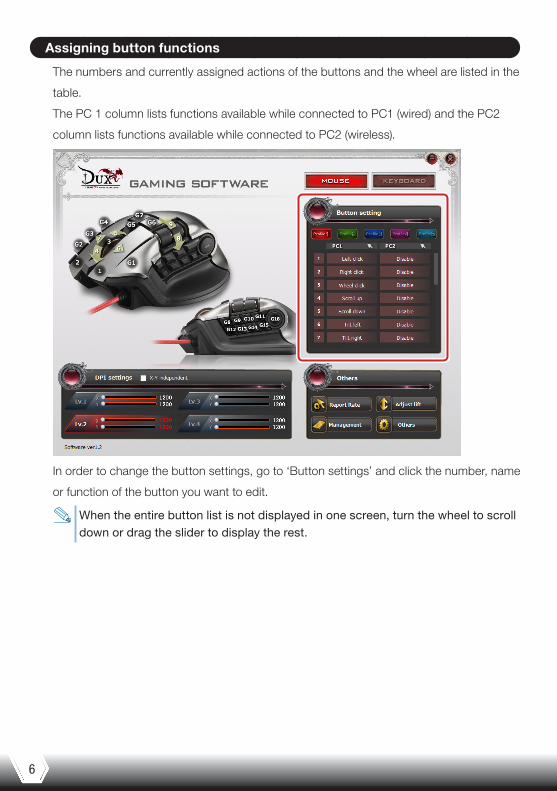
Assigning button functions
The numbers and currently assigned actions of the buttons and the wheel are listed in the
table.
The PC 1 column lists functions available while connected to PC1 (wired) and the PC2
column lists functions available while connected to PC2 (wireless).
In order to change the button settings, go to ‘Button settings’ and click the number, name
or function of the button you want to edit.
When the entire button list is not displayed in one screen, turn the wheel to scroll down or drag the slider to display the rest.
7
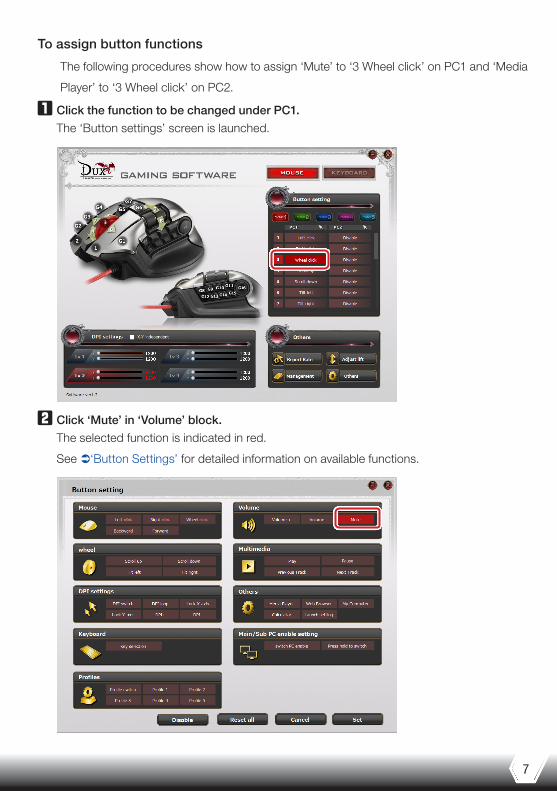
To assign button functions
The following procedures show how to assign ‘Mute’ to ‘3 Wheel click’ on PC1 and ‘Media
Player’ to ‘3 Wheel click’ on PC2.
Click the function to be changed under PC1.
The ‘Button settings’ screen is launched.
Click ‘Mute’ in ‘Volume’ block.
The selected function is indicated in red.
See ‘Button Settings’ for detailed information on available functions.
8
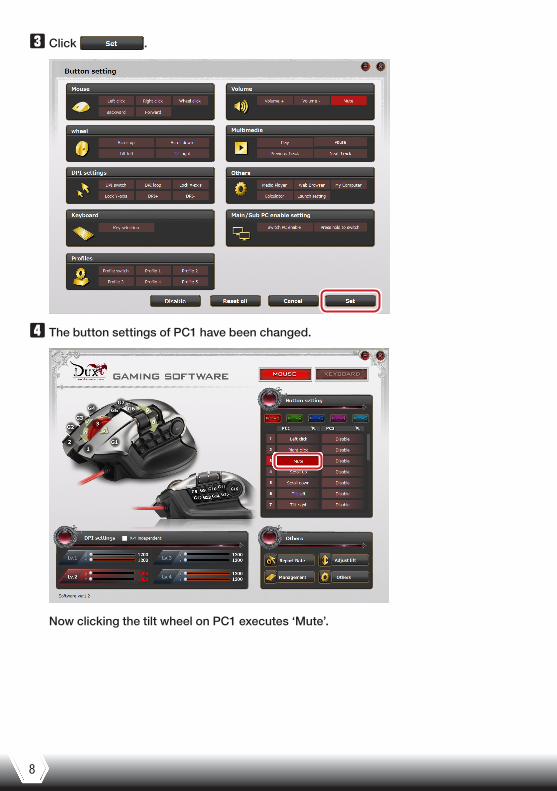
Click .
The button settings of PC1 have been changed.
Now clicking the tilt wheel on PC1 executes ‘Mute’.
9
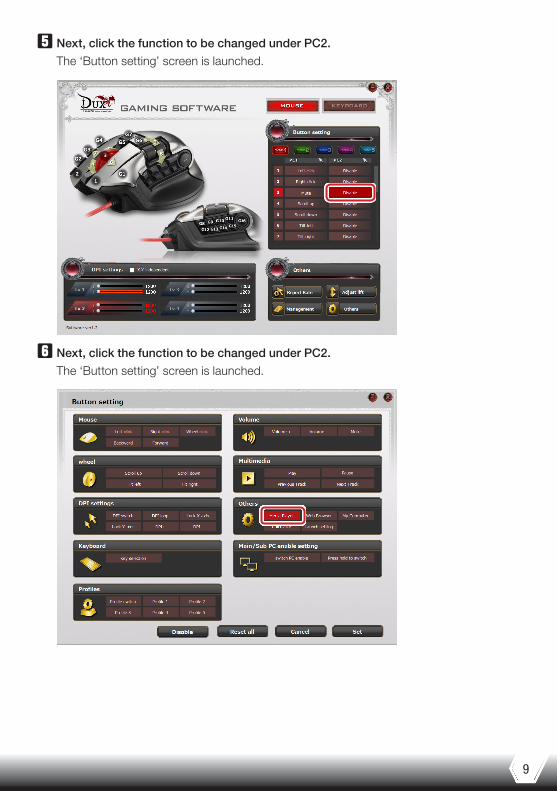
Next, click the function to be changed under PC2.
The ‘Button setting’ screen is launched.
Next, click the function to be changed under PC2.
The ‘Button setting’ screen is launched.
10
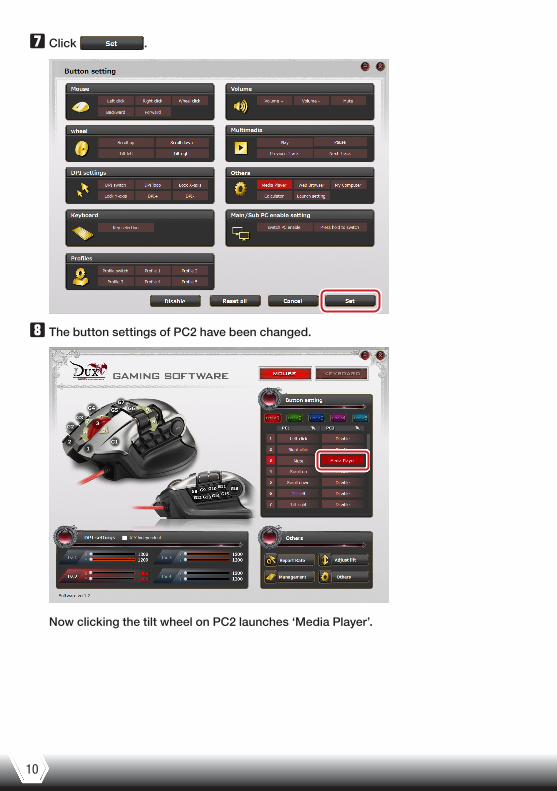
Click .
The button settings of PC2 have been changed.
Now clicking the tilt wheel on PC2 launches ‘Media Player’.
11
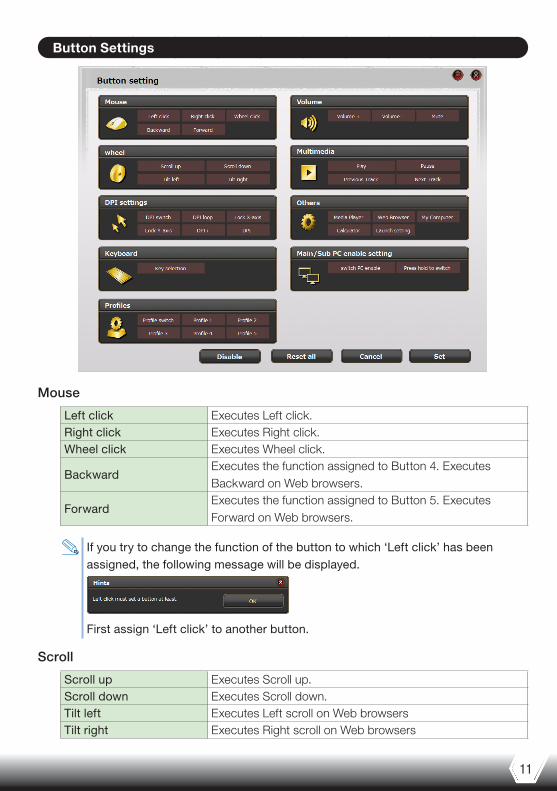
Button Settings
Mouse
Left click Executes Left click.Right click Executes Right click.Wheel click Executes Wheel click.
BackwardExecutes the function assigned to Button 4. Executes Backward on Web browsers.
ForwardExecutes the function assigned to Button 5. Executes Forward on Web browsers.
If you try to change the function of the button to which ‘Left click’ has been assigned, the following message will be displayed.
First assign ‘Left click’ to another button.
Scroll
Scroll up Executes Scroll up.Scroll down Executes Scroll down.Tilt left Executes Left scroll on Web browsersTilt right Executes Right scroll on Web browsers
12
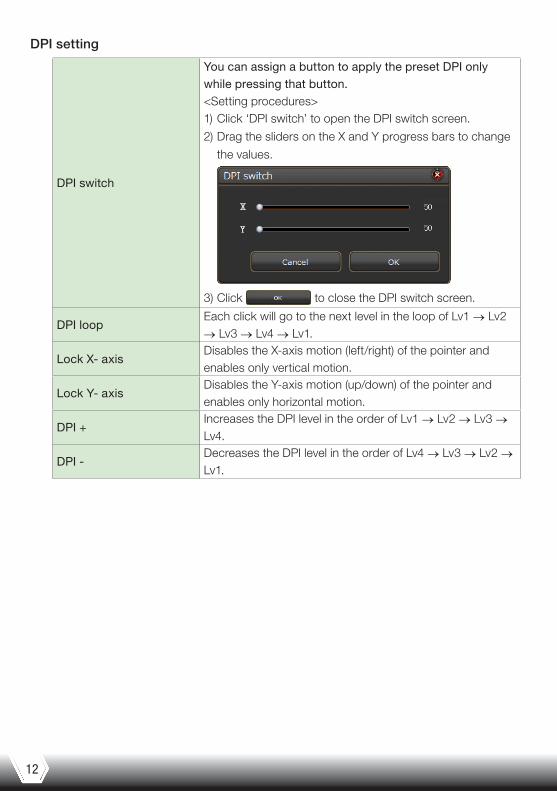
DPI setting
DPI switch
You can assign a button to apply the preset DPI only while pressing that button.<Setting procedures>1) Click ‘DPI switch’ to open the DPI switch screen.
2) Drag the sliders on the X and Y progress bars to change
the values.
3) Click to close the DPI switch screen.
DPI loopEach click will go to the next level in the loop of Lv1 → Lv2 → Lv3 → Lv4 → Lv1.
Lock X- axisDisables the X-axis motion (left/right) of the pointer and enables only vertical motion.
Lock Y- axisDisables the Y-axis motion (up/down) of the pointer and enables only horizontal motion.
DPI +Increases the DPI level in the order of Lv1 → Lv2 → Lv3 → Lv4.
DPI -Decreases the DPI level in the order of Lv4 → Lv3 → Lv2 → Lv1.

13
Keyboard
You can assign the function of a key selected on the ‘Software keyboard’ to any mouse
button.
<Setting procedures>
1) Click to display ‘Software keyboard’.
2) Click the key to which you want to assign the function of the mouse button.
The clicked key will be bracketed in red.
You can also set keys in combination with simultaneous pressing keys, such as ‘Ctrl’, ‘Shift’ and ‘Alt’.
3) Click to close ‘Software keyboard’.
Profile
Profile switch Changes to the next profile in the numerical order.Profile 1 Changes to Profile 1.Profile 2 Changes to Profile 2.Profile 3 Changes to Profile 3.Profile 4 Changes to Profile 4.Profile 5 Changes to Profile 5.
We recommend that ‘Profile switch’ is assigned to the same button in all Profiles.
Otherwise, consecutive clicking of a profile switch will not create a switching loop.
14
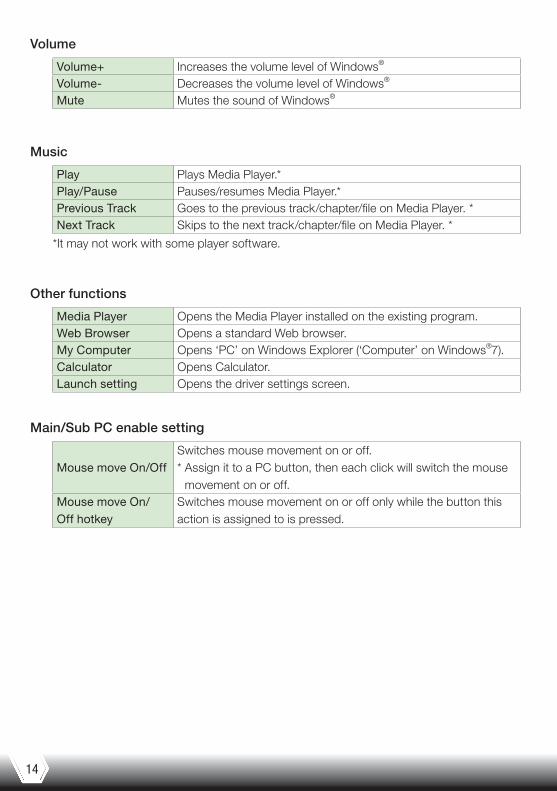
Volume
Volume+ Increases the volume level of Windows®
Volume- Decreases the volume level of Windows®
Mute Mutes the sound of Windows®
Music
Play Plays Media Player.*Play/Pause Pauses/resumes Media Player.*Previous Track Goes to the previous track/chapter/file on Media Player. *Next Track Skips to the next track/chapter/file on Media Player. *
*It may not work with some player software.
Other functions
Media Player Opens the Media Player installed on the existing program.Web Browser Opens a standard Web browser.My Computer Opens ‘PC’ on Windows Explorer (‘Computer’ on Windows®7).Calculator Opens Calculator.Launch setting Opens the driver settings screen.
Main/Sub PC enable setting
Mouse move On/Off Switches mouse movement on or off.* Assign it to a PC button, then each click will switch the mouse
movement on or off.Mouse move On/ Off hotkey
Switches mouse movement on or off only while the button this action is assigned to is pressed.
15
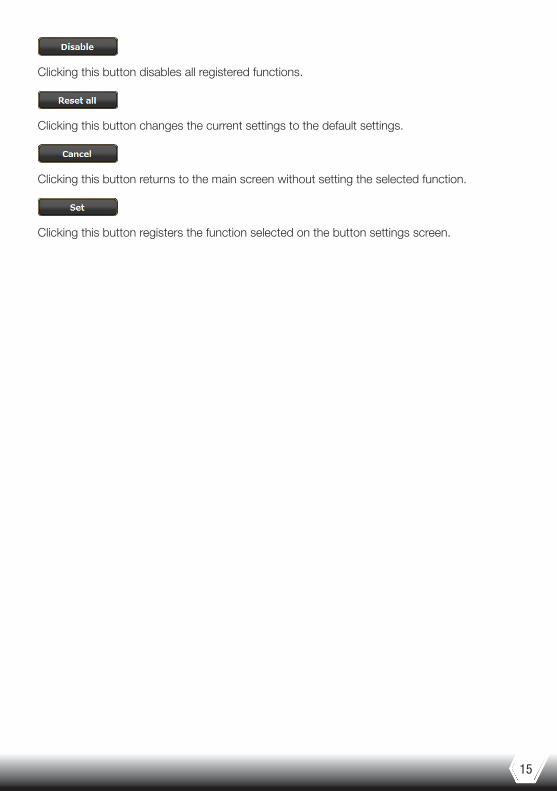
Clicking this button disables all registered functions.
Clicking this button changes the current settings to the default settings.
Clicking this button returns to the main screen without setting the selected function.
Clicking this button registers the function selected on the button settings screen.
16
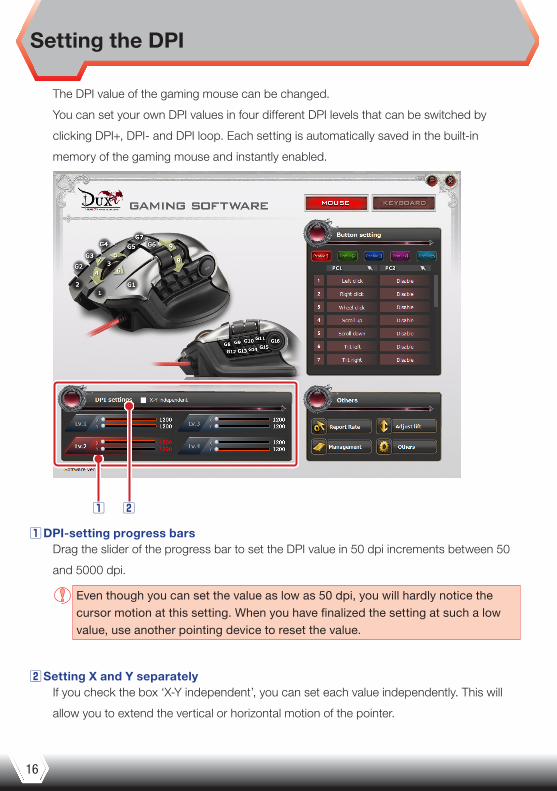
Setting the DPI
The DPI value of the gaming mouse can be changed.
You can set your own DPI values in four different DPI levels that can be switched by
clicking DPI+, DPI- and DPI loop. Each setting is automatically saved in the built-in
memory of the gaming mouse and instantly enabled.
DPI-setting progress barsDrag the slider of the progress bar to set the DPI value in 50 dpi increments between 50
and 5000 dpi.
Even though you can set the value as low as 50 dpi, you will hardly notice the cursor motion at this setting. When you have finalized the setting at such a low value, use another pointing device to reset the value.
Setting X and Y separatelyIf you check the box ‘X-Y independent’, you can set each value independently. This will
allow you to extend the vertical or horizontal motion of the pointer.
17
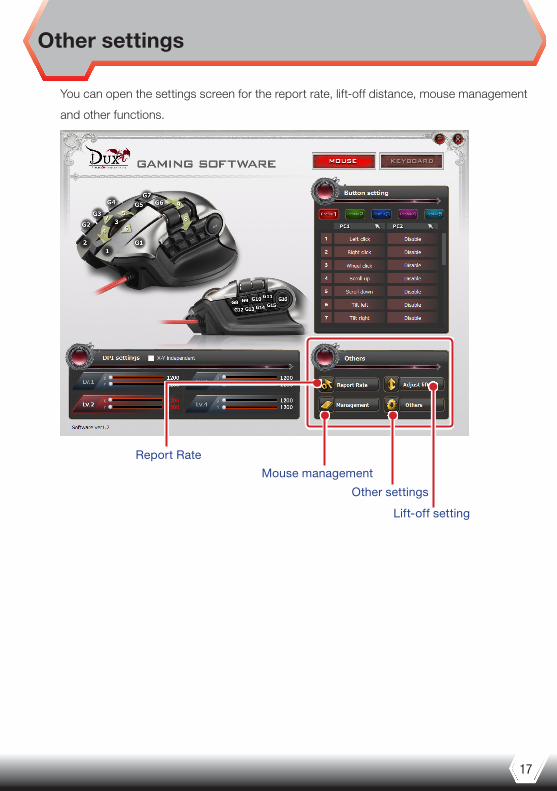
Other settings
You can open the settings screen for the report rate, lift-off distance, mouse management
and other functions.
Report Rate
Lift-off setting
Mouse management
Other settings
18
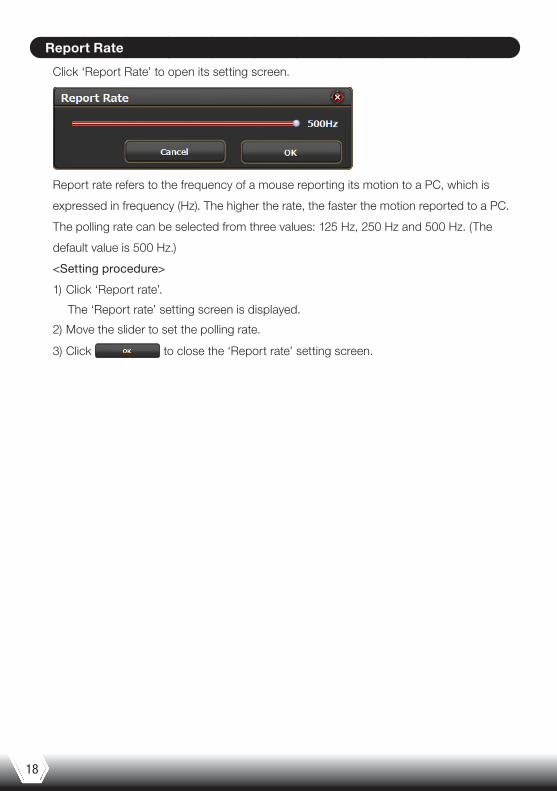
Report Rate
Click ‘Report Rate’ to open its setting screen.
Report rate refers to the frequency of a mouse reporting its motion to a PC, which is
expressed in frequency (Hz). The higher the rate, the faster the motion reported to a PC.
The polling rate can be selected from three values: 125 Hz, 250 Hz and 500 Hz. (The
default value is 500 Hz.)
<Setting procedure>
1) Click ‘Report rate’.
The ‘Report rate’ setting screen is displayed.
2) Move the slider to set the polling rate.
3) Click to close the ‘Report rate’ setting screen.
19
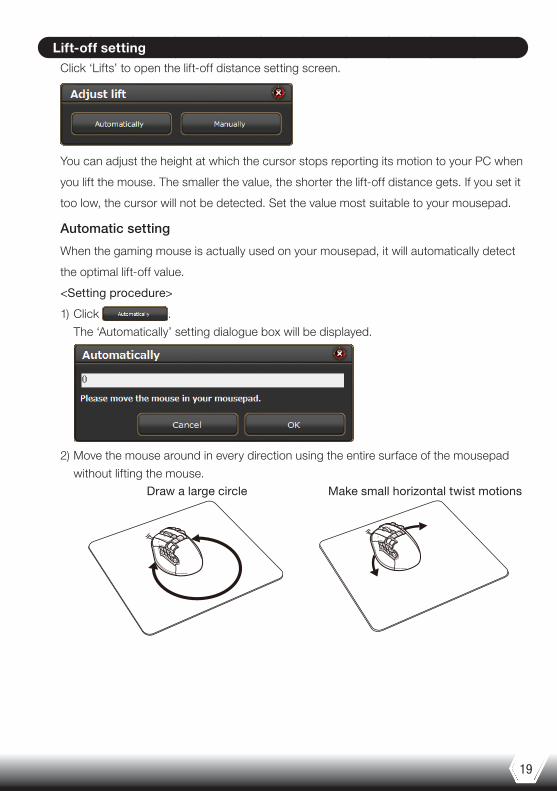
Lift-off settingClick ‘Lifts’ to open the lift-off distance setting screen.
You can adjust the height at which the cursor stops reporting its motion to your PC when
you lift the mouse. The smaller the value, the shorter the lift-off distance gets. If you set it
too low, the cursor will not be detected. Set the value most suitable to your mousepad.
Automatic setting
When the gaming mouse is actually used on your mousepad, it will automatically detect
the optimal lift-off value.
<Setting procedure>
1) Click .
The ‘Automatically’ setting dialogue box will be displayed.
2) Move the mouse around in every direction using the entire surface of the mousepad
without lifting the mouse.Draw a large circle Make small horizontal twist motions

20
3) Click .
Manual setting
You can also set the value manually.
<Setting procedure>
1) Click .
The ‘Manually’ setting dialogue box will be displayed.
2) Enter a value
3) Click .
4) If the cursor is in sync with the mouse, click .
If the cursor does not move, wait for ten seconds without clicking .
After the ‘Manually’ setting dialogue box is closed, start all over from the first step.
If the value is manually set too low, the cursor may not move at all. When you
have finalized the setting at such a low value, place the mouse on another
operable surface, such as a mousepad, or use another pointing device to reset
the value.
21
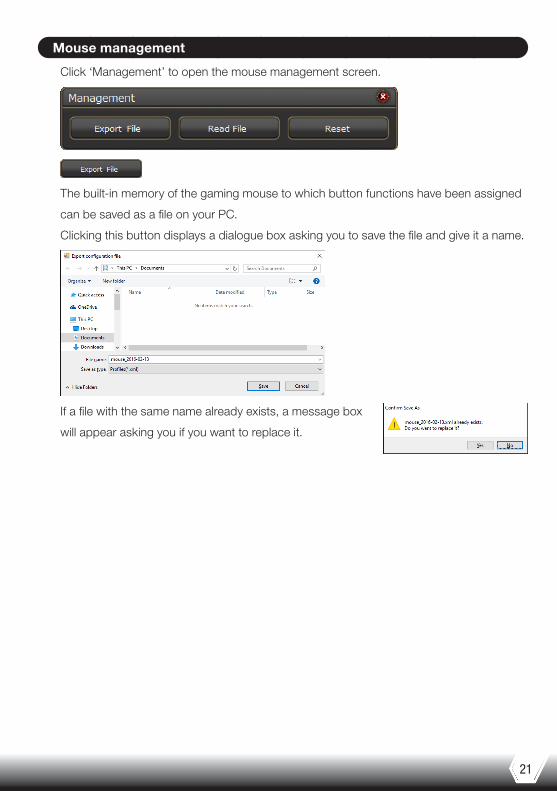
Mouse management
Click ‘Management’ to open the mouse management screen.
The built-in memory of the gaming mouse to which button functions have been assigned
can be saved as a file on your PC.
Clicking this button displays a dialogue box asking you to save the file and give it a name.
If a file with the same name already exists, a message box
will appear asking you if you want to replace it.

22
The file saved on your PC will be read into the built-in memory of the gaming mouse.
Clicking this button displays the following message.
Click to display the following dialogue box.
Select the saved file and click , then the contents of the file will be read into the
built-in memory of the gaming mouse.
All settings, including button assignments and DPI settings, will
be reset to the default values.
Clicking this button displays the following message box.
Click to reset to the default settings.
23
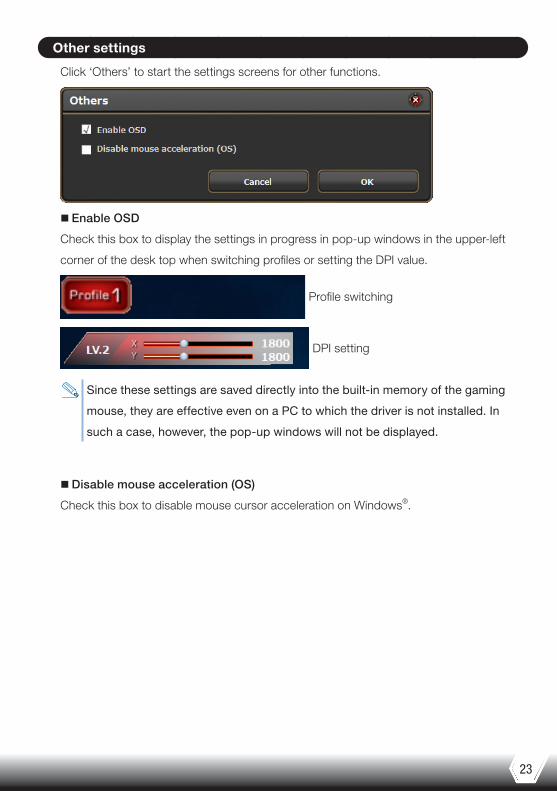
Other settings
Click ‘Others’ to start the settings screens for other functions.
� Enable OSD
Check this box to display the settings in progress in pop-up windows in the upper-left
corner of the desk top when switching profiles or setting the DPI value.
Profile switching
DPI setting
Since these settings are saved directly into the built-in memory of the gaming
mouse, they are effective even on a PC to which the driver is not installed. In
such a case, however, the pop-up windows will not be displayed.
�Disable mouse acceleration (OS)
Check this box to disable mouse cursor acceleration on Windows®.

24
MMO Gaming MouseM-DUX70BK
Driver setting guideFirst edition Dec. 4, 2015
• Copyright of this manual is reserved for ELECOM CO., LTD.• Do not reproduce or reprint a part or all of this manual without permission.• In order to make improvements to this product, the design and specifications are
subject to change without prior notice.• We are not responsible for any consequences as a result of your use of this product.• Company and product names mentioned in the manual are, in general, trademarks or
registered trademarks of their respective companies.
©2015 ELECOM Co., Ltd. All Rights Reserved.


![Versi 1 - sx.xecuter.comID]_SXOS_v1.3.pdf · TegraRcmGUI Portable – Download ... Pada Tab Setting, klik instal Driver dan ikuti perintah untuk menginstal Switch RCM driver ke komputer.](https://static.fdocument.pub/doc/165x107/5cc7f3aa88c993d63c8c4d58/versi-1-sx-idsxosv13pdf-tegrarcmgui-portable-download-pada-tab.jpg)