Dewinkler interactive text app
10
Interactive Text Application in Unity3D 1 by August DeWinkler, Urban Designer, Multimedia Artist for Florida Atlantic University’s Master of Fine Arts Degree in Media, Technology, and Entertainment course Creating Interactive Culture date completed December 7 th , 2015 Abstract This paper will examine the components and process to create an interactive text experience App in Augmented Reality. The idea is to use topic headings as outlined in the course syllabus for Creating Interactive Culture, which are: Sonic Frameworks, Performative Frameworks, Spatial Frameworks, and Linear Frameworks. Text sheets will be created to display these compounded words so that the App will be able to find them and display a graphic that is specifically targeted to each sheet individually. The goal is to familiarize one with the applications and processes to create the App, as there are extra steps required to output a project of this magnitude. This paper will go beyond the steps given in a normal tutorial or instructional manual, therefore let it be recognized that this is not a tutorial. It is a composition explaining the steps and process as required to create Augmented Reality Apps with Android Studio, Unity3D, and Vuforia. This will also help to document the process, as in a checklist of processes; because leaving out one part could be detrimental to the entire project. When the design of the application is complete, Unity 3D will then compile it, or “package it” in Unity 3D terms for it to run on Android devices. Furthermore, for the sake of this research, the content of this App can be modified or replaced to suit the users needs or for just simple experimentation to see what the programs can offer. In fact, let me encourage it; as creating personal visual content is really the only way for one to see and to experience the personal nature of this kind of App creation.
-
Upload
august-dewinkler -
Category
Documents
-
view
221 -
download
0
description
Â
Transcript of Dewinkler interactive text app
Interactive Text Application in Unity3D
1
by August DeWinkler, Urban Designer, Multimedia Artist
for Florida Atlantic University’s Master of Fine Arts Degree
in Media, Technology, and Entertainment
course Creating Interactive Culture
date completed December 7th , 2015
Abstract
This paper will examine the components and process to create an interactive text
experience App in Augmented Reality. The idea is to use topic headings as outlined in the
course syllabus for Creating Interactive Culture, which are: Sonic Frameworks, Performative
Frameworks, Spatial Frameworks, and Linear Frameworks. Text sheets will be created to
display these compounded words so that the App will be able to find them and display a
graphic that is specifically targeted to each sheet individually.
The goal is to familiarize one with the applications and processes to create the App, as
there are extra steps required to output a project of this magnitude. This paper will go beyond
the steps given in a normal tutorial or instructional manual, therefore let it be recognized that
this is not a tutorial. It is a composition explaining the steps and process as required to create
Augmented Reality Apps with Android Studio, Unity3D, and Vuforia. This will also help to
document the process, as in a checklist of processes; because leaving out one part could be
detrimental to the entire project.
When the design of the application is complete, Unity 3D will then compile it, or
“package it” in Unity 3D terms for it to run on Android devices. Furthermore, for the sake of
this research, the content of this App can be modified or replaced to suit the users needs or for
just simple experimentation to see what the programs can offer. In fact, let me encourage it;
as creating personal visual content is really the only way for one to see and to experience the
personal nature of this kind of App creation.
Interactive Text Application in Unity3D
2
Outline
1. Background of Unity3D, Vuforia with Android on Samsung
a. Historical Context of Unity 3D
b. Historical Context of Vuforia
c. Samsung Phones and Tablets as the Interface with Android Studio
2. Setting Up
a. System Configuration and Requirements
b. Software Accounts Unity3D Pro and Vuforia
3. Starting with the Image Targets
a. Creation with any image editor
b. Testing the Track able Target in Vuforia
4. Project Creation in Unity3D
a. Importing Vuforia into the Project
b. Creating Licenses for the App with Vuforia and Unity3D
5. Applying the Graphics
a. Setting up the Image Targets
b. Attaching the Prefabs, Animations, and Scripts
6. Packaging the App
a. Build Settings
b. Android Studio
c. Player Settings
7. Closing Remarks
8. Works Cited
Interactive Text Application in Unity3D
3
1 Background of Unity3D, Vuforia with Android on Samsung
Historical Context of Unity 3D Unity3D came into existence in 2004 after its developers failed at making a successful
game named “GooBall.” What, they realized is that their game engine to produce the game
could be refined for an open source market. Although the founders Nicholas Francis, Joachim
Ante, and David Helgason aspired to be game designers they became game developers aiming
their game engine to independent developers that did not have the resources to put together
their game concepts. Therefore “Unity was created with the vision to democratize game
development and level the playing field for developers across the globe” [1].
Historical Context of Vuforia Vuforia was a product from the famous company named Qualcomm, which has been a
major player, and innovation company that is responsible for the very first cell phone call and
for many other “Quality Communication” items that they have invented over the years. Hence
Qualcomm is a derivative of Quality Communications. On November 3, 2015 Qualcomm sold
its product named Vuforia to PTC a tech company that helps “manufacturers transform the
way they create, operate and service product for sustained competitive advantage.” [2]
Samsung Phones and Tablets as the Interface There are several devices and configurations that can produce augmented reality
Applications, but I have chosen Android Studio as the SDK for loads to Samsung Products. As
a bonus to creating these applications with Android and Samsung it is possible to create
applications in Virtual Reality as they have partnered with Oculus Rift. Once the Android
Studio SDK has been set up it runs behind the scenes and creates all the components
necessary to produce and place the APPS on the Android devices.
2 Setting Up
System Configuration and Requirements As of the writing of this paper. December 7,2015 ; the current version combination to
produce augmented reality apps with Vuforia is their version 5 as it is compatible with Unity3D
version 5.1.3. There is always a lag time between the latest release of Unity3D to that of what
Vuforia can support. It is very important to note that for the beginner, once a project is
started, it should remain in the started version of the software.
Interactive Text Application in Unity3D
4
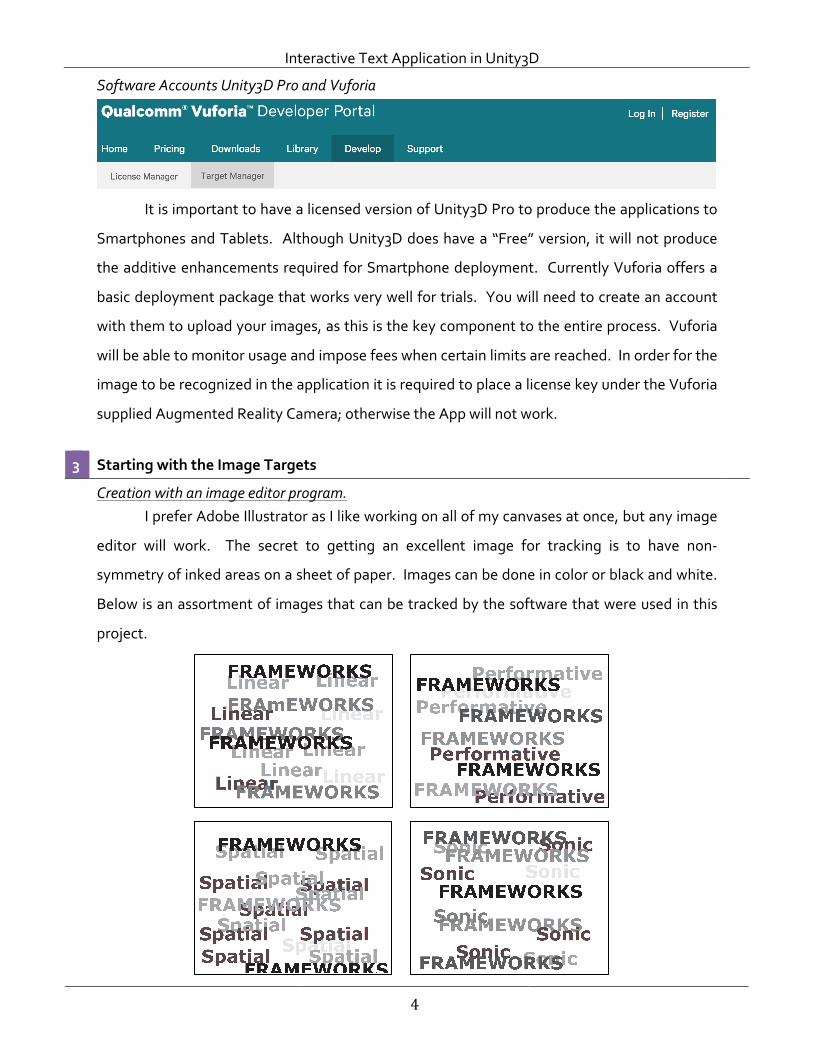
Software Accounts Unity3D Pro and Vuforia
It is important to have a licensed version of Unity3D Pro to produce the applications to
Smartphones and Tablets. Although Unity3D does have a “Free” version, it will not produce
the additive enhancements required for Smartphone deployment. Currently Vuforia offers a
basic deployment package that works very well for trials. You will need to create an account
with them to upload your images, as this is the key component to the entire process. Vuforia
will be able to monitor usage and impose fees when certain limits are reached. In order for the
image to be recognized in the application it is required to place a license key under the Vuforia
supplied Augmented Reality Camera; otherwise the App will not work.
3 Starting with the Image Targets
Creation with an image editor program. I prefer Adobe Illustrator as I like working on all of my canvases at once, but any image
editor will work. The secret to getting an excellent image for tracking is to have non-‐
symmetry of inked areas on a sheet of paper. Images can be done in color or black and white.
Below is an assortment of images that can be tracked by the software that were used in this
project.
Interactive Text Application in Unity3D
5
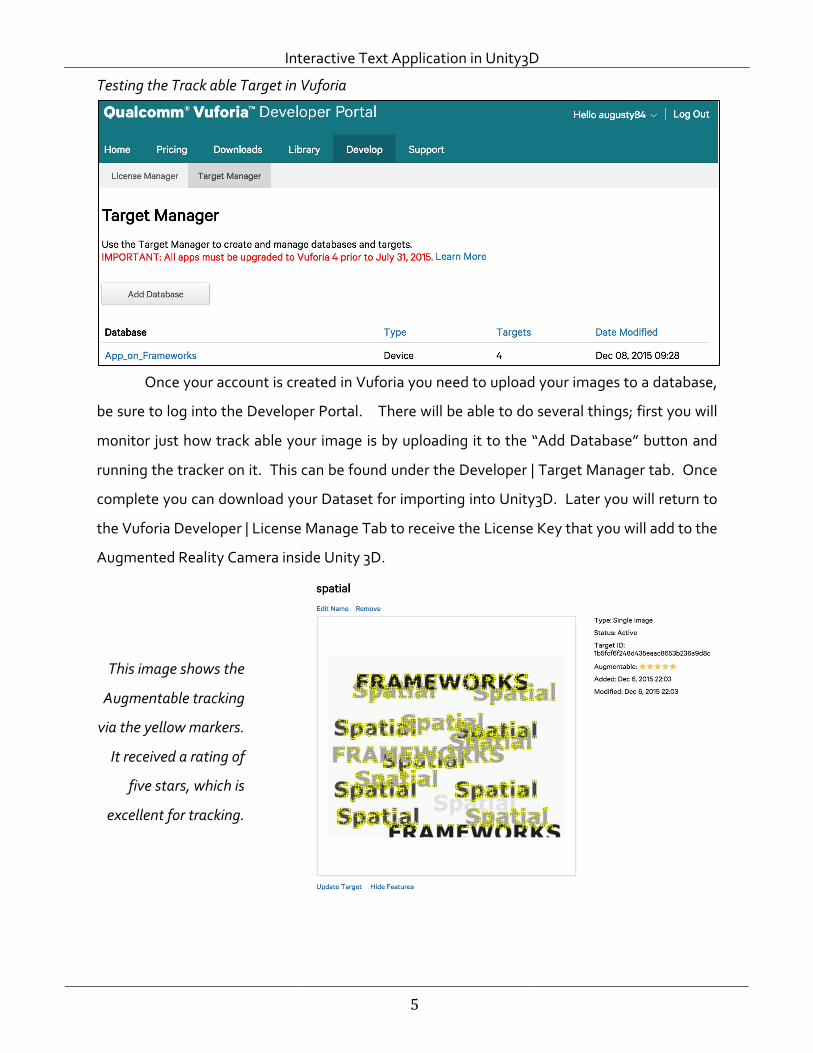
Testing the Track able Target in Vuforia
Once your account is created in Vuforia you need to upload your images to a database,
be sure to log into the Developer Portal. There will be able to do several things; first you will
monitor just how track able your image is by uploading it to the “Add Database” button and
running the tracker on it. This can be found under the Developer | Target Manager tab. Once
complete you can download your Dataset for importing into Unity3D. Later you will return to
the Vuforia Developer | License Manage Tab to receive the License Key that you will add to the
Augmented Reality Camera inside Unity 3D.
This image shows the
Augmentable tracking
via the yellow markers.
It received a rating of
five stars, which is
excellent for tracking.
Interactive Text Application in Unity3D
6
4 Project Creation in Unity3D
Importing Vuforia into the Project As a reminder, this paper is for the individual that already has a good understanding of
Unity3D, and its aim is only to highlight the key components to make a successful augmented
reality application. I like to start with a fresh new project in Unity, but you can start with a
sample project and just replace some of the information and sometimes it may work, but why
gamble with that because then you might have to start from scratch all over again. Remember
when I said that it was important to stay in the version of Unity that you start your project.
When using a template you do not always know what version the template or sample file was
used to create the project. Unity often deprecates codes, functions, and scripts for each of its
releases, which will prohibit project upgrades.
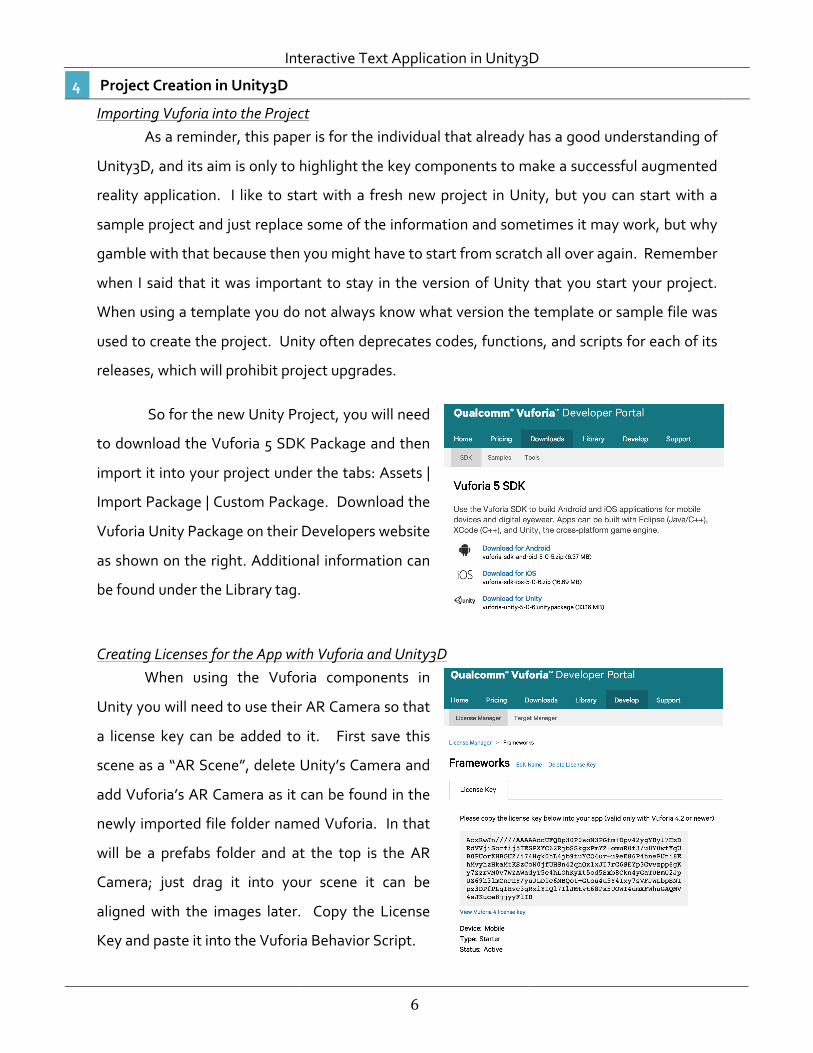
So for the new Unity Project, you will need
to download the Vuforia 5 SDK Package and then
import it into your project under the tabs: Assets |
Import Package | Custom Package. Download the
Vuforia Unity Package on their Developers website
as shown on the right. Additional information can
be found under the Library tag.
Creating Licenses for the App with Vuforia and Unity3D When using the Vuforia components in
Unity you will need to use their AR Camera so that
a license key can be added to it. First save this
scene as a “AR Scene”, delete Unity’s Camera and
add Vuforia’s AR Camera as it can be found in the
newly imported file folder named Vuforia. In that
will be a prefabs folder and at the top is the AR
Camera; just drag it into your scene it can be
aligned with the images later. Copy the License
Key and paste it into the Vuforia Behavior Script.
Interactive Text Application in Unity3D
7
5 Applying the Graphics
Setting up the Image Targets There are many kinds of Augmented shapes that can be created, but for this project I
used the image target. From the same Prefabs folder you will find the ImageTarget, drag that
into your scene and place it at position 0,0,0. Scaling is an issue with a lot of Unity Users. It is
said that it defaults to one meter. Which does seem to work logically, especially when you add
a first person controller as the human scale gets imported at 2 meters or around 6 feet. I set up
my sheets in Illustrator in inches and the came in about the same size. Unity works best at a
large scale, so I place a zero after the imported scale it matches up. In other words my sheets
were standard letter, 8.5” x 11”. I made the scale 110 and it seems to work fine as a readable
target. You will need to import the dataset from when you downloaded it from Vuforia. This
is different then the Vuforia Unity Package.
Attaching the Prefabs, Animations, and Scripts Next you want to add the track able image that was downloaded from the Vuforia Data
set. Import it from the tabs: Assets | Import Package | Custom Package as you did for the
Vuforia extension. Click on the ImageTarget object that you placed at position 0,0,0 and go to
the “Image Target Behavior (Script)” in the dataset field you should see the name that
matches what you placed in Vuforia and select it. Below it you will click that button and you
will see the image name that you uploaded to Vuforia and select it. It is possible that your
scale might have reverted back, so just change it to an appropriate viewing size by adding at
least a zero to the end of it.
Now you can either create something on your Image Target, or bring a premade model
onto it, such as one with an fbx extension. The trick here is to scale it proportionally to the
ImageTarget, as the ImageTarget must remain in view for the model to respond to it when the
App is running. I have experimented with objects that are larger than the image target and
they hold up well. I have also experimented with backing away from image targets by about
five feet and they hold in place. When the device camera is too far away the objects just
disappear from the image target. Sometimes you need to move into the image target for your
object to show up, but once it locks into place it will hold as long as the image target is in the
field of view of the device camera.

Interactive Text Application in Unity3D
8
6 Packaging the App
Build Settings To get the Application to run on your Android or IOS device, you have to have the
extended Unity3D license. It is usually part of a Pro License, but if you purchased a Student /
Commercial License then it might be an Add-‐On service, as was the case for my purchase. It is
possible to run the App with the free version but there are limitations and you cannot have a
Pro license or you are subject to the additional add on fee to push you App to an Android or
IOS device, I have the Unity3D Pro and had to purchase the Android Pro Add-‐On in order to
get the Apps to work on any of my Android devices. Since it is also possible to use Vuforia for
Virtual Reality with the Samsung Galaxy Note Smartphone, I chose the Android Pro Add-‐On.
The next part is to get the project file ready to compile the application to the Android
Device. Please note, I am not discussing IOS Devices, as there are other steps involved in that
process. So to begin, click the tabs: File | Build Settings, there you will see at the top of the
screen a section named “Scenes in Build.” Make sure your current scene is selected or the one
that contains the AR components. If you are an advanced user then you know to place all
scenes in hierarchical order for access. The Platform should be Android and there is no need to
edit any of the Android components just to the right.
Android Studio Hopefully you have compiled Apps to android before and have placed the appropriate
links in the Unity Preferences that will allow Android Studio and Java to work behind the
scenes. If not, you have to have downloaded and installed Android Studio SDK and the latest
Java SDK. Detailed instructions for Android Studio can be found here:
http://docs.unity3d.com/Manual/android-‐sdksetup.html
All you need to do is install Java on your computer and let Unity Know where it is in the Unity
Preferences under the External Tools Tab. It will be looking for the SDK folder.
Player, Other, and Publishing Settings These are the hidden settings, as I like to call them because they are what will make
your App work or not! It was very frustrating to me at how intricate they were and the
instructions were very hard to find to enable all the right steps for the push to my android
device, but once you figure it out it gets easier to keep plugging in the App’s right information.
Interactive Text Application in Unity3D
9
There are three main points here and the rest are just customization, but what is needed first is
under the Player Settings tab and that is a company name. Make one up, but if you plan on
posting to the Play or Apple stores you will need it for your Developers Licenses and later for
those huge profits that you will pay income taxes. Below that line is the App Name that is the
one that will be displayed in the “Stores” and most importantly on your tablet or smartphone.
The next big step is under the “Other Settings” tab to the Player Settings and in section
Identifier; you need to add a line for what Unity calls your Bundle Identifier. It is suggested to
reverse type your company’s website, then the app name. After that is a version number, I
increment these when really big changes take effect. Skip the next one and just go to the
minimum API level, as this is the version of android that you want to be able to build to. I
usually do not go that far back because older phones and tablets do not support the camera
being used in game Apps.
The last big step is under Publishing Settings in which you give your App a Keystore identifier.
I have been giving each app a unique identifier, which holds a code in file folder on your
computer. So, where it says “Create New Keystore” it will take you to a place on your hard
drive. Mine are located in file folder appropriately named “Unity_Keystore.” There I am
placing the App names as file folders. I do give all my Apps the same Passwords as I can barely
remember my own bank password so I just use a generic one for all my Apps.
7 Closing Remarks
Hopefully this document has provided enough information to get an Augmented
Reality Application up and running for your particular project. If not, there are ample
resources available especially in the Learn and Community Sections on the Unity Website. I
have found that I can get the base done, that is the object and its recognition to the image
target relatively easily. But it is when I start adding other features like interactivity,
animations; advanced scripting that makes unity go haywire. It is important to make
incremental saves of your Unity Project so that you can revert back to something if things just
do not work out. I had to do this to my class project as I was trying to add an old script that
used to work in a previous version of Unity; but it would not work in the version that I was
currently using. In fact it corrupted the file the project would not work at all!
Interactive Text Application in Unity3D
10
To back up your Unity Project File, do this with Unity not being open. Go to your file
directory and just copy the file into the same folder. I like to see it with the same name and
with the word copy next to it. That way I know that I have a duplicate of it, I also like to put
revision letters or numbers next to the name so that I can identify steps in my creation process.
I like to keep my build files outside of my project settings as these happen in increments.
When I am done I will just delete all of the earlier ones as they can take up a lot of memory. It
is only necessary to keep the most recent builds as long as there are earlier versions of your
Unity Project to return to if needed. One last tidbit, I recently started to create master
directories by Unity Version number as a way to keep a placement of Unity Projects. It is
possible to upgrade your Unity Project but it may not be successful, so I will copy the project
from one Unity Version File and place it in the newer Unity Version File; then when I open up
the file in Unity’s newest version I will now if it worked or not. If it didn’t, then I can keep
working on the file in its original version, as that is still intact in its original place.
Works Cited:
[1] "The Leading Global Game Industry Software." Unity. Web. 10 Dec. 2014. <http://unity3d.com/public-‐
relations>.
[2] "PTC Adds Product & Service Advantage | PTC." What-‐we-‐do. Web. 7 Dec. 2015.
<http://www.ptc.com/about/what-‐we-‐do>.
[3] "Pre-‐order Unity 5 and Get Unity 4 Today!" Unity. Web. 10 Dec. 2014. <https://store.unity3d.com/>.