Surveillance sentinelle des fièvres : Intérêt dans la surveillance du paludisme
DEATCH
Schnellinstallationsanleitung
IP-Überwachungskamera IUK 5 A1 (IAN 48807)Diese Anleitung zeigt Ihnen in wenigen Schritten, wie Sie die IP-Überwachungskamera mit Hilfe Ihres Smartphones oder Tablets in Betrieb nehmen und in Ihr WLAN-Netzwerk integrieren.
LAN
WAN
Schritt 1 Schritt 2 Schritt 3 Schritt 4
■ Schrauben Sie die WLAN-Antenne an die Kamera.
■ Verbinden Sie den Netzadapter mit der Kamera und einer Netzsteckdose.
■ Verbinden Sie die Kamera über das mitgelieferte Netzwerkkabel mit Ihrem Netzwerk-Router oder -switch.
■ Stellen Sie sicher, dass ihr Smartphone bzw. Tablet mit Ihrem WLAN-Netzwerk verbunden ist.
■ Wenn Sie ein Android-Smartphone bzw. Tablet verwenden, installieren Sie sich die App „IUK viewer“ aus dem Google Play Store.
■ Wenn Sie ein iPhone bzw. iPad verwenden, installieren Sie sich die App „IUK viewer“ aus dem Apple App-Store.
■ Starten Sie die App und tippen Sie auf „Kamera hinzufügen“.
■ Wählen Sie „QR-Code scannen“ und scannen Sie den QR-Code auf der Unterseite der Kamera.
■ Wenn der QR-Code erfolgreich gescannt worden ist, erscheint in der KAMERA INFO die entsprechende ID der Kamera. Tippen Sie anschließend auf „Fertig“.
Besuchen Sie unsere Produktunterstützungs-Webseite unter www.kompernass.com, um die aktuellste Version der Bedienungsanleitung, eventuelle Firmware-Updates und zusätzliche Bediensoftware herunterzuladen.
QIG_48807_IUK5A1_DE.indd 2 15.04.15 16:01
Schritt 5 Schritt 6 Schritt 7 Schritt 8
■ Das Kamerabild erscheint in der Übersicht. Tippen Sie auf den Pfeil, um zum Einstellungs-menü zu wechseln.
■ Tippen Sie auf „WLAN Einstellungen“. ■ Anschließend wird automatisch nach verfüg-baren WLAN-Netzwerken in der Umgebung gesucht. Nach kurzer Zeit erscheinen die ver-fügbaren WLAN-Netzwerke in der Übersicht.
■ Wählen Sie Ihr WLAN-Netzwerk aus.
■ Geben Sie im Feld „Passwort“ Ihren Netzwerk-schlüssel ein. Tippen Sie abschließend auf „Join“.
► Die Kamera wird jetzt neu gestartet und Sie können das Netzwerkkabel entfernen. Die Installation der Kamera in Ihr WLAN-Netz-werk ist jetzt abgeschlossen und Sie können die Kamera über die App bedienen. Weitere Informationen finden Sie in der ausführlichen Bedienungsanleitung der Kamera.
Besuchen Sie unsere Produktunterstützungs-Webseite unter www.kompernass.com, um die aktuellste Version der Bedienungsanleitung, eventuelle Firmware-Updates und zusätzliche Bediensoftware herunterzuladen.
QIG_48807_IUK5A1_DE.indd 3 15.04.15 16:01
GBIE
Quick installation guide
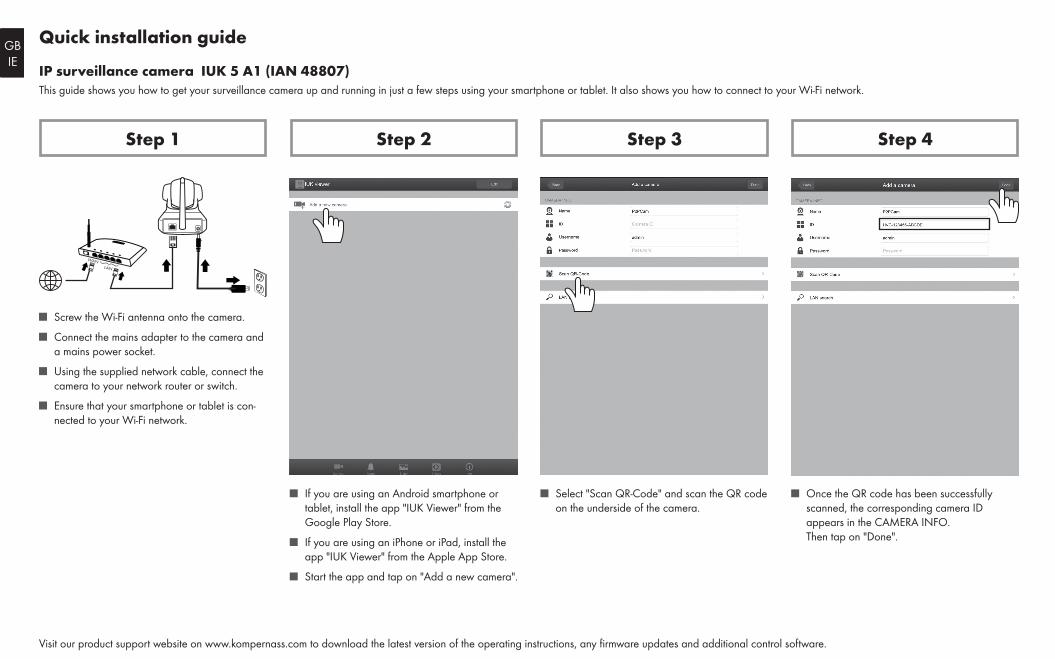
IP surveillance camera IUK 5 A1 (IAN 48807)This guide shows you how to get your surveillance camera up and running in just a few steps using your smartphone or tablet. It also shows you how to connect to your Wi-Fi network.
LAN
WAN
Step 1 Step 2 Step 3 Step 4
■ Screw the Wi-Fi antenna onto the camera.
■ Connect the mains adapter to the camera and a mains power socket.
■ Using the supplied network cable, connect the camera to your network router or switch.
■ Ensure that your smartphone or tablet is con-nected to your Wi-Fi network.
■ If you are using an Android smartphone or tablet, install the app "IUK Viewer" from the Google Play Store.
■ If you are using an iPhone or iPad, install the app "IUK Viewer" from the Apple App Store.
■ Start the app and tap on "Add a new camera".
■ Select "Scan QR-Code" and scan the QR code on the underside of the camera.
■ Once the QR code has been successfully scanned, the corresponding camera ID appears in the CAMERA INFO. Then tap on "Done".
Visit our product support website on www.kompernass.com to download the latest version of the operating instructions, any firmware updates and additional control software.
QIG_48807_IUK5A1_GB.indd 2 15.04.15 16:03
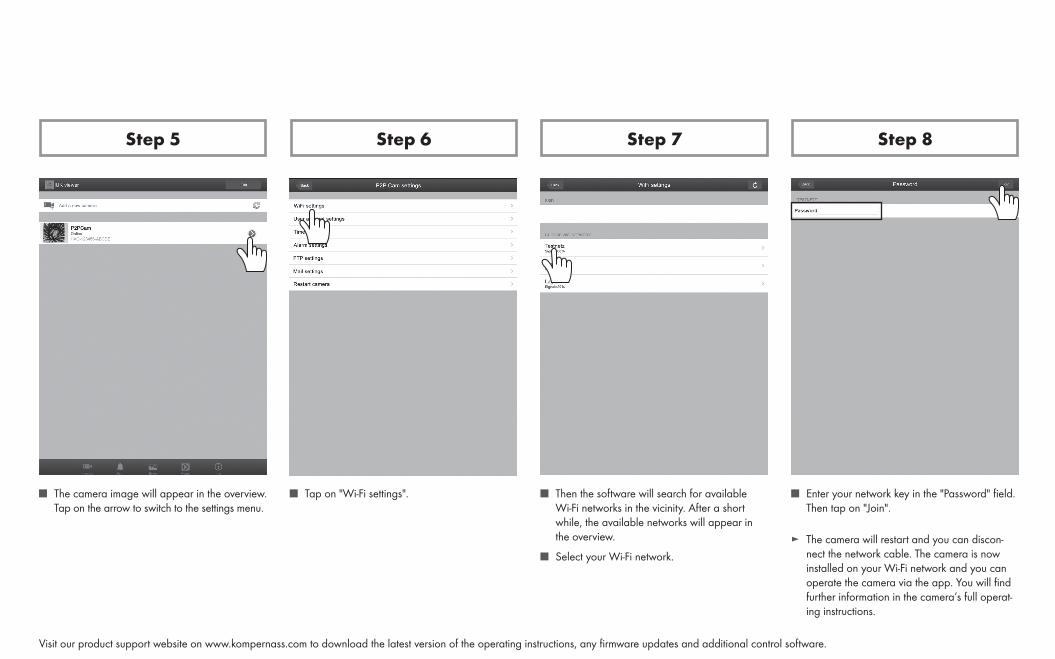
Step 5 Step 6 Step 7 Step 8
■ The camera image will appear in the overview. Tap on the arrow to switch to the settings menu.
■ Tap on "Wi-Fi settings". ■ Then the software will search for available Wi-Fi networks in the vicinity. After a short while, the available networks will appear in the overview.
■ Select your Wi-Fi network.
■ Enter your network key in the "Password" field. Then tap on "Join".
► The camera will restart and you can discon-nect the network cable. The camera is now installed on your Wi-Fi network and you can operate the camera via the app. You will find further information in the camera’s full operat-ing instructions.
Visit our product support website on www.kompernass.com to download the latest version of the operating instructions, any firmware updates and additional control software.
QIG_48807_IUK5A1_GB.indd 3 15.04.15 16:03
IAN 48807
IP-ÜBERWACHUNGSKAMERA IUK 5 A1
IP-ÜBERWACHUNGSKAMERABedienungsanleitung
IP SURVEILLANCE CAMERAOperating instructions
DE / AT / CH Bedienungsanleitung Seite 1GB Operating instructions Page 43
Klappen Sie vor dem Lesen die beiden Seiten mit den Abbildungen aus und machen Sie sich anschließend mit allen Funktionen des Gerätes vertraut.
Before reading, unfold both pages containing illustrations and familiarise yourself with all functions of the device.
A
B
C
D
1IUK 5 A1
DEATCH
Inhaltsverzeichnis
Einführung . . . . . . . . . . . . . . . . . . . . . . . . . . . . . . . . . . . . . . . . . . . . . . . . . . . .3
Informationen zu dieser Bedienungsanleitung . . . . . . . . . . . . . . . . . . . . . . . . . . . . . . . . . . 3Urheberrecht. . . . . . . . . . . . . . . . . . . . . . . . . . . . . . . . . . . . . . . . . . . . . . . . . . . . . . . . . . . . 3Bestimmungsgemäße Verwendung . . . . . . . . . . . . . . . . . . . . . . . . . . . . . . . . . . . . . . . . . . 3Warnhinweise . . . . . . . . . . . . . . . . . . . . . . . . . . . . . . . . . . . . . . . . . . . . . . . . . . . . . . . . . . . 3
Sicherheit . . . . . . . . . . . . . . . . . . . . . . . . . . . . . . . . . . . . . . . . . . . . . . . . . . . .4
Grundlegende Sicherheitshinweise . . . . . . . . . . . . . . . . . . . . . . . . . . . . . . . . . . . . . . . . . . 4Mögliche Verletzung von Rechten Dritter . . . . . . . . . . . . . . . . . . . . . . . . . . . . . . . . . . . . . . 6
Bedienelemente . . . . . . . . . . . . . . . . . . . . . . . . . . . . . . . . . . . . . . . . . . . . . . .8
Aufstellen und Anschließen . . . . . . . . . . . . . . . . . . . . . . . . . . . . . . . . . . . . . .9
Lieferumfang und Transportinspektion . . . . . . . . . . . . . . . . . . . . . . . . . . . . . . . . . . . . . . . . 9Entsorgung der Verpackung . . . . . . . . . . . . . . . . . . . . . . . . . . . . . . . . . . . . . . . . . . . . . . . . 9Anforderungen an den Aufstellort . . . . . . . . . . . . . . . . . . . . . . . . . . . . . . . . . . . . . . . . . . 10Stromversorgung . . . . . . . . . . . . . . . . . . . . . . . . . . . . . . . . . . . . . . . . . . . . . . . . . . . . . . . . 11Audioanschluss . . . . . . . . . . . . . . . . . . . . . . . . . . . . . . . . . . . . . . . . . . . . . . . . . . . . . . . . . 11LAN-Anschluss . . . . . . . . . . . . . . . . . . . . . . . . . . . . . . . . . . . . . . . . . . . . . . . . . . . . . . . . . 11WLAN-Betrieb . . . . . . . . . . . . . . . . . . . . . . . . . . . . . . . . . . . . . . . . . . . . . . . . . . . . . . . . . 11Alarm-Anschluss . . . . . . . . . . . . . . . . . . . . . . . . . . . . . . . . . . . . . . . . . . . . . . . . . . . . . . . . 11
Bedienung und Betrieb . . . . . . . . . . . . . . . . . . . . . . . . . . . . . . . . . . . . . . . .12
Systemvoraussetzungen . . . . . . . . . . . . . . . . . . . . . . . . . . . . . . . . . . . . . . . . . . . . . . . . . . 12Inbetriebnahme . . . . . . . . . . . . . . . . . . . . . . . . . . . . . . . . . . . . . . . . . . . . . . . . . . . . . . . . 13Die Kamera im Netzwerk finden . . . . . . . . . . . . . . . . . . . . . . . . . . . . . . . . . . . . . . . . . . . 13Kamerabild im Browser „Internet Explorer 11“ darstellen . . . . . . . . . . . . . . . . . . . . . . . . 15Bedeutung der Steuertasten und -felder . . . . . . . . . . . . . . . . . . . . . . . . . . . . . . . . . . . . . . 18Konfiguration über das Browser-Interface . . . . . . . . . . . . . . . . . . . . . . . . . . . . . . . . . . . . 21Die Seite „Grundeinstellungen“ . . . . . . . . . . . . . . . . . . . . . . . . . . . . . . . . . . . . . . . . . . . . 21Die Seite „Alarm“ . . . . . . . . . . . . . . . . . . . . . . . . . . . . . . . . . . . . . . . . . . . . . . . . . . . . . . . 23Die Seite „Netzwerk“ . . . . . . . . . . . . . . . . . . . . . . . . . . . . . . . . . . . . . . . . . . . . . . . . . . . . 26Die Seite „Steuerungs Einstellungen“ . . . . . . . . . . . . . . . . . . . . . . . . . . . . . . . . . . . . . . . . 27Die Seite „Benutzer Einstellungen“ . . . . . . . . . . . . . . . . . . . . . . . . . . . . . . . . . . . . . . . . . . 28Abweichende Bedienung bei Verwendung der Smartphone-Vorschau . . . . . . . . . . . . . . 30Kamerabild auf Smartphone darstellen . . . . . . . . . . . . . . . . . . . . . . . . . . . . . . . . . . . . . . 30Kamera über Smartphone steuern . . . . . . . . . . . . . . . . . . . . . . . . . . . . . . . . . . . . . . . . . . 31Zentrales Monitoring über spezielle Software . . . . . . . . . . . . . . . . . . . . . . . . . . . . . . . . . 33
2 IUK 5 A1
DEATCH
Reinigung . . . . . . . . . . . . . . . . . . . . . . . . . . . . . . . . . . . . . . . . . . . . . . . . . . .38
Lagerung / Entsorgung . . . . . . . . . . . . . . . . . . . . . . . . . . . . . . . . . . . . . . . . .38
Lagerung . . . . . . . . . . . . . . . . . . . . . . . . . . . . . . . . . . . . . . . . . . . . . . . . . . . . . . . . . . . . . 38Gerät entsorgen . . . . . . . . . . . . . . . . . . . . . . . . . . . . . . . . . . . . . . . . . . . . . . . . . . . . . . . . 38
Fehlerbehebung . . . . . . . . . . . . . . . . . . . . . . . . . . . . . . . . . . . . . . . . . . . . . .38
Fehlerursachen und -behebung . . . . . . . . . . . . . . . . . . . . . . . . . . . . . . . . . . . . . . . . . . . . 39
Anhang . . . . . . . . . . . . . . . . . . . . . . . . . . . . . . . . . . . . . . . . . . . . . . . . . . . . .40
Hinweise zur Konformitätserklärung . . . . . . . . . . . . . . . . . . . . . . . . . . . . . . . . . . . . . . . . . 40Technische Daten . . . . . . . . . . . . . . . . . . . . . . . . . . . . . . . . . . . . . . . . . . . . . . . . . . . . . . . 40Garantie . . . . . . . . . . . . . . . . . . . . . . . . . . . . . . . . . . . . . . . . . . . . . . . . . . . . . . . . . . . . . . 41Service . . . . . . . . . . . . . . . . . . . . . . . . . . . . . . . . . . . . . . . . . . . . . . . . . . . . . . . . . . . . . . . 42Importeur . . . . . . . . . . . . . . . . . . . . . . . . . . . . . . . . . . . . . . . . . . . . . . . . . . . . . . . . . . . . . 42
3IUK 5 A1
DEATCH
Einführung
Informationen zu dieser BedienungsanleitungHerzlichen Glückwunsch zum Kauf Ihres neuen Gerätes.
Sie haben sich damit für ein hochwertiges Produkt entschieden. Die Bedienungsanleitung ist Bestandteil dieses Produkts. Sie enthält wichtige Hinweise für Sicherheit, Gebrauch und Entsorgung. Machen Sie sich vor der Benutzung des Produkts mit allen Bedien- und Sicherheitshinweisen vertraut. Benutzen Sie das Produkt nur wie beschrieben und für die angegebenen Einsatzbereiche. Händigen Sie bei Weitergabe oder Verkauf des Produktes an Dritte alle Unterlagen inkl. dieser Bedienungsanleitung mit aus.
UrheberrechtDiese Dokumentation ist urheberrechtlich geschützt.
Jede Vervielfältigung, bzw. jeder Nachdruck, auch auszugsweise, sowie die Wiedergabe der Abbil-dungen, auch im veränderten Zustand ist nur mit schriftlicher Zustimmung des Herstellers gestattet.
Bestimmungsgemäße VerwendungDieses Gerät als Gerät der Informationstechnologie ist nur zum Aufnehmen von digitalen Audio- und Videodaten sowie zu deren Übertragung an computergestützte Monitore per Kabel oder Funk bestimmt. Eine andere oder darüber hinausgehende Benutzung gilt als nicht bestimmungsgemäß. Das Gerät ist nicht zur Verwendung in gewerblichen oder industriellen Bereichen vorgesehen.
Ansprüche jeglicher Art wegen Schäden aus nicht bestimmungsgemäßer Verwendung, unsachgemäßen Reparaturen, unerlaubt vorgenommener Veränderungen oder Verwendung nicht zugelassener Ersatzteile sind ausgeschlossen. Das Risiko trägt allein der Betreiber.
WarnhinweiseIn der vorliegenden Bedienungsanleitung werden folgende Warnhinweise verwendet:
GEFAHR
Ein Warnhinweis dieser Gefahrenstufe kennzeichnet eine drohende gefährliche Situation.
Falls die gefährliche Situation nicht vermieden wird, kann dies zum Tod oder zu schweren Verlet-zungen führen.
► Die Anweisungen in diesem Warnhinweis befolgen, um die Gefahr des Todes oder schwerer Verletzungen von Personen zu vermeiden.
4 IUK 5 A1
DEATCH
WARNUNG
Ein Warnhinweis dieser Gefahrenstufe kennzeichnet eine mögliche gefährliche Situation.
Falls die gefährliche Situation nicht vermieden wird, kann dies zu Verletzungen führen.
► Die Anweisungen in diesem Warnhinweis befolgen, um Verletzungen von Personen zu vermeiden.
ACHTUNG
Ein Warnhinweis dieser Gefahrenstufe kennzeichnet einen möglichen Sachschaden.
Falls die Situation nicht vermieden wird, kann dies zu Sachschäden führen.
► Die Anweisungen in diesem Warnhinweis befolgen, um Sachschäden zu vermeiden.
HINWEIS
► Ein Hinweis kennzeichnet zusätzliche Informationen, die den Umgang mit dem Gerät erleichtern.
SicherheitIn diesem Kapitel erhalten Sie wichtige Sicherheitshinweise im Umgang mit dem Gerät.
Dieses Gerät entspricht den vorgeschriebenen Sicherheitsbestimmungen. Ein unsachgemäßer Gebrauch kann zu Personen- und Sachschäden führen.
Grundlegende SicherheitshinweiseBeachten Sie für einen sicheren Umgang mit dem Gerät die folgenden Sicherheitshinweise:
■ Kontrollieren Sie das Gerät vor der Verwendung auf äußere sichtbare Schäden. Nehmen Sie ein beschädigtes oder heruntergefallenes Gerät nicht in Betrieb.
■ Bei Beschädigung der Kabel oder Anschlüsse lassen Sie diese von autorisiertem Fachpersonal oder dem Kundenservice austauschen.
■ Personen, die aufgrund ihrer körperlichen, geistigen oder motorischen Fähigkeiten nicht in der Lage sind das Gerät sicher zu bedienen, dürfen das Gerät nur unter Aufsicht oder Anweisung durch eine verantwortliche Person benutzen.
■ GEFAHR Verpackungsmaterialien sind kein Kinderspielzeug! Halten Sie alle Verpackungsma-terialien von Kindern fern. Es besteht Erstickungsgefahr!
■ Achten Sie beim Befestigen des Gerätes auf sicheren Halt, damit es nicht herunterfallen kann und Menschen verletzen kann.
5IUK 5 A1
DEATCH
■ Gestatten Sie Kindern die Benutzung des Gerätes nur unter Aufsicht. Kinder können mögliche Gefahren nicht immer richtig erkennen. WARNUNG Im Lieferumfang befinden sich ver-schluckbare Kleinteile. Wurde ein Teil verschluckt, konsultieren Sie sofort einen Arzt.
■ Lassen Sie Reparaturen am Gerät nur von autorisierten Fachbetrieben oder dem Kundenservice durchführen. Durch unsachgemäße Reparaturen können Gefahren für den Benutzer entstehen. Zudem erlischt der Garantieanspruch. Öffnen Sie keinenfalls das Gehäuse der Kamera oder des Netzadapters. Es besteht Brand- und Stromschlaggefahr!
■ Eine Reparatur des Gerätes während der Garantiezeit darf nur von einem vom Hersteller auto-risierten Kundendienst vorgenommen werden, sonst besteht bei nachfolgenden Schäden kein Garantieanspruch mehr.
■ Defekte Bauteile dürfen nur gegen Original-Ersatzteile ausgetauscht werden. Nur bei diesen Teilen ist gewährleistet, dass sie die Sicherheitsanforderungen erfüllen.
■ Verwenden Sie ausschließlich den mitgelieferten Netzadapter zum Betrieb des Gerätes.
■ Stellen Sie keine Gegenstände auf das Gerät.
■ Schützen Sie das Produkt vor Feuchtigkeit. Verwenden Sie es nur in trockenen Innenräumen, nicht im Freien oder in der Nähe von Flüssigkeiten.
■ Das Gerät nicht in der Nähe von offenen Flammen (z. B. Kerzen) oder unter extremen Bedingun-gen (z. B. in explosiver Umgebung) betreiben.
■ Die Kamera darf nicht in Bereichen eingesetzt werden, in denen sich explosive Gasgemische bilden können, hierzu zählen z. B. Tankanlagen.
■ Hinweis zur Netztrennung: Auch wenn das Gerät nicht in Betrieb ist, verbraucht es Strom. Um dies zu verhindern, trennen Sie das Gerät vom Netz, indem Sie den Netzadapter aus der Netzsteckdose ziehen. Daher sollten Sie das Gerät so verwenden, dass stets ein unbehinderter Zugang zur Netzsteckdose gewähr-leistet ist, damit Sie den Netzadapter auch in einer Notsituation sofort abziehen können. Um Brandgefahr auszuschließen, ein unbeabsichtigtes Einschalten zu vermeiden und Energiekosten zu sparen, sollten Sie den Netzadapter bei Nichtgebrauch des Gerätes grundsätzlich von der Netzsteckdose trennen.
■ Fassen Sie den Netzadapter immer direkt an, wenn Sie ihn aus der Steckdose nehmen wollen. Ziehen Sie nicht am Kabel, und fassen Sie den Netzadapter niemals mit nassen Händen an, da dies einen Kurzschluss oder elektrischen Schlag verursachen kann. Stellen Sie weder Möbel-stücke o.ä. auf das Netzadapterkabel und achten Sie darauf, dass es nicht eingeklemmt wird. Machen Sie niemals einen Knoten in das Kabel und binden Sie es nicht mit anderen Kabeln. Legen Sie das Netzadapterkabel und ggf. das Netzwerk-, Audio- oder Alarmkabel so, dass niemand darauf tritt oder darüber stolpert. Ein beschädigter Netzadapter kann einen Brand oder elektrischen Schlag verursachen. Prüfen Sie den Netzadapter von Zeit zu Zeit. Sollte er beschä-digt sein, wenden Sie sich an Ihre nächste autorisierte Kundendienststelle oder Ihren Händler, um ihn zu ersetzen.

6 IUK 5 A1
DEATCH
■ Vor einen Sturm und/oder Gewitter mit Blitzschlaggefahr trennen Sie den Netzadapter bitte vom Stromnetz.
■ Die verwendete Steckdose muss leicht zugänglich sein, so dass der Netzadapter notfalls leicht abgezogen werden kann.
■ Sollten Sie ungewöhnliche Geräusche, Rauch oder ähnlich unklare Situationen wahrnehmen, trennen Sie unverzüglich den Netzadapter von der Stromversorgung. Lassen Sie das Gerät durch einen qualifizierten Fachmann überprüfen, bevor Sie es erneut verwenden (siehe Kapitel „Service”).
Elektrostatische Entladungen
■ In einigen seltenen Fällen kann es sein, dass es zu Fehlfunktionen der Kamera aufgrund von elektrostatischer Entladung kommt. Im Falle einer Fehlfunktion aufgrund elektrostatischer Entladung muss das Produkt zurückgesetzt werden. Trennen Sie hierzu den Netzadapter aus der Steckdose und warten Sie ca. zehn Sekun-den, bevor Sie ihn erneut in die Steckdose stecken.
Mögliche Verletzung von Rechten DritterBei der Benutzung der IP-Überwachungskamera müssen Sie folgende Hinweise beachten:
Urheberschutz
Grundsätzlich hat jede Person das Recht am eigenen Bild. Nach dem Urheberrechtsgesetz dürfen Bilder ohne Einwilligung der Betroffenen nur dann veröffentlicht werden, wenn die Personen lediglich als Beiwerk neben einer Landschaft oder sonstigen Örtlichkeiten erscheinen. Die Beantwortung der Frage, ob eine Person nur Beiwerk ist, hängt von den Umständen des Einzelfalls ab. Aus Gründen der Rechtssicherheit sollte in allen Fällen, in denen Aufnahmen mit Bezug zu identifizierbaren Perso-nen möglich sind, über die Kamera informiert werden (siehe auch Abschnitt „Hinweispflicht“).
Schutz der Privatsphäre
Die Privatsphäre Anderer darf durch die gezeigten Bilder nicht verletzt werden. Richten Sie Ihre Kamera nicht in den Garten oder auf die Eingangstür Ihrer Nachbarwohnung, auch wenn diese Orte aus Ihrer eigenen Wohnung oder von öffentlichen Standorten aus einsehbar sind. Dies berechtigt nicht zur Veröffentlichung dieser Einsichten.
Personelle Bestimmbarkeit
Eine personelle Bestimmbarkeit liegt vor, wenn festgestellt werden kann, dass eine bestimmte Person zu einer bestimmten Zeit an einem bestimmten Ort war. Die Identifikation kann dabei auch über ein personenbezogenes Kennzeichen, wie z. B. das Fahrzeugkennzeichen, erfolgen. Eine personelle Bestimmbarkeit von Personen ist unbedingt zu vermeiden.
7IUK 5 A1
DEATCH
Überwachungskameras am Arbeitsplatz
Die Überwachung am Arbeitsplatz untersteht in Deutschland besonders strengen Auflagen. Arbeitgeber sollten auf Überwachungskameras am Arbeitsplatz vollständig verzichten, solange eine mögliche Rechtsverletzung nicht vollständig ausgeschlossen werden kann.
Überwachungskameras im Straßenverkehr
Bei Überwachungskameras mit Blick auf den Straßenverkehr empfiehlt es sich, den Standort der Kameras und den Bildausschnitt so zu konfigurieren, dass durch die Aufnahmen die Verkehrsteilnehmer nicht über die Autonummer bestimmbar sind. Auch Fahrzeugaufschriften können zu einer Bestimmbarkeit der Verkehrsteilnehmer führen.
Hinweispflicht
Ist eine Identifikation von Personen nicht auszuschließen, muss ein Hinweis auf die Überwachungs-kamera an allen Zugangswegen zum Aufnahmebereich gut erkennbar aufgestellt sein. Passanten müssen zudem darüber informiert werden, dass sie mit dem Betreten des Aufnahmebereichs ihre Ein-willigung zur Aufnahme der Bilder erteilen und dass sie im Falle der Verweigerung der Einwilligung die Aufnahme vermeiden können, indem sie den Bereich nicht betreten. Hierbei ist auf die Freiwilligkeit der Erklärung zu achten. Befindet sich die Kamera an einer Stelle, die Betroffene passieren müssen, um zum Ziel zu gelangen (z. B. am Eingang einer Sehenswürdigkeit), so liegt mangels Freiwilligkeit keine wirksame Einwilligung vor.
Beachten Sie zu möglichen Verletzungen von Rechten Dritter immer die gesetzlichen Bestimmungen des jeweiligen Einsatzlandes.
Hinweis zu geschützten Markennamen und Logos
Die Verwendung von geschützten Marken- und Handelsnamen sowie Markenlogos in dieser Anleitung stellt keine Urheberrechtsverletzung dar, sondern dient als Hinweis. Auch wenn diese an den jeweiligen Stellen nicht als solche gekennzeichnet sind, gelten die entsprechenden gesetzlichen Bestimmungen.
Die verwendeten Markennamen und -logos sind Eigentum der Hersteller und unterliegen deren Urheberrechtsbestimmungen. Informationen hierzu entnehmen Sie bitte den entsprechenden Veröffentlichungen der Hersteller.
8 IUK 5 A1
DEATCH
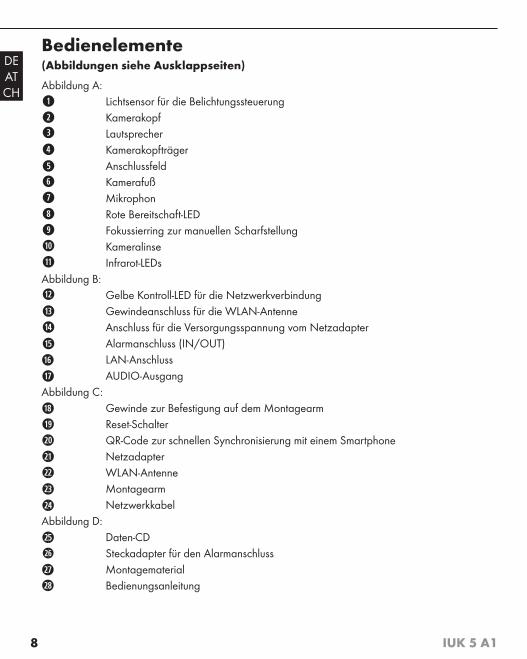
Bedienelemente(Abbildungen siehe Ausklappseiten)
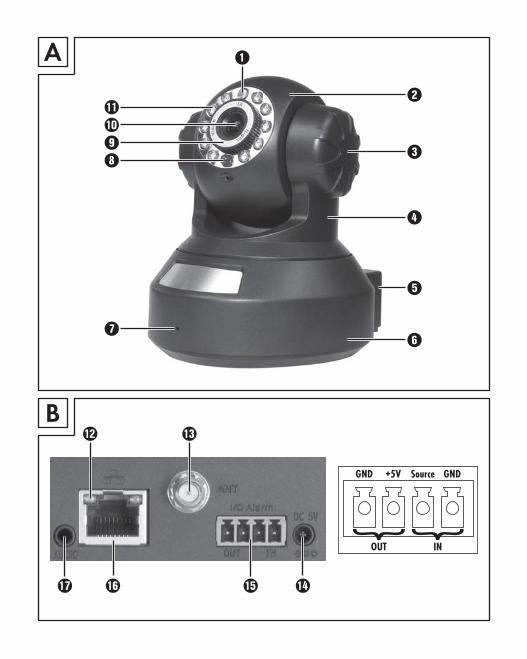
Abbildung A: Lichtsensor für die Belichtungssteuerung Kamerakopf Lautsprecher Kamerakopfträger Anschlussfeld Kamerafuß Mikrophon Rote Bereitschaft-LED Fokussierring zur manuellen Scharfstellung Kameralinse Infrarot-LEDs
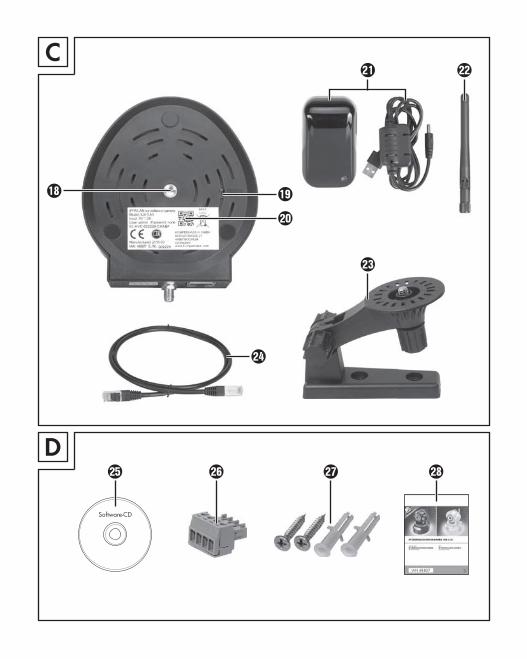
Abbildung B: Gelbe Kontroll-LED für die Netzwerkverbindung Gewindeanschluss für die WLAN-Antenne Anschluss für die Versorgungsspannung vom Netzadapter Alarmanschluss (IN/OUT) LAN-Anschluss AUDIO-Ausgang
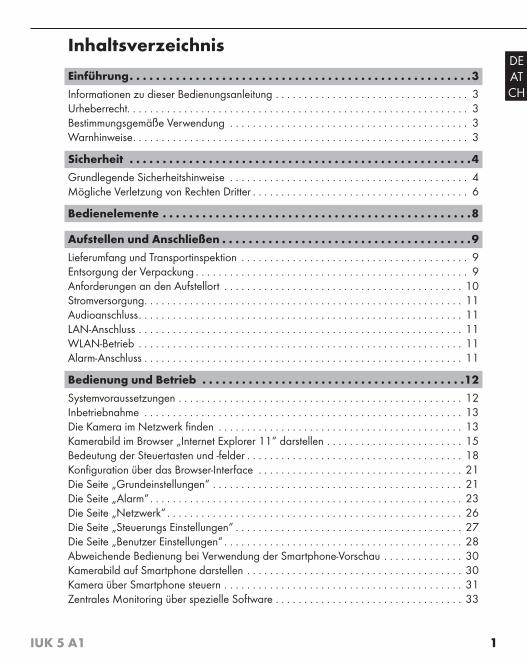
Abbildung C: Gewinde zur Befestigung auf dem Montagearm Reset-Schalter QR-Code zur schnellen Synchronisierung mit einem Smartphone Netzadapter WLAN-Antenne Montagearm Netzwerkkabel
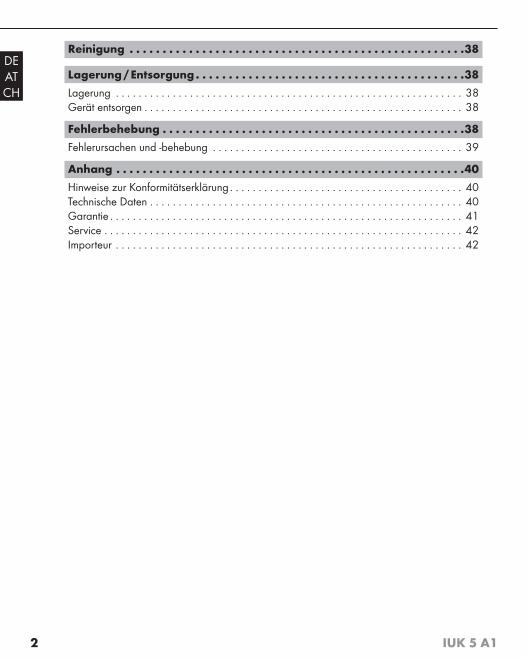
Abbildung D: Daten-CD Steckadapter für den Alarmanschluss Montagematerial Bedienungsanleitung

9IUK 5 A1
DEATCH
Aufstellen und Anschließen GEFAHR
Bei der Inbetriebnahme des Gerätes können Personen- und Sachschäden auftreten!
Beachten Sie die folgenden Sicherheitshinweise, um die Gefahren zu vermeiden:
► Beachten Sie die Hinweise zum elektrischen Anschluss des Gerätes, um Sachschäden zu vermeiden.
Lieferumfang und TransportinspektionBitte prüfen Sie den Lieferumfang (siehe Ausklappseiten). Der Lieferumfang besteht aus folgenden Komponenten:
● IP-Überwachungskamera IUK 5 A1
● Netzadapter
● Abnehmbare WLAN-Antenne
● Montagearm
● Netzwerkkabel
● Daten-CD
● Steckadapter für den Alarmanschluss
● Montagematerial
● Bedienungsanleitung
HINWEIS
► Prüfen Sie die Lieferung auf Vollständigkeit und auf sichtbare Schäden.
► Bei einer unvollständigen Lieferung oder Schäden infolge mangelhafter Verpackung oder durch Transport wenden Sie sich an die Service-Hotline (siehe Kapitel Service).
♦ Entnehmen Sie alle Teile des Gerätes und die Bedienungsanleitung aus dem Karton.
♦ Entfernen Sie sämtliches Verpackungsmaterial.
Entsorgung der Verpackung Die Verpackung schützt das Gerät vor Transportschäden. Die Verpackungsmaterialien
sind nach umweltverträglichen und entsorgungstechnischen Gesichtspunkten ausgewählt und deshalb recyclebar. Die Rückführung der Verpackung in den Materialkreislauf spart Rohstoffe und verringert das Abfallaufkommen. Entsorgen Sie nicht mehr benötigte Verpackungsmaterialien gemäß den örtlich geltenden Vorschriften.
10 IUK 5 A1
DEATCH
HINWEIS
► Heben Sie wenn möglich die Originalverpackung während der Garantiezeit des Gerätes auf, um das Gerät im Garantiefall ordnungsgemäß verpacken zu können.
Anforderungen an den AufstellortFür einen sicheren und fehlerfreien Betrieb des Gerätes muss der Aufstellort folgende Voraussetzun-gen erfüllen:
■ Zum Aufstellen können Sie das Gerät auf eine feste, fl ache und waagerechte Unterlage stellen.
■ Die Oberfl ächen von Möbeln enthalten möglicherweise Bestandteile, die die Gummifüße des Gerätes angreifen und aufweichen können. Legen Sie gegebenenfalls eine Unterlage unter die Gummifüße des Gerätes.
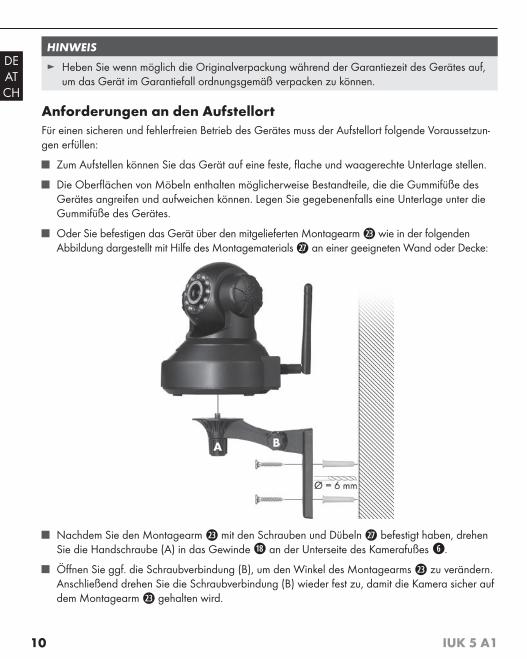
■ Oder Sie befestigen das Gerät über den mitgelieferten Montagearm wie in der folgenden Abbildung dargestellt mit Hilfe des Montagematerials an einer geeigneten Wand oder Decke:
■ Nachdem Sie den Montagearm mit den Schrauben und Dübeln befestigt haben, drehen Sie die Handschraube (A) in das Gewinde an der Unterseite des Kamerafußes .
■ Öff nen Sie ggf. die Schraubverbindung (B), um den Winkel des Montagearms zu verändern. Anschließend drehen Sie die Schraubverbindung (B) wieder fest zu, damit die Kamera sicher auf dem Montagearm gehalten wird.
11IUK 5 A1
DEATCH
■ Betreiben Sie das Gerät nur an trockenen Orten, nie in einer heißen Umgebung oder in der Nähe von brennbarem Material.
■ Betreiben Sie das Gerät nur an Orten, die eine ausreichende Belüftung bieten.
Stromversorgung ♦ Zum Betrieb des Gerätes verwenden Sie ausschließlich den mitgelieferten Netzadapter .
♦ Stecken Sie den Stecker des Netzadapterkabels in den Anschluss für die Versorgungsspan-nung . Dann stecken Sie den Netzadapter in eine ordnungsgemäß angeschlossene Netz-steckdose, die eine laut Technischen Daten zulässige Spannung liefert.
Audioanschluss
HINWEIS
► Das Audiosignal, das von einem an den Computer angeschlossenen Mikrofon an die Kamera übertragen und vom eingebauten Lautsprecher wiedergegeben wird, liegt am AUDIO-Aus-gang an, und kann von dort an einen Verstärker weitergegeben werden.
♦ Schließen Sie an den AUDIO-Ausgang ein geeignetes Miniklinkenkabel 3,5 mm (nicht mit-geliefert) an, um das Audiosignal zu verstärken. Bitte beachten Sie hierzu auch die Anleitung des hier angeschlossenen Audiogerätes.
LAN-Anschluss ♦ Um das Kamerabild in einem kabelgebundenen Netzwerk zu nutzen, verbinden Sie den
LAN-Anschluss mit dem mitgelieferten oder einem anderen geeigneten Netzwerkkabel mit einem Netzwerk-Router oder -switch.
WLAN-Betrieb ♦ Um das Kamerabild drahtlos in einem Netzwerk zu nutzen, schrauben Sie die beiliegende
WLAN-Antenne auf den Gewindeanschluss .
Alarm-Anschluss ♦ Mit dem Alarmanschluss (IN/OUT) können Sie die Kamera in ein bereits bestehendes
Alarmsystem einbinden.
♦ Insgesamt besteht der Alarm-Anschluss aus 4 Anschlüssen. An die beiden IN-Anschlüsse rechts können Sie Alarmgeber anschließen, z. B. Bewegungsmelder oder sonstige alarmge-bende Geräte. Werden die IN-Anschlüsse extern miteinander verbunden, so wird ein Alarm ausgelöst. Dabei kann die Verbindung über einen Schalter bzw. Relais stattfinden.
12 IUK 5 A1
DEATCH
♦ An den beiden OUT-Anschlüsse links kann ein externes Gerät wie ein Alarmgeber, eine Sirene oder ein Türöffner angeschlossen werden. Hier wird ein Signal ausgegeben, sobald der Ausgang manuell eingeschaltet wurde oder wenn der Ausgang für Alarmmeldungen ausgewählt wurde und die IP-Überwachungskamera einen Alarm erkennt. Die maximale Schaltleistung der OUT-Anschlüsse beträgt 5 V / 500 mA.
♦ Für weitere Informationen lesen Sie die Bedienungsanleitungen der beteiligten Komponenten.
Bedienung und BetriebIn diesem Kapitel erhalten Sie wichtige Hinweise zu Bedienung und Betrieb des Gerätes.
Die Grundfunktion der IP-Überwachungskamera ist die Bereitstellung von Videobildern in einem IP-Netzwerk. Echtzeit -Video-Bilder in hoher Qualität (VGA und QVGA) werden mit bis zu 25 Bildern pro Sekunde im LAN/WLAN übertragen. Dabei kommt Kompressionstechnik auf Grundlage von H.264/JPEG-Hardware zum Einsatz.
Die Funktion der IP-Überwachungskamera basiert auf dem TCP/IP-Standard-Netzwerkprotokoll. Der eingebaute Web-Server unterstützt die Browser „Internet Explorer 11“, „Mozilla Firefox“ etc., verschiedene Smartphone-Browser sowie die mitgelieferte zentrale Überwachungs-Software. Daher können Einrichtung und Konfiguration des Geräts ganz bequem über das Netzwerk erledigt werden, ebenso ein mögliches Update der Firmware Ihrer IP-Überwachungskamera. Dadurch steht Ihnen das Kamerabild jederzeit und an jedem Ort über einen Klick ins Netz zur Verfügung. Voraussetzung für den Internetzugriff ist natürlich eine entsprechende Konfiguration des Netzwerk-Routers.
HINWEIS
► Nur die Verwendung des Browsers „Internet Explorer 11“ bietet Zugang zu allen verfügbaren Bedienoptionen.
Systemvoraussetzungen
HINWEIS
► Die Überwachungs-Software lässt sich nur unter Windows®-Betriebssystemen installieren. Die Video-Darstellung und die Konfiguration sind aber web-basiert und funktionieren daher plattformübergreifend.
Betriebssysteme: Windows 2000® (SP4), Windows XP® (SP 2), Vista®, Win 7, Win 8
Prozessor: 2.0 GHz oder höher
RAM: 512 MB oder mehr
Netzwerk-Karte: 10MBit/s oder besser
Grafikkartenspeicher: 512 MB oder mehr
Unterstützte Web-Browser: Internet Explorer 11, diverse andere mit reduziertem Funktionsumfang
Bildschirmauflösung: 1024 × 768 oder höher
13IUK 5 A1
DEATCH
InbetriebnahmeCa. 30 Sekunden nach Herstellen der Spannungsversorgung führt die Kamera einen Selbsttest durch und fährt dabei den vollständigen horizontalen und vertikalen Schwenkbereich ab. Anschließend ist das Gerät einsatzbereit. Hat das Gerät eine kabelgebundene Netzwerkverbindung erkannt, blinkt die gelbe Kontroll-LED in schneller Folge.
HINWEIS
► Für die Erstkonfi guration muss die Kamera mit dem LAN-Anschluss verbunden sein.
Die Kamera im Netzwerk fi ndenLegen Sie die mitgelieferte CD in das Disc-Laufwerk des Windows®-Computer ein, mit dem Sie die Kamera konfi gurieren wollen. Öff nen Sie das Laufwerk im Explorer und klicken Sie mit einem Doppel-klick auf die Datei „Search Tool“. Dies startet das Programm zur Suche der Kamera im Netzwerk (keine Installation von Dateien auf Ihrem Computer).
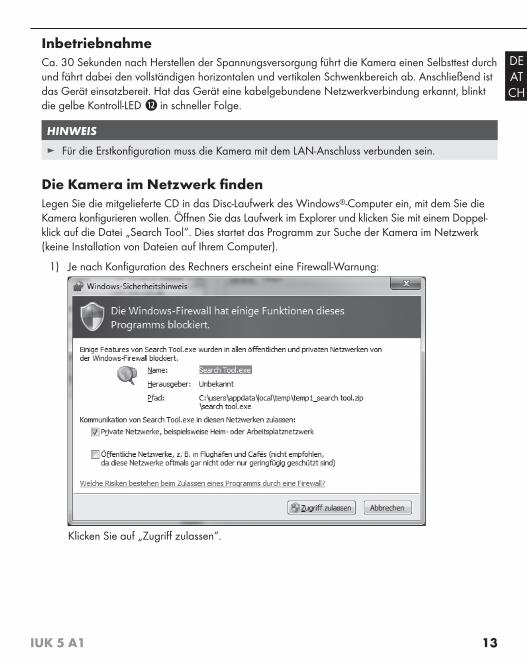
1) Je nach Konfi guration des Rechners erscheint eine Firewall-Warnung:
Klicken Sie auf „Zugriff zulassen“.
14 IUK 5 A1
DEATCH
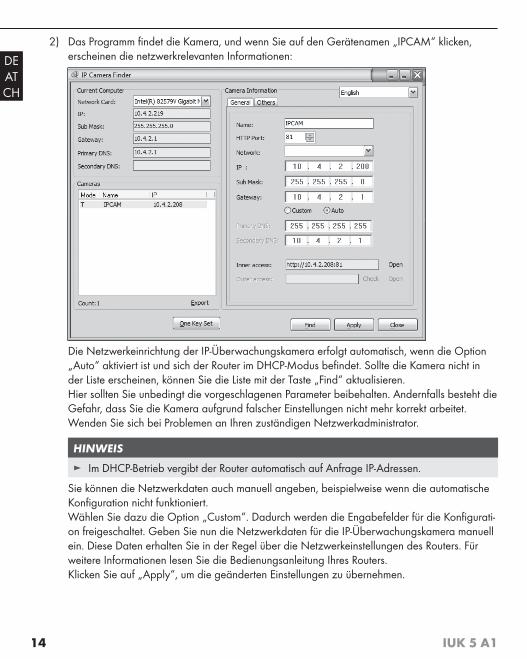
2) Das Programm fi ndet die Kamera, und wenn Sie auf den Gerätenamen „IPCAM“ klicken, erscheinen die netzwerkrelevanten Informationen:
Die Netzwerkeinrichtung der IP-Überwachungskamera erfolgt automatisch, wenn die Option „Auto“ aktiviert ist und sich der Router im DHCP-Modus befi ndet. Sollte die Kamera nicht in der Liste erscheinen, können Sie die Liste mit der Taste „Find“ aktualisieren.Hier sollten Sie unbedingt die vorgeschlagenen Parameter beibehalten. Andernfalls besteht die Gefahr, dass Sie die Kamera aufgrund falscher Einstellungen nicht mehr korrekt arbeitet.Wenden Sie sich bei Problemen an Ihren zuständigen Netzwerkadministrator.
HINWEIS
► Im DHCP-Betrieb vergibt der Router automatisch auf Anfrage IP-Adressen.
Sie können die Netzwerkdaten auch manuell angeben, beispielweise wenn die automatische Konfi guration nicht funktioniert.Wählen Sie dazu die Option „Custom“. Dadurch werden die Engabefelder für die Konfi gurati-on freigeschaltet. Geben Sie nun die Netzwerkdaten für die IP-Überwachungskamera manuell ein. Diese Daten erhalten Sie in der Regel über die Netzwerkeinstellungen des Routers. Für weitere Informationen lesen Sie die Bedienungsanleitung Ihres Routers.Klicken Sie auf „Apply“, um die geänderten Einstellungen zu übernehmen.
15IUK 5 A1
DEATCH
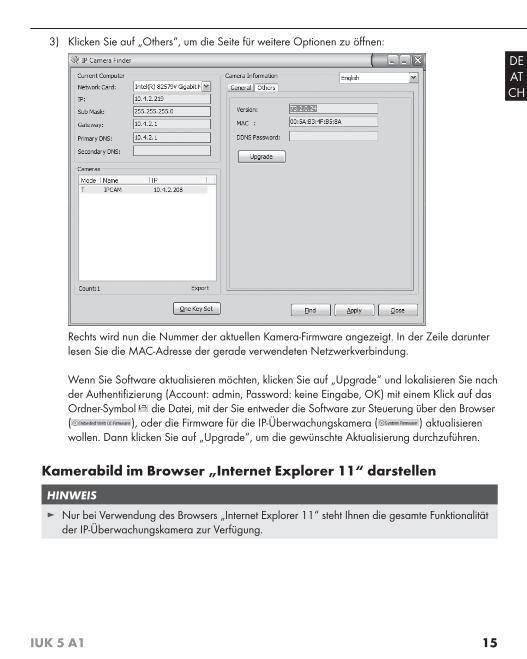
3) Klicken Sie auf „Others“, um die Seite für weitere Optionen zu öff nen:
Rechts wird nun die Nummer der aktuellen Kamera-Firmware angezeigt. In der Zeile darunter lesen Sie die MAC-Adresse der gerade verwendeten Netzwerkverbindung.
Wenn Sie Software aktualisieren möchten, klicken Sie auf „Upgrade“ und lokalisieren Sie nach der Authentifi zierung (Account: admin, Password: keine Eingabe, OK) mit einem Klick auf das Ordner-Symbol die Datei, mit der Sie entweder die Software zur Steuerung über den Browser ( ), oder die Firmware für die IP-Überwachungskamera ( ) aktualisieren wollen. Dann klicken Sie auf „Upgrade“, um die gewünschte Aktualisierung durchzuführen.
Kamerabild im Browser „Internet Explorer 11“ darstellen
HINWEIS
► Nur bei Verwendung des Browsers „Internet Explorer 11“ steht Ihnen die gesamte Funktionalität der IP-Überwachungskamera zur Verfügung.
16 IUK 5 A1
DEATCH
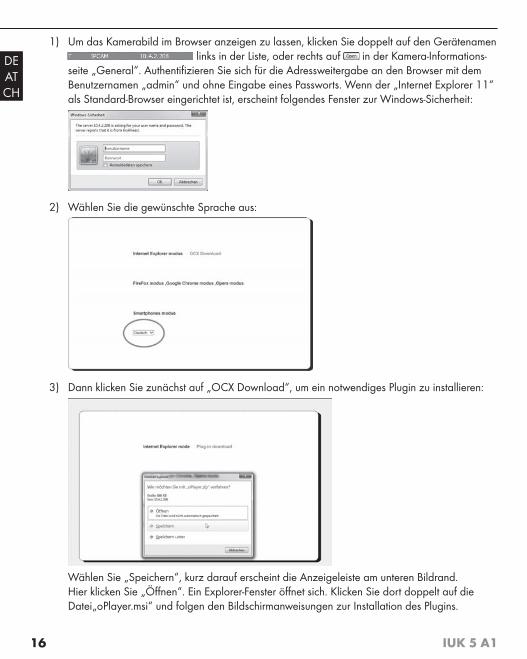
1) Um das Kamerabild im Browser anzeigen zu lassen, klicken Sie doppelt auf den Gerätenamen links in der Liste, oder rechts auf in der Kamera-Informations-
seite „General“. Authentifi zieren Sie sich für die Adressweitergabe an den Browser mit dem Benutzernamen „admin“ und ohne Eingabe eines Passworts. Wenn der „Internet Explorer 11“ als Standard-Browser eingerichtet ist, erscheint folgendes Fenster zur Windows-Sicherheit:
2) Wählen Sie die gewünschte Sprache aus:
3) Dann klicken Sie zunächst auf „OCX Download“, um ein notwendiges Plugin zu installieren:
Wählen Sie „Speichern“, kurz darauf erscheint die Anzeigeleiste am unteren Bildrand. Hier klicken Sie „Öff nen“. Ein Explorer-Fenster öff net sich. Klicken Sie dort doppelt auf die Datei„oPlayer.msi“ und folgen den Bildschirmanweisungen zur Installation des Plugins.
17IUK 5 A1
DEATCH
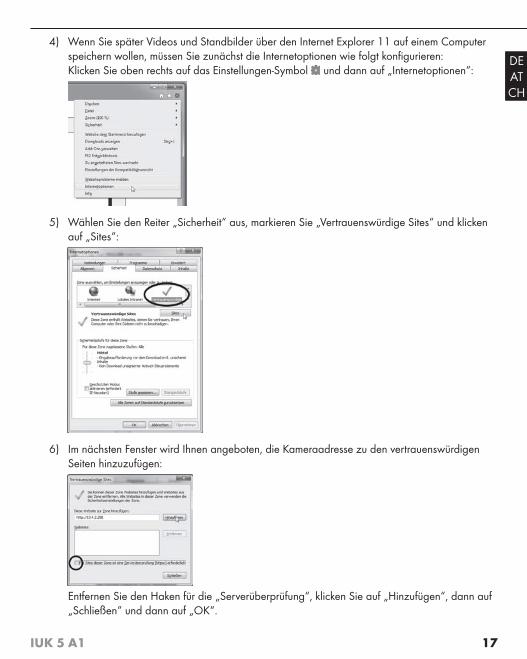
4) Wenn Sie später Videos und Standbilder über den Internet Explorer 11 auf einem Computer speichern wollen, müssen Sie zunächst die Internetoptionen wie folgt konfi gurieren:Klicken Sie oben rechts auf das Einstellungen-Symbol und dann auf „Internetoptionen“:
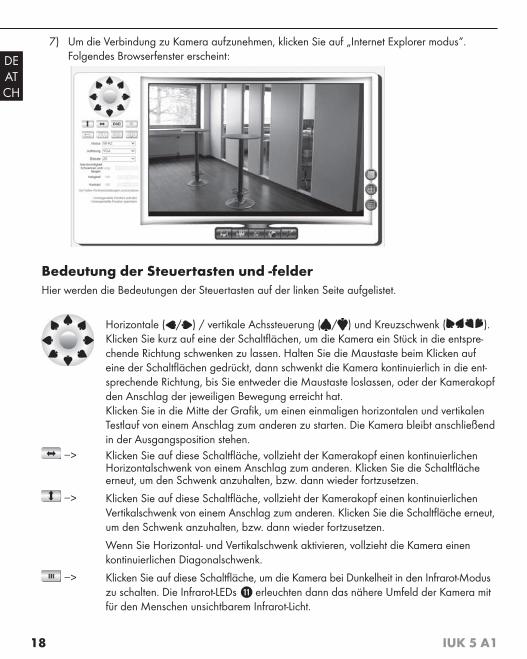
5) Wählen Sie den Reiter „Sicherheit“ aus, markieren Sie „Vertrauenswürdige Sites“ und klicken auf „Sites“:
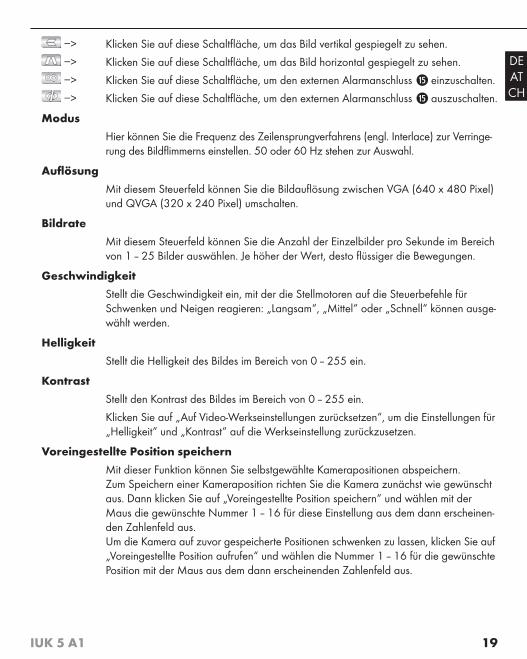
6) Im nächsten Fenster wird Ihnen angeboten, die Kameraadresse zu den vertrauenswürdigen Seiten hinzuzufügen:
Entfernen Sie den Haken für die „Serverüberprüfung“, klicken Sie auf „Hinzufügen“, dann auf „Schließen“ und dann auf „OK“.
18 IUK 5 A1
DEATCH
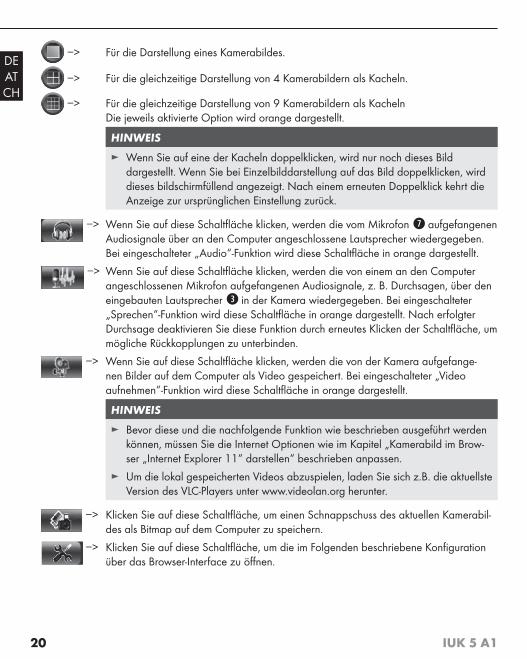
7) Um die Verbindung zu Kamera aufzunehmen, klicken Sie auf „Internet Explorer modus“.Folgendes Browserfenster erscheint:
Bedeutung der Steuertasten und -felderHier werden die Bedeutungen der Steuertasten auf der linken Seite aufgelistet.
Horizontale ( / ) / vertikale Achssteuerung ( / ) und Kreuzschwenk ( ).Klicken Sie kurz auf eine der Schaltfl ächen, um die Kamera ein Stück in die entspre-chende Richtung schwenken zu lassen. Halten Sie die Maustaste beim Klicken auf eine der Schaltfl ächen gedrückt, dann schwenkt die Kamera kontinuierlich in die ent-sprechende Richtung, bis Sie entweder die Maustaste loslassen, oder der Kamerakopf den Anschlag der jeweiligen Bewegung erreicht hat.Klicken Sie in die Mitte der Grafi k, um einen einmaligen horizontalen und vertikalen Testlauf von einem Anschlag zum anderen zu starten. Die Kamera bleibt anschließend in der Ausgangsposition stehen.
−> Klicken Sie auf diese Schaltfl äche, vollzieht der Kamerakopf einen kontinuierlichen Horizontalschwenk von einem Anschlag zum anderen. Klicken Sie die Schaltfl äche erneut, um den Schwenk anzuhalten, bzw. dann wieder fortzusetzen.
−> Klicken Sie auf diese Schaltfl äche, vollzieht der Kamerakopf einen kontinuierlichen Vertikalschwenk von einem Anschlag zum anderen. Klicken Sie die Schaltfl äche erneut, um den Schwenk anzuhalten, bzw. dann wieder fortzusetzen.
Wenn Sie Horizontal- und Vertikalschwenk aktivieren, vollzieht die Kamera einen kontinuierlichen Diagonalschwenk.
−> Klicken Sie auf diese Schaltfl äche, um die Kamera bei Dunkelheit in den Infrarot-Modus zu schalten. Die Infrarot-LEDs erleuchten dann das nähere Umfeld der Kamera mit für den Menschen unsichtbarem Infrarot-Licht.
19IUK 5 A1
DEATCH
−> Klicken Sie auf diese Schaltfl äche, um das Bild vertikal gespiegelt zu sehen.
−> Klicken Sie auf diese Schaltfl äche, um das Bild horizontal gespiegelt zu sehen.
−> Klicken Sie auf diese Schaltfl äche, um den externen Alarmanschluss einzuschalten.
−> Klicken Sie auf diese Schaltfl äche, um den externen Alarmanschluss auszuschalten.
Modus
Hier können Sie die Frequenz des Zeilensprungverfahrens (engl. Interlace) zur Verringe-rung des Bildfl immerns einstellen. 50 oder 60 Hz stehen zur Auswahl.
Aufl ösung
Mit diesem Steuerfeld können Sie die Bildaufl ösung zwischen VGA (640 x 480 Pixel)und QVGA (320 x 240 Pixel) umschalten.
Bildrate
Mit diesem Steuerfeld können Sie die Anzahl der Einzelbilder pro Sekunde im Bereich von 1 – 25 Bilder auswählen. Je höher der Wert, desto fl üssiger die Bewegungen.
Geschwindigkeit
Stellt die Geschwindigkeit ein, mit der die Stellmotoren auf die Steuerbefehle für Schwenken und Neigen reagieren: „Langsam“, „Mittel“ oder „Schnell“ können ausge-wählt werden.
Helligkeit
Stellt die Helligkeit des Bildes im Bereich von 0 – 255 ein.
Kontrast
Stellt den Kontrast des Bildes im Bereich von 0 – 255 ein.
Klicken Sie auf „Auf Video-Werkseinstellungen zurücksetzen“, um die Einstellungen für „Helligkeit“ und „Kontrast“ auf die Werkseinstellung zurückzusetzen.
Voreingestellte Position speichern
Mit dieser Funktion können Sie selbstgewählte Kamerapositionen abspeichern.Zum Speichern einer Kameraposition richten Sie die Kamera zunächst wie gewünscht aus. Dann klicken Sie auf „Voreingestellte Position speichern“ und wählen mit der Maus die gewünschte Nummer 1 – 16 für diese Einstellung aus dem dann erscheinen-den Zahlenfeld aus.Um die Kamera auf zuvor gespeicherte Positionen schwenken zu lassen, klicken Sie auf „Voreingestellte Position aufrufen“ und wählen die Nummer 1 – 16 für die gewünschte Position mit der Maus aus dem dann erscheinenden Zahlenfeld aus.
20 IUK 5 A1
DEATCH
−> Für die Darstellung eines Kamerabildes.
−> Für die gleichzeitige Darstellung von 4 Kamerabildern als Kacheln.
−> Für die gleichzeitige Darstellung von 9 Kamerabildern als KachelnDie jeweils aktivierte Option wird orange dargestellt.
HINWEIS
► Wenn Sie auf eine der Kacheln doppelklicken, wird nur noch dieses Bild dargestellt. Wenn Sie bei Einzelbilddarstellung auf das Bild doppelklicken, wird dieses bildschirmfüllend angezeigt. Nach einem erneuten Doppelklick kehrt die Anzeige zur ursprünglichen Einstellung zurück.
−> Wenn Sie auf diese Schaltfl äche klicken, werden die vom Mikrofon aufgefangenen Audiosignale über an den Computer angeschlossene Lautsprecher wiedergegeben. Bei eingeschalteter „Audio“-Funktion wird diese Schaltfl äche in orange dargestellt.
−> Wenn Sie auf diese Schaltfl äche klicken, werden die von einem an den Computer angeschlossenen Mikrofon aufgefangenen Audiosignale, z. B. Durchsagen, über den eingebauten Lautsprecher in der Kamera wiedergegeben. Bei eingeschalteter „Sprechen“-Funktion wird diese Schaltfl äche in orange dargestellt. Nach erfolgter Durchsage deaktivieren Sie diese Funktion durch erneutes Klicken der Schaltfl äche, um mögliche Rückkopplungen zu unterbinden.
−> Wenn Sie auf diese Schaltfl äche klicken, werden die von der Kamera aufgefange-nen Bilder auf dem Computer als Video gespeichert. Bei eingeschalteter „Video aufnehmen“-Funktion wird diese Schaltfl äche in orange dargestellt.
HINWEIS
► Bevor diese und die nachfolgende Funktion wie beschrieben ausgeführt werden können, müssen Sie die Internet Optionen wie im Kapitel „Kamerabild im Brow-ser „Internet Explorer 11“ darstellen“ beschrieben anpassen.
► Um die lokal gespeicherten Videos abzuspielen, laden Sie sich z.B. die aktuellste Version des VLC-Players unter www.videolan.org herunter.
−> Klicken Sie auf diese Schaltfl äche, um einen Schnappschuss des aktuellen Kamerabil-des als Bitmap auf dem Computer zu speichern.
−> Klicken Sie auf diese Schaltfl äche, um die im Folgenden beschriebene Konfi guration über das Browser-Interface zu öff nen.
21IUK 5 A1
DEATCH
Konfiguration über das Browser-Interface
HINWEIS
Für alle im Folgenden beschriebenen Menüs gilt:
► Zur Übermittlung der vorgenommenen Einstellungen an die Kamera klicken Sie auf „Übermitteln“, der Bildinhalt blinkt dann einmal zur Bestätigung. Um die in der Kamera gespeicherten Daten wieder in die Browser-Seite zu laden, klicken Sie auf „Aktualisieren“.
► Nach manchen Eingaben startet das Gerät neu. Die Sekunden bis zum Neustart werden auf dem Bildschirm herunter gezählt. Trennen Sie das Gerät während dieser Zeit auf keinen Fall von der Stromversorgung, andernfalls könnte es irreparabel beschädigt werden.
► Klicken Sie auf „Zurück“, um die Einstellungen zu verlassen und zur Darstellung des Kamerabil-des im Browser zurückzukehren.
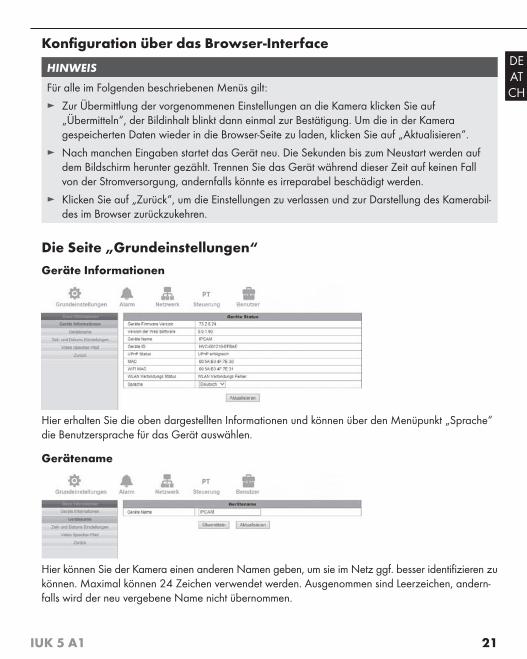
Die Seite „Grundeinstellungen“Geräte Informationen
Hier erhalten Sie die oben dargestellten Informationen und können über den Menüpunkt „Sprache“ die Benutzersprache für das Gerät auswählen.
Gerätename
Hier können Sie der Kamera einen anderen Namen geben, um sie im Netz ggf. besser identifizieren zu können. Maximal können 24 Zeichen verwendet werden. Ausgenommen sind Leerzeichen, andern-falls wird der neu vergebene Name nicht übernommen.

22 IUK 5 A1
DEATCH
Zeit- und Datums Einstellungen
Im Menüpunkt „NTP Server“ können Sie die Zeitzone einstellen, in der die Kamera betrieben wird. Wenn das Häkchen bei „Mit NTP Server Zeit synchronisieren“ gesetzt ist, können Sie unter „NTP server“ einen Zeitserver auswählen, der die aktuelle Uhrzeit bereitstellt. Klicken Sie auf „Mit PC Zeit synchronisieren“, um die Zeiteinstellung der Kamera mit der des Computers zu synchronisieren.
Video Speicher-Pfad
Klicken Sie auf „Durchsuchen“, um den Pfad festzulegen, in dem die von der Kamera aufgezeichneten Videos gespeichert werden sollen. In diesem Dialog können keine Ordner angelegt werden. Sollten Sie in einem bestimmten neuen Ordner speichern wollen, müssen Sie diesen zuvor angelegt haben.
Geben Sie im Feld „Video Größe (MB)“ die maximale Größe der aufgezeichneten Videos zwischen 200 und 1.000 MB an.
Geben Sie im Feld „Video Länge (Minuten)“ die maximale Länge der aufgezeichneten Videos zwischen 5 und 120 Minuten an.
HINWEIS
► Um die lokal gespeicherten Videos abzuspielen, laden Sie sich z.B. die aktuellste Version des VLC-Players unter www.videolan.org herunter.
Um sicher zu stellen, dass das Laufwerk, auf dem der oben ausgewählte Pfad liegt, ausreichend Speicherplatz verfügbar ist, können Sie im Feld „Reservierter Speicherplatz (MB)“ festlegen, wie viel Speicherplatz für Videoaufzeichnungen reserviert bleibt, also nicht von anderen Applikationen belegt werden kann.
Wenn bei Erreichen der Speicherplatzgrenze zuvor aufgenommene Videos gelöscht werden sollen, setzen Sie das Häkchen bei „Vorhandene Video-Dateien überschreiben“. Andernfalls werden keine neuen Videos mehr gespeichert.
23IUK 5 A1
DEATCH
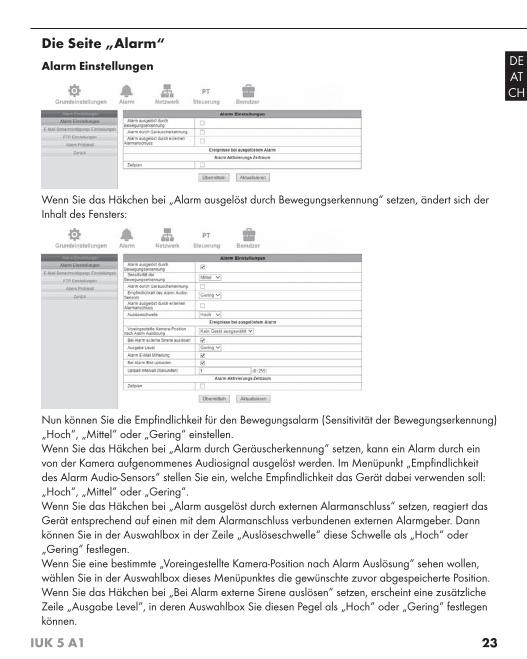
Die Seite „Alarm“Alarm Einstellungen
Wenn Sie das Häkchen bei „Alarm ausgelöst durch Bewegungserkennung“ setzen, ändert sich der Inhalt des Fensters:
Nun können Sie die Empfindlichkeit für den Bewegungsalarm (Sensitivität der Bewegungserkennung) „Hoch“, „Mittel“ oder „Gering“ einstellen. Wenn Sie das Häkchen bei „Alarm durch Geräuscherkennung“ setzen, kann ein Alarm durch ein von der Kamera aufgenommenes Audiosignal ausgelöst werden. Im Menüpunkt „Empfindlichkeit des Alarm Audio-Sensors“ stellen Sie ein, welche Empfindlichkeit das Gerät dabei verwenden soll: „Hoch“, „Mittel“ oder „Gering“. Wenn Sie das Häkchen bei „Alarm ausgelöst durch externen Alarmanschluss“ setzen, reagiert das Gerät entsprechend auf einen mit dem Alarmanschluss verbundenen externen Alarmgeber. Dann können Sie in der Auswahlbox in der Zeile „Auslöseschwelle“ diese Schwelle als „Hoch“ oder „Gering“ festlegen. Wenn Sie eine bestimmte „Voreingestellte Kamera-Position nach Alarm Auslösung“ sehen wollen, wählen Sie in der Auswahlbox dieses Menüpunktes die gewünschte zuvor abgespeicherte Position.Wenn Sie das Häkchen bei „Bei Alarm externe Sirene auslösen“ setzen, erscheint eine zusätzliche Zeile „Ausgabe Level“, in deren Auswahlbox Sie diesen Pegel als „Hoch“ oder „Gering“ festlegen können.

24 IUK 5 A1
DEATCH
Setzen Sie das Häkchen bei „Alarm E-Mail Mitteilung“, wenn das Gerät bei Alarmauslösung eine E-Mail verschicken soll.
Wenn Sie das Häkchen bei „Bei Alarm Bild uploaden“ setzen, erscheint eine zusätzliche Zeile „Upload Intervall (Sekunden)“, in deren Eingabebox Sie festlegen können, in welchen Abständen ein Bild hochgeladen werden soll. 0 – 255 Sekunden stehen zur Auswahl.
Wenn Sie das Häkchen bei „Zeitplan“ setzen, erscheint folgende Übersicht:
Vertikal werden die Wochentage abgebildet, horizontal die Uhrzeit von 0 bis 23 Uhr. Jedes Feld steht für eine Viertelstunde, in der die oben ausgewählten Alarmfunktionen aktiviert werden können. Klicken Sie dazu auf die Felder für die Zeiträume, in denen ein Alarm ausgelöst werden soll, wenn das Gerät Bewegungen oder Audiosignale wahrnimmt. Ein aktiviertes Feld erscheint blau. Ein Dop-pelklick auf ein aktiviertes Feld wählt alle Felder der betreff enden Stunde an.
HINWEIS
► E-Mail- und Upload-Funktionen sind nur bei Internet-Verbindung der Kamera möglich.
E-Mail Benachrichtigungs Einstellungen
Wenn Sie auf der Menüseite „Alarm Einstellungen“ das Häkchen bei „Alarm E-Mail Mitteilung“ gesetzt haben, können Sie hier unter „Absender“ die E-Mail-Adresse des Versenders sowie den zu verwendenden SMTP-Server und -Port eintragen. Beachten Sie die entsprechenden Parameter und Einstellungen Ihres E-Mail-Providers.
Wenn der E-Mail-Versand mit Authentifi zierung durchgeführt werden muss, setzen Sie das Häkchen bei „Benötige Authentifi kation“. Dann erscheinen die zusätzlichen Zeilen „SMTP Benutzer“ und „SMTP Passwort“. Tragen Sie hier die benötigten SMTP-Informationen Ihres E-Mail-Providers ein.
25IUK 5 A1
DEATCH
Unter „SSL“ wählen Sie die Verschlüsselungsmethode aus: SSL, TLS oder NONE für unverschlüsselte E-Mail-Verbindung.
In den Feldern „Empfänger 1 – 4“ tragen Sie die E-Mail-Adressen von bis zu vier Empfängern der Alarm-E-Mail ein.
Nachdem Sie die Eingaben vorgenommen haben, können Sie die E-Mail-Funktion mit einem Klick auf „Testen“ überprüfen.
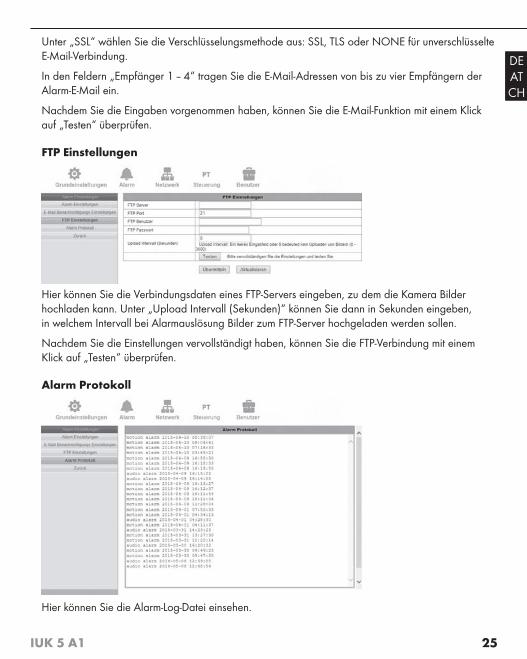
FTP Einstellungen
Hier können Sie die Verbindungsdaten eines FTP-Servers eingeben, zu dem die Kamera Bilder hochladen kann. Unter „Upload Intervall (Sekunden)“ können Sie dann in Sekunden eingeben, in welchem Intervall bei Alarmauslösung Bilder zum FTP-Server hochgeladen werden sollen.
Nachdem Sie die Einstellungen vervollständigt haben, können Sie die FTP-Verbindung mit einem Klick auf „Testen“ überprüfen.
Alarm Protokoll
Hier können Sie die Alarm-Log-Datei einsehen.
26 IUK 5 A1
DEATCH
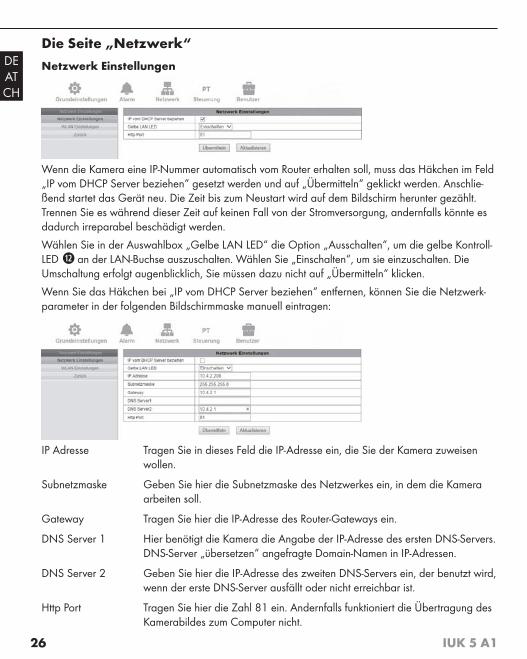
Die Seite „Netzwerk“Netzwerk Einstellungen
Wenn die Kamera eine IP-Nummer automatisch vom Router erhalten soll, muss das Häkchen im Feld „IP vom DHCP Server beziehen“ gesetzt werden und auf „Übermitteln“ geklickt werden. Anschlie-ßend startet das Gerät neu. Die Zeit bis zum Neustart wird auf dem Bildschirm herunter gezählt. Trennen Sie es während dieser Zeit auf keinen Fall von der Stromversorgung, andernfalls könnte es dadurch irreparabel beschädigt werden.
Wählen Sie in der Auswahlbox „Gelbe LAN LED“ die Option „Ausschalten“, um die gelbe Kontroll-LED an der LAN-Buchse auszuschalten. Wählen Sie „Einschalten“, um sie einzuschalten. Die Umschaltung erfolgt augenblicklich, Sie müssen dazu nicht auf „Übermitteln“ klicken.
Wenn Sie das Häkchen bei „IP vom DHCP Server beziehen“ entfernen, können Sie die Netzwerk-parameter in der folgenden Bildschirmmaske manuell eintragen:
IP Adresse Tragen Sie in dieses Feld die IP-Adresse ein, die Sie der Kamera zuweisen wollen.
Subnetzmaske Geben Sie hier die Subnetzmaske des Netzwerkes ein, in dem die Kamera arbeiten soll.
Gateway Tragen Sie hier die IP-Adresse des Router-Gateways ein.
DNS Server 1 Hier benötigt die Kamera die Angabe der IP-Adresse des ersten DNS-Servers. DNS-Server „übersetzen“ angefragte Domain-Namen in IP-Adressen.
DNS Server 2 Geben Sie hier die IP-Adresse des zweiten DNS-Servers ein, der benutzt wird, wenn der erste DNS-Server ausfällt oder nicht erreichbar ist.
Http Port Tragen Sie hier die Zahl 81 ein. Andernfalls funktioniert die Übertragung des Kamerabildes zum Computer nicht.
27IUK 5 A1
DEATCH
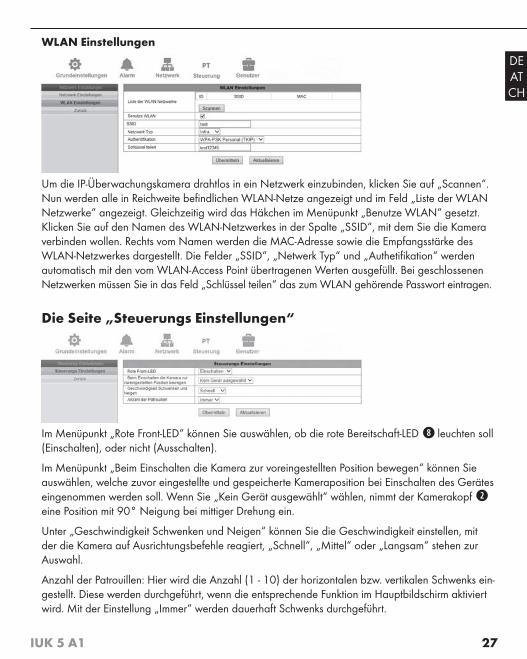
WLAN Einstellungen
Um die IP-Überwachungskamera drahtlos in ein Netzwerk einzubinden, klicken Sie auf „Scannen“. Nun werden alle in Reichweite befindlichen WLAN-Netze angezeigt und im Feld „Liste der WLAN Netzwerke“ angezeigt. Gleichzeitig wird das Häkchen im Menüpunkt „Benutze WLAN“ gesetzt. Klicken Sie auf den Namen des WLAN-Netzwerkes in der Spalte „SSID“, mit dem Sie die Kamera verbinden wollen. Rechts vom Namen werden die MAC-Adresse sowie die Empfangsstärke des WLAN-Netzwerkes dargestellt. Die Felder „SSID“, „Netwerk Typ“ und „Authetifikation“ werden automatisch mit den vom WLAN-Access Point übertragenen Werten ausgefüllt. Bei geschlossenen Netzwerken müssen Sie in das Feld „Schlüssel teilen“ das zum WLAN gehörende Passwort eintragen.
Die Seite „Steuerungs Einstellungen“
Im Menüpunkt „Rote Front-LED“ können Sie auswählen, ob die rote Bereitschaft-LED leuchten soll (Einschalten), oder nicht (Ausschalten).
Im Menüpunkt „Beim Einschalten die Kamera zur voreingestellten Position bewegen“ können Sie auswählen, welche zuvor eingestellte und gespeicherte Kameraposition bei Einschalten des Gerätes eingenommen werden soll. Wenn Sie „Kein Gerät ausgewählt“ wählen, nimmt der Kamerakopf eine Position mit 90° Neigung bei mittiger Drehung ein.
Unter „Geschwindigkeit Schwenken und Neigen“ können Sie die Geschwindigkeit einstellen, mit der die Kamera auf Ausrichtungsbefehle reagiert, „Schnell“, „Mittel“ oder „Langsam“ stehen zur Auswahl.
Anzahl der Patrouillen: Hier wird die Anzahl (1 - 10) der horizontalen bzw. vertikalen Schwenks ein-gestellt. Diese werden durchgeführt, wenn die entsprechende Funktion im Hauptbildschirm aktiviert wird. Mit der Einstellung „Immer“ werden dauerhaft Schwenks durchgeführt.
28 IUK 5 A1
DEATCH
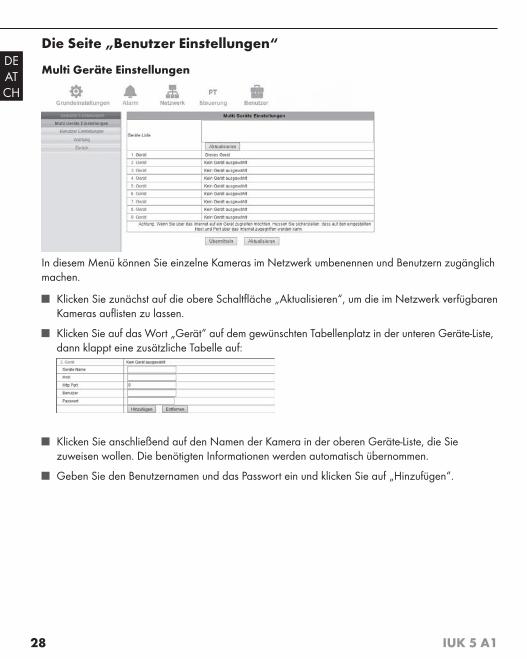
Die Seite „Benutzer Einstellungen“
Multi Geräte Einstellungen
In diesem Menü können Sie einzelne Kameras im Netzwerk umbenennen und Benutzern zugänglich machen.
■ Klicken Sie zunächst auf die obere Schaltfl äche „Aktualisieren“, um die im Netzwerk verfügbaren Kameras aufl isten zu lassen.
■ Klicken Sie auf das Wort „Gerät“ auf dem gewünschten Tabellenplatz in der unteren Geräte-Liste, dann klappt eine zusätzliche Tabelle auf:
■ Klicken Sie anschließend auf den Namen der Kamera in der oberen Geräte-Liste, die Sie zuweisen wollen. Die benötigten Informationen werden automatisch übernommen.
■ Geben Sie den Benutzernamen und das Passwort ein und klicken Sie auf „Hinzufügen“.
29IUK 5 A1
DEATCH
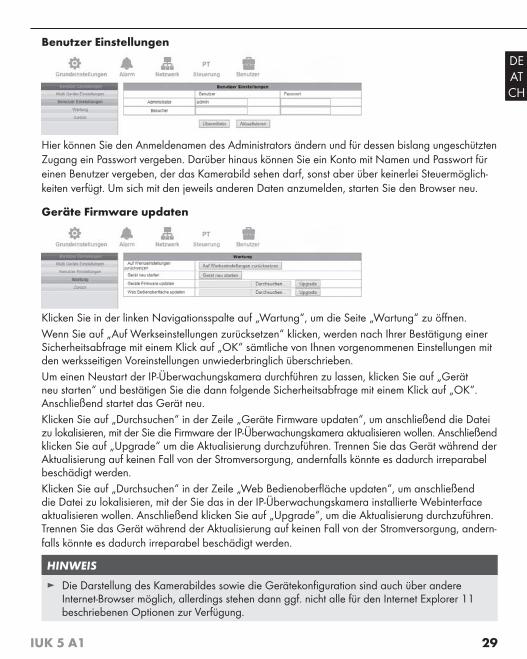
Benutzer Einstellungen
Hier können Sie den Anmeldenamen des Administrators ändern und für dessen bislang ungeschützten Zugang ein Passwort vergeben. Darüber hinaus können Sie ein Konto mit Namen und Passwort für einen Benutzer vergeben, der das Kamerabild sehen darf, sonst aber über keinerlei Steuermöglich-keiten verfügt. Um sich mit den jeweils anderen Daten anzumelden, starten Sie den Browser neu.
Geräte Firmware updaten
Klicken Sie in der linken Navigationsspalte auf „Wartung“, um die Seite „Wartung“ zu öffnen.Wenn Sie auf „Auf Werkseinstellungen zurücksetzen“ klicken, werden nach Ihrer Bestätigung einer Sicherheitsabfrage mit einem Klick auf „OK“ sämtliche von Ihnen vorgenommenen Einstellungen mit den werksseitigen Voreinstellungen unwiederbringlich überschrieben.Um einen Neustart der IP-Überwachungskamera durchführen zu lassen, klicken Sie auf „Gerät neu starten“ und bestätigen Sie die dann folgende Sicherheitsabfrage mit einem Klick auf „OK“. Anschließend startet das Gerät neu.Klicken Sie auf „Durchsuchen“ in der Zeile „Geräte Firmware updaten“, um anschließend die Datei zu lokalisieren, mit der Sie die Firmware der IP-Überwachungskamera aktualisieren wollen. Anschließend klicken Sie auf „Upgrade“ um die Aktualisierung durchzuführen. Trennen Sie das Gerät während der Aktualisierung auf keinen Fall von der Stromversorgung, andernfalls könnte es dadurch irreparabel beschädigt werden.Klicken Sie auf „Durchsuchen“ in der Zeile „Web Bedienoberfläche updaten“, um anschließend die Datei zu lokalisieren, mit der Sie das in der IP-Überwachungskamera installierte Webinterface aktualisieren wollen. Anschließend klicken Sie auf „Upgrade“, um die Aktualisierung durchzuführen. Trennen Sie das Gerät während der Aktualisierung auf keinen Fall von der Stromversorgung, andern-falls könnte es dadurch irreparabel beschädigt werden.
HINWEIS
► Die Darstellung des Kamerabildes sowie die Gerätekonfiguration sind auch über andere Internet-Browser möglich, allerdings stehen dann ggf. nicht alle für den Internet Explorer 11 beschriebenen Optionen zur Verfügung.
30 IUK 5 A1
DEATCH
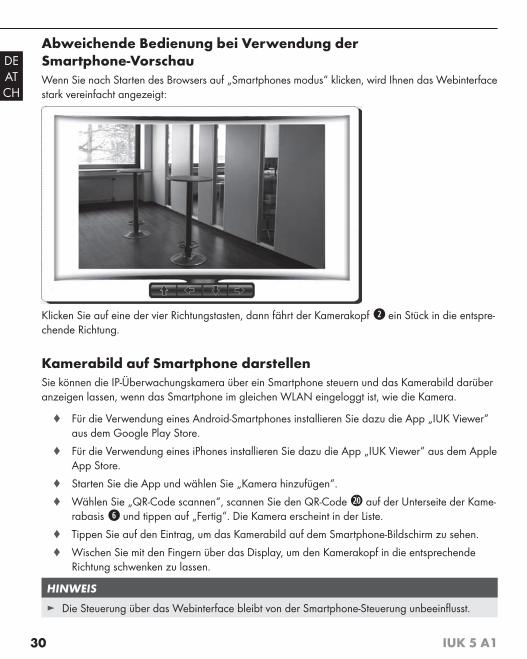
Abweichende Bedienung bei Verwendung der Smartphone-VorschauWenn Sie nach Starten des Browsers auf „Smartphones modus“ klicken, wird Ihnen das Webinterface stark vereinfacht angezeigt:
Klicken Sie auf eine der vier Richtungstasten, dann fährt der Kamerakopf ein Stück in die entspre-chende Richtung.
Kamerabild auf Smartphone darstellenSie können die IP-Überwachungskamera über ein Smartphone steuern und das Kamerabild darüber anzeigen lassen, wenn das Smartphone im gleichen WLAN eingeloggt ist, wie die Kamera.
♦ Für die Verwendung eines Android-Smartphones installieren Sie dazu die App „IUK Viewer“ aus dem Google Play Store.
♦ Für die Verwendung eines iPhones installieren Sie dazu die App „IUK Viewer“ aus dem Apple App Store.
♦ Starten Sie die App und wählen Sie „Kamera hinzufügen“.
♦ Wählen Sie „QR-Code scannen“, scannen Sie den QR-Code auf der Unterseite der Kame-rabasis und tippen auf „Fertig“. Die Kamera erscheint in der Liste.
♦ Tippen Sie auf den Eintrag, um das Kamerabild auf dem Smartphone-Bildschirm zu sehen.
♦ Wischen Sie mit den Fingern über das Display, um den Kamerakopf in die entsprechende Richtung schwenken zu lassen.
HINWEIS
► Die Steuerung über das Webinterface bleibt von der Smartphone-Steuerung unbeeinfl usst.
31IUK 5 A1
DEATCH
Kamera über Smartphone steuern
HINWEIS
► Gezeigt wird hier die Funktionsweise der App für Android, Abweichungen bei Verwendung von Apple-Geräten ist möglich.
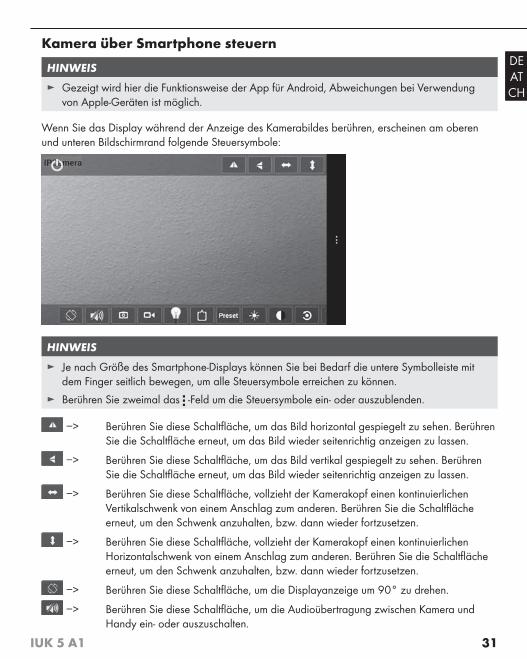
Wenn Sie das Display während der Anzeige des Kamerabildes berühren, erscheinen am oberen und unteren Bildschirmrand folgende Steuersymbole:
HINWEIS
► Je nach Größe des Smartphone-Displays können Sie bei Bedarf die untere Symbolleiste mit dem Finger seitlich bewegen, um alle Steuersymbole erreichen zu können.
► Berühren Sie zweimal das -Feld um die Steuersymbole ein- oder auszublenden.
−> Berühren Sie diese Schaltfl äche, um das Bild horizontal gespiegelt zu sehen. Berühren Sie die Schaltfl äche erneut, um das Bild wieder seitenrichtig anzeigen zu lassen.
−> Berühren Sie diese Schaltfl äche, um das Bild vertikal gespiegelt zu sehen. Berühren Sie die Schaltfl äche erneut, um das Bild wieder seitenrichtig anzeigen zu lassen.
−> Berühren Sie diese Schaltfl äche, vollzieht der Kamerakopf einen kontinuierlichen Vertikalschwenk von einem Anschlag zum anderen. Berühren Sie die Schaltfl äche erneut, um den Schwenk anzuhalten, bzw. dann wieder fortzusetzen.
−> Berühren Sie diese Schaltfl äche, vollzieht der Kamerakopf einen kontinuierlichen Horizontalschwenk von einem Anschlag zum anderen. Berühren Sie die Schaltfl äche erneut, um den Schwenk anzuhalten, bzw. dann wieder fortzusetzen.
−> Berühren Sie diese Schaltfl äche, um die Displayanzeige um 90° zu drehen.
−> Berühren Sie diese Schaltfl äche, um die Audioübertragung zwischen Kamera und Handy ein- oder auszuschalten.

32 IUK 5 A1
DEATCH
−> Berühren Sie diese Schaltfl äche, um einen Schnappschuss der Anzeige speichern zu lassen.
−> Berühren Sie diese Schaltfl äche, um den Stream von der Kamera als Video im Handy speichern zu lassen. Während der Aufnahme wird oben rechts im Display „Recording“ eingeblendet. Bei aktivierter Funktion leuchtet das Symbol in rot. Berühren Sie diese Schaltfl äche erneut, um die Aufnahme zu beenden.
HINWEIS
► Wenn Ihr Video-Player das Dateiformat nicht unterstützt, können Sie einen ande-ren Player herunterladen (z.B. MX Player).
−> Berühren Sie diese Schaltfl äche, um die gelbe LAN-LED ein- oder auszuschalten. Bei aktivierter Funktion leuchtet das Symbol in rot.
−> Berühren Sie diese Schaltfl äche, um aus verschiedenen Einstellungen zu Datenüber-tragung auszuwählen. Berühren Sie die Schaltfl äche erneut, um diese Funktion zu beenden.
−> Berühren Sie diese Schaltfl äche, um bis zu 16 Kamerapositionen speichern bzw. abru-fen zu können. Berühren Sie die Schaltfl äche erneut, um diese Funktion zu beenden.
−> Berühren Sie diese Schaltfl äche, um einen Schieberegler einblenden zu lassen, über den Sie die Helligkeit der Displayanzeige erhöhen oder verringern können.
−> Berühren Sie diese Schaltfl äche, um einen Schieberegler einblenden zu lassen, über den Sie den Kontrast der Displayanzeige erhöhen oder verringern können.
−> Berühren Sie diese Schaltfl äche, um die Einstellungen für Helligkeit und Kontrast wie-der auf die Werkseinstellungen zurückzusetzen.
−> Berühren Sie diese Schaltfl äche, um die Infrarot-LEDs der Kamera ein- oder auszu-schalten.
−> Berühren Sie diese Schaltfl äche, um die Anzeige des Kamerabildes zu beenden.
33IUK 5 A1
DEATCH
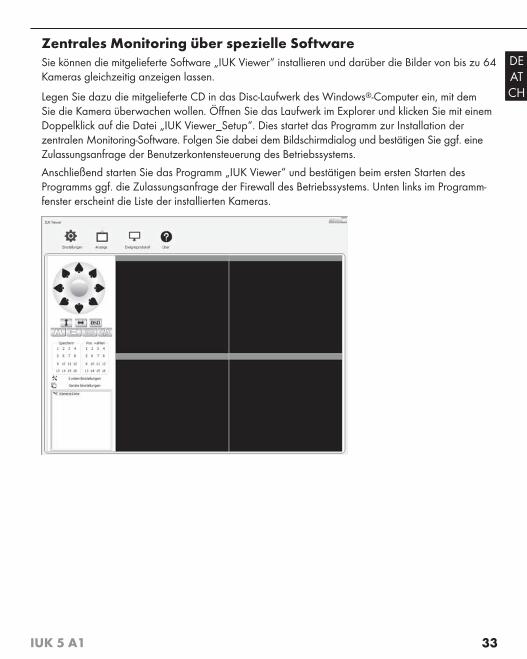
Zentrales Monitoring über spezielle SoftwareSie können die mitgelieferte Software „IUK Viewer“ installieren und darüber die Bilder von bis zu 64 Kameras gleichzeitig anzeigen lassen.
Legen Sie dazu die mitgelieferte CD in das Disc-Laufwerk des Windows®-Computer ein, mit dem Sie die Kamera überwachen wollen. Öffnen Sie das Laufwerk im Explorer und klicken Sie mit einem Doppelklick auf die Datei „IUK Viewer_Setup“. Dies startet das Programm zur Installation der zentralen Monitoring-Software. Folgen Sie dabei dem Bildschirmdialog und bestätigen Sie ggf. eine Zulassungsanfrage der Benutzerkontensteuerung des Betriebssystems.
Anschließend starten Sie das Programm „IUK Viewer“ und bestätigen beim ersten Starten des Programms ggf. die Zulassungsanfrage der Firewall des Betriebssystems. Unten links im Programm-fenster erscheint die Liste der installierten Kameras.
34 IUK 5 A1
DEATCH
▯ Menü
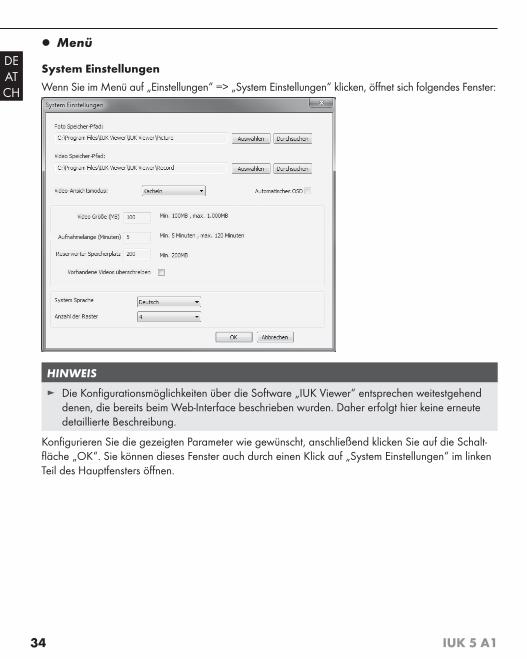
System Einstellungen
Wenn Sie im Menü auf „Einstellungen“ => „System Einstellungen“ klicken, öffnet sich folgendes Fenster:
HINWEIS
► Die Konfigurationsmöglichkeiten über die Software „IUK Viewer“ entsprechen weitestgehend denen, die bereits beim Web-Interface beschrieben wurden. Daher erfolgt hier keine erneute detaillierte Beschreibung.
Konfigurieren Sie die gezeigten Parameter wie gewünscht, anschließend klicken Sie auf die Schalt-fläche „OK“. Sie können dieses Fenster auch durch einen Klick auf „System Einstellungen“ im linken Teil des Hauptfensters öffnen.
35IUK 5 A1
DEATCH
Geräte Einstellungen
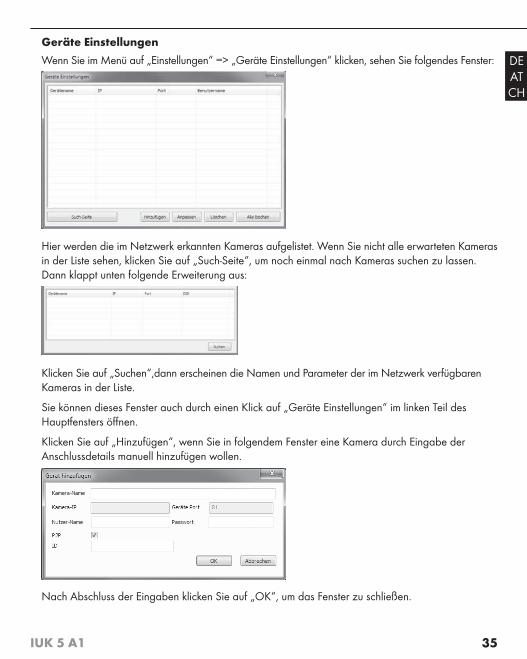
Wenn Sie im Menü auf „Einstellungen“ => „Geräte Einstellungen“ klicken, sehen Sie folgendes Fenster:
Hier werden die im Netzwerk erkannten Kameras aufgelistet. Wenn Sie nicht alle erwarteten Kameras in der Liste sehen, klicken Sie auf „Such-Seite“, um noch einmal nach Kameras suchen zu lassen. Dann klappt unten folgende Erweiterung aus:
Klicken Sie auf „Suchen“,dann erscheinen die Namen und Parameter der im Netzwerk verfügbaren Kameras in der Liste.
Sie können dieses Fenster auch durch einen Klick auf „Geräte Einstellungen“ im linken Teil des Hauptfensters öffnen.
Klicken Sie auf „Hinzufügen“, wenn Sie in folgendem Fenster eine Kamera durch Eingabe der Anschlussdetails manuell hinzufügen wollen.
Nach Abschluss der Eingaben klicken Sie auf „OK“, um das Fenster zu schließen.
36 IUK 5 A1
DEATCH
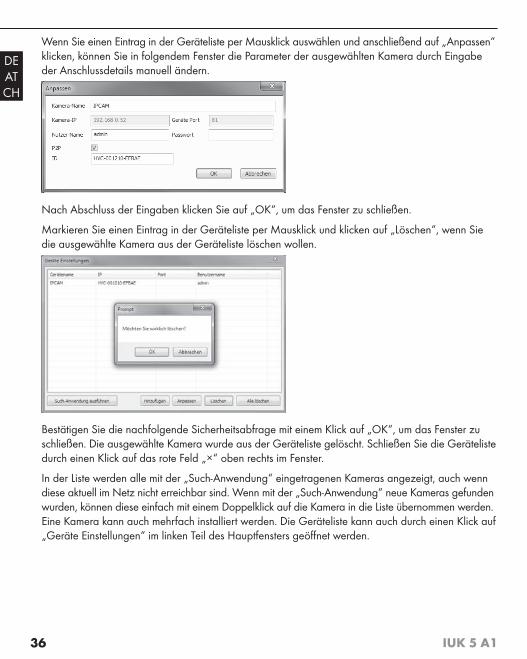
Wenn Sie einen Eintrag in der Geräteliste per Mausklick auswählen und anschließend auf „Anpassen“ klicken, können Sie in folgendem Fenster die Parameter der ausgewählten Kamera durch Eingabe der Anschlussdetails manuell ändern.
Nach Abschluss der Eingaben klicken Sie auf „OK“, um das Fenster zu schließen.
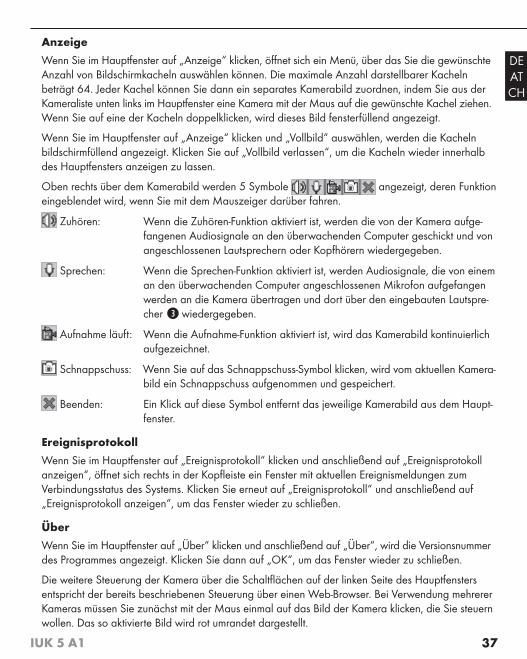
Markieren Sie einen Eintrag in der Geräteliste per Mausklick und klicken auf „Löschen“, wenn Sie die ausgewählte Kamera aus der Geräteliste löschen wollen.
Bestätigen Sie die nachfolgende Sicherheitsabfrage mit einem Klick auf „OK“, um das Fenster zu schließen. Die ausgewählte Kamera wurde aus der Geräteliste gelöscht. Schließen Sie die Geräteliste durch einen Klick auf das rote Feld „ד oben rechts im Fenster.
In der Liste werden alle mit der „Such-Anwendung“ eingetragenen Kameras angezeigt, auch wenn diese aktuell im Netz nicht erreichbar sind. Wenn mit der „Such-Anwendung“ neue Kameras gefunden wurden, können diese einfach mit einem Doppelklick auf die Kamera in die Liste übernommen werden. Eine Kamera kann auch mehrfach installiert werden. Die Geräteliste kann auch durch einen Klick auf „Geräte Einstellungen“ im linken Teil des Hauptfensters geöffnet werden.
37IUK 5 A1
DEATCH
Anzeige
Wenn Sie im Hauptfenster auf „Anzeige“ klicken, öff net sich ein Menü, über das Sie die gewünschte Anzahl von Bildschirmkacheln auswählen können. Die maximale Anzahl darstellbarer Kacheln beträgt 64. Jeder Kachel können Sie dann ein separates Kamerabild zuordnen, indem Sie aus der Kameraliste unten links im Hauptfenster eine Kamera mit der Maus auf die gewünschte Kachel ziehen. Wenn Sie auf eine der Kacheln doppelklicken, wird dieses Bild fensterfüllend angezeigt.
Wenn Sie im Hauptfenster auf „Anzeige“ klicken und „Vollbild“ auswählen, werden die Kacheln bildschirmfüllend angezeigt. Klicken Sie auf „Vollbild verlassen“, um die Kacheln wieder innerhalb des Hauptfensters anzeigen zu lassen.
Oben rechts über dem Kamerabild werden 5 Symbole angezeigt, deren Funktion eingeblendet wird, wenn Sie mit dem Mauszeiger darüber fahren.
Zuhören: Wenn die Zuhören-Funktion aktiviert ist, werden die von der Kamera aufge-fangenen Audiosignale an den überwachenden Computer geschickt und von angeschlossenen Lautsprechern oder Kopfhörern wiedergegeben.
Sprechen: Wenn die Sprechen-Funktion aktiviert ist, werden Audiosignale, die von einem an den überwachenden Computer angeschlossenen Mikrofon aufgefangen werden an die Kamera übertragen und dort über den eingebauten Lautspre-cher wiedergegeben.
Aufnahme läuft: Wenn die Aufnahme-Funktion aktiviert ist, wird das Kamerabild kontinuierlich aufgezeichnet.
Schnappschuss: Wenn Sie auf das Schnappschuss-Symbol klicken, wird vom aktuellen Kamera-bild ein Schnappschuss aufgenommen und gespeichert.
Beenden: Ein Klick auf diese Symbol entfernt das jeweilige Kamerabild aus dem Haupt-fenster.
Ereignisprotokoll
Wenn Sie im Hauptfenster auf „Ereignisprotokoll“ klicken und anschließend auf „Ereignisprotokoll anzeigen“, öff net sich rechts in der Kopfl eiste ein Fenster mit aktuellen Ereignismeldungen zum Verbindungsstatus des Systems. Klicken Sie erneut auf „Ereignisprotokoll“ und anschließend auf „Ereignisprotokoll anzeigen“, um das Fenster wieder zu schließen.
Über
Wenn Sie im Hauptfenster auf „Über“ klicken und anschließend auf „Über“, wird die Versionsnummer des Programmes angezeigt. Klicken Sie dann auf „OK“, um das Fenster wieder zu schließen.
Die weitere Steuerung der Kamera über die Schaltfl ächen auf der linken Seite des Hauptfensters entspricht der bereits beschriebenen Steuerung über einen Web-Browser. Bei Verwendung mehrerer Kameras müssen Sie zunächst mit der Maus einmal auf das Bild der Kamera klicken, die Sie steuern wollen. Das so aktivierte Bild wird rot umrandet dargestellt.
38 IUK 5 A1
DEATCH
ReinigungACHTUNG
Beschädigung des Gerätes!
► Stellen Sie sicher, dass bei der Reinigung keine Feuchtigkeit in das Gerät eindringt, um eine irreparable Beschädigung des Gerätes zu vermeiden.
■ Reinigen Sie die Oberflächen des Gerätes mit einem weichen, trockenen Tuch. Verwenden Sie bei hartnäckigen Verschmutzungen handelsübliche Spülmittel und nur wenig Wasser. Achten Sie darauf, dass kein Wasser ins Gerät eindringt.
Lagerung / Entsorgung
LagerungSollten Sie das Gerät längere Zeit nicht benutzen, lagern Sie es an einem sauberen, trockenen Ort ohne direkte Sonneneinstrahlung, vorzugsweise in der Originalverpackung.
Gerät entsorgen Das nebenstehende Symbol einer durchgestrichenen Mülltonne auf Rädern zeigt an,
dass dieses Gerät der Richtlinie 2012/19/EU unterliegt. Diese Richtlinie besagt, dass Sie dieses Gerät am Ende seiner Nutzungszeit nicht mit dem normalen Hausmüll entsorgen dürfen, sondern in speziell eingerichteten Sammelstellen, Wertstoffhöfen oder
Entsorgungsbetrieben abgeben müssen.
Diese Entsorgung ist für Sie kostenfrei. Schonen Sie die Umwelt und entsorgen Sie fachgerecht.
Weitere Informationen erhalten Sie bei Ihrem lokalen Entsorger oder der Stadt- bzw. Gemeindever-waltung.
FehlerbehebungIn diesem Kapitel erhalten Sie wichtige Hinweise zur Störungslokalisierung und Störungsbehebung. Beachten Sie die Hinweise um Gefahren und Beschädigungen zu vermeiden.
WARNUNG
Beachten Sie die folgenden Sicherheitshinweise, um Gefahren und Sachschäden zu vermeiden:
► Reparaturen an Elektrogeräten dürfen nur von Fachleuten durchgeführt werden, die vom Her-steller geschult sind. Durch unsachgemäße Reparaturen können erhebliche Gefahren für den Benutzer und Schäden am Gerät entstehen.
39IUK 5 A1
DEATCH
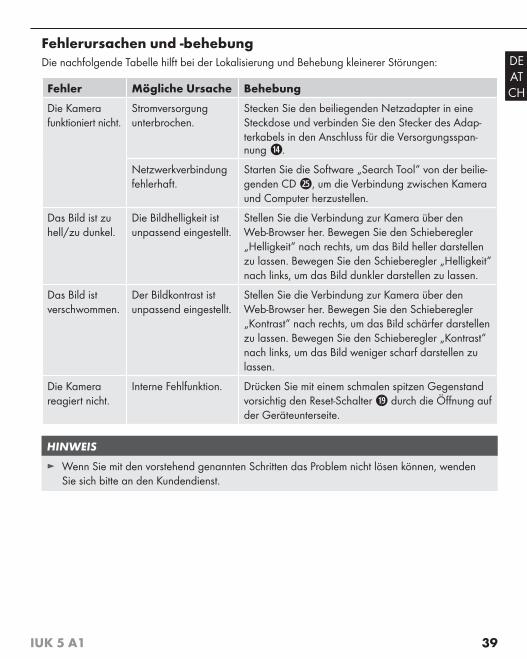
Fehlerursachen und -behebungDie nachfolgende Tabelle hilft bei der Lokalisierung und Behebung kleinerer Störungen:
Fehler Mögliche Ursache Behebung
Die Kamera funktioniert nicht.
Stromversorgung unterbrochen.
Stecken Sie den beiliegenden Netzadapter in eine Steckdose und verbinden Sie den Stecker des Adap-terkabels in den Anschluss für die Versorgungsspan-nung .
Netzwerkverbindung fehlerhaft.
Starten Sie die Software „Search Tool“ von der beilie-genden CD , um die Verbindung zwischen Kamera und Computer herzustellen.
Das Bild ist zu hell/zu dunkel.
Die Bildhelligkeit ist unpassend eingestellt.
Stellen Sie die Verbindung zur Kamera über den Web-Browser her. Bewegen Sie den Schieberegler „Helligkeit“ nach rechts, um das Bild heller darstellen zu lassen. Bewegen Sie den Schieberegler „Helligkeit“ nach links, um das Bild dunkler darstellen zu lassen.
Das Bild ist verschwommen.
Der Bildkontrast ist unpassend eingestellt.
Stellen Sie die Verbindung zur Kamera über den Web-Browser her. Bewegen Sie den Schieberegler „Kontrast“ nach rechts, um das Bild schärfer darstellen zu lassen. Bewegen Sie den Schieberegler „Kontrast“ nach links, um das Bild weniger scharf darstellen zu lassen.
Die Kamera reagiert nicht.
Interne Fehlfunktion. Drücken Sie mit einem schmalen spitzen Gegenstand vorsichtig den Reset-Schalter durch die Öffnung auf der Geräteunterseite.
HINWEIS
► Wenn Sie mit den vorstehend genannten Schritten das Problem nicht lösen können, wenden Sie sich bitte an den Kundendienst.
40 IUK 5 A1
DEATCH
Anhang
Hinweise zur Konformitätserklärung Dieses Gerät entspricht hinsichtlich Übereinstimmung mit den grundlegenden Anforde-
rungen und den anderen relevanten Vorschriften der europäischen Richtlinie für elektro-magnetische Verträglichkeit 2004/108/EC sowie der RoHS-Richtlinie 2011/65/EU.Die vollständige Original-Konformitätserklärung ist beim Importeur erhältlich.
Technische Daten
IP-Überwachungskamera
Betriebsspannung 5 V , über mitgelieferten Netzadapter
Stromaufnahme 2 A
Sensor 0,3 MP
Auflösung 640 x 480 Pixel
WLAN-Standard 802.11b/g/n
Arbeitsfrequenz 2400 – 2483,5 MHz
Max. Video-Bildrate 25 fps
Bewegungsradius Vertikal: 105°, Horizontal: 355°
Min. Beleuchtung 2,0 Lux @ 500 nm
Betriebstemperatur 5 bis +40°C
Lagertemperatur −10 bis +60°C
Feuchtigkeit (keine Kondensation) 5 bis 75 %
Maße ca. 11,8 x 10,3 x 12,9 cm
Gewicht ca. 300 g
41IUK 5 A1
DEATCH
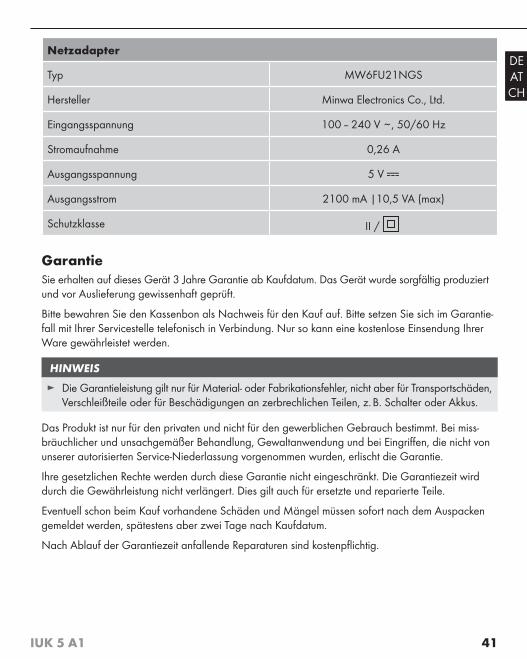
Netzadapter
Typ MW6FU21NGS
Hersteller Minwa Electronics Co., Ltd.
Eingangsspannung 100 – 240 V ~, 50/60 Hz
Stromaufnahme 0,26 A
Ausgangsspannung 5 V
Ausgangsstrom 2100 mA |10,5 VA (max)
Schutzklasse II /
GarantieSie erhalten auf dieses Gerät 3 Jahre Garantie ab Kaufdatum. Das Gerät wurde sorgfältig produziert und vor Auslieferung gewissenhaft geprüft.
Bitte bewahren Sie den Kassenbon als Nachweis für den Kauf auf. Bitte setzen Sie sich im Garantie-fall mit Ihrer Servicestelle telefonisch in Verbindung. Nur so kann eine kostenlose Einsendung Ihrer Ware gewährleistet werden.
HINWEIS
► Die Garantieleistung gilt nur für Material- oder Fabrikationsfehler, nicht aber für Transportschäden, Verschleißteile oder für Beschädigungen an zerbrechlichen Teilen, z. B. Schalter oder Akkus.
Das Produkt ist nur für den privaten und nicht für den gewerblichen Gebrauch bestimmt. Bei miss-bräuchlicher und unsachgemäßer Behandlung, Gewaltanwendung und bei Eingriffen, die nicht von unserer autorisierten Service-Niederlassung vorgenommen wurden, erlischt die Garantie.
Ihre gesetzlichen Rechte werden durch diese Garantie nicht eingeschränkt. Die Garantiezeit wird durch die Gewährleistung nicht verlängert. Dies gilt auch für ersetzte und reparierte Teile.
Eventuell schon beim Kauf vorhandene Schäden und Mängel müssen sofort nach dem Auspacken gemeldet werden, spätestens aber zwei Tage nach Kaufdatum.
Nach Ablauf der Garantiezeit anfallende Reparaturen sind kostenpflichtig.
42 IUK 5 A1
DEATCH
Service Service Deutschland Tel.: 0800 5435 111 (Kostenfrei aus dem dt. Festnetz/Mobilfunknetz) E-Mail: [email protected]
IAN 48807
Service Österreich Tel.: 0820 201 222 (0,15 EUR/Min.) E-Mail: [email protected]
IAN 48807
Service Schweiz Tel.: 0842 665566 (0,08 CHF/Min., Mobilfunk max. 0,40 CHF/Min.) E-Mail: [email protected]
IAN 48807
Erreichbarkeit Hotline: Montag bis Freitag von 8:00 Uhr – 20:00 Uhr (MEZ)
ImporteurKOMPERNASS HANDELS GMBH
BURGSTRASSE 21
44867 BOCHUM
GERMANY
www.kompernass.com
43IUK 5 A1
GB
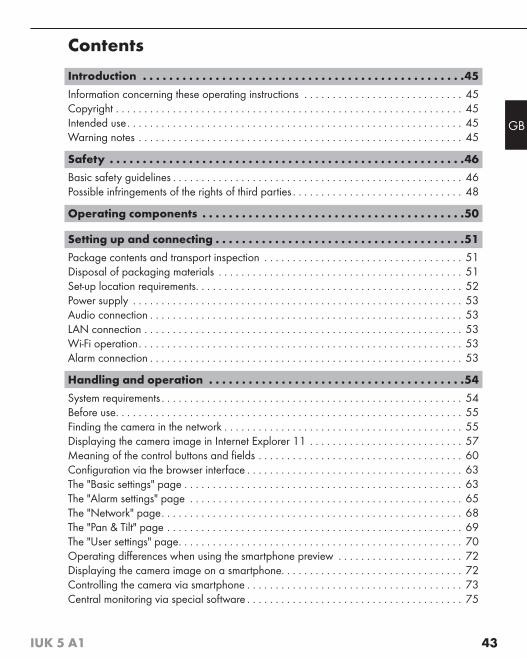
Contents
Introduction . . . . . . . . . . . . . . . . . . . . . . . . . . . . . . . . . . . . . . . . . . . . . . . . .45
Information concerning these operating instructions . . . . . . . . . . . . . . . . . . . . . . . . . . . . 45Copyright . . . . . . . . . . . . . . . . . . . . . . . . . . . . . . . . . . . . . . . . . . . . . . . . . . . . . . . . . . . . . 45Intended use . . . . . . . . . . . . . . . . . . . . . . . . . . . . . . . . . . . . . . . . . . . . . . . . . . . . . . . . . . . 45Warning notes . . . . . . . . . . . . . . . . . . . . . . . . . . . . . . . . . . . . . . . . . . . . . . . . . . . . . . . . . 45
Safety . . . . . . . . . . . . . . . . . . . . . . . . . . . . . . . . . . . . . . . . . . . . . . . . . . . . . .46
Basic safety guidelines . . . . . . . . . . . . . . . . . . . . . . . . . . . . . . . . . . . . . . . . . . . . . . . . . . . 46Possible infringements of the rights of third parties . . . . . . . . . . . . . . . . . . . . . . . . . . . . . . 48
Operating components . . . . . . . . . . . . . . . . . . . . . . . . . . . . . . . . . . . . . . . .50
Setting up and connecting . . . . . . . . . . . . . . . . . . . . . . . . . . . . . . . . . . . . . .51
Package contents and transport inspection . . . . . . . . . . . . . . . . . . . . . . . . . . . . . . . . . . . 51Disposal of packaging materials . . . . . . . . . . . . . . . . . . . . . . . . . . . . . . . . . . . . . . . . . . . 51Set-up location requirements. . . . . . . . . . . . . . . . . . . . . . . . . . . . . . . . . . . . . . . . . . . . . . . 52Power supply . . . . . . . . . . . . . . . . . . . . . . . . . . . . . . . . . . . . . . . . . . . . . . . . . . . . . . . . . . 53Audio connection . . . . . . . . . . . . . . . . . . . . . . . . . . . . . . . . . . . . . . . . . . . . . . . . . . . . . . . 53LAN connection . . . . . . . . . . . . . . . . . . . . . . . . . . . . . . . . . . . . . . . . . . . . . . . . . . . . . . . . 53Wi-Fi operation . . . . . . . . . . . . . . . . . . . . . . . . . . . . . . . . . . . . . . . . . . . . . . . . . . . . . . . . . 53Alarm connection . . . . . . . . . . . . . . . . . . . . . . . . . . . . . . . . . . . . . . . . . . . . . . . . . . . . . . . 53
Handling and operation . . . . . . . . . . . . . . . . . . . . . . . . . . . . . . . . . . . . . . .54
System requirements . . . . . . . . . . . . . . . . . . . . . . . . . . . . . . . . . . . . . . . . . . . . . . . . . . . . . 54Before use . . . . . . . . . . . . . . . . . . . . . . . . . . . . . . . . . . . . . . . . . . . . . . . . . . . . . . . . . . . . . 55Finding the camera in the network . . . . . . . . . . . . . . . . . . . . . . . . . . . . . . . . . . . . . . . . . . 55Displaying the camera image in Internet Explorer 11 . . . . . . . . . . . . . . . . . . . . . . . . . . . 57Meaning of the control buttons and fields . . . . . . . . . . . . . . . . . . . . . . . . . . . . . . . . . . . . 60Configuration via the browser interface . . . . . . . . . . . . . . . . . . . . . . . . . . . . . . . . . . . . . . 63The "Basic settings" page . . . . . . . . . . . . . . . . . . . . . . . . . . . . . . . . . . . . . . . . . . . . . . . . . 63The "Alarm settings" page . . . . . . . . . . . . . . . . . . . . . . . . . . . . . . . . . . . . . . . . . . . . . . . . 65The "Network" page . . . . . . . . . . . . . . . . . . . . . . . . . . . . . . . . . . . . . . . . . . . . . . . . . . . . . 68The "Pan & Tilt" page . . . . . . . . . . . . . . . . . . . . . . . . . . . . . . . . . . . . . . . . . . . . . . . . . . . . 69The "User settings" page . . . . . . . . . . . . . . . . . . . . . . . . . . . . . . . . . . . . . . . . . . . . . . . . . . 70Operating differences when using the smartphone preview . . . . . . . . . . . . . . . . . . . . . . 72Displaying the camera image on a smartphone. . . . . . . . . . . . . . . . . . . . . . . . . . . . . . . . 72Controlling the camera via smartphone . . . . . . . . . . . . . . . . . . . . . . . . . . . . . . . . . . . . . . 73Central monitoring via special software . . . . . . . . . . . . . . . . . . . . . . . . . . . . . . . . . . . . . . 75
44 IUK 5 A1
GB
Cleaning . . . . . . . . . . . . . . . . . . . . . . . . . . . . . . . . . . . . . . . . . . . . . . . . . . . .80
Storage / Disposal . . . . . . . . . . . . . . . . . . . . . . . . . . . . . . . . . . . . . . . . . . . .80
Storage . . . . . . . . . . . . . . . . . . . . . . . . . . . . . . . . . . . . . . . . . . . . . . . . . . . . . . . . . . . . . . . 80Disposal of the device . . . . . . . . . . . . . . . . . . . . . . . . . . . . . . . . . . . . . . . . . . . . . . . . . . . 80
Troubleshooting . . . . . . . . . . . . . . . . . . . . . . . . . . . . . . . . . . . . . . . . . . . . . .80
Fault causes and rectification . . . . . . . . . . . . . . . . . . . . . . . . . . . . . . . . . . . . . . . . . . . . . . 81
Appendix . . . . . . . . . . . . . . . . . . . . . . . . . . . . . . . . . . . . . . . . . . . . . . . . . . .82
Notes on the Declaration of Conformity . . . . . . . . . . . . . . . . . . . . . . . . . . . . . . . . . . . . . 82Technical data . . . . . . . . . . . . . . . . . . . . . . . . . . . . . . . . . . . . . . . . . . . . . . . . . . . . . . . . . 82Warranty . . . . . . . . . . . . . . . . . . . . . . . . . . . . . . . . . . . . . . . . . . . . . . . . . . . . . . . . . . . . . 83Service . . . . . . . . . . . . . . . . . . . . . . . . . . . . . . . . . . . . . . . . . . . . . . . . . . . . . . . . . . . . . . . 84Importer . . . . . . . . . . . . . . . . . . . . . . . . . . . . . . . . . . . . . . . . . . . . . . . . . . . . . . . . . . . . . . 84
45IUK 5 A1
GB
Introduction
Information concerning these operating instructionsCongratulations on the purchase of your new device.
You have selected a high-quality product. The operating instructions are part of this product. They contain important information on safety, usage and disposal. Before using the product, familiarise yourself with all handling and safety guidelines. Use the product only as described and for the range of applications specified. Please pass on all documentation incl. these operating instructions to any future owner(s) if you sell this product or give it away.
CopyrightThis documentation is protected by copyright.
Any copying or reproduction, including in the form of extracts, or any reproduction of images (even in a modified state), is permitted only with the written authorisation of the manufacturer.
Intended useThis device is an information technology device designed for recording audio and video data as well as their transmission to computer-based monitors by cable or wirelessly. It is not intended for any other or more extensive use. This device is not intended for use in commercial or industrial environments.
The manufacturer accepts no responsibility for damage caused by failure to observe these instructions, improper use or repairs, unauthorised modifications or the use of unapproved replacement parts. The operator bears sole liability.
Warning notesThe following warning notice types are used in these operating instructions:
DANGER
A warning notice at this hazard level indicates an imminently hazardous situation.
If the hazardous situation is not avoided, it could result in death or serious physical injury.
► Follow the instructions in this warning notice to avoid the risk of death or serious injury.
46 IUK 5 A1
GB
WARNING
A warning notice at this hazard level indicates a potentially hazardous situation.
Failure to avoid this hazardous situation could result in injury.
► Follow the instructions in this warning notice to prevent injury.
CAUTION
A warning notice at this hazard level indicates a potential for property damage.
Failure to avoid this situation could result in property damage.
► Follow the instructions in this warning notice to prevent property damage.
NOTE
► A note provides additional information that will assist you in using the device.
SafetyIn this section, you will find important safety instructions for using the device.
The device complies with statutory safety regulations. Improper use may result in personal injury and property damage.
Basic safety guidelinesTo ensure safe operation of the device, follow the safety guidelines set out below:
■ Check the device for visible external damage before use. Do not operate a device that has been damaged or dropped.
■ If the cables or connections are damaged, have them replaced by an authorised specialist or the Customer Service department.
■ People who, due to their physical, intellectual or motor abilities, are incapable of operating the device safely may only use the device under the supervision or direction of a responsible person.
■ DANGER! Do not allow children to play with the packaging material! Keep all packaging materials out of the reach of children. Risk of suffocation!
■ When mounting the device, ensure that it cannot fall and injure anyone.

47IUK 5 A1
GB
■ Allow children to use the device only with supervision. Children are not always able to correctly recognise potential dangers. WARNING! Some of the supplied parts can be swallowed. If a part is swallowed, seek medical advice as soon as possible.
■ All repairs must be carried out by authorised specialist companies or by the Customer Service department. Failure to make proper repairs may put the user at risk. It will also invalidate any warranty claims. Never open the housing of the camera or of the mains adapter. There is a risk of fire and/or electrical shock.
■ Repairs to the device during the warranty period may only be carried out by a customer service department authorised by the manufacturer. Otherwise, no warranty claims will be held for any subsequent damages.
■ Defective components must always be replaced with original replacement parts. Compliance with the safety requirements can only be guaranteed by using these replacement parts.
■ Always use only the supplied mains adapter to operate the device.
■ Do not place any objects on the device.
■ Protect the product from moisture. Use it only in dry interior rooms; do not it use outdoors or in moist environments.
■ Never operate the device directly near open flames (e.g. candles) or in extreme environmental conditions (e.g. in an explosive atmosphere).
■ The camera may not be used in areas in which there may be a build-up of explosive gases, this includes petrol stations or similar.
■ Notes on disconnecting from the power supply: Even when the device is not in operation, it still draws power. To prevent this, disconnect the device from the mains by pulling the mains adapter from the socket. Therefore, you should use the device in such a way so as to ensure unrestricted access to the mains socket, so that you can remove the mains adapter immediately in the case of an emergency. To prevent any risk of fire or unintentional switching on, and to save energy costs, you should always unplug the device from the socket when it is not in use.
■ Grip the mains adapter directly whenever you want to pull it from the socket. Do not pull on the cable itself and never touch the mains adapter with wet hands, as this could result in either a short circuit or electric shock. Do not place any furniture or similar items on the mains adapter cable and ensure that it cannot become trapped. Never tie knots in the cable and do not bind it together with other cables. Lay the mains cable and, if applicable, the network, audio or alarm cable so that they cannot be stepped on or tripped over. A damaged mains adapter can cause a fire or electrical shock. Check the mains adapter regularly. If it is damaged, contact your nearest authorised customer service centre or your dealer to have it replaced.
48 IUK 5 A1
GB
■ Please remove the mains adapter from the mains before a storm and/or thunderstorm.
■ The power socket used must be easily accessible so that the mains adapter can be easily discon-nected in an emergency.
■ If you notice any unusual noises, smoke or similar uncertain situations, immediately disconnect the mains adapter from the power supply. Have the device checked by a qualified specialist before using it again (see section "Service").
Electrostatic discharge
■ In some rare cases, it is possible that the camera may malfunction due to electrostatic discharge.In the event of a malfunction due to electrostatic discharge, the product must be reset. To do this, disconnect the mains adapter from the wall socket and then wait for about ten seconds before plugging the device back in again.
Possible infringements of the rights of third partiesPlease note the following when using the surveillance camera:
Copyright protection
Every person owns the rights to their own image. According to copyright law, pictures of people may only be published without their permission if the affected person appears merely as an incidental feature in a landscape or other location. The question as to whether a person is merely an incidental feature must be ascertained on a case by case basis. To avoid any legal uncertainty, a warning notice about the camera should be provided in all cases in which identifiable persons might be recorded (see section "Duty of notification").
Protection of privacy
The privacy of others may not be infringed by any published images. Do not set up the camera so it points to the garden or an entrance of a neighbouring residence, even if these locations are easily visible from your own residence or to the general public. This does not a constitute a right to publish these views.
Personal identifiability
Personal identifiability exists when it can be established that a specific person was at a certain location at a given time. This identification can be also made by means of an identifier related to a specific person, e.g. a car license plate. Personal identifiability must avoided under all circumstances.
Surveillance cameras at the workplace
Surveillance at the workplace is subject to particularly strict regulations in Germany. Employers should not use surveillance cameras in the workplace in any cases where this could lead to a possible infringement of legal rights.
49IUK 5 A1
GB
Road traffic surveillance cameras
In the case of surveillance cameras directed at road traffic, it is advisable that the location of the camera and the image frame be selected so that the road users cannot be identified by means of the license plates. Inscriptions/logos on vehicles may also serve as a means of identifying a road user.
Duty of notification
If it is not possible to preclude the identification of persons, a notification informing of the presence of the surveillance camera must be placed at clearly visible locations on all access routes to the area within the filming range of the camera. Pedestrians must also be informed that by entering the filming range of the camera they give their consent to be filmed/photographed and if they do not consent then they should not access the affected area. The voluntary nature of this consent must be considered. If the camera is located such that an affected person must pass by in order to reach a destination (e.g. at the entrance to a place of interest) then the absence of voluntariness precludes the granting of an effective consent.
The respective legal requirements of the country in which the camera is being used should always be observed to avoid possible infringements of the rights of third parties.
Note on registered brand names and logos
The use of registered brand names and trade names as well as brand logos in these instructions does not constitute an infringement of copyright, but rather merely serves as a reference. Even if these are not specifically labelled as such in the respective passages of the text, the relevant legal provisions apply.
The brand names and logos used are the property of their respective manufacturers and are subject to their copyright provisions. Further information can be found in the respective publications of the manufacturers.
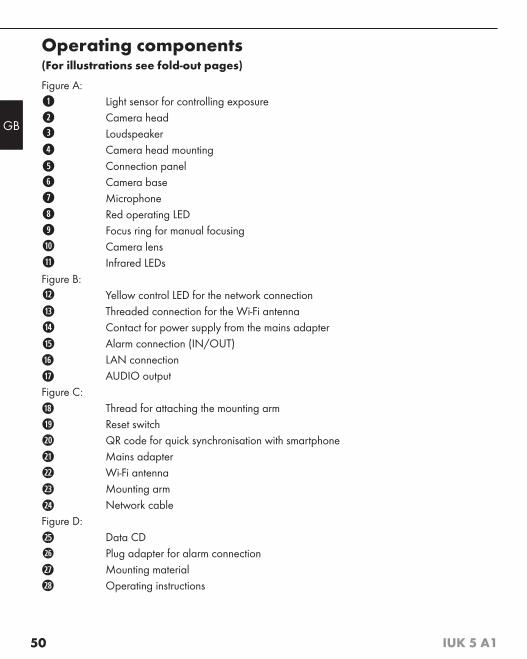
50 IUK 5 A1
GB
Operating components(For illustrations see fold-out pages)
Figure A: Light sensor for controlling exposure Camera head Loudspeaker Camera head mounting Connection panel Camera base Microphone Red operating LED Focus ring for manual focusing Camera lens Infrared LEDs
Figure B: Yellow control LED for the network connection Threaded connection for the Wi-Fi antenna Contact for power supply from the mains adapter Alarm connection (IN/OUT) LAN connection AUDIO output
Figure C: Thread for attaching the mounting arm Reset switch QR code for quick synchronisation with smartphone Mains adapter Wi-Fi antenna Mounting arm Network cable
Figure D: Data CD Plug adapter for alarm connection Mounting material Operating instructions

51IUK 5 A1
GB
Setting up and connecting DANGER
During the first use of the device there is a risk of injury and/or damage to property!
To avoid risks, observe the following safety instructions:
► Please follow the instructions regarding the electrical connection of the device to avoid damage to property.
Package contents and transport inspectionPlease check the contents of the package (see fold-out pages). The following components are included in delivery:
● Surveillance camera IUK 5 A1
● Mains adapter
● Removable Wi-Fi antenna
● Mounting arm
● Network cable
● Data CD
● Plug adapter for alarm connection
● Mounting material
● Operating instructions
NOTE
► Check the package for completeness and for signs of visible damage.
► If any items are missing or damaged as a result of defective packaging or insufficient care during transportation, contact the Service hotline (see the section Service).
♦ Remove all parts of the device and the operating instructions from the box.
♦ Remove all packaging material.
Disposal of packaging materials The packaging protects the device from damage during carriage. The packaging materials
have been selected for their environmental friendliness and ease of disposal, and are therefore recyclable. Returning the packaging to the material cycle conserves raw materials and reduces the amount of waste which is generated. Dispose of packaging materials that are no longer needed in accordance with applicable local regulations.

52 IUK 5 A1
GB
NOTE
► If possible, keep the original packaging of the device for the warranty period so that the device can be packed properly for return shipment in the event of a warranty claim.
Set-up location requirementsFor safe and trouble-free operation of the device, the set-up location must fulfi l the following requirements:
■ Set up the device on a fi rm, fl at and horizontal surface.
■ The surfaces of some items of furniture might contain components that can corrode and soften the rubber pads of the device. If necessary, place a cover under the device’s pads.
■ Or install the device using the mounting materials that are included in the delivery to fi x the mounting arm onto the wall as shown in the following diagram.
■ After you have attached the mounting arm with the screws and wall plugs , turn the hand screw (A) into the thread on the bottom of the camera base .
■ If required, loosen the screw connection (B) to adjust the angle of the mounting arm . Then retighten the screw connection (B) so that the camera is held securely on the mounting arm .
■ Operate the device only in dry locations, never in a hot environment or anywhere near fl ammable materials.
■ Operate the device only in locations with adequate ventilation.
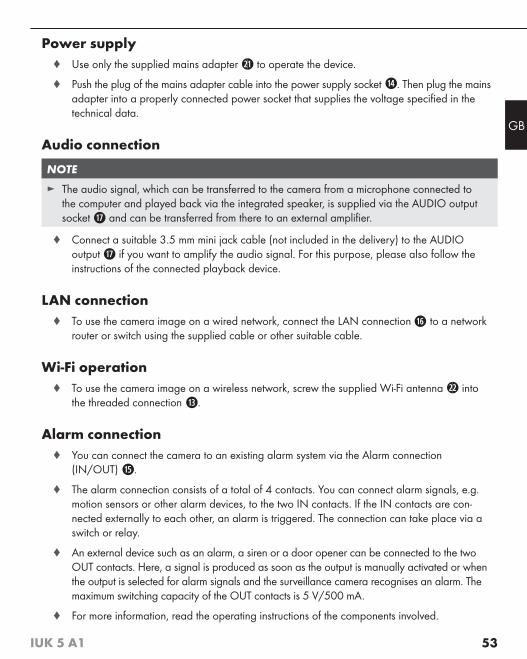
53IUK 5 A1
GB
Power supply ♦ Use only the supplied mains adapter to operate the device.
♦ Push the plug of the mains adapter cable into the power supply socket . Then plug the mains adapter into a properly connected power socket that supplies the voltage specified in the technical data.
Audio connection
NOTE
► The audio signal, which can be transferred to the camera from a microphone connected to the computer and played back via the integrated speaker, is supplied via the AUDIO output socket and can be transferred from there to an external amplifier.
♦ Connect a suitable 3.5 mm mini jack cable (not included in the delivery) to the AUDIO output if you want to amplify the audio signal. For this purpose, please also follow the instructions of the connected playback device.
LAN connection ♦ To use the camera image on a wired network, connect the LAN connection to a network
router or switch using the supplied cable or other suitable cable.
Wi-Fi operation ♦ To use the camera image on a wireless network, screw the supplied Wi-Fi antenna into
the threaded connection .
Alarm connection ♦ You can connect the camera to an existing alarm system via the Alarm connection
(IN/OUT) .
♦ The alarm connection consists of a total of 4 contacts. You can connect alarm signals, e.g. motion sensors or other alarm devices, to the two IN contacts. If the IN contacts are con-nected externally to each other, an alarm is triggered. The connection can take place via a switch or relay.
♦ An external device such as an alarm, a siren or a door opener can be connected to the two OUT contacts. Here, a signal is produced as soon as the output is manually activated or when the output is selected for alarm signals and the surveillance camera recognises an alarm. The maximum switching capacity of the OUT contacts is 5 V/500 mA.
♦ For more information, read the operating instructions of the components involved.
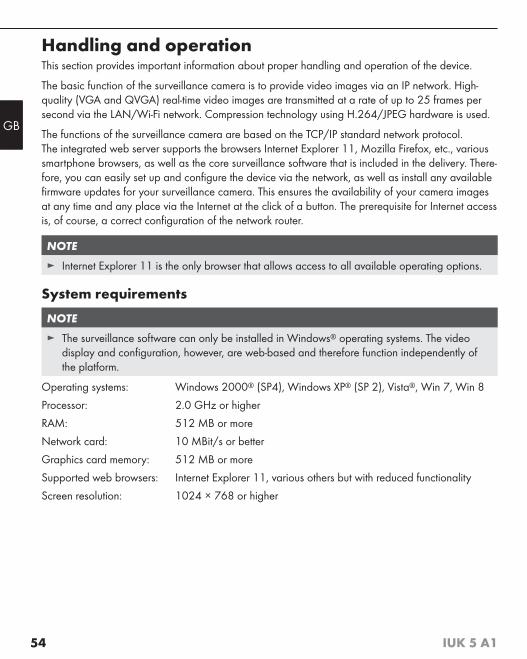
54 IUK 5 A1
GB
Handling and operationThis section provides important information about proper handling and operation of the device.
The basic function of the surveillance camera is to provide video images via an IP network. High-quality (VGA and QVGA) real-time video images are transmitted at a rate of up to 25 frames per second via the LAN/Wi-Fi network. Compression technology using H.264/JPEG hardware is used.
The functions of the surveillance camera are based on the TCP/IP standard network protocol. The integrated web server supports the browsers Internet Explorer 11, Mozilla Firefox, etc., various smartphone browsers, as well as the core surveillance software that is included in the delivery. There-fore, you can easily set up and configure the device via the network, as well as install any available firmware updates for your surveillance camera. This ensures the availability of your camera images at any time and any place via the Internet at the click of a button. The prerequisite for Internet access is, of course, a correct configuration of the network router.
NOTE
► Internet Explorer 11 is the only browser that allows access to all available operating options.
System requirements
NOTE
► The surveillance software can only be installed in Windows® operating systems. The video display and configuration, however, are web-based and therefore function independently of the platform.
Operating systems: Windows 2000® (SP4), Windows XP® (SP 2), Vista®, Win 7, Win 8
Processor: 2.0 GHz or higher
RAM: 512 MB or more
Network card: 10 MBit/s or better
Graphics card memory: 512 MB or more
Supported web browsers: Internet Explorer 11, various others but with reduced functionality
Screen resolution: 1024 × 768 or higher
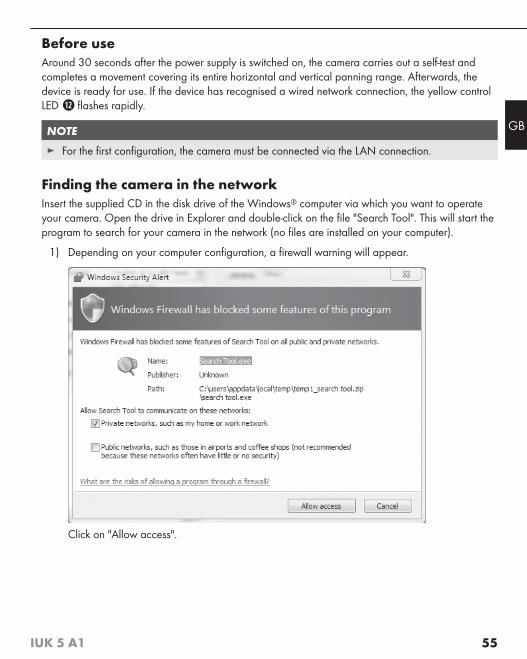
55IUK 5 A1
GB
Before useAround 30 seconds after the power supply is switched on, the camera carries out a self-test and completes a movement covering its entire horizontal and vertical panning range. Afterwards, the device is ready for use. If the device has recognised a wired network connection, the yellow control LED fl ashes rapidly.
NOTE
► For the fi rst confi guration, the camera must be connected via the LAN connection.
Finding the camera in the networkInsert the supplied CD in the disk drive of the Windows® computer via which you want to operate your camera. Open the drive in Explorer and double-click on the fi le "Search Tool". This will start the program to search for your camera in the network (no fi les are installed on your computer).
1) Depending on your computer confi guration, a fi rewall warning will appear.
Click on "Allow access".

56 IUK 5 A1
GB
2) The program fi nds the camera and when you click on the device name "IPCAM", the relevant network information appears:
The network confi guration of the surveillance camera is carried out automatically if the "Auto" option is activated and the router is in DHCP mode. If the camera does not appear on the list, you can refresh the list by clicking on the "Find" button. Here, we strongly recommend that you retain the suggested parameters. Otherwise, there is a risk that the camera will not work correctly due to incorrect settings. In case of problems, contact your network administrator.
NOTE
► In DHCP operation, your router will issue IP addresses automatically on demand.
You can also enter the network data manually, for instance, if the automatic confi guration does not work. To do this, select the option "Custom". This activates the input fi elds for the confi guration. Now enter the network data for the surveillance camera manually. Generally, these data include the network settings for your router. For further information, read the operating instructions for your router. Click "Apply" to accept the new settings.

57IUK 5 A1
GB
3) Click "Others" to open the page for advanced options.
The number of the current camera fi rmware is displayed on the right. In the line below, you can read the MAC address of the current network connection.
If you would like to update the software, click on "Upgrade" and, following authentication (account: admin, password: no entry, OK) click on the folder symbol to fi nd the fi le with which you want to update either the browser-based control software ( ) or the fi rmware for your surveillance camera ( ). Then click on "Upgrade" to carry out the required update.
Displaying the camera image in Internet Explorer 11
NOTE
► You only have access to all of the features of the IP surveillance camera when using the Internet Explorer 11 browser.

58 IUK 5 A1
GB
1) To display the camera image in the browser, double-click on the device name in the list on the left or click on the button on the right in the camera
information page "General". Sign yourself into the browser for the address disclosure using the user name "admin" without any password. If Internet Explorer 11 is set up as your default browser, the following Windows query should appear:
2) Select the desired language:
3) Then click on "Plug-in download" to install a required plug-in.
Click on "Save". Shortly afterwards, the indicator bar appears on the lower edge of the screen. Here, click on "Open". An Explorer window will open. Double-click on the fi le "oPlayer.msi" and follow the on-screen instructions to install the plug-in.
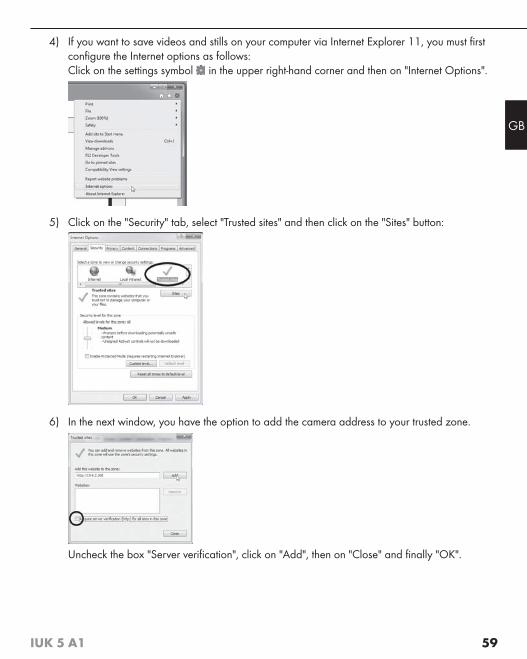
59IUK 5 A1
GB
4) If you want to save videos and stills on your computer via Internet Explorer 11, you must fi rst confi gure the Internet options as follows: Click on the settings symbol in the upper right-hand corner and then on "Internet Options".
5) Click on the "Security" tab, select "Trusted sites" and then click on the "Sites" button:
6) In the next window, you have the option to add the camera address to your trusted zone.
Uncheck the box "Server verifi cation", click on "Add", then on "Close" and fi nally "OK".

60 IUK 5 A1
GB
7) To make the connection to your camera, click on "Internet Explorer mode". The following browser window appears:
Meaning of the control buttons and fi eldsThe following is a list of the meanings of the control buttons on the left side.
Horizontal ( / )/vertical ( / ) axis control and diagonal panning ( ).Click briefl y on one of the buttons to make the camera pan in the corresponding direction. If you hold down the mouse button while clicking on one of the buttons, the camera will continue panning in the corresponding direction until you either let go of the mouse button or the camera reaches the stop in the respective direction.Click in the middle of the graphic to carry out a one-time horizontal and vertical test run from one stop to the other. The camera returns to its starting position afterwards.
−> If you click on this button, the camera will execute a continuous horizontal pan from one stop to the other. Click the button again to stop the pan or resume panning.
−> If you click on this button, the camera will execute a continuous vertical pan from one stop to the other. Click the button again to stop the pan or resume panning.
If you activate horizontal and vertical panning, the camera executes a continuous diagonal pan.
−> If it is dark, click on this button to switch the camera to infrared mode. The infrared LEDs illuminate the immediate surroundings of the camera with infrared light, which is not visible to the human eye.
−> Click this button to mirror the image vertically.
−> Click this button to mirror the image horizontally.
−> Click this button to switch on an external alarm connection .
−> Click this button to switch off an external alarm connection .
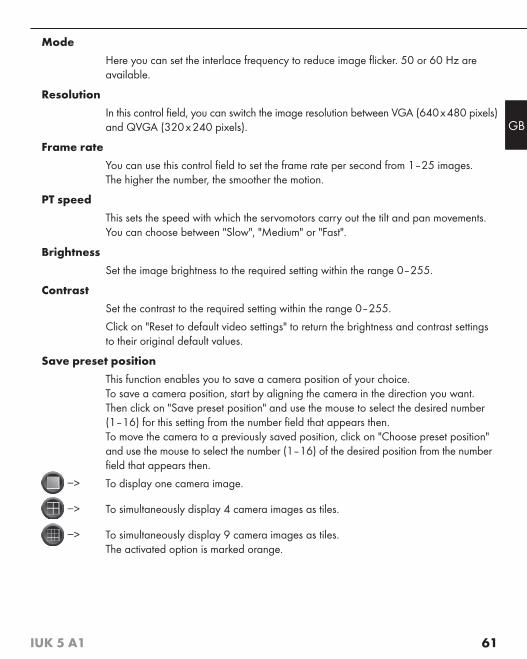
61IUK 5 A1
GB
Mode
Here you can set the interlace frequency to reduce image fl icker. 50 or 60 Hz are available.
Resolution
In this control fi eld, you can switch the image resolution between VGA (640 x 480 pixels) and QVGA (320 x 240 pixels).
Frame rate
You can use this control fi eld to set the frame rate per second from 1–25 images. The higher the number, the smoother the motion.
PT speed
This sets the speed with which the servomotors carry out the tilt and pan movements. You can choose between "Slow", "Medium" or "Fast".
Brightness
Set the image brightness to the required setting within the range 0–255.
Contrast
Set the contrast to the required setting within the range 0–255.
Click on "Reset to default video settings" to return the brightness and contrast settings to their original default values.
Save preset position
This function enables you to save a camera position of your choice. To save a camera position, start by aligning the camera in the direction you want. Then click on "Save preset position" and use the mouse to select the desired number (1–16) for this setting from the number fi eld that appears then. To move the camera to a previously saved position, click on "Choose preset position" and use the mouse to select the number (1–16) of the desired position from the number fi eld that appears then.
−> To display one camera image.
−> To simultaneously display 4 camera images as tiles.
−> To simultaneously display 9 camera images as tiles.The activated option is marked orange.
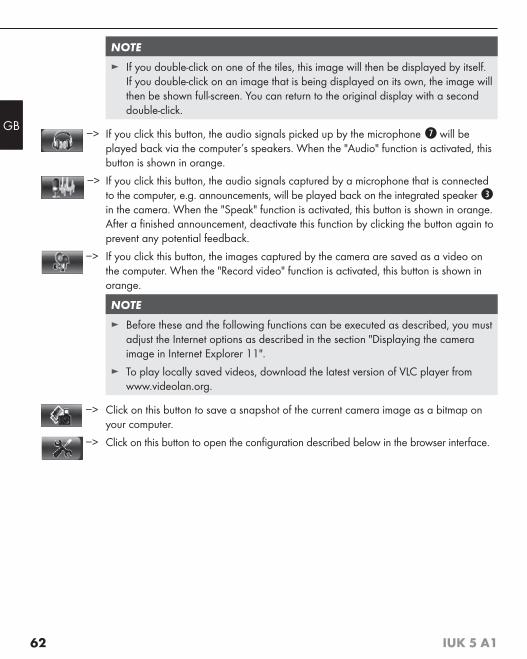
62 IUK 5 A1
GB
NOTE
► If you double-click on one of the tiles, this image will then be displayed by itself. If you double-click on an image that is being displayed on its own, the image will then be shown full-screen. You can return to the original display with a second double-click.
−> If you click this button, the audio signals picked up by the microphone will be played back via the computer’s speakers. When the "Audio" function is activated, this button is shown in orange.
−> If you click this button, the audio signals captured by a microphone that is connected to the computer, e.g. announcements, will be played back on the integrated speaker in the camera. When the "Speak" function is activated, this button is shown in orange. After a fi nished announcement, deactivate this function by clicking the button again to prevent any potential feedback.
−> If you click this button, the images captured by the camera are saved as a video on the computer. When the "Record video" function is activated, this button is shown in orange.
NOTE
► Before these and the following functions can be executed as described, you must adjust the Internet options as described in the section "Displaying the camera image in Internet Explorer 11".
► To play locally saved videos, download the latest version of VLC player from www.videolan.org.
−> Click on this button to save a snapshot of the current camera image as a bitmap on your computer.
−> Click on this button to open the confi guration described below in the browser interface.
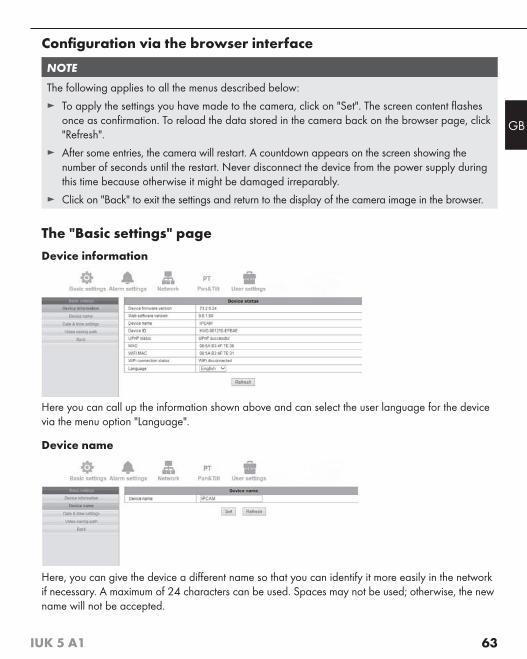
63IUK 5 A1
GB
Configuration via the browser interface
NOTE
The following applies to all the menus described below:
► To apply the settings you have made to the camera, click on "Set". The screen content flashes once as confirmation. To reload the data stored in the camera back on the browser page, click "Refresh".
► After some entries, the camera will restart. A countdown appears on the screen showing the number of seconds until the restart. Never disconnect the device from the power supply during this time because otherwise it might be damaged irreparably.
► Click on "Back" to exit the settings and return to the display of the camera image in the browser.
The "Basic settings" pageDevice information
Here you can call up the information shown above and can select the user language for the device via the menu option "Language".
Device name
Here, you can give the device a different name so that you can identify it more easily in the network if necessary. A maximum of 24 characters can be used. Spaces may not be used; otherwise, the new name will not be accepted.
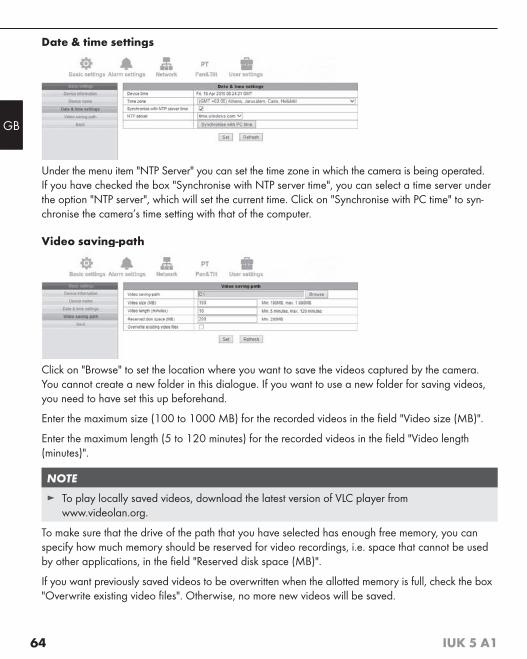
64 IUK 5 A1
GB
Date & time settings
Under the menu item "NTP Server" you can set the time zone in which the camera is being operated. If you have checked the box "Synchronise with NTP server time", you can select a time server under the option "NTP server", which will set the current time. Click on "Synchronise with PC time" to syn-chronise the camera’s time setting with that of the computer.
Video saving-path
Click on "Browse" to set the location where you want to save the videos captured by the camera. You cannot create a new folder in this dialogue. If you want to use a new folder for saving videos, you need to have set this up beforehand.
Enter the maximum size (100 to 1000 MB) for the recorded videos in the field "Video size (MB)".
Enter the maximum length (5 to 120 minutes) for the recorded videos in the field "Video length (minutes)".
NOTE
► To play locally saved videos, download the latest version of VLC player from www.videolan.org.
To make sure that the drive of the path that you have selected has enough free memory, you can specify how much memory should be reserved for video recordings, i.e. space that cannot be used by other applications, in the field "Reserved disk space (MB)".
If you want previously saved videos to be overwritten when the allotted memory is full, check the box "Overwrite existing video files". Otherwise, no more new videos will be saved.

65IUK 5 A1
GB
The "Alarm settings" pageAlarm settings
If you check the box "Alarm triggered by motion detection", the content of the window will change.
Now you can adjust the motion detection sensitivity for the alarm ("High", "Medium" or "Low"). If you check the box "Alarm triggered by audio detector", the alarm can be triggered by an audio signal recorded on the camera. Under the menu item "Alarm-audio detection sensitivity" you can set which sensitivity level the device should use for this purpose: "High", "Medium" or "Low". If you check the box "Alarm triggered by external detector", the device will react accordingly to an alarm signal from an external alarm trigger connected to the alarm connection. Then you can set the threshold in the line "Trigger level" to "High" or "Low". If you want to see a specific "Preset position when alarm is triggered", choose the desired position that was previously stored from the selection box under this menu item.
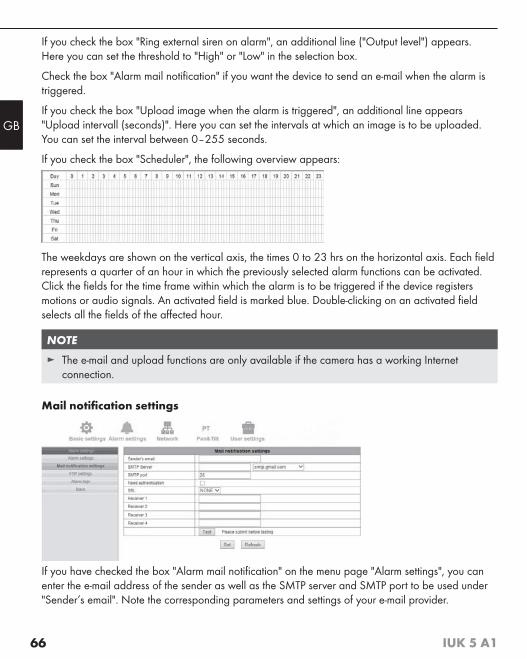
66 IUK 5 A1
GB
If you check the box "Ring external siren on alarm", an additional line ("Output level") appears. Here you can set the threshold to "High" or "Low" in the selection box.
Check the box "Alarm mail notification" if you want the device to send an e-mail when the alarm is triggered.
If you check the box "Upload image when the alarm is triggered", an additional line appears "Upload intervall (seconds)". Here you can set the intervals at which an image is to be uploaded. You can set the interval between 0–255 seconds.
If you check the box "Scheduler", the following overview appears:
The weekdays are shown on the vertical axis, the times 0 to 23 hrs on the horizontal axis. Each field represents a quarter of an hour in which the previously selected alarm functions can be activated. Click the fields for the time frame within which the alarm is to be triggered if the device registers motions or audio signals. An activated field is marked blue. Double-clicking on an activated field selects all the fields of the affected hour.
NOTE
► The e-mail and upload functions are only available if the camera has a working Internet connection.
Mail notification settings
If you have checked the box "Alarm mail notification" on the menu page "Alarm settings", you can enter the e-mail address of the sender as well as the SMTP server and SMTP port to be used under "Sender’s email". Note the corresponding parameters and settings of your e-mail provider.

67IUK 5 A1
GB
If the e-mail is to be sent with authentication, check the box "Needs authentication". Then the additional lines "Sender’s account" and "Account password" appear. Enter the required SMTP information of your e-mail provider here.
Enter the required encryption method under "SSL": SSL, TLS or NONE an unencrypted e-mail connection.
Enter the e-mail addresses of up to four recipients in the fields "Receiver 1–4".
After you have made your entries, you can test the e-mail function by clicking the "Test" button.
FTP settings
Here you can enter the connection data of an FTP server to which the camera can upload images. Under the setting "Upload interval (seconds)" you can enter the number of seconds that should elapse between each image upload to the FTP server after the alarm has been triggered.
After you have made your entries, you can test the FTP connection by clicking the "Test" button.
Alarm logs
Here you can view the alarm log file.

68 IUK 5 A1
GB
The "Network" page
Network settings
If you want the router to automatically assign the camera an IP number, check the box "Obtain IP address from DHCP server" and then click on "Set". After this, the device will restart. A countdown appears on the screen showing the time until the restart. Never disconnect the device from the power supply during this time because otherwise, it might be damaged irreparably.
Select the option "Turn off" in the checkbox "Yellow back LED" to switch off the yellow control LED on the LAN socket. Select "Turn on" to switch it on. The switching takes place instantly; you do not need to click on "Set".
If you uncheck "Obtain IP address from DHCP server", you can enter the network parameters manually in the following input screen:
IP address: Enter the IP address that you want to assign to the camera here.
Subnet mask: Enter the subnet mask of the network in which the camera is to operate here.
Gateway: Enter the IP address of the router gateway here.
DNS Server 1: Here the camera requires the entry of the first DNS server. DNS servers "trans-late" the queried domain names into IP addresses.
DNS Server 2: Enter the name of the second DNS server here. This server will be used if the first server is not available.
Http port: Enter the number 81 here. Otherwise, the transfer of the image to the computer will not work.
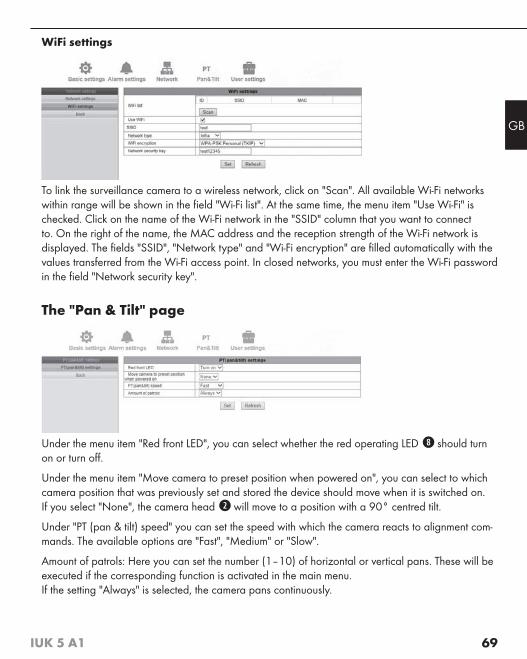
69IUK 5 A1
GB
WiFi settings
To link the surveillance camera to a wireless network, click on "Scan". All available Wi-Fi networks within range will be shown in the field "Wi-Fi list". At the same time, the menu item "Use Wi-Fi" is checked. Click on the name of the Wi-Fi network in the "SSID" column that you want to connect to. On the right of the name, the MAC address and the reception strength of the Wi-Fi network is displayed. The fields "SSID", "Network type" and "Wi-Fi encryption" are filled automatically with the values transferred from the Wi-Fi access point. In closed networks, you must enter the Wi-Fi password in the field "Network security key".
The "Pan & Tilt" page
Under the menu item "Red front LED", you can select whether the red operating LED should turn on or turn off.
Under the menu item "Move camera to preset position when powered on", you can select to which camera position that was previously set and stored the device should move when it is switched on. If you select "None", the camera head will move to a position with a 90° centred tilt.
Under "PT (pan & tilt) speed" you can set the speed with which the camera reacts to alignment com-mands. The available options are "Fast", "Medium" or "Slow".
Amount of patrols: Here you can set the number (1–10) of horizontal or vertical pans. These will be executed if the corresponding function is activated in the main menu. If the setting "Always" is selected, the camera pans continuously.

70 IUK 5 A1
GB
The "User settings" page
Multi device settings
In this menu, you can rename individual cameras in the network and assign user access.
■ Start by clicking on the "Refresh" button at the top to display the list of available cameras.
■ Click on the word "Device" on the desired table entry in the lower device list and an additional table pops up:
■ Then, in the upper device list, click on the name of the camera that you want to assign. The required information is added automatically.
■ Enter the user name and the password and click on "Add".
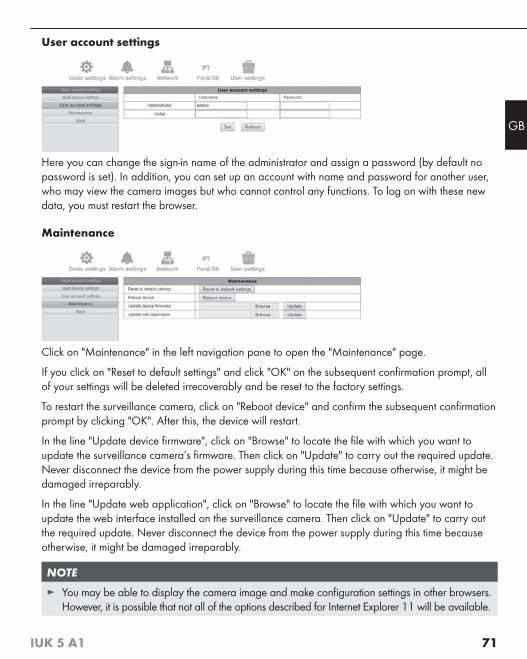
71IUK 5 A1
GB
User account settings
Here you can change the sign-in name of the administrator and assign a password (by default no password is set). In addition, you can set up an account with name and password for another user, who may view the camera images but who cannot control any functions. To log on with these new data, you must restart the browser.
Maintenance
Click on "Maintenance" in the left navigation pane to open the "Maintenance" page.
If you click on "Reset to default settings" and click "OK" on the subsequent confirmation prompt, all of your settings will be deleted irrecoverably and be reset to the factory settings.
To restart the surveillance camera, click on "Reboot device" and confirm the subsequent confirmation prompt by clicking "OK". After this, the device will restart.
In the line "Update device firmware", click on "Browse" to locate the file with which you want to update the surveillance camera’s firmware. Then click on "Update" to carry out the required update. Never disconnect the device from the power supply during this time because otherwise, it might be damaged irreparably.
In the line "Update web application", click on "Browse" to locate the file with which you want to update the web interface installed on the surveillance camera. Then click on "Update" to carry out the required update. Never disconnect the device from the power supply during this time because otherwise, it might be damaged irreparably.
NOTE
► You may be able to display the camera image and make configuration settings in other browsers. However, it is possible that not all of the options described for Internet Explorer 11 will be available.

72 IUK 5 A1
GB
Operating diff erences when using the smartphone previewIf you click on "Smartphone mode" when you start the browser, the web interface is displayed in a much simplifi ed form:
Click on one of the four direction buttons to move the camera head a little in the desired direction.
Displaying the camera image on a smartphoneYou can control the surveillance camera via a smartphone and also display the camera image on the smartphone if both devices are logged on to the same Wi-Fi network.
♦ If you are using an Android smartphone, install the app "IUK Viewer" from the Google Play Store.
♦ If you are using an iPhone, install the app "IUK Viewer" from the Apple App Store.
♦ Start the app and select "Add a new camera".
♦ Select "Scan QR-Code" and scan the QR code on the bottom of the camera base and then tap on "Done". The camera appears on the list.
♦ Tap on the entry to see the camera image on the smartphone display.
♦ Swipe over the screen to pan the camera head in the corresponding direction.
NOTE
► Using the smartphone to control the device has no eff ect on the web interface.
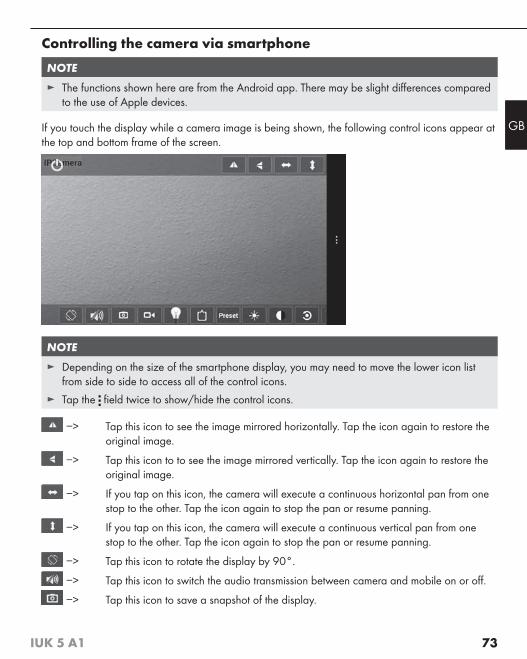
73IUK 5 A1
GB
Controlling the camera via smartphone
NOTE
► The functions shown here are from the Android app. There may be slight diff erences compared to the use of Apple devices.
If you touch the display while a camera image is being shown, the following control icons appear at the top and bottom frame of the screen.
NOTE
► Depending on the size of the smartphone display, you may need to move the lower icon list from side to side to access all of the control icons.
► Tap the fi eld twice to show/hide the control icons.
−> Tap this icon to see the image mirrored horizontally. Tap the icon again to restore the original image.
−> Tap this icon to to see the image mirrored vertically. Tap the icon again to restore the original image.
−> If you tap on this icon, the camera will execute a continuous horizontal pan from one stop to the other. Tap the icon again to stop the pan or resume panning.
−> If you tap on this icon, the camera will execute a continuous vertical pan from one stop to the other. Tap the icon again to stop the pan or resume panning.
−> Tap this icon to rotate the display by 90°.
−> Tap this icon to switch the audio transmission between camera and mobile on or off .
−> Tap this icon to save a snapshot of the display.

74 IUK 5 A1
GB
−> Tap this icon to save the stream from the camera as a video on the smartphone. During the recording, "Recording" appears in the upper right of the display. When the function is activated, the symbol lights up red. Tap the icon again to stop the recording.
NOTE
► If your default video player cannot play the fi les, you may install other players. For example: „MX Player“.
−> Tap this icon to switch the yellow LAN LED on or off . When the function is acti-vated, the symbol lights up red.
−> Tap this icon to choose from various settings for the data transmission. Tap the icon again to stop the function.
−> Tap this icon to save or retrieve up to 16 camera positions. Tap the icon again to stop the function.
−> Tap this icon to display a slider with which you can raise or lower the display brightness.
−> Tap this icon to display a slider with which you can raise or lower the display contrast.
−> Tap this icon to reset the brightness and contrast settings to the factory defaults.
−> Tap this icon to switch the camera’s infrared LEDs on or off .
−> Tap this icon to stop displaying the camera image.

75IUK 5 A1
GB
Central monitoring via special softwareYou can install the supplied software "IUK Viewer" to view images from up to 64 cameras at the same time.
Insert the supplied CD into the disk drive of the Windows® computer with which you want to operate your camera. Open the drive in Explorer and double-click on the file "IUK Viewer_Setup". This starts the installation program for the central monitoring software. Follow the on-screen instructions and confirm the authorisation query from the operating system’s user account control.
Afterwards, start the program "IUK Viewer" and confirm the authorisation query from the operating system’s firewall if applicable, when the program is started for the first time. On the bottom left in the program window, you will see a list of the installed cameras.
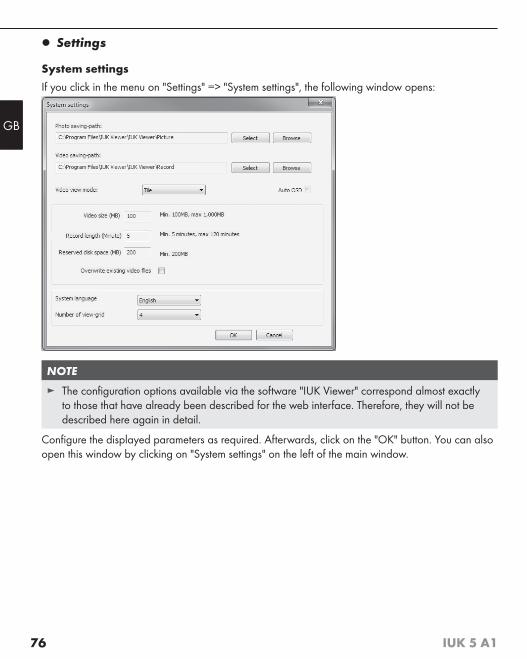
76 IUK 5 A1
GB
▯ Settings
System settings
If you click in the menu on "Settings" => "System settings", the following window opens:
NOTE
► The configuration options available via the software "IUK Viewer" correspond almost exactly to those that have already been described for the web interface. Therefore, they will not be described here again in detail.
Configure the displayed parameters as required. Afterwards, click on the "OK" button. You can also open this window by clicking on "System settings" on the left of the main window.
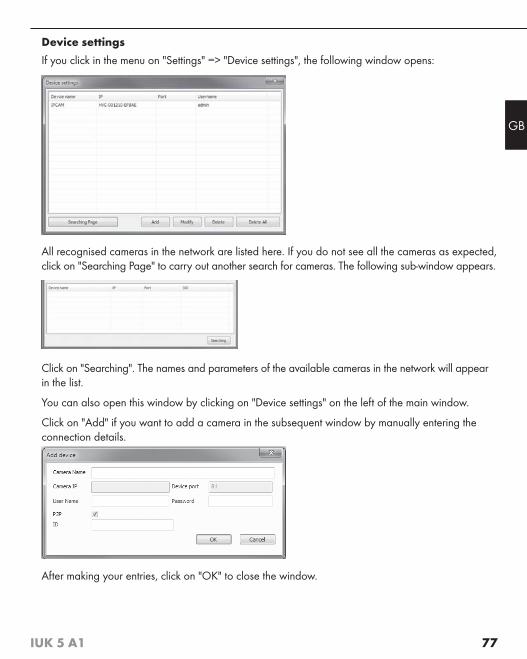
77IUK 5 A1
GB
Device settings
If you click in the menu on "Settings" => "Device settings", the following window opens:
All recognised cameras in the network are listed here. If you do not see all the cameras as expected, click on "Searching Page" to carry out another search for cameras. The following sub-window appears.
Click on "Searching". The names and parameters of the available cameras in the network will appear in the list.
You can also open this window by clicking on "Device settings" on the left of the main window.
Click on "Add" if you want to add a camera in the subsequent window by manually entering the connection details.
After making your entries, click on "OK" to close the window.
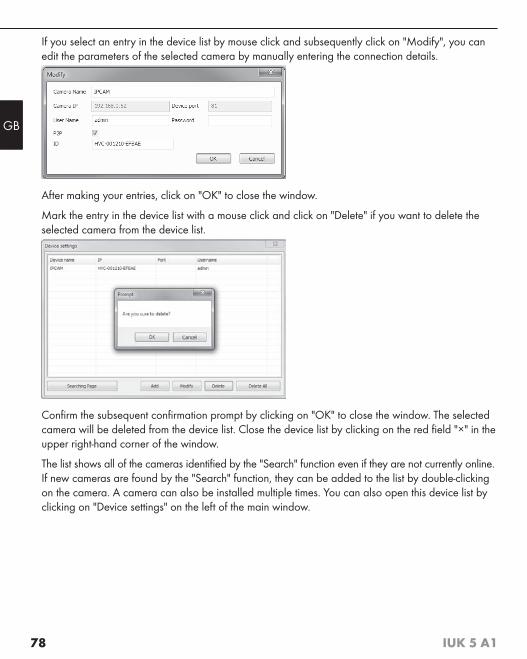
78 IUK 5 A1
GB
If you select an entry in the device list by mouse click and subsequently click on "Modify", you can edit the parameters of the selected camera by manually entering the connection details.
After making your entries, click on "OK" to close the window.
Mark the entry in the device list with a mouse click and click on "Delete" if you want to delete the selected camera from the device list.
Confirm the subsequent confirmation prompt by clicking on "OK" to close the window. The selected camera will be deleted from the device list. Close the device list by clicking on the red field "×" in the upper right-hand corner of the window.
The list shows all of the cameras identified by the "Search" function even if they are not currently online. If new cameras are found by the "Search" function, they can be added to the list by double-clicking on the camera. A camera can also be installed multiple times. You can also open this device list by clicking on "Device settings" on the left of the main window.

79IUK 5 A1
GB
Screen
If you click on "Screen" in the main window, a menu opens via which you can select the desired number of the screen tiles. The maximum number of tiles that can be displayed is 64. You can assign a separate camera image to each tile by dragging a camera from the camera list on the lower left of the main window onto the desired tile. If you double-click on one of the tiles, this image will then be displayed full screen.
If you click on "Screen" on the main window and select "Full screen", the tiles are shown full-screen. Click on "Exit Full screen" to show the tiles back inside the main window.
On the top right above the camera image, 5 icons appear. Their function is displayed if you hover over them with the mouse pointer.
Listen: If the Listen function is activated, the audio signals captured by the camera will be sent to the monitoring computer and played back via its connected speakers or headphones.
Speak: If the Speak function is activated, audio signals that are captured by a microphone connected to the monitoring computer will be transmitted to the camera and played back via its integrated speaker .
Recording: If the Recording function is activated, the camera image is continuously recorded.
Snapshot: If you click on the Snapshot icon, a snapshot of the current camera image is captured and saved.
Close: Clicking on this icon will close the respective camera image on the main window.
Log
If you click on "Log" on the main window and then on "Log window", a window will open in the right of the head bar with the current event logs on the system connection status. Click on "Log" and then "Log window" again to close the window.
About
If you click on "About" in the main window and then on "About", the version number of the program will be displayed. Then click on "OK" to close the window.
The remaining camera controls using the buttons on the left-hand side of the main window correspond exactly to the controls in the web browser already described. When using more than one camera, you must start by clicking on the image of the camera that you want to control with the mouse. The activated image will be bordered in red.

80 IUK 5 A1
GB
CleaningCAUTION
Damage to the device!
► To avoid irreparable damage to the device, ensure that no moisture gets into it during cleaning.
■ Clean the surfaces of the device with a soft, dry cloth. Use a normal commercial detergent and a little water to remove stubborn residue. Ensure that no water gets into the device.
Storage / Disposal
StorageIf you plan not to use the device for an extended period, store it in a clean, dry place away from direct sunlight.
Disposal of the device The adjacent symbol of a crossed-out wheelie bin means that this device is subject to
Directive 2012/19/EU. This directive states that this device may not be disposed of in normal household waste at the end of its useful life, but must be brought to a specially set-up collection point, recycling depot or disposal company.
This disposal is free of charge for the user. Protect the environment and dispose of this device properly.
You can obtain further information from your local disposal company or the city or local authority.
TroubleshootingThis section contains important information about fault identification and rectification. Follow the instructions to avoid hazards and damage.
WARNING
Observe the following safety information to avoid hazards and property damage:
► Repairs to electrical devices should only be carried out by specialists trained by the manufac-turer. Improper repairs can cause considerable risks to users and damage to the device.

81IUK 5 A1
GB
Fault causes and rectificationThe following table will help to identify and rectify minor malfunctions:
Malfunction Possible cause Remedy
The camera does not work.
Power supply inter-rupted.
Plug the supplied mains adapter into a power outlet and connect the plug of the adapter cable into the power supply socket .
Network connection faulty.
Start the "Search Tool" software on the supplied CD to set up the connection between the camera and the computer.
The image is too bright/dark.
The brightness needs adjustment.
Connect to the camera via the web browser. Move the "Brightness" slider to the right to make the image brighter. Move the "Brightness" slider to the left to make the image darker.
The image is blurred.
The contrast needs adjustment.
Connect to the camera via the web browser. Move the "Contrast" slider to the right to set a higher contrast. Move the "Contrast" slider to the left to set a lower contrast.Turn the focus ring clockwise/anticlockwise to focus the image manually.
The camera is unresponsive.
Internal error. Use a small pointed object to carefully carefully push the reset switch through the opening on the under-side of the device.
NOTE
► If you are unable to resolve the problem by taking any of the aforementioned steps, please contact the Customer Service department.

82 IUK 5 A1
GB
Appendix
Notes on the Declaration of Conformity This device complies with the basic requirements and other relevant provisions of the
Electromagnetic Compatibility Directive 2004/108/EC and the RoHS Directive 2011/65/EU. The complete Declaration of Compliance, in its original form, is available from the importer.
Technical data
IP surveillance camera
Operating voltage 5 V via the supplied mains adapter
Current consumption 2 A
Sensor 0.3 MP
Resolution 640 x 480 pixels
Wi-Fi standard 802.11b/g/n
Working frequency 2400–2483.5 MHz
Max. video frame rate 25 fps
Movement radius Vertical: 105°, horizontal: 355°
Min. illumination 2.0 lux @ 500 nm
Operating temperature 5 to +40°C
Storage temperature −10 to +60°C
Humidity (no condensation) 5 to 75%
Dimensions approx. 11.8 x 10.3 x 12.9 cm
Weight approx. 300 g

83IUK 5 A1
GB
Mains adapter
Type MW6FU21NGS
Manufacturer Minwa Electronics Co., Ltd.
Input voltage 100–240 V ~, 50/60 Hz
Current consumption 0.26 A
Output voltage 5 V
Output current 2100 mA |10.5 VA (max)
Protection class II /
WarrantyYou are granted a 3-year warranty on this device, valid from the date of purchase. This device has been manufactured with care and inspected meticulously prior to delivery.
Please retain your receipt as proof of purchase. In the event of a warranty claim, please contact your Customer Service unit by telephone. This is the only way to guarantee free return of your goods.
NOTE
► The warranty only covers claims for material and manufacturing defects, not for transport dam-age, worn parts or damage to fragile components such as buttons or rechargeable batteries.
This product is intended solely for private use and not for commercial purposes. The warranty shall be deemed void in cases of misuse or improper handling, use of force and modifications/repairs which have not been carried out by one of our authorised Service centres.
Your statutory rights are not restricted by this warranty. The warranty period is not prolonged by repairs effected under the warranty. This also applies to replaced and repaired components.
Any damage and defects present at the time of purchase must be reported immediately after unpacking, but no later than two days after the date of purchase.
Repairs carried out after expiry of the warranty period shall be subject to charge.
84 IUK 5 A1
GB
Service Service Great Britain Tel.: 0871 5000 720 (£ 0.10/Min.) E-Mail: [email protected]
IAN 48807
Hotline availability: Monday to Friday 08:00 - 20:00 (CET)
ImporterKOMPERNASS HANDELS GMBH
BURGSTRASSE 21
44867 BOCHUM
GERMANY
www.kompernass.com

IAN 48807
KOMPERNASS HANDELS GMBHBURGSTRASSE 2144867 BOCHUMDEUTSCHLAND / GERMANYwww.kompernass.com
Stand der Informationen · Last Information Update: 04 / 2015 · Ident.-No.: IUK5A1-012015-4