Copyright Black & Decker purchasing the Black & Decker system which will ... Carrying strap 10....
16
GW200 GW225 GW250 GW254
Transcript of Copyright Black & Decker purchasing the Black & Decker system which will ... Carrying strap 10....

1
GW200GW225GW250GW254

2Copyright Black & Decker
3
A
B1
a
b
12
10
32
1
4
5
6
11
7
8
6 (GW254)
4
B2 B3
C
D E1 E2
E3
15
16
13 14
0
B5 B6
B4
5
E4 E5
F1 F2 F3
F4 F5
F6
F7
6
F8 F9 G
7
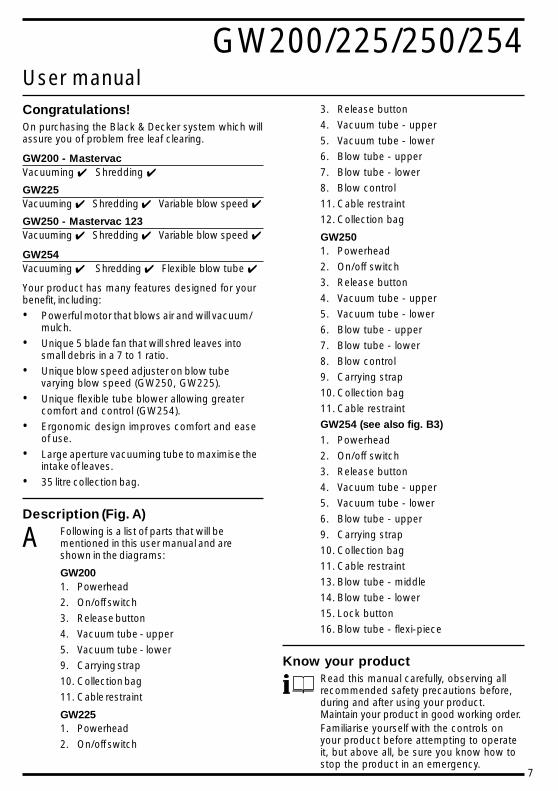
Congratulations!On purchasing the Black & Decker system which willassure you of problem free leaf clearing.
GW200 - MastervacVacuuming ✔ Shredding ✔
GW225Vacuuming ✔ Shredding ✔ Variable blow speed ✔
GW250 - Mastervac 123Vacuuming ✔ Shredding ✔ Variable blow speed ✔
GW254Vacuuming ✔ Shredding ✔ Flexible blow tube ✔
Your product has many features designed for yourbenefit, including:
• Powerful motor that blows air and will vacuum/mulch.
• Unique 5 blade fan that will shred leaves intosmall debris in a 7 to 1 ratio.
• Unique blow speed adjuster on blow tubevarying blow speed (GW250, GW225).
• Unique flexible tube blower allowing greatercomfort and control (GW254).
• Ergonomic design improves comfort and easeof use.
• Large aperture vacuuming tube to maximise theintake of leaves.
• 35 litre collection bag.
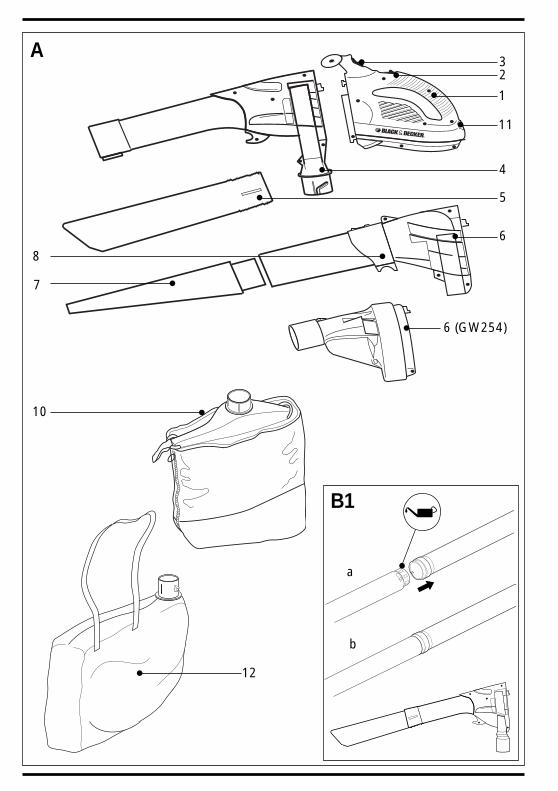
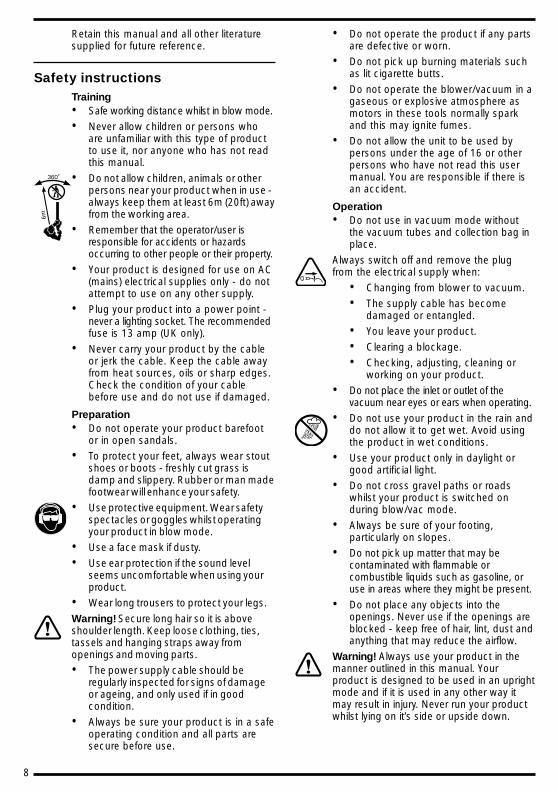
Description (Fig. A)
A Following is a list of parts that will bementioned in this user manual and areshown in the diagrams:
GW2001. Powerhead
2. On/off switch
3. Release button
4. Vacuum tube - upper
5. Vacuum tube - lower
9. Carrying strap
10. Collection bag
11. Cable restraint
GW2251. Powerhead
2. On/off switch
3. Release button
4. Vacuum tube - upper
5. Vacuum tube - lower
6. Blow tube - upper
7. Blow tube - lower
8. Blow control
11. Cable restraint
12. Collection bag
GW2501. Powerhead
2. On/off switch
3. Release button
4. Vacuum tube - upper
5. Vacuum tube - lower
6. Blow tube - upper
7. Blow tube - lower
8. Blow control
9. Carrying strap
10. Collection bag
11. Cable restraint
GW254 (see also fig. B3)
1. Powerhead
2. On/off switch
3. Release button
4. Vacuum tube - upper
5. Vacuum tube - lower
6. Blow tube - upper
9. Carrying strap
10. Collection bag
11. Cable restraint
13. Blow tube - middle
14. Blow tube - lower
15. Lock button
16. Blow tube - flexi-piece
Know your productRead this manual carefully, observing allrecommended safety precautions before,during and after using your product.Maintain your product in good working order.Familiarise yourself with the controls onyour product before attempting to operateit, but above all, be sure you know how tostop the product in an emergency.
User manual
GW200/225/250/254
8
Retain this manual and all other literaturesupplied for future reference.
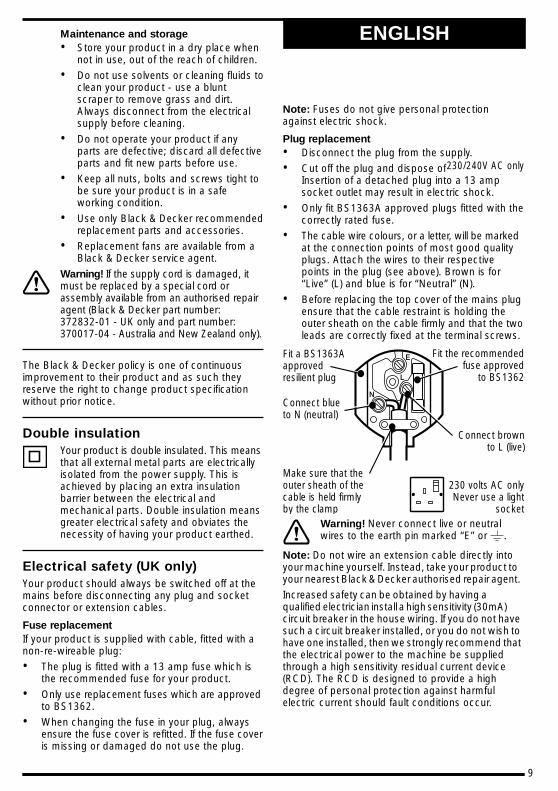
Safety instructionsTraining• Safe working distance whilst in blow mode.
• Never allow children or persons whoare unfamiliar with this type of productto use it, nor anyone who has not readthis manual.
6 m
360˚ • Do not allow children, animals or otherpersons near your product when in use -always keep them at least 6m (20ft) awayfrom the working area.
• Remember that the operator/user isresponsible for accidents or hazardsoccurring to other people or their property.
• Your product is designed for use on AC(mains) electrical supplies only - do notattempt to use on any other supply.
• Plug your product into a power point -never a lighting socket. The recommendedfuse is 13 amp (UK only).
• Never carry your product by the cableor jerk the cable. Keep the cable awayfrom heat sources, oils or sharp edges.Check the condition of your cablebefore use and do not use if damaged.
Preparation• Do not operate your product barefoot
or in open sandals.
• To protect your feet, always wear stoutshoes or boots - freshly cut grass isdamp and slippery. Rubber or man madefootwear will enhance your safety.
• Use protective equipment. Wear safetyspectacles or goggles whilst operatingyour product in blow mode.
• Use a face mask if dusty.
• Use ear protection if the sound levelseems uncomfortable when using yourproduct.
• Wear long trousers to protect your legs.
Warning! Secure long hair so it is aboveshoulder length. Keep loose clothing, ties,tassels and hanging straps away fromopenings and moving parts.
• The power supply cable should beregularly inspected for signs of damageor ageing, and only used if in goodcondition.
• Always be sure your product is in a safeoperating condition and all parts aresecure before use.
• Do not operate the product if any partsare defective or worn.
• Do not pick up burning materials suchas lit cigarette butts.
• Do not operate the blower/vacuum in agaseous or explosive atmosphere asmotors in these tools normally sparkand this may ignite fumes.
• Do not allow the unit to be used bypersons under the age of 16 or otherpersons who have not read this usermanual. You are responsible if there isan accident.
Operation• Do not use in vacuum mode without
the vacuum tubes and collection bag inplace.
!
Always switch off and remove the plugfrom the electrical supply when:
• Changing from blower to vacuum.
• The supply cable has becomedamaged or entangled.
• You leave your product.
• Clearing a blockage.
• Checking, adjusting, cleaning orworking on your product.
• Do not place the inlet or outlet of thevacuum near eyes or ears when operating.
• Do not use your product in the rain anddo not allow it to get wet. Avoid usingthe product in wet conditions.
• Use your product only in daylight orgood artificial light.
• Do not cross gravel paths or roadswhilst your product is switched onduring blow/vac mode.
• Always be sure of your footing,particularly on slopes.
• Do not pick up matter that may becontaminated with flammable orcombustible liquids such as gasoline, oruse in areas where they might be present.
• Do not place any objects into theopenings. Never use if the openings areblocked - keep free of hair, lint, dust andanything that may reduce the airflow.
Warning! Always use your product in themanner outlined in this manual. Yourproduct is designed to be used in an uprightmode and if it is used in any other way itmay result in injury. Never run your productwhilst lying on it’s side or upside down.
9
Maintenance and storage• Store your product in a dry place when
not in use, out of the reach of children.
• Do not use solvents or cleaning fluids toclean your product - use a bluntscraper to remove grass and dirt.Always disconnect from the electricalsupply before cleaning.
• Do not operate your product if anyparts are defective; discard all defectiveparts and fit new parts before use.
• Keep all nuts, bolts and screws tight tobe sure your product is in a safeworking condition.
• Use only Black & Decker recommendedreplacement parts and accessories.
• Replacement fans are available from aBlack & Decker service agent.
Warning! If the supply cord is damaged, itmust be replaced by a special cord orassembly available from an authorised repairagent (Black & Decker part number:372832-01 - UK only and part number:370017-04 - Australia and New Zealand only).
The Black & Decker policy is one of continuousimprovement to their product and as such theyreserve the right to change product specificationwithout prior notice.
Double insulationYour product is double insulated. This meansthat all external metal parts are electricallyisolated from the power supply. This isachieved by placing an extra insulationbarrier between the electrical andmechanical parts. Double insulation meansgreater electrical safety and obviates thenecessity of having your product earthed.
Electrical safety (UK only)Your product should always be switched off at themains before disconnecting any plug and socketconnector or extension cables.
Fuse replacementIf your product is supplied with cable, fitted with anon-re-wireable plug:
• The plug is fitted with a 13 amp fuse which isthe recommended fuse for your product.
• Only use replacement fuses which are approvedto BS1362.
• When changing the fuse in your plug, alwaysensure the fuse cover is refitted. If the fuse coveris missing or damaged do not use the plug.
Note: Fuses do not give personal protectionagainst electric shock.
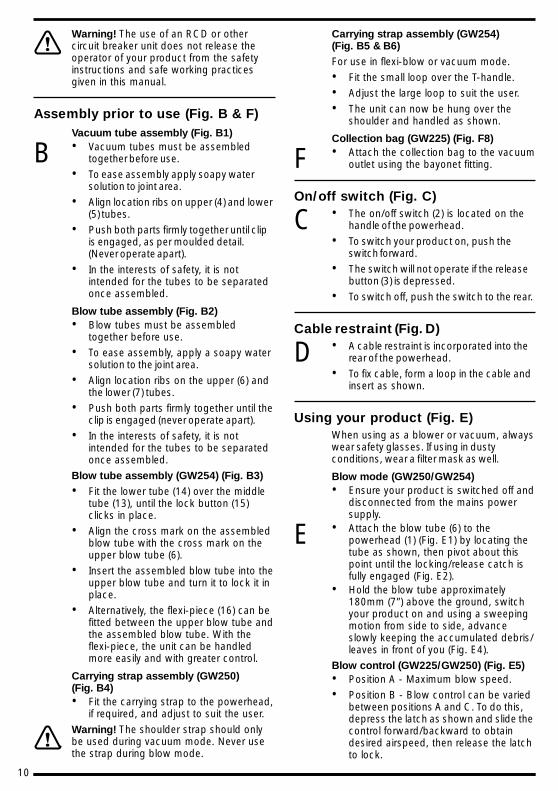
Plug replacement• Disconnect the plug from the supply.
• Cut off the plug and dispose of immediately.Insertion of a detached plug into a 13 ampsocket outlet may result in electric shock.
• Only fit BS1363A approved plugs fitted with thecorrectly rated fuse.
• The cable wire colours, or a letter, will be markedat the connection points of most good qualityplugs. Attach the wires to their respectivepoints in the plug (see above). Brown is for“Live” (L) and blue is for “Neutral” (N).
• Before replacing the top cover of the mains plugensure that the cable restraint is holding theouter sheath on the cable firmly and that the twoleads are correctly fixed at the terminal screws.
Fit a BS1363Aapprovedresilient plug
Connect blueto N (neutral)
Make sure that theouter sheath of thecable is held firmlyby the clamp
Fit the recommendedfuse approved
to BS1362
Connect brownto L (live)
230 volts AC onlyNever use a light
socketWarning! Never connect live or neutralwires to the earth pin marked “E” or .
Note: Do not wire an extension cable directly intoyour machine yourself. Instead, take your product toyour nearest Black & Decker authorised repair agent.
Increased safety can be obtained by having aqualified electrician install a high sensitivity (30mA)circuit breaker in the house wiring. If you do not havesuch a circuit breaker installed, or you do not wish tohave one installed, then we strongly recommend thatthe electrical power to the machine be suppliedthrough a high sensitivity residual current device(RCD). The RCD is designed to provide a highdegree of personal protection against harmfulelectric current should fault conditions occur.
230/240V AC only
ENGLISH
10
Warning! The use of an RCD or othercircuit breaker unit does not release theoperator of your product from the safetyinstructions and safe working practicesgiven in this manual.
Assembly prior to use (Fig. B & F)Vacuum tube assembly (Fig. B1)
B • Vacuum tubes must be assembledtogether before use.
• To ease assembly apply soapy watersolution to joint area.
• Align location ribs on upper (4) and lower(5) tubes.
• Push both parts firmly together until clipis engaged, as per moulded detail.(Never operate apart).
• In the interests of safety, it is notintended for the tubes to be separatedonce assembled.
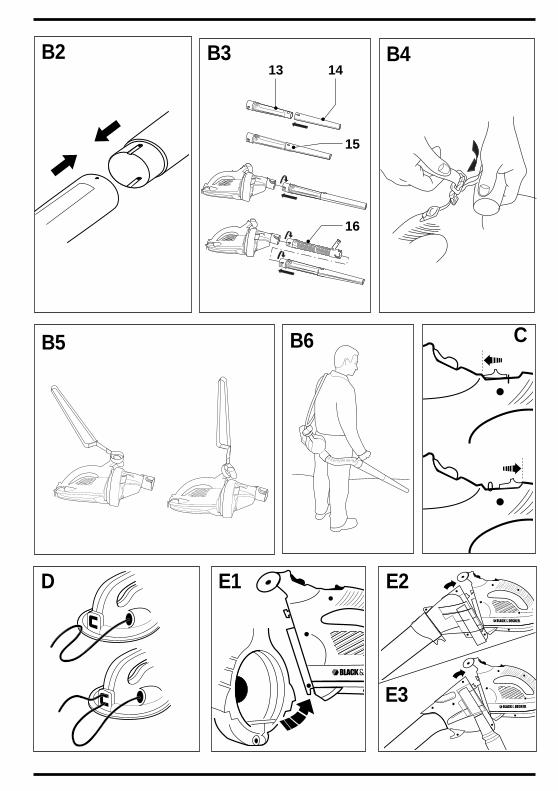
Blow tube assembly (Fig. B2)• Blow tubes must be assembled
together before use.
• To ease assembly, apply a soapy watersolution to the joint area.
• Align location ribs on the upper (6) andthe lower (7) tubes.
• Push both parts firmly together until theclip is engaged (never operate apart).
• In the interests of safety, it is notintended for the tubes to be separatedonce assembled.
Blow tube assembly (GW254) (Fig. B3)
• Fit the lower tube (14) over the middletube (13), until the lock button (15)clicks in place.
• Align the cross mark on the assembledblow tube with the cross mark on theupper blow tube (6).
• Insert the assembled blow tube into theupper blow tube and turn it to lock it inplace.
• Alternatively, the flexi-piece (16) can befitted between the upper blow tube andthe assembled blow tube. With theflexi-piece, the unit can be handledmore easily and with greater control.
Carrying strap assembly (GW250)(Fig. B4)• Fit the carrying strap to the powerhead,
if required, and adjust to suit the user.
Warning! The shoulder strap should onlybe used during vacuum mode. Never usethe strap during blow mode.
Carrying strap assembly (GW254)(Fig. B5 & B6)
For use in flexi-blow or vacuum mode.
• Fit the small loop over the T-handle.
• Adjust the large loop to suit the user.
• The unit can now be hung over theshoulder and handled as shown.
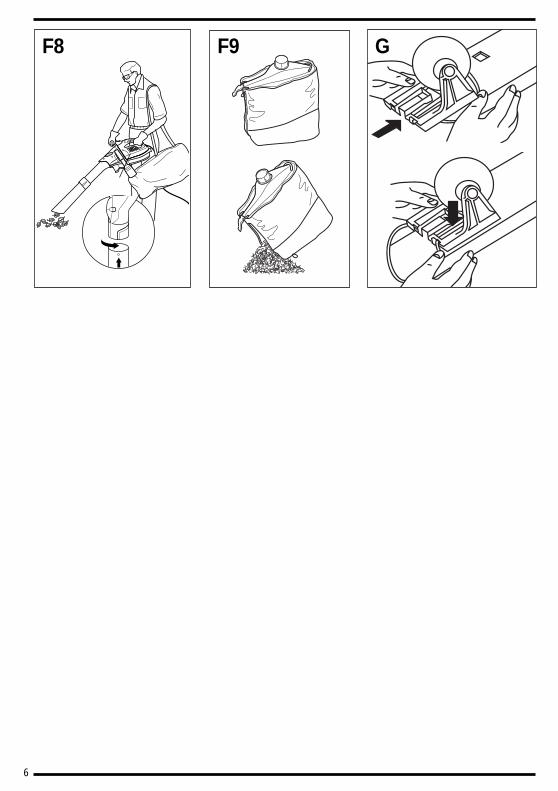
Collection bag (GW225) (Fig. F8)
F • Attach the collection bag to the vacuumoutlet using the bayonet fitting.
On/off switch (Fig. C)
C • The on/off switch (2) is located on thehandle of the powerhead.
• To switch your product on, push theswitch forward.
• The switch will not operate if the releasebutton (3) is depressed.
• To switch off, push the switch to the rear.
Cable restraint (Fig. D)
D • A cable restraint is incorporated into therear of the powerhead.
• To fix cable, form a loop in the cable andinsert as shown.
Using your product (Fig. E)When using as a blower or vacuum, alwayswear safety glasses. If using in dustyconditions, wear a filter mask as well.
Blow mode (GW250/GW254)• Ensure your product is switched off and
disconnected from the mains powersupply.
E • Attach the blow tube (6) to thepowerhead (1) (Fig. E1) by locating thetube as shown, then pivot about thispoint until the locking/release catch isfully engaged (Fig. E2).
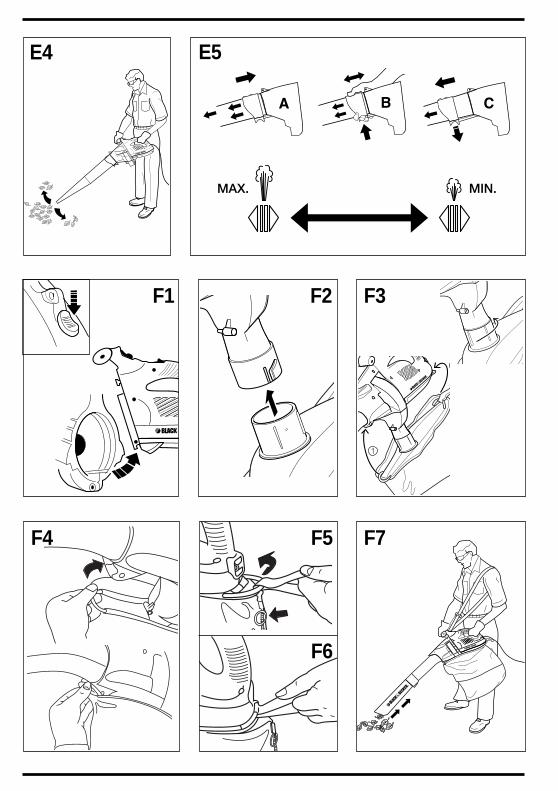
• Hold the blow tube approximately180mm (7”) above the ground, switchyour product on and using a sweepingmotion from side to side, advanceslowly keeping the accumulated debris/leaves in front of you (Fig. E4).
Blow control (GW225/GW250) (Fig. E5)• Position A - Maximum blow speed.
• Position B - Blow control can be variedbetween positions A and C. To do this,depress the latch as shown and slide thecontrol forward/backward to obtaindesired airspeed, then release the latchto lock.
11
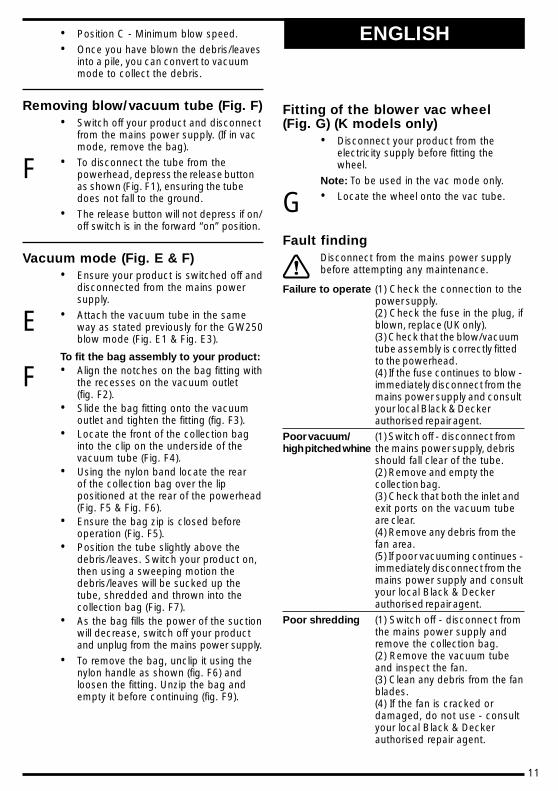
• Position C - Minimum blow speed.
• Once you have blown the debris/leavesinto a pile, you can convert to vacuummode to collect the debris.
Removing blow/vacuum tube (Fig. F)• Switch off your product and disconnect
from the mains power supply. (If in vacmode, remove the bag).
F • To disconnect the tube from thepowerhead, depress the release buttonas shown (Fig. F1), ensuring the tubedoes not fall to the ground.
• The release button will not depress if on/off switch is in the forward “on” position.
Vacuum mode (Fig. E & F)• Ensure your product is switched off and
disconnected from the mains powersupply.
E • Attach the vacuum tube in the sameway as stated previously for the GW250blow mode (Fig. E1 & Fig. E3).
To fit the bag assembly to your product:
F • Align the notches on the bag fitting withthe recesses on the vacuum outlet(fig. F2).
• Slide the bag fitting onto the vacuumoutlet and tighten the fitting (fig. F3).
• Locate the front of the collection baginto the clip on the underside of thevacuum tube (Fig. F4).
• Using the nylon band locate the rearof the collection bag over the lippositioned at the rear of the powerhead(Fig. F5 & Fig. F6).
• Ensure the bag zip is closed beforeoperation (Fig. F5).
• Position the tube slightly above thedebris/leaves. Switch your product on,then using a sweeping motion thedebris/leaves will be sucked up thetube, shredded and thrown into thecollection bag (Fig. F7).
• As the bag fills the power of the suctionwill decrease, switch off your productand unplug from the mains power supply.
• To remove the bag, unclip it using thenylon handle as shown (fig. F6) andloosen the fitting. Unzip the bag andempty it before continuing (fig. F9).
Fitting of the blower vac wheel(Fig. G) (K models only)
• Disconnect your product from theelectricity supply before fitting thewheel.
Note: To be used in the vac mode only.
G • Locate the wheel onto the vac tube.
Fault findingDisconnect from the mains power supplybefore attempting any maintenance.
Failure to operate (1) Check the connection to thepower supply.(2) Check the fuse in the plug, ifblown, replace (UK only).(3) Check that the blow/vacuumtube assembly is correctly fittedto the powerhead.(4) If the fuse continues to blow -immediately disconnect from themains power supply and consultyour local Black & Deckerauthorised repair agent.
Poor vacuum/ (1) Switch off - disconnect fromhigh pitched whine the mains power supply, debris
should fall clear of the tube.(2) Remove and empty thecollection bag.(3) Check that both the inlet andexit ports on the vacuum tubeare clear.(4) Remove any debris from thefan area.(5) If poor vacuuming continues -immediately disconnect from themains power supply and consultyour local Black & Deckerauthorised repair agent.
Poor shredding (1) Switch off - disconnect fromthe mains power supply andremove the collection bag.(2) Remove the vacuum tubeand inspect the fan.(3) Clean any debris from the fanblades.(4) If the fan is cracked ordamaged, do not use - consultyour local Black & Deckerauthorised repair agent.
ENGLISH
12
Cleaning your productDisconnect from the mains power supplybefore any cleaning or maintenance iscarried out. Keep your product dry.Under no circumstances spray with water.
• Clean your product regularly.
• Remove any leaves stuck to the inside of thevacuum tube.
• Plastic parts may be cleaned using a mild soapand a cloth dampened with hot water.
Do not use any type of detergent, cleaneror solvent which may contain chemicalsthat could seriously damage the plastic.
• Self lubricating bearings are used in yourproduct, therefore lubrication is not required.
Protecting the environmentBlack & Decker provides a facility forrecycling Black & Decker products oncethey have reached the end of their workinglife. This service is provided free of charge.To take advantage of this service pleasereturn your product to any authorisedrepair agent who will collect them on ourbehalf.
You can check the location of your nearestauthorised repair agent by contacting your localBlack & Decker office at the address indicated inthis manual. Alternatively, a list of authorisedBlack & Decker repair agents and full details of ourafter-sales service and contacts are available on theInternet at: www.2helpU.com.
GuaranteeBlack & Decker is confident of the quality of itsproducts and offers an outstanding guarantee.This guarantee statement is in addition to and in noway prejudices your statutory rights. The guaranteeis valid within the territories of the Member Statesof the European Union and the European FreeTrade Area.
If a Black & Decker product becomes defective dueto faulty materials, workmanship or lack ofconformity, within 24 months from the date ofpurchase, Black & Decker guarantees to replacedefective parts, repair products subjected to fairwear and tear or replace such products to ensureminimum inconvenience to the customer unless:
• The product has been used for trade,professional or hire purposes;
• The product has been subjected to misuse orneglect;
• The product has sustained damage throughforeign objects, substances or accidents;
• Repairs have been attempted by persons otherthan authorised repair agents or Black & Deckerservice staff.
To claim on the guarantee, you will need to submitproof of purchase to the seller or an authorisedrepair agent. You can check the location of yournearest authorised repair agent by contacting yourlocal Black & Decker office at the address indicatedin this manual. Alternatively, a list of authorisedBlack & Decker repair agents and full details of ourafter-sales service and contacts are available on theInternet at: www.2helpU.com.
Other outdoor toolsBlack & Decker has a full range of outdoor powertools that make life in the garden easy. If you wouldlike further information on the following products,please contact our Service and Information Centre(see the address page towards the end of thismanual) or your local Black & Decker retailer.
String trimmersChainsawsCordless shearHedgetrimmersLawnmowersLawnrakersLeafbustersShredders
Not all products are available in all countries.
13
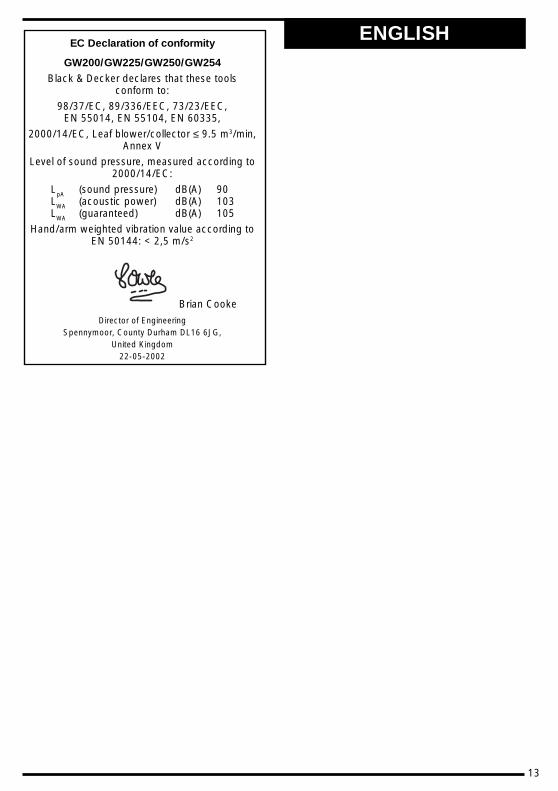
ENGLISHEC Declaration of conformity
GW200/GW225/GW250/GW254
Black & Decker declares that these toolsconform to:
98/37/EC, 89/336/EEC, 73/23/EEC,EN 55014, EN 55104, EN 60335,
2000/14/EC, Leaf blower/collector ≤ 9.5 m3/min,Annex V
Level of sound pressure, measured according to2000/14/EC:
LpA (sound pressure) dB(A) 90LWA (acoustic power) dB(A) 103LWA (guaranteed) dB(A) 105
Hand/arm weighted vibration value according toEN 50144: < 2,5 m/s2
Brian Cooke
Director of EngineeringSpennymoor, County Durham DL16 6JG,
United Kingdom22-05-2002

Australia DEWALT Industrial Power Tool Company Tel. 03 9895 92007 Clarice Road Fax 03 9899 7465Box Hill, Victoria 3128
New Zealand Black & Decker Tel. 09 579 760081 Hugo Johnson Drive Fax 09 579 8200Penrose, Auckland, New Zealand
South Africa Black & Decker South Africa (Pty) Ltd Tel. (011) 653-1400Physical address: Fax (011) 653-149939 Commerce CrescentEastgate, ext. 12, Sandton, Kramerville 2148Postal address:Postnet Suite 107, Private Bag X65Halfway House 1685
United Kingdom Black & Decker Tel. 01753 511234210 Bath Road Fax 01753 551155Slough, Berkshire SL1 3YD Helpline 01753 574277
578548-06
Dea
ler
add
ress
Dat
e o
f p
urch
ase
○
○
○
○
○
○
○
○
○
○
○
○
○
○
○
○
○
○
○
○
○
○
○
○
○
○
○
○
○
○
○
○
○
○
○
○
○
○
○
○
○
○
○
○
○
○
○
○
○
○
○
○
○
○
○
○
○
○
○
○
○
○
○
○
○
○
○
○
○
○
○
○
○
○
✁
Nam
e:...
......
......
......
......
......
......
......
......
......
......
......
......
......
......
......
......
...
Ad
dre
ss: .
......
......
......
......
......
......
......
......
......
......
......
......
......
......
......
......
..
Tow
n:...
......
......
......
......
......
......
......
......
......
......
......
......
......
......
......
......
....
Post
al c
ode:
......
......
......
......
......
......
......
......
......
......
......
......
......
......
......
...
Was
thi
s to
ol a
gift
?
Yes
No
Was
thi
s to
ol y
our
first
pur
chas
e?
Yes
No
Was
thi
s to
ol b
oug
ht a
s a
rep
lace
men
t?
Yes
No
Dea
ler
add
ress
: ....
......
......
......
......
......
......
......
......
......
......
......
......
......
......
......
......
......
......
......
......
......
......
......
......
......
......
......
......
......
......
......
......
.....
......
......
......
......
......
......
......
......
......
......
......
......
......
......
......
......
......
......
.....
Dat
a p
rote
ctio
n ac
t:Ti
ck t
he b
ox if
you
pre
fer
not
to r
ecei
ve fu
rthe
r in
form
atio
n.
GU
AR
AN
TEE
CA
RD
Please co
mp
lete this section im
med
iately after the purchase o
f your to
ol and
send it to
Black &
Decker in yo
urco
untry. If you live in A
ustralia or N
ew Z
ealand, p
lease register b
y using the alternative g
uarantee cardsup
plied
.
○
○
○
○
○
○
○
○
○
○
○
○
○
○
○
○
○
○
○
○
○
○
○
○
○
○
○
○
○
○
○
○
○
○
○
○
○
○
○
○
○
○
○
○
○
○
○
○
○
○
○
○
○
○
○
○
○
○
○
○
○
○
○
○
○
○
○
○
○
○
○
○
○
✁
578548-06