Camera foto digitala - i.dedeman.ro · Digital camera Digitális fényképezőgép PNI Explorer M1...
24
Digital camera Digitális fényképezőgép PNI Explorer M1 Manual de utilizare User manual Használati útmutató Camera foto digitala
Transcript of Camera foto digitala - i.dedeman.ro · Digital camera Digitális fényképezőgép PNI Explorer M1...

Digital cameraDigitális fényképezőgép
PNI Explorer M1
Manual de utilizare User manual
Használati útmutató
Camera foto digitala

1
Ÿ Rezolutie video: 1280x720 HD, 640x480 VGA, 320x240 QVGA, Ÿ Rezolutie foto: 4896x3672 (18M), 4608x3456 (16M), 4416x3312 (14M), 4000x3000
(12M), 3648x2736 (10M), 3264x2448 (8M), 3648x2048 (7M HD), 2592x1944 (5M), 2048x1536 (3M), 1920x1080 (2M HD), 640x480 (VGA)
Ÿ Ecran LCD 2.7 inchŸ 8X zoom digitalŸ Stabilizator imagineŸ Detectia feteiŸ Captura zambetŸ Fotografiere continuaŸ Slot card SD (pana la 32GB)Ÿ Flash incorporatŸ Software PhoTags Express ce va permite editarea, tiparirea sau trimiterea prin e-mail
a fotografiilor
Caracteristici principale RO
Ÿ Camera digitalaŸ CD cu fisierul de instalare a software-ului PhoTags Express Ÿ Cablu USB Ÿ Manual de utilizareŸ CureaŸ Husa cameraŸ Baterie Li-ionŸ Incarcator 220V->5V
Continut pachet
Ÿ Minim 128 MB RAM, mai mult de 150MB spatiu liber pe discŸ Interfata USB Ÿ CD-ROM Ÿ Rezolutie recomandata pentru ecran: cel putin 1024 X 768 pixels.
Cerinte de sistem Windows XP/7
Ÿ Cel putin Procesor 800MHz si memorie 512 MB RAMŸ Cel putin 15GB memorie libera pe HDDŸ Suport pentru grafica super VGA Ÿ Interfata USB Ÿ CD-ROM
Cerinte de sistem pentru Windows Vista
Ÿ Procesor Power Macintosh G3 500 MHz sau mai nouŸ Mac OS X versiunea 10.5.X sau mai nouaŸ RAM de cel putin 128 MB (recomandat 256 MB), 150 MB spatiu liber pe discŸ Rezolutie cel putin 800 x 600 pxNota: Folosita pe un Mac camera nu are nevoie de software.
Cerinte de sistem pentru Macintosh
2
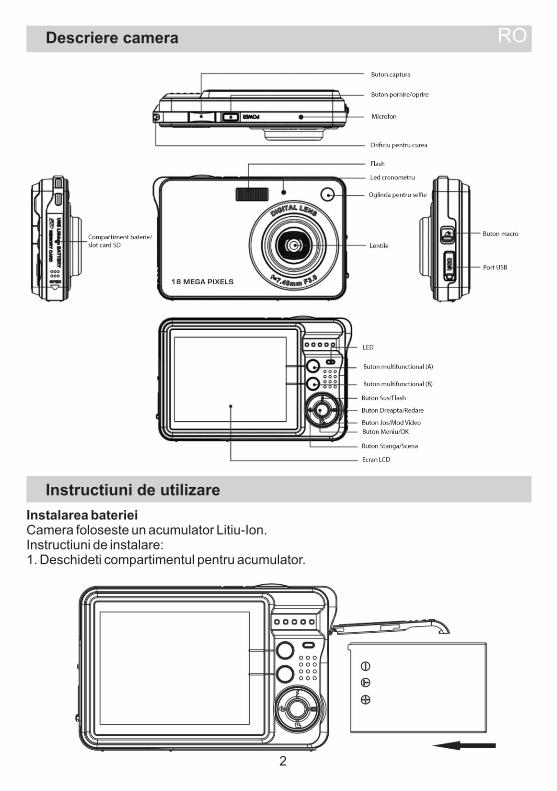
Descriere camera RO
Instructiuni de utilizare
Instalarea baterieiCamera foloseste un acumulator Litiu-Ion. Instructiuni de instalare:1. Deschideti compartimentul pentru acumulator.
3
1. Introduceti acumulatorul respectand polaritatea. 2. Inchideti compartimentul pentru acumulator.Nota: Scoateti bateria daca nu folositi camera timp indelungat.
Incarcarea acumulatoruluiPentru a incarca acumulatorul, conectati camera la PC sau la un alimentator 220V->5V prin cablul USB. In timpul incarcarii ledul va clipi si se va stinge cand acumulatorul va fi complet incarcat.
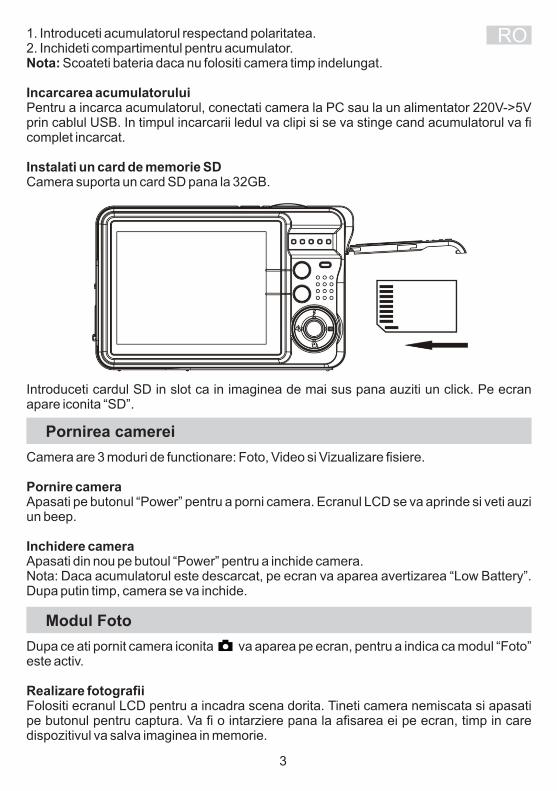
Instalati un card de memorie SDCamera suporta un card SD pana la 32GB.
RO
Introduceti cardul SD in slot ca in imaginea de mai sus pana auziti un click. Pe ecran apare iconita “SD”.
Pornirea camerei
Camera are 3 moduri de functionare: Foto, Video si Vizualizare fisiere.
Pornire camera Apasati pe butonul “Power” pentru a porni camera. Ecranul LCD se va aprinde si veti auzi un beep.
Inchidere cameraApasati din nou pe butoul “Power” pentru a inchide camera.Nota: Daca acumulatorul este descarcat, pe ecran va aparea avertizarea “Low Battery”. Dupa putin timp, camera se va inchide.
Modul Foto
Dupa ce ati pornit camera iconita va aparea pe ecran, pentru a indica ca modul “Foto” este activ.
Realizare fotografiiFolositi ecranul LCD pentru a incadra scena dorita. Tineti camera nemiscata si apasati pe butonul pentru captura. Va fi o intarziere pana la afisarea ei pe ecran, timp in care dispozitivul va salva imaginea in memorie.

4
Numarul de poze pe care le puteti realiza cu setarile curente va fi afisat pe ecran.Daca memoria este plina si incercati sa faceti o poza, pe ecran va aparea “Memory Full Insert a SD memory Card to Transfer and Take More Photos!”. Descarcati pozele in computer pentru a goli cardul sau inlocuiti-l cu un card gol.
Functia zoom digitalPuteti mari subiectul incadrat pana de 8 ori. Apasati butonul multifunctional A pentru a face zoom si butonul B pentru a micsora. iconita va aparea pe ecran.
FlashIn conditii de iluminare scazuta, e mai bine sa folositi flash-ul.Apasati pe butonul Flash. Iconita va aparea pe ecran. Daca flash-ul nu este pregatit, un led rosu se va aprinde deasupra ecranului.Apasati butonul Flash pana cand pe ecran va aparea iconita . Acum, modul “Ochi rosii” este activ.
ScenaCamera ofera mai multe setari prestabilite: Auto / Portret noapte / Scena noapte / Portret / Scena / Sport / Petrecere / Plaja / Sensibilitate ridicata. Selectati scena in functie de lumina si de conditiile de mediu.
Apasati butonul Meniu. Apasati butonul Dreapta/Stanga pentru a selecta iconita .
Folositi butoanele Sus si Jos si selectati una din optiunile: Auto / Portret noapte / Scena noapte / Portret / Scena / Sport / Petrecere / Plaja / Sensibilitate ridicata. Apasati butonul A pentru a confirma.
Dimensiune imagineDimensiunea si calitatea imaginii influenteaza numarul de imagini care pot fi salvate pe card.
Pentru a seta dimensiunea imaginii:1. Apasati butonul Meniu.2. Apasati butonul Dreapta/Stanga si selectati iconita MP3. Apasati Sus/Jos si selectati: 4896x3672 (18M), 4608x3456 (16M), 4416x3312 (14M), 4000x3000 (12M), 3648x2736 (10M), 3264x2448 (8M), 3648x2048 (7M HD), 2592x1944 (5M), 2048x1536 (3M), 1920x1080 (2M HD), 640x480 (VGA).4. Apasati butonul meniu sau butonul A pentru a confirma. Dimensiunea imaginii va aparea pe ecran.
Nota: Apasati butonul B pentru a iesi din orice meniu.
Stabilizator imagine1. Apasati butonul Meniu.2. Apasati butonul Dreapta/Stanga si selectati iconita 3. Apasati Sus/Jos si selectati: On/Off.Apasati butonul meniu sau butonul A pentru a confirma. Iconita va aparea pe ecran daca ati activat aceasta functie.
RO

5
RODetectie fata1. Apasati butonul Meniu.2. Apasati butonul Dreapta/Stanga si selectati iconita .3. Apasati Sus/Jos si selectati: On/Off.4. Apasati butonul meniu sau butonul A pentru a confirma
Captura zambet1. Apasati butonul Meniu.2. Apasati butonul Dreapta/Stanga si selectati iconita .3. Apasati Sus/Jos si selectati: On/Off.4. Apasati butonul meniu sau butonul A pentru a confirma.
Captura continuaPuteti face maxim 6 fotografii apasand doar o singura data butonul de captura.1. Apasati butonul Meniu2. Apasati butonul Dreapta/Stanga si selectati iconita .3. Apasati Sus/Jos si selectati: On/Off.4. Apasati butonul meniu sau butonul A pentru a confirma.
Nota: Dimensiunea imaginii va deveni automat VGA daca este activat modul captura imagine.
CronometruVa puteti incadra si Dvs. intr-o fotografie daca activati aceasta functie 1. Apasati butonul Meniu2. Apasati butonul Dreapta/Stanga si selectati iconita . 3. Apasati Sus/Jos si selectati 2, 5 sau 10 secunde.4. Apasati butonul meniu sau butonul A pentru a confirma.
SetariPuteti seta Expunerea, ISO, Echilibru alb, Claritate, Calitate, Dimensiune, Data, Limba, Frecventa, Sunet beep, Format etc.1. Apasati butonul Meniu2. Apasati butonul Dreapta/Stanga si selectati iconita .
Modul Video
Note: Pentru a inregistra trebuie sa instalati un card SD (pana la 32GB).
Apasati butonul “Jos” pentru a intra in modul Video. Iconita va aparea pe ecran.
Apasati butonul Captura pentru a porni/opri inregistrarea.
1. Puteti vizualiza inregistrarile direct in camera sau intr-un Mac prin Quick time sau prin Windows Media player.
Nota: Fisierele video vor avea extensia AVI.

6
Mod vizualizare imagini RO
Apasati butonul Dreapta pentru a intra in modul de vizualizare. Puteti vizualiza fotografiile si inregistrarile video salvate pe cardul SD. Puteti sa le rotiti, sa le protejati pentru a nu fi sterse, le puteti sterge sau le puteti decupa direct din camera.
Afisare pictogrameCand camera este in modul Redare apasati tasta Jos. Pe ecran vor fi afisate imaginile sub forma de pictograme. Selectati un fisier JPG, apasati tasta meniu sau tasta multifunctionala A pentru a afisa fisierul selectat pe intreg ecranul.
Nota: Cand selectati un fisier JPG, iconita va aparea pe ecran.
Protejarea fisierelorPuteti proteja atat pozele cat si inregistrarile video de stergerea accidentala. 1. Apasati butonul Meniu2. Apasati butonul Dreapta/Stanga si selectati iconita .3. Apasati Sus/Jos si selectati: Blocheaza/Deblocheaza.4. Apasati butonul meniu sau butonul A pentru a confirma.5. Iconita va aparea pe ecran daca selectati “Blocheaza”.
StergerePuteti sterge pozele sau inregistrarile video nedorite salvate pe cardul SD. Fisierele care au fost protejate nu vor fi sterse.
Decupare imaginiPuteti decupa imaginile pentru a pastra doar o anumita portiune din scena. Imaginea decupata va fi salvata ca o imagine separata. TiparirePuteti tipari fotografiile direct din camera folosind aplicatia “Pictbridge”.
7
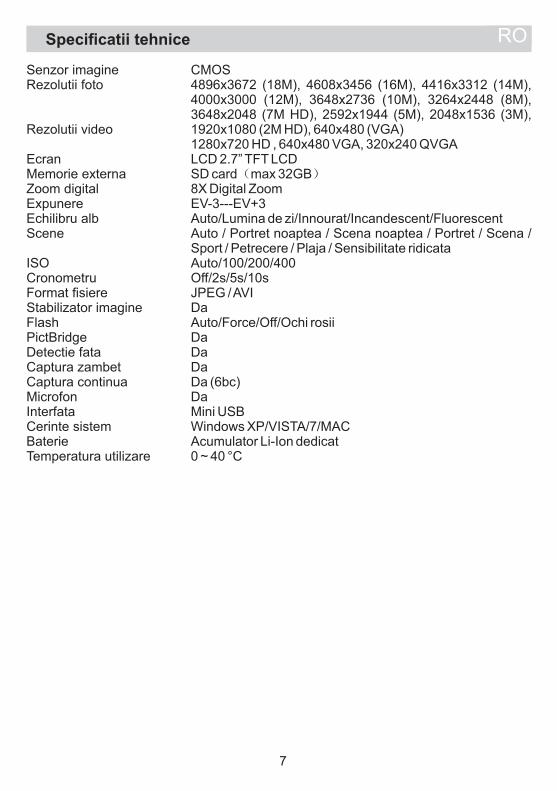
Specificatii tehnice RO
Senzor imagineRezolutii foto
Rezolutii video
Ecran Memorie externaZoom digitalExpunereEchilibru albScene
ISOCronometruFormat fisiereStabilizator imagineFlashPictBridgeDetectie fataCaptura zambetCaptura continuaMicrofonInterfataCerinte sistemBaterie Temperatura utilizare
CMOS 4896x3672 (18M), 4608x3456 (16M), 4416x3312 (14M), 4000x3000 (12M), 3648x2736 (10M), 3264x2448 (8M), 3648x2048 (7M HD), 2592x1944 (5M), 2048x1536 (3M), 1920x1080 (2M HD), 640x480 (VGA)1280x720 HD , 640x480 VGA, 320x240 QVGALCD 2.7” TFT LCDSD card(max 32GB)8X Digital ZoomEV-3---EV+3Auto/Lumina de zi/Innourat/Incandescent/FluorescentAuto / Portret noaptea / Scena noaptea / Portret / Scena / Sport / Petrecere / Plaja / Sensibilitate ridicataAuto/100/200/400Off/2s/5s/10sJPEG / AVI DaAuto/Force/Off/Ochi rosiiDaDaDaDa (6bc)DaMini USBWindows XP/VISTA/7/MACAcumulator Li-Ion dedicat0 ~ 40 °C

8
Ÿ Video resolutions: 1280x720 HD, 640x480 VGA, 320x240 QVGAŸ Photo resolutions: 4896x3672 (18M), 4608x3456 (16M), 4416x3312 (14M),
4000x3000 (12M), 3648x2736 (10M), 3264x2448 (8M), 3648x2048 (7M HD), 2592x1944 (5M), 2048x1536 (3M), 1920x1080 (2M HD), 640x480 (VGA)
Ÿ 2.7 inch TFT LCDŸ 8X digital zoomŸ Anti-shake functionŸ Face detectionŸ Smile CaptureŸ Continue ShotŸ SD memory card slot accepts SD compatible memory card up to 32GB.Ÿ Built in FlashŸ PhoTags Express software for managing and enhancing your photos, printing,
sending photos by e-mails and much more
Key Features EN
Ÿ Digital CameraŸ PhoTags Express software installation CDŸ USB cableŸ User's manualŸ StrapŸ Camera bagŸ Li-ion batteryŸ Charger
Package content
Ÿ Min 128 MB RAM, more than 150MB free disk spaceŸ Available USB Interface Ÿ CD-ROM DriveŸ Recommended screen resolution 1024 X 768 pixels or higher
Computer system requirement for Windows 7/XP
Ÿ At least 800MHz processor and 512 MB of system memoryŸ At least 15GB of available spaceŸ Support for Super VGA graphicsŸ Available USB Interface Ÿ CD-ROM Drive
Computer system requirement for Windows Vista
Ÿ Power Macintosh G3 500 MHz or higherŸ Mac OS X version 10.5.X or laterŸ At least 128 MB or more available system RAM), 150 MB free disk spaceŸ 800 x 600 or higher-resolution monitor displaying millions of colorsNote: This hardware is plug and play compatible when used on a Mac, however, the included software can be used on Windows operating systems only.
Computer system requirements for Macintosh

9
Camera description
Prepare your camera for use
Install batteryYour camera supplied a lithium battery, please refer to the following illustration as correct installation method:1. Slide and open the battery compartment.
EN
10
1. Insert the lithium battery correctly as the correct polarity facing up. 2. Close the battery compartment.
Note: Please uninstall your battery when you don't use your camera for a long time.
Charging your lithium batteryTo charge your battery, you only need to connect your camera to PC or 220V adapter with supplied USB cable correctly. The LED light will light up and it will be off after full charge.
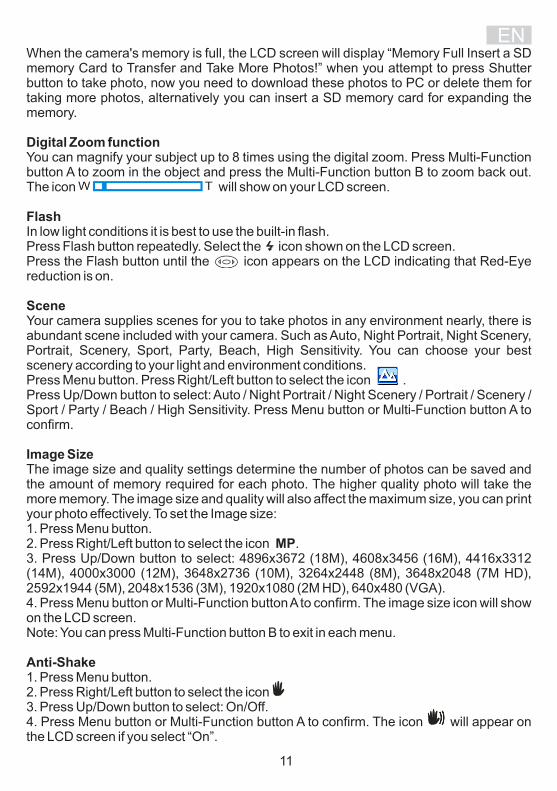
Install a SD memory cardThis camera supports any compatible SD memory card up to 32GB.
Locate the SD memory card slot, insert a card as above, until you hear a “Click” sound, it indicates your SD card is installed with an icon “SD” appear on the LCD screen.
Starting your digital Camera
Your digital camera is included 3 modes: Camera mode, Video mode and Playback mode.Power on Press Power button once to turn on your camera. The LCD will light up and it will sound “beep”, this indicates your camera is turned on and ready for use.
Power offPress Power button once to turn off your camera. When there is insufficient battery power, your camera will show “Low Battery” on the LCD screen and power off automatically after a moment.
Photo mode
After you power on your camera, icon will appear on your LCD screen, indicating your camera is in Camera Mode.Taking PhotosYou can compose your shot using LCD screen. Hold the camera steady and press Shutter button to take photo. There will be a short delay while the camera saves the photo to memory. After each photo is shot (when the camera returns to icon mode) the numbers of photos left to shoot at this resolution will be displayed on the LCD screen.
EN
11
When the camera's memory is full, the LCD screen will display “Memory Full Insert a SD memory Card to Transfer and Take More Photos!” when you attempt to press Shutter button to take photo, now you need to download these photos to PC or delete them for taking more photos, alternatively you can insert a SD memory card for expanding the memory.
Digital Zoom functionYou can magnify your subject up to 8 times using the digital zoom. Press Multi-Function button A to zoom in the object and press the Multi-Function button B to zoom back out. The icon will show on your LCD screen.
FlashIn low light conditions it is best to use the built-in flash. Press Flash button repeatedly. Select the icon shown on the LCD screen. Press the Flash button until the icon appears on the LCD indicating that Red-Eye reduction is on.
SceneYour camera supplies scenes for you to take photos in any environment nearly, there is abundant scene included with your camera. Such as Auto, Night Portrait, Night Scenery, Portrait, Scenery, Sport, Party, Beach, High Sensitivity. You can choose your best scenery according to your light and environment conditions.Press Menu button. Press Right/Left button to select the icon .Press Up/Down button to select: Auto / Night Portrait / Night Scenery / Portrait / Scenery / Sport / Party / Beach / High Sensitivity. Press Menu button or Multi-Function button A to confirm.
Image SizeThe image size and quality settings determine the number of photos can be saved and the amount of memory required for each photo. The higher quality photo will take the more memory. The image size and quality will also affect the maximum size, you can print your photo effectively. To set the Image size:1. Press Menu button.2. Press Right/Left button to select the icon MP.3. Press Up/Down button to select: 4896x3672 (18M), 4608x3456 (16M), 4416x3312 (14M), 4000x3000 (12M), 3648x2736 (10M), 3264x2448 (8M), 3648x2048 (7M HD), 2592x1944 (5M), 2048x1536 (3M), 1920x1080 (2M HD), 640x480 (VGA).4. Press Menu button or Multi-Function button A to confirm. The image size icon will show on the LCD screen.Note: You can press Multi-Function button B to exit in each menu.
Anti-Shake1. Press Menu button.2. Press Right/Left button to select the icon 3. Press Up/Down button to select: On/Off.4. Press Menu button or Multi-Function button A to confirm. The icon will appear on the LCD screen if you select “On”.
EN

12
Face Detect1. Press Menu button.2. Press Right/Left button to select the icon .3. Press Up/Down button to select: On/Off.4. Press Menu button or Multi-Function button A to confirm.
Smile Capture1. Press Menu button.2. Press Right/Left button to select the icon .3. Press Up/Down button to select: On/Off.4. Press Menu button or Multi-Function button A to confirm.
Continue ShotYou can take 6 photos continuously after pressing Shutter button only once with this function on.1. Press Menu button.2. Press Right/Left button to select the icon .3. Press Up/Down button to select: On/Off.4. Press Menu button or Multi-Function button A to confirm.Note: The image size will automatically become VGA when select continue shot on , if you try to change the image size “Continue Shot Mode Off” information will remind you that you can only use continue shot function when the image size is VGA.
Self TimerYou can include yourself in a photo by using this feature to delay the time between your pressing Shutter button and when the photo is actually taken. 1. Press Menu button.2. Press Right/Left button to select icon , the function menu as below:3. Press Up/Down button to select 2, 5 or 10 seconds count down shooting or you can select Off to turn off.4. Press Menu button or Multi-Function button A to confirm.Note: Press Shutter button to take a photo, the self timer LED indicator will flash 2, 5 or 10 seconds ( per you selection) until the photo is taken.
SetupYou can set Exposure, ISO, White Balance, Sharpness, Quality, Size, Date, Auto Power Off, Language, Frequency, Beep Sound, Format, Default Setting and Cancel.To operate it as below:1. Press Menu button.2. Press Right/Left button to select icon .
Modul Video
Note: The camera has limited internal memory and does not allow recording videos without a SD card inserted. Press Down button to enter the Video mode and start shooting videos, an icon will appear on the LCD screen and a red spot will be flashing on the LCD screen.Press Shutter button to stop shooting and exit to the Camera mode, the elapsed time will be shown on the LCD screen. The video files have AVI extension.
EN
13
Playback Mode
Press Right button to enter Playback mode. You can playback the photos and videos in your camera. In Playback mode you can rotate, protect, delete and crop your photos and you can play, protect and delete video clips. You can also print photos directly from your camera using PictBridge.
Thumbnail displayWhen the camera is in the Playback Mode, press Down button will take you to the thumbnail display. Select a JPG file, Press Menu button or Multi-Function button A to display the files in full screen. In full screen display mode, you can press up/down button to enter zoom in/out mode:
Note: when you select a file is JPEG file, then the icon will display on the LCD screen.
ProtectYou can protect your photos/videos from accidental deletion. 1. Press Menu button.2. Press Right/Left button to select the icon .3. Press Up/Down button to select: Lock/Unlock.4. Press Menu button or Multi-Function button A to confirm. A lock icon will be shown on the LCD if you select “Lock”.At step 3, select “Unlock” and press Menu button or Multi-Function button A to unlock the current file.
Note: You can press Multi-Function button B to exit in each menu.
DeleteDelete unwanted photos and videos at any time to free up memory. You can delete one image or video clip at a time or delete all the unprotected photos and videos that are currently recorded on the memory card at once.
Crop ImageCrop your photos to show only a specific portion of an image or to highlight certain focal points. The Crop feature lets you zoom in on an image and then save that part of the image as a new photo. PrintYou can print your photos directly from your camera using “Pictbridge” software.
EN
14
Technical specifications RO
Image sensorPhoto resolutions
Video resolutions
Display External memoryDigital zoom ExposureWhite balance Scene
ISOtimerFile typeImagine stabilizer FlashPictBridgeFace detectionSmile captureContinuous captureMicrophoneInterfaceSystem requirements Battery Using temperature
CMOS 4896x3672 (18M), 4608x3456 (16M), 4416x3312 (14M), 4000x3000 (12M), 3648x2736 (10M), 3264x2448 (8M), 3648x2048 (7M HD), 2592x1944 (5M), 2048x1536 (3M), 1920x1080 (2M HD), 640x480 (VGA)1280x720 HD , 640x480 VGA, 320x240 QVGALCD 2.7” TFT LCDSD card(max 32GB)8X Digital ZoomEV-3---EV+3Auto / Daylight / Cloudy / Incandescent / FluorescentAuto / Night Portrait / Night Scenery / Portrait / Scenery / Sport / Party / Beach / High sensitivityAuto/100/200/400Off/2s/5s/10sJPEG / AVI YesAuto/Force/Off/Red eyesYesYesYesYes (6pcs)YesMini USBWindows XP/VISTA/7/MACLi-Ion dedicated battery 0 ~ 40 °C
EN
15
Ÿ Videó felbontás: 1280x720 HD, 640x480 VGA, 320x240 QVGA, Ÿ Fénykép felbontás: 4896x3672 (18M), 4608x3456 (16M), 4416x3312 (14M),
4000x3000 (12M), 3648x2736 (10M), 3264x2448 (8M), 3648x2048 (7M HD), 2592x1944 (5M), 2048x1536 (3M), 1920x1080 (2M HD), 640x480 (VGA)
Ÿ LCD 2.7 átmérős LCD képernyőŸ Digitalis 8X zoomŸ KépstabilizátorŸ ArcfelismerésŸ Mosolygos rögzítésŸ Fényképezőgép huzatŸ SD szlotkártya ( 32GB-ig)Ÿ Beépített FlashŸ PhoTags Express szoftver ami lehetővé teszi a fényképek szerkesztését,
nyomtatását vagy email küldését
Főbb jellemzők: HU
Ÿ Digitális fényképezőgépŸ PhoTags Express szoftver CD telepítési fálja Ÿ USB kábelŸ Használati útmutatóŸ SzíjŸ Fényképezőgép táskaŸ Li-ion akkumulátorŸ Töltő
Csomag tartalma
Ÿ Minimum 128 MB RAM,több mint 150MB szabad lemezterületŸ USB felületŸ CD-ROM Ÿ Ajánlott felbontás a képernyőnek:legalább 1024 X 768 képpont.
Windows XP/7 rendszer követelmények
Ÿ Legalább 800MHz procceszor és 512 MB RAM memóriaŸ Legalább 15GB szabad memória a HDDŸ Támogatott szuper grafika VGA Ÿ USB felületŸ CD-ROM
Windows Vista rendszer követelmények
Ÿ Power Macintosh G3 500 MHZ procceszor vagy ennél újabb Ÿ Mac OS X verzió 10.5.X vagy ennél újabb Ÿ Legalább 128 MB RAM (ajánlott 256 MB), 150 MB szabad lemezterületŸ Legalább 800 x 600 px felbontásMegjegyzés: Ha egy Mac-on használja kamerát ehhez nem kell szoftver.
Macintosh rendszer követelmények
16
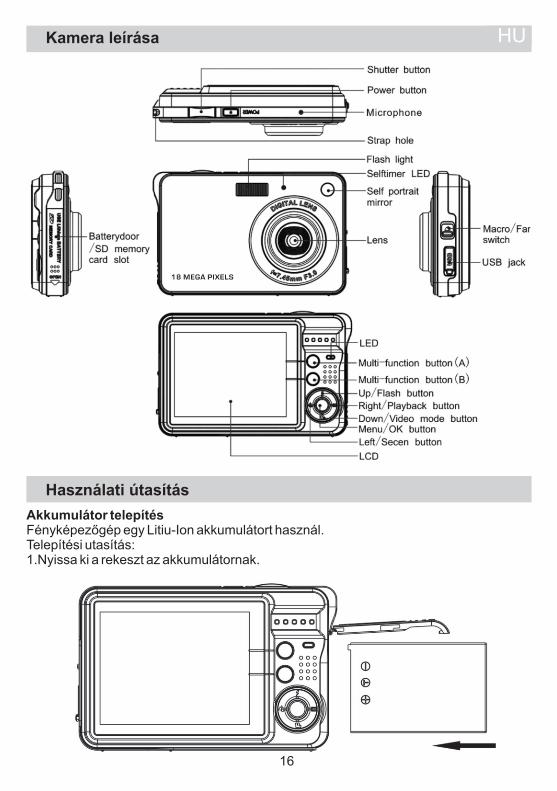
Kamera leírása HU
Használati útasítás
Akkumulátor telepítésFényképezőgép egy Litiu-Ion akkumulátort használ. Telepítési utasítás:1.Nyissa ki a rekeszt az akkumulátornak.
17
1. Helyezze be az akkumulátort betartva a pólaritást.2.Zárja be az akkumulátornak rekeszét.
Megjegyzés: Vegye ki az akkumulátort, ha már több ideje nem használja az akkumulátort.
Akkumulátor feltöltéseHogy feltöltse az akkumulátort, csatlakoztassa a fényképezőgépet egy PC-hez USB kábel segítségével . A feltöltés során a LED villogni fog és ki fog kapcsolodni amikor az akkumulátor teljesen feltöltődőt.
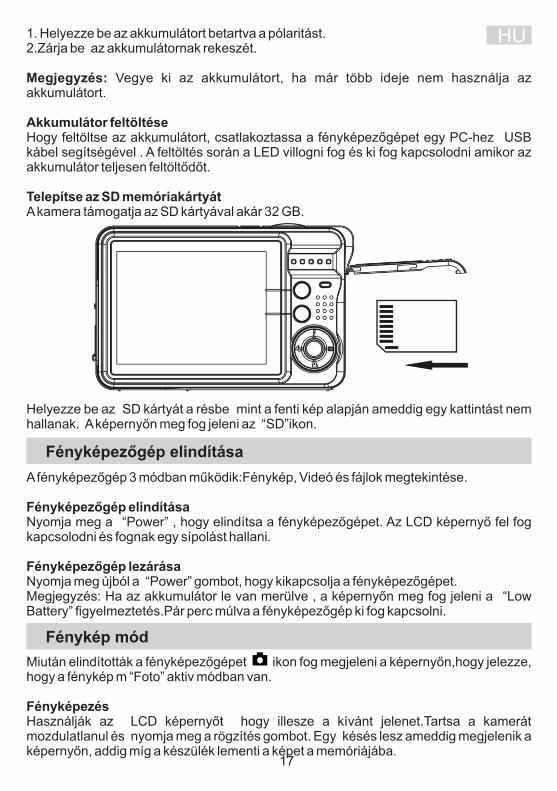
Telepítse az SD memóriakártyátA kamera támogatja az SD kártyával akár 32 GB.
HU
Helyezze be az SD kártyát a résbe mint a fenti kép alapján ameddig egy kattintást nem hallanak. A képernyőn meg fog jeleni az “SD”ikon.
Fényképezőgép elindítása
A fényképezőgép 3 módban működik:Fénykép, Videó és fájlok megtekintése.
Fényképezőgép elindításaNyomja meg a “Power” , hogy elindítsa a fényképezőgépet. Az LCD képernyő fel fog kapcsolodni és fognak egy sípolást hallani.
Fényképezőgép lezárásaNyomja meg újból a “Power” gombot, hogy kikapcsolja a fényképezőgépet.Megjegyzés: Ha az akkumulátor le van merülve , a képernyőn meg fog jeleni a “Low Battery” figyelmeztetés.Pár perc múlva a fényképezőgép ki fog kapcsolni.
Fénykép mód
Miután elindították a fényképezőgépet ikon fog megjeleni a képernyőn,hogy jelezze, hogy a fénykép m “Foto” aktiv módban van.
FényképezésHasználják az LCD képernyőt hogy illesze a kívánt jelenet.Tartsa a kamerát mozdulatlanul és nyomja meg a rögzítés gombot. Egy késés lesz ameddig megjelenik a képernyőn, addig míg a készülék lementi a képet a memóriájába.
18
A képek számát amit rögzíthet be tudja állítani a jelenlegi beállításokkal ami képernyőn fog megjeleni.Ha a memória megtelt és fényképezni akar a képernyőn meg fog jeleni a “Memory Full Insert a SD memory Card to Transfer and Take More Photos!”. Töltse le a fényképeket egy számítógépbe vagy cserélje ki egy üres memóriakártyával
Zoom digital funkcióNagyíthatja tárgyat 8-szer.Nyomja meg a multifunkciónális A gombot a nagyításhoz és a B gombot a kicsinyitéshez f meg fog jeleni a képernyőn.
FlashGyenge fényviszonyokban ,jobb ha flasht használják.Nyomja meg a Flash gombot . ikon fog megjeleni a képernyőn .Ha a flash nem áll készen , egy piros led fog felkapcsolodni a a képernyő felett .Nyomja meg a Flash gombot amíg a képernyőn ikon fog megjeleni . Most a “Piros szem” mód aktiv lesz.
JelenetFényképező több beállítási jelenet is ajánl: Auto, Éjszakai portré,Éjszakai jelenet, Portré, Jelent, Sport, Szórakozás, Strand, Nagy érzékenység. Válassza ki a jelenetet fény és környezeti viszonyok szerint.
Nyomja meg a Menü gombot. Nyomja meg a Jobb/Bal gombot, hogy kiválssza
Használja Fel és Le gombot és válassza ki az egyik lehetőséget a következőkből: Auto, Éjszakai portré,Éjszakai jelenet, Portré, Jelent, Sport, Szórakozás, Strand, Nagy érzékenység. Nyomja meg A gombot a megerősítéshez.
KépméretA képek mérete és minösége befolyásolja a képek számát amiket le lehet menteni a memóriakártyára.
Hogy beállítsa a kép méretét:1. Nyomja meg a Menü gombot.2. Nyomja meg a Jobb/Bal gombot és válassza ki a MP ikont.3.Nyomja meg a Le/Fel gombot és válassza ki : 4896x3672 (18M), 4608x3456 (16M), 4416x3312 (14M), 4000x3000 (12M), 3648x2736 (10M), 3264x2448 (8M), 3648x2048 (7M HD), 2592x1944 (5M), 2048x1536 (3M), 1920x1080 (2M HD), 640x480 (VGA).4. Nyomja meg a menü gombot vagy az A gombot a megerősítéshez. A kép mérete meg fog jeleni a képernyőn.
Megjegyzés:Nyomja meg a B gombot, hogy kilépjen bármely menüből. Képstabilizátor1. Nyomja meg a menü gombot.2. Nyomja meg a Jobb/Bal és válassza ki az ikont.3. Nyomja meg Fel/Le gombot és válassza ki: On/Off.4.Nyomja meg a menü gombot vagy A gombot a megerősítéshez . A ikon fog megjeleni a képernyőn ha aktiválta ezt a funkciót.
HU

19
Arcfelismerés1. Nyomja meg a menü gombot.2. Nyomja meg a Jobb/Bal gombot és válassza ki az . ikont.3. Nyomja meg a Fel/Le és válassza ki : On/Off.4. Nyomja meg a menü gombot vagy az A gombot a megerősítéshez.
Mosoly rögzítés1.Nyomja meg a menü gombot.2. Nyomja meg a Jobb/Bal gombot és válassza ki az ikont.3. Nyomja meg a Fel/Le és válassza ki : On/Off.4. Nyomja meg a menü gombot vagy az A gombot a megerősítéshez.
Folyamatos rögzítésMaximum 6 fényképet csinálhatnak csak egyszer lenyomva a rögzítési gombot. 1. Nyomja meg a menü gombot.2. Nyomja meg a Jobb/Bal gombot és válassza ki az . ikont.3. Nyomja meg a Fel/Le és válassza ki : On/Off.4. Nyomja meg a menü gombot vagy az A gombot a megerősítéshez.
Megjegyzés:A kép mérete automatikusan VGA lesz, ha aktiválva van képrögzítési mód.
StopperóraÖn is belefér egy képbe ha aktiválja ezt a funkciót.1. Nyomja meg a menü gombot.2. Nyomja meg a Jobb/Bal gombot és válassza ki a ikont . 3. Nyomja meg a Fel/Le és válassza ki a 2, 5 vagy 10 másodpercet4.Nyomja meg a menü gombot vagy az A gombot a megerősítéshez.
BeálljtásokBeállíthatjuk az exponálás, ISO, fehéregyensúly, élesség, minőség, méret, dátum, nyelv, frekvencia, sípoló hang, méret stb1. Nyomja meg a menü gombot.2. Nyomja meg a Jobb/Bal gombot és válassza ki az ikont
Videó mód
Megjegyzés: Hogy rögzítsen fel kell telepíteni egy SD kártyát ( 32GB-ig).
Nyomja le a “Le” gombot, hogy videó módba lépjen. ikon fog megjeleni a képernyőn.
Nyomja le a Rögzítési gombot, hogy elindítsa /lezárja a vételezést.
1. Meg tudja nézi a vételezéseket közvetlenül a kamerából vagy egy Macbe Quick time-on keresztül vagy Windows Media player keresztül.
Megjegyzés :Videófájlok AVI formátumban lesznek.
HU

20
Megtekintési mód a képeknek HUNyomja meg a Jobb gombot, hogy megtekintési módba lépjen. Meg tudja tekinteni a fényképeket és a videófelvételeket ami az SD kártyára van lementve. Tudják forgatni , megvédeni, hogy ne törölödjenek ki vagy ki tudják törölni közvetlenül a fényképezőgépből.
Ikon megjelenitéstAmikor a fényképezőgép Lejátszási módban van nyomják meg a Le gombot. A képernyőn meg fognak jeleni a képek ikon formájában.Válasszon ki a JPG fájl,nyomja meg a menüt vagy az A multifunkciónális gombot, hogy megjelenítse a kiválasztott fájlt az egész képernyőn. Megjegyzés: Amikor kiválasztanak egy JPG fáljt,a fenti ikon fog megjeleni a képernyőn.
Fájlok megvédéseMeg tudja védeni a képeket és a videófelvételeket a véletlenszerű kitöröléstől.1. Nyomja meg a Menü gombot.2. Nyomja meg aJobb/Bal gombot és válassa ki a ikont .3. Nyomja meg Le/Fel és válassza ki : Zárás/Kioldás.4. Nyomja meg a Menü gombot vagy az A gombot a megerősítéshez.5. Ikon fog megjeleni a képernyőn ha kiválasztották a “Zárás”.
TörlésKi tudja törölni a nem kivánt fényképeket és videófelváteleket ami az SD kártyán vannak lementve. A megvédett fáljlok nem fognak kitörölödni.
KépkivágásKi tudja vágni a képeket, hogy csak egy része maradjon meg a jelenetnek . A kivágott kép, egy külön képként fog lementödni. NyomtatásKi tudják nyomtatni a fényképeket közvetlenül a kamerából használva a “Pictbridge”.

21
Műszaki adatok HU
KépérékelőFénykép felbontás
Videó felbontás
Képernyő Külső memóriaDigitális zoomExponálásFehéregyensúlyJelenet
ISOStopperóraFálj formátumKépstabilizátorFlashPictBridgeAlcfelismerésMosoly rögzítésFolyamatos rögzítésMikrofonFelületRendszer követelményekAkkumulátorÜzemi hőmérséklet
CMOS 4896x3672 (18M), 4608x3456 (16M), 4416x3312 (14M), 4000x3000 (12M), 3648x2736 (10M), 3264x2448 (8M), 3648x2048 (7M HD), 2592x1944 (5M), 2048x1536 (3M), 1920x1080 (2M HD), 640x480 (VGA)1280x720 HD , 640x480 VGA, 320x240 QVGALCD 2.7” TFT LCDSD kártya(max 32GB)8X Digital ZoomEV-3---EV+3Auto/Napfény / Felhős / Izzólámpa / FluoreszkálóAuto / Éjszakai portré / Éjszakai jelenet / Portré / Jelenet / Sport / Szórakozás/ Strand /Magas érzékenységAuto/100/200/400Off/2s/5s/10sJPEG / AVI IgenAuto/Force/Off/Vörös szemIgenIgenIgenIgen (VGA 6PCS)IgenUSB 2.0Windows XP/VISTA/7/MACLi-Ion0 ~ 40 °C

22