BR 3G6200Wg Manual
129
-
Upload
tandercaster -
Category
Documents
-
view
228 -
download
0
Transcript of BR 3G6200Wg Manual
8/4/2019 BR 3G6200Wg Manual
http://slidepdf.com/reader/full/br-3g6200wg-manual 1/129
8/4/2019 BR 3G6200Wg Manual
http://slidepdf.com/reader/full/br-3g6200wg-manual 2/129
1
Copyright©
by Edimax Technology Co, LTD. all rights reserved. No part of this publicationmay be reproduced, transmitted, transcribed, stored in a retrieval system, or translated intoany language or computer language, in any form or by any means, electronic, mechanical,magnetic, optical , chemical, manual or otherwise, without the prior written permission of thiscompany.
This company makes no representations or warranties, either expressed or implied, withrespect to the contents hereof and specifically disclaims any warranties, merchantability orfitness for any particular purpose. Any software described in this manual is sold or licensed"as is". Should the programs prove defective following their purchase, the buyer (and not thiscompany, its distributor, or its dealer) assumes the entire cost of all necessary servicing,repair, and any incidental or consequential damages resulting from any defect in the software.
Further, this company reserves the right to revise this publication and to make changes fromtime to time in the contents hereof without obligation to notify any person of such revision orchanges.
Linux Open Source Code
Certain Edimax products include software code developed by third parties, includingsoftware code subject to the GNU General Public License ("GPL") or GNU LesserGeneral Public License ("LGPL"). Please see the GNU (www.gnu.org) and LPGL(www.gnu.org) Web sites to view the terms of each license.
The GPL Code and LGPL Code used in Edimax products are distributed without any
warranty and are subject to the copyrights of their authors. For details, see the GPLCode and LGPL Code licenses. You can download the firmware-files athttp://www.edimax.com under "Download" page.
The product you have purchased and the setup screen may appear slightly different fromthose shown in this QIG. For more detailed information about this product, please referto the User's Manual on the CD-ROM.Software and specifications subject to change without notice. Please visit our web site forthe update.
All rights reserved. Trademarks or registered trademarks are the property of theirrespective holders
8/4/2019 BR 3G6200Wg Manual
http://slidepdf.com/reader/full/br-3g6200wg-manual 3/129
2
Introduction................................................................................................................. 4
Chapter 1.................................................................................................................. 19
1.1 Cable Modem ..................................................................................................... 31
1.2 Fixed-IP xDSL .................................................................................................... 32
1.3 PPPoE................................................................................................................ 33
1.4 PPTP .................................................................................................................. 35
1.5 L2TP................................................................................................................... 37
1.6 Telstra Big Pond ................................................................................................. 39
Chapter 2.................................................................................................................. 41
2.1 System................................................................................................................ 43 2.1.1 Time Zone........................................................................................................ 44
2.1.2 Password Settings........................................................................................... 44
2.1.3 Remote Management ...................................................................................... 46
2.2 3G/3.5G.............................................................................................................. 48
( A ) Plug and play, no setup procedure required............................................... 48
( B ) PIN code or user name / password required:............................................. 48
2.3 WAN ................................................................................................................... 49
2.3.1 Dynamic IP ...................................................................................................... 50
2.3.2 Static IP Address.............................................................................................. 51
2.3.3 PPPoE (PPP over Ethernet) ............................................................................ 51
2.3.4 PPTP ............................................................................................................... 51
2.3.5 L2TP................................................................................................................ 51
2.3.6 Telstra Big Pond............................................................................................... 51
2.3.7 DNS................................................................................................................. 52
2.3.8 DDNS .............................................................................................................. 52 2.4 LAN .................................................................................................................... 54
2.5 Wireless.............................................................................................................. 56
2.5.1 Basic Settings.................................................................................................. 57
2.5.2 Advanced Settings........................................................................................... 59
2.5.3 Security............................................................................................................ 62
2.5.3.1 WEP only...................................................................................................... 62
2.5.3.2 802.1x only ................................................................................................... 64
8/4/2019 BR 3G6200Wg Manual
http://slidepdf.com/reader/full/br-3g6200wg-manual 4/129
3
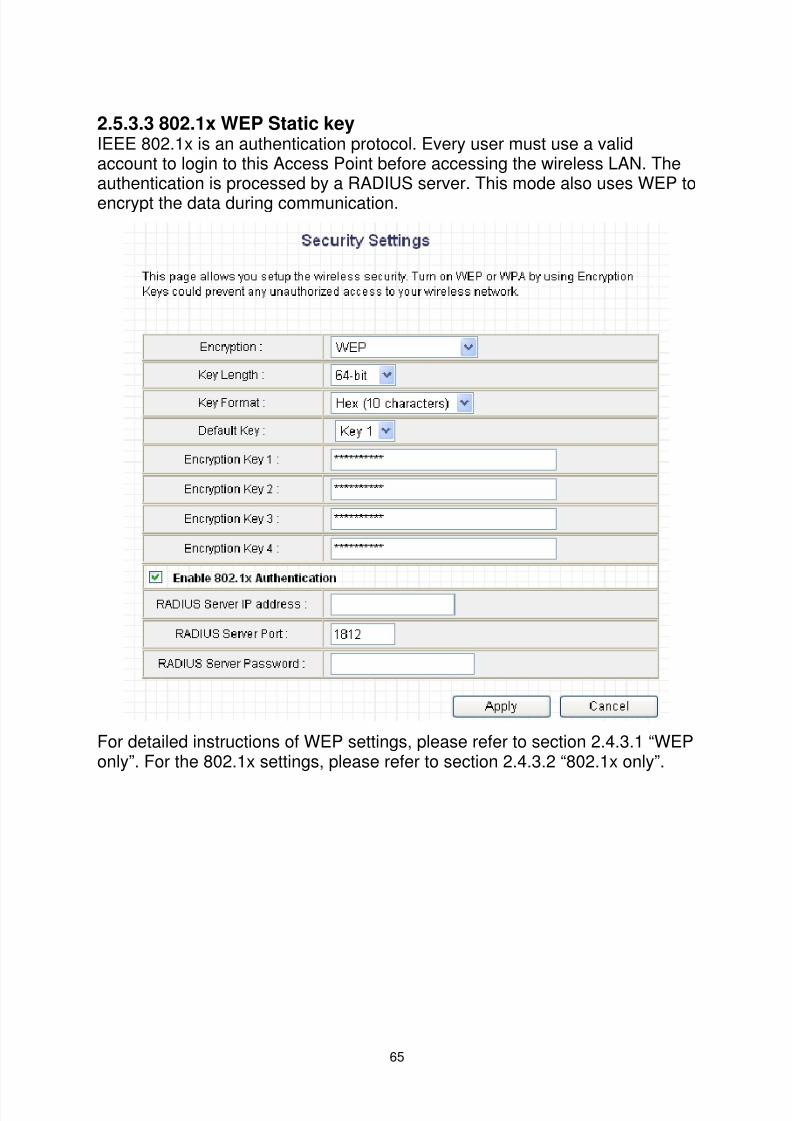
2.5.3.3 802.1x WEP Static key ................................................................................. 65
2.5.3.4 WPA Pre-shared key..................................................................................... 66
2.5.3.5 WPA Radius.................................................................................................. 68
2.5.4 Access Control................................................................................................. 69
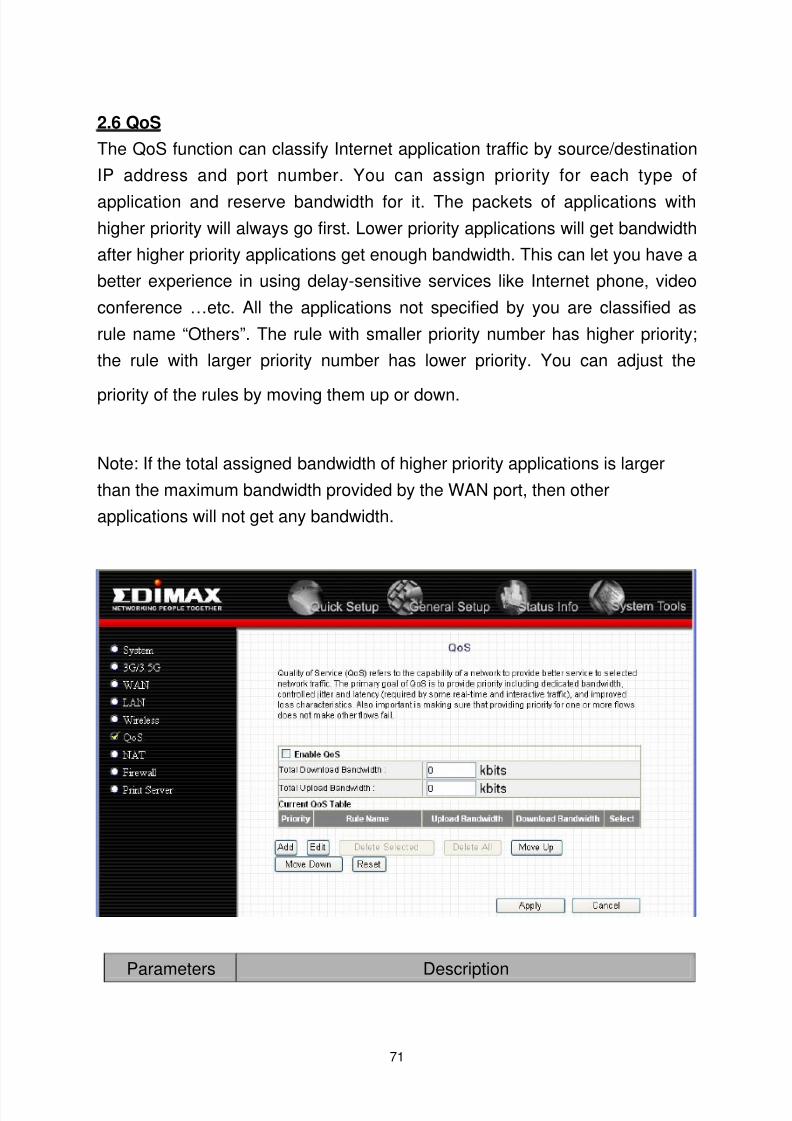
2.6 QoS .................................................................................................................... 71
2.7 NAT..................................................................................................................... 75
2.7.1 Port Forwarding............................................................................................... 77
2.7.2 Virtual Server ................................................................................................... 79
2.7.3 Special Applications......................................................................................... 81
2.7.4 UPnP Settings ................................................................................................. 84
2.7.5 ALG Settings.................................................................................................... 85 2.7.6 Static Routing .................................................................................................. 86
2.8 Firewall ............................................................................................................... 88
2.8.1 Access Control................................................................................................. 88
2.8.2 URL Blocking................................................................................................... 93
2.8.3 DoS (Denial of Service) ................................................................................... 94
2.8.4 DMZ................................................................................................................. 95
2.9 Print Server......................................................................................................... 96
2.9.1 LPR Printing .................................................................................................... 98
2.9.2 IPP Printing.....................................................................................................105
Chapter 3.................................................................................................................110
3.1 Status and Information....................................................................................... 111
3.2 Device Status.....................................................................................................113
3.3 System Log........................................................................................................114
3.4 Security Log.......................................................................................................115
3.5 Active DHCP Client............................................................................................116 3.6 Statistics ............................................................................................................117
Chapter 4.................................................................................................................118
4.1 Configuration Tools............................................................................................118
4.2 Firmware Upgrade.............................................................................................119
4.3 Reset .................................................................................................................120
Appendix A ..............................................................................................................121
Glossary ..................................................................................................................123

8/4/2019 BR 3G6200Wg Manual
http://slidepdf.com/reader/full/br-3g6200wg-manual 5/129
4
IntroductionThank you for purchasing Edimax 3G-6200Wg wireless 802.11b/g 3G broadbandrouter! This high cost-efficiency router is the best choice for Mobile / Small office /
Home office users, all computers and network devices can share a single wireless3G modem or xDSL / cable** modem internet connection at high speed. Easy installprocedures allows any computer users to setup a network environment in very shorttime - within minutes, even inexperienced. When the number of your computers andnetwork-enabled devices grow, you can also expand the number of network slot bysimple attach a hub or switch, to extend the scope of your network!
You can configure the router by running the Setup Wizard in the CD-ROM provided inthe package. The wizard provides quick setup for wireless 3G/3.5G Internetconnection, Ethernet WAN Internet connection, SSID, wireless security, firmwareupgrade and changing router’s password. When you start the Setup Wizard, you willget the following Welcome screen. Please choose the language to start with andfollow the easy steps in the Wizard. No instruction for the Setup Wizard is given here.
If you lost the CD-ROM or you prefer the traditional web setup, please follow theprocedures in this Quick Installation Guide to configure the router
** Note : Only one Internet connection (wireless 3G or xDSL/Cable) can be used at
the same time.
8/4/2019 BR 3G6200Wg Manual
http://slidepdf.com/reader/full/br-3g6200wg-manual 6/129
5
Features- High Internet access throughput- Allow multiple users to share a single Internet connection
- Supports up to 253 network client users- Provides two USB port for connecting USB printer- Internet Access via Cable or xDSL modem- Access Servers on your LAN from the Public Network- Equipped with four LAN ports (10/100M) and one WAN port (10/100M)- Provides IEEE 802.11g/b wireless LAN access point- Support DHCP (Server/Client) for easy setup- Support advance features such as: special applications, DMZ, virtual server,access control, firewall
- Allow you to monitor the router’s status such as: DHCP Client Log, SystemLog, Security Log and Device/Connection Status- Easy to use Web-based GUI for configuration and management- Remote Management allows configuration and upgrades from a remote site(over the Internet)
Minimum Requirements- One External xDSL (ADSL) or Cable modem with an Ethernet port (RJ-45)- Network Interface Card (NIC) for each Personal Computer (PC)- Computer with a Web-Browser (Internet Explorer 5.0 or higher / NetscapeNavigator 7.2 or higher)
Package Contents- One Wireless broadband router- One Quick Installation Guide- One User Manual CD
- One Power Adapter- Ethernet Cable- Antenna- Accessories
NoteThe WAN “idle timeout” auto-disconnect function may not work due toabnormal activities of some network application software, computer virus orhacker attacks from the Internet. For example, some software sends network
packets to the Internet in the background, even when you are not using the
8/4/2019 BR 3G6200Wg Manual
http://slidepdf.com/reader/full/br-3g6200wg-manual 7/129
6
Internet. So please turn off your computer when you are not using it. Thisfunction also may not work with some ISP. So please make sure this functioncan work properly when you use this function in the first time, especially your
ISP charge you by access time.
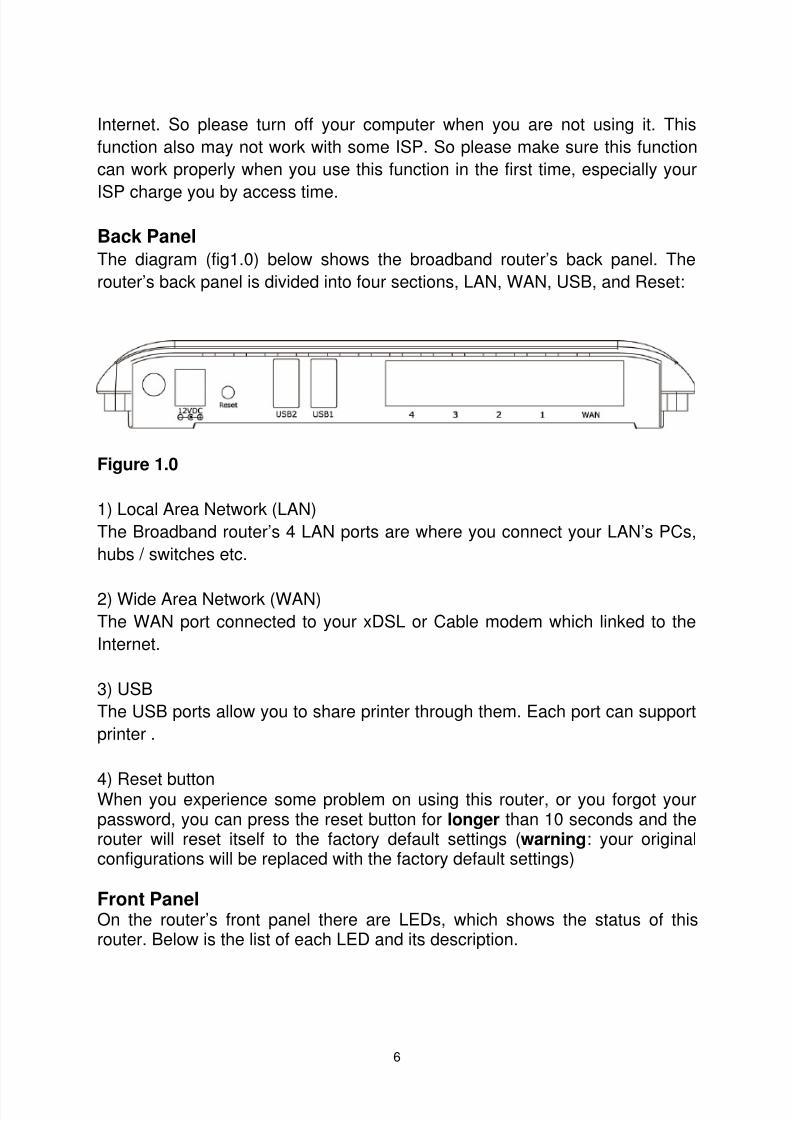
Back PanelThe diagram (fig1.0) below shows the broadband router’s back panel. Therouter’s back panel is divided into four sections, LAN, WAN, USB, and Reset:
Figure 1.0
1) Local Area Network (LAN) The Broadband router’s 4 LAN ports are where you connect your LAN’s PCs,hubs / switches etc.
2) Wide Area Network (WAN)The WAN port connected to your xDSL or Cable modem which linked to theInternet.
3) USBThe USB ports allow you to share printer through them. Each port can supportprinter .
4) Reset buttonWhen you experience some problem on using this router, or you forgot yourpassword, you can press the reset button for longer than 10 seconds and therouter will reset itself to the factory default settings ( warning : your originalconfigurations will be replaced with the factory default settings)
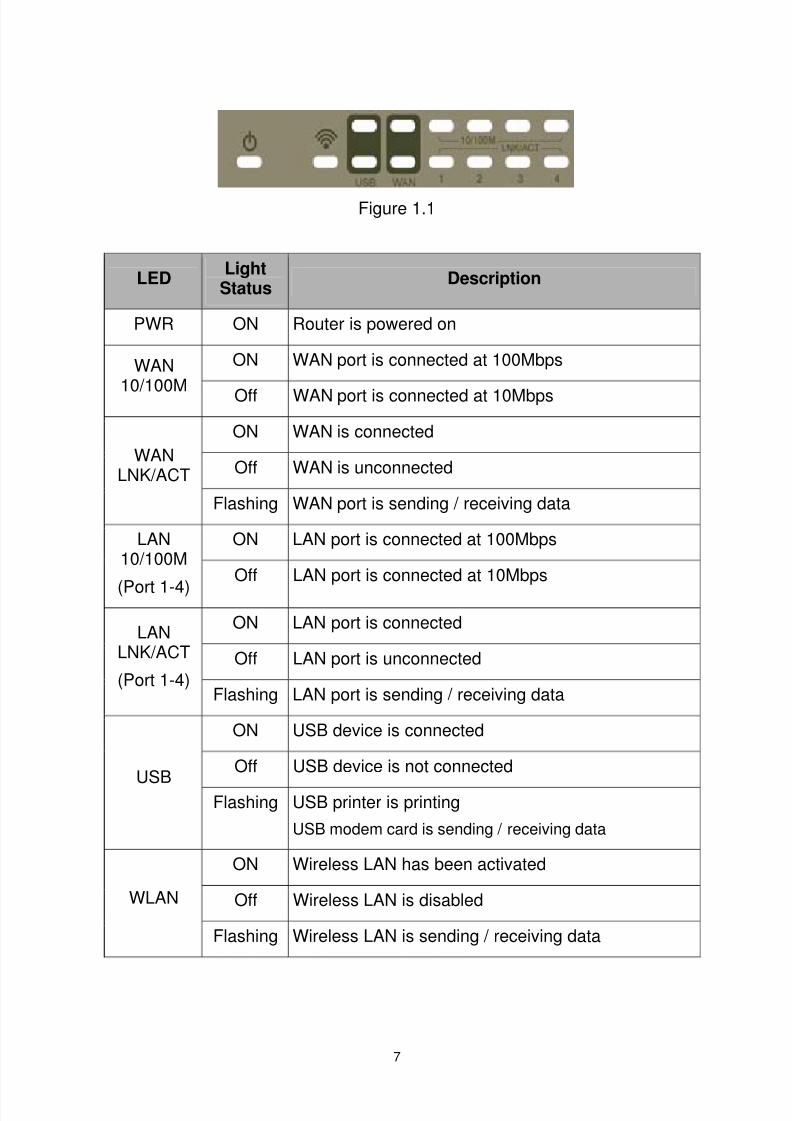
Front PanelOn the router’s front panel there are LEDs, which shows the status of thisrouter. Below is the list of each LED and its description.
8/4/2019 BR 3G6200Wg Manual
http://slidepdf.com/reader/full/br-3g6200wg-manual 8/129
7
Figure 1.1
LED LightStatus Description
PWR ON Router is powered on
ON WAN port is connected at 100MbpsWAN
10/100M Off WAN port is connected at 10Mbps
ON WAN is connected
Off WAN is unconnectedWAN
LNK/ACT
Flashing WAN port is sending / receiving data
ON LAN port is connected at 100MbpsLAN10/100M
(Port 1-4)Off LAN port is connected at 10Mbps
ON LAN port is connected
Off LAN port is unconnectedLAN
LNK/ACT
(Port 1-4)Flashing LAN port is sending / receiving data
ON USB device is connected
Off USB device is not connectedUSB Flashing USB printer is printing
USB modem card is sending / receiving data
ON Wireless LAN has been activated
Off Wireless LAN is disabledWLAN
Flashing Wireless LAN is sending / receiving data
8/4/2019 BR 3G6200Wg Manual
http://slidepdf.com/reader/full/br-3g6200wg-manual 9/129
8
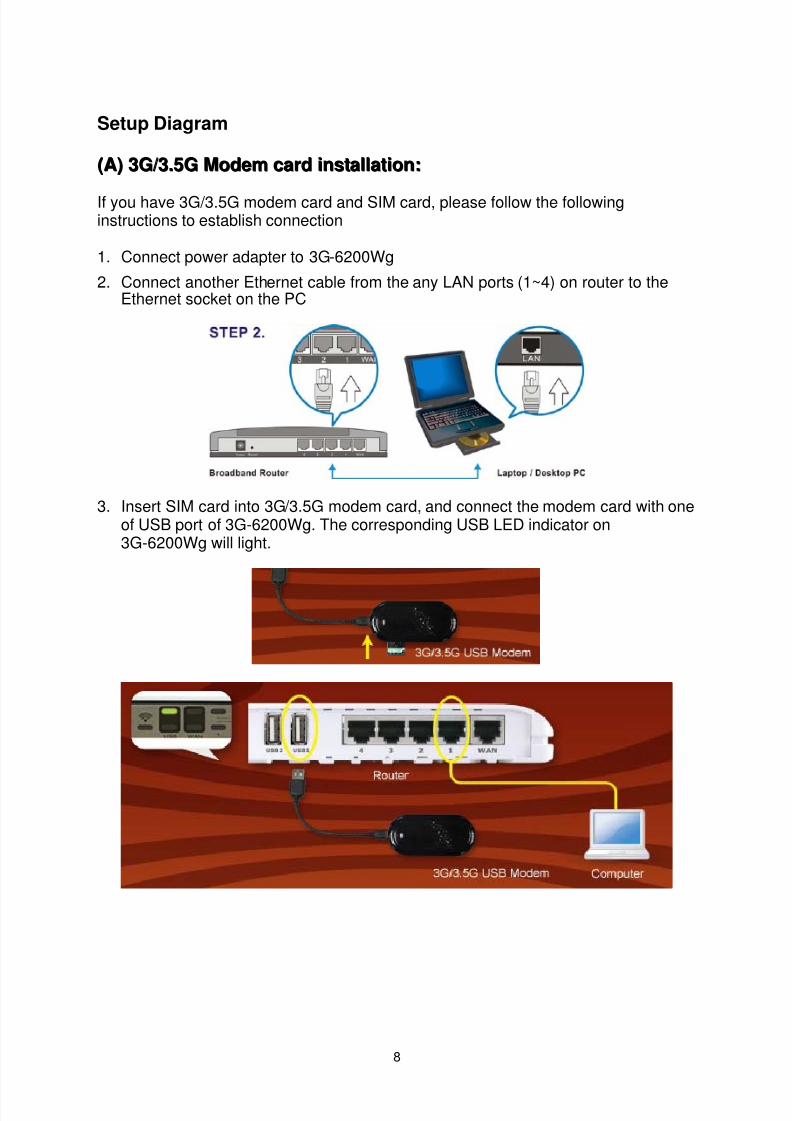
Setup Diagram
((AA)) 33GG//33 ..55GG MMoo dd ee mm cc aa rrdd iinn ss ttaa llllaa tt iioo nn ::
If you have 3G/3.5G modem card and SIM card, please follow the followinginstructions to establish connection
1. Connect power adapter to 3G-6200Wg
2. Connect another Ethernet cable from the any LAN ports (1~4) on router to theEthernet socket on the PC
3. Insert SIM card into 3G/3.5G modem card, and connect the modem card with oneof USB port of 3G-6200Wg. The corresponding USB LED indicator on3G-6200Wg will light.
8/4/2019 BR 3G6200Wg Manual
http://slidepdf.com/reader/full/br-3g6200wg-manual 10/129
9
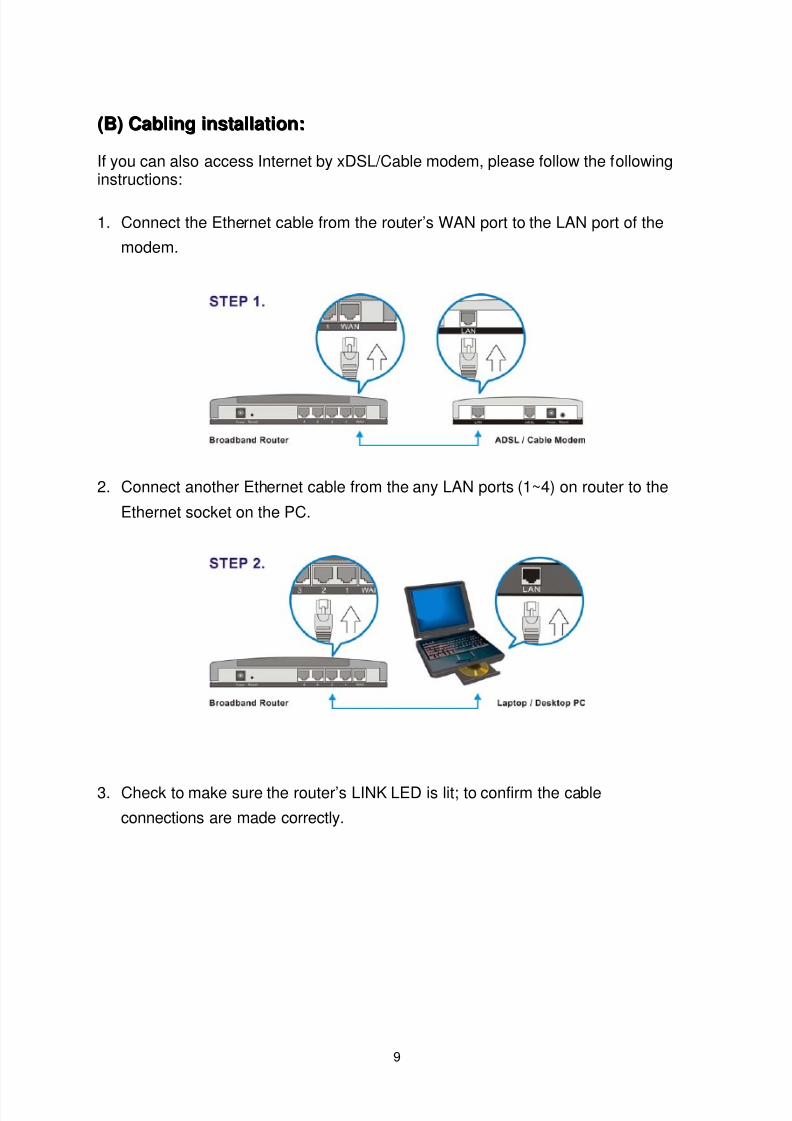
((BB)) CCaa bb lliinn gg iinn ss ttaa llllaa tt iioo nn ::
If you can also access Internet by xDSL/Cable modem, please follow the followinginstructions:
1. Connect the Ethernet cable from the router’s WAN port to the LAN port of the
modem.
2. Connect another Ethernet cable from the any LAN ports (1~4) on router to the
Ethernet socket on the PC.
3. Check to make sure the router’s LINK LED is lit; to confirm the cable
connections are made correctly.

8/4/2019 BR 3G6200Wg Manual
http://slidepdf.com/reader/full/br-3g6200wg-manual 11/129
10
Figure 1.2 below shows a typical setup for a Local Area Network (LAN).
Figure 1.2
Getting startedThis is a step-by-step instruction on how to start using the router and getconnected to the Internet.
1) Setup your network as shown in the setup diagram above (fig 1.2).
2) You will need to set your LAN PC clients so that it can obtain an IP addressautomatically. All LAN clients require an IP address. Just like the mailingaddress in real world, it allows LAN clients to find one another. (If you alreadyconfigured your PC to obtain an IP automatically, please jump to step 3, page11)
Configure your PC to obtain an IP address automaticallyBroadband router’s DHCP function is switched on by default; this means thatyou can obtain an IP address automatically once you’ve configured your PCto obtain an IP address automatically. This section will show you how toconfigure your PC’s so that it can obtain an IP address automatically for either
Windows 95/98/Me, 2000 or NT operating systems. For other operating
8/4/2019 BR 3G6200Wg Manual
http://slidepdf.com/reader/full/br-3g6200wg-manual 12/129
11
systems (Macintosh, Sun, etc.), follow the manufacturer’s instructions. Thefollowing is a step-by-step illustration on how to configure your PC to obtainan IP address automatically for:
2a) Windows 95/98/Me 2b) Windows XP 2c) Windows 2000, and2d) Windows NT .
2a) Windows 95/98/Me
1. Click the Start button and select Settings , then click Control Panel . The
Control Panel window will appear.2. Double-click Network icon. The Network window will appear.3. Check your list of Network Components. If TCP/IP is not installed, click the
Add button to install it; if TCP/IP is installed, jump to step 6 .4. In the Network Component Type dialog box, select Protocol and click Add
button.5. In the Select Network Protocol dialog box, select Microsoft and TCP/IP and
then click the OK button to start installing the TCP/IP protocol. You may needyour Windows installation CD to complete the installation.
6. After installing TCP/IP, go back to the Network dialog box. Select TCP/IP
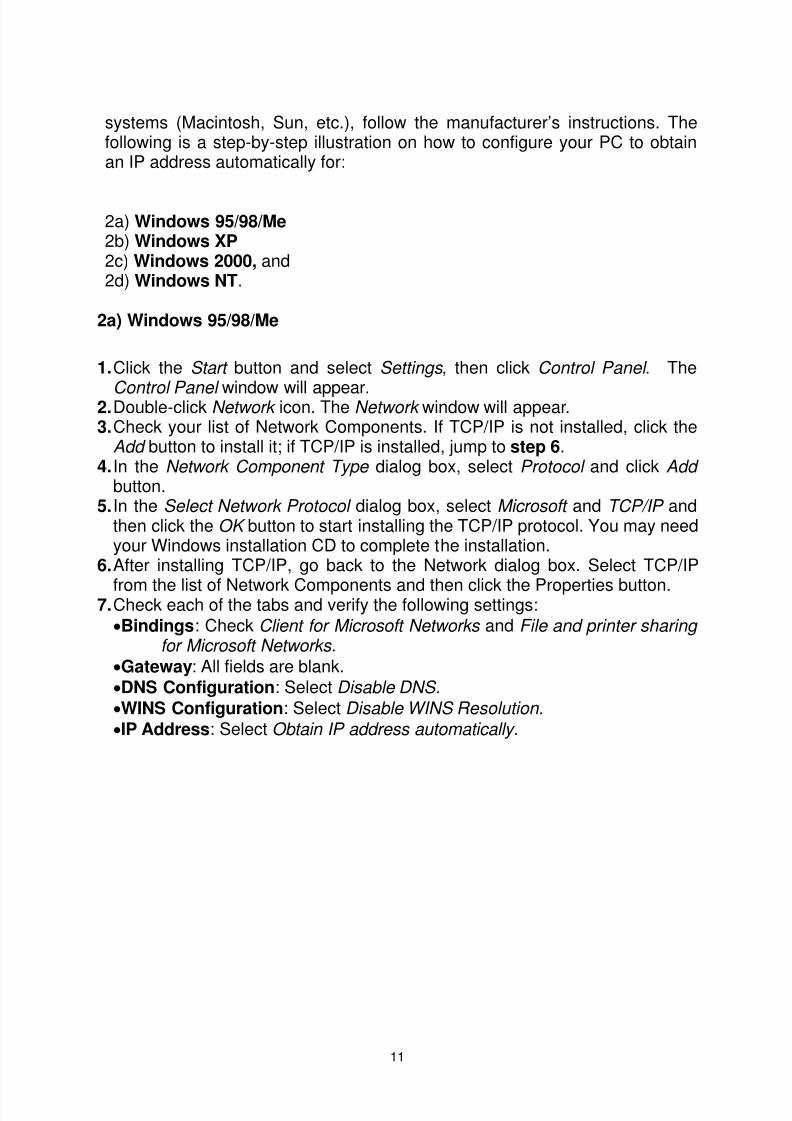
from the list of Network Components and then click the Properties button.7. Check each of the tabs and verify the following settings:• Bindings : Check Client for Microsoft Networks and File and printer sharing
for Microsoft Networks .• Gateway : All fields are blank.• DNS Configuration : Select Disable DNS. • WINS Configuration : Select Disable WINS Resolution. • IP Address : Select Obtain IP address automatically .
8/4/2019 BR 3G6200Wg Manual
http://slidepdf.com/reader/full/br-3g6200wg-manual 13/129
12
8. Reboot the PC. Your PC will now obtain an IP address automatically fromyour Broadband Router’s DHCP server.
Note : Please make sure that the Broadband router is the only DHCP server onyour LAN.
Once you’ve configured your PC to obtain an IP address automatically,please proceed to Step 3
2b) Windows XP
1. Click the Start button and select Settings , then click Network Connections. The Network Connections window will appear.
2. Double-click Local Area Connection icon. The Local Area Connection window will appear.
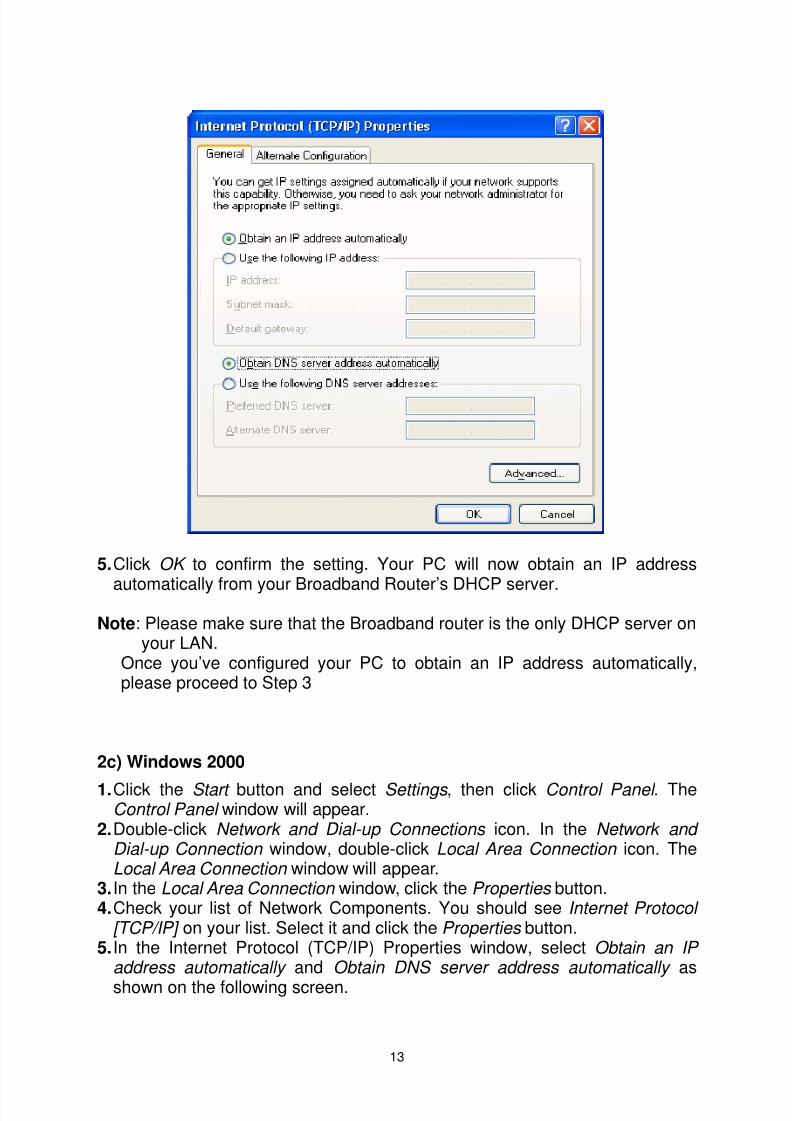
3. Check your list of Network Components. You should see Internet Protocol [TCP/IP] on your list. Select it and click the Properties button.4. In the Internet Protocol (TCP/IP) Properties window, select Obtain an IP
address automatically and Obtain DNS server address automatically asshown on the following screen.
8/4/2019 BR 3G6200Wg Manual
http://slidepdf.com/reader/full/br-3g6200wg-manual 14/129
13
5. Click OK to confirm the setting. Your PC will now obtain an IP address
automatically from your Broadband Router’s DHCP server.
Note : Please make sure that the Broadband router is the only DHCP server onyour LAN.
Once you’ve configured your PC to obtain an IP address automatically,please proceed to Step 3
2c) Windows 2000
1. Click the Start button and select Settings , then click Control Panel . TheControl Panel window will appear.
2. Double-click Network and Dial-up Connections icon. In the Network and Dial-up Connection window, double-click Local Area Connection icon. TheLocal Area Connection window will appear.
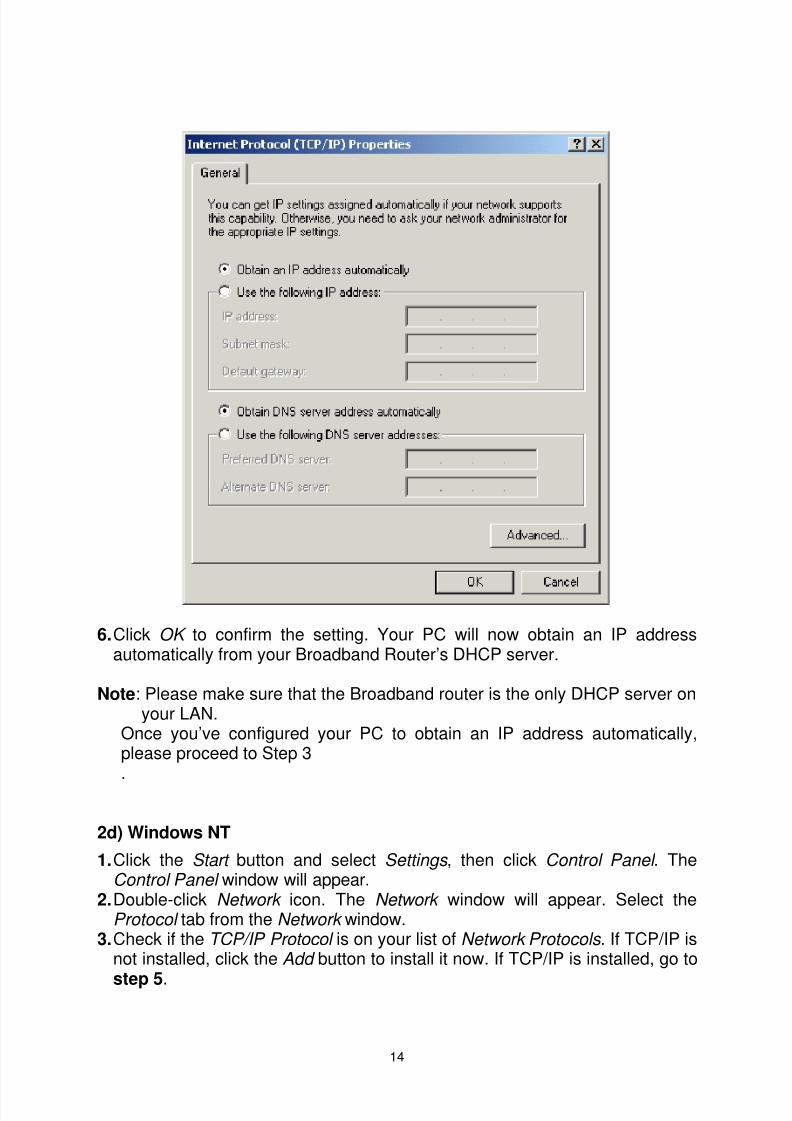
3. In the Local Area Connection window, click the Properties button.4. Check your list of Network Components. You should see Internet Protocol
[TCP/IP] on your list. Select it and click the Properties button.5. In the Internet Protocol (TCP/IP) Properties window, select Obtain an IP
address automatically and Obtain DNS server address automatically asshown on the following screen.
8/4/2019 BR 3G6200Wg Manual
http://slidepdf.com/reader/full/br-3g6200wg-manual 15/129
14
6. Click OK to confirm the setting. Your PC will now obtain an IP addressautomatically from your Broadband Router’s DHCP server.
Note : Please make sure that the Broadband router is the only DHCP server onyour LAN.
Once you’ve configured your PC to obtain an IP address automatically,please proceed to Step 3.
2d) Windows NT
1. Click the Start button and select Settings , then click Control Panel . TheControl Panel window will appear.
2. Double-click Network icon. The Network window will appear. Select the Protocol tab from the Network window.
3. Check if the TCP/IP Protocol is on your list of Network Protocols . If TCP/IP isnot installed, click the Add button to install it now. If TCP/IP is installed, go to
step 5 .
8/4/2019 BR 3G6200Wg Manual
http://slidepdf.com/reader/full/br-3g6200wg-manual 16/129
15
4. In the Select Network Protocol window, select the TCP/IP Protocol and clickthe Ok button to start installing the TCP/IP protocol. You may need yourWindows CD to complete the installation.
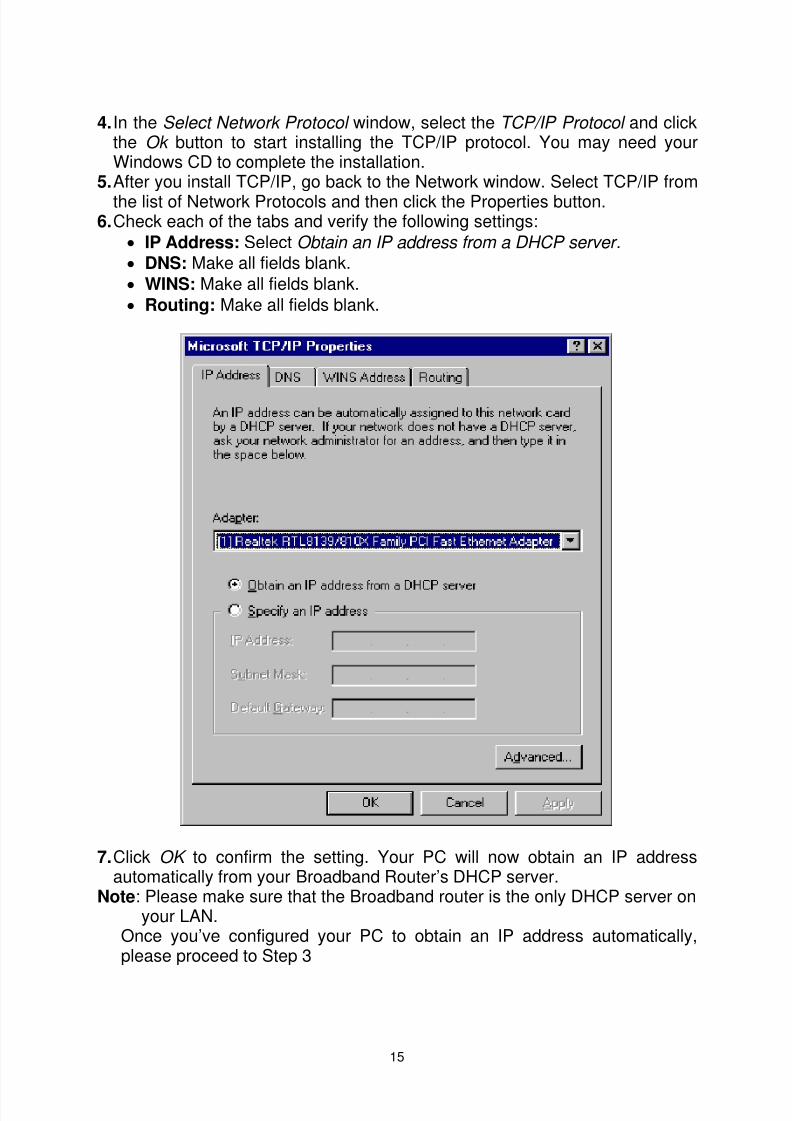
5. After you install TCP/IP, go back to the Network window. Select TCP/IP fromthe list of Network Protocols and then click the Properties button.
6. Check each of the tabs and verify the following settings:• IP Address: Select Obtain an IP address from a DHCP server .• DNS: Make all fields blank.• WINS: Make all fields blank.• Routing: Make all fields blank.
7. Click OK to confirm the setting. Your PC will now obtain an IP addressautomatically from your Broadband Router’s DHCP server.
Note : Please make sure that the Broadband router is the only DHCP server onyour LAN.
Once you’ve configured your PC to obtain an IP address automatically,please proceed to Step 3
8/4/2019 BR 3G6200Wg Manual
http://slidepdf.com/reader/full/br-3g6200wg-manual 17/129
16
3) Once you have configured your PCs to obtain an IP address automatically,the router’s DHCP server will automatically give each of your LAN clients an IPaddress. By default the Broadband Router’s DHCP server is enabled so thatyou can obtain an IP address automatically. To see if you have obtained an IPaddress, see Appendix A.
Note : Please make sure that the Broadband router’s DHCP server is theonly DHCP server on your LAN. If there is another DHCP on your network,then you’ll need to switch one of the DHCP servers off. (To disable theBroadband router’s DHCP server see chapter 2 LAN Port)
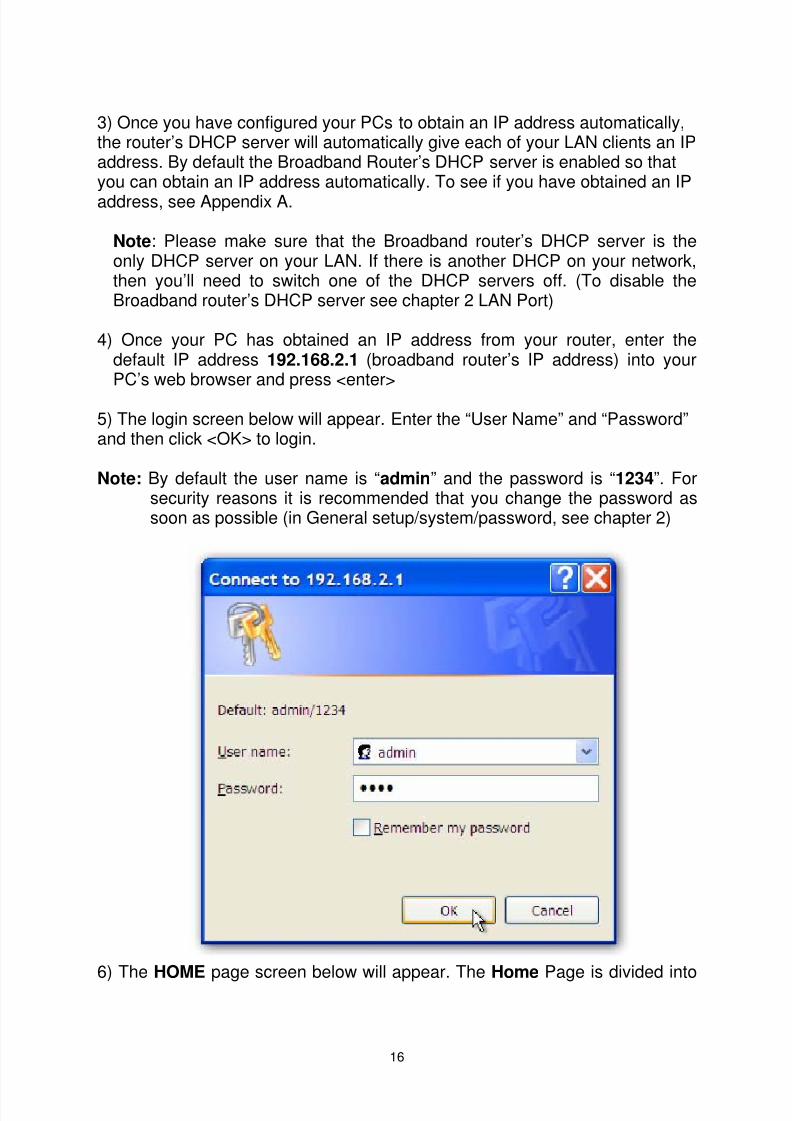
4) Once your PC has obtained an IP address from your router, enter thedefault IP address 192.168.2.1 (broadband router’s IP address) into yourPC’s web browser and press <enter>
5) The login screen below will appear. Enter the “User Name” and “Password”and then click <OK> to login.
Note: By default the user name is “ admin ” and the password is “ 1234 ”. Forsecurity reasons it is recommended that you change the password assoon as possible (in General setup/system/password, see chapter 2)
6) The HOME page screen below will appear. The Home Page is divided into

8/4/2019 BR 3G6200Wg Manual
http://slidepdf.com/reader/full/br-3g6200wg-manual 18/129
17
four sections, Quick Setup Wizard , General Setup , Status Info andSystem Tools.
Quick Setup Wizard (Chapter 1)Select your Internet connection type and setup the configurations needed toconnect to your Internet Service Provider (ISP).
General Setup (Chapter 2)
This section contains configurations for the Broadband router’s advancedfunctions such as: address mapping, virtual server, access control, hackerattack prevention, DMZ, special applications and other functions to meet yourneeds.
Status Info (Chapter 3)In this section you can see the Broadband router's system information, InternetConnection, Device Status, System Log, Security Log and DHCP clientinformation.
Tools (Chapter 4)

8/4/2019 BR 3G6200Wg Manual
http://slidepdf.com/reader/full/br-3g6200wg-manual 19/129
18
This section contains the broadband router’s tool sets - tools includeconfiguration, firmware upgrade and Reset. Configuration tools allow you tobackup (save), restore, or restore to factory default configuration for yourBroadband router. The firmware upgrade tool allows you to upgrade yourBroadband router's firmware. The RESET tool allows you to reset yourBroadband router.
7) Click on Quick Setup Wizard (see chapter 1) to start configuring settingsrequired by your ISP so that you can start accessing the Internet. The othersections (General Setup, Status Information and Tools) do not need to beconfigured unless you wish to implement/monitor more advancedfeatures/information.Select the section (Quick Setup Wizard, General Setup, Status Informationand Tools) you wish to configure and proceed to the corresponding chapter.
8/4/2019 BR 3G6200Wg Manual
http://slidepdf.com/reader/full/br-3g6200wg-manual 20/129
19
Chapter 1
Quick Setup
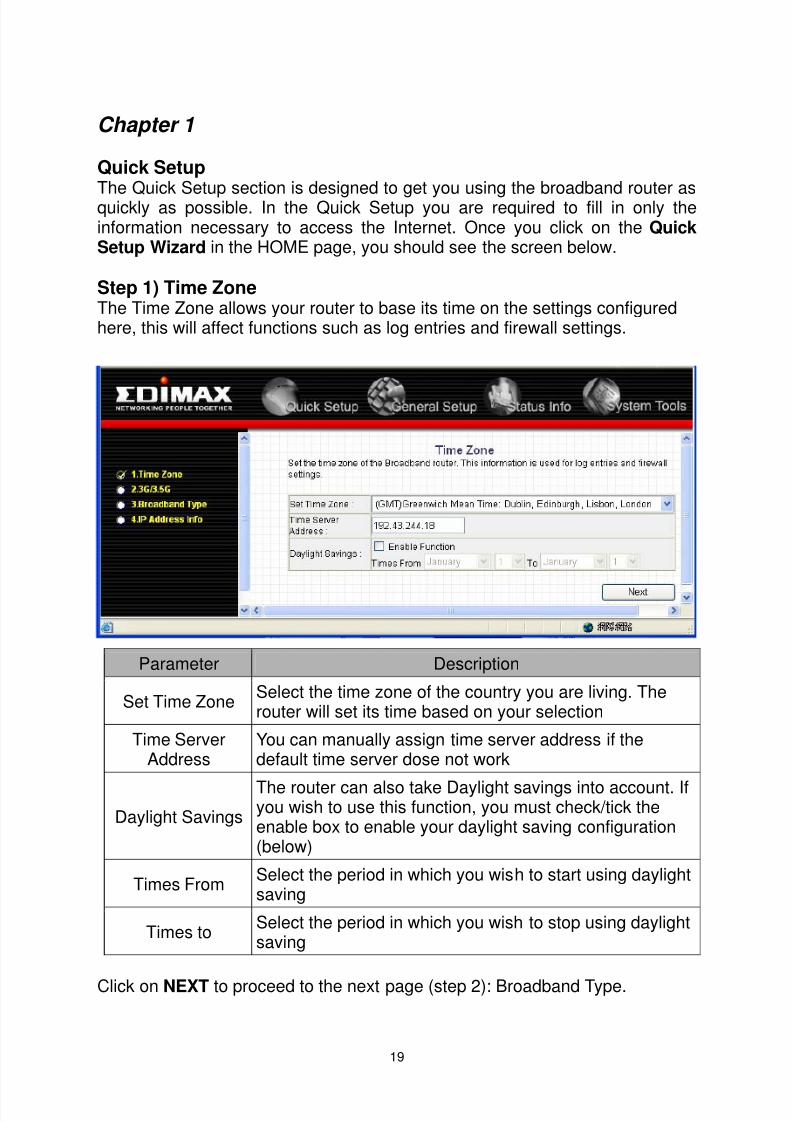
The Quick Setup section is designed to get you using the broadband router asquickly as possible. In the Quick Setup you are required to fill in only theinformation necessary to access the Internet. Once you click on the QuickSetup Wizard in the HOME page, you should see the screen below.
Step 1) Time ZoneThe Time Zone allows your router to base its time on the settings configuredhere, this will affect functions such as log entries and firewall settings.
Parameter Description
Set Time Zone Select the time zone of the country you are living. Therouter will set its time based on your selection
Time ServerAddress
You can manually assign time server address if thedefault time server dose not work
Daylight SavingsThe router can also take Daylight savings into account. Ifyou wish to use this function, you must check/tick theenable box to enable your daylight saving configuration(below)
Times From Select the period in which you wish to start using daylightsaving
Times to Select the period in which you wish to stop using daylightsaving
Click on NEXT to proceed to the next page (step 2): Broadband Type.

8/4/2019 BR 3G6200Wg Manual
http://slidepdf.com/reader/full/br-3g6200wg-manual 21/129
20
Step 2) 3G/3.5G Internet Configuration
3G-6200Wg supports most of 3G/3.5G modem cards, just connect the modem cardto the USB port of 3G-6200Wg and 3G-6200Wg will recognize it automatically, noadditional setup procedure required. However, some of modem cards require PINcode or account / password (you have to use 3G-6200Wg’s web interface to inputthese information), and some modem cards requires you to connect the modem cardwith your PC and install driver / utility before you connect it with 3G-6200Wg (all PCswhich need to access Internet by 3G-6200Wg requires to perform this procedureonce). If you still not able to connect to Internet, please use wired Internet connectionto access our website :http://www.edimax.com/ ,download latest version of firmwareand upgrade 3G-6200Wg’s firmware. If you still not be able to get connected by your3G/3.5G modem card, please contact your dealer of purchase and provide the modelname of the 3G/3.5G modem card you have, we’ll try our best to help you to solvethe problem.
Only one Internet connection (wireless / wired) can be used at the same time.Wireless connection (3G/3.5G) will be selected first, and use wired Internetconnection as backup. Therefore, please DO NOT connect your 3G/3.5G modemcard with 3G-6200Wg, or your telecomm service provider may charge you with highcommunication fee. For example, if you connect 3G/3.5G modem card with3G-6200Wg when you’re using wired Internet connection, wired connection will bedropped and use 3G/3.5G wireless connection instead. If 3G/3.5G wireless signalreception is poor and the connection can not be restored within 60 seconds,3G-6200Wg will use wired Internet connection again, and will not switch back towireless Internet connection (This only happens with wired Internet connection isavailable. If wired connection is unavailable, 3G-6200Wg will try to establish 3G/3.5Gwireless connection again and again). If you want to use 3G/3.5G wirelessconnection again, you need to remove 3G/3.5G modem card from 3G-6200Wg andreconnect it back after 5 seconds.
( A ) Plug and play, no setup procedure required.
Connect the USB 3G/3.5G modem card with 3G-6200Wg and make sure thecorresponding USB LED indicator of 3G-6200Wg lights up, then you can use the webbrowser to access Internet.
( B ) PIN code or user name / password required:
Please check the authentication method you want to use. Most of telecomm serviceproviders require you to input PIN Code, please check ‘SIM’ and input the PIN codeprovided by telecomm service provider. Most of options listed here are optional andyou don’t have to provide those information if telecomm service provider doesn’tprovide you with those information.If telecomm provider provides you with username / password, please check /User

8/4/2019 BR 3G6200Wg Manual
http://slidepdf.com/reader/full/br-3g6200wg-manual 22/129
21
Name / Password box and input the user name / password provided by telecommservice provider, then click ‘APPLY’ button. Wait for 1 minute (for 3G-6200Wg toreboot), then you can access Internet.
( C ) Driver / Utility required on PC side
Some 3G/3.5G modem card does not work with instructions (A) or (B) listed above(ex. BandLuxe C100S). You need to install 3G/3.5G modem card driver / utility onevery PC which needs to access Internet first. After driver / utility installation iscomplete, every PC will be able to access Internet via 3G/6200Wg.
1. Plug in the BandLuxe C100S modem card to the USB port of your computer.
2. The system will detect the hardware of C100S USB adapter and also the storage
inside the adapter.

8/4/2019 BR 3G6200Wg Manual
http://slidepdf.com/reader/full/br-3g6200wg-manual 23/129
22
3. Please click “Cancel” to ignore the message of the found new hardware wizard.
4. Please go to “My computer”, you will see the BandLuxe C100S. Double click the
device.
8/4/2019 BR 3G6200Wg Manual
http://slidepdf.com/reader/full/br-3g6200wg-manual 24/129
23
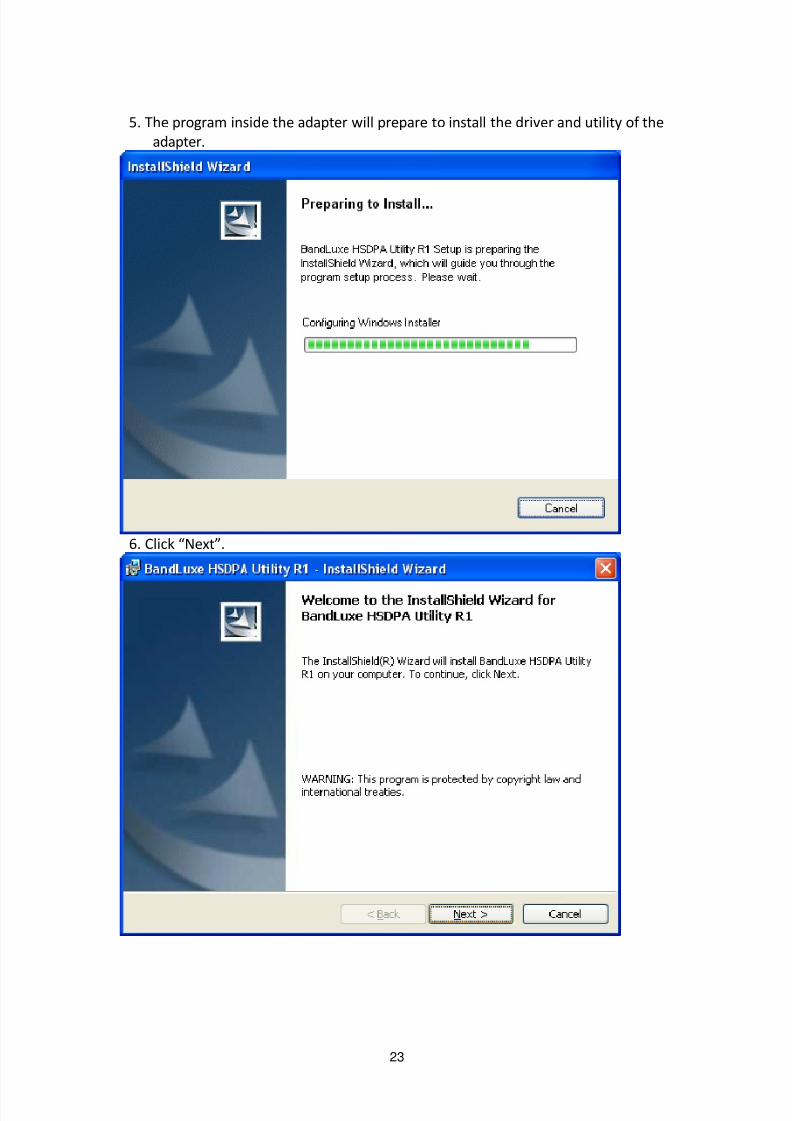
5. The program inside the adapter will prepare to install the driver and utility of the
adapter.
6. Click “Next”.
8/4/2019 BR 3G6200Wg Manual
http://slidepdf.com/reader/full/br-3g6200wg-manual 25/129
24
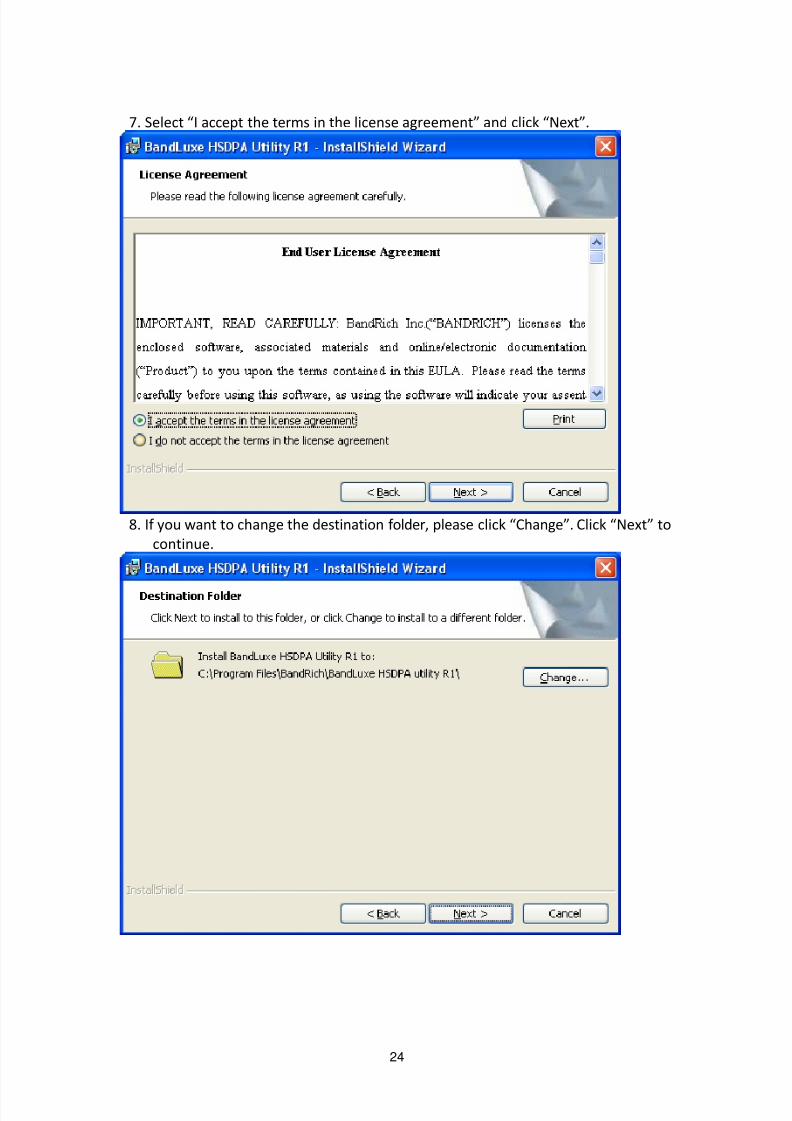
7. Select “I accept the terms in the license agreement” and click “Next”.
8. If you want to change the destination folder, please click “Change”. Click “Next” to
continue.
8/4/2019 BR 3G6200Wg Manual
http://slidepdf.com/reader/full/br-3g6200wg-manual 26/129
25
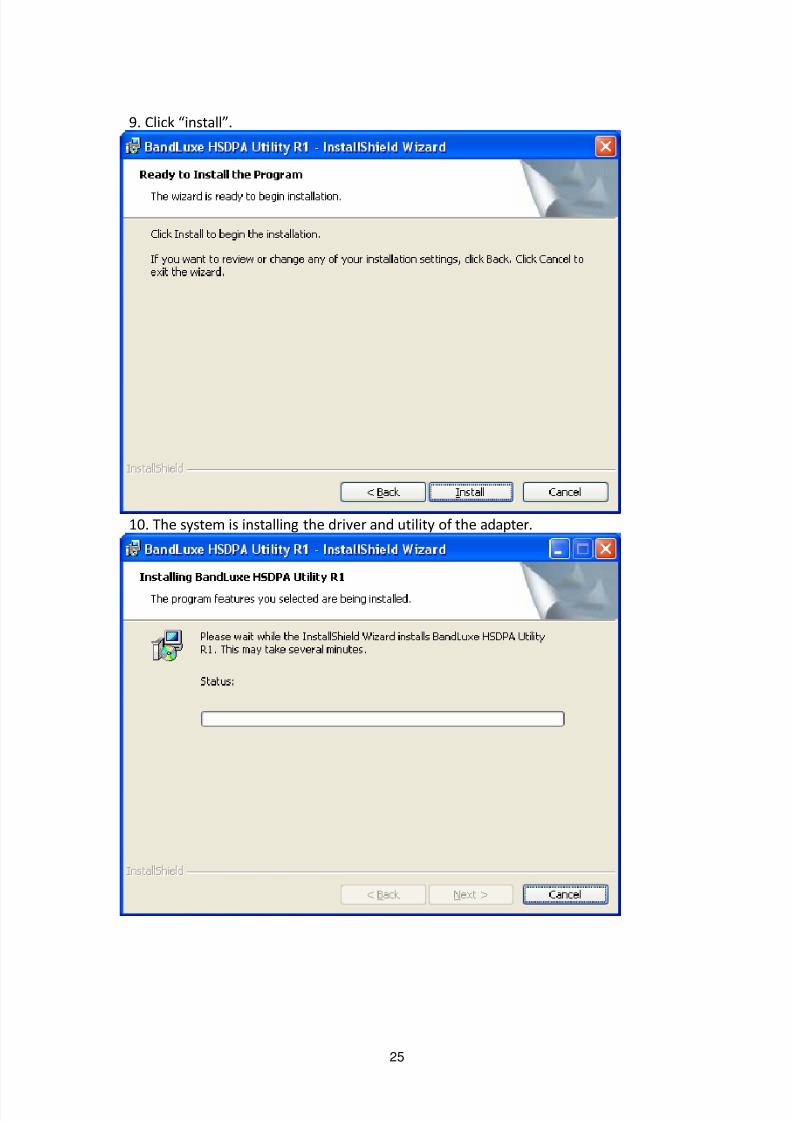
9. Click “install”.
10. The system is installing the driver and utility of the adapter.
8/4/2019 BR 3G6200Wg Manual
http://slidepdf.com/reader/full/br-3g6200wg-manual 27/129
26
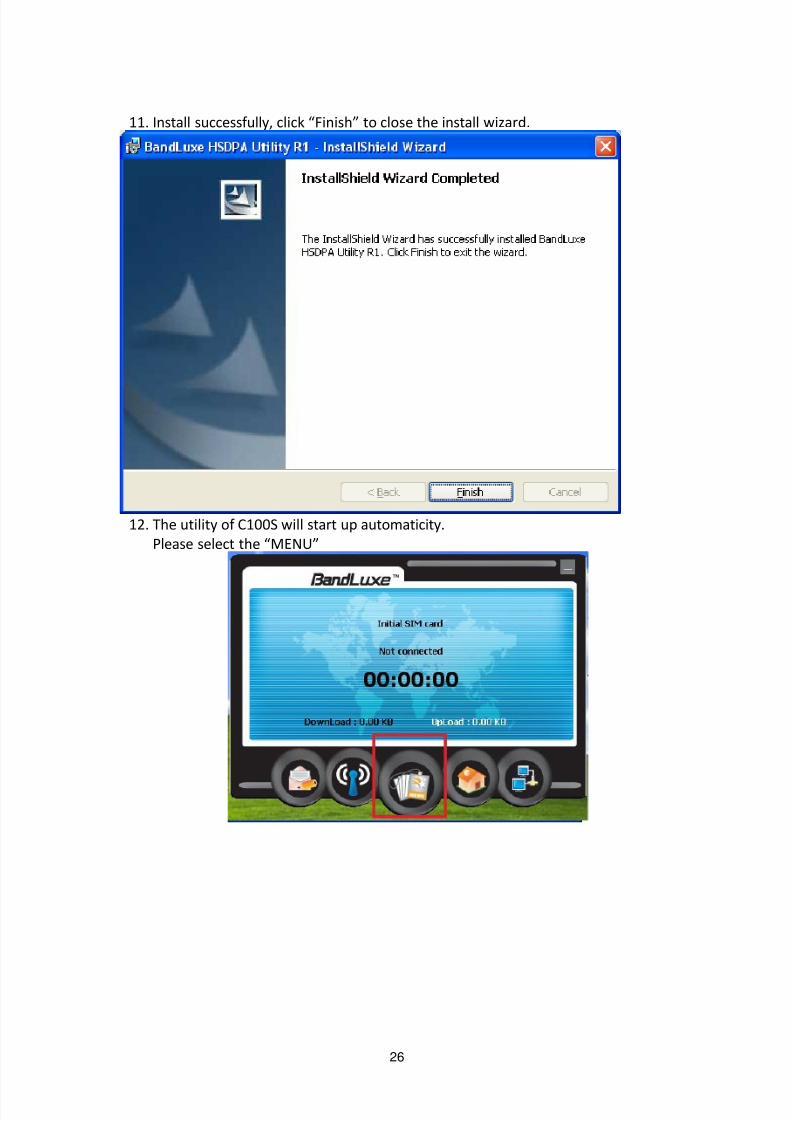
11. Install successfully, click “Finish” to close the install wizard.
12. The utility of C100S will start up automaticity.
Please select the “MENU”
8/4/2019 BR 3G6200Wg Manual
http://slidepdf.com/reader/full/br-3g6200wg-manual 28/129
27
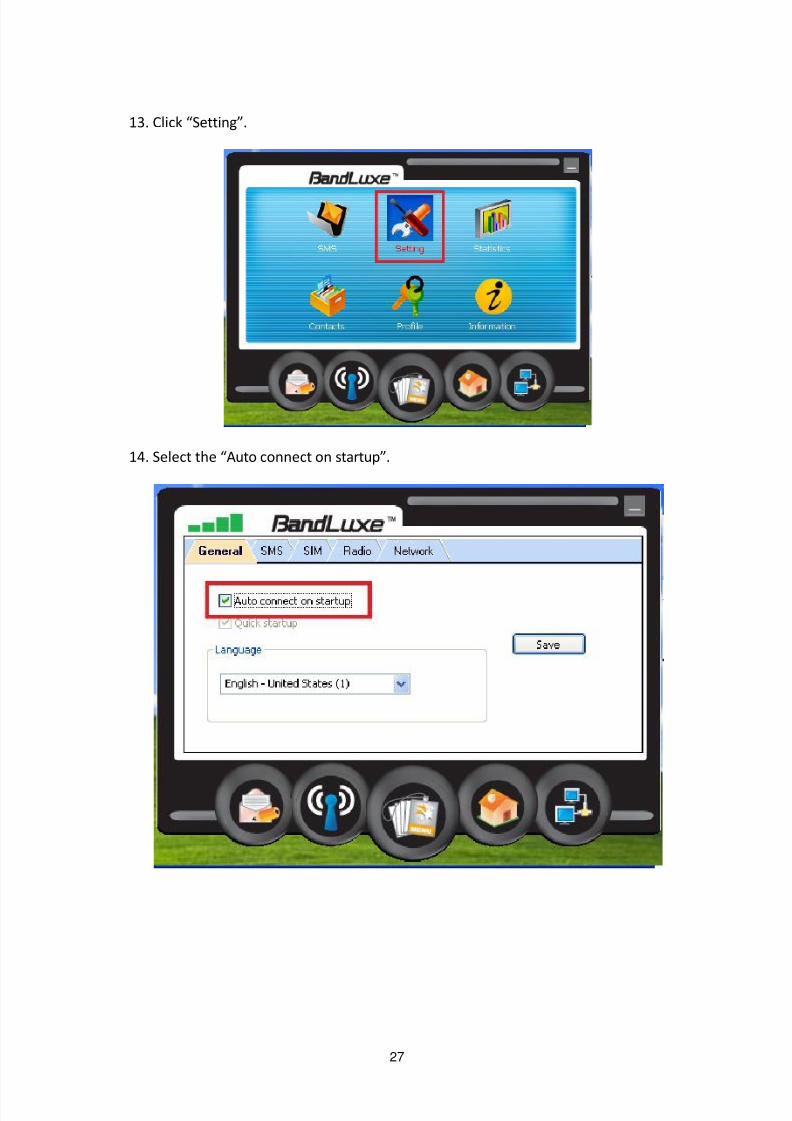
13. Click “Setting”.
14. Select the “Auto connect on startup”.

8/4/2019 BR 3G6200Wg Manual
http://slidepdf.com/reader/full/br-3g6200wg-manual 29/129
28
15. Plug in the C100S into the USB port of the 3G router.
16. The USB adapter will get the IP address from ISP automatically. You can check the
Status of the 3G ‐ 6200Wg on the Web site (ex: 192.168.2.1).
17. Now you are able to connect to Internet successfully.
8/4/2019 BR 3G6200Wg Manual
http://slidepdf.com/reader/full/br-3g6200wg-manual 30/129
29
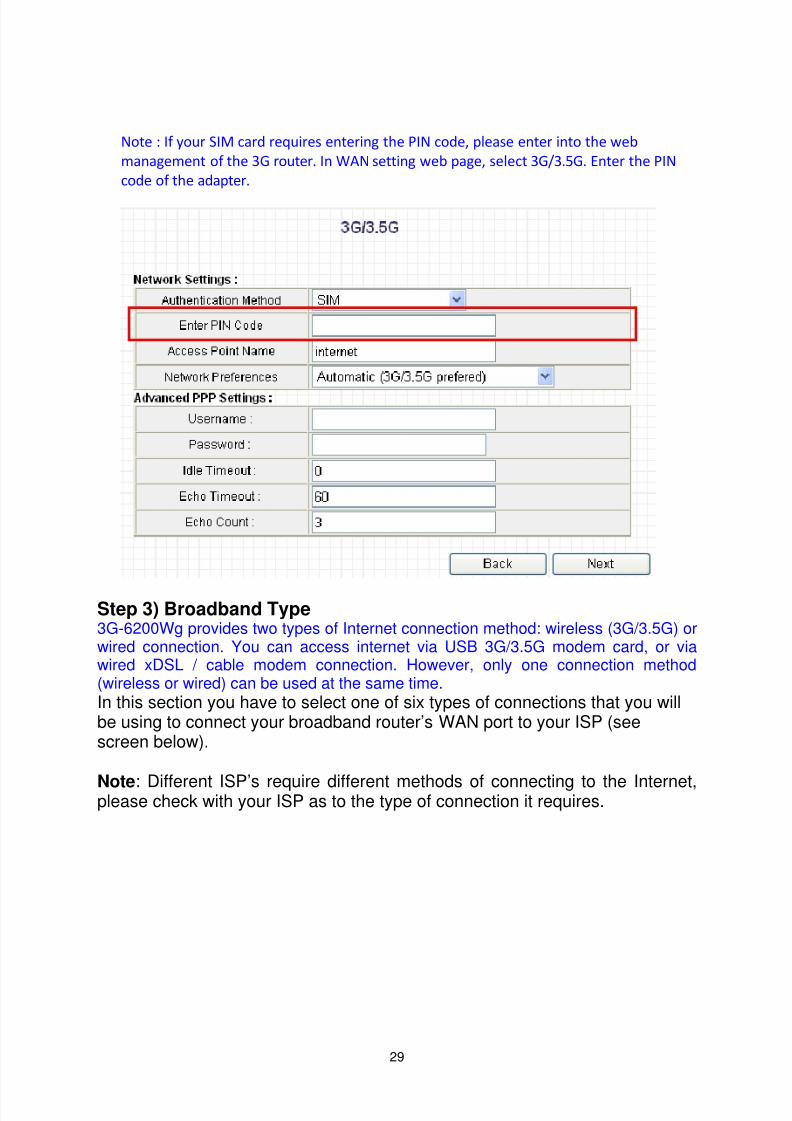
Note : If your SIM card requires entering the PIN code, please enter into the web
management of the 3G router. In WAN setting web page, select 3G/3.5G. Enter the PIN
code of the adapter.
Step 3) Broadband Type3G-6200Wg provides two types of Internet connection method: wireless (3G/3.5G) orwired connection. You can access internet via USB 3G/3.5G modem card, or viawired xDSL / cable modem connection. However, only one connection method(wireless or wired) can be used at the same time. In this section you have to select one of six types of connections that you willbe using to connect your broadband router’s WAN port to your ISP (seescreen below).
Note : Different ISP’s require different methods of connecting to the Internet,please check with your ISP as to the type of connection it requires.

8/4/2019 BR 3G6200Wg Manual
http://slidepdf.com/reader/full/br-3g6200wg-manual 31/129
30
Menu Description
Cable Modem Your ISP will assign you with an IP address automatically
Fixed-IP xDSL Your ISP gave you an IP address already
PPPoE xDSL Your ISP requires you to use Point-to-Point Protocol overEthernet (PPPoE)
PPTP xDSL Your ISP requires you to use a Point-to-Point TunnelingProtocol (PPTP)
L2TP xDSL Your ISP requires you to use a Layer Two TunnelingProtocol (L2TP)
Telstra Big Pond This Protocol only used for Telstra Big Pond Internetservice in Australia
Click on one of the WAN type and then proceed to the manual’s relevantsub-section ( 1.1 , 1.2 , 1.3 , 1.4 , 1.5 or 1.6 ). Click on Back to return to the
previous screen.
8/4/2019 BR 3G6200Wg Manual
http://slidepdf.com/reader/full/br-3g6200wg-manual 32/129
31
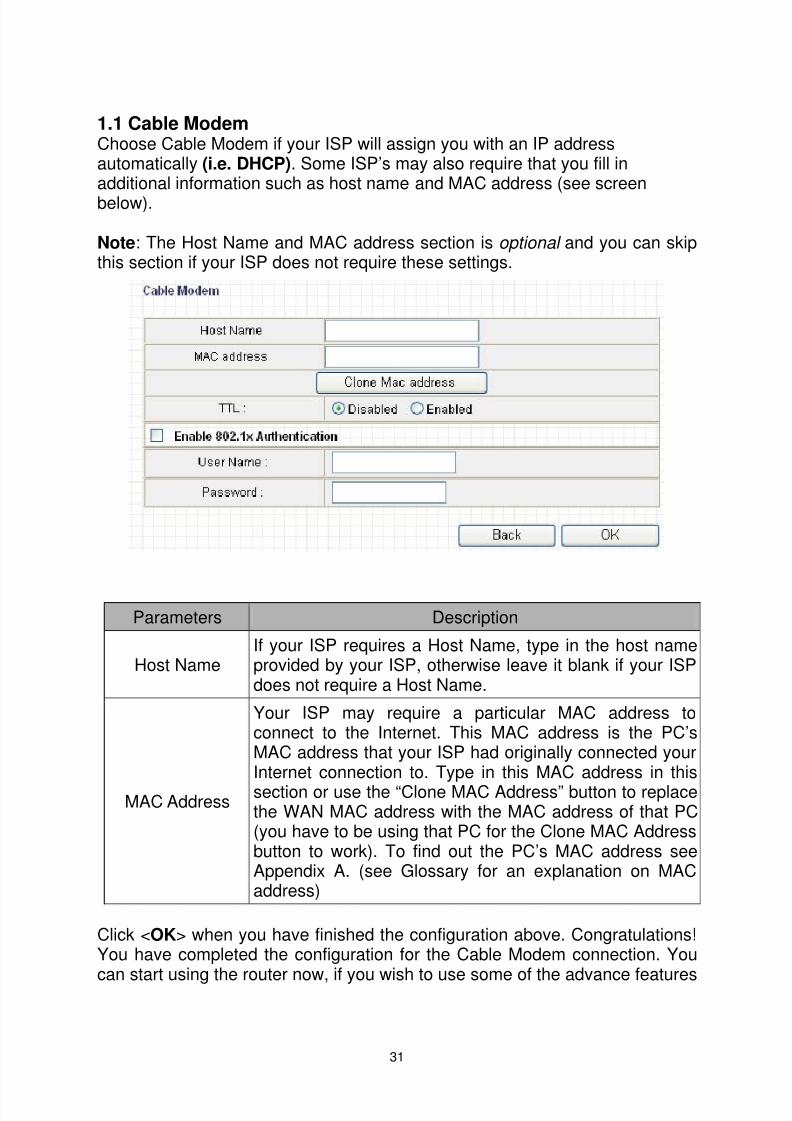
1.1 Cable ModemChoose Cable Modem if your ISP will assign you with an IP addressautomatically (i.e. DHCP) . Some ISP’s may also require that you fill inadditional information such as host name and MAC address (see screenbelow).
Note : The Host Name and MAC address section is optional and you can skipthis section if your ISP does not require these settings.
Parameters Description
Host NameIf your ISP requires a Host Name, type in the host nameprovided by your ISP, otherwise leave it blank if your ISPdoes not require a Host Name.
MAC Address
Your ISP may require a particular MAC address toconnect to the Internet. This MAC address is the PC’sMAC address that your ISP had originally connected yourInternet connection to. Type in this MAC address in thissection or use the “Clone MAC Address” button to replacethe WAN MAC address with the MAC address of that PC(you have to be using that PC for the Clone MAC Addressbutton to work). To find out the PC’s MAC address seeAppendix A. (see Glossary for an explanation on MACaddress)
Click < OK> when you have finished the configuration above. Congratulations!You have completed the configuration for the Cable Modem connection. You
can start using the router now, if you wish to use some of the advance features

8/4/2019 BR 3G6200Wg Manual
http://slidepdf.com/reader/full/br-3g6200wg-manual 33/129
32
supported by this router see chapter 2, 3, 4.
1.2 Fixed-IP xDSLSelect Fixed-IP xDSL if your ISP has given you a specific IP address for you touse. Your ISP should provide all the information required in this section.
Parameters Description
IP address This is the IP address that your ISP has given you.
Subnet Mask Enter the Subnet Mask provided by your ISP (e.g.255.255.255.0)
DNS address This is the ISP’s DNS server IP address
Gateway IPaddress
This is the ISP’s IP address gateway
Click <OK> when you have finished the configuration above. Congratulations!You have completed the configuration for the Fixed-IP x DSL connection. Youcan start using the router now, if you wish to use some of the advance featuressupported by this router see chapter 2, 3,

8/4/2019 BR 3G6200Wg Manual
http://slidepdf.com/reader/full/br-3g6200wg-manual 34/129
33
1.3 PPPoESelect PPPoE if your ISP requires the PPPoE protocol to connect you to theInternet. Your ISP should provide all the information required in this section.
Parameter DescriptionUser Name Enter the User Name provided by your ISP for the PPPoE
connection
Password Enter the Password provided by your ISP for the PPPoEconnection
Service Name This is optional. Enter the Service name of your ISP whenyour ISP requires it, otherwise leave it blank.
MTU
This is optional. You can specify the maximum size ofyour transmission packet to the Internet. Leave it as it is ifyou to not wish to set the maximum packet size. Pleaseask your ISP for detailed information.
Connection Type
If you select “Continuous”, the router will maintain theconnection to the ISP. If the WAN connection drops, therouter will reconnect to the ISP automatically.If you select “Connect On Demand”, the router willauto-connect to the ISP when someone wants to use theInternet and keep connected until the WAN idle timeout.The router will drop the WAN connection if the time period
that no one is using the Internet exceeds the “Idle Time”.
8/4/2019 BR 3G6200Wg Manual
http://slidepdf.com/reader/full/br-3g6200wg-manual 35/129
34
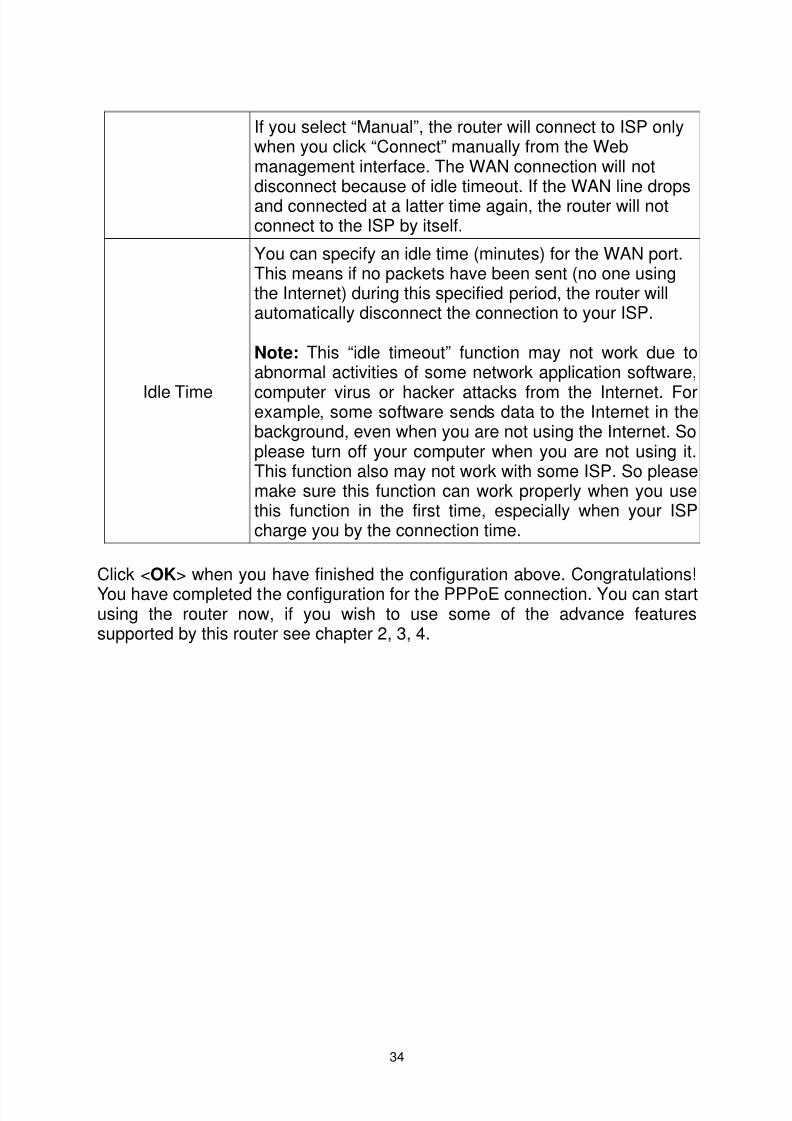
If you select “Manual”, the router will connect to ISP onlywhen you click “Connect” manually from the Webmanagement interface. The WAN connection will notdisconnect because of idle timeout. If the WAN line dropsand connected at a latter time again, the router will notconnect to the ISP by itself.
Idle Time
You can specify an idle time (minutes) for the WAN port.This means if no packets have been sent (no one usingthe Internet) during this specified period, the router willautomatically disconnect the connection to your ISP.
Note: This “idle timeout” function may not work due toabnormal activities of some network application software,
computer virus or hacker attacks from the Internet. Forexample, some software sends data to the Internet in thebackground, even when you are not using the Internet. Soplease turn off your computer when you are not using it.This function also may not work with some ISP. So pleasemake sure this function can work properly when you usethis function in the first time, especially when your ISPcharge you by the connection time.
Click < OK> when you have finished the configuration above. Congratulations!You have completed the configuration for the PPPoE connection. You can startusing the router now, if you wish to use some of the advance featuressupported by this router see chapter 2, 3, 4.

8/4/2019 BR 3G6200Wg Manual
http://slidepdf.com/reader/full/br-3g6200wg-manual 36/129
35
1.4 PPTPSelect PPTP if your ISP requires the PPTP protocol to connect you to theInternet. Your ISP should provide all the information required in this section.
Parameter Description
Obtain an IP
address
The ISP requires you to obtain an IP address by DHCP
automatically before connecting to the PPTP server.Use the following
IP AddressThe ISP gave you a static IP to be used to connect IPaddress to the PPTP server
IP Address This is the IP address that your ISP gave you to establisha PPTP connection
Subnet Mask Enter the Subnet Mask provided by your ISP (e.g.255.255.255.0)
Gateway Enter the IP address of the ISP’s Gateway
User ID Enter the User Name provided by your ISP for the PPTP

8/4/2019 BR 3G6200Wg Manual
http://slidepdf.com/reader/full/br-3g6200wg-manual 37/129
36
connection. Sometimes called as Connection ID
Password Enter the Password provided by your ISP for the PPTPconnection
PPTP Gateway
If your LAN has a PPTP gateway, then enter that PPTPgateway’s IP address here. If you do not have a PPTPgateway then enter the ISP’s Gateway IP address, sameas above
Connection ID This is the ID given by your ISP, and this is optional.
BEZEQ-ISRAE Select this item if you are using the service provided byBEZEQ in Israel.
Connection Type
If you select “Continuous”, the router will maintain the
connection to the ISP. If the WAN line breaks down andlinks again at a latter time, the router will reconnect to theISP automatically; if you select “Connect On Demand”,the router will auto-connect to the ISP when someonewants to use the Internet and keep connected until theWAN idle timeout. The router will close the WANconnection if the time period that no one is using theInternet exceeds the “Idle Time”.If you select “Manual”, the router will connect to ISP onlywhen you click “Connect” manually from the Web
management interface. The WAN connection will not bedisconnected because of idle timeout. If the WAN linebreaks down and got connected again at a latter time, therouter will not connect to the ISP by itself.
Idle Time
You can specify an idle time threshold (minutes) for theWAN port. This means if no packets has been sent (noone using the Internet) throughout this specified period,then the router will automatically disconnect theconnection to your ISP.
Note: This “idle timeout” function may not work due toabnormal activities of some network application software,computer virus or hacker attacks from the Internet. Forexample, some software sends network packets to theInternet in the background, even when you are not usingthe Internet. So please turn off your computer when youare not using it. This function also may not work withsome ISP. So please make sure this function can workproperly when you use this function in the first time,especially your ISP charge you by time used
8/4/2019 BR 3G6200Wg Manual
http://slidepdf.com/reader/full/br-3g6200wg-manual 38/129
37
Click < OK> when you have finished the configuration above. Congratulations!You have completed the configuration for the PPTP connection. You can startusing the router now, if you wish to use some of the advance featuressupported by this router see chapter 2, 3, 4.
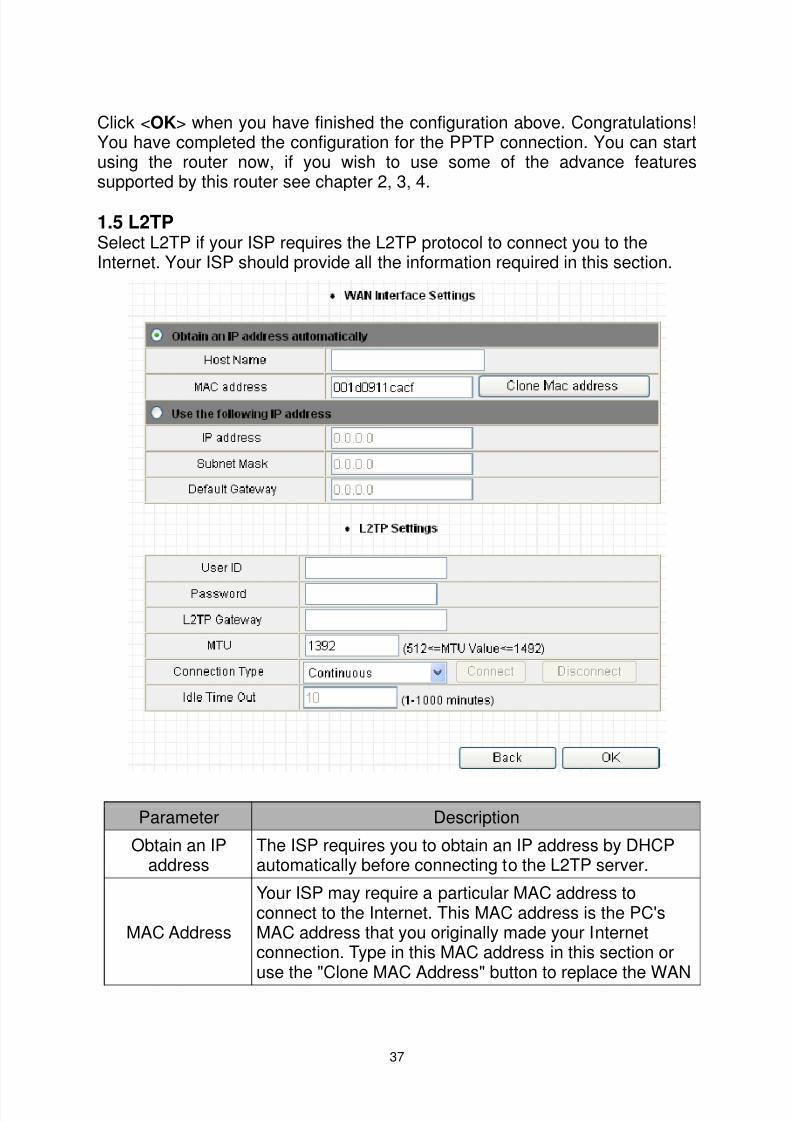
1.5 L2TPSelect L2TP if your ISP requires the L2TP protocol to connect you to theInternet. Your ISP should provide all the information required in this section.
Parameter Description
Obtain an IPaddress
The ISP requires you to obtain an IP address by DHCPautomatically before connecting to the L2TP server.
MAC Address
Your ISP may require a particular MAC address toconnect to the Internet. This MAC address is the PC'sMAC address that you originally made your Internetconnection. Type in this MAC address in this section oruse the "Clone MAC Address" button to replace the WAN
8/4/2019 BR 3G6200Wg Manual
http://slidepdf.com/reader/full/br-3g6200wg-manual 39/129
38
MAC address with the MAC address of that PC (you haveto be using that PC for the Clone MAC Address button towork). To find out the PC's MAC address see Appendix A.(see Glossary for an explanation on MAC address)
Use the followingIP Address
The ISP gave you a static IP to be used to connect to theL2TP server.
IP Address This is the IP address that your ISP has given you toestablish a L2TP connection.
Subnet Mask Enter the Subnet Mask provided by your ISP (e.g.255.255.255.0)
Gateway Enter the IP address of the ISP Gateway
User ID Enter the User Name provided by your ISP for the PPTPconnection. Sometimes called a Connection ID
Password Enter the Password provided by your ISP for the PPTPconnection
L2TP GatewayIf your LAN has a L2TP gateway, then enter that L2TPgateway IP address here. If you do not have a L2TPgateway then enter the ISP’s Gateway IP address above
MTUThis is optional. You can specify the maximum size ofyour transmission packet to the Internet. Keep default
value if you do not wish to set a maximum packet size.
Connection Type
If you select “Continuous”, the router will maintain theconnection to the ISP. If the WAN line breaks down andlinks again at a latter time, the router will auto-reconnectto the ISP. If you select “Connect On Demand”, the routerwill connect to the ISP automatically when someonewants to use the Internet and keep connected until theWAN idle timeout. The router will close the WANconnection if the time period that no one is using theInternet exceeds the “Idle Time”. If you select “Manual”,the router will connect to ISP only when you click“Connect” manually from the Web user interface. TheWAN connection will not be disconnected due to the idletimeout. If the WAN line breaks down and latter linksagain, the router will not connect to the ISP by itself.
Idle Time Out
The WAN “idle timeout" auto-disconnect function may notwork due to abnormal activities of some networkapplication software, computer virus or hacker attacksfrom the Internet. For example, some software sends
network packets to the Internet in the background, even
8/4/2019 BR 3G6200Wg Manual
http://slidepdf.com/reader/full/br-3g6200wg-manual 40/129
39
when you are not using the Internet. This function alsomay not work with some ISP. So please make sure thisfunction can work properly when you use this function inthe first time, especially your ISP charge you by timeused. Due to the many uncontrollable issues, we do notguarantee the WAN “idle timeout" auto-disconnectfunction will always work. In order to prevent from extraconnection fee, please TURN OFF THE ROUTER WHENYOU ARE NOT USING INTERNET .
Click < OK> when you have finished the configuration above. Congratulations!You have completed the configuration for the L2TP connection. You can startusing the router now, if you wish to use some of the advance features
supported by this router see chapter 2, 3, 4.
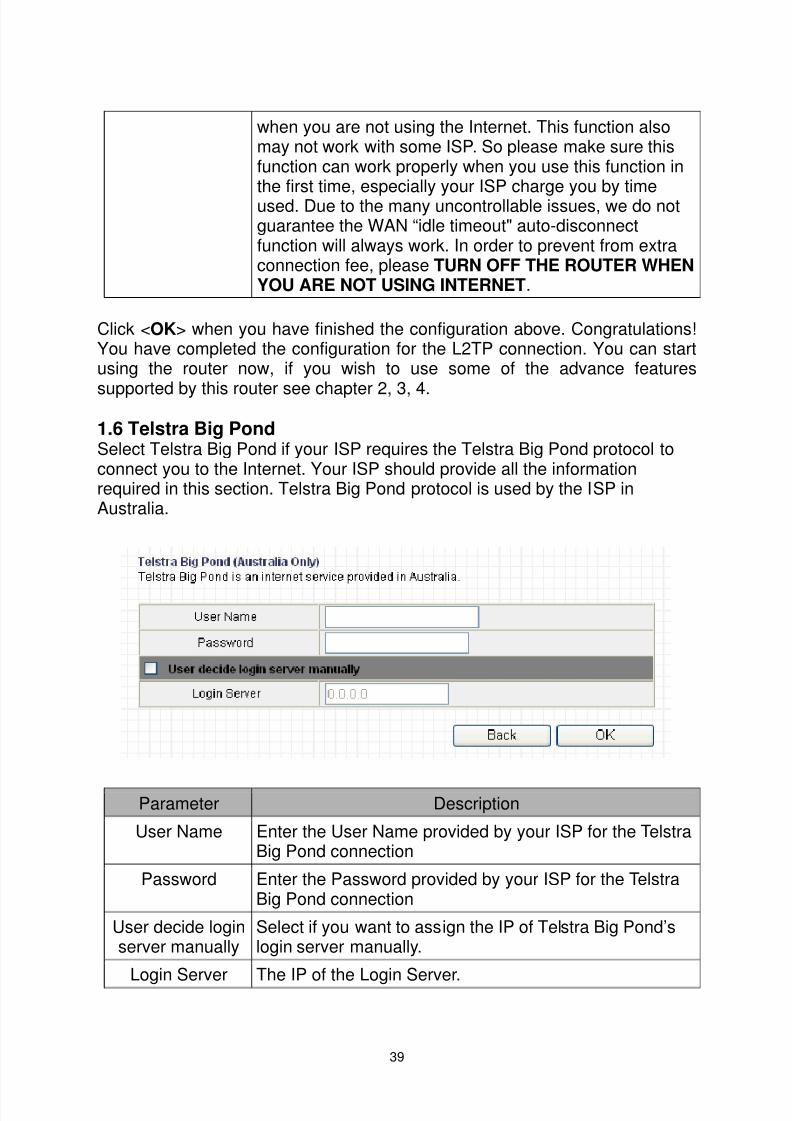
1.6 Telstra Big PondSelect Telstra Big Pond if your ISP requires the Telstra Big Pond protocol toconnect you to the Internet. Your ISP should provide all the informationrequired in this section. Telstra Big Pond protocol is used by the ISP inAustralia.
Parameter Description
User Name Enter the User Name provided by your ISP for the TelstraBig Pond connection
Password Enter the Password provided by your ISP for the TelstraBig Pond connection
User decide loginserver manually
Select if you want to assign the IP of Telstra Big Pond’slogin server manually.
Login Server The IP of the Login Server.

8/4/2019 BR 3G6200Wg Manual
http://slidepdf.com/reader/full/br-3g6200wg-manual 41/129
40
Click < OK> when you have finished the configuration above. Congratulations!You have completed the configuration for the Telstra Big Pond connection. Youcan start using the router now, if you wish to use some of the advance featuressupported by this router see chapter 2, 3, 4.
8/4/2019 BR 3G6200Wg Manual
http://slidepdf.com/reader/full/br-3g6200wg-manual 42/129
41
Chapter 2
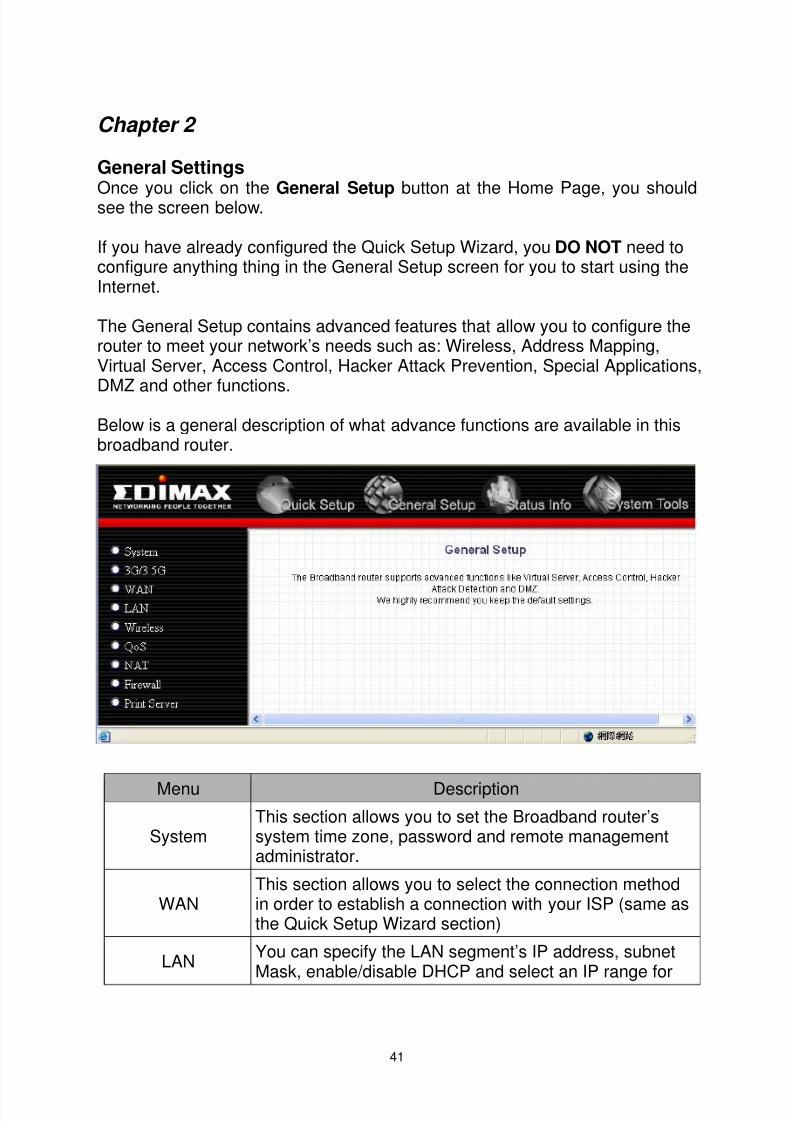
General Settings
Once you click on the General Setup button at the Home Page, you shouldsee the screen below.
If you have already configured the Quick Setup Wizard, you DO NOT need toconfigure anything thing in the General Setup screen for you to start using theInternet.
The General Setup contains advanced features that allow you to configure therouter to meet your network’s needs such as: Wireless, Address Mapping,Virtual Server, Access Control, Hacker Attack Prevention, Special Applications,
DMZ and other functions.Below is a general description of what advance functions are available in thisbroadband router.
Menu Description
SystemThis section allows you to set the Broadband router’ssystem time zone, password and remote managementadministrator.
WANThis section allows you to select the connection methodin order to establish a connection with your ISP (same asthe Quick Setup Wizard section)
LAN You can specify the LAN segment’s IP address, subnetMask, enable/disable DHCP and select an IP range for

8/4/2019 BR 3G6200Wg Manual
http://slidepdf.com/reader/full/br-3g6200wg-manual 43/129
42
your LAN
Wireless Setup the wireless LAN’s SSID, WEP key, MAC filtering.
QoS You can setup the QoS bandwidth control policy.
NAT
You can configure the Address Mapping, Virtual Serverand Special Applications functions in this section. Thisallows you to specify what user/packet can pass yourrouter’s NAT.
Firewall The Firewall section allows you to configure AccessControl, Hacker Prevention and DMZ.
Print Server The Print Server section allows you to enable the USBports to support USB printer.
Select one of the above General Setup selections and proceed to the manual’srelevant sub-section
8/4/2019 BR 3G6200Wg Manual
http://slidepdf.com/reader/full/br-3g6200wg-manual 44/129
43
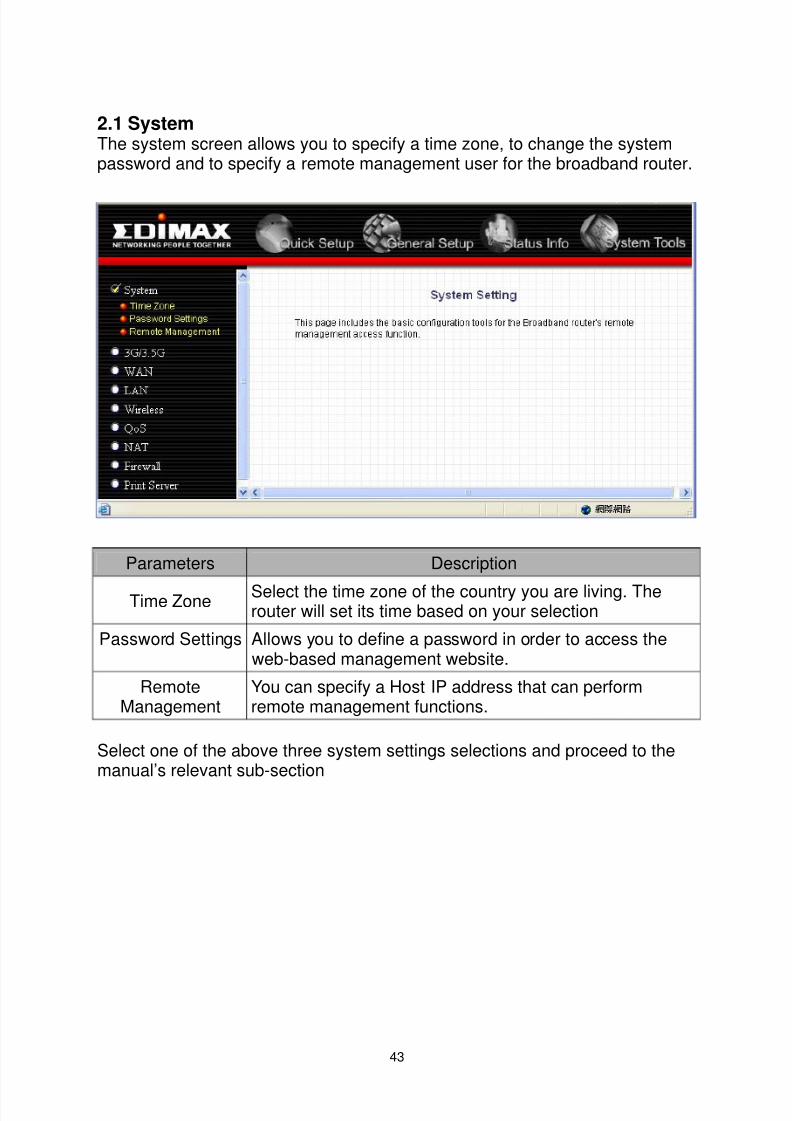
2.1 SystemThe system screen allows you to specify a time zone, to change the systempassword and to specify a remote management user for the broadband router.
Parameters Description
Time Zone Select the time zone of the country you are living. Therouter will set its time based on your selection
Password Settings Allows you to define a password in order to access theweb-based management website.
RemoteManagement
You can specify a Host IP address that can performremote management functions.
Select one of the above three system settings selections and proceed to themanual’s relevant sub-section
8/4/2019 BR 3G6200Wg Manual
http://slidepdf.com/reader/full/br-3g6200wg-manual 45/129
44
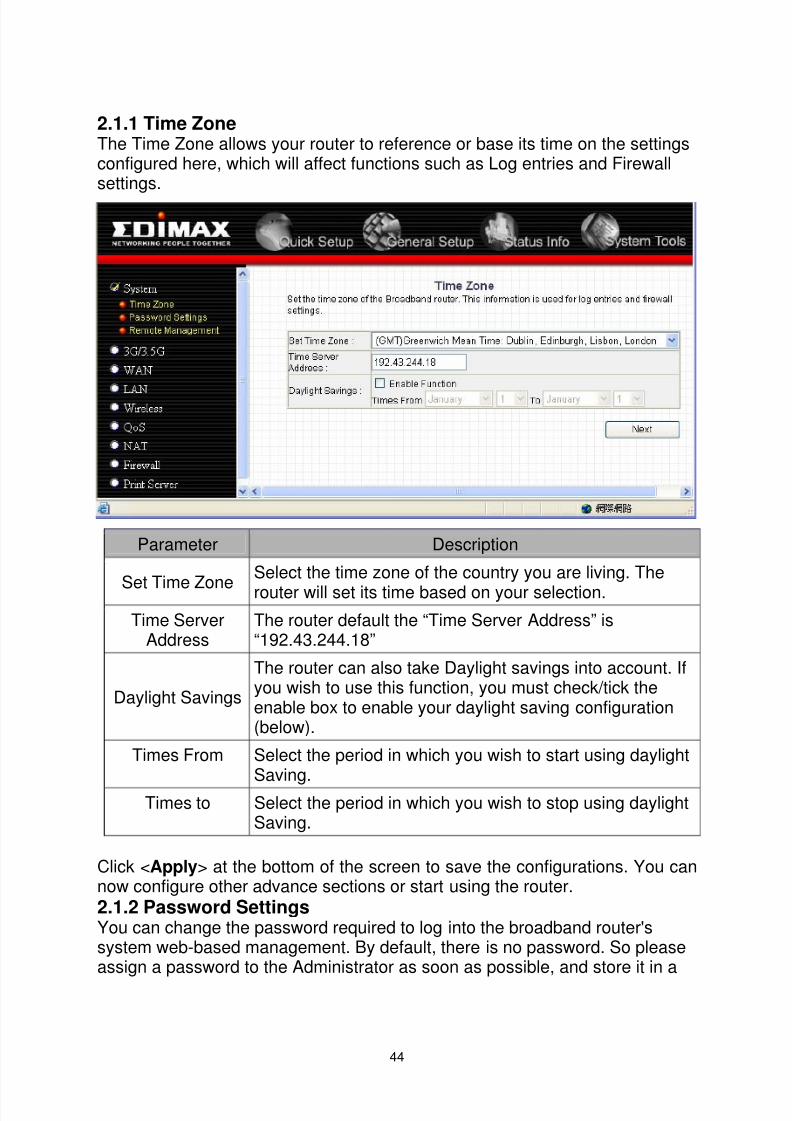
2.1.1 Time ZoneThe Time Zone allows your router to reference or base its time on the settingsconfigured here, which will affect functions such as Log entries and Firewallsettings.
Parameter Description
Set Time ZoneSelect the time zone of the country you are living. Therouter will set its time based on your selection.
Time ServerAddress
The router default the “Time Server Address” is“192.43.244.18”
Daylight Savings
The router can also take Daylight savings into account. Ifyou wish to use this function, you must check/tick theenable box to enable your daylight saving configuration(below).
Times From Select the period in which you wish to start using daylightSaving.
Times to Select the period in which you wish to stop using daylightSaving.
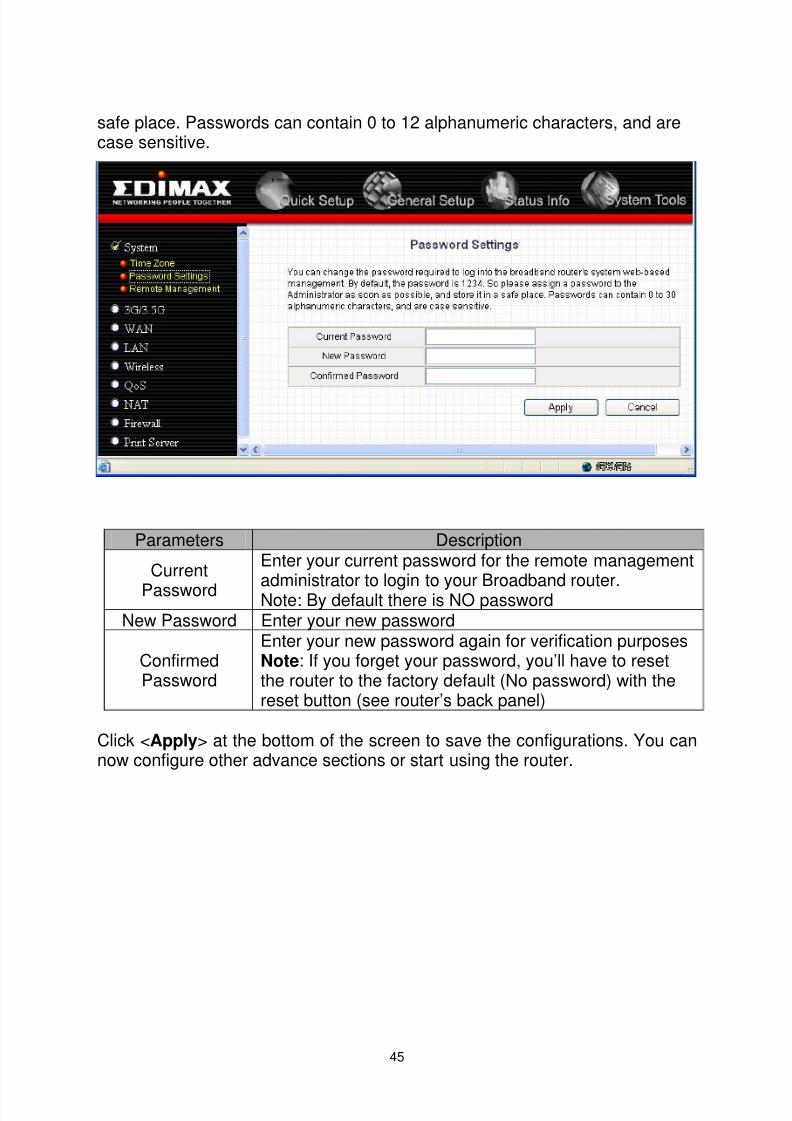
Click < Apply > at the bottom of the screen to save the configurations. You cannow configure other advance sections or start using the router.2.1.2 Password SettingsYou can change the password required to log into the broadband router'ssystem web-based management. By default, there is no password. So pleaseassign a password to the Administrator as soon as possible, and store it in a
8/4/2019 BR 3G6200Wg Manual
http://slidepdf.com/reader/full/br-3g6200wg-manual 46/129
45
safe place. Passwords can contain 0 to 12 alphanumeric characters, and arecase sensitive.
Parameters Description
CurrentPassword
Enter your current password for the remote management
administrator to login to your Broadband router.Note: By default there is NO passwordNew Password Enter your new password
ConfirmedPassword
Enter your new password again for verification purposesNote : If you forget your password, you’ll have to resetthe router to the factory default (No password) with thereset button (see router’s back panel)
Click < Apply > at the bottom of the screen to save the configurations. You cannow configure other advance sections or start using the router.
8/4/2019 BR 3G6200Wg Manual
http://slidepdf.com/reader/full/br-3g6200wg-manual 47/129
46
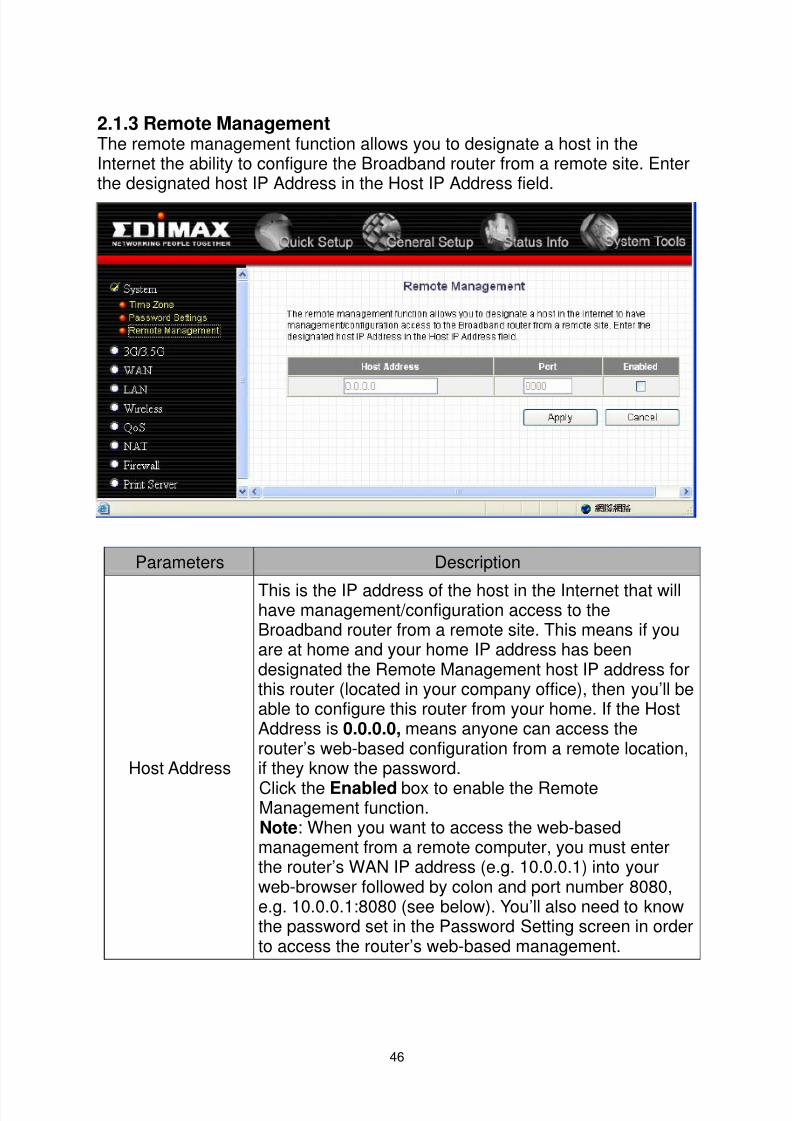
2.1.3 Remote ManagementThe remote management function allows you to designate a host in theInternet the ability to configure the Broadband router from a remote site. Enterthe designated host IP Address in the Host IP Address field.
Parameters Description
Host Address
This is the IP address of the host in the Internet that willhave management/configuration access to theBroadband router from a remote site. This means if youare at home and your home IP address has beendesignated the Remote Management host IP address forthis router (located in your company office), then you’ll beable to configure this router from your home. If the HostAddress is 0.0.0.0, means anyone can access therouter’s web-based configuration from a remote location,if they know the password.Click the Enabled box to enable the RemoteManagement function.Note : When you want to access the web-basedmanagement from a remote computer, you must enterthe router’s WAN IP address (e.g. 10.0.0.1) into yourweb-browser followed by colon and port number 8080,e.g. 10.0.0.1:8080 (see below). You’ll also need to knowthe password set in the Password Setting screen in orderto access the router’s web-based management.

8/4/2019 BR 3G6200Wg Manual
http://slidepdf.com/reader/full/br-3g6200wg-manual 48/129
47
Port The port number of remote management web interface.
Enabled Select “Enabled” to enable the remote managementfunction.
Click < Apply > at the bottom of the screen to save the configurations. You cannow configure other advanced functions or start using the router (with theadvanced settings in place)
8/4/2019 BR 3G6200Wg Manual
http://slidepdf.com/reader/full/br-3g6200wg-manual 49/129
48
2.2 3G/3.5G3G-6200Wg provides two types of Internet connection method: wireless (3G/3.5G) orwired connection. You can access internet via USB 3G/3.5G modem card, or viawired xDSL / cable modem connection. However, only one connection method(wireless or wired) can be used at the same time. Related instructions will be givenas follow.3G-6200Wg supports most of 3G/3.5G modem cards, just connect the modem cardto the USB port of 3G-6200Wg and 3G-6200Wg will recognize it automatically, noadditional setup procedure required. However, some of modem cards require PINcode or account / password (you have to use 3G-6200Wg’s web interface to inputthese information), and some modem cards requires you to connect the modem cardwith your PC and install driver / utility before you connect it with 3G-6200Wg (all PCswhich need to access Internet by 3G-6200Wg requires to perform this procedureonce). If you still not able to connect to Internet, please use wired Internet connectionto access our website :http://www.edimax.com/ ,download latest version of firmwareand upgrade 3G-6200Wg’s firmware. If you still not be able to get connected by your3G/3.5G modem card, please contact your dealer of purchase and provide the modelname of the 3G/3.5G modem card you have, we’ll try our best to help you to solvethe problem.
Only one Internet connection (wireless / wired) can be used at the same time.Wireless connection (3G/3.5G) will be selected first, and use wired Internetconnection as backup. Therefore, please DO NOT connect your 3G/3.5G modemcard with 3G-6200Wg, or your telecomm service provider may charge you with highcommunication fee. For example, if you connect 3G/3.5G modem card with3G-6200Wg when you’re using wired Internet connection, wired connection will bedropped and use 3G/3.5G wireless connection instead. If 3G/3.5G wireless signalreception is poor and the connection can not be restored within 60 seconds,3G-6200Wg will use wired Internet connection again, and will not switch back towireless Internet connection (This only happens with wired Internet connection isavailable. If wired connection is unavailable, 3G-6200Wg will try to establish 3G/3.5Gwireless connection again and again). If you want to use 3G/3.5G wirelessconnection again, you need to remove 3G/3.5G modem card from 3G-6200Wg and
reconnect it back after 5 seconds.
( A ) Plug and play, no setup procedure required.
Connect the USB 3G/3.5G modem card with 3G-6200Wg and make sure thecorresponding USB LED indicator of 3G-6200Wg lights up, then you can use the webbrowser to access Internet.
( B ) PIN code or user name / password required:
Please check the authentication method you want to use. Most of telecomm service
8/4/2019 BR 3G6200Wg Manual
http://slidepdf.com/reader/full/br-3g6200wg-manual 50/129
49
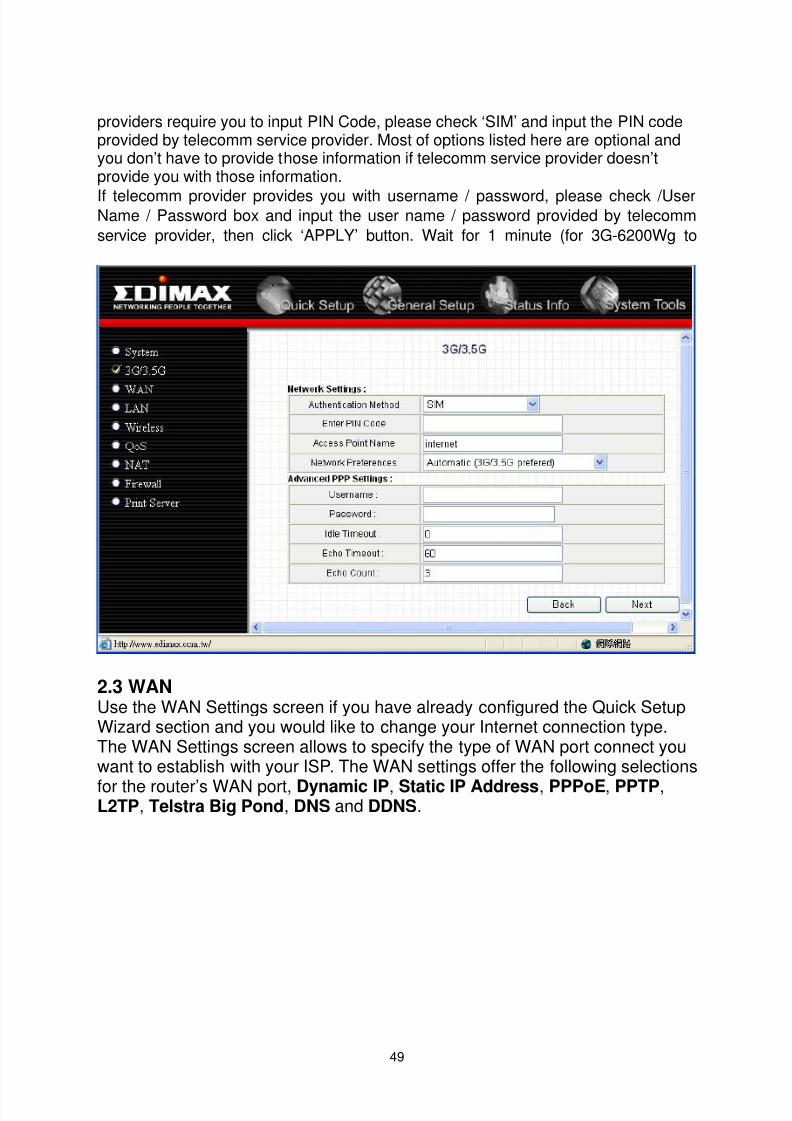
providers require you to input PIN Code, please check ‘SIM’ and input the PIN codeprovided by telecomm service provider. Most of options listed here are optional andyou don’t have to provide those information if telecomm service provider doesn’tprovide you with those information.
If telecomm provider provides you with username / password, please check /UserName / Password box and input the user name / password provided by telecommservice provider, then click ‘APPLY’ button. Wait for 1 minute (for 3G-6200Wg to
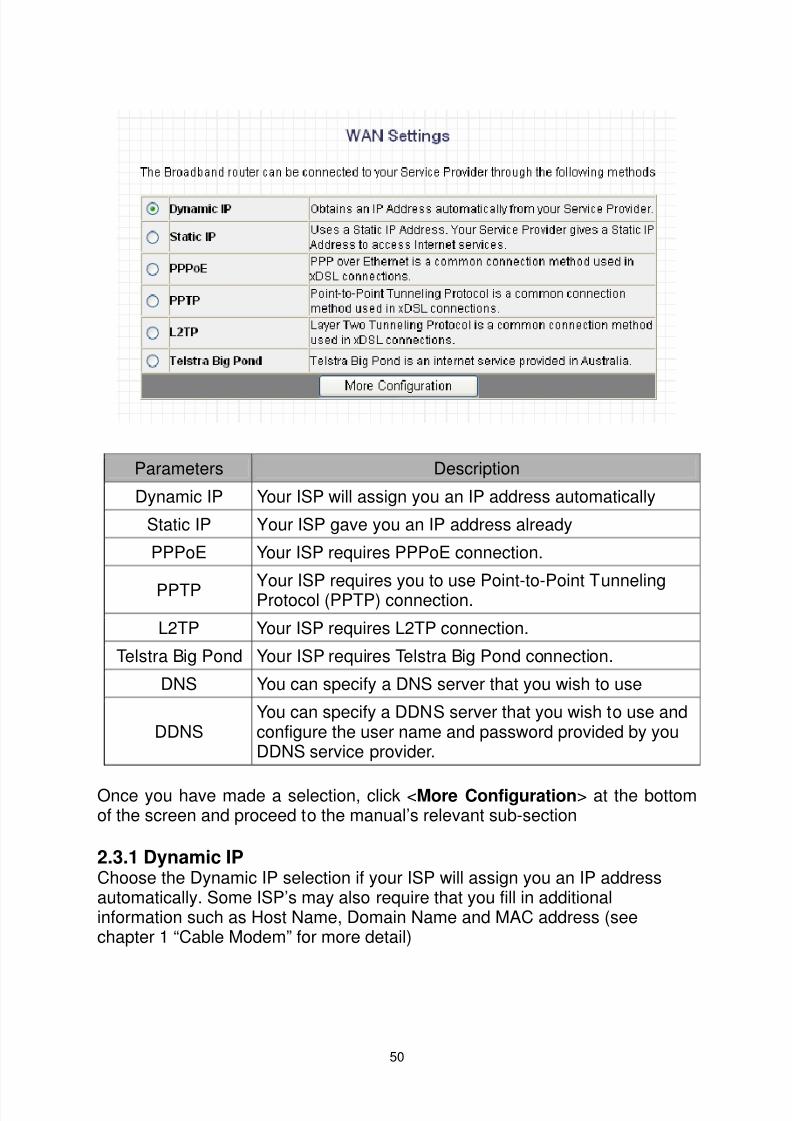
2.3 WANUse the WAN Settings screen if you have already configured the Quick SetupWizard section and you would like to change your Internet connection type.The WAN Settings screen allows to specify the type of WAN port connect youwant to establish with your ISP. The WAN settings offer the following selectionsfor the router’s WAN port, Dynamic IP , Static IP Address , PPPoE , PPTP , L2TP , Telstra Big Pond , DNS and DDNS .
8/4/2019 BR 3G6200Wg Manual
http://slidepdf.com/reader/full/br-3g6200wg-manual 51/129
50
Parameters Description
Dynamic IP Your ISP will assign you an IP address automatically
Static IP Your ISP gave you an IP address already
PPPoE Your ISP requires PPPoE connection.
PPTP Your ISP requires you to use Point-to-Point TunnelingProtocol (PPTP) connection.
L2TP Your ISP requires L2TP connection.
Telstra Big Pond Your ISP requires Telstra Big Pond connection.
DNS You can specify a DNS server that you wish to use
DDNSYou can specify a DDNS server that you wish to use andconfigure the user name and password provided by youDDNS service provider.
Once you have made a selection, click < More Configuration > at the bottomof the screen and proceed to the manual’s relevant sub-section
2.3.1 Dynamic IPChoose the Dynamic IP selection if your ISP will assign you an IP addressautomatically. Some ISP’s may also require that you fill in additionalinformation such as Host Name, Domain Name and MAC address (seechapter 1 “Cable Modem” for more detail)

8/4/2019 BR 3G6200Wg Manual
http://slidepdf.com/reader/full/br-3g6200wg-manual 52/129
51
2.3.2 Static IP AddressSelect Static IP address if your ISP assigned you with a specific IP address foryou to use. Your ISP should provide all the information required in this section.(See chapter 1 “Fixed IP” for more detail)
2.3.3 PPPoE (PPP over Ethernet)Select PPPoE if your ISP requires the PPPoE protocol to connect you to theInternet. Your ISP should provide all the information required in this section.(See chapter 1 “PPPoE” for more detail)
2.3.4 PPTPSelect PPTP if your ISP requires the PPTP protocol to connect you to theInternet. Your ISP should provide all the information required in this section.
(See chapter 1 “PPTP” for more detail)2.3.5 L2TPSelect L2TP if your ISP requires the L2TP protocol to connect to the Internet.Your ISP should provide all the information required in this section. (Seechapter 1 “L2TP” for detailed information)
2.3.6 Telstra Big PondSelect Telstra Big Pond if your ISP requires the Telstra Big Pond protocol toconnect to the Internet. Your ISP should provide all the information required in
this section. Telstra Big Pond protocol is used by the ISP in Australia. (Seechapter 1 “Telstra Big Pond” for more detail)

8/4/2019 BR 3G6200Wg Manual
http://slidepdf.com/reader/full/br-3g6200wg-manual 53/129
52
2.3.7 DNSA Domain Name System (DNS) server is like an index of IP addresses andWeb addresses. If you type a Web address into your browser, such aswww.router.com, a DNS server will find that name in its index and thematching IP address. Most ISPs provide a DNS server for speed andconvenience. If your Service Provider connects you to the Internet withdynamic IP settings, it is likely that the DNS server IP address is providedautomatically. However, if there is a DNS server that you would rather use,you need to specify the IP address of that DNS server here.
Parameters Description
DNS address Fill in the ISP’s DNS server IP address; or you can specifyyour own preferred DNS server IP address
Secondary DNSAddress
(optional)
This is optional. You can enter another DNS server’s IPaddress as a backup. The secondary DNS will be usedwhen the above DNS fail.
Click < Apply > at the bottom of the screen to save the configurations. You cannow configure other advance sections or start using the router (with theadvanced settings in place)
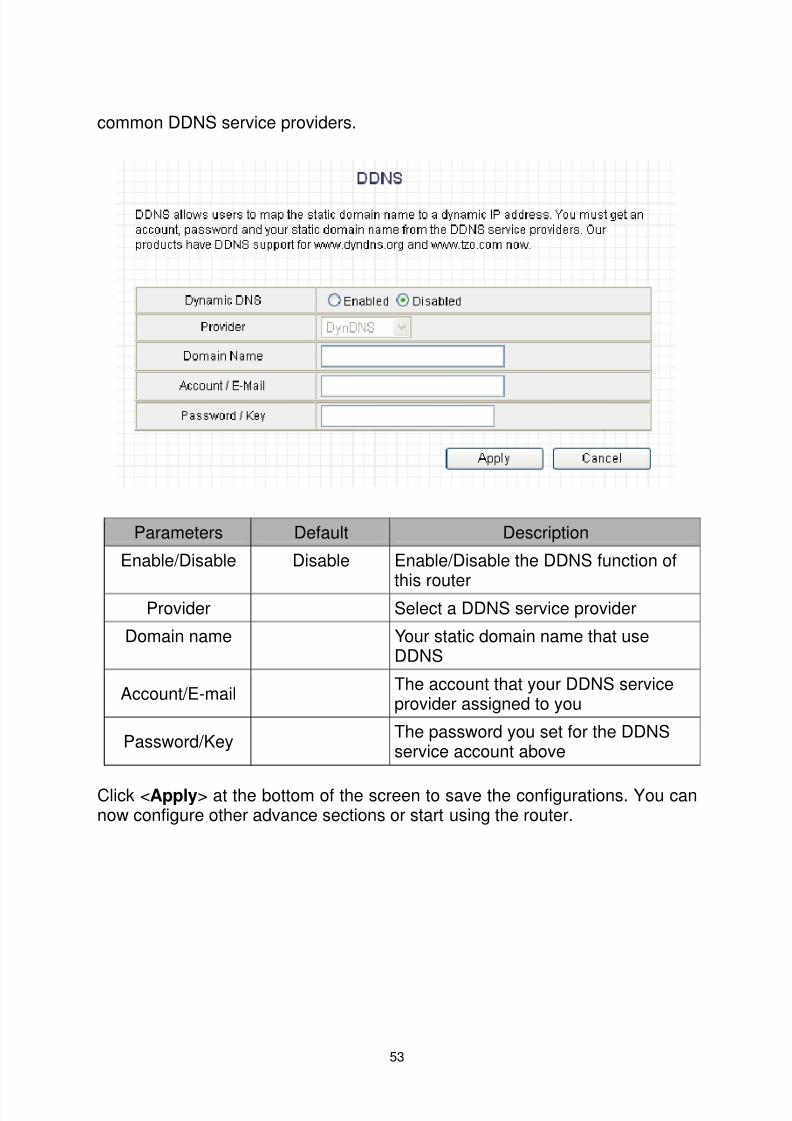
2.3.8 DDNSDDNS allows you to map the static domain name to a dynamic IP address.You must get an account, password and your static domain name from the
DDNS service providers. This router supports DynDNS, TZO and other
8/4/2019 BR 3G6200Wg Manual
http://slidepdf.com/reader/full/br-3g6200wg-manual 54/129
53
common DDNS service providers.
Parameters Default Description
Enable/Disable Disable Enable/Disable the DDNS function of
this routerProvider Select a DDNS service provider
Domain name Your static domain name that useDDNS
Account/E-mail The account that your DDNS serviceprovider assigned to you
Password/Key The password you set for the DDNSservice account above
Click < Apply > at the bottom of the screen to save the configurations. You cannow configure other advance sections or start using the router.

8/4/2019 BR 3G6200Wg Manual
http://slidepdf.com/reader/full/br-3g6200wg-manual 55/129
54
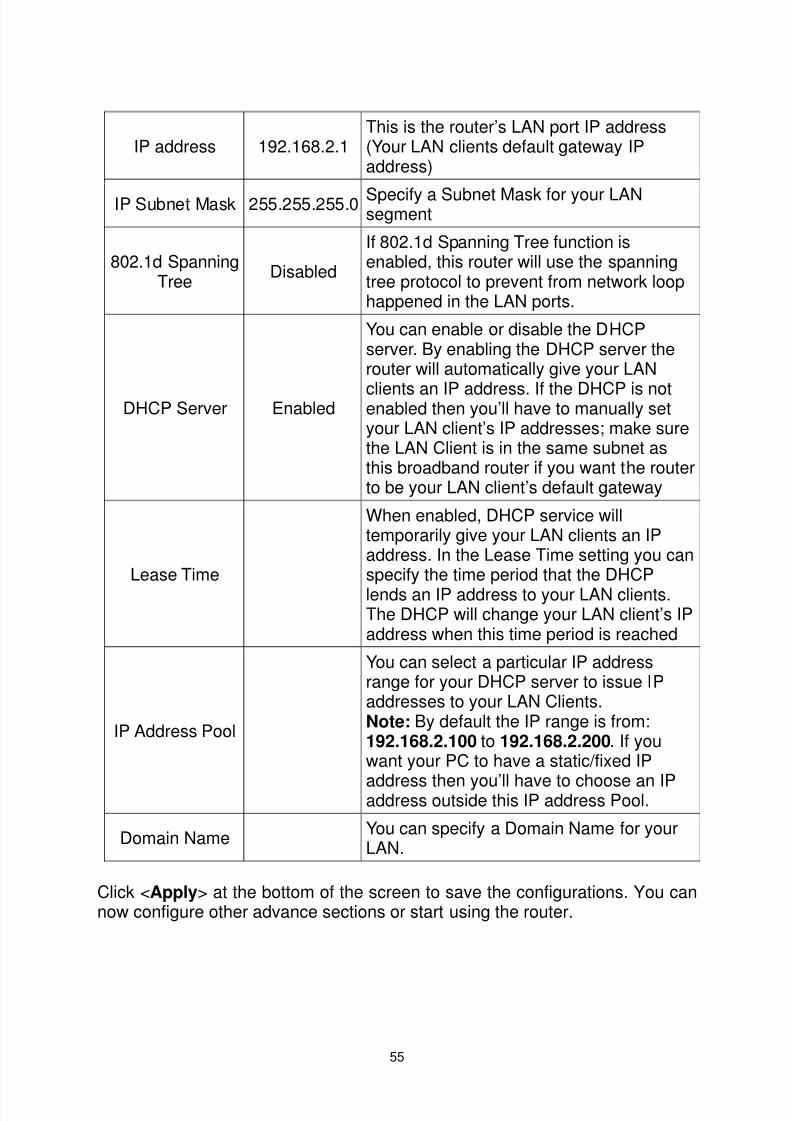
2.4 LAN
The LAN Port screen below allows you to specify a private IP address for yourrouter’s LAN ports as well as a subnet mask for your LAN segment.
Parameters Default Description
8/4/2019 BR 3G6200Wg Manual
http://slidepdf.com/reader/full/br-3g6200wg-manual 56/129
55
IP address 192.168.2.1This is the router’s LAN port IP address(Your LAN clients default gateway IPaddress)
IP Subnet Mask 255.255.255.0 Specify a Subnet Mask for your LANsegment
802.1d SpanningTree Disabled
If 802.1d Spanning Tree function isenabled, this router will use the spanningtree protocol to prevent from network loophappened in the LAN ports.
DHCP Server Enabled
You can enable or disable the DHCPserver. By enabling the DHCP server therouter will automatically give your LAN
clients an IP address. If the DHCP is notenabled then you’ll have to manually setyour LAN client’s IP addresses; make surethe LAN Client is in the same subnet asthis broadband router if you want the routerto be your LAN client’s default gateway
Lease Time
When enabled, DHCP service willtemporarily give your LAN clients an IPaddress. In the Lease Time setting you canspecify the time period that the DHCPlends an IP address to your LAN clients.The DHCP will change your LAN client’s IPaddress when this time period is reached
IP Address Pool
You can select a particular IP addressrange for your DHCP server to issue IPaddresses to your LAN Clients.Note: By default the IP range is from:192.168.2.100 to 192.168.2.200 . If youwant your PC to have a static/fixed IP
address then you’ll have to choose an IPaddress outside this IP address Pool.
Domain Name You can specify a Domain Name for yourLAN.
Click < Apply > at the bottom of the screen to save the configurations. You cannow configure other advance sections or start using the router.

8/4/2019 BR 3G6200Wg Manual
http://slidepdf.com/reader/full/br-3g6200wg-manual 57/129
56
2.5 WirelessWireless Access Point builds a wireless LAN and can let all PCs equipped withIEEE 802.11b or 801.11g wireless network adaptor connect to your Intranet. Itsupports WEP and WPA2 encryption to enhance the security of your wirelessnetwork.
Parameters Default
Description
Enable ordisable
Wirelessmodulefunction
Enable
You can select to enable or disable the wirelessaccess point module of this router.
Click < Apply > at the bottom of the screen to save the configurations. You cannow configure other advance sections or start using the router.

8/4/2019 BR 3G6200Wg Manual
http://slidepdf.com/reader/full/br-3g6200wg-manual 58/129
57
2.5.1 Basic SettingsYou can set parameters that are used for the wireless stations to connect tothis router. The parameters include Mode, ESSID, Channel Number andAssociated Client.
Parameters Default Description
Mode It allows you to set the AP to AP, Bridge orWDS mode.
Band
It allows you to select the wireless band:802.11b and / or 802.11g. You can select B+Gmode to allow both 802.11b and 802.11g clients
to connect to this wireless access point.
ESSID defaultThis is the name of the wireless access point.All devices in the same wireless LAN shouldhave the same ESSID.
ChannelNumber 11
The wireless channel used by the wirelessaccess point. All devices in the same wirelessLAN should use the same channel.
MAC
address
If you want to combine more than one network,you have to set this access point to “APBridge-Point to Point mode”, “AP Bridge-Point
8/4/2019 BR 3G6200Wg Manual
http://slidepdf.com/reader/full/br-3g6200wg-manual 59/129
58
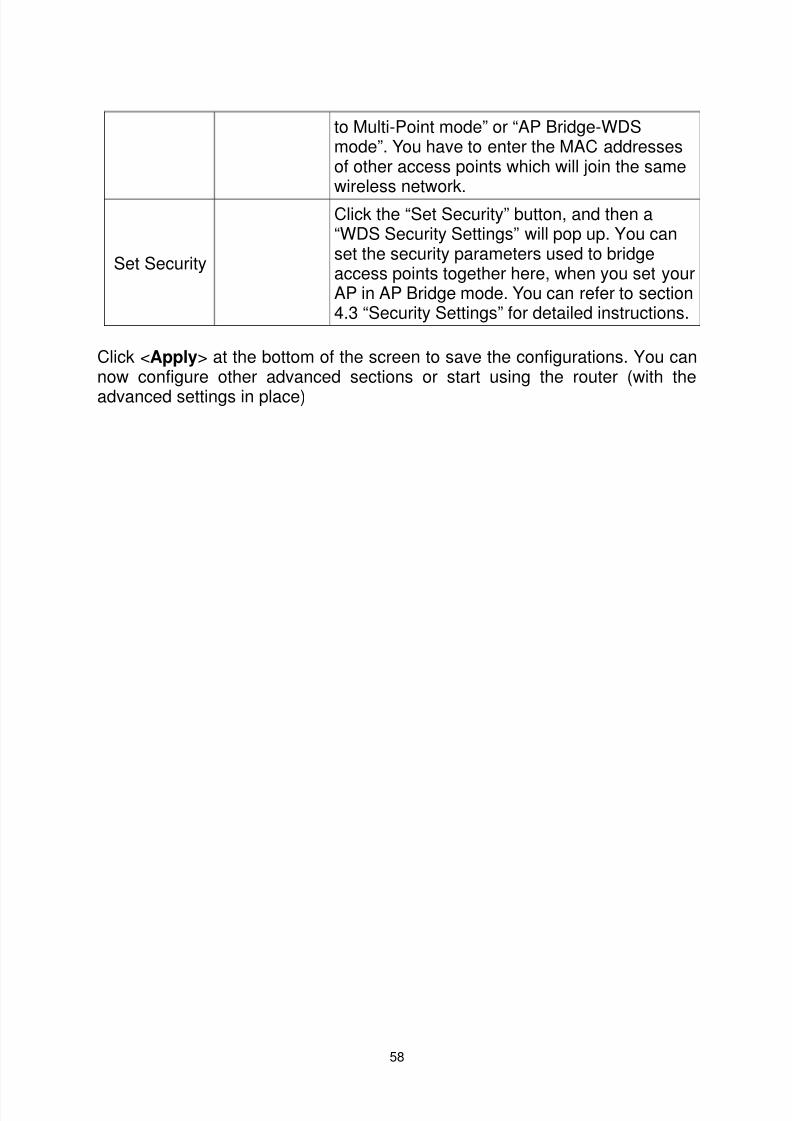
to Multi-Point mode” or “AP Bridge-WDSmode”. You have to enter the MAC addressesof other access points which will join the samewireless network.
Set Security
Click the “Set Security” button, and then a“WDS Security Settings” will pop up. You canset the security parameters used to bridgeaccess points together here, when you set yourAP in AP Bridge mode. You can refer to section4.3 “Security Settings” for detailed instructions.
Click < Apply > at the bottom of the screen to save the configurations. You cannow configure other advanced sections or start using the router (with theadvanced settings in place)

8/4/2019 BR 3G6200Wg Manual
http://slidepdf.com/reader/full/br-3g6200wg-manual 60/129
59
2.5.2 Advanced SettingsYou can set advanced wireless LAN parameters of this router. The parametersinclude Authentication Type, Fragment Threshold, RTS Threshold, BeaconInterval, preamble Type, etc. You should not change these parameters unlessyou know their function and effects.
Parameters Description
FragmentThreshold
"Fragment Threshold" specifies the maximumfragmentation size of data packet to be transmitted. If thisvalue is too low, it will result in bad performance.
RTS Threshold When the packet size is smaller the RTS threshold, the

8/4/2019 BR 3G6200Wg Manual
http://slidepdf.com/reader/full/br-3g6200wg-manual 61/129
60
wireless access point will not use the RTS/CTSmechanism to send this packet.
Beacon Interval
The interval of time that this wireless access point
broadcast a beacon. Beacon is used to synchronize thewireless network.
DTIM Period
The DTIM period you specify here indicates how often theclients served by this access point should check forbuffered data which still exists on the AP and waiting forpickup.
Data Rate
The “Data Rate” is the rate this access point used totransmit data packets. The access point will use thehighest possible selected transmission rate to transmit the
data packets.
Preamble TypeThe “Long Preamble” can provide better wireless LANcompatibility while the “Short Preamble” can providebetter wireless LAN performance.
BroadcastESSID
If you enable “Broadcast ESSID”, every wireless stationlocated within the coverage of this access point willdiscover this access point more easily. If you are buildinga wireless network which will open to the public, it’srecommended to enable this feature. Disabling “Broadcast
ESSID” can provide better security.
IAPPIf you enable “IAPP”, it will allow wireless station roamingbetween IAPP enabled access points within the samewireless LAN.
CTS Protect
It is recommended to enable the protection mechanism.This mechanism can decrease the rate of data collisionbetween 802.11b and 802.11g wireless stations. When theprotection mode is enabled, the throughput of the AP willbe a little lower due to many of frame traffic will be
transmitted.
Tx PowerYou can adjust the wireless transmit power here. Byreduce the TX power, you can reduce the wirelesscoverage to make it only cover the area you need.
Turbo Mode By enable the turbo mode, you can enhance thethroughput up to 35Mbps.
WMM
WMM stands for Wi-Fi Multimedia. It is a standard createdto define quality of service (QoS) in Wi-Fi networks. Thisadds prioritized capabilities to Wi-Fi networks and
optimizes their performance when multiple concurring

8/4/2019 BR 3G6200Wg Manual
http://slidepdf.com/reader/full/br-3g6200wg-manual 62/129
61
applications, each with different latency and throughputrequirements, compete for network resources.
Click < Apply > at the bottom of the screen to save the configurations. You cannow configure other advance sections or start using the router.
8/4/2019 BR 3G6200Wg Manual
http://slidepdf.com/reader/full/br-3g6200wg-manual 63/129
62
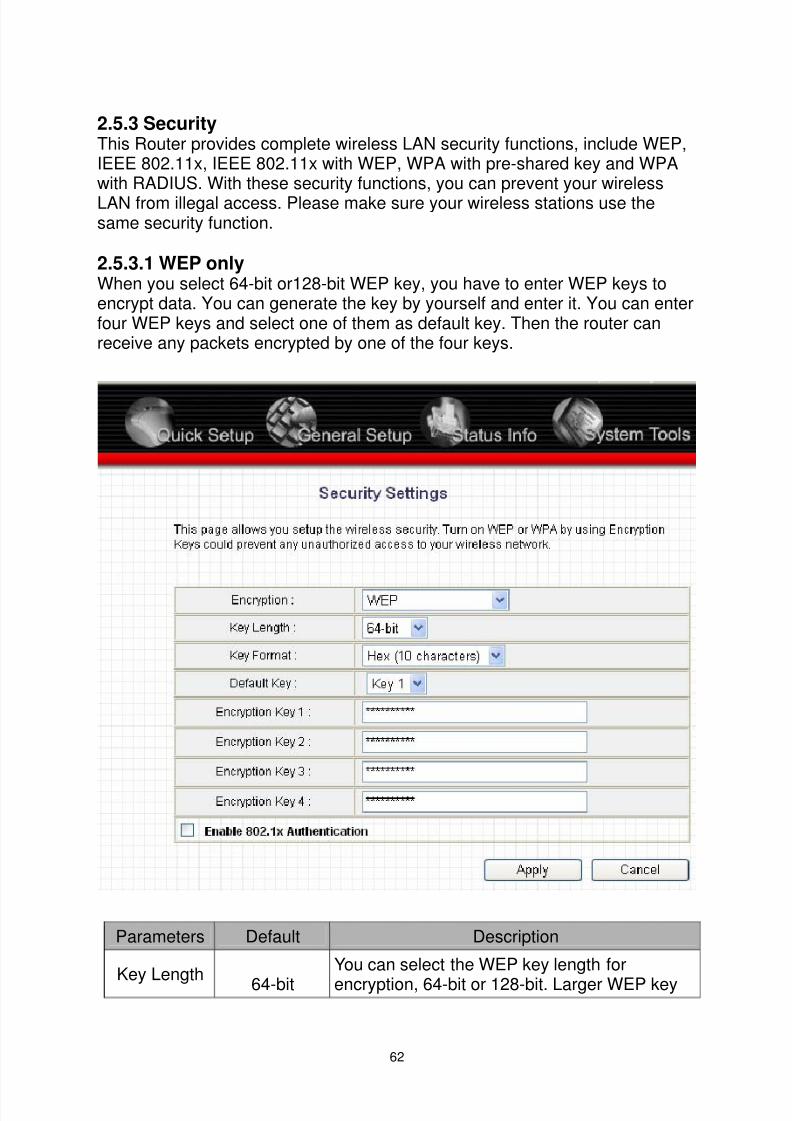
2.5.3 SecurityThis Router provides complete wireless LAN security functions, include WEP,IEEE 802.11x, IEEE 802.11x with WEP, WPA with pre-shared key and WPAwith RADIUS. With these security functions, you can prevent your wirelessLAN from illegal access. Please make sure your wireless stations use thesame security function.
2.5.3.1 WEP onlyWhen you select 64-bit or128-bit WEP key, you have to enter WEP keys toencrypt data. You can generate the key by yourself and enter it. You can enterfour WEP keys and select one of them as default key. Then the router canreceive any packets encrypted by one of the four keys.
Parameters Default Description
Key Length 64-bitYou can select the WEP key length forencryption, 64-bit or 128-bit. Larger WEP key

8/4/2019 BR 3G6200Wg Manual
http://slidepdf.com/reader/full/br-3g6200wg-manual 64/129
63
length will provide higher level of security, butthe data throughput will be lowered.
Key Format
You can select ASCII Characters (alphanumeric
format) or Hexadecimal Digits ("A-F", "a-f" and"0-9") to be the WEP Key.For example: ASCII Characters: guestHexadecimal Digits: 12345abcde
Default KeySelect one of the four keys to encrypt yourdata. Only the key you select it in the "Defaultkey" will be used.
Key 1 - Key4
The WEP keys are used to encrypt datatransmitted over the wireless network. Fill the
text box by following the rules: 64-bit WEP:input 10-digit Hex values (in the "A-F", "a-f" and"0-9" range) or 5-digit ASCII character as theencryption keys.128-bit WEP: input 26-digit Hex values ("A-F","a-f" and "0-9") or 13-digit ASCII characters asthe encryption keys.
Click < Apply > at the bottom of the screen to save the configurations. You cannow configure other advance sections or start using the router.

8/4/2019 BR 3G6200Wg Manual
http://slidepdf.com/reader/full/br-3g6200wg-manual 65/129
64
2.5.3.2 802.1x onlyIEEE 802.1x is an authentication protocol. Every user must use a validaccount to login to this Access Point before accessing the wireless LAN. Theauthentication is processed by a RADIUS server. This mode onlyauthenticates user by IEEE 802.1x, but it does not encryption the data duringcommunication.
Parameters DescriptionRADIUS Server
IP addressThe IP address of external RADIUS server.
RADIUS ServerPort
The service port of the external RADIUS server.
RADIUS ServerPassword
The password used by external RADIUS server.
Click < Apply > at the bottom of the screen to save the configurations. You cannow configure other advance sections or start using the router.
8/4/2019 BR 3G6200Wg Manual
http://slidepdf.com/reader/full/br-3g6200wg-manual 66/129

8/4/2019 BR 3G6200Wg Manual
http://slidepdf.com/reader/full/br-3g6200wg-manual 67/129
66
2.5.3.4 WPA Pre-shared keyWi-Fi Protected Access (WPA) is an advanced security standard. You can usea pre-shared key to authenticate wireless stations and encrypt data duringcommunication. It uses TKIP or CCMP (AES) to change the encryption keyfrequently. So the encryption key will not be known by hackers easily, and thiswill improve security.
Parameters Description
WPA(TKIP) TKIP will change the encryption key frequently to enhancethe wireless LAN security.
WPA2(AES)WPA2 AES uses CCMP protocol to change encryption keyfrequently. AES can provide high level encryption to enhancethe wireless LAN security.
WPA2 Mixed WPA2 Mixed will use TKIP or AES based on the othercommunication peer automatically.
Pre-sharedKey Format
You may select Passphrase (alphanumeric format) orHexadecimal Digits (in the “A-F”, “a-f” and “0-9” range) to bethe Pre-shared Key. For example:Passphrase: iamguestHexadecimal Digits: 12345abcde
Pre-sharedKey
The Pre-shared key is used to authenticate and encrypt datatransmitted over the wireless network. Fill the text box byfollowing the rules listed here: Hex WEP: input 64-digit Hexvalues (“A-F”, “a-f” and “0-9”) or at least 8 character passphrase as the pre-shared keys.

8/4/2019 BR 3G6200Wg Manual
http://slidepdf.com/reader/full/br-3g6200wg-manual 68/129
67
Click < Apply > at the bottom of the screen to save the configurations. You cannow configure other advance sections or start using the router.

8/4/2019 BR 3G6200Wg Manual
http://slidepdf.com/reader/full/br-3g6200wg-manual 69/129
68
2.5.3.5 WPA RadiusWi-Fi Protected Access (WPA) is an advanced security standard. You can usean external RADIUS server to authenticate wireless stations and provide thesession key to encrypt data during communication. It uses TKIP or CCMP(AES) to change the encryption key frequently, and this will improve security.
Parameters Description
WPA(TKIP) TKIP will change the encryption key frequently to enhancethe wireless LAN security.
WPA2(AES)WPA2 AES uses CCMP protocol to change encryption keyfrequently. AES can provide high level encryption toenhance the wireless LAN security.
WPA2 Mixed WPA2 MIXED will use TKIP or AES based on the othercommunication peer automatically.
RADIUS Server
IP address
The IP address of external RADIUS server.
RADIUS ServerPort
The service port of the external RADIUS server.
RADIUS ServerPassword
The password used by external RADIUS server.
Click < Apply > at the bottom of the screen to save the configurations. You cannow configure other advance sections or start using the router.

8/4/2019 BR 3G6200Wg Manual
http://slidepdf.com/reader/full/br-3g6200wg-manual 70/129
69
2.5.4 Access ControlThis wireless router provides MAC Address Control, which preventsunauthorized MAC Addresses from accessing your wireless network.
Parameters Description
Enable wirelessaccess control
Enable wireless access control
Add MACaddress into the
list
Fill in the "MAC Address" and "Comment" of the wirelessstation to be added and then click "Add". Then this wirelessstation will be added into the "Current Access Control List"below. If you find any issues before adding it and want tocorrect it. Just click "Clear" and both "MAC Address" and"Comment" fields will be cleared.
Remove MACaddress from list
If you want to remove some MAC address from the "CurrentAccess Control List ", select the MAC addresses you wantto remove in the list and then click "Delete Selected". If youwant remove all MAC addresses from the table, click"Delete All" button. Click "Reset" will clear your currentselections.
Click < Apply > at the bottom of the screen to save the configurations. You can

8/4/2019 BR 3G6200Wg Manual
http://slidepdf.com/reader/full/br-3g6200wg-manual 71/129
70
now configure other advance sections or start using the router.
8/4/2019 BR 3G6200Wg Manual
http://slidepdf.com/reader/full/br-3g6200wg-manual 72/129

8/4/2019 BR 3G6200Wg Manual
http://slidepdf.com/reader/full/br-3g6200wg-manual 73/129
72
Enable/DisableQoS
You can check “Enable QoS” to enable QoS function forthe WAN port. You also can uncheck “Enable QoS” todisable QoS function for the WAN port.
Total DownloadBandwidth
Here you can set maximum download bandwidth for all theusers of the router.
Total UploadBandwidth
Here you can set the maximum upload bandwidth for allthe users of the router.
Add a QoS ruleinto the table
Click “Add”, and the QoS rule form will appear. Click“Apply” after filling the form and the rule will be added intothe table.
Remove QoSrules from table
If you want to remove some QoS rules from the table,select the QoS rules you want to remove in the table andthen click "Delete Selected". If you want to remove all QoSrules from the table, just click "Delete All" button. Click"Reset" will clear your current selections.
Edit a QoS rule
Select the rule you want to edit and click “Edit”, then thedetailed information of the selected QoS rule will appear.Click “Apply” after editing the form and the rule will besaved.
Adjust QoS rule
priority
You can select the rule and click “Move Up” to make itspriority higher. You also can select the rule and click “MoveDown” to make its priority lower.
Edit QoS Rule:You can assign packet classification criteria by its local IP range, remote IPrange, traffic type, protocol, local port range and remote port range parameters.The parameters you leave blank will be ignored. The priority of this rule will beapplied to packets that match the classification criteria of this rule. You canlimit bandwidth consumed by packets that match this rule or guaranteebandwidth required by packets that match this rule.
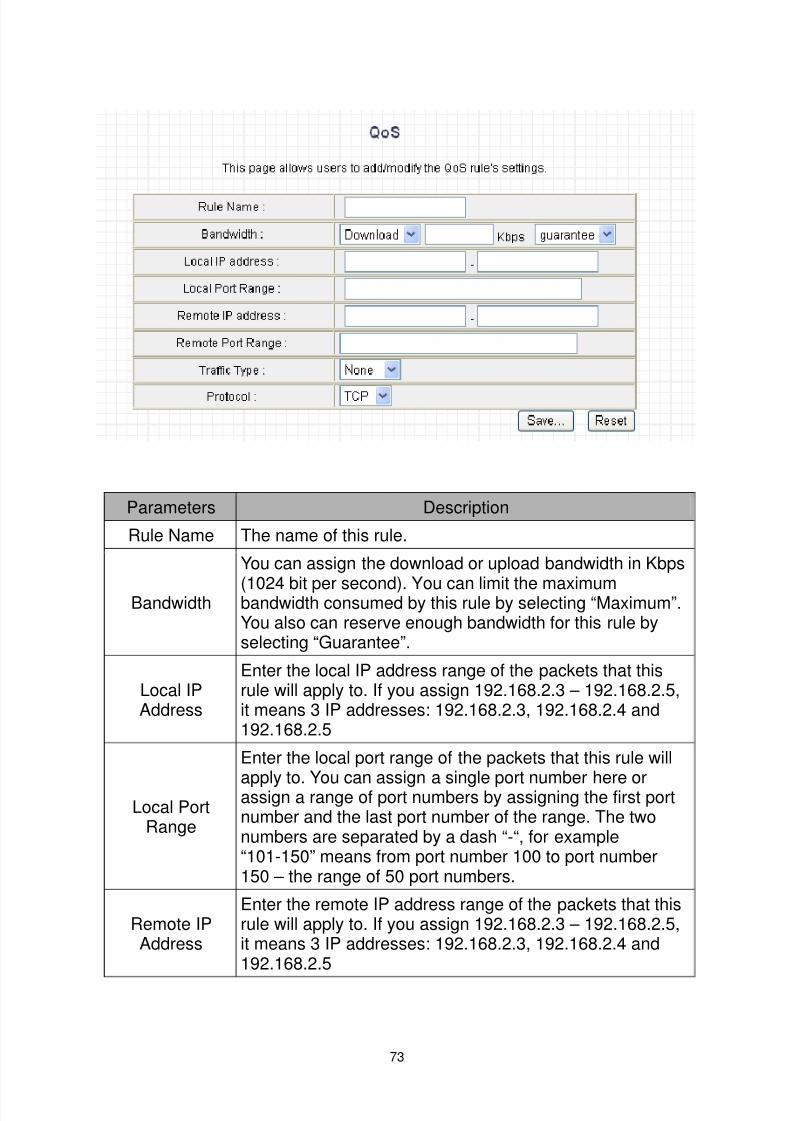
8/4/2019 BR 3G6200Wg Manual
http://slidepdf.com/reader/full/br-3g6200wg-manual 74/129
73
Parameters Description
Rule Name The name of this rule.
Bandwidth
You can assign the download or upload bandwidth in Kbps
(1024 bit per second). You can limit the maximumbandwidth consumed by this rule by selecting “Maximum”.You also can reserve enough bandwidth for this rule byselecting “Guarantee”.
Local IPAddress
Enter the local IP address range of the packets that thisrule will apply to. If you assign 192.168.2.3 – 192.168.2.5,it means 3 IP addresses: 192.168.2.3, 192.168.2.4 and192.168.2.5
Local PortRange
Enter the local port range of the packets that this rule will
apply to. You can assign a single port number here orassign a range of port numbers by assigning the first portnumber and the last port number of the range. The twonumbers are separated by a dash “-“, for example“101-150” means from port number 100 to port number150 – the range of 50 port numbers.
Remote IPAddress
Enter the remote IP address range of the packets that thisrule will apply to. If you assign 192.168.2.3 – 192.168.2.5,it means 3 IP addresses: 192.168.2.3, 192.168.2.4 and192.168.2.5
8/4/2019 BR 3G6200Wg Manual
http://slidepdf.com/reader/full/br-3g6200wg-manual 75/129
74
Remote Port
Range
Enter the remote port range of the packets that this rule willapply to. You can assign a single port number here orassign a range of port numbers by assigning the first portnumber and the last port number of the range. The twonumbers are separated by a dash “-“, for example“101-150” means from port number 101 to port number150, which indicates 50 port numbers.
Traffic Type
Select the traffic type of the packets that this rule will applyto. We list some popular applications here to ease theconfiguration. You also can get the same result by usingother parameters, for example source or destination portnumber, if you are familiar with the application protocol.
ProtocolSelect the protocol type of the packets that this rule willapply to.
Apply Apply and exit the form.
Reset Clear the content of this form.
Click < Apply > at the bottom of the screen to save the configurations. You cannow configure other advance sections or start using the router.
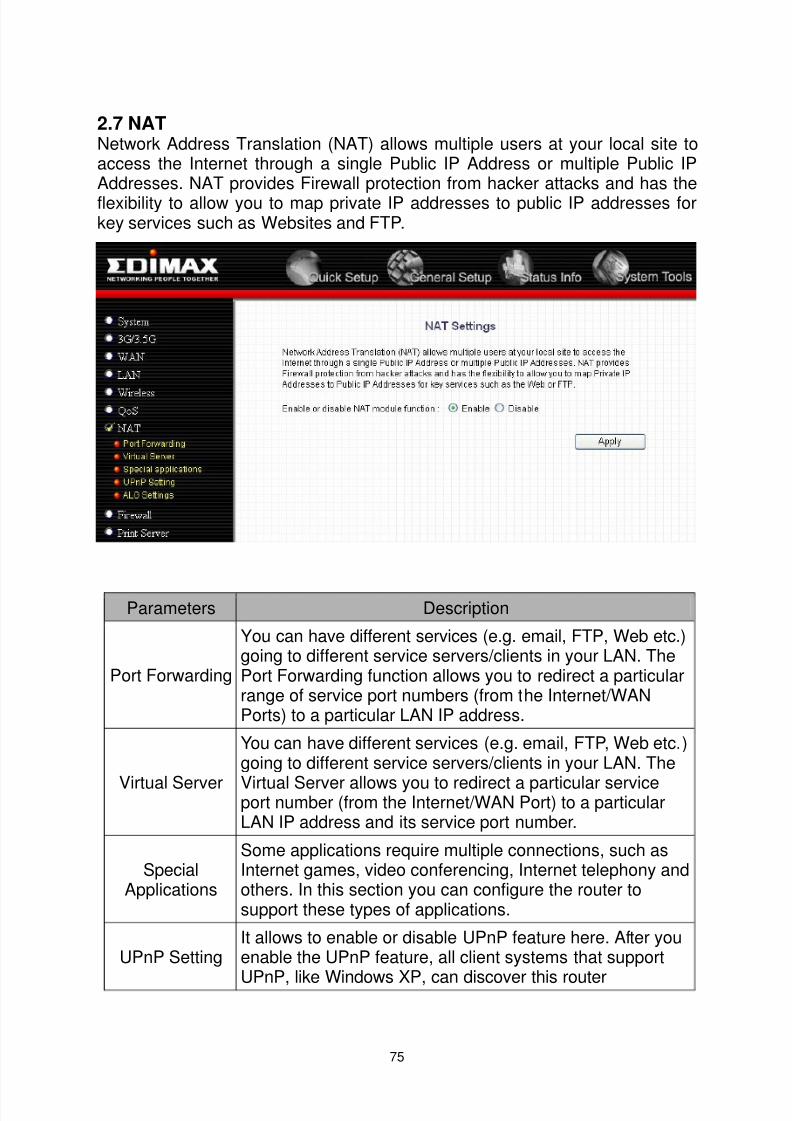
8/4/2019 BR 3G6200Wg Manual
http://slidepdf.com/reader/full/br-3g6200wg-manual 76/129
75
2.7 NATNetwork Address Translation (NAT) allows multiple users at your local site toaccess the Internet through a single Public IP Address or multiple Public IPAddresses. NAT provides Firewall protection from hacker attacks and has theflexibility to allow you to map private IP addresses to public IP addresses forkey services such as Websites and FTP.
Parameters Description
Port Forwarding
You can have different services (e.g. email, FTP, Web etc.)going to different service servers/clients in your LAN. ThePort Forwarding function allows you to redirect a particularrange of service port numbers (from the Internet/WANPorts) to a particular LAN IP address.
Virtual Server
You can have different services (e.g. email, FTP, Web etc.)going to different service servers/clients in your LAN. The
Virtual Server allows you to redirect a particular serviceport number (from the Internet/WAN Port) to a particularLAN IP address and its service port number.
SpecialApplications
Some applications require multiple connections, such asInternet games, video conferencing, Internet telephony andothers. In this section you can configure the router tosupport these types of applications.
UPnP SettingIt allows to enable or disable UPnP feature here. After youenable the UPnP feature, all client systems that support
UPnP, like Windows XP, can discover this router
8/4/2019 BR 3G6200Wg Manual
http://slidepdf.com/reader/full/br-3g6200wg-manual 77/129
76
automatically and access the Internet through this routerwithout any configuration. The NAT Traversal functionprovided by UPnP can let applications that support UPnPsmoothly connect to Internet sites without anyincompatibility problem due to the NAPT port translation.
ALG Setting You can let special applications that require “ApplicationLayer Gateway” to be supported here.
Static Routing You can disable NAT function and setup the routing rulesmanually.
Click on one of the above NAT selections and proceed to the manual'srelevant sub-section.
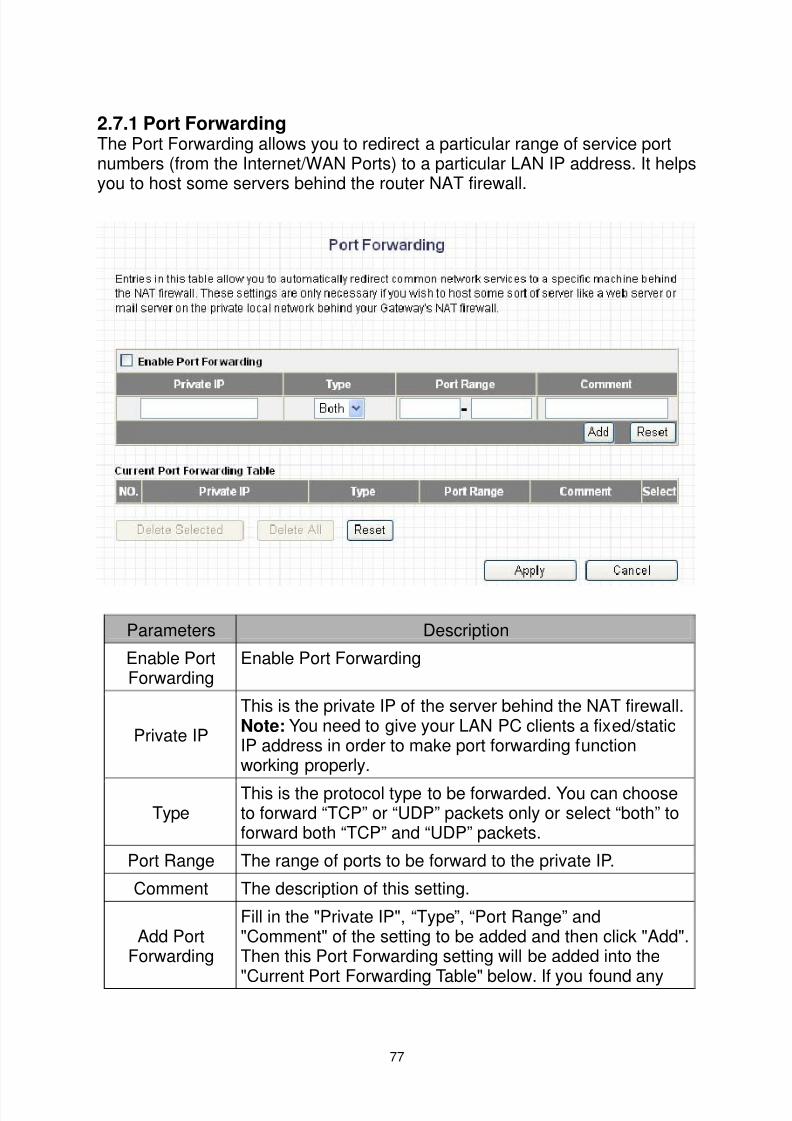
8/4/2019 BR 3G6200Wg Manual
http://slidepdf.com/reader/full/br-3g6200wg-manual 78/129
77
2.7.1 Port ForwardingThe Port Forwarding allows you to redirect a particular range of service portnumbers (from the Internet/WAN Ports) to a particular LAN IP address. It helpsyou to host some servers behind the router NAT firewall.
Parameters Description
Enable PortForwarding
Enable Port Forwarding
Private IP
This is the private IP of the server behind the NAT firewall.Note: You need to give your LAN PC clients a fixed/staticIP address in order to make port forwarding functionworking properly.
TypeThis is the protocol type to be forwarded. You can chooseto forward “TCP” or “UDP” packets only or select “both” toforward both “TCP” and “UDP” packets.
Port Range The range of ports to be forward to the private IP.
Comment The description of this setting.
Add PortForwarding
Fill in the "Private IP", “Type”, “Port Range” and"Comment" of the setting to be added and then click "Add".Then this Port Forwarding setting will be added into the
"Current Port Forwarding Table" below. If you found any
8/4/2019 BR 3G6200Wg Manual
http://slidepdf.com/reader/full/br-3g6200wg-manual 79/129

8/4/2019 BR 3G6200Wg Manual
http://slidepdf.com/reader/full/br-3g6200wg-manual 80/129
79
2.7.2 Virtual ServerUse the Virtual Server function when you want different servers/clients in yourLAN to handle different service/Internet application type (e.g. Email, FTP, Webserver etc.) from the Internet. Computers use numbers called port numbers torecognize a particular service/Internet application type. The Virtual Serverallows you to redirect a particular service port number (from the Internet/WANPort) to a particular LAN private IP address and its service port number. (SeeGlossary for an explanation on Port number)
Parameters Description
Enable VirtualServe
Enable Virtual Server.
Private IP
This is the LAN client/host IP address that the Public Port number packet will be sent to.Note: You need to give your LAN PC clients a fixed/staticIP address in order to make Virtual Server workingproperly.
Private Port This is the port number (of the above Private IP host) that
the below Public Port number will be changed to when the
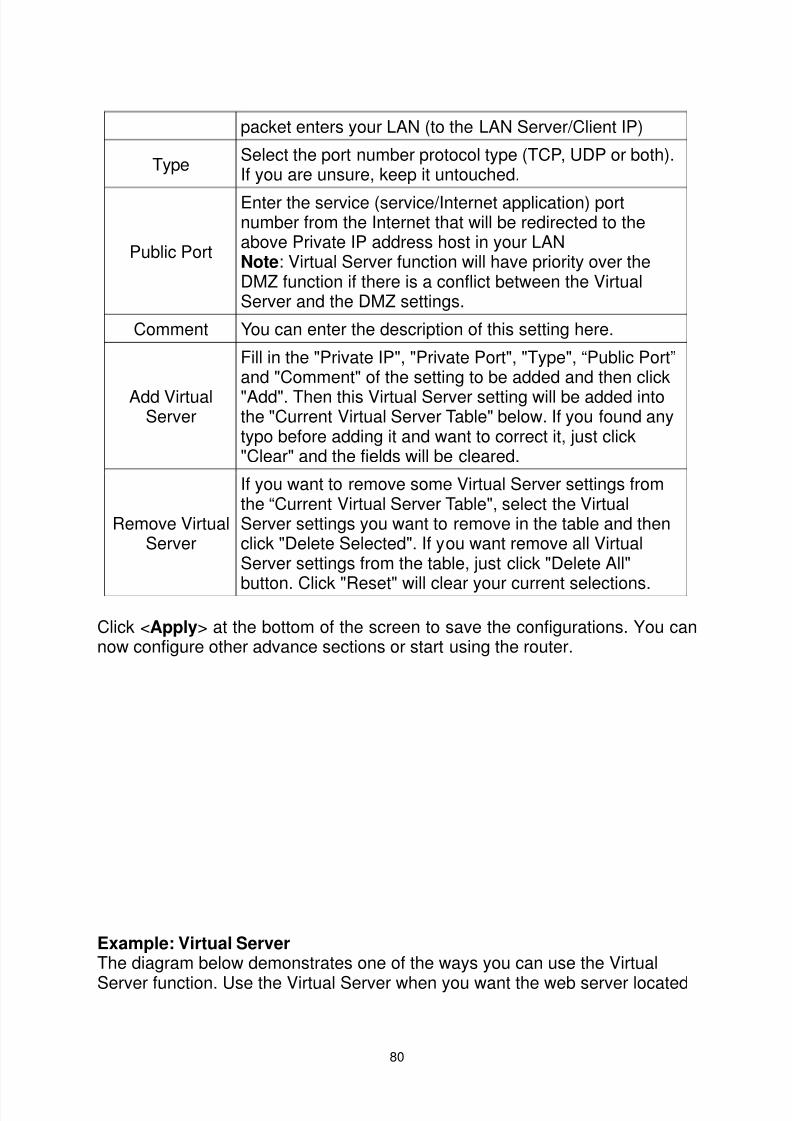
8/4/2019 BR 3G6200Wg Manual
http://slidepdf.com/reader/full/br-3g6200wg-manual 81/129
80
packet enters your LAN (to the LAN Server/Client IP)
Type Select the port number protocol type (TCP, UDP or both).If you are unsure, keep it untouched.
Public Port
Enter the service (service/Internet application) portnumber from the Internet that will be redirected to theabove Private IP address host in your LANNote : Virtual Server function will have priority over theDMZ function if there is a conflict between the VirtualServer and the DMZ settings.
Comment You can enter the description of this setting here.
Add VirtualServer
Fill in the "Private IP", "Private Port", "Type", “Public Port”and "Comment" of the setting to be added and then click"Add". Then this Virtual Server setting will be added intothe "Current Virtual Server Table" below. If you found anytypo before adding it and want to correct it, just click"Clear" and the fields will be cleared.
Remove VirtualServer
If you want to remove some Virtual Server settings fromthe “Current Virtual Server Table", select the VirtualServer settings you want to remove in the table and thenclick "Delete Selected". If you want remove all VirtualServer settings from the table, just click "Delete All"
button. Click "Reset" will clear your current selections.
Click < Apply > at the bottom of the screen to save the configurations. You cannow configure other advance sections or start using the router.
Example: Virtual ServerThe diagram below demonstrates one of the ways you can use the VirtualServer function. Use the Virtual Server when you want the web server located
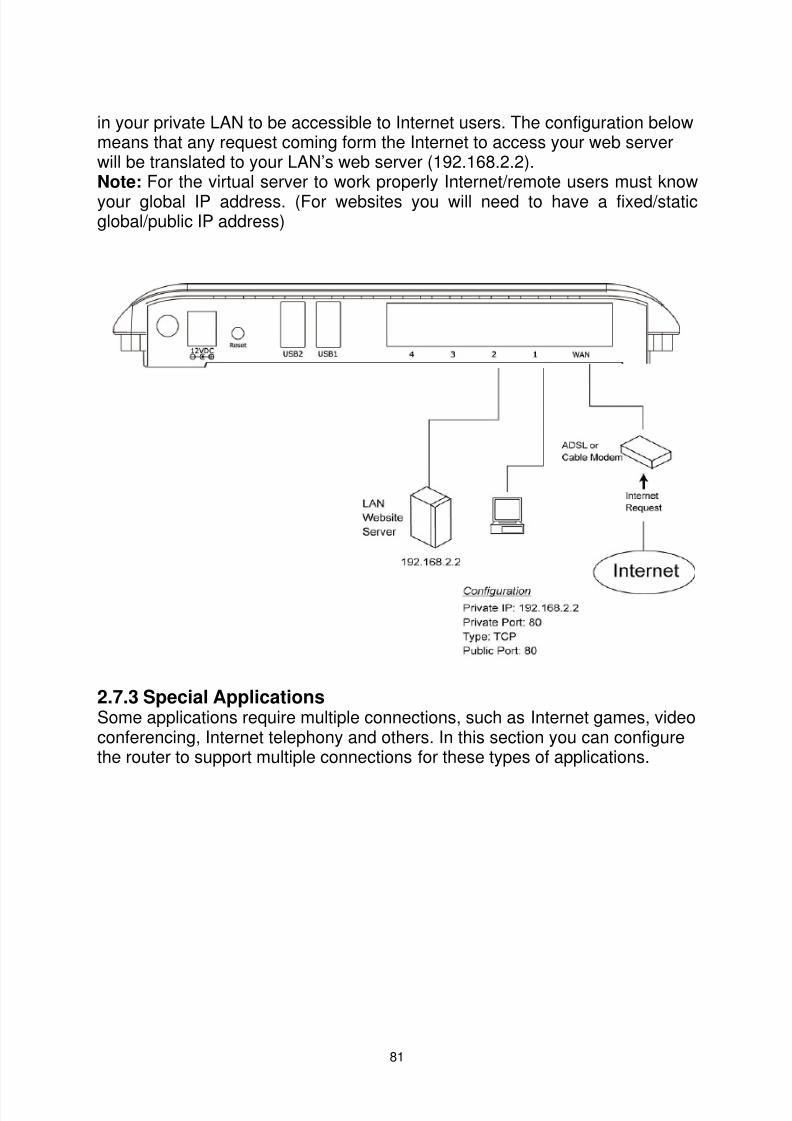
8/4/2019 BR 3G6200Wg Manual
http://slidepdf.com/reader/full/br-3g6200wg-manual 82/129
81
in your private LAN to be accessible to Internet users. The configuration belowmeans that any request coming form the Internet to access your web serverwill be translated to your LAN’s web server (192.168.2.2).Note: For the virtual server to work properly Internet/remote users must knowyour global IP address. (For websites you will need to have a fixed/staticglobal/public IP address)
2.7.3 Special ApplicationsSome applications require multiple connections, such as Internet games, videoconferencing, Internet telephony and others. In this section you can configurethe router to support multiple connections for these types of applications.
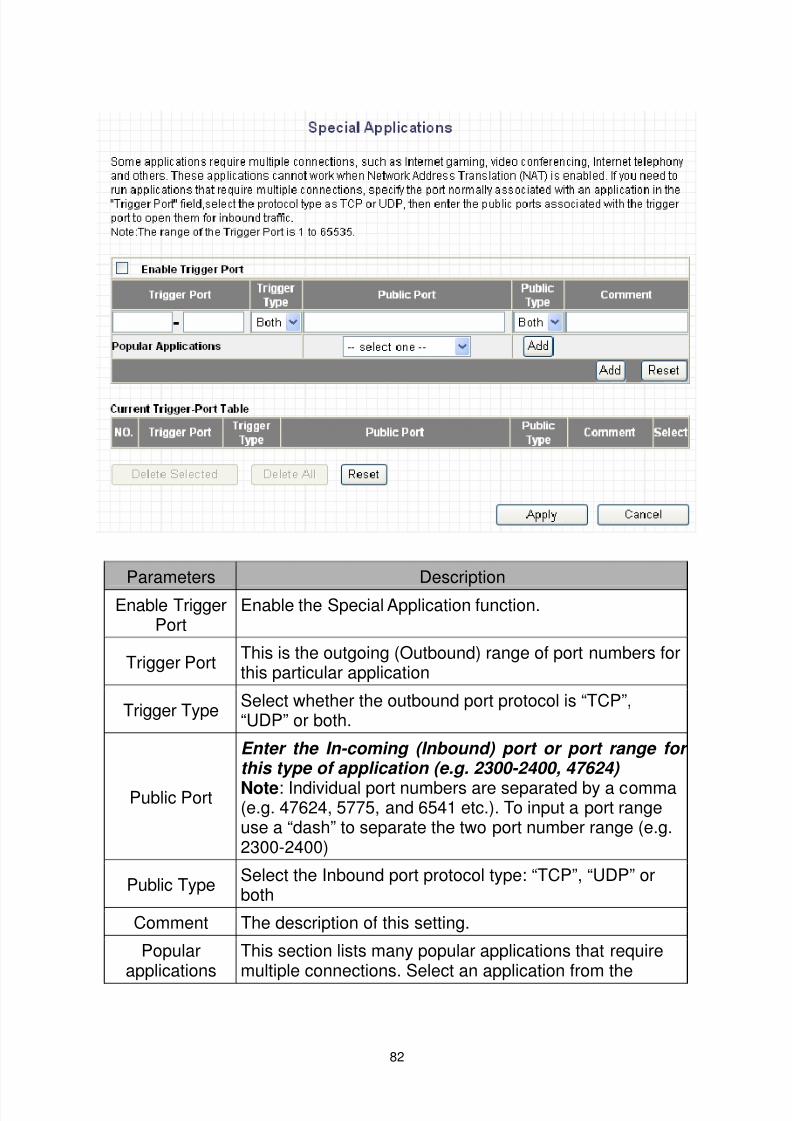
8/4/2019 BR 3G6200Wg Manual
http://slidepdf.com/reader/full/br-3g6200wg-manual 83/129
82
Parameters Description
Enable TriggerPort
Enable the Special Application function.
Trigger Port This is the outgoing (Outbound) range of port numbers forthis particular application
Trigger Type Select whether the outbound port protocol is “TCP”,“UDP” or both.
Public Port
Enter the In-coming (Inbound) port or port range for this type of application (e.g. 2300-2400, 47624) Note : Individual port numbers are separated by a comma(e.g. 47624, 5775, and 6541 etc.). To input a port rangeuse a “dash” to separate the two port number range (e.g.2300-2400)
Public Type Select the Inbound port protocol type: “TCP”, “UDP” orboth
Comment The description of this setting.
Popularapplications
This section lists many popular applications that requiremultiple connections. Select an application from the
8/4/2019 BR 3G6200Wg Manual
http://slidepdf.com/reader/full/br-3g6200wg-manual 84/129
83
Popular Applications selection and click “Add”. It willautomatically list the Public Ports required for this popularapplication you’d specified.
Add SpecialApplication
Fill in the "Trigger Port", "Trigger Type”, “Public Port”,"Public Type", "Public Port" and "Comment" of the settingto be added and then click "Add". Then this SpecialApplication setting will be added to the "CurrentTrigger-Port Table" below. If you found any typo beforeadding it and want to correct it, just click "Clear" and thefields will be cleared.If you want to add a popular application, select one“Popular Application” and then click “Add”.
RemoveSpecial
Application
If you want to remove some Special Application settingsfrom the "Current Trigger-Port Table", select the SpecialApplication settings you want to remove in the table andthen click "Delete Selected". If you want remove allSpecial Applications settings from the table, just click"Delete All" button. Click "Reset" will clear your currentselections.
Click < Apply > at the bottom of the screen to save the configurations. You cannow configure other advance sections or start using the router.
Example: Special Applications If you need to run applications that require multiple connections, specify theport (outbound) normally associated with that application in the "Trigger Port"field. Then select the protocol type (TCP or UDP) and enter the public portsassociated with the trigger port to open them up for inbound traffic.
Example:
ID Trigger
Port
Trigger
TypePublic Port Public
TypeComment
1 28800 UDP 2300-2400,47624 TCP MSN Game
Zone2 6112 UDP 6112 UDP Battle.net
In the example listed above, when a user triggered port 28800 (outbound) forMSN Game Zone then the router will direct incoming packets for ports2300-2400 and 47624 to that user.
Note: Only one LAN client can use a particular special application at a time.
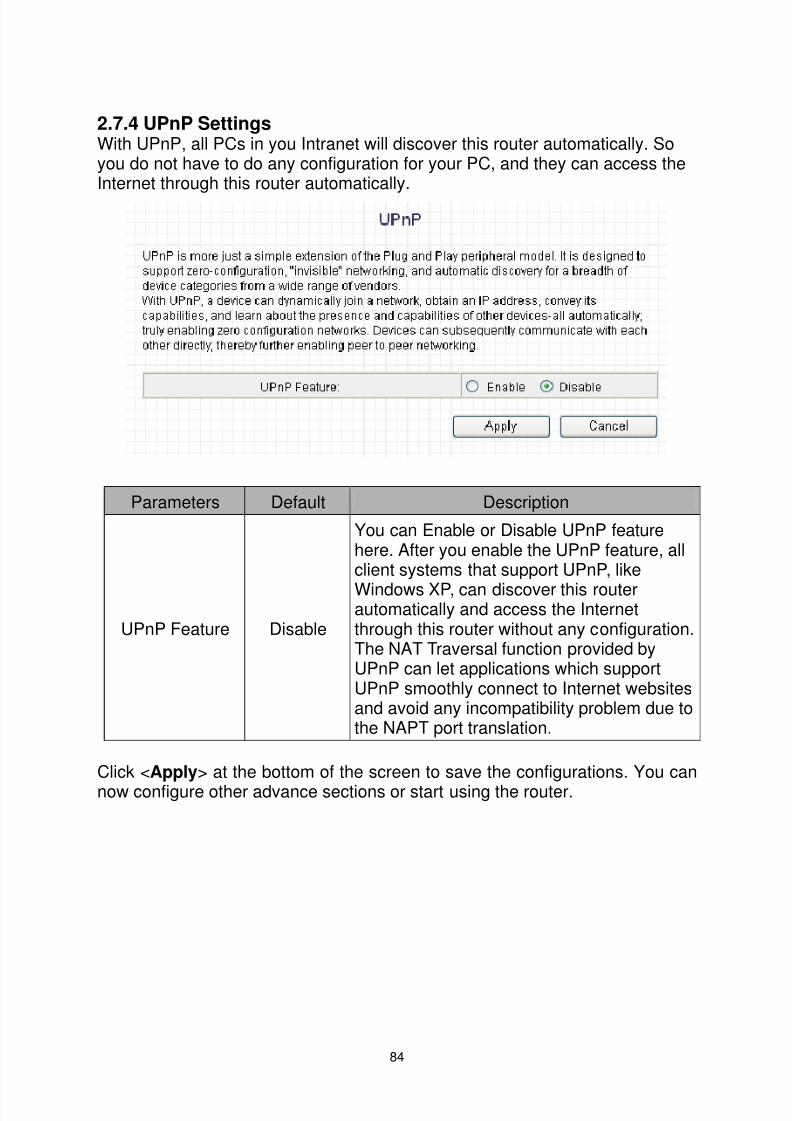
8/4/2019 BR 3G6200Wg Manual
http://slidepdf.com/reader/full/br-3g6200wg-manual 85/129
84
2.7.4 UPnP SettingsWith UPnP, all PCs in you Intranet will discover this router automatically. Soyou do not have to do any configuration for your PC, and they can access theInternet through this router automatically.
Parameters Default Description
UPnP Feature Disable
You can Enable or Disable UPnP featurehere. After you enable the UPnP feature, allclient systems that support UPnP, likeWindows XP, can discover this routerautomatically and access the Internetthrough this router without any configuration.The NAT Traversal function provided byUPnP can let applications which supportUPnP smoothly connect to Internet websitesand avoid any incompatibility problem due tothe NAPT port translation.
Click < Apply > at the bottom of the screen to save the configurations. You cannow configure other advance sections or start using the router.
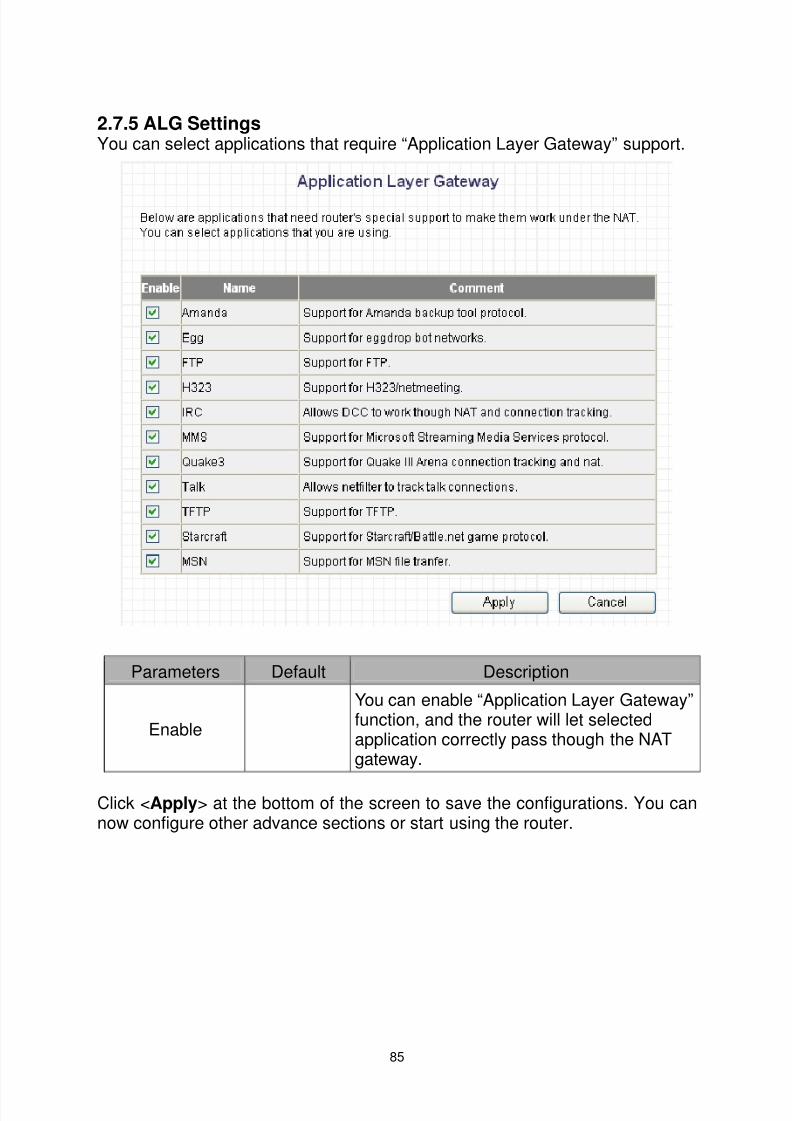
8/4/2019 BR 3G6200Wg Manual
http://slidepdf.com/reader/full/br-3g6200wg-manual 86/129
85
2.7.5 ALG SettingsYou can select applications that require “Application Layer Gateway” support.
Parameters Default Description
Enable
You can enable “Application Layer Gateway”function, and the router will let selectedapplication correctly pass though the NATgateway.
Click < Apply > at the bottom of the screen to save the configurations. You cannow configure other advance sections or start using the router.

8/4/2019 BR 3G6200Wg Manual
http://slidepdf.com/reader/full/br-3g6200wg-manual 87/129
86
2.7.6 Static RoutingThis router provides static routing function when NAT is disabled. With staticrouting, the router can forward packets according to your routing rules. The IPsharing function will not work any more in static routing mode.
Note: The DMZ function of firewall will not work if static routing is enabled.
8/4/2019 BR 3G6200Wg Manual
http://slidepdf.com/reader/full/br-3g6200wg-manual 88/129
87
Parameters Description
Enable StaticRouting
Static routing function is disabled by default. You have toenable the static routing function, to make your routing rules
take effect.Destination
LAN IPThe network address of destination LAN.
Subnet Mask The subnet mask of destination LAN.
DefaultGateway
The next stop gateway of the path toward the destinationLAN. This is the IP of the neighbor router that this routershould communicate with on the path to the destination LAN.
Hop Count The number of hops (routers) to pass through to reach the
destination LAN.Interface The interface that go to the next hop (router).
Add a Rule
Fill in the "Destination LAN IP", "Subnet Mask”, “DefaultGateway”, "Hop Count" and "Interface" of the rule to beadded and click "Add". Then this static routing rule will beadded to the "Static Routing Table" listed below. If you foundany typo before adding it and want to correct it, just click"Reset" and the fields will be cleared.
Remove aRule
If you want to remove some routing rules from the "Static
Routing Table", select the rules you want to remove in thetable and click "Delete Selected". If you want remove allrules from the table, just click "Delete All" button. Click"Reset" will clear your current selections.
Click < Apply > at the bottom of the screen to save the configurations. You cannow configure other advance sections or start using the router.

8/4/2019 BR 3G6200Wg Manual
http://slidepdf.com/reader/full/br-3g6200wg-manual 89/129
88
2.8 Firewall
This broadband router provides extensive firewall protection by restrictingconnection parameters, thus limiting the risk of hacker attack, and defendingagainst a wide array of common Internet attacks. However, for applicationsthat require unrestricted access to the Internet, you can configure a specificclient/server to be located in Demilitarized Zone (DMZ).
Note : To enable the Firewall settings select Enable and click Apply
Parameters Description
Access Control Access control allows you to specify which computer canor cannot access to certain Internet applications
URL Blocking URL Blocking allows you to specify which URLs can notbe accessed by users.
DoS The Broadband router's firewall can block common hackerattacks and can log the attack activities.
DMZThe DMZ function allows you to redirect all packets goingto your WAN port IP address to a particular IP address inyour LAN.
Click on one of the firewall selections and proceed to the manual’s relevantsub-section2.8.1 Access ControlIf you want to restrict users from accessing certain Internetapplications/services (e.g. Internet websites, email, FTP etc.), this is the placeto set that configuration. Access Control allows users to define the traffic typepermitted in your LAN. You can control which PC client can have access to
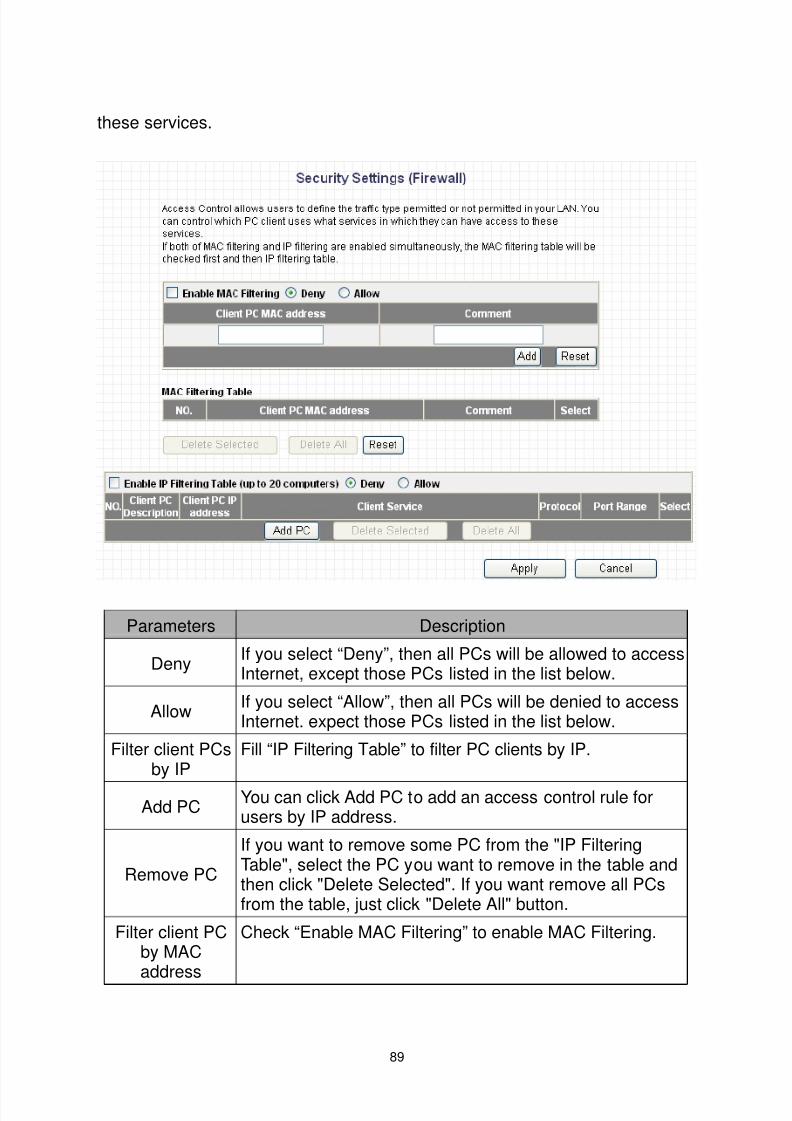
8/4/2019 BR 3G6200Wg Manual
http://slidepdf.com/reader/full/br-3g6200wg-manual 90/129
89
these services.
Parameters Description
Deny If you select “Deny”, then all PCs will be allowed to accessInternet, except those PCs listed in the list below.
Allow If you select “Allow”, then all PCs will be denied to accessInternet. expect those PCs listed in the list below.
Filter client PCsby IP
Fill “IP Filtering Table” to filter PC clients by IP.
Add PC You can click Add PC to add an access control rule forusers by IP address.
Remove PC
If you want to remove some PC from the "IP FilteringTable", select the PC you want to remove in the table andthen click "Delete Selected". If you want remove all PCsfrom the table, just click "Delete All" button.
Filter client PCby MACaddress
Check “Enable MAC Filtering” to enable MAC Filtering.
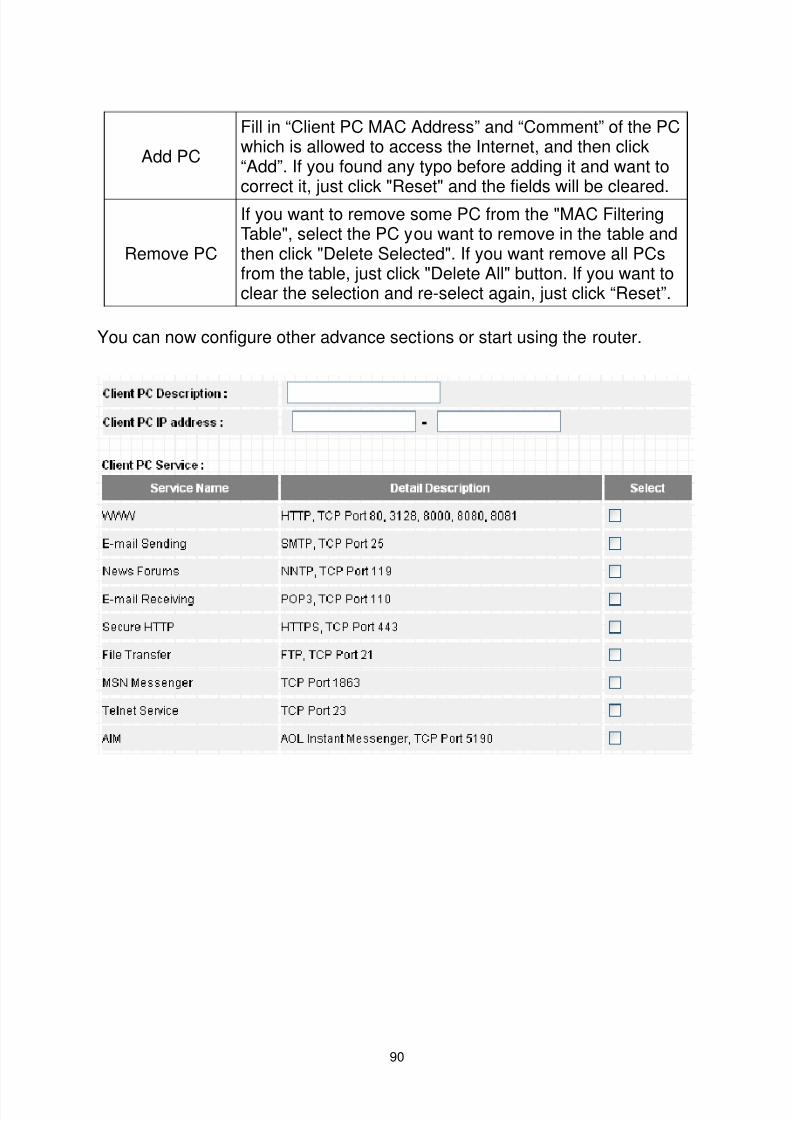
8/4/2019 BR 3G6200Wg Manual
http://slidepdf.com/reader/full/br-3g6200wg-manual 91/129
90
Add PC
Fill in “Client PC MAC Address” and “Comment” of the PCwhich is allowed to access the Internet, and then click“Add”. If you found any typo before adding it and want tocorrect it, just click "Reset" and the fields will be cleared.
Remove PC
If you want to remove some PC from the "MAC FilteringTable", select the PC you want to remove in the table andthen click "Delete Selected". If you want remove all PCsfrom the table, just click "Delete All" button. If you want toclear the selection and re-select again, just click “Reset”.
You can now configure other advance sections or start using the router.

8/4/2019 BR 3G6200Wg Manual
http://slidepdf.com/reader/full/br-3g6200wg-manual 92/129
91
Parameters Description
Client PCDescription
The description for this client PC rule.
Client PC IPAddresses
Enter the IP address range that you wish to apply thisaccess control rule. This is the user’s IP address(es) thatyou wish to setup an access control rule.Note: You need to give your LAN PC clients a fixed/staticIP address, to make the access control rule workingproperly.
Client PCService
You can block the clients from accessing some Internetservices by checking the services you want to block.
Protocol This allows you to select UDP, TCP or both protocol typesyou want to block.
Port RangeYou can assign up to five port ranges. The router willblock clients from accessing Internet services which willuse these ports.
Apply Changes Click “Apply Changes” to save the setting.
Reset Click “Reset” to clear all fields.
Click < Apply Changes > at the bottom of the screen to save the configurations.You can now configure other advance sections or start using the router.
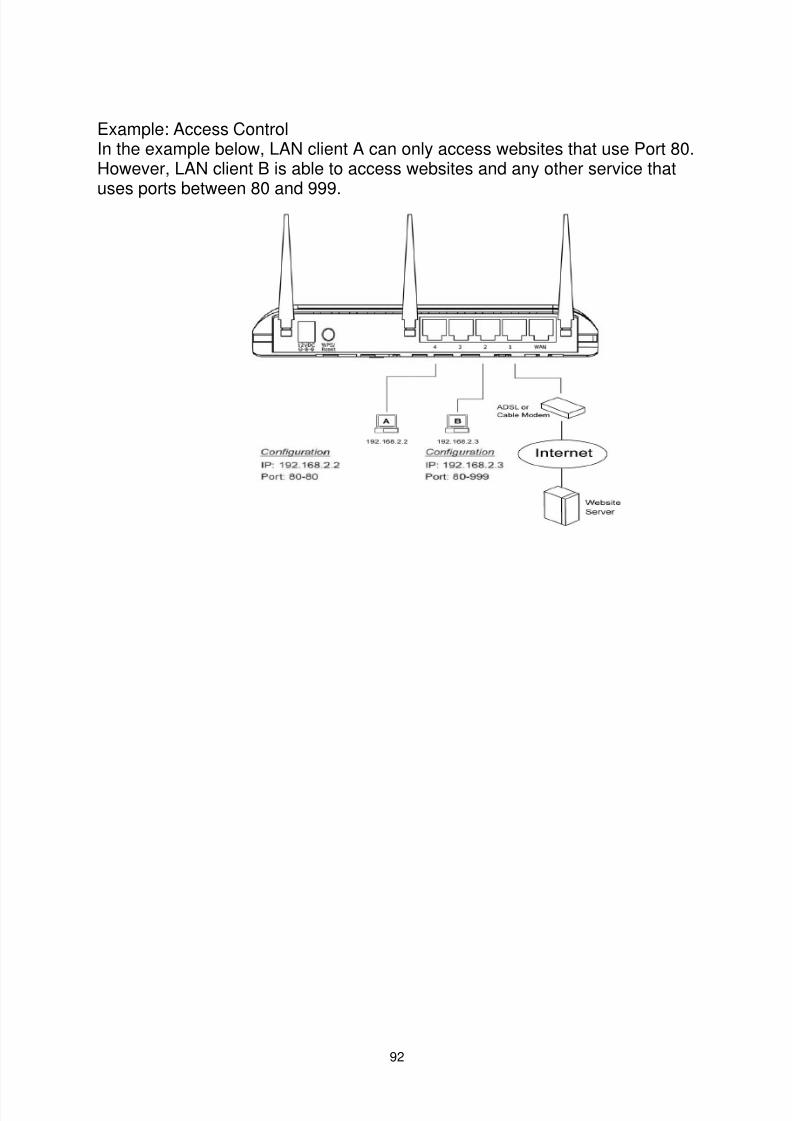
8/4/2019 BR 3G6200Wg Manual
http://slidepdf.com/reader/full/br-3g6200wg-manual 93/129
92
Example: Access ControlIn the example below, LAN client A can only access websites that use Port 80.However, LAN client B is able to access websites and any other service that
uses ports between 80 and 999.

8/4/2019 BR 3G6200Wg Manual
http://slidepdf.com/reader/full/br-3g6200wg-manual 94/129
93
2.8.2 URL BlockingYou can block access to some web sites from particular PCs by entering a fullURL address or just keyword of the Web site.
Parameters Description
Enable URLBlocking
Enable/disable URL Blocking
Add URLKeyword
Fill in “URL/Keyword” and then click “Add”. You can enterthe full URL address or the keyword of the web site youwant to block. If you found any typo before adding it andwant to correct it, just click "Reset" and the field will becleared.
Remove URLKeyword
If you want to remove some URL keyword from the"Current URL Blocking Table", select the URL keyword
you want to remove in the table and then click "DeleteSelected". If you want remove all URL keyword from thetable, just click "Delete All" button. If you want to clear theselection and re-select again, just click “Reset”.
You can now configure other advance sections or start using the router.
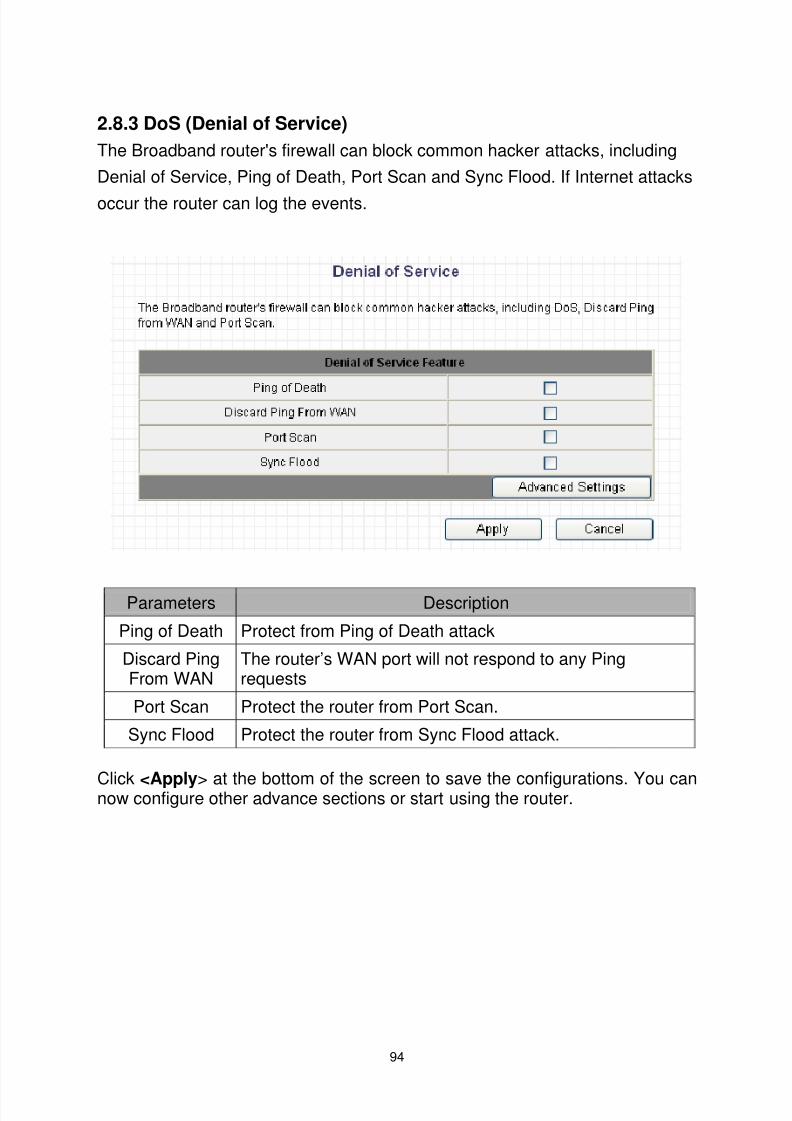
8/4/2019 BR 3G6200Wg Manual
http://slidepdf.com/reader/full/br-3g6200wg-manual 95/129
94
2.8.3 DoS (Denial of Service)The Broadband router's firewall can block common hacker attacks, includingDenial of Service, Ping of Death, Port Scan and Sync Flood. If Internet attacksoccur the router can log the events.
Parameters Description
Ping of Death Protect from Ping of Death attack
Discard PingFrom WAN
The router’s WAN port will not respond to any Pingrequests
Port Scan Protect the router from Port Scan.
Sync Flood Protect the router from Sync Flood attack.
Click <Apply > at the bottom of the screen to save the configurations. You cannow configure other advance sections or start using the router.
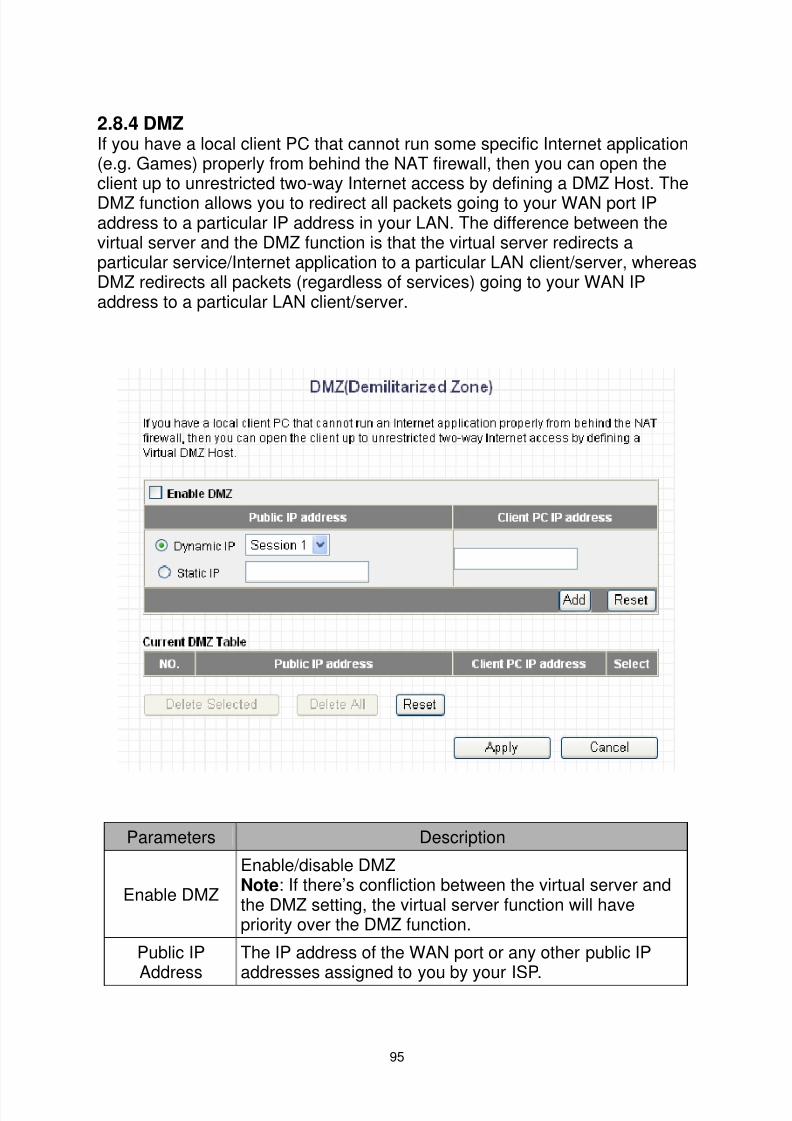
8/4/2019 BR 3G6200Wg Manual
http://slidepdf.com/reader/full/br-3g6200wg-manual 96/129
95
2.8.4 DMZIf you have a local client PC that cannot run some specific Internet application(e.g. Games) properly from behind the NAT firewall, then you can open theclient up to unrestricted two-way Internet access by defining a DMZ Host. TheDMZ function allows you to redirect all packets going to your WAN port IPaddress to a particular IP address in your LAN. The difference between thevirtual server and the DMZ function is that the virtual server redirects aparticular service/Internet application to a particular LAN client/server, whereasDMZ redirects all packets (regardless of services) going to your WAN IPaddress to a particular LAN client/server.
Parameters Description
Enable DMZ
Enable/disable DMZNote : If there’s confliction between the virtual server andthe DMZ setting, the virtual server function will havepriority over the DMZ function.
Public IPAddress
The IP address of the WAN port or any other public IPaddresses assigned to you by your ISP.
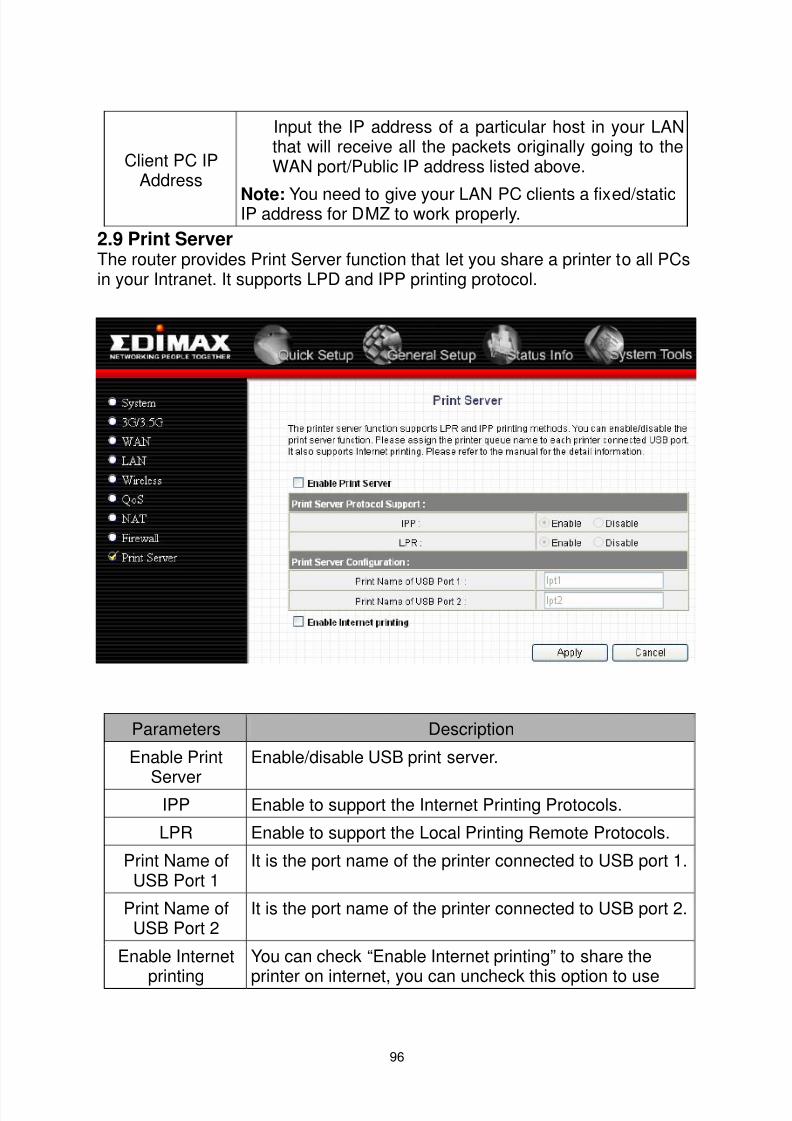
8/4/2019 BR 3G6200Wg Manual
http://slidepdf.com/reader/full/br-3g6200wg-manual 97/129
96
Client PC IPAddress
Input the IP address of a particular host in your LANthat will receive all the packets originally going to theWAN port/Public IP address listed above.
Note: You need to give your LAN PC clients a fixed/staticIP address for DMZ to work properly.2.9 Print ServerThe router provides Print Server function that let you share a printer to all PCsin your Intranet. It supports LPD and IPP printing protocol.
Parameters Description
Enable Print
Server
Enable/disable USB print server.
IPP Enable to support the Internet Printing Protocols.
LPR Enable to support the Local Printing Remote Protocols.
Print Name ofUSB Port 1
It is the port name of the printer connected to USB port 1.
Print Name ofUSB Port 2
It is the port name of the printer connected to USB port 2.
Enable Internet
printing
You can check “Enable Internet printing” to share the
printer on internet, you can uncheck this option to use

8/4/2019 BR 3G6200Wg Manual
http://slidepdf.com/reader/full/br-3g6200wg-manual 98/129
97
printer on intranet only.
Click < Apply > at the bottom of the screen to save the configurations. You can
now configure other advance sections or start using the router.
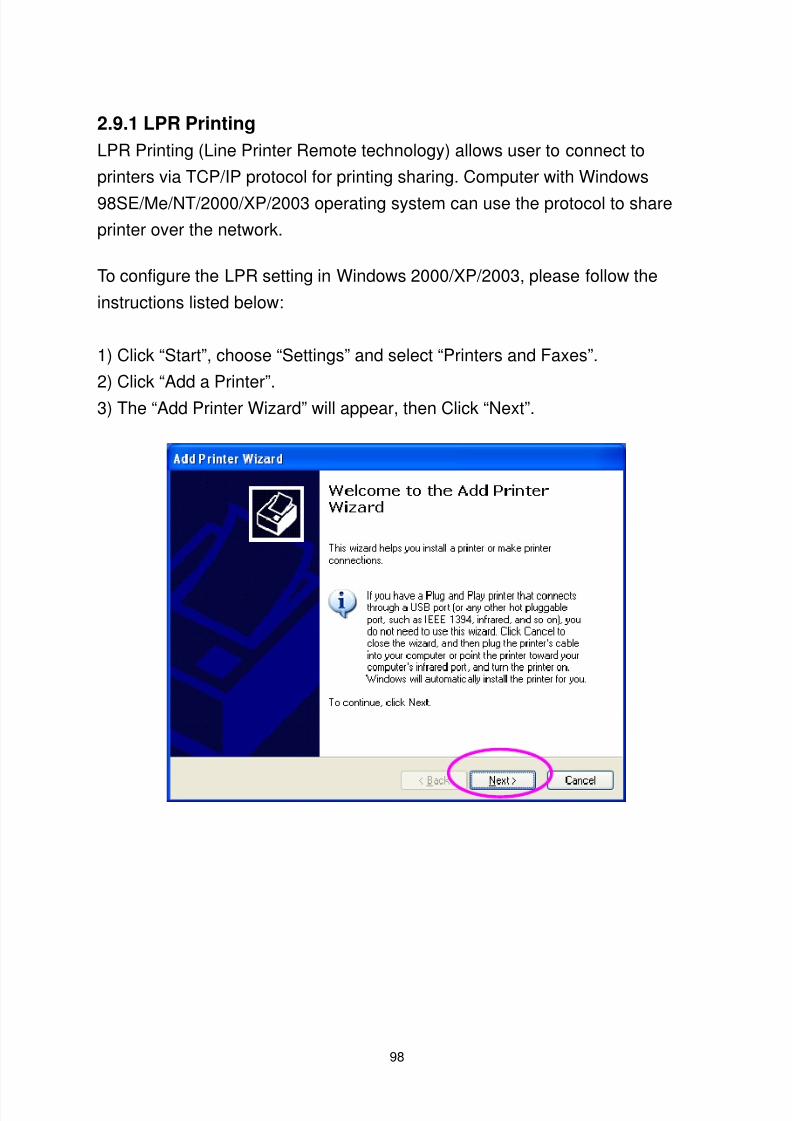
8/4/2019 BR 3G6200Wg Manual
http://slidepdf.com/reader/full/br-3g6200wg-manual 99/129
98
2.9.1 LPR PrintingLPR Printing (Line Printer Remote technology) allows user to connect toprinters via TCP/IP protocol for printing sharing. Computer with Windows98SE/Me/NT/2000/XP/2003 operating system can use the protocol to shareprinter over the network.
To configure the LPR setting in Windows 2000/XP/2003, please follow theinstructions listed below:
1) Click “Start”, choose “Settings” and select “Printers and Faxes”.2) Click “Add a Printer”. 3) The “Add Printer Wizard” will appear, then Click “Next”.
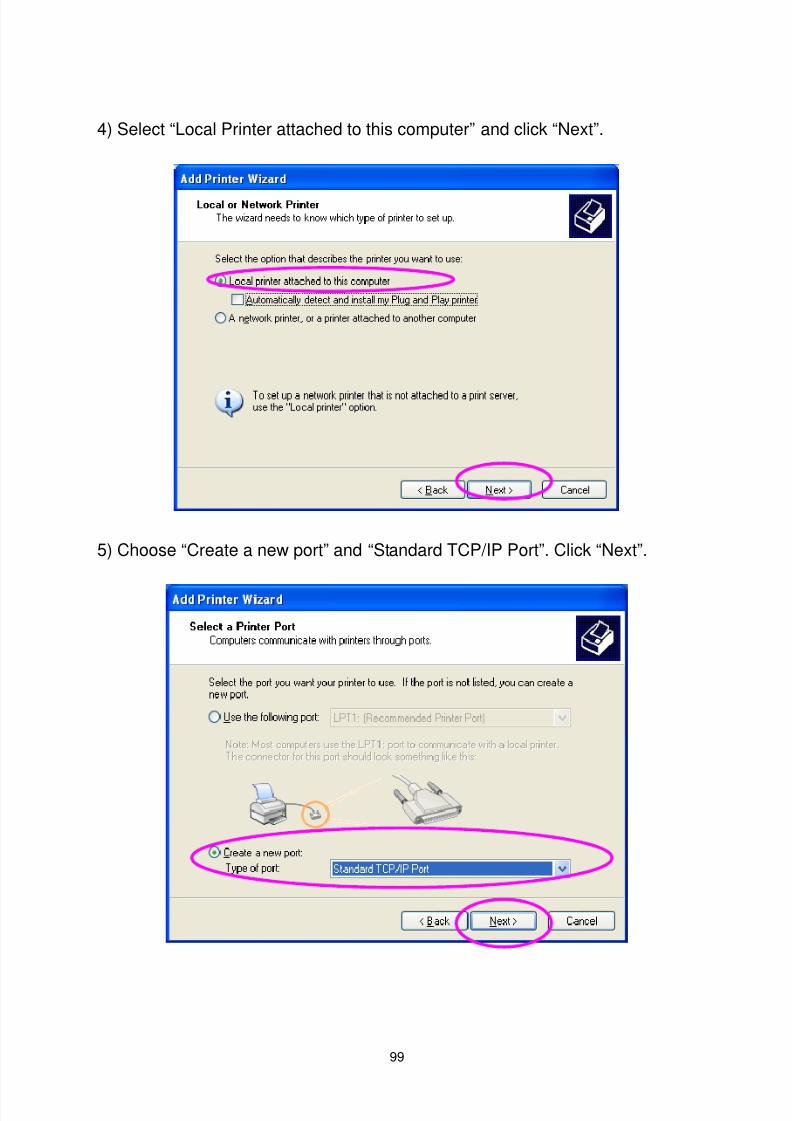
8/4/2019 BR 3G6200Wg Manual
http://slidepdf.com/reader/full/br-3g6200wg-manual 100/129
99
4) Select “Local Printer attached to this computer” and click “Next”.
5) Choose “Create a new port” and “Standard TCP/IP Port”. Click “Next”.
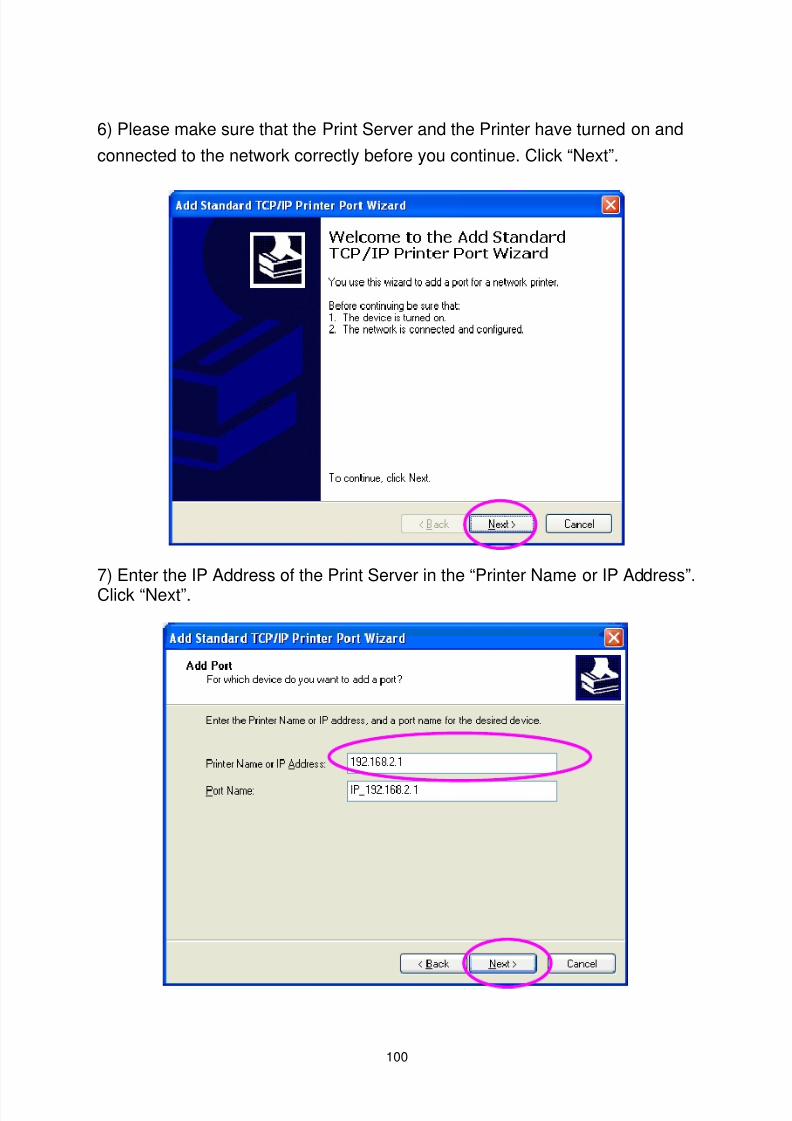
8/4/2019 BR 3G6200Wg Manual
http://slidepdf.com/reader/full/br-3g6200wg-manual 101/129
100
6) Please make sure that the Print Server and the Printer have turned on andconnected to the network correctly before you continue. Click “Next”.
7) Enter the IP Address of the Print Server in the “Printer Name or IP Address”.Click “Next”.

8/4/2019 BR 3G6200Wg Manual
http://slidepdf.com/reader/full/br-3g6200wg-manual 102/129
101
8) Select “Custom” and click “Settings”. When you have finished the settings atstep 9, click “Next” to continue.
9) Select “LPR” and enter “lpt1” in the “Queue Name”, click “OK”. By default
the queue name of the Print Server is “lpt1”.
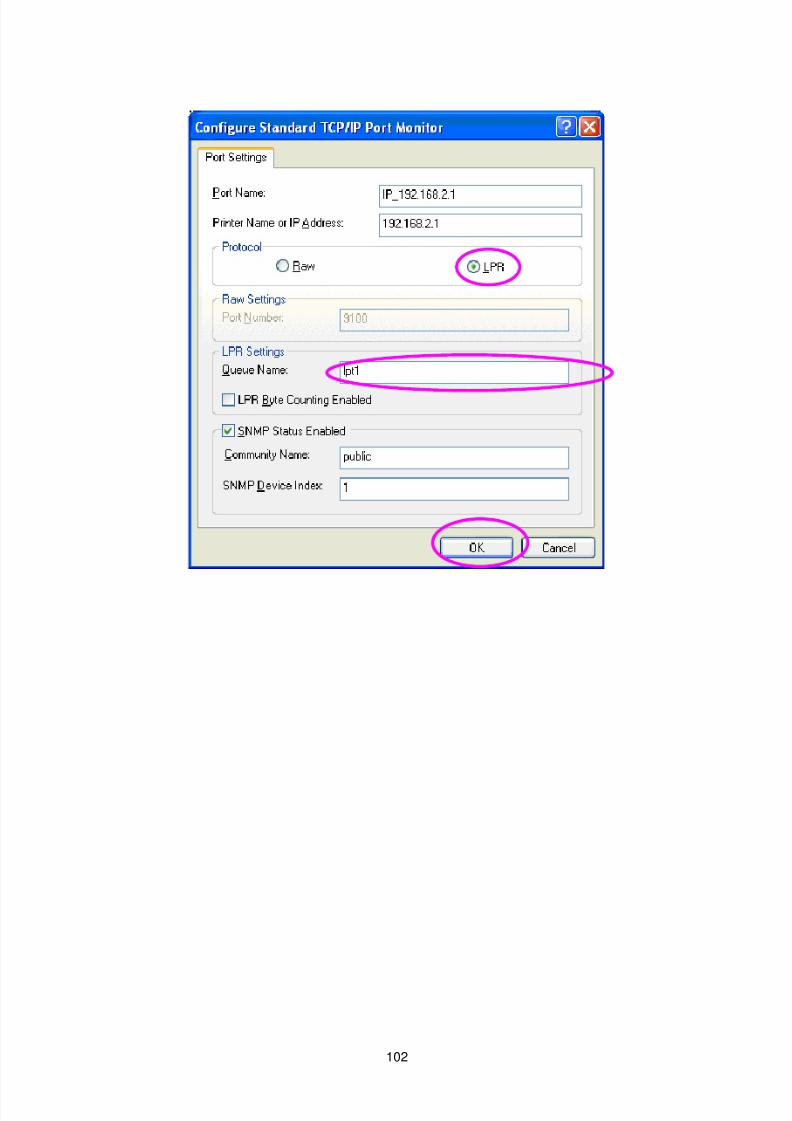
8/4/2019 BR 3G6200Wg Manual
http://slidepdf.com/reader/full/br-3g6200wg-manual 103/129
102
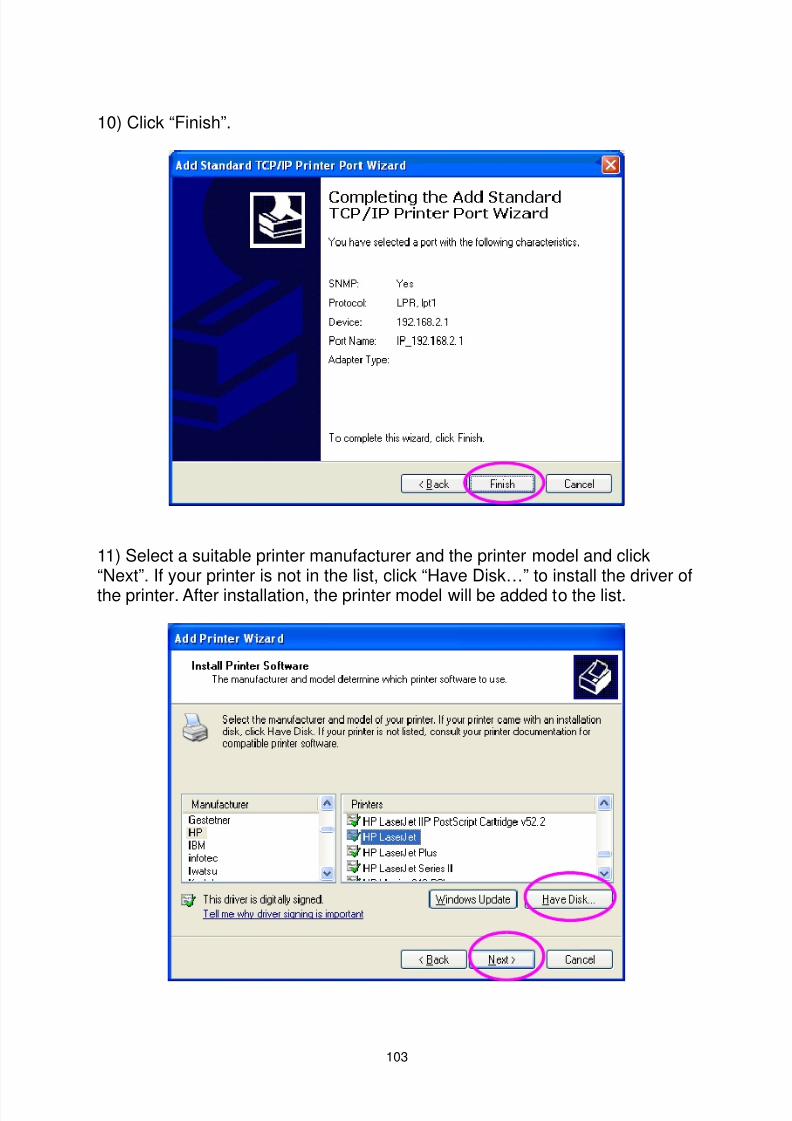
8/4/2019 BR 3G6200Wg Manual
http://slidepdf.com/reader/full/br-3g6200wg-manual 104/129
103
10) Click “Finish”.
11) Select a suitable printer manufacturer and the printer model and click“Next”. If your printer is not in the list, click “Have Disk…” to install the driver ofthe printer. After installation, the printer model will be added to the list.
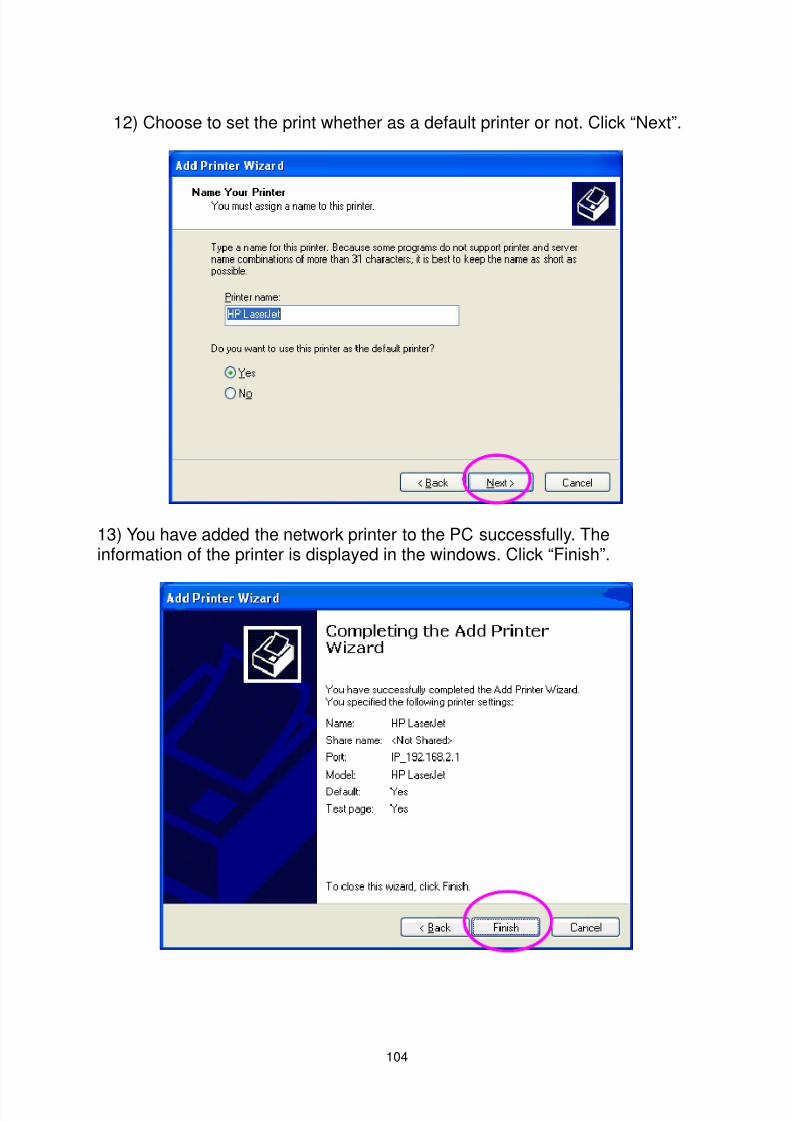
8/4/2019 BR 3G6200Wg Manual
http://slidepdf.com/reader/full/br-3g6200wg-manual 105/129
104
12) Choose to set the print whether as a default printer or not. Click “Next”.
13) You have added the network printer to the PC successfully. Theinformation of the printer is displayed in the windows. Click “Finish”.
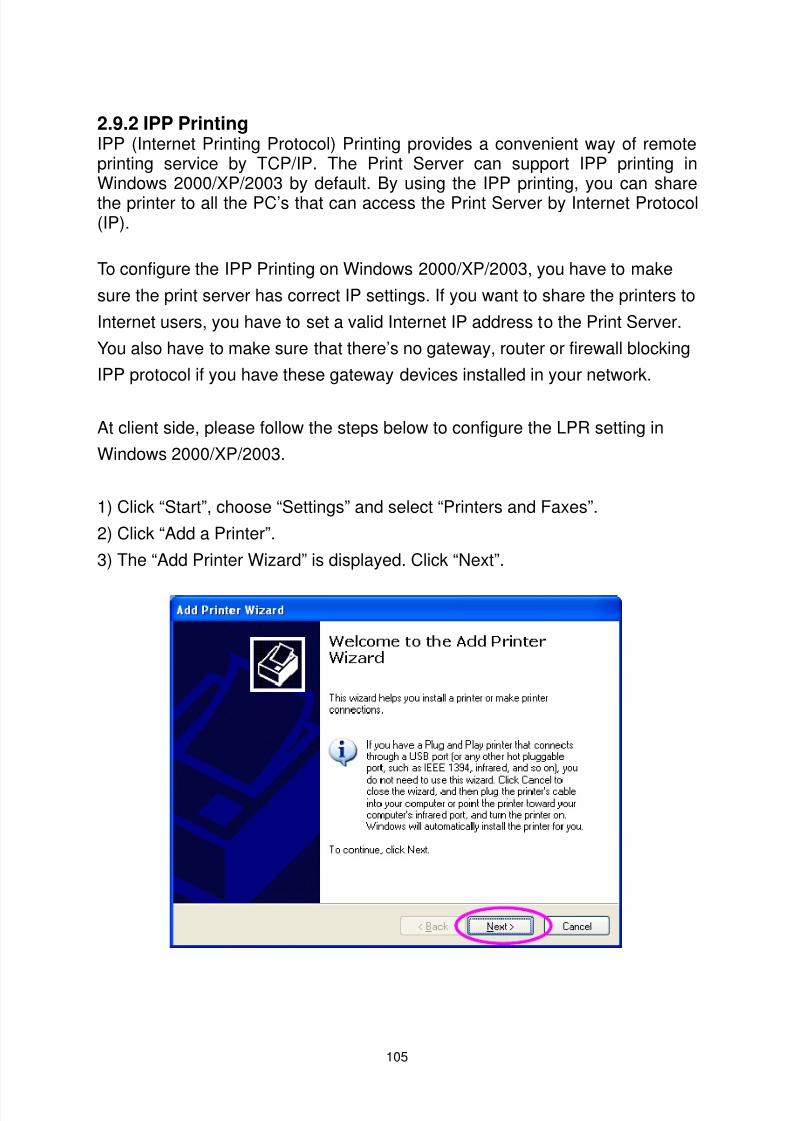
8/4/2019 BR 3G6200Wg Manual
http://slidepdf.com/reader/full/br-3g6200wg-manual 106/129
105
2.9.2 IPP PrintingIPP (Internet Printing Protocol) Printing provides a convenient way of remoteprinting service by TCP/IP. The Print Server can support IPP printing inWindows 2000/XP/2003 by default. By using the IPP printing, you can sharethe printer to all the PC’s that can access the Print Server by Internet Protocol(IP).
To configure the IPP Printing on Windows 2000/XP/2003, you have to makesure the print server has correct IP settings. If you want to share the printers toInternet users, you have to set a valid Internet IP address to the Print Server.You also have to make sure that there’s no gateway, router or firewall blockingIPP protocol if you have these gateway devices installed in your network.
At client side, please follow the steps below to configure the LPR setting inWindows 2000/XP/2003.
1) Click “Start”, choose “Settings” and select “Printers and Faxes”.2) Click “Add a Printer”.3) The “Add Printer Wizard” is displayed. Click “Next”.

8/4/2019 BR 3G6200Wg Manual
http://slidepdf.com/reader/full/br-3g6200wg-manual 107/129
106
4) Select “A network printer, or a printer attached to another computer”, thenclick “Next”.
5) Select “Connect to a printer on the Internet or on a home or office network”
and enter the URL of Print Server. The URL format is “http://IP:631/Port Name”.The IP should be the Print Server’s IP. The number 631 is IPP standard portnumber. Port Name is the port name of Print Server that your printer isconnected to. The default port name is “lpt1”. One example of the URL ishttp://192.168.2.1:631/lpt1. After entering the URL of Print Server, click “Next”.
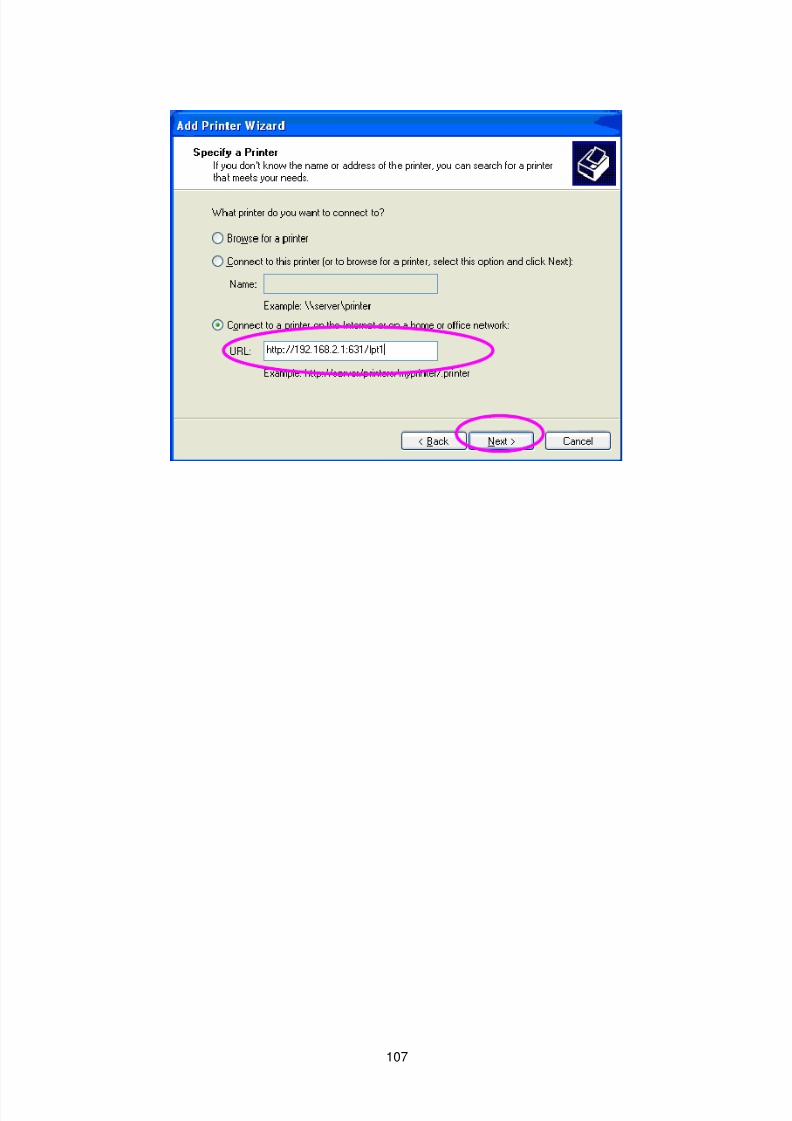
8/4/2019 BR 3G6200Wg Manual
http://slidepdf.com/reader/full/br-3g6200wg-manual 108/129
107

8/4/2019 BR 3G6200Wg Manual
http://slidepdf.com/reader/full/br-3g6200wg-manual 109/129
108
6) Select a suitable printer manufacturer and the printer model and click “Next”.If your printer is not in the list, click “Have Disk…” to install the driver of theprinter. After installation, the printer model will be added to the list.
7) Choose to set the print whether as a default printer or not. Click “Next”.
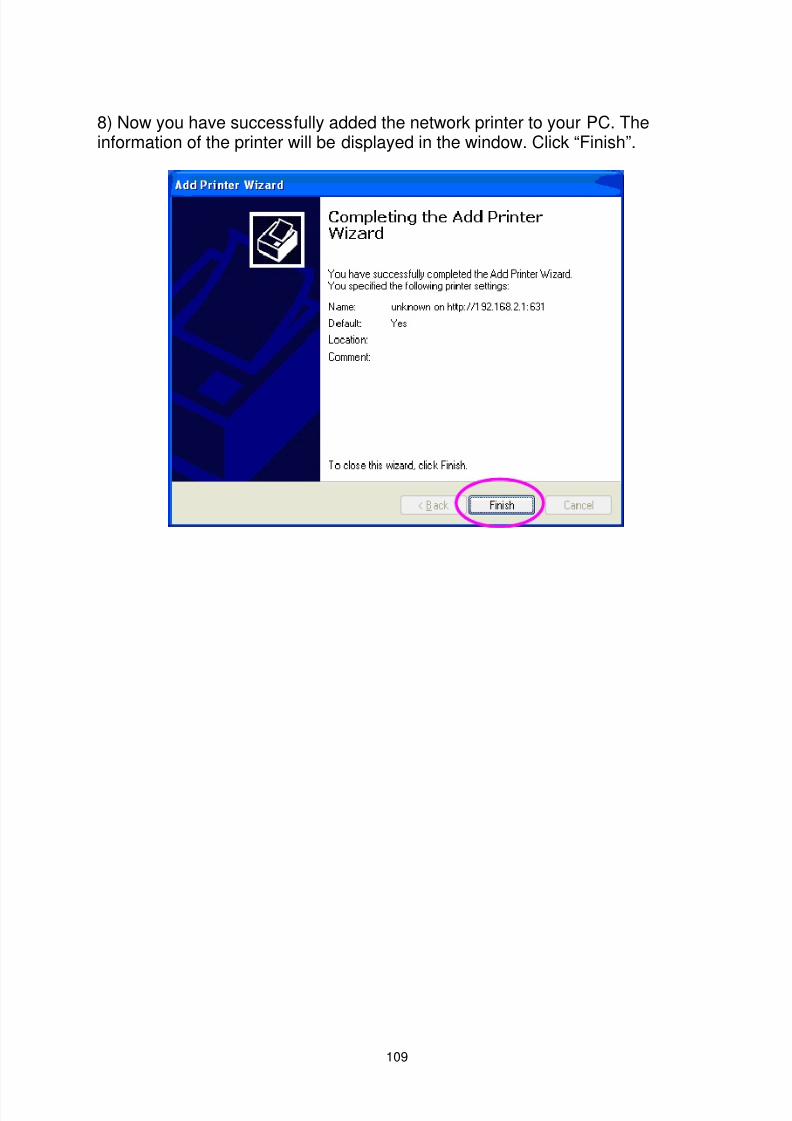
8/4/2019 BR 3G6200Wg Manual
http://slidepdf.com/reader/full/br-3g6200wg-manual 110/129
109
8) Now you have successfully added the network printer to your PC. Theinformation of the printer will be displayed in the window. Click “Finish”.
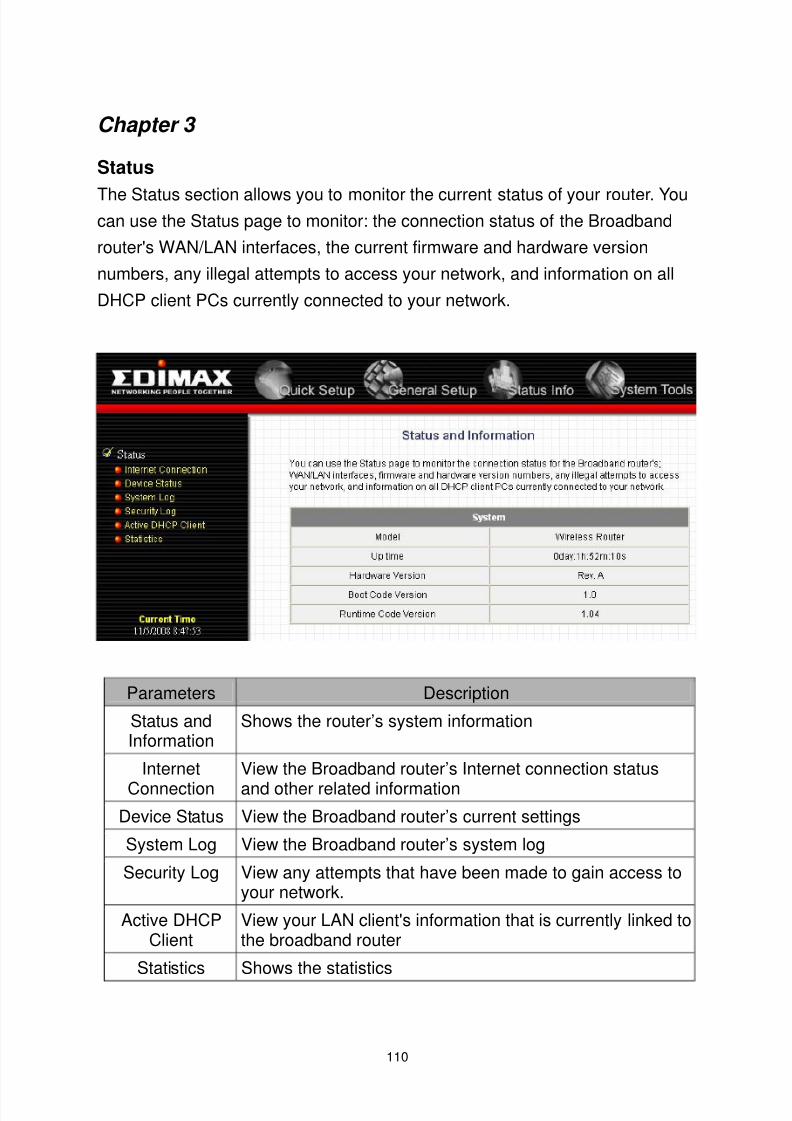
8/4/2019 BR 3G6200Wg Manual
http://slidepdf.com/reader/full/br-3g6200wg-manual 111/129
110
Chapter 3
Status
The Status section allows you to monitor the current status of your router. Youcan use the Status page to monitor: the connection status of the Broadbandrouter's WAN/LAN interfaces, the current firmware and hardware versionnumbers, any illegal attempts to access your network, and information on allDHCP client PCs currently connected to your network.
Parameters Description
Status andInformation
Shows the router’s system information
InternetConnection
View the Broadband router’s Internet connection statusand other related information
Device Status View the Broadband router’s current settings
System Log View the Broadband router’s system log
Security Log View any attempts that have been made to gain access toyour network.
Active DHCPClient
View your LAN client's information that is currently linked tothe broadband router
Statistics Shows the statistics
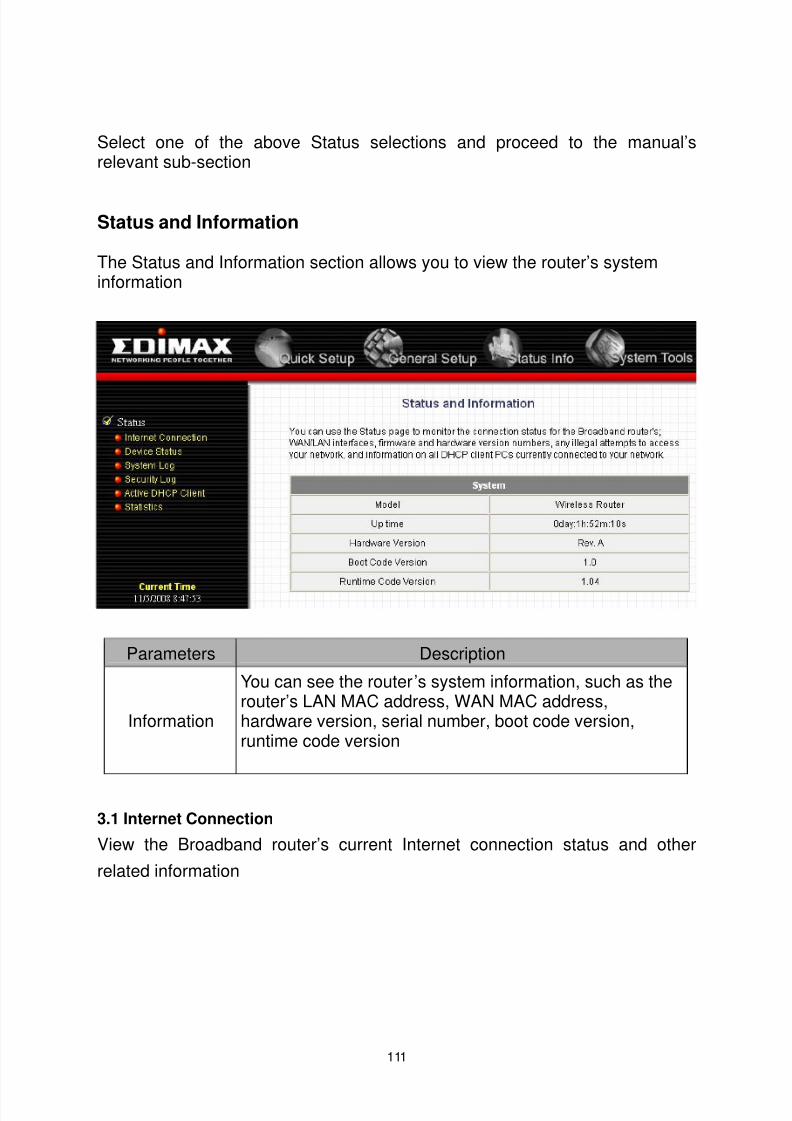
8/4/2019 BR 3G6200Wg Manual
http://slidepdf.com/reader/full/br-3g6200wg-manual 112/129
111
Select one of the above Status selections and proceed to the manual’srelevant sub-section
Status and Information
The Status and Information section allows you to view the router’s systeminformation
Parameters Description
Information
You can see the router’s system information, such as therouter’s LAN MAC address, WAN MAC address,hardware version, serial number, boot code version,runtime code version
3.1 Internet Connection
View the Broadband router’s current Internet connection status and otherrelated information
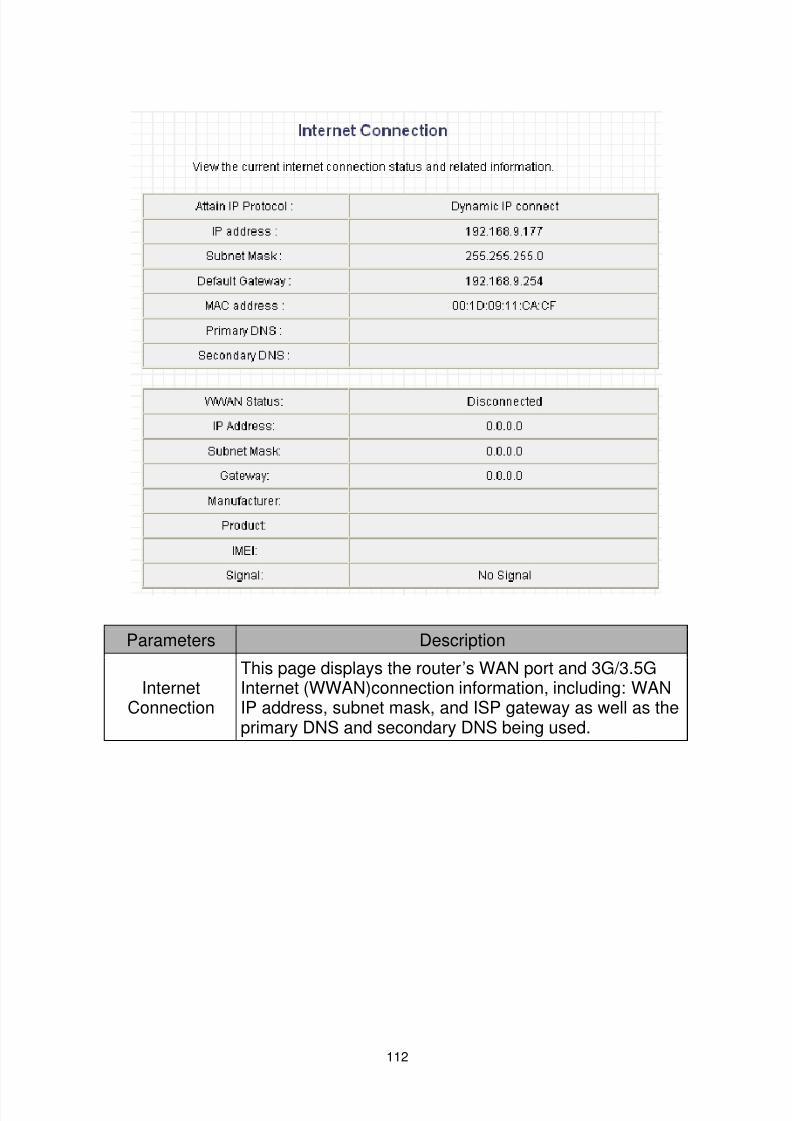
8/4/2019 BR 3G6200Wg Manual
http://slidepdf.com/reader/full/br-3g6200wg-manual 113/129
112
Parameters Description
InternetConnection
This page displays the router’s WAN port and 3G/3.5GInternet (WWAN)connection information, including: WANIP address, subnet mask, and ISP gateway as well as theprimary DNS and secondary DNS being used.
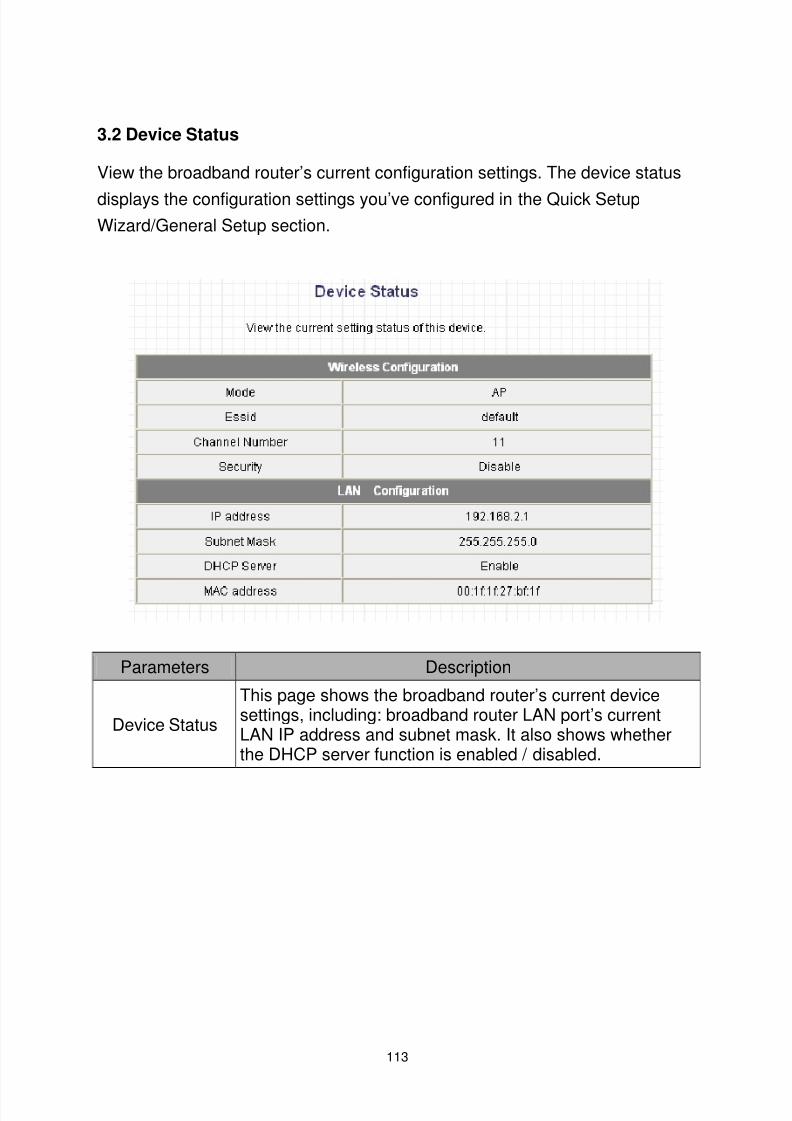
8/4/2019 BR 3G6200Wg Manual
http://slidepdf.com/reader/full/br-3g6200wg-manual 114/129
113
3.2 Device Status
View the broadband router’s current configuration settings. The device status
displays the configuration settings you’ve configured in the Quick SetupWizard/General Setup section.
Parameters Description
Device Status
This page shows the broadband router’s current devicesettings, including: broadband router LAN port’s currentLAN IP address and subnet mask. It also shows whetherthe DHCP server function is enabled / disabled.

8/4/2019 BR 3G6200Wg Manual
http://slidepdf.com/reader/full/br-3g6200wg-manual 115/129
114
3.3 System Log
View the operation log of the system.
Parameters Description
System Log
This page shows the system log of the broadband router. Itdisplays any event occurred after system start up.At the bottom of the page, the system log can be saved<Save > as a local file, you can clear the log by click<Clear > button, too. You can also click < Refresh > buttonto get the most updated information. When the system ispowered down, the system log will disappear if it’s notsaved as a local file.

8/4/2019 BR 3G6200Wg Manual
http://slidepdf.com/reader/full/br-3g6200wg-manual 116/129
115
3.4 Security Log
View any attempts that have been made to gain access to your network.
Parameters Description
Security Log
This page shows the current security log of theBroadband router. It displays all attempts tried to accessyour network.At the bottom of the page, the security log can be saved<Save > as a local file, you can clear the log by clicking<Clear >, too. You can also click < Refresh > button to getthe most updated information. When the system ispowered down, the security log will disappear if it’s notsaved as a local file.
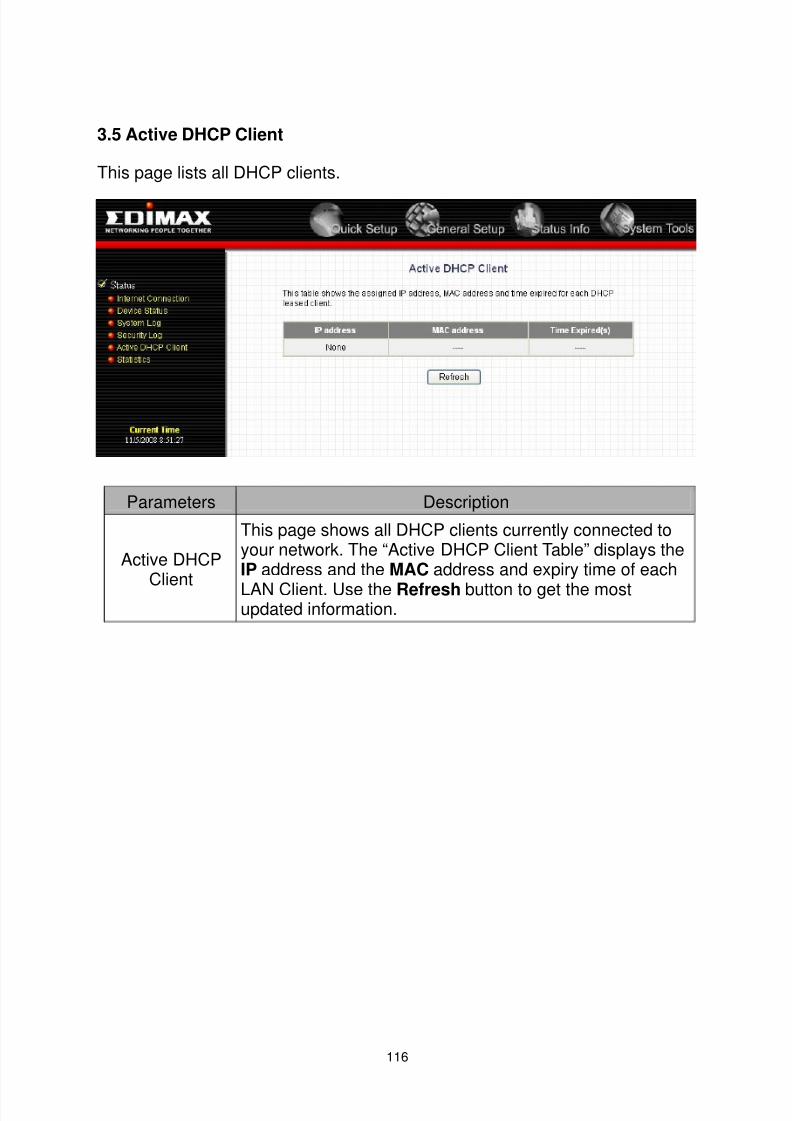
8/4/2019 BR 3G6200Wg Manual
http://slidepdf.com/reader/full/br-3g6200wg-manual 117/129
116
3.5 Active DHCP Client
This page lists all DHCP clients.
Parameters Description
Active DHCPClient
This page shows all DHCP clients currently connected toyour network. The “Active DHCP Client Table” displays theIP address and the MAC address and expiry time of each
LAN Client. Use the Refresh button to get the mostupdated information.

8/4/2019 BR 3G6200Wg Manual
http://slidepdf.com/reader/full/br-3g6200wg-manual 118/129
117
3.6 StatisticsView the statistics of packets sent and received on WAN, LAN and WirelessLAN interface.
Parameters Description
Statistics Shows the statistics of packets sent and received on WAN,LAN and Wireless LAN interface.
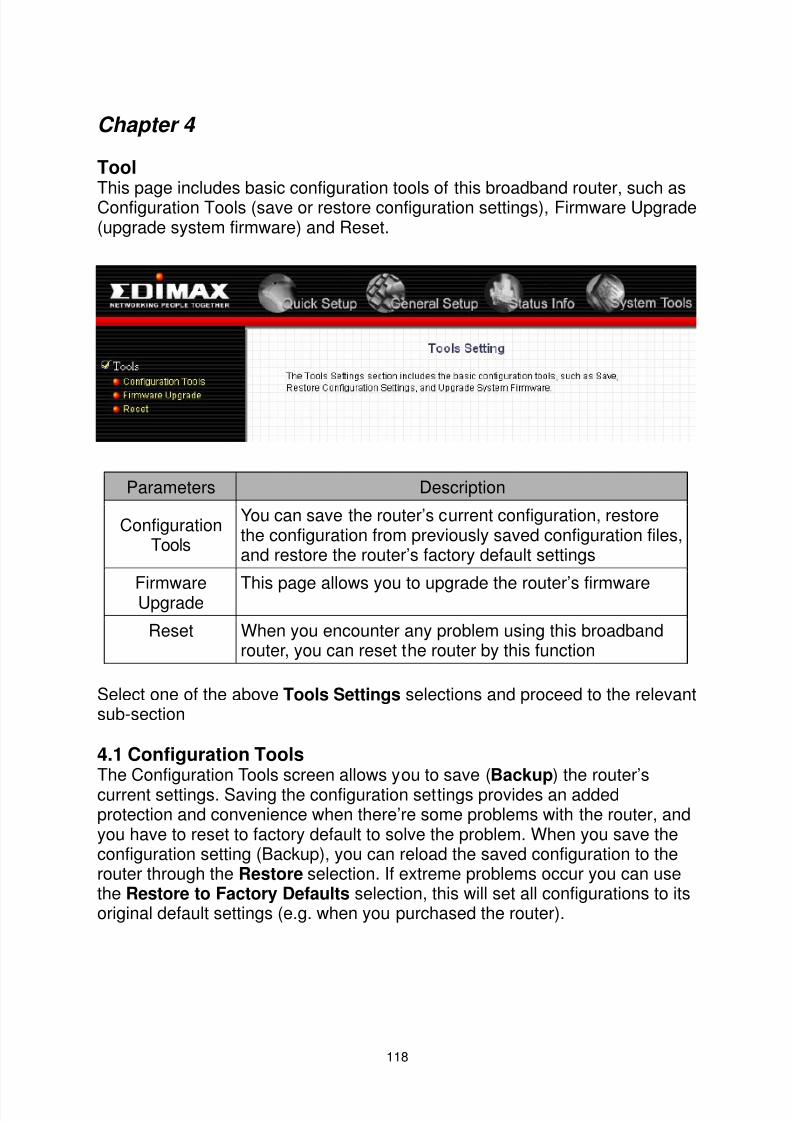
8/4/2019 BR 3G6200Wg Manual
http://slidepdf.com/reader/full/br-3g6200wg-manual 119/129
118
Chapter 4
Tool
This page includes basic configuration tools of this broadband router, such asConfiguration Tools (save or restore configuration settings), Firmware Upgrade(upgrade system firmware) and Reset.
Parameters Description
ConfigurationTools
You can save the router’s current configuration, restorethe configuration from previously saved configuration files,and restore the router’s factory default settings
FirmwareUpgrade This page allows you to upgrade the router’s firmware
Reset When you encounter any problem using this broadbandrouter, you can reset the router by this function
Select one of the above Tools Settings selections and proceed to the relevantsub-section
4.1 Configuration ToolsThe Configuration Tools screen allows you to save ( Backup ) the router’scurrent settings. Saving the configuration settings provides an addedprotection and convenience when there’re some problems with the router, andyou have to reset to factory default to solve the problem. When you save theconfiguration setting (Backup), you can reload the saved configuration to therouter through the Restore selection. If extreme problems occur you can usethe Restore to Factory Defaults selection, this will set all configurations to itsoriginal default settings (e.g. when you purchased the router).
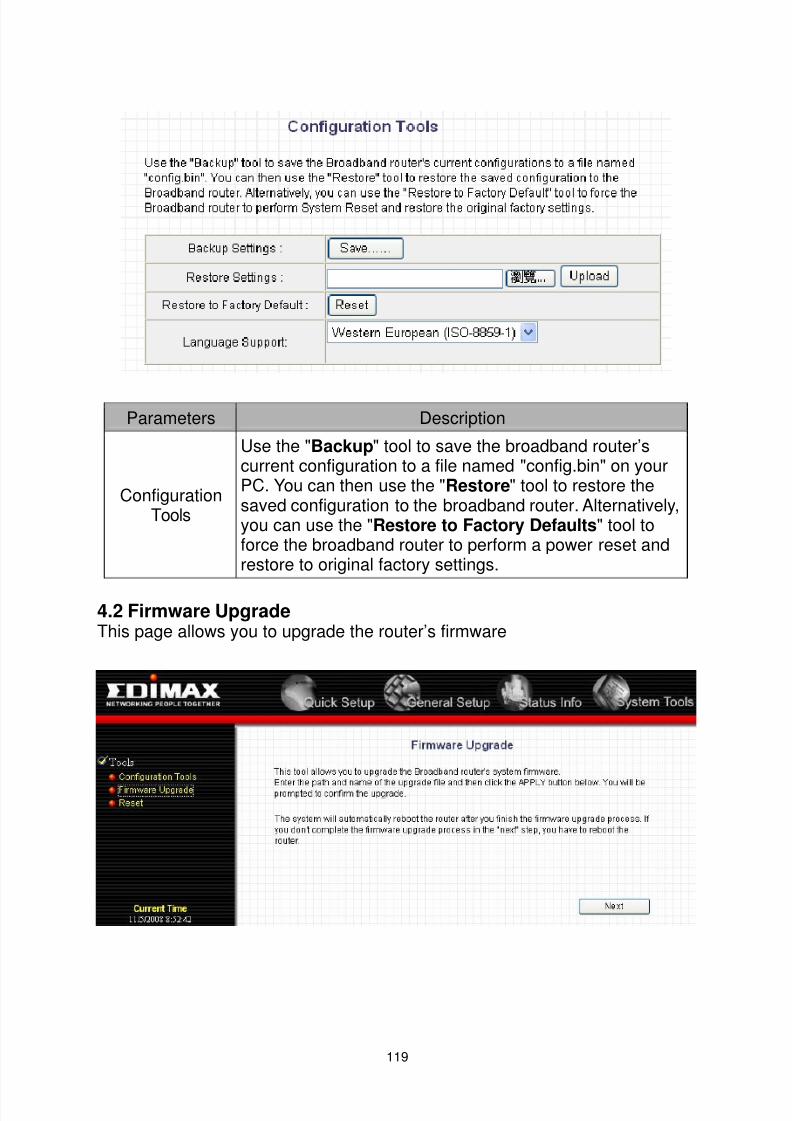
8/4/2019 BR 3G6200Wg Manual
http://slidepdf.com/reader/full/br-3g6200wg-manual 120/129
119
Parameters Description
ConfigurationTools
Use the " Backup " tool to save the broadband router’scurrent configuration to a file named "config.bin" on yourPC. You can then use the " Restore " tool to restore thesaved configuration to the broadband router. Alternatively,you can use the " Restore to Factory Defaults " tool toforce the broadband router to perform a power reset andrestore to original factory settings.
4.2 Firmware UpgradeThis page allows you to upgrade the router’s firmware
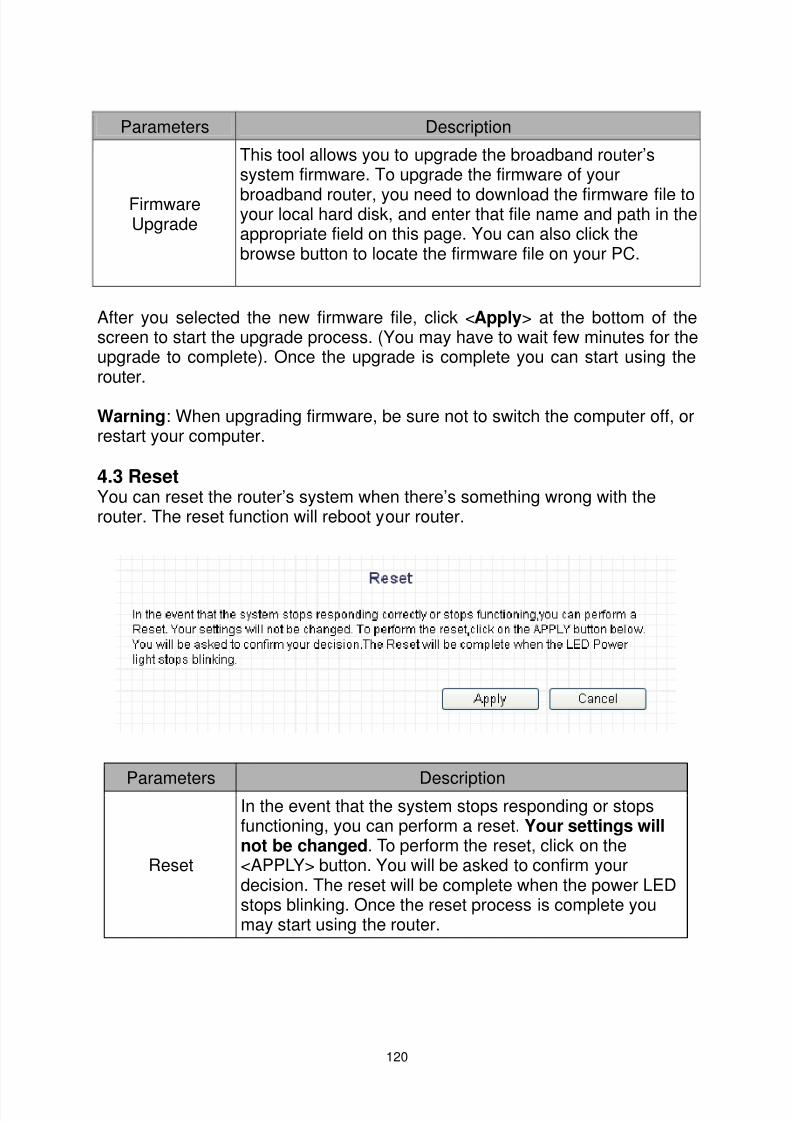
8/4/2019 BR 3G6200Wg Manual
http://slidepdf.com/reader/full/br-3g6200wg-manual 121/129
120
Parameters Description
FirmwareUpgrade
This tool allows you to upgrade the broadband router’ssystem firmware. To upgrade the firmware of your
broadband router, you need to download the firmware file toyour local hard disk, and enter that file name and path in theappropriate field on this page. You can also click thebrowse button to locate the firmware file on your PC.
After you selected the new firmware file, click < Apply > at the bottom of thescreen to start the upgrade process. (You may have to wait few minutes for theupgrade to complete). Once the upgrade is complete you can start using therouter.
Warning : When upgrading firmware, be sure not to switch the computer off, orrestart your computer.
4.3 ResetYou can reset the router’s system when there’s something wrong with therouter. The reset function will reboot your router.
Parameters Description
Reset
In the event that the system stops responding or stopsfunctioning, you can perform a reset. Your settings willnot be changed . To perform the reset, click on the<APPLY> button. You will be asked to confirm yourdecision. The reset will be complete when the power LEDstops blinking. Once the reset process is complete youmay start using the router.

8/4/2019 BR 3G6200Wg Manual
http://slidepdf.com/reader/full/br-3g6200wg-manual 122/129
121
Appendix A
How to find your PC’s IP and MAC address manually
1) In Window’s open the Command Prompt program
2) Type Ipconfig /all and <enter>
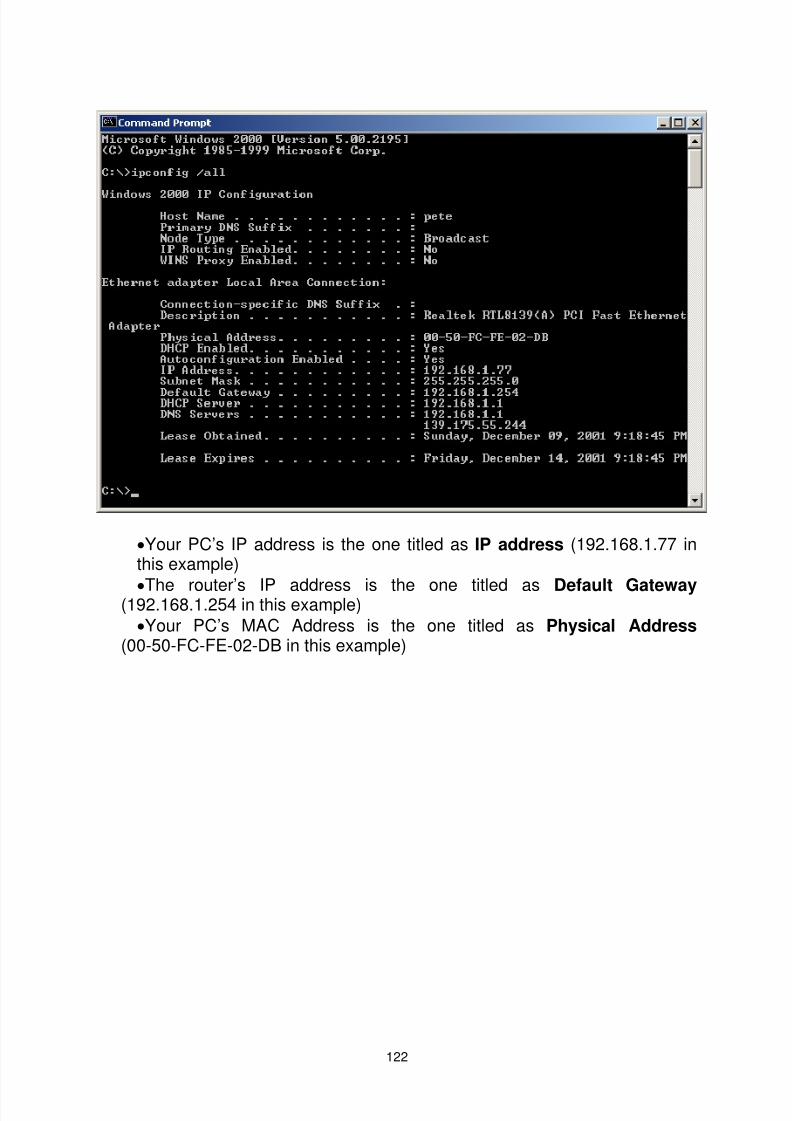
8/4/2019 BR 3G6200Wg Manual
http://slidepdf.com/reader/full/br-3g6200wg-manual 123/129
122
• Your PC’s IP address is the one titled as IP address (192.168.1.77 inthis example)
• The router’s IP address is the one titled as Default Gateway (192.168.1.254 in this example)• Your PC’s MAC Address is the one titled as Physical Address
(00-50-FC-FE-02-DB in this example)
8/4/2019 BR 3G6200Wg Manual
http://slidepdf.com/reader/full/br-3g6200wg-manual 124/129
123
Glossary
Default Gateway (Router): Every non-router IP device needs a defaultgateway. When the device sends out an IP packet, if the destination is not inthe same network, the device will send the packet to default gateway, whichwill then forward it to the destination.
DHCP: Dynamic Host Configuration Protocol. This protocol automaticallyassigns an IP address for every computer in your network.
DNS Server IP Address: DNS stands for Domain Name System, which allowsInternet servers to have a domain name (such as www.Broadbandrouter.com)and one or more IP addresses (such as 192.34.45.8). A DNS server willmaintain a database of domain names and respective IP addresses, so whena domain name is requested (like typing “Broadbandrouter.com” in yourInternet browser), the user will get the corresponding IP address. The DNSserver IP address used by the computers on your home network is the locationof the DNS server your ISP has assigned to you.
DSL Modem: DSL stands for Digital Subscriber Line. A DSL modem usesyour existing phone lines to transmit data at high speeds.
Ethernet: A kind of standard of computer networks. Ethernet networks areconnected by special cables and hubs, and transfers data at up to 10/100million bits per second (Mbps).
Idle Timeout: Idle timeout is designed so that after no traffic has beentransferred to the Internet for a pre-configured amount of time, the connectionwill be disconnected automatically.
IP Address and Network (Subnet) Mask: IP stands for Internet Protocol. AnIP address consists four sets of numbers separated by periods, whichidentifies a single, unique Internet computer host in an IP network. Example:192.168.2.1. It consists of 2 portions: the IP network address, and the hostidentifier.
The IP address is a 32-bit binary pattern, which can be represented as fourcascaded decimal numbers separated by “.”: aaa.aaa.aaa.aaa, where each“aaa” can be anything from 000 to 255, or as four cascaded binary numbersseparated by “.”: bbbbbbbb.bbbbbbbb.bbbbbbbb.bbbbbbbb, where each “b”can either be 0 or 1.A network mask is also a 32-bit binary pattern, and consists of consecutiveleading
1’s followed by consecutive trailing 0’s, such as
8/4/2019 BR 3G6200Wg Manual
http://slidepdf.com/reader/full/br-3g6200wg-manual 125/129
124
11111111.11111111.11111111.00000000. Therefore sometimes a networkmask can also be described simply as “x” number of leading 1’s.When both are represented side by side in their binary forms, all bits in the IPaddress that correspond to 1’s in the network mask become part of the IPnetwork address, and the remaining bits correspond to the host ID.
For example, if the IP address for a device is, in its binary form,11011001.10110000.10010000.00000111, and if its network mask is,11111111.11111111.11110000.00000000It means the device’s network address is11011001.10110000.10010000.00000000, and its host ID is,00000000.00000000.00000000.00000111. This is a convenient and efficientmethod for routers to route IP packets to their destination.
ISP Gateway Address: (see ISP listed below for explanations). The ISPGateway Address is an IP address for the Internet router located at the ISP'soffice.
ISP: Internet Service Provider. An ISP is a business that provides connectivityto the Internet for individuals and other businesses or organizations.
LAN: Local Area Network. A LAN is a group of computers and devicesconnected together in a relatively small area (such as a house or an office).Your home network is considered as a LAN.
MAC Address: MAC stands for Media Access Control. A MAC address is thehardware address of a device connected to a network. The MAC address is aunique identifier for a device with an Ethernet interface. It comprises two parts:3 bytes of data that corresponds to the Manufacturer ID (which is unique foreach manufacturer), plus 3 bytes that are often used as the product’s serialnumber.
NAT: Network Address Translation. This process allows all of the computerson your home network to use one IP address. Using the broadband router’sNAT capability, you can access the Internet from any computer on your homenetwork without having to purchase more IP addresses from your ISP.
Port: Network Clients (LAN PC) uses port numbers to identify one networkapplication/protocol from another. Below is a list of common applications andprotocol/port numbers:
Application Protocol Port Number
Telnet TCP 23

8/4/2019 BR 3G6200Wg Manual
http://slidepdf.com/reader/full/br-3g6200wg-manual 126/129
125
FTP TCP 21SMTP TCP 25POP3 TCP 110
H.323 TCP 1720SNMP UCP 161
SNMP Trap UDP 162HTTP TCP 80PPTP TCP 1723
PC Anywhere TCP 5631PC Anywhere UDP 5632
PPPoE: Point-to-Point Protocol over Ethernet. Point-to-Point Protocol is asecure data transmission method originally created for dial-up connections;PPPoE is for Ethernet connections. PPPoE relies on two widely acceptedstandards, Ethernet and the Point-to-Point Protocol. It is a communicationsprotocol for transmitting information over Ethernet between differentmanufacturers
Protocol: A protocol is a set of rules for interaction agreed between multipleparties so that when they communication with each other based on such aprotocol, the interpretation of their behavior is well defined and can be made
objectively, without confusion or misunderstanding.Router: A router is an intelligent network device that forwards packetsbetween different networks based on network layer address information suchas IP addresses.
Subnet Mask: A subnet mask, which may be a part of the TCP/IP informationprovided by your ISP, is a set of four numbers (e.g. 255.255.255.0) configuredlike an IP address. It is used to create IP address numbers used only within aparticular network (as opposed to valid IP address numbers recognized by the
Internet, which must be assigned by InterNIC).TCP/IP, UDP: Transmission Control Protocol/Internet Protocol (TCP/IP) andUnreliable Datagram Protocol (UDP). TCP/IP is the standard protocol for datatransmission over the Internet. Both TCP and UDP are transport layer protocol.TCP performs proper error detection and error recovery, and thus is reliable.UDP on the other hand is not reliable. They both run on top of the IP (InternetProtocol), a network layer protocol.
WAN: Stands for Wide Area Network. A network that connects computers
located in geographically separated areas (e.g. different buildings, cities,

8/4/2019 BR 3G6200Wg Manual
http://slidepdf.com/reader/full/br-3g6200wg-manual 127/129

8/4/2019 BR 3G6200Wg Manual
http://slidepdf.com/reader/full/br-3g6200wg-manual 128/129
127
FFederal Communication CommissionInterference Statement
This equipment has been tested and found to comply with the limits for a Class B digital device,pursuant to Part 15 of FCC Rules. These limits are designed to provide reasonable protectionagainst harmful interference in a residential installation. This equipment generates, uses, and canradiate radio frequency energy and, if not installed and used in accordance with the instructions, maycause harmful interference to radio communications.However, there is no guarantee that interference will not occur in a particular installation. If thisequipment does cause harmful interference to radio or television reception, which can be determinedby turning the equipment off and on, the user is encouraged to try to correct the interference by one ormore of the following measures:1. Reorient or relocate the receiving antenna.2. Increase the separation between the equipment and receiver.3. Connect the equipment into an outlet on a circuit different from that to which the receiver is
connected.4. Consult the dealer or an experienced radio technician for help.FCC Caution
This device and its antenna must not be co-located or operating in conjunction with any other antennaor transmitter.This device complies with Part 15 of the FCC Rules. Operation is subject to the following twoconditions: (1) this device may not cause harmful interference, and (2) this device must accept anyinterference received, including interference that may cause undesired operation.Any changes or modifications not expressly approved by the party responsible for compliance couldvoid the authority to operate equipment.Federal Communications Commission (FCC) Radiation Exposure StatementThis equipment complies with FCC radiation exposure set forth for an uncontrolled environment. Inorder to avoid the possibility of exceeding the FCC radio frequency exposure limits, human proximityto the antenna shall not be less than 2.5cm (1 inch) during normal operation.Federal Communications Commission (FCC) RF Exposure RequirementsSAR compliance has been established in the laptop computer(s) configurations with PCMCIA slot onthe side near the center, as tested in the application for Certification, and can be used in laptopcomputer(s) with substantially similar physical dimensions, construction, and electrical and RFcharacteristics. Use in other devices such a PDAs or lappads is not authorized.This transmitter is restricted for use with the specific antenna tested in the application for Certification.The antenna(s) used for this transmitter must not be co-located or operating in conjunction with anyother antenna or transmitter.R&TTE Compliance StatementThis equipment complies with all the requirements of DIRECTIVE 1999/5/EC OF THE EUROPEANPARLIAMENT AND THE COUNCIL of March 9, 1999 on radio equipment and telecommunicationterminal Equipment and the mutual recognition of their conformity (R&TTE)The R&TTE Directive repeals and replaces in the directive 98/13/EEC (Telecommunications TerminalEquipment and Satellite Earth Station Equipment) As of April 8, 2000.SafetyThis equipment is designed with the utmost care for the safety of those who install and use it. However,special attention must be paid to the dangers of electric shock and static electricity when working withelectrical equipment. All guidelines of this and of the computer manufacture must therefore be allowedat all times to ensure the safe use of the equipment.EU Countries Intended for UseThe ETSI version of this device is intended for home and office use in Austria, Belgium, Denmark,Finland, France, Germany, Greece, Ireland, Italy, Luxembourg, Bulgaria, Cyprus, Czech Republic,Estonia, Hungary, Latvia, Lithuania, Malta, Poland, Romania, Slovakia, Slovenia, the Netherlands,Portugal, Spain, Sweden, and the United Kingdom.The ETSI version of this device is also authorized for use in EFTA member states: Iceland,Liechtenstein, Norway, and Switzerland.EU Countries not intended for useNone
N2037

8/4/2019 BR 3G6200Wg Manual
http://slidepdf.com/reader/full/br-3g6200wg-manual 129/129