Applicant User Guide - Medford, Oregon User Guide(1).pdfePlan Applicant User Guide Last Updated...
26
Electronic Plan Review Applicant User Guide
Transcript of Applicant User Guide - Medford, Oregon User Guide(1).pdfePlan Applicant User Guide Last Updated...

Electronic Plan Review
Applicant User Guide
ePlan Applicant User Guide Last Updated 08/26/14 1
ePlan Applicant User Guide Table of Contents
Introduction to ePlan............................................................................................................. 2
Electronic Plan Submission…………………………………………………………………….... 3-11
ePlan Review Invitation………………………………………………………………….… 3
Installing the required ePlan components….………………………………………….… 4
Logging In………….……………………………………..……………………………..…..
Troubleshooting.….……………………………………..……………………………..….. 4-5
4-5 6
Standards……………………………………………………………………………………………. 7-9
Plan File Naming……………………………………………………………………………. 7
File Type…………………………………………………………………………………….. 8
Folder Structure…………………………………………………………………………….. 9
Graphic Scale……………………………………………………………………………..... 9
File Sheet Size…………………...……………………………………………………….… 9
Other Requirements………..…...………………………………………………………..… 9
Uploading Plan Drawings and Documents…………………………………………….………. 10-12
Security Timeout…………………………………………………………………………............... 12
Prescreening………………………………………………………………………………………… 13-15
Prescreening Has Been Returned……………………………………………………….. 13-15
Change Requests and Plan Resubmit …………………………………………...…………….. 16-22
Accepting the Applicant Resubmit Task ………………………………………………… 16
eForm Components …………………………...………………………………………….. 17
Markups and Changemarks ……………………………………………………………… 18-21
Upload Corrections…………………………………………………………………..……. 22
Approval..……………………………………………………………………………………………. 23
Appendix.……………………………………………………………………………………………. 24
Credits.....……………………………………………………………………………………………. 25

ePlan Applicant User Guide Last Updated 08/26/14 2
Introduction to ePlan Electronic Plan Review (ePlan) is a web-based solution that allows plans for Building Permits to
be submitted electronically, replacing the traditional paper-based review method. EPlan will
improve the plan review cycle, reduce costs associated with obtaining building permits, as well
as support green initiatives.
This manual provides basic documentation on the steps involved in the Electronic Plan Review
(ePlan) process. It has been prepared as a general reference guide and is not designed to
present every detail or situations on every element of the process. There are text descriptions
and screen images of the step-by-step tasks necessary to complete a submittal and review
using ePlan.
If at any time in the process you have questions or concerns, do not hesitate to contact us.
Building Safety Department 541-774-2350 [email protected] ePlan web address https://eplan.cityofmedford.org/eplan
NOTE: In addition to this user manual, please reference the help documentation available within
the ePlan Review Web portal for further assistance.

ePlan Applicant User Guide Last Updated 08/26/14 3
TIP! ePlan works best in Internet Explorer.
If your default web browser is not Internet Explorer, you can enter ePlan manually by opening Internet Explorer and typing the following web address:
https://eplan.cityofmedford.org/eplan
TIP! Additional forms may be
required. Please visit the
Building Safety Department’s
Application and Request
Forms page for a complete
list.
Electronic Plan Submission Please complete the following prior to getting started:
Fill out appropriate application forms:
Residential: Building Permit Application,
Residential Energy Checklist, & Moisture Content
Form
Commercial: Building Permit Application, Letter of
Authorization, & Property Use Description Form A
or Form B
Please fax or email your building permit application in
order to obtain an application number and an email
invitation to electronically upload your drawing and documents.
The individual responsible for plan revisions must be the applicant on the application.
Review the standards for naming your drawing and document files, sheet sizes, file
formats accepted, etc. (Review the entire “Standards” section of this guide.)
ePlan Review Invitation
When your application for a Building Permit is reviewed and accepted, an Electronic Plan
Review invitation will be sent to your e-mail address. For first time users, the invitation e-mail will
contain your login information, temporary password and information about the project, including
a link to the ePlan web portal.
ePlan Applicant User Guide Last Updated 08/26/14 4
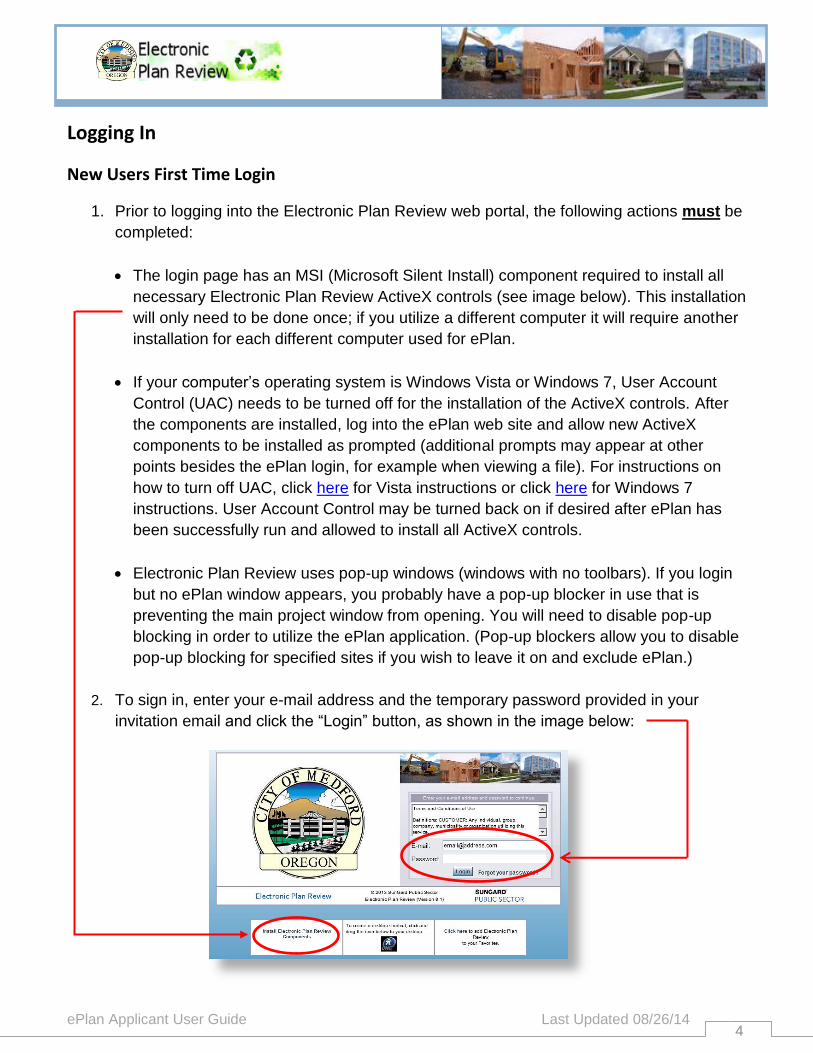
Logging In
New Users First Time Login
1. Prior to logging into the Electronic Plan Review web portal, the following actions must be
completed:
The login page has an MSI (Microsoft Silent Install) component required to install all
necessary Electronic Plan Review ActiveX controls (see image below). This installation
will only need to be done once; if you utilize a different computer it will require another
installation for each different computer used for ePlan.
If your computer’s operating system is Windows Vista or Windows 7, User Account
Control (UAC) needs to be turned off for the installation of the ActiveX controls. After
the components are installed, log into the ePlan web site and allow new ActiveX
components to be installed as prompted (additional prompts may appear at other
points besides the ePlan login, for example when viewing a file). For instructions on
how to turn off UAC, click here for Vista instructions or click here for Windows 7
instructions. User Account Control may be turned back on if desired after ePlan has
been successfully run and allowed to install all ActiveX controls.
Electronic Plan Review uses pop-up windows (windows with no toolbars). If you login
but no ePlan window appears, you probably have a pop-up blocker in use that is
preventing the main project window from opening. You will need to disable pop-up
blocking in order to utilize the ePlan application. (Pop-up blockers allow you to disable
pop-up blocking for specified sites if you wish to leave it on and exclude ePlan.)
2. To sign in, enter your e-mail address and the temporary password provided in your
invitation email and click the “Login” button, as shown in the image below:
ePlan Applicant User Guide Last Updated 08/26/14 5
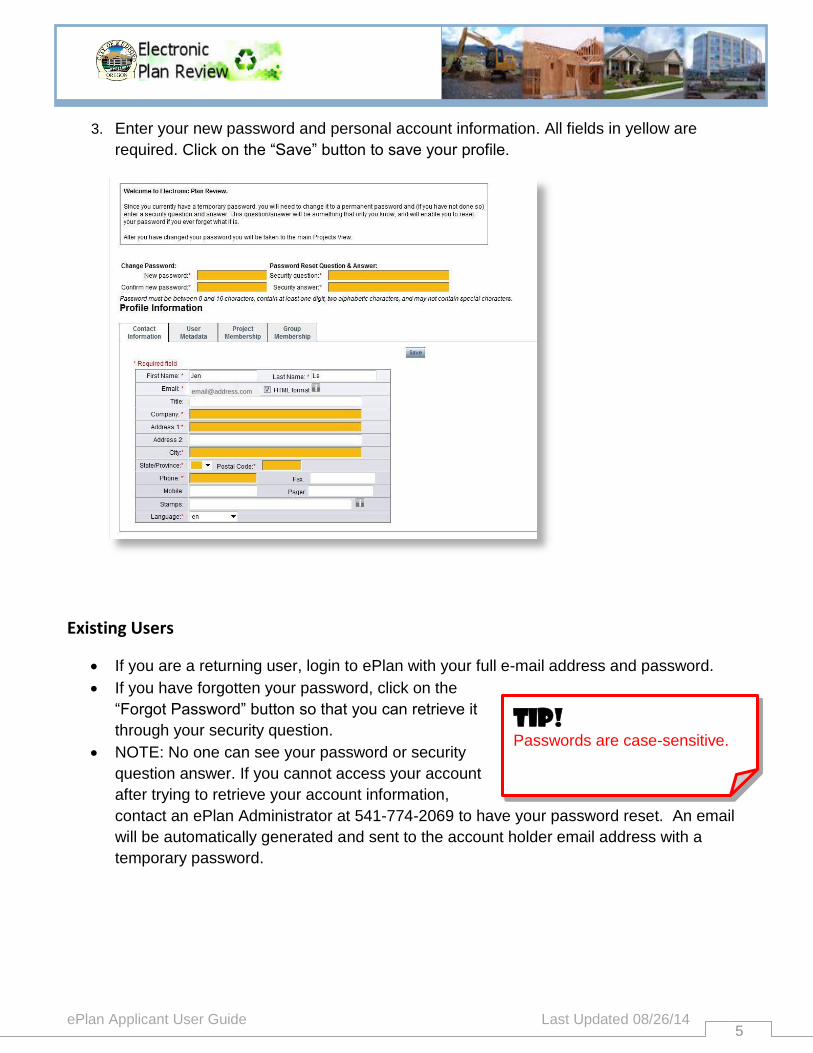
3. Enter your new password and personal account information. All fields in yellow are
required. Click on the “Save” button to save your profile.
Existing Users
If you are a returning user, login to ePlan with your full e-mail address and password.
If you have forgotten your password, click on the
“Forgot Password” button so that you can retrieve it
through your security question.
NOTE: No one can see your password or security
question answer. If you cannot access your account
after trying to retrieve your account information,
contact an ePlan Administrator at 541-774-2069 to have your password reset. An email
will be automatically generated and sent to the account holder email address with a
temporary password.
TIP!
Passwords are case-sensitive.
N

ePlan Applicant User Guide Last Updated 08/26/14 6
Common ePlans Issues and Solutions:
(Courtesy of City of Bend, Oregon)
ePlan Applicant User Guide Last Updated 08/26/14 7
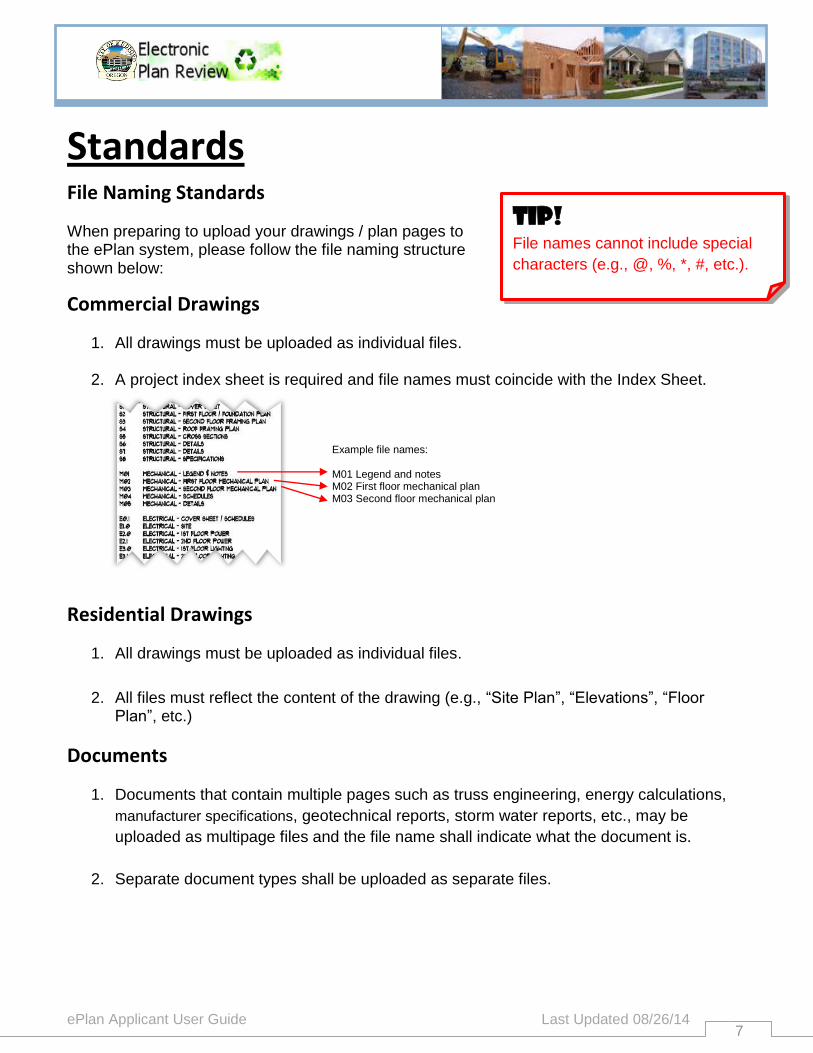
Standards File Naming Standards
When preparing to upload your drawings / plan pages to the ePlan system, please follow the file naming structure shown below:
Commercial Drawings
1. All drawings must be uploaded as individual files.
2. A project index sheet is required and file names must coincide with the Index Sheet.
Residential Drawings
1. All drawings must be uploaded as individual files.
2. All files must reflect the content of the drawing (e.g., “Site Plan”, “Elevations”, “Floor
Plan”, etc.)
Documents
1. Documents that contain multiple pages such as truss engineering, energy calculations,
manufacturer specifications, geotechnical reports, storm water reports, etc., may be
uploaded as multipage files and the file name shall indicate what the document is.
2. Separate document types shall be uploaded as separate files.
TIP!
File names cannot include special
characters (e.g., @, %, *, #, etc.).
Example file names: M01 Legend and notes M02 First floor mechanical plan M03 Second floor mechanical plan
ePlan Applicant User Guide Last Updated 08/26/14 8
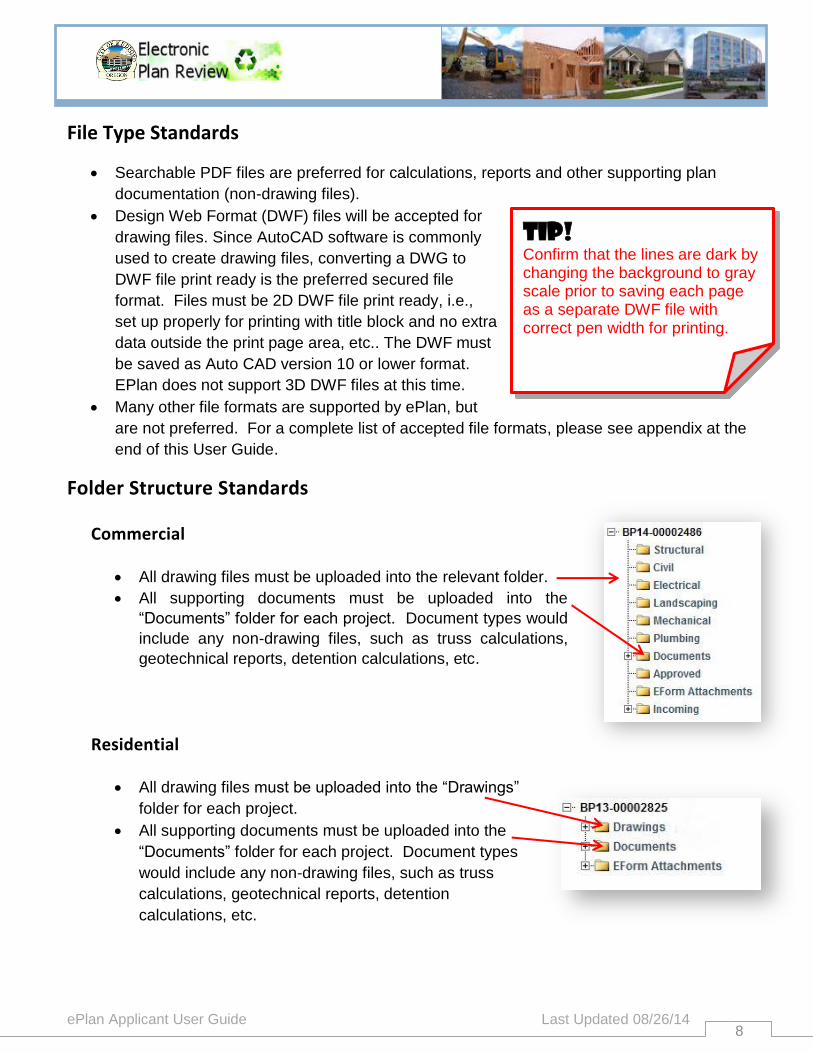
File Type Standards
Searchable PDF files are preferred for calculations, reports and other supporting plan
documentation (non-drawing files).
Design Web Format (DWF) files will be accepted for
drawing files. Since AutoCAD software is commonly
used to create drawing files, converting a DWG to
DWF file print ready is the preferred secured file
format. Files must be 2D DWF file print ready, i.e.,
set up properly for printing with title block and no extra
data outside the print page area, etc.. The DWF must
be saved as Auto CAD version 10 or lower format.
EPlan does not support 3D DWF files at this time.
Many other file formats are supported by ePlan, but
are not preferred. For a complete list of accepted file formats, please see appendix at the
end of this User Guide.
Folder Structure Standards
Commercial
All drawing files must be uploaded into the relevant folder. All supporting documents must be uploaded into the
“Documents” folder for each project. Document types would
include any non-drawing files, such as truss calculations,
geotechnical reports, detention calculations, etc.
Residential
All drawing files must be uploaded into the “Drawings”
folder for each project.
All supporting documents must be uploaded into the
“Documents” folder for each project. Document types
would include any non-drawing files, such as truss
calculations, geotechnical reports, detention
calculations, etc.
TIP!
Confirm that the lines are dark by changing the background to gray scale prior to saving each page as a separate DWF file with correct pen width for printing.
ePlan Applicant User Guide Last Updated 08/26/14 9
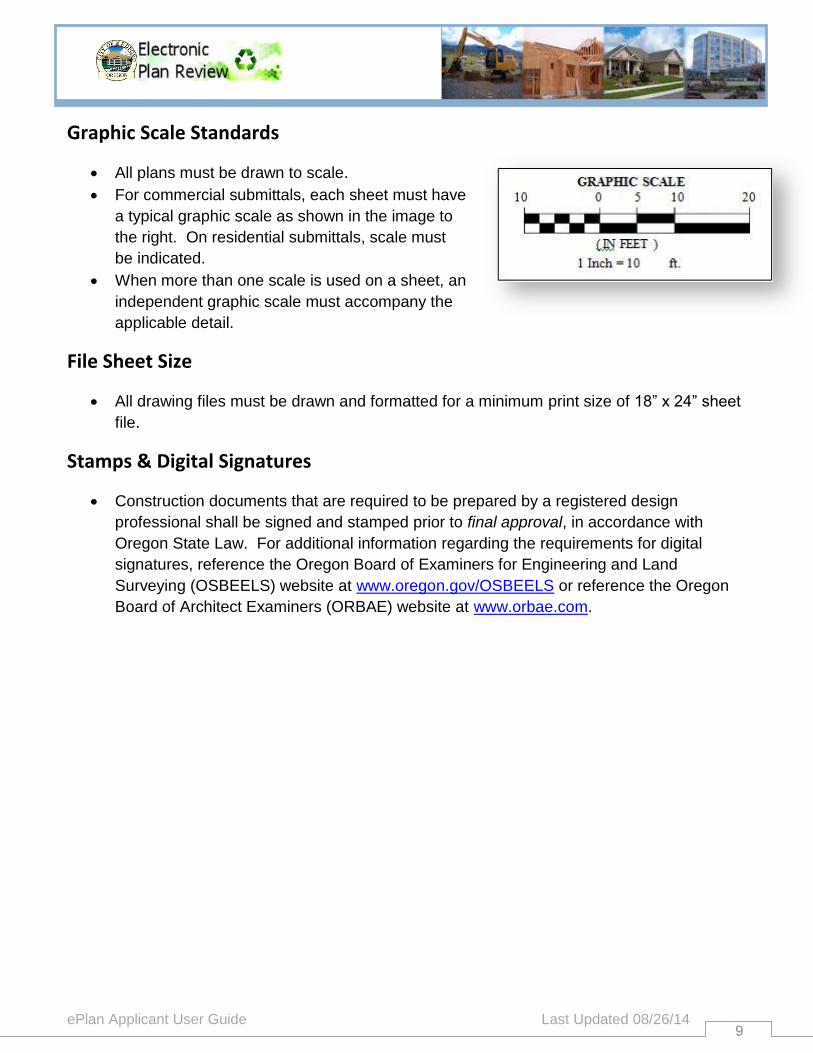
Graphic Scale Standards
All plans must be drawn to scale.
For commercial submittals, each sheet must have
a typical graphic scale as shown in the image to
the right. On residential submittals, scale must
be indicated. When more than one scale is used on a sheet, an
independent graphic scale must accompany the
applicable detail.
File Sheet Size
All drawing files must be drawn and formatted for a minimum print size of 18” x 24” sheet
file.
Stamps & Digital Signatures
Construction documents that are required to be prepared by a registered design
professional shall be signed and stamped prior to final approval, in accordance with
Oregon State Law. For additional information regarding the requirements for digital
signatures, reference the Oregon Board of Examiners for Engineering and Land
Surveying (OSBEELS) website at www.oregon.gov/OSBEELS or reference the Oregon
Board of Architect Examiners (ORBAE) website at www.orbae.com.
ePlan Applicant User Guide Last Updated 08/26/14 10
Uploading Plan Drawings and
Documents
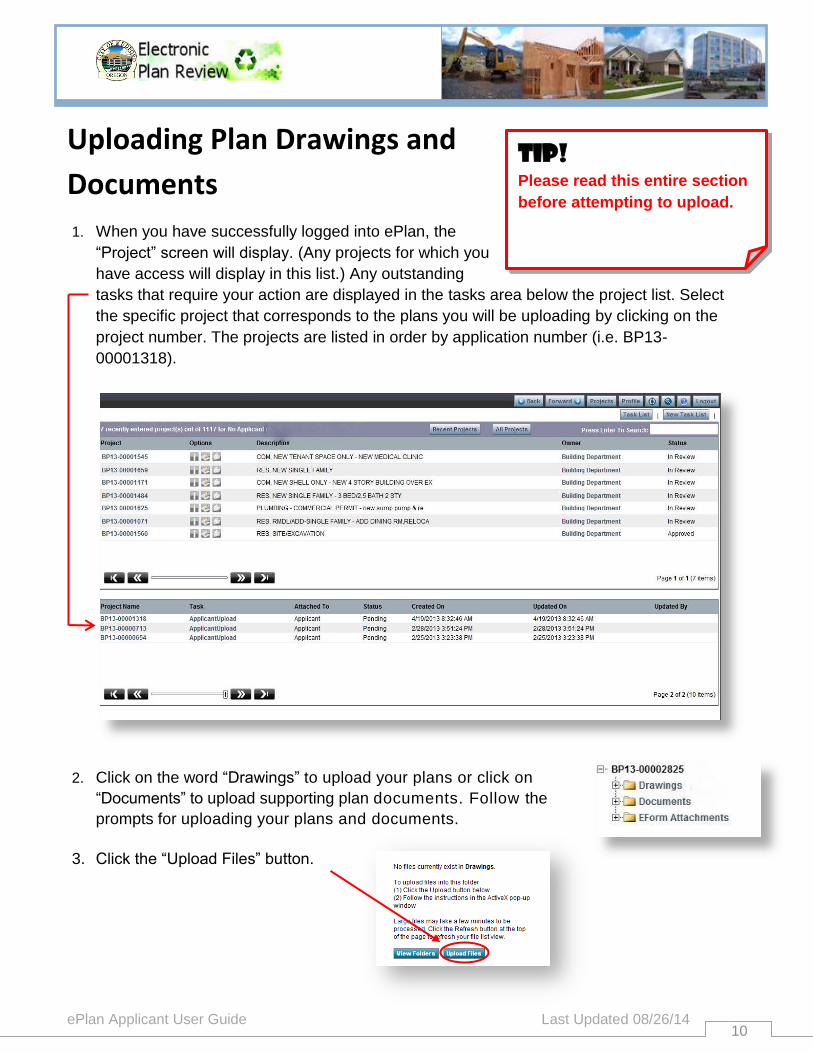
1. When you have successfully logged into ePlan, the
“Project” screen will display. (Any projects for which you
have access will display in this list.) Any outstanding
tasks that require your action are displayed in the tasks area below the project list. Select
the specific project that corresponds to the plans you will be uploading by clicking on the
project number. The projects are listed in order by application number (i.e. BP13-
00001318).
2. Click on the word “Drawings” to upload your plans or click on
“Documents” to upload supporting plan documents. Follow the
prompts for uploading your plans and documents.
3. Click the “Upload Files” button.
TIP!
Please read this entire section
before attempting to upload.

ePlan Applicant User Guide Last Updated 08/26/14 11
4. Select or browse to the file location on
your computer. Select or highlight the files
you want to upload; multiple files can be
selected by using your Shift or Ctrl keys.
Click the “Open” button.
Alternatively, if Silverlight is installed
on the computer, files can be
dragged and dropped into the
upload window.
5. Click the “Upload” button to upload files to the project. Click on the “Close” button to close
the dialog box.
6. Once files are uploaded to the folder(s), the folder list is
populated with thumbnail images of each file contained in the
folder. Under each thumbnail, the file name, author, date, and
any relevant file icons are displayed.

ePlan Applicant User Guide Last Updated 08/26/14 12
7. When all drawings and documents have been uploaded, select “Task List” at the top right of
the screen.
8. Find the “Applicant Upload” task for the project and select it. Indicate that you have
uploaded all drawings and documents by checking the box at the bottom of the form.
Select “Complete” to finish your electronic submittal.
9. Congratulations! You have successfully finished part one of
submitting your plans electronically. A notification has been
sent to the Submittal Coordinator to start the prescreening
review to determine if submittal requirements have been
met.
10. Please logout after your session is complete.
Security Timeout
Due to security and resource concerns, the system will automatically sign you out after 90
minutes of inactivity. When you are ready to resume working with the system, click any button
on the ePlan screen. The system automatically will load the sign-in page for you.
TIP!
To return to the project list,
click on the “Projects”
button at the top of the page.

ePlan Applicant User Guide Last Updated 08/26/14 13
Prescreening Prescreening Has Been Approved
If your submittal is approved, your plans and documents will continue through the ePlan
system for review by the City of Medford. Please allow at least 8 business hours after
you receive your application number.
Prescreening Has Been Returned
If your submittal requirements were not complete, you will receive an e-mail notification
that prescreening has been denied and corrections are needed.
1. Login to Electronic Plan Review. Find the project
and associated task in the Task List, click the
“CorrectionComplete” task and accept it.
TIP! ePlan works best in Internet Explorer
If your default web browser is not Internet Explorer, you can
enter ePlan manually by opening Internet Explorer and typing the
following web address: https://eplan.cityofmedford.org/eplan
ePlan Applicant User Guide Last Updated 08/26/14 14
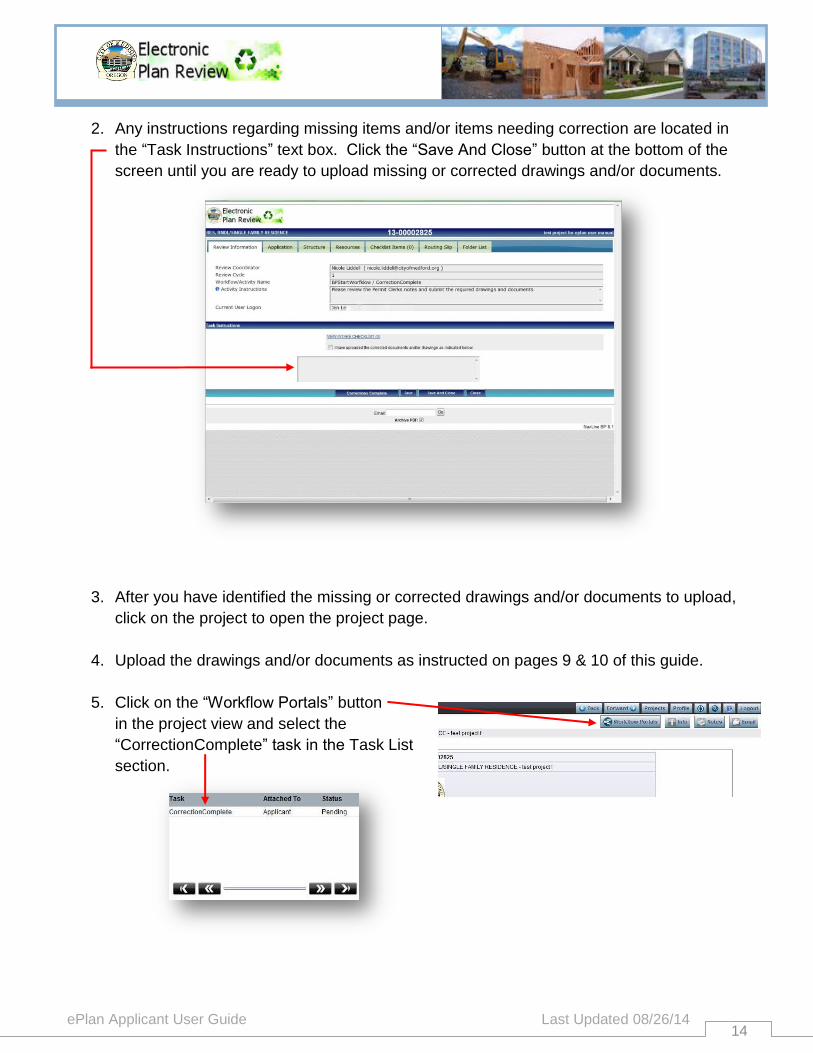
2. Any instructions regarding missing items and/or items needing correction are located in
the “Task Instructions” text box. Click the “Save And Close” button at the bottom of the
screen until you are ready to upload missing or corrected drawings and/or documents.
3. After you have identified the missing or corrected drawings and/or documents to upload,
click on the project to open the project page.
4. Upload the drawings and/or documents as instructed on pages 9 & 10 of this guide.
5. Click on the “Workflow Portals” button
in the project view and select the
“CorrectionComplete” task in the Task List
section.
ePlan Applicant User Guide Last Updated 08/26/14 15
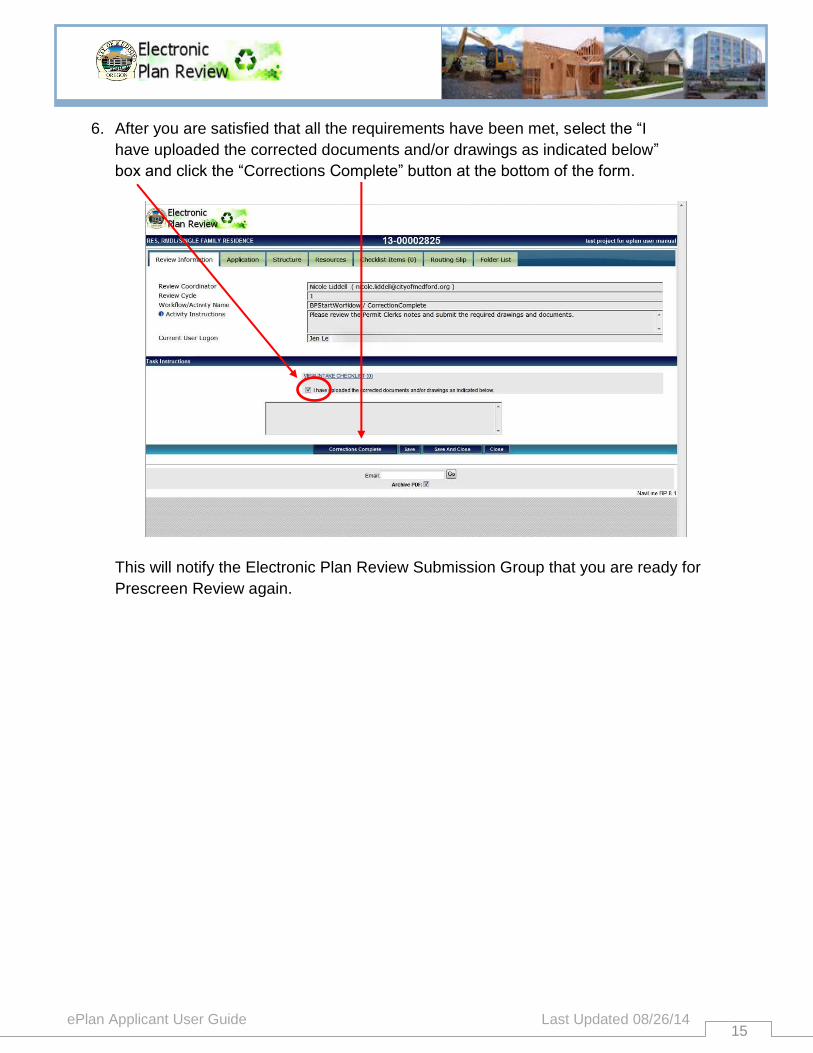
6. After you are satisfied that all the requirements have been met, select the “I
have uploaded the corrected documents and/or drawings as indicated below”
box and click the “Corrections Complete” button at the bottom of the form.
This will notify the Electronic Plan Review Submission Group that you are ready for
Prescreen Review again.
ePlan Applicant User Guide Last Updated 08/26/14 16
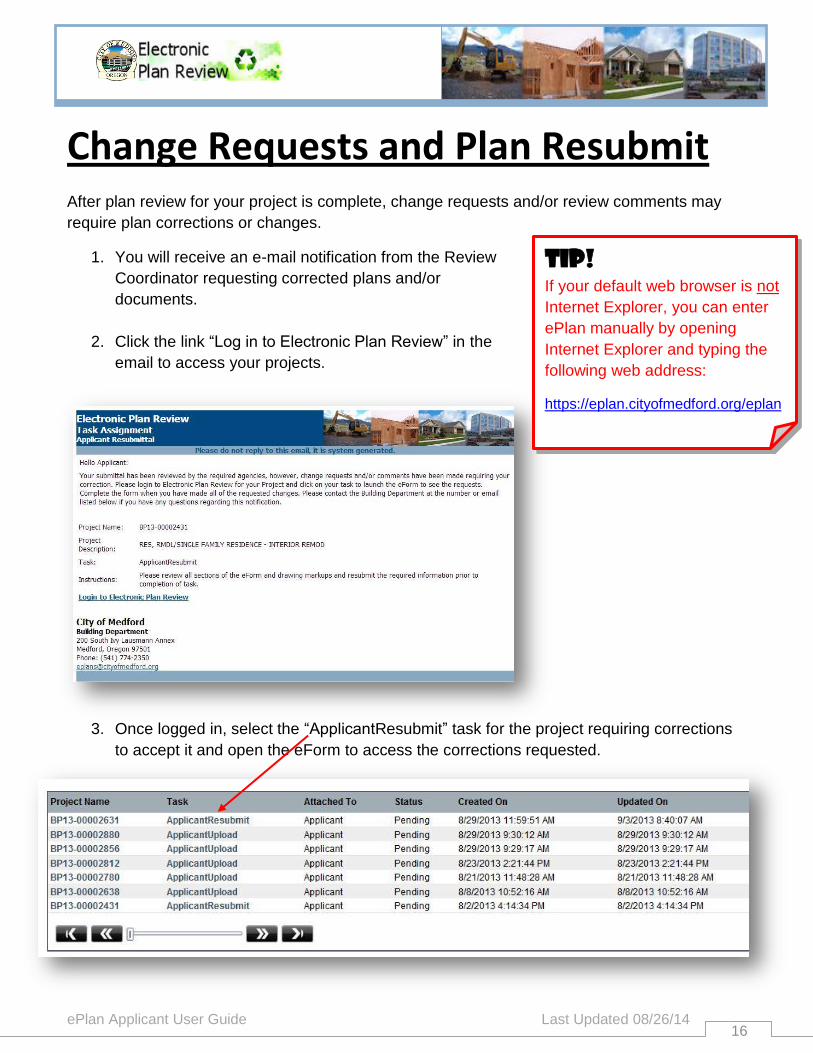
Change Requests and Plan Resubmit After plan review for your project is complete, change requests and/or review comments may
require plan corrections or changes.
1. You will receive an e-mail notification from the Review
Coordinator requesting corrected plans and/or
documents.
2. Click the link “Log in to Electronic Plan Review” in the
email to access your projects.
3. Once logged in, select the “ApplicantResubmit” task for the project requiring corrections
to accept it and open the eForm to access the corrections requested.
TIP!
If your default web browser is not
Internet Explorer, you can enter
ePlan manually by opening
Internet Explorer and typing the
following web address:
https://eplan.cityofmedford.org/eplan
ePlan Applicant User Guide Last Updated 08/26/14 17
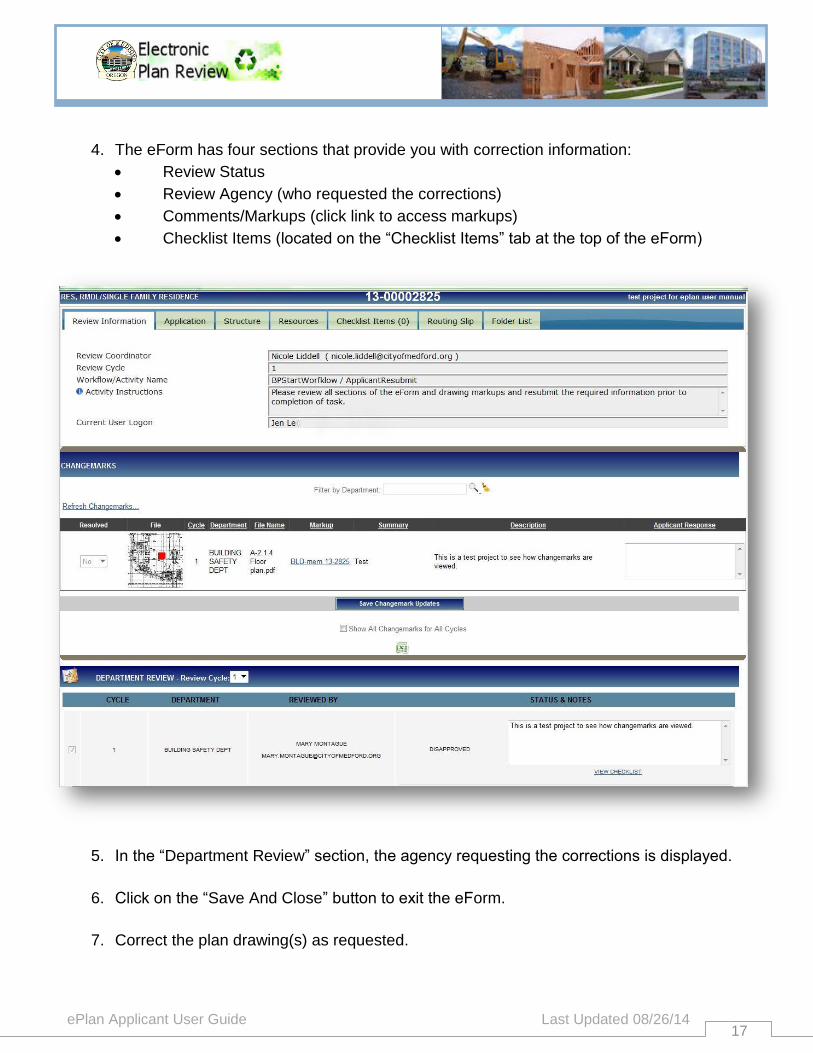
4. The eForm has four sections that provide you with correction information:
Review Status
Review Agency (who requested the corrections)
Comments/Markups (click link to access markups)
Checklist Items (located on the “Checklist Items” tab at the top of the eForm)
5. In the “Department Review” section, the agency requesting the corrections is displayed.
6. Click on the “Save And Close” button to exit the eForm.
7. Correct the plan drawing(s) as requested.
ePlan Applicant User Guide Last Updated 08/26/14 18
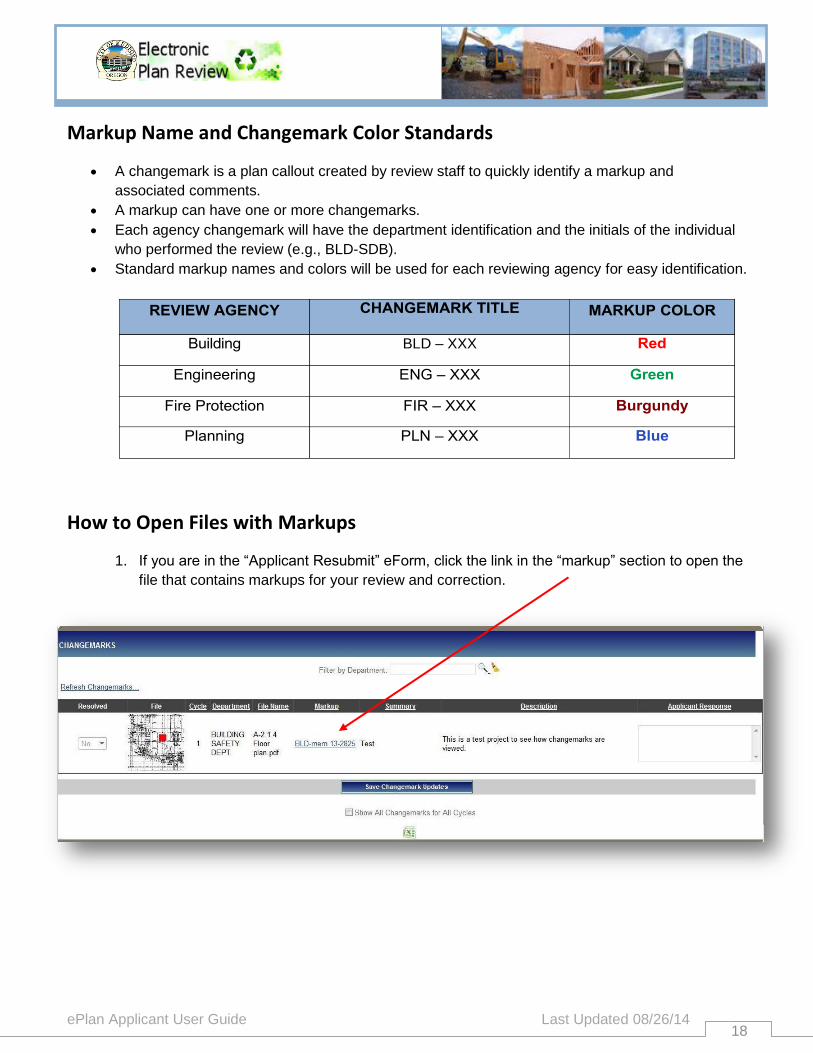
BLD – XXX
Markup Name and Changemark Color Standards
A changemark is a plan callout created by review staff to quickly identify a markup and
associated comments.
A markup can have one or more changemarks.
Each agency changemark will have the department identification and the initials of the individual
who performed the review (e.g., BLD-SDB). Standard markup names and colors will be used for each reviewing agency for easy identification.
How to Open Files with Markups
1. If you are in the “Applicant Resubmit” eForm, click the link in the “markup” section to open the
file that contains markups for your review and correction.

ePlan Applicant User Guide Last Updated 08/26/14 19
2. Another way to open the files is from the “Projects” page. After selecting the project you want
to work with from the projects page, you must left click the appropriate folder to open and
access the list of files in the folder.
3. If markups exist on the file a markup icon will be displayed.
ePlan Applicant User Guide Last Updated 08/26/14 20
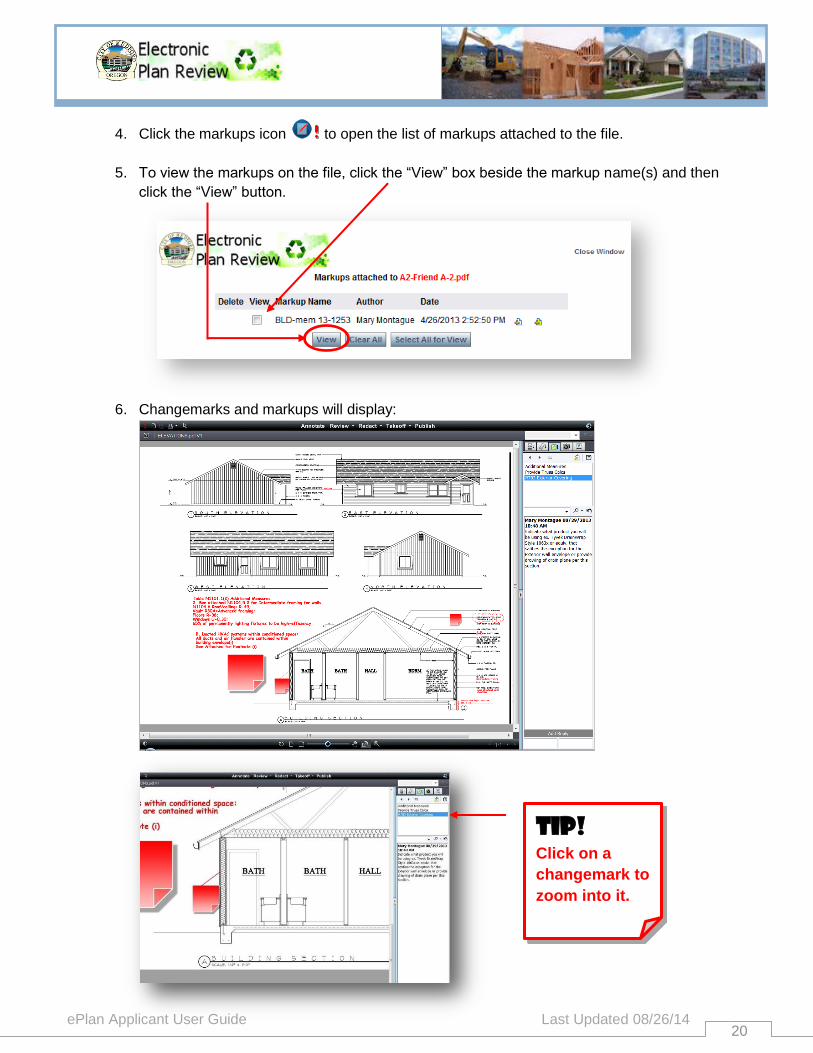
4. Click the markups icon to open the list of markups attached to the file.
5. To view the markups on the file, click the “View” box beside the markup name(s) and then
click the “View” button.
6. Changemarks and markups will display:
TIP!
Click on a
changemark to
zoom into it.

ePlan Applicant User Guide Last Updated 08/26/14 21
Managing Changemarks
1. Existing changemarks can be sorted by title, author,
date, type, state, or position by selecting the appropriate
sorting order from the drop down list. Position sorts
the changemarks notes in the order that they appear in
the document pages.
2. You can search and filter Changemarks notes by
content and/or title by entering a word or phrase in the
search text box. (Click Show All to return all
changemarks notes to the list.)
3. Click on a resulting changemarks note that you wish to
view. The original changemarks text displays in the
panel's lower frame, including any discussion replies
that have been added. The current type and state of the
changemarks note are displayed at the bottom of the
panel.
4. You can progress sequentially through the changemarks
notes by using the Next and Previous arrow buttons
5. The changemarks entities appear at the same
magnification level the author created them.
6. You can extract information from one or all changemarks
notes contained in a document through the copy
changemarks dialog. Click to access this dialog,
then open another program such as Microsoft Word and
paste the information into the blank document.
7. You can launch any hyperlinks present in the
changemarks panel, which will launch the specified URL
in a separate browser window.
ePlan Applicant User Guide Last Updated 08/26/14 22
Upload Corrections
1. Login to Electronic Plan Review to upload the corrected drawing(s) and/or document(s).
2. Ensure that the corrected drawings retain the same file name and size as the originals.
3. Check to see if a new version number is created when you upload. If no new version number is created, confirm that the file actually changed. If there were no changes to the file, a new version will not be created.
NOTE: Only staff can delete files. Please contact the Building Department if a file needs to be deleted.
4. Verify that all plans and documents that have markups have been corrected. Failure to submit corrected plans will result in a submittal returned for corrections.
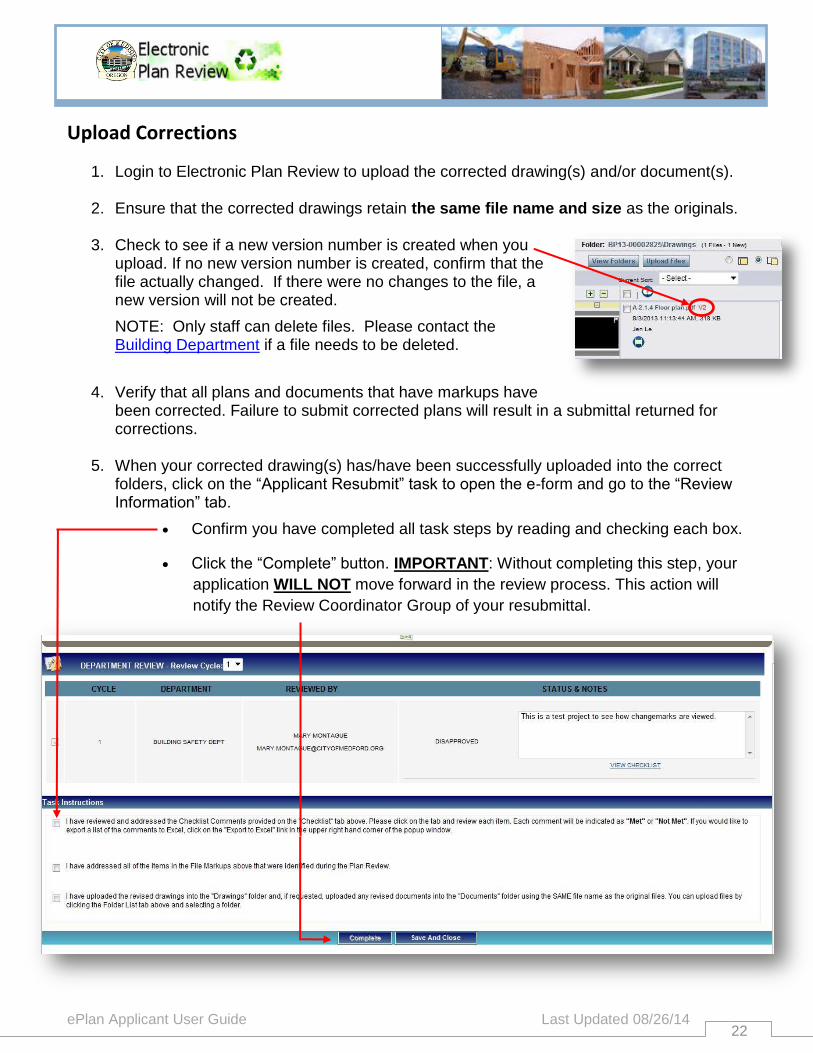
5. When your corrected drawing(s) has/have been successfully uploaded into the correct folders, click on the “Applicant Resubmit” task to open the e-form and go to the “Review Information” tab.
Confirm you have completed all task steps by reading and checking each box.
Click the “Complete” button. IMPORTANT: Without completing this step, your
application WILL NOT move forward in the review process. This action will
notify the Review Coordinator Group of your resubmittal.

ePlan Applicant User Guide Last Updated 08/26/14 23
Approval
When the plan review is approved by all
reviewers and the permits have been
created, you will be notified for final fee
payment. After payment for the building
permit has been made, you will receive an
email notification that your approved plans
and documents are available for download
in the Approved Drawings folder.
The plans and associated specifications/documents need to be present on the jobsite.
(You will need to have the stamped plans printed at your local print shop if you aren’t able
to print large scale plans). The approved plans shall be open to inspection by the
Building Official or a duly authorized representative.

ePlan Applicant User Guide Last Updated 08/26/14 24
Appendix

ePlan Applicant User Guide Last Updated 08/26/14 25
Credits Maciejewski, Erin K. & Seminole County Government. (2012). Applicant User Guide.