Agilent 3200P pH Meter · PDF fileInstallation 1 3200P pH Meter User Guide 11 Installing the...
162
Agilent Technologies Agilent 3200P pH Meter pH 计 User Guide 用户手册
Transcript of Agilent 3200P pH Meter · PDF fileInstallation 1 3200P pH Meter User Guide 11 Installing the...
Agilent 3200P pH Meter pH 计
User Guide 用户手册
Agilent Technologies
3200P pH Meter User Guide
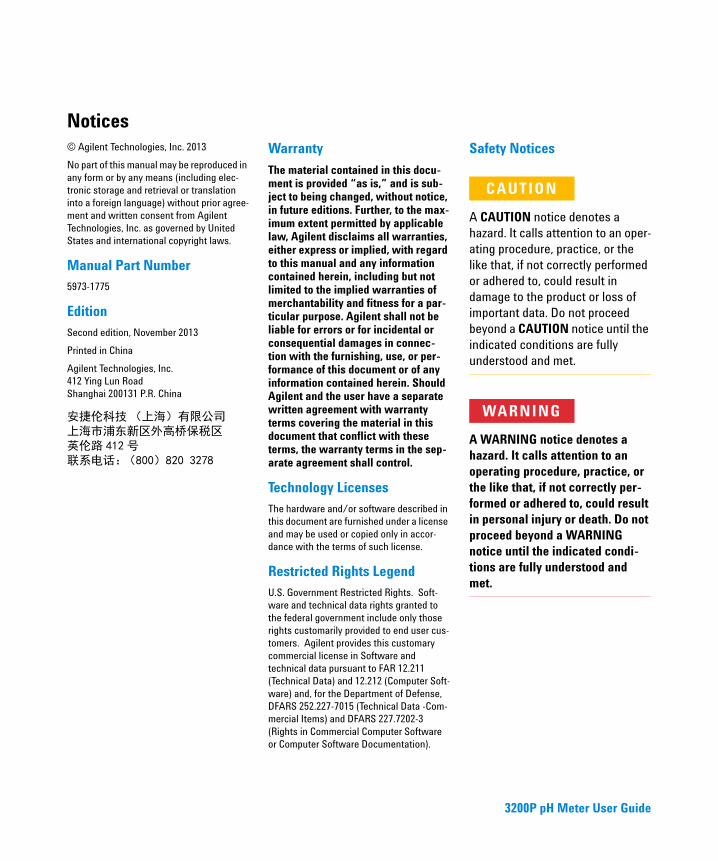
Notices© Agilent Technologies, Inc. 2013
No part of this manual may be reproduced in any form or by any means (including elec-tronic storage and retrieval or translation into a foreign language) without prior agree-ment and written consent from Agilent Technologies, Inc. as governed by United States and international copyright laws.
Manual Part Number5973-1775
EditionSecond edition, November 2013
Printed in China
Agilent Technologies, Inc. 412 Ying Lun Road Shanghai 200131 P.R. China
Warranty
The material contained in this docu-ment is provided “as is,” and is sub-ject to being changed, without notice, in future editions. Further, to the max-imum extent permitted by applicable law, Agilent disclaims all warranties, either express or implied, with regard to this manual and any information contained herein, including but not limited to the implied warranties of merchantability and fitness for a par-ticular purpose. Agilent shall not be liable for errors or for incidental or consequential damages in connec-tion with the furnishing, use, or per-formance of this document or of any information contained herein. Should Agilent and the user have a separate written agreement with warranty terms covering the material in this document that conflict with these terms, the warranty terms in the sep-arate agreement shall control.
Technology Licenses The hardware and/or software described in this document are furnished under a license and may be used or copied only in accor-dance with the terms of such license.
Restricted Rights LegendU.S. Government Restricted Rights. Soft-ware and technical data rights granted to the federal government include only those rights customarily provided to end user cus-tomers. Agilent provides this customary commercial license in Software and technical data pursuant to FAR 12.211 (Technical Data) and 12.212 (Computer Soft-ware) and, for the Department of Defense, DFARS 252.227-7015 (Technical Data -Com-mercial Items) and DFARS 227.7202-3 (Rights in Commercial Computer Software or Computer Software Documentation).
Safety Notices
CAUTION
A CAUTION notice denotes a hazard. It calls attention to an oper-ating procedure, practice, or the like that, if not correctly performed or adhered to, could result in damage to the product or loss of important data. Do not proceed beyond a CAUTION notice until the indicated conditions are fully understood and met.
WARNING
A WARNING notice denotes a hazard. It calls attention to an operating procedure, practice, or the like that, if not correctly per-formed or adhered to, could result in personal injury or death. Do not proceed beyond a WARNING notice until the indicated condi-tions are fully understood and met.
安捷伦科技(上海)有限公司 上海市浦东新区外高桥保税区 英伦路 412 号 联系电话:(800)820 3278
Contents
1 Installation 7
Tools and Components Needed for Installation 8
Installing the 3200P pH Meter 9
Installing the Power Adaptor 11
Installing the Ground Line 12
More Information 12
2 Operation 13
Introduction 14
Safety Information 16
Agilent Customer Portal 17
Term Definitions 18
Features 19
Specifications 20
The Operating Panel 21Display 21Keypad 21
Setting Up the pH Meter 23To start up the 3200P pH Meter 23Accessing setup parameters 24To manually set the solution temperature 28To set up the system (System Setup) 30To select the display language 32To set the meter to turn off automatically (Auto Power Off) 32To set up the buzzer 32To set up annual check prompt 32
3200P pH Meter User Guide 3
Using the pH Meter 33To prepare an electrode for use 33To adjust mV zero 34To calibrate pH electrode (Calib pH EC) 37To measure pH value 40To measure mV value 41To measure temperature 41To turn off the 3200P pH Meter 41
Storing Data 42To delete saved data 42To output data 42
Viewing Parameters During Measurement 43To view saved data 44To view last calibrated data 47
3 Troubleshooting and Maintenance 49
Troubleshooting Common Problems 50
General Troubleshooting Procedure 52Check the temperature measurement 52Check the potential (mV) value 53Check the pH value 53Restore factory default settings 54
Meter Self-Diagnostics and Messages 56Severe errors 56Error warning 57
Maintenance 59Electrode cleaning 59Electrode storage 59
4 3200P pH Meter User Guide
Appendix I NIST and GB Traceable Buffer 63
Appendix II EcFWUPDATE Operating Guide 65
Overview 66
Install the Software 66Install EcFWUPDATE 66Install the USB driver 67Configure the USB port 69
Run the Program 71
User Interface Reference 74
Appendix III EcPRINT Operating Guide 75
Overview 76
Install the Software 76Install EcPRINT 76Install the USB driver 76Configure the USB port 78
Run the Program 80
User Interface Reference 82
3200P pH Meter User Guide 5

6 3200P pH Meter User Guide
Agilent 3200P pH MeterUser Guide
1Installation
Tools and Components Needed for Installation 8
Installing the 3200P pH Meter 9
Installing the Power Adaptor 11
Installing the Ground Line 12
More Information 12
Use the tools and accessories shipped with 3200P pH Meter during installation.
7Agilent Technologies
1 Installation
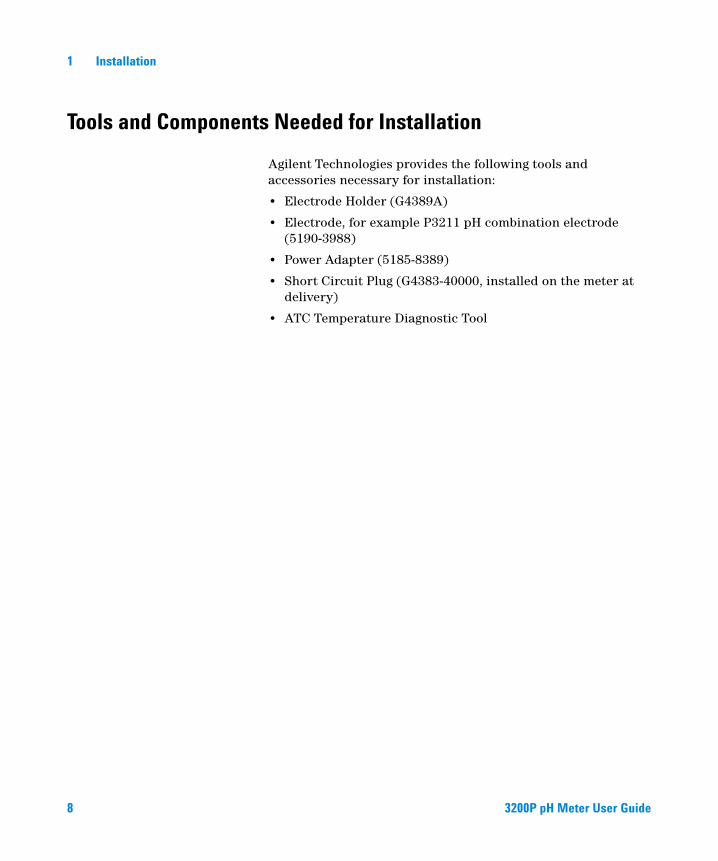
Tools and Components Needed for Installation
Agilent Technologies provides the following tools and accessories necessary for installation:
• Electrode Holder (G4389A)
• Electrode, for example P3211 pH combination electrode (5190-3988)
• Power Adapter (5185-8389)
• Short Circuit Plug (G4383-40000, installed on the meter at delivery)
• ATC Temperature Diagnostic Tool
8 3200P pH Meter User Guide
Installation 1
Installing the 3200P pH Meter
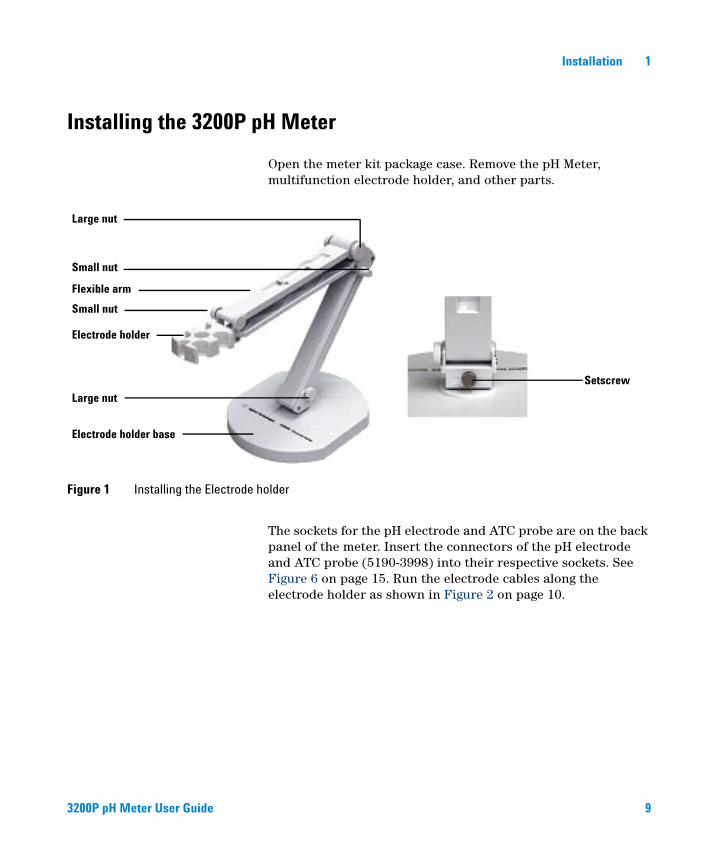
Open the meter kit package case. Remove the pH Meter, multifunction electrode holder, and other parts.
The sockets for the pH electrode and ATC probe are on the back panel of the meter. Insert the connectors of the pH electrode and ATC probe (5190-3998) into their respective sockets. See Figure 6 on page 15. Run the electrode cables along the electrode holder as shown in Figure 2 on page 10.
Figure 1 Installing the Electrode holder
Large nut
Small nut
Flexible arm
Small nut
Electrode holder
Large nut
Electrode holder base
Setscrew
3200P pH Meter User Guide 9
1 Installation
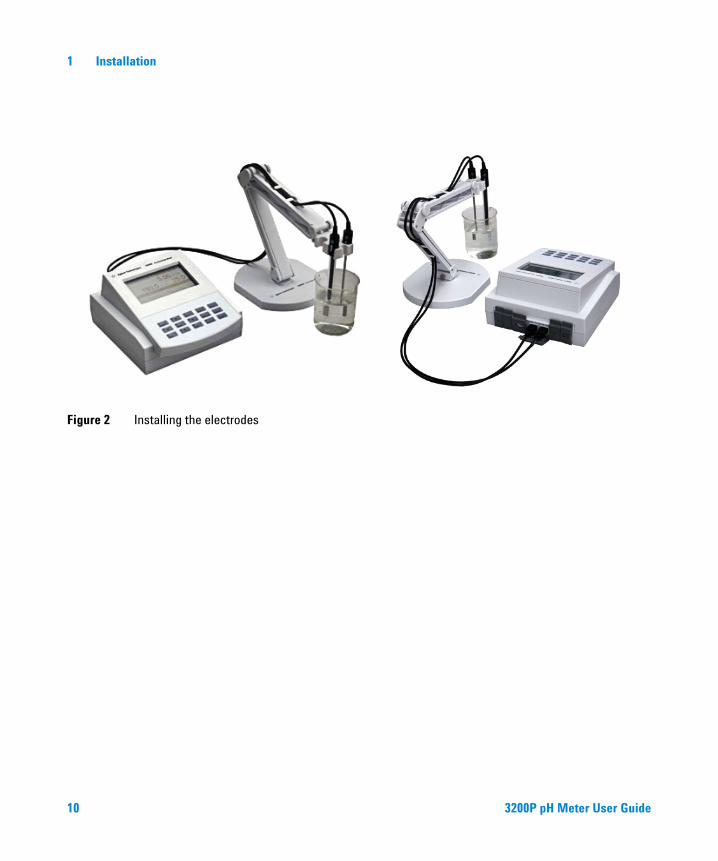
Figure 2 Installing the electrodes
10 3200P pH Meter User Guide
Installation 1
Installing the Power Adaptor
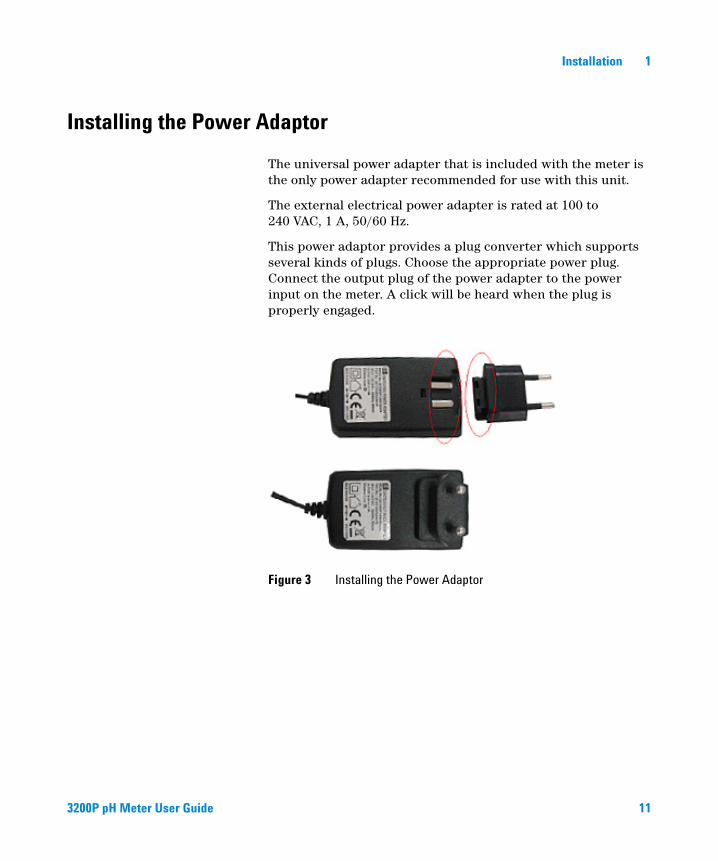
The universal power adapter that is included with the meter is the only power adapter recommended for use with this unit.
The external electrical power adapter is rated at 100 to 240 VAC, 1 A, 50/60 Hz.
This power adaptor provides a plug converter which supports several kinds of plugs. Choose the appropriate power plug. Connect the output plug of the power adapter to the power input on the meter. A click will be heard when the plug is properly engaged.
Figure 3 Installing the Power Adaptor
3200P pH Meter User Guide 11
1 Installation
Installing the Ground Line
The meter ships with an optional ground line. During use, if another device (such as a constant temperature bath) causes electrical interference and an unstable reading, install the ground line. Connect one terminal of the ground line to the
meter ground socket ( ) and the other terminal to the interference source.
More Information
For more information, visit the Agilent website at http://www.agilent.com/chem. See also the instructions provided with each electrode.
12 3200P pH Meter User Guide
Agilent 3200P pH MeterUser Guide
2Operation
Introduction 14
Safety Information 16
Agilent Customer Portal 17
Term Definitions 18
Features 19
Specifications 20
The Operating Panel 21
Setting Up the pH Meter 23
Using the pH Meter 33
Storing Data 42
Viewing Parameters During Measurement 43
This chapter describes how to use the 3200P pH Meter.
13Agilent Technologies
2 Operation
Introduction
The 3200P pH Meter is suitable for accurately measuring the pH value of various solutions.
During measurement, the LCD display shows the current state of the 3200P pH Meter. During measurement, you can also change the displayed parameters.
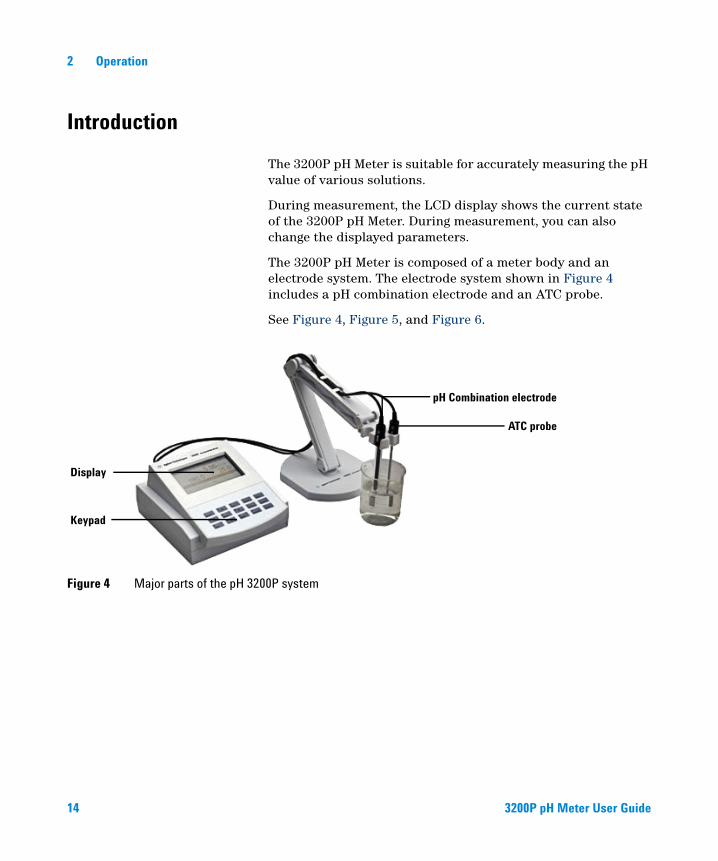
The 3200P pH Meter is composed of a meter body and an electrode system. The electrode system shown in Figure 4 includes a pH combination electrode and an ATC probe.
See Figure 4, Figure 5, and Figure 6.
Figure 4 Major parts of the pH 3200P system
Display
Keypad
pH Combination electrode
ATC probe
14 3200P pH Meter User Guide
Operation 2
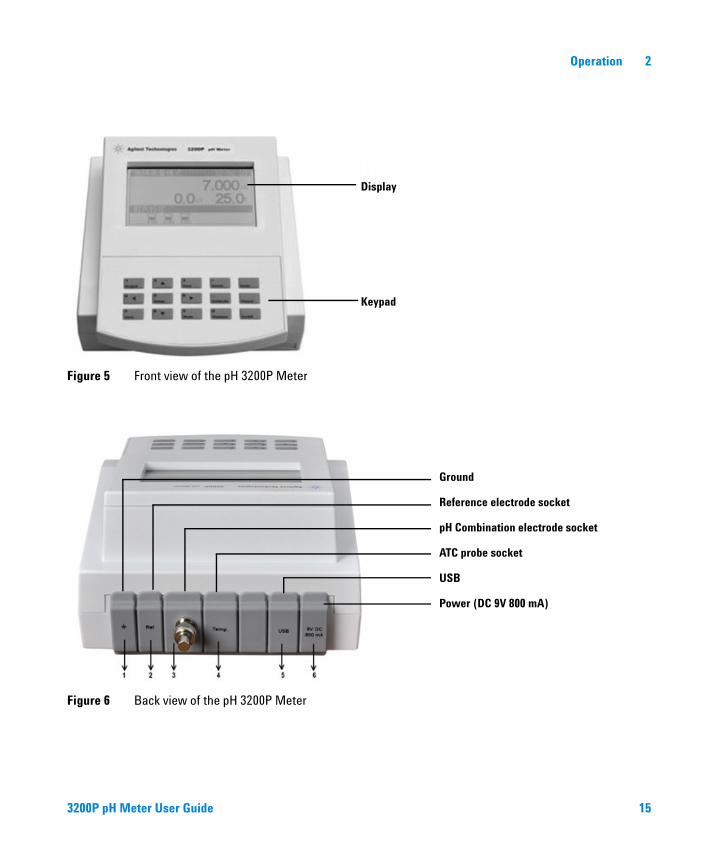
Figure 5 Front view of the pH 3200P Meter
Figure 6 Back view of the pH 3200P Meter
Display
Keypad
Ground
Reference electrode socket
pH Combination electrode socket
ATC probe socket
USB
Power (DC 9V 800 mA)
3200P pH Meter User Guide 15
2 Operation
Safety Information
Before operating your meter, be sure to read the installation and operation instructions.
The most common safety issues when working with the meter include:
• Using any power source other than the original power adaptor may produce some safety problems.
• Be sure that the meter has a good ground connection.
• Prevent exposure to corrosive gases.
• Keep the sockets of the meter clean and dry. Avoid contact with acidic, alkaline, and salt solutions.
• The meter can be used continuously for a long time. After a measurement, soak all electrodes in distilled water.
• To protect high resistance components from damage, install the short circuit plug (G4383-40000) onto the pH electrode socket when the meter is not connected to a pH electrode. (The short-circuit plug ships installed in the pH socket of the meter, see Figure 6.) Keep the short-circuit plug clean and dry. The plug can be damaged by humidity. A damaged short-circuit plug can damage the meter.
16 3200P pH Meter User Guide
Operation 2
Agilent Customer Portal
Agilent also provides customized information for the products you own through a customer portal. This web service provides many customizable services as well as information related directly to your Agilent products and orders. Log onto the portal at http://www.agilent.com/chem.
3200P pH Meter User Guide 17
2 Operation
Term Definitions
pH Slope The mV variation of each unit of pH represented by mV/pH or percent (%) theoretical slope
pH E0 Also called Zero Potential and is the mV value at pH 7
One-point pH Calibration Calibration with one pH buffer
Multi-point pH Calibration Calibration with more than one pH buffer
R R indicates the reading is stable and ready to be taken. During calibration, it means the data is stable and locked. Whether the reading is stable is determined by what you set in Set Condition. Press [Measure] key to unlock. Before next point calibration, please unlock first. During measurement, in auto-lock mode, it means the data is stable and locked. In the other two modes, it indicates the data is stable but not locked, press [Measure] key to unlock.
18 3200P pH Meter User Guide
Operation 2
Features
The 3200P pH Meter is a state-of-the-art and customer-friendly benchtop analytical instrument, designed for the measurement of pH, potential (mV), and temperature in aqueous solutions. It features:
• Measurement of pH, potential (mV), and temperature
• Automatic pH buffer recognition for buffers prepared according to NIST, DIN and GB standards
• Supports multi-point calibration (up to five point calibration)
• LCD display
• Supports GLP:
• Requires setting an operator number
• Records all measurements
• Records, views and prints calibration data
• All saved data meets GLP. Stores a maximum of 1000 sets of measurement data
• Can view, print and delete stored measurement data
• Supports three measuring modes: Continuous Mode, Timed Reading, and Auto-Lock Mode
• Have stability prompt "R" for the operation.
• A USB port can be connected to a PC when using the optional G3490A software.
• When the meter is powered off, the stored measuring data, calibrated data, and setting parameters will not be lost.
• Can turn itself off to conserve power and support the annual check prompt function.
• Provides self-diagnostic messages and functions to support troubleshooting issues that occur
• Provides LCD back lighting for use under dim lighting conditions
• Meter firmware can be updated for any new features or bug fixes that arise.
3200P pH Meter User Guide 19
2 Operation
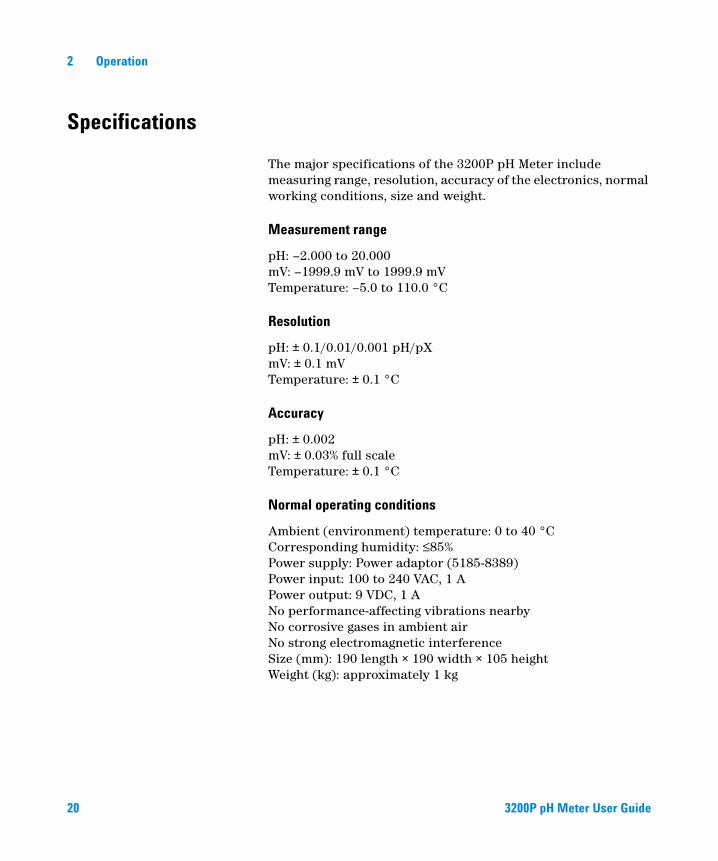
Specifications
The major specifications of the 3200P pH Meter include measuring range, resolution, accuracy of the electronics, normal working conditions, size and weight.
Measurement range
pH: –2.000 to 20.000 mV: –1999.9 mV to 1999.9 mV Temperature: –5.0 to 110.0 °C
Resolution
pH: ± 0.1/0.01/0.001 pH/pX mV: ± 0.1 mV Temperature: ± 0.1 °C
Accuracy
pH: ± 0.002 mV: ± 0.03% full scale Temperature: ± 0.1 °C
Normal operating conditions
Ambient (environment) temperature: 0 to 40 °C Corresponding humidity: ≤85% Power supply: Power adaptor (5185-8389) Power input: 100 to 240 VAC, 1 A Power output: 9 VDC, 1 A No performance-affecting vibrations nearby No corrosive gases in ambient air No strong electromagnetic interference Size (mm): 190 length × 190 width × 105 height Weight (kg): approximately 1 kg
20 3200P pH Meter User Guide
Operation 2
The Operating Panel
Display
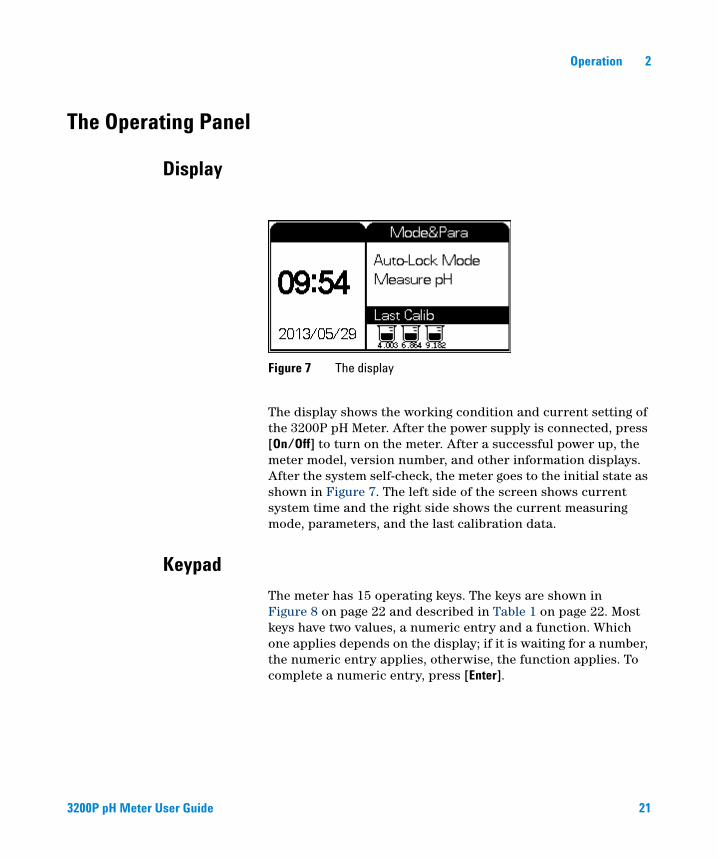
The display shows the working condition and current setting of the 3200P pH Meter. After the power supply is connected, press [On/Off] to turn on the meter. After a successful power up, the meter model, version number, and other information displays. After the system self-check, the meter goes to the initial state as shown in Figure 7. The left side of the screen shows current system time and the right side shows the current measuring mode, parameters, and the last calibration data.
Keypad
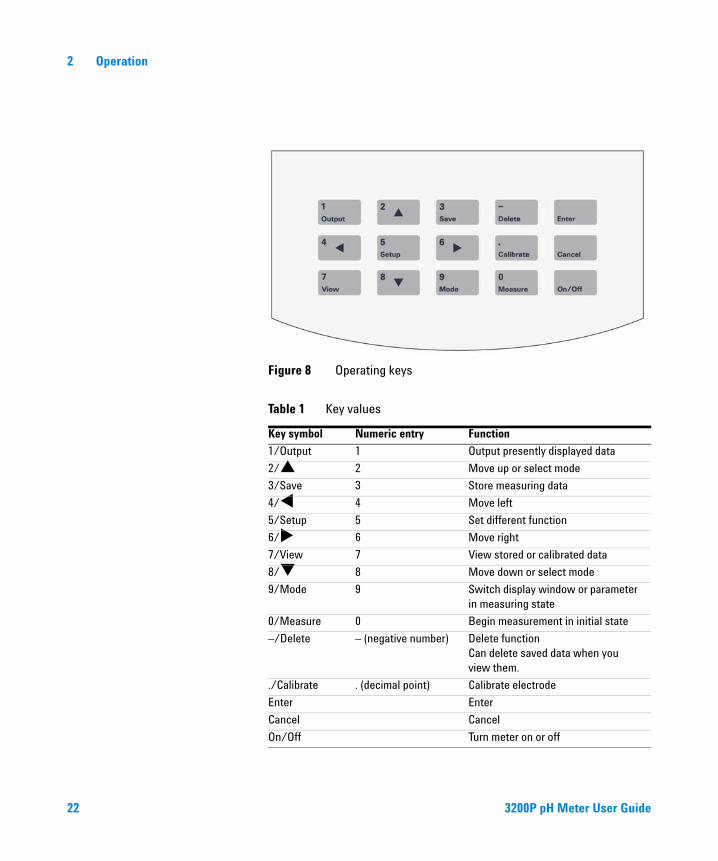
The meter has 15 operating keys. The keys are shown in Figure 8 on page 22 and described in Table 1 on page 22. Most keys have two values, a numeric entry and a function. Which one applies depends on the display; if it is waiting for a number, the numeric entry applies, otherwise, the function applies. To complete a numeric entry, press [Enter].
Figure 7 The display
3200P pH Meter User Guide 21
2 Operation
Figure 8 Operating keys
Table 1 Key values
Key symbol Numeric entry Function
1/Output 1 Output presently displayed data
2/ 2 Move up or select mode
3/Save 3 Store measuring data
4/ 4 Move left
5/Setup 5 Set different function
6/ 6 Move right
7/View 7 View stored or calibrated data
8/ 8 Move down or select mode
9/Mode 9 Switch display window or parameter in measuring state
0/Measure 0 Begin measurement in initial state
–/Delete – (negative number) Delete function Can delete saved data when you view them.
./Calibrate . (decimal point) Calibrate electrode
Enter Enter
Cancel Cancel
On/Off Turn meter on or off
22 3200P pH Meter User Guide
Operation 2
Setting Up the pH Meter
This section describes the tasks that an operator will perform when starting up the 3200P pH Meter.
Using the meter involves:
1 Selecting the measurement mode and the display parameters.
2 Preparing the electrode.
3 Measuring the pH.
To start up the 3200P pH Meter
Always operate the meter in an environment that meets the requirements listed in “Normal operating conditions” on page 20.
1 Connect the meter to the power supply.
2 Ensure the meter has a good ground.
3 Check the electrode connector and meter socket. The electrode must have a reliable connection.
4 Press [On/Off] to turn the meter on.
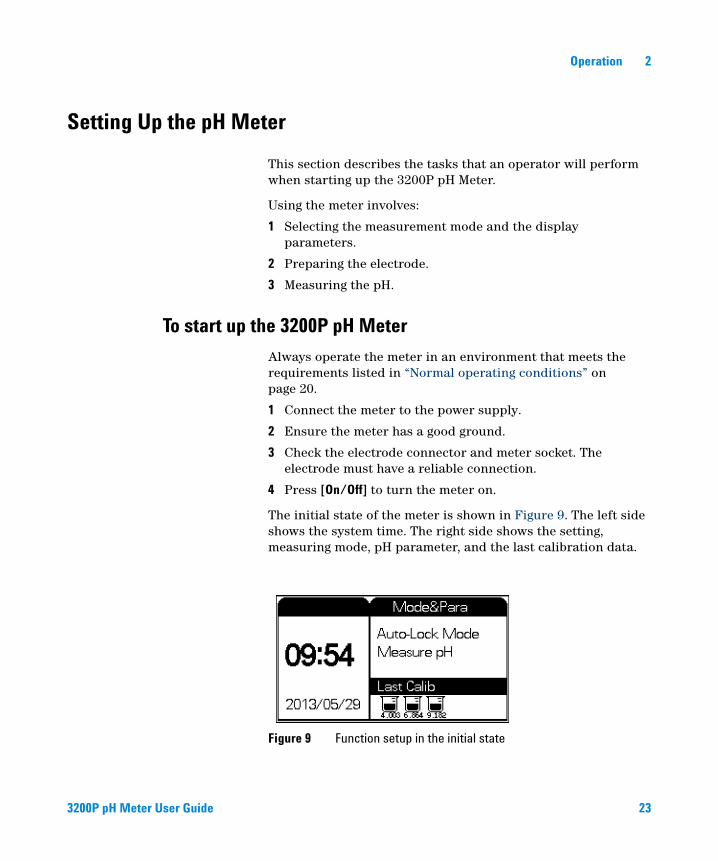
The initial state of the meter is shown in Figure 9. The left side shows the system time. The right side shows the setting, measuring mode, pH parameter, and the last calibration data.
Figure 9 Function setup in the initial state
3200P pH Meter User Guide 23
2 Operation
Accessing setup parameters
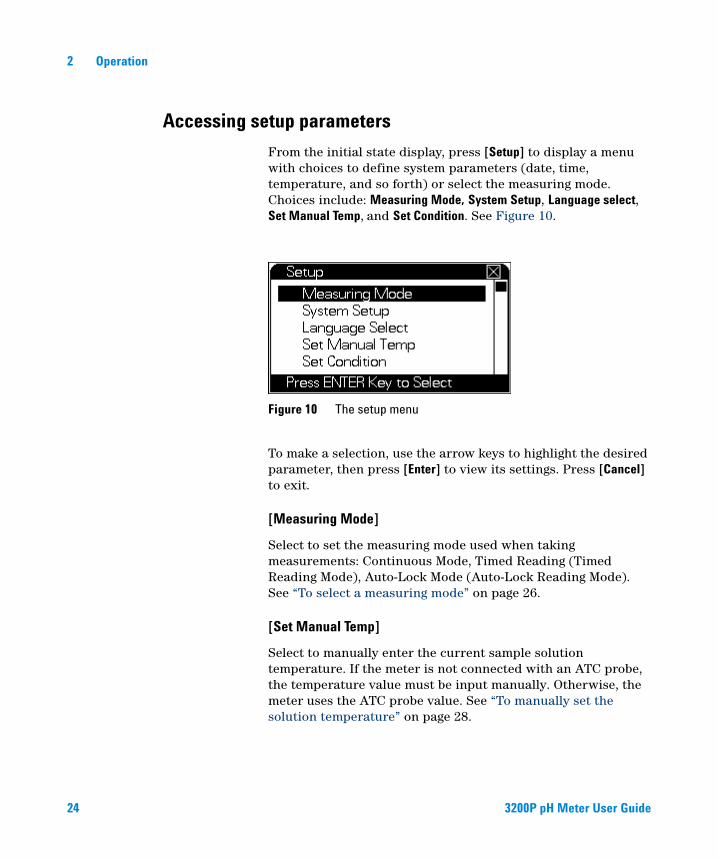
From the initial state display, press [Setup] to display a menu with choices to define system parameters (date, time, temperature, and so forth) or select the measuring mode. Choices include: Measuring Mode, System Setup, Language select, Set Manual Temp, and Set Condition. See Figure 10.
To make a selection, use the arrow keys to highlight the desired parameter, then press [Enter] to view its settings. Press [Cancel] to exit.
[Measuring Mode]
Select to set the measuring mode used when taking measurements: Continuous Mode, Timed Reading (Timed Reading Mode), Auto-Lock Mode (Auto-Lock Reading Mode). See “To select a measuring mode” on page 26.
[Set Manual Temp]
Select to manually enter the current sample solution temperature. If the meter is not connected with an ATC probe, the temperature value must be input manually. Otherwise, the meter uses the ATC probe value. See “To manually set the solution temperature” on page 28.
Figure 10 The setup menu
24 3200P pH Meter User Guide
Operation 2
[Set Condition]
Select this mode to enter an Auto-Lock condition in Auto-Lock reading mode. See “To set a condition for Auto-Lock mode” on page 29.
[System Setup]
Set up system time and GLP Standard. See “To set up the system (System Setup)” on page 30.
[Language Select]
Supports Chinese and English version. See “To select the display language” on page 32.
[Auto Power Off]
Supports the function of turning off automatically. See “To set the meter to turn off automatically (Auto Power Off)” on page 32.
[Set Default]
Select to delete all custom settings and restore the factory default settings. See “To restore factory defaults (Set Default)” on page 54.
3200P pH Meter User Guide 25

2 Operation
To select a measuring mode
The meter supports three measuring modes: Continuous Mode, Timed Reading, and Auto-Lock Mode. After selecting a parameter and measuring mode, the next measurement will use the new settings.
To select a measuring mode:
1 In the initial state, press [Setup] and then [Enter]. The meter displays is similar to Figure 11. The left side displays parameters. The right side lists the measuring modes. A √ next to a mode means that this mode has been selected in the current setup.
2 Use the arrow keys to highlight the desired mode.
3 Press [Setup] to select the highlighted mode.
4 Press [Enter] to save the new setup, exit the Setup mode, and return to the previous menu.
Press [Cancel] to exit the Setup mode without saving changes.
Figure 11 Measuring mode
26 3200P pH Meter User Guide
Operation 2
Measuring modes
Continuous mode
This is the most commonly used measuring mode. The meter performs the measurement and calculates and displays the result continuously. You can view the calibrated parameter, calibrate the electrode, and save or output the result during the measurement. After measurement, press [Cancel] and then [Enter] to exit the measuring mode.
Timed Reading mode
In this mode, the meter continuously measures the pH for a specified period of time. For example, to measure pH continuously for 30 minutes, select this mode and set the time interval to 30. When measurement begins, the meter continuously displays the results of measurements and calculations. When the set time period ends, the meter saves the measuring data. (If the USB interface is connected to a PC, the meter also prints out the measurement data). Then the meter begins the next measurement automatically. To stop measurement, press [Cancel] and then [Enter].
In this mode, you enter the desired time interval. The default value for the time interval is 600 seconds. The range is 1 to 5940 seconds.
Auto-Lock Reading mode (Auto-Lock mode)
Auto-Lock mode requires that you set a condition as described in ““To set a condition for Auto-Lock mode” on page 29. When measurement begins, the meter continuously displays the results of measurements and calculations until the measurements meet the preset Auto-Lock conditions, at which point the measurement ends.
During a measurement in this mode, you can view measuring parameters, calibrate the electrode, and so forth. After measurement ends, you can save and output the results.
Press [Cancel] to exit this mode or press [Measure] to begin the next measurement.
3200P pH Meter User Guide 27
2 Operation
The default measuring mode is Auto-Lock mode. You can modify this as required.
To manually set the solution temperature
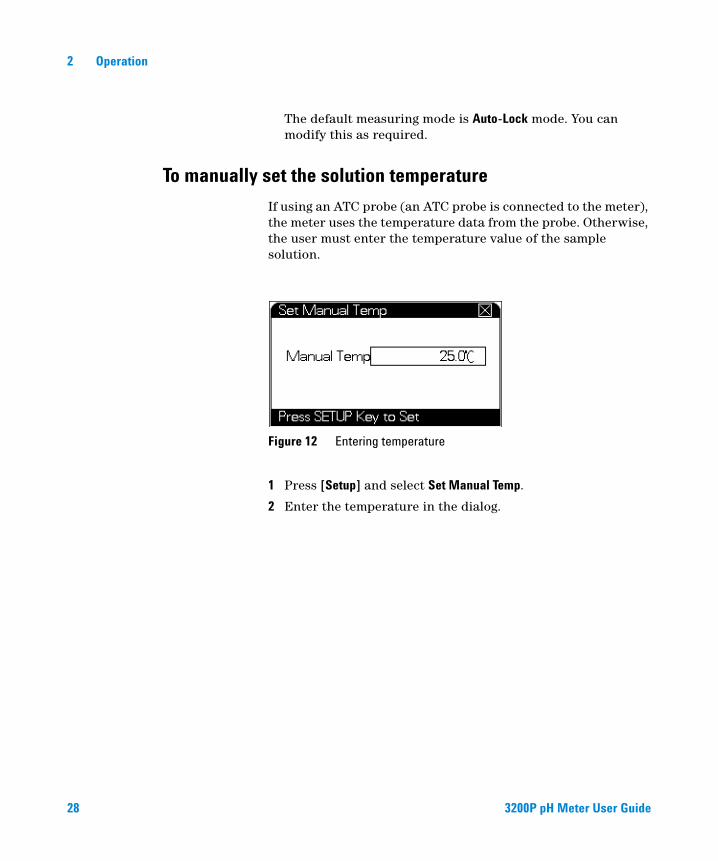
If using an ATC probe (an ATC probe is connected to the meter), the meter uses the temperature data from the probe. Otherwise, the user must enter the temperature value of the sample solution.
1 Press [Setup] and select Set Manual Temp.
2 Enter the temperature in the dialog.
Figure 12 Entering temperature
28 3200P pH Meter User Guide
Operation 2
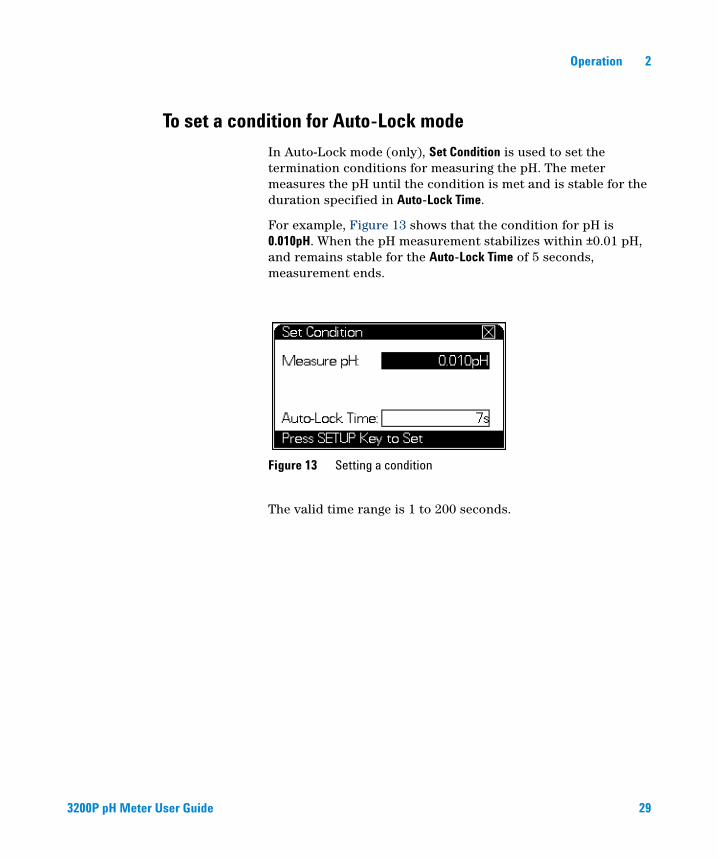
To set a condition for Auto-Lock mode
In Auto-Lock mode (only), Set Condition is used to set the termination conditions for measuring the pH. The meter measures the pH until the condition is met and is stable for the duration specified in Auto-Lock Time.
For example, Figure 13 shows that the condition for pH is 0.010pH. When the pH measurement stabilizes within ±0.01 pH, and remains stable for the Auto-Lock Time of 5 seconds, measurement ends.
The valid time range is 1 to 200 seconds.
Figure 13 Setting a condition
3200P pH Meter User Guide 29
2 Operation
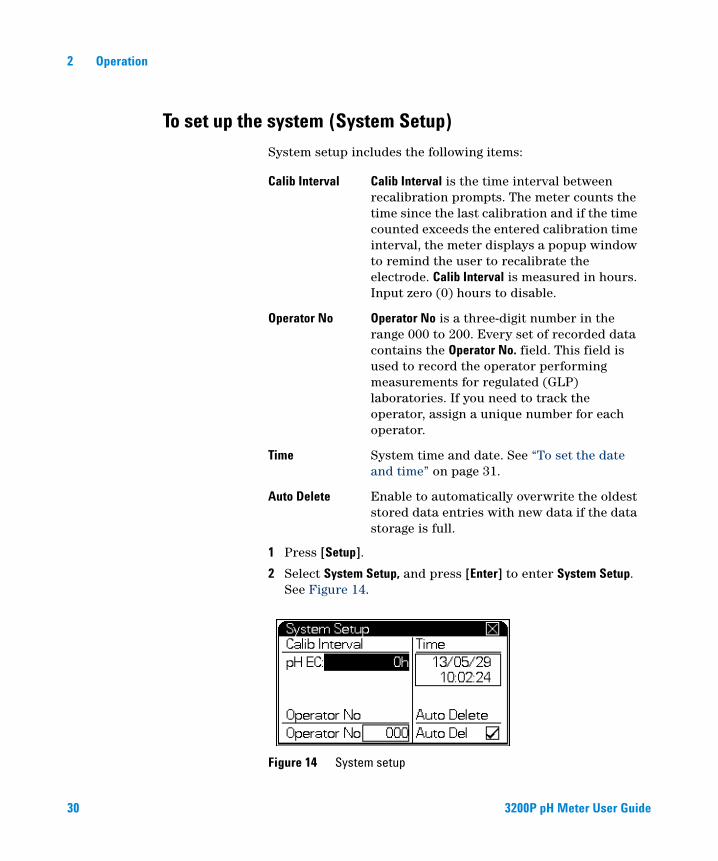
To set up the system (System Setup)
System setup includes the following items:
1 Press [Setup].
2 Select System Setup, and press [Enter] to enter System Setup. See Figure 14.
Calib Interval Calib Interval is the time interval between recalibration prompts. The meter counts the time since the last calibration and if the time counted exceeds the entered calibration time interval, the meter displays a popup window to remind the user to recalibrate the electrode. Calib Interval is measured in hours. Input zero (0) hours to disable.
Operator No Operator No is a three-digit number in the range 000 to 200. Every set of recorded data contains the Operator No. field. This field is used to record the operator performing measurements for regulated (GLP) laboratories. If you need to track the operator, assign a unique number for each operator.
Time System time and date. See “To set the date and time” on page 31.
Auto Delete Enable to automatically overwrite the oldest stored data entries with new data if the data storage is full.
Figure 14 System setup
30 3200P pH Meter User Guide
Operation 2
3 Use the arrow keys to select the desired parameter.
4 Press [Setup] to modify the corresponding parameter. Enter the new setting using the keypad.
5 Press [Enter] to save the change, exit System Setup.
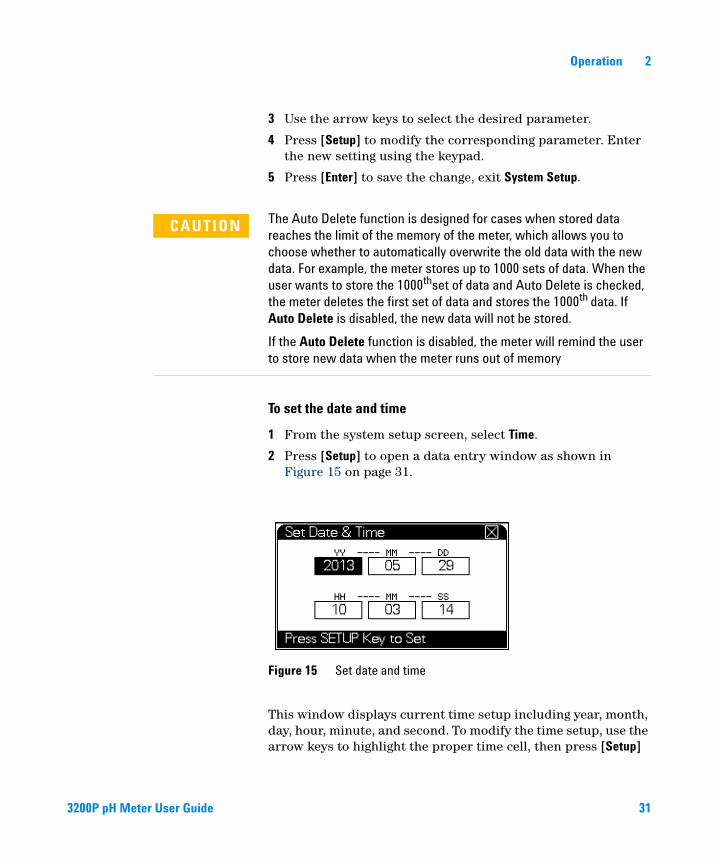
To set the date and time
1 From the system setup screen, select Time.
2 Press [Setup] to open a data entry window as shown in Figure 15 on page 31.
This window displays current time setup including year, month, day, hour, minute, and second. To modify the time setup, use the arrow keys to highlight the proper time cell, then press [Setup]
CAUTION The Auto Delete function is designed for cases when stored data reaches the limit of the memory of the meter, which allows you to choose whether to automatically overwrite the old data with the new data. For example, the meter stores up to 1000 sets of data. When the user wants to store the 1000thset of data and Auto Delete is checked, the meter deletes the first set of data and stores the 1000th data. If Auto Delete is disabled, the new data will not be stored.
If the Auto Delete function is disabled, the meter will remind the user to store new data when the meter runs out of memory
Figure 15 Set date and time
3200P pH Meter User Guide 31

32 3200P pH Meter User Guide
2 Operation
and input the correct value. Press [Enter] to save. When all changes have been made, press [Enter] to save the final setup. Press [Cancel] to exit from System Setup.
To select the display language
The meter can display either Chinese or English text. To select the preferred language, from the initial state press [Setup]. Choose Language Select and then select either Chinese or English.
To set the meter to turn off automatically (Auto Power Off)
This meter can automatically turn off after a specified period of time. You can set a time period for Auto Power Off from 10–480 minutes. When the meter has run for the length of time that equals to Auto Power Off setpoint, the meter will be forced to be power off.
To disable Auto Power Off, set the time period to zero (0).
To set up the buzzer
If the buzzer affects use, it can be closed. Press [Setup] to choose.
To set up annual check prompt
The meter allows you to select Close or 1 or 12 months in advanced. If the user initiates this function, the meter will make judgement after self-check when turn on. If the condition is met, it will prompt. Press [Setup] to choose.
CAUTION Some special prompts will still activate buzzer.
Operation 2
Using the pH Meter
For best accuracy, perform the following procedures before making measurements.
To prepare an electrode for use
A new electrode should be stored wet in the reference filling solution (5190-0545) and should be in working condition when received. Used electrodes should be stored as described in “Electrode storage” on page 59.
1 Check the electrode for any mechanical damage. If the storage bottle is dry, soak the electrode in reference filling solution for at least 2 hours before use.
2 Take the storage bottle off and keep it for future use.
3 Check the measuring tip for solidified electrolyte. If present, rinse off with distilled or deionized water.
4 Unplug the filling hole and add new reference filling solution if necessary. Fill to at least 20 mm higher than the level of sample. The liquid junction must be immersed completely in solution.
• To guarantee the movement of reference filling solution during measurement, keep the filling hole open during measurement.
5 Hold the electrode measuring tip downwards and swing it several times to remove air bubbles near the sensitive glass bulb.
6 Install the electrode into the electrode holder as shown in Figure 2 on page 10. Put the electrode in the solution with the measuring tip downwards.
Do not remove the short-circuit plug until after adjusting mv zero.
3200P pH Meter User Guide 33
2 Operation
To adjust mV zero
Although the meter compensates for many factors which may affect measurement (such as temperature), it still can not guarantee the ideal condition of zero drift. For accurate measurement, perform Adjust mV Zero before measurement.
To adjust mV zero:
1 Turn off the meter.
2 Adjusting the zero requires the short-circuit plug (G4383-40000). If needed, disconnect the electrode and install the short circuit plug into the pH socket.
3 Turn on the meter and let stabilize for 30 seconds.
4 Press [Setup], select Adjust mV Zero, and press [Enter]. The meter will display Adjust mV zero?.
5 Press [Enter] and the meter will calibrate mV zero.
If the potential (mV) value deviates far from zero, double check the short circuit plug connection.
After adjusting the mV zero, connect the electrode to the meter. Store the short-circuit plug in a clean, dry place. Damage to the plug can damage the meter.
34 3200P pH Meter User Guide

Operation 2
To select the pH Buffer Group
The meter provides auto-recognition, to recognize several buffer groups which are prepared according to either the NIST standard, the DIN standard, or the GB standard. Each group contains several buffers.
Table 2 Buffer groups
Buffer pH NIST group DIN group GB group
1.677 1.680 2.000 3.557 3.559 3.775 4.003 4.008 6.864 6.865 7.000 7.409 7.416 9.182 9.184 10.014 12.454 12.460 12.469
3200P pH Meter User Guide 35
2 Operation
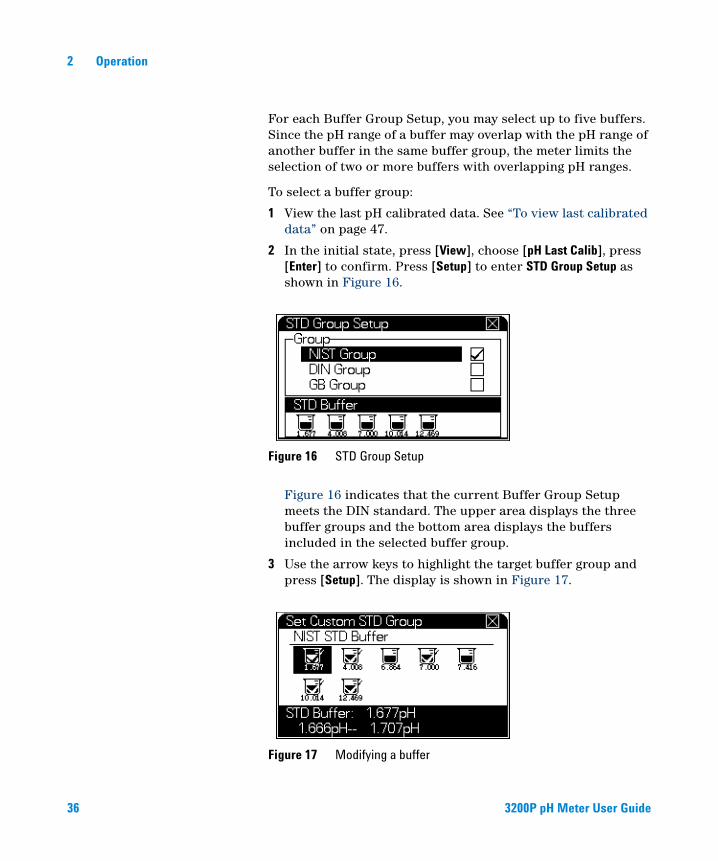
For each Buffer Group Setup, you may select up to five buffers. Since the pH range of a buffer may overlap with the pH range of another buffer in the same buffer group, the meter limits the selection of two or more buffers with overlapping pH ranges.
To select a buffer group:
1 View the last pH calibrated data. See “To view last calibrated data” on page 47.
2 In the initial state, press [View], choose [pH Last Calib], press [Enter] to confirm. Press [Setup] to enter STD Group Setup as shown in Figure 16.
Figure 16 indicates that the current Buffer Group Setup meets the DIN standard. The upper area displays the three buffer groups and the bottom area displays the buffers included in the selected buffer group.
3 Use the arrow keys to highlight the target buffer group and press [Setup]. The display is shown in Figure 17.
Figure 16 STD Group Setup
Figure 17 Modifying a buffer
36 3200P pH Meter User Guide
Operation 2
It shows icons corresponding to buffers in the NIST Buffer Group. Icons with √ indicate a selected buffer. Icons without √ indicate that this buffer is available but not selected. The bottom part of the display shows the pH value and the range of the highlighted buffer.
The number of buffers with a √ indicates the number of point calibrations. For example, 3 buffers with a √ means the number of calibration points.
4 Use the arrow keys to highlight the target buffer, then press [Setup] to select or deselect it.
For example, to select the 4.008 pH buffer, use the arrow keys to highlight the icon with 4.008 pH. Press [Setup] and this icon is selected.
To prevent selecting buffers with overlapping pH ranges, select only buffers necessary for measurement and clear selection of other buffers.
The meter allows selection of up to five buffers for each Buffer Group Setup.
To calibrate pH electrode (Calib pH EC)
Before each measurement, Agilent recommends recalibrating the electrode. Calibration overwrites the previous calibration data.
Recalibrate the electrode regularly. To set a calibration reminder, see “To set up the system (System Setup)” on page 30.
To perform the calibration:
1 Clean the pH electrode, reference electrode, and ATC probe.
2 Prepare one to five buffers. They can be purchased or can be prepared by you. Place them in a constant temperature environment to equilibrate.
3 If not connected, connect the electrode to the meter. Store the short circuit plug in a clean, dry place.
4 Place the electrodes in the buffer to be calibrated. The pH electrode’s ceramic liquid junction should be immersed in solution, otherwise it may cause unstable reading.
3200P pH Meter User Guide 37
2 Operation
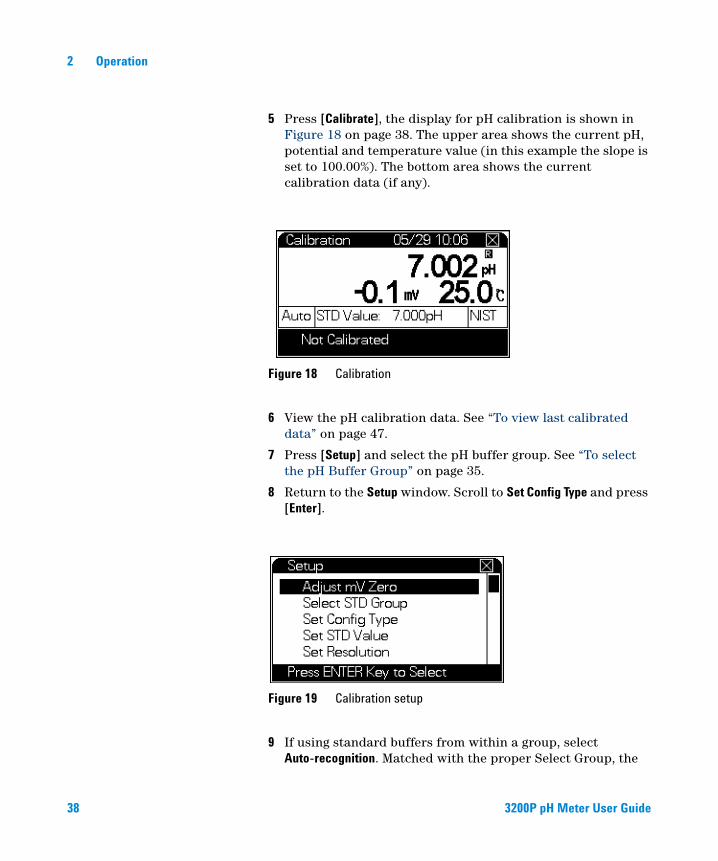
5 Press [Calibrate], the display for pH calibration is shown in Figure 18 on page 38. The upper area shows the current pH, potential and temperature value (in this example the slope is set to 100.00%). The bottom area shows the current calibration data (if any).
6 View the pH calibration data. See “To view last calibrated data” on page 47.
7 Press [Setup] and select the pH buffer group. See “To select the pH Buffer Group” on page 35.
8 Return to the Setup window. Scroll to Set Config Type and press [Enter].
9 If using standard buffers from within a group, select Auto-recognition. Matched with the proper Select Group, the
Figure 18 Calibration
Figure 19 Calibration setup
38 3200P pH Meter User Guide
Operation 2
meter will automatically recognize these buffers. If the meter can not recognize a buffer, it will prompt with Calibration error.
If you have created and are using a custom buffer, select Manual Recognition. You will manually input the pH of the selected buffer at the selected temperature.
10 Press [Enter] key to return to the calibration window.
11 The meter will be ready to take a calibration reading for the first buffer solution selected in the buffer group.
12 Once the reading is stable, and R appears, press [Enter]. The meter will display Storing…… and save the calibration data.
13 After a few seconds, the meter will display a Continue? prompt window. Press [Enter] to continue calibrating other buffers, press [Cancel] to exit calibration. At any time during calibration, press [Cancel] to end calibration.
For example, to calibrate the electrode with 4.003 pH and 9.182 pH buffers, you must have selected 4.003 pH and 9.182 pH buffers in the Buffer Group Setup, otherwise the meter will not automatically recognize these two buffers. Even worse, it may lead to the wrong calibration.
The meter supports up to five calibration points. When the fifth buffer is calibrated, the meter will prompt to end calibration.
For buffers such as 6.864 pH and 7.000 pH which have overlapping pH ranges, we recommend the following calibration method.
• When you calibrate the 6.864 pH buffer, set the buffer group to contain only 6.864 pH, then calibrate it. Reset the buffer group to contain only 7.000 pH, then calibrate it.
• You could also use the manual recognition method, in which you manually input the pH of the selected buffer at the selected temperature.
You can use both auto- and manual recognition to calibrate the electrode to the buffer solutions in use.
3200P pH Meter User Guide 39
2 Operation
To measure pH value
1 Before measuring pH, adjust mV zero. See “To adjust mV zero” on page 34.
2 Calibrate the meter. See “To calibrate pH electrode (Calib pH EC)” on page 37.
3 From the initial state display, press [Setup] and select a measuring mode. See “To select a measuring mode” on page 26.
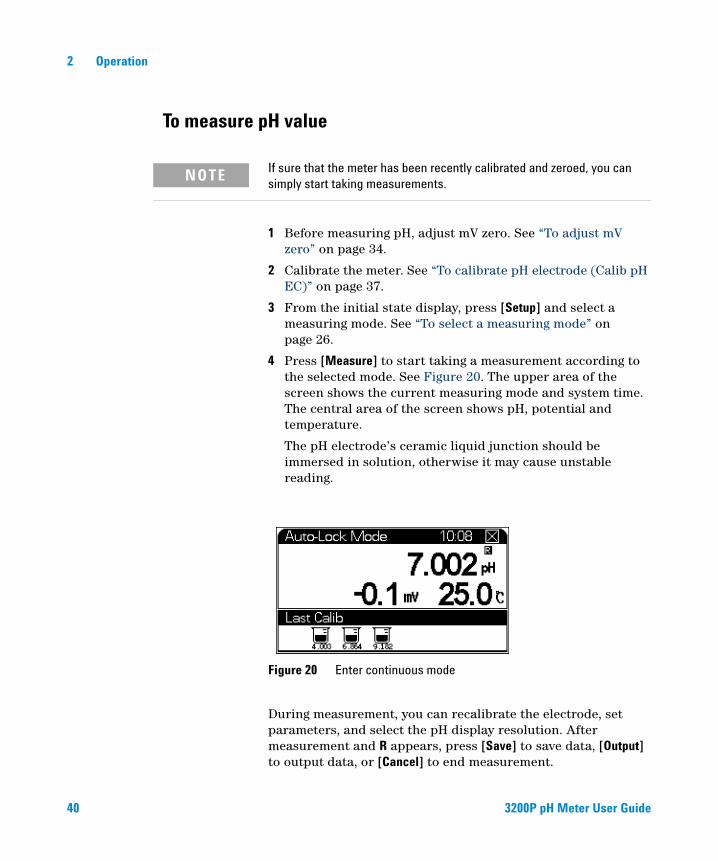
4 Press [Measure] to start taking a measurement according to the selected mode. See Figure 20. The upper area of the screen shows the current measuring mode and system time. The central area of the screen shows pH, potential and temperature.
The pH electrode’s ceramic liquid junction should be immersed in solution, otherwise it may cause unstable reading.
During measurement, you can recalibrate the electrode, set parameters, and select the pH display resolution. After measurement and R appears, press [Save] to save data, [Output] to output data, or [Cancel] to end measurement.
NOTE If sure that the meter has been recently calibrated and zeroed, you can simply start taking measurements.
Figure 20 Enter continuous mode
40 3200P pH Meter User Guide
Operation 2
To measure mV value
In any measuring mode, the meter always displays the current pH and mV value.
To measure temperature
In any measuring mode, the meter will display the current temperature value.
To turn off the 3200P pH Meter
After using the meter, ensure you have pressed [Save] to save data. Then, press [On/Off] for more than 3 seconds to turn off the meter.
When not in use, all electrodes should be soaked in distilled water. If the meter is out of use for a long time, do the following:
• Disconnect the power adaptor from the power line to avoid damaging the power adaptor and the meter.
• The socket of the meter must be kept clean and dry. Avoid contact of the socket with acidic, alkaline, and salt solution.
• If disconnecting the pH electrode, install the short-circuit plug onto the meter to prevent damage to the meter.
• Store the electrode in reference filling solution. For refillable electrodes, plug the filling hole. If the electrode is out of use for a long time, put it back in the box and store it at ambient temperature.
3200P pH Meter User Guide 41
2 Operation
Storing Data
The meter can save up to 1000 sets of pH data. When the meter saves data depends on the measuring mode. In Continuous Mode and Auto-Lock Mode, press [Save] to save data when the readings become stable. In Timed Reading mode, the meter will automatically save measurement data after the measurement time expires. (Data can always be saved manually.)
To delete saved data
The meter can both save and delete data. Inaccurate or unwanted data can be deleted individually or all at once.
1 From the initial or measuring mode, press [View] to display data.
2 Scroll to the data to delete, then press [Delete].
To output data
Please see the “Appendix III EcPRINT Operating Guide” on page 75.
42 3200P pH Meter User Guide
Operation 2
Viewing Parameters During Measurement
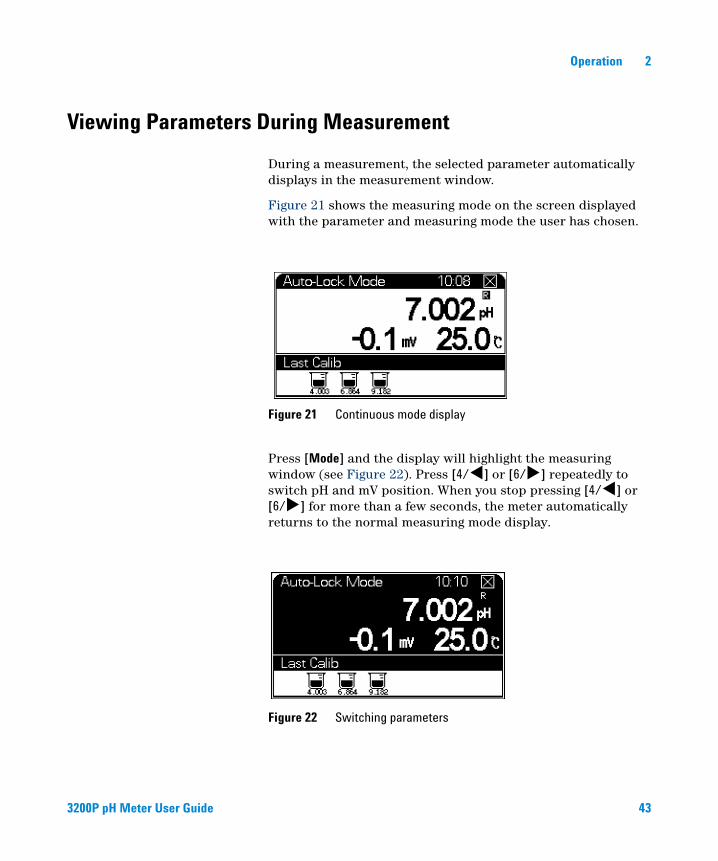
During a measurement, the selected parameter automatically displays in the measurement window.
Figure 21 shows the measuring mode on the screen displayed with the parameter and measuring mode the user has chosen.
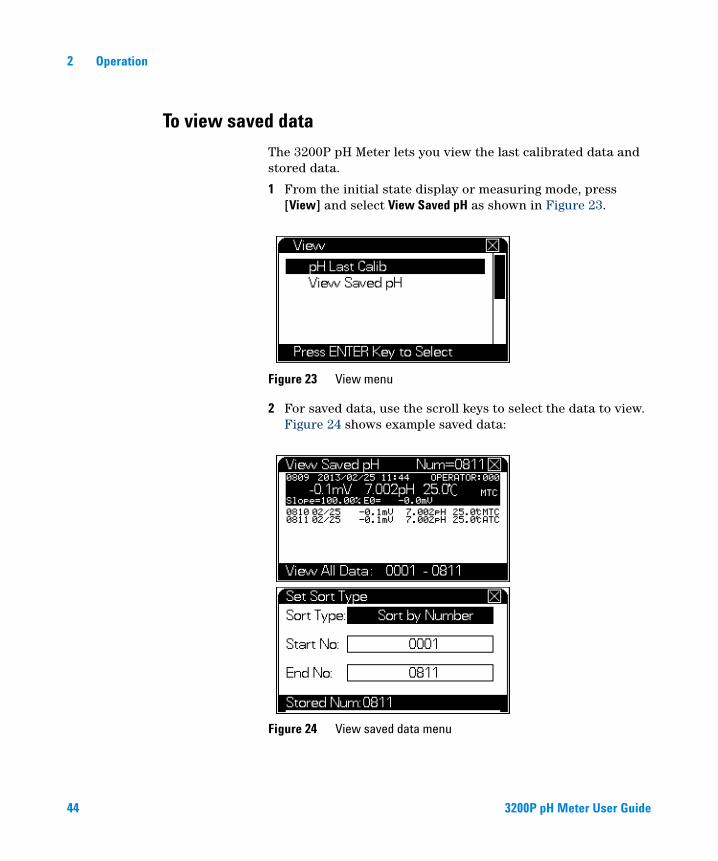
Press [Mode] and the display will highlight the measuring window (see Figure 22). Press [4/] or [6/] repeatedly to switch pH and mV position. When you stop pressing [4/] or [6/] for more than a few seconds, the meter automatically returns to the normal measuring mode display.
Figure 21 Continuous mode display
Figure 22 Switching parameters
3200P pH Meter User Guide 43
2 Operation
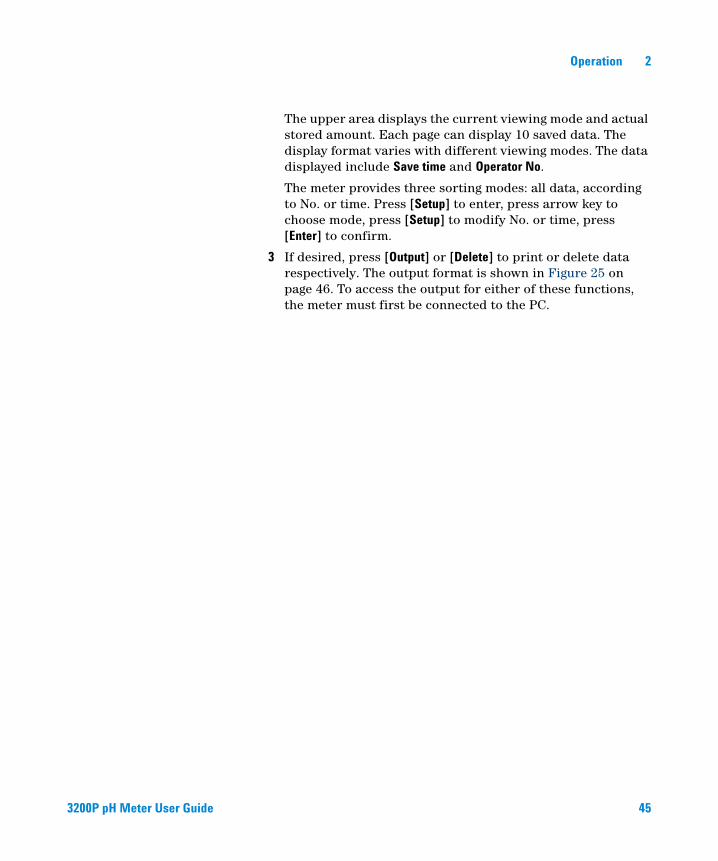
To view saved data
The 3200P pH Meter lets you view the last calibrated data and stored data.
1 From the initial state display or measuring mode, press [View] and select View Saved pH as shown in Figure 23.
2 For saved data, use the scroll keys to select the data to view. Figure 24 shows example saved data:
Figure 23 View menu
Figure 24 View saved data menu
44 3200P pH Meter User Guide
Operation 2
The upper area displays the current viewing mode and actual stored amount. Each page can display 10 saved data. The display format varies with different viewing modes. The data displayed include Save time and Operator No.
The meter provides three sorting modes: all data, according to No. or time. Press [Setup] to enter, press arrow key to choose mode, press [Setup] to modify No. or time, press [Enter] to confirm.
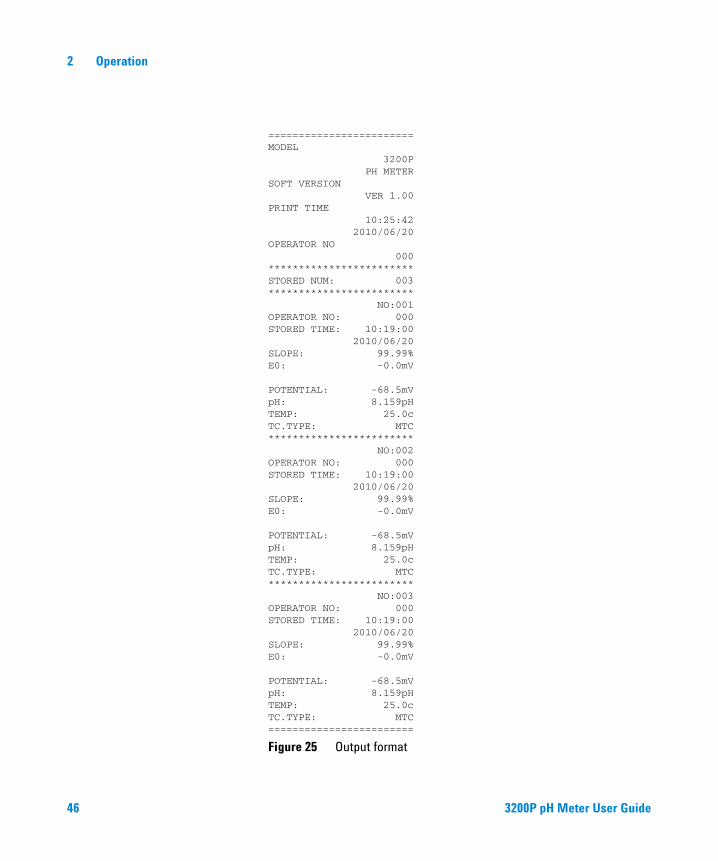
3 If desired, press [Output] or [Delete] to print or delete data respectively. The output format is shown in Figure 25 on page 46. To access the output for either of these functions, the meter must first be connected to the PC.
3200P pH Meter User Guide 45
2 Operation
Figure 25 Output format
========================MODEL 3200P PH METERSOFT VERSION VER 1.00PRINT TIME 10:25:42 2010/06/20OPERATOR NO 000************************STORED NUM: 003************************ NO:001OPERATOR NO: 000STORED TIME: 10:19:00 2010/06/20SLOPE: 99.99%E0: -0.0mV
POTENTIAL: -68.5mVpH: 8.159pHTEMP: 25.0cTC.TYPE: MTC************************ NO:002OPERATOR NO: 000STORED TIME: 10:19:00 2010/06/20SLOPE: 99.99%E0: -0.0mV
POTENTIAL: -68.5mVpH: 8.159pHTEMP: 25.0cTC.TYPE: MTC************************ NO:003OPERATOR NO: 000STORED TIME: 10:19:00 2010/06/20SLOPE: 99.99%E0: -0.0mV
POTENTIAL: -68.5mVpH: 8.159pHTEMP: 25.0cTC.TYPE: MTC========================
46 3200P pH Meter User Guide
Operation 2
To view last calibrated data
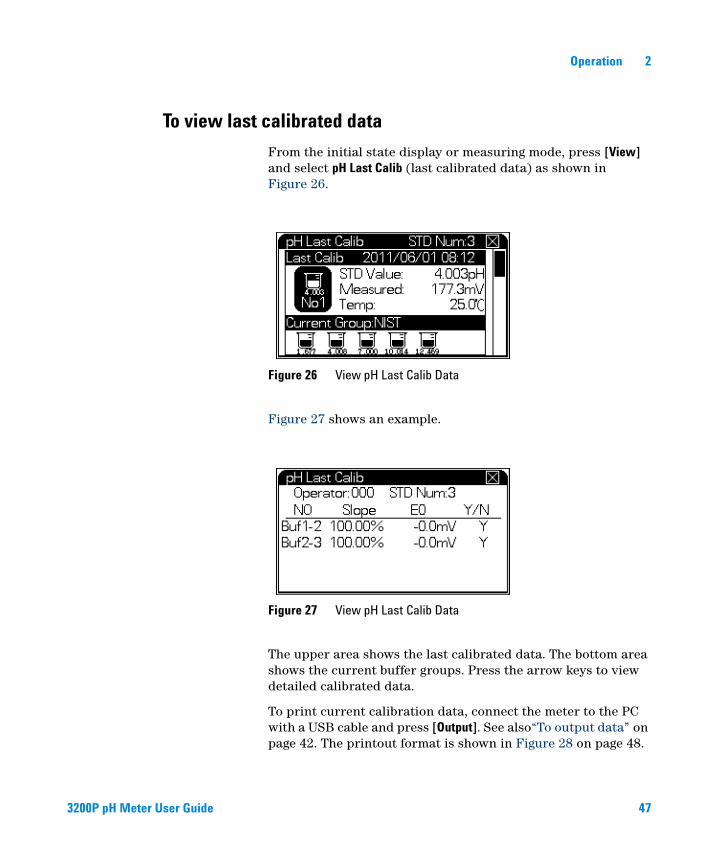
From the initial state display or measuring mode, press [View] and select pH Last Calib (last calibrated data) as shown in Figure 26.
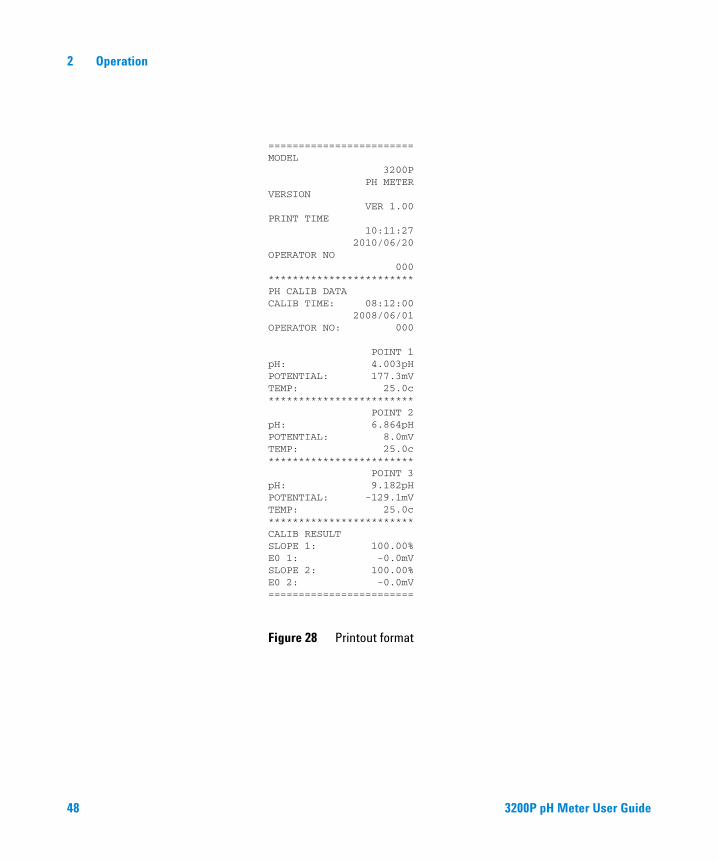
Figure 27 shows an example.
The upper area shows the last calibrated data. The bottom area shows the current buffer groups. Press the arrow keys to view detailed calibrated data.
To print current calibration data, connect the meter to the PC with a USB cable and press [Output]. See also“To output data” on page 42. The printout format is shown in Figure 28 on page 48.
Figure 26 View pH Last Calib Data
Figure 27 View pH Last Calib Data
3200P pH Meter User Guide 47
2 Operation
Figure 28 Printout format
========================MODEL 3200P PH METERVERSION VER 1.00PRINT TIME 10:11:27 2010/06/20OPERATOR NO 000************************PH CALIB DATACALIB TIME: 08:12:00 2008/06/01OPERATOR NO: 000
POINT 1pH: 4.003pHPOTENTIAL: 177.3mVTEMP: 25.0c************************ POINT 2pH: 6.864pHPOTENTIAL: 8.0mVTEMP: 25.0c************************ POINT 3pH: 9.182pHPOTENTIAL: -129.1mVTEMP: 25.0c************************CALIB RESULTSLOPE 1: 100.00%E0 1: -0.0mVSLOPE 2: 100.00%E0 2: -0.0mV========================
48 3200P pH Meter User Guide
Agilent 3200P pH MeterUser Guide
3Troubleshooting and Maintenance
Troubleshooting Common Problems 50
General Troubleshooting Procedure 52
Meter Self-Diagnostics and Messages 56
Maintenance 59
Electrode cleaning 59
Electrode storage 59
Consumables and replacement parts 60
This chapter describes how to verify whether the meter is working properly and how to maintain the meter.
49Agilent Technologies
3 Troubleshooting and Maintenance
Troubleshooting Common Problems
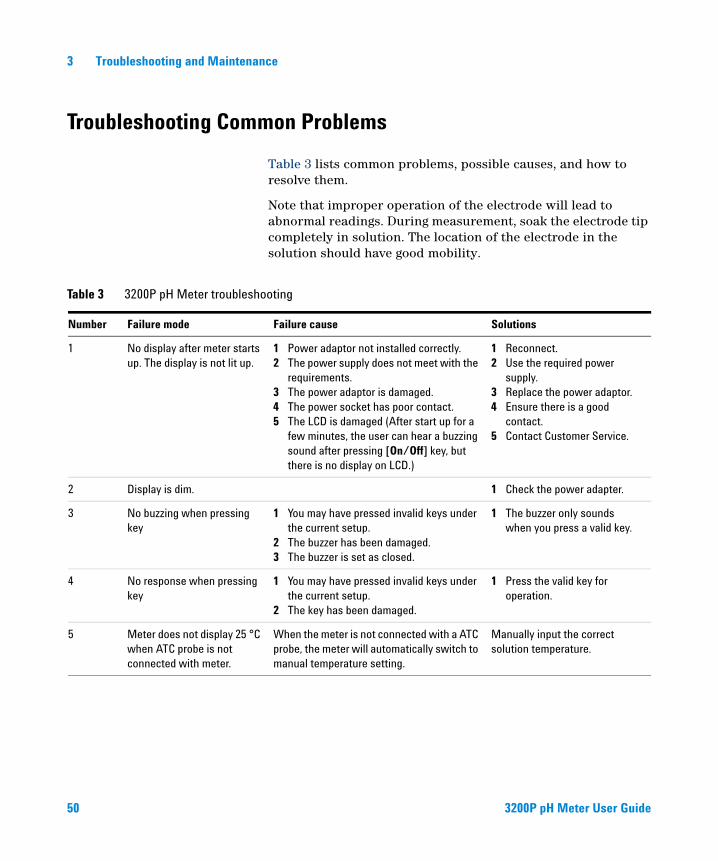
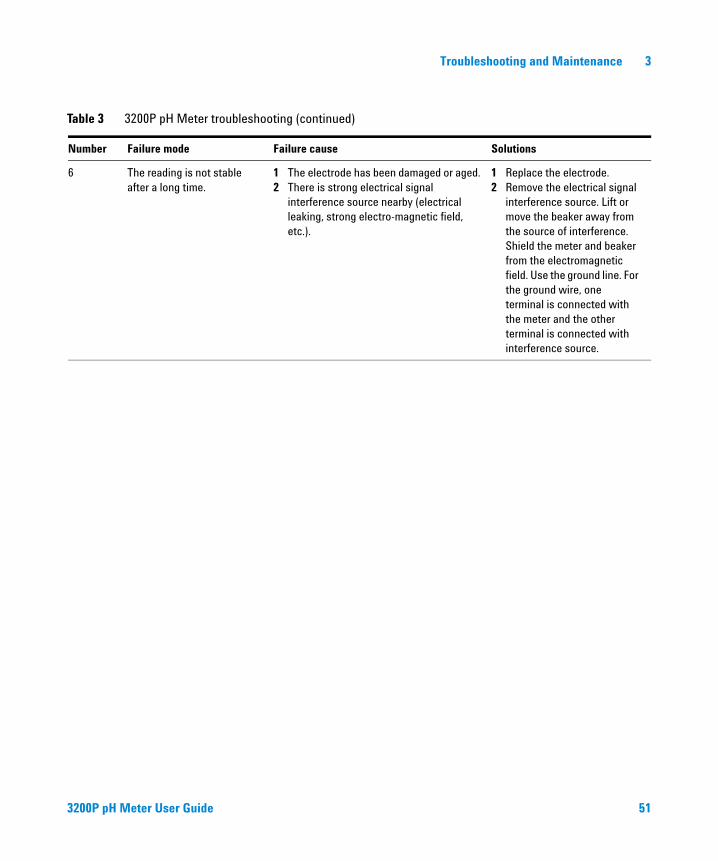
Table 3 lists common problems, possible causes, and how to resolve them.
Note that improper operation of the electrode will lead to abnormal readings. During measurement, soak the electrode tip completely in solution. The location of the electrode in the solution should have good mobility.
Table 3 3200P pH Meter troubleshooting
Number Failure mode Failure cause Solutions
1 No display after meter starts up. The display is not lit up.
1 Power adaptor not installed correctly.2 The power supply does not meet with the
requirements.3 The power adaptor is damaged.4 The power socket has poor contact.5 The LCD is damaged (After start up for a
few minutes, the user can hear a buzzing sound after pressing [On/Off] key, but there is no display on LCD.)
1 Reconnect.2 Use the required power
supply.3 Replace the power adaptor.4 Ensure there is a good
contact.5 Contact Customer Service.
2 Display is dim. 1 Check the power adapter.
3 No buzzing when pressing key
1 You may have pressed invalid keys under the current setup.
2 The buzzer has been damaged.3 The buzzer is set as closed.
1 The buzzer only sounds when you press a valid key.
4 No response when pressing key
1 You may have pressed invalid keys under the current setup.
2 The key has been damaged.
1 Press the valid key for operation.
5 Meter does not display 25 °C when ATC probe is not connected with meter.
When the meter is not connected with a ATC probe, the meter will automatically switch to manual temperature setting.
Manually input the correct solution temperature.
50 3200P pH Meter User Guide
Troubleshooting and Maintenance 3
6 The reading is not stable after a long time.
1 The electrode has been damaged or aged.2 There is strong electrical signal
interference source nearby (electrical leaking, strong electro-magnetic field, etc.).
1 Replace the electrode.2 Remove the electrical signal
interference source. Lift or move the beaker away from the source of interference. Shield the meter and beaker from the electromagnetic field. Use the ground line. For the ground wire, one terminal is connected with the meter and the other terminal is connected with interference source.
Table 3 3200P pH Meter troubleshooting (continued)
Number Failure mode Failure cause Solutions
3200P pH Meter User Guide 51
3 Troubleshooting and Maintenance
General Troubleshooting Procedure
During the use of the meter, there are many factors that may affect the measurement, including the electrode, the standard solutions used to calibrate electrode, the sample solution, the temperature during measurement, incorrect operation, or use, and so forth. When the measured results are significantly different from what was expected, first determine whether the meter itself or factors other than the meter caused the error. Follow the suggestions described below to diagnose the problem. Since there are multiple measuring methods, you will need to diagnose the meter based on your application conditions.
Diagnose whether the errors are caused by meter hardware, electrode calibration data error, parameter errors, or other errors, including the sample solution, solution preparation, buffer solutions used for calibration, and so forth.
For factors other than the meter, compare measurement results between known solutions. Put the electrode in different standard solutions. Check the corresponding potential (mV) value and pH value. Based on the comparison, judge whether the deviation is resulted from the electrode, the solution, or something else.
Check the temperature measurement
Because temperature measurements are used for all measurements, always ensure temperature measuring is functioning well.
Connect the ATC temperature diagnostic tool (5185-8390) to the meter. Turn on the meter to enter into measurement state. With the ATC temperature diagnostic tool connected, the meter should display a temperature reading between 49.0 to 51.0 °C. If yes, the meter is correctly measuring temperature. If the meter displays a temperature reading significantly different from 50 °C, there is a problem with the meter. Contact Agilent service.
52 3200P pH Meter User Guide
Troubleshooting and Maintenance 3
Check the potential (mV) value
Disconnect the pH electrode. Install the short circuit plug (G4383-40000, shipped with the meter) into the pH/pX socket. Turn on the meter. Enter the pH measurement state. At this moment, the meter should display a potential (mV) reading between –0.5 to 0.5 mV (also called mV Zero). If yes, this indicates that the meter is functioning properly. If the potential (mV) reading significantly deviates from zero, then use the Adjust mV Zero function to adjust mV Zero. See “To adjust mV zero” on page 34 for more information. After adjustment, the potential (mV) reading should be near to zero. If the potential value (mV) reading cannot be adjusted near to zero by the mV Zero adjustment, this indicates a problem with the meter. Contact Agilent service.
Check the pH value
Disconnect the ATC probe. Set up the meter as manual temperature input. See “To manually set the solution temperature” on page 28. Set the solution temperature to 25 °C. When the potential (mV) is zero, the meter should display a pH reading among 6.99 to 7.01 pH. If yes, this indicates the electrode calibration data of the meter is acceptable. If not, there may be a problem with the electrode calibration data. Check the slope of electrode again. Press [View], select Last pH Calib and press [Enter]. Now, view the calibration data and slope of last calibration. If the calibration data is severely out of the expected range (the meter displays an error message, see Table 4 on page 57), this indicates a problem in the last electrode calibration, which may lead to a large measurement error. Recalibrate the electrode. Pay attention to the Buffer Group selection during calibration.
NOTE In the measurement state, the meter may display an error message simultaneously with measurement data.
3200P pH Meter User Guide 53
3 Troubleshooting and Maintenance
Restore factory default settings
If other troubleshooting does not find the problem, you can restore the meter to the factory default settings. This clears all user calibrations and settings so that you can verify that an erroneous calibration or setting is not the cause of the problem. After restoring the factory default settings, retest the meter.
To restore factory defaults (Set Default)
Select Set Default from the initial state display to restore all parameters to the factory defaults settings. The factory defaults are listed below.
• Clear mV Zero:
Any user-set mV zero value is cleared. With the short-circuit plug connected, check the mV reading. If the meter displays a non-zero mV value, adjust the mV zero. Failure to check and adjust the mV zero can lead to incorrect measurements.
• Modify Buffer Group data:
The Buffer Group of NIST standards includes three points, 4.01 pH, 7.00 pH, and 10.01 pH. The Buffer Group of DIN standards includes five points: 1.68 pH, 4.01 pH, 6.86 pH, 9.18 pH, and 12.45 pH. The Buffer Group of GB standards includes five points: 1.68 pH, 4.01 pH, 6.86 pH, 9.18 pH, and 12.45 pH. For example, the current Buffer Group is set up as NIST standards.
• Modify pH Calibration data:
Three standard buffer solutions and the data are as listed below. By default, the electrode slope is set to 100% and E0 is set to 0.0 mV.
• pH buffer 1: 4.003 pH/177.299 mV/25.0 °C
• pH buffer 2: 6.864 pH/ 8.046 mV/ 25.0 °C
• pH buffer 3: 9.182 pH/-129.085 mV/ 25.0 °C
• Set manual temperature: 25 °C
• Set measuring method: Auto-Lock Mode
• Set interval of Timed Mode: 600 seconds.
• Disable calibration message interval (Calib Interval)
54 3200P pH Meter User Guide

Troubleshooting and Maintenance 3
• Set the meter to overwrite the oldest data with new data if the data storage becomes full.
• Set Operator No.: 000
• Set Auto-Lock condition in auto-lock reading mode: 0.01 pH
• Set Auto-Lock Time in auto-lock reading mode: 7 s
• Set pH resolution: 0.001 pH
• Set Auto Power Off: 0 (disabled)
• Set buzzer: Open
• Set annual check prompt: Closed
• Set Auto delete: Open
3200P pH Meter User Guide 55
3 Troubleshooting and Maintenance
Meter Self-Diagnostics and Messages
The meter supports self-diagnosis, which can find some common errors caused by meter, electrode, solution, or operation. It deals with these errors differently according to their severity.
There are two levels of severity: Severe system errors hinder further use of the meter or make the meter unable to finish necessary tasks. In this case, replacement or maintenance of the meter is required.
Minor errors, which are prompts or warnings, are caused by various reasons and can be corrected in several ways. However, you must pay attention to these errors to ensure measurement integrity and reliability. If you ignore these error messages the operation can continue.
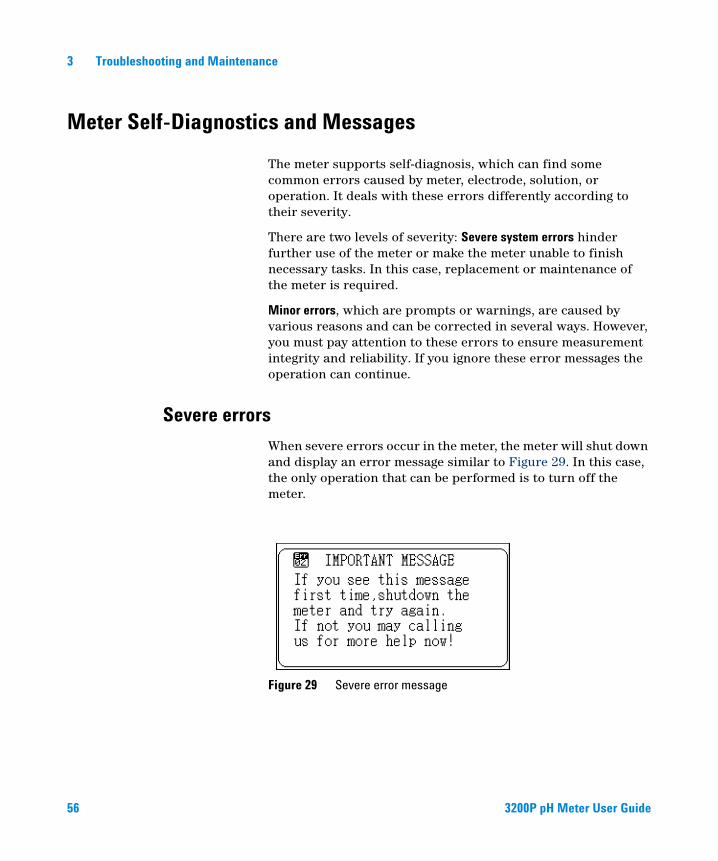
Severe errors
When severe errors occur in the meter, the meter will shut down and display an error message similar to Figure 29. In this case, the only operation that can be performed is to turn off the meter.
Figure 29 Severe error message
56 3200P pH Meter User Guide
Troubleshooting and Maintenance 3
Error warning
Error warnings indicate improper electrode installation, solution problems, and electrode setup during use. Read these error warnings carefully. Proper maintenance and operation will reduce errors.
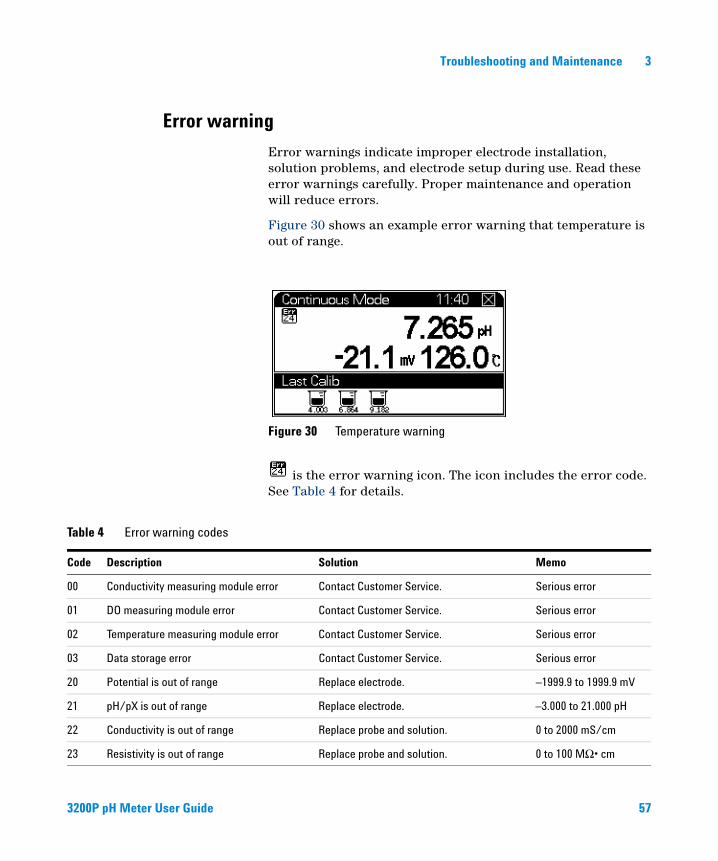
Figure 30 shows an example error warning that temperature is out of range.
is the error warning icon. The icon includes the error code. See Table 4 for details.
Figure 30 Temperature warning
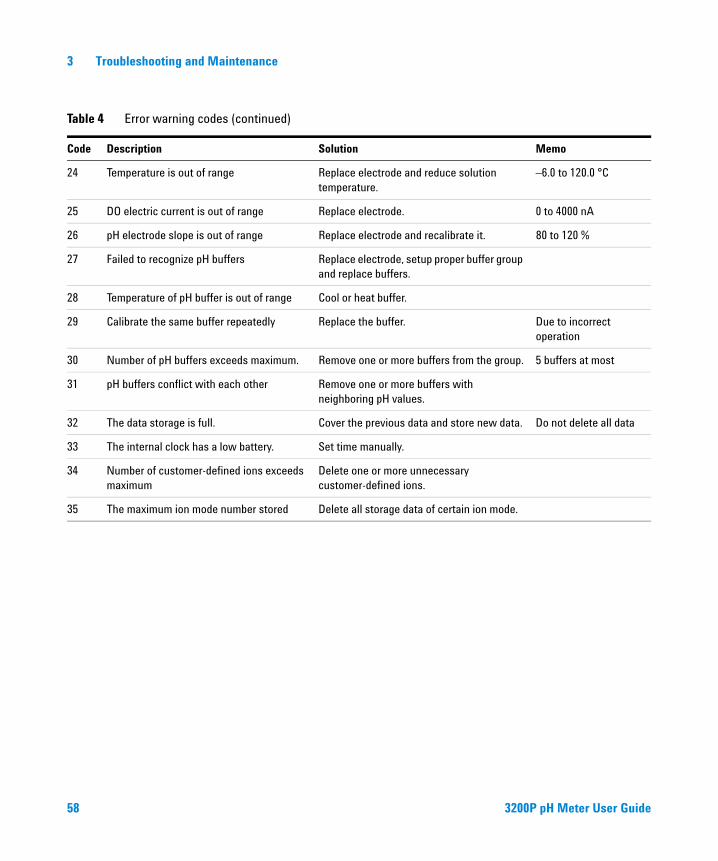
Table 4 Error warning codes
Code Description Solution Memo
00 Conductivity measuring module error Contact Customer Service. Serious error
01 DO measuring module error Contact Customer Service. Serious error
02 Temperature measuring module error Contact Customer Service. Serious error
03 Data storage error Contact Customer Service. Serious error
20 Potential is out of range Replace electrode. –1999.9 to 1999.9 mV
21 pH/pX is out of range Replace electrode. –3.000 to 21.000 pH
22 Conductivity is out of range Replace probe and solution. 0 to 2000 mS/cm
23 Resistivity is out of range Replace probe and solution. 0 to 100 MΩ• cm
3200P pH Meter User Guide 57
3 Troubleshooting and Maintenance
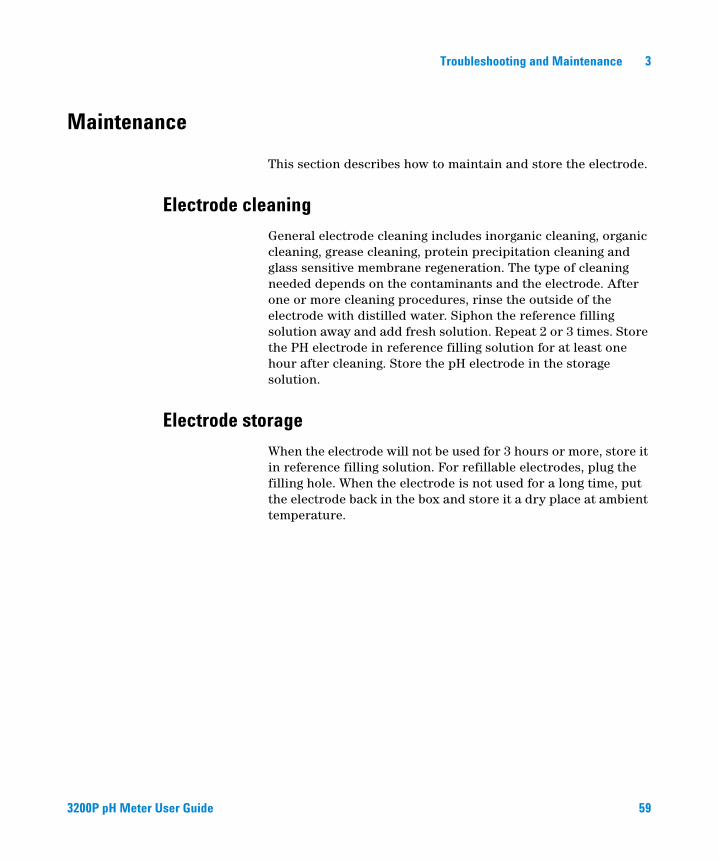
24 Temperature is out of range Replace electrode and reduce solution temperature.
–6.0 to 120.0 °C
25 DO electric current is out of range Replace electrode. 0 to 4000 nA
26 pH electrode slope is out of range Replace electrode and recalibrate it. 80 to 120 %
27 Failed to recognize pH buffers Replace electrode, setup proper buffer group and replace buffers.
28 Temperature of pH buffer is out of range Cool or heat buffer.
29 Calibrate the same buffer repeatedly Replace the buffer. Due to incorrect operation
30 Number of pH buffers exceeds maximum. Remove one or more buffers from the group. 5 buffers at most
31 pH buffers conflict with each other Remove one or more buffers with neighboring pH values.
32 The data storage is full. Cover the previous data and store new data. Do not delete all data
33 The internal clock has a low battery. Set time manually.
34 Number of customer-defined ions exceeds maximum
Delete one or more unnecessary customer-defined ions.
35 The maximum ion mode number stored Delete all storage data of certain ion mode.
Table 4 Error warning codes (continued)
Code Description Solution Memo
58 3200P pH Meter User Guide
Troubleshooting and Maintenance 3
Maintenance
This section describes how to maintain and store the electrode.
Electrode cleaning
General electrode cleaning includes inorganic cleaning, organic cleaning, grease cleaning, protein precipitation cleaning and glass sensitive membrane regeneration. The type of cleaning needed depends on the contaminants and the electrode. After one or more cleaning procedures, rinse the outside of the electrode with distilled water. Siphon the reference filling solution away and add fresh solution. Repeat 2 or 3 times. Store the PH electrode in reference filling solution for at least one hour after cleaning. Store the pH electrode in the storage solution.
Electrode storage
When the electrode will not be used for 3 hours or more, store it in reference filling solution. For refillable electrodes, plug the filling hole. When the electrode is not used for a long time, put the electrode back in the box and store it a dry place at ambient temperature.
3200P pH Meter User Guide 59
3 Troubleshooting and Maintenance
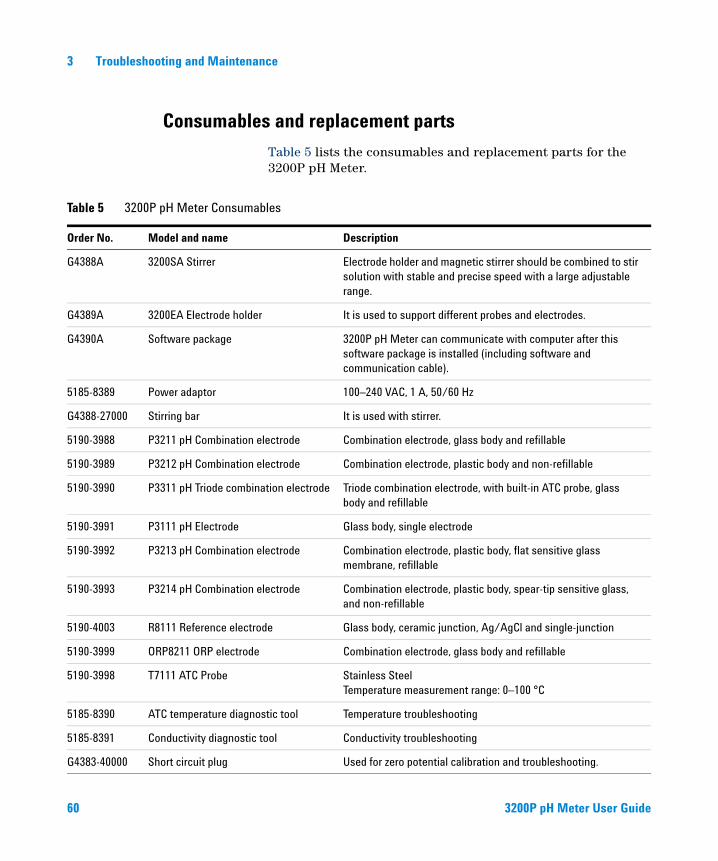
Consumables and replacement parts
Table 5 lists the consumables and replacement parts for the 3200P pH Meter.
Table 5 3200P pH Meter Consumables
Order No. Model and name Description
G4388A 3200SA Stirrer Electrode holder and magnetic stirrer should be combined to stir solution with stable and precise speed with a large adjustable range.
G4389A 3200EA Electrode holder It is used to support different probes and electrodes.
G4390A Software package 3200P pH Meter can communicate with computer after this software package is installed (including software and communication cable).
5185-8389 Power adaptor 100–240 VAC, 1 A, 50/60 Hz
G4388-27000 Stirring bar It is used with stirrer.
5190-3988 P3211 pH Combination electrode Combination electrode, glass body and refillable
5190-3989 P3212 pH Combination electrode Combination electrode, plastic body and non-refillable
5190-3990 P3311 pH Triode combination electrode Triode combination electrode, with built-in ATC probe, glass body and refillable
5190-3991 P3111 pH Electrode Glass body, single electrode
5190-3992 P3213 pH Combination electrode Combination electrode, plastic body, flat sensitive glass membrane, refillable
5190-3993 P3214 pH Combination electrode Combination electrode, plastic body, spear-tip sensitive glass, and non-refillable
5190-4003 R8111 Reference electrode Glass body, ceramic junction, Ag/AgCl and single-junction
5190-3999 ORP8211 ORP electrode Combination electrode, glass body and refillable
5190-3998 T7111 ATC Probe Stainless Steel Temperature measurement range: 0–100 °C
5185-8390 ATC temperature diagnostic tool Temperature troubleshooting
5185-8391 Conductivity diagnostic tool Conductivity troubleshooting
G4383-40000 Short circuit plug Used for zero potential calibration and troubleshooting.
60 3200P pH Meter User Guide
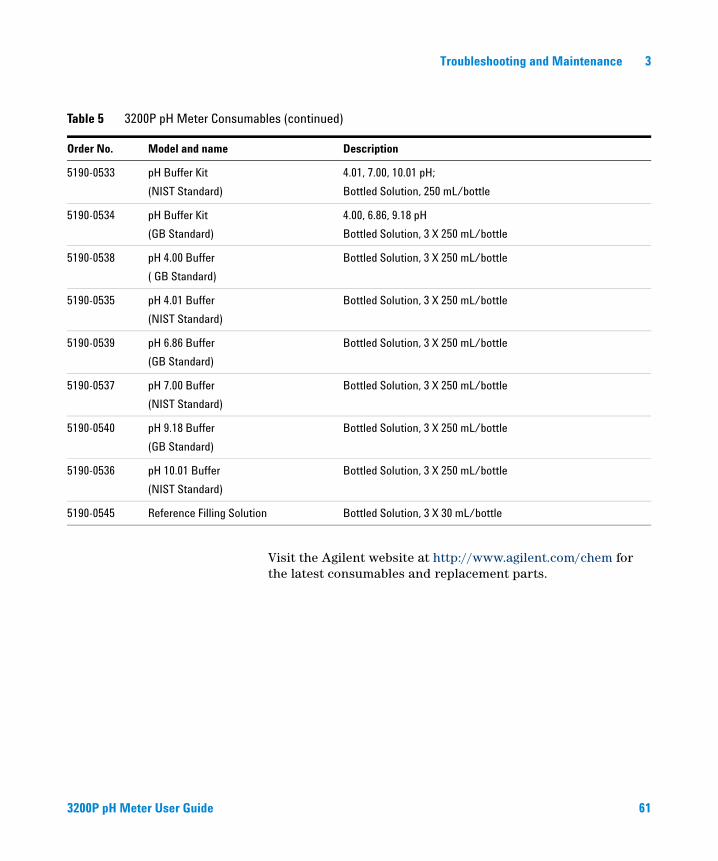
Troubleshooting and Maintenance 3
Visit the Agilent website at http://www.agilent.com/chem for the latest consumables and replacement parts.
5190-0533 pH Buffer Kit
(NIST Standard)
4.01, 7.00, 10.01 pH;
Bottled Solution, 250 mL/bottle
5190-0534 pH Buffer Kit
(GB Standard)
4.00, 6.86, 9.18 pH
Bottled Solution, 3 X 250 mL/bottle
5190-0538 pH 4.00 Buffer
( GB Standard)
Bottled Solution, 3 X 250 mL/bottle
5190-0535 pH 4.01 Buffer
(NIST Standard)
Bottled Solution, 3 X 250 mL/bottle
5190-0539 pH 6.86 Buffer
(GB Standard)
Bottled Solution, 3 X 250 mL/bottle
5190-0537 pH 7.00 Buffer
(NIST Standard)
Bottled Solution, 3 X 250 mL/bottle
5190-0540 pH 9.18 Buffer
(GB Standard)
Bottled Solution, 3 X 250 mL/bottle
5190-0536 pH 10.01 Buffer
(NIST Standard)
Bottled Solution, 3 X 250 mL/bottle
5190-0545 Reference Filling Solution Bottled Solution, 3 X 30 mL/bottle
Table 5 3200P pH Meter Consumables (continued)
Order No. Model and name Description
3200P pH Meter User Guide 61

3 Troubleshooting and Maintenance
62 3200P pH Meter User Guide
Agilent 3200P pH MeterUser Guide
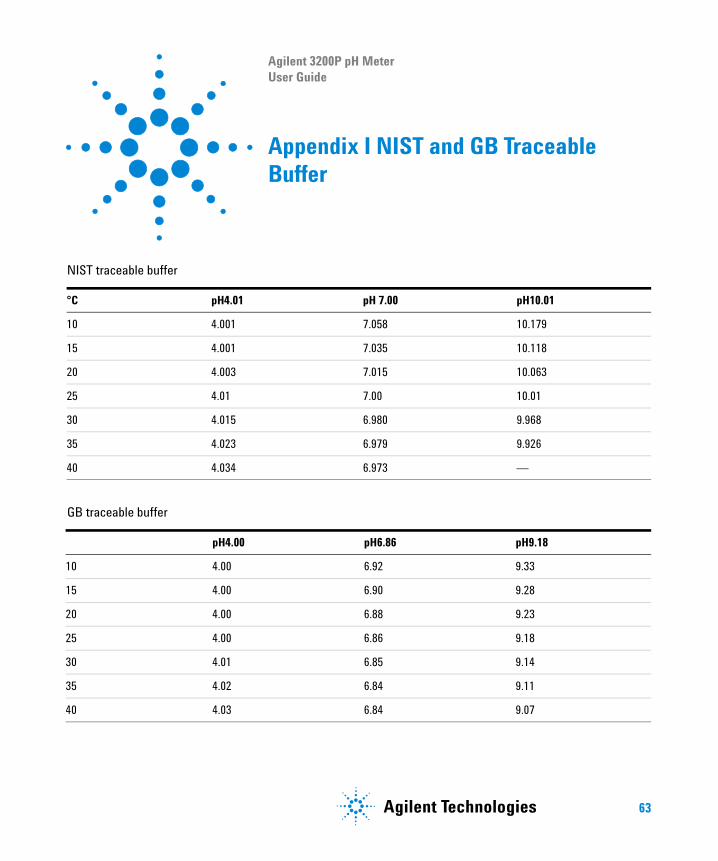
Appendix I NIST and GB Traceable Buffer
NIST traceable buffer
°C pH4.01 pH 7.00 pH10.01
10 4.001 7.058 10.179
15 4.001 7.035 10.118
20 4.003 7.015 10.063
25 4.01 7.00 10.01
30 4.015 6.980 9.968
35 4.023 6.979 9.926
40 4.034 6.973 —
GB traceable buffer
pH4.00 pH6.86 pH9.18
10 4.00 6.92 9.33
15 4.00 6.90 9.28
20 4.00 6.88 9.23
25 4.00 6.86 9.18
30 4.01 6.85 9.14
35 4.02 6.84 9.11
40 4.03 6.84 9.07
63Agilent Technologies

3 Appendix I NIST and GB Traceable Buffer
64 3200P pH Meter User Guide
Agilent 3200P pH MeterUser Guide
Appendix II EcFWUPDATE Operating Guide
Overview 66
Install the Software 66
Install EcFWUPDATE 66
Install the USB driver 67
Configure the USB port 69
Run the Program 71
User Interface Reference 74
65Agilent Technologies
Appendix II EcFWUPDATE Operating Guide
Overview
The EcFWUPDATE tool allows a PC to update the firmware on an Agilent electrochemical instrument. Using the PC USB port, the software can load new firmware into the internal program memory of the instrument.
Install the Software
This program is supported on the following operating systems:
• 32 bit Windows 7
• 32 bit Windows XP, Service pack 3
Install EcFWUPDATE
1 Download the EcFWUPDATE.ZIP file from this Agilent website: http://www.chem.agilent.com/en-US/Support/Downloads/ Utilities/Pages/default.aspx.
2 Unzip the EcFWUPDATE.ZIP file to a temporary directory.
3 From the temporary directory location, double-click the EcFWUPDATE.EXE file and follow the instructions provided on the software setup wizard to complete the installation of the EcFWUPDATE program.
The USB driver must be installed before running this program.
66 3200P pH Meter User Guide
Appendix II EcFWUPDATE Operating Guide
Install the USB driver
Install the provided USB driver on a PC to allow communication with the instrument. If this driver was previously installed for EcPRINT please skip this procedure.
1 Run CP210xVCPInstaller.exe which is located in the temporary directory used for unzipping the EcFWUPDATE.ZIP file.
2 With the instrument powered off, connect the USB cable (provided with the instrument) from the instrument port labeled USB to a USB port on the PC.
3 Power on the instrument.
3200P pH Meter User Guide 67
Appendix II EcFWUPDATE Operating Guide
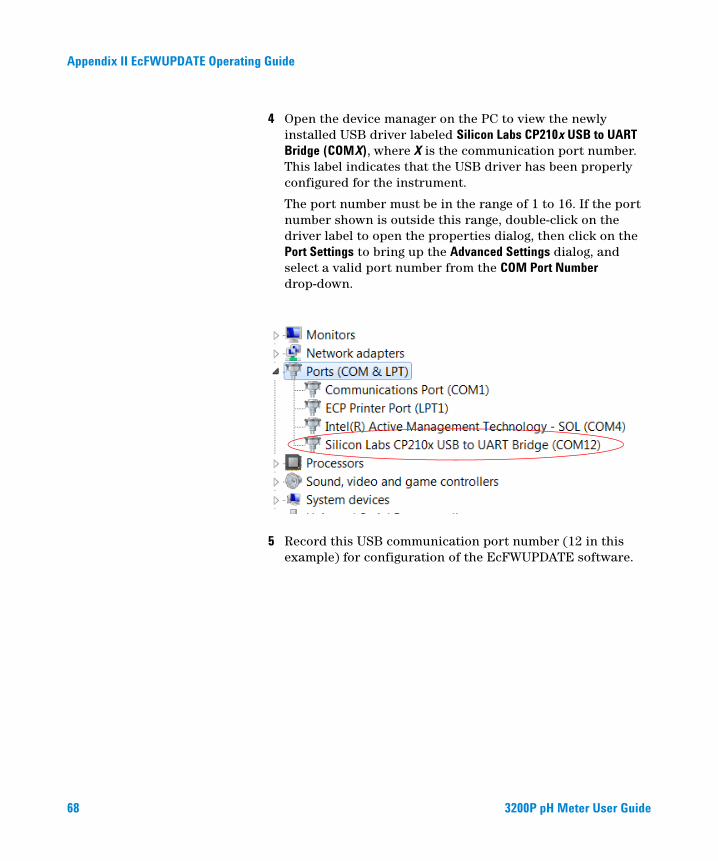
4 Open the device manager on the PC to view the newly installed USB driver labeled Silicon Labs CP210x USB to UART Bridge (COMX), where X is the communication port number. This label indicates that the USB driver has been properly configured for the instrument.
The port number must be in the range of 1 to 16. If the port number shown is outside this range, double-click on the driver label to open the properties dialog, then click on the Port Settings to bring up the Advanced Settings dialog, and select a valid port number from the COM Port Number drop-down.
5 Record this USB communication port number (12 in this example) for configuration of the EcFWUPDATE software.
68 3200P pH Meter User Guide
Appendix II EcFWUPDATE Operating Guide
Configure the USB port
This procedure assigns the previously recorded USB port number to the EcFWUPDATE program.
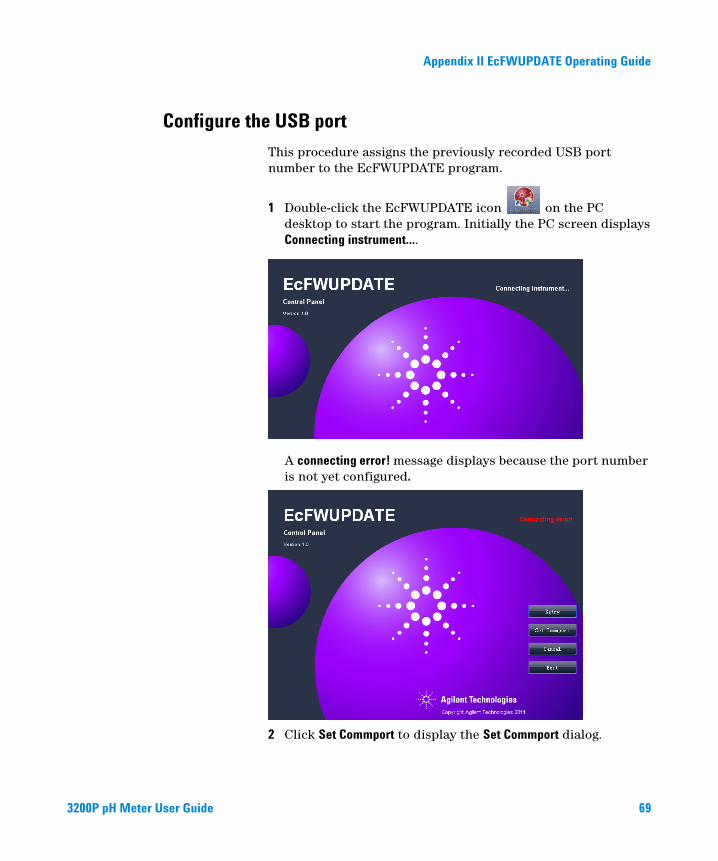
1 Double-click the EcFWUPDATE icon on the PC desktop to start the program. Initially the PC screen displays Connecting instrument....
A connecting error! message displays because the port number is not yet configured.
2 Click Set Commport to display the Set Commport dialog.
3200P pH Meter User Guide 69

Appendix II EcFWUPDATE Operating Guide
3 Enter the previously recorded communication port number (12 in this example) and click OK.
4 Click Retry and the EcFWUPDATE software should now connect to the instrument and display the instrument type, and firmware version number.
5 A prompt displays if an update is required.
6 Click Cancel to exit or click OK to update the firmware now. See the next section on “Run the Program” and continue with step 2.
70 3200P pH Meter User Guide
Appendix II EcFWUPDATE Operating Guide
Run the Program
Configure the USB port before running the software.
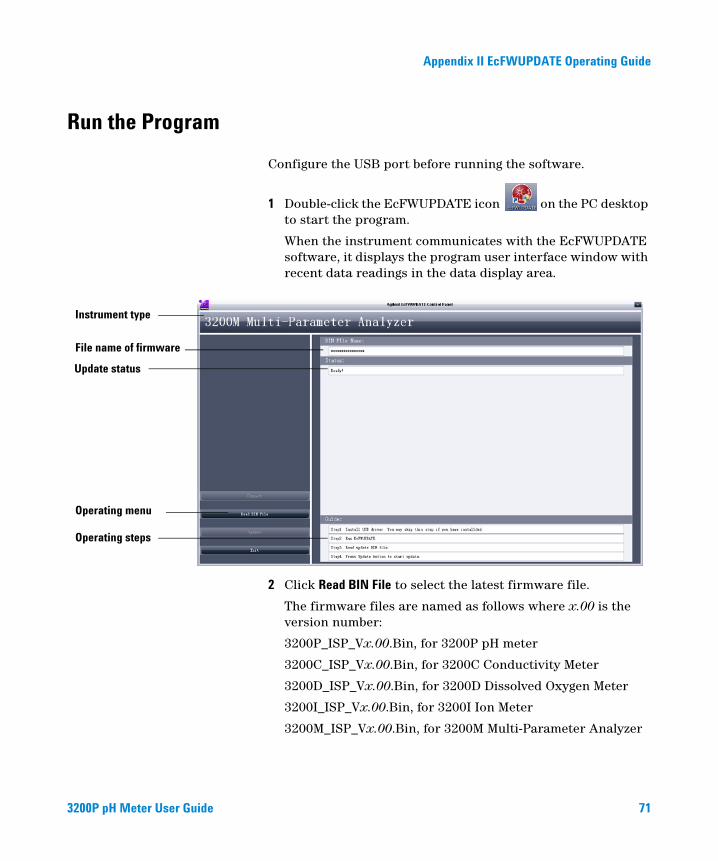
1 Double-click the EcFWUPDATE icon on the PC desktop to start the program.
When the instrument communicates with the EcFWUPDATE software, it displays the program user interface window with recent data readings in the data display area.
2 Click Read BIN File to select the latest firmware file.
The firmware files are named as follows where x.00 is the version number:
3200P_ISP_Vx.00.Bin, for 3200P pH meter
3200C_ISP_Vx.00.Bin, for 3200C Conductivity Meter
3200D_ISP_Vx.00.Bin, for 3200D Dissolved Oxygen Meter
3200I_ISP_Vx.00.Bin, for 3200I Ion Meter
3200M_ISP_Vx.00.Bin, for 3200M Multi-Parameter Analyzer
Instrument type
File name of firmware
Operating menu
Update status
Operating steps
3200P pH Meter User Guide 71
Appendix II EcFWUPDATE Operating Guide
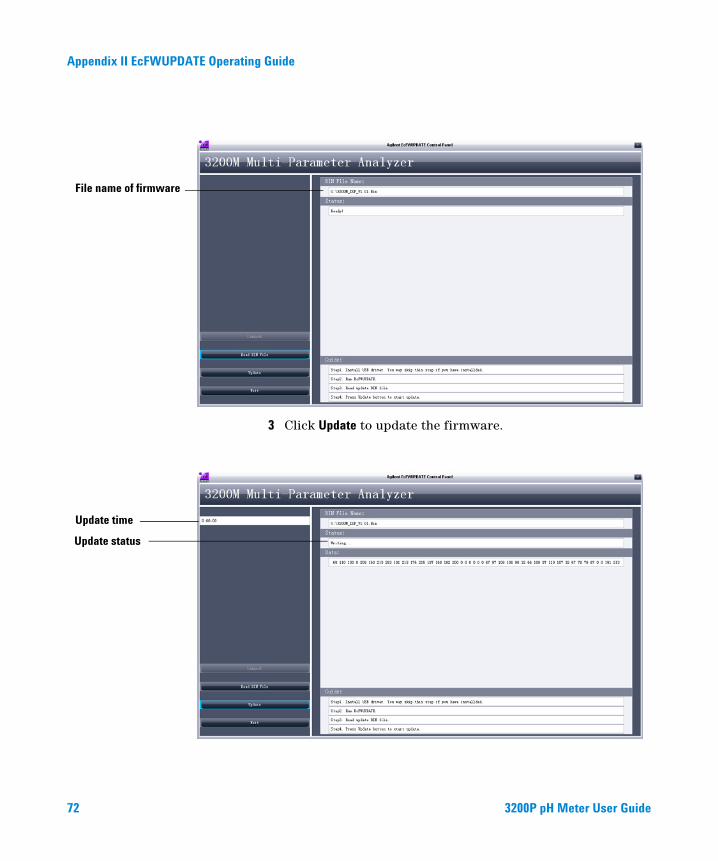
3 Click Update to update the firmware.
File name of firmware
Update time
Update status
72 3200P pH Meter User Guide

Appendix II EcFWUPDATE Operating Guide
When the firmware update is complete, the following message displays.
4 Click Exit to exit the program.
3200P pH Meter User Guide 73
Appendix II EcFWUPDATE Operating Guide
User Interface Reference
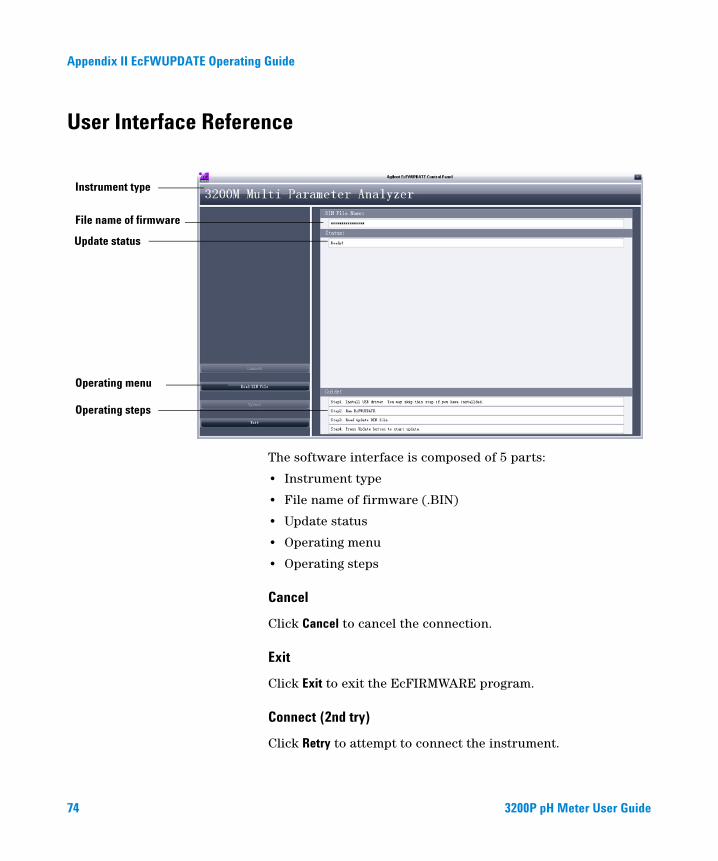
The software interface is composed of 5 parts:
• Instrument type
• File name of firmware (.BIN)
• Update status
• Operating menu
• Operating steps
Cancel
Click Cancel to cancel the connection.
Exit
Click Exit to exit the EcFIRMWARE program.
Connect (2nd try)
Click Retry to attempt to connect the instrument.
Instrument type
File name of firmware
Operating menu
Update status
Operating steps
74 3200P pH Meter User Guide
Agilent 3200P pH MeterUser Guide
Appendix III EcPRINT Operating Guide
Overview 76
Install the Software 76
Install EcPRINT 76
Install the USB driver 76
Configure the USB port 78
Run the Program 80
User Interface Reference 82
75Agilent Technologies
Appendix III EcPRINT Operating Guide
Overview
The EcPRINT software allows a PC to communicate with an Agilent electrochemical instrument through a USB port. The instrument sends acquired data to the PC for viewing, printing, and saving the data to a PC storage device.
Install the Software
This program is supported on the following operating systems:
• 32 bit Windows 7
• 32 bit Windows XP, Service pack 3
Install EcPRINT
1 Download the EcPRINT.ZIP file from this Agilent website: http://www.chem.agilent.com/en-US/Support/Downloads/ Utilities/Pages/default.aspx.
2 Unzip the EcPRINT.ZIP file to a temporary directory.
3 From the temporary directory location, double-click the EcPRINT.EXE file and follow the instructions provided on the software setup wizard to complete the installation of the EcPRINT program.
The USB driver must be installed before running this program.
Install the USB driver
Install the provided USB driver on a PC to allow communication with the instrument. If this driver was previously installed for EcFWUPDATE please skip this procedure.
1 Run CP210xVCPInstaller.exe, which is located in the temporary directory used for unzipping the EcPRINT.ZIP file.
2 With the instrument powered off, connect the USB cable (provided with the instrument) from the instrument port labeled USB to a USB port on the PC.
76 3200P pH Meter User Guide
Appendix III EcPRINT Operating Guide
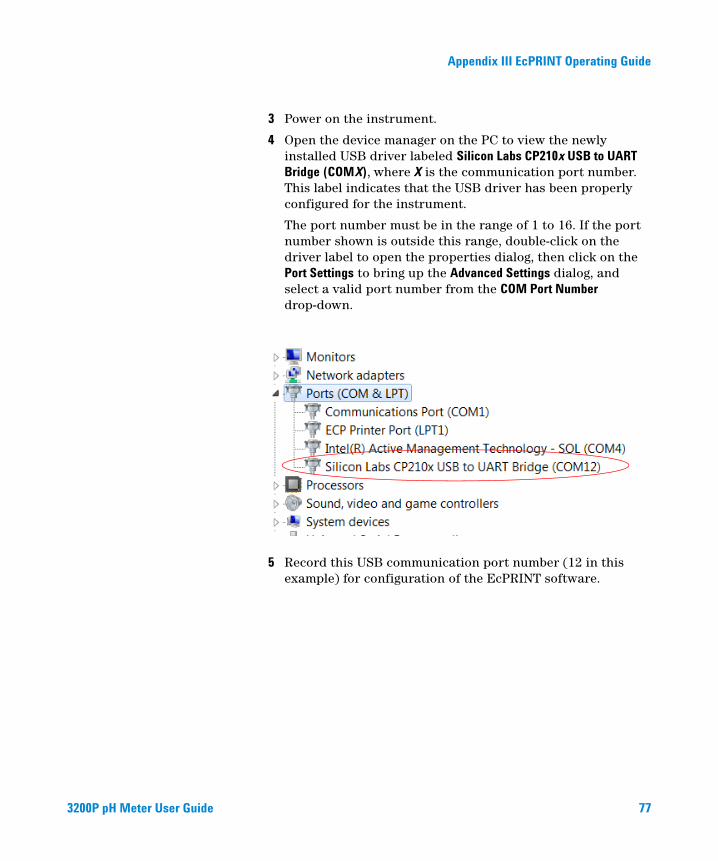
3 Power on the instrument.
4 Open the device manager on the PC to view the newly installed USB driver labeled Silicon Labs CP210x USB to UART Bridge (COMX), where X is the communication port number. This label indicates that the USB driver has been properly configured for the instrument.
The port number must be in the range of 1 to 16. If the port number shown is outside this range, double-click on the driver label to open the properties dialog, then click on the Port Settings to bring up the Advanced Settings dialog, and select a valid port number from the COM Port Number drop-down.
5 Record this USB communication port number (12 in this example) for configuration of the EcPRINT software.
3200P pH Meter User Guide 77

Appendix III EcPRINT Operating Guide
Configure the USB port
This procedure assigns the previously recorded USB port number to the EcPrint program.
1 Double-click the EcPRINT icon on the PC desktop to start the program. Initially the PC screen displays Connecting instrument....
A connecting error! message displays because the port number is not yet configured.
78 3200P pH Meter User Guide
Appendix III EcPRINT Operating Guide
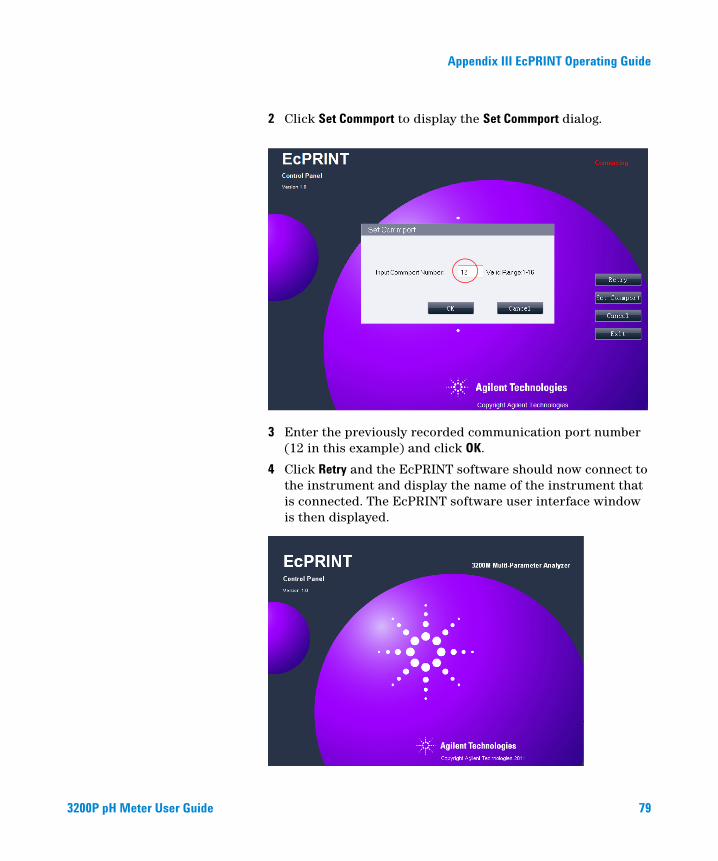
2 Click Set Commport to display the Set Commport dialog.
3 Enter the previously recorded communication port number (12 in this example) and click OK.
4 Click Retry and the EcPRINT software should now connect to the instrument and display the name of the instrument that is connected. The EcPRINT software user interface window is then displayed.
3200P pH Meter User Guide 79
Appendix III EcPRINT Operating Guide
Run the Program
Configure the USB port before running the software.
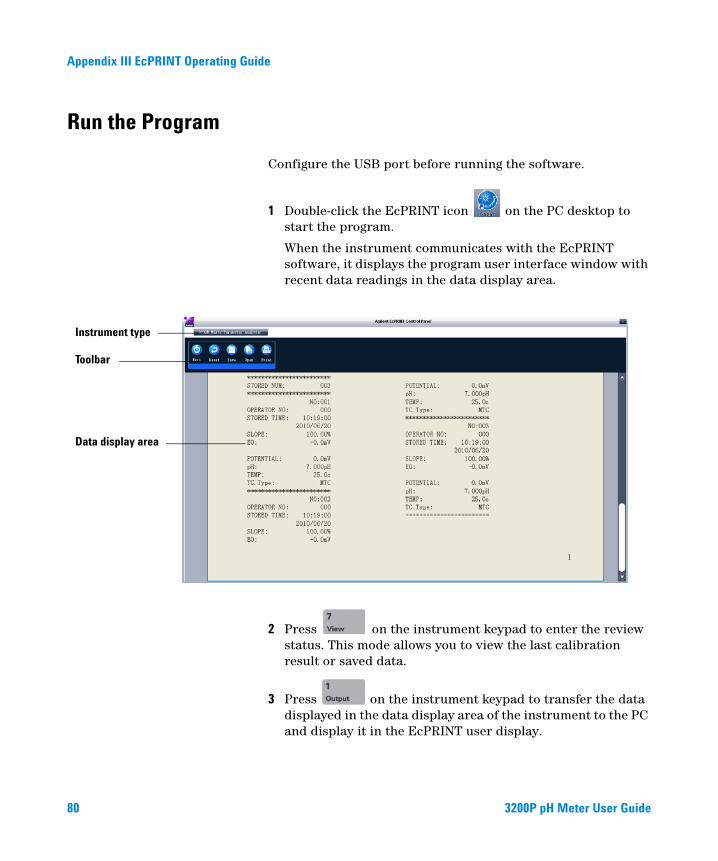
1 Double-click the EcPRINT icon on the PC desktop to start the program.
When the instrument communicates with the EcPRINT software, it displays the program user interface window with recent data readings in the data display area.
2 Press on the instrument keypad to enter the review status. This mode allows you to view the last calibration result or saved data.
3 Press on the instrument keypad to transfer the data displayed in the data display area of the instrument to the PC and display it in the EcPRINT user display.
Instrument type
Toolbar
Data display area
80 3200P pH Meter User Guide
Appendix III EcPRINT Operating Guide
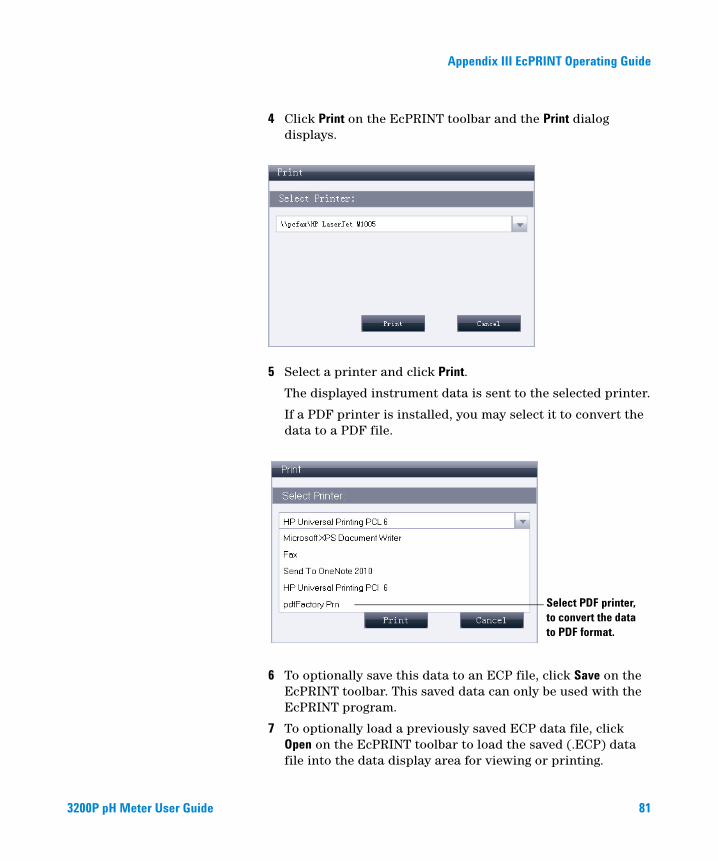
4 Click Print on the EcPRINT toolbar and the Print dialog displays.
5 Select a printer and click Print.
The displayed instrument data is sent to the selected printer.
If a PDF printer is installed, you may select it to convert the data to a PDF file.
6 To optionally save this data to an ECP file, click Save on the EcPRINT toolbar. This saved data can only be used with the EcPRINT program.
7 To optionally load a previously saved ECP data file, click Open on the EcPRINT toolbar to load the saved (.ECP) data file into the data display area for viewing or printing.
Select PDF printer, to convert the data to PDF format.
3200P pH Meter User Guide 81
Appendix III EcPRINT Operating Guide
User Interface Reference
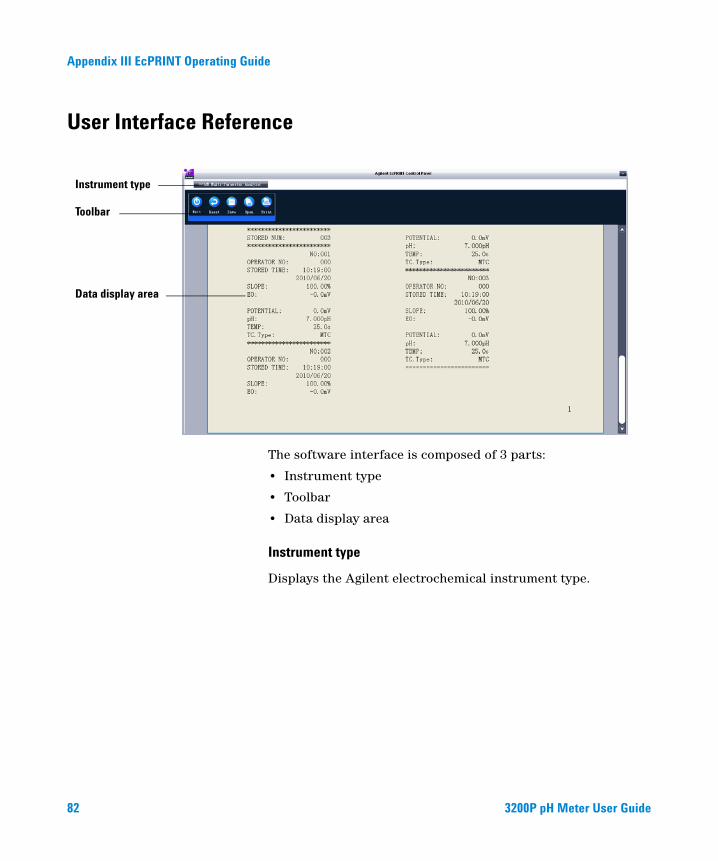
The software interface is composed of 3 parts:
• Instrument type
• Toolbar
• Data display area
Instrument type
Displays the Agilent electrochemical instrument type.
Instrument type
Toolbar
Data display area
82 3200P pH Meter User Guide
Appendix III EcPRINT Operating Guide
Toolbar
Data display area
Displays instrument data output when the instrument’s Output button is pressed, and also displays data from ECP data files loaded into the EcPRINT program.
Exit exits the EcPRINT program
Reset clears all output data
Save saves the data as an ECP file
Open opens the saved data ECP file
Print sends the output data to a specified printer
3200P pH Meter User Guide 83

Appendix III EcPRINT Operating Guide
84 3200P pH Meter User Guide

Agilent 3200P pH 计
用户手册
Agilent Technologies

Agilent 3200P pH 计用户手册
声明© Agilent Technologies, Inc. 2013 根据美国和国际版权法的规定,未经 Agilent Technologies, Inc. 事先同意和书面许可,不得以任何形式或采取任何手段 (包括电子存储和检索或翻译成其他
语言)复制本手册中的任何内容。
手册部件号5973-1775
版本
第二版 , 2013 年 11 月
中国印刷
安捷伦科技 (上海)有限公司 上海市浦东新区外高桥保税区 英伦路 412 号
联系电话:(800) 820 3278
担保说明
本手册内容按 “ 原样 ” 提供,在将来的版本中如有更改,恕不另行通知。此外,在使用法律允许的最大范围内,Agilent 对本手册以及此处包含的任何信息不作任何明示或暗示担保,包括但不仅限于适销性针某一特殊用途的实用性的暗示担保。对于因提供、使用或执行本手册或此处包含的任何信息而产生的错误,或造成的偶然或必然的损失,Agilent 不承担任何责任。如果 Agilent与用户签订了单独的书面协议,而其中涉及本手册内容的担保条款与这些条款存在冲突,则以协议中的担保条款为准。
安全声明
小心
小心提示表示存在危险。提醒您注意某个操作步骤、某项操作或类似问题,如果执行不当或未遵照提示操作,可能会损坏产品或丢失重要数据。只有完全理解并符合指定的条件时,才可以忽略小心提示的要求继续进行操作。
警告
警告提示表示存在危险。提醒您注意某个操作步骤、某项操作或类似问题,如果执行不当或未遵照提示操作,可能会导致人身伤害或死亡。只有完全理解并符合指定的条件时,才可以忽略警告提示的要求继续进行操作。
目录
3200P 型 pH 计安装指南 91
安装所需的工具和部件 92
3200P 型 pH 计安装 93
电极支架的安装 93电极的安装 94电源适配器的安装 95
接地线的安装 96
获得更多信息 97
3200P 型 pH 计操作指南 99
简介 100
在哪里可以获得相关信息 100术语解释 1013200P 型 pH 计的特点 1013200P 型 pH 计的主要技术性能 1023200P 型 pH 计的前视图 1043200P 型 pH 计的后视图 104操作盘 105
操作基本知识 107
概述 107仪器控制 107更正问题 125
3200P 型 pH 计故障排除 127
仪器基本故障以及解决办法 128
仪器自诊断操作指导 129
Agilent 3200P pH 计用户手册 87
目录
仪器的电位诊断 129仪器的 pH 值诊断 129仪器的温度诊断 129仪器的恢复默认值诊断 130
仪器自诊断相应代码与说明 131
严重错误 131警告错误 132
电极的保养、维护和贮存 135
电极的清洗 136
电极的储存 136
3200P 型 pH 计耗材信息 137
附录 1:不同温度对应的 pH 值 139
附录 2:EcFWUPDATE 操作说明书 141
概述 142
软件安装 142
安装 EcFWUPDATE 142安装 USB 驱动程序 142设置通讯口 144
软件运行 147
软件界面 150
附录 3:EcPRINT 操作说明书 151
概述 152
软件安装 152
安装 EcPRINT 152安装 USB 驱动程序 152设置通讯口 154
88 Agilent 3200P pH 计用户手册
Contents
软件运行 156
软件界面 158
Agilent 3200P pH 计用户手册 89

目录
90 Agilent 3200P pH 计用户手册

Agilent 3200P pH 计用户手册
13200P 型 pH 计安装指南
安装所需的工具和部件 92
3200P 型 pH 计安装 93
接地线的安装 96
获得更多信息 97
获得更多信息 97
本安装过程,要求使用随 3200P 型 pH 计附带的配件。
91Agilent Technologies
1
安装所需的工具和部件
Agilent 提供安装所需的专业工具和附件,如下:
• 电极支架 (G4389A)
• 电极 ,如 P3211 pH Combination Electrode (5190-3988)
• 电源适配器 ( 5185-8389)
• 短路插头 (出厂时安装在仪表上 , G4383-40000)
• ATC 温度诊断插头 (5185-8390)
92 Agilent 3200P pH 计用户手册
1
3200P 型 pH 计安装
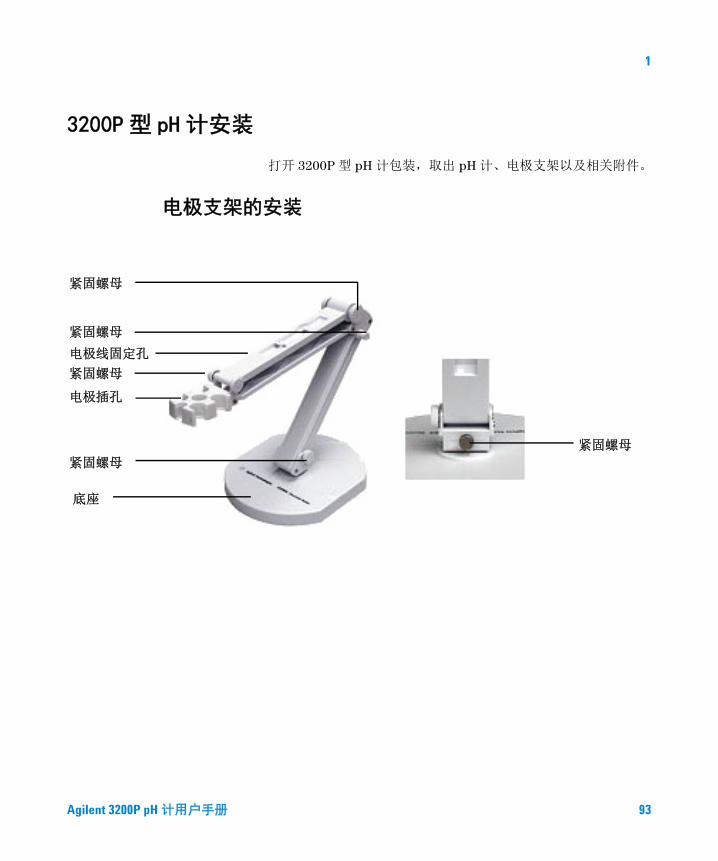
打开 3200P 型 pH 计包装,取出 pH 计、电极支架以及相关附件。
电极支架的安装
紧固螺母
紧固螺母
电极线固定孔
紧固螺母
电极插孔
紧固螺母
底座
紧固螺母
Agilent 3200P pH 计用户手册 93

1
电极的安装
在 pH 计的背面找到 pH/pX 电极接口、温度电极接口,然后,分别将 pH 测量电极、温度电极(5190-3998)插入相应 pH/pX 电极接口和温度电极接口内,并将电极线夹在电极支架边缘固定孔中。
94 Agilent 3200P pH 计用户手册

1
电源适配器的安装
仪器随机提供电源适配器。请注意,本适配器只适用于本仪器,不建议用于其他类型的仪器。我们也不建议使用其他类型的电源适配器。
本电源适配器适用于以下电源:100~240VAC, 1A, 50/60Hz。
对应不同地区的电源,电源适配器提供多种转接插头,用户请正确选择合适的电源插头,然后按照图示将电源插头安装到适配器底座上,听到 “ 啪 ” 的一声表示已经安装到位。
Agilent 3200P pH 计用户手册 95
1
接地线的安装
仪器随机提供接地线,但是接地线在测量过程中不是必须安装的。有时电极和被测溶液组成的测量部分会受到某些设备的干扰(如恒温槽等设备),从而引起跳字、影响测量,此时必须将测量部分屏蔽起来,并安装接地线,消除干扰。当仪器受到干扰时,将 DC501接地线一端连接仪器,另一端连接测量部分的屏蔽层,比如恒温槽的外壳等。
96 Agilent 3200P pH 计用户手册
1
获得更多信息
有关更多信息,请参阅:
1 3200P 型 pH 计操作指南,以获得和熟悉日常操作说明。
2 电极操作指南,以获得电极使用和维护说明。
Agilent 3200P pH 计用户手册 97

1
98 Agilent 3200P pH 计用户手册
Agilent 3200P pH 计用户手册
23200P 型 pH 计操作指南
简介 100
在哪里可以获得相关信息 100
术语解释 101
3200P 型 pH 计的特点 101
3200P 型 pH 计的主要技术性能 102
3200P 型 pH 计的前视图 104
3200P 型 pH 计的后视图 104
操作盘 105
操作基本知识 107
概述 107
仪器控制 107
更正问题 125
此文档提供对组成 3200P 型 pH 计的各个组件的概述。
99Agilent Technologies

2
简介
在哪里可以获得相关信息
除此文档之外, Agilent 还提供了其他相关说明产品,这些产品描述如何安装、操作和维护 3200P 型 pH 计及其故障排除。
使用 pH 计之前,请确保已阅读 3200P 型 pH 计安装指南和操作指南。使用 pH 计时最常见的安全问题有:
1 如果选用非原机配备电源适配器可能会发生不必要的安全问题。
2 必须有良好的接地。
3 防止腐蚀性气体侵入。
4 仪器的接口必须保持清洁、干燥,切忌与酸、碱、盐溶液接触。
5 仪器可供长期稳定使用。测试完样品,所用电极应浸在蒸馏水中。
6 pH 计属于高精度测量仪器,为了避免仪器的高阻器件受到损坏,当仪器不连接 pH 电极时,应将随机提供的短路插头(G4383-40000) 插入 pH/pX 电极接口。当仪器连接电极时,必须将短路插头放置在干燥、干净的环境,防止短路插头受潮,再次使用时影响仪器性能,甚至损坏仪器。
Agilent 客户门户网站
Agilent 建立了一个客户门户网站,可为您所拥有的产品提供相关 自定义信息。通过该 Web 服务,您可以获得多种自定义服务以及 与 Agilent 产品和订单直接相关的信息。该门户网站的登录地为 http://www.agilent.com/chem。
100 Agilent 3200P pH 计用户手册
2
术语解释
pH 斜率:每变化 1pH 值产生电位的变化量,通常用 mV/pH 或 %表示。
pH 的 E0:又称 “ 零电位 ”,通常是指 pH 为 7 时的电位值。
pH 的一点标定:用一种 pH 缓冲溶液进行的校准。
pH 的多点标定:用两种以上 pH 缓冲溶液进行的校准。
R 标记:表示读数稳定。标定过程中,表示数据已稳定并锁定,用户可以读取、保存数据。判定数据稳定与否的依据是设定的平衡条件。按 “ 测量 ” 键可以解锁。每次标定前,请先解锁。测量过程中,表示数据已稳定,用户可以读取、保存数据。在平衡测量模式时,出现 R 标记,数据将锁定。按 “ 测量 ” 可以解锁。
3200P 型 pH 计的特点
3200P 型 pH 计是一台新颖、实用的实验室分析仪器,适用于实验室精确测量水溶液的 pH 值、电位值与温度值。其主要特点为:
1 支持测量 pH 值、电位值、温度值。
2 支持自动识别,支持 NIST、 DIN、 GB 等标准。
3 支持多点标定功能,最多可以标定 5 点。
4 采用点阵式液晶,显示清晰,外形美观。具有良好的人机界面,操作方便。
5 支持 GLP 规范:
a 仪器要求设置操作者编号并记录;
b 记录并允许查阅、打印标定数据。
c 支持贮存符合 GLP 规范的测量数据 1000 套。
6 允许查阅、打印、删除贮存的测量数据。
7 支持三种测量模式:连续测量模式、定时测量模式和平衡测量模式,可以满足用户不同测量需要。
8 具有稳定提示标志 R,便于用户操作。
9 具有 USB 接口,配合专用的通信软件,可以实现与 PC 连接。
10 具有断电保护功能,仪器使用完毕关机后或非正常断电情况下,仪器内部贮存的测量数据、标定数据以及设置的参数不会丢失。
Agilent 3200P pH 计用户手册 101
2
11 仪器支持自动关机功能和支持年检提示功能。
12 仪器支持恢复默认数据功能;支持自诊断,可以诊断仪器是否正常工作。
13 带有背光设计,可以在阴暗的环境下使用。
14 采用新型材料 PC 面板,轻触按键设计,可靠性好,寿命长。
15 仪器具有固件升级功能,当仪器有功能性的拓展时,可以使用本功能更新。
3200P 型 pH 计的主要技术性能
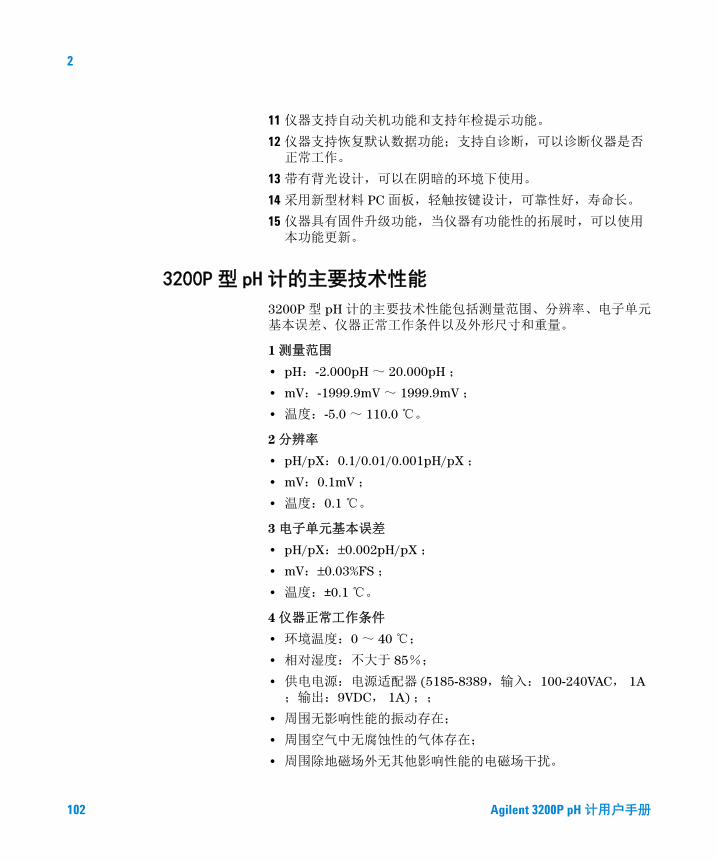
3200P 型 pH 计的主要技术性能包括测量范围、分辨率、电子单元基本误差、仪器正常工作条件以及外形尺寸和重量。
1 测量范围
• pH:-2.000pH ~ 20.000pH ;
• mV:-1999.9mV ~ 1999.9mV ;
• 温度:-5.0 ~ 110.0 ℃。
2 分辨率
• pH/pX:0.1/0.01/0.001pH/pX ;
• mV:0.1mV ;
• 温度:0.1 ℃。
3 电子单元基本误差
• pH/pX:±0.002pH/pX ;
• mV:±0.03%FS ;
• 温度:±0.1 ℃。
4 仪器正常工作条件
• 环境温度:0 ~ 40 ℃;
• 相对湿度:不大于 85%;
• 供电电源:电源适配器 (5185-8389,输入:100-240VAC, 1A;输出:9VDC, 1A) ;;
• 周围无影响性能的振动存在;
• 周围空气中无腐蚀性的气体存在;
• 周围除地磁场外无其他影响性能的电磁场干扰。
102 Agilent 3200P pH 计用户手册
2
5 外形尺寸 ( 长 × 宽 × 高, mm):
• 190×190×105
6 重量 (kg):
• 约 1kg。
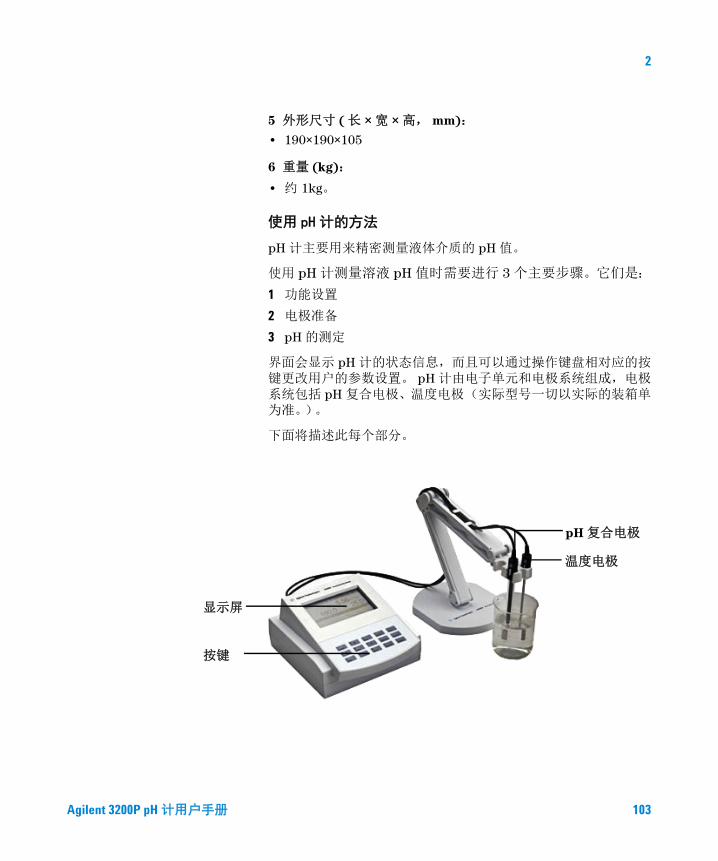
使用 pH 计的方法
pH 计主要用来精密测量液体介质的 pH 值。
使用 pH 计测量溶液 pH 值时需要进行 3 个主要步骤。它们是:
1 功能设置
2 电极准备
3 pH 的测定
界面会显示 pH 计的状态信息,而且可以通过操作键盘相对应的按键更改用户的参数设置。 pH 计由电子单元和电极系统组成,电极系统包括 pH 复合电极、温度电极(实际型号一切以实际的装箱单为准。)。
下面将描述此每个部分。
显示屏
按键
pH 复合电极
温度电极
Agilent 3200P pH 计用户手册 103
2
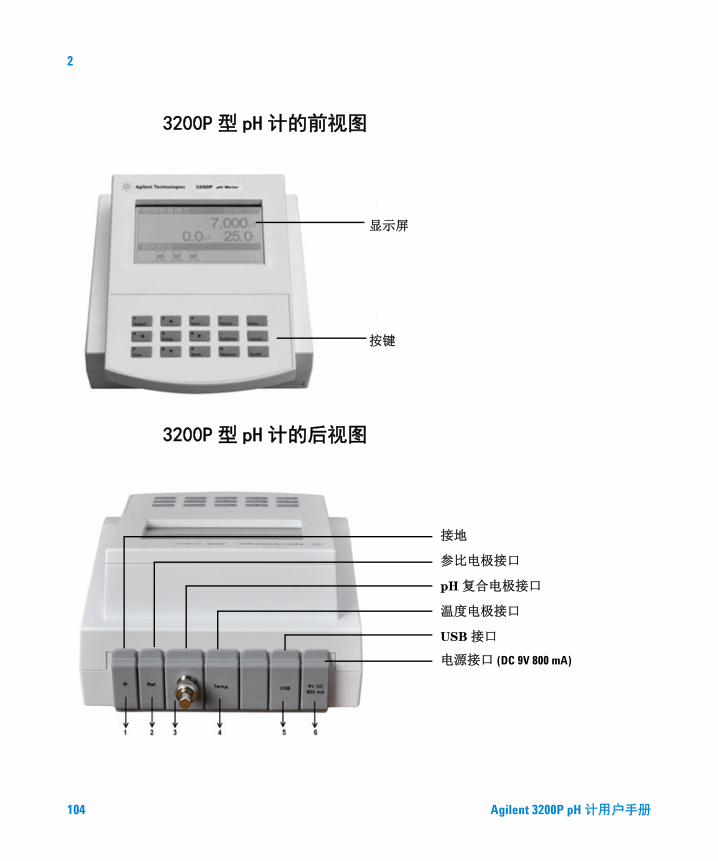
3200P 型 pH 计的前视图
3200P 型 pH 计的后视图
显示屏
按键
接地
参比电极接口
pH 复合电极接口
温度电极接口
USB 接口
电源接口 (DC 9V 800 mA)
104 Agilent 3200P pH 计用户手册
2
操作盘
操作盘由显示屏和操作键盘组成。
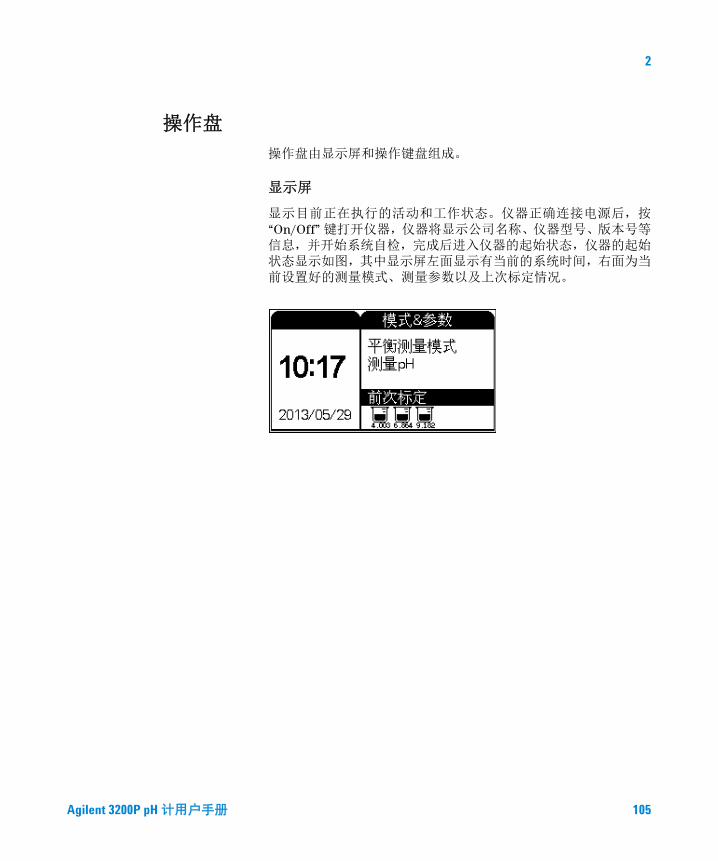
显示屏
显示目前正在执行的活动和工作状态。仪器正确连接电源后,按“On/Off” 键打开仪器,仪器将显示公司名称、仪器型号、版本号等信息,并开始系统自检,完成后进入仪器的起始状态,仪器的起始状态显示如图,其中显示屏左面显示有当前的系统时间,右面为当前设置好的测量模式、测量参数以及上次标定情况。
Agilent 3200P pH 计用户手册 105
2
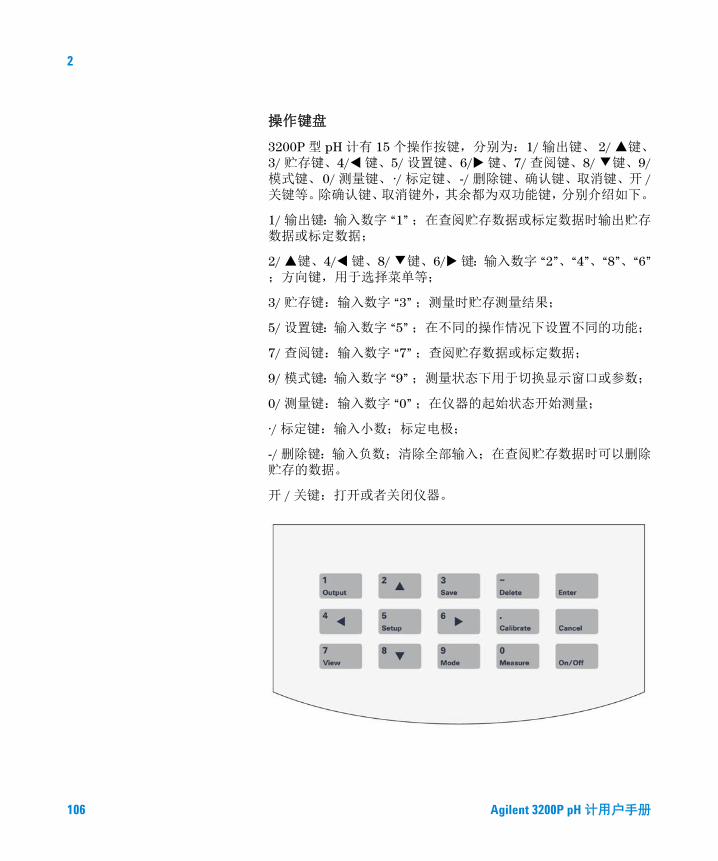
操作键盘
3200P 型 pH 计有 15 个操作按键,分别为:1/ 输出键、 2/ ▲键、3/ 贮存键、4/键、5/ 设置键、6/键、7/ 查阅键、8/ ▼键、9/模式键、0/ 测量键、 ·/ 标定键、 -/ 删除键、确认键、取消键、开 /关键等。除确认键、取消键外,其余都为双功能键,分别介绍如下。
1/ 输出键:输入数字 “1” ;在查阅贮存数据或标定数据时输出贮存数据或标定数据;
2/ ▲键、4/键、8/ ▼键、6/键:输入数字 “2”、“4”、“8”、“6”;方向键,用于选择菜单等;
3/ 贮存键:输入数字 “3” ;测量时贮存测量结果;
5/ 设置键:输入数字 “5” ;在不同的操作情况下设置不同的功能;
7/ 查阅键:输入数字 “7” ;查阅贮存数据或标定数据;
9/ 模式键:输入数字 “9” ;测量状态下用于切换显示窗口或参数;
0/ 测量键:输入数字 “0” ;在仪器的起始状态开始测量;
·/ 标定键:输入小数;标定电极;
-/ 删除键:输入负数;清除全部输入;在查阅贮存数据时可以删除贮存的数据。
开 / 关键:打开或者关闭仪器。
106 Agilent 3200P pH 计用户手册
2
操作基本知识
本节描述使用 3200P 型 pH 计可以执行的任务。
概述
操作 pH 计涉及下列任务:
• 启动 3200P 型 pH 计。启动 3200P 型 pH 计。
• 功能设置。请参阅 “ 起始状态下的功能设置 ”。
• 电极准备。请参阅 “ 电极准备 ”。
• 零点电位的校正。请参阅 “ 零点电位的校正 ”。
• pH 标液组的选择。请参阅 “ 设置标液组 ”。
• pH 电极的准备。请参阅 “ 电极的准备 ”。
• pH 电极的标定。请参阅 “ 电极的标定 ”。
• pH 值的测量。请参阅 “pH 值的测量方法 ”
• 电位测量。请参阅 “ 电位的测量方法 ”。
• 温度的测量。请参阅 “ 温度的测量方法 ”
• 数据贮存功能。请参阅 “ 数据贮存功能 ”。
• 数据删除功能。请参阅 “ 数据删除功能 ”。
• 数据输出功能。请参阅 “ 数据输出功能 ”。
• 查阅贮存数据。请参阅 “ 查阅功能 ”。
• 查阅上次标定数据。请参阅 “ 查阅功能 ”
• 关闭 3200P 型 pH 计。请参阅 “ 关闭 3200P 型 pH 计 ”。
仪器控制
3200P 型 pH 计通常直接由操作按键控制。
启动 3200P 型 pH 计
首先要正确地安装和维护 pH 计。开机前,须检查电源是否接妥,应保证仪器良好接地。电极的连接须可靠,防止腐蚀性气体侵袭。仪器插入电源后,按 “On/Off” 键开机。
Agilent 3200P pH 计用户手册 107
2
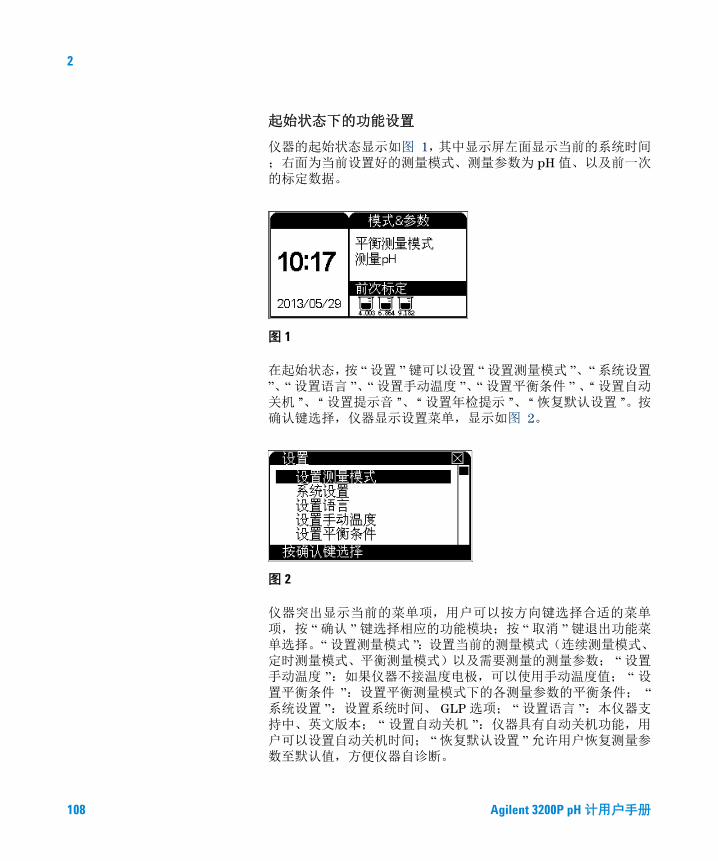
起始状态下的功能设置
仪器的起始状态显示如图 1,其中显示屏左面显示当前的系统时间 ;右面为当前设置好的测量模式、测量参数为 pH 值、以及前一次的标定数据。
图 1
在起始状态,按 “ 设置 ” 键可以设置 “ 设置测量模式 ”、 “ 系统设置 ”、“ 设置语言 ”、“ 设置手动温度 ”、“ 设置平衡条件 ” 、“ 设置自动 关机 ”、“ 设置提示音 ”、“ 设置年检提示 ”、“ 恢复默认设置 ”。按确认键选择,仪器显示设置菜单,显示如图 2。
图 2
仪器突出显示当前的菜单项,用户可以按方向键选择合适的菜单项,按 “ 确认 ” 键选择相应的功能模块;按 “ 取消 ” 键退出功能菜单选择。“ 设置测量模式 ”:设置当前的测量模式(连续测量模式、定时测量模式、平衡测量模式)以及需要测量的测量参数; “ 设置手动温度 ”:如果仪器不接温度电极,可以使用手动温度值; “ 设置平衡条件 ”:设置平衡测量模式下的各测量参数的平衡条件; “系统设置 ”:设置系统时间、 GLP 选项; “ 设置语言 ”:本仪器支持中、英文版本; “ 设置自动关机 ”:仪器具有自动关机功能,用户可以设置自动关机时间; “ 恢复默认设置 ” 允许用户恢复测量参数至默认值,方便仪器自诊断。
108 Agilent 3200P pH 计用户手册
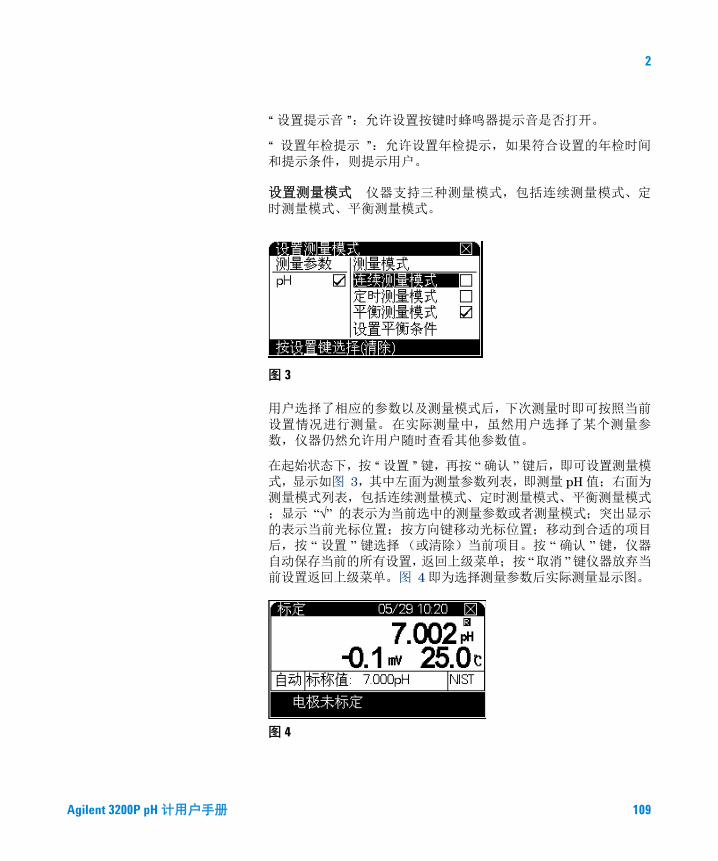
2
“ 设置提示音 ”:允许设置按键时蜂鸣器提示音是否打开。
“ 设置年检提示 ”:允许设置年检提示,如果符合设置的年检时间和提示条件,则提示用户。
设置测量模式 仪器支持三种测量模式,包括连续测量模式、定时测量模式、平衡测量模式。
图 3
用户选择了相应的参数以及测量模式后,下次测量时即可按照当前设置情况进行测量。 在实际测量中,虽然用户选择了某个测量参 数,仪器仍然允许用户随时查看其他参数值。
在起始状态下,按 “ 设置 ” 键,再按 “ 确认 ” 键后,即可设置测量模式,显示如图 3,其中左面为测量参数列表,即测量 pH 值;右面为 测量模式列表,包括连续测量模式、定时测量模式、平衡测量模式;显示 “√” 的表示为当前选中的测量参数或者测量模式;突出显示的表示当前光标位置;按方向键移动光标位置;移动到合适的项目后,按 “ 设置 ” 键选择(或清除)当前项目。按 “ 确认 ” 键,仪器自动保存当前的所有设置,返回上级菜单;按 “取消 ”键仪器放弃当前设置返回上级菜单。图 4 即为选择测量参数后实际测量显示图。
图 4
Agilent 3200P pH 计用户手册 109
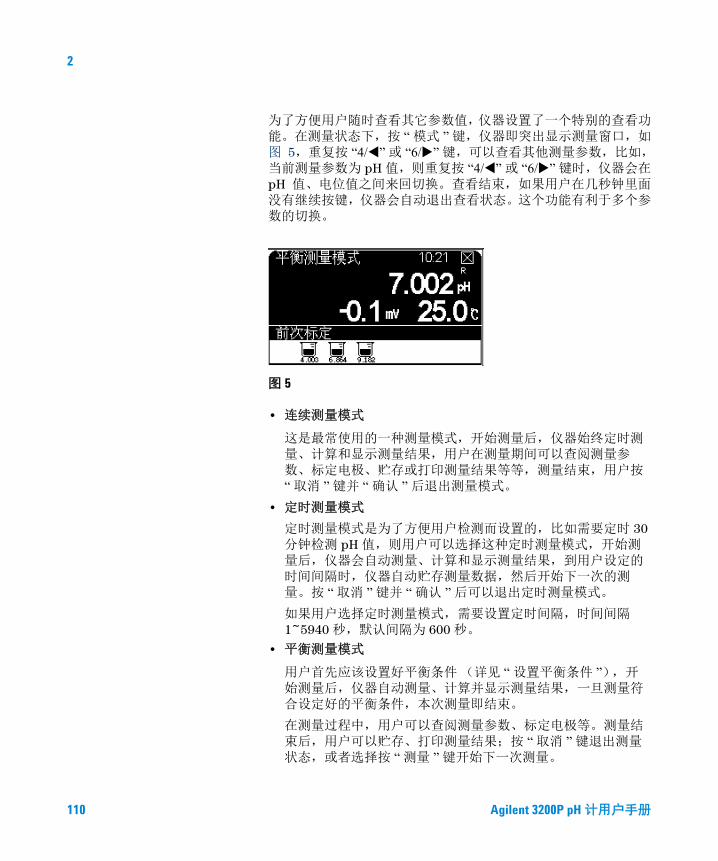
2
为了方便用户随时查看其它参数值,仪器设置了一个特别的查看功能。在测量状态下,按 “ 模式 ” 键,仪器即突出显示测量窗口,如图 5,重复按 “4/” 或 “6/” 键,可以查看其他测量参数,比如, 当前测量参数为 pH 值,则重复按 “4/” 或 “6/” 键时,仪器会在pH 值、电位值之间来回切换。查看结束,如果用户在几秒钟里面没有继续按键,仪器会自动退出查看状态。这个功能有利于多个参数的切换。
图 5
• 连续测量模式
这是最常使用的一种测量模式,开始测量后,仪器始终定时测量、计算和显示测量结果,用户在测量期间可以查阅测量参数、标定电极、贮存或打印测量结果等等,测量结束,用户按“ 取消 ” 键并 “ 确认 ” 后退出测量模式。
• 定时测量模式
定时测量模式是为了方便用户检测而设置的,比如需要定时 30分钟检测 pH 值,则用户可以选择这种定时测量模式,开始测量后,仪器会自动测量、计算和显示测量结果,到用户设定的时间间隔时,仪器自动贮存测量数据,然后开始下一次的测量。按 “ 取消 ” 键并 “ 确认 ” 后可以退出定时测量模式。
如果用户选择定时测量模式,需要设置定时间隔,时间间隔1~5940 秒,默认间隔为 600 秒。
• 平衡测量模式
用户首先应该设置好平衡条件 (详见 “ 设置平衡条件 ”),开始测量后,仪器自动测量、计算并显示测量结果,一旦测量符合设定好的平衡条件,本次测量即结束。
在测量过程中,用户可以查阅测量参数、标定电极等。测量结束后,用户可以贮存、打印测量结果;按 “ 取消 ” 键退出测量状态,或者选择按 “ 测量 ” 键开始下一次测量。
110 Agilent 3200P pH 计用户手册
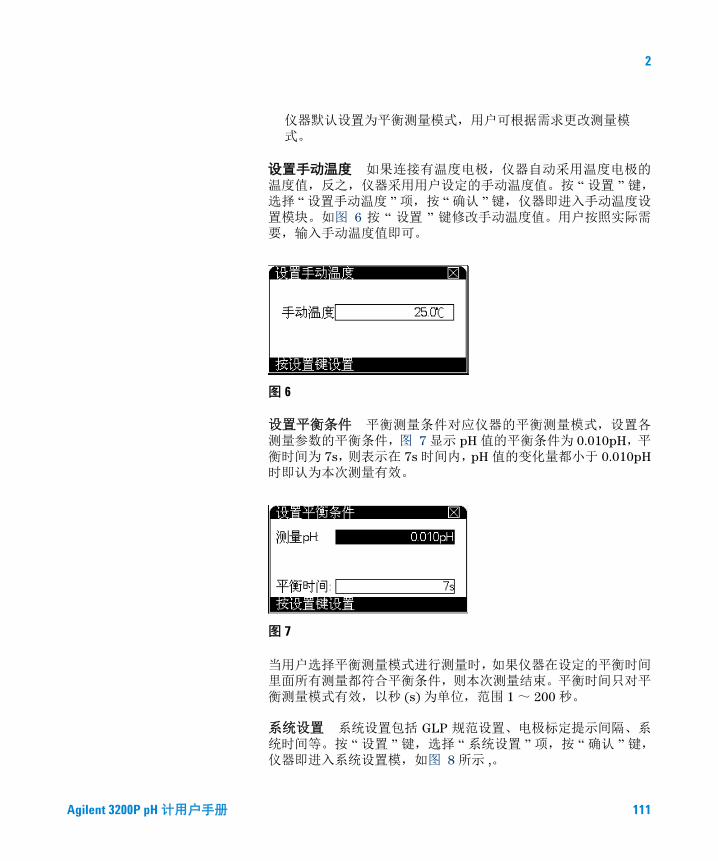
2
仪器默认设置为平衡测量模式,用户可根据需求更改测量模式。
设置手动温度 如果连接有温度电极,仪器自动采用温度电极的温度值,反之,仪器采用用户设定的手动温度值。按 “ 设置 ” 键,选择 “ 设置手动温度 ” 项,按 “ 确认 ” 键,仪器即进入手动温度设置模块。如图 6 按 “ 设置 ” 键修改手动温度值。用户按照实际需 要,输入手动温度值即可。
图 6
设置平衡条件 平衡测量条件对应仪器的平衡测量模式,设置各测量参数的平衡条件,图 7 显示 pH 值的平衡条件为 0.010pH,平 衡时间为 7s,则表示在 7s 时间内,pH 值的变化量都小于 0.010pH时即认为本次测量有效。
图 7
当用户选择平衡测量模式进行测量时,如果仪器在设定的平衡时间里面所有测量都符合平衡条件,则本次测量结束。平衡时间只对平衡测量模式有效,以秒 (s) 为单位,范围 1 ~ 200 秒。
系统设置 系统设置包括 GLP 规范设置、电极标定提示间隔、系统时间等。按 “ 设置 ” 键,选择 “ 系统设置 ” 项,按 “ 确认 ” 键,仪器即进入系统设置模,如图 8 所示 ,。
Agilent 3200P pH 计用户手册 111
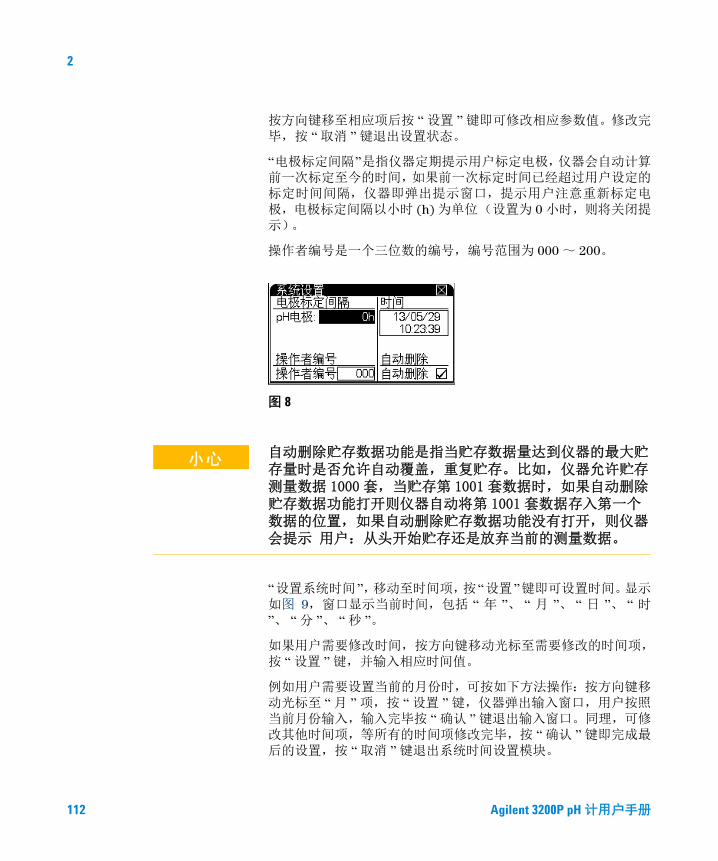
2
按方向键移至相应项后按 “ 设置 ” 键即可修改相应参数值。修改完毕,按 “ 取消 ” 键退出设置状态。
“电极标定间隔”是指仪器定期提示用户标定电极,仪器会自动计算前一次标定至今的时间,如果前一次标定时间已经超过用户设定的标定时间间隔,仪器即弹出提示窗口,提示用户注意重新标定电极,电极标定间隔以小时 (h) 为单位(设置为 0 小时,则将关闭提示)。
操作者编号是一个三位数的编号,编号范围为 000 ~ 200。
图 8
“设置系统时间”,移动至时间项,按“设置 ”键即可设置时间。显示如图 9,窗口显示当前时间,包括 “ 年 ”、 “ 月 ”、 “ 日 ”、 “ 时 ”、 “ 分 ”、 “ 秒 ”。
如果用户需要修改时间,按方向键移动光标至需要修改的时间项,按 “ 设置 ” 键,并输入相应时间值。
例如用户需要设置当前的月份时,可按如下方法操作:按方向键移动光标至 “ 月 ” 项,按 “ 设置 ” 键,仪器弹出输入窗口,用户按照当前月份输入,输入完毕按 “ 确认 ” 键退出输入窗口。同理,可修改其他时间项,等所有的时间项修改完毕,按 “ 确认 ” 键即完成最后的设置,按 “ 取消 ” 键退出系统时间设置模块。
小心 自动删除贮存数据功能是指当贮存数据量达到仪器的最大贮存量时是否允许自动覆盖,重复贮存。比如,仪器允许贮存测量数据 1000 套,当贮存第 1001 套数据时,如果自动删除贮存数据功能打开则仪器自动将第 1001 套数据存入第一个数据的位置,如果自动删除贮存数据功能没有打开,则仪器会提示 用户:从头开始贮存还是放弃当前的测量数据。
112 Agilent 3200P pH 计用户手册
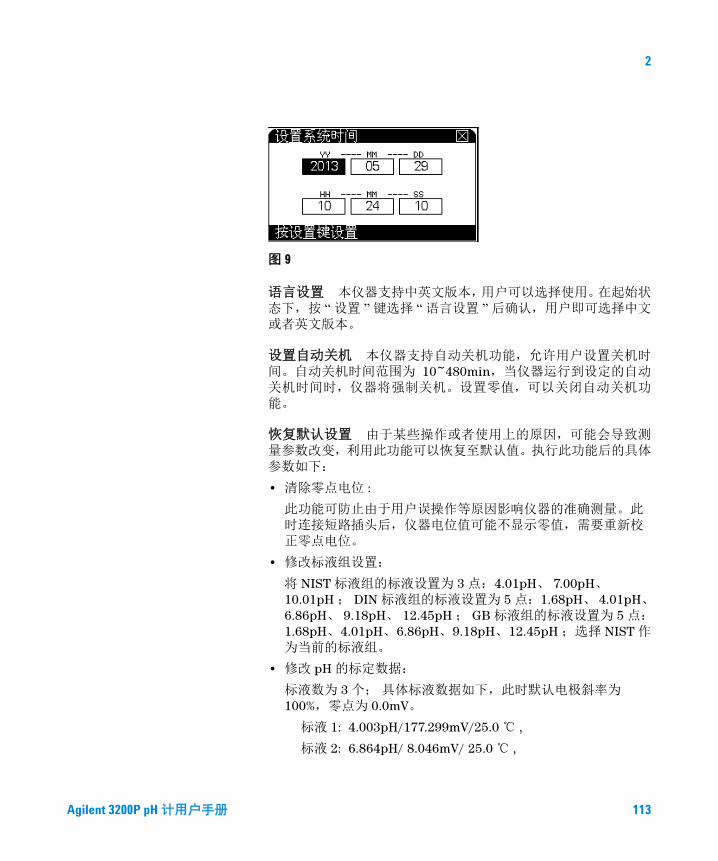
2
图 9
语言设置 本仪器支持中英文版本,用户可以选择使用。在起始状态下,按 “ 设置 ” 键选择 “ 语言设置 ” 后确认,用户即可选择中文或者英文版本。
设置自动关机 本仪器支持自动关机功能,允许用户设置关机时间。自动关机时间范围为 10~480min,当仪器运行到设定的自动关机时间时,仪器将强制关机。设置零值,可以关闭自动关机功能。
恢复默认设置 由于某些操作或者使用上的原因,可能会导致测量参数改变,利用此功能可以恢复至默认值。执行此功能后的具体参数如下:
• 清除零点电位 :
此功能可防止由于用户误操作等原因影响仪器的准确测量。此时连接短路插头后,仪器电位值可能不显示零值,需要重新校正零点电位。
• 修改标液组设置:
将 NIST 标液组的标液设置为 3 点:4.01pH、 7.00pH、10.01pH ; DIN 标液组的标液设置为 5 点:1.68pH、 4.01pH、6.86pH、 9.18pH、 12.45pH ; GB 标液组的标液设置为 5 点:1.68pH、4.01pH、6.86pH、9.18pH、12.45pH ;选择 NIST 作为当前的标液组。
• 修改 pH 的标定数据:
标液数为 3 个; 具体标液数据如下,此时默认电极斜率为100%,零点为 0.0mV。
标液 1: 4.003pH/177.299mV/25.0 ℃ ,
标液 2: 6.864pH/ 8.046mV/ 25.0 ℃ ,
Agilent 3200P pH 计用户手册 113
2
标液 3: 9.182pH/-129.085mV/ 25.0 ℃。
• 设置手动温度为 25.0 ℃;
• 设置测量模式为平衡测量模式;
• 设置定时测量模式的定时间隔为 600 秒;
• 关闭标定间隔提示功能;
• 允许数据从头覆盖;
• 设置操作者编号为 000 ;
• 设置平衡测量模式下的平衡条件为 0.01pH ;
• 设置平衡测量模式下的平衡时间为 7s ;
• 设置 pH 显示分辨率为 0.001pH ;
• 设置自动关机时间为 0,即关闭自动关机功能。
• 蜂鸣器提示音打开
• 年检提示关闭
• 自动删除打开
设置提示音
仪器允许用户设置按键时蜂鸣器提示音是否打开。用户如果觉得蜂鸣器的提示音影响使用,可以选择关闭。 按 “设置 ”键,选择 “设置提示音 ”后,按 “确认 ”键即可进入选择。 注意:仪器对应某些特别提示时,仍然会以蜂鸣器提示的形式提醒用户。
设置年检提示
对于有些用户可能需要设置一定的年检时间,仪器可以提供本功能。仪器允许用户选择关闭年检提示或提前 1-12 个月提示,如果用户打开年检提示功能,仪器在开机完成自检后,会进行判断,如果符合用户设置的年检时间和提示条件,则提示用户。 按“设置”键,选择“设置年检提示”后,按“确认”键即可进入选择。
114 Agilent 3200P pH 计用户手册
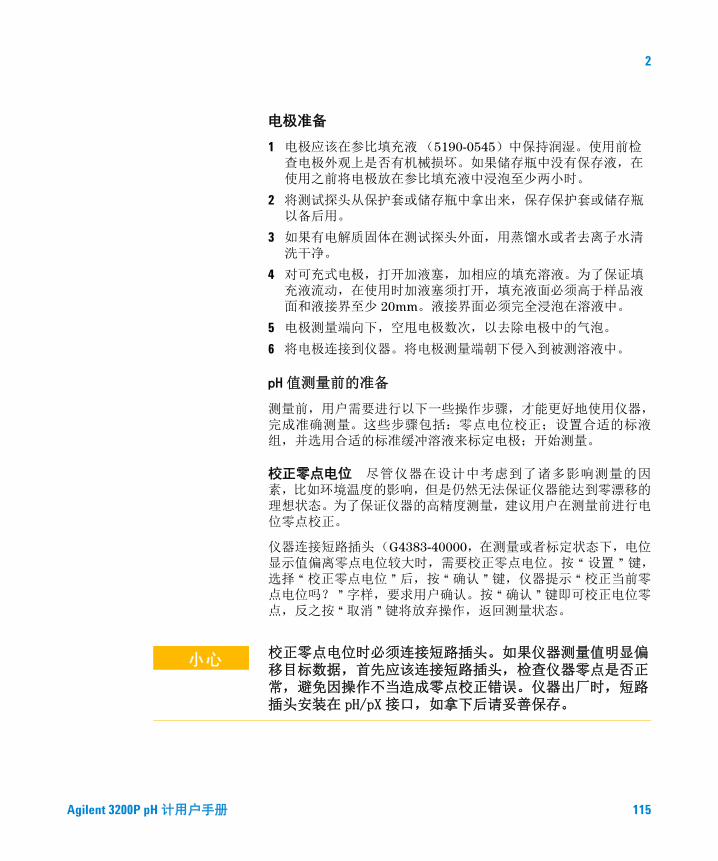
2
电极准备
1 电极应该在参比填充液 (5190-0545)中保持润湿。使用前检查电极外观上是否有机械损坏。如果储存瓶中没有保存液,在使用之前将电极放在参比填充液中浸泡至少两小时。
2 将测试探头从保护套或储存瓶中拿出来, 保存保护套或储存瓶以备后用。
3 如果有电解质固体在测试探头外面,用蒸馏水或者去离子水清洗干净。
4 对可充式电极,打开加液塞, 加相应的填充溶液。为了保证填充液流动,在使用时加液塞须打开,填充液面必须高于样品液面和液接界至少 20mm。液接界面必须完全浸泡在溶液中。
5 电极测量端向下,空甩电极数次,以去除电极中的气泡。
6 将电极连接到仪器。将电极测量端朝下侵入到被测溶液中。
pH值测量前的准备
测量前,用户需要进行以下一些操作步骤,才能更好地使用仪器,完成准确测量。这些步骤包括:零点电位校正;设置合适的标液组,并选用合适的标准缓冲溶液来标定电极;开始测量。
校正零点电位 尽管仪器在设计中考虑到了诸多影响测量的因素,比如环境温度的影响,但是仍然无法保证仪器能达到零漂移的理想状态。为了保证仪器的高精度测量,建议用户在测量前进行电位零点校正。
仪器连接短路插头(G4383-40000,在测量或者标定状态下,电位显示值偏离零点电位较大时,需要校正零点电位。按 “ 设置 ” 键,选择 “ 校正零点电位 ” 后,按 “ 确认 ” 键,仪器提示 “ 校正当前零点电位吗? ” 字样,要求用户确认。按 “ 确认 ” 键即可校正电位零点,反之按 “ 取消 ” 键将放弃操作,返回测量状态。
小心 校正零点电位时必须连接短路插头。如果仪器测量值明显偏移目标数据,首先应该连接短路插头,检查仪器零点是否正常,避免因操作不当造成零点校正错误。仪器出厂时,短路插头安装在 pH/pX 接口,如拿下后请妥善保存。
Agilent 3200P pH 计用户手册 115
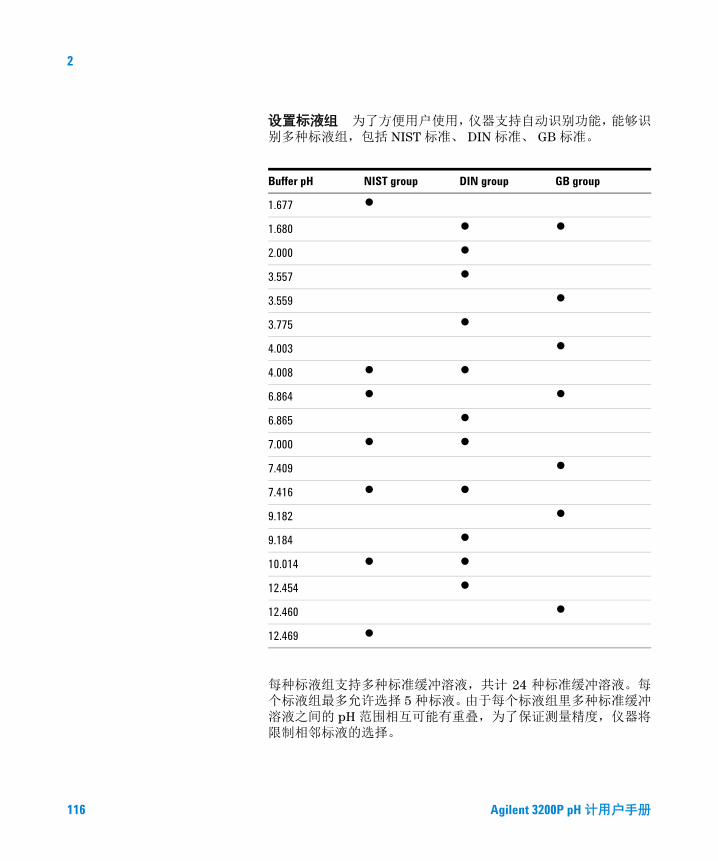
2
设置标液组 为了方便用户使用,仪器支持自动识别功能,能够识别多种标液组,包括 NIST 标准、 DIN 标准、 GB 标准。
每种标液组支持多种标准缓冲溶液,共计 24 种标准缓冲溶液。每个标液组最多允许选择 5 种标液。由于每个标液组里多种标准缓冲溶液之间的 pH 范围相互可能有重叠,为了保证测量精度,仪器将限制相邻标液的选择。
Buffer pH NIST group DIN group GB group
1.677 1.680 2.000 3.557 3.559 3.775 4.003 4.008 6.864 6.865 7.000 7.409 7.416 9.182 9.184 10.014 12.454 12.460 12.469
116 Agilent 3200P pH 计用户手册
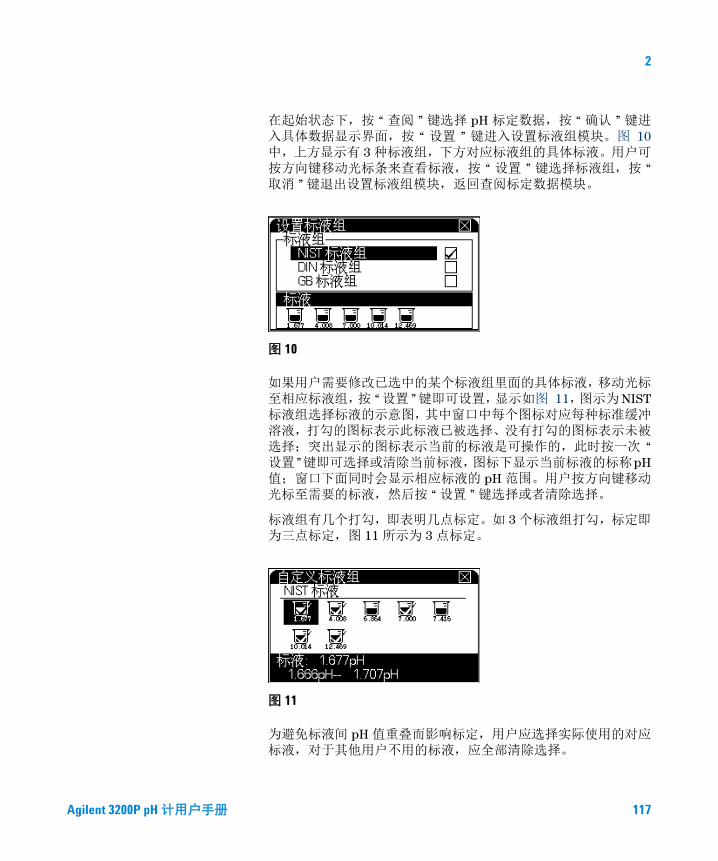
2
在起始状态下,按 “ 查阅 ” 键选择 pH 标定数据,按 “ 确认 ” 键进入具体数据显示界面,按 “ 设置 ” 键进入设置标液组模块。图 10 中,上方显示有 3 种标液组,下方对应标液组的具体标液。用户可按方向键移动光标条来查看标液,按 “ 设置 ” 键选择标液组,按 “取消 ” 键退出设置标液组模块,返回查阅标定数据模块。
图 10
如果用户需要修改已选中的某个标液组里面的具体标液,移动光标至相应标液组,按 “设置 ”键即可设置,显示如图 11,图示为NIST 标液组选择标液的示意图,其中窗口中每个图标对应每种标准缓冲溶液,打勾的图标表示此标液已被选择、没有打勾的图标表示未被选择;突出显示的图标表示当前的标液是可操作的,此时按一次 “设置”键即可选择或清除当前标液,图标下显示当前标液的标称pH值;窗口下面同时会显示相应标液的 pH 范围。用户按方向键移动光标至需要的标液,然后按 “ 设置 ” 键选择或者清除选择。
标液组有几个打勾,即表明几点标定。如 3 个标液组打勾,标定即为三点标定,图 11 所示为 3 点标定。
图 11
为避免标液间 pH 值重叠而影响标定,用户应选择实际使用的对应标液,对于其他用户不用的标液,应全部清除选择。
Agilent 3200P pH 计用户手册 117
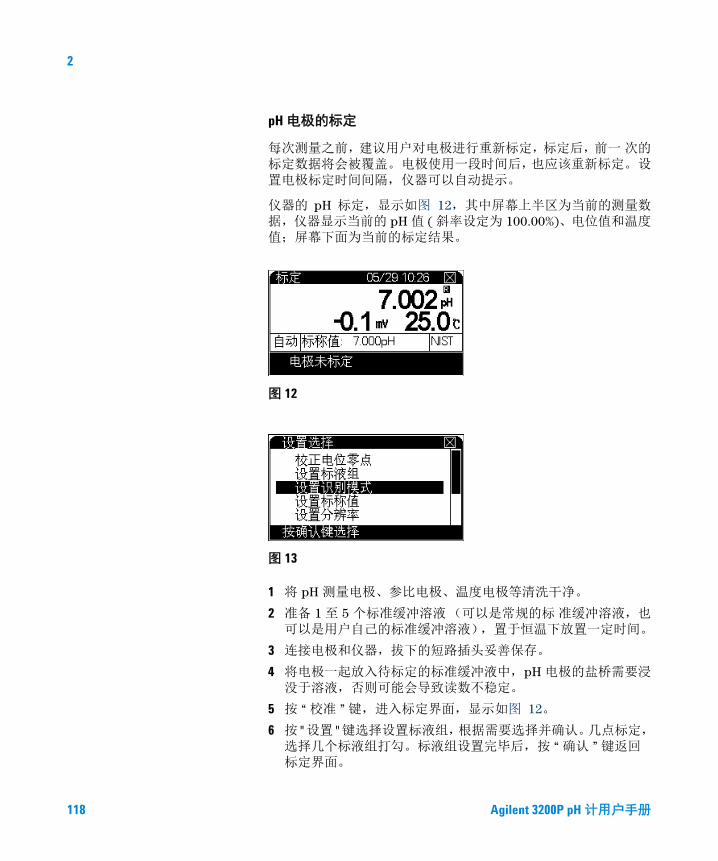
2
pH 电极的标定
每次测量之前,建议用户对电极进行重新标定,标定后,前一 次的 标定数据将会被覆盖。 电极使用一段时间后,也应该重新标定。 设 置电极标定时间间隔,仪器可以自动提示。
仪器的 pH 标定,显示如图 12,其中屏幕上半区为当前的测量数 据,仪器显示当前的 pH 值 ( 斜率设定为 100.00%)、电位值和温度值;屏幕下面为当前的标定结果。
图 12
图 13
1 将 pH 测量电极、参比电极、温度电极等清洗干净。
2 准备 1 至 5 个标准缓冲溶液(可以是常规的标 准缓冲溶液,也可以是用户自己的标准缓冲溶液),置于恒温下放置一定时间。
3 连接电极和仪器,拔下的短路插头妥善保存。
4 将电极一起放入待标定的标准缓冲液中,pH 电极的盐桥需要浸没于溶液,否则可能会导致读数不稳定。
5 按 “ 校准 ” 键,进入标定界面,显示如图 12。
6 按 "设置 "键选择设置标液组,根据需要选择并确认。几点标定,选择几个标液组打勾。标液组设置完毕后,按 “ 确认 ” 键返回标定界面。
118 Agilent 3200P pH 计用户手册
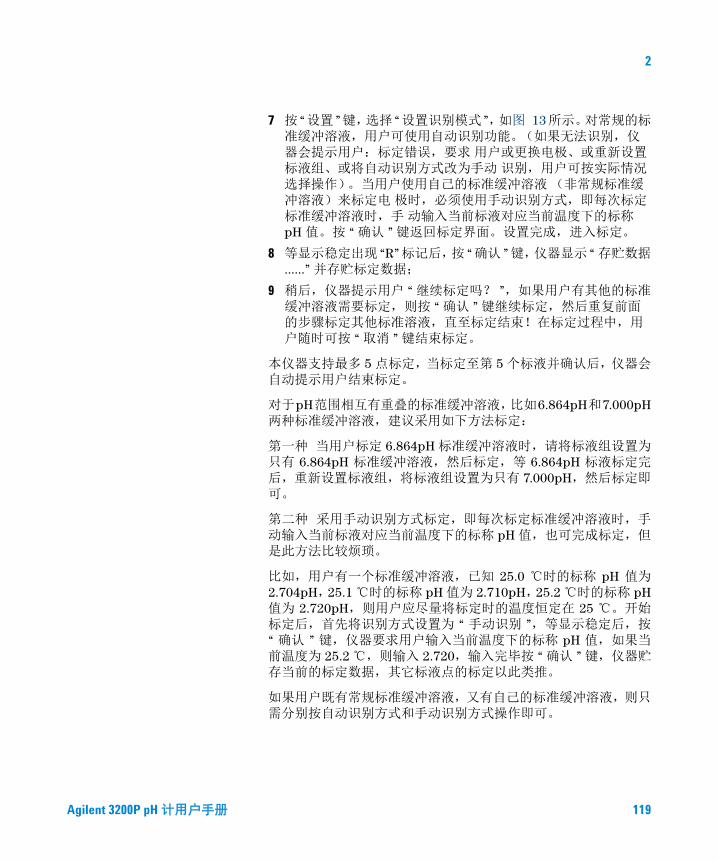
2
7 按 “设置 ”键,选择 “设置识别模式 ”,如图 13所示。对常规的标准缓冲溶液,用户可使用自动识别功能。(如果无法识别,仪器会提示用户:标定错误,要求 用户或更换电极、或重新设置标液组、或将自动识别方式改为手动 识别,用户可按实际情况选择操作)。 当用户使用自己的标准缓冲溶液 (非常规标准缓冲溶液)来标定电 极时,必须使用手动识别方式,即每次标定标准缓冲溶液时,手 动输入当前标液对应当前温度下的标称 pH 值。 按 “ 确认 ” 键返回标定界面。设置完成,进入标定。
8 等显示稳定出现 “R”标记后,按 “确认 ”键,仪器显示 “ 存贮数据……” 并存贮标定数据;
9 稍后,仪器提示用户 “ 继续标定吗? ”,如果用户有其他的标准缓冲溶液需要标定,则按 “ 确认 ” 键继续标定,然后重复前面的步骤标定其他标准溶液,直至标定结束!在标定过程中,用户随时可按 “ 取消 ” 键结束标定。
本仪器支持最多 5 点标定,当标定至第 5 个标液并确认后,仪器会自动提示用户结束标定。
对于pH范围相互有重叠的标准缓冲溶液,比如6.864pH和7.000pH两种标准缓冲溶液,建议采用如下方法标定:
第一种 当用户标定 6.864pH 标准缓冲溶液时,请将标液组设置为 只有 6.864pH 标准缓冲溶液,然后标定,等 6.864pH 标液标定完后,重新设置标液组,将标液组设置为只有 7.000pH,然后标定即可。
第二种 采用手动识别方式标定,即每次标定标准缓冲溶液时,手 动输入当前标液对应当前温度下的标称 pH 值,也可完成标定,但是此方法比较烦琐。
比如,用户有一个标准缓冲溶液,已知 25.0 ℃时的标称 pH 值为2.704pH,25.1 ℃时的标称 pH 值为 2.710pH,25.2 ℃时的标称 pH值为 2.720pH,则用户应尽量将标定时的温度恒定在 25 ℃。开始标定后,首先将识别方式设置为 “ 手动识别 ”,等显示稳定后,按“ 确认 ” 键,仪器要求用户输入当前温度下的标称 pH 值,如果当前温度为 25.2 ℃,则输入 2.720,输入完毕按 “ 确认 ” 键,仪器贮存当前的标定数据,其它标液点的标定以此类推。
如果用户既有常规标准缓冲溶液,又有自己的标准缓冲溶液,则只需分别按自动识别方式和手动识别方式操作即可。
Agilent 3200P pH 计用户手册 119
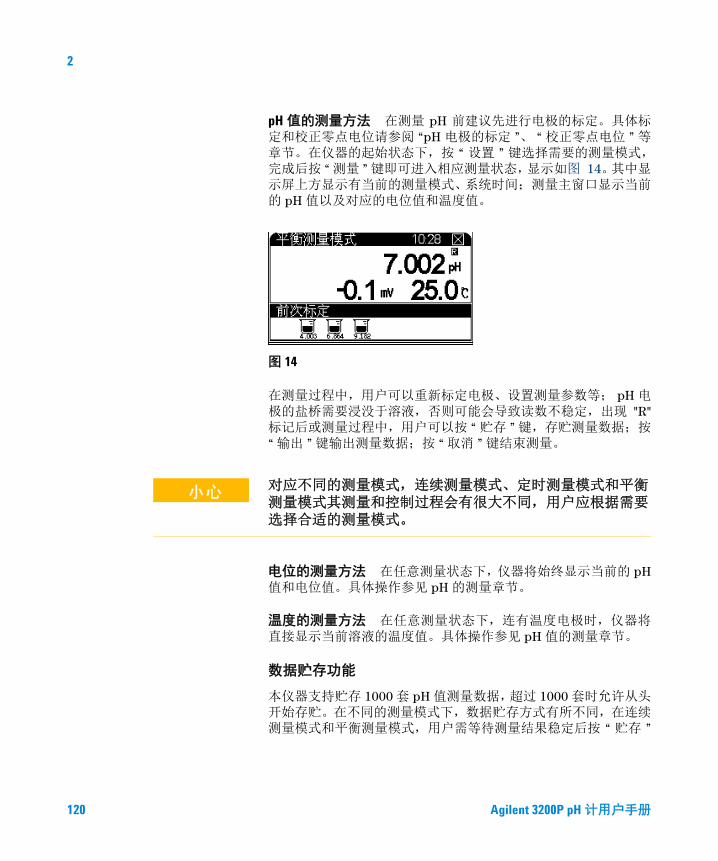
2
pH 值的测量方法 在测量 pH 前建议先进行电极的标定。具体标定和校正零点电位请参阅 “pH 电极的标定 ”、 “ 校正零点电位 ” 等章节。在仪器的起始状态下,按 “ 设置 ” 键选择需要的测量模式,完成后按 “ 测量 ” 键即可进入相应测量状态,显示如图 14。其中显 示屏上方显示有当前的测量模式、系统时间;测量主窗口显示当前的 pH 值以及对应的电位值和温度值。
图 14
在测量过程中,用户可以重新标定电极、设置测量参数等; pH 电极的盐桥需要浸没于溶液,否则可能会导致读数不稳定,出现 "R"标记后或测量过程中,用户可以按 “ 贮存 ” 键,存贮测量数据;按 “ 输出 ” 键输出测量数据;按 “ 取消 ” 键结束测量。
电位的测量方法 在任意测量状态下,仪器将始终显示当前的 pH值和电位值。具体操作参见 pH 的测量章节。
温度的测量方法 在任意测量状态下,连有温度电极时,仪器将直接显示当前溶液的温度值。具体操作参见 pH 值的测量章节。
数据贮存功能
本仪器支持贮存 1000 套 pH 值测量数据,超过 1000 套时允许从头开始存贮。在不同的测量模式下,数据贮存方式有所不同,在连续测量模式和平衡测量模式,用户需等待测量结果稳定后按 “ 贮存 ”
小心 对应不同的测量模式,连续测量模式、定时测量模式和平衡测量模式其测量和控制过程会有很大不同,用户应根据需要选择合适的测量模式。
120 Agilent 3200P pH 计用户手册
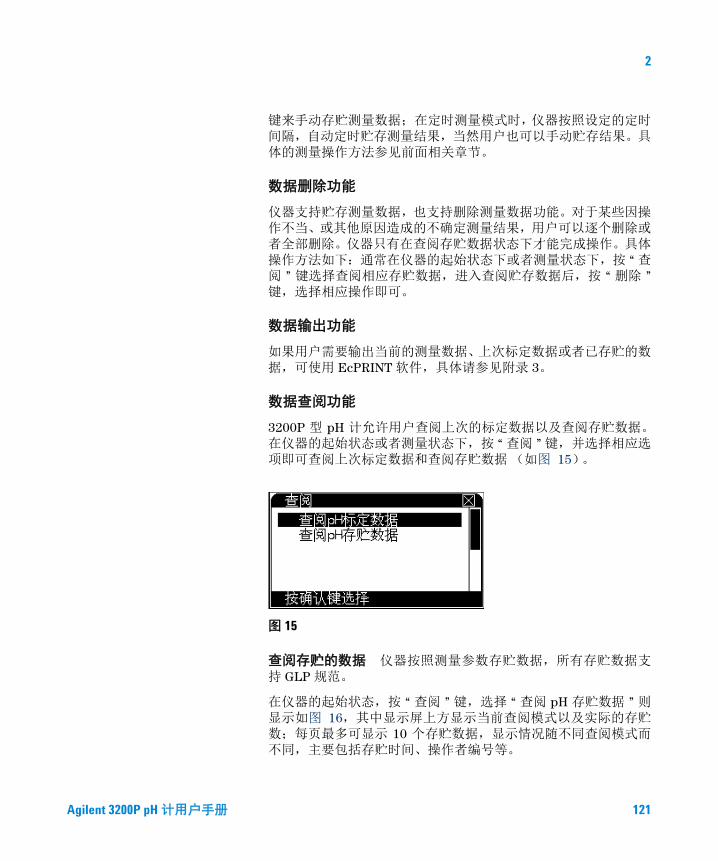
2
键来手动存贮测量数据;在定时测量模式时,仪器按照设定的定时间隔,自动定时贮存测量结果,当然用户也可以手动贮存结果。具体的测量操作方法参见前面相关章节。
数据删除功能
仪器支持贮存测量数据,也支持删除测量数据功能。对于某些因操作不当、或其他原因造成的不确定测量结果,用户可以逐个删除或者全部删除。仪器只有在查阅存贮数据状态下才能完成操作。具体操作方法如下:通常在仪器的起始状态下或者测量状态下,按 “ 查阅 ” 键选择查阅相应存贮数据,进入查阅贮存数据后,按 “ 删除 ”键,选择相应操作即可。
数据输出功能
如果用户需要输出当前的测量数据、上次标定数据或者已存贮的数据,可使用 EcPRINT 软件,具体请参见附录 3。
数据查阅功能
3200P 型 pH 计允许用户查阅上次的标定数据以及查阅存贮数据。在仪器的起始状态或者测量状态下,按 “ 查阅 ” 键,并选择相应选项即可查阅上次标定数据和查阅存贮数据 (如图 15)。
图 15
查阅存贮的数据 仪器按照测量参数存贮数据,所有存贮数据支持 GLP 规范。
在仪器的起始状态,按 “ 查阅 ” 键,选择 “ 查阅 pH 存贮数据 ” 则显示如图 16,其中显示屏上方显示当前查阅模式以及实际的存贮 数;每页最多可显示 10 个存贮数据,显示情况随不同查阅模式而不同,主要包括存贮时间、操作者编号等。
Agilent 3200P pH 计用户手册 121
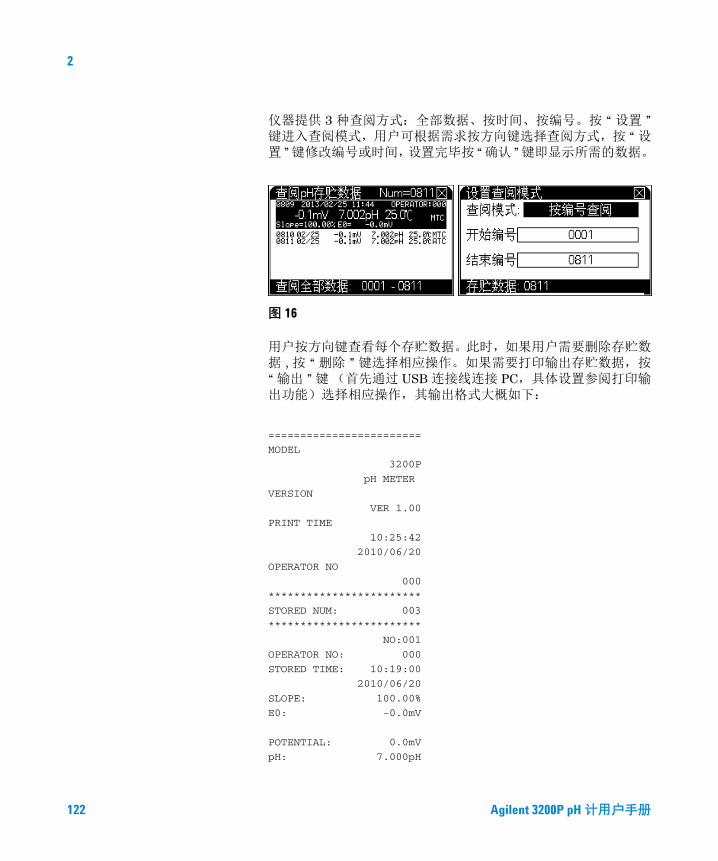
2
仪器提供 3 种查阅方式:全部数据、按时间、按编号。按 “ 设置 ”键进入查阅模式,用户可根据需求按方向键选择查阅方式,按 “ 设置 ”键修改编号或时间,设置完毕按 “确认 ”键即显示所需的数据。
图 16
用户按方向键查看每个存贮数据。此时,如果用户需要删除存贮数据 , 按 “ 删除 ” 键选择相应操作。如果需要打印输出存贮数据,按“ 输出 ” 键(首先通过 USB 连接线连接 PC,具体设置参阅打印输出功能)选择相应操作,其输出格式大概如下:
========================
MODEL
3200P
pH METER
VERSION
VER 1.00
PRINT TIME
10:25:42
2010/06/20
OPERATOR NO
000
************************
STORED NUM: 003
************************
NO:001
OPERATOR NO: 000
STORED TIME: 10:19:00
2010/06/20
SLOPE: 100.00%
E0: -0.0mV
POTENTIAL: 0.0mV
pH: 7.000pH
122 Agilent 3200P pH 计用户手册
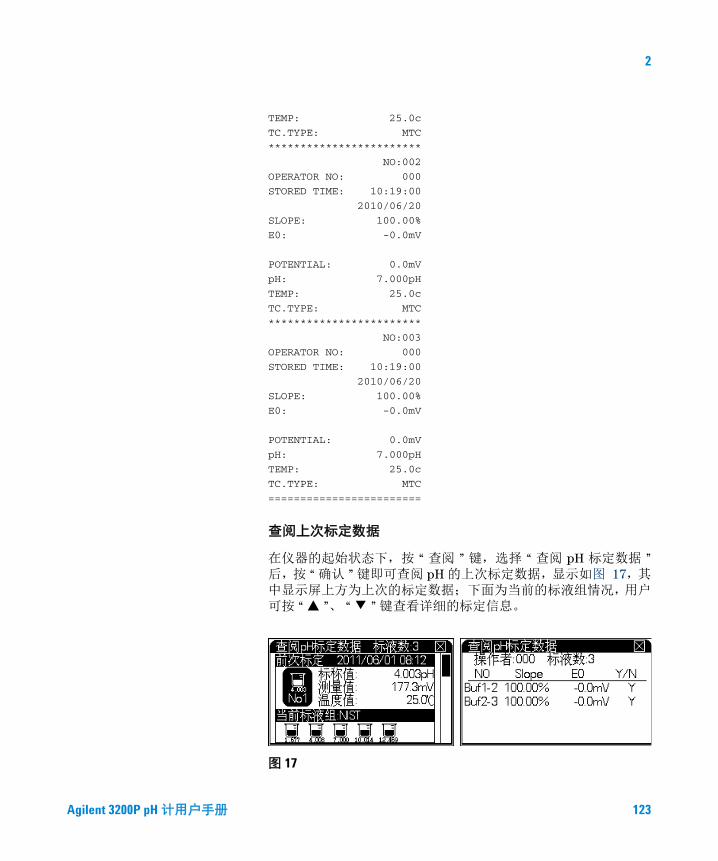
2
TEMP: 25.0c
TC.TYPE: MTC
************************
NO:002
OPERATOR NO: 000
STORED TIME: 10:19:00
2010/06/20
SLOPE: 100.00%
E0: -0.0mV
POTENTIAL: 0.0mV
pH: 7.000pH
TEMP: 25.0c
TC.TYPE: MTC
************************
NO:003
OPERATOR NO: 000
STORED TIME: 10:19:00
2010/06/20
SLOPE: 100.00%
E0: -0.0mV
POTENTIAL: 0.0mV
pH: 7.000pH
TEMP: 25.0c
TC.TYPE: MTC
========================
查阅上次标定数据
在仪器的起始状态下,按 “ 查阅 ” 键,选择 “ 查阅 pH 标定数据 ”后,按 “ 确认 ” 键即可查阅 pH 的上次标定数据,显示如图 17,其 中显示屏上方为上次的标定数据;下面为当前的标液组情况,用户可按 “ ▲ ”、 “ ▼ ” 键查看详细的标定信息。
图 17
Agilent 3200P pH 计用户手册 123
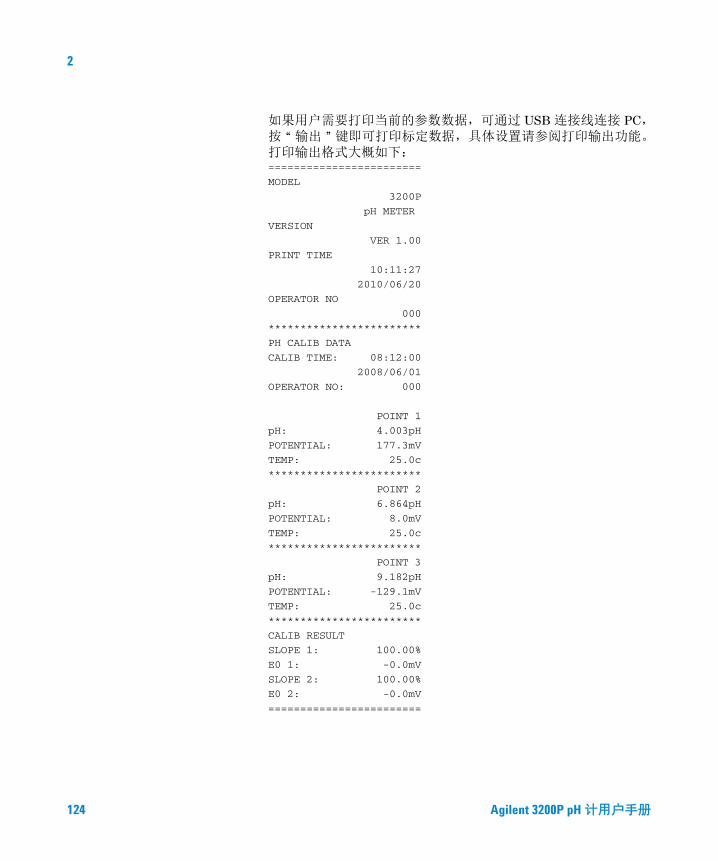
2
如果用户需要打印当前的参数数据,可通过 USB 连接线连接 PC,按 “ 输出 ” 键即可打印标定数据,具体设置请参阅打印输出功能。打印输出格式大概如下:========================
MODEL
3200P
pH METER
VERSION
VER 1.00
PRINT TIME
10:11:27
2010/06/20
OPERATOR NO
000
************************
PH CALIB DATA
CALIB TIME: 08:12:00
2008/06/01
OPERATOR NO: 000
POINT 1
pH: 4.003pH
POTENTIAL: 177.3mV
TEMP: 25.0c
************************
POINT 2
pH: 6.864pH
POTENTIAL: 8.0mV
TEMP: 25.0c
************************
POINT 3
pH: 9.182pH
POTENTIAL: -129.1mV
TEMP: 25.0c
************************
CALIB RESULT
SLOPE 1: 100.00%
E0 1: -0.0mV
SLOPE 2: 100.00%
E0 2: -0.0mV
========================
124 Agilent 3200P pH 计用户手册
2
关闭 3200P 型 pH 计
用户使用完毕,如果需要存贮数据请确保已按 “ 贮存 ” 键,此时按仪器的 “ 开 / 关 ” 键 3 秒以上关闭仪器。测试完样品,所用电极应浸在蒸馏水中。如果仪器长期不用,请注意:
1 断开电源适配器的电源,以免损坏电源适配器并间接损坏仪器,给您带来不必要的损失!
2 仪器的插座必须保持清洁、干燥,切忌与酸、碱、盐溶液接触。
3 仪器不使用时,短路插头也要接上,以免仪器输入开路而损坏仪器。
4 测量结束,建议将电极存放在参比填充液中。对可充电极,将加液塞塞上。长期不使用时,将电极放回盒体内室温保存。
更正问题
1 接通电源后,若显示屏不亮,应检查电源器是否有电压输出。
2 仪器不使用时,短路插头也要接上,以免仪器输入开路而损坏仪器。
3 仪器必须有良好的接地,防止腐蚀性气体侵入。
4 若上述各种情况排除后,仪器仍不能正常工作,则与有关部门联系。
Agilent 3200P pH 计用户手册 125

2
126 Agilent 3200P pH 计用户手册

Agilent 3200P pH 计用户手册
33200P 型 pH 计故障排除
仪器基本故障以及解决办法 128
仪器自诊断操作指导 129
仪器自诊断相应代码与说明 131
此文档提供仪器基本故障解决方法,在使用过程中,仪器出现故障,可根据本文件排除基本故障。
127Agilent Technologies
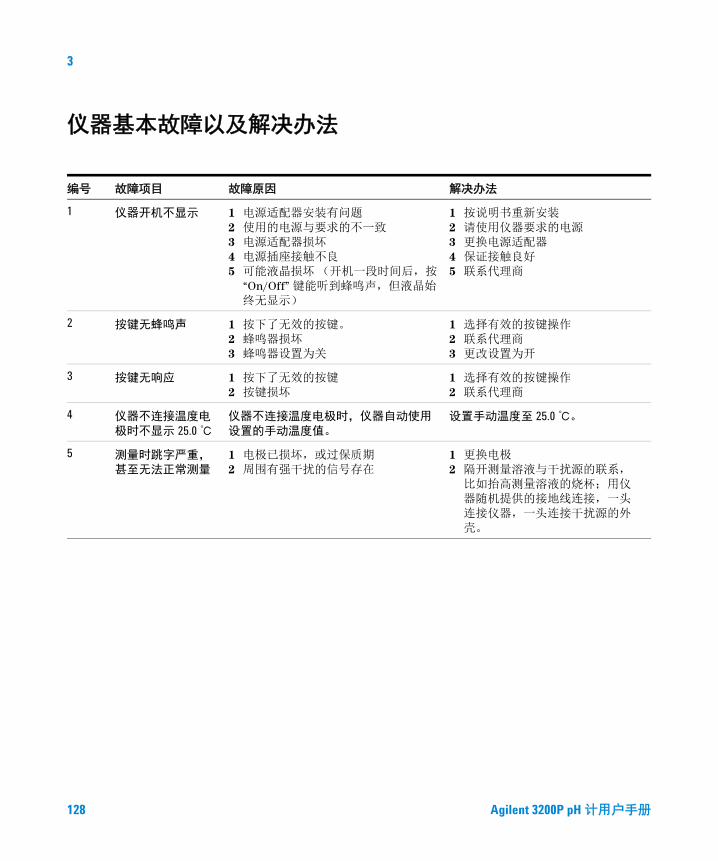
3
仪器基本故障以及解决办法
编号 故障项目 故障原因 解决办法
1 仪器开机不显示 1 电源适配器安装有问题2 使用的电源与要求的不一致3 电源适配器损坏4 电源插座接触不良5 可能液晶损坏 (开机一段时间后,按
“On/Off” 键能听到蜂鸣声,但液晶始终无显示)
1 按说明书重新安装2 请使用仪器要求的电源3 更换电源适配器4 保证接触良好5 联系代理商
2 按键无蜂鸣声 1 按下了无效的按键。2 蜂鸣器损坏3 蜂鸣器设置为关
1 选择有效的按键操作2 联系代理商3 更改设置为开
3 按键无响应 1 按下了无效的按键2 按键损坏
1 选择有效的按键操作2 联系代理商
4 仪器不连接温度电极时不显示 25.0 ℃
仪器不连接温度电极时,仪器自动使用设置的手动温度值。
设置手动温度至 25.0 ℃。
5 测量时跳字严重,甚至无法正常测量
1 电极已损坏,或过保质期2 周围有强干扰的信号存在
1 更换电极2 隔开测量溶液与干扰源的联系,
比如抬高测量溶液的烧杯;用仪器随机提供的接地线连接,一头连接仪器,一头连接干扰源的外壳。
128 Agilent 3200P pH 计用户手册

3
仪器自诊断操作指导
在使用过程中,有很多因素会影响测量结果,包括测量使用的电极、标定电极斜率的标准缓冲溶液、样品溶液、测量时的温度、操作或者使用不当等等,当出现测量结果与预想的结果值相差甚远时,为了更好地快速判断是仪器本身还是仪器以外的因素导致测量的误差,可以参照本操作指导进行简单的自我诊断。
仪器的电位诊断
断开测量电极,仪器连接随机提供的短路插头;开机,进入测量状态,此时仪器显示的电位值应该 -0.5~0.5mV ( 通常叫零电位 ),表 示仪器硬件功能正常;如果零电位偏差较大,请使用校正零点电位功能,校正后电位值应显示为零值 ( 具体校正方法参见前面章节 );如果零点电位确实偏移很大,仪器无法完成校正,则说明硬件有问题,请联系相关部门。
仪器的 pH 值诊断
断开温度电极;仪器将使用设置的手动温度值,将手动温度设置为25.0 ℃ (具体参见设置手动温度章节);电位为零时,仪器显示的 pH 值应该在 6.99~7.01pH,则表明仪器的电极标定数据满足测量要求,否则有可能是电极标定数据不正确造成,需要进一步查看电极斜率。按 “ 查阅 ” 键选择 “ 查阅标定数据 ” 项并确认后,可查看前一次的标定情况以及电极斜率值。如果标定的数据严重超出测量要求 ( 仪器显示有错误标记,错误代码参见后面的表格 ),则表示前一次的电极标定有问题,可能导致较大测量误差,需要重新标定,标定时请注意标液组的选择。注意,在测量状态下,仪器也会有同步的错误提示。
仪器的温度诊断
仪器连接随机提供的 ATC 温度诊断工具(5185-8390),开机,进入测量状态,此时仪器显示的温度值在 49.0~51.0 ℃,则表示仪器的温度测量正常。如果偏差很大,则表示仪器硬件有问题,请联系相关部门。
Agilent 3200P pH 计用户手册 129
3
仪器的恢复默认值诊断
为了彻底验证仪器,可以使用恢复默认设置功能,将电极斜率恢复到默认值 100%,电极零点为 0.0mV,手动温度为 25.0 ℃的理想状态。注意,使用本功能后,仪器在恢复电极标定数据的同时,还将恢复其他的默认设置,请用户注意。退出测量状态,在仪器的起始状态下,按 “ 设置 ” 键选择 “ 恢复默认设置 ” 项并确认,即可恢复默认值。然后按照上述步骤再次验证仪器是否存在问题。
按照上述方法可简单判断是仪器本身硬件、电极标定数据,还是电极以外的测量因素导致测量误差。对应仪器以外的原因,用户可以使用类比的办法,将电极放置在不同的标准缓冲溶液中,查看测量的电位或 pH 值,类比判断是电极本身,还是溶液问题,抑或是其他原因。
130 Agilent 3200P pH 计用户手册
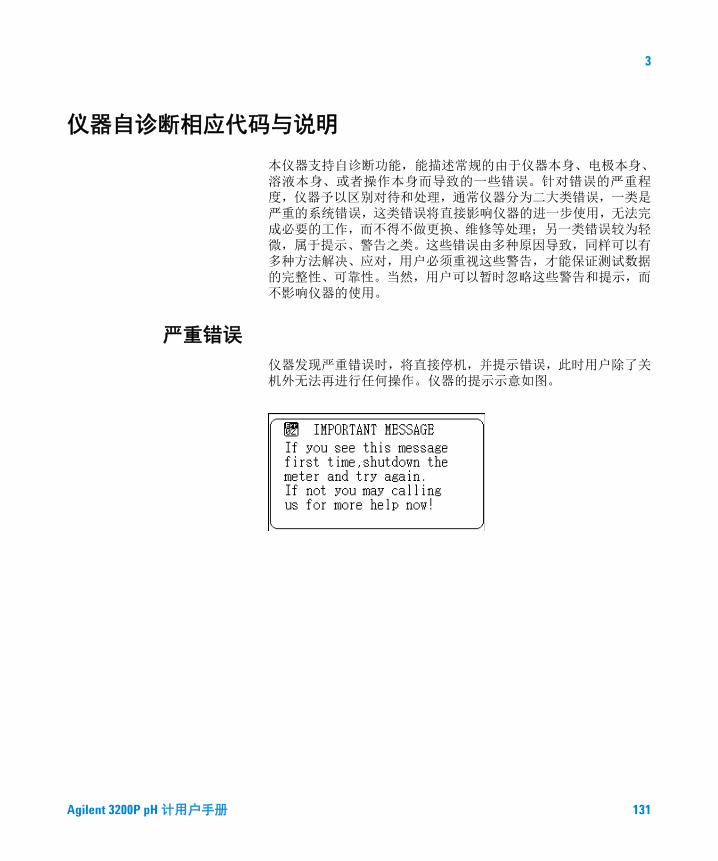
3
仪器自诊断相应代码与说明
本仪器支持自诊断功能,能描述常规的由于仪器本身、电极本身、溶液本身、或者操作本身而导致的一些错误。针对错误的严重程度,仪器予以区别对待和处理,通常仪器分为二大类错误,一类是严重的系统错误,这类错误将直接影响仪器的进一步使用,无法完成必要的工作,而不得不做更换、维修等处理;另一类错误较为轻微,属于提示、警告之类。这些错误由多种原因导致,同样可以有多种方法解决、应对,用户必须重视这些警告,才能保证测试数据的完整性、可靠性。当然,用户可以暂时忽略这些警告和提示,而不影响仪器的使用。
严重错误
仪器发现严重错误时,将直接停机,并提示错误,此时用户除了关机外无法再进行任何操作。仪器的提示示意如图。
Agilent 3200P pH 计用户手册 131
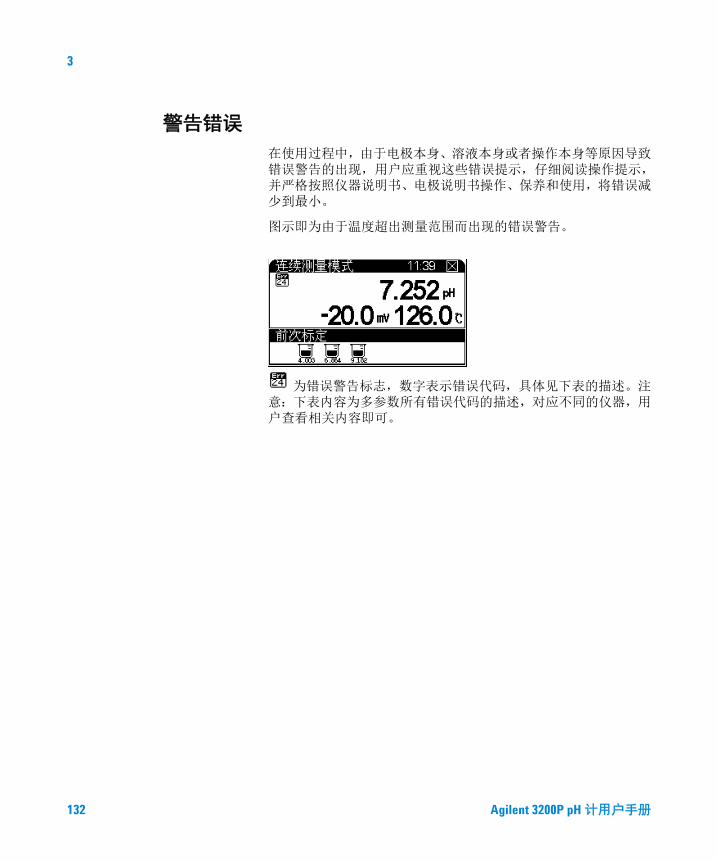
3
警告错误
在使用过程中,由于电极本身、溶液本身或者操作本身等原因导致错误警告的出现,用户应重视这些错误提示,仔细阅读操作提示,并严格按照仪器说明书、电极说明书操作、保养和使用,将错误减少到最小。
图示即为由于温度超出测量范围而出现的错误警告。
为错误警告标志,数字表示错误代码,具体见下表的描述。注 意:下表内容为多参数所有错误代码的描述,对应不同的仪器,用户查看相关内容即可。
132 Agilent 3200P pH 计用户手册
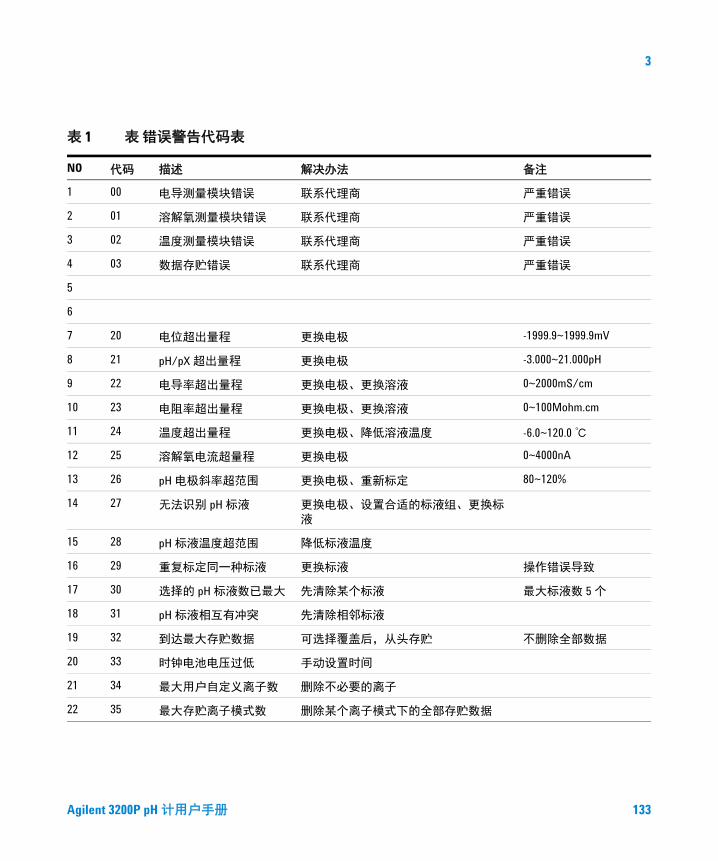
3
表 1 表 错误警告代码表
NO 代码 描述 解决办法 备注
1 00 电导测量模块错误 联系代理商 严重错误
2 01 溶解氧测量模块错误 联系代理商 严重错误
3 02 温度测量模块错误 联系代理商 严重错误
4 03 数据存贮错误 联系代理商 严重错误
5
6
7 20 电位超出量程 更换电极 -1999.9~1999.9mV
8 21 pH/pX 超出量程 更换电极 -3.000~21.000pH
9 22 电导率超出量程 更换电极、更换溶液 0~2000mS/cm
10 23 电阻率超出量程 更换电极、更换溶液 0~100Mohm.cm
11 24 温度超出量程 更换电极、降低溶液温度 -6.0~120.0 ℃
12 25 溶解氧电流超量程 更换电极 0~4000nA
13 26 pH 电极斜率超范围 更换电极、重新标定 80~120%
14 27 无法识别 pH 标液 更换电极、设置合适的标液组、更换标液
15 28 pH 标液温度超范围 降低标液温度
16 29 重复标定同一种标液 更换标液 操作错误导致
17 30 选择的 pH 标液数已最大 先清除某个标液 最大标液数 5 个
18 31 pH 标液相互有冲突 先清除相邻标液
19 32 到达最大存贮数据 可选择覆盖后,从头存贮 不删除全部数据
20 33 时钟电池电压过低 手动设置时间
21 34 最大用户自定义离子数 删除不必要的离子
22 35 最大存贮离子模式数 删除某个离子模式下的全部存贮数据
Agilent 3200P pH 计用户手册 133

3
134 Agilent 3200P pH 计用户手册

Agilent 3200P pH 计用户手册
4电极的保养、维护和贮存
电极的清洗 136
电极的储存 136
本节描述电极的保养、维护和贮存信息。
135Agilent Technologies
4
电极的清洗
对应不同的电极污染程度和污染物性质,电极的一般清洗方法,包
括无机物清洗、有机物清洗、油脂类清洗、蛋白质沉淀清洗、玻璃敏感膜再生等等。通常进行一种或两种以上清洗后,用蒸馏水清洗电极外部,将填充溶液吸空,加满新鲜的填充溶液,如此重复 2-3次。在 pH 电极保存溶液中浸泡至少一个小时。
电极的储存
不使用时,建议将电极存放在参比填充液中。对可充电极,将加液塞塞上。
长期不使用时,将电极放回盒体内室温保存。
136 Agilent 3200P pH 计用户手册
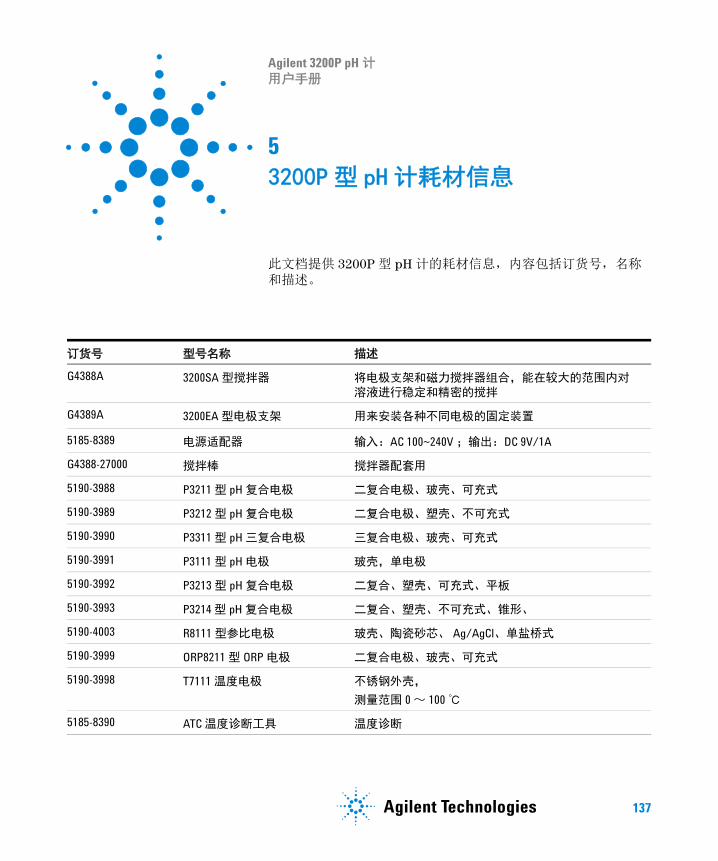
Agilent 3200P pH 计用户手册
53200P 型 pH 计耗材信息
此文档提供 3200P 型 pH 计的耗材信息,内容包括订货号,名称和描述。
订货号 型号名称 描述
G4388A 3200SA 型搅拌器 将电极支架和磁力搅拌器组合,能在较大的范围内对溶液进行稳定和精密的搅拌
G4389A 3200EA 型电极支架 用来安装各种不同电极的固定装置
5185-8389 电源适配器 输入:AC 100~240V ;输出:DC 9V/1A
G4388-27000 搅拌棒 搅拌器配套用
5190-3988 P3211 型 pH 复合电极 二复合电极、玻壳、可充式
5190-3989 P3212 型 pH 复合电极 二复合电极、塑壳、不可充式
5190-3990 P3311 型 pH 三复合电极 三复合电极、玻壳、可充式
5190-3991 P3111 型 pH 电极 玻壳,单电极
5190-3992 P3213 型 pH 复合电极 二复合、塑壳、可充式、平板
5190-3993 P3214 型 pH 复合电极 二复合、塑壳、不可充式、锥形、
5190-4003 R8111 型参比电极 玻壳、陶瓷砂芯、 Ag/AgCl、单盐桥式
5190-3999 ORP8211 型 ORP 电极 二复合电极、玻壳、可充式
5190-3998 T7111 温度电极 不锈钢外壳,
测量范围 0 ~ 100 ℃
5185-8390 ATC 温度诊断工具 温度诊断
137Agilent Technologies
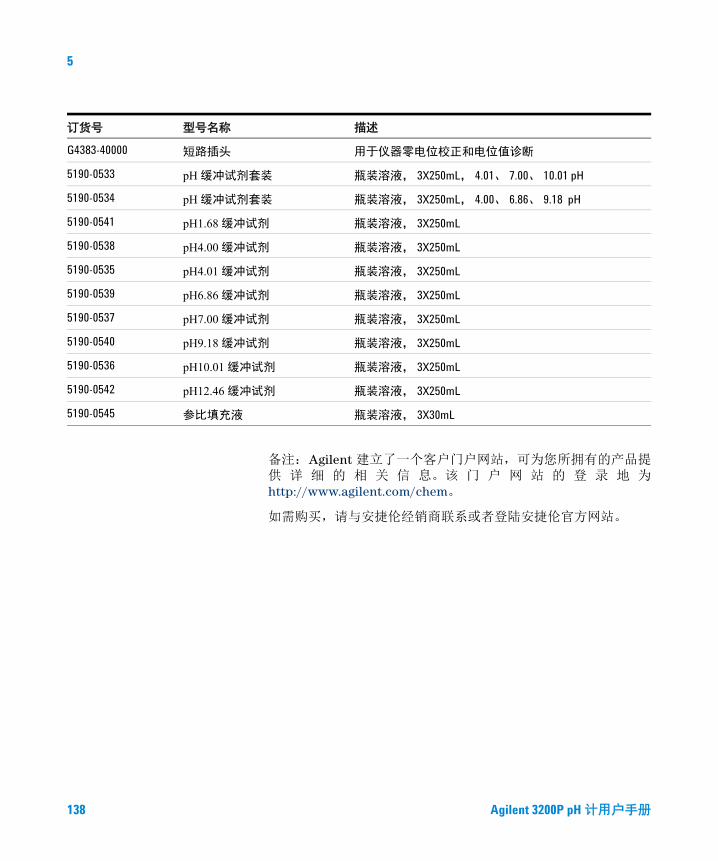
5
备注: Agilent 建立了一个客户门户网站,可为您所拥有的产品提 供 详 细 的 相 关 信 息。该 门 户 网 站 的 登 录 地 为http://www.agilent.com/chem。
如需购买,请与安捷伦经销商联系或者登陆安捷伦官方网站。
G4383-40000 短路插头 用于仪器零电位校正和电位值诊断
5190-0533 pH 缓冲试剂套装 瓶装溶液, 3X250mL, 4.01、 7.00、 10.01 pH
5190-0534 pH 缓冲试剂套装 瓶装溶液, 3X250mL, 4.00、 6.86、 9.18 pH
5190-0541 pH1.68 缓冲试剂 瓶装溶液, 3X250mL
5190-0538 pH4.00 缓冲试剂 瓶装溶液, 3X250mL
5190-0535 pH4.01 缓冲试剂 瓶装溶液, 3X250mL
5190-0539 pH6.86 缓冲试剂 瓶装溶液, 3X250mL
5190-0537 pH7.00 缓冲试剂 瓶装溶液, 3X250mL
5190-0540 pH9.18 缓冲试剂 瓶装溶液, 3X250mL
5190-0536 pH10.01 缓冲试剂 瓶装溶液, 3X250mL
5190-0542 pH12.46 缓冲试剂 瓶装溶液, 3X250mL
5190-0545 参比填充液 瓶装溶液, 3X30mL
订货号 型号名称 描述
138 Agilent 3200P pH 计用户手册
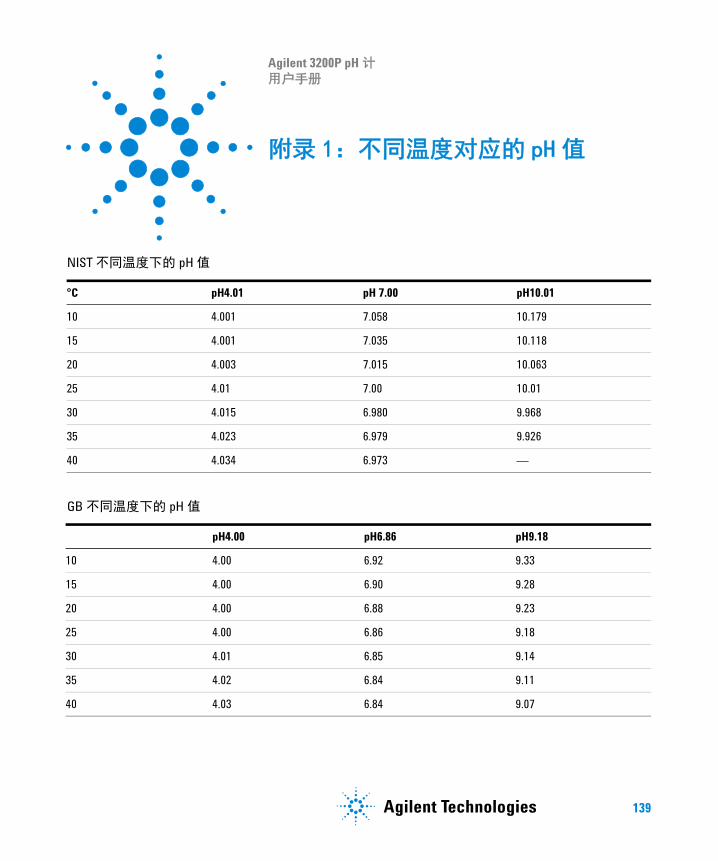
Agilent 3200P pH 计用户手册
附录 1:不同温度对应的 pH 值
NIST 不同温度下的 pH 值
°C pH4.01 pH 7.00 pH10.01
10 4.001 7.058 10.179
15 4.001 7.035 10.118
20 4.003 7.015 10.063
25 4.01 7.00 10.01
30 4.015 6.980 9.968
35 4.023 6.979 9.926
40 4.034 6.973 —
GB 不同温度下的 pH 值
pH4.00 pH6.86 pH9.18
10 4.00 6.92 9.33
15 4.00 6.90 9.28
20 4.00 6.88 9.23
25 4.00 6.86 9.18
30 4.01 6.85 9.14
35 4.02 6.84 9.11
40 4.03 6.84 9.07
139Agilent Technologies

5
140 Agilent 3200P pH 计用户手册
Agilent 3200P pH 计用户手册
附录 2:EcFWUPDATE 操作说明书
概述 92
软件安装 92
安装 EcFWUPDATE 92
安装 USB 驱动程序 92
设置通讯口 94
软件运行 97
软件界面 100
91Agilent Technologies
概述
EcFWUPDATE 是 Agilent 电化学仪器的固件升级软件。通过仪器 的 USB 接口,软件可以将仪器的新版本固件文件升级到仪器的存储器中。
软件安装
该程序支持以下操作系統:
• 32 位的 Windows 7
• 32 位 Windows XP Service Pack 3
安装 EcFWUPDATE
1 从安捷伦公司网站 http://www.chem.agilent.com/en-US/Support/Downloads/ Utilities/Pages/default.aspx 下载 EcFWUPDATE.ZIP 软件包。
2 将软件包 EcFWUPDATE.ZIP 解压到一个临时文件夹。
3 双击 EcFWUPDATE.EXE 并根据软件安装向导完成软件安装。
在使用 EcFWUPDATE 软件之前必须安装 USB 驱动软件。
安装 USB 驱动程序
必要时,需安装 USB 驱动软件将计算机的 USB 口模拟成 RS232 接口。如果已经安装过驱动程序,请跳过这一步。
1 运行随本软件一起提供的 USB 驱动程序 CP210xVCPInstaller.exe (包含在 EcFWUPDATE.ZIP 软件包中 )。
2 断开仪器电源,用 USB 连接线 ( 随仪器附带 ) 将仪器连接到计算机的一个 USB 接口。
3 打开仪器电源。
4 进入计算机设备管理器,在 “ 端口 ” 一 栏中可以看到已安装的 USB 串口设备, Silicon Labs CP210x USB to UART Bridge (COMX), 表示 USB 驱动程序已经正确安 装,可以正常使用。 X 为通讯端口号。
92 Agilent 3200P pH 计用户手册
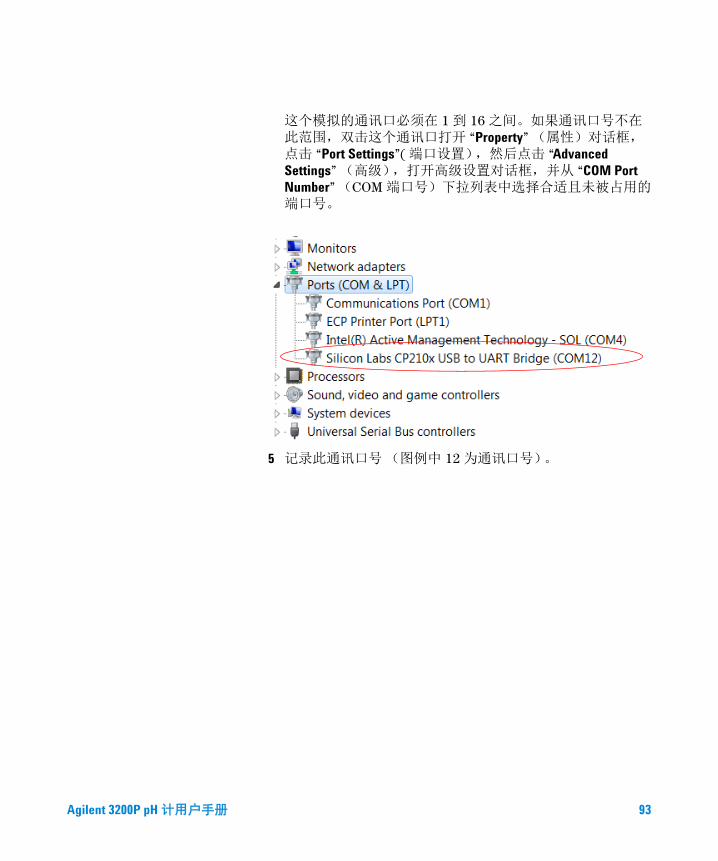
这个模拟的通讯口必须在 1 到 16 之间。如果通讯口号不在此范围,双击这个通讯口打开 “Property” (属性)对话框,点击 “Port Settings”( 端口设置),然后点击 “Advanced Settings” (高级),打开高级设置对话框,并从 “COM Port Number” (COM 端口号)下拉列表中选择合适且未被占用的端口号。
5 记录此通讯口号 (图例中 12 为通讯口号)。
Agilent 3200P pH 计用户手册 93
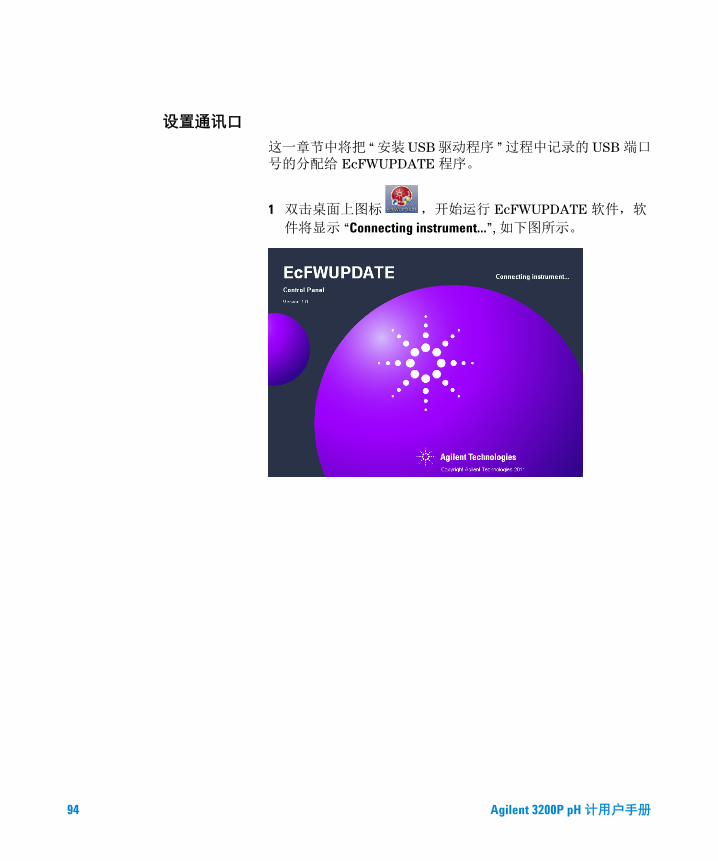
设置通讯口
这一章节中将把 “ 安装 USB 驱动程序 ” 过程中记录的 USB 端口 号的分配给 EcFWUPDATE 程序。
1 双击桌面上图标 ,开始运行 EcFWUPDATE 软件,软
件将显示 “Connecting instrument...”, 如下图所示。
94 Agilent 3200P pH 计用户手册
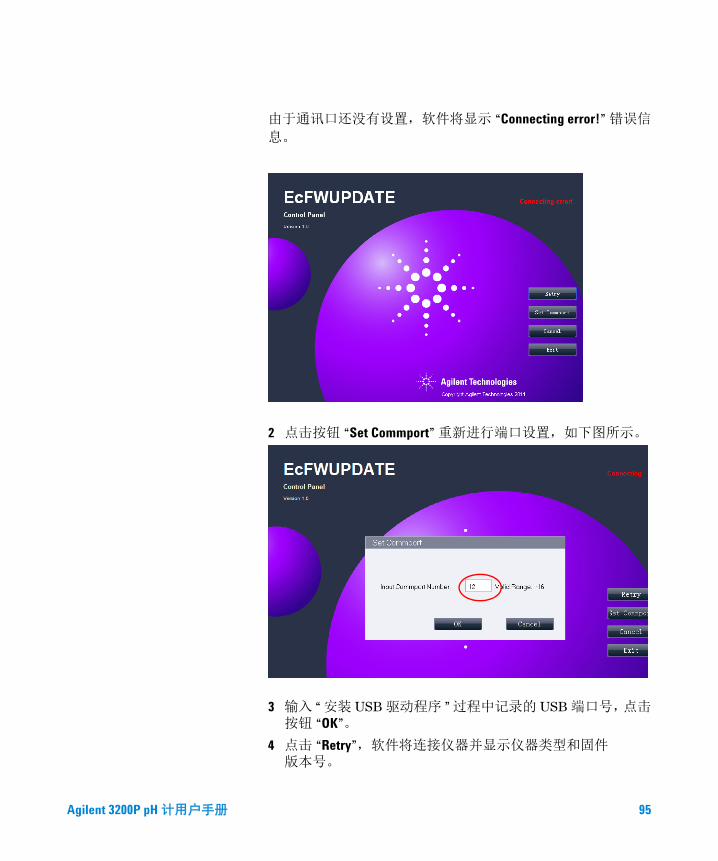
由于通讯口还没有设置,软件将显示 “Connecting error!” 错误信
息。
2 点击按钮 “Set Commport” 重新进行端口设置,如下图所示。
3 输入 “ 安装 USB 驱动程序 ” 过程中记录的 USB 端口号,点击按钮 “OK”。
4 点击 “Retry”,软件将连接仪器并显示仪器类型和固件 版本号。
Agilent 3200P pH 计用户手册 95

5 系统将提示版本升级信息。
6 点击 “Cancel” 退出或者点击 “OK” 来升级固件信息。参照下一章 “ 软件运行 ” 并从第 2 步开始
96 Agilent 3200P pH 计用户手册
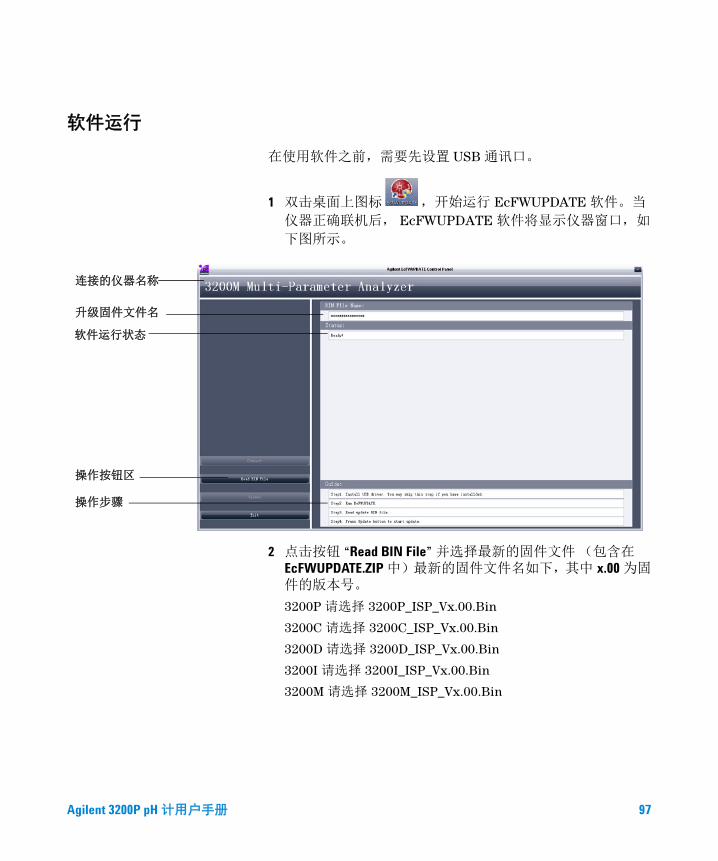
软件运行
在使用软件之前,需要先设置 USB 通讯口。
1 双击桌面上图标 ,开始运行 EcFWUPDATE 软件。当
仪器正确联机后, EcFWUPDATE 软件将显示仪器窗口,如
下图所示。
2 点击按钮 “Read BIN File” 并选择最新的固件文件 (包含在EcFWUPDATE.ZIP 中)最新的固件文件名如下,其中 x.00 为固件的版本号。
3200P 请选择 3200P_ISP_Vx.00.Bin
3200C 请选择 3200C_ISP_Vx.00.Bin
3200D 请选择 3200D_ISP_Vx.00.Bin
3200I 请选择 3200I_ISP_Vx.00.Bin
3200M 请选择 3200M_ISP_Vx.00.Bin
连接的仪器名称
升级固件文件名
操作按钮区
软件运行状态
操作步骤
Agilent 3200P pH 计用户手册 97

3 点击按钮 “Update” 进行升级,如下图所示。
升级固件文件名
升级时间
升级状态
98 Agilent 3200P pH 计用户手册
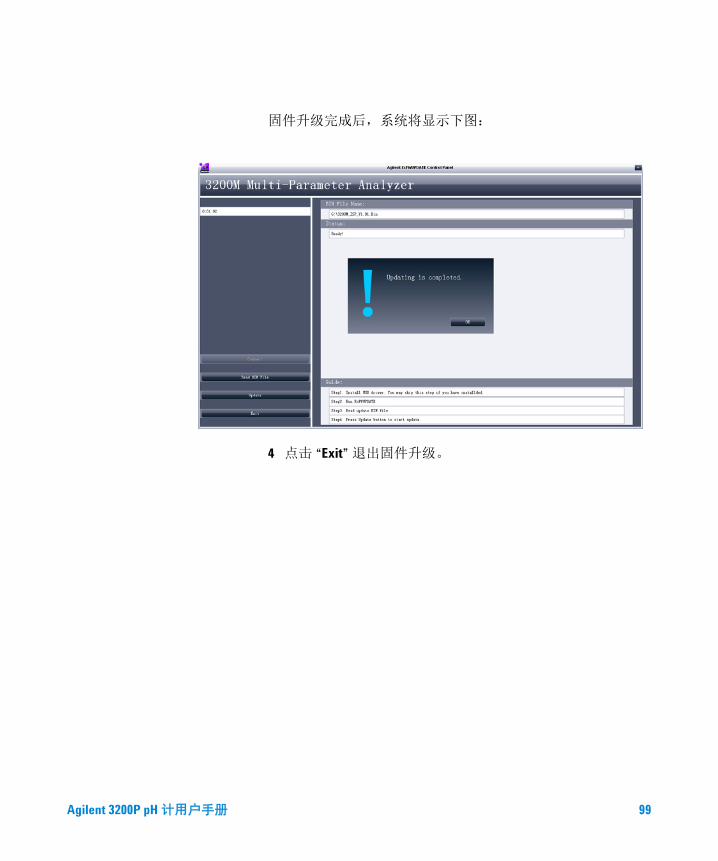
固件升级完成后,系统将显示下图:
4 点击 “Exit” 退出固件升级。
Agilent 3200P pH 计用户手册 99
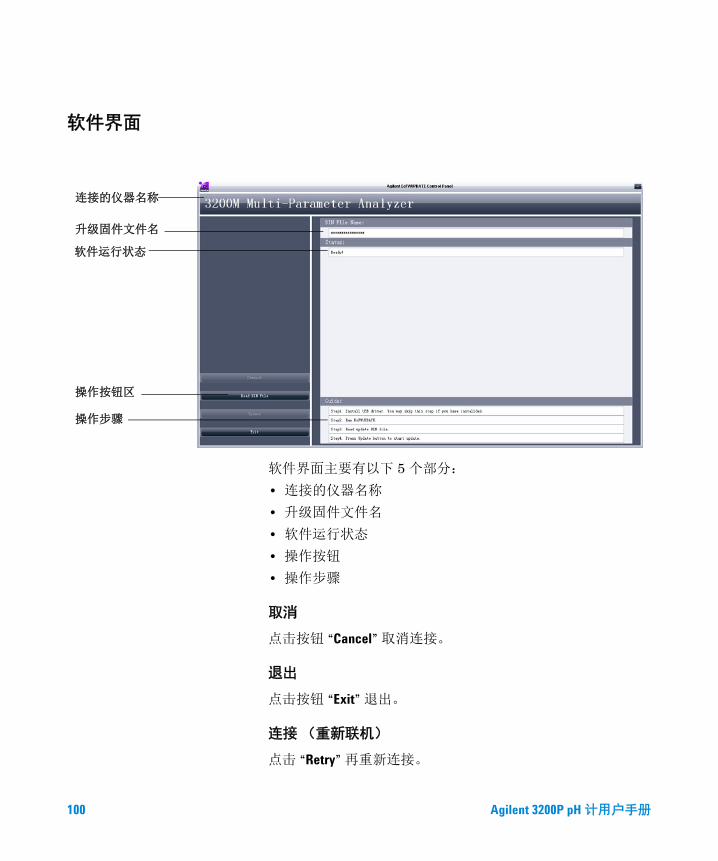
软件界面
软件界面主要有以下 5 个部分:
• 连接的仪器名称
• 升级固件文件名
• 软件运行状态
• 操作按钮
• 操作步骤
取消
点击按钮 “Cancel” 取消连接。
退出
点击按钮 “Exit” 退出。
连接 (重新联机)
点击 “Retry” 再重新连接。
连接的仪器名称
升级固件文件名
操作按钮区
软件运行状态
操作步骤
100 Agilent 3200P pH 计用户手册

Agilent 3200P pH 计用户手册
附录 3:EcPRINT 操作说明书
概述 102
软件安装 102
安装 EcPRINT 102
安装 USB 驱动程序 102
设置通讯口 104
软件运行 106
软件界面 108
101Agilent Technologies
概述
EcPRINT 是 Agilent 电化学仪器的打印软件。通过仪器的 USB接口,软件可以接收仪器输出的数据,可通过 PC 浏览、打印或保存数据。
软件安装
该程序支持以下操作系統:
• 32 位的 Windows 7
• 32 位 Windows XP Service Pack 3
安装 EcPRINT
1 从安捷伦公司网站 http://www.chem.agilent.com/en-US/Support/Downloads/ Utilities/Pages/default.aspx 下载 EcPRINT.ZIP 软件包。
2 将软件包 EcPRINT.ZIP 解压到一个临时文件夹。
3 双击 EcPRINT.EXE 并根据软件安装向导完成软件安装。
在使用 EcPRINT 软件之前必须安装 USB 驱动软件。
安装 USB 驱动程序
必要时,需安装USB驱动软件将计算机的 USB口模拟成 RS232 接口。如果已经安装过驱动程序,请跳过这一步。
1 运行随本软件一起提供的 USB 驱动程序 CP210xVCPInstaller.exe ( 包含在 EcPRINT.ZIP 软件包中 )。
2 断开仪器电源,用 USB 连接线 ( 随仪器附带 ) 将仪器连接到计算机的一个 USB 接口。
3 打开仪器电源。
102 Agilent 3200P pH 计用户手册
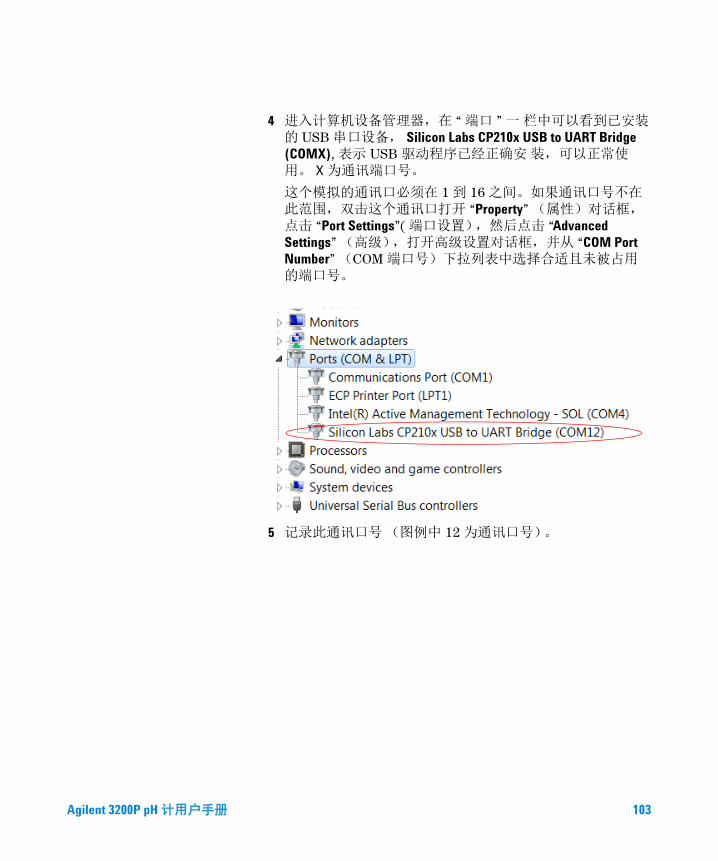
4 进入计算机设备管理器,在 “ 端口 ” 一 栏中可以看到已安装的 USB 串口设备, Silicon Labs CP210x USB to UART Bridge (COMX), 表示 USB 驱动程序已经正确安 装,可以正常使用。 X 为通讯端口号。
这个模拟的通讯口必须在 1 到 16 之间。如果通讯口号不在此范围,双击这个通讯口打开 “Property” (属性)对话框,点击 “Port Settings”( 端口设置),然后点击 “Advanced Settings” (高级),打开高级设置对话框,并从 “COM Port Number” (COM 端口号)下拉列表中选择合适且未被占用的端口号。
5 记录此通讯口号 (图例中 12 为通讯口号)。
Agilent 3200P pH 计用户手册 103
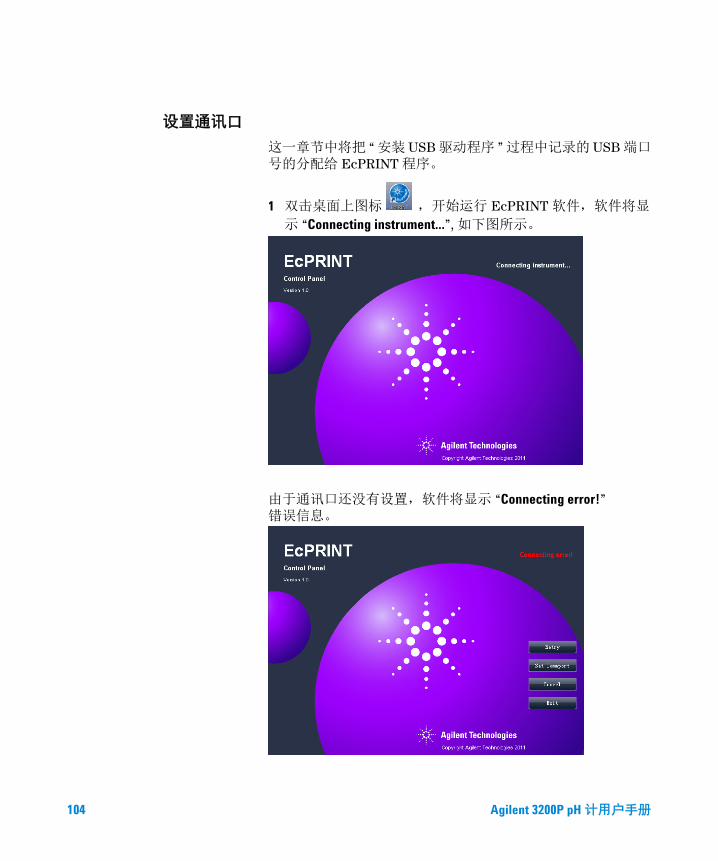
设置通讯口
这一章节中将把 “ 安装 USB 驱动程序 ” 过程中记录的 USB 端口号的分配给 EcPRINT 程序。
1 双击桌面上图标 ,开始运行 EcPRINT 软件,软件将显
示 “Connecting instrument...”, 如下图所示。
由于通讯口还没有设置,软件将显示 “Connecting error!” 错误信息。
104 Agilent 3200P pH 计用户手册
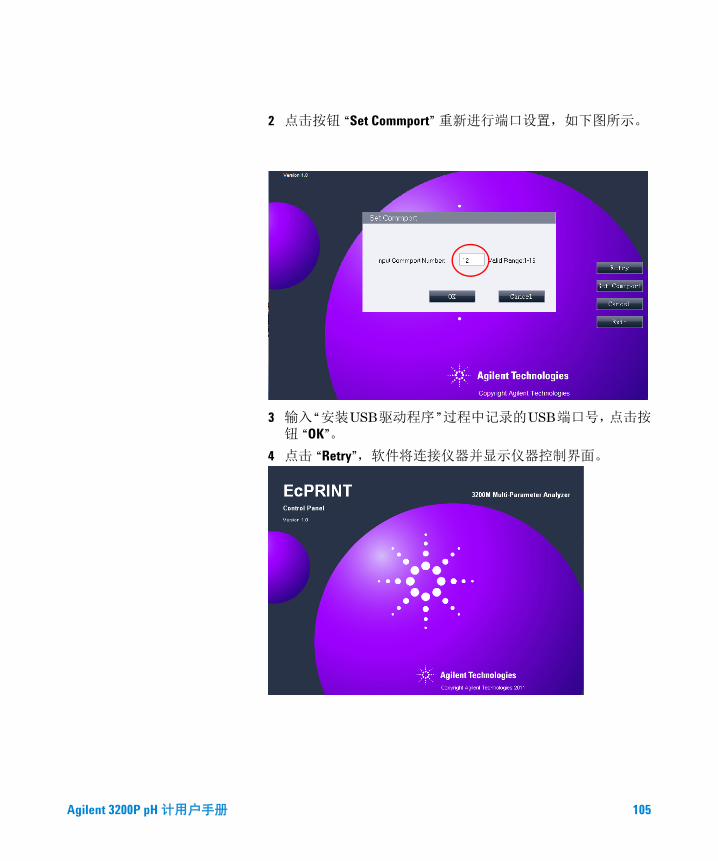
2 点击按钮 “Set Commport” 重新进行端口设置,如下图所示。
3 输入“安装USB驱动程序”过程中记录的USB端口号,点击按钮 “OK”。
4 点击 “Retry”,软件将连接仪器并显示仪器控制界面。
Agilent 3200P pH 计用户手册 105
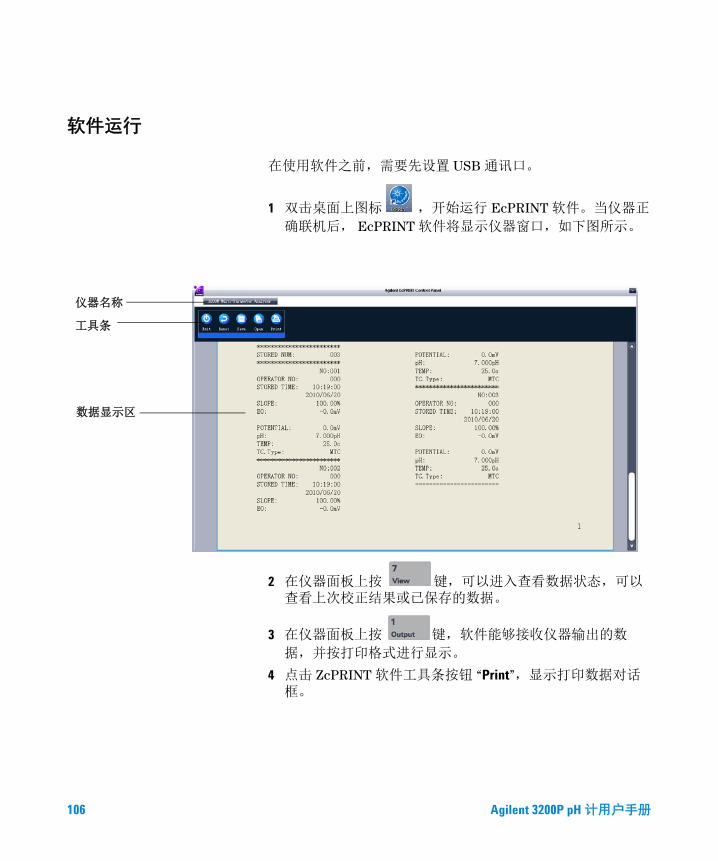
软件运行
在使用软件之前,需要先设置 USB 通讯口。
1 双击桌面上图标 ,开始运行 EcPRINT 软件。当仪器正
确联机后, EcPRINT 软件将显示仪器窗口,如下图所示。
2 在仪器面板上按 键,可以进入查看数据状态,可以查看上次校正结果或已保存的数据。
3 在仪器面板上按 键,软件能够接收仪器输出的数
据,并按打印格式进行显示。
4 点击 ZcPRINT 软件工具条按钮 “Print”,显示打印数据对话框。
仪器名称
工具条
数据显示区
106 Agilent 3200P pH 计用户手册
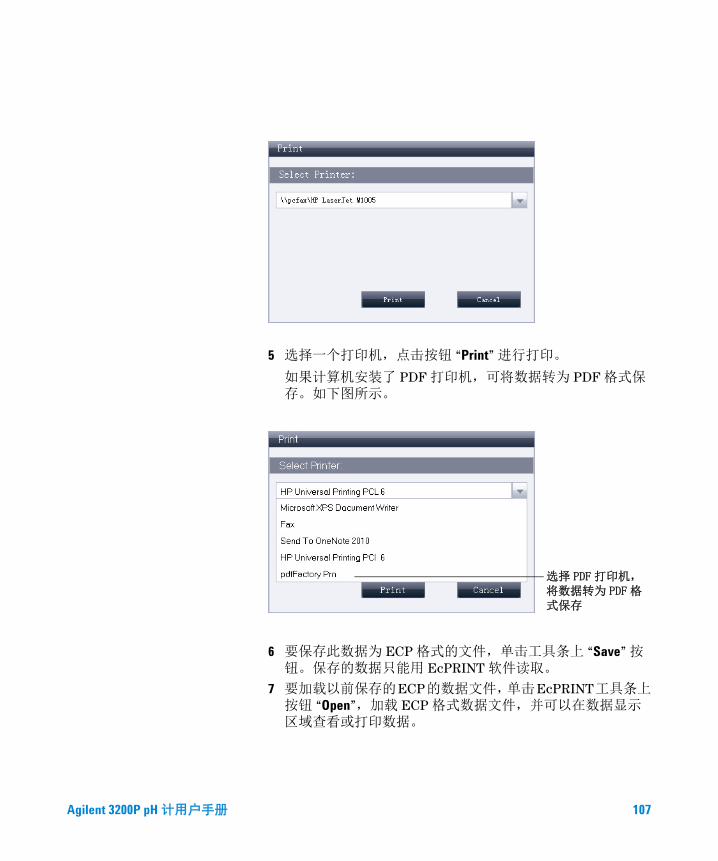
5 选择一个打印机,点击按钮 “Print” 进行打印。
如果计算机安装了 PDF 打印机,可将数据转为 PDF 格式保存。如下图所示。
6 要保存此数据为 ECP 格式的文件,单击工具条上 “Save” 按钮。保存的数据只能用 EcPRINT 软件读取。
7 要加载以前保存的ECP的数据文件,单击EcPRINT工具条上按钮 “Open”,加载 ECP 格式数据文件,并可以在数据显示区域查看或打印数据。
选择 PDF 打印机,将数据转为 PDF 格式保存
Agilent 3200P pH 计用户手册 107
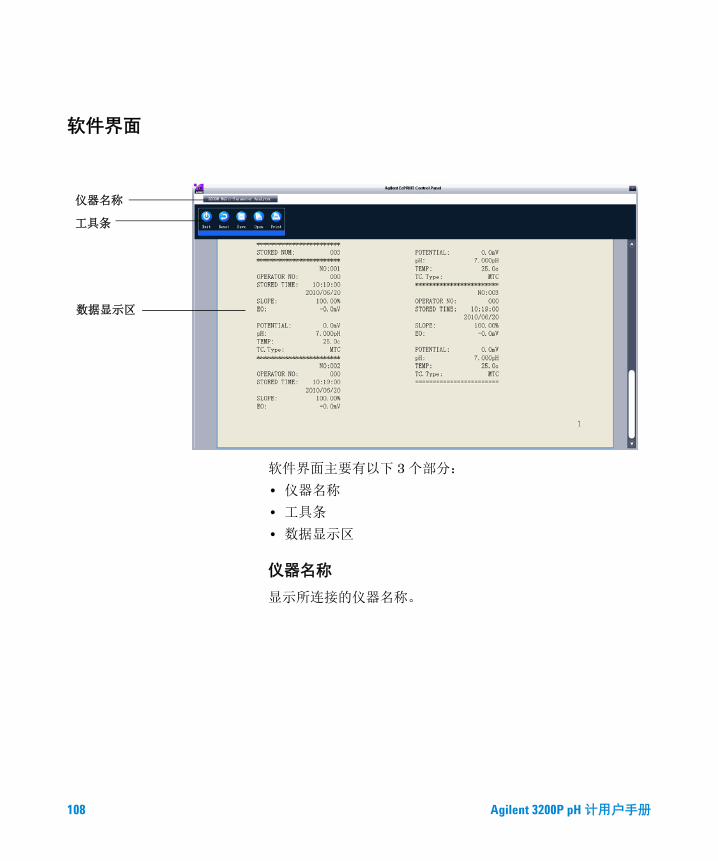
软件界面
软件界面主要有以下 3 个部分:
• 仪器名称
• 工具条
• 数据显示区
仪器名称
显示所连接的仪器名称。
仪器名称
工具条
数据显示区
108 Agilent 3200P pH 计用户手册
工具条
数据显示区
实时显示当按仪器上 “Output” 按钮时输出的数据或从 ECP 文件读取的数据。
Exit 退出
Reset 清除全部输出数据
Save 保存数据,格式为 ECP
Open 打开保存的数据文件(ECP 格式)
Print 打印输出数据
Agilent 3200P pH 计用户手册 109

110 Agilent 3200P pH 计用户手册

© Agilent Technologies, Inc. 2013
Printed in China 11/2013Second edition, November 2013
*5973-1775*5973-1775
www.agilent.com
Agilent Technologies