Access Online Cardholder Transaction Approval Training 1 Client Logo.
47
Access Online Cardholder Transaction Approval Training 1 Client Logo
-
Upload
lisa-farmer -
Category
Documents
-
view
218 -
download
2
Transcript of Access Online Cardholder Transaction Approval Training 1 Client Logo.
Access Online Cardholder Transaction
Approval Training
1
Client Logo
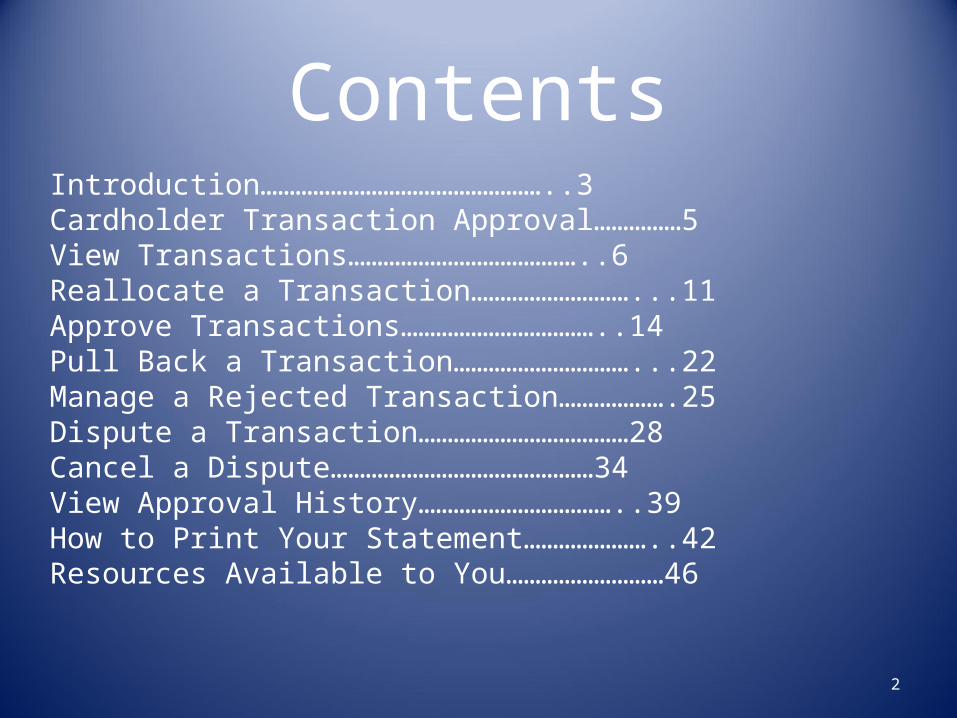
ContentsIntroduction…………………………………………..3Cardholder Transaction Approval……………5View Transactions…………………………………..6Reallocate a Transaction………………………...11Approve Transactions……………………………..14Pull Back a Transaction…………………………...22Manage a Rejected Transaction……………….25Dispute a Transaction………………………………28Cancel a Dispute………………………………………34View Approval History……………………………..39How to Print Your Statement…………………..42Resources Available to You………………………46
2

IntroductionTwo basic users will use the Transaction Approval Process (TAP) function:
1) Cardholders- Cardholders will use TAP to approve, reallocate and forward transactions to their approval manager. 2) Approving Managers- Approval managers will use TAP to review, reject or final approve transactions forwarded to them.
Both approval managers and cardholders can perform the following basic procedures: 1) Approve Transactions- Cardholders and approval managers can approve transactions. 2) Pull Back Transactions- Both cardholders and approving managers can pull back transactions that
have not been modified yet.
In Addition, Approval Managers Can:3) Reject Transactions- Approval managers can reject transactions and send them back to the cardholder. The rejecting approval manager must specify a rejection reason so that the cardholder receiving the rejected transaction knows how to manage it.
3

TAP Overview
4
Cardholder Transaction Approval
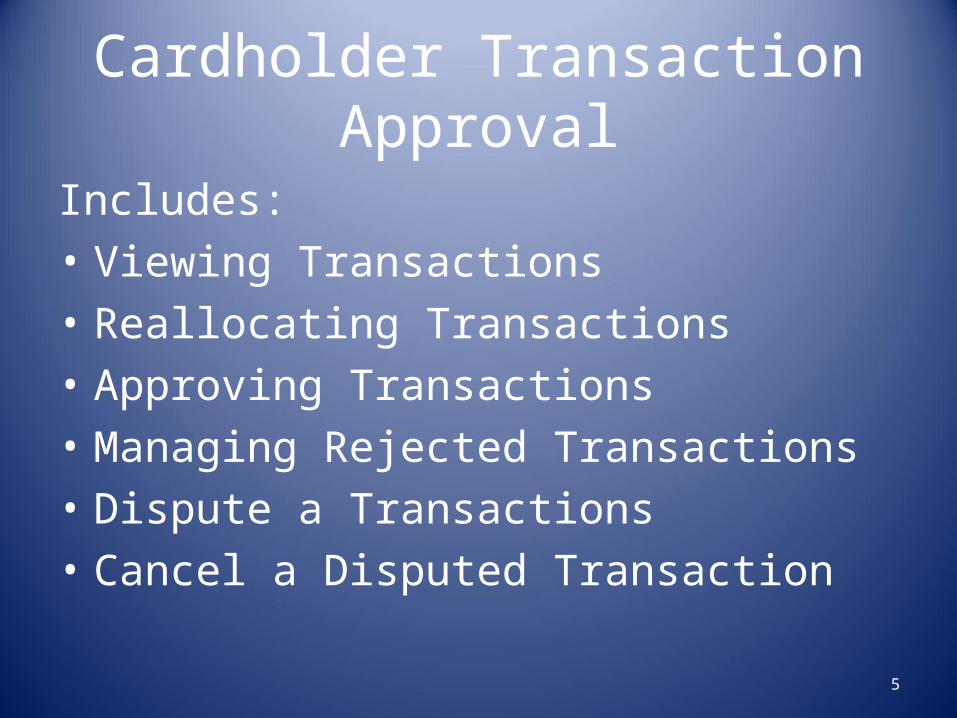
Includes:• Viewing Transactions• Reallocating Transactions• Approving Transactions• Managing Rejected Transactions• Dispute a Transactions• Cancel a Disputed Transaction
5

View Transactions
To view transactions: 1.From the Left-Column Navigation Bar select the Transaction Management high-level task. The Transaction Management screen displays.
6
View Transactions- Continued
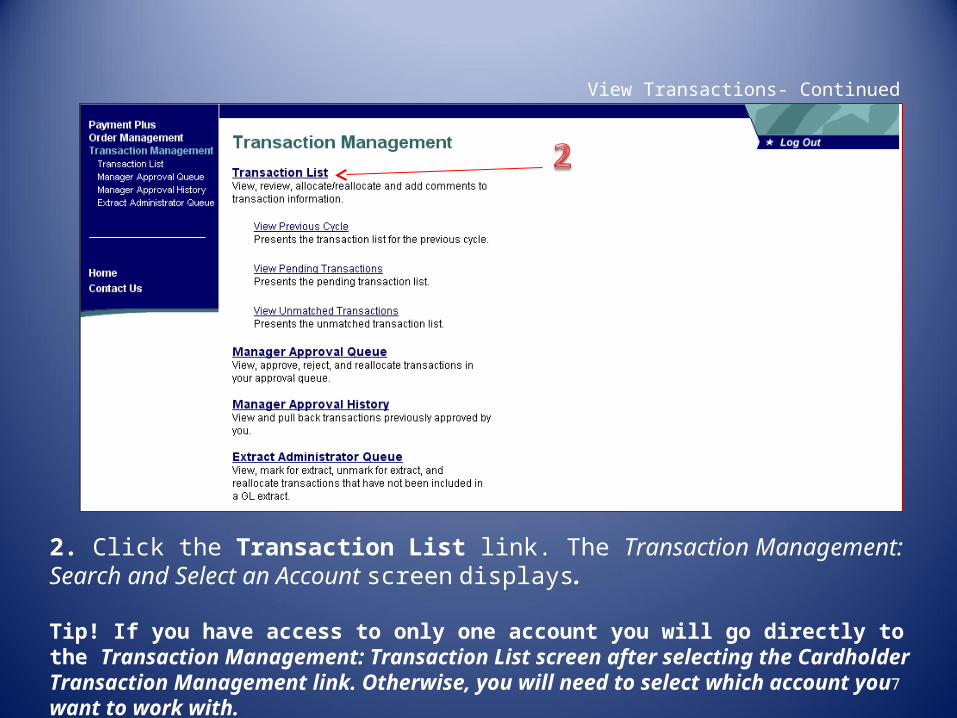
2. Click the Transaction List link. The Transaction Management: Search and Select an Account screen displays.
Tip! If you have access to only one account you will go directly to the Transaction Management: Transaction List screen after selecting the Cardholder Transaction Management link. Otherwise, you will need to select which account you want to work with. 7
View Transactions- Continued
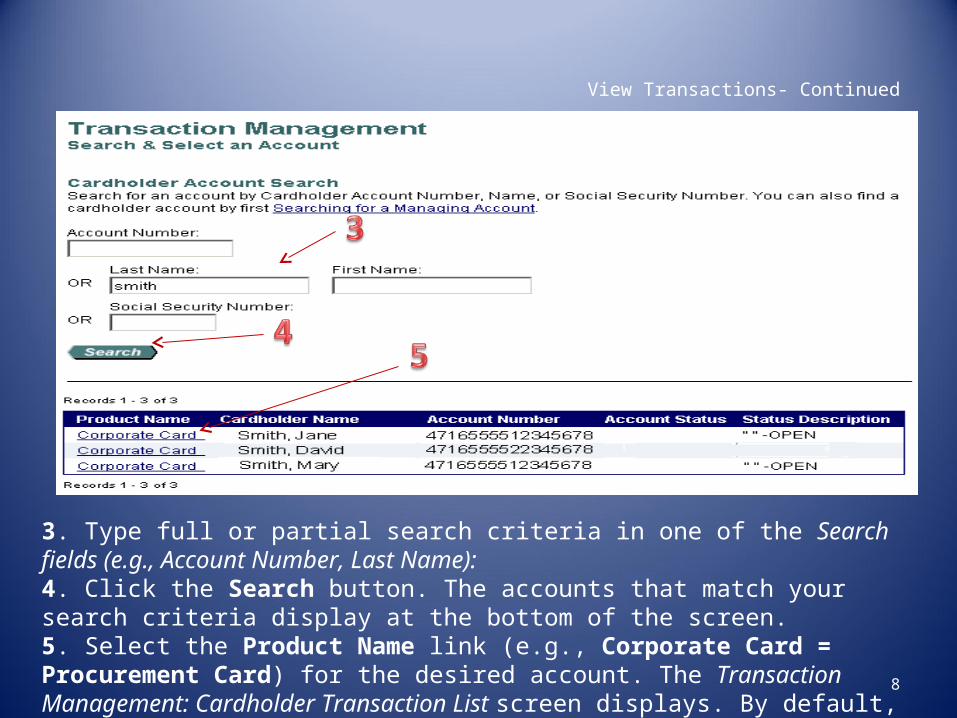
3. Type full or partial search criteria in one of the Search fields (e.g., Account Number, Last Name): 4. Click the Search button. The accounts that match your search criteria display at the bottom of the screen. 5. Select the Product Name link (e.g., Corporate Card = Procurement Card) for the desired account. The Transaction Management: Cardholder Transaction List screen displays. By default, the current cycle is selected.
8
View Transactions- Continued
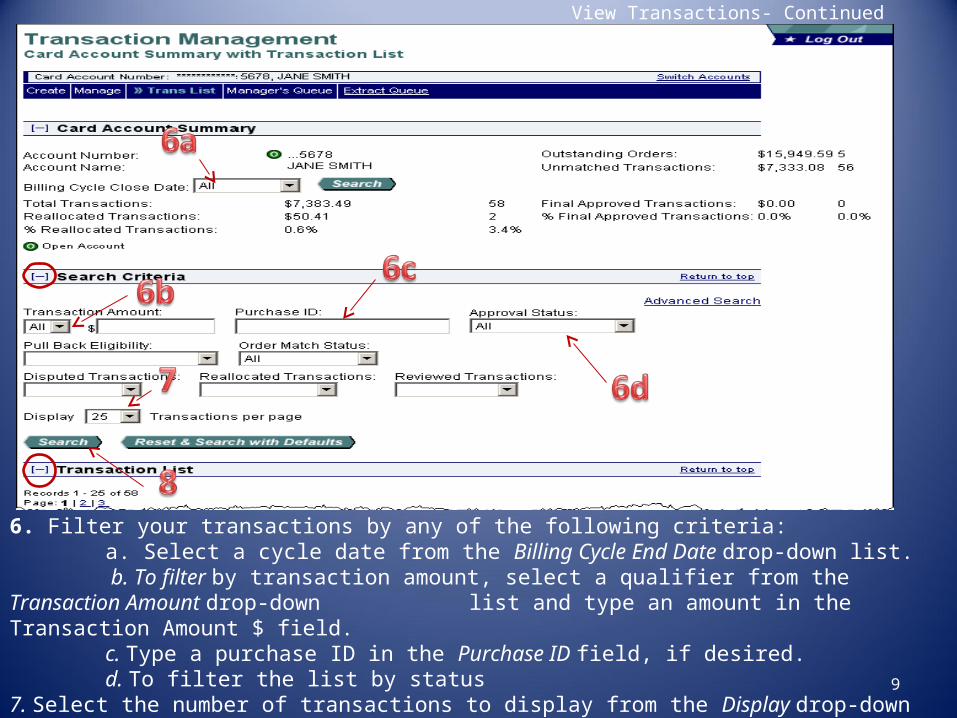
6. Filter your transactions by any of the following criteria: a. Select a cycle date from the Billing Cycle End Date drop-down list. b. To filter by transaction amount, select a qualifier from the Transaction Amount drop-down list and type an amount in the Transaction Amount $ field. c. Type a purchase ID in the Purchase ID field, if desired. d. To filter the list by status
7. Select the number of transactions to display from the Display drop-down list. 8. Click the Search button. The transactions that match your filtering criteria display.
9
View Transactions- Continued
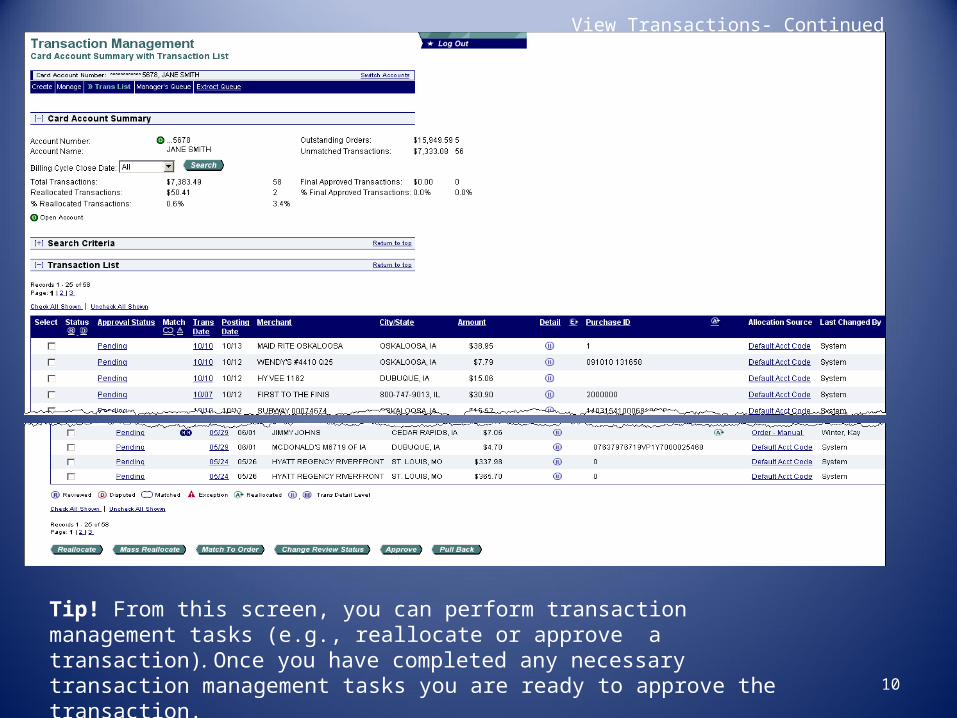
Tip! From this screen, you can perform transaction management tasks (e.g., reallocate or approve a transaction). Once you have completed any necessary transaction management tasks you are ready to approve the transaction.
10
Reallocate a Transaction
When you reallocate a transaction, you change the accounting information to allocate the transaction to an accounting code different than your default accounting code. Transactions cannot be split between two accounting codes.
11

Reallocate a Transaction- Continued
12
To reallocate a transaction: 1.To navigate to the Transaction List screen repeat the steps on slides 6-10 of this presentation.2. On the Transaction Management: Transaction List screen, click the Accounting Code link next to the transaction you wish to reallocate. The Transaction Management: Detail screen displays with the Allocations tab open.

Reallocate a Transaction- Continued
13
3. To reallocate the entire transaction to a single accounting code: a.Click the Magnifying Glass icon to bring up a Valid Value List (VVL) of additional approved oracle strings. VVL= List of Approved Oracle Account Strings.4. Click the Save Allocations button. A confirmation message displays and an A icon displays next to the transaction. The allocation information is always accessible on the Allocations tab whenever you access transaction detail.

Approve a TransactionsTo manage your own transactions, you can:
• View a list of your transactions, filtered by approval status (e.g., pending, pulled back) and other parameters
• Approve and forward a transaction to an approval manager • Pull back a transaction as long as the approval manager (also called
the pending approver) has not approved, rejected, or modified the transaction (e.g., reallocated, added comments, changed user line items).
• Manage a rejected transaction if your approval manager sends it back to you
• View the approval history to see the current approval status of the transaction, along with each user who approved a transaction, the date and time of each approval, and whether or not each user modified the transaction’s allocation, comments, or line items.
14

Approve a Transaction- Continued
To approve a transaction : 1. Navigate to the Transaction List screen, repeat the steps on slides 6-10 of this presentation.Select a check box for a transaction with a Pending or Pulled Back status.
Tip! You can select multiple transactions. Also, you can select the Check All Shown link if you want to approve all the displayed transactions. 2. Click the Approve button. The Transaction Management: Approve Transaction(s) screen displays.
15
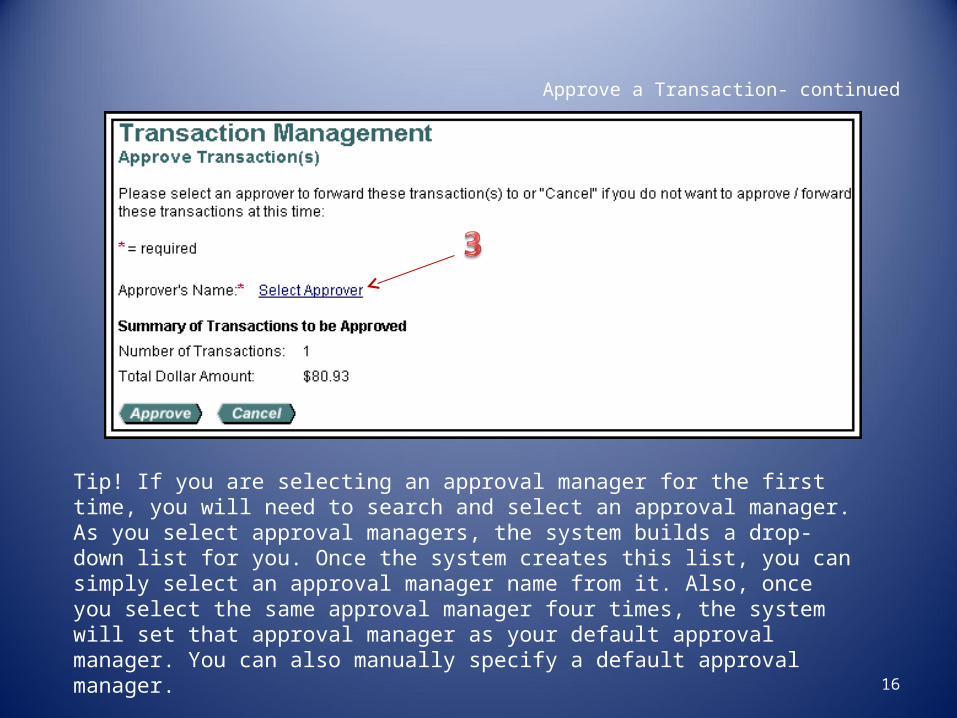
Approve a Transaction- continued
Tip! If you are selecting an approval manager for the first time, you will need to search and select an approval manager. As you select approval managers, the system builds a drop-down list for you. Once the system creates this list, you can simply select an approval manager name from it. Also, once you select the same approval manager four times, the system will set that approval manager as your default approval manager. You can also manually specify a default approval manager.
3. Click the Select Approver link. The Approve Transaction(s): Search and Select an Approver screen displays. 16
Approve a Transaction- Continued
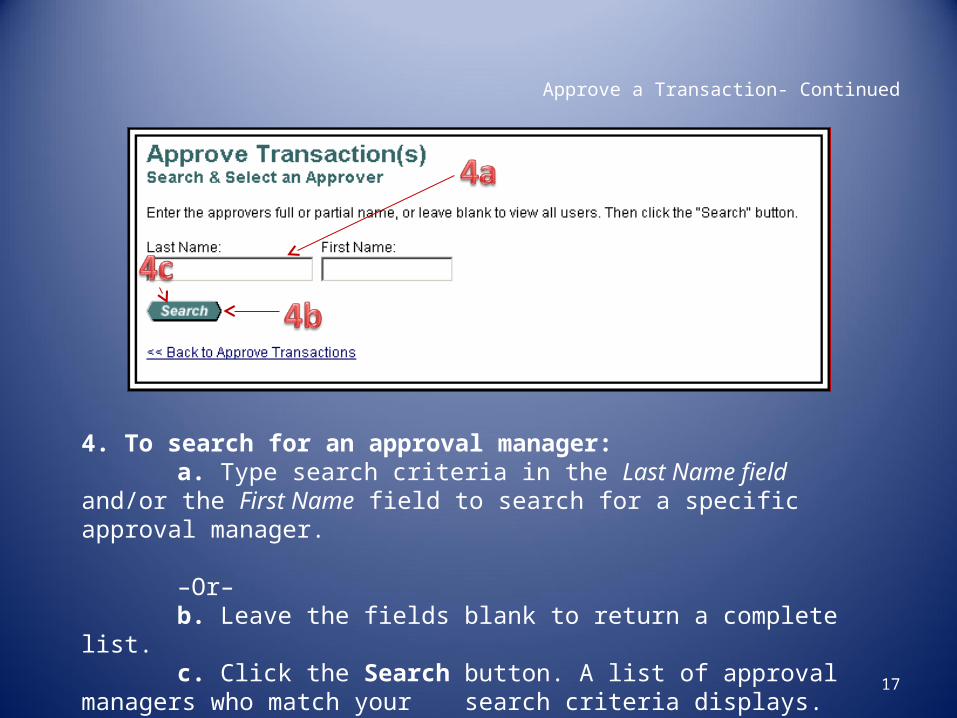
4. To search for an approval manager: a. Type search criteria in the Last Name field and/or the First Name
field to search for a specific approval manager.
–Or– b. Leave the fields blank to return a complete list. c. Click the Search button. A list of approval managers who match your search criteria displays.
17
Approve a Transaction- Continued
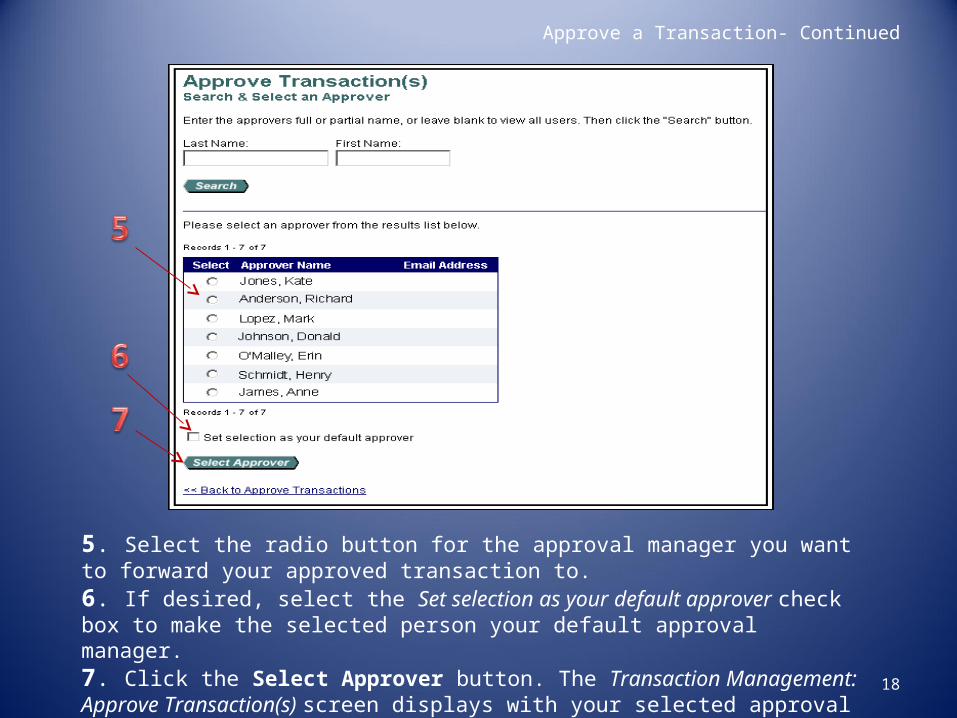
5. Select the radio button for the approval manager you want to forward your approved transaction to. 6. If desired, select the Set selection as your default approver check box to make the selected person your default approval manager. 7. Click the Select Approver button. The Transaction Management: Approve Transaction(s) screen displays with your selected approval manager in the Approver’s Name field. 18
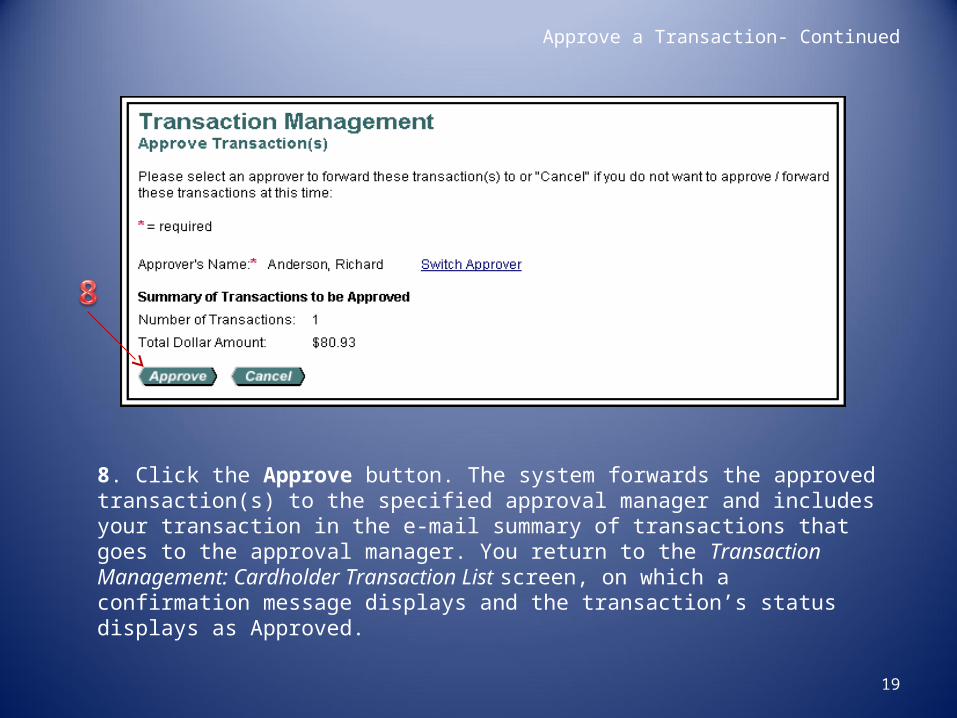
Approve a Transaction- Continued
8. Click the Approve button. The system forwards the approved transaction(s) to the specified approval manager and includes your transaction in the e-mail summary of transactions that goes to the approval manager. You return to the Transaction Management: Cardholder Transaction List screen, on which a confirmation message displays and the transaction’s status displays as Approved.
19
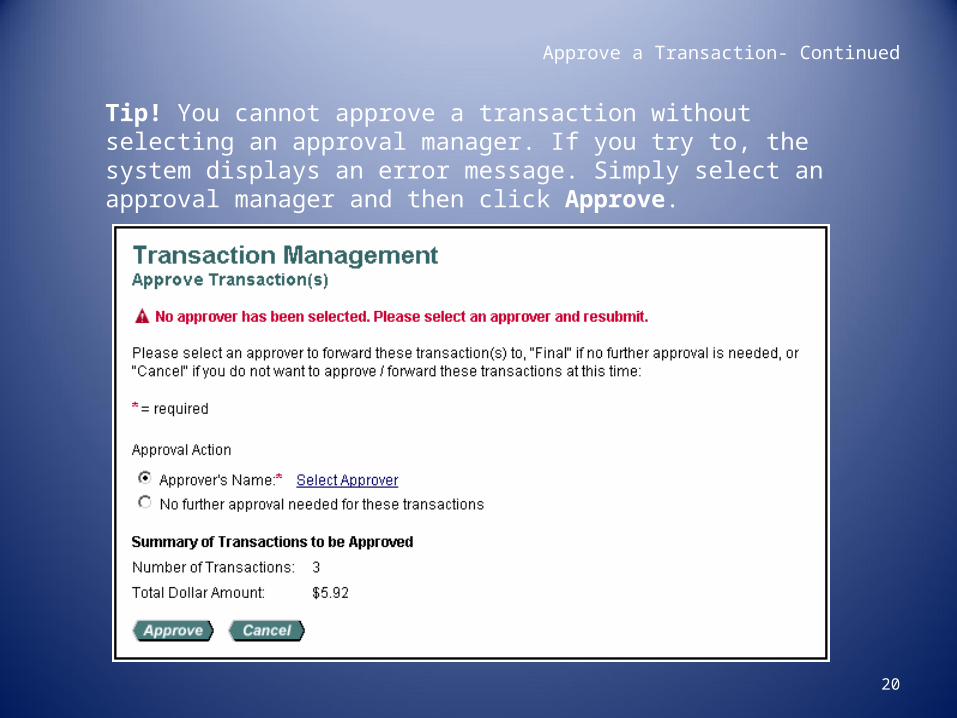
Approve a Transaction- Continued
Tip! You cannot approve a transaction without selecting an approval manager. If you try to, the system displays an error message. Simply select an approval manager and then click Approve.
20

Approve a Transaction- Continued
9. Repeat steps 1–8 on slides 27-31 for all remaining transactions you wish to approve and forward.
21

Pull Back a Transaction
You can pull back a transaction before the approval manager you forwarded the transaction to has approved, rejected, or modified (e.g., reallocated) the transaction. After an approval manager takes action on a transaction, the transaction belongs to the current approval manager and you can no longer pull back the transaction.
22

Pull Back a Transaction- Continued
To pull back a transaction: 1. To navigate to this screen follow the steps on slides 6-9. Select the Eligible for Pullback option from the Pull Back Eligibility drop-down list. 2. Click the Search button. Transactions that you can pull back display at the bottom of the screen. 23
Pull Back a Transaction- Continued
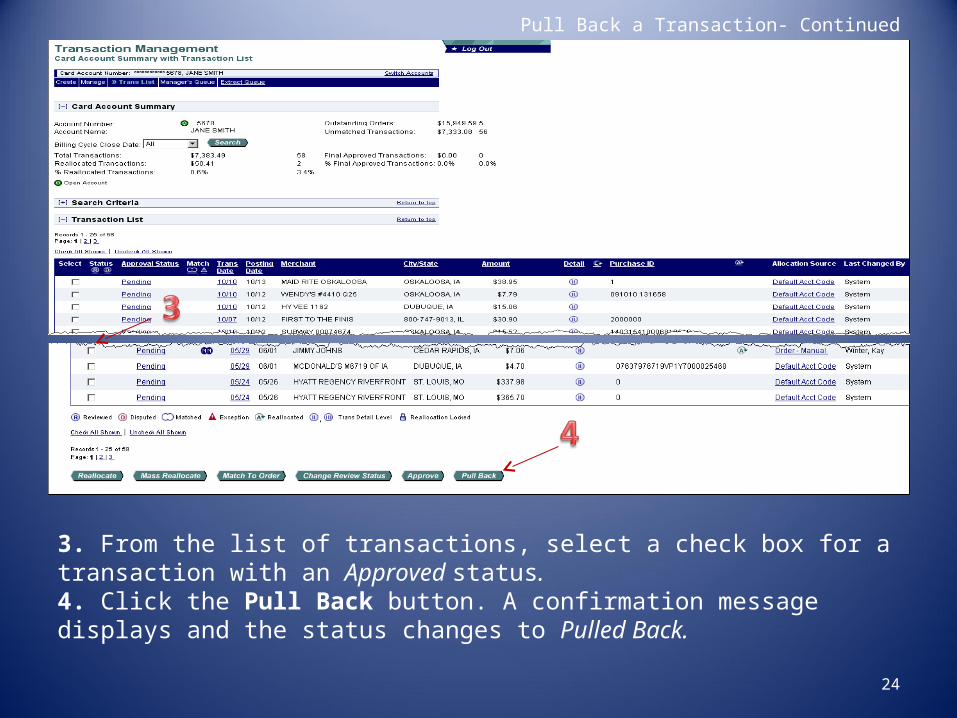
3. From the list of transactions, select a check box for a transaction with an Approved status. 4. Click the Pull Back button. A confirmation message displays and the status changes to Pulled Back.
24
Manage a Rejected Transaction
The approval manager you forward a transaction to may reject a transaction. When an approval manager rejects a transaction, the system requires the rejecting approval manager to provide a reason and/or comments, so you know how to modify the transaction to make it acceptable. After you modify the transaction, you can re-approve and forward the transaction back to your approval manager.
25

Manage a Rejected Transaction- Continued
To manage a rejected transaction: 1. Select Rejected from the Approval Status drop-down list. 2. Click the Search button. 3. Clicked the Rejected link for the transaction you want to work with. The Transaction Management: Transaction Detail screen displays. 26
Manage a Rejected Transaction- Continued
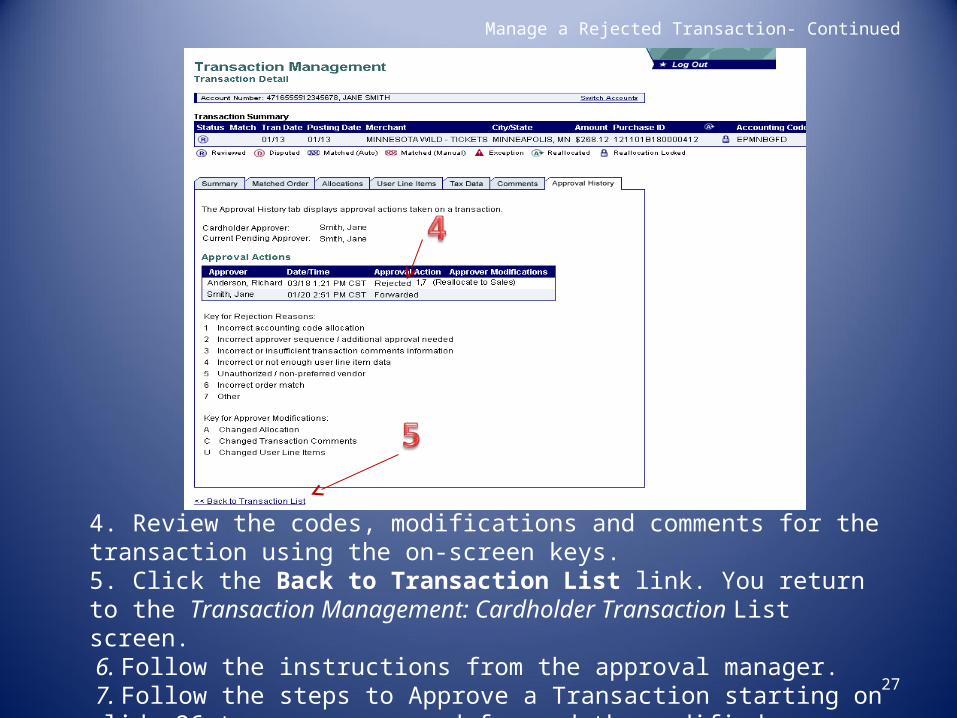
4. Review the codes, modifications and comments for the transaction using the on-screen keys. 5. Click the Back to Transaction List link. You return to the Transaction Management: Cardholder Transaction List screen. 6. Follow the instructions from the approval manager. 7. Follow the steps to Approve a Transaction starting on slide 26 to re-approve and forward the modified transaction. 27

Dispute a Transaction
You can use Access Online to dispute a transaction, including selecting a reason for the dispute. In addition, you can use the system to request a copy of the sales draft to get more information about the disputed transaction. You can also cancel a disputed transaction as long as the disputed transaction is unresolved.
28
Dispute a Transaction- Continued
29
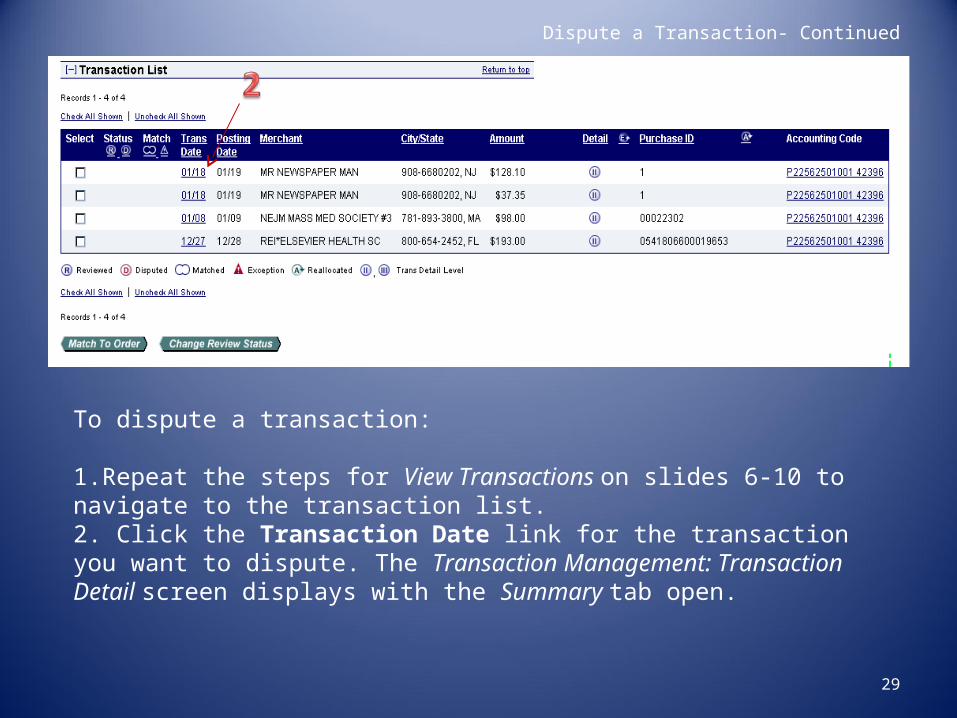
To dispute a transaction:
1.Repeat the steps for View Transactions on slides 6-10 to navigate to the transaction list. 2. Click the Transaction Date link for the transaction you want to dispute. The Transaction Management: Transaction Detail screen displays with the Summary tab open.
Dispute a Transaction- Continued
30
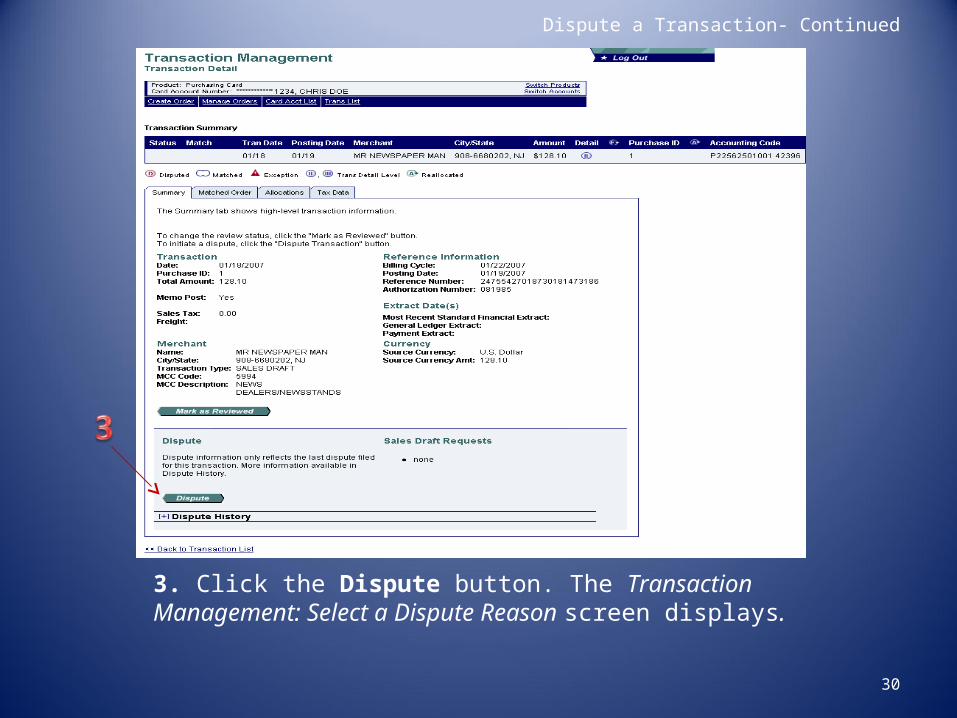
3. Click the Dispute button. The Transaction Management: Select a Dispute Reason screen displays.

Dispute a Transaction- Continued
31
4. Select the radio button for the appropriate dispute reason.
5. Click the Select button. The Transaction Management: Dispute Reason screen displays, listing your selected dispute reason.

Dispute a Transaction- Continued
32
Tip! The Transaction Management: Dispute Reason screen has different fields depending on the dispute reason selected.
6. Verify or type your name in the Requestor Name field. 7. Type your phone number in the Requestor Phone Number field. 8. In the Comments box, enter additional comments to explain why you are disputing the charge. 9. Click the Continue button. The Transaction Management: Dispute Reason screen displays with a message at the top confirming that your request has been completed.
Dispute a Transaction- Continued
33
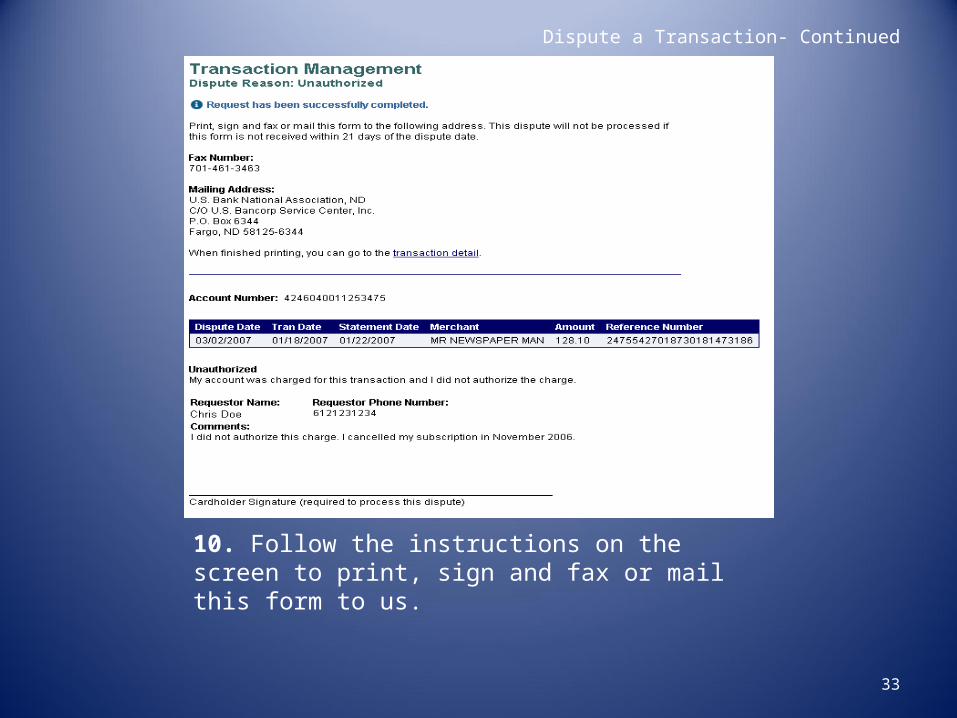
10. Follow the instructions on the screen to print, sign and fax or mail this form to us.
Cancel a Dispute
You can easily cancel an unresolved dispute. If you cancel a dispute, keep in mind that the transaction is automatically settled in favor of the merchant. After you cancel a dispute, you can also re-dispute the transaction
34
Cancel a Dispute- Continued
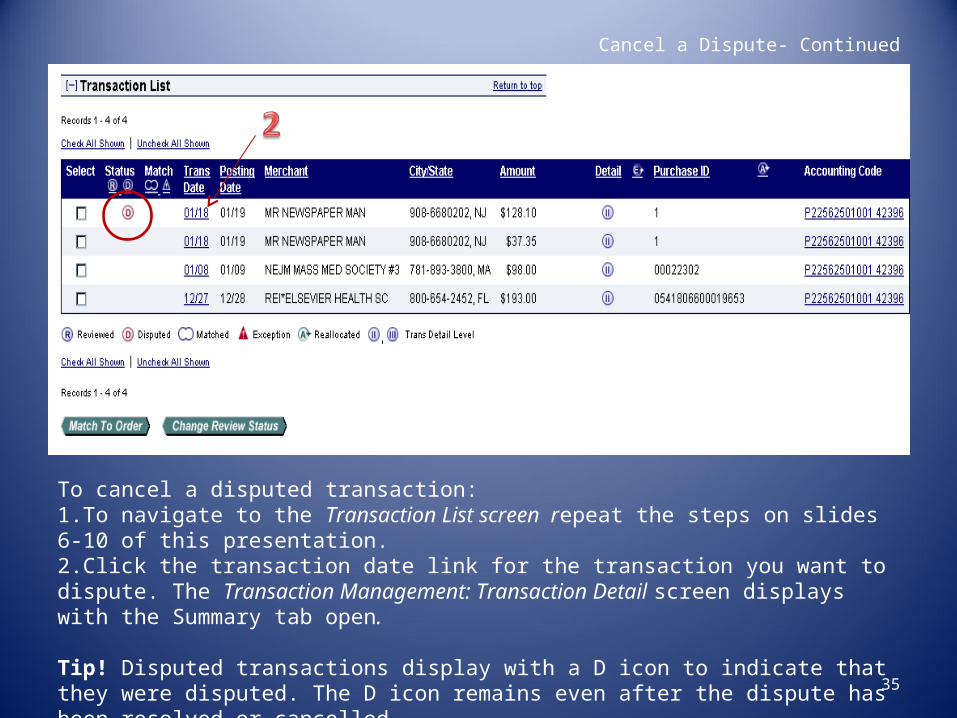
35
To cancel a disputed transaction: 1.To navigate to the Transaction List screen repeat the steps on slides 6-10 of this presentation.2.Click the transaction date link for the transaction you want to dispute. The Transaction Management: Transaction Detail screen displays with the Summary tab open.
Tip! Disputed transactions display with a D icon to indicate that they were disputed. The D icon remains even after the dispute has been resolved or cancelled.
Cancel a Dispute- Continued
36
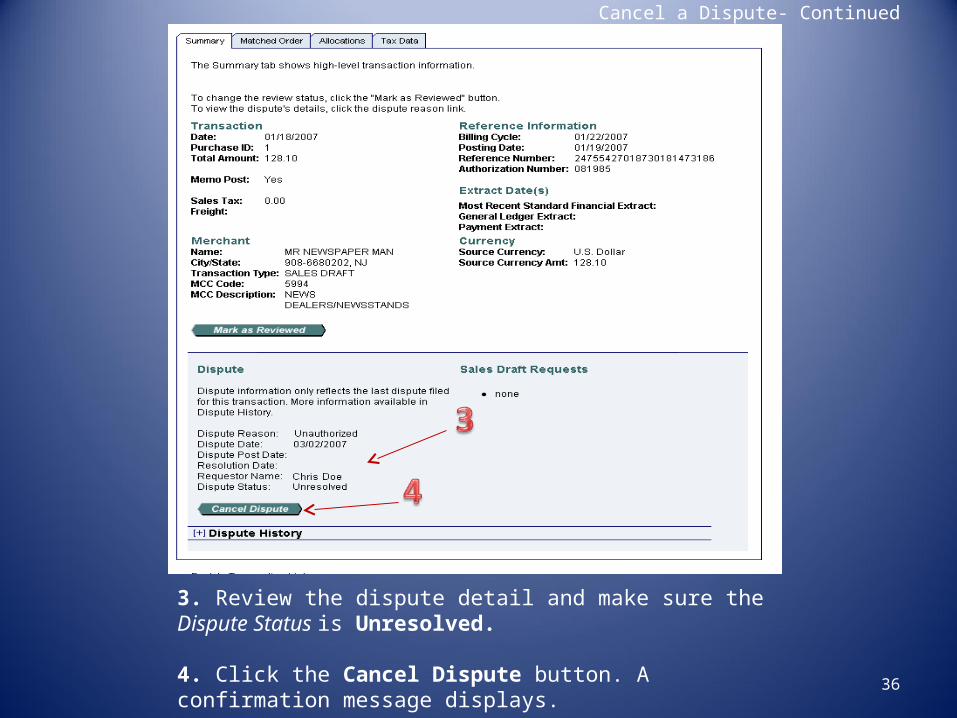
3. Review the dispute detail and make sure the Dispute Status is Unresolved.
4. Click the Cancel Dispute button. A confirmation message displays.
Cancel a Dispute- Continued
37
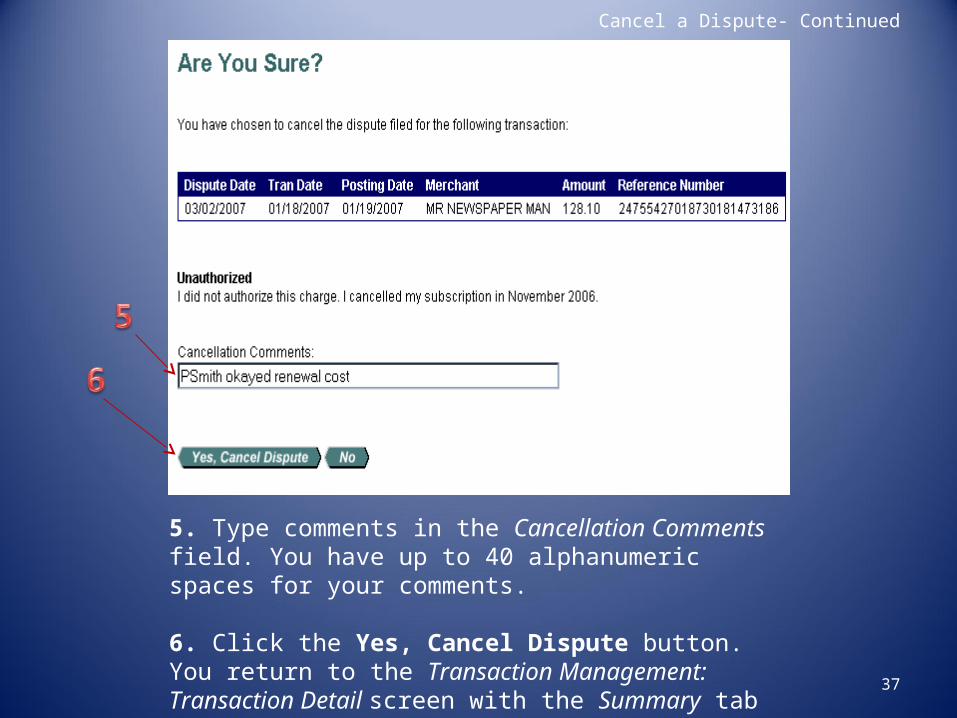
5. Type comments in the Cancellation Comments field. You have up to 40 alphanumeric spaces for your comments.
6. Click the Yes, Cancel Dispute button. You return to the Transaction Management: Transaction Detail screen with the Summary tab open.
Cancel a Dispute- Continued
38
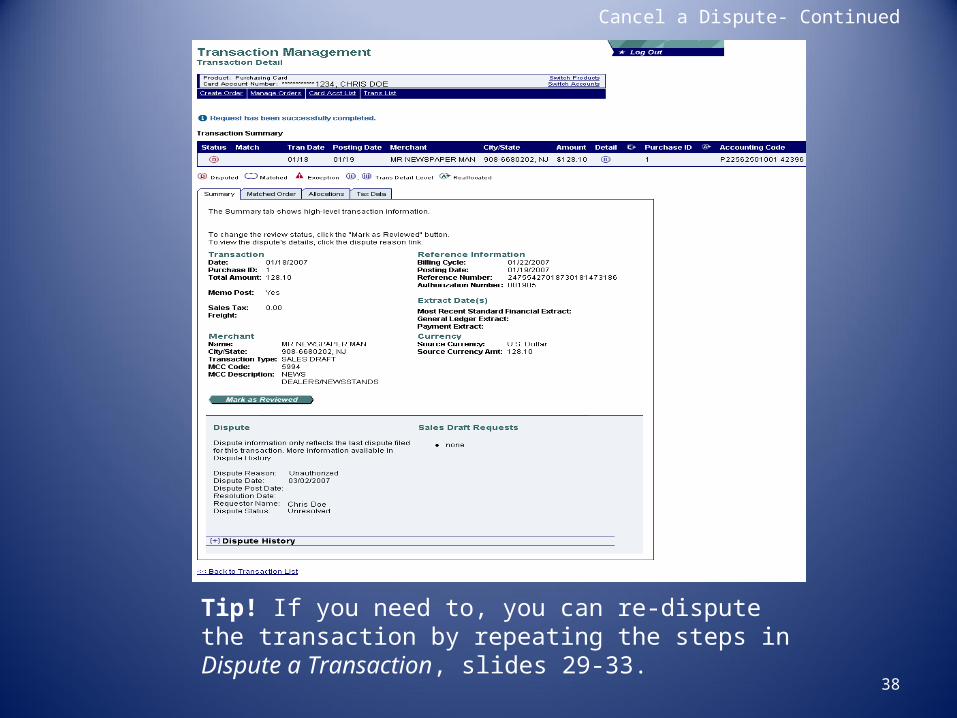
Tip! If you need to, you can re-dispute the transaction by repeating the steps in Dispute a Transaction, slides 29-33.

View Approval History
If you want to see the history of a transaction, you can view the approval history for a specific transaction on the Approval History tab. The Approval History tab provides an audit trail, including the name of the approval manager and what action the approval manager took related to the transaction.
39
View Approval History- Continued
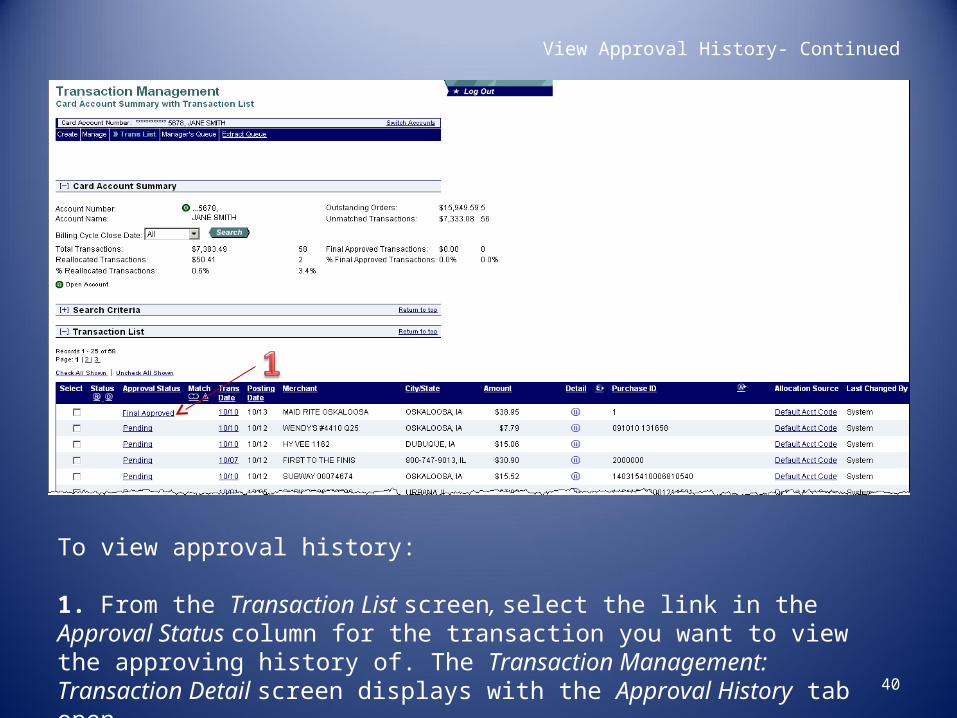
To view approval history:
1. From the Transaction List screen, select the link in the Approval Status column for the transaction you want to view the approving history of. The Transaction Management: Transaction Detail screen displays with the Approval History tab open.
40

View Approval History- Continued
2. Review the approval action information. 3. Click the Back to Transaction List link. You return to the Transaction Management: Cardholder Transaction List screen.
41
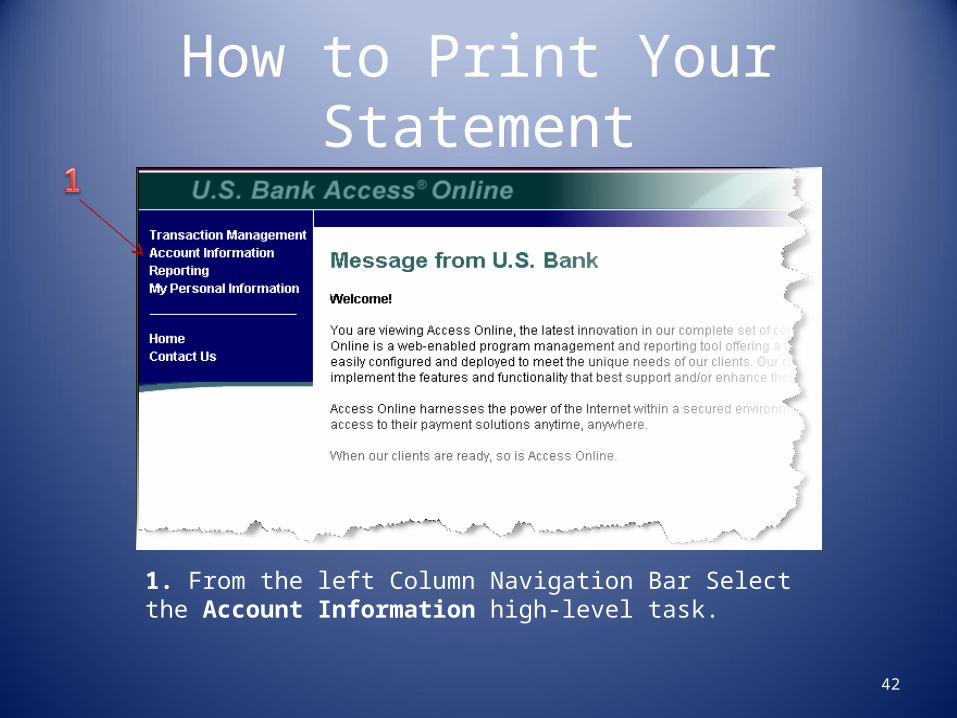
How to Print Your Statement
42
1. From the left Column Navigation Bar Select the Account Information high-level task.
How to Print Your Statement- Continued
43
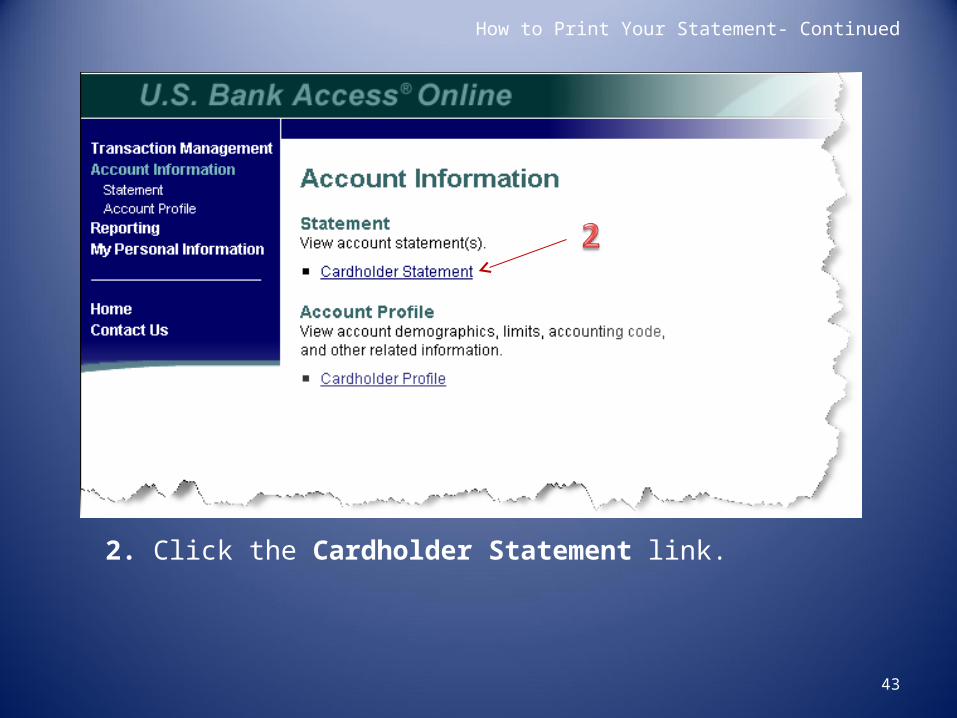
2. Click the Cardholder Statement link.
How to Print Your Statement- Continued
44
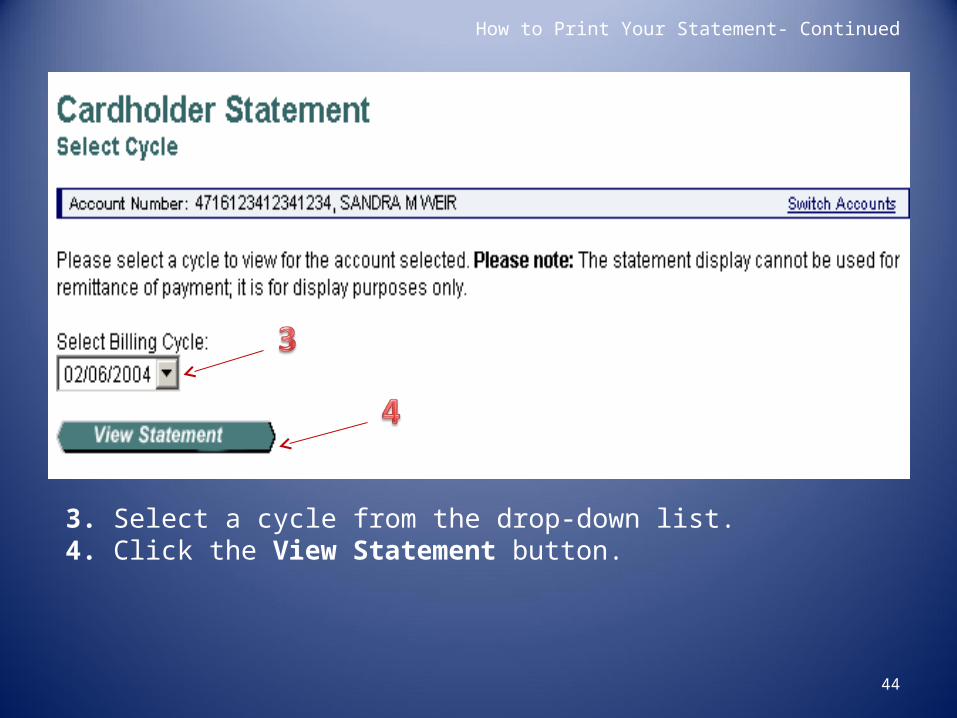
3. Select a cycle from the drop-down list. 4. Click the View Statement button.

How to Print Your Statement- Continued
45
The statement opens as a PDF file in a new window.
Print this PDF file as your monthly statement and submit to Accounts Payable with all original receipts and the PCC Purchase Report.

Resources Available To You• Access Online Help Desk – (877) 887-9260
- General Website Navigation Inquiry- Resetting Passwords- General Account Inquiry
• 24-Hour Customer Service- (800) 344-5696- Balance Inquiry- Statement Inquiry- Disputed Items- Declined Purchases- Card Activation- Lost, Stolen or Compromised Card
• Purchasing Card Program Administrator...
46

Congratulations!!!!You have made it
through your Access Online Training