A material package for teaching handcrafts through CLIL
183
The world is your oyster! A material package for teaching handcrafts through CLIL Master’s Thesis Anna-Maarit Ahvenainen University of Jyväskylä Department of Languages English February 2014
Transcript of A material package for teaching handcrafts through CLIL

The world is your oyster!
A material package for teaching handcrafts through CLIL
Master’s Thesis
Anna-Maarit Ahvenainen
University of Jyväskylä
Department of Languages
English
February 2014


JYVÄSKYLÄN YLIOPISTO
Tiedekunta – Faculty
Humanistinen tiedekunta
Laitos – Department
Kielten laitos
Tekijä – Author
Anna-Maarit Ahvenainen
Työn nimi – Title
The world is your oyster! – A material package for teaching handcrafts through CLIL
Oppiaine – Subject
Englannin kieli
Työn laji – Level
Pro gradu -tutkielma
Aika – Month and year
Helmikuu 2014
Sivumäärä – Number of pages
37s + materiaalipaketti 137s
Tiivistelmä – Abstract
Globalisoituvassa, verkottuvassa ja monikulttuuristuvassa maailmassa kyky kommunikoida vierailla kielillä
ja kulttuurien tuntemus muuttuvat yhä tärkeämmiksi taidoiksi, joita myös suomalaisen koulun on kyettävä
välittämään oppilaille. Eräs lähestymistapa tämän tavoitteen toteuttamiseksi on Content and Language
Integrated Learning eli CLIL, jonka mukaisessa opetuksessa keskitytään sekä käytetyn vieraan kielen että
käsiteltävänä olevan oppiaineen sisällön oppimiseen. CLIL mahdollistaa vieraan kielen käytön paitsi
oppimisen kohteena, myös sen välineenä, mikä kasvattaa oppilaiden kommunikaatiotaitoja ja motivaatiota
kielen oppimiseen.
Tämä opinnäytetyö tarjoaa opettajien käyttöön oppimateriaalipaketin, jonka avulla voidaan opettaa
tekstiilikäsityötä ja englannin kieltä CLIL:in periaatteiden mukaisesti. Oppimateriaalipakettiin kuuluu viisi
eri kokonaisuutta, joiden puitteissa opiskellaan käsityötaitoja kuten painantaa, värjäystä ja ompelua,
teoreettisempaa tietoa kuten vieraiden kulttuurien tapoja ja kierrätystä sekä englannin kieltä, erityisesti
kuullun ja luetun ymmärtämistä, suullista ilmaisua sekä aiheisiin liittyvää sanastoa. Kokonaisuudet on jaettu
yhteensä kolmeentoista 90 minuutin mittaiseen oppituntiin, joihin sisältyy erityyppisiä tehtäviä. Materiaali
on suunnattu lähtökohtaisesti peruskoulun kuudennelle luokalle käsityön oppiaineeseen toteutettavaksi
yhtäjaksoisesti, mutta paketista on yhtä lailla mahdollista poimia yksittäisiä kokonaisuuksia tai oppitunteja
toteutettavaksi esimerkiksi englanninopetuksen tai oppiainerajat ylittävän opetuksen yhteydessä, myös
muissa ikäryhmissä.
Paketti sisältää opettajalle suunnatun yksityiskohtaisen ohjeistuksen oppituntien toteuttamiseen, tunneilla
tarvittavan kirjallisen ja sähköisen oppimateriaalin sekä tiedot tarvittavista käsityömateriaaleista ja
välineistä. Opettajan ohjeistuksen yhteydessä määritellään myös oppituntien sisällölliset, taidolliset,
kulttuurilliset ja kielelliset tavoitteet, oppilaiden suoritusten arviointiperusteet sekä se, miten CLIL toteutuu
oppimateriaalia käytettäessä.
Asiasanat – Keywords
Handcrafts, CLIL, material package
Säilytyspaikka – Depository
Kielten laitos, JYX
Muita tietoja – Additional information


Table of contents
1. INTRODUCTION............................................................................................... 1
2. CONTENT AND LANGUAGE INTEGRATED LEARNING (CLIL)............. 3
2.1. Defining CLIL compared to other language teaching approaches............... 3
2.2. The past and the present of CLIL................................................................. 6
2.3. Benefits of CLIL........................................................................................... 9
3. THEORETICAL CONCEPT OF CLIL.............................................................. 13
3.1. Integration of content and language learning................................................ 13
3.2. CLIL and intercultural understanding.......................................................... 18
3.3. Tools for using CLIL.................................................................................... 18
3.3.1. The Language Triptych......................................................................... 19
3.3.2. The 4Cs Framework.............................................................................. 20
3.3.3. Monitoring CLIL in action – The CLIL Matrix.................................... 22
4. CLIL IN FINLAND............................................................................................. 24
5. TEACHING THROUGH CLIL IN PRIMARY SCHOOL................................. 25
6. LEARNING LANGUAGES THROUGH HANDCRAFTS................................ 26
6.1. Starting point for CLIL and handcrafts......................................................... 26
6.2. Handcrafts, language and culture - KÄ-KI-KU – approach.......................... 28
6.3. The aims of the material package combining handcrafts and English.......... 31
7. DISCUSSION...................................................................................................... 32
8. BIBLIOGRAPHY................................................................................................ 34
APPENDIX: Multicultural handcrafts in English: A teacher’s handbook

1
1. INTRODUCTION
“Knowledge is got by experience, all the rest is information.” (Einstein)
The idea of Einstein’s functions as a starting point to this thesis. In order to gain
knowledge it is more effective to experience it rather than just to read about it. Learning
a language is also something one cannot achieve only by reading how to do it. It is a
process that requires a lot of one’s brain capacity and different skills, such as social,
cultural and memory skills. Experiencing the learning in real life situations is something
many language teachers have aimed to accomplish, but have struggled because of the
textbook-based teaching. The English language is the most common foreign language
taught in Finnish classrooms, but still many people feel uncomfortable using the
language. However, there are different teaching approaches available to shake the
traditional ways of language learning and to create more opportunities for experiencing
and communicating in the language rather than just learning information about it.
As one of these creative approaches, Content and Language Integrated Learning (CLIL)
enables the pupils to experience learning a language in real context. In short, CLIL is an
educational approach that combines learning both the subject matter, or content, and a
foreign language at the same time. In other words, it is possible to create a language
learning environment in the classroom that is at the same time motivating, creative and
based on experiencing and actual language use. This can be done for example with
combining any school subject, such as biology, mathematics or history, and learning in
English or any other language together.
Gierlinger (2007, as quoted by Coyle et al. 2010, 10-11) lists some of the findings why
teachers are willing to implement CLIL in their teaching. First of all, most teachers find
CLIL to be very motivational both to the learner and the teacher. Learning and teaching
is fun, and CLIL offers a fresh perspective and new challenges for both. Moreover,
CLIL improves language competence and creates a unique setting for creativity for the
teacher and the learners. These findings support the aim to learn languages by
experiencing.

2
Although learning in a foreign language, and more specifically through the CLIL
approach, has been around for years, there still are not a lot of printed teaching materials
available. The materials are also more often about learning geography, mathematics or
biology through CLIL rather than using creative subjects as the content.
Learning through CLIL is in itself a creative way of learning languages, but
implementing CLIL with a creative subject, such as arts and crafts, adds an extra
dimension to the learning experience. This is the reason why the subject chosen for the
CLIL material package is crafts, in more detail handcrafts. To support the suitability of
handcrafts as the content for CLIL, there is a Finnish theory invented by Lappalainen
(2007) about combining learning handcrafts, culture and language together (KÄ-KI-
KU). The idea is aimed for multicultural classrooms where a multisensory environment
eases the process of adjusting to a new language and culture. More about the theory can
be found in chapter six. It should also be noted that handcrafts as its own school subject
is quite unusual around the world and therefore should be appreciated even more. In
Finland, handcrafts have a long history, not only as cultural heritage, but also as a
subject taught in school.
The thesis consists of a theoretical background of CLIL and a material package for
teaching handcrafts through CLIL, called Multicultural handcrafts in English: A
teacher’s handbook. The material package is aimed for 6th
graders, since their English
language abilities are developed enough for learning the concepts in crafts. Moreover,
the material package is designed to be unisex and in the 6th
grade it is still possible for
the boys to study handcrafts as well. In the thesis, first the concept of CLIL and its
historical background is explained, as well as the benefits of CLIL. Second, the
theoretical background of CLIL and implementing CLIL in practice by using different
tools is emphasised. Third, the situation of CLIL in Finland is discussed as well as its
use in the primary school. Fourth, the idea of learning handcrafts through CLIL and the
concept of combining handcrafts, culture and language (KÄ-KI-KU) are explained in
detail. Finally, the discussion leads to the setting of the material package and explains
the aims based on the Finnish National Core Curriculum for Basic Education (2004).

3
2. CONTENT AND LANGUAGE INTEGRATED LEARNING (CLIL)
The world is becoming “smaller and smaller” through the effects of globalisation,
including immigration and internationalisation of the economy. The educational system
must also adapt, in order to provide the learners with the necessary skills required in the
contemporary and future society. These requirements include adequate language skills
and the capability for intercultural understanding, which enable international
cooperation, as well as harmonious co-existence in our own multicultural society. The
language education community has developed various approaches to meet these
challenges. The most widely established approach in Europe, Content and Language
Integrated Learning (CLIL), has been developed based on these approaches. (Dalton-
Puffer & Smit 2007, 7-8)
2.1. Defining CLIL compared to other language teaching approaches
Content and Language Integrated Learning is a dual-focused educational approach
based on teaching content in a language that is different from the usual language of
instruction, in order to learn both content and language. (Maljers et al. 2007, 8) The
combinations of different usage of CLIL are endless. For example, it has been used to
teach Italians science in French, Japanese geography in English and Australians
mathematics in Chinese. (Mehisto et al. 2008, 9) In CLIL, attention is given to teaching
both the topic and the foreign language used in the teaching, so it could be said that the
aim of the education is dual-focused. In order to reach this goal the subject has to be
taught with and through a foreign language, not just in a foreign language. (Eurydice
2006, 7) Therefore, CLIL can be considered to be neither subject learning, nor
language learning, but a mixture of both. (Marsh 2008, 233)
Since the 1970s there have been many approaches around the world that emphasise the
principle of teaching in a foreign language, or in other words, teaching content through
a language that is not one’s first language instead of studying the language itself. These
approaches include among others Language across the Curriculum, Immersion
Education, Immigrant On-Arrival Programs, Programs for Students with Limited

4
English Proficiency, and Language for Specific Purposes and Content Based Instruction
(Richards & Rodgers 2001, 205), as well as Content and Language Integrated Learning
(CLIL). Language across the Curriculum is a term invented in Britain in the mid-1970s
for native-language education. The idea is that learning and using a language takes place
while studying throughout the curriculum. Immersion Education was developed in
Canada in the 1970s in order to help English-speaking students to learn French. The
idea is as well that the curriculum is taught in a foreign language. Immigrant On-Arrival
Programs were introduced in Australia and the focus is to teach everyday language for
immigrants arriving to the country. Moreover, Programs for Students with Limited
English Proficiency aim to improve the language abilities of children arriving to the
new country. Language for Specific Purposes is a movement aim to teach specific
language and social skills, for example, teaching language needed for working in a
hospital. Finally, Content Based Instruction is an approach that emphasises also the
importance of content. The previous approaches mainly focus on learning the language,
whereas Content Based Instruction is centred on the content and the academic skills to
be learned through a foreign language. (Richards & Rodgers, 2001, 205-207) Although
all the approaches are about teaching in a foreign language, there are slight differences.
CLIL is also slightly different compared to the previous approaches, since it emphasises
both learning the language and learning the content, as well as learning about culture
and gaining cognitive skills. Mehisto et al. (2008, 10) also state that during the 1970s,
bilingual education became more accessible for children from different backgrounds
and the need for an effective second-language teaching became more necessary.
The components of CLIL could be from the 70s but its birth and place in the world of
teaching in a foreign language approaches raise some disagreement. It has been said that
the inspiration behind CLIL is the methodological principle based on foreign language
teaching research that in order to learn languages more efficiently students must be
exposed to situations in which they encounter genuine communication (Marsh, 2008,
233-238). According to Coyle et al. (2010, 1) when designing CLIL, it was attempted to
combine the best qualities of many educational approaches, such as immersion, content-
based language teaching and bilingual teaching. Mehisto et al. (2008, 12) agree and
continue that CLIL succeeds in enabling the experience gained from using these
approaches to be synthesised and applied in a flexible way in the classroom.With a
slightly different view, Mehisto et al. (2008, 12) also consider CLIL to be the umbrella

5
term for educational approaches such as immersion, bilingual education and language
showers. With CLIL, it is possible to use a second language for learning with different
levels of intensity in the exposure to the language. Maljers et al. (2007, 8) support this
view stating that CLIL was introduced as an inclusive umbrella term to cover several
similar educational approaches, such as immersion and bilingual education. However,
Coyle et al. (2010, 1) claim that the other educational approaches share only some basic
theories and practices with CLIL, since CLIL is strongly content-driven and not only a
language teaching-approach. For example, the major difference between CLIL and
immersion is that the emphasis in CLIL is in the content of the subject being taught,
whereas in immersion it is in the language itself.
Further, there are also other differences between Immersion Education and CLIL
compiled by Seikkula-Leino (2002, 4). For example, immersion teachers are usually
bilingual and the foreign language used is their mother tongue, whereas CLIL teachers
tend to be merely fluent in the language used for teaching despite it being a foreign
language for themselves. (Swain and Lapkin 1982, 5, as quoted by Seikkula-Leino2002,
4) In addition, in immersion, students are not required to have any experience in the
language being taught, whereas CLIL students should already have basic knowledge
about the language. (Vesterbacka 1991, 64-65 as quoted by Seikkula-Leino 2002, 4)
Moreover, Marsh (2008, 238) notes that the difference between CLIL and the other
content-based approaches to foreign language teaching is that the content has not been
chosen in order to teach communication in everyday situations or general content of the
target language culture, but instead consists of the other school subjects than foreign
languages taught according to the curriculum. Although several different approaches
have had an influence on CLIL, Seikkula-Leino (2002, 3) states that one of the strongest
influences on CLIL has come from Immersion Education.
In the end, defining CLIL in relation to the different approaches for teaching in a
foreign language is not quite straightforward since a lot of different definitions exist.
However, they all seem to share the same basic principles of CLIL being a dual focused
educational approach that offers a unique perspective on language learning.

6
2.2. The past and the present of CLIL
The following attempts to describe the story behind CLIL; how the concept of learning
in a foreign language was started, what kind of different variations it has had through
the years, what the driving force behind the rise of learning in a foreign language is and
what the situation of CLIL around the world and in Finland is now and has been in the
past.
Learning in a language different than one’s first language is a very old technique.
According to Mehisto et al. (2008, 9), methods related to CLIL have been used for
thousands of years around the world, at least since about 5000 years ago. At that time
the Akkadian people wanted to learn the Sumerian language after conquering their land.
Therefore they studied different subjects, such as theology, botany and zoology, in
Sumerian. According to Coyle et al. (2010, 2), CLIL type teaching was common also in
the days of Ancient Rome, when families educated their children in Greek in order to
give access to the language and the social surroundings of Greece. In Europe, teaching
in a foreign language has been in use for many years, especially in countries’ border-
areas where people use more than one language (Nikula & Marsh 1997, 7). These kinds
of practices can be seen in today’s world as well, especially when regarding the global
English language learning. Moreover, in recent centuries, the benefits of
multilingualism have been more widely understood. (Mehisto et al., 2008, 9) The
popularity of teaching in a foreign language has also grown significantly, because of the
growing internationalisation and globalisation. (Nikula & Marsh 1997, 7)
Multilingual programmes have also been born out of different demographic, economic
and geographic circumstances. For example, this was the case with Immersion. In the
year 1965 in the francophone province of Quebec in Canada, a group of English-
speakers persuaded the local education system to offer their children a language
immersion programme, in which all the subjects were taught completely in French.
Teaching and learning strategies were developed by trial and error and the focus was
directed to oral communication skills. (Mehisto et al., 2008, 9-10) More precisely, the
immersion programs aimed to help the students develop a high level of proficiency in
the foreign language, positive attitudes toward the target culture, as well as learning the
skills and knowledge required in the curriculum, while simultaneously developing the

7
language skills on the level appropriate for the students’ age and abilities. As a result,
one of the strongest influences on CLIL has come from Immersion Education (Seikkula-
Leino 2002, 3). In Finland, there has also been a lot of research on Immersion Education
in Vaasa University, for e ample Laur n (2000) and Björklund (2001) have studied its
effects in Finland. To conclude, almost all of the research about Immersion Education
have shown positive results in the area of content and language learning (Pihko 2010,
20).
In Europe, the dual-focused educational approach known today as CLIL was started in
the 1990s with strong support from the European Commission (Marsh 2008, 233-238),
and the term CLIL itself was adopted in 1994 (Marsh, Maljers and Hartiala 2001). Since
1994 CLIL has experienced exponential growth across Europe (Maljers et al., 2007, 8),
and Coyle et al. (2010, 1) describe the reason behind CLIL being a widely known
approach around the world to be the transferability of CLIL across the countries and
different school types. The success has also been educational since the content- and
language-learning outcomes have been quite positive in CLIL classrooms.
Maljers et al. (2007, 7) characterise the period 1994-2004 of CLIL as internationally
meaningful and full of development. In that period, the concept of CLIL was introduced
with a range of declarations, events and publications. CLIL programmes were set up
and organised at both national and regional levels. In the following decade, 2004 to
2014, the experience about CLIL needs to be consolidated through international and
multidisciplinary research, involving the schools and teachers that are currently offering
CLIL programmes. According to Maljers et al. (2007, 7), this phase “focuses heavily on
competence building tools for teachers, capacity building frameworks for schools and
organisations, and the development of evidence bases by which to validate approaches
and forms of good practice.”
In the 1990s Nikula & Marsh (1997, 7-8) noted that from different approaches to
teaching in a foreign language, especially CLIL has become popular in Europe. About
ten years later, Mehisto, Marsh and Frigols (2008, 10-11) pointed out that even
mainstream education had to deal with the language-related effects of globalisation by
the mid-1990s. In order to improve European unity and chances in international
economic competition, it is more and more important to offer better opportunities for all

8
young Europeans to learn foreign languages more effectively. Due to the rise of China
and other Asian countries, the need for widely understood languages such as English or
Mandarin Chinese is becoming greater and greater. Today, because of globalisation,
different parts of the world are connected to each other in an unprecedented scale. This
global change has an effect on education as well. In an integrated world, integrated
learning can be used as a tool for offering the students more possibilities to learn the
language and skills required in the contemporary society. This was true already in the
90’s, and according to Nikula & Marsh (1997, 16) the reason behind the success of
teaching in a foreign language was the growing significance of internationalisation in
every aspect of life. Moreover, strong language skills were seen as an asset both in
social life and in the society. Nikula & Marsh (1997, 7-8) and Mehisto et al. (2008, 10-
11) agree that there are many different approaches available in the area of teaching in a
foreign language, but they all share the same basic principles. Teaching in a foreign
language is the basic concept that defines the ways of using foreign language in
teaching. The ways vary depending on the extent of teaching, the amount of using a
foreign language, the number of foreign languages and the duration of teaching. The
differences are caused by variation in educational policies in different countries, as well
as circumstances in particular schools. (Nikula & Marsh 1997, 7-8)
CLIL is in use especially around Europe and many countries have experiences about it.
According to a survey made by Maljers et al. (2007, 4-7) at least the member states of
the European Centre of Modern Languages (ECML) have experiences in CLIL. These
member states include Armenia, Austria, Belgium, Bulgaria, Czech Republic, Estonia,
Finland, France, Germany, Hungary, Italy, The Former Yugoslav Republic of
Macedonia, Malta, The Netherlands, Norway, Poland, Slovakia, Spain, Sweden and
United Kingdom. The extent of using CLIL differs in these countries. In Finland, CLIL
or similar programmes are available in English, Finnish, French, German, Russian,
Sami and Swedish (Maljers et al. 2007, 64).
Teaching and learning in a foreign language has a long history, but CLIL itself is a
rather new phenomenon. Just like in teaching in general, also in CLIL there is constant
development, as it continues to grow and adjust to new circumstances. However, it
remains to be seen whether there will be enough interested schools, teachers and
students in the future to make CLIL genuinely popular around the world.

9
2.3. Benefits of CLIL
As one of the characterising advantages of CLIL, Richards & Rodgers (2001, 209)
describe that “people learn a second language most successfully when the information
they are acquiring is perceived as interesting, useful, and leading to a desired goal.”In
other words, meaningful use of the language is important to the learning of a language.
In teaching in a foreign language, the language is considered an instrument of learning,
instead of its target. The language is also used to convey meaningful and authentic
content matter. (Nikula & Marsh 1997, 13)
In more detail, Richards & Rodgers (2001, 204-205) have also pointed out that if the
focus in teaching a foreign language is chosen to be communication and successful
exchange of information, the focus in a foreign language classroom should not be
merely on grammar or other subject matter about the language itself, but rather on
content, subject matter independent of the language. That way the students would learn
the language simultaneously with learning curricular subjects other than foreign
languages. Further, Mehisto et al. (2008, 11) describe the integration of teaching and
learning of content and language to be the essence of CLIL and Maljers et al. (2007, 9)
claim CLIL to offer a more authentic environment for the learning and development of
language skills, which helps make the learning progress more relevant, immediate and
valuable. The emphasis in CLIL is mostly in meaning rather than form, which has
positive effects on the fluency and motivation in using a foreign language, as well as
reducing the target language anxiety. In addition, the emphasis on real-life
communication in the CLIL classroom helps further the development of Communicative
Competence, as theorised by Hymes (1974). Communicative Competence is often seen
as the most desired goal in foreign language learning, and CLIL offers the settings for
this by promoting meaningful communication. (Dalton-Puffer & Smit 2007, 9)
According to Mehisto et al. (2008, 30) the final aim of CLIL is enabling the students to
become independent learners, capable of learning skills as well as content and language
knowledge in two or more languages. They should also be motivated and interested in,
as well as capable of, communicating with other speakers of the language used in their
CLIL classroom, even outside the school environment. Moreover, Coyle (2002) point
out that CLIL is a unique approach because it integrates contextualised content,

10
cognition, communication and culture into teaching and learning practice (as quoted by
Coyle 2010, 6). In other words, CLIL lessons attempt to cover all of these four aspects
and successfully put them into practise during lessons. Further, Mehisto et al. (2008, 12)
describe CLIL to have three different goals; language, content and learning skills.
Therefore language goals support content goals in CLIL. In addition, the third element,
learning skills, are used to support both language and content goals.
Dalton-Puffer & Smit (2007, 8-9) have outlined arguments that highlight the benefits of
CLIL. The approach enables a more natural way of learning a language than the
traditional, strongly instructional teaching. CLIL also promotes meaningful
communication; when learning a subject through a foreign language, the goal of the
learning process is not just learning the language itself, but rather learning to be able to
use the language authentically. Furthermore, in a CLIL classroom two different
curricular areas are being taught and learned simultaneously, which contributes to
efficient use of time and resources. This also intensifies the target language exposure
through the increase in the amount of time spent in a foreign language environment, as
the exposure to the foreign language is not limited to the traditional lessons of that
language. Fluency in foreign languages could be promoted through increasing the
volume of actual foreign language classes. However, this is often not possible due to
limited time and resources, so other ways of enhancing language proficiency must be
searched for. Therefore teaching in a foreign language is often carried out by subject
teachers teaching their own subjects in a foreign language. (Nikula & Marsh 1997, 8)
Moreover, Marsh (2008, 233-238) states that the language and the content were
combined in order to include more language learning in the mainstream education
without diminishing the share of other subjects in the curriculum.
CLIL in Europe is diverse and manifests itself in a variety of applications in different
countries. According to a Europe-wide survey conducted in 2001, there are five
dimensions that are considered important as reasons for adopting CLIL in schools.
These dimensions are not distinct types of CLIL, but rather reflect the educational goals
that can be achieved through CLIL (Marsh 2008, 240). These dimensions are inter-
linked in the practice of CLIL, and they form the common principles to all the different
applications of CLIL around Europe. The five dimensions are based on issues relating to
culture, environment, language, content and learning. Each of the dimensions is realised

11
differently according to the age, socio-linguistic environment and degree of exposure to
CLIL of the learners. It should be noted that these dimensions are interrelated, and
therefore the goal of teaching should be to achieve more than one dimension
simultaneously. (Marsh et al., 2001, 17) The dimensions are as follows:
The Culture Dimension
o Building intercultural knowledge and understanding
o Developing intercultural communication skills
o Learning about specific neighbouring countries/regions and/or minority
groups
o Introducing the wider cultural context
· The Environment Dimension
o Preparing for internationalisation
o Accessing international certification
o Enhancing school profile
· The Language Dimension
o Improving overall target language competence
o Developing oral communication skills
o Deepening awareness of knowledge of language, and language use
o Developing plurilingual interests and attitudes
o Introducing a target language
· The Content Dimension
o Providing opportunities to study content through different perspectives
o Accessing subject-specific target language terminology
o Preparing for future studies and/or working life
· The Learning Dimension
o Complementing individual learning strategies
o Diversifying methods and forms of classroom practice
o Increasing learner motivation
(Marsh, Maljers and Hartiala, 2001, 16)
Moreover, according to Coyle (2008, 104-105) there are significant benefits that may be
attained through CLIL. These benefits include: raising learner linguistic competence
and confidence; raising teacher and learner expectations; developing risk-taking and

12
problem-solving skills in the learners; increasing vocabulary learning skills and
grammatical awareness; motivating and encouraging student independence; taking
students beyond the usual foreign language topics; improving first language literacy;
encouraging linguistic spontaneity; developing study skills and concentration; and
generating positive attitudes and addressing gender issues in motivation. In other words,
CLIL has also other benefits that can be attained in addition to linguistic skills. Among
other things, CLIL helps to develop risk-taking, problem-solving and study skills, as
well as motivate students.
As mentioned earlier, according to Marsh (2008, 235) a continuing problem in schools
is curricular pressure. This means that all the subjects require time, which is a rare
commodity. CLIL helps answer the problem of scarcity of time allotted to foreign
language teaching by introducing a way of promoting foreign language skills in an
intensive way without a need to increase the share of actual foreign language lessons.
The curricular pressure also affects students’ motivation negatively through the
homogenization of methods and materials used in the classroom, which often leads to
ignoring the individual language learning styles of different students. CLIL helps
increase motivation by making the language itself meaningful for the students through
enabling them to understand how it is used in the real life.
In Finland, it has been found that learning in another language also supports the
development of reading and writing in one’s own mother tongue (Merisuo-Storm 2002;
2007 as quoted by Pihko 2010). Moreover, Pihko (2007, as quoted by Pihko 2010)
states that the learning environment of CLIL supports the motivation of learning
languages and the self-image of a student as a language learner. Pihko (2010, 33-34)
confirms this in her recent study and adds that the students’ attitude towards learning
languages was also more positive in CLIL classes than in regular language classes.
However, she also points out that, as in regular classes, also in CLIL classes many of
the students experienced anxiety towards speaking in a foreign language. This aspect
should therefore be taken into account especially when designing the CLIL lessons and
adjusting the level of difficulty.

13
3. THEORETICAL CONCEPT OF CLIL
How is it possible that CLIL is able to integrate content learning and language learning
into a whole new educational approach? The following chapters attempt to answer that
question. Coyle et al. (2010, 27) state that CLIL is much more than simply teaching and
learning in another language. He continues that CLIL is also more than just adding
grammatical points of the target language into the subject content material that is taught.
Marsh, Enner and Sygmund (1999, 17, as quoted in Coyle et al. 2010, 27) agree, stating
that CLIL is about far more than simply teaching the subject matter in the traditional
way, only with a different language of instruction.
3.1. Integration of content learning and language learning
First step is to consider what kind of content can be taught in a CLIL context. The
content of learning in CLIL is very flexible and does not necessarily apply to the
traditional school curriculum subjects such as geography, music or physics. Content in
CLIL can be drawn anywhere from the National Core Curriculum and it is possible to
bind together different subjects such as environment and history. CLIL setting can also
be theme-based and involve different projects that students can accomplish, such as
inventing eco-friendly transportation. It could be said that only the sky is the limit when
deciding the content of learning in CLIL. The only matter of concern is that learning
with CLIL should always integrate the content and the language, and the relationship
between them should not be ignored. (Coyle et al. 2010, 27-28, 33) Moreover, Mehisto
et al. (2008, 30) add that “in CLIL the primary focus is on substance (content) as
opposed to form.” Since the purpose of studying is to make it possible to apply the
learned information and skills in the long term, merely memorising words and facts or
repeating foreign-language phrases is not very useful in achieving desirable learning
outcomes.As a result, in CLIL the learning context should not be merely teaching in
another language. However, it is possible to vary from more content-led to more
language-led approaches or vice versa. (Coyle et al. 2010, 27-28, 33) In addition,
Dalton-Puffer & Smit (2007, 12) summarise that CLIL programmes can vary from
mainly language-driven to mainly content-driven depending on the main curriculum

14
functions, teaching materials, staffing decisions and organisational structures of the
CLIL programmes. They continue that at the moment in Europe the most often used
approach in CLIL is the content-driven approach, because of the easiness of using the
already e isting curriculum. Also, in Clegg’s (2003, 89 as quoted in Coyle et al. 2010,
33) opinion there are two alternative approaches to CLIL. One is language-led and the
other is subject-led. Both of these approaches can be emphasised, depending on the
situation and context. However, according to Coyle et al. (2010, 35) it is important to
address both meaning and form and create a balance between them.
Moreover, in his study of the CLIL schools in Upper-Austria, Gierlinger (2007, 100-
102) found that the subjects most often used in CLIL were Geography, Biology and
History. The main reasons for using these subjects are their international character and
the extensive vocabulary and visual aid they offer. However, some scientists like
Rymarczyk (2003 as quoted by Gierlinger 2007, 102) believe that more tangible
subjects, such as Art, Music or Sports function better as a starting point in a CLIL class,
especially for beginners.
Choosing the content of learning is relatively easy, but choosing how to teach the
content is a more difficult question. Effective content learning demands students to be
cognitively engaged. This means that CLIL teachers have to actively involve students
into self-awareness about their own learning processes. In CLIL classrooms, group
work and problem solving among peers are required, since interactivity is a key feature
of CLIL. Therefore, teachers should take into account metacognition, or “learning to
learn”, and guide the students to develop their cognitive and communication skills.
(Coyle et al. 2010, 29) Mehisto et al. (2008, 30) describe as well, that the process of
teaching and learning is powered by thinking. Therefore better thinking will lead to
better learning outcomes. Taking this into account is one of the underlying factors in the
effectiveness of the CLIL method.
Mehisto et al. (2008, 30) define cognition, or thinking, as “the mental faculty of
knowing, which includes: perceiving; recognising; judging; reasoning; conceiving and
imagining.” For better understanding the cognitive development of students in order to
more successfully guide them, one can use the publication of Bloom’s ta onomy as a
starting point. Bloom (1956) outlined six different thinking processes under the headline

15
named the Cognitive Process Dimension, which consists of lower- and higher-order
thinking processes. Mehisto et al. (2008, 154) describe Bloom’s ta onomy to be perhaps
“one of the most widely known models of critical thinking”. The taxonomy consists of
six levels of thinking skills as seen in Table 1, beginning with lower forms and
advancing towards more abstract and complex ones.
Table 1: Bloom’s ta onomy (1956) as quoted by Coyle et al. (2010, 31)
The Cognitive Process Dimension
Lower-order processing:
Remembering Such as producing appropriate information from memory, e.g.
· Recognizing
· Recalling
Understanding Meaning –making from experiences and resources, e.g.
· Interpreting
· Exemplifying
· Classifying
· Summarizing
· Inferring
· Comparing
· Explaining
Applying Such as using a procedure, e.g.
· Executing
· Implementing
Higher-order processing:
Analysing Breaking down a concept into its parts and explaining how the parts relate to the whole,
e.g.
· Differentiating
· Organizing
· Attributing
Evaluating Making critical judgements, e.g.
· Checking
· Critiquing

16
Create
Evaluate
Analyse
Apply
Understand
Remember
Creating Putting together pieces to construct something new or recognizing components of a new
structure, e.g.
· Generating
· Planning
· Producing
These dimensions can be used to ensure the development of learners’ cognitive skills in
CLIL context, but without forgetting that students should also have the language ability
to accomplish these skills. (Coyle et al. 2010, 30)
One other version of Bloom’s ta onomy was modified by Anderson and Krathwohl
(2001) and is perhaps easier for a teacher to use as a checklist. As seen on Figure 1,
most of the lessons are first constructed with appliance of new knowledge and
understanding, then analysing the application and evaluating the progress of learning
and finally creating something new. (Mehisto et al. 2008, 154-155)
Figure 1: Bloom’s ta onomy modified by Anderson and Krathwohl (2001)
Coyle et al. (2010, 32) points out that traditional foreign language learning has its roots
in the learning of grammar and texts. She continues that in recent history
communicative approaches have emerged and become popular. The reason for
popularity is that communicative approaches promote both focus on form and focus on
meaning. In other words, it has become more relevant to learn how to communicate in a
foreign language. Although focusing on meaning has become more important in recent

17
years, focus on form (grammar) should not be forgotten. There should be a cohesive
balance between them. There are also certain principles that are relevant for
communicative language learning, as well as for CLIL. They have been listed in 2004
by Savignon (as quoted by Coyle et al. 2010, 32-33) and they could be summarized as
follows:
1. Language is a tool for communication
2. Diversity is recognized and accepted as part of language development
3. Learner competence is relative in terms of genre, style and correctness
4. Multiple varieties of language are recognized
5. Culture is instrumental
6. There is no single methodology for language learning and teaching, or set of
prescribed techniques
7. The goal is language using as well as language learning
Coyle et al. (2010, 33) also note that for CLIL to succeed, it is not enough to learn
languages through practice and understanding grammatical progression. The learners
must also be supported in using the language for content learning.
In addition, in CLIL classes there is always the question of the amount of the target
language being used, and the role of the mother tongue. Gierlinger (2007, 106-107)
states that there are different views about the role of the mother tongue used in CLIL.
His study about German teachers using their mother tongue in their CLIL classes
reveals that the use of mother tongue depends heavily on the teacher, as well as the
context in the classroom. The extent of mother tongue use varied from almost nothing at
all to up to one third of the whole lesson. The mother tongue was used primarily for
clarifying the content and instruction, helping beginners, summarising the major aspects
of the topic, as well as maintaining discipline. All in all, the teachers were inclined not
to use the mother tongue, except when it is especially beneficial for the learning
process. Therefore there are no fi ed rules on the use of the students’ native language in
a CLIL classroom, and it is up to the teacher to find the appropriate balance for the
group of learners in question.

18
3.2. CLIL and intercultural understanding
In addition to language and content, there is another important element that has a big
role in CLIL. That element is culture, because language and culture are always
connected to each other (Coyle et al. 2010, 39). Brown (1980, 138) also states that
cultural patterns, customs, and ways of life are expressed in language. He continues that
worldviews differ from each other, and the language used to describe those views can
contain specific cultural markers.
Coyle et al. (2010, 39) describe that in the setting of a foreign language environment
such as a CLIL classroom, this means that language, cultural understanding, cognitive
engagement and thinking are connected to the content being taught, as well as the
context. CLIL has the opportunity to open the door for intercultural experiences and
enhance global understanding. It should also be remembered that enhancing
intercultural understanding does not merely mean offering the facts, such as different
celebrations and customs. It involves deep learning, which means analysing the
information and connecting it to already known concepts.In order to achieve cultural
understanding, there should be meaningful communication in the classroom between
peers and teachers. Moreover, there should be interaction outside the classroom as well.
(Coyle et al. 2010, 40)
3.3. Tools for using CLIL
There are certain tools available for teachers who want to use CLIL in practice. These
tools are, as described by Coyle et al. (2010, 36-67) The Language Triptych, which
illustrates the CLIL linguistic progression; the 4Cs Framework, that conceptualises the
different components of CLIL; and the CLIL Matrix, that measures the
interconnectedness of cognitive and linguistic levels of tasks and materials. The
following chapters define their purpose of use.

19
3.3.1. The Language Triptych
The Language Triptych illustrates the CLIL linguistic progression as seen on Figure 2,
highlighting three interrelated perspectives: language of learning, language for learning
and language through learning. (Coyle et al. 2010, 36) It can be used as a helpful tool,
when designing the linguistic perspective of a CLIL class or course.
Figure 2: the Language Triptych (Coyle et al. 2010, 36)
Language of learning
Language for learning Language through learning
“Language of learning is an analysis of language needed for learners to access basic
concepts and skills relating to the subject theme or topic”. (Coyle et al. 2010, 37) This
means that the teacher should be aware of the linguistic demands of the content and
modify his/her teaching accordingly. (ibid.)
“Language for learning focuses on the kind of language needed to operate in a foreign
language environment”. (ibid.) The learners need strategies to use the foreign language
effectively. These include skills required for pair work, cooperative group work, asking
questions, debating, chatting, enquiring, thinking, memorizing and etc. In other words,
students should have the skills to understand and use the language in order to make a
CLIL class work. (ibid.)
“Language through learning is based on the principle that effective learning cannot take
place without active involvement of language and thinking”. (ibid.) Therefore learners
CLIL linguistic
progression
Language learning
and language using

20
should always articulate their understanding in order to achieve deeper level of learning.
(ibid.)
3.3.2. The 4Cs Framework
The 4Cs Framework is a tool which helps conceptualise the different components of
CLIL more easily. The four Cs represent content, communication, cognition and
culture. The 4Cs Framework points out the symbiotic relationship between content and
language learning, and concentrates on the specific contexts within them. (Coyle 2010,
41) However, Mehisto et al. (2008, 31) define the 4C’s to be content, communication,
cognition and community and describe them to be the guiding principles for lesson
planning. Coyle et al. (2010. 41) continue that the 4C’s tool helps to piece together all
the necessary aspects of CLIL and create an overall picture. The 4C’s are shown on
Figure 3 below.
Figure 3: the 4C’s Framework by Coyle et al. (2010, 41)
Content consists of “progression in new knowledge, skills and understanding”.This
means studying the subject through CLIL is not only acquiring information about the
theme in question, but also learning skills for both school and life, and gaining a deeper
understanding about the issues taught. Moreover, it is possible to teach cross-curricular

21
themes through CLIL, not only strictly in the framework of the curricular subjects.
(Coyle et al. 2010, 41, 53) In addition, Mehisto et al. (2008, 31) add a list of definitions
concerning content:
o content is clearly linked to the community within and outside the classroom
o students apply new content and develop related skills through experiential
activities
o content is substantive without being overwhelming
o content from various subjects is integrated
o cultural content is integrated into all subjects
Communication includes “interaction, progression in language using and
learning”.Therefore the stress is not only on learning grammar and lexis, but instead on
using the language in an authentic way. The purpose of CLIL is to integrate content
learning and language learning in an equal measure. This allows learning a language, as
well as learning through that language. In addition, Mehisto et al. (2008, 31) add a list
of definitions concerning communication:
o students actively use the right to participate in activities and communication, in
the classroom and in the community
o desk placement, displays on classroom walls and other available resources
support learning and communication
o students and teachers co-construct and negotiate meaning
o language/communication skills are developed in all subjects
Cognition encompasses “engagement in higher order thinking and understanding,
problem solving and accepting challenges and reflecting on them”. Instead of learning
by rote, the students are encouraged to construct new knowledge and new skills through
lower and higher order thinking skills. When considering the cognitive level of the
students, Bloom’s Ta onomy (as mentioned earlier) can be used as a useful tool for the
teacher. (Coyle et al. 2010, 41, 53) In addition, Mehisto et al. (2008, 31) add a list of
definitions concerning cognition;

22
o content, language and learning skills outcomes are articulated in co-operation
with students
o learning builds on a student’s e isting knowledge, skills, attitudes, interests and
experience
o students analyse achievement of learning outcomes independently, with other
students and with the teacher, and work to set new outcomes
o students synthesize, evaluate and apply knowledge and skills acquired in several
subjects
Culture entails “’self’ and ‘other’ awareness, identity, citizenship, and progression
towards pluricultural understanding”. Studying through a foreign language allows
international understanding to develop. By understanding other cultures, the students
can also learn to understand themselves and their place in the global community.
However, meaningful connections, and, if possible, also authentic intercultural
communication (e.g. with a “sister class” abroad), are required for reaching the full
potential of cultural learning. (Coyle et al. 2010, 41, 53) In addition, as pointed out
earlier, Mehisto et al. (2008, 31) add a list of definitions concerning the fourth part of
their 4C model, community;
o students feel that being members of a learning community is enriching
o students have the self-confidence and skills to work within a group and the local
community, balancing personal interests with those others
o teachers, students (and parents, employers, etc) are partners in education
o students can define their role within the classroom, the local and the global
context
3.3.3. Monitoring CLIL in action – The CLIL Matrix
Monitoring and evaluating the process of teaching is necessary for a CLIL teacher.
Essential to this is building an environment in which the students are able to understand
the language, but being provided with sufficient cognitive challenges in order to learn
both the language and the content systematically. The CLIL Matrix is a useful tool for

23
measuring the interconnectedness of cognitive and linguistic levels of tasks and
materials, as seen on Figure 4. (Coyle et al. 2010, 67)
Figure 4: the CLIL Matrix - an adapted version of Cummins’ 1984 model (Coyle et al.
2010, 68)
These four quadrants offer a key for effective learning. When teaching in a foreign
language, it is important to make sure the level of the language used is understandable
for the students in order to enable advanced content learning. In the CLIL Matrix, this
situation is represented by quadrant 2. Typically, the teaching progresses from the
confidence-building, transitory quadrant 1 through quadrant 2 to quadrant 3. Moving
from quadrant 2 to quadrant 3 requires attention for gradually teaching and learning the
language, while simultaneously maintaining cognitive challenge in teaching the content.
Quadrant 4 is appropriate only in exceptional cases, when linguistic practice and focus
on form are being emphasised. (Coyle et al. 2010, 44)
The Language Triptych, The 4Cs Framework and The CLIL Matrix are all useful tools
for a teacher. They help to conceptualise all the perspectives of CLIL. However, they
are not the only tools available and one can find different tools for example from the
book Uncovering CLIL by Mehisto et al. (2008).
2
3
1
4
Co
gnit
i
ved
em
and
s
Linguistic
demands
LOW HIGH
LOW

24
4. CLIL IN FINLAND
In Finland, an important background factor for teaching in foreign languages was the
school reform in the 1960s, which extended studying foreign languages to involve all
the pupils. A discussion about positive experiences from a few international and IB
schools and the ways to apply them to mainstream schools was widespread in the 1980s.
As a result, a committee in the Ministry of Education supported in 1989 teaching in
foreign languages as a method of motivating and enhancing the study of foreign
languages. Changes in the law made it possible to extend the scope of teaching in
foreign languages. (Nikula & Marsh 1997, 16)
Nikula (2007, 183-184) states that in Finland CLIL began to gain popularity in the early
1990s when the law was changed to allow teaching in foreign languages, not only in
Finnish and Swedish. CLIL in Finland is largely a “grassroot phenomenon”, since the
choice to use the method is often based on the interest of individual teachers to
introduce and maintain it in their own schools. Unfortunately, the number of schools
offering CLIL has been decreasing during the previous ten years, and they have been
concentrating in larger towns and schools. According to a national survey in 2005
(University of Jyväskylä), 5.7% of schools in Finland were offering CLIL, whereas
according to a survey in 1996 (University of Turku) 11.7% of schools offered CLIL
(Marsh et al. 2007, 68) Further, Lehti et al. (2006, as quoted by Pihko 2010, 16) believe
that the decrease in CLIL teaching could result from waning of the initial enthusiasm,
the tightening of funding from municipal budgets, lack of teaching materials and
resources, or inadequate guidance from the national level. Additionally, language skill
requirements for teachers teaching in foreign languages were raised in 1999
(Opetushallitus 1999 as quoted by Pihko 2010, 16), which may also have prevented
interested teachers from participating in CLIL programmes. There is, however, a lot of
interest towards CLIL in Finland, despite the small scale. According to the survey in
2005, schools with CLIL tend to have positive experiences about its impact and are
planning to keep using the method. However, these schools wish to gain more support
for CLIL in the fields of school policies and teacher education. Most schools using the
method in Finland are offering CLIL in English. The pupils’ participation in CLIL is

25
voluntary, which leads to the pupils choosing it to be already more interested and
fluent in English than average. (Nikula 2007, 183-184)
Marsh et al. (2007) describe the background of Finnish CLIL programmes by dividing it
into three distinct elements. According to them, there is a wish to introduce into
mainstream education a more equal environment, in which the students learn
knowledge, skills and attitudes that will be needed in their future jobs and lives. Marsh
et al. (2007) name this aspect Philosophy. The second aspect, Educational Perspective,
emphasises the importance of recognising that language learning styles vary between
different students, as well as “learning by doing”. The authors contrast this with the
traditional method of teaching the students’ knowledge that they may need in the future,
but cannot apply in practice immediately. Since CLIL cannot achieve its goals merely
by existing theoretically on paper, programmes need to be implemented in practice. The
will to turn CLIL into a reality, or Impetus for Action, has been the result of pressure
from two different levels; there has been action from politicians, in the form of changes
in legislation and Ministry directives, as well as from ordinary parents and students
demanding possibilities for participating in CLIL programmes. Furthermore, in Pihko’s
(2010, 126) opinion the current situation in Finland offers an excellent starting point for
the development of teaching in a foreign language. There are a lot of schools and
teachers interested in CLIL and they should be supported even more by offering them
training and encouragement.
5. TEACHING THROUGH CLIL IN PRIMARY SCHOOL
According to the survey in 2005, 3.6% of primary level schools in Finland were offering
CLIL for their students (Marsh et al. 2007, 68). This figure is surprisingly small, when
considering that language learning is easier when starting from a young age. Brumfit et
al. (1991, 130) also state that using one’s own native language is natural for children in
situations where the other person speaks it as well. However, when children end up in
situations where they are in the company of others, especially other children, who they
do not share a common language with, they do their best to comprehend the other one’s

26
language and use it for communication. What are then the main reasons behind applying
and not applying CLIL in primary schools?
To answer this question, in her study on conversational language learning for primary
students Barbara Buchholz (2007, 51-77) states that CLIL is often considered being
“not feasible” for primary students. However, in reality the problem of feasibility lies
rather with most of the primary teachers instead of the pupils. According to Buchholz, it
is possible even in primary schools to create an environment where the classrooms
discourse and conversation between pupils is at times purely in English. Through
successful, relevant, meaningful, personal and informative EFL communication, the
students can become prepared for CLIL, since in addition to developing their basic
interpersonal speaking and listening skills, the children are inspired to keep learning
outside the classroom through encounters with foreign people and their cultures.
Limitations in vocabulary and language structures, the inability to transfer and apply the
foreign language in a contextualized form, as well as neglecting the social aspect of
language use within interactive communication, were discovered to be the main
challenges for primary students. The latter was also discovered to make the children
more vulnerable to distractions and less motivated and interested in their schoolwork.
As a result, several teaching strategies were revealed to be useful in improving the
classroom discourse. These include setting clear goals and reflecting on achievements,
setting spatial language environment zones, making vocabulary available (e.g. with
stickers), making language structures accessible (e.g. with posters), using the second
language only, setting flexible steps towards self-directed learning, motivating for
practice (e.g. topics beyond schoolbooks), as well as providing tools for peer- and self-
control.
6. LEARNING LANGUAGES THROUGH
HANDCRAFTS
6.1. Starting point for CLIL and handcrafts
CLIL has already been described in detail and next the concept of handcrafts will be
discussed. Handcrafts have many different names to describe the action, for example

27
crafts, handicrafts, needlework and design. In this thesis the term crafts has been mainly
used to refer the subject at school. Moreover, the term crafts include working with
fabric, yarn and other materials that can be attached to each other mainly by sewing and
knitting. In other words, the term crafts do not include working with wood or metal.
Why crafts would be a good content for CLIL? Making crafts serves many different
styles of learning. It includes kinaesthetic and visual learning. By adding language to
support the learning, auditive learning style is being included. Making crafts is a very
tangible way to learn, and the language related to crafts is also quite rich. Many verbs
and adverbs are involved with making things by hand. Also many different adjectives
are used for describing the crafts. In addition to learning the vocabulary, observing
one’s own and others’ work offers a chance to engage in practical dialogue in a
meaningful environment. Creativity and producing useful items also help motivate the
pupil.
Crafts is a subject that involves a lot of precise movement. According to Kuczala &
Lengel (2010, 17-19) the brain-body connection is a basic tool for learning for humans.
Adding movement to learning enforces the memory trace and creates a more permanent
bond between nerve paths. Intentional movement as a learning method also helps the
pupils to concentrate and creates necessary variation in the school work. Additionally,
interaction between peers creates solidarity and eases communication. With movement,
new things to be learned are also easier to remember and store in the memory, since
often movement creates a positive memory trace and alleviates stress. Humans learn
best through tangible and illustrative examples, and movement is a very tangible way to
learn. Kuczala & Lengel (2010, 144-145) have defined three learning domains of
education that are connected to one’s developmental stages. They are cognitive,
affective and psychomotor domain. The cognitive domain is about gaining knowledge
and raising one’s intellectual skills; the affective domain is about dealing with different
emotions and social and communication skills; the psychomotor domain includes
physical movement, coordination and the independence and responsibility of one’s own
life. All of these domains should be taken into account by the teacher in order to educate
the child as a whole. Teachers are already developing learner’s cognitive abilities but
social and physical growth should not be forgotten either (Kuczala & Lengel 2010, 144-

28
145). By combining CLIL and crafts, all of these three domains should then be taken
into account.
According to Vuorinen (2001, 179-180), learning by doing is perhaps the earliest
method of learning from other people. Little children learn by imitating older people, or
through trial and error. This kind of learning does not, however, disappear when
children grow up. Vuorinen (2001) believes that it is possible for people to learn
through action and taking part in different activities in various learning environments,
including school. Learning by doing may include different teaching methods from crafts
to acting. It is not a strictly defined learning method, but instead can be utilised in the
framework of different educational approaches, as long as the goal is to achieve
educational goals through activities that are strongly linked to the subject matter being
studied. The benefits of learning by doing include narrowing the gap between theory
and practice, as well as making it possible for learning to take place within social
interaction, which supports the learning of many different skills essential for work.
Furthermore, Vuorinen (2001, 180-181) claims that it is important for the learner to
tangibly live and experience the reality which the subject matter being learned is about.
The reason behind the effect is that the learners get immediate feedback from their own
experiences and actions, in other words their learning. Especially when the aim is to
teach skills or influence the students’ attitudes, learning by doing can be a very
successful teaching method. Therefore by combining CLIL and crafts, one is combining
both language learning and learning by doing.
6.2. Handcrafts, language and culture - KÄ-KI-KU - approach
Learning through crafts makes it easier for different cultures to meet each other. This is
claimed by Eeva-Maija Lappalainen in her doctoral thesis (2005). Learning crafts offers
a possibility for cultures to meet through many different senses. Touch and visuality -
including making by hand, craft materials, shapes, colours, tools and work methods -
can be used in crafts as a means for culturally sensitive interaction.
In her doctoral thesis, Lappalainen (2005) concentrates on building multicultural
pedagogy aimed for meeting of different cultures, which requires both practical and

29
theoretical understanding and skills. The central content of the thesis is combining the
learning of crafts, language and culture, which is shortened in Finnish into Kä-Ki-Ku
(käsityö, kieli, kulttuuri). (Lappalainen 2005) Tuula Rekola (globaalikasvatus.fi, 2007)
describes the learning method created by Lappalainen as a useful tool in multicultural
education. According to Rekola (globaalikasvatus.fi, 2007), the Kä-Ki-Ku learning
method differs from the traditional learning environment for crafts, as well as from
teaching crafts in a foreign language. The aim in the learning method is to enable the
student to verbalise the learning of making things.
Combining crafts, language and culture means that learning a language is included in
the process of learning crafts. This is done through verbalising craft-related activity and
learning it. (Lappalainen 2005, 37) The Kä-Ki-Ku learning method is originally
designed for learning Finnish language and culture. The target group is therefore
immigrants, whose learning process and becoming a part of the Finnish society are
being supported through the method. At the same time, a multicultural environment is
being constructed. Craft-related activity offers a new kind of a possibility to learn
language and culture in a more tangible way. For the immigrants, combining crafts to
the learning of the language also lowers the threshold of getting familiar with a new
language and culture, as well as makes it possible to utilise the immigrants’ own
cultural capital. (Lappalainen 2005, 33-34) According to Lappalainen (2005, 40),
learning craft-related activities can be made more verbal, oral and literal. In the Kä-Ki-
Ku learning method, the intention is to deliberately use vocabulary, pronunciation,
expressions and language structures serving the learning of the (Finnish) language. It is
also worth remembering that the craft being produced has to serve some kind of
function.
Combining the learning of crafts, language and culture includes elements that are
similar to immersion, since the aim is to advance and improve bilingualism. It is also
important that the language is a tool for learning, not the main target. However, it must
be noted that the Kä-Ki-Ku learning method differs from both the traditional
environment for learning crafts and teaching crafts in a foreign language. (Lappalainen
2005, 36)

30
The basis for the learning method is cultural awareness of the cultural heritage in use,
which belongs to the ethnic cultural orientation. It is filtered by values, norms and
attitudes, from which the notions originate. Cultural awareness includes the
understanding of e.g. the language and learning it, as well as history, art, habits, societal
issues and handicrafts. At its best, craft-related cultural awareness can represent
knowledge about and familiarity with materials, shapes, patterns, work methods, colors
et cetera used in the making of the crafts. Lappalainen (2005) notes that among
immigrants, the participants in a discussion often lack a common language, which
makes it difficult to express cultural awareness about language, society, interaction,
purpose, aims and other cultural heritage. However, a dialogue can be created through
making items by hand and illustrating the issues together, which enables both the
teacher and the student to utilise their own knowledge about their cultural heritage.
The Kä-Ki-Ku learning method can be used for learning many different kinds of crafts,
and can be used by language study groups in basic, as well as advanced, stages. The aim
of the method is to enable the student to verbalise the learning of producing items by
hand. For a beginner, it is possible to pick not only nouns, but also other words, word
classes and forms such as verbs, adjectives and adverbs relevant to the context, together
with the group of learners.(Lappalainen 2005)
Since the publication of Lappalainen’s doctoral thesis, the Kä-Ki-Ku learning method
has been utilised in many schools around Finland. Additionally, it has been used
successfully in multicultural learning environments. For example, the Kaukametsä adult
education center in Kajaani has used the theory in a project for improving education of
immigrants, supported by the Finnish National Board of Education. It has also been
applied in the Department of Teacher Education in Kajaani. (Maahanmuuttajat.fi, 2007)
The material package in this thesis attempts to help combine English language teaching
to the subject of crafts in the framework of CLIL. Therefore it shares many important
aims with the Kä-Ki-Ku teaching method. Kä-Ki-Ku also emphasises the relation
between crafts, culture and language, which further illuminates the need for CLIL
programmes to include the subject of crafts. This suggests that a material package for
crafts using CLIL is useful.

31
6.3. The aims of the material package combining handcrafts and English
The exercises in the material package teach a variety of skills and knowledge about
crafts, language and culture. The content of learning about crafts include material
knowledge, making crafts out of recycled materials, fabric dyeing techniques, sewing
skills and building an exhibition. The pupils learn also language skills, such as listening
and reading comprehension, communication skills, vocabulary and searching for
information in English. The cultural aspects of the material include DIY (do it yourself)
culture, being environmentally friendly, recycling, and cultural information about crafts,
materials and people around the world. The techniques behind the crafts are illuminated
through examples. As a result, the pupils will learn language, crafts and culture, as well
as cognitive skills at the same time.
The idea is to manufacture products that are unisex, so that boys would be more
interested in hand crafts as well. Moreover, the goal is also to make products that are
interesting and usable in the opinion of the pupils. The content of teaching should also
be related to the pupils’ own life.
The aims and choices of the exercises are based on the Finnish National Core
Curriculum for Basic Education (2004). The general objectives for crafts in grades 5-9
include among other things giving consideration to ethical, ecological and economic
values while working; becoming familiar with other peoples’ design and crafts cultures;
and learning to appreciate and critically examine their own work and find creative
solutions to problems. These objectives are shared in the material package as well. The
contents chosen for the material package are also based on the National Core
Curriculum for Basic Education (NCCBE). In NCCBE the general contents for crafts
include among other things forms, composition and colours; knowledge of materials;
various systems and instructions for working; knowledge of culture, tradition and
design from other cultures; and evaluation of one’s own work. These are used in the
material package too. The specific contents for textile work in grades 5-9 include among
other things history of textiles; symbolic meaning of clothes and textile art; information
technology applications as help in design; constructing three-dimensional textile
products and using patterns; using different textile materials and craft techniques; and

32
recycling of textile products. These contents are also present in the material package, as
well as working according to work instructions and being able to work both alone and in
groups.
The material package is aimed for primary level pupils, more specifically for 6th
graders. The primary level was chosen because learning a foreign language is better to
start as early as possible. Coyle et al. (2010, 18) agree with this and suggests that
learning a new language should feel as natural as possible. However, finding the right
level of teaching with CLIL is important, especially with pupils in the primary school.
The pupils should feel comfortable with learning in a foreign language to avoid
frustration and stress. Other reasons for choosing the 6th
graders are that they already
possess basic skills for English language, and both girls and boys still have textile work
at school.
The frame of the CLIL material package is based on the Tool Kit provided by Coyle et
al. (2010, 74-85). Each unit in the package has a plan for the CLIL lessons and the
structure of the lessons is also based on the combination of content, culture,
communication and cognitive skills. More detailed information can be found in the
material package.
7. DISCUSSION
Why is creating new CLIL material so important? In his article Gierlinger (2007, 92)
describes the main difficulty the teachers using CLIL are facing. CLIL is often seen as
difficult because of a lack of materials and the increased workload. There are not many
appropriate materials available for CLIL classes, and because of this teachers have to
create them by themselves. This often then creates too much strain for the teachers.
This thesis aims to contribute such material to be used in teaching hand crafts, as well as
English, in Finnish primary schools. This is the first Master’s Thesis in the University
of Jyväskylä that combines hand crafts and English using CLIL as the educational
approach. Using hand crafts as the content in CLIL is fairly uncommon and there are

33
not many materials to be found in the Internet. However, as explained in the earlier
chapter, hand crafts offer a very good basis for learning according to the principles of
CLIL. Learning by doing and creating crafts motivates pupils in the primary level. The
language to be used is very concrete and the results of using the language can actually
be seen in the form of a finished product. Learning hand crafts through CLIL also gives
the opportunity to examine various cultures from a different angle. The pupils will learn
that a single craft or a product can have a very interesting history and that there is
always a story behind making that particular craft. The idea is to become culturally
aware and appreciate the traditions of other cultures. Being culturally aware also
supports the cognitive abilities, which can be taken into account easily by combining
hand crafts and CLIL. For example, learning hand crafts develops the skills for
understanding and defining, which are useful abilities in many other school subjects as
well.
The exercises and instructions in the material package are mainly invented and made by
the author, so they have not been tested in a classroom situation yet. The material
package can be used as a whole, or single pieces and ideas can be taken from it. Ideally,
the material works best when it is used as a whole, since the topics are related to each
other and the level of difficulty of the crafts increases from the beginning to the end.
Most of the written instructions and pictures in the material package are invented and
drawn by the author, so there is still room for improvement. It is also good to consider,
whether using PowerPoint presentations is the best way of presenting information. The
material could possibly be improved by concentrating on a single theme instead of
many, for example concentrating mainly on recycling and environment or world crafts
and multiculturalism.
Although CLIL is only a single branch of the huge tree of language learning methods
and approaches, it is still quite a unique approach, when all the 4Cs are taken into
account. It is hoped that there will be more materials made for CLIL in the future and
especially for creative subjects such as crafts, in order to increase motivation and
interest towards foreign languages.

34
8. BIBLIOGRAPHY
Anderson, L. W. and Krathwohl, D. R. (eds.) (2001). A Taxonomy for Learning,
Teaching, and Assessing; A Revision of Bloom’s Ta onomy of Educational Objectives.
New York: Longman.
Björklund, Siv (ed.) (2001). Language as a tool: immersion research and practices.
Vaasa: Vaasan yliopisto.
Brown, H. D. (1980). Principles of Language Learning and Teaching. Englewood
Cliffs, NJ: Prentice Hall.
Brumfit, C., Moon, J. & Tongue, R. (1991). Teaching English to children: from
practice to principle. London: Hammersmith.
Buchholz, Barbara (2007). Reframing young learners’ classroom discourse structure as
a preliminary requirement for a CLIL-based ELT approach. In Dalton-Puffer, Christiane
& Smit, Ute (eds.) Empirical Perspectives on CLIL Classroom Discourse. Frankfurt am
Main: Peter Lang, 51-77.
Carrio-Pastor, Maria Luisa (ed.). (2009) Content and Language Integrated Learning:
Cultural Diversity. Bern: Peter Lang
Coyle, Do (2002). Relevance of CLIL to the European Commission's language learning
objectives. In D. Marsh (ed.), CLIL/EMILE–The European dimension: actions, trends
and foresight potential. Jyväskylä: University of Jyväskylä, 27–28.
http://ec.europa.eu/languages/documents/doc491_en.pdf (30.7.2013)
Coyle, Do, Hood, Phillip & Marsh, David (2010). CLIL: Content and Language
Integrated Learning. Cambridge: Cambridge University Press.
Dalton-Puffer, Christiane & Smit, Ute (eds.) (2007). Empirical Perspectives on CLIL
Classroom Discourse. Frankfurt am Main: Peter Lang. 7-8.

35
Eurydice Report: 2006, Content and Language Integrated Learning (CLIL) at School in
Europe, Eurydice European Unit, Brussels.
http://ec.europa.eu/languages/documents/studies/clil-at-school-in-europe_en.pdf
(30.7.2013)
Gierlinger, Erwin M. (2007) Modular CLIL in lower secondary education: some
insights from a research project in Austria. In Dalton-Puffer, Christiane & Smit, Ute
(eds.) Empirical Perspectives on CLIL Classroom Discourse. Frankfurt am Main: Peter
Lang p. 79-118.
Globaalikasvatus.fi. Kä-Ki-Ku- oppimistyyli monikulttuurikasvatuksen avuksi. Rekola,
Tuula (5.11.2007). http://www.globaalikasvatus.fi/blogi/2007_11_06_ka-ki-ku_-
oppimistyyli_monikulttuurisuuskasvatuksen_avuksi (30.7.2013)
Järvinen, Heini-Marja (1999). Acquisition of English in content and language integrated
learning at elementary level in the Finnish comprehensive school. Turku: Turun
yliopisto.
Kajaanin yliopistokeskus. Kampuslehti (huhtikuu 2007).
http://www.kajaaninyliopistokeskus.oulu.fi/kampuslehti/huhti2007/0407.html
(29.7.2013)
Kuczala, Mike & Lengel, Traci (2010). The Kinesthetic Classroom: Teaching and
Learning Trough Movement. ThousandOaks: Corvin.
Lappalainen, Eeva-Maija. (2005) Kulttuurisesti sensitiivinen opettajuus; Käden, kielen
ja kulttuurin oppimisen yhdistäminen maahanmuuttajien koulutuksessa ja opettajan
kasvupolulla. Oulun yliopisto: Kasvatustieteidentiedekunta. Oulu: Gummerus.
Laurén, Christer (2000). Kielten taitajaksi: kielikylpy käytännössä. Jyväskylä: Atena.
Maahanmuuttajat.fi. Julkaisu – Käsityö kielen oppimisen apuvälineenä (2007)

36
http://www.maahanmuuttajat.fi/content/staticfiles/Julkaisu_-
_Kasityo_kielen_oppimisen_apuvalineena_2007.pdf (29.7.2013)
Maljers, Anne; Marsh, David and Wolff, Dieter (eds.) (2007) Windows on CLIL -
Content and Language Integrated Learning in the European Spotlight. Alkmaar:
Europees Platform.
Marsh, David; Maljers, Anne &Hartiala, Aini-Kristiina (2001). Profiling European
CLIL classrooms : languages open doors. Jyväskylä: University of Jyväskylä.
Marsh, David; Järvinen, Heini-Marja & Haataja, Kim (2007). Perspectives from
Finland. In Maljers, Anne; Marsh, David and Wolff, Dieter (eds.) Windows on CLIL -
Content and Language Integrated Learning in the European Spotlight. Alkmaar
:Europees Platform, 68-83.
Marsh, David (2008). Language Awareness and CLIL. In Hornberger, Nancy H.
Encyclopedia of Language and Education.
Mehisto, Peeter; Marsh, David Frigols, Mar a esu (2008). Uncovering CLIL:
content and language integrated learning in bilingual and multilingual education.
Oxford: Macmillan Education.
Nikula, Tarja & Marsh, David (1997) Vieraskielisen opetuksen tavoitteet ja
toteuttaminen. Helsinki: Opetushallitus.
Nikula, Tarja (2007). The IRF pattern and space for interaction: comparing CLIL and
EFL classrooms. In Dalton-Puffer, Christiane & Smit, Ute (eds.) Empirical Perspectives
on CLIL Classroom Discourse. Frankfurt am Main: Peter Lang, pp. 179-204.
Opetushallitus. Perusopetuksen opetussuunnitelman perusteet (2004)
http://www.oph.fi/download/139848_pops_web.pdf
Pihko, Marja-Kaisa (2010). Vieras kieli kouluopiskelun välineenä: oppilaiden
kokemuksista vihjeitä CLIL-opetuksen kehittämiseen. Jyväskylä: Jyväskylän yliopisto

37
Richards, Jack C. & Rodgers, Theodore S. (2001). Approaches and Methods in
Language Teaching. Cambridge Language Teaching Library. Cambridge University
Press.
Seikkula-Leino, Jaana (ed.) (2002). Klikkaako CLIL?: katsaus vieraskieliseen
opetukseen ja vinkkejä sen käytännön toteutukseen. University of Turku.
Vuorinen, I. (2001). Tuhat tapaa opettaa: Menetelmäopas opettajille, kouluttajille ja
ryhmän ohjaajille. Tampere

Anna-Maarit Ahvenainen
University of Jyväskylä
Multicultural handcrafts in English: A teacher’s handbook

TABLE OF CONTENTS
FOREWORD 1
How to use the material 2
Ideas for variation 7
Course outline 9
UNIT 1 – THE WORLD OF CRAFTS: THE JOURNEY BEGINS 11
LESSON 1 – INTRODUCTION TO THE WORLD OF CRAFTS
IN ENGLISH 14
Appendix 1: Introduction – Outline and aims 18
Appendix 2: Context and background – Lesson rules 19
Appendix 3: Thinking activity – The purpose of clothing 20
Appendix 4: Thinking activity – Clothing vocabulary 21
LESSON 2 – MATERIAL KNOWLEDGE 22
Appendix 1: Thinking activity – What am I wearing? 26
Appendix 2: Instructions – Instructions for making a portfolio 27
Appendix 3: Instructions – Natural and synthetic fibres 28
Appendix 4: Individual work – The answers for the portfolio 30
Appendix 5: Self-assessment 31
UNIT 2 –ECO-FRIENDLY CRAFT IDEAS FROM AFRICA, PARAGUAY AND NATIVE
AMERICANS 32
LESSON 3 – AFRICA: MAKING A FOOTBALL OUT OF SCRAP MATERIAL 35
Appendix 1: Instructions – How to make an African football 39
LESSON 4 – PARAGUAY: POWER OF MUSIC FROM TRASH 40
Appendix 1: Warm up – Listen and guess instruments 43
Appendix 2: Thinking activity – Comparing the instruments 44
Appendix 3: Instructions – How to make a drum and a simple flute 45
LESSON 5 – NATIVE AMERICANS: CATCHING DREAMS WITH THE HELP OF
NATURE 47
Appendix 1: Warm up – Find the words of Native American origin 50
Appendix 2: Context and background & Instructions – Native American dream
catcher (PowerPoint) 51
Appendix 3: Thinking activity – My favourite place in nature 54
Appendix 4: Self-assessment 55

UNIT 3 – PRINTING AND COLOUR DYEING: INSPIRATION FROM AROUND THE
WORLD 56
LESSON 6 – DESIGN YOUR OWN PRINT:
THE WORLD IS YOUR OYSTER! 59
Appendix 1: Warm up – Draw the shape and vocabulary for shapes 63
Appendix 2: Context and background – Print designs around the world &
Instructions – How to make a stamp (PowerPoint) 65
LESSON 7 – TIE DYEING: A BREEZE FROM AMERICA IN THE 60’S 69
Appendix 1: Warm up – Rubber band competition 72
Appendix 2: Context and background – The art of tie dyeing 73
Appendix 3: Instructions – How to tie dye 74
Appendix 4: Thinking activity – Making a hypothesis 77
LESSON 8 – DYEING WITH NATURAL AND ARTIFICIAL COLOURS 78
Appendix 1: Warm up – Colourful sayings 81
Appendix 2: Context and background – The colour wheel 82
Appendix 3: Thinking activity – Is it artificial or natural? 83
Appendix 4: Instructions: Kool-Aid dyeing and dyeing with plants
(PowerPoint) 84
Appendix 5: Self-assessment 88
UNIT 4 – SEWING WITH RECYCLED MATERIAL & KNOWLEDGE ABOUT HATS
AROUND THE WORLD 89
LESSON 9 –THE ART OF BEANIE-MAKING & HATS AROUND
THE WORLD 92
Appendix 1: Warm up – What kind of a hat do I have? 95
Appendix 2: Warm up – Types of hats 96
Appendix 3: Thinking activity – They are all mixed up! 97
Appendix 4: Planning – What is the next step? 100
Appendix 5: Instructions – DIY beanie 101
Appendix 6: Context and background – History of the beanie hat & Hats around
the world vocabulary 104
Appendix 7: Context and background – Hats around the world
(PowerPoint) 105
LESSON 10 – SEWING THE BEANIE USING RECYCLED MATERIALS 109
Appendix 1: Warm up – Pantomime & Thinking activity – How would you
recycle your clothes 113

Appendix 2: Thinking activity – Recycling ideas 114
Appendix 3: Self-assessment – KWL chart 115
Appendix 4: Context and background – Recycling clothes (PowerPoint) 116
LESSON 11 – STYLE YOUR BEANIE 117
Appendix 1: Warm up – What is missing? 120
Appendix 2: Context and background – How to customise your clothing
(vocabulary) & Planning – Decorate me! 121
Appendix 3: Context and background – How to customise your clothing
(PowerPoint) 122
UNIT 5 – THE WORLD OF CRAFTS: THE EXHIBITION 124
LESSON 12 – PREPARING THE EXHIBITION 127
Appendix 1: Context and background – How to build an exhibition?
(PowerPoint) 130
Appendix 2: Instructions – Building the exhibition 131
LESSON 13 – LOOKING BACK AT THE EXPERIENCE& FEEDBACK 134
Appendix 1: Self-assessment 136

1
FOREWORD
This material is designed for primary school pupils and learning in a foreign language.
The material is based on the CLIL approach, in which content and language are
combined together with culture and cognitive skills to create a comprehensive
educational approach.
The material package is divided into 5 units, consisting of 13 lessons. The material
aims to teach different skills in handcrafts, including constructing, dyeing and sewing
skills. The language skills emphasised are oral communication, reading and listening to
work instructions and presentations, and learning new vocabulary. The cultural aspects
of the material include DIY (Do It Yourself) crafts culture, fibre materials, textile prints,
environmentally friendly crafts and different hats around the world. The cognitive skills
to be practised include among other things remembering, understanding, analysing,
evaluating and creating.
Each unit has an overall introduction to the lessons and the lessons include specific
instructions for the teacher. After the structure of a lesson, there are appendices to be
used for every lesson, including vocabulary, worksheets, PowerPoint presentations and
work instructions for crafts. The material may be used as a whole, for example as a
course or during autumn semester, or it is possible just to use pieces and ideas from it.
Have fun and be creative!

2
HOW TO USE THE MATERIAL
Target group
The material is aimed for 6th graders, but it is possible to use the material for younger
pupils as well. The material can be used as a course package or use only individual
units or lessons. The material is based on CLIL approach, in other words it is suitable
to be used in schools that practice CLIL, especially in hand crafts classes. It is also
possible to use the material in a regular school, as a variation to normal hand crafts
classes or English language classes.
Group size
There isn’t a certain group size that has been set for the lessons. The estimated ideal
group size is around 20 pupils, but smaller or bigger class sizes are also acceptable.
The pupils just need to be divided into groups that fit the purpose.
Length of the lessons and tasks
There are 13 lessons in the material package. The lessons take 90 minutes each, in
other words two times 45 minutes. There can be a break between the first and the
second half of the lesson, but the activities have been timed without a break. The times
required for activities can be seen at the end of the description of each activity. These
times however are only estimates and they may take longer or shorter time than
intended, depending on the skill level of the pupils. For example, it is quite possible to
lengthen the duration of the whole course to fit the autumn semester.
Contents
The material package is divided into five units:
UNIT 1: The world of crafts: The journey begins
UNIT 2: Eco-friendly craft ideas from Africa, Paraguay and Native Americans
UNIT 3: Printing and colour dyeing inspiration from around the world
UNIT 4: Sewing with recycled material & knowledge about hats around the
world and
UNIT 5: The world of crafts: The exhibition.
The overall themes are DIY (do it yourself) culture, being environmentally friendly,
recycling, and cultural information about crafts, materials and people around the world.

3
The crafts the pupils are going to make during the course are:
Portfolio about textile fibres
Football made out of plastic bags
Drum and flute made out of household items
Dream catcher
Printed fabric bag with a self-made stamp
Tie dyed T-shirt
Dyeing fabric with plants and dyeing yarn with Kool Aid juice powder
Beanie hat made out of an old sweater
Exhibition props
Using English language through CLIL
In the beginning of each unit there are two headlines: In this unit pupils will learn, and
CLIL: Overall plan for the unit. The first headline explains in short what the pupils will
learn during the lessons inside the unit. The second one explains the CLIL aspect of
the lessons inside the unit. The CLIL plan is based on the model provided in CLIL:
Content and Language Integrated Learning by Coyle, Do, Hood, Phillip & Marsh, David
(2010, 75-81). The CLIL plan includes: Aims of the lessons; Teaching objectives
(divided into content, culture, communication and cognition); Learning outcomes;
Criteria for assessment and; Resources.
The aims of the lessons describe the whole learning experience. The teaching
objectives that are divided into four categories describe in more detail what the teacher
plans to teach. The first category, content includes the specific aims for learning hand
crafts. The second category, culture includes the cultural aspects to be learned during
the lessons. The third category, communication explains the English language to be
used and learned during the lessons. This category is yet divided into three different
sections: language of learning (key vocabulary for the lessons), language for
learning(tools for using the language), and language through learning(learning that
happens between formal learning). The fourth category, cognition explains the
cognitive aspects the pupils are going to learn or practice during the lessons, such as
understanding, defining, identifying etc.
Next, the learning outcomes explain the hoped results for the whole unit. The criteria
for assessment explain what aspects should be taken into account when evaluating the
participation and work of the pupils. Finally the resources summarises the equipment
and materials needed for the lessons.

4
The CLIL approach is a comprehensive method, where many different aspects are
taken into account. However, the emphasis of these aspects can differ between the
units and the lessons. Some of the lessons emphasise especially learning the
language, others learning about the content and culture, and others different thinking
activities that stress the cognitive abilities.
More detailed information about CLIL can be found for example in:
Coyle, Do; Hood, Phillip & Marsh, David (2010). CLIL: Content and Language
Integrated Learning. Cambridge: Cambridge University Press.
The language abilities emphasised in the material package are:
Reading and listening to instructions and presentations in English
Learning vocabulary related among other things to clothing, textile fibres,
musical instruments, nature, shapes, colours, hats, sewing and recycling
Asking, discussing, expressing opinion, agreeing/ disagreeing, describing and
cheering in English
Searching information in English
Presenting information in English
How to compare, prepositions for directions and wordplay (anagrams,
abbreviations, colour-related sayings)

5
The structure of the lessons
In the beginning of each lesson description there are two short sections called: In this
lesson pupils will learn, and Directions for the teacher. These describe in short the aims
of the lesson and some overall instructions for the teacherto consider.
After the beginning, there is the section called Structure of the lesson. The lessons are
structured according to different activity types that are accompanied with certain
symbol pictures to help identification. These activity types with symbols are:
Warm up:
A fun introduction to the
topic
Context and
background:
Introducing the content
and the background of
the lesson
Thinking activity:
Practising cognitive
skills and
communication
Instructions:
The instructions for
working to be read,
watched or listened
Individual work:
Working by following
the instructions and
time for using English
Self-assessment
Assessing own work
Introduction:
Discussion about the
outline and aims in the
beginning of each unit
Planning:
Making plans with or
without a partner before
starting to work
Extra activity
Extra ideas for activities
Presentation:
Oral presentation of
finished work
Tidying up
Tidying up the
classroom
Glossary
Adding words to a big
classroom glossary

6
The structures generally vary a bit between the lessons, but the last lesson of the last
unit is different from the rest. On that lesson there is an exhibition for all the crafts and
time to give feedback to the others, as well as evaluate own work and progress.
Before starting the lessons
In the beginning of the lessons it is important to create positive atmosphere for learning
crafts in English. The teacher should address the pupils and for example ask about
their weekend, plans for later that day or perhaps present an interesting craft to the
pupils before starting the actual lesson. The purpose of small talk is to make the pupils
more relaxed towards using English while learning crafts.
In the end of the lessons, there are always two reoccurring activities. These are tidying
up and filling the glossary. It is important to teach the pupils to act responsibly with their
work space and clean afterwards. Filling the glossary will accumulate the vocabulary
knowledge of the pupils and give them a possibility to affect to their own learning.
There is more detailed information about using the glossary on the very first lesson.
The role of the teacher should be an enabler. The teacher is the one presenting new
information and making sure everyone understands. During the activities the teacher
should be available for any questions and encourage the pupils to exceed themselves.
It is important that the teacher speaks only in English, with a few exceptions when a
translation is needed. The teacher’s use of English practises the listening skills of the
pupils and sets an example. However, it is essential to make sure the difficulty level of
English is appropriate for the pupils, to avoid frustration and misunderstanding.
The pupils should try to use English as much as possible and they should be
encouraged to do so. It should be reminded that making mistakes does not matter and
only by rehearsing one can become a master. It is important to create a mistake
friendly atmosphere. The pupils may however use Finnish as well but they should be
urged to try to explain in English instead. It might be helpful to create separate English
and Finnish zones in the classroom, where the zone sets the language to be used.
Giving constant feedback to the pupils is vital. Encouraging the pupils while working
and giving small praises from their work and the use of language may have a huge
significance for a single pupil. The teacher may also develop an own feedback and
praise system, for example, giving stickers or setting up a star chart with prizes in the
end of the units.

7
IDEAS FOR VARIATION
The material created here is open for many different variations and every teacher can
modify the ideas to fit their style. Here are some ideas how to give an extra flavour to
the lessons, by dividing the pupils differently, by setting up the classroom interestingly
or by going on to field trips.
Ideas for dividing the pupils into groups or partners
Forming partners
Numbers in a hat: The pupils pick a number from a hat and the owners of the
numbers side by side become partners, for example 1- 2 and 3- 4.
Who is my partner: Every pupil gets a piece of paper with a name pinned on
their back. The pupils need to find out who this person is by asking questions
from each other. They can only ask questions that can be answered with Yes or
No, for example, is he a boy or a girl? Does she have a blue shirt?
Word partners: Each pupil gets a piece of paper with a word on it and the task
is to find the suitable partner for that word, for example, sheep – wool, to cut –
scissors and to knit – yarn.
Forming groups
Where my family is: Using a Happy Families card game to find a group. Each
pupil gets a card of a family member and the task is to find the rest of the family
by asking around.
The Native American way: Each pupil has a small stick with her/his name
written on it. These sticks are put in a big pile and the “Indian chief” with her/his
eyes closed always picks two sticks at a time and puts them to one group. The
“Indian chief” may be the teacher or a pupil.
Dividing with numbers: The teacher divides the pupils for example to five
groups by saying let’s count to five. Each pupil then says a number between
one and five and the pupils with the same number form a group.
The picture puzzle: There is a one whole picture for one group. The teacher
may cut the pictures as many pieces as necessary. The task is to solve the
puzzle and find the group members with the correct pieces of the puzzle.
More ideas for example in: Aulio, Olli. (2009). Suuri leikkikirja. Jyväskylä: Gummerus
kirjapaino Oy.

8
Setting the classroom
The standard classroom setting might sometimes feel unimaginative and unpleasant
place for creativity. To prevent this, it might be a good idea sometimes to change how
the classroom is set. If the classroom has desks, they could be arranged into different
formations, such as a huge circle, smaller group circles or just random figures. If there
are just big tables for making crafts, they can be decorated with pictures related to the
topic. It is also possible to get rid of the chairs for some lessons and get some
mattresses and pillows on the floor.
The teacher may also decorate the classroom with pictures, crafts and craft books to
make the learning space interesting. The idea is that the pupils would feel comfortable
in the classroom environment and would be eager to work.
Field trips
If there is time, it is always interesting to go on a field trip. Field trips give an extra
dimension to the topic and help the pupils to comprehend the matters in more detail.
There are several field trip possibilities for this material package, and here are some of
them:
Visiting the local recycling centre and seeing how recycled materials can be
reused
Visiting the local crafts museum and finding out more detailed information about
how the crafts were made and what is the history behind them
Going outside and experiencing the nature. Finding materials to use for the
crafts and imagining how different crafts were made before machines and
synthetic materials.
Visiting a local flea market and searching for materials to be used in class

9
COURSE OUTLINE
UNIT
LESSONS
CONTENT
ACTIVITIES
UNIT 1
The world of crafts: The
journey begins
1, 2
Introduction Material knowledge
What is DIY? Lesson rules and policies What are textiles and the purpose of clothing? Style your class mate! Pop the balloon! What are natural and synthetic fibres? What am I wearing? How to make a portfolio
UNIT 2
Eco-friendly
craft ideas from Africa, Paraguay
and Native Americans
3, 4, 5
Africa: football Paraguay: drum and flute Native Americans: dream catcher
Sketches – Reinvent a plastic bag African toys My favourite toys and gadgets How to make an African football Listen and guess! Making instruments from trash Comparing the instruments How to make a drum and a simple flute Find the words of Native American origin The Native American dream catcher How to make a dream catcher My favourite place in nature
UNIT 3
Printing and
colour dyeing: inspiration from
around the world
6, 7, 8
Designing a print Tie dyeing Dyeing with natural and artificial colours
Draw the shape and vocabulary for shapes What is a pattern? & Print designs around the world How to make a stamp Rubber band competition The art of tie dyeing How to tie dye Making a hypothesis Colourful sayings The colour wheel How to dye with Kool-Aid and plants Is it artificial or natural?

10
UNIT 4
Sewing with
recycled material & knowledge about hats around the
world
9, 10, 11
Hats around the world Sewing a beanie Styling the beanie
What kind of a hat do I have? Hats around the world They are all mixed up! How to sew a beanie Pantomiming Recycling clothes What can I do? Recycling ideas Sewing the beanie What is missing? How to customise your clothing
UNIT 5
The world of
crafts: the exhibition
12, 13
Preparing the exhibition Looking back at the experience& feedback
Still image How to build an exhibition? Building the exhibition Viewing the work of others and giving feedback Final thoughts about the course

11
U N I T 1
T H E W O R L D O F C R A F T S : T H E J O U R N E Y B E G I N S
IN CLU D ING:
LESSON 1 – Introduction to the world of crafts in English
LESSON 2 – Material knowledge
IN THIS UNIT PUPILS WILL LEARN:
the rules of the CLIL lessons and introduction to the units
how textiles are made, the purpose of clothing and clothing vocabulary
to tell the difference between natural and synthetic fibres, information about
them and how people process the fibres across the world
to express themselves in English through play, search information from the
Internet in English and make a portfolio about the natural and synthetic fibres
CLIL: OVERALL PLAN FOR THE UNIT
AIMS
To establish the rules of the classroom together
To understand what DIY (do it yourself) culture means
To understand what are textiles and the purpose of clothing
To recognise natural and synthetic fibres and understand the process of
manufacturing them
To advance the learning of using materials and equipment for crafts
To learn new vocabulary and to improve reading and understanding work
instructions
To enable expressing oneself creatively in English
To learn searching information from the Internet and dictionaries, and
connecting information
To produce a small portfolio about textile fibres in English
To assess own progress

12
TEACHING OBJECTIVES
What the teacher plans to teach?
Content
Establishing the classroom rules
Information about natural and
synthetic fibres
Making a portfolio
The meaning of textiles and
clothing
Culture
Manufacturing textile fibres
around the world
How clothing can represent your
culture
Understanding that one can also
learn in a different language
Value of DIY culture (do it
yourself)
Communication
Language of learning
Key vocabulary: clothing and textile fibres, and e.g. rules, DIY, textiles, clothing,
natural and synthetic fibres, wool, cotton, flax/ linen, silk, oil, portfolio, to search,
dictionary, styling
Language for learning
Asking questions: Can I help you? Can you help me? What am I wearing?
Understanding: The purpose of clothing – fill in the gaps, watching videos about
manufacturing textile fibres
Searching and classifying: clothing vocabulary, making a portfolio
Expressing opinion and explaining: Discussing about rules, describing one’s
clothing
Wordplay: Abbreviation
Language through learning
Recognising language used in activities
Learning from the teacher and the other pupils’ use of language
Familiarising oneself with new words related to the activities
Responding and reacting to questions

13
Cognition
Helping the pupils to comprehend the key concepts and putting them in use in
different contexts
Identifying the stages of work when watching and reading instructions
Understanding the origin of textile fibres and the process of manufacturing them
Understanding where one can find information
Building, learning and using vocabulary
LEARNING OUTCOMES
By the end of the unit learners will be able to:
remember the classroom rules
understand, read and listen work instructions
use language needed for making a portfolio
use new vocabulary in a context
understand where the textile fibres come from
understand the meaning of clothing
use language for asking and giving help
make a small portfolio by searching information from the Internet
CRITERIA FOR ASSESSMENT
Using teacher, peer and self-assessment to assess how well learners:
Contribute to the classroom glossary
Follow work instructions
Produce a portfolio
Participate enthusiastically in classroom activities
Understand the instructions by listening and reading
RESOURCES
Computer, visual presenter, black-/ whiteboard
Worksheets
Posters
Clothes
Fabric samples
Printer

14
UNIT 1
CLIL LESSON OUTLINES
LESSON 1 – INTRODUCTION TO THE WORLD OF CRAFTS IN ENGLISH (90MIN)
IN THIS LESSON PUPILS WILL LEARN:
the rules of the CLIL lessons and introduction to the units
how textiles are made, the purpose of clothing and clothing vocabulary
to express themselves through play in English
DIRECTIONS FOR THE TEACHER:
It is important to encourage the pupils to feel confident with using English and
create a positive atmosphere for learning
It is advisable to use different kinds of crafts, pictures, books etc. to make the
classroom more interesting and inspirational
STRUCTURE OF THE LESSON:
Introduction: Outline and aims
The objectives are to introduce the units to the pupils and give an
overall picture what they are going to make and accomplish.
The teacher goes through roughly the outlines for the following units together with the
pupils by using contents page of the material package. The teacher should explain that
during these lessons, the aim is to learn crafts and culture around the world in English
language. It should be pointed out as well that the pupils have the opportunity to use
English in real context and that it is possible even though they would not understand
everything. In other words, the pupils should try to use English as much as possible,
but using Finnish is acceptable if it is necessary. The teacher should use a visual
presenter/ blackboard to show the contents of the units. (5min)
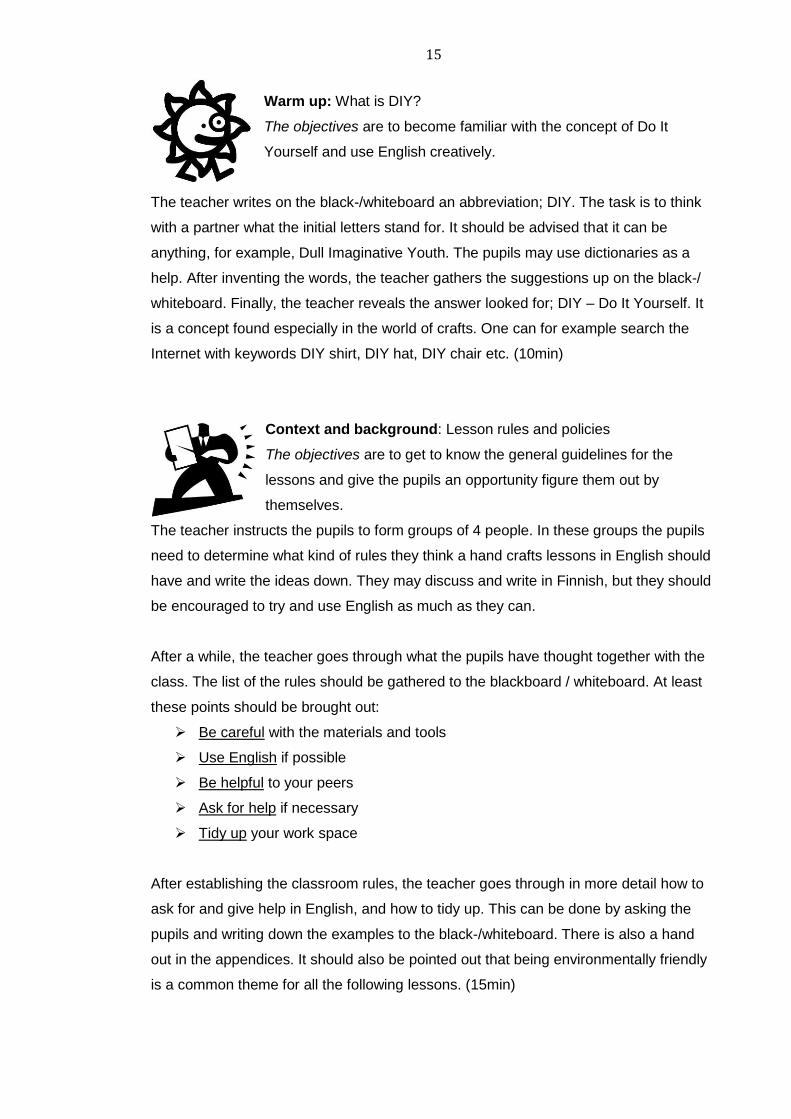
15
Warm up: What is DIY?
The objectives are to become familiar with the concept of Do It
Yourself and use English creatively.
The teacher writes on the black-/whiteboard an abbreviation; DIY. The task is to think
with a partner what the initial letters stand for. It should be advised that it can be
anything, for example, Dull Imaginative Youth. The pupils may use dictionaries as a
help. After inventing the words, the teacher gathers the suggestions up on the black-/
whiteboard. Finally, the teacher reveals the answer looked for; DIY – Do It Yourself. It
is a concept found especially in the world of crafts. One can for example search the
Internet with keywords DIY shirt, DIY hat, DIY chair etc. (10min)
Context and background: Lesson rules and policies
The objectives are to get to know the general guidelines for the
lessons and give the pupils an opportunity figure them out by
themselves.
The teacher instructs the pupils to form groups of 4 people. In these groups the pupils
need to determine what kind of rules they think a hand crafts lessons in English should
have and write the ideas down. They may discuss and write in Finnish, but they should
be encouraged to try and use English as much as they can.
After a while, the teacher goes through what the pupils have thought together with the
class. The list of the rules should be gathered to the blackboard / whiteboard. At least
these points should be brought out:
Be careful with the materials and tools
Use English if possible
Be helpful to your peers
Ask for help if necessary
Tidy up your work space
After establishing the classroom rules, the teacher goes through in more detail how to
ask for and give help in English, and how to tidy up. This can be done by asking the
pupils and writing down the examples to the black-/whiteboard. There is also a hand
out in the appendices. It should also be pointed out that being environmentally friendly
is a common theme for all the following lessons. (15min)

16
Thinking activity: What are textiles and the purpose of clothing?
The objectives are to find out what textiles are and the purpose of
clothing, learn clothing vocabulary and find information by using the
Internet or dictionaries.
First, the teacher goes through together with the class a short slideshow “What are
Textiles?” from the website of the Children’s University of Manchester. From the
slideshow it would be advisable to use the second, the third and the fourth slide (which
of these do you think are textiles, the purpose of textiles, can you find all 10 textiles?).
The Children’s University of Manchester – What are textiles?
http://www.childrensuniversity.manchester.ac.uk/interactives/art&design/talkingtextiles/
whataretextiles/ (6.12.2013)
Second, the teacher gives the pupils worksheet to fill in with a partner. This worksheet
has a fill in the gaps exercise and the sentences are about the purpose of clothing.
After a while, the teacher goes through the correct answers with the whole class.
Third, the teacher divides the class into six groups. From these groups two of the
groups get the same assignment. The task is to find and form a list of words in English
that fit the headline (at least five words). The three headlines are: clothing for the upper
body, clothing for the lower body and clothing for the hands, feet and head. The groups
may use the Internet or dictionaries to find words to fit the headline. After finding the
words, the two groups with the same assignment check each other’s lists. These word
lists can be used in the next activity. (30min)
Instructions: Style your class mate!
The objectives are to use English in a fun situation and express
personality by styling a class mate in groups.
The teacher divides the pupils into groups of 3-4 people (formed from the earlier
groups, so that in these groups there are pupils from the each headline category). In
these groups one of the pupils volunteers to become the target for styling. The groups
have around five minutes to style their class mate using clothes brought by the teacher
and the clothes from the pupils. It should be instructed to use English and utilise the
clothing vocabulary learned earlier. If wanted, the teacher may set up the styling by
showing pictures of celebrities with crazy costumes, such as artists Lady Gaga and the
band members from Kiss. After styling, the group need to think how to present their
piece of art to the rest of the class. (5min)

17
Individual work: Styling and communicating
The objectives are to follow the earlier instructions, communicate in
English and have fun by styling.
The pupils start styling their class mate and using the clothing vocabulary. The groups
should be able to describe what clothing pieces they have used to style their class
mate.
The fashion show: after styling, the teacher sets up a stage for the fashion show and
uses music to enhance the atmosphere. The teacher may work as a host for the show
and ask questions from the groups while they are presenting. (15min)
Tidying up
The objectives are to practise listening skills and responsibility of own
work space.
The pupils tidy up their work space as instructed by the teacher. Using the hand out for
tidying up as a help is advisable. (5min)
Glossary
The objectives are to grow active vocabulary and give the pupils an
opportunity to affect their own learning.
The teacher introduces the glossary. The pupils add new learned words to the
classroom glossary (poster) and two words they would like to learn (poster). On every
lesson, two of the pupils will write down at least two new words in English (+translation)
they have learned during the lesson and two new words in Finnish they would like to
learn. The next two will find out what these words are in English and write them down
to the poster in the beginning of the next lesson.(5min)
Example:
1. First lesson: pupils A and B both write down two new learned words and two
words wanted to be learned, that pupils C and D will find out
2. Second lesson: pupils C and D write down the four wanted words from the first
lesson, the two words each they have learned during the second lesson, and
two new words each pupils E and F will find out
3. The following lessons: continuing through the all pupils. After 12 lessons there
should be 48 lesson words + 44 wanted words on the posters making altogether
92 words.

18
Unit 1 – Lesson 1
Appendix 1: Introduction – Outline and aims
CONTENTS
UNIT 1 – The world of crafts: The journey begins
LESSON 1 – Introduction to the world of crafts in English
LESSON 2 – Material knowledge
UNIT 2 – Eco-friendly craft ideas from Africa, Paraguay and Native Americans
LESSON 3 – Africa: Making a football out of scrap material
LESSON 4 – Paraguay: Power of music from trash
LESSON 5 – Native Americans: Catching dreams with the help of nature
UNIT 3 – Printing and colour dyeing inspiration from around the world
LESSON 6 – Design your own print: the world is your oyster!
LESSON 7 – Tie dyeing: a breeze from America in the 60’s
LESSON 8 – Dyeing with natural and artificial colours
UNIT 4 – Sewing with recycled material & knowledge about hats around the world
LESSON 9 – The art of beanie-making & hats around the world
LESSON 10 – Sewing the beanie using recycled materials
LESSON 11 – Style your beanie
UNIT 5 – The world of crafts: The exhibition
LESSON 12 – Preparing the exhibition
LESSON 13 – Looking back at the experience & feedback
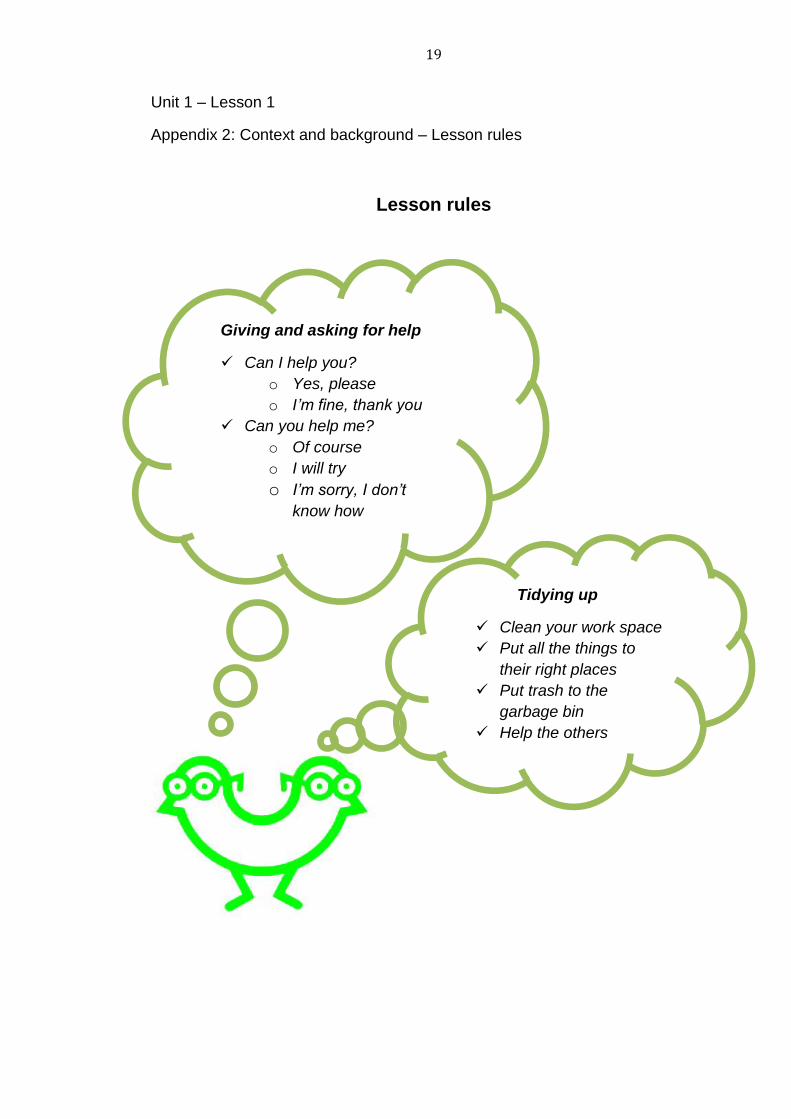
19
Unit 1 – Lesson 1
Appendix 2: Context and background – Lesson rules
Lesson rules
Giving and asking for help
Can I help you?
o Yes, please
o I’m fine, thank you
Can you help me?
o Of course
o I will try
o I’m sorry, I don’t
know how
Tidying up
Clean your work space
Put all the things to
their right places
Put trash to the
garbage bin
Help the others

20
Unit 1 – Lesson 1
Appendix 3: Thinking activity – The purpose of clothing
CLOTHING
What does it mean?
Fill in the gaps.
Clothing is made to ____________parts of the human body.
Humans are the only animals that ___________ clothing.
Clothing _______________ humans from the high and cold
temperatures.
Clothing is also worn for decoration, as _____________ clothing.
People from different cultures wear different clothing, because of
different ______________, beliefs and _________________.
Clothing can differ in different _________________ (e.g. work,
home, school) and different ______________.
Clothing can express your ______________________.
fashion protects
customs wear
cover situations
ages weather
personality

21
Unit 1 – Lesson 1
Appendix 4: Thinking activity – Clothing vocabulary
Clothing for the upper body
Clothing for the lower body
Clothing for the hands, feet and head

22
UNIT 1
LESSON 2 – MATERIAL KNOWLEDGE (90MIN)
IN THIS LESSON PUPILS WILL LEARN:
to tell the difference between natural and synthetic fibres and information about
them
how people process the fibres across the world
to search information from the Internet in English and make a portfolio about the
natural and synthetic fibres
to assess their learning
DIRECTIONS FOR THE TEACHER:
Make sure to have enough fabric samples for the portfolios
It is also possible to discuss about the environmental aspects of manufacturing
fibres and the working conditions of workers
If time, the pupils can find out what fibres are manufactured in Finland
STRUCTURE OF THE LESSON:
Warm up: Pop the balloon!
The objectives are to have a fun start to the lesson and use English
spontaneously.
Before the lesson starts, the teacher sets up the classroom with balloons on the floor.
Inside some of these balloons there are small pieces of fabric that are cotton, wool,
linen and silk. There should be as many balloons as there are pupils, but most of the
balloons are without a fabric sample. The teacher should set up the activity as a lottery,
in other words, in some of the balloons there is a winning item. Next the teacher
instructs the pupils to choose a balloon, but not touching it. After all the pupils have
chosen a balloon, they have an opportunity to pop the balloon in any way they want,
and the ones finding a fabric sample, get a small prize. These four fabric samples are
then connected to the next activity. (5min)

23
Context and background: What are natural and synthetic fibres?
The objectives are to find out information about the four main natural
fibres and a few synthetic ones.
The teacher goes through the first slide of the How are textiles made? from the
Children’s University of Manchester website with the pupils. The slide talks about the
sources of natural and synthetic fibres. The teacher should ask about the pictures and
translate unknown words.
The Children’s University of Manchester – How are textiles made?
http://www.childrensuniversity.manchester.ac.uk/interactives/art&design/talkingtextiles/
howaretextilesmade/ (4.12.2013)
After the short introduction to the different fibres, the teacher shows videos from the
Internet about producing these fibres around the world. The teacher may choose to
show sections from all of the clips or just from a few of them. The videos are about
cotton production in California, USA; sheep shearing in UK; silk production in China;
flax to linen production in general; and polyester production from plastic bottles. It is
not necessary to understand everything from the video clips, just the main idea. The
teacher may ask afterwards if the pupils understood the general idea and what their
thoughts about the videos were. (25min)
Americasheartland – California Cotton Harvest
http://www.youtube.com/watch?v=iSqinChTT70 (4.12.2013)
Buzzfizz1 – Sheep shearing
http://www.youtube.com/watch?v=TtP63IOhg1Y (4.12.2013)
ChinaVideoTravel– Tour inside a Chinese silk factory part1
http://www.youtube.com/watch?v=DtqYmfEPUiI (4.12.2013)
KravetInc – How Linen Is Made
http://www.youtube.com/watch?v=24yQ5R8On2U (4.12.2013)
DragonTV – Recycling plastic bottles into polyester
http://dragontv.ssis-suzhou.net/media/05-recycling-plastic-bottles-into-polyester
(4.12.2013)

24
Thinking activity: What am I wearing?
The objectives are to understand from what sources the clothes are
made from and describe what one is wearing in English.
The pupils work with a partner or with a small group. The task is to find out from what
kind of fibres their clothes are made of by reading the washer. The teacher provides
the pupils a hand out to help asking and answering questions. (5min)
Instructions: How to make a portfolio
The objective is to make a small portfolio about the natural and
synthetic fibres.
The teacher gives instructions to make a small portfolio to include information about the
four main natural fibres and three synthetic fibres. The pupils receive printed
worksheets to fill for each fibre. The information should be filled by the pupils
themselves, by searching the Internet. The exception is the synthetic fibres worksheet,
which is already filled in with the information; the pupils only need to find out what it
says and attach fabric samples to it.
The teacher gives different website addresses to visit but the pupils should be
encouraged to search beyond those as well. It should be reminded that some websites
are more reliable than others, e.g. what about Wikipedia, blogs or old websites?
Moreover, the teacher should provide the pupils with some fabric samples that they can
add to their portfolio. The information needed for the portfolio include: fibre, source,
sample, qualities and the major producing countries. There is an answer sheet for the
portfolio in the appendices. (10min)
Individual work: Searching information and making the portfolio
The objectives are to find relevant information form the Internet in
English and create a small portfolio.
The pupils can work with a partner to increase communication, but each of the pupils
needs to finish their own portfolio. After the portfolios are finished, the teacher can go
through the correct answers together with the class or check the portfolios individually.
(30min)

25
Self-assessment
The objective is to assess one’s own work after the unit.
The teacher provides the pupils with a self-assessment hand out. After filling it out the
pupils discuss about it with their partner and finally hand it out to the teacher. (5min)
Tidying up
The objectives are to practise listening skills and responsibility of own
work space.
The pupils tidy up their work space as instructed by the teacher. (5min)
Glossary
The objectives are to grow active vocabulary and give the pupils an
opportunity to affect their own learning.
The pupils add new learned words to the classroom glossary (poster) and adding
words pupils would like to learn (poster). Chosen pupils will write the words to the
posters. (5min)

26
Unit 1 – Lesson 2
Appendix 1: Thinking activity – What am I wearing?
What am I wearing?
Find out what materials you are wearing. Check the label from your clothes that
has the washing instructions, and search from what material your clothes are
made of. Tell the results to your partner in English
Selvitä mitä materiaaleja on ylläsi. Tarkista pesulappu ja etsi mitä materiaaleja
vaatteesi sisältää. Kerro tulokset parillesi englanniksi.
Examples:
What are you
wearing?
I am wearing a T-
shirt made out of
cotton
I am wearing a
cardigan made
out of wool

27
Unit 1 – Lesson 2
Appendix 2 : Instructions – Instructions for making a portfolio
Instructions for making a portfolio
1. Make a cover for the portfolio with a headline
“Natural and synthetic fibres”
2. Cut a sample for each fibre
3. Search information from the Internet and fill in the
info sheets for each fibre
Examples of website addresses:
http://www.naturalfibres2009.org/en/fibres/
http://www.statista.com/statistics/235685/cotton-production-in-
2010-and-2011-by-country/
Use keywords such as:
The qualities of wool
Major producers of cotton
4. Remember to add sources to the last page

28
Unit 1 – Lesson 2
Appendix 3 : Instructions – Natural and synthetic fibres
Natural fibres
Fibre:___________________________
Source: __________________________
Qualities:
____________________________
____________________________
____________________________
____________________________
____________________________
Major producing countries:
1. ____________________________
2. ____________________________
3. ____________________________
Sample

29
Synthetic fibres
Fibres:
1. Polyester
2. Nylon
3. Acrylic
Source: Oil, coal and petrol-based
chemicals (monomers)
Qualities:
durable
warm
breathable
comfortable
colourfast
wrinkle-resistant
Major producing countries:
1. China
2. India
3. United States
Sources:
IHS Chemical – Fibers overview
http://www.ihs.com/products/chemical/planning/ceh/fibers.aspx (5.12.2013)
Isambard Community School – Synthetic Fibres
http://www.isambard.swindon.sch.uk/_includes/attachments/P847/Synthetic%20Fibres.
pdf (5.12.2013)
Samples

30
Unit 1 – Lesson 2
Appendix 4: Individual work – The answers for the portfolio
The answers for the portfolio
Natural fibres
Cotton Wool
Cotton
Linen Silk
Cotton
plant
Sheep Flaxplant Silkworms
cool to wear
very absorbent, dries slowly
soft handle
durable
warm to wear
absorbent, dries slowly
breathable, repels rain
soft handle
can shrink
not durable
cool to wear
very absorbent, dries quickly
stiffer handle
durable
wrinkles easily
warm to wear
absorbent
soft handle
durable
1. China
2. India
3. United
States
1. China
2. Australia
3. New
Zealand
Sources:
http://www.statista.com/statistics/235685/cotton-production-in-2010-and-2011-by-country/(13.12.2013)
http://www.top5ofanything.com/index.php?h=f9962ed3(13.12.2013)
http://www.naturalfibres2009.org/en/fibres/flax.html(13.12.2013)
http://www.naturalfibres2009.org/en/fibres/silk.html(13.12.2013)
1. France
2. Belgium
3. The
Netherlands
1. China
2. Brazil
3. India

31
Unit 1 – Lesson 2
Appendix 5: Self- assessment
SELF-ASSESSMENT
I followed the instructions
I learned new things about the
topic
I learned new vocabulary
I used English language
I understood everything
I tried my best

32
U N I T 2
E C O - F R I E N D L Y C R A F T I D E A S F R O M A F R I C A , P A R A G U A Y A N D N A T I V E
A M E R I C A N S
IN CLU D ING:
LESSON 3 – Africa: Making a football out of scrap material
LESSON 4 – Paraguay: Power of music from trash
LESSON 5 – Native Americans: Catching dreams with the help of nature
IN THIS UNIT PUPILS WILL LEARN:
to make a football out of plastic bags and information about the life in Africa
to manufacture a drum and a flute from trash/ household items and information
about Landfillharmonic orchestra and poverty in Paraguay
to learn how to make a dream catcher and information about Native Americans
and the appreciation of nature
to express opinion, compare and describe in English
to assess their learning
CLIL: OVERALL PLAN FOR THE UNIT
AIMS
To work with eco-friendly materials
To learn about the life in Africa and Paraguay, as well as information about the
Native Americans
To gain practical knowledge how to use recycled materials and appreciate
nature
To encourage the pupils to be creative
To advance the learning of using materials and equipment for crafts
To learn new vocabulary and to improve reading and understanding work
instructions
To practice expressing opinion, comparing and describing in English
To assess own work

33
TEACHING OBJECTIVES
What the teacher plans to teach?
Content
How to make football out of
plastic bags
How to make musical
instruments from trash
How to make a dream catcher
Using recycled and eco-friendly
materials
Culture
Living with poverty in Africa and
Paraguay
Native American culture
Understanding that one can also
learn in a different language
Value of DIY culture (do it
yourself)
Communication
Language of learning
Key vocabulary: Musical instruments and nature vocabulary and e.g. football,
plastic bag, poverty, musical instrument, trash, dream catcher, American Indian,
eco-friendly
Language for learning
Asking questions: can I help you? Can you help me? What differences you can
notice?
Comparing: comparing musical instruments
Understanding: reading and listening instructions
Expressing opinion and describing: my favourite toy is IPad; Describing a
drawing: I drew a lake, because I like swimming
Wordplay: finding nature words from anagrams
Language through learning
Recognising language used in activities
Learning from the teacher and the other pupils’ use of language
Familiarising oneself with new words related to the activities
Responding and reacting to questions
Cognition
Helping the pupils to comprehend the key concepts and putting them in use in
different contexts
Identifying the stages of work when watching and reading instructions

34
Understanding the meaning of environmentally friendly and poverty around the
world
Understanding the Native Americans’ appreciation towards nature
Building, learning and using vocabulary
LEARNING OUTCOMES
By the end of the unit learners will be able to:
make a football and musical instruments out of recycled materials
understand, read and listen work instructions
use language needed for the process of making eco-friendly crafts
use new vocabulary in a context
understand and learn how to use materials from the nature
express their creativity
use language for asking and giving help
express their opinion, compare musical instruments and describe their drawings
Assess their own work
CRITERIA FOR ASSESSMENT
Using teacher, peer and self-assessment to assess how well learners:
Contribute to the classroom glossary
Follow work instructions
Produce a football, an instrument and a dream catcher
Participate enthusiastically in classroom activities
Understand the instructions by listening and reading
RESOURCES
Computer, visual presenter, whiteboard
Worksheets
Plastic bags
Yarn, string
Cardboard container
Balloons
Rubber bands
Willow hoops
Beads, feathers

35
UNIT 2
CLIL LESSON OUTLINES
LESSON 3 – AFRICA: MAKING A FOOTBALL OUT OF SCRAP MATERIAL (90MIN)
IN THIS LESSON PUPILS WILL LEARN:
to make a football out of plastic bags
information about the life in Africa and what we can learn from them
to express their opinion
DIRECTIONS FOR THE TEACHER:
It is important not to emphasise just the poverty in Africa, but the imagination
and the attitude towards life as well
If possible, play African music on the background while working to enhance the
atmosphere
STRUCTURE OF THE LESSON:
Introduction: Outline and aims
The objectives are to introduce the unit to the pupils and give an
overall picture what they are going to make and accomplish.
The teacher goes through the unit outline and the aims of the unit together with the
pupils. The teacher should use the section “In this unit pupils will learn” and describe
the main aims described for the each lesson. One should use a visual presenter/
blackboard to show the outline in written as well. (5min)

36
Warm up: Sketches – Reinvent a plastic bag
The objectives are to express an opinion in a short time and make a
little performance in English, without any great pressure.
The pupils shall work with a partner. The teacher gives each couple a plastic bag and
instructs them to be creative and invent a new purpose for the plastic bag or make
something new out of the plastic bag. The pupils have only a couple of minutes to
invent something and then each couple performs their idea to the rest of the class. The
idea is to have a lot of short sketches. After the sketches, the teacher points out that
there are a lot of different ways to use plastic bags, and that they should not be just
garbage. (15min)
Context and background: African toys
The objectives are to find out how to manufacture a football out of
plastic bags and what kind of toys children make themselves in
Africa, as well as wonder the power of imagination.(20min)
The teacher shows a video from YouTube about an African boy from Malawi who is
making a football out of plastic bags. The video should be watched at least for the first
three minutes. After watching the video, the teacher asks the pupils to point out things
they noticed, or things that are different than in Finland. Some thoughts that could be
drawn from the video are poverty, imagination, recycling, dancing, happiness and
different kind of toys. The teacher should also point out that playing football/ soccer is
very popular in Africa.
How to make an African football
http://www.youtube.com/watch?v=h2T6s7WCe8Y (19.11.2013)
After discussing together with the pupils, the teacher shows pictures of African toys
from the Internet. Again, the teacher asks the pupils to point out the differences and
things they see in the pictures.
Children’s toys from Africa (Unesco publication)
http://www.arvindguptatoys.com/arvindgupta/africantoys.pdf (20.11.2013)
African toys by Silvia Morara
http://silviamorara.photoshelter.com/gallery/african-toys/G0000eL1TGJQSUJU/
(20.11.2013)

37
Thinking activity: My favourite toys and gadgets
The objectives are to think which three of their toys/ gadgets the pupils
would choose and why and explain it to a partner.
The teacher shows pictures of children around the world with their favourite toys. After
watching the pictures, the teacher asks the pupils to choose three of their favourite toys
and describe them to a partner. The idea is to wonder together if it would be possible to
live with less toys and gadgets. The teacher may point out that income differences exist
not only between but also within countries, so not all children in developing countries
are poor or vice versa.
Photos of children from around the world with their favourite toys
http://twentytwowords.com/2013/03/13/photos-of-children-from-around-the-world-with-
their-favorite-toys-30-pictures/ (20.11.2013)
Instructions: How to make an African football
The objective is to understand the instructions in English.
The teacher provides the pupils with the written instructions of making a football and
goes through the steps by demonstrating the process. The instructions differ slightly
from the video shown. (10min)
Individual work: Making the football out of plastic bags
The objectives are to follow the instructions and work with a partner
to increase communication.
If possible, the teacher can play African music on the background to enhance the
atmosphere. The teacher reminds the pupils about the asking and giving help policy
(explained in earlier lessons). (30min)

38
Tidying up
The objectives are to practise listening skills and responsibility of own
work space.
The pupils tidy up their work space as instructed by the teacher. (5min)
Glossary
The objectives are to grow active vocabulary and give the pupils an
opportunity to affect their own learning.
The pupils add new learned words to the classroom glossary (poster) and adding
words pupils would like to learn (poster). Chosen pupils will write the words to the
posters. (5min)

39
Materials: plastic bags
string scissors
Unit 2 – Lesson 3
Appendix 1: Instructions – How to make an African football
Making a football out of plastic bags
1. Take a small plastic bag and put some plastic bags inside it
2. Close the bag by twisting
3. Put the ends of the plastic bag around the “ball” again
4. Continue adding plastic bags until you are happy with the size
5. Tie strings around the “ball”
Vocabulary
a plastic bag
string
inside
to twist
to add
to tie
muovipussi
naru
sisään, sisälle
kiertää, kääntää
lisätä
sitoa

40
UNIT 2
LESSON 4– PARAGUAY: POWER OF MUSIC FROM TRASH (90MIN)
IN THIS LESSON PUPILS WILL LEARN:
to manufacture a drum and a flute from trash/ household items
information about Landfillharmonic orchestra and poverty in Paraguay
to compare instruments in English
DIRECTIONS FOR THE TEACHER:
To understand the value of musical instruments, the pupils can estimate the
prices of different instruments
It is possible to find out more information about Paraguay. At least, in the
beginning of the lesson, the pupils can guess where it is situated on the map.
STRUCTURE OF THE LESSON
Warm up: Listen and guess!
The objectives are to listen to different instruments and guess what
they are.
The pupils are divided into small groups. The teacher plays sounds of different musical
instruments and the pupils try to guess what they are. They may answer in Finnish, but
they get an extra point if they know the answer in English as well. If wanted, the
teacher may give a small price to the winning team. There is an answer sheet in the
appendices. (10min)
DSO Kids – Listen by instrument
http://www.dsokids.com/listen/by-instrument/.aspx (24.11.2013)

41
Context and background: Making instruments from trash
The objectives are to get to know the Landfillharmonic orchestra from
Paraguay and understand the possibilities of making instruments out
of trash.
The teacher shows a video about the Landfillharmonic orchestra in Paraguay. The
teacher may choose whether to use a video with English subtitles or with an English
narrator. After watching the video, the teacher should ask the pupils what the main idea
in the video was and if there was a lot of information they did not understand. The
teacher should emphasise that if they were not able to understand everything, they
were still able to understand the main idea. In other words, it is not always necessary to
know every word, in order to understand or be understood.
Newsfeed Time – with English subtitles
http://newsfeed.time.com/2012/12/11/watch-the-recycled-orchestra-slum-children-
create-music-out-of-garbage/(22.11.2013)
NTD TV – with an English narrator
http://www.youtube.com/watch?v=yiYFcuIkBjU(22.11.2013)
After watching the video about the orchestra in Paraguay, the pupils explore two
different websites about making instruments from trash and household items. This can
be done with the whole class together or if possible, the pupils can use computers by
themselves or with a partner. In addition, the teacher can ask the pupils to find
instructions for making a drum and a simple flute. (20min)
New York Philharmonic Kidzone
http://www.nyphilkids.org/lab/main.phtml (22.11.2013)
Bash the Trash
http://www.bashthetrash.com/(22.11.2013)
Thinking activity: Comparing the instruments
The objective is to compare some of the instruments in English with a
partner.
After exploring the websites, the pupils should discuss and compare the instruments
with a partner, according to a hand out given by the teacher.(10min)

42
Instructions: How to make a drum and a simple flute
The objectives are to be able to understand instructions from the
video as well as in written form.
The teacher shows videos containing the instructions for a drum and a simple flute.
The teacher also provides the pupils with the instructions in a written form. The teacher
may point out that the membrane/ drum head is originally made from animal skin.
(10min)
ExpertVillage – How to make a tom tom
http://www.youtube.com/watch?v=sOa_4ON8lxc (24.11.2013)
Arvind Gupta – Paper flute
http://www.youtube.com/watch?v=YdEIV_vCqhk (24.11.2013)
Individual work: Making a drum and a simple flute
The objectives are to work according to the instructions and help each
other.
After the pupils have finished their drum and flute, the teacher should encourage the
pupils to invent their own instruments. (30min)
Tidying up
The objectives are to practise listening skills and responsibility of own
work space.
The pupils tidy up their work space as instructed by the teacher. (5min)
Glossary
The objectives are to grow active vocabulary and give the pupils an
opportunity to affect their own learning.
The pupils add new learned words to the classroom glossary (poster) and adding
words pupils would like to learn (poster). Chosen pupils will write the words to the
posters. (5min)

43
Unit 2 – Lesson 4
Appendix 1: Warm up – Listen and guess instruments
DSO Kids – Listen by instrument
http://www.dsokids.com/listen/by-instrument/.aspx (24.11.2013)
Listen to the different instruments and guess what they are in
Finnish and in English!
1.
2.
3.
4.
5.
6.
7.

44
Unit 2 – Lesson 4
Appendix 2: Thinking activity – Comparing the instruments
Compare the instruments!
Examples:
I think a guitar is bigger than a flute
I think a piano is more expensive than a flute
I think the piano is the biggest instrument
I think the piano is the most beautiful instrument
Adjectives
big
small
loud
beautiful
interesting
expensive
popular
Guitar Trumpet Flute
Drum Violin Piano

45
Unit 2 – Lesson 4
Appendix 3: Instructions–How to make a drum and a simple flute
Making a drum
1. Cut the balloon as in the picture and remove the valve
2. Stretch the balloon to fit the top of the cardboard container
3. Fit the drum head tightly with a rubber band
4. You may decorate the drum and play it with a pencil
Vocabulary
to cut to remove a valve to stretch a cylinder cardboard a container to fit a drum head tightly
leikata poistaa venttiili venyttää lieriö pahvi astia sovittaa, asettaa rumpukalvo tiukasti
Materials:
A cylinder shaped cardboard
container
Balloons
A rubber band
Scissors

46
Making a flute
1. Cut the A4 size paper into half
2. Draw a small flap to the paper and cut
3. Roll the paper tightly using a pencil
4. Remove the pencil and glue the sides together
5. When you suckair on the flute, the flap vibrates and creates sound!
Vocabulary
a flute
a flap
to roll
to blow
to vibrate
to suck
huilu
läppä
rullata
puhaltaa
värähdellä
imeä
Materials:
Paper
A pencil
Scissors
Glue

47
UNIT 2
LESSON 5– NATIVE AMERICANS: CATCHING DREAMS WITH THE HELP OF NATURE(90MIN)
IN THIS LESSON PUPILS WILL LEARN:
to learn how to make a dream catcher
information about Native Americans and the appreciation of nature
to learn English words that originate from Native Americans, and describe their
drawings to the others by using nature vocabulary
to assess own learning
DIRECTIONS FOR THE TEACHER:
To enhance the atmosphere, it is possible to play Native American music while
working
If wanted more information about Native Americans, there are a lot of
information and ideas in the “Idea Book for Creating Lessons and Units about
American Indians” (Idea Book, 2002)
STRUCTURE OF THE LESSON
Warm up: Find the words of Native American origin
The objectives are to get to know English words that are American
Indian in origin and give the pupils time for pondering.
The teacher gives a worksheet to the pupils. The pupils should work in small groups.
The teacher explains that the idea is to guess which words of American Indian in origin
are hidden in the anagrams. When checking the correct answers, the teacher should
point out that there are many American Indian words especially for animals. Moreover,
it is possible to ask the pupils why they think these words originate from the Native
Americans. The words can be found on the website below. (5min)
Idea Book for Creating Lessons and Units about American Indians, (2002, 11)
http://opi.mt.gov/pdf/IndianEd/Resources/IdeaBook.pdf (27.11.2013)

48
Context and background: The Native American dream catcher
The objectives are to get to know the story behind the dream catcher
and understand the Native Americans’ appreciation towards nature.
The teacher shows a PowerPoint presentation about the topic, including a description
about the Native Americans and an animated video about the story of the dream
catcher. The teacher can ask the pupils to interpret the description in the beginning and
then clarify the meaning, and emphasise that one can be very creative with the
elements from nature. After watching the animated story, the teacher asks the pupils to
explain the main points. There is more information about the history of the dream
catcher, as well as about the Native Americans on the websites below. (15min)
Raquel Martinez – Dream catcher animatic
http://www.youtube.com/watch?v=iDAdhYyr70c (26.11.2013)
Dream-Catchers.org
http://www.dream-catchers.org/ (26.11.2013)
Idea Book for Creating Lessons and Units about American Indians, (2002, 11)
http://opi.mt.gov/pdf/IndianEd/Resources/IdeaBook.pdf (27.11.2013)
Instructions: How to make a dream catcher
The objectives are to be able to follow the instructions from the video,
as well as from the written hand out.
The teacher continues the PowerPoint presentation with showing a video of how to
make a dream catcher. After watching the video, the teacher gives the instructions in
written form as well. It should be pointed out, that originally the dream catchers were
made using a hoop of willow, leather, string, beads and feathers, in other words,
materials from nature. (10min)
Oritami – How to make a Dream Catcher
http://www.youtube.com/watch?v=XSmjHVh-xLM (26.11.2013)

49
Individual work: Making the dream catcher
The objectives are to follow the instructions and use English freely
while working.
The pupils start working with the dream catcher. They should be reminded about the
giving and asking help policy. It is possible to play Native American music while
working to enhance the atmosphere. (35min)
Thinking activity: My favourite place in nature
The objectives are to draw a favourite place in nature and tell about it
in a group.
The pupils are given a piece of paper to draw their favourite place in nature. After
drawing, the pupils form groups of 3-4 people. In these groups the pupils shall describe
their drawing and their favourite place in nature. The teacher provides a hand out to
help describing.(10min)
Self-assessment
The objective is to assess one’s own work after the unit.
The teacher provides the pupils with a self-assessment hand out. After filling it out the
pupils discuss about it with their partner and finally hand it out to the teacher. (5min)
Tidying up
The objectives are to practise listening skills and responsibility of own
work space.
The pupils tidy up their work space as instructed by the teacher. (5min)
Glossary
The objectives are to grow active vocabulary and give the pupils an
opportunity to affect their own learning.
The pupils add new learned words to the classroom glossary (poster) and adding
words pupils would like to learn (poster). Chosen pupils will write the words to the
posters. (5min)

50
Unit 2 – Lesson 5 Appendix 1: Warm up – Find the words of Native American origin
What words of American Indian origin are hidden here?
car hurien
mock ham
que rabbe
yakka
soome
piti
knusk
cocoran
Use pictures as a help!
Correct answers: hurricane, hammock, barbeque, kayak, moose, tipi, skunk, raccoon

51
Unit 2 – Lesson 5
Appendix 2: Context and background & Instructions– Native American dream
catcher

52

53

54
Unit 2 – Lesson 5
Appendix 3: Thinking activity – My favourite place in nature
Tell about your drawing!
Examples:
I drew the sea and our summer cottage
I drew the beach here, because I really enjoy sun bathing
My favourite place is by the lake
Nature vocabulary
grass
trees
forest
mountain
park
flowers
lake
waterfall
river
ocean
water
sea
sand
beach
animals
sky
snow
sun

55
Unit 2 – Lesson 5
Appendix 4: Self- assessment
SELF-ASSESSMENT
I followed the instructions
I learned new things about the
topic
I learned new vocabulary
I used English language
I understood everything
I tried my best

56
U N I T 3
P R I N T I N G A N D C O L O U R D Y E I N G : I N S P I R A T I O N F R O M A R O U N D T H E
W O R L D
IN CLU D ING:
LESSON 6 – Design your own print: the world is your oyster!
LESSON 7 – Tie dyeing: a breeze from America in the 60’s
LESSON 8 – Dyeing with natural and artificial colours
IN THIS UNIT PUPILS WILL LEARN:
to design an own print using other cultures as inspiration
information about different tie dyeing techniques from America
to understand the difference between natural and artificial colours
vocabulary and phrases concerning shapes, encouragement and colours
to assess own progress
CLIL: OVERALL PLAN FOR THE UNIT
AIMS
To make an own print design using print designs from other cultures as an
inspiration
To gain knowledge about different tie dyeing techniques
To understand dyeing with artificial and natural colours
To learn new vocabulary and to improve reading and understanding work
instructions
To advance the learning of using materials and equipment for crafts
To encourage the pupils to be creative
To assess one’s own work and progress

57
TEACHING OBJECTIVES
What the teacher plans to teach?
Content
How to design a print
Making a stamp for printing
Different tie dyeing techniques
Using artificial and natural
colours
Dyeing with Kool-Aid and dyeing
with plants
Culture
Using print designs around the
world as an inspiration
Dyeing techniques and cultural
aspects from America
Understanding that one can also
learn in a different language
Value of DIY culture (do it
yourself)
Communication
Language of learning
Key vocabulary: shape vocabulary, cheering words, colour vocabulary and e.g.
to print, to dye, artificial colour, natural colour, design, hand block printing, a
stamp, tie dyeing, spiral, hypothesis, Kool Aid, yarn, plants, hypothesis
Language for learning
Asking questions: can you help me? Can I help you? What do you think?
Classifying and organizing: discussing whether a colour is artificial or natural
Describing: prepositions for directions, describing what to draw, telling about a
hypothesis
Understanding: reading and listening instructions and presentations
Expressions: cheering and praising
Wordplay: understanding and explaining colour sayings
Language through learning
Recognizing language used in activities
Learning from the teacher and the other pupils’ use of language
Familiarizing oneself with new words related to the activities
Responding and reacting to questions

58
Cognition
Helping the pupils to comprehend the key concepts and putting them in use in
different contexts
Building, learning and using vocabulary
Encouraging creativity when designing an own print
Understanding the origins of different dyeing colours
Recognizing different print designs around the world
LEARNING OUTCOMES
By the end of the unit learners will be able to:
recognize different print patterns around the world
manufacture their own print
use new vocabulary in a context
express their creativity
use language for asking and giving help
assess their own and peers’ work
CRITERIA FOR ASSESSMENT
Using teacher, peer and self-assessment to assess how well learners:
Produce a self-made print using other cultures as an inspiration
Use different dyeing techniques
Contribute to the classroom glossary
Follow work instructions and listen the teacher
Participate enthusiastically in classroom activities
RESOURCES
Smart board, visual presenter
T-shirts, fabric bags
fabric dyes
small pieces of wood
cardboard/ foam
rubber bands
plain fabric
woollen yarn (natural)
Kool Aid – colours
plants, hammers

59
UNIT 3
CLIL LESSON OUTLINES
LESSON 6 – DESIGN YOUR OWN PRINT: THE WORLD IS YOUR OYSTER! (90MIN)
IN THIS LESSON PUPILS WILL LEARN:
to make their own print design
different print designs around the world
vocabulary for different shapes and prepositions for directions
DIRECTIONS FOR THE TEACHER:
The pupils should be encouraged to use other cultures as an inspiration
Make a model of a stamp before the lesson to demonstrate the finished product
Show the actual procedure of printing
STRUCTURE OF THE LESSON:
Introduction: Outline and aims
The objectives are to introduce the unit to the pupils and give an
overall picture what they are going to make and accomplish.
The teacher goes through the unit outline and the aims of the unit together with the
pupils. The teacher should use the section “In this unit pupils will learn” and describe
the main aims described for the each lesson. One should use a visual presenter/
blackboard to show the outline in written as well. (5min)

60
Warm up: Draw the shape and vocabulary for shapes
The objectives are to get familiar with the vocabulary for different
shapes, and practice listening and giving instructions.
First the pupils are given a hand out to connect the right word and shape. Second, the
teacher goes through the vocabulary for different shapes with the pupils. Third, the
pupils work with a partner so that the other one keeps his/her eyes closed and is ready
to draw a pattern. The other one instructs what kind of pattern he/she needs to draw.
(15min)
Context and background:
What is a pattern? & Print designs around the world
What is a pattern?
The objective is to introduce the pupils with the concept of a pattern.
The teacher introduces the concept of pattern making with the help of a presentation
presented on the website of the Children’s University of Manchester. The use of a
Smart board would be advisable to make it possible for the pupils to participate
actively. The teacher should translate the difficult words for the pupils. (10min)
What is a pattern? – The Children’s University of Manchester
http://www.childrensuniversity.manchester.ac.uk/interactives/art&design/talkingtextiles/
pattern/ (12.11.2013)
And
Print designs around the world
The objectives are to explore the world of fabric printing and the cultural diversity of
many countries.
The teacher shows a PowerPoint presentation about different print designs around the
world, including The United Kingdom, The United States, Australia & New Zealand,
India and Africa. In the presentation there are links to different websites with pictures of
textile designs. There is also a slide with people wearing clothes original to the country

61
and the pupils can discuss shortly with a partner next to them and guess from which
country the people are from (India, Australia, The United States, Mexico and Scotland).
The pupils are given a vocabulary to support learning. The teacher asks questions
about the topic, such as “what is textile printing?”, “what is your favourite picture?”,
“what kind of similarities/differences you can find between the countries?”, “what these
pictures tell about the culture?” and “can you recognise a Finnish person from the
clothes?” (10min)
Instructions: How to make a stamp
The objectives are to follow instructions and make your own stamp for
printing.
The teacher goes through the specific work instructions for making the stamp with the
help of a PowerPoint presentation. Vocabulary is given to the pupils to help
understanding. The teacher also provides an instruction sheet (from the presentation)
for everyone. (10min)
Planning: Planning the stamp
The objectives are to use designs from other cultures as an
inspiration and plan your own print.
The pupils start planning their stamp. They may use the pictures seen from the
websites as their inspiration, or if possible, use computers by themselves to search
sources for ideas from the websites provided by the teacher. The pupils may also work
with a partner to increase communication. The teacher should remind the pupils that
the print should be simple enough for manufacturing. (10min)
Individual work: Making and using the stamp
The objectives are to put theory into practice and give the pupils
freedom to use English in any way they want.
The pupils start making their planned print and if time, printing it to the T-shirt. The
teacher reminds the pupils about the asking and giving help policy (explained in earlier
lessons). (20min)

62
Tidying up
The objectives are to practise listening skills and responsibility of own
work space.
The pupils tidy up their work space as instructed by the teacher. (5min)
Glossary
The objectives are to grow active vocabulary and give the pupils an
opportunity to affect their own learning.
The pupils add new learned words to the classroom glossary (poster) and adding
words pupils would like to learn (poster). Chosen pupils will write the words to the
posters. (5min)

63
Unit 3 – Lesson 6
Appendix 1: Warm up – Draw the shape and vocabulary for shapes
Draw the shape!
First go through the vocabulary for different shapes. Then work with a partner.
The other one keeps his/her eyes closed (or open) and is ready to draw. The
other one instructs in English what kind of a pattern he/she needs to draw.
Teacher provides the images for patterns or you can draw your own image.
Käy ensin läpi sanasto erilaisille muodoille. Sitten työskentele parin kanssa. Toinen pitää silmät
kiinni (tai auki) ja on valmistautunut piirtämään. Toinen ohjeistaa englanniksi millainen kuvio
toisen tulisi piirtää. Opettajalta saat kuvat tai voit piirtää kuvan myös itse.
Examples:
o First draw a circle/ triangle/ diamond/ rectangle/ star/ square/
curve/ oval
o Then draw a......between/ above/ inside/ outside/ beside/ under/ in
front of/ behind

64
Vocabulary for shapes
Connect the right word and shape
Circle
Oval
Triangle
Square
Star
Diamond
Curve
Moon shape
Rectangle
Heart shape
Line
Extra activity: Guide your partner to colour the shapes
Example:
o Colour the diamond blue/yellow/red…

65
Unit 3 – Lesson 6
Appendix 2: Context and background– Print designs around the world&
Instructions – How to make a stamp (PowerPoint)

66

67

68

69
UNIT 3
LESSON 7 – TIE DYEING: A BREEZE FROM AMERICA IN THE 60’S (90MIN)
IN THIS LESSON PUPILS WILL LEARN:
to tie dye a T-shirt with different techniques and hypothesise the results
to follow instructions from a video in English
to cheer their peers in English
DIRECTIONS FOR THE TEACHER:
Set the right atmosphere for this lesson by playing American music from the
60’s while working.
The T-shirt used for the tie dyeing can also be an old one from the pupil
Remember to protect the surfaces with garbage bags/ newspapers
It is possible to watch more DIY tie dyeing videos from the internet during the
lesson
STRUCTURE OF THE LESSON:
Warm up: Rubber band competition
The objectives are to have a fun start to the lesson and practice
cheering phrases.
The teacher divides the class into two/three/four groups depending on the size of the
classroom and the amount of pupils. Each group has about 20 rubber bands. The
teacher forms a circle on the floor (e.g. with a yarn) for each group. The groups then
compete with the other groups, by sling shooting the rubber bands inside their circle.
The winning group is the one with the most rubber bands inside the circle. While
competing, the pupils should cheer their group mates in English. The teacher goes
through the phrases for that together with the pupils before starting the competition. It
is also possible to play some background music from the 60’s to enhance the
atmosphere.

70
The pupils have to work with rubber bands during the lesson, so to prevent excess
playing with them, the pupils have now a permit to play with them. After this warm up, it
is not allowed to shoot the rubber bands in the classroom anymore.(10min)
UsingEnglish.com - Vocabulary for praising:
http://www.usingenglish.com/files/pdf/classroom-language-phraselist-for-praising-
consoling-and-encouraging.pdf (14.11.2013)
Context and background: The art of tie dyeing
The objectives are to explore the different methods of tie dyeing and
practise listening to and following instructions in English.
The teacher shows a video from YouTube about tie dyeing. Prior to the video, the
teacher provides the pupils with a vocabulary to support understanding the video. The
teacher may stop the video at some points to ensure apprehension. Some of the steps
seen on the video are different than the instructions given to the pupils later on (e.g. the
colour mixing process and the stomping)
VacationOwnership: How to make a tie-dye T-shirt
http://www.youtube.com/watch?v=tb95RW7XoGc (13.11.2013)
After watching the video, the teacher can ask the pupils if they have any questions
about it. The teacher should also explain the pupils that tie dyeing is an old technique,
used for example in India, Africa and China. It became popular in the United States in
the 60’s as part of the hippie movement. More information at History Librarypoint:
http://history.librarypoint.org/dying_for_tie_dye (13.11.2013) Lastly the teacher should
point out that there are a lot of different techniques available on the Internet and the
pupils will receive instructions to some of them. (10min)
Instructions: How to tie dye
The objective is to give the pupils written instructions about different
tie dyeing techniques for a T-shirt.
The teacher provides the pupils with the written instructions for tie dyeing and goes
through them together with the pupils. The teacher should encourage the pupils to be
creative and discuss their dyeing plans with one another. (10min)

71
Extra instruction for the centre spiral.
http://www.youtube.com/watch?v=PbjWkiQ5DtI(13.11.2013)
Individual work: Continuing printing and starting with the tie dyeing
The objectives are to finish printing the fabric bag and start working
with the tie dyeing of a T-shirt by following the written instructions.
The pupils not finished with the printing start with that. The tie dying should be done
with a partner to increase cooperative working and communication. To speed the
process, it is advisable that before the lesson the teacher has already mixed the
different dyes and placed them within the squeeze bottles. At this point, the teacher
may enhance the atmosphere by playing American music from the 60’s while the pupils
work.(40min)
Thinking activity: Making a hypothesis
The objectives are to hypothesise the end result of the tie dyeing of a
T-shirt by drawing and describing it to a partner.
After finishing their tie dyeing, the pupils are given a hand out to predict the end result
of dyeing their T-shirts. After drawing the pupils describe their hypothesis to their
partner. The teacher should explain the meaning of hypothesis and advise the pupils to
use the vocabulary from the written instructions as a help. (10min)
Tidying up
The objectives are to practise listening skills and responsibility of own
work space.
The pupils tidy up their work space as instructed by the teacher. (5min)
Glossary
The objectives are to grow active vocabulary and give the pupils an
opportunity to affect their own learning.
The pupils add new learned words to the classroom glossary (poster) and adding
words pupils would like to learn (poster). Chosen pupils will write the words to the
posters. (5min)

72
Unit 3 – Lesson 7
Appendix 1: Warm up – Rubber band competition
Cheer your friend!
Excellent!
Fantastic!
Nice work!
Perfect!
Well
done!
Hooray!
Bravo!
Wow! That was
terrific!
You did it!

73
Unit 3 – Lesson 7
Appendix 2: Context and background – The art of tie dyeing
VacationOwnership: How to make a tie-dye T-shirt
http://www.youtube.com/watch?v=tb95RW7XoGc (13.11.2013)
Vocabulary
tie-dye
messy
an apron
a pair of gloves
to prepare
a bucket
soda ash
vibrant
plain colour
to soak
to wring out
flat
side spiral
to twist
a fold
even
an elastic/ rubber band
equal
a powder
a section
to flip over
to unveil
solmuvärjäys
sotkuinen
essu
käsinepari
valmistautua
sanko
sooda
kirkas, eloisa
tavallisen värinen (valkoinen)
liottaa
vääntää/ puristaa kuivaksi
tasainen, tasaisesti
sivuspiraali/kierre
kiertää
taitos, laskos
tasainen
kuminauha
yhtäsuuri
jauhe
osio, lohko
kääntää ympäri, kumota
paljastaa

74
Unit 3 – Lesson 7
Appendix 3: Instructions – How to tie dye
How to tie dye: different techniques
1. Mix the textile colours according to their package instructions
2. Put the colour mix to a squeeze bottle
3. Soak the T-shirt in water before dyeing
4. After dyeing you design, put the tied T-shirt into a plastic bag
for the night
5. Next day open the package and rinse/ wash with water
6. Finally iron the dried T-shirt to attach the colour
Materials: White T-shirt (100% cotton)
Textile colours Fixative and salt
An apron Rubber gloves
A bucket Rubber bands A plastic bag

75
SPIRALS
Lay the T-shirt on a flat surface. Grab the shirt with
your fingers – this will be the centre of the design.
Start twisting the shirt. Try to keep the folds even.
Twist until the shirt looks like a pie.
Put the rubber bands carefully around the “pie”.
Use at least three rubber bands. You should now have at
least six sections for dyeing. Remember to flip over the
“pie” to dye from the other side as well.
Colour designs
Side spiral, same colours on the
opposite sides the sun burst
Centre spiral with one colour Centre spiral with three colours
Centre spiral with colour rings
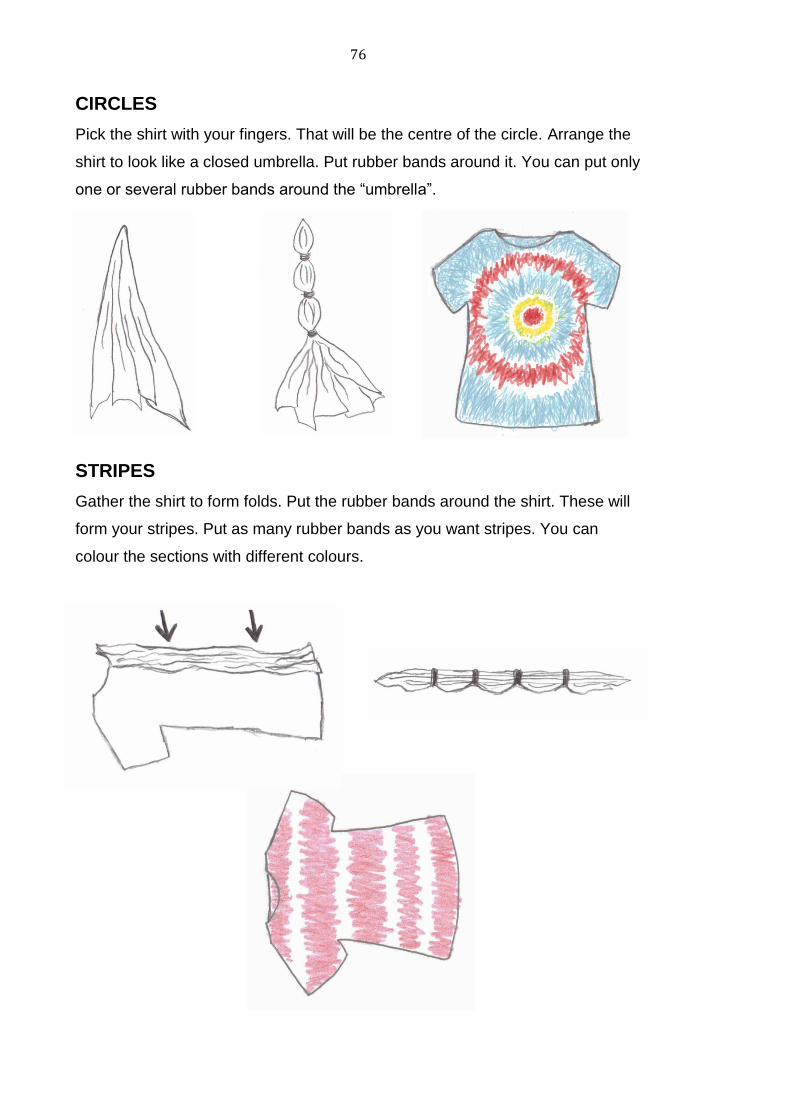
76
CIRCLES
Pick the shirt with your fingers. That will be the centre of the circle. Arrange the
shirt to look like a closed umbrella. Put rubber bands around it. You can put only
one or several rubber bands around the “umbrella”.
STRIPES
Gather the shirt to form folds. Put the rubber bands around the shirt. These will
form your stripes. Put as many rubber bands as you want stripes. You can
colour the sections with different colours.

77
Unit 3 – Lesson 7
Appendix 4: Thinking activity – Making a hypothesis
Colour your hypothesis

78
UNIT 3
LESSON 8– DYEING WITH NATURAL AND ARTIFICIAL COLOURS (90MIN)
IN THIS LESSON PUPILS WILL LEARN:
to know the meaning of primary, secondary, tertiary and complementary colours
to understand the difference between artificial and natural colours
to dye yarn with Kool-Aid and fabric with plants
new vocabulary for adjectives and colour sayings in English
to assess own progress
DIRECTIONS FOR THE TEACHER:
The lesson has many different topics to learn, so make sure to tie everything
together to form a clear path
Create a colourful atmosphere to the classroom, for example by decorating it
with balloons, playing background music that has colours in the lyrics or
dressing up yourself with colourful clothes
STRUCTURE OF THE LESSON:
Warm up: Colourful sayings
The objectives are to get to know different sayings involving colours
and ponder what they mean.
The teacher gives the pupils a worksheet about colourful sayings. The pupils should
work within small groups and decode the sayings together, either in English or in
Finnish. After finishing their work, the teacher goes through the right answers. If
wanted, the groups can make small plays/ still images about the sayings for the other
pupils to guess.(10min)
More information about the colour sayings on the website of Squidoo:
http://gloriousconfusion.squidoo.com/colours-proverbs-and-sayings (18.11.2013)

79
Context and background: The colour wheel
The objectives are to go through the colour wheel and understand
what primary, secondary and tertiary colours mean.
The teacher goes through together with the pupils the colour wheel presentation from
the website of The Children’s University of Manchester. The presentation includes the
primary, secondary and tertiary colours, as well as the meaning of complementary
colours, the colour symbolism of feelings and a small quiz about the topic. If possible,
the use of a Smart board is advisable. A vocabulary list is provided to help
understanding. (10min)
The Children’s University of Manchester – The colour wheel
http://www.childrensuniversity.manchester.ac.uk/interactives/art&design/talkingtextiles/
colourwheel/ (18.11.2013)
Thinking activity: Is it artificial or natural?
The objectives are to speculate if a colour presented is artificial or
natural and discuss about it with a partner.
Before the lesson, the teacher sets up a selection of artificial and natural colours retted
in glasses of water. Before the activity, the teacher should explain the difference
between an artificial and a natural colour. There is more information on the website of
Kolorjet Chemicals: http://www.dyes-pigments.com/synthetic-dyes.html (18.11.2013)
After displaying the glasses of coloured water, the pupils try to determine whether the
different colours were made by using artificial or natural colours. The pupils should
discuss with a partner or a small group, and fill out the hand out given by the teacher.
After making their guesses, the teacher gathers the information from each of the
groups and then reveals one by one the correct answers. The artificial colours could be
made from food colouring and Kool-Aid colours. The natural colours could be made
from tea, berries, fruits and plants. (10min)
Instructions: How to dye with Kool-Aid and plants
The objectives are to try simple dyeing techniques with both artificial
and natural colours.
http://www.childrensuniversity.manchester.ac.uk/interactives/art&design/talkingtextiles/colourwheel/

80
The teacher shows a PowerPoint presentation about dyeing with Kool-Aid and dyeing
with plants. At the same time the teacher can demonstrate the process in real life or
show the process from the Internet:
After presenting, the teacher provides the pupils with a printed version of the
presentation. The class should be divided into two groups, so that the other half would
work with the Kool-Aid dyeing and the other half with the plant dyeing and then switch
to the other after finishing the first. (10min)
Individual work: Kool-Aid dyeing and plant dyeing
The objectives are to dye yarn with Kool-Aid and to dye fabric with
leafs and flowers, as well as understand instructions in English.
The pupils start working with dyeing with Kool-Aid and plants. The pupils should be
encouraged to help each other and use English while working. (35min)
Tidying up
The objectives are to practise listening skills and responsibility of own
work space.
The pupils tidy up their work space as instructed by the teacher. (5min)
Glossary
The objectives are to grow active vocabulary and give the pupils an
opportunity to affect their own learning.
The pupils add new learned words to the classroom glossary (poster) and adding
words pupils would like to learn (poster). Chosen pupils will write the words to the
posters. (5min)
Self-assessment
The objective is to assess one’s own work after the unit.
The teacher provides the pupils with a self-assessment hand out. After filling it out the
pupils discuss about it with their partner and finally hand it out to the teacher. (5min)

81
Unit 3 – Lesson 8
Appendix 1: Warm up – Colourful sayings
Explain the colour related sayings
I feel blue
He is green with envy
I see red!
He is yellow
I’m purple with rage!
He is the black sheep
I once told a white lie
It is in the grey area

82
Unit 3 – Lesson 8
Appendix 2: Context and background –The colour wheel
The Children’s University of Manchester – The colour wheel
http://www.childrensuniversity.manchester.ac.uk/interactives/art&design/talkingt
extiles/colourwheel/ (18.11.2013)
Vocabulary
to symbolize
jealousy
primary colour
secondary colour
tertiary colour
mood
an attitude
complementary colour
to seem
vibrant
symboloida, merkitä
kateus, mustasukkaisuus
pääväri
väliväri
toisen asteen väri
mieliala
asenne
vastaväri
näyttääjoltakin
kirkas

83
Unit 3 – Lesson 8
Appendix 3: Thinking activity –Is it artificial or natural?
Is it artificial or natural?
Artificial
Natural
1.
2.
3.
4.
5.
6.
Vocabulary
artificial, synthetic
natural
keinotekoinen
luonnollinen

84
Unit 3 – Lesson 8
Appendix 4: Instructions: Kool-Aid dyeing and dyeing with plants (PowerPoint)
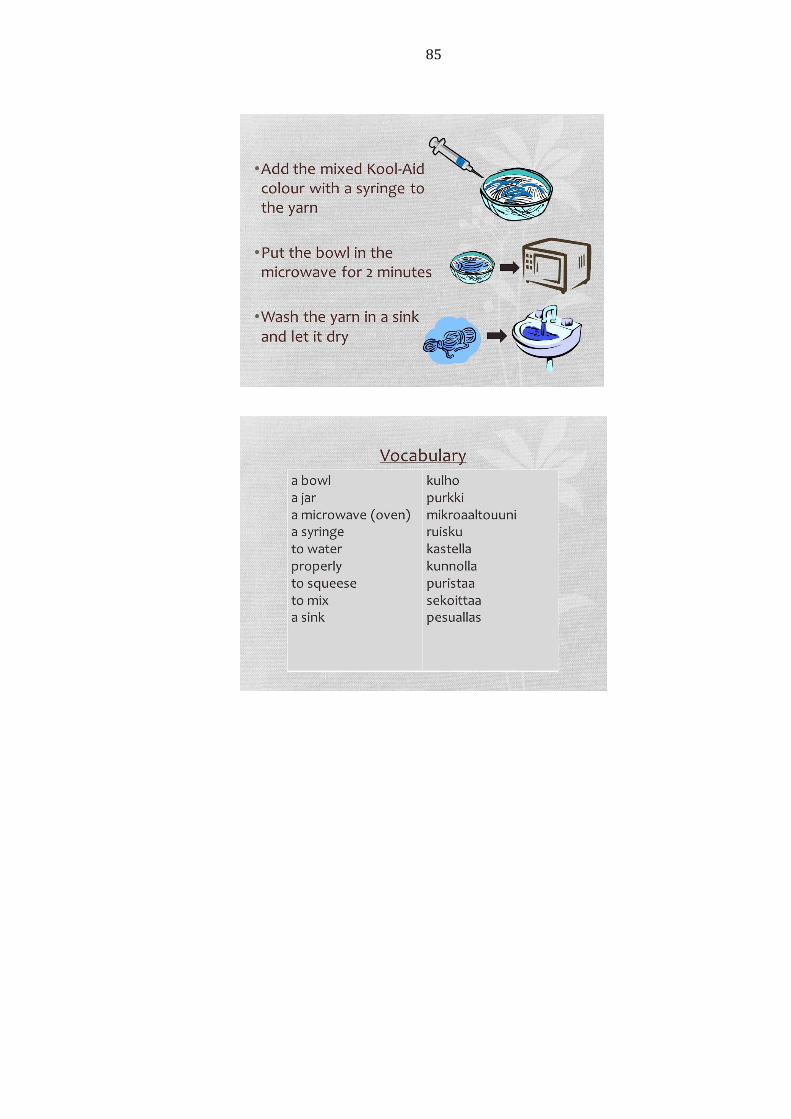
85

86

87

88
Unit 3 – Lesson 8
Appendix 5: Self- assessment
SELF-ASSESSMENT
I followed the instructions
I learned new things about the
topic
I learned new vocabulary
I used English language
I understood everything
I tried my best

89
U N I T 4
S E W I N G W I T H R E C Y C L E D M A T E R I A L & K N O W L E D G E A B O U T
H A T S A R O U N D T H E W O R L D
IN CLU D ING :
LESSON 9 – The art of beanie-making & hats around the world
LESSON 10 – Sewing the beanie using recycled materials
LESSON 11 – Styling your beanie
IN THIS UNIT PUPILS WILL LEARN:
to sew a beanie hat from an old sweater and decorate it in a personal way
information about different hats around the world
information about recycling clothes
to assess their work with the help of KWL chart
CLIL: OVERALL PLAN FOR THE UNIT
AIMS
To improve sewing skills (straight stitch and zig zag)
To learn new vocabulary and to improve reading and understanding work
instructions
To advance the learning of using materials and equipment for crafts
To learn about hats and their purposes around the world
To gain practical knowledge about recycling old clothes
To encourage the pupils to be creative and to express their individual styles
To become aware of one’s own progress

90
TEACHING OBJECTIVES
What the teacher plans to teach?
Content
Introduction of the topic
How to make a beanie hat
Sewing skills and using patterns
Recycling old clothes
Decorating creatively
Culture
Hats around the world and their
purposes
Fashion for youngsters
Understanding that one can also
learn in a different language
Value of DIY culture (do it
yourself)
Communication
Language of learning
Key vocabulary: hat vocabulary, sewing vocabulary and words connected to
recycling
Language for learning
Asking questions: Can I help you? Can you help me? What do you know
about…? Is my hat brimmed?
Classifying and organising: Rearranging a jumbled work instruction -This work
step belongs to here; First I’m going to lay the sweater on the table
Understanding: Reading and listening instructions and presentations
Expressing opinion: How would you recycle? Agreeing and disagreeing
Presenting: Presenting a finished product
Other: Giving oral feedback to others
Language through learning
Recognising language used in activities
Learning from the teacher and the other pupils’ use of language
Familiarising oneself with new words related to the activities
Responding and reacting to questions
Cognition
Helping the pupils to comprehend the key concepts and putting them in use in
different contexts
Building, learning and using vocabulary

91
Identifying the stages of work when sewing a beanie
Encouraging creativity when decorating and using the language
Understanding the origin and purpose of different hats and connecting them
using visual aids
LEARNING OUTCOMES
By the end of the unit learners will be able to:
make a beanie hat using a straight stitch and a zig-zag stitch
understand and read work instructions
recognize the different work steps and organizing them
use language needed for the process of making a hat
use new vocabulary in a context
understand and learn new recycling methods
express their creativity
use language for asking and giving help
recognize different hats and their purposes
demonstrate the outcome and the process of making a hat to the rest of the
class
Assess their own and peers’ work
CRITERIA FOR ASSESSMENT
Using teacher, peer and self-assessment to assess how well learners:
Construct and use a KWL chart
Contribute to the classroom glossary
Follow work instructions and cutting plan
Produce a usable beanie hat of high quality
Participate enthusiastically in classroom activities
Recognize and classify different hats and their purposes
RESOURCES
Computer, visual presenter, whiteboard
Worksheets
Old sweaters
Sewing machines, yarn, needles, pins, scissors
Decorating items

92
UNIT 4
CLILLESSON OUTLINES
LESSON 9 – THE ART OF BEANIE-MAKING & HATS AROUND THE WORLD (90MIN)
IN THIS LESSON PUPILS WILL LEARN:
to interpret instructions how to sew a beanie hat from an old sweater
information about different hats around the world
to express opinion
DIRECTIONS FOR THE TEACHER:
The focuses of the lesson are to be able to understand work instructions and to
express opinion.
The purpose of the PowerPoint- presentation Hats around the world is to tie
simple hat vocabulary to a bigger cultural background.
STRUCTURE OF THE LESSON:
Warm up: What kind of a hat do I have?
The objectives are to give a fun start to the unit, as well as to practice
asking, words for different hats and adjectives.
The pupils get a picture of a hat that is put on their forehead and they have to circle
around asking questions about it and trying to guess what kind of a hat it is. Before this
the pupils and the teacher go through together the vocabulary for the different hats and
the questions. There is a worksheet in the appendices. The teacher may give the
instructions to the pupils in written as well to enhance reading comprehension. (10min)

93
Introduction: Outline and aims
The objectives are to introduce the unit to the pupils and give an
overall picture what they are going to make and accomplish.
Go through the unit outline and the aims of the unit together. Use the section “In this
unit pupils will learn” and describe the main aims described for the each lesson. You
should use a visual presenter/ blackboard to show the outline in written as well. (5min)
Context and background: Hats around the world
The objectives are to introduce the pupils to the world of hats and
their cultural background, as well as learn new vocabulary.
The teacher shows the pupils a Power Point presentation about different hat styles
around the world. The pupils are given a vocabulary list to support learning. The
teacher can ask questions about the topic, such as why people do wear hats, what is
your favourite hat, do you own a brimmed hat, when do you use a beanie? The teacher
should use English as much as possible, but make sure that the pupils understand the
content of the presentation. (15min)
Thinking activity: They are all mixed up!
The objectives are to familiarise the pupils with reading the work
instructions and encourage communication and problem solving with a
partner.
The pupils are given a mixed up work instruction of making a beanie and the task is to
rearrange the jumbled work instruction with a partner as fast as possible. The winners
could be rewarded with a little prize. (10min)
Instructions: How to sew a beanie
The objective is to support understanding of the work process.
The teacher goes through the specific work instructions for the beanie as well as new
vocabulary. The teacher also provides an instruction sheet for everyone. (10min)

94
Planning: My working steps
The objectives are to give the pupils a positive experience from
reading and understanding the sewing instructions in English and give
an opportunity to describe working in English.
The pupils explain to a partner what their working steps are going to be. The teacher
provides the pupils with a sheet of instructions. (5min)
Individual work: Making the beanie
The objectives are to put theory into practice and give the pupils
freedom to use English in any way they want.
The pupils start making their beanie hat. The teacher reminds the pupils about the
asking and giving help policy (explained in earlier lessons). (20min)
Tidying up
The objectives are to practise listening skills and responsibility of own
work space.
The pupils tidy up their work space as instructed by the teacher. (5min)
Glossary
The objectives are to grow active vocabulary and give the pupils an
opportunity to affect their own learning.
The pupils add new learned words to the classroom glossary (poster) and adding
words pupils would like to learn (poster). Chosen pupils will write the words to the
posters. (5min)

95
Unit 4 – Lesson 9
Appendix 1: Warm up – What kind of a hat do I have?
What kind of a hat do I have?
You get a picture of a hat that you will put on your forehead. Walk around the
classroom and ask questions about your hat. Ask only one question from one
person. Try and guess what kind of a hat you have!
Saat kuvan hatusta, jonka laitat otsallesi. Kiertele luokassa ja kysy muilta kysymyksiä
selvittääksesi millainen hattu sinulla on.
Questions:
o Is my hat
Answers:
o No, it isn’t
o Yes, it is
Extra activity: Try to think different adjectives describing hats;
you can think them in Finnish as well.
Keksi erilaisia adjektiiveja kuvailemaan hattuja; voit miettiä niitä myös
suomeksi.
big?
yellow?
sporty?
brimmed?
brimless?
warm?
funny?
tall?
wide?
a cowboy hat?

96
Unit 4 – Lesson 9
Appendix 2: Warm up – Types of hats
Types of hats
a cowboy hat a top hat a baseball cap
a beanie a sombrero a party hat
a newsboy cap a trilby hat a sun hat

97
Unit 4 – Lesson 9
Appendix 3: Thinking activity – They are all mixed up!
They are all mixed up!
Rearrange the jumbled work instruction. Work with a partner.
Järjestele sekaisin oleva työohje. Työskentele parin kanssa
Examples:
o I think the first step is…
o The first/second/third/fourth/fifth/sixth step is…
o What do you think?

98
They are all mixed up!
Cut off the different steps and mix them up. Then let the pupils to try and
rearrange the steps with a partner.
Lay the sweater on the table. Cut the sweater in
half right under the armpits.
Cut down the seam of one side, in other words cut the sweater
in half. Now you have one big piece.
Measure the circumference of your head. Use the
measurement around your head and add 3 cm of seam
allowance (1.5 cm on both sides). This is how long the material
needs to be.
Draw a line across the material using fabric chalk
and cut off the excess material.
Head measurement +
3 cm seam allowance
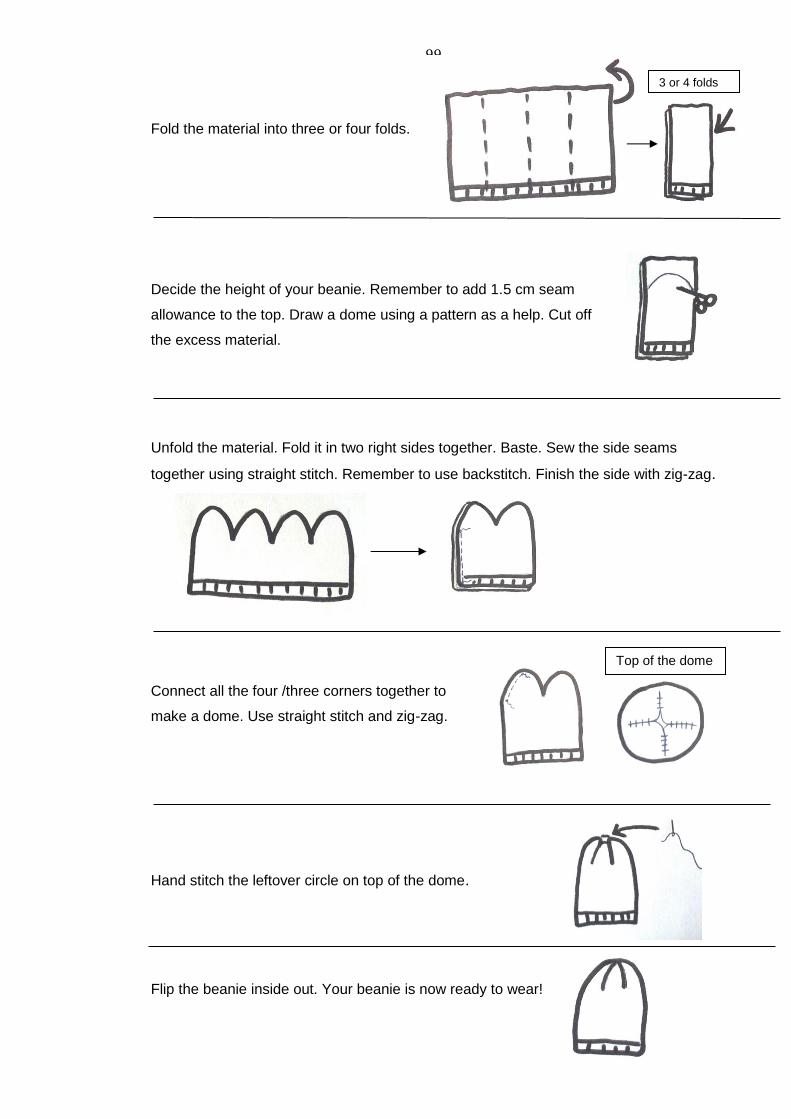
99
Fold the material into three or four folds.
Decide the height of your beanie. Remember to add 1.5 cm seam
allowance to the top. Draw a dome using a pattern as a help. Cut off
the excess material.
Unfold the material. Fold it in two right sides together. Baste. Sew the side seams
together using straight stitch. Remember to use backstitch. Finish the side with zig-zag.
Connect all the four /three corners together to
make a dome. Use straight stitch and zig-zag.
Hand stitch the leftover circle on top of the dome.
Flip the beanie inside out. Your beanie is now ready to wear!
3 or 4 folds
Top of the dome

100
Unit 4 – lesson 9
Appendix 4: Planning – What is the next step?
What is the next step?
Explain to a partner what your working steps are going to be. Use the work
instruction that the teacher gave you.
Kerro parillesi millainen työskentelyjärjestys sinulla tulee olemaan. Käytä opettajan
antamaa työohjetta.
Examples:
o First/second/then I am going to…
o What are you going to do?

101
Unit 4 – lesson 9
Appendix 5: Instructions – DIY beanie
DIY BEANIE: work instruction
STEP 1
Lay the sweater on the table. Cut the
sweater in half right under the armpits.
STEP 2
Cut down the seam of one side, in other words
cut the sweater in half. Now you have one big
piece.
STEP 3
Measure the circumference of your head. Use the
measurement around your head and add 3 cm of
seam allowance (1.5 cm on both sides). This is
how long the material needs to be.
Materials:
old sweater
scissors
thread
needle
pins
chalk
measuring tape
sewing machine

102
STEP 4
Draw a line across the material using
fabric chalk and cut off the excess
material.
STEP 5
Fold the material into three or four
folds.
STEP 6
Decide the height of your beanie. Remember to add 1.5
cm seam allowance to the top. Draw a dome using a
pattern as a help. Cut off the excess material.
STEP 7
Unfold the material. Fold it in two right sides together. Baste. Sew the side
seams together using straight stitch. Remember to use backstitch. Finish the
side with zig-zag.
Head measurement +
3 cm seam allowance
3 or 4 folds

103
STEP 8
Connect all the four /three corners
together to make a dome. Use straight
stitch and zig-zag.
STEP 9
Hand stitch the leftover circle on top of the dome.
STEP 10
Flip the beanie inside out. Your beanie is now ready to wear!
TIPS
Use the excess material to make another beanie.
Decorate the beanie to fit your style!
More information on Wikihow: http://www.wikihow.com/Make-a-Fleece-
Beanie-Hat (4.12.2013)
Vocabulary
to fold
a dome
the right side (of
fabric)
to baste
a side seam
a straight stitch
a backstitch
taittaa, laskostaa
(pää)laki, kupoli
kankaan oikea puoli
harsia, kiinnittää
yhteen
sivusauma
suora ommel
peruutus ommel
DIY( do it yourself)
a seam
a circumference
to measure
a seam allowance
a fabric chalk
excess
“tee se itse”
sauma
ympärysmitta
mitata
saumanvara
liitu (kangas)
liika, ylimääräinen
Top of the dome

104
Unit 4 – Lesson 9
Appendix 6: Context and background – History of the beanie hat & Hats around
the world vocabulary
Hats around the world (PowerPoint presentation)
Vocabulary
a uniform
to act
a shade
ethnicity
to accessorise
an outfit
univormu
toimia
varjo
etnisyys
täydentää, somistaa
asuaan
yksityiskohdin
asu, asukokonaisuus
a hat form
a brim
a cap
a milliner
a beanie
a special occasion
hattumalli
lieri (hatun)
lakki, lippalakki
hatuntekijä
pipo, myssy
juhlatilaisuus
History of the beanie hat
Beanies probably got their names from the slang term "bean," which meant
head in the early days of the 20th century in the United States. The first
beanies were almost like skullcaps and were used by blue-collar laborers who
needed to keep their hair out of the way but did not want a brim that could
obstruct their vision. Schoolchildren began to wear beanies in the early 1900s
to imitate their working dads. The working beanies evolved into the modern-
day baseball cap, but the children's beanies morphed into a hat that became
hugely popular on U.S. college campuses around 1920. The addition of a
small propeller to the top of the beanie made them a hit with kids. Eventually
as college students and even children became more sophisticated, the beanie
lost its following. However, it made a comeback in the woollen fleece version
in the 1990s as cold-weather sports became popular.
Source:
Where Did the Beanie Hat Originate? |
eHowhttp://www.ehow.com/about_4596900_did-beanie-hat-
originate.html#ixzz2SsiML8oJ (4.12.2013)

105
Unit 4 – Lesson 9
Appendix 7: Context and background – Hats around the world (PowerPoint)
.

106

107

108

109
UNIT 4
LESSON 10 – SEWING THE BEANIE USING RECYCLED MATERIALS (90MIN)
IN THIS LESSON PUPILS WILL LEARN:
information about recycling clothes and textiles
making a beanie hat from an old sweater
filling the KWL (know, wonder, learnt) chart
to express opinion/ present information
DIRECTIONS FOR THE TEACHER:
It is important to encourage the pupils to express their opinion, present
information and ask for help
The pupils should get familiar with the bigger picture of recycling clothes and
that making a beanie is an example of something concrete they can make
themselves
STRUCTURE OF THE LESSON
Warm up: Pantomiming
The objectives are to recall the words used in the previous lesson and
have a fun start to the lesson.
The pupils are divided into groups of 4-5 people. In these groups the pupils are going
to pantomime to each other the words from the previous lesson. Vocabulary lists and
classroom glossary can be used as a help. This activity could be done with the whole
class as well, but smaller groups enhance the use of language and make it less
stressful to speak in a foreign language. The teacher may provide an instruction sheet
to the pupils. (10min)

110
Introduction: KWL chart about recycling
The objectives are to find out together what the pupils already know
about recycling and what they wonder/want to know about it.
The teacher and the pupils fill out the KWL chart together. This can be done on the
blackboard or with the help of a visual presenter. Teacher should ask the pupils what
theyknow about recycling clothes and what they want to know. The pupils may use only
single words that come to their minds as well as Finnish if necessary. (5min)
Context and background: Recycling clothes
The objectives are to think together about different ways of recycling
clothes and tie the making of a beanie to a bigger concept. The
message is that anyone can recycle their old clothes.
The teacher talks about recycling old clothes using PowerPoint- presentation as the
basis. Unfamiliar vocabulary should be translated. The teacher may also compare
differences in recycling in Finland and in the United Kingdom. For example, there are a
lot of charity shops in UK whereas in Finland people usually sell their old clothes
themselves in flea markets. The presentation also contains an infographic and a video
about recycling. More about using them are found in the following thinking
activity.(10min)
Thinking activity: What can I do?
The objectives are to explore the manufacturing process of a T-shirt
and the resources used, and to find out how people can be more
environmentally friendly with their clothes. Moreover, the pupils
practice discussing with a group and presenting information.
The infographic is divided into five sections (leaving the last section about line drying
out). The pupils form five groups and each of the groups has their own section to
examine. After examining the infographic, the group has to present the content of their
section to the rest of the class. The pupils should be encouraged to explain in their own
words, and be creative, for example by drawing or acting. After the presentations, there
should be a short discussion led by the teacher about the opinions raised about the
topic as well as the pupils’ experiences about recycling their clothes. It is also possible
to discuss with a partner about how one would recycle. (20min)

111
UrbanTimes.co – The life of a T-shirt
http://urbantimes.co/2012/11/life-of-a-t-shirt
infographic/?utm_source=ajaxsearch&utm_medium=search&utm_term=the%20life%20
of%20&utm_campaign=search(4.12.2013)
OR/AND
Thinking activity: Recycling ideas
The objectives are to familiarise the pupils with the possibilities of recycling textiles and
give an opportunity to express opinions.
The teacher shows a short commercial about reusing textiles by Globe Hope (a Finnish
textile company that uses recycled materials). The commercial is about making new
items out of old army textiles. The video should be stopped at 0:41, before revealing
the new item made out of a sleeping bag. At this point the teacher should ask the
pupils what they think will be made out of the sleeping bag. The teacher gives a hand
out about the task and the pupils should discuss and express their opinions with a
partner/ in small groups about the outcome. After the discussions, the teacher compiles
the guesses of the pupils to the blackboard and finally reveals the actual outcome.
(10min)
Globe Hope - Recycled Materials - Army textiles
http://www.youtube.com/watch?v=XLp2N2kIxeg
Individual work: Sewing the beanie
The objectives are to put theory into practice and give the pupils
freedom to use English in any way they want.
The pupils continue working with the beanie by following the instruction sheet. The
teacher circles around and helps if necessary. The use of English language should be
encouraged. (45min)

112
Self-assessment: Finishing the KWL chart
The objective is to finish the KWL chart together.
The teacher and the pupils fill out the KWL-chart together by adding what pupils have
learned during the lesson about recycling clothes and give the pupils an opportunity to
gather their thoughts about the lesson as well as see what they have learned. The
pupils may answer in Finnish as well, but the teacher should write in English to the
chart.
Tidying up
The objectives are to practise listening skills and responsibility of own
work space.
The pupils tidy up their work space as instructed by the teacher. (5min)
Glossary
The objectives are to grow active vocabulary and give the pupils an
opportunity to affect their own learning.
The pupils add new learned words to the classroom glossary (poster) and adding
words pupils would like to learn (poster). Chosen pupils will write the words to the
posters. (5min)
Extra activity: Redesign your clothes
The objectives are to be creative and express ideas in English.
The teacher asks the pupils: How could you recycle the clothes you are wearing right
now? The pupils will work with a partner. They shall discuss together what kind of new
clothes or other items could be made out of them. It is also possible to draw the ideas
on a piece of paper.

113
Unit 4 – Lesson 10
Appendix 1: Warm up – Pantomime& Thinking activity – How would you recycle
your clothes
Pantomime!
Pantomime with the words from the previous lesson. Work with a group of 4-5.
Example words:
o a top hat/baseball cap/ beanie/
sombrero
o a work instruction
o a straight stitch
o brimmed/ brimless
How would you recycle your clothes?
Discuss with your partner.
Examples:
I would take some of my clothes to
o a flea market
o a charity shop
o a textile bank
o my relatives or friends
I would make
o new clothes from old ones
o new decorations to my old clothes

114
Unit 4 – Lesson 10
Appendix 2: Thinking activity – Recycling ideas
Recycling ideas
Expressing opinion
I think that…
I believe that…
In my opinion…
I would say that…
Agreeing and disagreeing
I think so too/ I don’t think so
Yes, I agree/ No, I disagree
Example:
A. I think it is going to be a beanie
B. No, I disagree. In my opinion it is going to be a pillow case
a winter jacket a laptop case winter pants
a pillow case a beanie a teapot cover

115
Unit 4 – Lesson 10
Appendix 3 : Self-assessment – KWL chart

116
Appendix 4: Context and background – Recycling clothes (PowerPoint)

117
UNIT 4
LESSON 11 – STYLE YOUR BEANIE (90MIN)
IN THIS LESSON PUPILS WILL LEARN:
how to customise the beanie and your clothing in general
to make plans and search for information
to present their work and give feedback to the other pupils
DIRECTIONS FOR THE TEACHER:
The pupils not finished sewing the beanie may still continue their work
In the beginning of the lesson the teacher should inform the pupils about the
presentations in the end
STRUCTURE OF THE LESSON
Warm up: What is missing?
The objectives are to familiarise the pupils with new vocabulary and
different styling accessories, and to have a fun start to the lesson.
The teacher has different accessories (buttons, laces, ribbons, sequins) in different
colours. The teacher shows all the accessories with the visual presenter and takes one
of them off while the pupils are not watching. The pupils need to determine with a
partner which one is missing. The new vocabulary should be explained before the
activity and the hand out given to the pupils. (10min)
Context and background: How to customise your clothing
The objectives are to offer information about the world of customising
your clothing, and show some of the possibilities one can make.
Finding the information and instructions from the internet is also
important.

118
The teacher talks about personalising your clothes and shows a PowerPoint
presentation about the topic. At the end of the presentation there are links to different
websites presenting different ways to style your clothing. The teacher should point out
that there are a lot of different websites and videos offering information about DIY your
clothing. (10m)
Planning: Customising the beanie
The objectives are to give planning time for the pupils and encourage
them to verbalise their thinking.
The pupils make plans for decorating the beanie. If possible, the pupils should be given
some time to search the internet for some ideas. After making their plans the pupils
should tell a partner about their plans. The teacher provides the pupils with an
instruction sheet. (10min)
Individual work: Finishing the beanie
The objectives are to follow the plans and give the pupils freedom to
use English in any way they want.
The pupils finish making the beanie by decorating it. The teacher should circle around
the classroom and examine the plans of the pupils as well as give feedback about
them. (40min)
Tidying up
The objectives are to practise listening skills and responsibility of own
work space.
The pupils tidy up their work space as instructed by the teacher. (5min)
Glossary
The objectives are to grow active vocabulary and give the pupils an
opportunity to affect their own learning.

119
The pupils add new learned words to the classroom glossary (poster) and adding
words pupils would like to learn (poster). Chosen pupils will write the words to the
posters. (5min)
Presentation: The finished beanie
The objectives are to present the finished product and examine one’s
own and peers’ work.
The pupils put their beanies on and circle around the classroom, while music is being
played in the background. When the teacher stops the music, a pupil starts presenting
her/his beanie to the closest pupil (for a one minute). After presenting to at least three
pupils, the pupils start giving feedback to the other pupils. The process is the same as
with presenting their own work, except now the pupils give feedback to each other.
(10min)

120
Unit 4 – Lesson 11
Appendix 1: Warm up – What is missing?
What is missing?
The teacher shows different accessories with
the visual presenter and takes one of the items
off. Discuss with your partner what is missing.
Opettaja näyttää erilaisia koristeita dokumenttikameralla ja ottaa yhden tavaroista pois.
Keskustele parisi kanssa mikä puuttuu.
Examples:
o I think the…. is missing
o Alright/ I agree
o I disagree/ I don’t think so
Vocabulary
fabric
glitter
a ribbon
a sequin
lace
a button
a fabric marker
kangas
kimalle
nauha
paljetti
pitsi
nappi
kangastussi

121
Unit 4 – Lesson 11
Appendix 2: Context and background – How to customise your clothing
(vocabulary) & Planning – Decorate me!
Vocabulary – How to customise your clothing
to decorate
to customise
to cut off
to adjust
a neckline
to turn pants into shorts
to redye
a pattern
a patch
koristella
”tuunata”
leikata pois
muotoilla, muokata
kaula-aukko
muuttaa housut shortseiksi
uudelleen värjätä
kuvio
paikka
Decorate me!
Make plans for decorating and customising the beanie and tell a partner about
your plans.
Suunnittele miten koristelet piposi ja kerro parille
suunnitelmasi.
Examples:
o I’m going to…
o I will make a flower
o What are you going to do?

122
UNIT 4 – Lesson 11
Appendix 3: Context and background – How to customise your clothing
(PowerPoint)

123

124
U N I T 5
T H E W O R L D O F C R A F T S : T H E E X H I B I T I O N
IN CLU D ING:
LESSON 12 – Preparing the exhibition
LESSON 13 – Looking back at the experience & feedback
IN THIS UNIT PUPILS WILL LEARN:
to build an exhibition
to manage their area of work in groups
to present their work
to give feedback to others and assess themselves
CLIL: OVERALL PLAN FOR THE UNIT
AIMS
To build an exhibition
To work in groups and organise the work
To advance the learning of using materials and equipment for crafts
To learn new vocabulary and to improve reading and understanding work
instructions
To enable expressing oneself creatively in English
To learn searching information from the Internet and dictionaries, and
connecting information
To present finished products
To give feedback and assess own work

125
TEACHING OBJECTIVES
What the teacher plans to teach?
Content
How to build an interesting
exhibition
Building exhibition props
Culture
How to represent different
cultures
Understanding that one can also
learn in a different language
Value of DIY culture (do it
yourself)
Communication
Language of learning
Key vocabulary: exhibition, building, presenting, organising, information, setting
Language for learning
Asking questions: Can I help you? Can you help me? Do you understand?
Presenting: Presenting finished work
Understanding: Reading and listening instructions and presentations
Classifying and organising: Organising own work in groups
Other: Giving feedback to others and assessing own work
Language through learning
Recognising language used in activities
Learning from the teacher and the other pupils’ use of language
Familiarising oneself with new words related to the activities
Responding and reacting to questions
Cognition
Helping the pupils to comprehend the key concepts and putting them in use in
different contexts
Identifying the
Understanding where one can find information
Building, learning and using vocabulary

126
LEARNING OUTCOMES
By the end of the unit learners will be able to:
understand what makes an exhibition interesting
organise their work with the help of a group leader
process different ideas and execute them
be creative and work together in English
present their work in English
give constructive feedback to the others
assess their own work
CRITERIA FOR ASSESSMENT
Using teacher, peer and self-assessment to assess how well learners:
Organise themselves to work
Follow work instructions
Build an exhibition and participate enthusiastically
Present their work
Give feedback to the others
RESOURCES
Computer, visual presenter, black-/ whiteboard
Worksheets
Stickers
Cardboard
Bed sheet fabric
Clothesline and clothespins
Tissue paper
Cotton wool
Paint, watercolours
Coloured lights

127
UNIT 5
CLIL LESSON OUTLINES
LESSON 12 – PREPARING THE EXHIBITION (90MIN)
IN THIS LESSON PUPILS WILL LEARN:
to build an exhibition
to organise their area of work in groups
to work and use English creatively
DIRECTIONS FOR THE TEACHER:
The exhibition may be directed only for the pupils, but preferably the whole
school and even parents would be invited to see the exhibition
It is important to make sure everyone is working together and making progress
STRUCTURE OF THE LESSON:
Introduction: Outline and aims
The objectives are to introduce the unit to the pupils and give an
overall picture what they are going to make and accomplish.
The teacher goes through the unit outline and the aims of the unit together with the
pupils. The teacher should use the section “In this unit pupils will learn” and describe
the main aims described for the each lesson. One should use a visual presenter/
blackboard to show the outline in written as well. (5min)

128
Warm up: Still image
The objective is to have a fun introduction to the topic and tell a story
with an image.
The pupils are going to form a display of still images, in other words frozen images with
their own bodies. The teacher or the pupils may give a setting for the images, such as;
at the supermarket, in the sauna, by the lake etc. First one of the pupils freezes into a
position, then the second pupil, and so on. When about half of the class is in a statue-
like formation, the still image is finished. Then the other half of the class may make
another still image. The idea is to tell a story with the still image and the pupils are the
ones constructing the story. The other half of the class watching the still image may
comment what was happening when the “picture” was taken. (10min)
Context and background: How to build an exhibition?
The objectives are to think how to build an interesting exhibition for
crafts and how the building groups should work.
The previous warm up works as a transition to the topic. The teacher shows a
PowerPoint presentation about building an exhibition. The idea is to wonder together
what makes an exhibition interesting. The teacher may ask the pupils, if they have
visited any exhibitions and what they were like. Then the topics for the groups are
shown and the teacher instructs the pupils how to work as a group. (10min)
Instructions: Building the exhibition
The objectives are to start working within groups and read instructions
in English, as well as be creative.
The teacher divides the pupils into three groups, according to the units. The pupils start
organising themselves by choosing a group leader, whose job is to watch that they will
finish their work. Next, the teacher gives each group their hand outs, with the crafts
they are presenting and the ideas how to present them. Depending on the pupils’ level
of skills and their ability to work together, the teacher may also determine beforehand
what to execute from the ideas and how to divide work between the pupils. Before the
groups start their work, the teacher should point an area for each group where to build
the exhibition. It should also be pointed out, that the groups have time until halfway of
the last lesson. (5min)

129
Thinking activity: Deciding what to make
The objectives are to discuss and decide within the group how to
execute their part of the exhibition.
The pupils have now time for a short discussion about what they are going to execute.
They should be encouraged to use English as much as possible. (5min)
Individual work: Working together
The objectives are to work as a group and be creative.
The teacher should provide the pupils enough different materials to implement their
ideas. Moreover, the teacher should be available for any questions and help the pupils
set up the exhibition. (45min)
Tidying up
The objectives are to practise listening skills and responsibility of own
work space.
The pupils tidy up their work space as instructed by the teacher. (5min)
Glossary
The objectives are to grow active vocabulary and give the pupils an
opportunity to affect their own learning.
The pupils add new learned words to the classroom glossary (poster) and adding
words pupils would like to learn (poster). Chosen pupils will write the words to the
posters. (5min)

130
Unit 5 – Lesson 12
Appendix 1: Context and background – How to build an exhibition?
(PowerPoint)

131
Unit 5 – Lesson 12
Appendix 2: Instructions – Building the exhibition
Building the exhibition
Unit 2: Eco-friendly craft ideas from Africa, Paraguay and Native Americans
Crafts:
a football made out of plastic bags
a drum and a flute made out of household items
a dream catcher
Ideas how to present them:
1. Building a goal for the footballs
2. Making animals from Africa
3. Drawing a big orchestra for the instruments
4. Building a tipi for the dream catchers
5. Or something else!
¨

132
Building the exhibition
Unit 3: Printing and colour dyeing inspiration from around the world
Crafts:
a fabric bag with a self-designed print
a tie dyed T-shirt
a piece of fabric dyed with plants
yarn dyed with Kool Aid
Ideas how to present them:
1. Drawing/ printing images of different patterns across the world
2. Setting up a clothes line with the tie dyed T-shirts
3. Images from the United States in the 60’s
4. Real or made plants and flowers next to the pieces of fabric dyed with
plants
5. A big dyed yarn pile and Kool Aid- juice serving
6. Or something else!

133
Building the exhibition
Unit 1: The world of crafts: The journey begins
+
Unit 4: Sewing with recycled material & knowledge about hats around the world
Crafts:
a sewn beanie hat with decorations
a portfolio about textile fibres
Ideas how to present them:
1. A winter land, with “snow” for the beanie hats
2. Balloon-heads inside the beanie hats
3. Figures of sheep, silkworms, flax plant and cotton plant for the portfolios
4. Or something else!

134
UNIT 5
LESSON 13 – LOOKING BACK AT THE EXPERIENCE & FEEDBACK (90MIN)
IN THIS LESSON PUPILS WILL LEARN:
to finish building the exhibition
to give feedback to the others and assess their own work
to present, view and appreciate own and others’ work
DIRECTIONS FOR THE TEACHER:
The pupils may prepare the presentations in more detail as well
The exhibition on the last lesson is only for the pupils, after that it may be
opened to others
The teacher can make sure each of the pupils get some kind of feedback
STRUCTURE OF THE LESSON
Individual work: Working together
The objectives are to continue working and finish by halfway through
the lesson.
The pupils have time to finish building the exhibition until halfway through the lesson. It
should be reminded that the groups should make written signs for the crafts to explain
what they are and from which materials they are made of, and to whom the individual
crafts belong to. The teacher should help as much as possible, for example provide
colourful lights to set the atmosphere and search a good place for the glossary to be
displayed. After finishing work, the pupils should have a five minute break outside the
classroom/ exhibition space, in order for the whole class to enter the exhibition like it is
something they are seeing for the first time. (45min)

135
Presentation: The exhibition
The objectives are to present the crafts in groups and verbalise the
thought process and work.
The groups present their own area of exhibition to the others in English; what they have
done and how they have done it. The last stop is viewing the glossary and seeing how
many new words the pupils have learned during the course. (15min)
Thinking activity: Viewing the work of others and giving feedback
The objectives are to view all the crafts and give feedback to the
others.
The pupils have now time to stroll around the exhibition space and experience the
setting.
Next the teacher sets up a blank piece of paper next to each exhibition area made by
the three groups. The pupils have now time to go around and write comments about
each setting, as well as give individual feedback. It should be reminded that the
feedback should be constructive and friendly, not mean.
After a while, each pupil is given three different stickers to give for the crafts that are:
the most beautiful
the most interesting
the craziest
After writing the comments and giving the stickers, the teacher and the pupils view the
results together. (25min)
Self-assessment: Final thoughts about the course
The objectives are to look back and evaluate the work during the
course.
The pupils receive two hand outs to fill in the end of the lesson. The first one is for
general self-evaluation and the second for evaluating each of the crafts they have
made. (5min)

136
Unit 5 – Lesson 13
Appendix 1: Self- assessment
SELF-ASSESSMENT
I liked the course
I am happy with my work
I learned new skills and
knowledge
I treated the others well
I used English language
I learned more English

137
Unit 5 – Lesson 13
SELF-ASSESSMENT: CRAFTS
Portfolio: Textile fibres
Football
Drum and flute
Dream catcher
Printed bag
Tie dyed T-shirt
Dyeing with plants and
Kool Aid
Beanie hat