
9781783553150_Solr_Cookbook_Third_Edition_Sample_Chapter
45
Solr Cookbook Third Edition Rafał Kuć Quick answers to common problems Solve real-time problems related to Apache Solr 4.x and 5.0 effectively with the help of over 100 easy-to-follow recipes Free Sample
-
Upload
packt-publishing -
Category
Technology
-
view
70 -
download
0
Transcript of 9781783553150_Solr_Cookbook_Third_Edition_Sample_Chapter
Solr CookbookThird Edition
Rafał Kuć
Solr Cookbook Third Edition
What this book will do for you...
Acquire the skills needed to index your data in different formats, forms, and sources
Overcome common problems while analyzing your data
Use the faceting mechanism to get aggregated information about your data
Improve your Solr instance and Solr cluster performance
Get to know how to confi gure and use SolrCloud
Make use of the highlighting and document grouping functionalities
Diagnose and resolve problems with Solr instances and clusters
Implement different autocomplete functionalities
$ 49.99 US£ 30.99 UK
Prices do not include local sales tax or VAT where applicable
Inside the Cookbook... A straightforward and easy-to-follow format
A selection of the most important tasks and problems
Carefully organized instructions for solving the problem effi ciently
Clear explanations of what you did
Apply the solution to other situations
Quick answers to common problems
Starting with vital information on setting up Solr, you will quickly progress to analyzing your text data through querying and performance improvement.With the help of intermediate and advanced recipes, you will learn how to index data and query Solr. Then, you will deep dive into faceting and learn how to improve Solr's performance. You will also work with SolrCloud clusters and will get to grips with the advanced functionalities of Solr. Finally, you will explore real-life situations, where Solr can be used to simplify daily collection handling. By the end of this book, you will be able to produce enhanced, optimized, and powerful results by implementing pro-level practices and techniques.
Rafał K
ućSolr C
ookbook Third Edition
Solve real-time problems related to Apache Solr 4.x and 5.0 effectively with the help of over 100 easy-to-follow recipes
P U B L I S H I N GP U B L I S H I N G
community experience dist i l ledP
UB
LIS
HIN
GP
UB
LIS
HIN
G
Visit www.PacktPub.com for books, eBooks, code, downloads, and PacktLib.
Free Sample
In this package, you will find: The author biography
A preview chapter from the book, Chapter 1 Apache Solr Configuration"
A synopsis of the book’s content
More information on Solr Cookbook Third Edition
About the Author Rafał Kuć is a born team leader and software developer. He currently works as a
consultant and software engineer at Sematext Group, Inc., where he concentrates on open
source technologies such as Apache Lucene and Solr, Elasticsearch, and Hadoop stack.
He has more than 14 years of experience in various software branches—from banking
software to e-commerce products. He focuses mainly on Java but is open to every tool
and programming language that will make the achievement of his goal easier and faster.
Rafał is also one of the founders of the solr.pl site, where he tries to share his knowledge
and help people with the problems they face with Solr and Lucene. He is also a speaker at
various conferences around the world, such as Lucene Eurocon, Berlin Buzzwords,
ApacheCon, Lucene Revolution, and DevOps Days.
Rafał began his journey with Lucene in 2002, and it wasn't love at first sight. When he
came back to Lucene in late 2003, he revised his thoughts about the framework and saw
the potential in search technologies. Then, Solr came along and that was it. He started
working with Elasticsearch in the middle of 2010. Currently, Lucene, Solr, Elasticsearch,
and information retrieval are his main points of interest. Rafał is also the author of
Apache Solr 3.1 Cookbook, and the update to it, Apache Solr 4.0
Cookbook, both published by Packt Publishing. He also authored Elasticsearch-related
books, ElasticSearch Server and its second edition, and the first and second editions of
Mastering ElasticSearch, all published by Packt Publishing.
This book is a second update to the first book I ever wrote— Apache Solr 3.1 Cookbook,
Packt Publishing. Again, similar to Apache Solr Cookbook 4.0, Packt Publishing, what
meant to be an update turned out to be almost a complete rewrite because of the pending
release of Solr 5.0 and the changes to Solr itself. Between Solr 4.0 and 5.0, there were a
lot of changes and additions to Solr, and I know I didn't manage to gather them all in the
recipes that are present in the book you are holding. However, I hope that if you are
either using Solr 4.x or Solr 5.0, this book will help you overcome some common
problems and will push your knowledge about Solr a bit further.
Acknowledgments
Although I would go the same way if I could go back in time, the time during the writing
of this book was not easy for my family. The ones that suffered from this the most were
my wife, Agnes, and my two great kids—son Philip and daughter Susanna. Without their
patience and understanding, writing this book wouldn't have been possible. I would also
like to thank my and Agnes' parents for their support and help.
I would like to thank all the people involved in creating, developing, and maintaining
Lucene and Solr projects for their work and passion. Without them, this book wouldn't
have been written.
Once again, thank you.
Solr Cookbook Third Edition Welcome to Solr Cookbook, Third Edition. You will be taken on a tour of the most
common problems that a user might face while dealing with Apache Solr. You will also
explore some of the features that were recently introduced in Solr. You will learn how to
deal with the problems when configuring and setting up Solr, handle common queries, fi
ne-tune Solr instances, set up and use SolrCloud, use faceting and grouping, fighting
common problems, and many more things. Each and every recipe is based on real-life
problems and provides solutions along with detailed descriptions of the configuration and
code that was used.
What This Book Covers Chapter 1, Apache Solr Configuration, covers Solr configuration recipes, along with
setting up ZooKeeper, migrating from master to slave, and configuring Solr for different
use cases.
Chapter 2, Indexing Your Data, as the name suggests, explains data indexing, such as
binary files indexing, using Data Import Handler, language detection, updating a single
field of document, and much more.
Chapter 3, Analyzing Your Text Data, concentrates on common problems when
analyzing your data, such as stemming, geographical location indexing, or using
synonyms.
Chapter 4, Querying Solr, describes querying Apache Solr, such as nesting queries,
affecting the scoring of documents, phrase searching, or using the parent-child
relationship.
Chapter 5, Faceting, is dedicated to the faceting mechanism in which you can find the
information needed to overcome some problems that you might encounter while working
with Solr and faceting.
Chapter 6, Improving Solr Performance, focuses on improving your Apache Solr cluster
performance with information such as cache configuration, indexing speed up, and
much more.
Chapter 7, In the Cloud, covers the cloud side of Solr—SolrCloud, setting up collections,
replicas configuration, distributed indexing and searching, as well as aliasing and shard
manipulation.
Chapter 8, Using Additional Functionalities, explains how we can highlight long text
fields, sort results on the basis of function value, check user spelling mistakes, and use
the grouping functionality.
Chapter 9, Dealing with Problems, is a small chapter dedicated to the most common
situations such as memory problems, tuning segment merges, and others.
Chapter 10, Real-life Situations, describes how to handle real-life situations such as
implementing different autocomplete functionalities, using near real-time search, or
improving query relevance.
1Apache Solr
Confi guration
In this chapter, we will cover the following recipes:
Running Solr on a standalone Jetty
Installing ZooKeeper for SolrCloud
Migrating confi guration from master-slave to SolrCloud
Choosing the proper directory confi guration
Confi guring the Solr spellchecker
Using Solr in a schemaless mode
Limiting I/O usage
Using core discovery
Confi guring SolrCloud for NRT use cases
Confi guring SolrCloud for high-indexing use cases
Confi guring SolrCloud for high-querying use cases
Confi guring the Solr heartbeat mechanism
Changing similarity
Apache Solr Confi guration
8
IntroductionSetting up an example for a Solr instance is not a hard task. We have all that is provided with the Solr distribution package, which we need for the example deployment. In fact, this is the simplest way to run Solr. It is very convenient for local development because you don't need any additional software, apart from Java, which is already installed and you can control when to run Solr and easily change its confi guration. However, the example instance of Solr will probably not be the optimized way in terms of your deployment. For example, the default cache confi gurations are most likely not good for your deployment; there are only sample warming queries that don't refl ect your production queries, there are fi eld types you don't need, and so on. This is why I will show a few confi guration-related recipes in this chapter.
If you don't have any experience with Apache Solr, refer to the Apache Solr tutorial, which can be found at http://lucene.apache.org/solr/tutorial.html, before reading this book. You can also check articles regarding Solr on http://solr.pl and http://blog.sematext.com.
This chapter focuses on Solr confi guration. It starts with showing you how to set up Solr, install ZooKeeper for SolrCloud, migrate your old master-slave confi guration to a SolrCloud deployment, and also covers some more advanced topics such as near real-time indexing and searching. We will also go through tuning Solr for specifi c use cases and the confi gurations of some more advanced functionality, such as the scoring algorithm.
One more thing before we go on—remember that while writing the book, the main version of Solr used was 4.10. All the recipes were also tested on Solr 5.0 in the newest version available, but the Solr 5.0 itself has not been released.
Running Solr on a standalone JettyThe simplest way to run Apache Solr on the Jetty servlet container is to run the provided example confi guration based on an embedded Jetty. This is very simple if you use the provided example deployment. However, it is not suited for production deployment, where you will have the standalone Jetty installed. In this recipe, I will show you how to confi gure and run Solr on a standalone Jetty container.
Getting readyFirst, you need to download the Jetty servlet container for your platform. You can get your download package from an automatic installer, such as apt-get, or you can download it from http://download.eclipse.org/jetty/. In addition to this, read the Using core discovery recipe of this chapter for more information.
Chapter 1
9
While writing this recipe, I used Solr Version 4.10 and Jetty Version 8.1.10. Solr 5.0 will stop providing the WAR fi le for deployment on the external web application container and will be ready for installation as it is.
How to do it...The fi rst step is to install the Jetty servlet container, which is beyond the scope of this book, so we will assume that you have Jetty installed in the /usr/share/jetty directory.
1. Let's start with copying the solr.war fi le to the webapps directory of the installed Jetty (so that the whole path is /usr/share/jetty/webapps). In addition to this, we need to create a temporary directory in the installed Jetty, so let's create the tmp directory in the Jetty installation directory.
2. Next, we need to copy and adjust the solr-jetty-context.xml fi le from the contexts directory of the Solr example distribution to the contexts directory of the installed Jetty. The fi nal fi le contents should look like this:
<?xml version="1.0"?><!DOCTYPE Configure PUBLIC "-//Jetty//Configure//EN" "http://www.eclipse.org/jetty/configure.dtd"><Configure class="org.eclipse.jetty.webapp.WebAppContext"> <Set name="contextPath"><SystemProperty name="hostContext" default="/solr"/></Set> <Set name="war"><SystemProperty name="jetty.home"/>/webapps/solr.war</Set> <Set name="defaultsDescriptor"><SystemProperty name="jetty.home"/>/etc/webdefault.xml</Set> <Set name="tempDirectory"><Property name="jetty.home" default="."/>/tmp</Set></Configure>
3. Now, we need to copy the jetty.xml and webdefault.xml fi les from the etc directory of the Solr distribution to the confi guration directory of Jetty; in our case, to the /usr/share/jetty/etc directory.
4. The next step is to copy the Solr core (https://wiki.apache.org/solr/SolrTerminology) confi guration fi les to the appropriate directory. I'm talking about fi les such as schema.xml, solrconfig.xml, and so forth—the fi les that can be found in the solr/collection1/conf directory of the example Solr distribution. These fi les should be put in the core_name/conf directory inside a folder specifi ed by the solr.solr.home system variable (in my case, this is the /usr/share/solr directory). For example, if we want our core to be named example_data, we should put the mentioned confi guration fi les in the /usr/share/solr/example_data/conf directory.
Apache Solr Confi guration
10
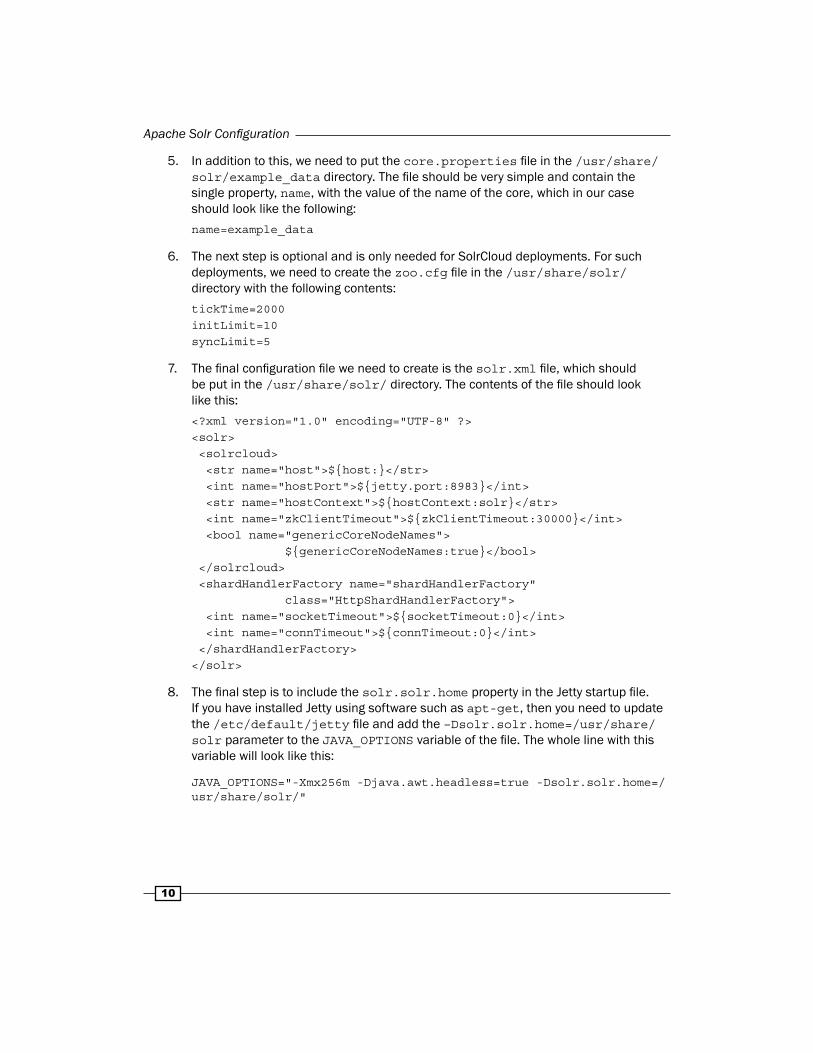
5. In addition to this, we need to put the core.properties fi le in the /usr/share/solr/example_data directory. The fi le should be very simple and contain the single property, name, with the value of the name of the core, which in our case should look like the following:
name=example_data
6. The next step is optional and is only needed for SolrCloud deployments. For such deployments, we need to create the zoo.cfg fi le in the /usr/share/solr/ directory with the following contents:
tickTime=2000initLimit=10syncLimit=5
7. The fi nal confi guration fi le we need to create is the solr.xml fi le, which should be put in the /usr/share/solr/ directory. The contents of the fi le should look like this:
<?xml version="1.0" encoding="UTF-8" ?><solr> <solrcloud> <str name="host">${host:}</str> <int name="hostPort">${jetty.port:8983}</int> <str name="hostContext">${hostContext:solr}</str> <int name="zkClientTimeout">${zkClientTimeout:30000}</int> <bool name="genericCoreNodeNames"> ${genericCoreNodeNames:true}</bool> </solrcloud> <shardHandlerFactory name="shardHandlerFactory" class="HttpShardHandlerFactory"> <int name="socketTimeout">${socketTimeout:0}</int> <int name="connTimeout">${connTimeout:0}</int> </shardHandlerFactory></solr>
8. The fi nal step is to include the solr.solr.home property in the Jetty startup fi le. If you have installed Jetty using software such as apt-get, then you need to update the /etc/default/jetty fi le and add the –Dsolr.solr.home=/usr/share/solr parameter to the JAVA_OPTIONS variable of the fi le. The whole line with this variable will look like this:
JAVA_OPTIONS="-Xmx256m -Djava.awt.headless=true -Dsolr.solr.home=/usr/share/solr/"

Chapter 1
11
If you didn't install Jetty with apt-get or a similar software, you might not have the /etc/default/jetty fi le. In this case, add the –Dsolr.solr.home=/usr/share/solr parameter to the Jetty startup fi le.
We can now run Jetty to see if everything is okay. To start Jetty, which was already installed, use the apt-get command, as shown:
/etc/init.d/jetty start
If there are no exceptions during startup, we have a running Jetty with Solr deployed and confi gured. To check whether Solr is running, visit http://localhost:8983/solr/.
Congratulations, you have just successfully installed, confi gured, and run the Jetty servlet container with Solr deployed.
How it works...For the purpose of this recipe, I assumed that we needed a single core installation with only the schema.xml and solrconfig.xml confi guration fi les. Multicore installation is very similar; it differs only in terms of the Solr confi guration fi les—one needs more than a single core defi ned.
The fi rst thing we did was copied the solr.war fi le and created the tmp directory. The WAR fi le is the actual Solr web application. The tmp directory will be used by Jetty to unpack the WAR fi le.
The solr-jetty-context.xml fi le that we place in the context directory allows Jetty to defi ne the context for a Solr web application. As you can see in its contents, we have set the context to be /solr, so our Solr application will be available under http://localhost:8983/solr/. We also need to specify where Jetty should look for the WAR fi le (the war property), where the web application descriptor fi le (the defaultsDescriptor property) is, and fi nally, where the temporary directory will be located (the tempDirectory property).
Copying the jetty.xml and webdefault.xml fi les is important. The standard Solr distribution comes with Jetty confi guration fi les prepared for high load; for example, we can avoid the distributed deadlock.
The next step is to provide confi guration fi les for the Solr core. These fi les should be put in the core_name/conf directory, which is created in a folder specifi ed by the system's solr.solr.home variable. Since our core is named example_data, and the solr.solr.home property points to /usr/share/solr, we place our confi guration fi les in the /usr/share/solr/example_data/conf directory. Note that I decided to use the /usr/share/solr directory as the base directory for all Solr confi guration fi les. This ensures the ability to update Jetty without the need to override or delete the Solr confi guration fi les.
Apache Solr Confi guration
12
The core.properties fi le allows Solr to identify the core that it will try to load. By providing the name property, we tell Solr what name the core should have. In our case, its name will be example_data.
The zoo.cfg fi le is optional, is only needed when setting up SolrCloud, and is used by Solr to specify ZooKeeper client properties. The tickTime property specifi es the number of milliseconds of each tick. The tick is the unit of time in ZooKeeper client connections. The initLimit property specifi es the number of ticks the initial synchronization phase can take, and the syncLimit property specifi es the number of ticks that can pass between sending a request and getting an acknowledgement. For example, because the syncLimit property is set to 5 and tickTime is 2000, the maximum time between sending the request and getting the acknowledgement is 10,000 milliseconds (syncLimit multiplied by tickTime).
The solr.xml fi le is described in the Using core discovery recipe in this chapter.
If you installed Jetty with the apt-get command or a similar software, then you need to update the /etc/default/jetty fi le to include the solr.solr.home variable for Solr to be able to see its confi guration directory.
After all these steps, we will be ready to launch Jetty. If you installed Jetty with apt-get or similar software, you can run Jetty with the fi rst command shown in the example. Otherwise, you can run Jetty with the java -jar start command from the Jetty installation directory.
After running the example query in your web browser, you should see the Solr front page as a single core. Congratulations, you have successfully confi gured and run the Jetty servlet container with Solr deployed.
There's more...There are a few more tasks that you can perform to counter some problems while running Solr within the Jetty servlet container. The most common tasks that I encountered during my work are described in the ensuing sections.
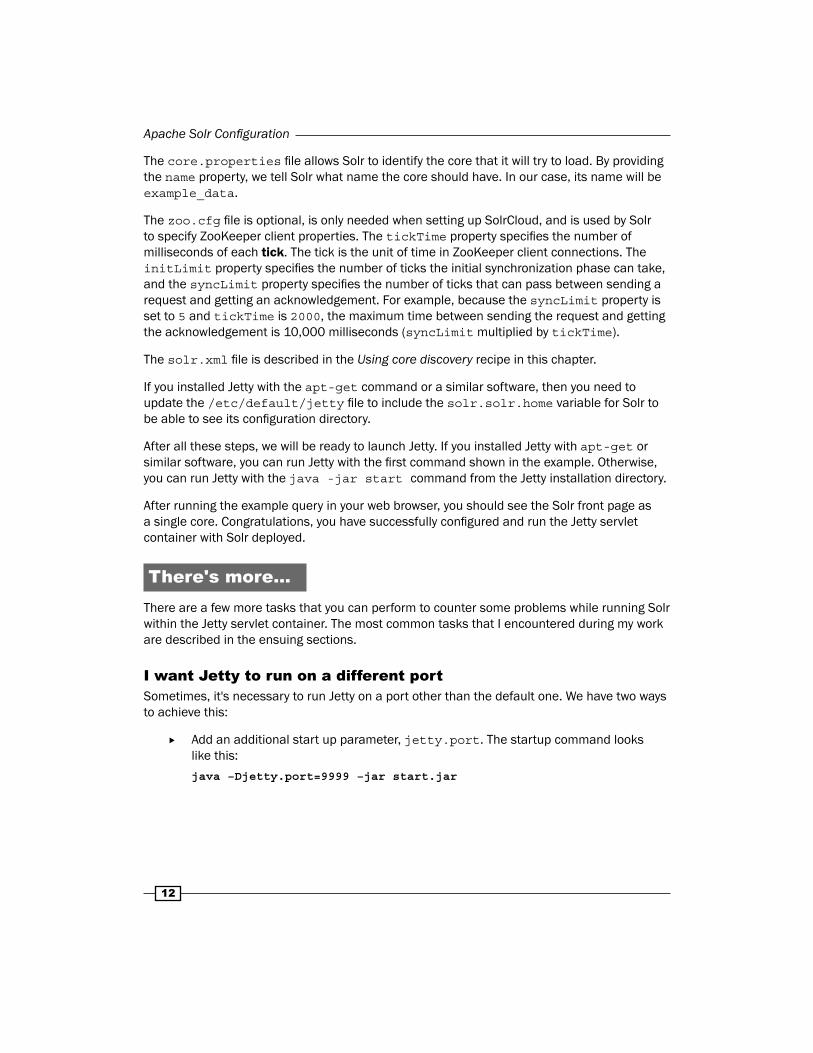
I want Jetty to run on a different portSometimes, it's necessary to run Jetty on a port other than the default one. We have two ways to achieve this:
Add an additional start up parameter, jetty.port. The startup command looks like this:
java –Djetty.port=9999 –jar start.jar
Chapter 1
13
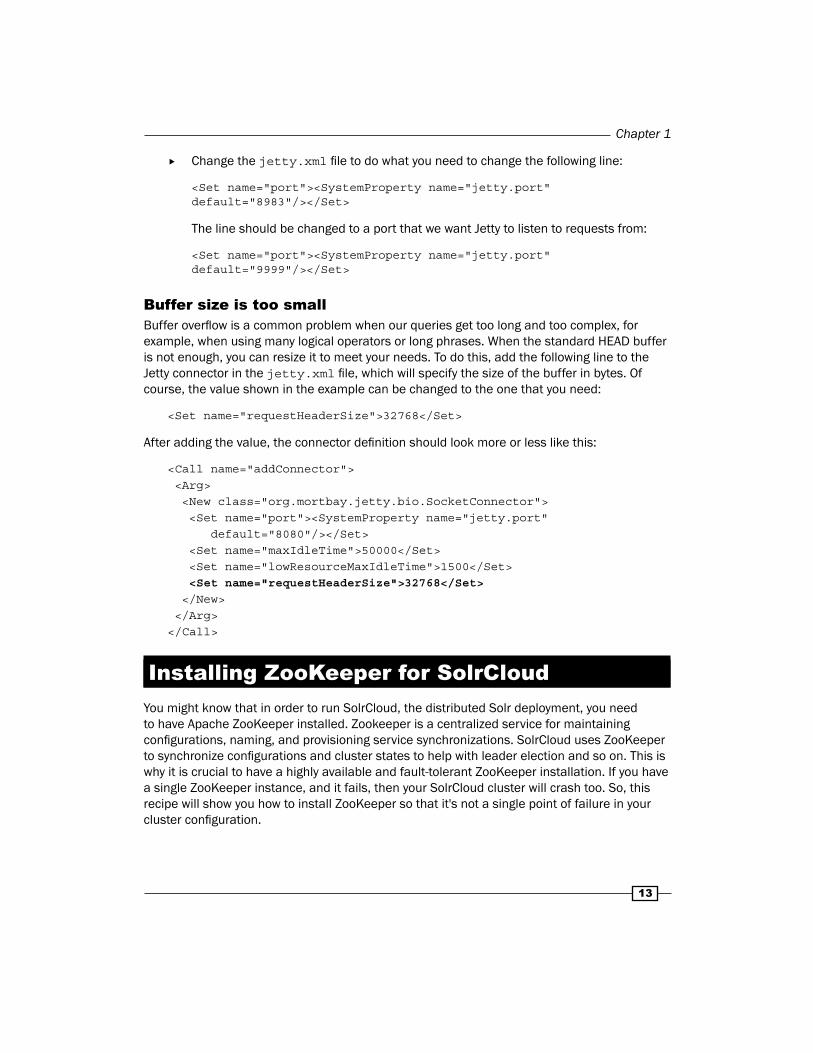
Change the jetty.xml fi le to do what you need to change the following line:
<Set name="port"><SystemProperty name="jetty.port" default="8983"/></Set>
The line should be changed to a port that we want Jetty to listen to requests from:
<Set name="port"><SystemProperty name="jetty.port" default="9999"/></Set>
Buffer size is too smallBuffer overfl ow is a common problem when our queries get too long and too complex, for example, when using many logical operators or long phrases. When the standard HEAD buffer is not enough, you can resize it to meet your needs. To do this, add the following line to the Jetty connector in the jetty.xml fi le, which will specify the size of the buffer in bytes. Of course, the value shown in the example can be changed to the one that you need:
<Set name="requestHeaderSize">32768</Set>
After adding the value, the connector defi nition should look more or less like this:
<Call name="addConnector"> <Arg> <New class="org.mortbay.jetty.bio.SocketConnector"> <Set name="port"><SystemProperty name="jetty.port" default="8080"/></Set> <Set name="maxIdleTime">50000</Set> <Set name="lowResourceMaxIdleTime">1500</Set> <Set name="requestHeaderSize">32768</Set> </New> </Arg></Call>
Installing ZooKeeper for SolrCloudYou might know that in order to run SolrCloud, the distributed Solr deployment, you need to have Apache ZooKeeper installed. Zookeeper is a centralized service for maintaining confi gurations, naming, and provisioning service synchronizations. SolrCloud uses ZooKeeper to synchronize confi gurations and cluster states to help with leader election and so on. This is why it is crucial to have a highly available and fault-tolerant ZooKeeper installation. If you have a single ZooKeeper instance, and it fails, then your SolrCloud cluster will crash too. So, this recipe will show you how to install ZooKeeper so that it's not a single point of failure in your cluster confi guration.

Apache Solr Confi guration
14
Getting readyThe installation instructions in this recipe contain information about installing ZooKeeper Version 3.4.6, but it should be useable for any minor release changes of Apache ZooKeeper. To download ZooKeeper, visit http://zookeeper.apache.org/releases.html. This recipe will show you how to install ZooKeeper in a Linux-based environment. For ZooKeeper to work, Java needs to be installed.
How to do it...Let's assume that we have decided to install ZooKeeper in the /usr/share/zookeeper directory of our server, and we want to have three servers (with IPs 192.168.1.1, 192.168.1.2, and 192.168.1.3) hosting a distributed ZooKeeper installation. This can be done by performing the following steps:
1. After downloading the ZooKeeper installation, we create the necessary directory:
sudo mkdir /usr/share/zookeeper
2. Then, we unpack the downloaded archive to the newly created directory. We do this on three servers.
3. Next, we need to change our ZooKeeper confi guration fi le and specify the servers that will form a ZooKeeper quorum. So, we edit the /usr/share/zookeeper/conf/zoo.cfg fi le and add the following entries:
clientPort=2181dataDir=/usr/share/zookeeper/datatickTime=2000initLimit=10syncLimit=5server.1=192.168.1.1:2888:3888server.2=192.168.1.2:2888:3888server.3=192.168.1.3:2888:3888
4. Now, the next thing we need to do is create a fi le called myid in the /usr/share/zookeeper/data directory. The fi le should contain a single number that corresponds to the server number. For example, if ZooKeeper is located on 192.168.1.1, it will be 1, and if ZooKeeper is located on 192.168.1.3, it will be 3, and so on.
5. Now, we can start the ZooKeeper servers with the following command:
/usr/share/zookeeper/bin/zkServer.sh start

Chapter 1
15
6. If everything goes well, you should see something like:
JMX enabled by default
Using config: /usr/share/zookeeper/bin/../conf/zoo.cfg
Starting zookeeper ... STARTED
That's all. Of course, you can also add the ZooKeeper service to start automatically as your operating system starts up, but this is beyond the scope of the recipe and book.
How it works...I talked about the ZooKeeper quorum and started this using three ZooKeeper nodes. ZooKeeper operates in a quorum, which means that at least 50 percent plus one server needs to be available and connected. We can start with a single ZooKeeper server, but such deployment won't be highly available and resistant to failures. So, to be able to handle at least a single ZooKeeper node failure, we need at least three ZooKeeper nodes running.
Let's skip the fi rst part because creating the directory and unpacking the ZooKeeper server is quite simple. What I would like to concentrate on are the confi guration values of the ZooKeeper server. The clientPort property specifi es the port on which our SolrCloud servers should connect to ZooKeeper. The dataDir property specifi es the directory where ZooKeeper will hold its data. Note that ZooKeeper needs read and write permissions to the directory. So far so good, right? So, now, the more advanced properties, such as tickTime, specifi ed in milliseconds is the basic time unit for ZooKeeper. The initLimit property specifi es how many ticks the initial synchronization phase can take. Finally, syncLimit specifi es how many ticks can pass between sending the request and receiving an acknowledgement.
There are also three additional properties present, server.1, server.2, and server.3. These three properties defi ne the addresses of the ZooKeeper instances that will form the quorum. The values for each of these properties are separated by a colon character. The fi rst part is the IP address of the ZooKeeper server, and the second and third parts are the ports used by ZooKeeper instances to communicate with each other.
The last thing is the myid fi le located in the /usr/share/zookeeper/data directory. The contents of the fi le is used by ZooKeeper to identify itself. This is why we need to properly confi gure it so that ZooKeeper is not confused. So, for the ZooKeeper server specifi ed as server.1, we need to write 1 to the myid fi le.
Downloading the example code
You can download the example code fi les for all Packt books you have purchased from your account at http://www.packtpub.com. If you purchased this book elsewhere, you can visit http://www.packtpub.com/support and register to have the fi les e-mailed directly to you.
Apache Solr Confi guration
16
Migrating confi guration from master-slave to SolrCloud
After the release of Apache Solr 4.0, many users wanted to leverage SolrCloud-distributed indexing and querying capabilities. SolrCloud is also very useful when it comes to handling collections as you can create them on-the-fl y, add replicas, and split already created shards, and this is only an example of the possibilities given by SolrCloud. Now, for releases after Solr 4.0, people are going for SolrCloud even more frequently. It's not hard to upgrade your current master-slave confi guration to work on SolrCloud, but there are some things you need to take care of. With the help of the following recipe, you will be able to easily upgrade your cluster.
Getting readyBefore continuing further, it is advised to read the Installing Zookeeper for SolrCloud and Running Solr on a standalone Jetty recipes of this chapter. They will show you how to set up a Zookeeper cluster to be ready for production use and how to confi gure Jetty and Solr to work with each other.
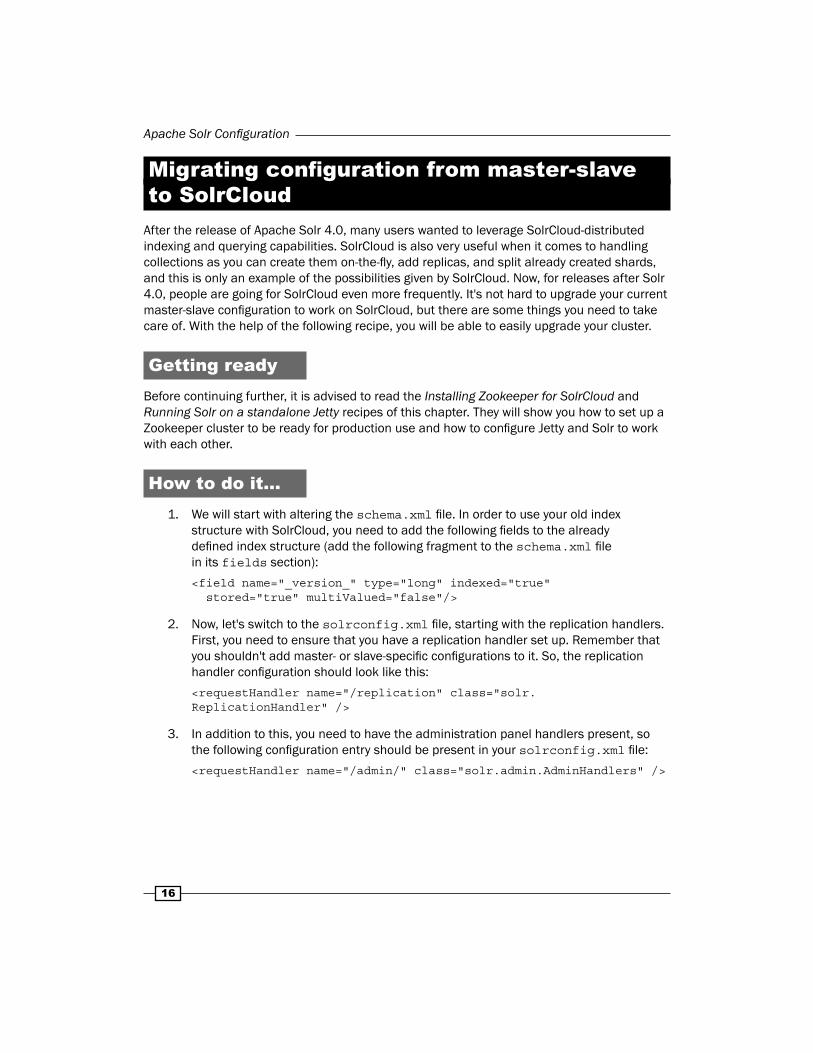
How to do it...1. We will start with altering the schema.xml fi le. In order to use your old index
structure with SolrCloud, you need to add the following fi elds to the already defi ned index structure (add the following fragment to the schema.xml fi le in its fields section):
<field name="_version_" type="long" indexed="true" stored="true" multiValued="false"/>
2. Now, let's switch to the solrconfig.xml fi le, starting with the replication handlers. First, you need to ensure that you have a replication handler set up. Remember that you shouldn't add master- or slave-specifi c confi gurations to it. So, the replication handler confi guration should look like this:
<requestHandler name="/replication" class="solr.ReplicationHandler" />
3. In addition to this, you need to have the administration panel handlers present, so the following confi guration entry should be present in your solrconfig.xml fi le:
<requestHandler name="/admin/" class="solr.admin.AdminHandlers" />
Chapter 1
17
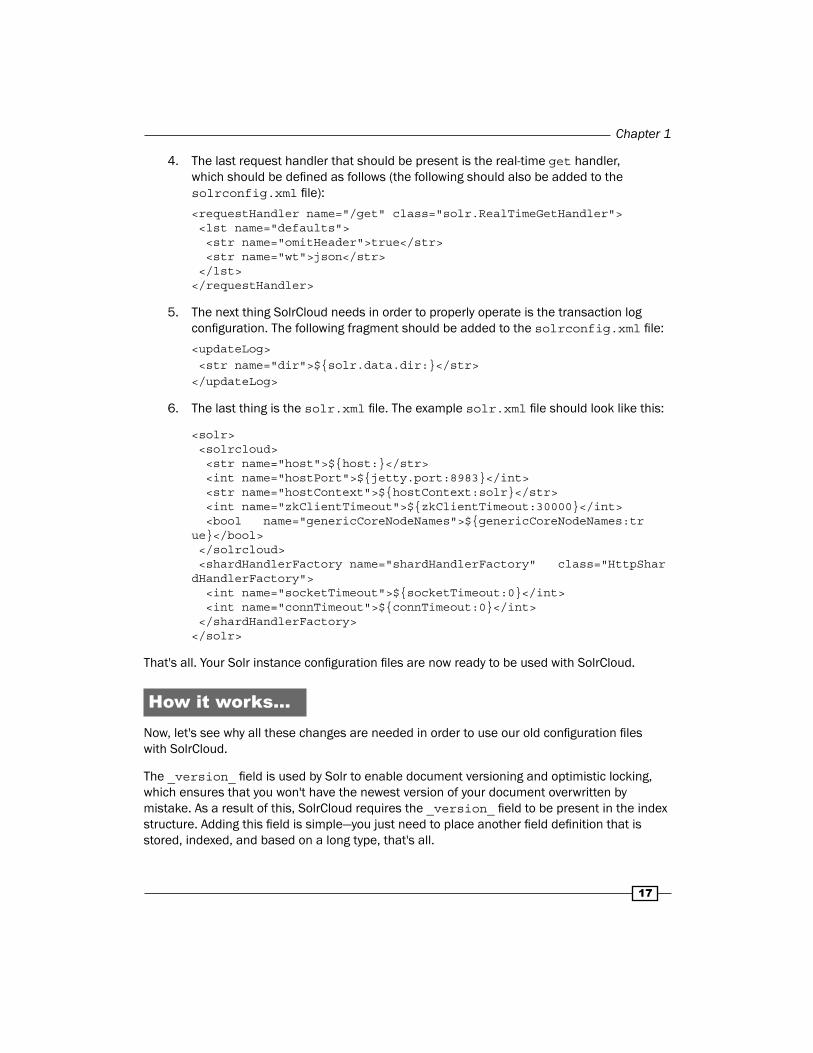
4. The last request handler that should be present is the real-time get handler, which should be defi ned as follows (the following should also be added to the solrconfig.xml fi le):
<requestHandler name="/get" class="solr.RealTimeGetHandler"> <lst name="defaults"> <str name="omitHeader">true</str> <str name="wt">json</str> </lst></requestHandler>
5. The next thing SolrCloud needs in order to properly operate is the transaction log confi guration. The following fragment should be added to the solrconfig.xml fi le:
<updateLog> <str name="dir">${solr.data.dir:}</str></updateLog>
6. The last thing is the solr.xml fi le. The example solr.xml fi le should look like this:
<solr> <solrcloud> <str name="host">${host:}</str> <int name="hostPort">${jetty.port:8983}</int> <str name="hostContext">${hostContext:solr}</str> <int name="zkClientTimeout">${zkClientTimeout:30000}</int> <bool name="genericCoreNodeNames">${genericCoreNodeNames:true}</bool> </solrcloud> <shardHandlerFactory name="shardHandlerFactory" class="HttpShardHandlerFactory"> <int name="socketTimeout">${socketTimeout:0}</int> <int name="connTimeout">${connTimeout:0}</int> </shardHandlerFactory></solr>
That's all. Your Solr instance confi guration fi les are now ready to be used with SolrCloud.
How it works...Now, let's see why all these changes are needed in order to use our old confi guration fi les with SolrCloud.
The _version_ fi eld is used by Solr to enable document versioning and optimistic locking, which ensures that you won't have the newest version of your document overwritten by mistake. As a result of this, SolrCloud requires the _version_ fi eld to be present in the index structure. Adding this fi eld is simple—you just need to place another fi eld defi nition that is stored, indexed, and based on a long type, that's all.
Apache Solr Confi guration
18
As for the replication handler, you should remember not to add slave- or master-specifi c confi gurations, but only a simple request handler defi nition, as shown in the previous example. The same applies to the administration panel handlers; they need to be available under the default URL address.
The real-time get handler is responsible for getting the updated documents right away. In general, the documents are not available to search if the Lucene index searcher is not open, which happens after a hard or soft commit command (we will talk more about commit and soft commit in the Confi guring SolrCloud for NRT use cases recipe of this chapter). This handler allows Solr (and also you) to retrieve the latest version of the document without the need to reopen the searcher, and thus, even if the document is not yet visible during a usual search operation. This is done by using the transaction log if the document is not yet indexed. The confi guration is very similar to usual request handler confi gurations; you need to add a new handler with the name property set to /get and the class property set to solr.RealTimeGetHandler. In addition to this, we want the handler to omit response headers (the omitHeader property set to true) and return a response in JSON (with the wt property set to json). We omit the headers so that we have responses that are easier to parse.
One of the last things that is needed by SolrCloud is the transaction log, which enables real-time get operations to be functional. The transaction log keeps track of all the uncommitted changes and enables real-time get handlers to retrieve them. In order to turn on transaction log usage, one should add the updateLog tag to the solrconfig.xml fi le and specify the directory where the transaction log directory should be created (by adding the dir property, as shown in the example). In the previous confi guration, we tell Solr that we want to use the Solr data directory as the place to store transaction log directories.
Finally, Solr needs you to keep the default address for the core administrative interface, so you should remember to have the adminPath property set to the value shown in the example (in the solr.xml fi le). This is needed in order for Solr to be able to manipulate cores.
We already talked about the solr.xml fi le contents in the Running Solr on a standalone Jetty recipe in this chapter, so refer to that recipe if you are not familiar with the contents.
Choosing the proper directory confi gurationOne of the most crucial properties of Apache Lucene and Solr is the Lucene Directory implementation. The directory interface provides an abstraction layer for all I/O operations for the Lucene library. Although it seems simple, choosing the right directory implementation can affect the performance of your Solr setup in a drastic way. This recipe will show you how to choose the right directory implementation.
Chapter 1
19
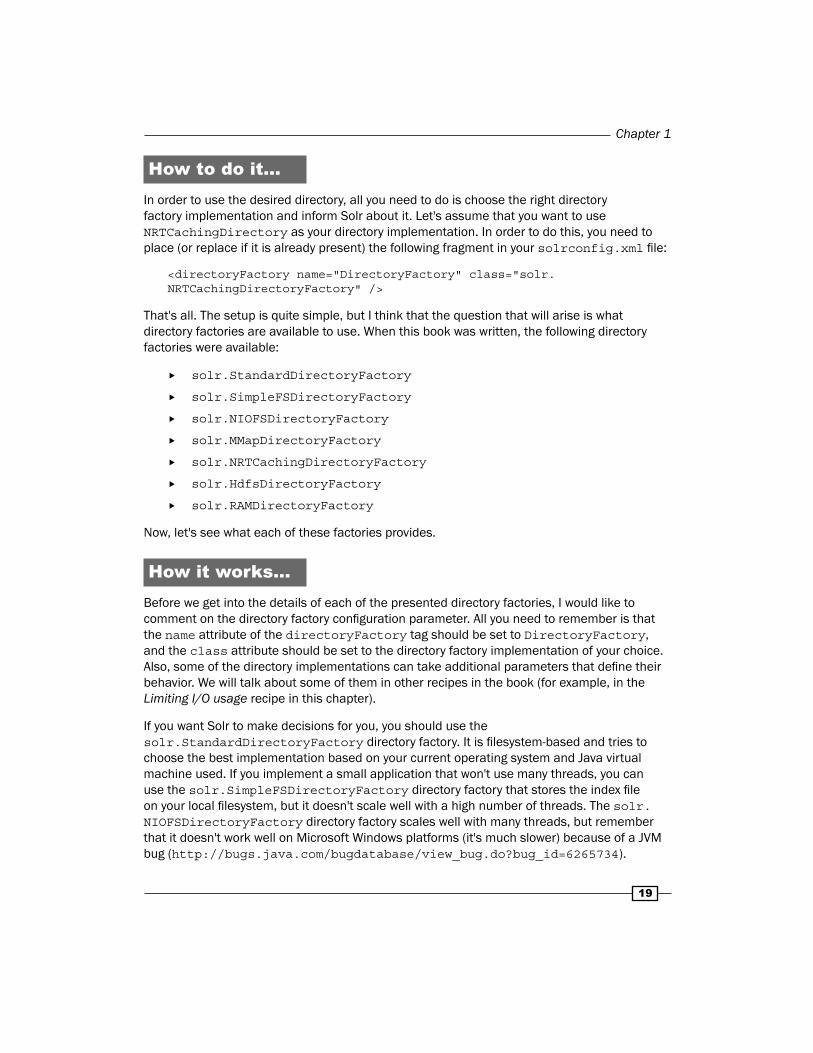
How to do it...In order to use the desired directory, all you need to do is choose the right directory factory implementation and inform Solr about it. Let's assume that you want to use NRTCachingDirectory as your directory implementation. In order to do this, you need to place (or replace if it is already present) the following fragment in your solrconfig.xml fi le:
<directoryFactory name="DirectoryFactory" class="solr.NRTCachingDirectoryFactory" />
That's all. The setup is quite simple, but I think that the question that will arise is what directory factories are available to use. When this book was written, the following directory factories were available:
solr.StandardDirectoryFactory
solr.SimpleFSDirectoryFactory
solr.NIOFSDirectoryFactory
solr.MMapDirectoryFactory
solr.NRTCachingDirectoryFactory
solr.HdfsDirectoryFactory
solr.RAMDirectoryFactory
Now, let's see what each of these factories provides.
How it works...Before we get into the details of each of the presented directory factories, I would like to comment on the directory factory confi guration parameter. All you need to remember is that the name attribute of the directoryFactory tag should be set to DirectoryFactory, and the class attribute should be set to the directory factory implementation of your choice. Also, some of the directory implementations can take additional parameters that defi ne their behavior. We will talk about some of them in other recipes in the book (for example, in the Limiting I/O usage recipe in this chapter).
If you want Solr to make decisions for you, you should use the solr.StandardDirectoryFactory directory factory. It is fi lesystem-based and tries to choose the best implementation based on your current operating system and Java virtual machine used. If you implement a small application that won't use many threads, you can use the solr.SimpleFSDirectoryFactory directory factory that stores the index fi le on your local fi lesystem, but it doesn't scale well with a high number of threads. The solr.NIOFSDirectoryFactory directory factory scales well with many threads, but remember that it doesn't work well on Microsoft Windows platforms (it's much slower) because of a JVM bug (http://bugs.java.com/bugdatabase/view_bug.do?bug_id=6265734).
Apache Solr Confi guration
20
The solr.MMapDirectoryFactory directory factory has been the default directory factory for Solr for 64-bit Linux systems since Solr 3.1. This directory implementation uses virtual memory and the kernel feature called mmap to access index fi les stored on disk. This allows Lucene (and thus Solr) to directly access the I/O cache. This is desirable, and you should stick to this directory if near real-time searching is not needed.
If you need near real-time indexing and searching, you should use solr.NRTCachingDirectoryFactory. It is designed to store some parts of the index in memory (small chunks), and thus speeds up some near real-time operations greatly. By saying near real-time, we mean that the documents are available within milliseconds from indexing.
If you want to know more about near real-time search and indexing, refer to a great explanation on the phrase on Solr wiki, available at https://wiki.apache.org/lucene-java/NearRealtimeSearch.
The solr.HdfsDirectoryFactory is used when Solr runs on HDFS fi lesystems, so inside a Hadoop cluster. If you are using Solr inside a Hadoop cluster, then it is almost certain that you'll want to use the directory implementation.
The last directory factory, solr.RAMDirectoryFactory, is the only one that is not persistent. The whole index is stored in the RAM memory, and thus, you'll lose your index after a restart or server crash. Also, you should remember that replication won't work when using solr.RAMDirectoryFactory. One might ask why I should use this factory? Imagine a volatile index autocomplete functionality or for unit tests of your query's relevance, or just anything you can think of when you don't need to have persistent and replicated data. However, remember that this directory is not designed to hold large amounts of data.
Confi guring the Solr spellcheckerIf you are used to the way the spellchecker worked in the previous Solr versions, then you might remember that it required its own index to give you spelling corrections. This approach had some disadvantages, such as the need to rebuild the index on each Solr node or replicate the spellchecker index between the nodes. With Solr 4.0, a new spellchecker implementation was introduced, solr.DirectSolrSpellchecker. It allows you to use your main index to provide spelling suggestions and doesn't need to be rebuilt after every commit. Now, let's see how to use this new spellchecker implementation in Solr.
Chapter 1
21
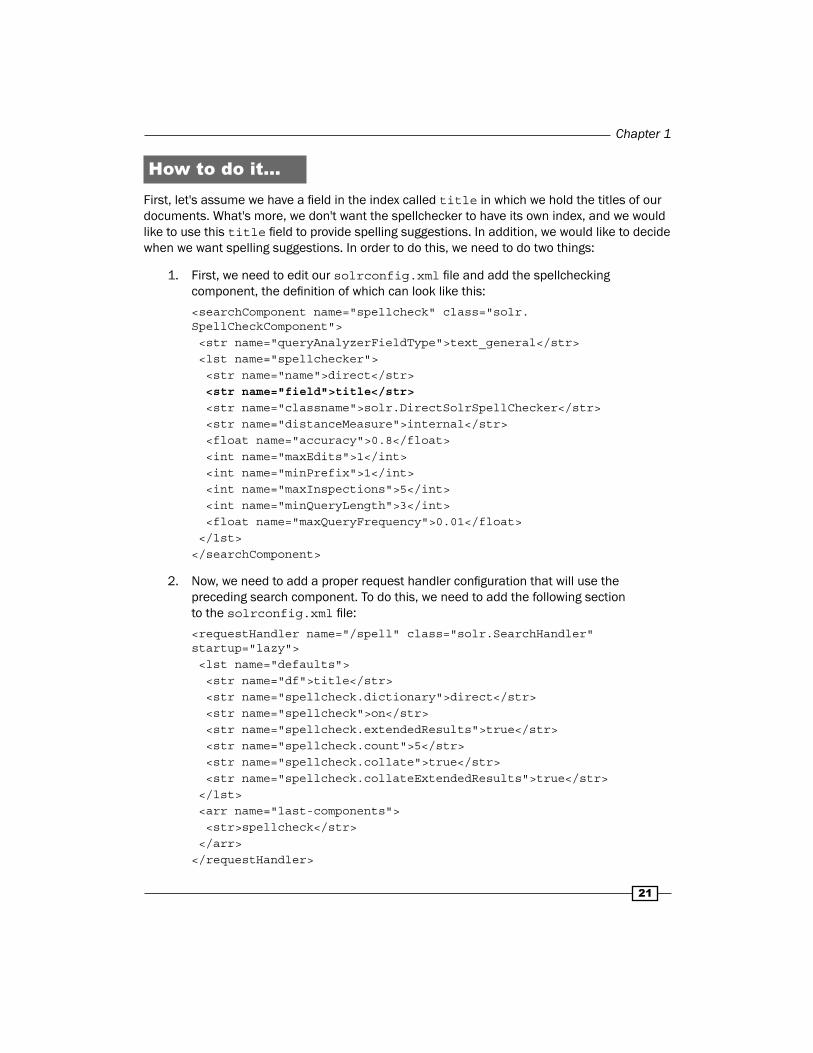
How to do it...First, let's assume we have a fi eld in the index called title in which we hold the titles of our documents. What's more, we don't want the spellchecker to have its own index, and we would like to use this title fi eld to provide spelling suggestions. In addition, we would like to decide when we want spelling suggestions. In order to do this, we need to do two things:
1. First, we need to edit our solrconfig.xml fi le and add the spellchecking component, the defi nition of which can look like this:
<searchComponent name="spellcheck" class="solr.SpellCheckComponent"> <str name="queryAnalyzerFieldType">text_general</str> <lst name="spellchecker"> <str name="name">direct</str> <str name="field">title</str> <str name="classname">solr.DirectSolrSpellChecker</str> <str name="distanceMeasure">internal</str> <float name="accuracy">0.8</float> <int name="maxEdits">1</int> <int name="minPrefix">1</int> <int name="maxInspections">5</int> <int name="minQueryLength">3</int> <float name="maxQueryFrequency">0.01</float> </lst></searchComponent>
2. Now, we need to add a proper request handler confi guration that will use the preceding search component. To do this, we need to add the following section to the solrconfig.xml fi le:
<requestHandler name="/spell" class="solr.SearchHandler" startup="lazy"> <lst name="defaults"> <str name="df">title</str> <str name="spellcheck.dictionary">direct</str> <str name="spellcheck">on</str> <str name="spellcheck.extendedResults">true</str> <str name="spellcheck.count">5</str> <str name="spellcheck.collate">true</str> <str name="spellcheck.collateExtendedResults">true</str> </lst> <arr name="last-components"> <str>spellcheck</str> </arr></requestHandler>

Apache Solr Confi guration
22
3. That's all. In order to get spelling suggestions, we need to run the following query:
/spell?q=disa
4. In response, we will get something like this:
<?xml version="1.0" encoding="UTF-8"?><response> <lst name="responseHeader"> <int name="status">0</int> <int name="QTime">5</int> </lst><result name="response" numFound="0" start="0"></result><lst name="spellcheck"> <lst name="suggestions"> <lst name="disa"> <int name="numFound">1</int> <int name="startOffset">0</int> <int name="endOffset">4</int> <int name="origFreq">0</int> <arr name="suggestion"> <lst> <str name="word">data</str> <int name="freq">1</int> </lst> </arr> </lst> <bool name="correctlySpelled">false</bool> <lst name="collation"> <str name="collationQuery">data</str> <int name="hits">1</int> <lst name="misspellingsAndCorrections"> <str name="disa">data</str> </lst> </lst> </lst></lst></response>
If you check your data folder, you will see that there is no directory responsible for holding the spellchecker index. Now, let's see how this works.
Chapter 1
23
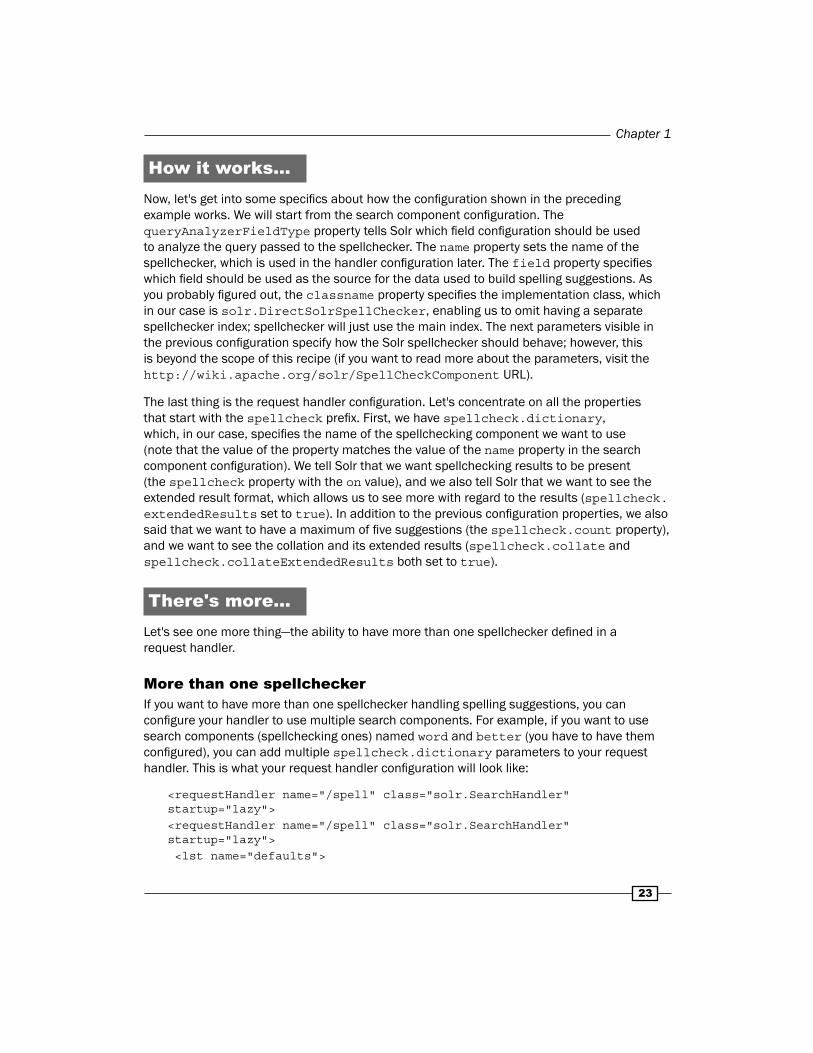
How it works...Now, let's get into some specifi cs about how the confi guration shown in the preceding example works. We will start from the search component confi guration. The queryAnalyzerFieldType property tells Solr which fi eld confi guration should be used to analyze the query passed to the spellchecker. The name property sets the name of the spellchecker, which is used in the handler confi guration later. The field property specifi es which fi eld should be used as the source for the data used to build spelling suggestions. As you probably fi gured out, the classname property specifi es the implementation class, which in our case is solr.DirectSolrSpellChecker, enabling us to omit having a separate spellchecker index; spellchecker will just use the main index. The next parameters visible in the previous confi guration specify how the Solr spellchecker should behave; however, this is beyond the scope of this recipe (if you want to read more about the parameters, visit the http://wiki.apache.org/solr/SpellCheckComponent URL).
The last thing is the request handler confi guration. Let's concentrate on all the properties that start with the spellcheck prefi x. First, we have spellcheck.dictionary, which, in our case, specifi es the name of the spellchecking component we want to use (note that the value of the property matches the value of the name property in the search component confi guration). We tell Solr that we want spellchecking results to be present (the spellcheck property with the on value), and we also tell Solr that we want to see the extended result format, which allows us to see more with regard to the results (spellcheck.extendedResults set to true). In addition to the previous confi guration properties, we also said that we want to have a maximum of fi ve suggestions (the spellcheck.count property), and we want to see the collation and its extended results (spellcheck.collate and spellcheck.collateExtendedResults both set to true).
There's more...Let's see one more thing—the ability to have more than one spellchecker defi ned in a request handler.
More than one spellcheckerIf you want to have more than one spellchecker handling spelling suggestions, you can confi gure your handler to use multiple search components. For example, if you want to use search components (spellchecking ones) named word and better (you have to have them confi gured), you can add multiple spellcheck.dictionary parameters to your request handler. This is what your request handler confi guration will look like:
<requestHandler name="/spell" class="solr.SearchHandler" startup="lazy"><requestHandler name="/spell" class="solr.SearchHandler" startup="lazy"> <lst name="defaults">

Apache Solr Confi guration
24
<str name="df">title</str> <str name="spellcheck.dictionary">direct</str> <str name="spellcheck.dictionary">word</str> <str name="spellcheck.dictionary">better</str> <str name="spellcheck">on</str> <str name="spellcheck.extendedResults">true</str> <str name="spellcheck.count">5</str> <str name="spellcheck.collate">true</str> <str name="spellcheck.collateExtendedResults">true</str> </lst> <arr name="last-components"> <str>spellcheck</str> </arr></requestHandler>
Using Solr in a schemaless modeMany use cases allow us to defi ne our index structure upfront. We can look at the data, see which parts are important, which we want to search, how we want to do it, and fi nally, we can create the schema.xml fi le that we will use. However, this is not always possible. Sometimes, you don't know the data structure before you go into production, or you know very little about it. Of course, we can use dynamic fi elds, but such an approach is limited. This is why the newest versions of Solr allow us to use the so-called schemaless mode in which Solr is able to guess the type of data and create a fi eld for it.
How to do it...Let's assume that we don't know anything about the data and we want to fully rely on Solr when it comes to it.
1. To do this, we start with the schema.xml fi le—the fields section of it. We need to include two fi elds, so our schema.xml fi le looks as follows:
<field name="id" type="string" indexed="true" stored="true" required="true" multiValued="false" /><field name="_version_" type="long" indexed="true" stored="true"/>
2. In addition to this, we need to specify the unique identifi er. We do this by including the following section in the schema.xml fi le:
<uniqueKey>id</uniqueKey>
Chapter 1
25
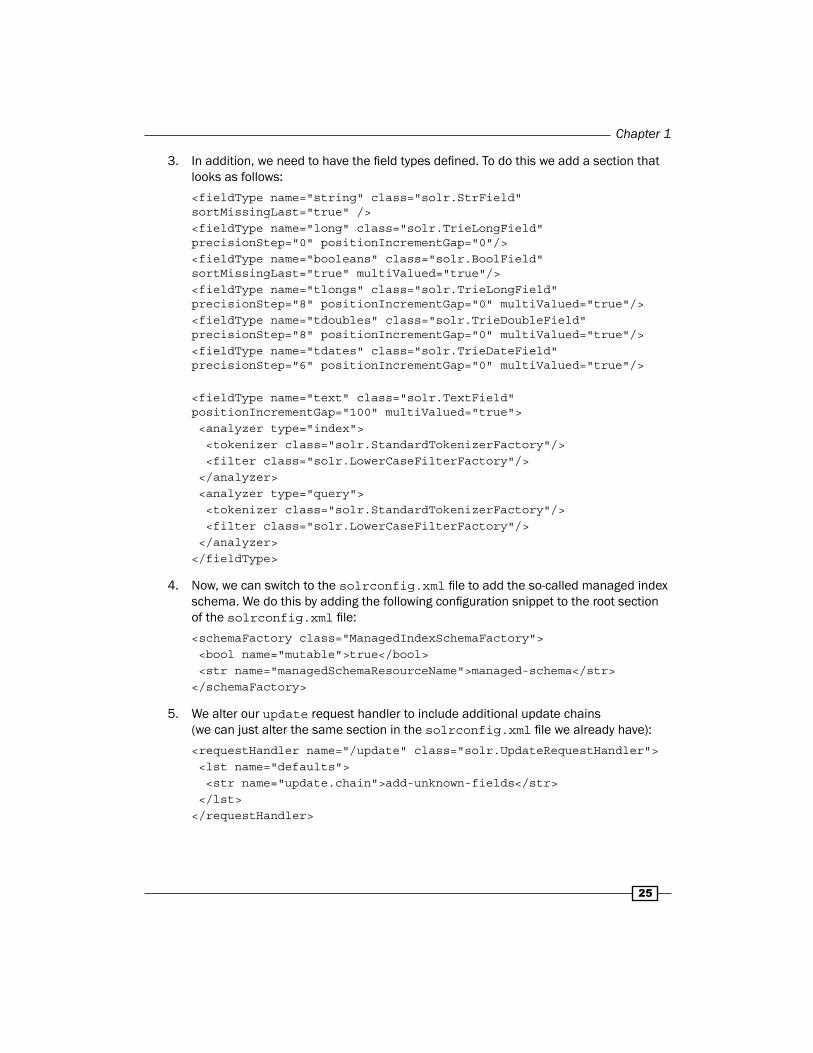
3. In addition, we need to have the fi eld types defi ned. To do this we add a section that looks as follows:
<fieldType name="string" class="solr.StrField" sortMissingLast="true" /><fieldType name="long" class="solr.TrieLongField" precisionStep="0" positionIncrementGap="0"/><fieldType name="booleans" class="solr.BoolField" sortMissingLast="true" multiValued="true"/><fieldType name="tlongs" class="solr.TrieLongField" precisionStep="8" positionIncrementGap="0" multiValued="true"/><fieldType name="tdoubles" class="solr.TrieDoubleField" precisionStep="8" positionIncrementGap="0" multiValued="true"/><fieldType name="tdates" class="solr.TrieDateField" precisionStep="6" positionIncrementGap="0" multiValued="true"/>
<fieldType name="text" class="solr.TextField" positionIncrementGap="100" multiValued="true"> <analyzer type="index"> <tokenizer class="solr.StandardTokenizerFactory"/> <filter class="solr.LowerCaseFilterFactory"/> </analyzer> <analyzer type="query"> <tokenizer class="solr.StandardTokenizerFactory"/> <filter class="solr.LowerCaseFilterFactory"/> </analyzer></fieldType>
4. Now, we can switch to the solrconfig.xml fi le to add the so-called managed index schema. We do this by adding the following confi guration snippet to the root section of the solrconfig.xml fi le:
<schemaFactory class="ManagedIndexSchemaFactory"> <bool name="mutable">true</bool> <str name="managedSchemaResourceName">managed-schema</str></schemaFactory>
5. We alter our update request handler to include additional update chains (we can just alter the same section in the solrconfig.xml fi le we already have):
<requestHandler name="/update" class="solr.UpdateRequestHandler"> <lst name="defaults"> <str name="update.chain">add-unknown-fields</str> </lst></requestHandler>
Apache Solr Confi guration
26
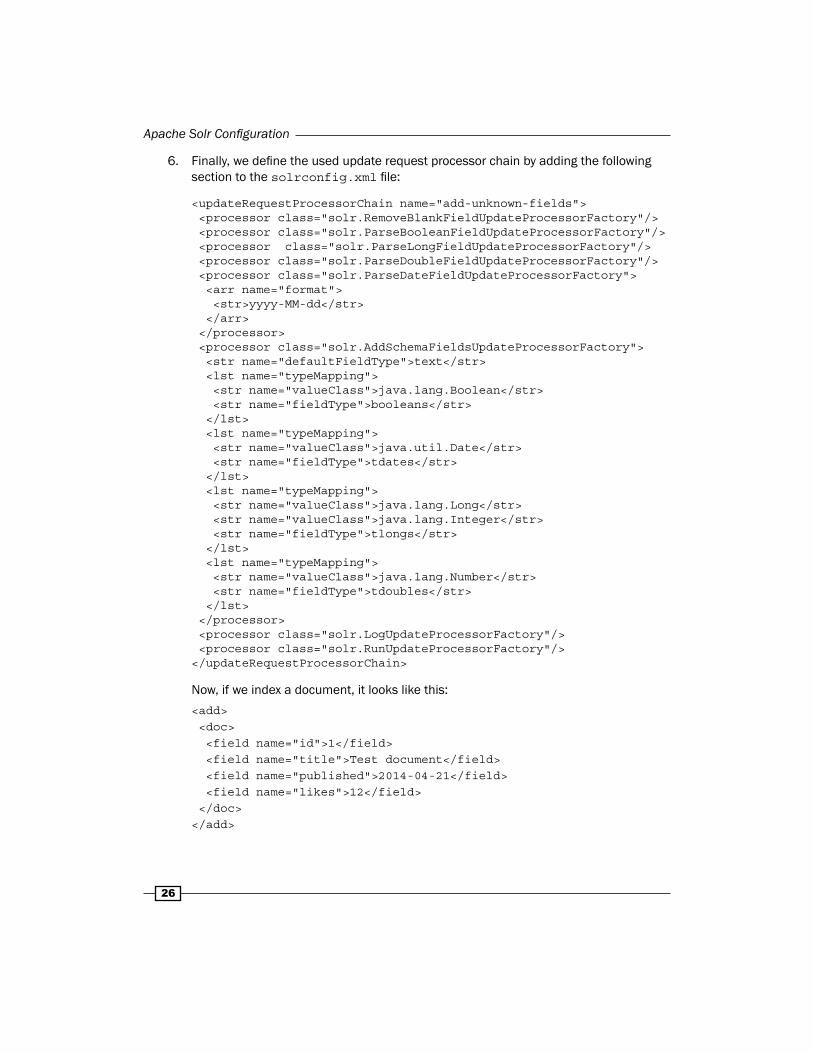
6. Finally, we defi ne the used update request processor chain by adding the following section to the solrconfig.xml fi le:
<updateRequestProcessorChain name="add-unknown-fields"> <processor class="solr.RemoveBlankFieldUpdateProcessorFactory"/> <processor class="solr.ParseBooleanFieldUpdateProcessorFactory"/> <processor class="solr.ParseLongFieldUpdateProcessorFactory"/> <processor class="solr.ParseDoubleFieldUpdateProcessorFactory"/> <processor class="solr.ParseDateFieldUpdateProcessorFactory"> <arr name="format"> <str>yyyy-MM-dd</str> </arr> </processor> <processor class="solr.AddSchemaFieldsUpdateProcessorFactory"> <str name="defaultFieldType">text</str> <lst name="typeMapping"> <str name="valueClass">java.lang.Boolean</str> <str name="fieldType">booleans</str> </lst> <lst name="typeMapping"> <str name="valueClass">java.util.Date</str> <str name="fieldType">tdates</str> </lst> <lst name="typeMapping"> <str name="valueClass">java.lang.Long</str> <str name="valueClass">java.lang.Integer</str> <str name="fieldType">tlongs</str> </lst> <lst name="typeMapping"> <str name="valueClass">java.lang.Number</str> <str name="fieldType">tdoubles</str> </lst> </processor> <processor class="solr.LogUpdateProcessorFactory"/> <processor class="solr.RunUpdateProcessorFactory"/></updateRequestProcessorChain>
Now, if we index a document, it looks like this:
<add> <doc> <field name="id">1</field> <field name="title">Test document</field> <field name="published">2014-04-21</field> <field name="likes">12</field> </doc></add>
Chapter 1
27
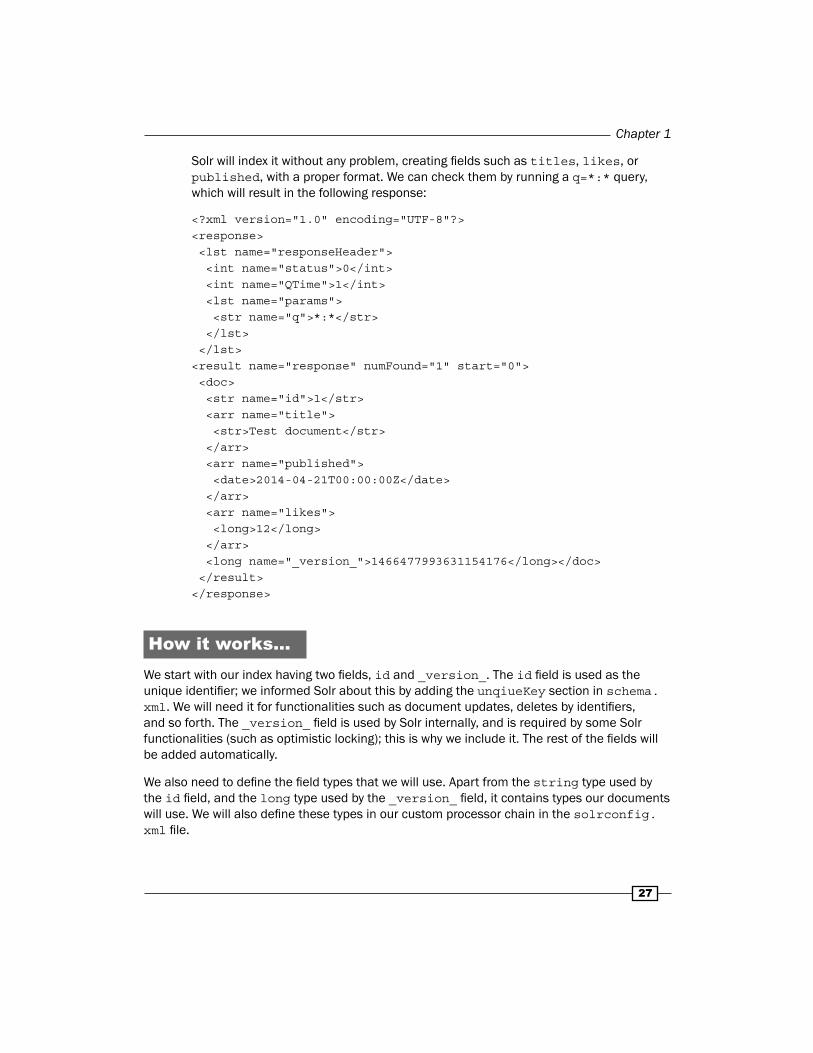
Solr will index it without any problem, creating fi elds such as titles, likes, or published, with a proper format. We can check them by running a q=*:* query, which will result in the following response:
<?xml version="1.0" encoding="UTF-8"?><response> <lst name="responseHeader"> <int name="status">0</int> <int name="QTime">1</int> <lst name="params"> <str name="q">*:*</str> </lst> </lst><result name="response" numFound="1" start="0"> <doc> <str name="id">1</str> <arr name="title"> <str>Test document</str> </arr> <arr name="published"> <date>2014-04-21T00:00:00Z</date> </arr> <arr name="likes"> <long>12</long> </arr> <long name="_version_">1466477993631154176</long></doc> </result></response>
How it works...We start with our index having two fi elds, id and _version_. The id fi eld is used as the unique identifi er; we informed Solr about this by adding the unqiueKey section in schema.xml. We will need it for functionalities such as document updates, deletes by identifi ers, and so forth. The _version_ fi eld is used by Solr internally, and is required by some Solr functionalities (such as optimistic locking); this is why we include it. The rest of the fi elds will be added automatically.
We also need to defi ne the fi eld types that we will use. Apart from the string type used by the id fi eld, and the long type used by the _version_ fi eld, it contains types our documents will use. We will also defi ne these types in our custom processor chain in the solrconfig.xml fi le.
Apache Solr Confi guration
28
The next thing is very important; the managed schema factory that we defi ned in solrconfig.xml, which is a ManagedIndexSchemaFactory type (the class property set to this value). By adding this section, we say that we want Solr to manage our schema.xml fi le. This means that Solr will load the schema.xml fi le during startup, change its name to schema.xml.bak, and will then create a fi le called managed-schema (the value of the managedSchemaResourceName property). From this point, we shouldn't modify our index structure manually—we should either let Solr do it during indexation or add and alter fi elds using the schema API (we will talk about this in the Altering the index structure on a live collection recipe in Chapter 8, Using Additional Functionalities). Since I assume that we will use the schema API, I've set the mutable property to true. If we want to disallow using the schema API, we should set the mutable property to false.
Note that you need to have a single schemaFactory defi ned, and it needs to be set to the ManagedIndexSchemaFactory type. If it is not set to this type, fi eld discovery will not work and the indexation will result in an error.
We also need to include an update request processor chain. Since we want all index requests to use our custom request chain, we add the update.chain property and set it to add-unknown-fields in the defaults section of our update request handler confi guration.
Finally, the second most important thing in this recipe is our update request processor chain called add-unknown-fields (the same as we used in the update processor confi guration). It defi nes several update processors that allow us to get the functionality of fi elds and their types' discoveries. The solr.RemoveBlankFieldUpdateProcessorFactory processor factory removes empty fi elds from the documents we send to indexation. The solr.ParseBooleanFieldUpdateProcessorFactory processor factory is responsible for parsing Boolean fi elds; solr.ParseLongFieldUpdateProcessorFactory parses fi elds that have data that uses the long type; solr.ParseDoubleFieldUpdateProcessorFactory parses fi elds with data of double type; and solr.ParseDateFieldUpdateProcessorFactory parses the date-based fi elds. We specify the format we want Solr to recognize (we will discuss this in more detail in the Using parsing update processors to parse data recipe in Chapter 2, Indexing Your Data).
Finally, we include the solr.AddSchemaFieldsUpdateProcessorFactory processor factory that adds the actual fi elds to our managed schema. We specify the default fi eld type to text by adding the defaultFieldType property. This type will be used when no other type will match the fi eld. After the default fi eld type defi nition, we see four lists called typeMapping. These sections defi ne the fi eld type mappings Solr will use. Each list contains at least one valueClass property and one fieldType property. The valueClass property defi nes the type of data Solr will assign to the fi eld type defi ned by the fieldType property.
Chapter 1
29
In our case, if Solr fi nds a date (<str name="valueClass">java.util.Date</str>) value in a fi eld, it will create a new fi eld using the tdates fi eld type (<str name="fieldType">tdates</str>). If Solr fi nds a long or an integer value, it creates a new fi eld using the tlongs fi eld type. Of course, a fi eld won't be created if it already exists in our managed schema. The name of the fi eld created in our managed schema will be the same as the name of the fi eld in the indexed document.
Finally, the solr.LogUpdateProcessorFactory processor factory tells Solr to write information about the update to log, and the solr.RunUpdateProcessorFactory processor factory tells Solr to run the update itself.
As we can see, our data includes fi elds that we didn't specify in the schema.xml fi le, and the document was indexed properly, which allows us to assume that the functionality works. If you want to check how our index structure looks like after indexation, use the schema API; you can do it yourself after reading the Retrieving information about the index structure recipe in Chapter 8, Using Additional Functionalities.
One thing to remember is that by default, Solr is able to automatically detect fi eld types such as Boolean, integer, fl oat, long, double, and date.
Take a look at https://cwiki.apache.org/confluence/display/solr/Schemaless+Mode for further information regarding the Solr schemaless mode.
Limiting I/O usageAs you might know, the Lucene index is divided into smaller pieces called segments, and each segment is stored on disk. Depending on the indexing and merge policy settings, Lucene, from time to time, merges two or more segments into a new one. This operation requires reading the old segments and writing a new one with the information from the old segments. The merges can happen at the same time when Solr indexes data and queries are run. The same goes for writing the segments; it can be pretty expensive when it comes to I/O usage. It is because of this that Solr allows us to confi gure the limits for I/O usage. This recipe will show you how to do this.
Getting readyBefore continuing further with this recipe, read the Choosing the proper directory confi guration recipe of this chapter to see what directories are available and how to confi gure them.
Apache Solr Confi guration
30
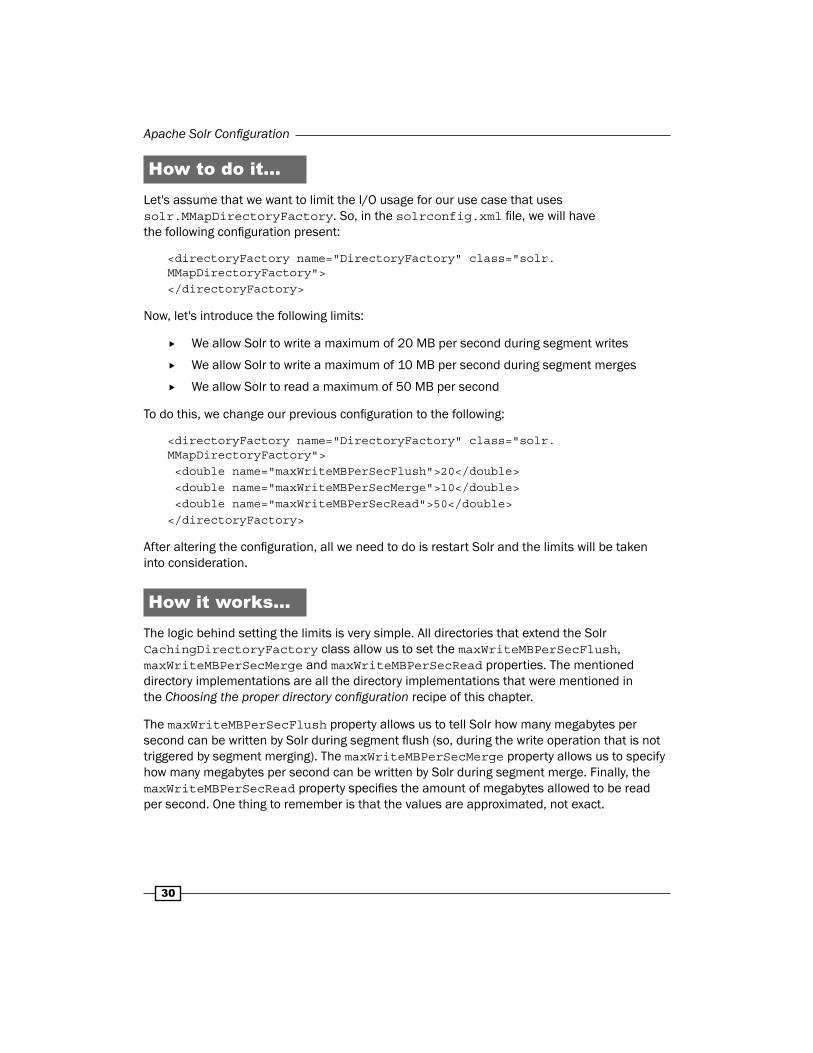
How to do it...Let's assume that we want to limit the I/O usage for our use case that uses solr.MMapDirectoryFactory. So, in the solrconfig.xml fi le, we will have the following confi guration present:
<directoryFactory name="DirectoryFactory" class="solr.MMapDirectoryFactory"></directoryFactory>
Now, let's introduce the following limits:
We allow Solr to write a maximum of 20 MB per second during segment writes
We allow Solr to write a maximum of 10 MB per second during segment merges
We allow Solr to read a maximum of 50 MB per second
To do this, we change our previous confi guration to the following:
<directoryFactory name="DirectoryFactory" class="solr.MMapDirectoryFactory"> <double name="maxWriteMBPerSecFlush">20</double> <double name="maxWriteMBPerSecMerge">10</double> <double name="maxWriteMBPerSecRead">50</double></directoryFactory>
After altering the confi guration, all we need to do is restart Solr and the limits will be taken into consideration.
How it works...The logic behind setting the limits is very simple. All directories that extend the Solr CachingDirectoryFactory class allow us to set the maxWriteMBPerSecFlush, maxWriteMBPerSecMerge and maxWriteMBPerSecRead properties. The mentioned directory implementations are all the directory implementations that were mentioned in the Choosing the proper directory confi guration recipe of this chapter.
The maxWriteMBPerSecFlush property allows us to tell Solr how many megabytes per second can be written by Solr during segment fl ush (so, during the write operation that is not triggered by segment merging). The maxWriteMBPerSecMerge property allows us to specify how many megabytes per second can be written by Solr during segment merge. Finally, the maxWriteMBPerSecRead property specifi es the amount of megabytes allowed to be read per second. One thing to remember is that the values are approximated, not exact.
Chapter 1
31
Limiting I/O usage can be very handy, especially in deployments where I/O usage is at its maximum. During query peak hours, when we want to solve server queries as fast as we can, we need to minimize the indexing and merging impact. With proper confi guration that is adjusted to our needs, we can just limit the I/O usage and still serve queries with the latency we want.
Using core discoveryUntil Solr 4.4, solr.xml needed to include mandatory information, such as the cores defi nition. This was needed because Solr used this information to get and load the defi ned cores and their properties, basically information that was required for Solr to operate properly. Starting from Solr 4.4, a new structure of the solr.xml fi le was introduced, and in addition to this, a process called core discovery was implemented. Due to these changes, we are not forced to describe the core in the solr.xml fi le, but instead, we can use simple text fi les, and Solr will automatically load the appropriate cores. This recipe will show you how to use the core discovery process.
How to do it...Using the new core discovery process is very simple.
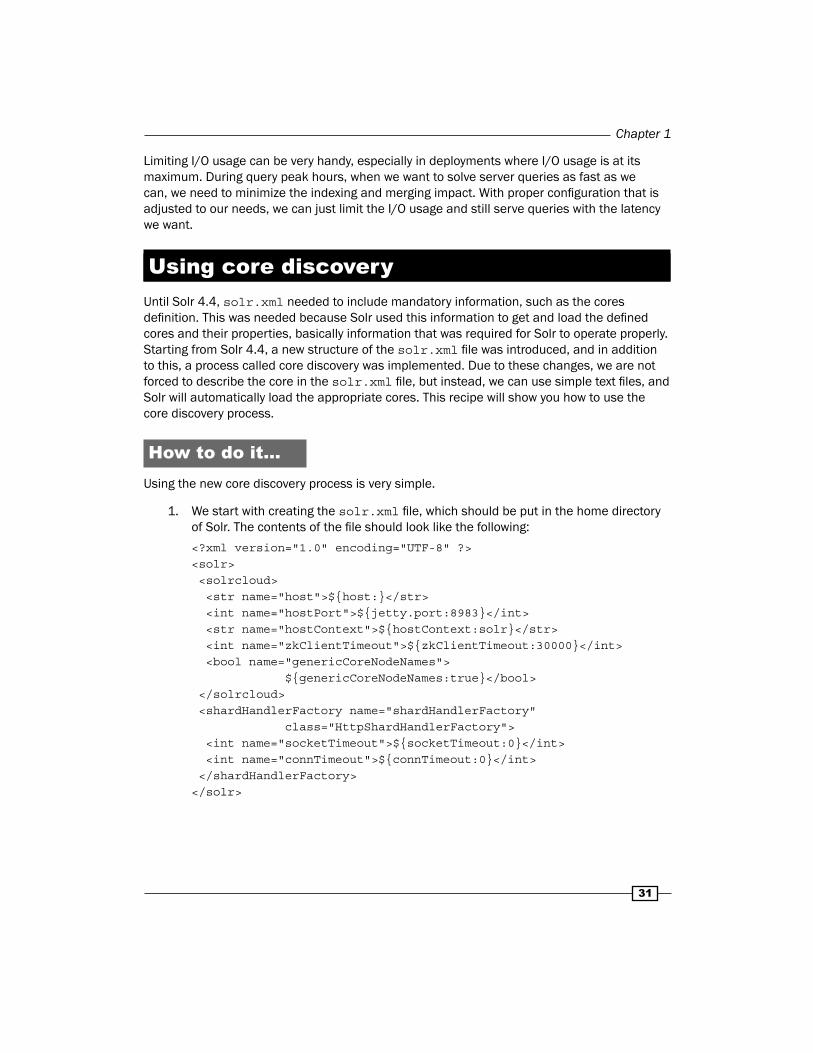
1. We start with creating the solr.xml fi le, which should be put in the home directory of Solr. The contents of the fi le should look like the following:
<?xml version="1.0" encoding="UTF-8" ?><solr> <solrcloud> <str name="host">${host:}</str> <int name="hostPort">${jetty.port:8983}</int> <str name="hostContext">${hostContext:solr}</str> <int name="zkClientTimeout">${zkClientTimeout:30000}</int> <bool name="genericCoreNodeNames"> ${genericCoreNodeNames:true}</bool> </solrcloud> <shardHandlerFactory name="shardHandlerFactory" class="HttpShardHandlerFactory"> <int name="socketTimeout">${socketTimeout:0}</int> <int name="connTimeout">${connTimeout:0}</int> </shardHandlerFactory></solr>
Apache Solr Confi guration
32
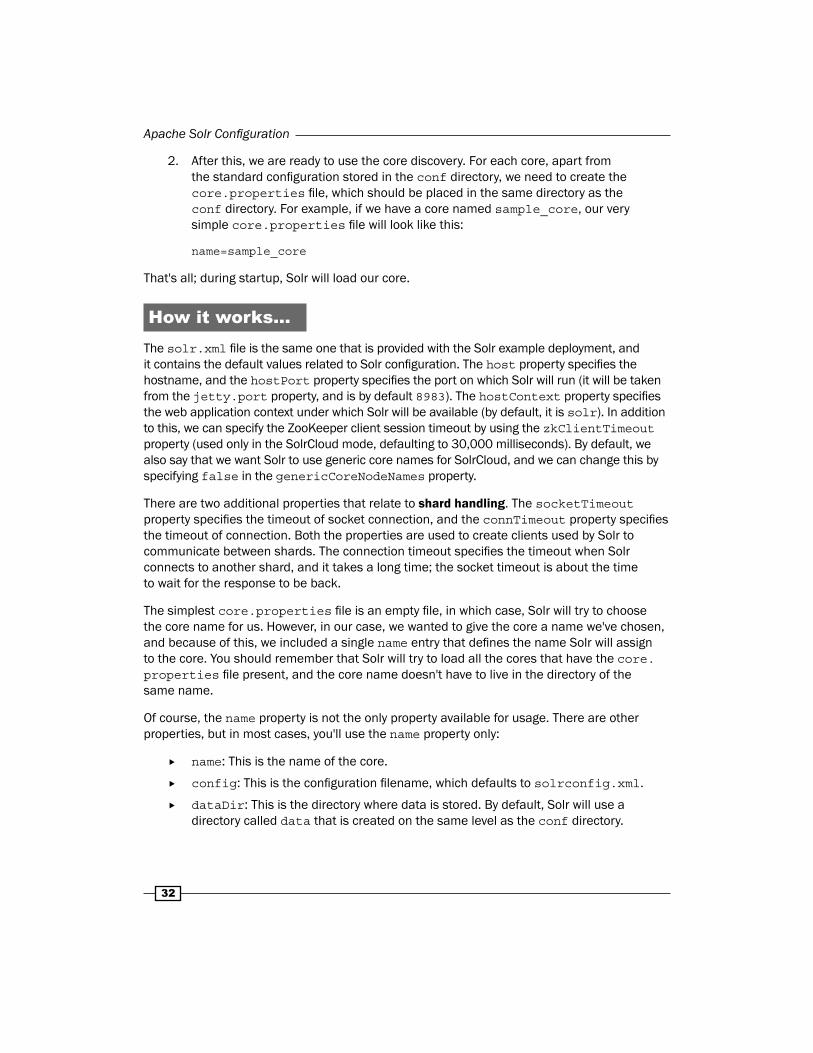
2. After this, we are ready to use the core discovery. For each core, apart from the standard confi guration stored in the conf directory, we need to create the core.properties fi le, which should be placed in the same directory as the conf directory. For example, if we have a core named sample_core, our very simple core.properties fi le will look like this:
name=sample_core
That's all; during startup, Solr will load our core.
How it works...The solr.xml fi le is the same one that is provided with the Solr example deployment, and it contains the default values related to Solr confi guration. The host property specifi es the hostname, and the hostPort property specifi es the port on which Solr will run (it will be taken from the jetty.port property, and is by default 8983). The hostContext property specifi es the web application context under which Solr will be available (by default, it is solr). In addition to this, we can specify the ZooKeeper client session timeout by using the zkClientTimeout property (used only in the SolrCloud mode, defaulting to 30,000 milliseconds). By default, we also say that we want Solr to use generic core names for SolrCloud, and we can change this by specifying false in the genericCoreNodeNames property.
There are two additional properties that relate to shard handling. The socketTimeout property specifi es the timeout of socket connection, and the connTimeout property specifi es the timeout of connection. Both the properties are used to create clients used by Solr to communicate between shards. The connection timeout specifi es the timeout when Solr connects to another shard, and it takes a long time; the socket timeout is about the time to wait for the response to be back.
The simplest core.properties fi le is an empty fi le, in which case, Solr will try to choose the core name for us. However, in our case, we wanted to give the core a name we've chosen, and because of this, we included a single name entry that defi nes the name Solr will assign to the core. You should remember that Solr will try to load all the cores that have the core.properties fi le present, and the core name doesn't have to live in the directory of the same name.
Of course, the name property is not the only property available for usage. There are other properties, but in most cases, you'll use the name property only:
name: This is the name of the core.
config: This is the confi guration fi lename, which defaults to solrconfig.xml.
dataDir: This is the directory where data is stored. By default, Solr will use a directory called data that is created on the same level as the conf directory.
Chapter 1
33
ulogDir: This is the directory where the transaction log entries are stored. For performance reasons, it might be good to store transaction logfi les on a disks other than the index fi les.
schema: This is the name of the fi le describing the index structure, which defaults to schema.xml.
shard: This is the identifi er of the shard.
collection: This is the name of the collection the core belongs to.
roles: This is the core role defi nition.
loadOnStartup: This can take a value of true or false. It defaults to true, which means Solr will load the core during startup.
transient: This can take a value of true or false. It defaults to false, which means that the core can't be automatically unloaded by Solr.
coreNodeName: This is the name of the core used by SolrCloud.
Finally, it is worth saying that the old solr.xml format will not be supported in Solr 5.0, so it is good to get familiar with the new format now.
There's more...If you want to see all the properties and sections exposed by the new solr.xml format, refer to the offi cial Apache Solr documentation located at https://cwiki.apache.org/confluence/display/solr/Format+of+solr.xml.
Confi guring SolrCloud for NRT use casesNowadays, we are used to getting information as soon as we can. We want our data to be indexed fast, effi ciently, and be available for searching as soon as possible; in perfect cases, right after they were sent for indexation. This is what near real time in Solr is all about— the ability to search the documents right after they are sent for indexation or with a very short latency. This recipe will show you how to confi gure Solr, especially SolrCloud for such use cases.
How to do it...I assume that you already have SolrCloud set up and ready to go (if you don't, refer to the Creating a new SolrCloud cluster recipe in Chapter 7, In the Cloud); you will now know how to update your collection confi guration and be interested in near real-time search.
Apache Solr Confi guration
34
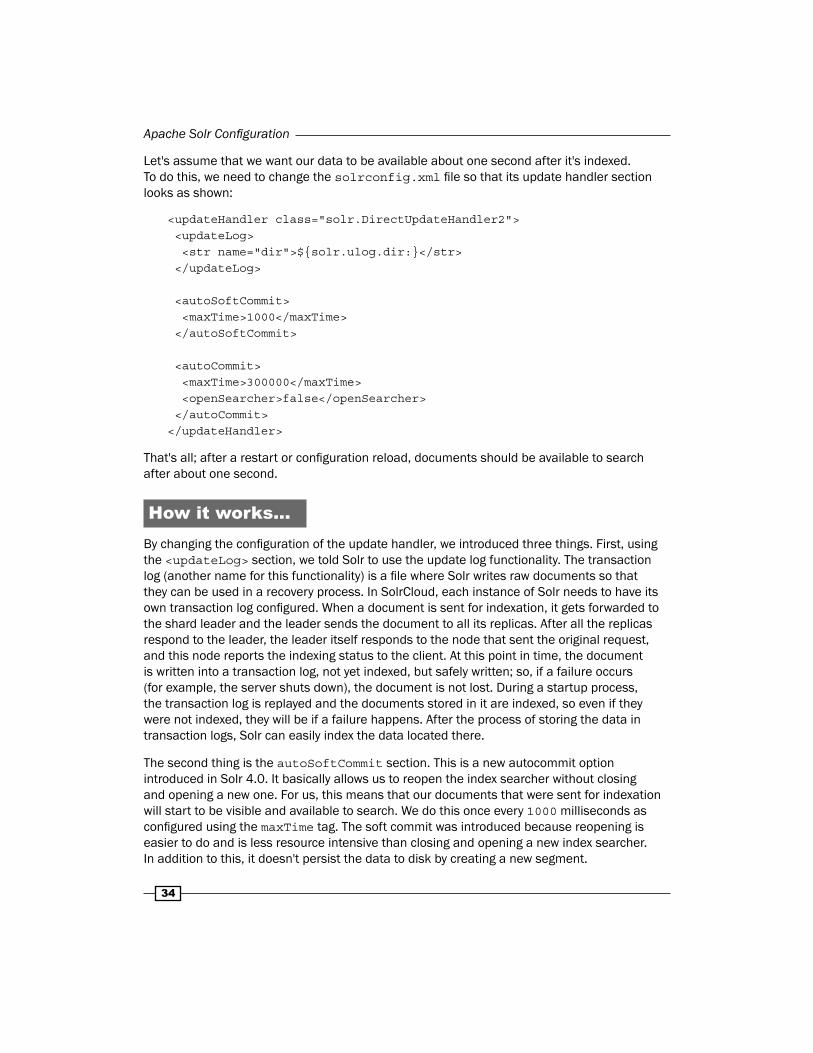
Let's assume that we want our data to be available about one second after it's indexed. To do this, we need to change the solrconfig.xml fi le so that its update handler section looks as shown:
<updateHandler class="solr.DirectUpdateHandler2"> <updateLog> <str name="dir">${solr.ulog.dir:}</str> </updateLog> <autoSoftCommit> <maxTime>1000</maxTime> </autoSoftCommit> <autoCommit> <maxTime>300000</maxTime> <openSearcher>false</openSearcher> </autoCommit></updateHandler>
That's all; after a restart or confi guration reload, documents should be available to search after about one second.
How it works...By changing the confi guration of the update handler, we introduced three things. First, using the <updateLog> section, we told Solr to use the update log functionality. The transaction log (another name for this functionality) is a fi le where Solr writes raw documents so that they can be used in a recovery process. In SolrCloud, each instance of Solr needs to have its own transaction log confi gured. When a document is sent for indexation, it gets forwarded to the shard leader and the leader sends the document to all its replicas. After all the replicas respond to the leader, the leader itself responds to the node that sent the original request, and this node reports the indexing status to the client. At this point in time, the document is written into a transaction log, not yet indexed, but safely written; so, if a failure occurs (for example, the server shuts down), the document is not lost. During a startup process, the transaction log is replayed and the documents stored in it are indexed, so even if they were not indexed, they will be if a failure happens. After the process of storing the data in transaction logs, Solr can easily index the data located there.
The second thing is the autoSoftCommit section. This is a new autocommit option introduced in Solr 4.0. It basically allows us to reopen the index searcher without closing and opening a new one. For us, this means that our documents that were sent for indexation will start to be visible and available to search. We do this once every 1000 milliseconds as confi gured using the maxTime tag. The soft commit was introduced because reopening is easier to do and is less resource intensive than closing and opening a new index searcher. In addition to this, it doesn't persist the data to disk by creating a new segment.
Chapter 1
35
However, one has to remember that even though the soft commit is less resource intensive, it is still not free. Some Solr caches will have to be reloaded, such as the fi lter, document, or query result caches. We will get into more confi guration details in the Confi guring SolrCloud for high-indexing use cases and Confi guring SolrCloud for high-querying use cases recipes in this chapter.
The last thing is the autocommit defi ned in the autoCommit section, which is called the hard autocommit. It is responsible for fl ushing data and closing the index segment used for it (because of this segment, merge might start in the background). In addition to this, the hard autocommit also closes the transaction log and opens a new one. We've confi gured this operation to happen every 5 minutes (300000 milliseconds). What we also included is the <openSearcher>false</openSearcher> section. This means that Solr won't open a new index searcher during a hard auto commit operation. We do this on purpose; we defi ne index searcher opening periods in the soft autocommit section. If we set the openSearcher section to true, Solr will close the old index searcher, open a new one, and automatically warm caches. Before Solr 4.0, this was the only way to have documents visible for searching when using autocommit.
One additional thing to remember is that with soft autocommit set to reopen the searcher very often, all the top level caches, such as the fi lter, document, and query result caches, will be invalidated. It is worth thinking and doing performance tests if the cache (all or some of them) are actually worth being used at all. I would like to give a clear advice here, but this is highly dependent on the use case. You can read more about cache confi guration in the Confi guring the document cache, Confi guring the query result cache, and Confi guring the fi lter cache recipes in Chapter 6, Improving Solr Performance.
Confi guring SolrCloud for high-indexing use cases
Solr is designed to work under high load, both when it comes to querying and indexing. However, the default confi guration provided with the example Solr deployment is not suffi cient when it comes to these use cases. This recipe will show you how to prepare your SolrCloud collection confi guration for use cases when the indexing rate is very high.
Getting readyBefore continuing reading the recipe, read the Running Solr on a standalone Jetty and Confi guring SolrCloud for NRT use cases recipes in this chapter.
Apache Solr Confi guration
36
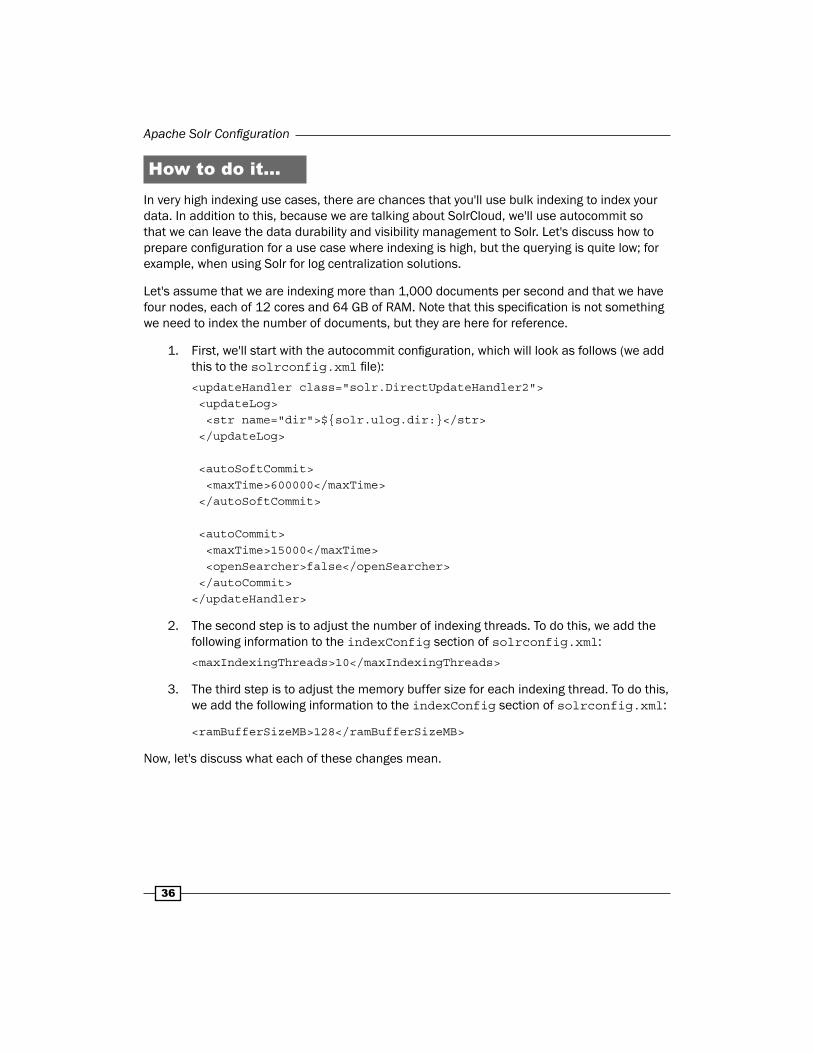
How to do it...In very high indexing use cases, there are chances that you'll use bulk indexing to index your data. In addition to this, because we are talking about SolrCloud, we'll use autocommit so that we can leave the data durability and visibility management to Solr. Let's discuss how to prepare confi guration for a use case where indexing is high, but the querying is quite low; for example, when using Solr for log centralization solutions.
Let's assume that we are indexing more than 1,000 documents per second and that we have four nodes, each of 12 cores and 64 GB of RAM. Note that this specifi cation is not something we need to index the number of documents, but they are here for reference.
1. First, we'll start with the autocommit confi guration, which will look as follows (we add this to the solrconfig.xml fi le):
<updateHandler class="solr.DirectUpdateHandler2"> <updateLog> <str name="dir">${solr.ulog.dir:}</str> </updateLog>
<autoSoftCommit> <maxTime>600000</maxTime> </autoSoftCommit>
<autoCommit> <maxTime>15000</maxTime> <openSearcher>false</openSearcher> </autoCommit></updateHandler>
2. The second step is to adjust the number of indexing threads. To do this, we add the following information to the indexConfig section of solrconfig.xml:
<maxIndexingThreads>10</maxIndexingThreads>
3. The third step is to adjust the memory buffer size for each indexing thread. To do this, we add the following information to the indexConfig section of solrconfig.xml:
<ramBufferSizeMB>128</ramBufferSizeMB>
Now, let's discuss what each of these changes mean.
Chapter 1
37
How it works...We started with tuning the autocommit setting, which you should be aware of after reading this recipe. Since we are not worried about documents being visible as soon as they are indexed, we set the soft autocommit's maxTime property to 600000. This means that we will reopen the searcher every 10 minutes, so our documents will be visible maximum 10 minutes after they are sent to indexation.
The one thing to look at is the short time for hard commit, which is every 15 seconds (the maxTime property of the autoCommit section set to 15000). We did this because we don't want transaction logs to contain a high number of entries because this can cause problems during the recovery process.
We also increased the default number of threads an index writer can use from the default 8 to 10 by setting the maxIndexingThreads property. Since we have 12 cores on each machine, and we are not querying much, we can allow more threads using the index writer. If the index writer uses the number of threads that's equal to the maxIndexingThreads property, the next thread will wait for one of the currently running to end. Remember that the maxIndexingThreads property sets the maximum allowed indexing threads, which doesn't mean they will be used every time.
We also increased the default RAM buffer size from 100 to 128 using the ramBufferSizeMB property. We did this to allow Lucene to buffer as many documents as needed in memory. If the size of the documents in the buffer is larger than the given value of the ramBufferSizeMB property, Lucene will fl ush the data to the directory, which will decide what else to do. We have to remember though that we are also using autocommit, so the data will be fl ushed every 15 seconds because of hard autocommit settings.
Remember that we didn't take into consideration the size of the cluster because we had the maximum number of nodes. You should remember that if I/O is the bottleneck when indexing, spreading the collection among more nodes should help with the indexing load.
In addition to this, you might want to look at the merging policy and segment merge processes as this can become a major bottleneck. If you are interested, refer to the Tuning segment merging recipe in Chapter 9, Dealing with Problems.
Apache Solr Confi guration
38
Confi guring SolrCloud for high-querying use cases
One of the things that Solr is really great for is high-querying use cases. Whether they are distributed queries using SolrCloud or single node queries running in master-slave environments, Solr does very well when it comes to handling queries and scaling. In this recipe, we will concentrate on use cases where we index quite a small amount of documents per second, but we want to have them at low latency.
Getting readyBefore continuing to read this recipe, read the Running Solr on a standalone Jetty, Confi guring SolrCloud for NRT use cases, and Confi guring SolrCloud for high-indexing use cases recipes of this chapter.
How to do it...Giving general advice for high-querying use cases is pretty hard because it very much depends on the data, cluster structure, query structure, and target latency. In this recipe, we will look at three things—confi guration, scaling, and overall general advices. Let's assume that we have four nodes, each having 128 GB of RAM and large disks, and we have 100 million documents we want to search across.
We should start with sizing our cluster. In general, this means choosing the right number of nodes, the right number of shards and replicas for your collections, and the memory. The general advice is to index some portion of your data and see how much space is used. For example, assuming you've indexed 1,000 documents and they are taking 1 MB of disk space, we can now calculate the disk space needed by 100 million documents; this will give us about 100 GB of total disk space used. With a replication factor of 2, we will need 200 GB, which means our four nodes should be enough to have the data cached by the operating system. In addition to this, we will need memory for Solr to operate (we can help ourselves calculate how much we will need using http://svn.apache.org/repos/asf/lucene/dev/trunk/dev-tools/size-estimator-lucene-solr.xls).
Given these facts, we can end up with a minimum of four shards and a replication factor of 2, which will give us a leader shard and its replica for each of the four initial shards we created the collection with. However, going for more initial shards might be better for scaling in the later stage of your application life cycle.

Chapter 1
39
After we know some information, we can prepare the autocommit settings. To do this, we alter our solrconfig.xml confi guration fi le and include the following update handler confi guration:
<updateHandler class="solr.DirectUpdateHandler2">
<updateLog> <str name="dir">${solr.ulog.dir:}</str> </updateLog>
<autoSoftCommit> <maxTime>30000</maxTime> </autoSoftCommit>
<autoCommit> <maxTime>600000</maxTime> <openSearcher>false</openSearcher> </autoCommit></updateHandler>
In addition to this, we should adjust caching, which is covered in the Confi guring the document cache, Confi guring the query result cache, and Confi guring the fi lter cache recipes in Chapter 6, Improving Solr Performance.
In addition to all this, you might want to look at the merging policy and segment merge processes as this can become a major bottleneck. If you are interested, refer to the Tuning segment merging recipe in Chapter 9, Dealing with Problems.
How it works...We started with sizing questions and estimations. Remember that the numbers you will extrapolate from the small portion of data are not exact numbers, they are estimations. What's more, we now know that in order to have our index fully cached by the operating system, we will need at least 200 GB of RAM memory that can be used for the system cache because we will have at least one shard and its physical copy. Of course, the four nodes with 128 GB of RAM are more or less a perfect case when we will be able to have our indices cached. This is because we will have a total of 512 GB of RAM across all nodes. Given the fact that we will end up with four leader shards, one on each machine, four replicas, again one on each machine, and that our index will be evenly divided, it will give us 50 GB of data on each node (25 GB for leader and the same for replica because it is an exact copy).
Apache Solr Confi guration
40
A few words about having more shards—sometimes, if you expect your data to grow, it is good to create a collection with more shards initially and place multiple ones on a single node. This gives more fl exibility when you add new nodes; you can migrate some shards without the need to split them, or you can create a new collection with new shards and reindex your data.
Next, we adjust the autocommit section. Since we don't need near real-time searching, we decide not to stress Solr too much and set the soft autocommit to 60000 milliseconds, which means that the data will be visible after 1 minute from indexing. In general, if you will, the more often you reopen the searcher, the more pressure is put on Solr, and thus, the queries will be slower. So, if you query heavily, you should set the soft autocommit to the maximum time allowed by your use case.
Of course, we also included the hard autocommit and set it to be executed every 10 minutes. We decided to go for this because we don't index much data, so the index shouldn't be changed too often, and the transaction log shouldn't be too large.
Confi guring the Solr heartbeat mechanismSolr is designed to be scalable, fault tolerant, and have a high up time so that we can have our search service always ready. Many of the deployments, whether they are still master-slave setups or SolrCloud ones, still use some kind of load-balancing and health-checking mechanism. Solr comes with a request handler that is designed to handle health-checking requests, and this recipe will show you how to set it up.
How to do it...Setting up the heartbeat mechanism in Solr is very easy. One just needs to add the following section to the solrconfig.xml fi le:
<requestHandler name="/admin/ping" class="solr.PingRequestHandler"> <lst name="invariants"> <str name="q">solrpingquery</str> </lst></requestHandler>
This is all. Of course, if we need all our cores and collections to respond to the health requests, we should include the previous section in the solrconfig.xml fi les for all of them. After this, run a query to the admin/ping handler of our Solr instance, for example:
curl 'localhost:8983/solr/heartbeat_core/admin/ping'
Chapter 1
41
Solr will respond with a status response, for example:
<?xml version="1.0" encoding="UTF-8"?>
<response>
<lst name="responseHeader"><int name="status">0</int><int name="QTime">6</int><lst name="params"/></lst><str name="status">OK</str>
</response>
How it works...The confi guration is really simple; we defi ned a new request handler that will be available under the /admin/ping address (of course, we have to prefi x it with the host address and core name). The class implementing the handle is the one dedicated to handle the heartbeat mechanism request, solr.PingRequestHandler. We also defi ned that the q parameter for all the ping requests will be solrpingquery and the request won't be able to overwrite this parameter (because we included it in the invariants section). The ping query should be as simple as it can get so that it runs blazingly fast; what's more, it is usually good for it not to return any search results.
As you can see, the response contains the status section, which in our case has the value of OK. In the case of an error, the status section will contain the error code.
There's more...The solr.PingRequestHandler handler allows us to enable and disable the heartbeat mechanism without shutting down the whole Solr instance.
Enabling and disabling the heartbeat mechanismIf we want to disable and enable the heartbeat mechanism without taking down the whole Solr instance, we need to introduce a property called healthcheckFile to our request handler confi guration, for example:
<requestHandler name="/admin/ping" class="solr.PingRequestHandler"> <lst name="invariants"> <str name="q">solrpingquery</str> </lst> <str name="healthcheckFile">server-enabled.txt</str></requestHandler>
Now, to enable the heartbeat mechanism, one should run the following command:
curl 'localhost:8983/solr/heartbeat_core/admin/ping?action=enable'
Apache Solr Confi guration
42
By running this, Solr will create a fi le named server-enabled.txt in the directory the data directory is located at. This fi le will contain information about when the heartbeat mechanism is enabled.
To disable the heartbeat mechanism, one should run the following command:
curl 'localhost:8983/ solr/heartbeat_core/admin/ping?action=disable'
This command will delete the previously created fi le.
We can also check the heartbeat status by running the following command:
curl 'localhost:8983/solr/heartbeat_core/admin/ping?action=status'
Changing similarityMost times, the default way to calculate the score of your documents is what you need. However, sometimes you need more from Solr than just the standard behavior. For example, you might want shorter documents to be more valuable compared to longer ones. Let's assume that you want to change the default behavior and use different score calculation algorithms for the description fi eld of your index. This recipe will show you how to leverage this functionality.
Getting readyBefore choosing one of the score calculation algorithms available in Solr, it's good to read a bit about them. The detailed description of all the algorithms is beyond the scope of this recipe and the book (although a simple description is mentioned later in the recipe), but I suggest visiting the Solr wiki page (or Javadocs) and reading basic information about the available implementations.
How to do it...For the purpose of this recipe, let's assume we have the following index structure (just add the following entries to your schema.xml fi le):
<field name="id" type="string" indexed="true" stored="true" required="true" /><field name="name" type="text_general" indexed="true" stored="true"/><field name="description" type="text_general_dfr" indexed="true" stored="true" />

Chapter 1
43
The string and text_general types are available in the default schema.xml fi le provided with the example Solr distribution. However, we want DFRSimilarity to be used to calculate the score for the description fi eld. In order to do this, we introduce a new type, which is defi ned as follows (just add the following entries to your schema.xml fi le):
<fieldType name="text_general_dfr" class="solr.TextField" positionIncrementGap="100"> <analyzer type="index"> <tokenizer class="solr.StandardTokenizerFactory"/> <filter class="solr.StopFilterFactory" ignoreCase="true" words="stopwords.txt" enablePositionIncrements="true" /> <filter class="solr.LowerCaseFilterFactory"/> </analyzer> <analyzer type="query"> <tokenizer class="solr.StandardTokenizerFactory"/> <filter class="solr.StopFilterFactory" ignoreCase="true" words="stopwords.txt" enablePositionIncrements="true" /> <filter class="solr.SynonymFilterFactory" synonyms="synonyms.txt" ignoreCase="true" expand="true"/> <filter class="solr.LowerCaseFilterFactory"/> </analyzer> <similarity class="solr.DFRSimilarityFactory"> <str name="basicModel">P</str> <str name="afterEffect">L</str> <str name="normalization">H2</str> <float name="c">7</float> </similarity></fieldType>
Also, to use the per-fi eld similarity, we have to add the following entry to your schema.xml fi le:
<similarity class="solr.SchemaSimilarityFactory"/>
That's all. Now, let's have a look and see how this works.
How it works...The index structure previously presented is pretty simple as there are only three fi elds. The one thing we are interested in is that the description fi eld uses our own custom fi eld type called text_generanl_dfr.
Apache Solr Confi guration
44
The thing we are most interested in is the new fi eld type defi nition called text_general_dfr. As you can see, apart from the index and query analyzer, there is an additional section called similarity. It is responsible for specifying which similarity implementation to use to calculate the score for a given fi eld. You are probably used to defi ning fi eld types, fi lters, and other things in Solr, so you probably know that the class attribute is responsible for specifying the class that implements the desired similarity implementation, in our case, solr.DFRSimilarityFactory. Also, if there is a need, you can specify additional parameters that confi gure the behavior of your chosen similarity class. In the previous example, we specifi ed the four additional parameters of basicModel, afterEffect, normalization, and c, all of which defi ne the DFRSimilarity behavior.
The solr.SchemaSimilarityFactory class is required to specify the similarity for each fi eld.
Although the recipe is not about all the similarities available, I wanted to list the available ones. Note that each similarity might require and use different confi guration parameters (all of them are described in the provided Javadocs). The list of currently available similarity factories are:
solr.DefaultSimilarityFactory: This is the default Lucene similarity implementing the default scoring algorithm (the Javadoc is available at http://lucene.apache.org/solr/4_10_0/solr-core/org/apache/solr/search/similarities/DefaultSimilarityFactory.html).
solr.SweetSpotSimilarityFactory: This is the extension to the default similarity factory, providing additional parameters to tune scoring behaviors (the Javadoc is available at http://lucene.apache.org/solr/4_10_0/solr-core/org/apache/solr/search/similarities/SweetSpotSimilarityFactory.html).
solr.BM25SimilarityFactory: This is the similarity model that bases the score calculation on the probabilistic model, estimating the probability of fi nding a document for a given query. It is said that this similarity performs best on short texts (the Javadoc is available at http://lucene.apache.org/solr/4_10_0/solr-core/org/apache/solr/search/similarities/BM25SimilarityFactory.html).
solr.DFRSimilarityFactory: This similarity is based on the divergence from the randomness probability model (the Javadoc is available at http://lucene.apache.org/solr/4_10_0/solr-core/org/apache/solr/search/similarities/DFRSimilarityFactory.html).
solr.IBSimilarityFactory: This similarity is based on the information-based probability model, which is similar to the one used for divergence from the randomness model (the Javadoc is available at http://lucene.apache.org/solr/4_10_0/solr-core/org/apache/solr/search/similarities/IBSimilarityFactory.html).
Chapter 1
45
solr.LMDirichletSimilarityFactory: This similarity is based on Bayesian smoothing using Dirichlet priors (the Javadoc is available at http://lucene.apache.org/solr/4_10_0/solr-core/org/apache/solr/search/similarities/LMDirichletSimilarityFactory.html).
solr.LMJelinekMercerSimilarityFactory: This similarity is based on the Jelinek-Mercer smoothing method (the Javadoc is available at http://lucene.apache.org/solr/4_10_0/solr-core/org/apache/solr/search/similarities/LMJelinekMercerSimilarityFactory.html).
Note that after the similarity model changes, full document reindexing should be performed.
There's more...In addition to per-fi eld similarity defi nition, you can also confi gure the global similarity.
Changing the global similarityApart from specifying the similarity class on a per-fi eld basis, you can choose fi elds other than the default one in a global way. For example, if you want to use BM25Similarity as the default fi eld, you should add the following entry to your schema.xml fi le:
<similarity class="solr.BM25SimilarityFactory"/>
As with the per-fi eld similarity, you need to provide the name of the factory class that is responsible for creating the appropriate similarity class.

Where to buy this book You can buy Solr Cookbook Third Edition from the Packt Publishing website.
Alternatively, you can buy the book from Amazon, BN.com, Computer Manuals and most internet
book retailers.
Click here for ordering and shipping details.
www.PacktPub.com
Stay Connected:
Get more information Solr Cookbook Third Edition