004-Assembly Design 組立設計
61
1 LUKE 誼卡科技 3DEXPERIENCE Assembly Design 組立設計
Transcript of 004-Assembly Design 組立設計

1
LUKE 誼卡科技
3DEXPERIENCE
Assembly Design 組立設計
2
課程
一、Creating and Modifying Products
二、定位Positioning Components
三、拘束Constraining Components
四、干涉檢查 Checking the Interference
3
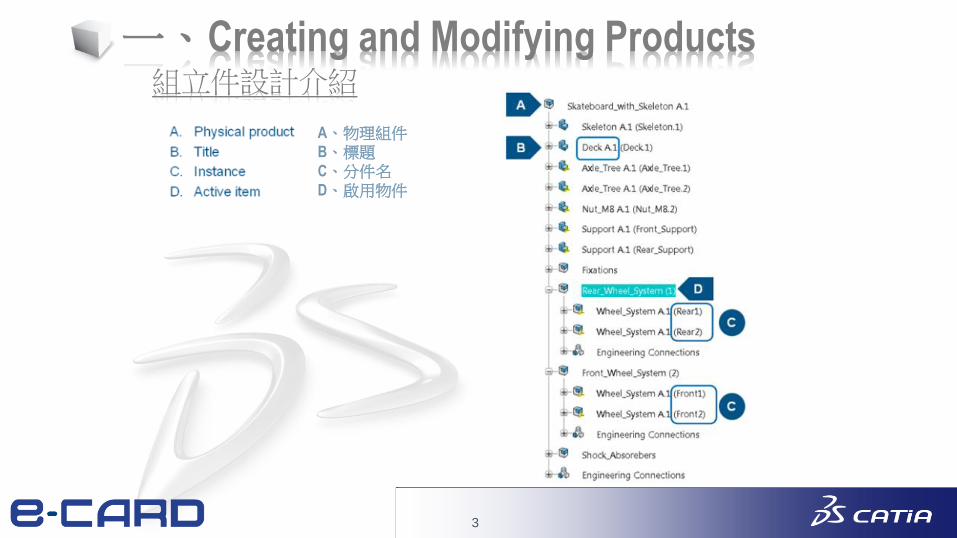
一、Creating and Modifying Products 組立件設計介紹
A、物理組件
B、標題
C、分件名
D、啟用物件
4
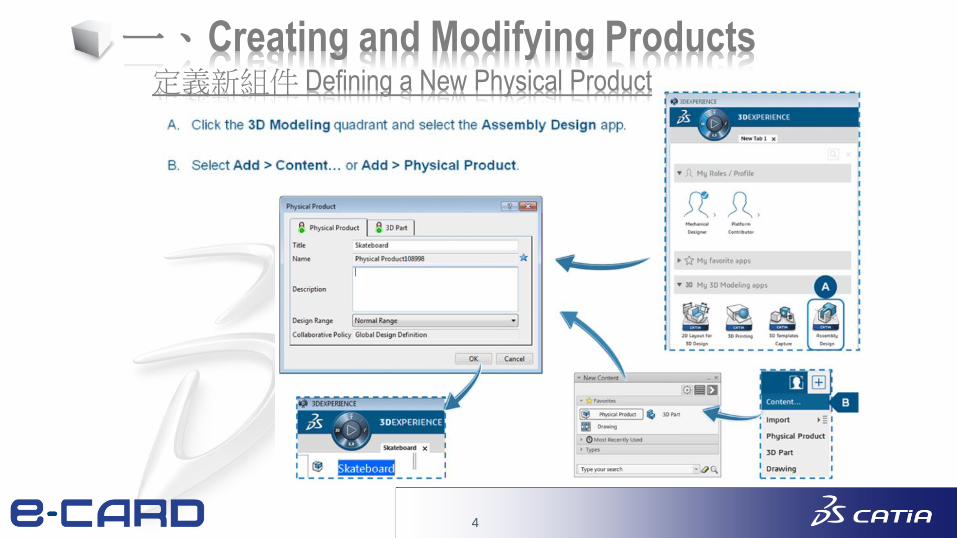
定義新組件 Defining a New Physical Product
一、Creating and Modifying Products
5
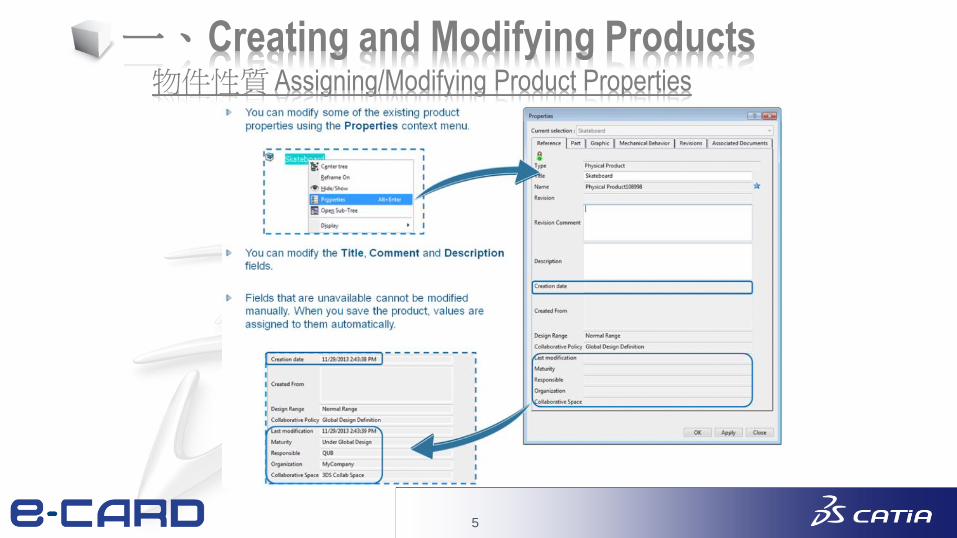
物件性質 Assigning/Modifying Product Properties
一、Creating and Modifying Products
6
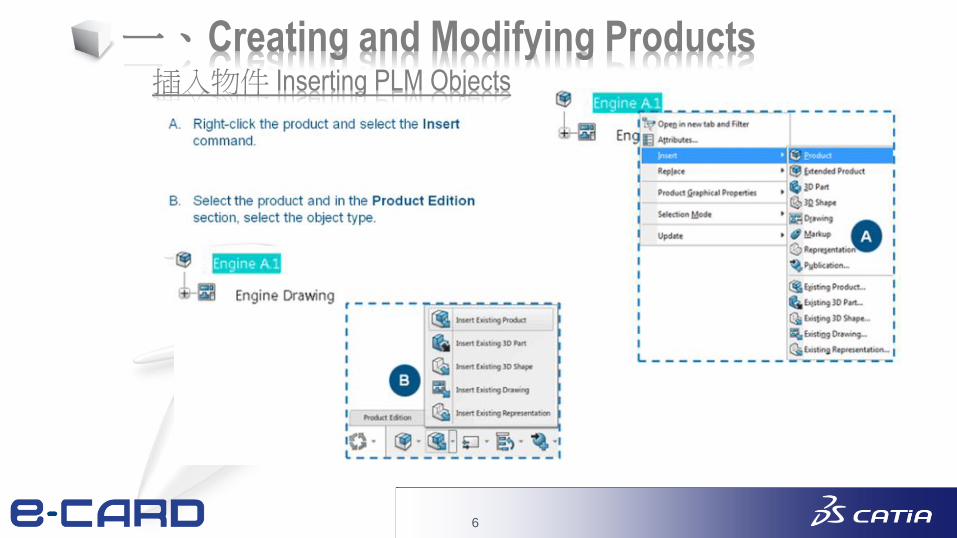
插入物件 Inserting PLM Objects
一、Creating and Modifying Products
7
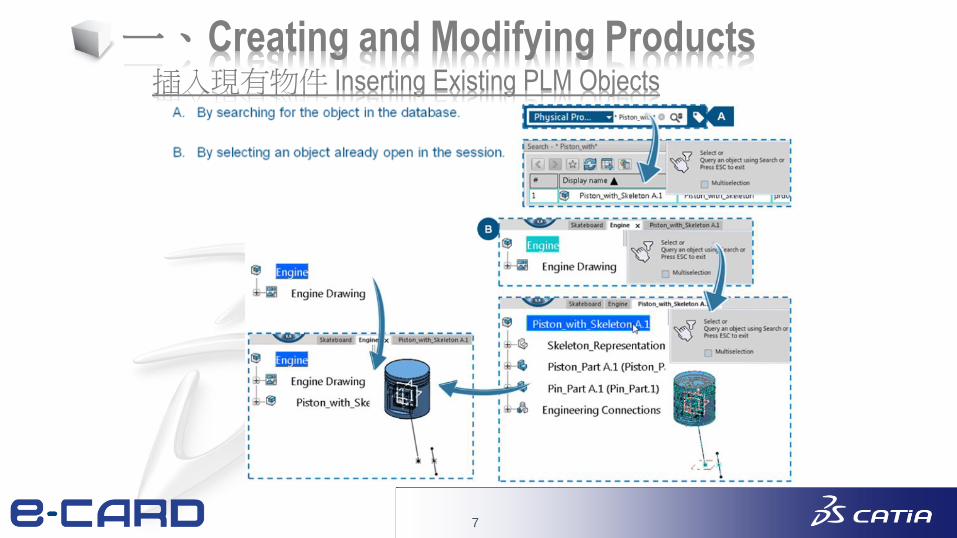
插入現有物件 Inserting Existing PLM Objects
一、Creating and Modifying Products
8
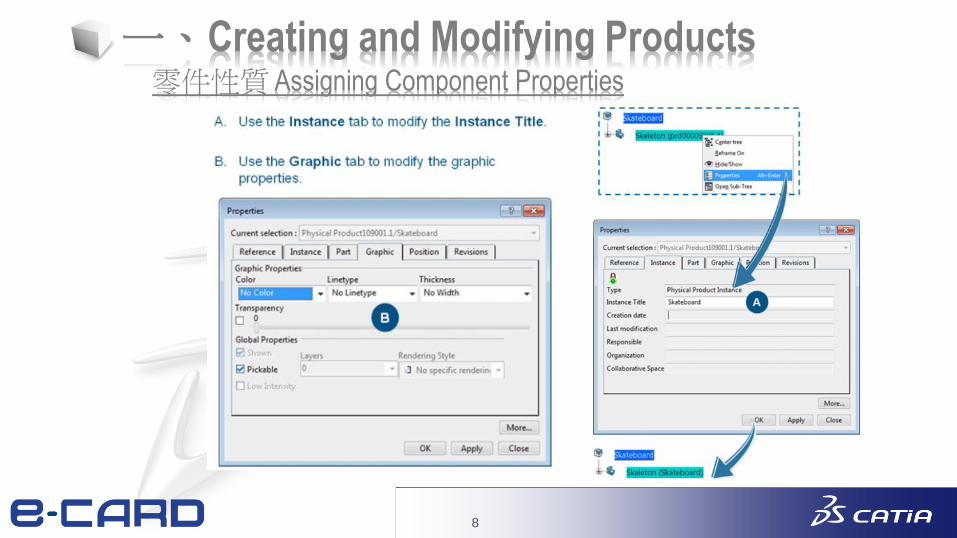
零件性質 Assigning Component Properties
一、Creating and Modifying Products
9
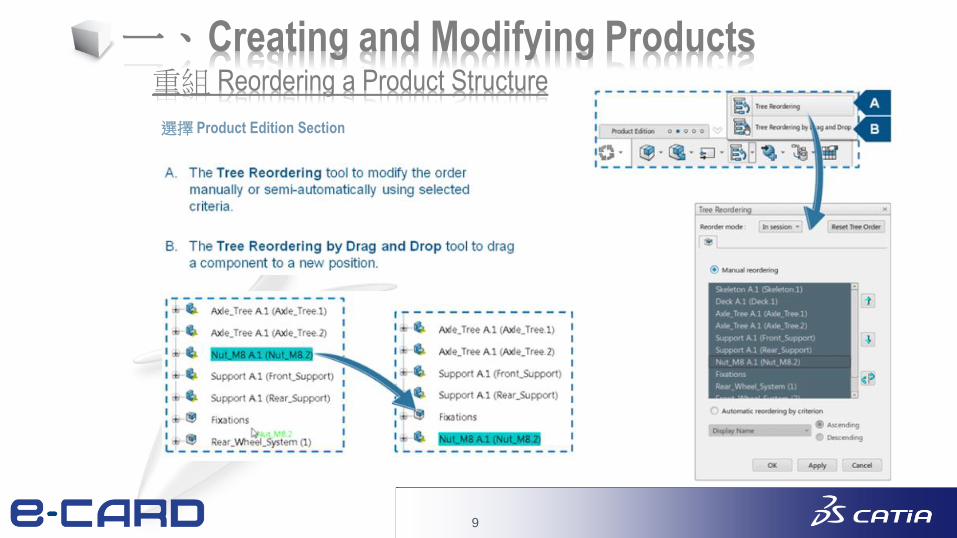
重組 Reordering a Product Structure
一、Creating and Modifying Products
選擇 Product Edition Section
10
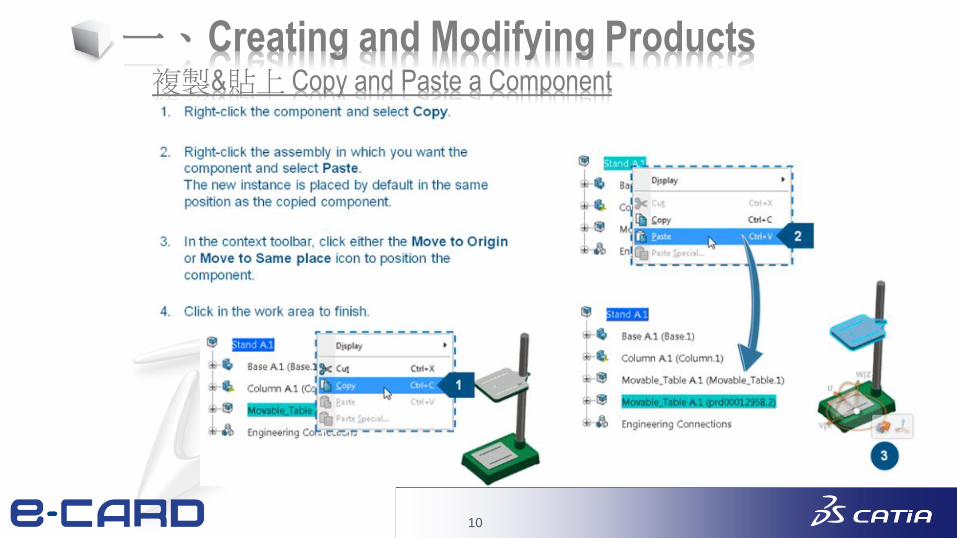
複製&貼上 Copy and Paste a Component
一、Creating and Modifying Products
11
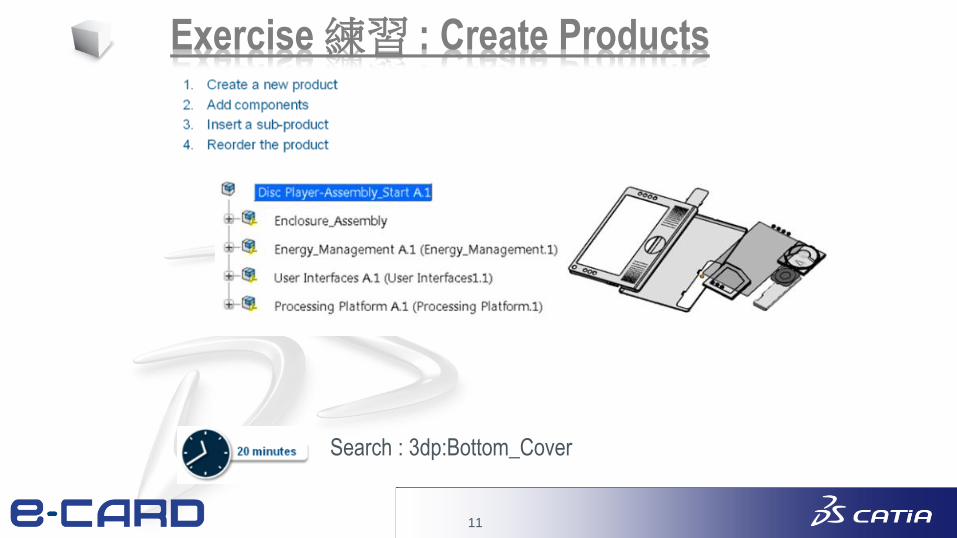
Exercise 練習 : Create Products
Search : 3dp:Bottom_Cover
12
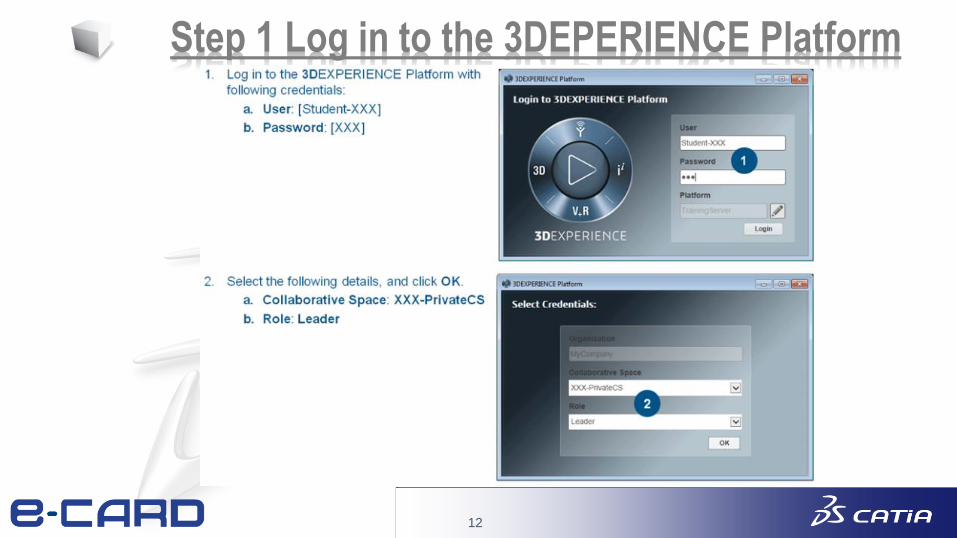
Step 1 Log in to the 3DEPERIENCE Platform
13
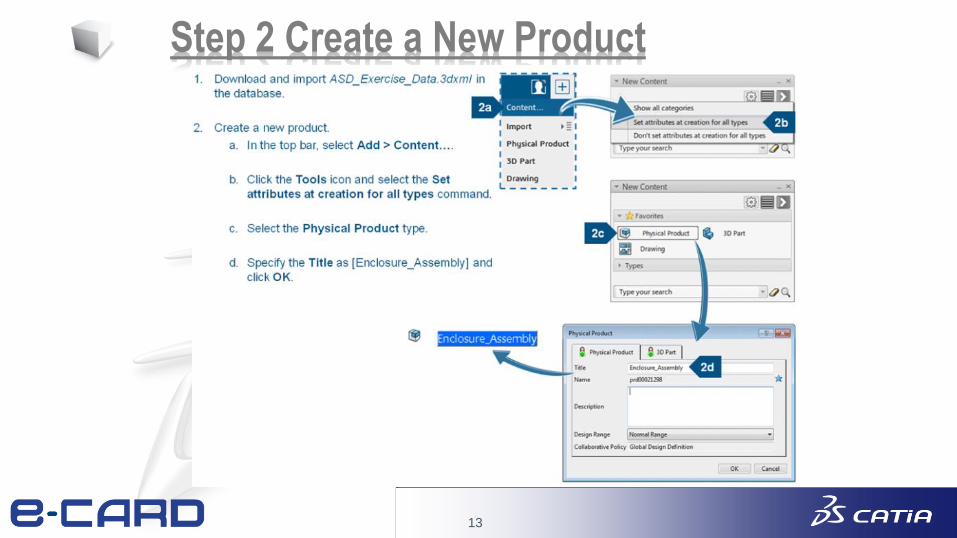
Step 2 Create a New Product

14
Step 3 Insert Existing Components (1/2)
15
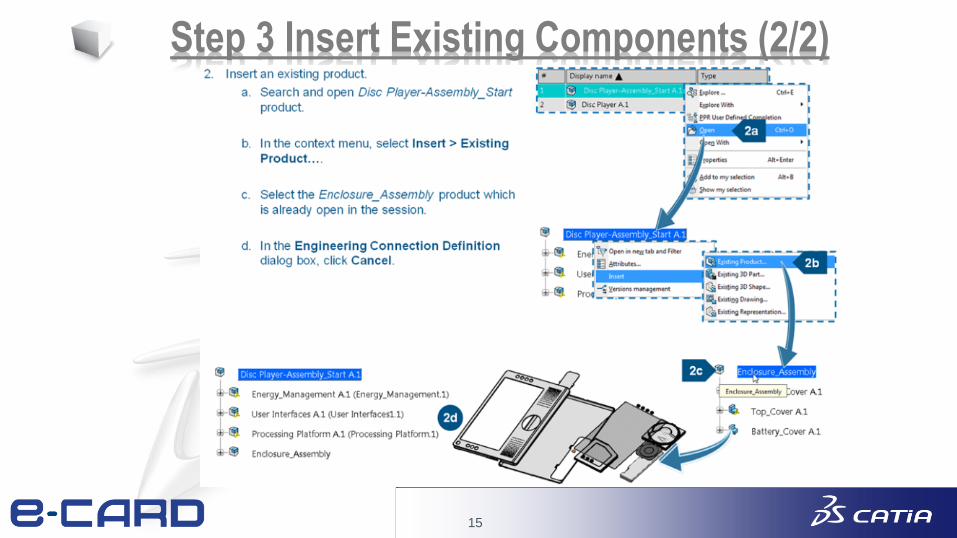
Step 3 Insert Existing Components (2/2)
16
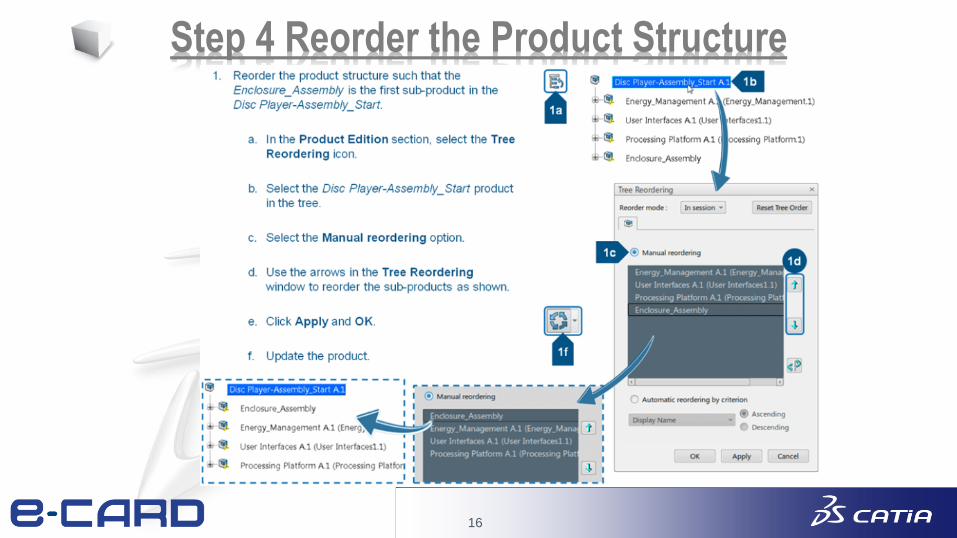
Step 4 Reorder the Product Structure

17
二、定位Positioning Components About the Robot
A、將Robot放置於任一零件上,抓取Robot
上的軸向移動,只是移動組件的觀看視角
B、當Robot被定位在組件上的軸,轉動Robot,此時物件會被轉動

18
二、定位Positioning Components 1-1、Using the Robot
19
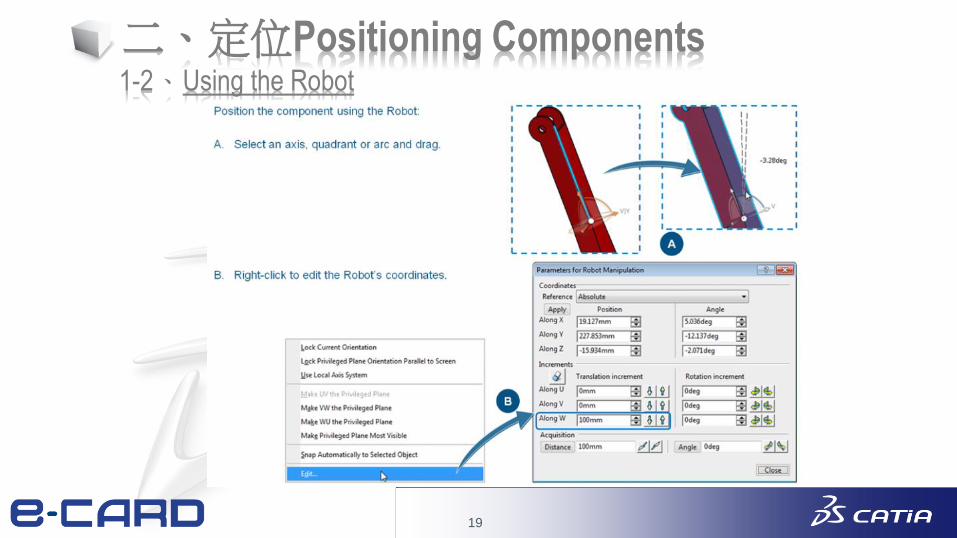
二、定位Positioning Components 1-2、Using the Robot
20
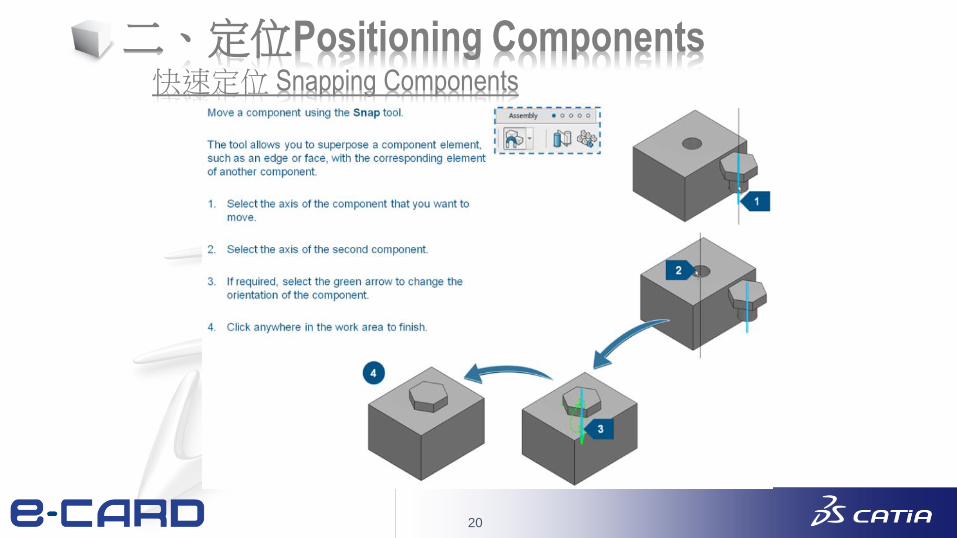
快速定位 Snapping Components
二、定位Positioning Components
21
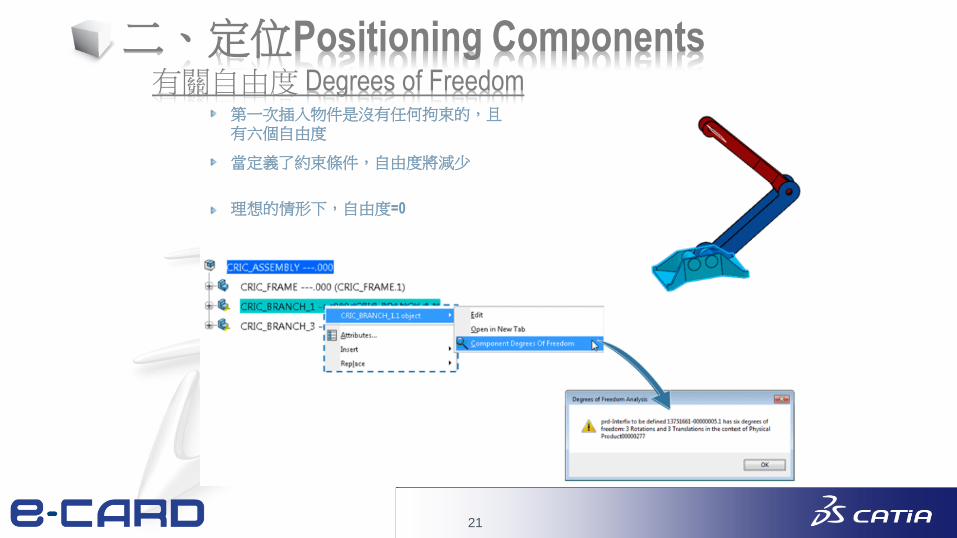
有關自由度 Degrees of Freedom
二、定位Positioning Components
第一次插入物件是沒有任何拘束的,且有六個自由度
當定義了約束條件,自由度將減少
理想的情形下,自由度=0
22
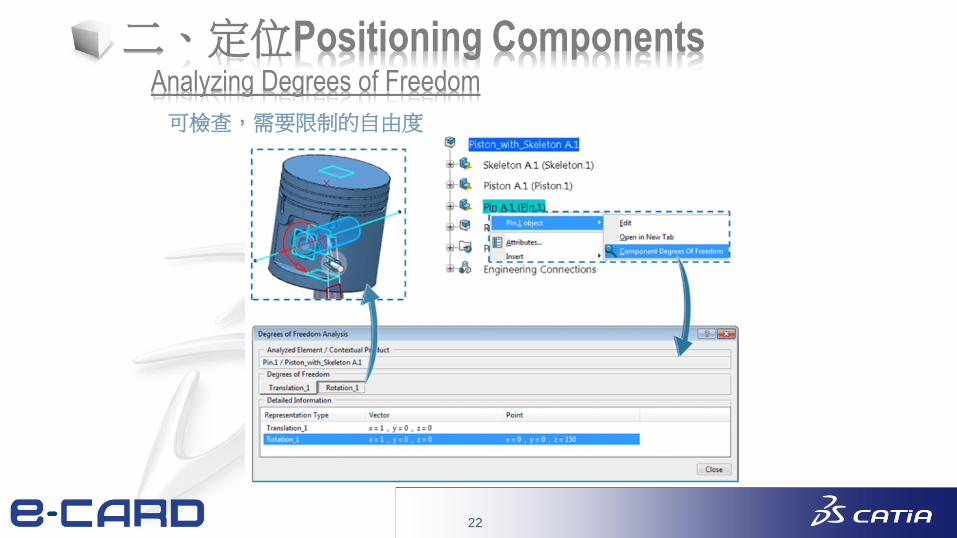
Analyzing Degrees of Freedom
二、定位Positioning Components
可檢查,需要限制的自由度
23
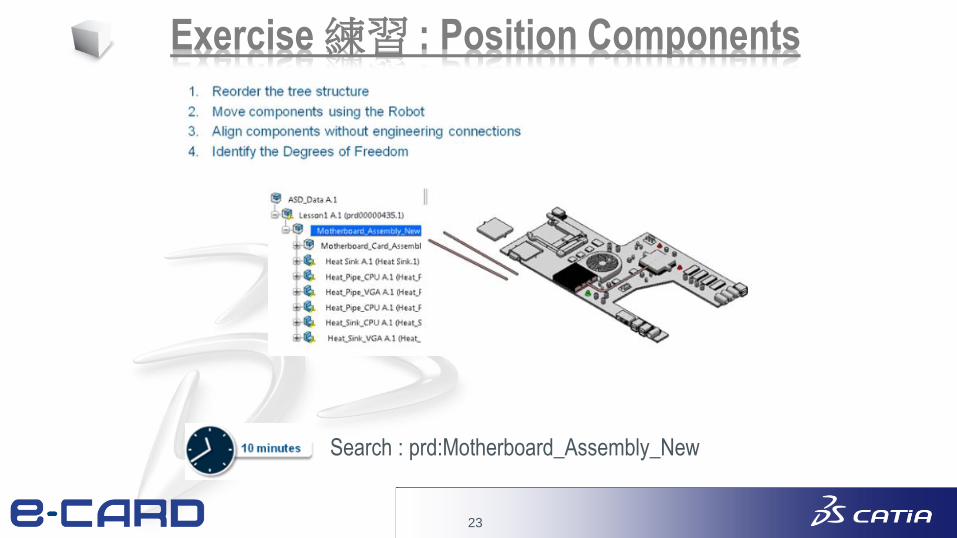
Exercise 練習 : Position Components
Search : prd:Motherboard_Assembly_New
24
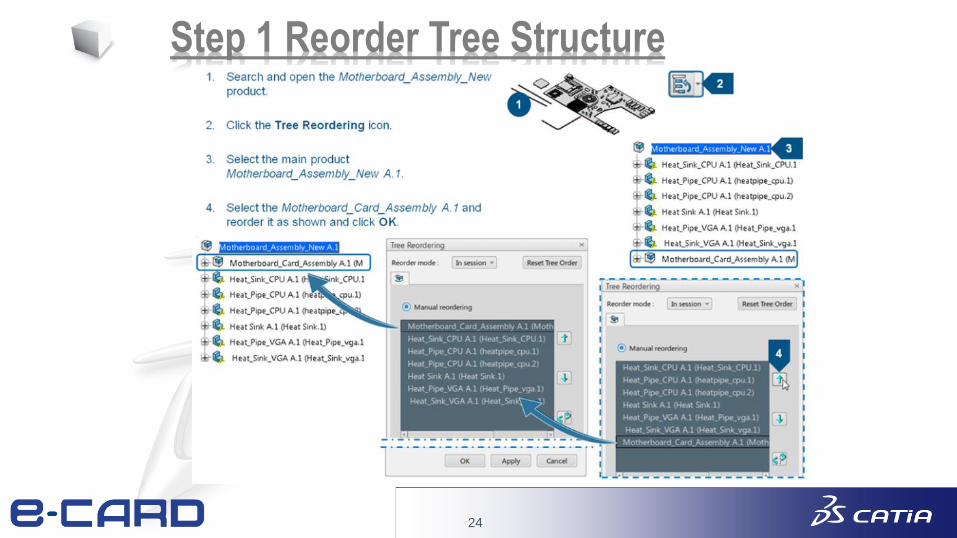
Step 1 Reorder Tree Structure
25
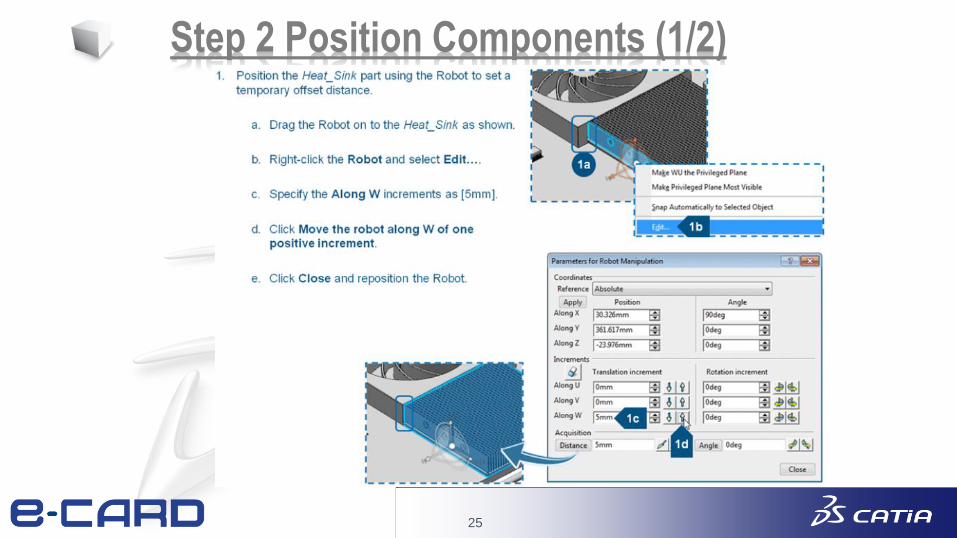
Step 2 Position Components (1/2)
26
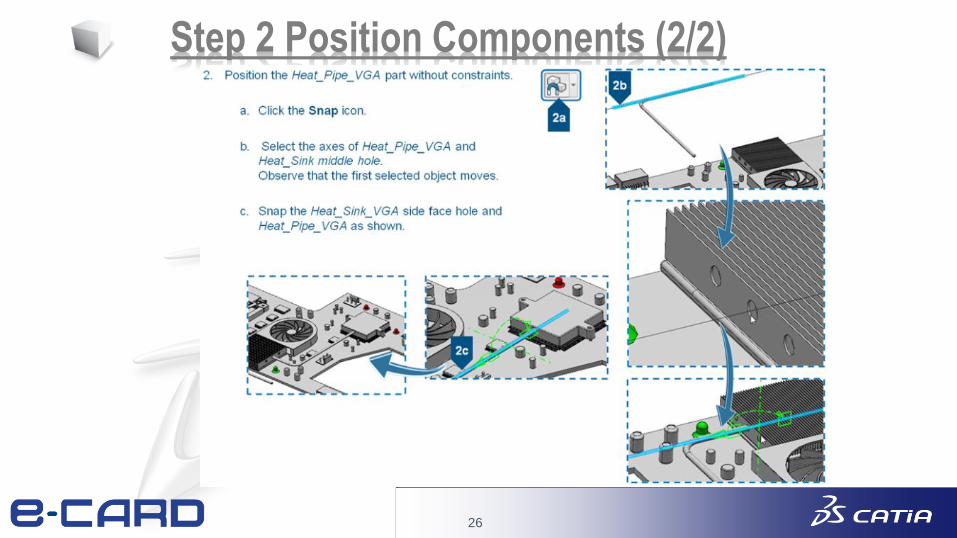
Step 2 Position Components (2/2)
27
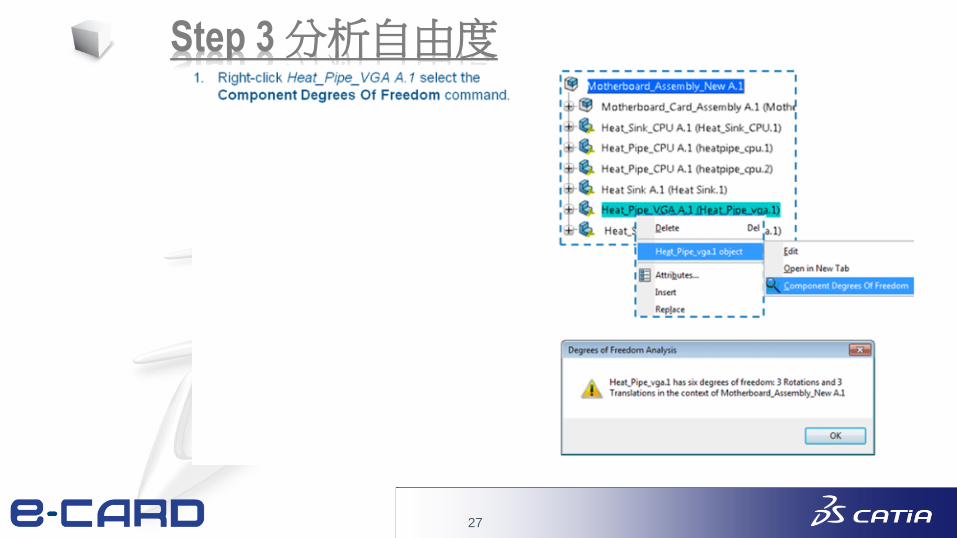
Step 3 分析自由度
28
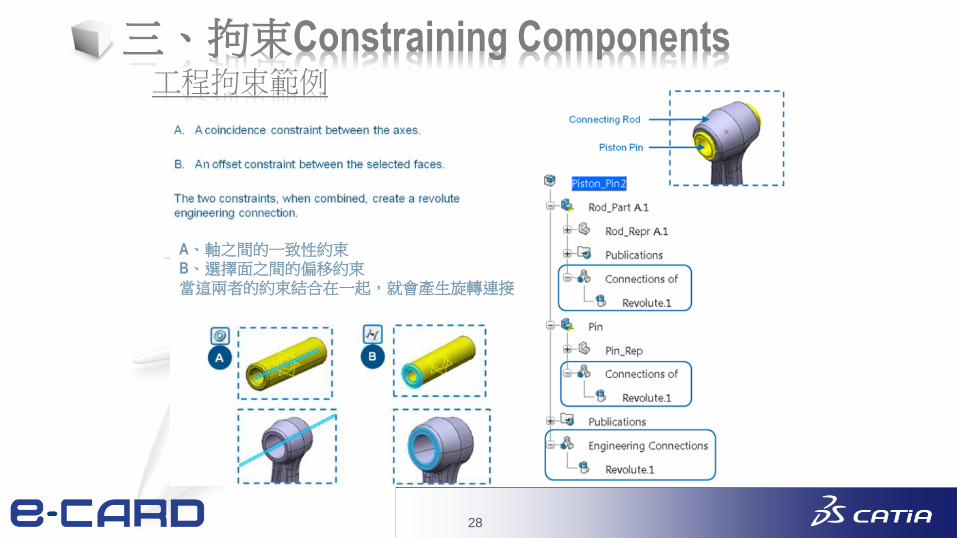
三、拘束Constraining Components 工程拘束範例
A、軸之間的一致性約束
B、選擇面之間的偏移約束
當這兩者的約束結合在一起,就會產生旋轉連接
29
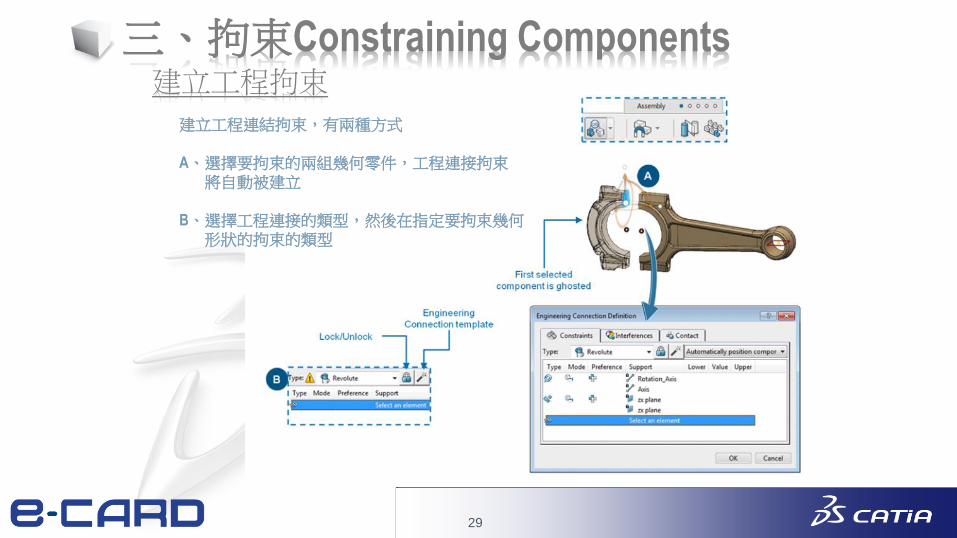
三、拘束Constraining Components 建立工程拘束
建立工程連結拘束,有兩種方式
A、選擇要拘束的兩組幾何零件,工程連接拘束
將自動被建立
B、選擇工程連接的類型,然後在指定要拘束幾何
形狀的拘束的類型
30
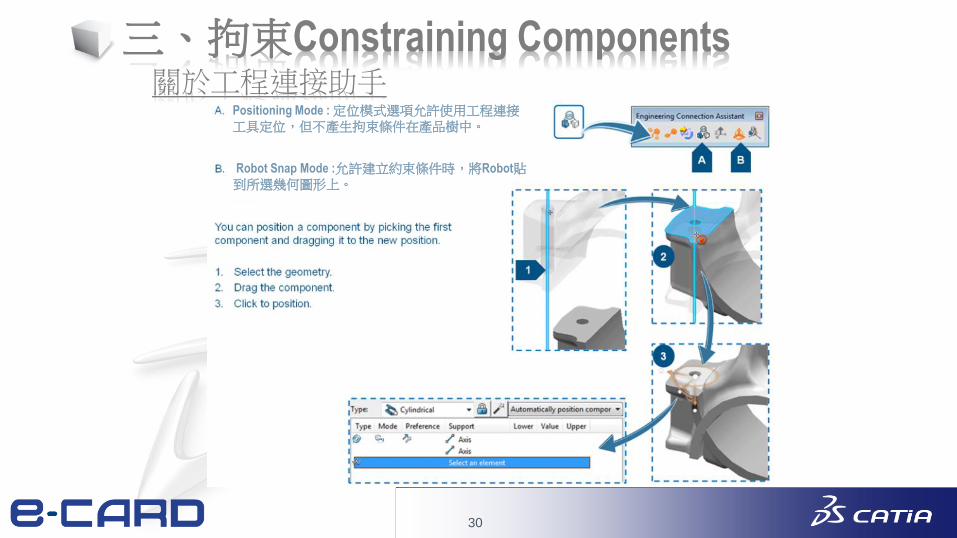
關於工程連接助手
三、拘束Constraining Components
Positioning Mode : 定位模式選項允許使用工程連接工具定位,但不產生拘束條件在產品樹中。
Robot Snap Mode :允許建立約束條件時,將Robot貼到所選幾何圖形上。
31
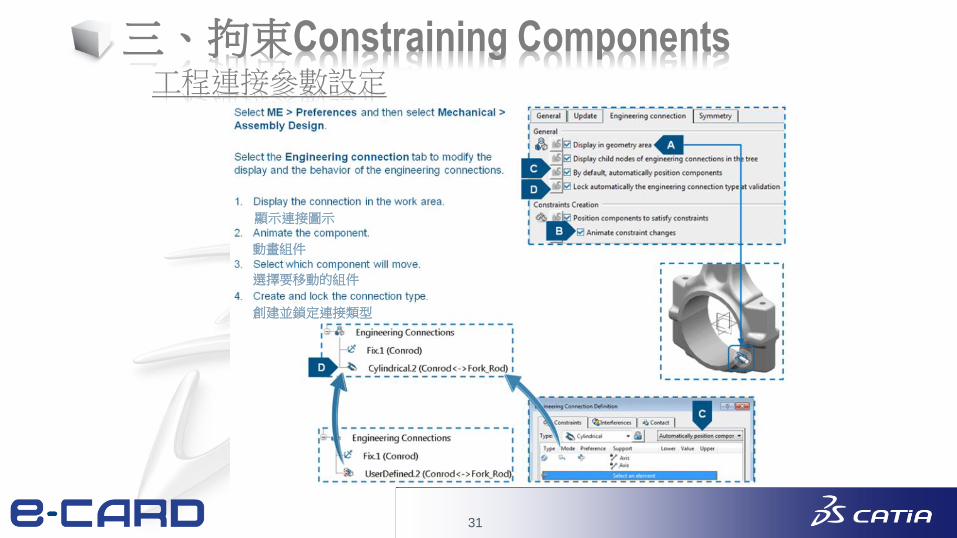
工程連接參數設定
三、拘束Constraining Components
顯示連接圖示
動畫組件
選擇要移動的組件
創建並鎖定連接類型

32
Exercise 練習 : Constrain Components
Search : prd:Motherboard_Assembly_New
33
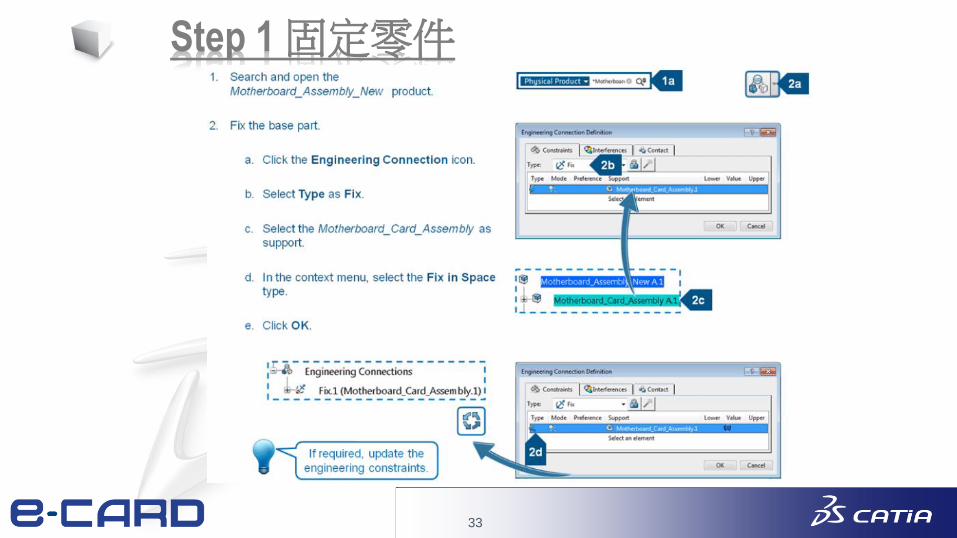
Step 1 固定零件
34
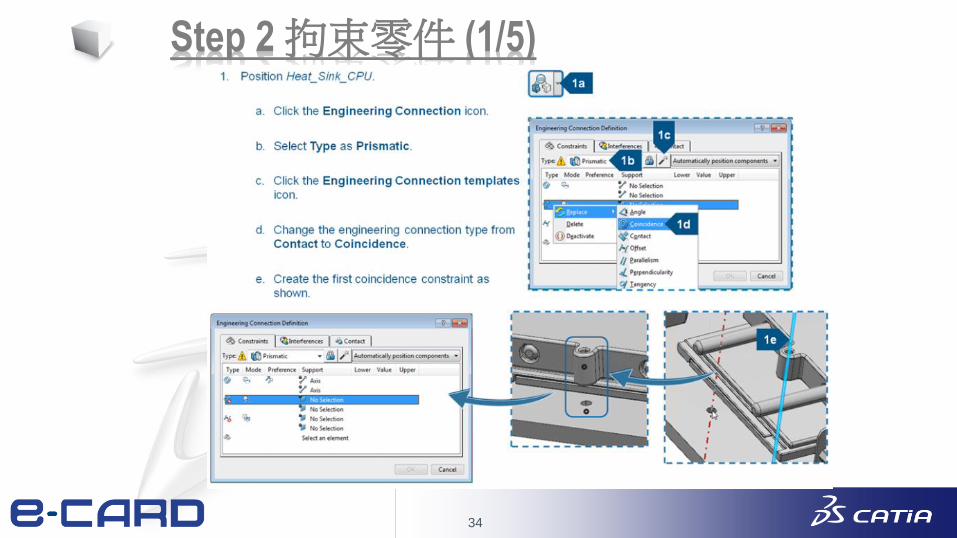
Step 2 拘束零件 (1/5)
35
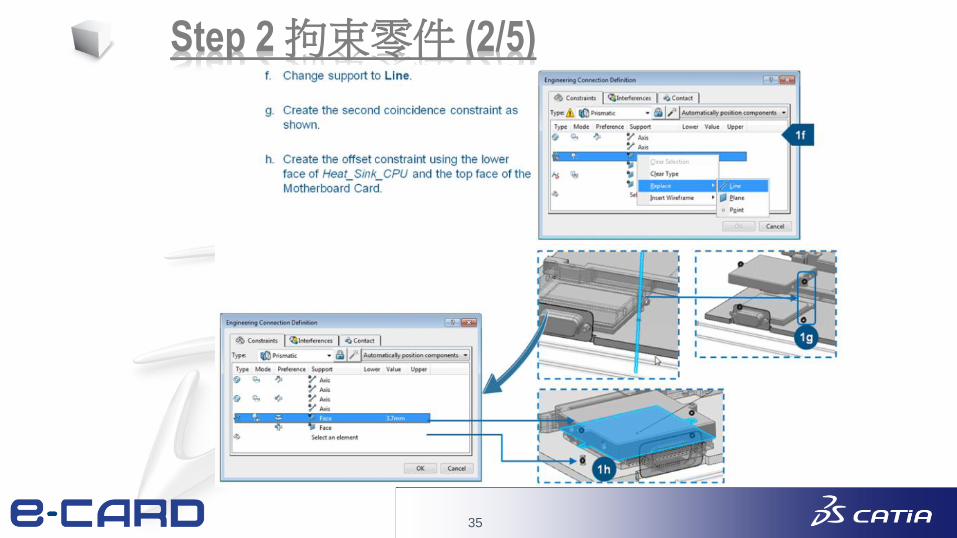
Step 2 拘束零件 (2/5)
36
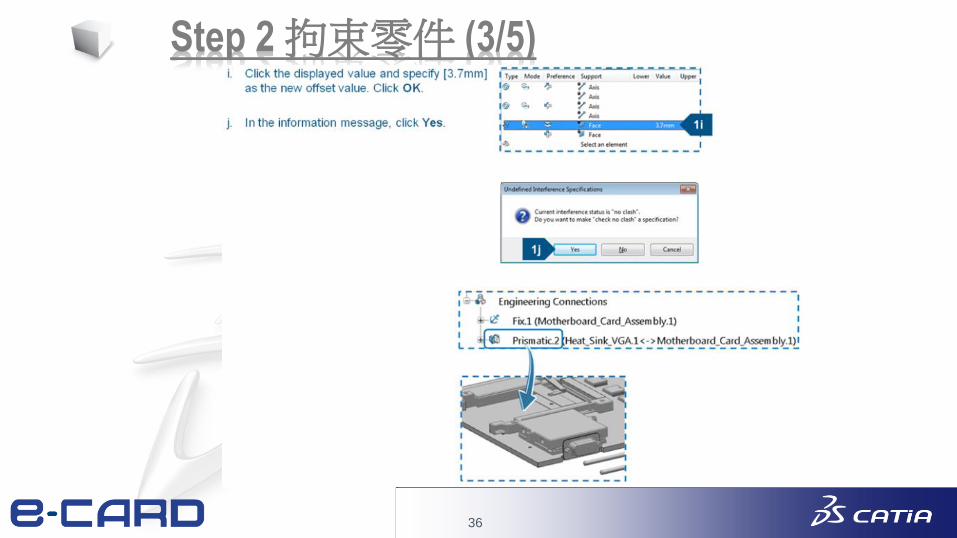
Step 2 拘束零件 (3/5)
37
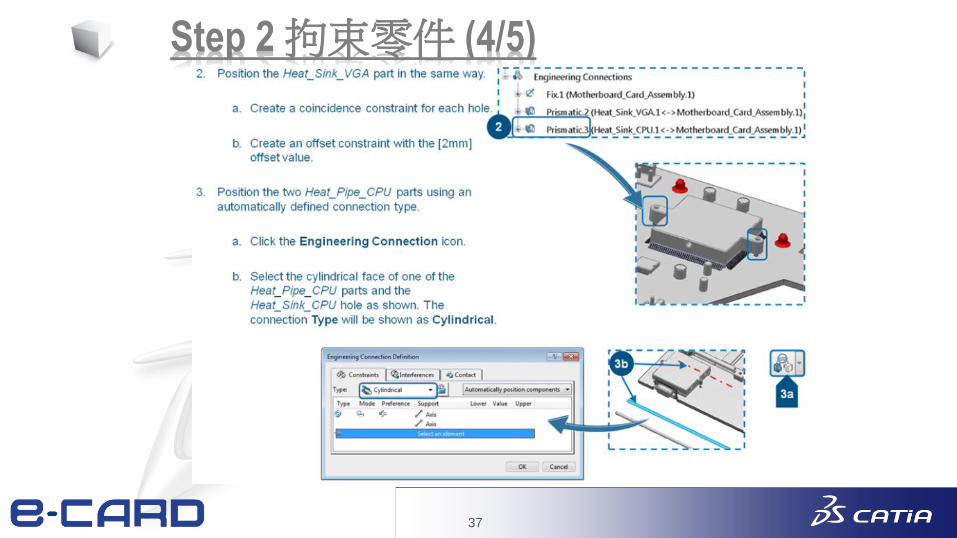
Step 2 拘束零件 (4/5)
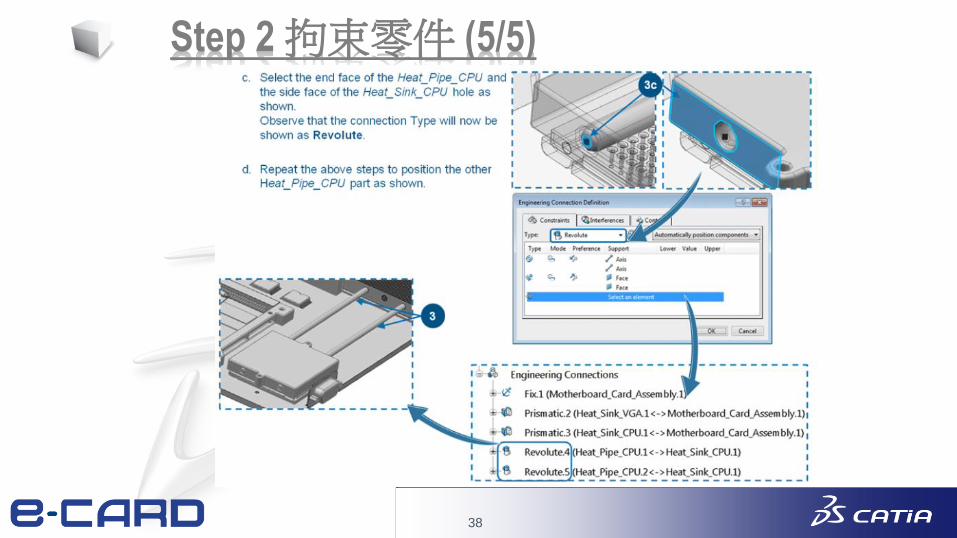
38
Step 2 拘束零件 (5/5)
39
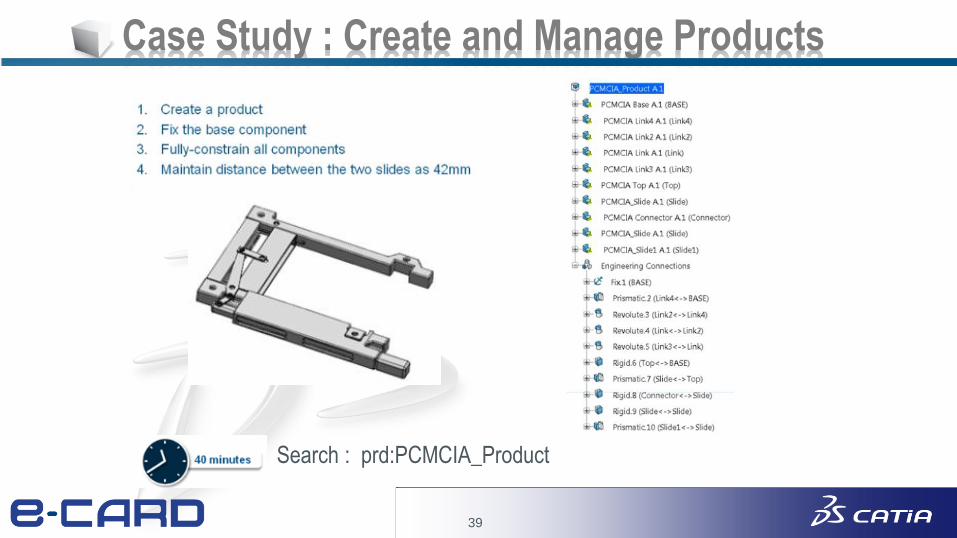
Case Study : Create and Manage Products
Search : prd:PCMCIA_Product
40
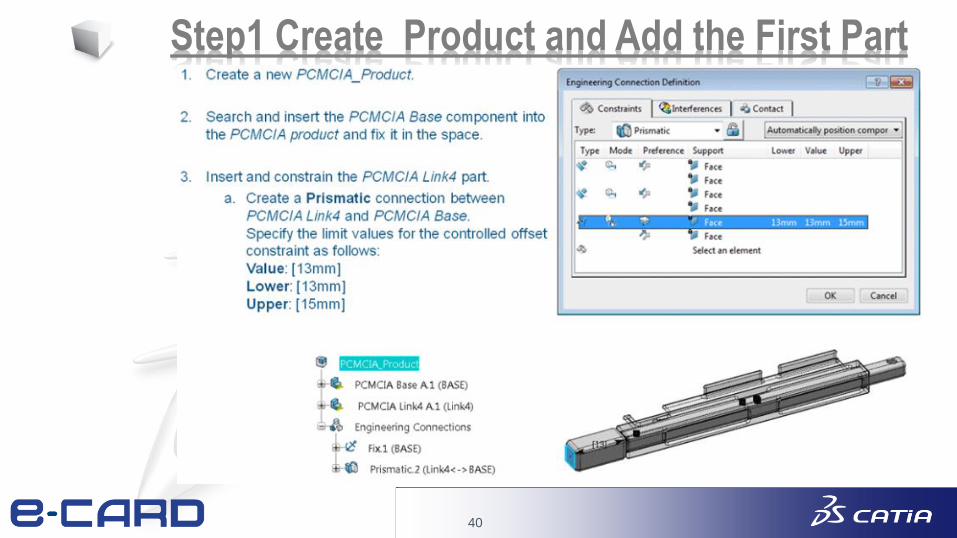
Step1 Create Product and Add the First Part
41
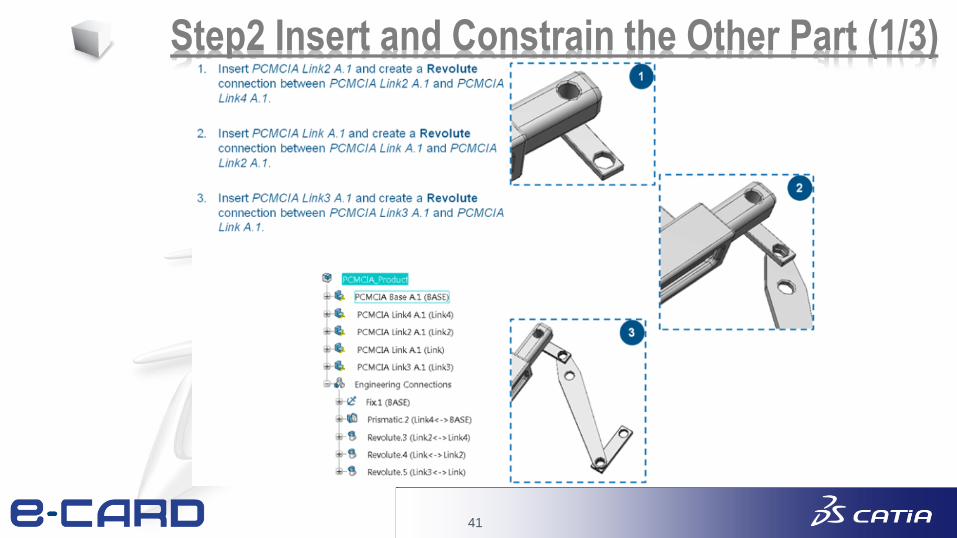
Step2 Insert and Constrain the Other Part (1/3)
42
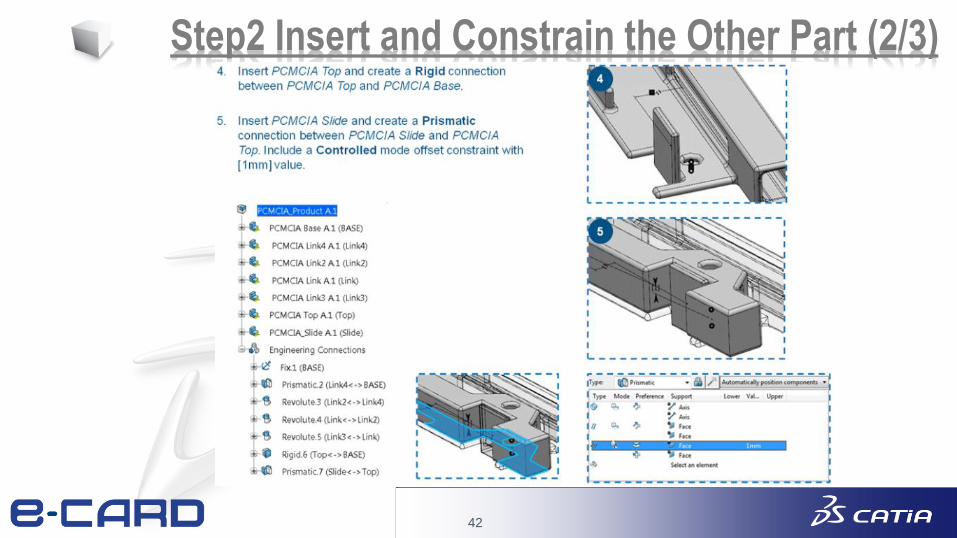
Step2 Insert and Constrain the Other Part (2/3)
43
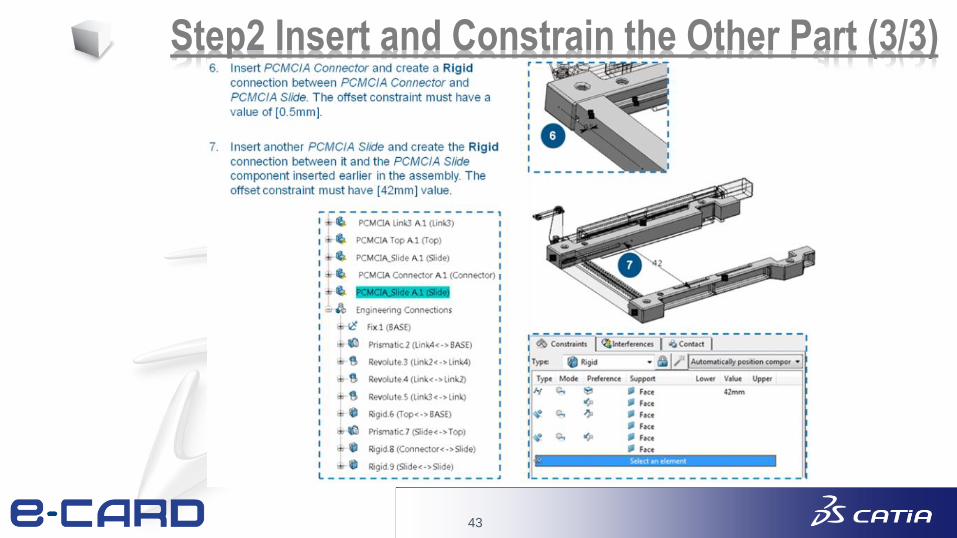
Step2 Insert and Constrain the Other Part (3/3)
44
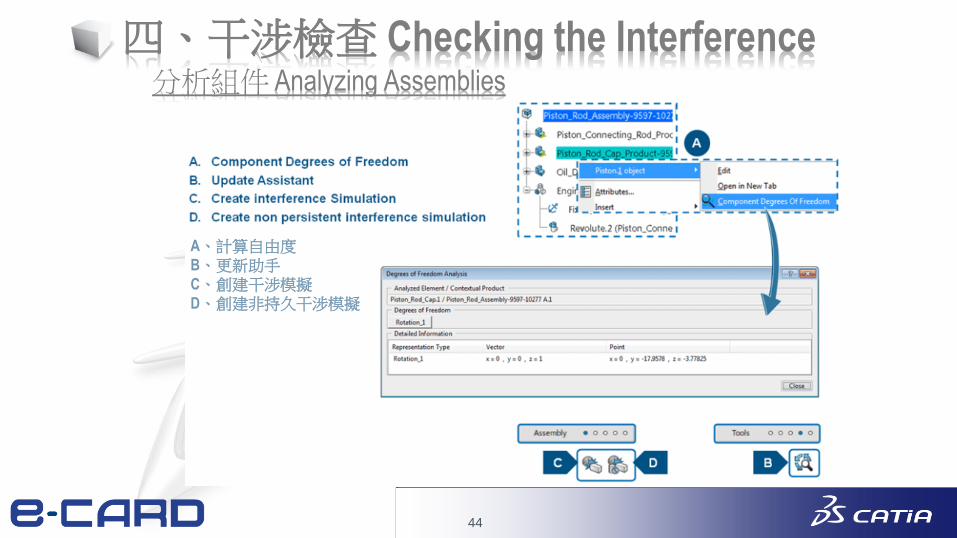
四、干涉檢查 Checking the Interference 分析組件 Analyzing Assemblies
A、計算自由度
B、更新助手
C、創建干涉模擬
D、創建非持久干涉模擬
45
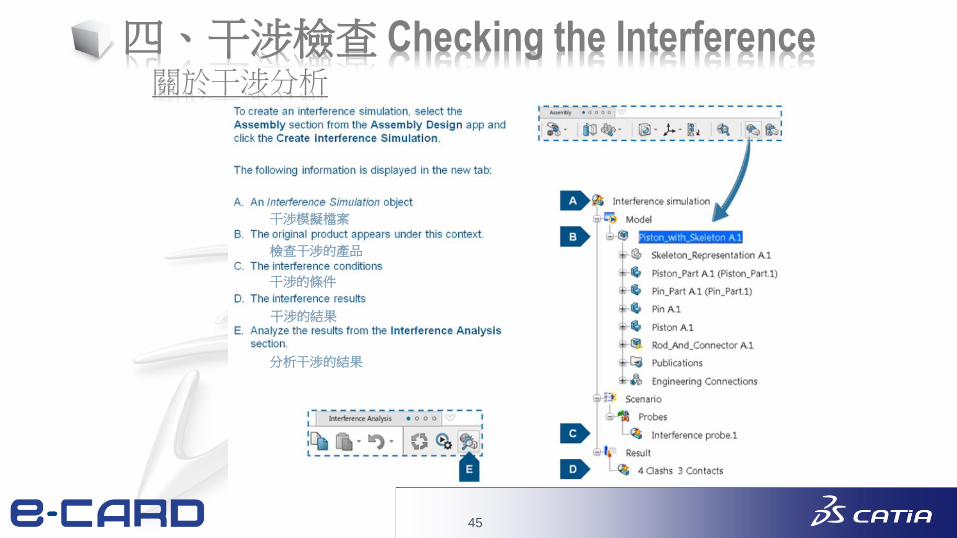
四、干涉檢查 Checking the Interference 關於干涉分析
干涉的結果
干涉模擬檔案
干涉的條件
分析干涉的結果
檢查干涉的產品
46
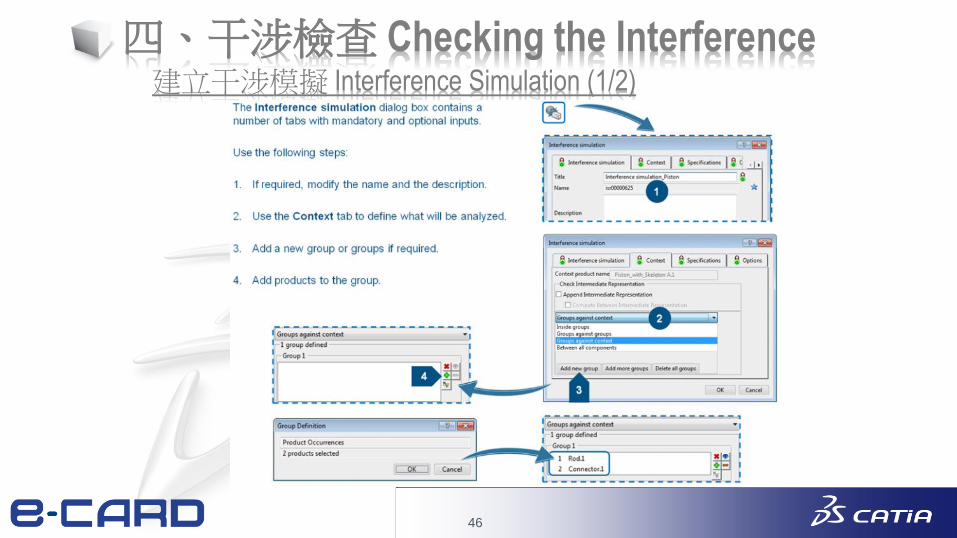
四、干涉檢查 Checking the Interference 建立干涉模擬 Interference Simulation (1/2)

47
四、干涉檢查 Checking the Interference 建立干涉模擬 Interference Simulation (2/2)
也可以延後 計算
如果取消第6選項<立即啟動計算>,則可以在後面Tree啟動計算。
48
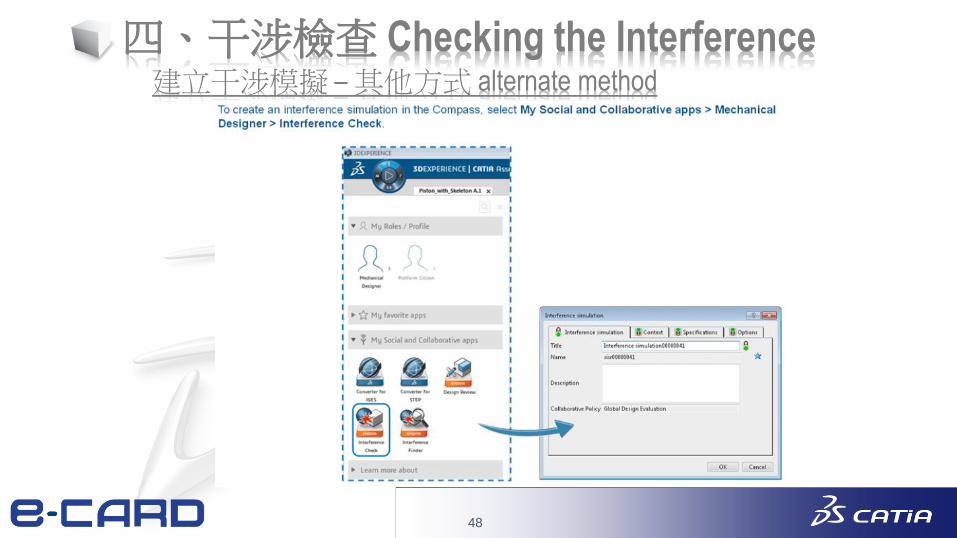
四、干涉檢查 Checking the Interference 建立干涉模擬 – 其他方式 alternate method
49
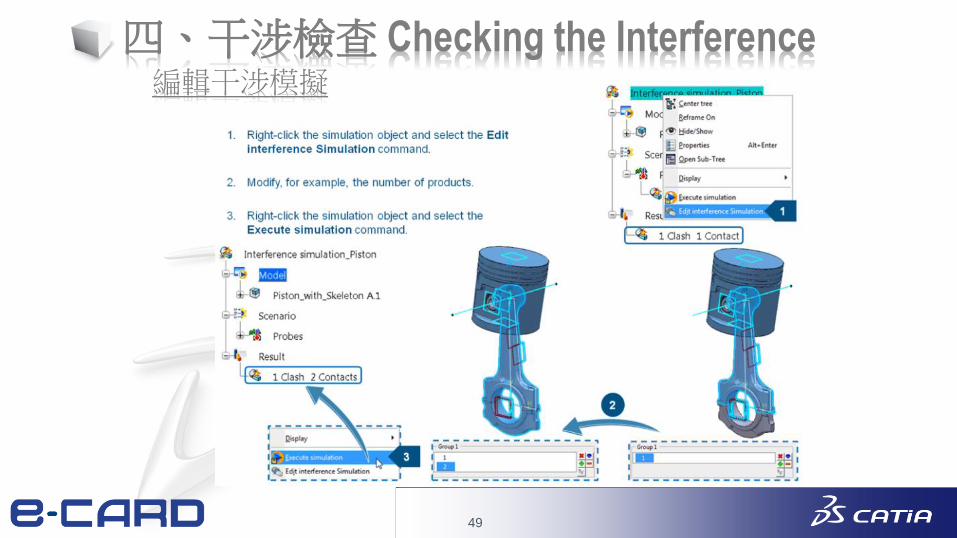
四、干涉檢查 Checking the Interference 編輯干涉模擬
50
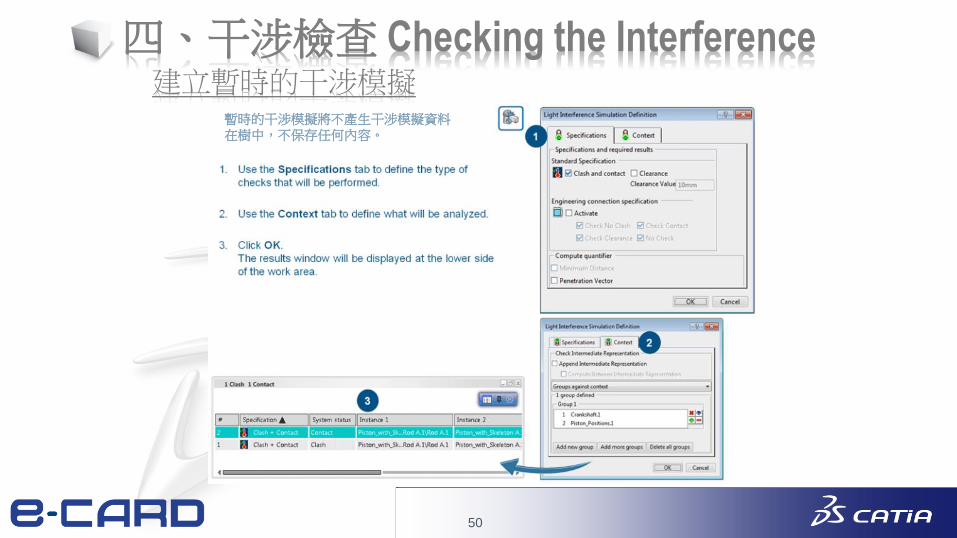
四、干涉檢查 Checking the Interference 建立暫時的干涉模擬
暫時的干涉模擬將不產生干涉模擬資料在樹中,不保存任何內容。
51
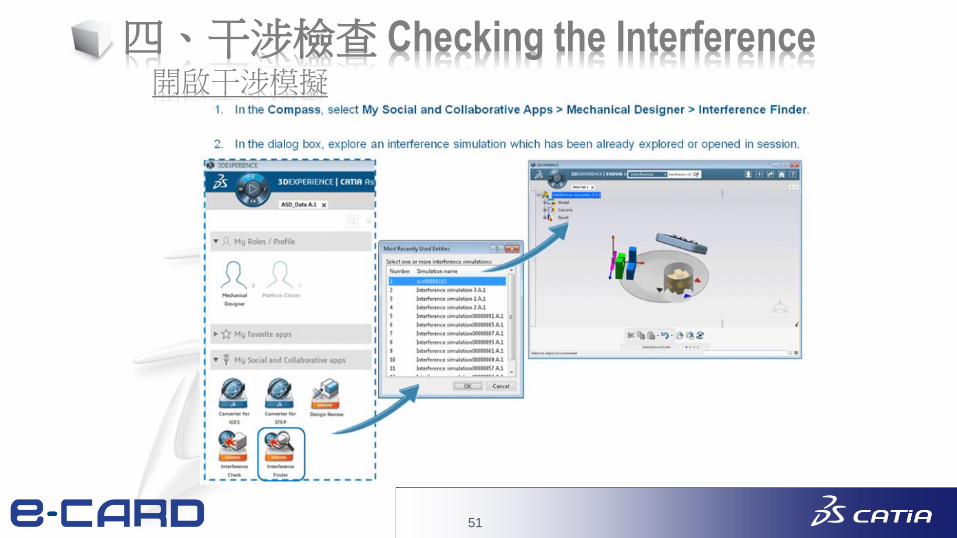
四、干涉檢查 Checking the Interference 開啟干涉模擬
52
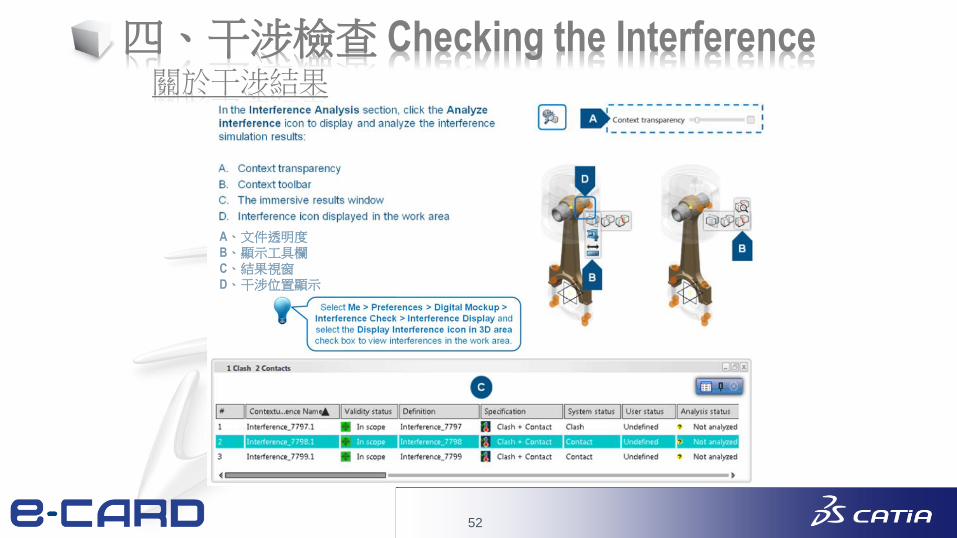
四、干涉檢查 Checking the Interference 關於干涉結果
A、文件透明度
B、顯示工具欄
C、結果視窗
D、干涉位置顯示
53
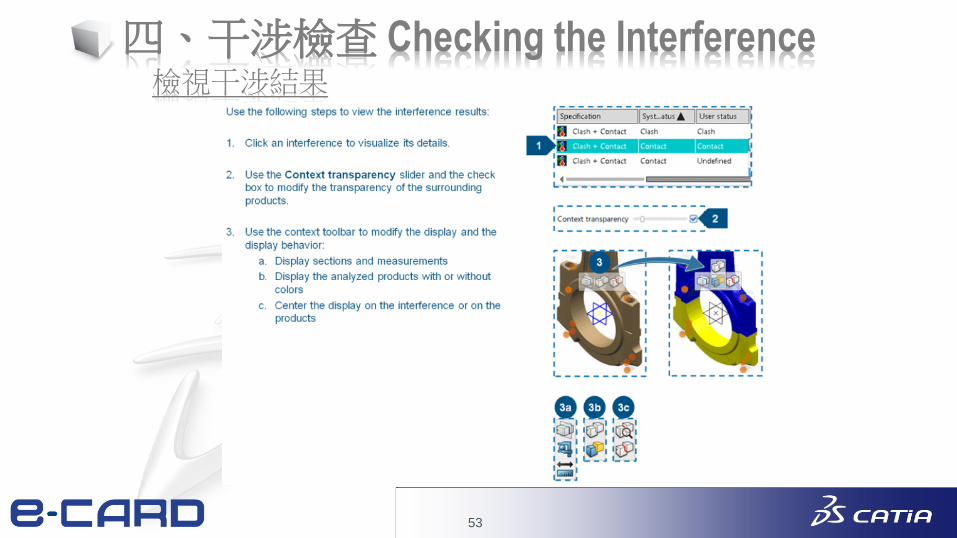
四、干涉檢查 Checking the Interference 檢視干涉結果
54
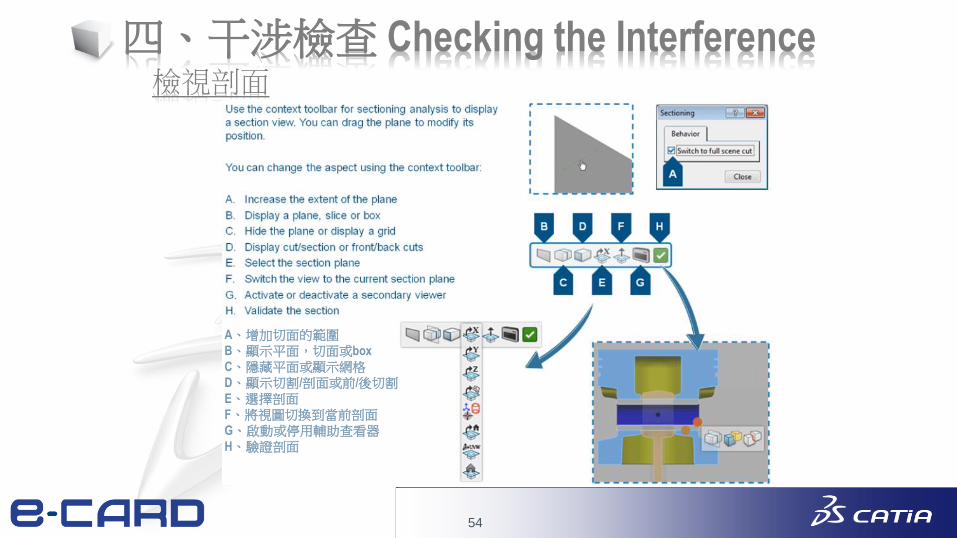
四、干涉檢查 Checking the Interference 檢視剖面
A、增加切面的範圍
B、顯示平面,切面或box
C、隱藏平面或顯示網格
D、顯示切割/剖面或前/後切割
E、選擇剖面
F、將視圖切換到當前剖面
G、啟動或停用輔助查看器
H、驗證剖面
55
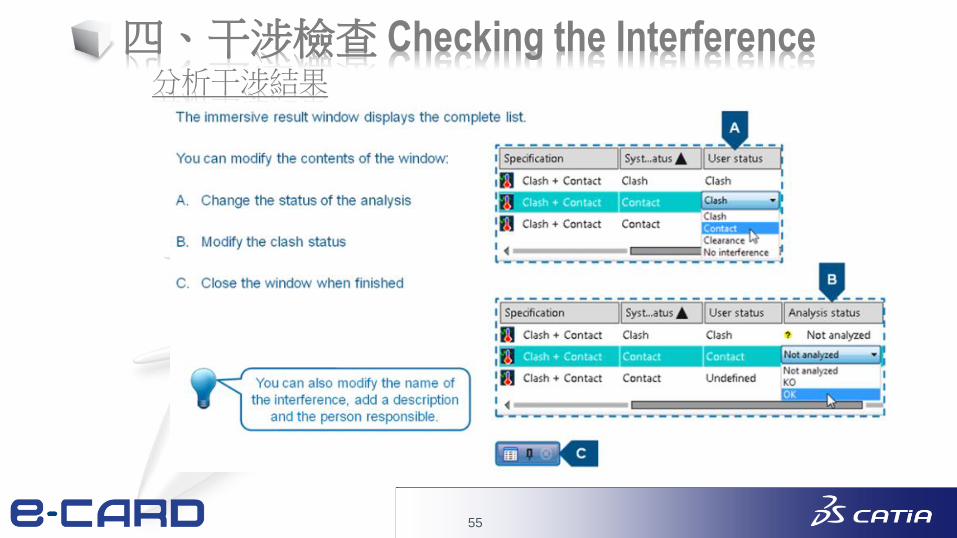
四、干涉檢查 Checking the Interference 分析干涉結果
56
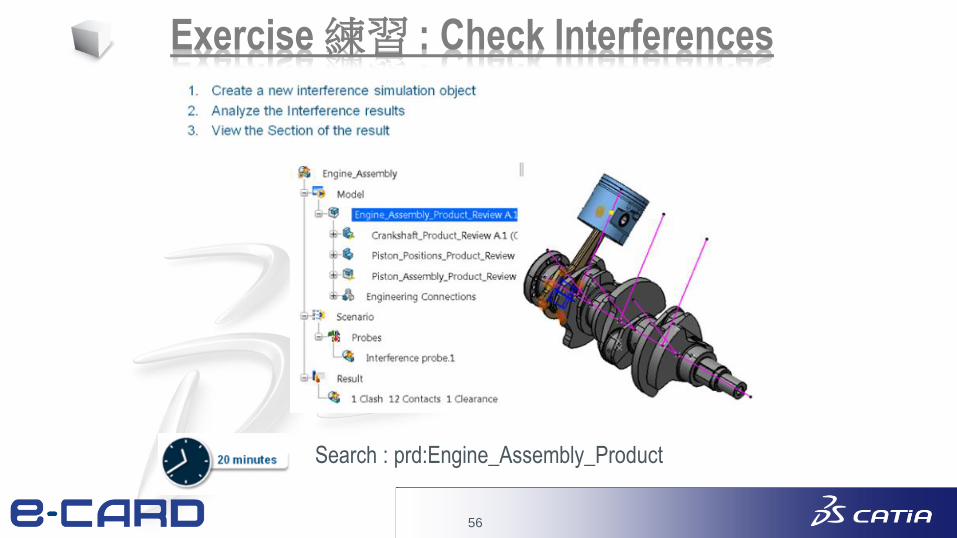
Exercise 練習 : Check Interferences
Search : prd:Engine_Assembly_Product
57
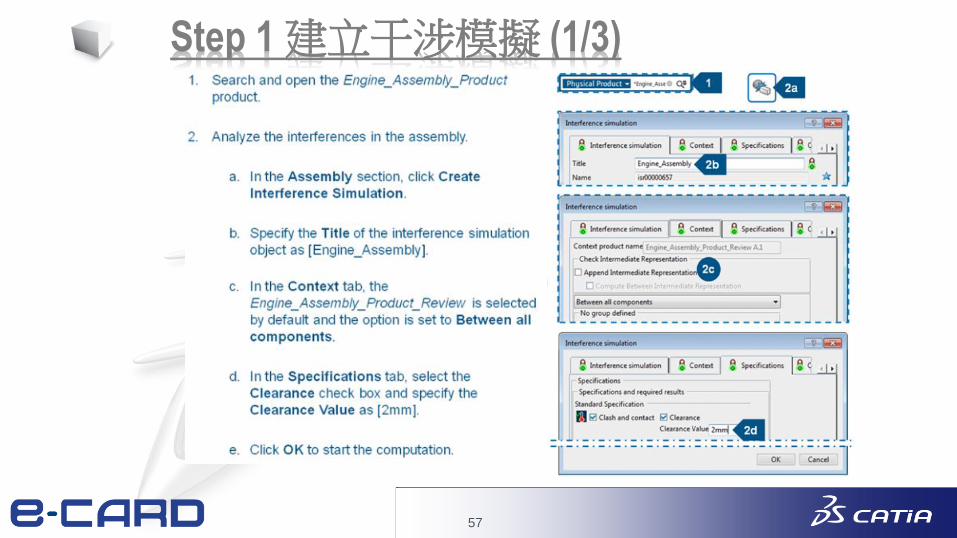
Step 1 建立干涉模擬 (1/3)
58
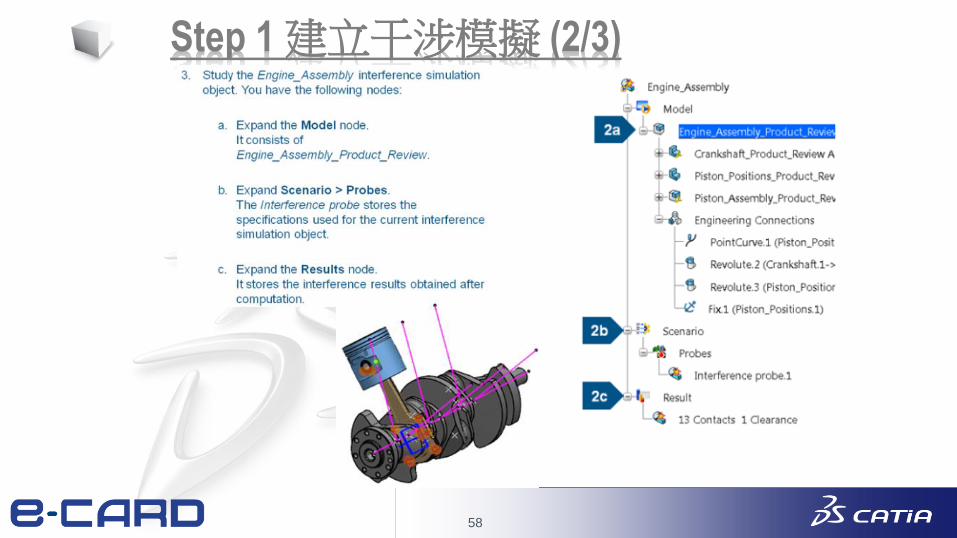
Step 1 建立干涉模擬 (2/3)
59
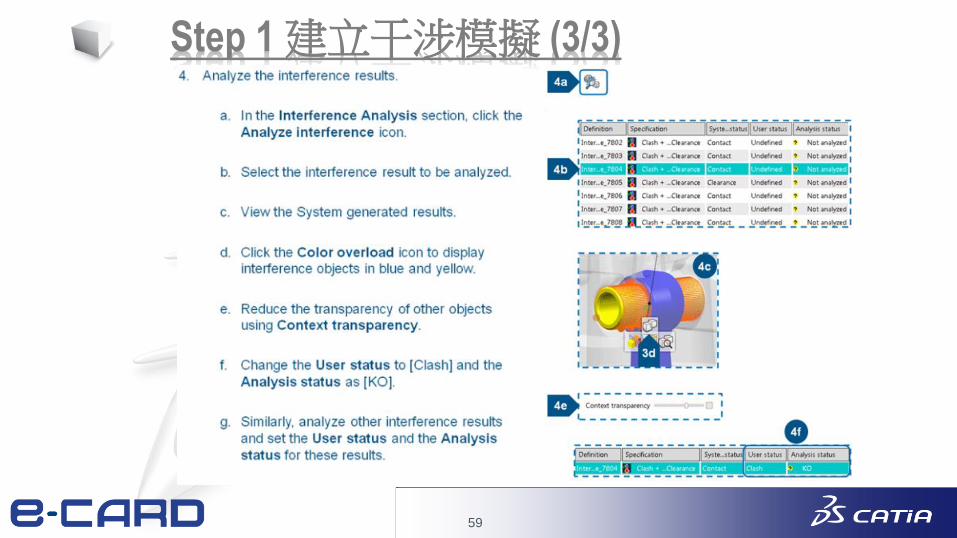
Step 1 建立干涉模擬 (3/3)
60
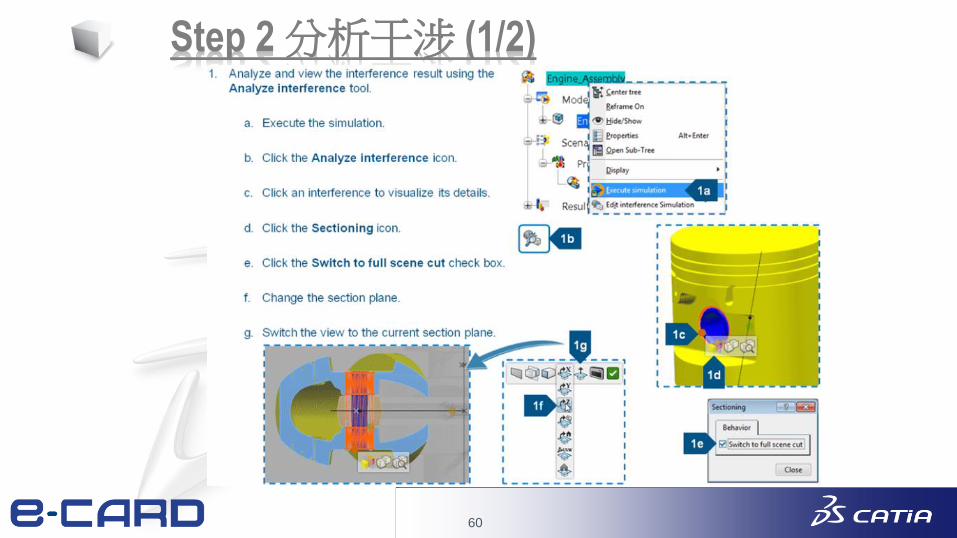
Step 2 分析干涉 (1/2)
61
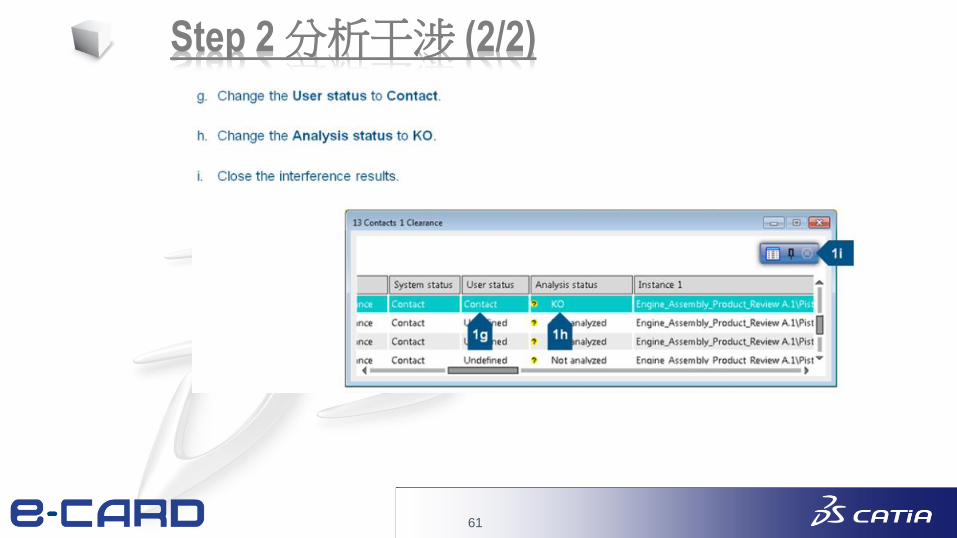
Step 2 分析干涉 (2/2)